Set Up an On-Chain Identity
Introduction
The Substrate Identity module is an out-of-the-box solution for adding personal information to your on-chain account. Establishing an identity makes it easier for your account to be recognized by others, as your display name will automatically populate when someone pastes your address into a field on the developer portal.
The identity you configure goes beyond a simple display name. Personal information can include default fields such as your legal name, display name, website, Twitter handle, Discord, and Riot (now known as Element) name. You can also use custom fields to include any other relevant information.
This guide will demonstrate setting up an identity with a display name and additional parameters, enhancing your visibility and recognizability.
General Definitions
To store your information on-chain, you must bond some funds, which will eventually be returned once the identity has been cleared. There are two categories of fields: default and custom. A basic deposit amount is reserved upon identity creation, and a storage deposit is required for each additional byte of data stored on-chain.
-
Default fields include - your legal name, display name, website, Twitter handle, Discord, Riot (now known as Element) name
-
Custom fields include - any other relevant information
-
Subaccounts - You can link subaccounts underneath a primary account. As an example, a sequencer service that's running multiple different sequencer nodes can establish subaccounts to demonstrate an official link between the nodes
| Variable | Definition | Value |
|---|---|---|
| Basic deposit | The amount held on deposit for setting an identity | 0.33333333 TANSSI |
| Deposit per byte | The amount held on deposit per byte of on-chain storage used setting an identity | 0.0001 TANSSI |
| Max additional fields | Maximum number of additional fields that may be stored in an ID | 100 |
| Max subaccounts | Maximum number of subaccounts that can be defined under an account identity | 100 |
| Variable | Definition | Value |
|---|---|---|
| Basic deposit | The amount held on deposit for setting an identity | 0.33333333 STAR |
| Deposit per byte | The amount held on deposit per byte of on-chain storage used setting an identity | 0.0001 STAR |
| Max additional fields | Maximum number of additional fields that may be stored in an ID | 100 |
| Max subaccounts | Maximum number of subaccounts that can be defined under an account identity | 100 |
Checking Prerequisites
To follow along with this guide, you will need the following:
- The developer portal open and connected to Tanssi MainNet.
- At least one account funded with
TANSSItokens.
- The developer portal open and connected to Dancelight.
- At least one account funded with
STARtokens.
If you need help importing your accounts into the developer portal, please check out the Connecting to the developer portal guide.
Get Started
Depending on the information to be included, there are a couple of different ways to set and clear an identity using the developer portal. If you intend to register your identity using only the default fields, you can follow the instructions for Managing an Identity via the Accounts page. This is the recommended way to set and manage your identity.
If you want to add custom fields beyond the default fields, follow the instructions for Managing an Identity via the Extrinsics page.
Note
Please note that using the Accounts page on the developer portal is recommended to manage your identity as it provides an easy-to-use interface that enforces character limits. If you use the Extrinsics page, please be aware that your input for each field (i.e., name, email, etc.) must be 32 characters or less; otherwise, your information will be cut off.
Manage an Identity via Accounts
Set an Identity
To get started with setting an identity using the Accounts page, head to the Accounts tab of the developer portal.
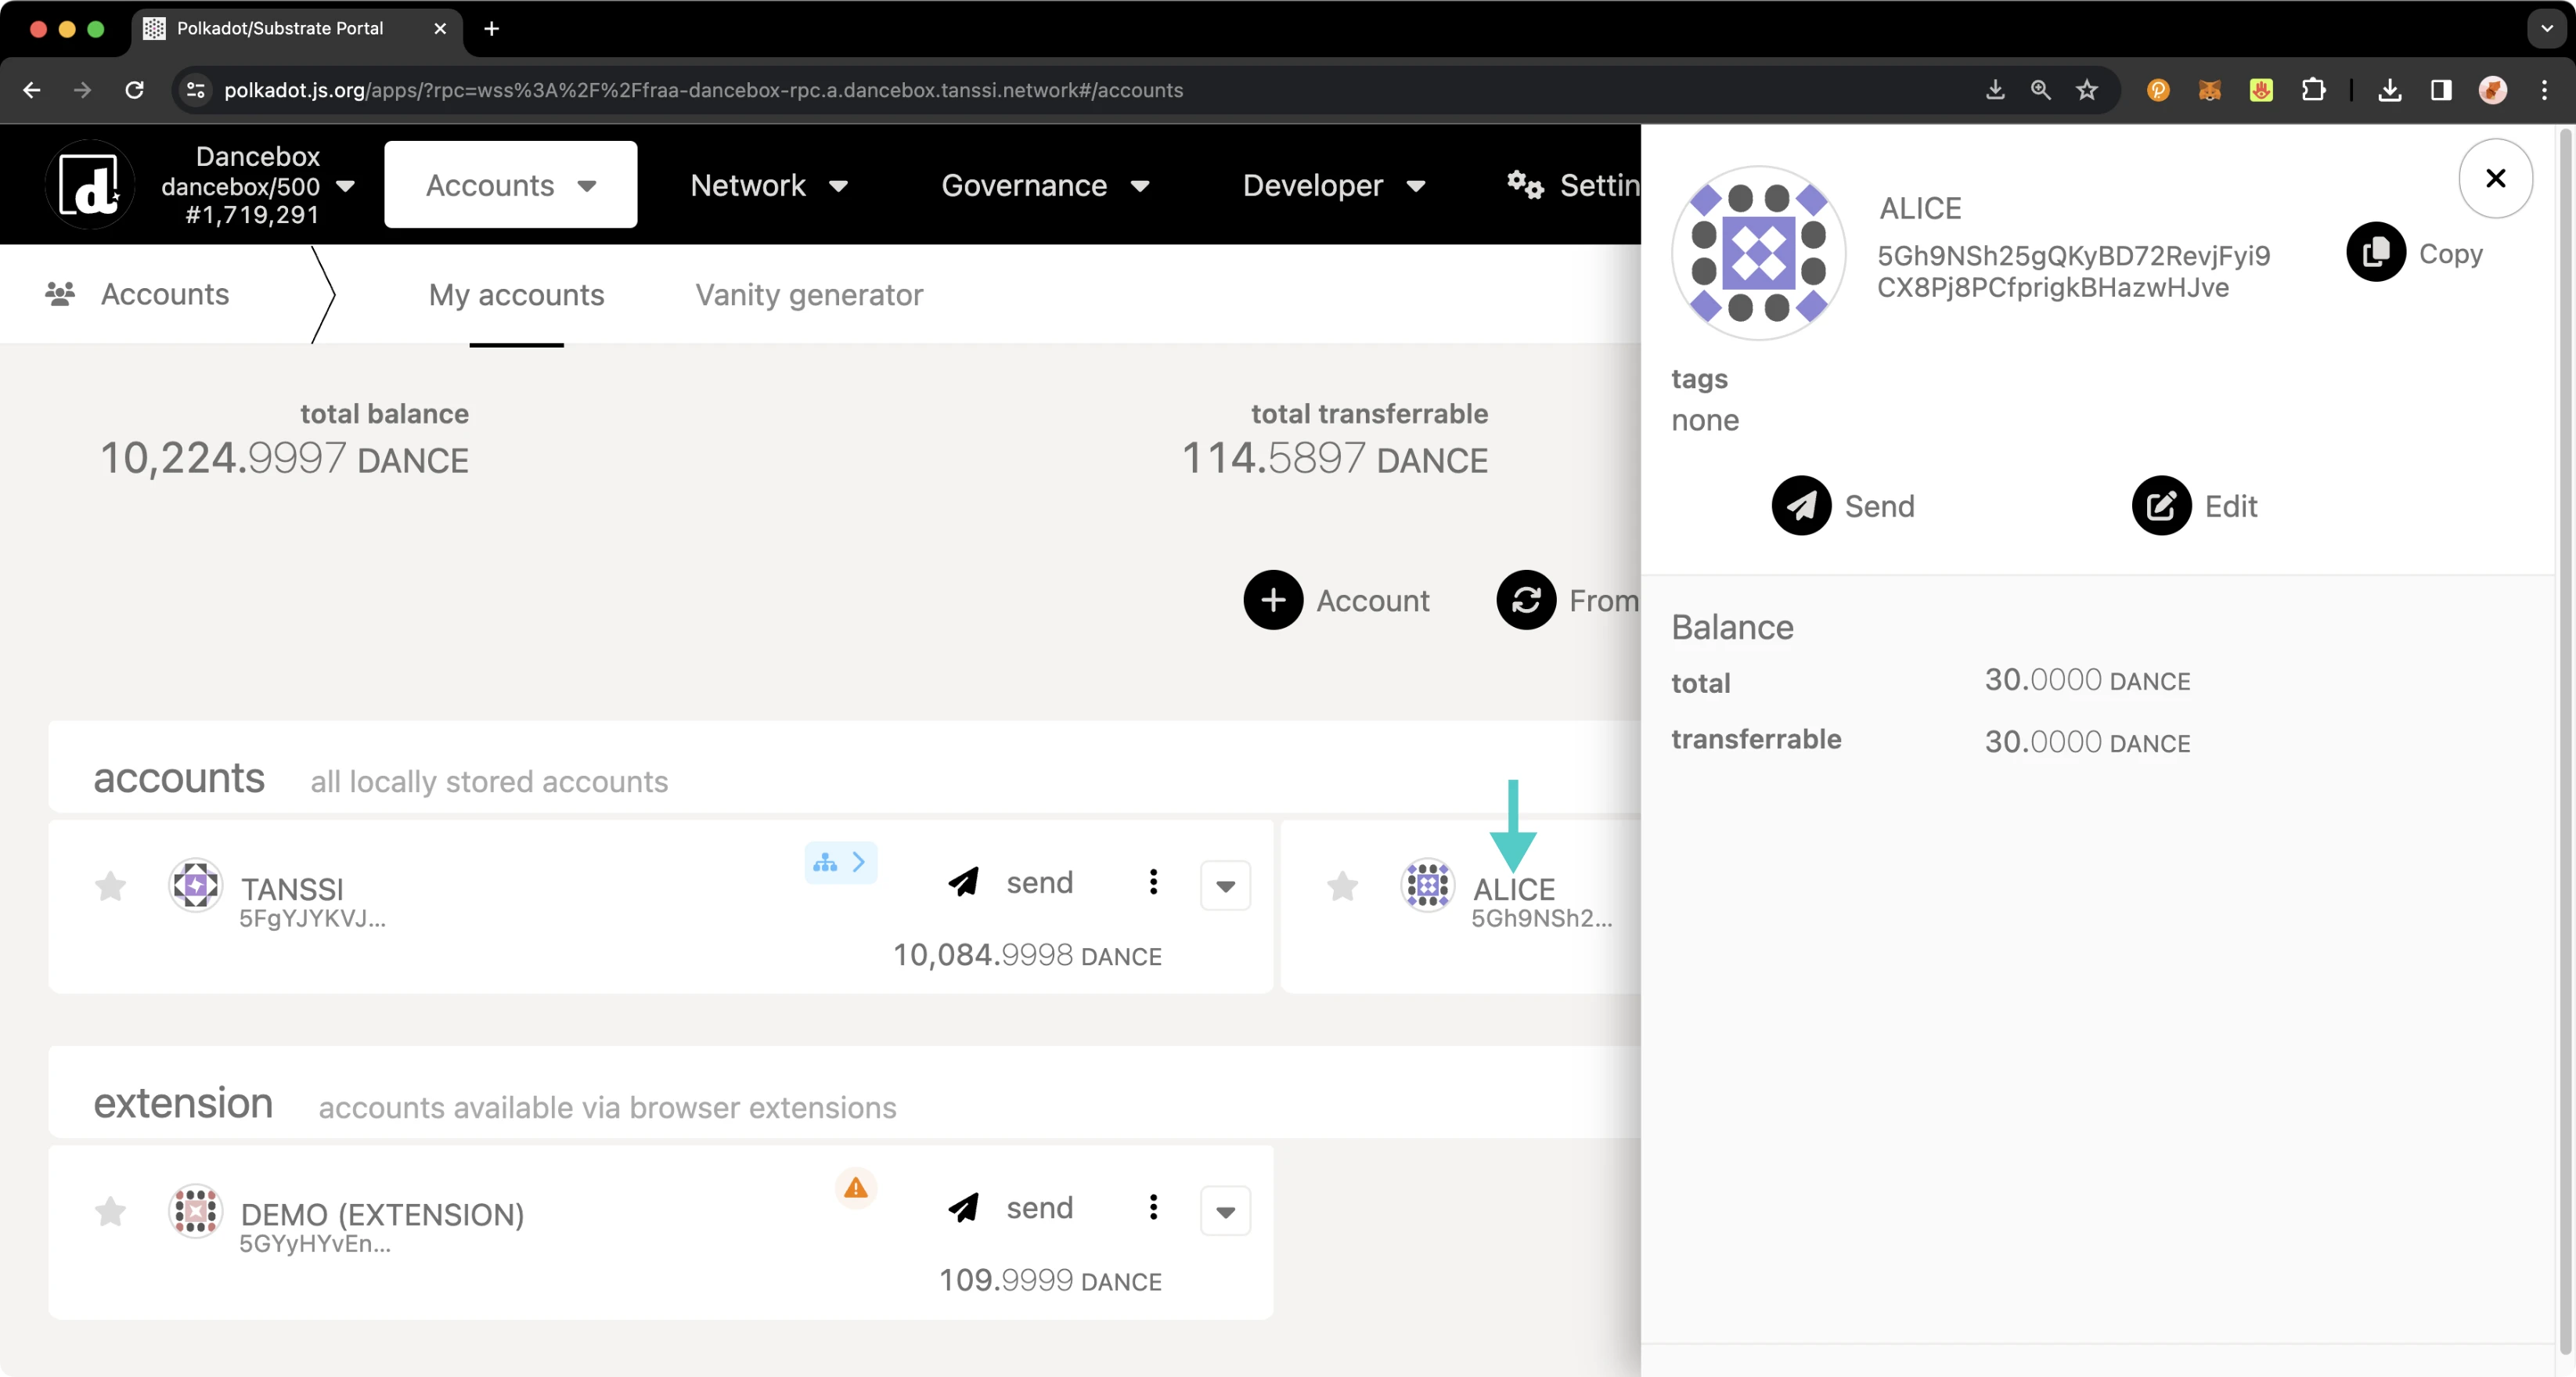
You should already have an account connected, so you can click on your account name to verify and note your balances. After you send the transaction to set an identity, the deposit(s) you submitted will be moved from your transferable balance to your reserved balance.
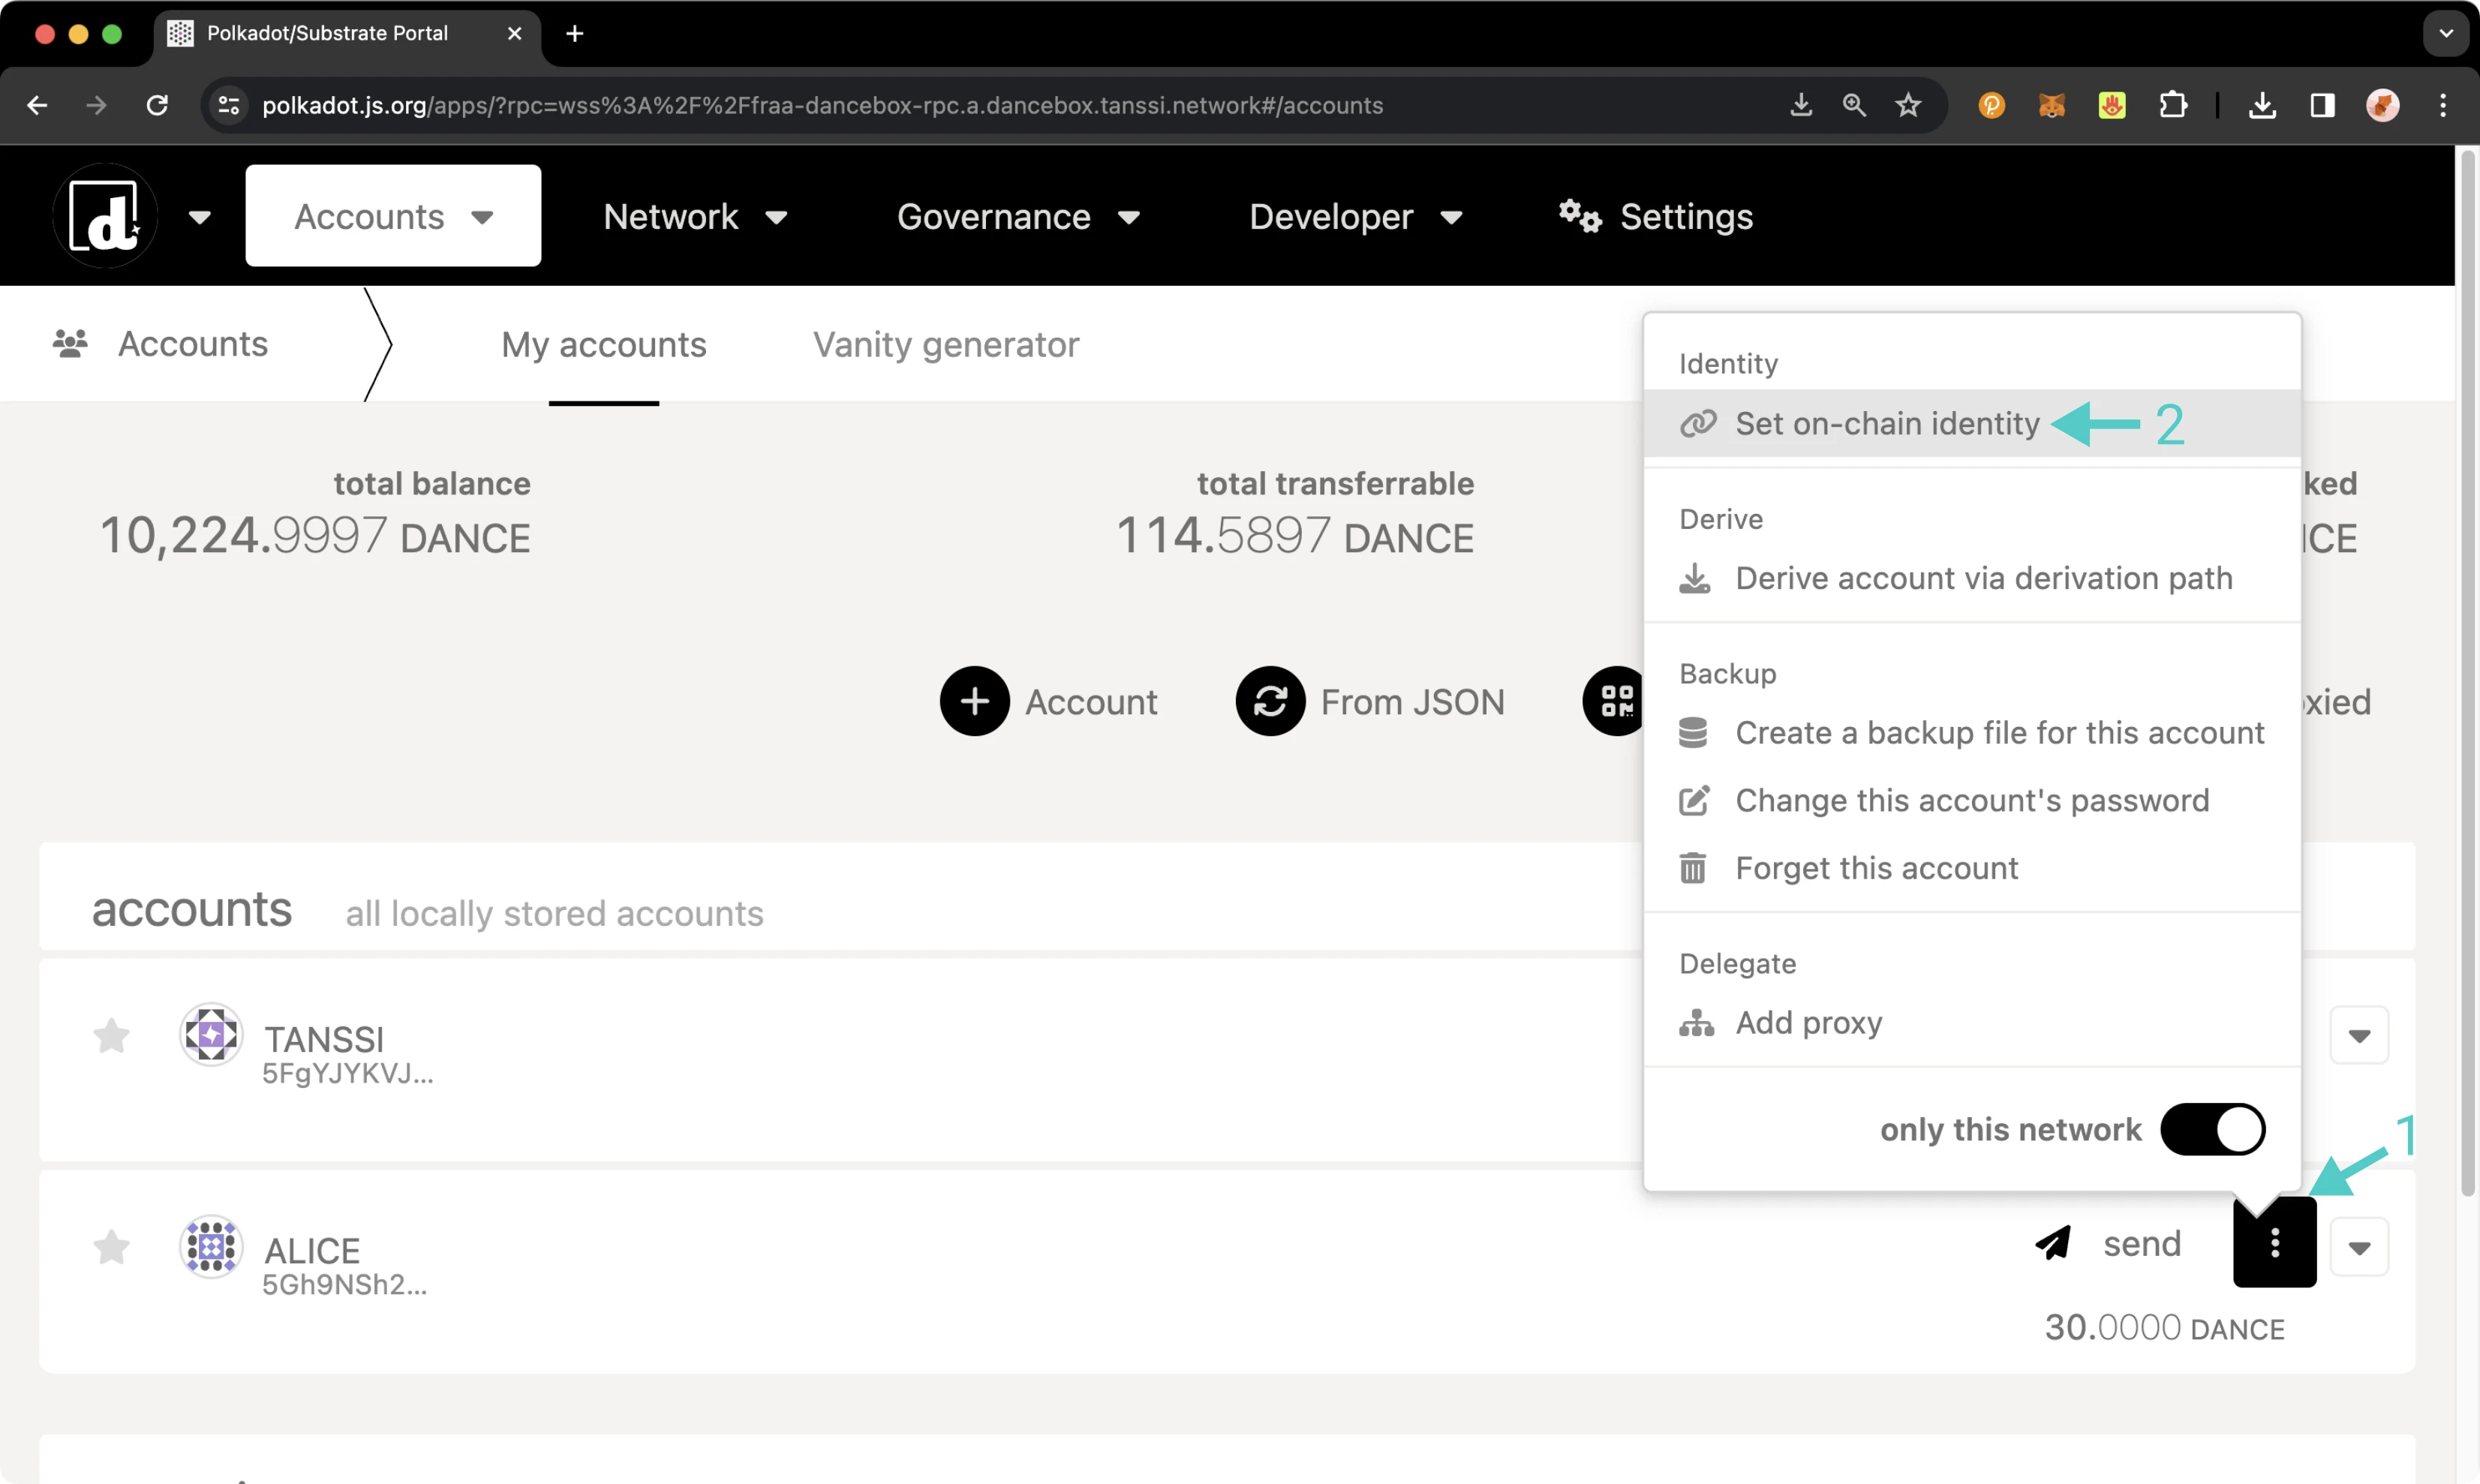
To set your identity, you'll need to:
- Click on the three vertical dots next to the account you would like to set an identity for
- A menu will pop up. Click Set on-chain identity
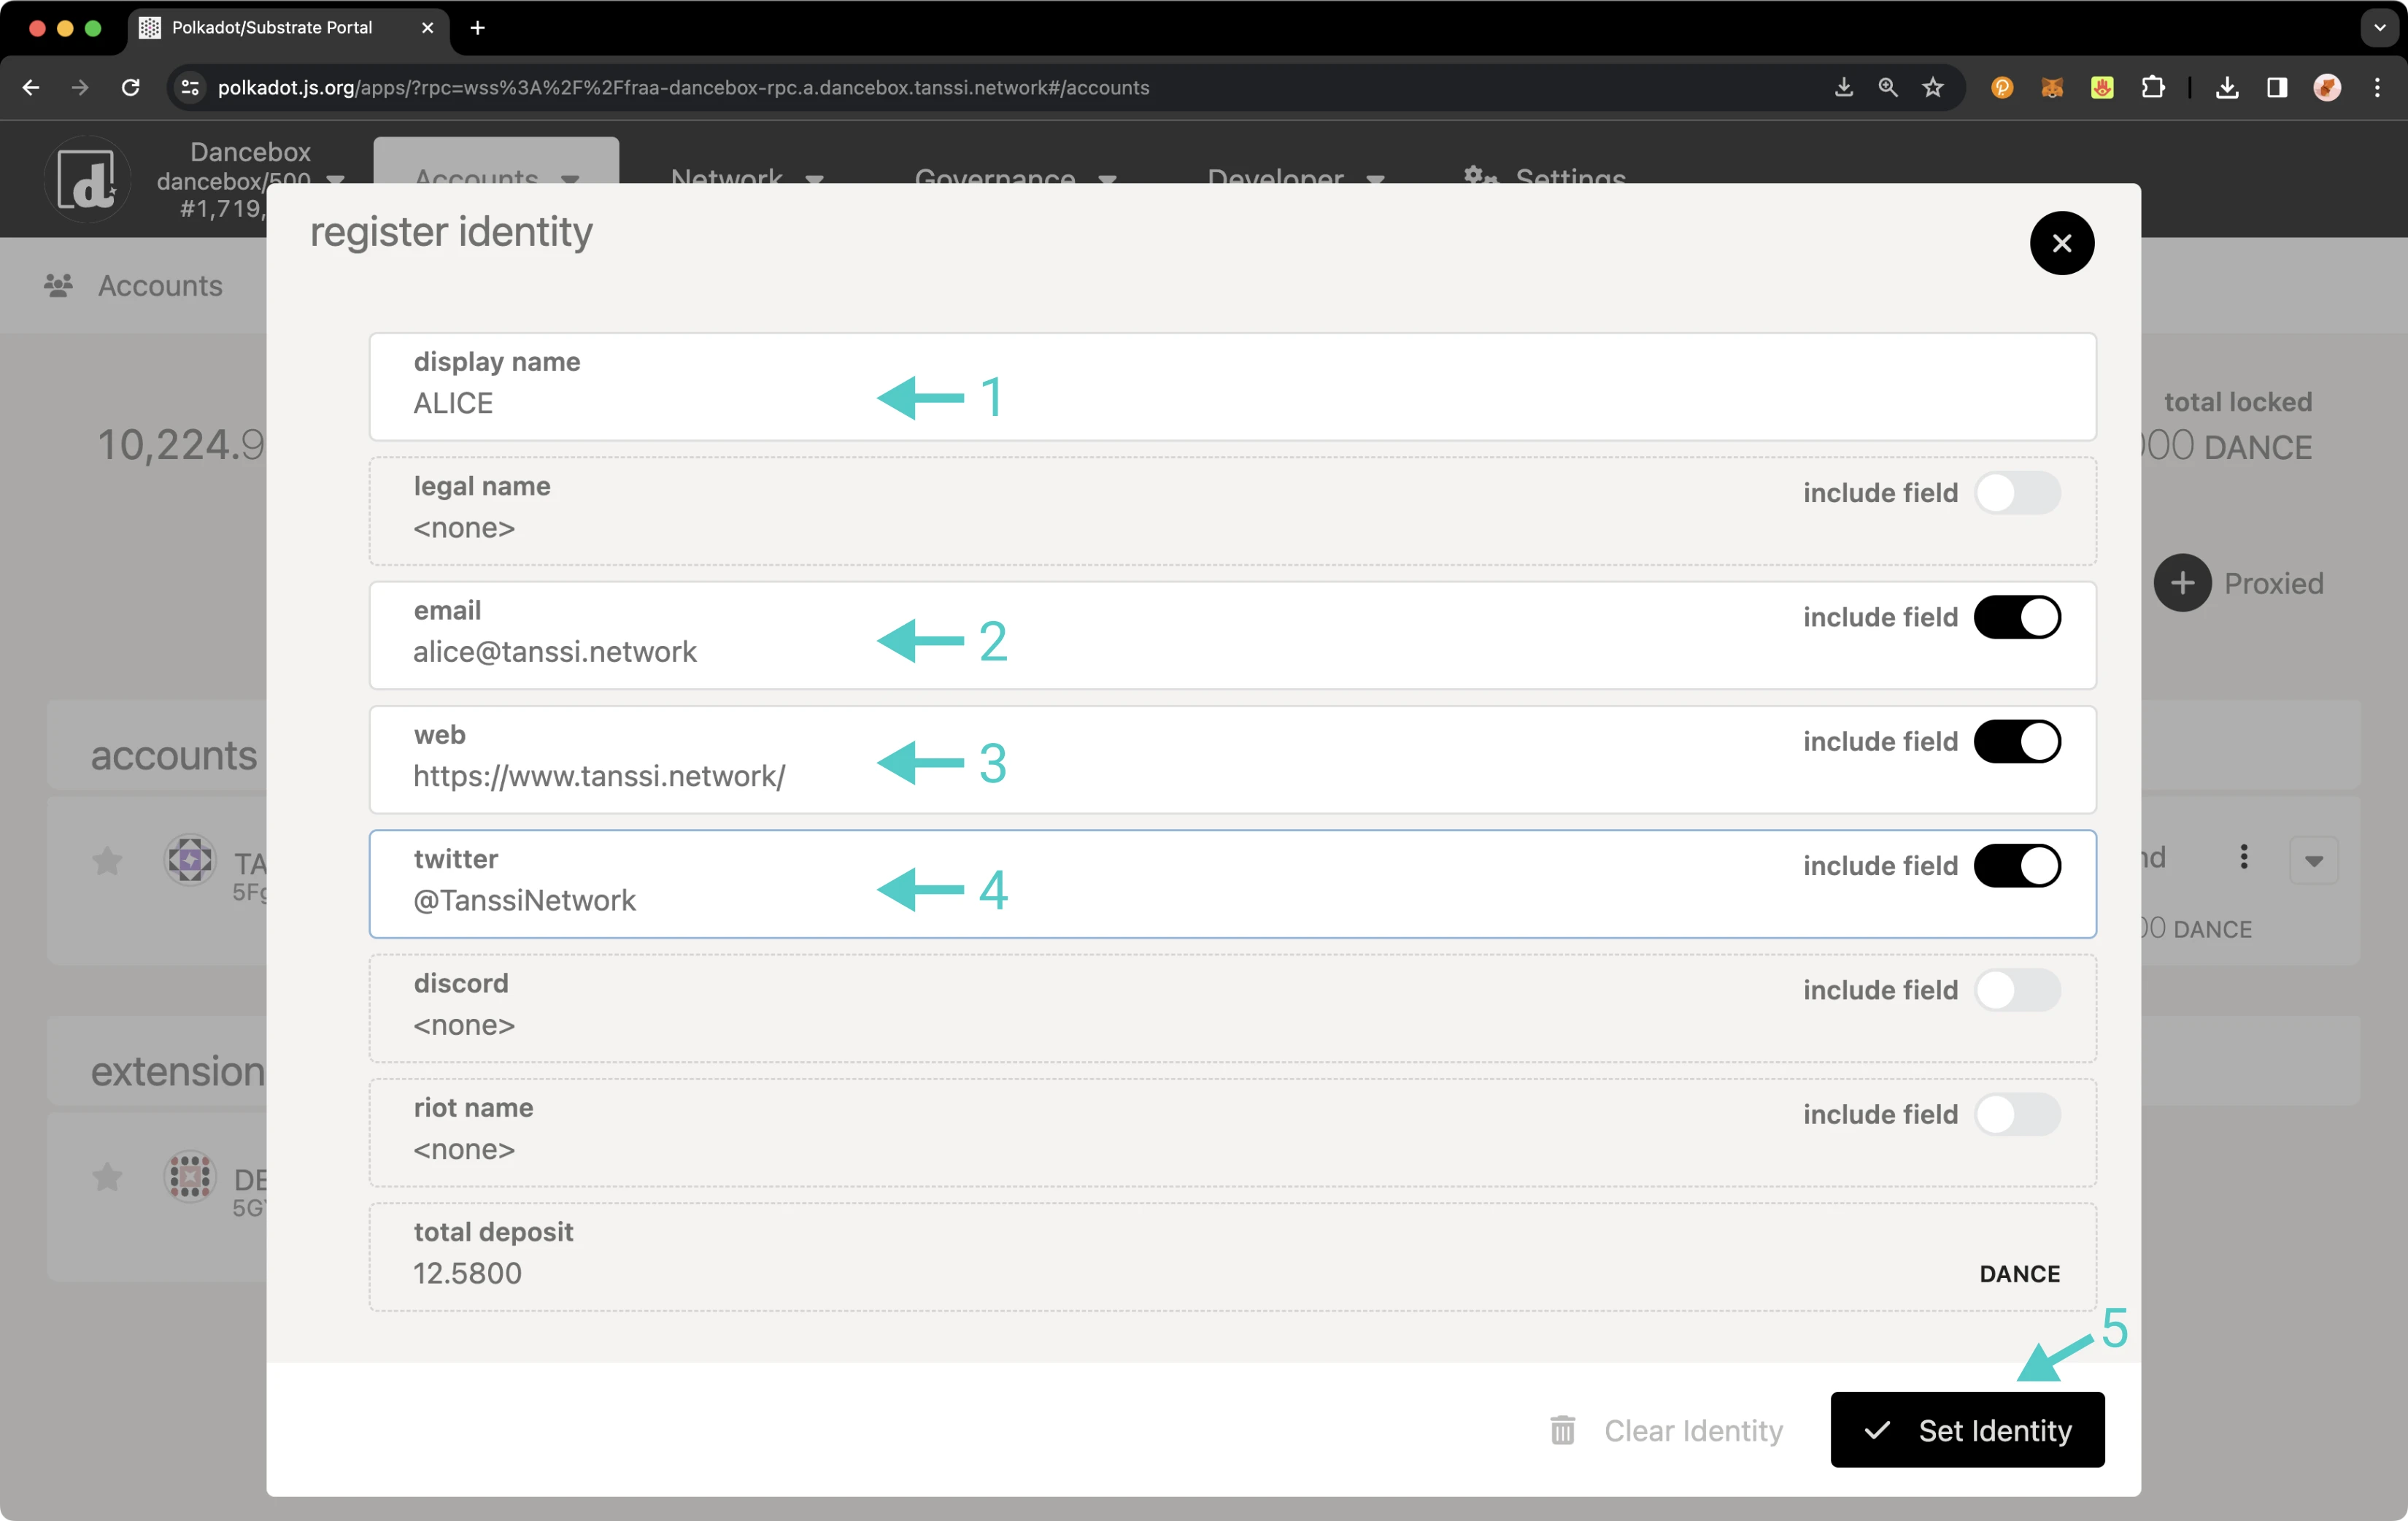
Next, the menu to register and set your identity will pop up, and you can start filling in your information. You are not required to enter information for every single field; you can choose to fill in just one field or all of them; it's up to you. For this example:
- Set your display name
- Click on the include field toggle for email and then enter in your email
- Click on the include field toggle for web and then enter in your website URL
- Click on the include field toggle for Twitter and then enter in your Twitter handle
- Review the prior data fields and click Set Identity
You will then be prompted to sign the transaction. If everything looks good, sign it.
You should see status notifications pop up in the top right-hand corner. Once the transaction has been confirmed, you can click on your account name again, and the panel will slide out on the right side of the page. Your balances will have changed, and you'll also see your new identity information.
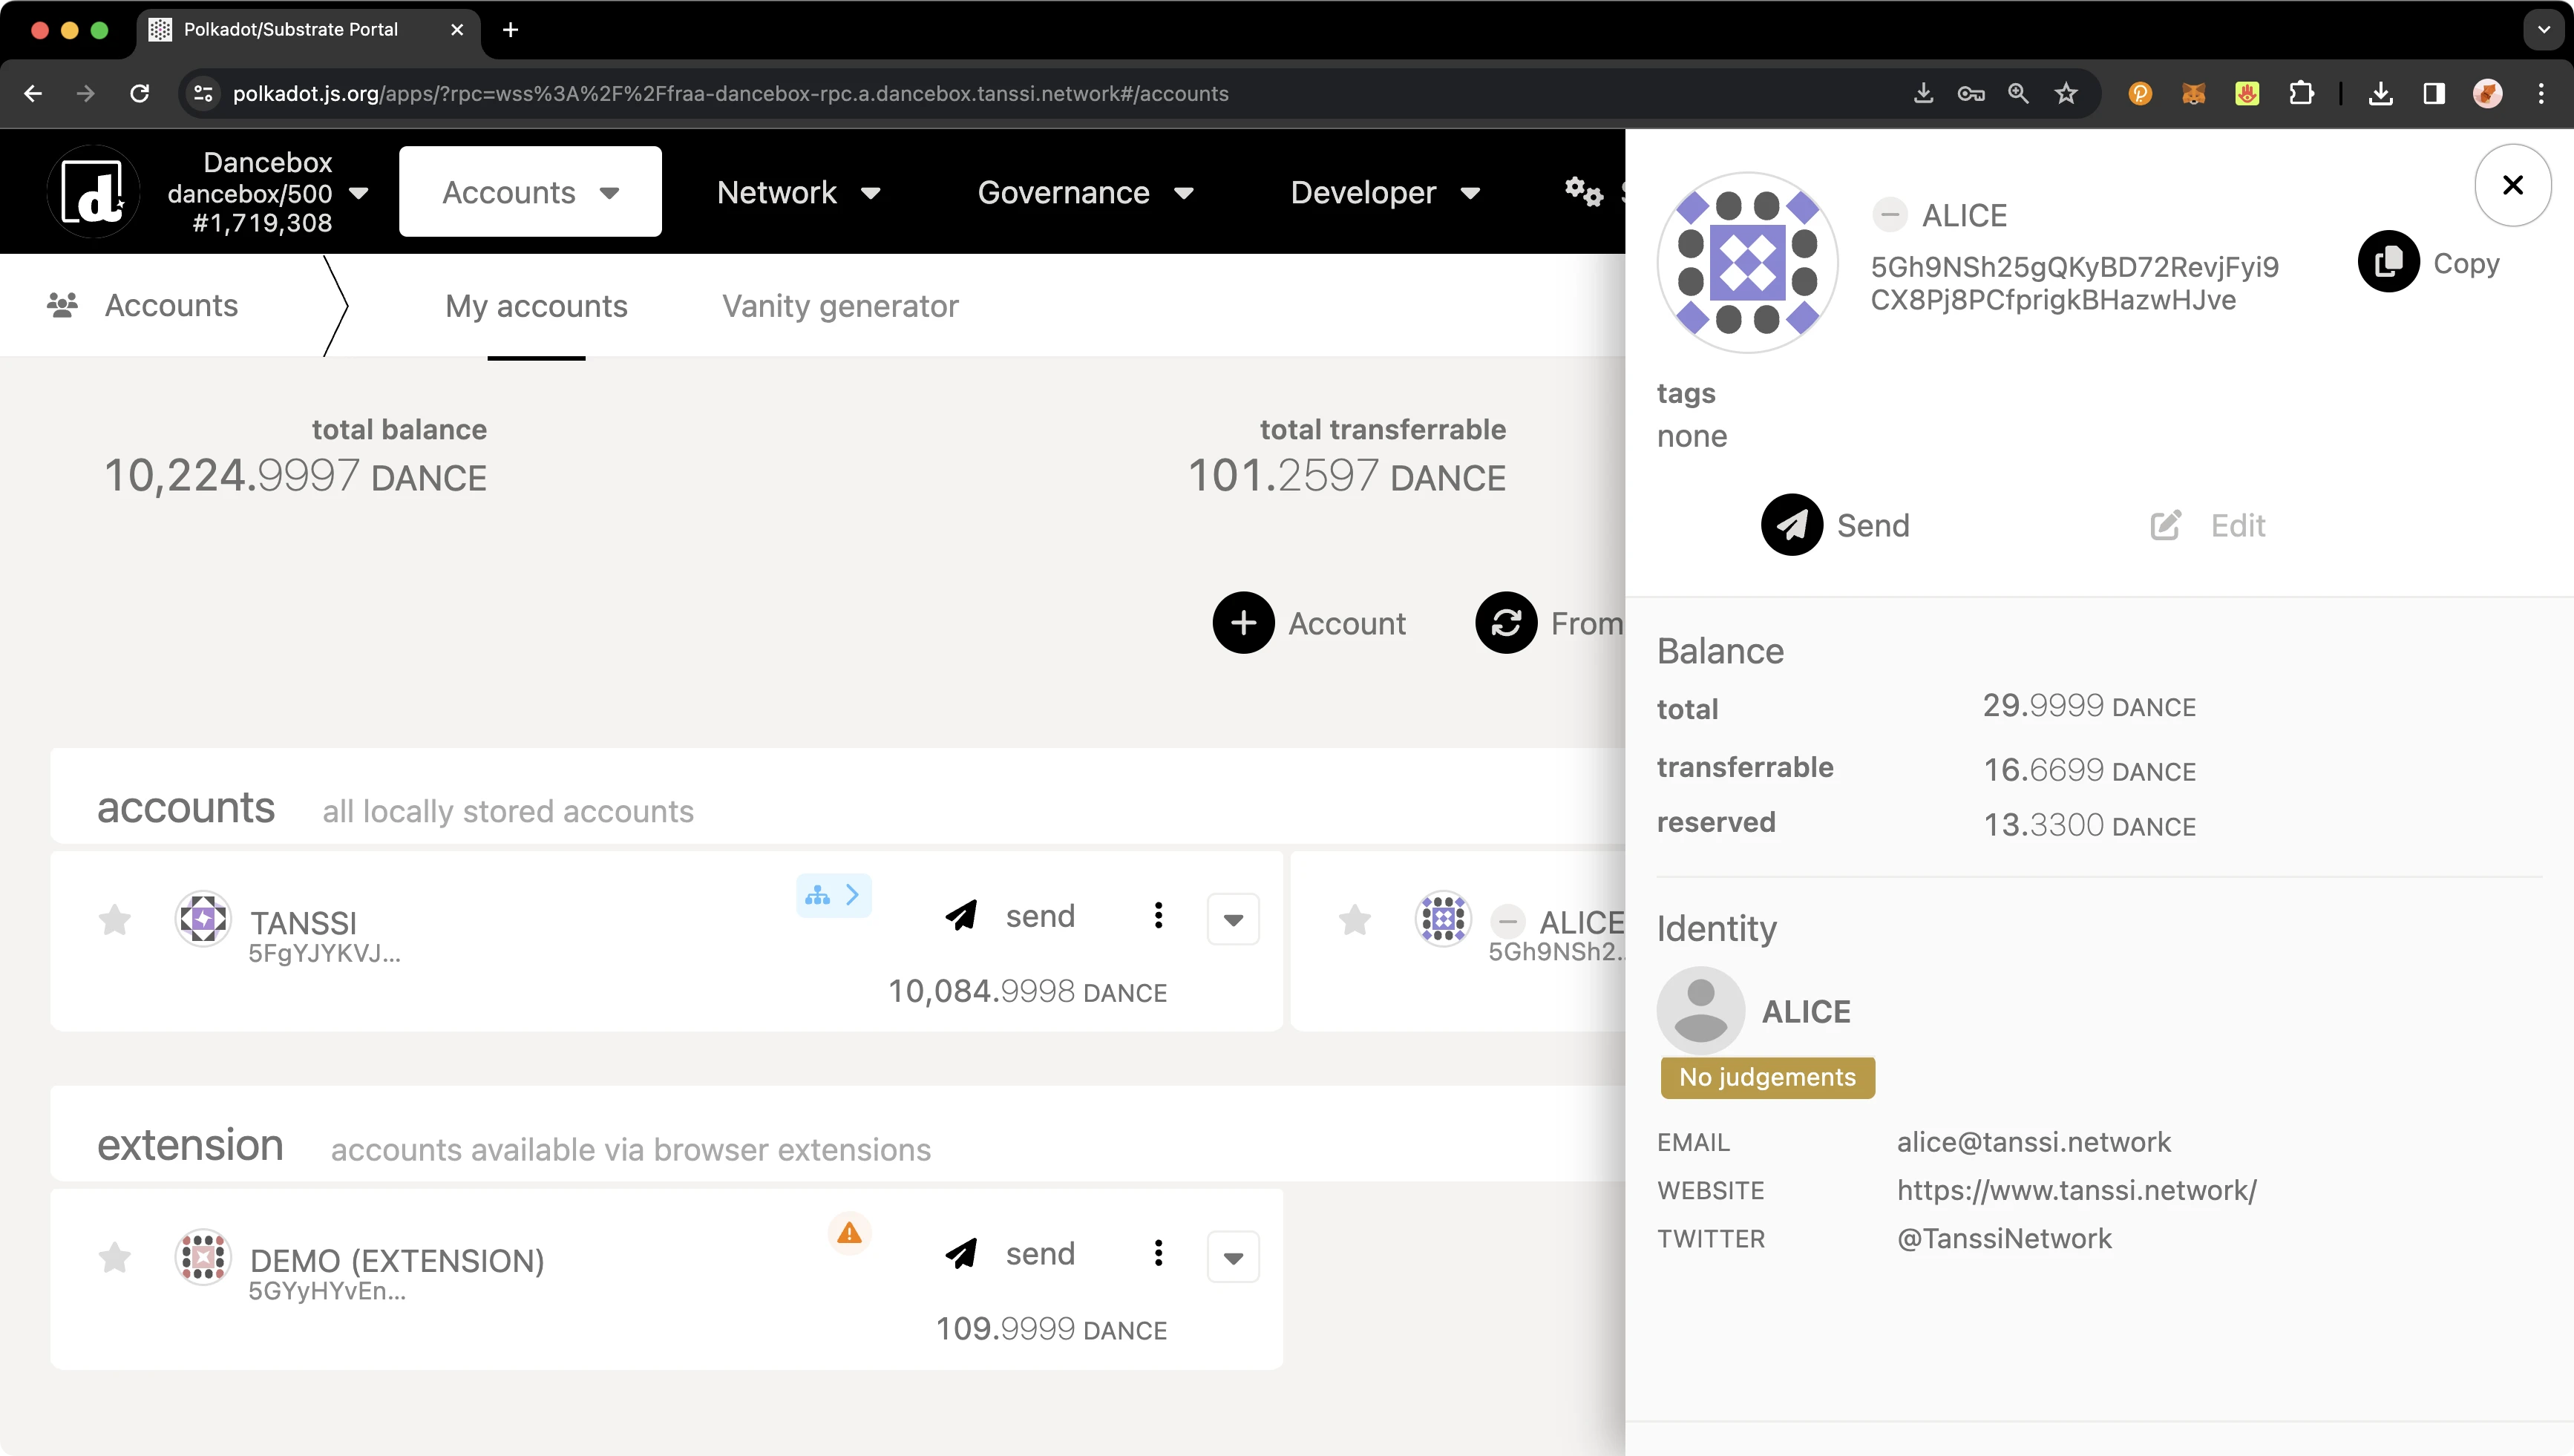
If the identity information matches what you entered, you've successfully set an identity!
Once you clear your identity, the deposit in your reserved balance will get transferred back to your transferable balance. If you need to change your identity, you can go through the process of setting your identity again. Please note that you must ensure all fields are re-entered, even if only one field needs to be changed, or they will be overwritten. You will not need to pay another deposit unless custom fields are used, but you will need to pay gas fees.
Manage an Identity via Extrinsics
Set an Identity
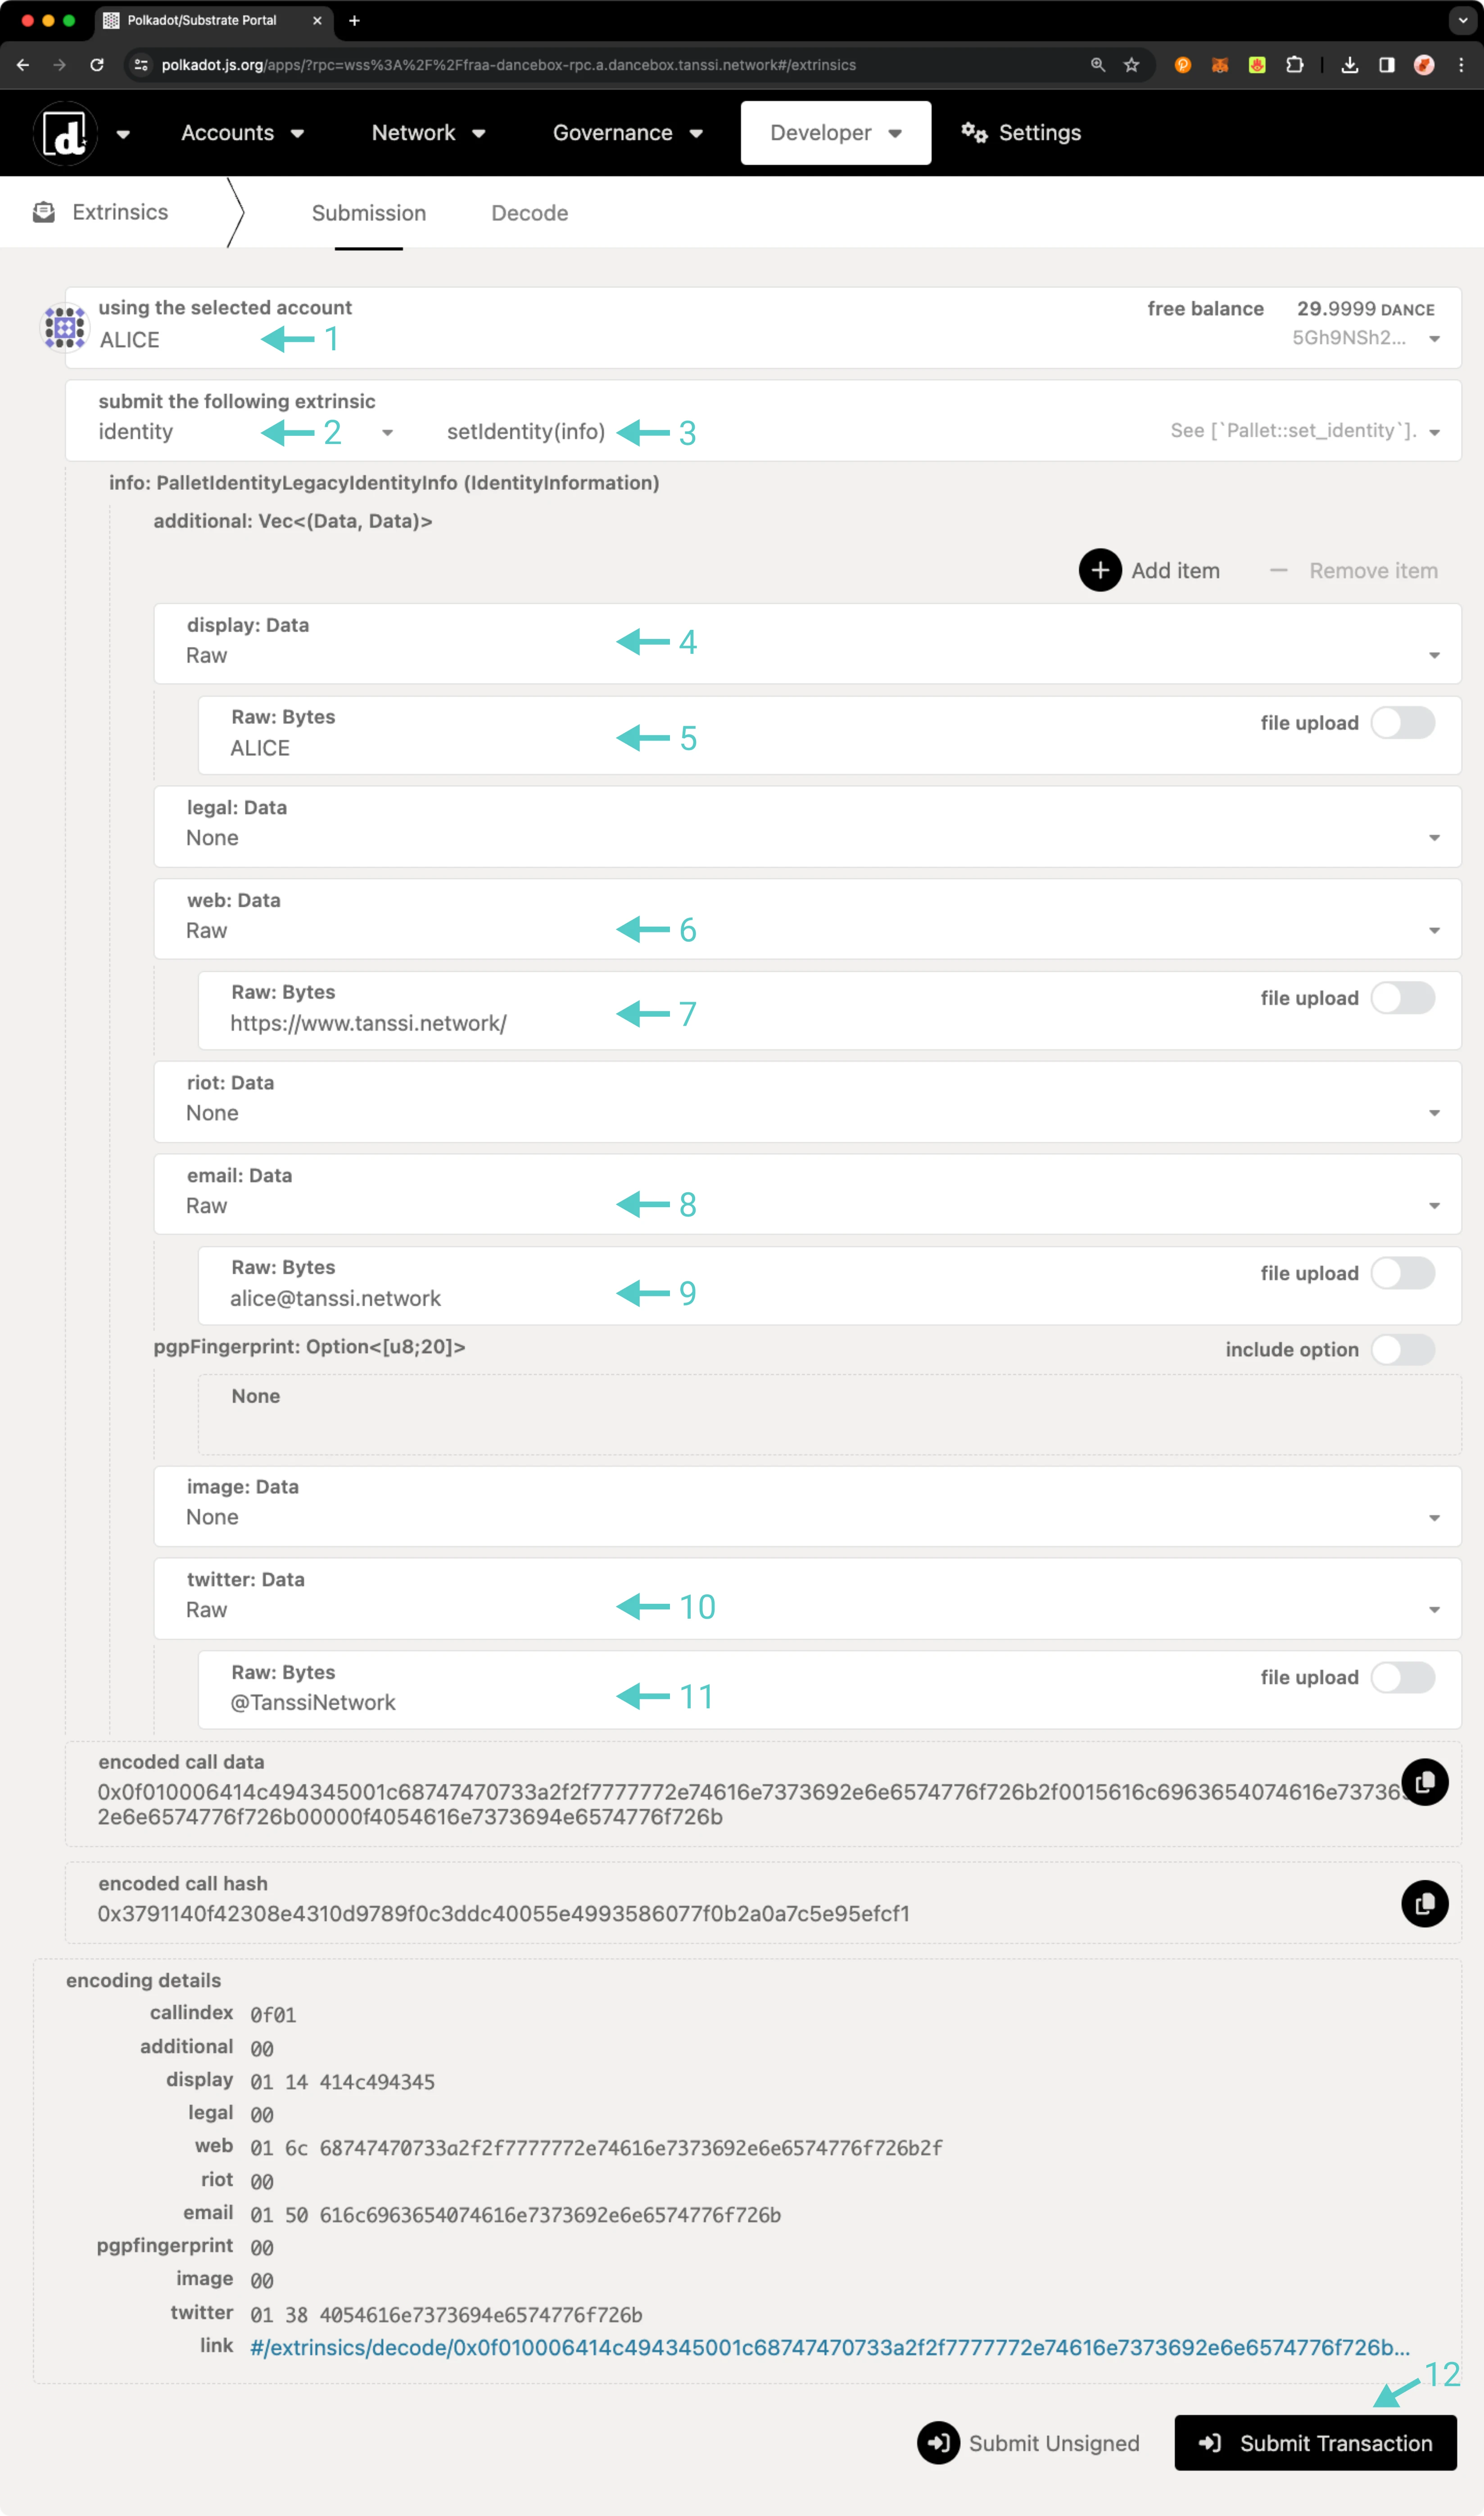
To register an identity using the extrinsics page, navigate to the Extrinsics page of the developer portal. Please ensure your input does not exceed 32 characters for each identity field. To complete your identity, take the following steps:
- Select your account
- Select identity from the submit the following extrinsic dropdown
- Then select the setIdentity(info) function
- Select Raw as the data format to enter your Display Name
- Enter the data for Display in the selected format
- Select Raw as the data format to enter your web address
- Enter your website URL in the selected format
- Select Raw as the data format to enter your email
- Enter your email address in the selected format
- Select Raw as the data format to enter your Twitter handle
- Enter your Twitter in the selected format. Enter the username only, starting with the
@symbol - Review the prepared fields and press Submit Transaction
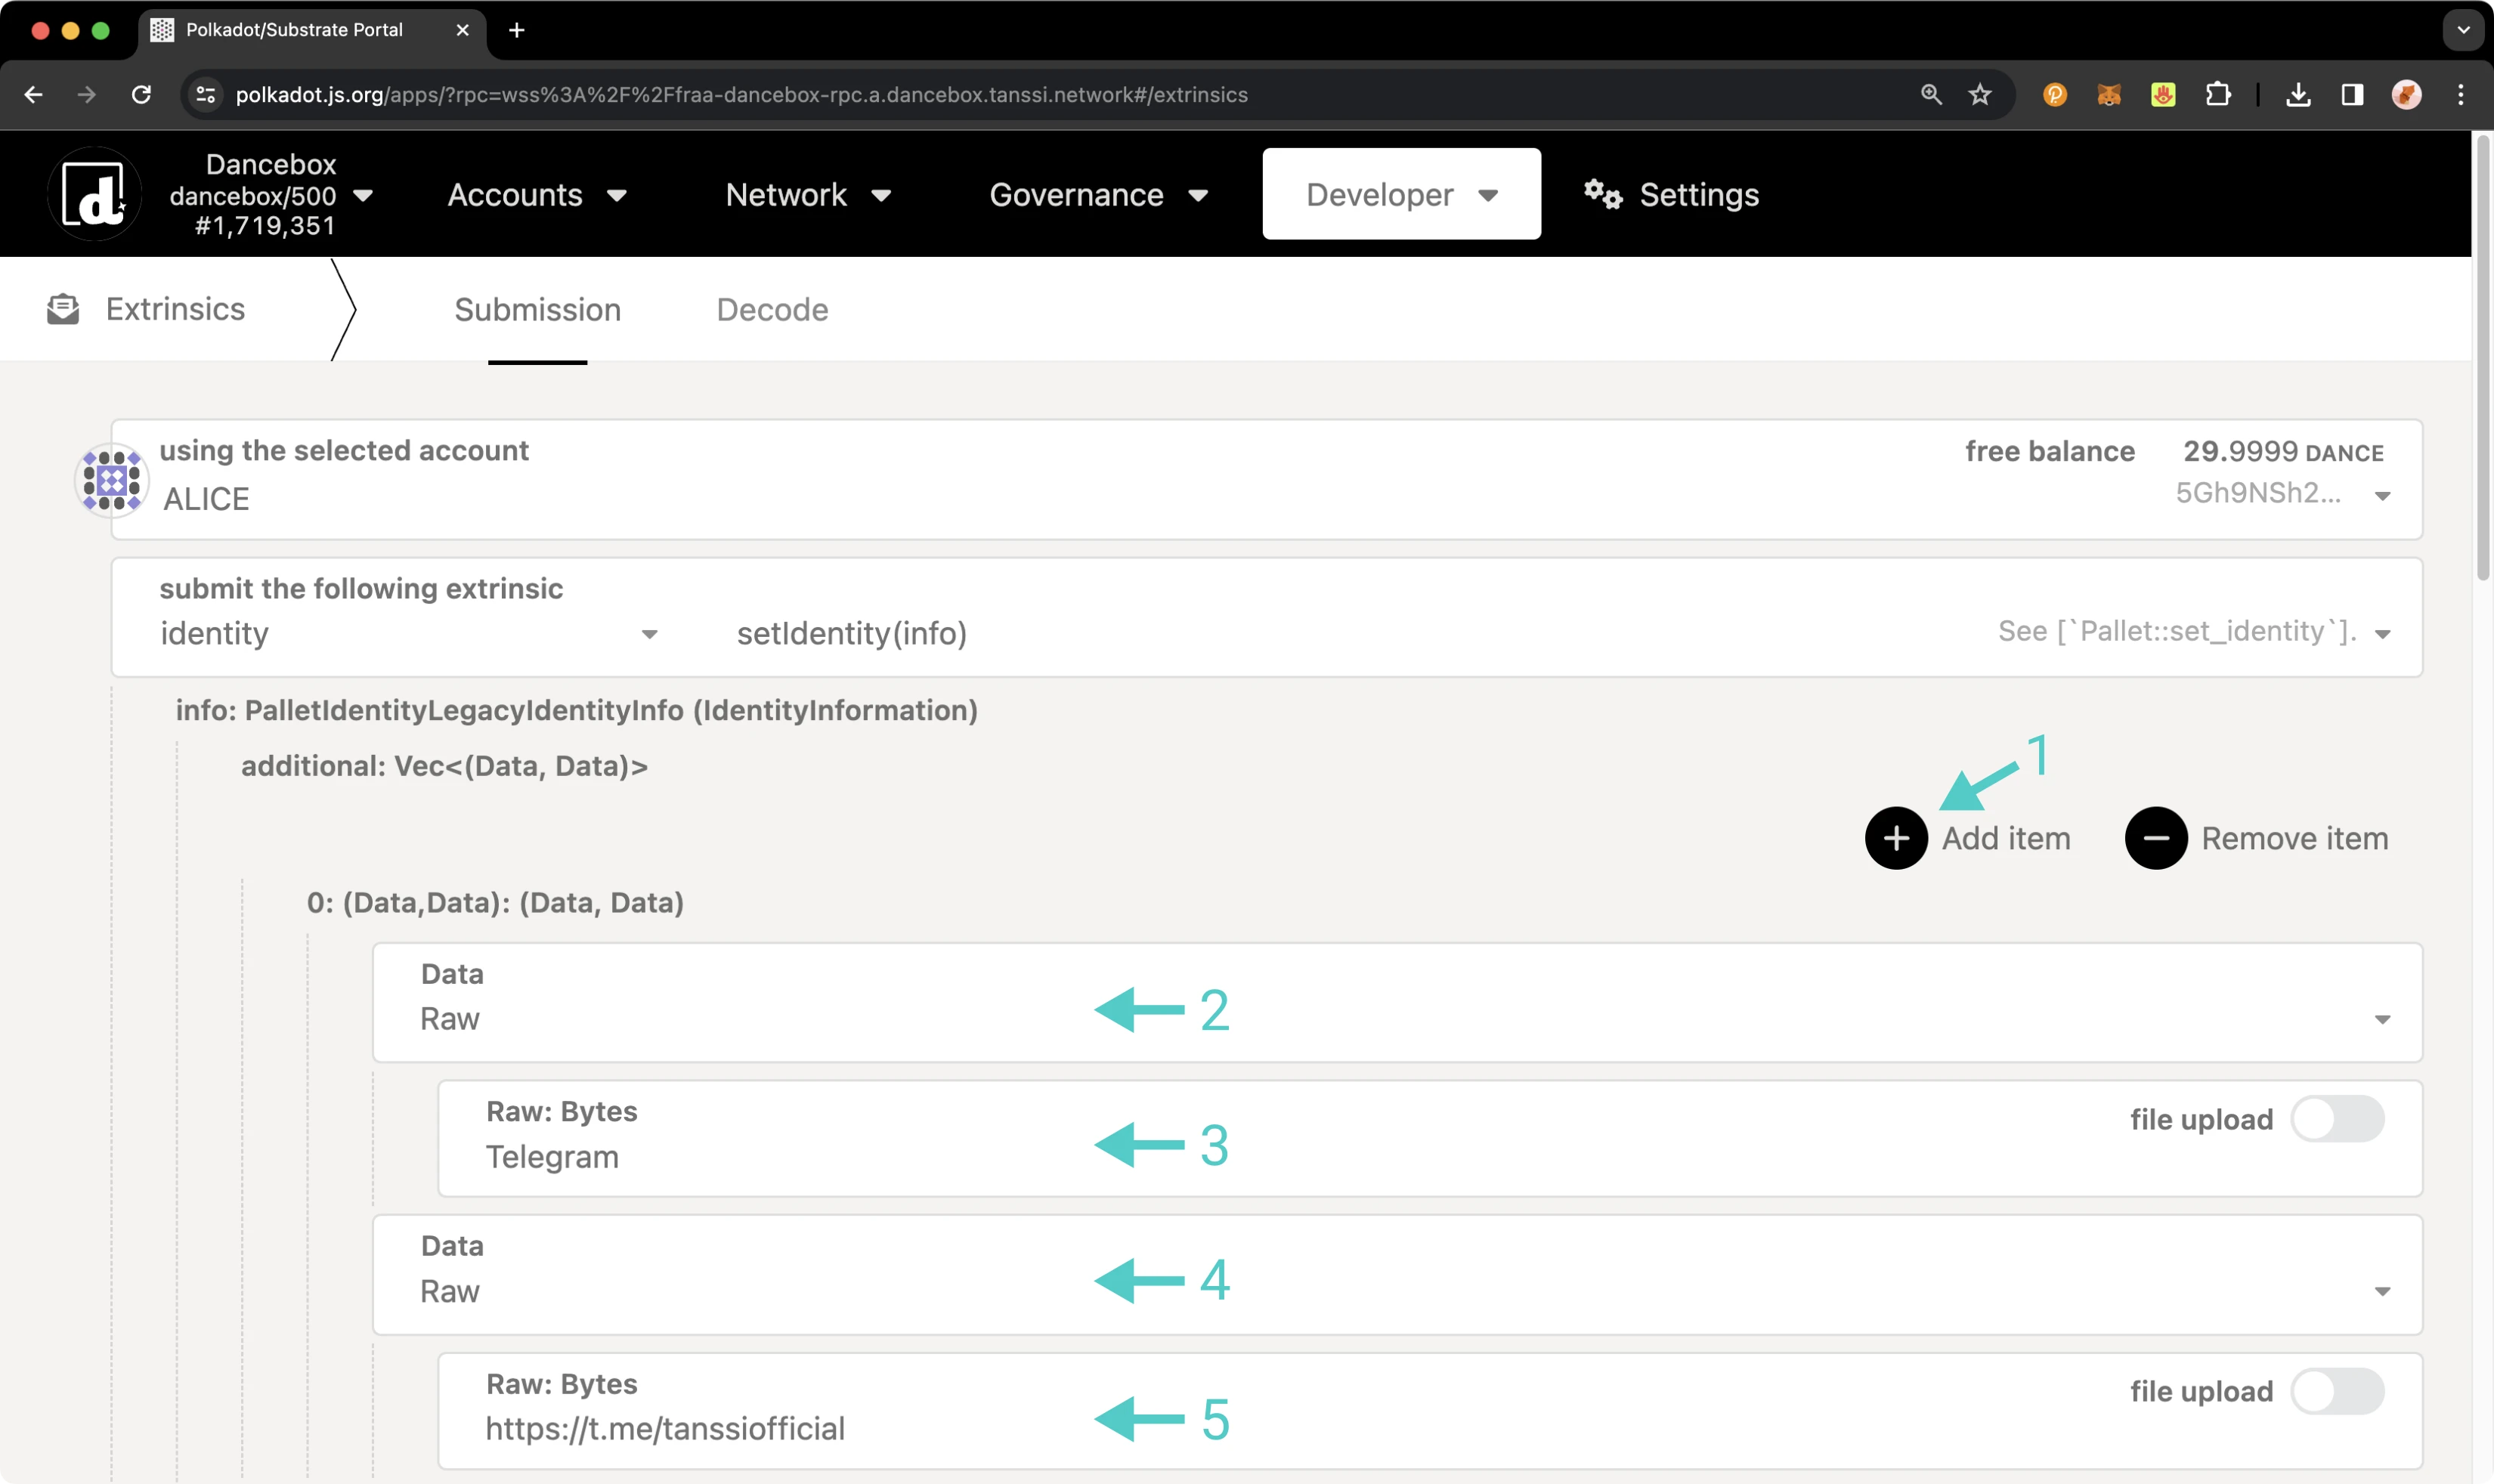
Optionally, if you would like to enter custom fields, take the following steps:
- Scroll to the top and click on Add item
- Two fields will appear: the first for the field name and the second for the value. Select Raw as the data format to enter the field name
- Enter the field name in the specified format
- Select Raw as the data format to enter the custom value
- Enter the custom value in the specified format
Finally, once all of your identity information has been added, you can scroll to the bottom of the page and click Submit Transaction.
You will then be prompted to sign the transaction. Remember, an additional deposit is required for each additional custom field. If everything looks good, sign the transaction.
You should see status notifications pop up in the top right-hand corner confirming the transaction. If successful, you've set an identity! Congratulations! To ensure everything went through and your identity information looks good, you can verify your identity.
Confirm an Identity
To verify the addition of your identity information, you can click on the Developer tab and then navigate to Chain state.
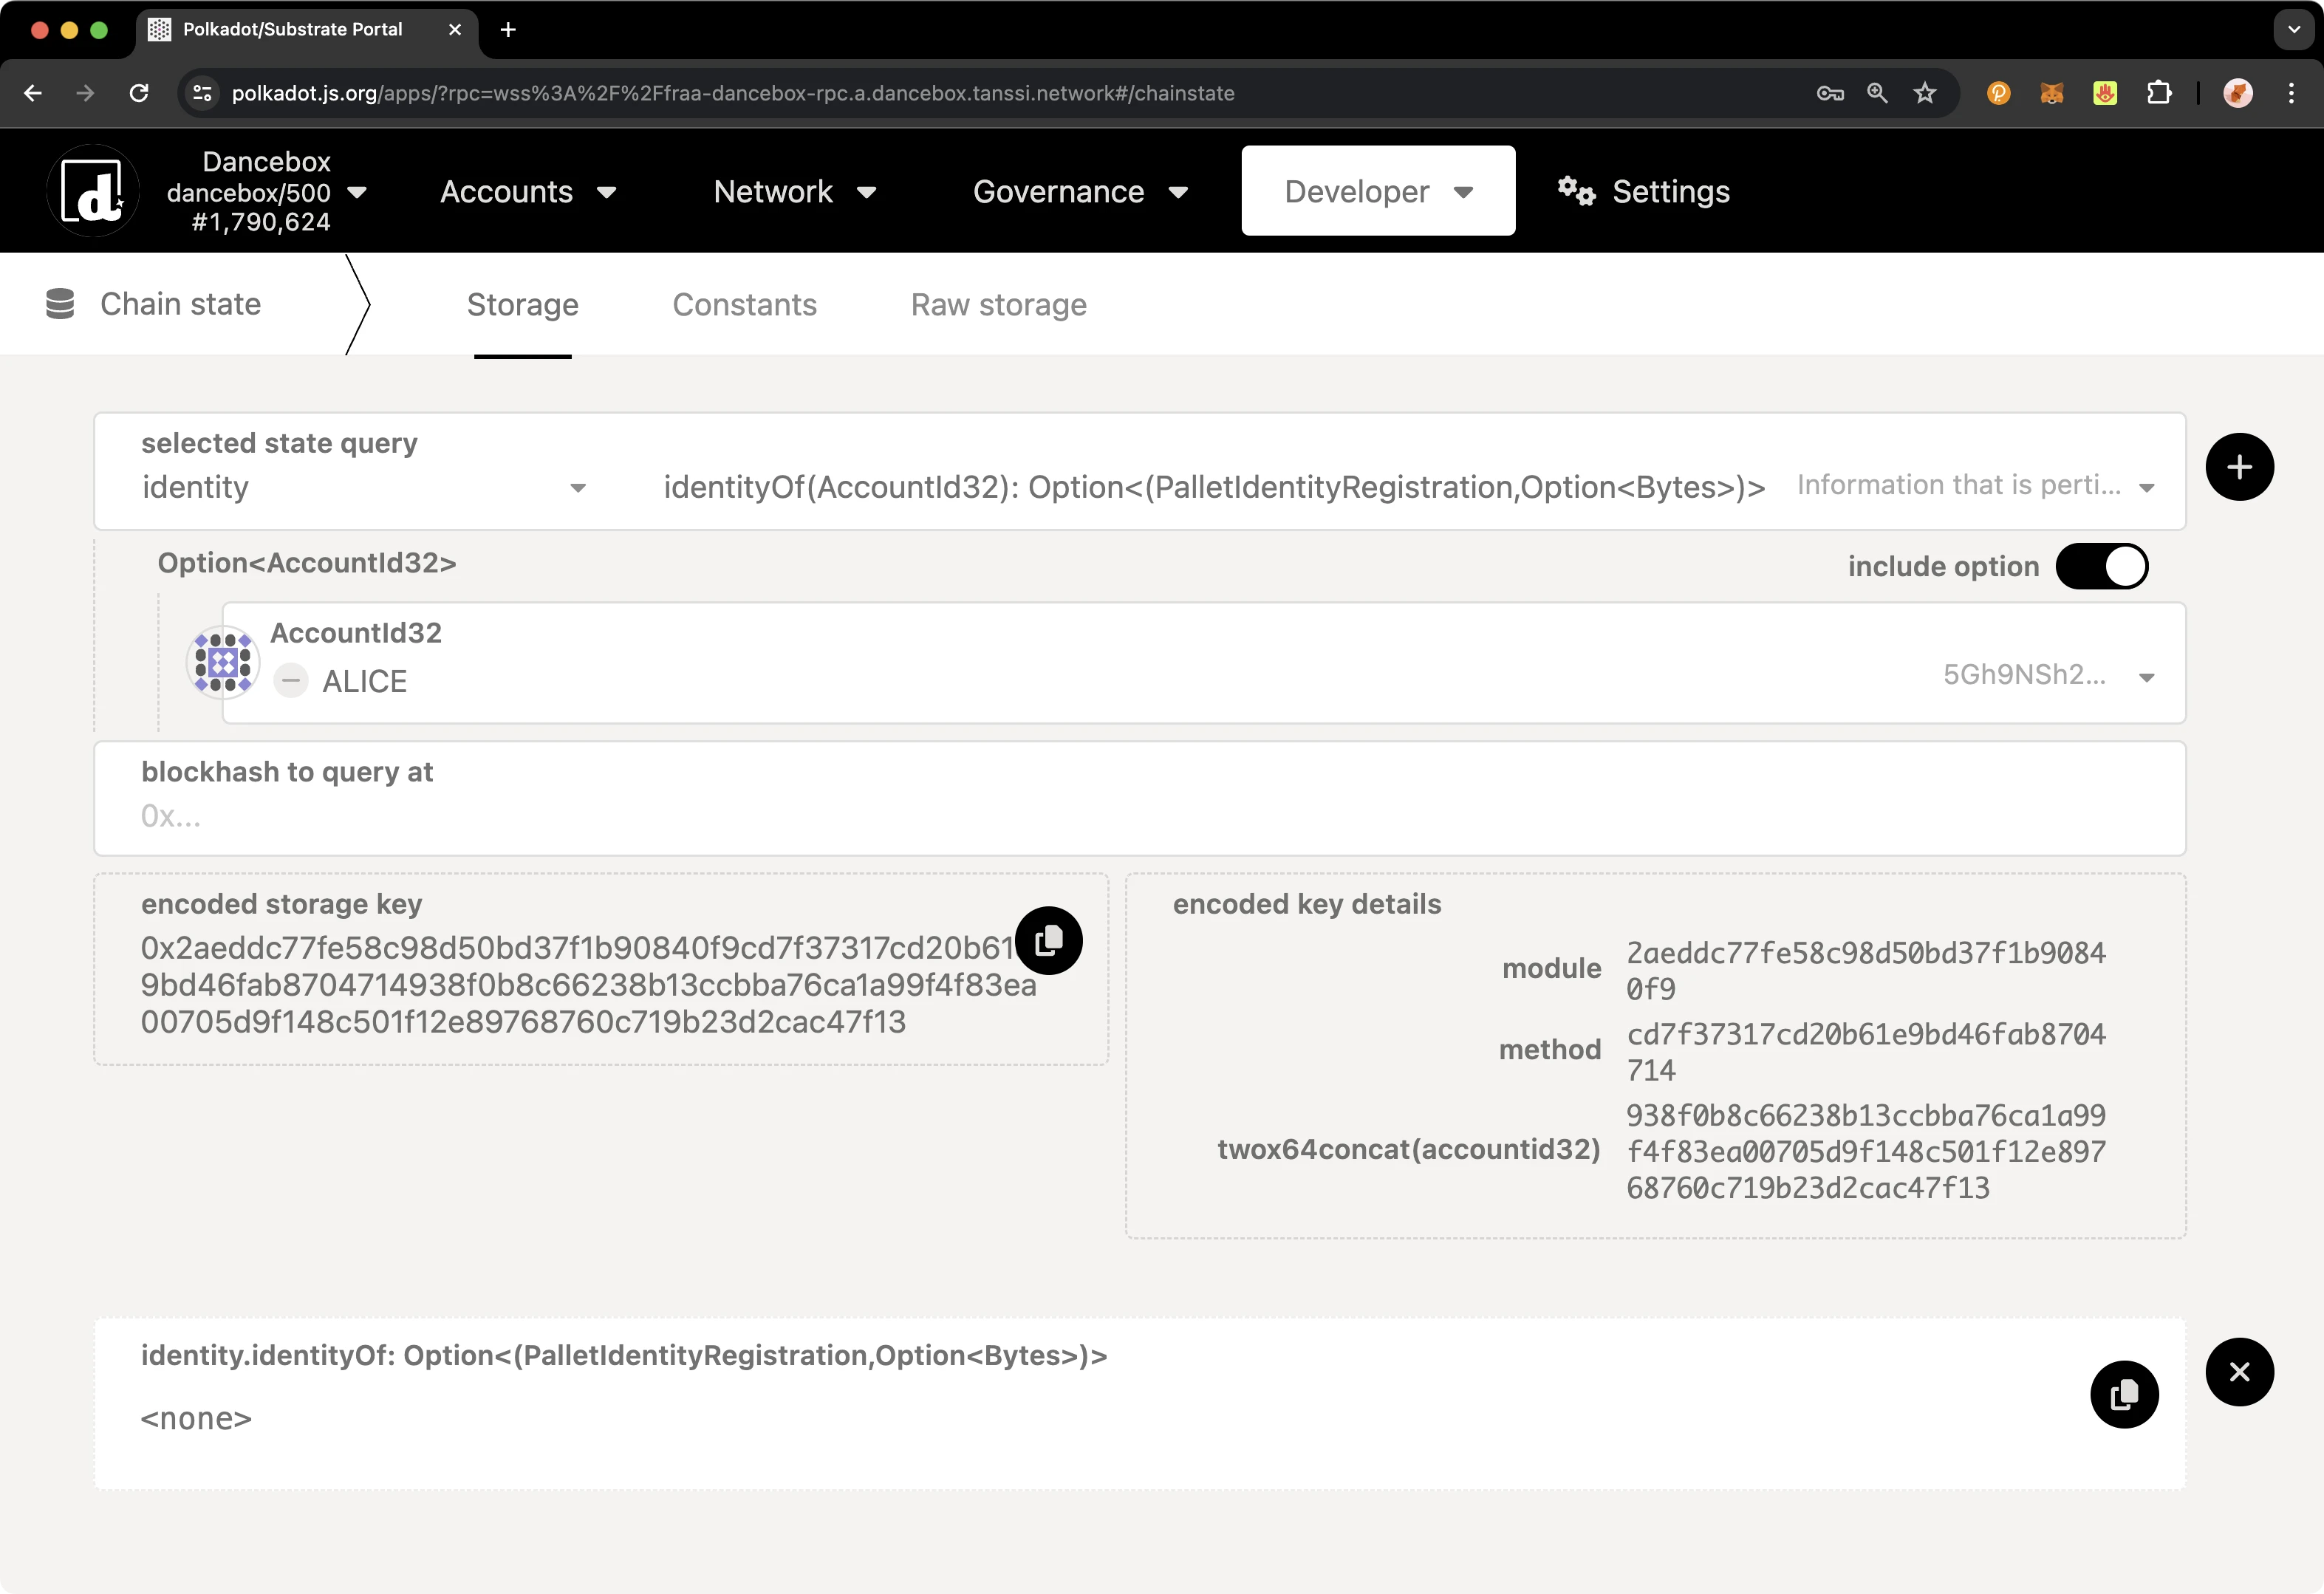
On the Chain State page, make sure Storage is selected. Then you can start to request your identity information:
- Set selected state query to identity
- Select the identityOf(AccountId) function
- Select your account
- Click the + button to get your identity information
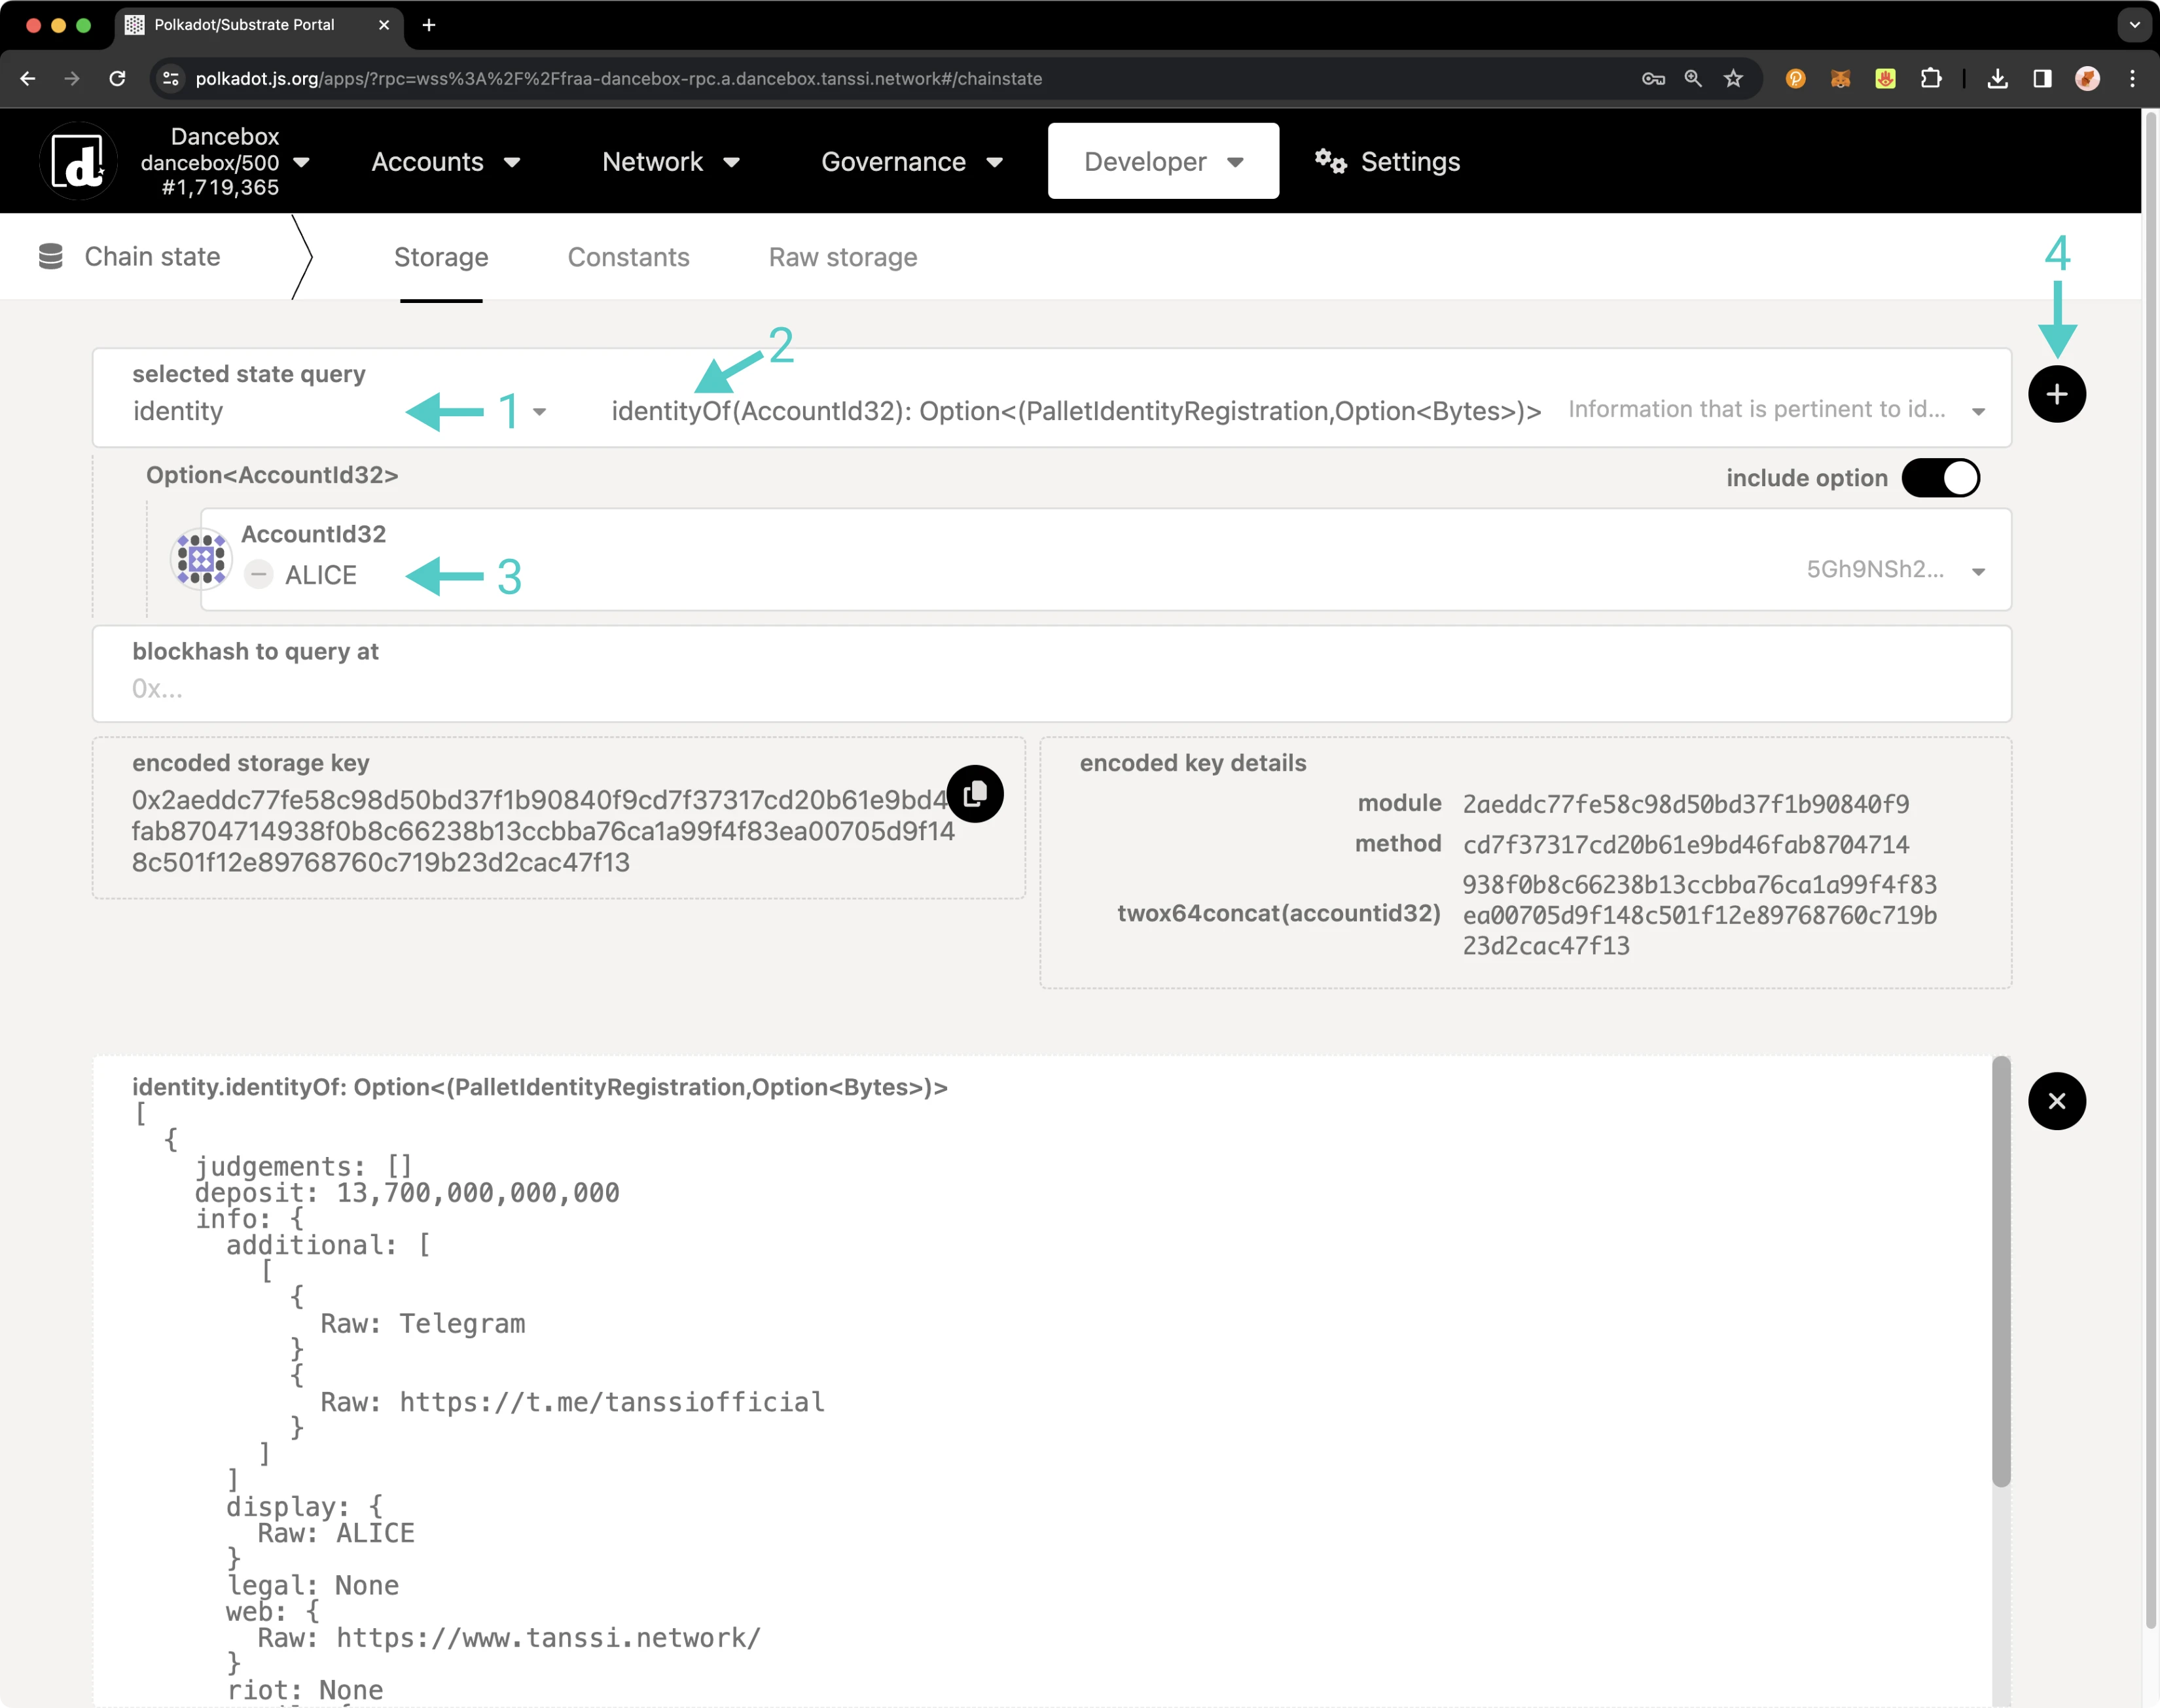
You can see now that you've successfully set an identity! Once you clear your identity, the deposit in your reserved balance will get transferred back to your transferable balance. If you need to change your identity, you can go through the process of setting your identity again. Please note that you must ensure all fields are re-entered, even if only one field needs to be changed, or they will be overwritten. You will not need to pay another deposit unless custom fields are used, but you will need to pay gas fees.
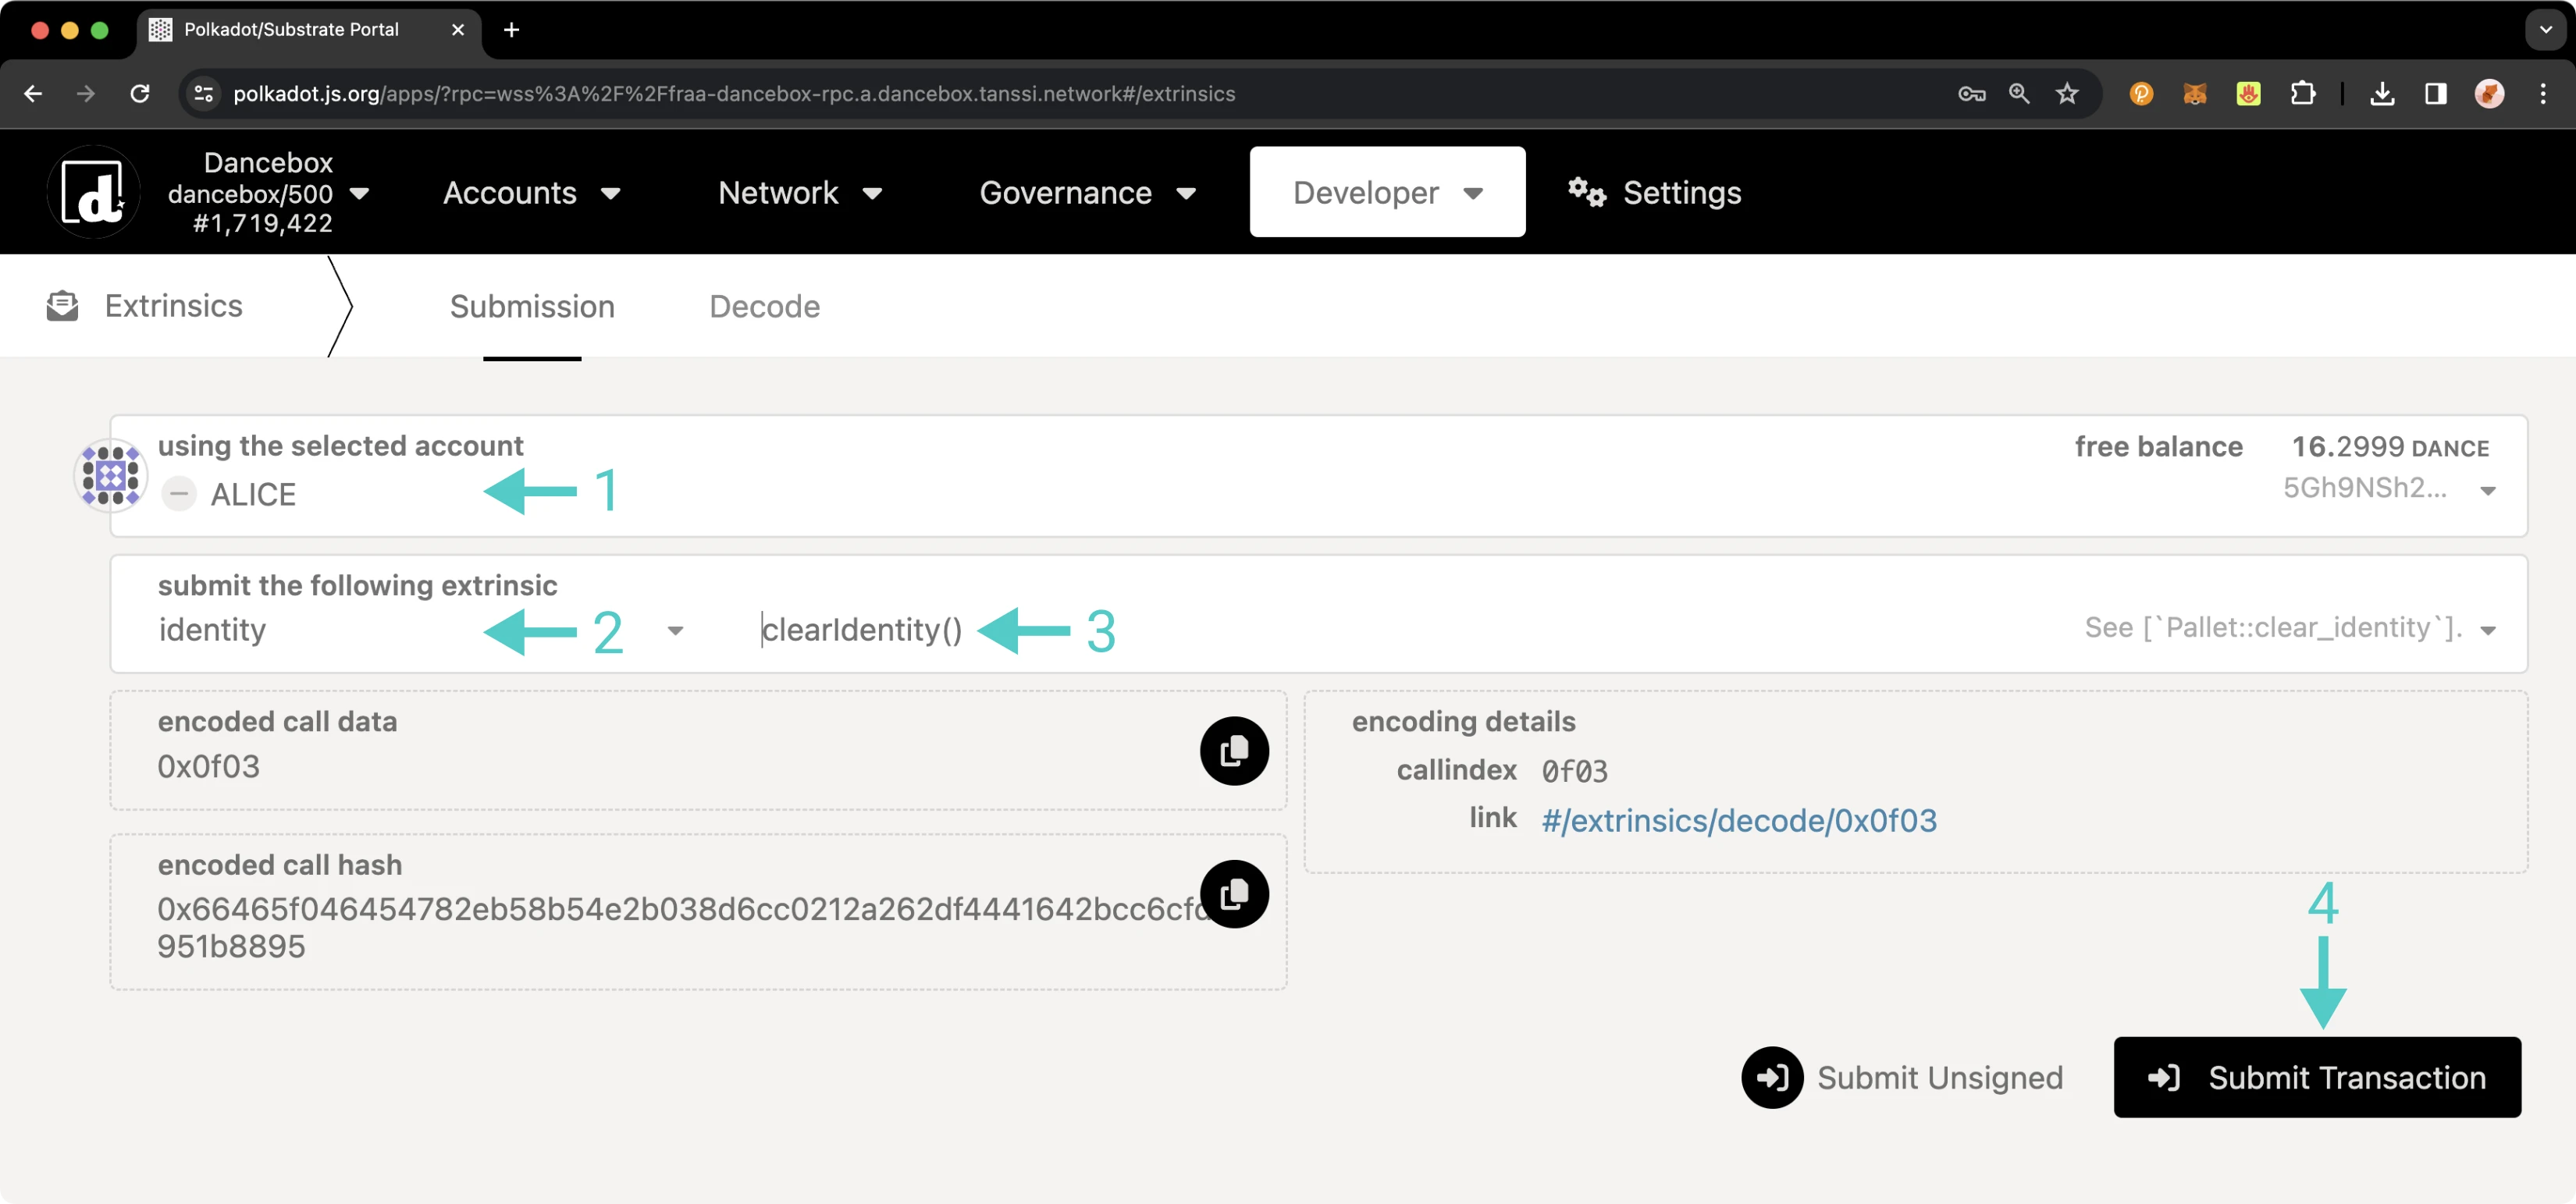
Clear an Identity
To clear your identity, take the following steps from Extrinsics tab of the developer portal:
- Select your account from the using the selected account dropdown
- Select identity from the submit the following extrinsic dropdown
- Then select the clearIdentity() function
- Click Submit Transaction
You will then be prompted to sign the transaction. If everything looks good, sign it. You should see status notifications in the top right-hand corner confirming the transaction.
To confirm that your identity information has been successfully removed, revisit the steps outlined in the Confirm an Identity section. This time, instead of displaying your identity details, the response should indicate none, confirming that no identity information is currently linked to your account. Additionally, when you check your balances, you will find that the deposit initially made for setting your identity has been credited back to your transferable balance. This completes the process of clearing your identity.
| Created: February 28, 2024