Proxy Accounts
Introduction
Proxy accounts can be set up to perform a limited number of actions on behalf of primary accounts and are helpful for keeping the underlying accounts safe. Your proxy account can act as a "hot wallet" to interact with the network on behalf of your "cold wallet" account. For added safety, you can regularly rotate the proxy account.
Proxy accounts can also help you implement the principle of least privilege for access control. For example, if you have multiple team members, you can give them the minimum level of access required to carry out their duties via a specific type of proxy account.
This tutorial will walk you through configuring a proxy account on Dancelight, the Tanssi TestNet, specifically for balance transfers. Then, it will demonstrate performing a balance transfer using the newly created proxy.
Checking Prerequisites
To follow along with this tutorial, you will need to have:
- Polkadot.js Apps open and connected to Dancelight.
- Create or have two accounts accessible on the developer portal.
- At least one of the accounts will need to be funded with
STARtokens.
If you need help importing your accounts into Polkadot.js Apps, please check out the Connecting to Polkadot.js guide.
General Definitions
When setting up a proxy account, a bond for the proxy is taken out of your free balance and moved to your reserved balance. The bond is required as adding a proxy requires on-chain storage space, and it is recalculated for each proxy you add or remove. The bond is returned to your free balance after all proxies are removed from your account.
The deposit is calculated based on a deposit base and a deposit factor:
- Deposit base - the amount to be reserved for an account to have a proxy list.
- Deposit factor - the additional amount to be reserved for every proxy the primary account has.
The equation for calculating the deposit is:
deposit base + deposit factor * number of proxies
You can find each of the relevant variables below.
| Variable | Value |
|---|---|
| Deposit base | 0.1008 TANSSI |
| Deposit factor | 0.0033 TANSSI |
| Max proxies | 32 proxies |
| Variable | Value |
|---|---|
| Deposit base | 0.1008 STAR |
| Deposit factor | 0.0033 STAR |
| Max proxies | 32 proxies |
Proxy Types
When creating a proxy account, you must choose a type of proxy that will define how the proxy can be used. The available options are:
Any- allows the proxy account to use any function supported by the proxy pallet. There is no filtering of calls.NonTransfer- this type of proxy account is allowed to submit any type of transaction with the exception of balance transfers.Balances- allows the proxy account to only make transactions related to sending funds.Governance- allows the proxy account to only make transactions related to the governance pallet, such as voting or creating democracy proposals. Note, governance is not yet enabled on Tanssi. You can create governance proxy accounts but they will not be able to take any actions until governance is enabled.Registrar- allows the proxy account to only make transactions related to the registrar pallet.SudoRegistrar- allows the proxy account to only make transactions related to the registrar pallet that need to be called by Sudo.CancelProxy- allows the proxy account to reject and remove any announced proxy calls.Staking- allows the proxy account to perform staking-related transactions, such as sequencer andsession()functions.SessionKeyManagement- allows the proxy account to make key management related transactions included in the session pallet.
For this guide, you will be setting up a proxy account using the balances proxy type. Since this type enables the proxy to spend funds on behalf of the primary account, you should exercise caution and only provide access to accounts you trust. The proxy will have access to transfer all of the funds within the primary account, and if not trusted, the proxy could drain the primary account. Ensure that you maintain oversight of your proxy accounts and remove any proxies that are no longer needed.
Creating a Proxy Account
There are a couple of ways you can create proxy accounts in Polkadot.js Apps, either from the Extrinsics page or the Accounts page. However, to create a time-delayed proxy, you will need to use the Extrinsics page. A time delay provides an additional layer of security to proxies by specifying a delay period based on the number of blocks. This will prevent the proxy account from executing a transaction until the delay period ends. The delay allows time for the primary account that controls the proxy to review pending transactions, potentially for malicious actions, and cancel if necessary before execution.
The following demo will showcase configuring a Balances proxy, which allows for transferring funds, making it perfect for demonstration purposes. After configuring your Balances proxy you can try transferring funds from the primary account via proxy.
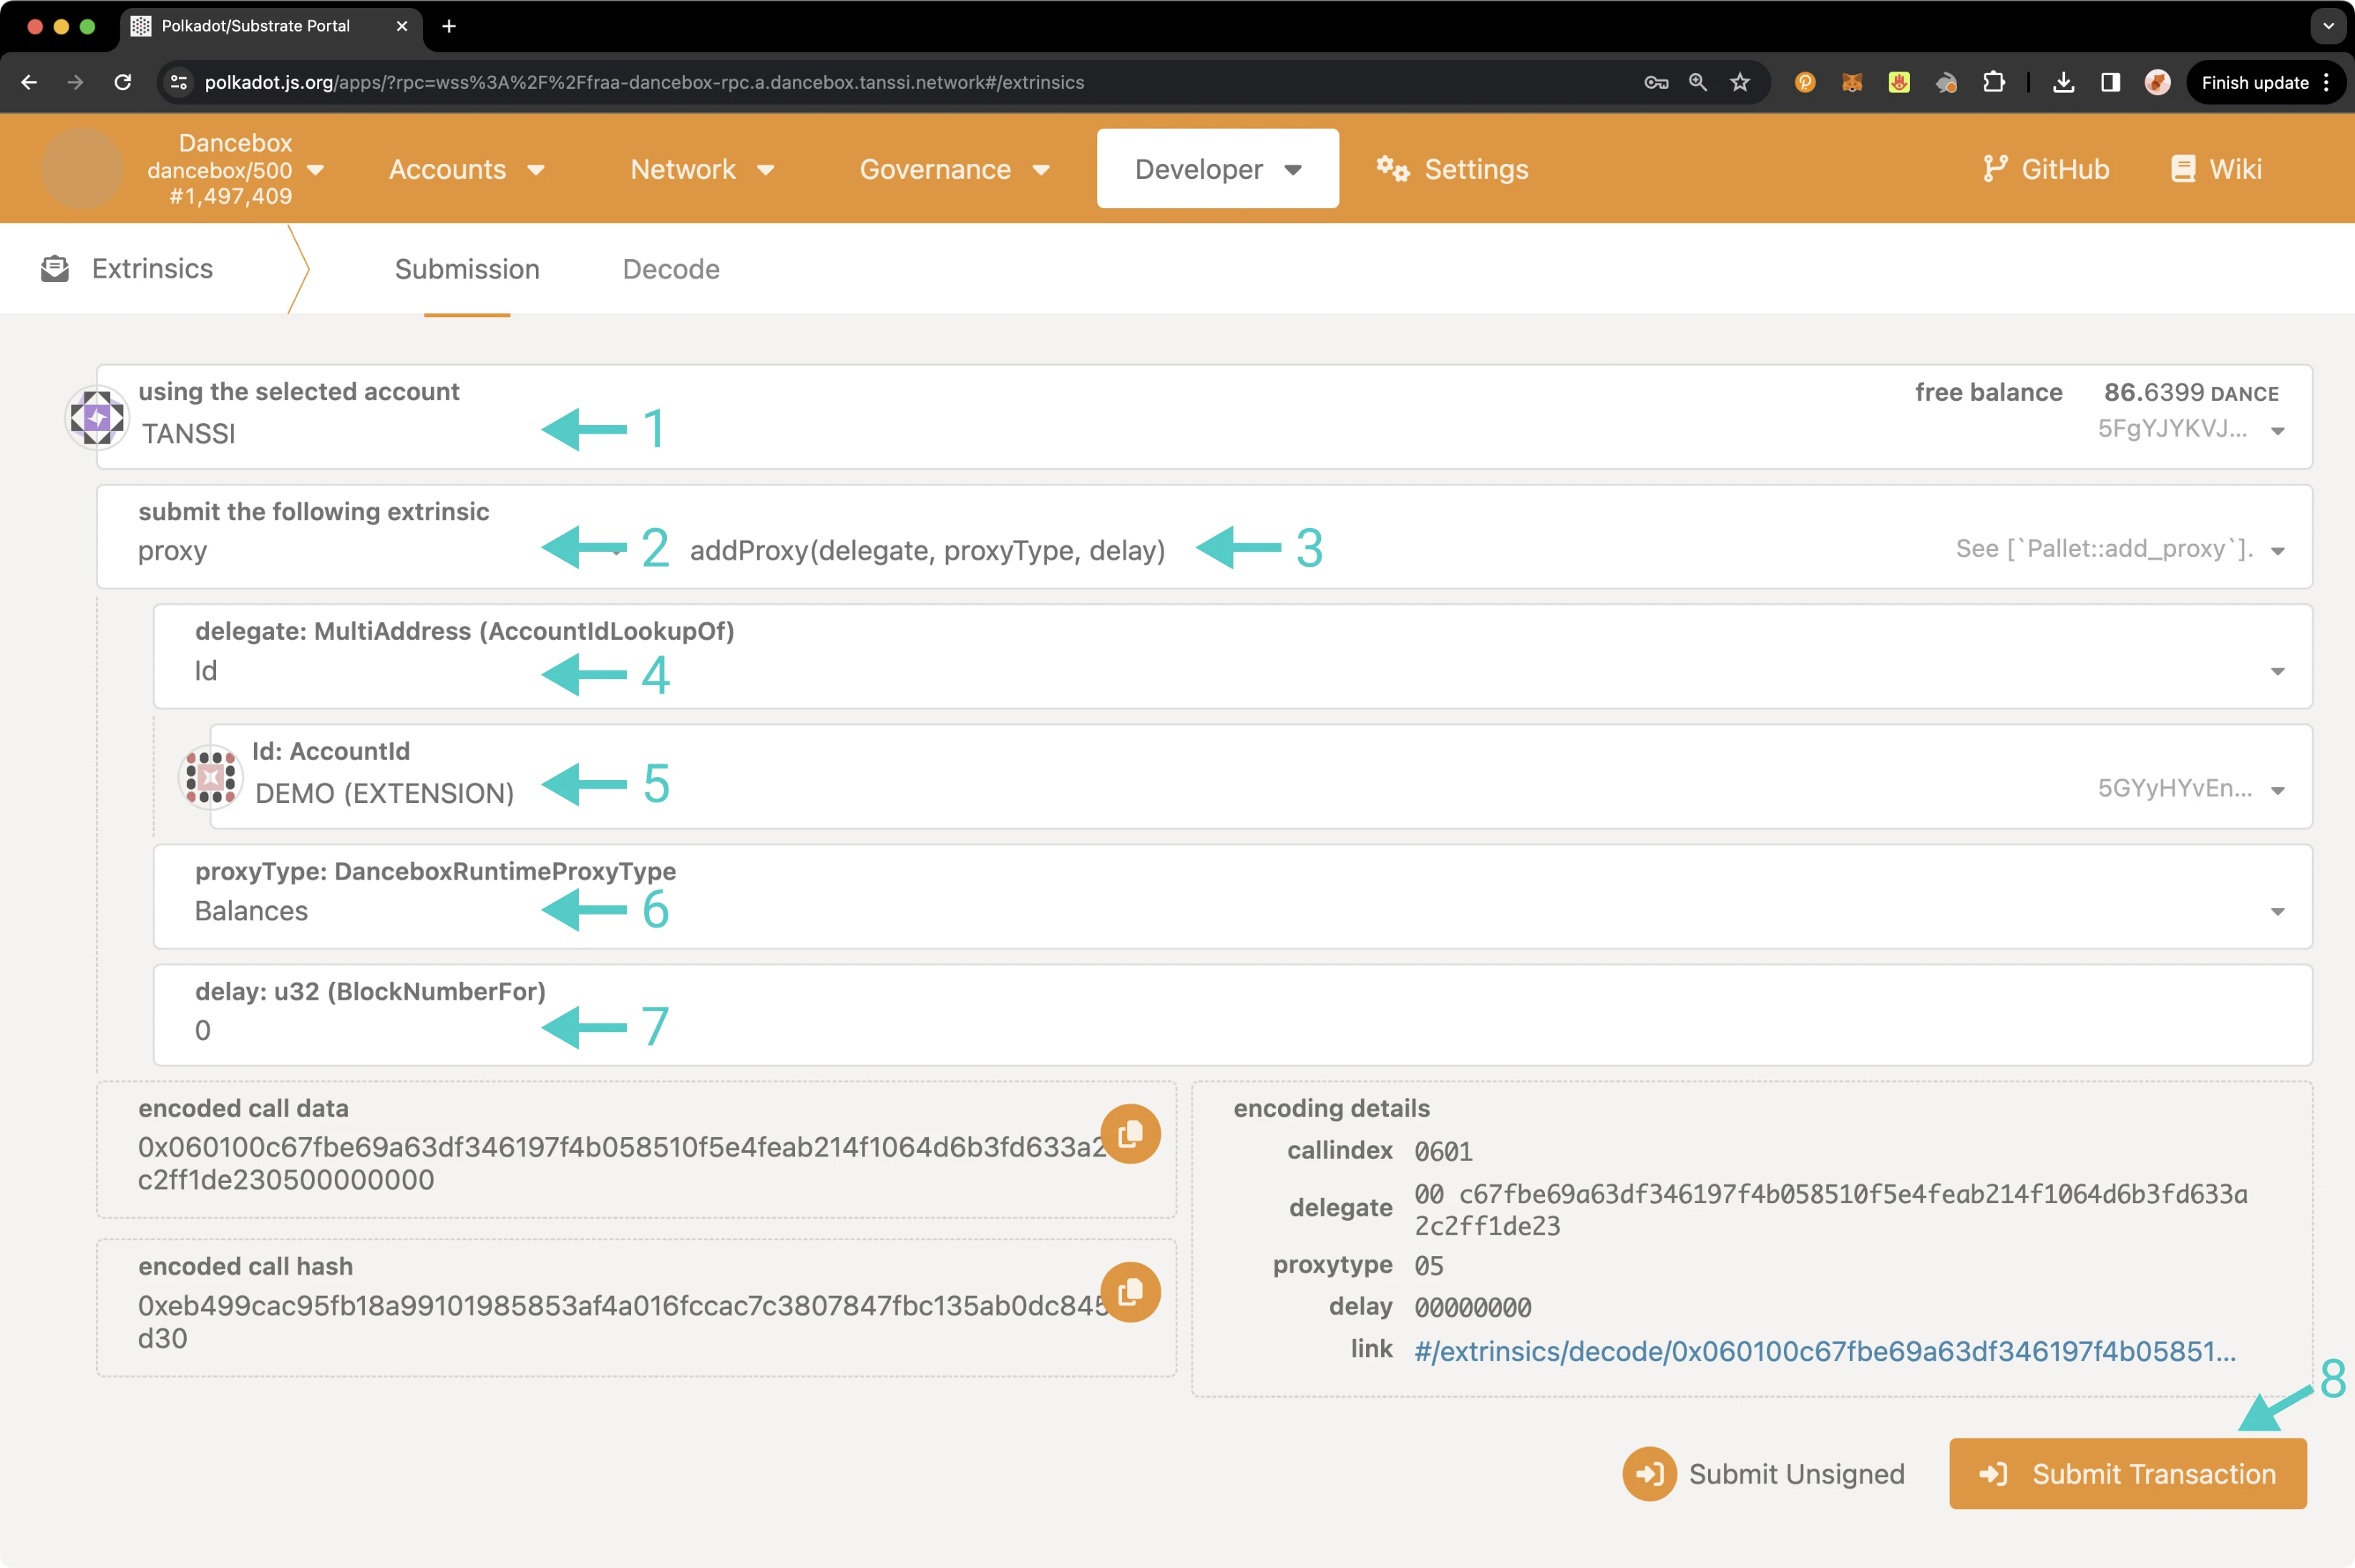
To get started creating your proxy account, head to the Developer tab and select Extrinsics from the dropdown. Next, you will need to take the following steps:
- Select the primary account.
- From the submit the following extrinsic dropdown, select proxy.
- Choose the addProxy extrinsic.
- Choose Id from the AccountIdLookupOf dropdown.
- Select the delegate account for the proxy.
- From the proxyType dropdown, choose Balances.
- Optionally, you can add a time delay using a specified number of blocks to add an additional layer of security for the primary account to review the pending transaction.
- Click Submit Transaction.
You will then be prompted to authorize and sign the transaction. Click Sign and Submit to create the proxy relationship. Once the transaction has been successfully submitted, you will receive some notifications confirming the transaction.
As previously mentioned, you can also create a proxy from the Accounts page. To do so, navigate to the Accounts page and take the following steps:
- Select the three vertical dots next to the primary account.
- Select Add proxy.
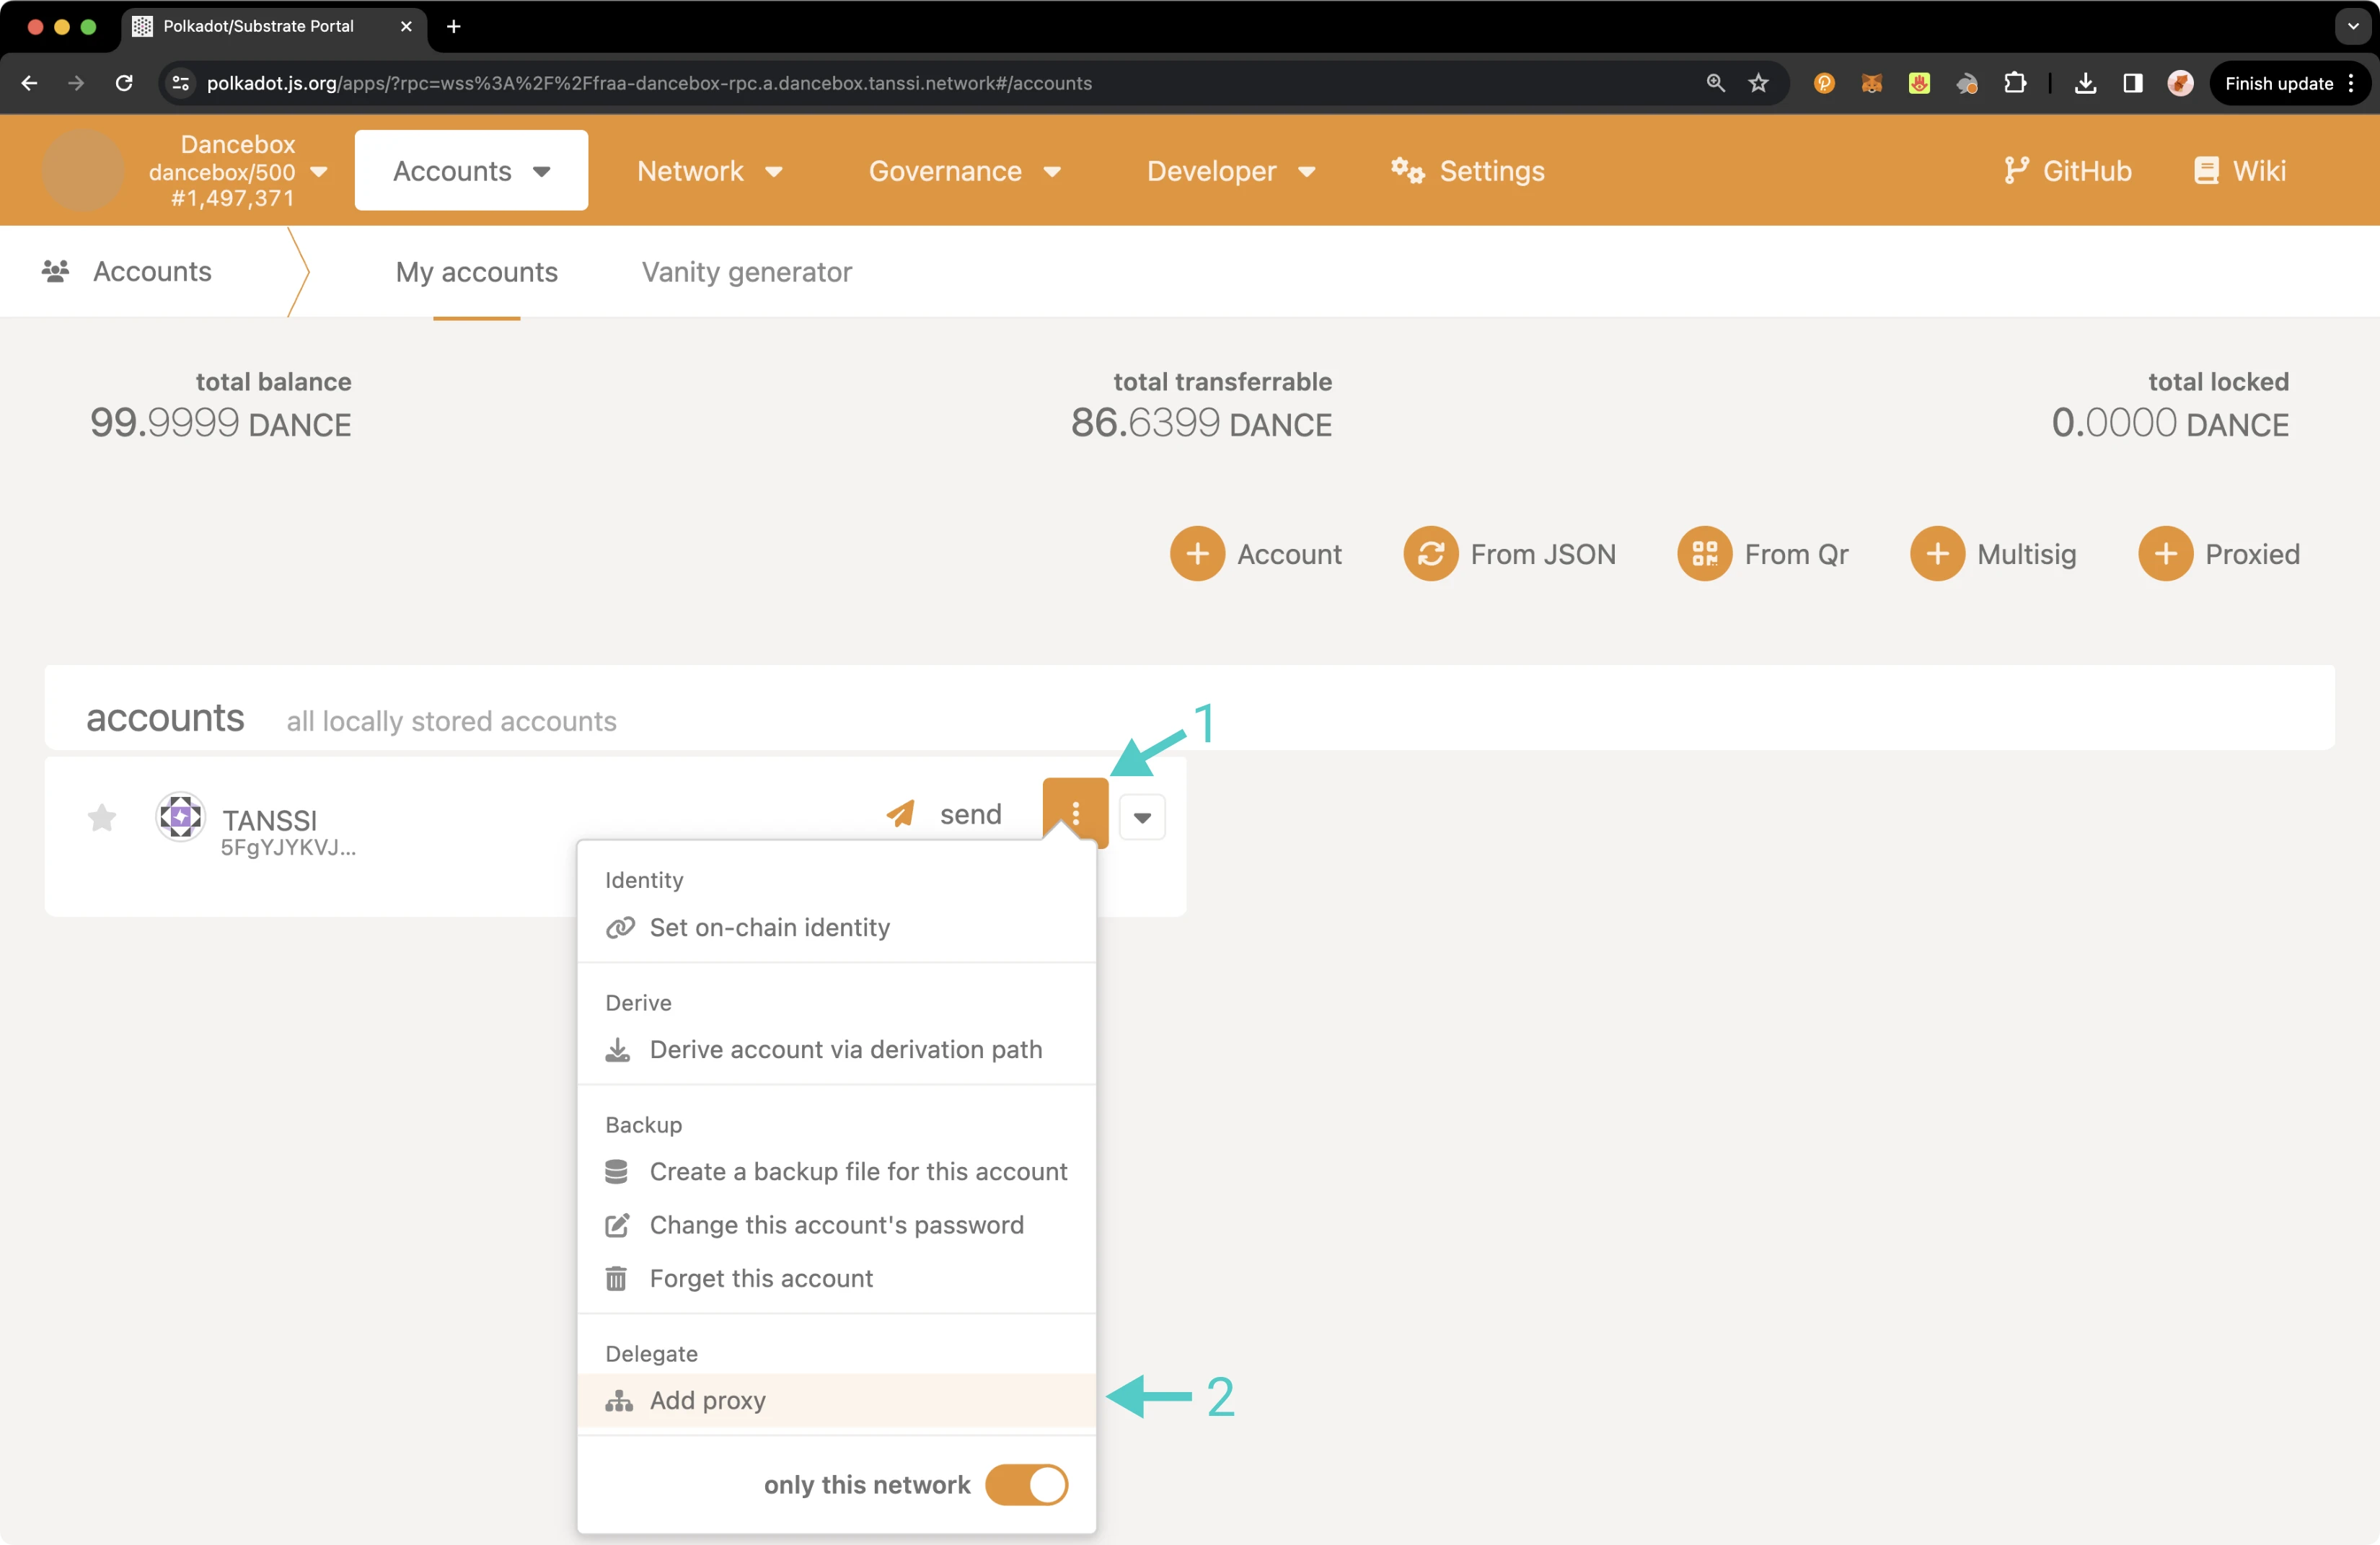
Note
If the account already has a proxy, Manage proxies will be displayed as an option instead of Add proxy.
A pop-up will appear and you can enter in the required information, such as the proxied/primary account, the proxy account, and type of proxy to create a proxy account. First click Add Proxy.
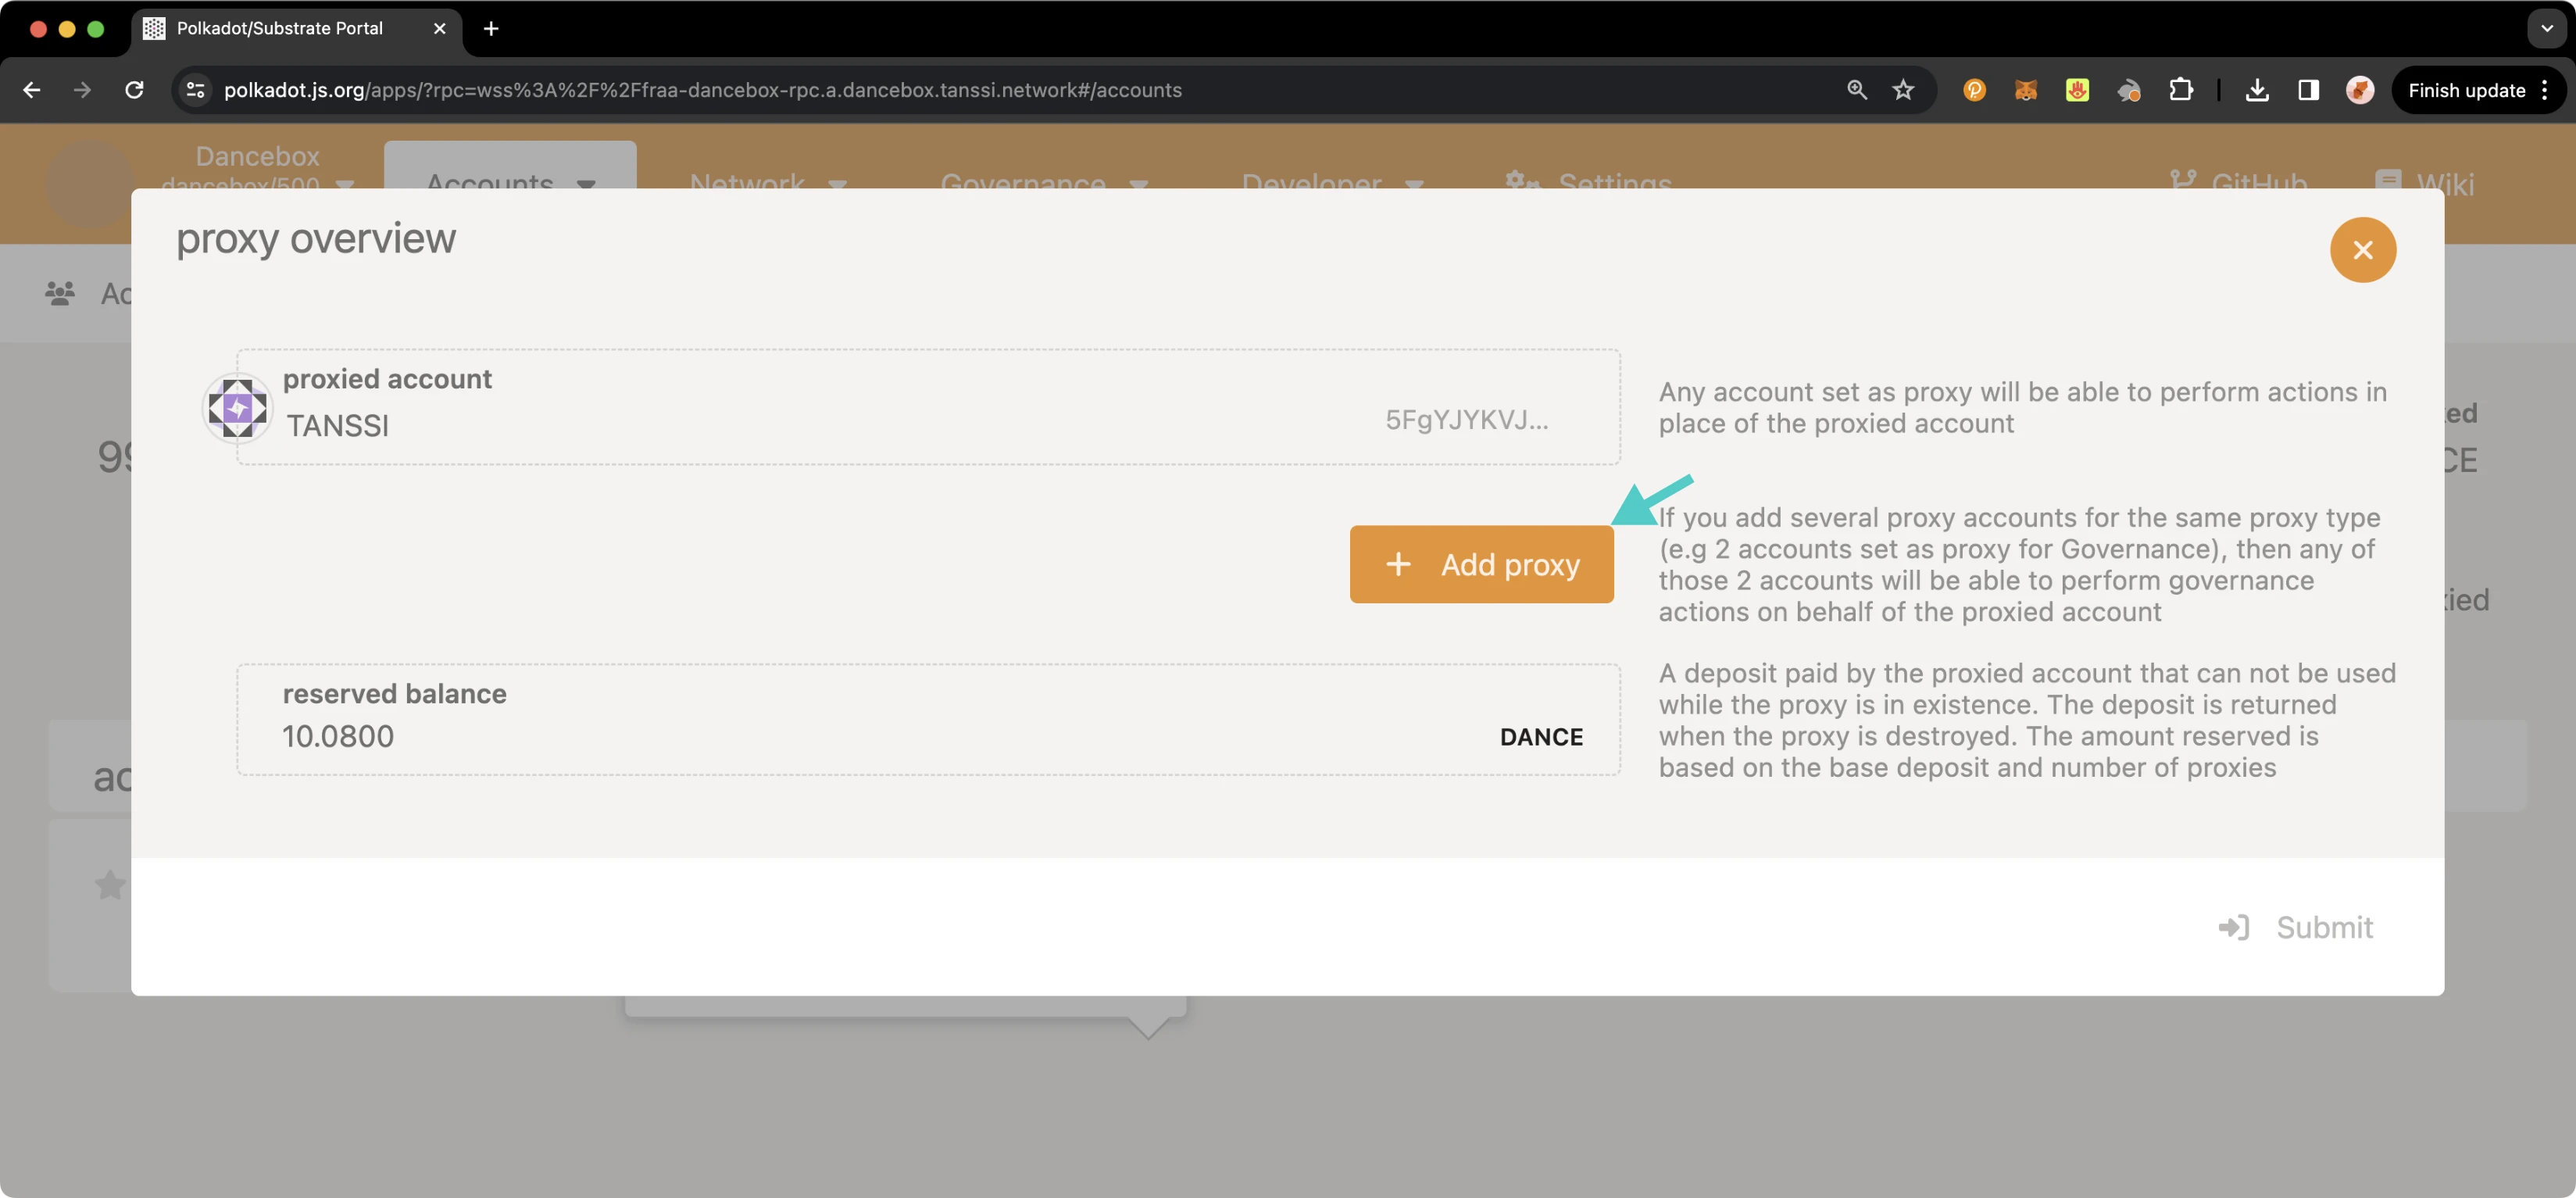
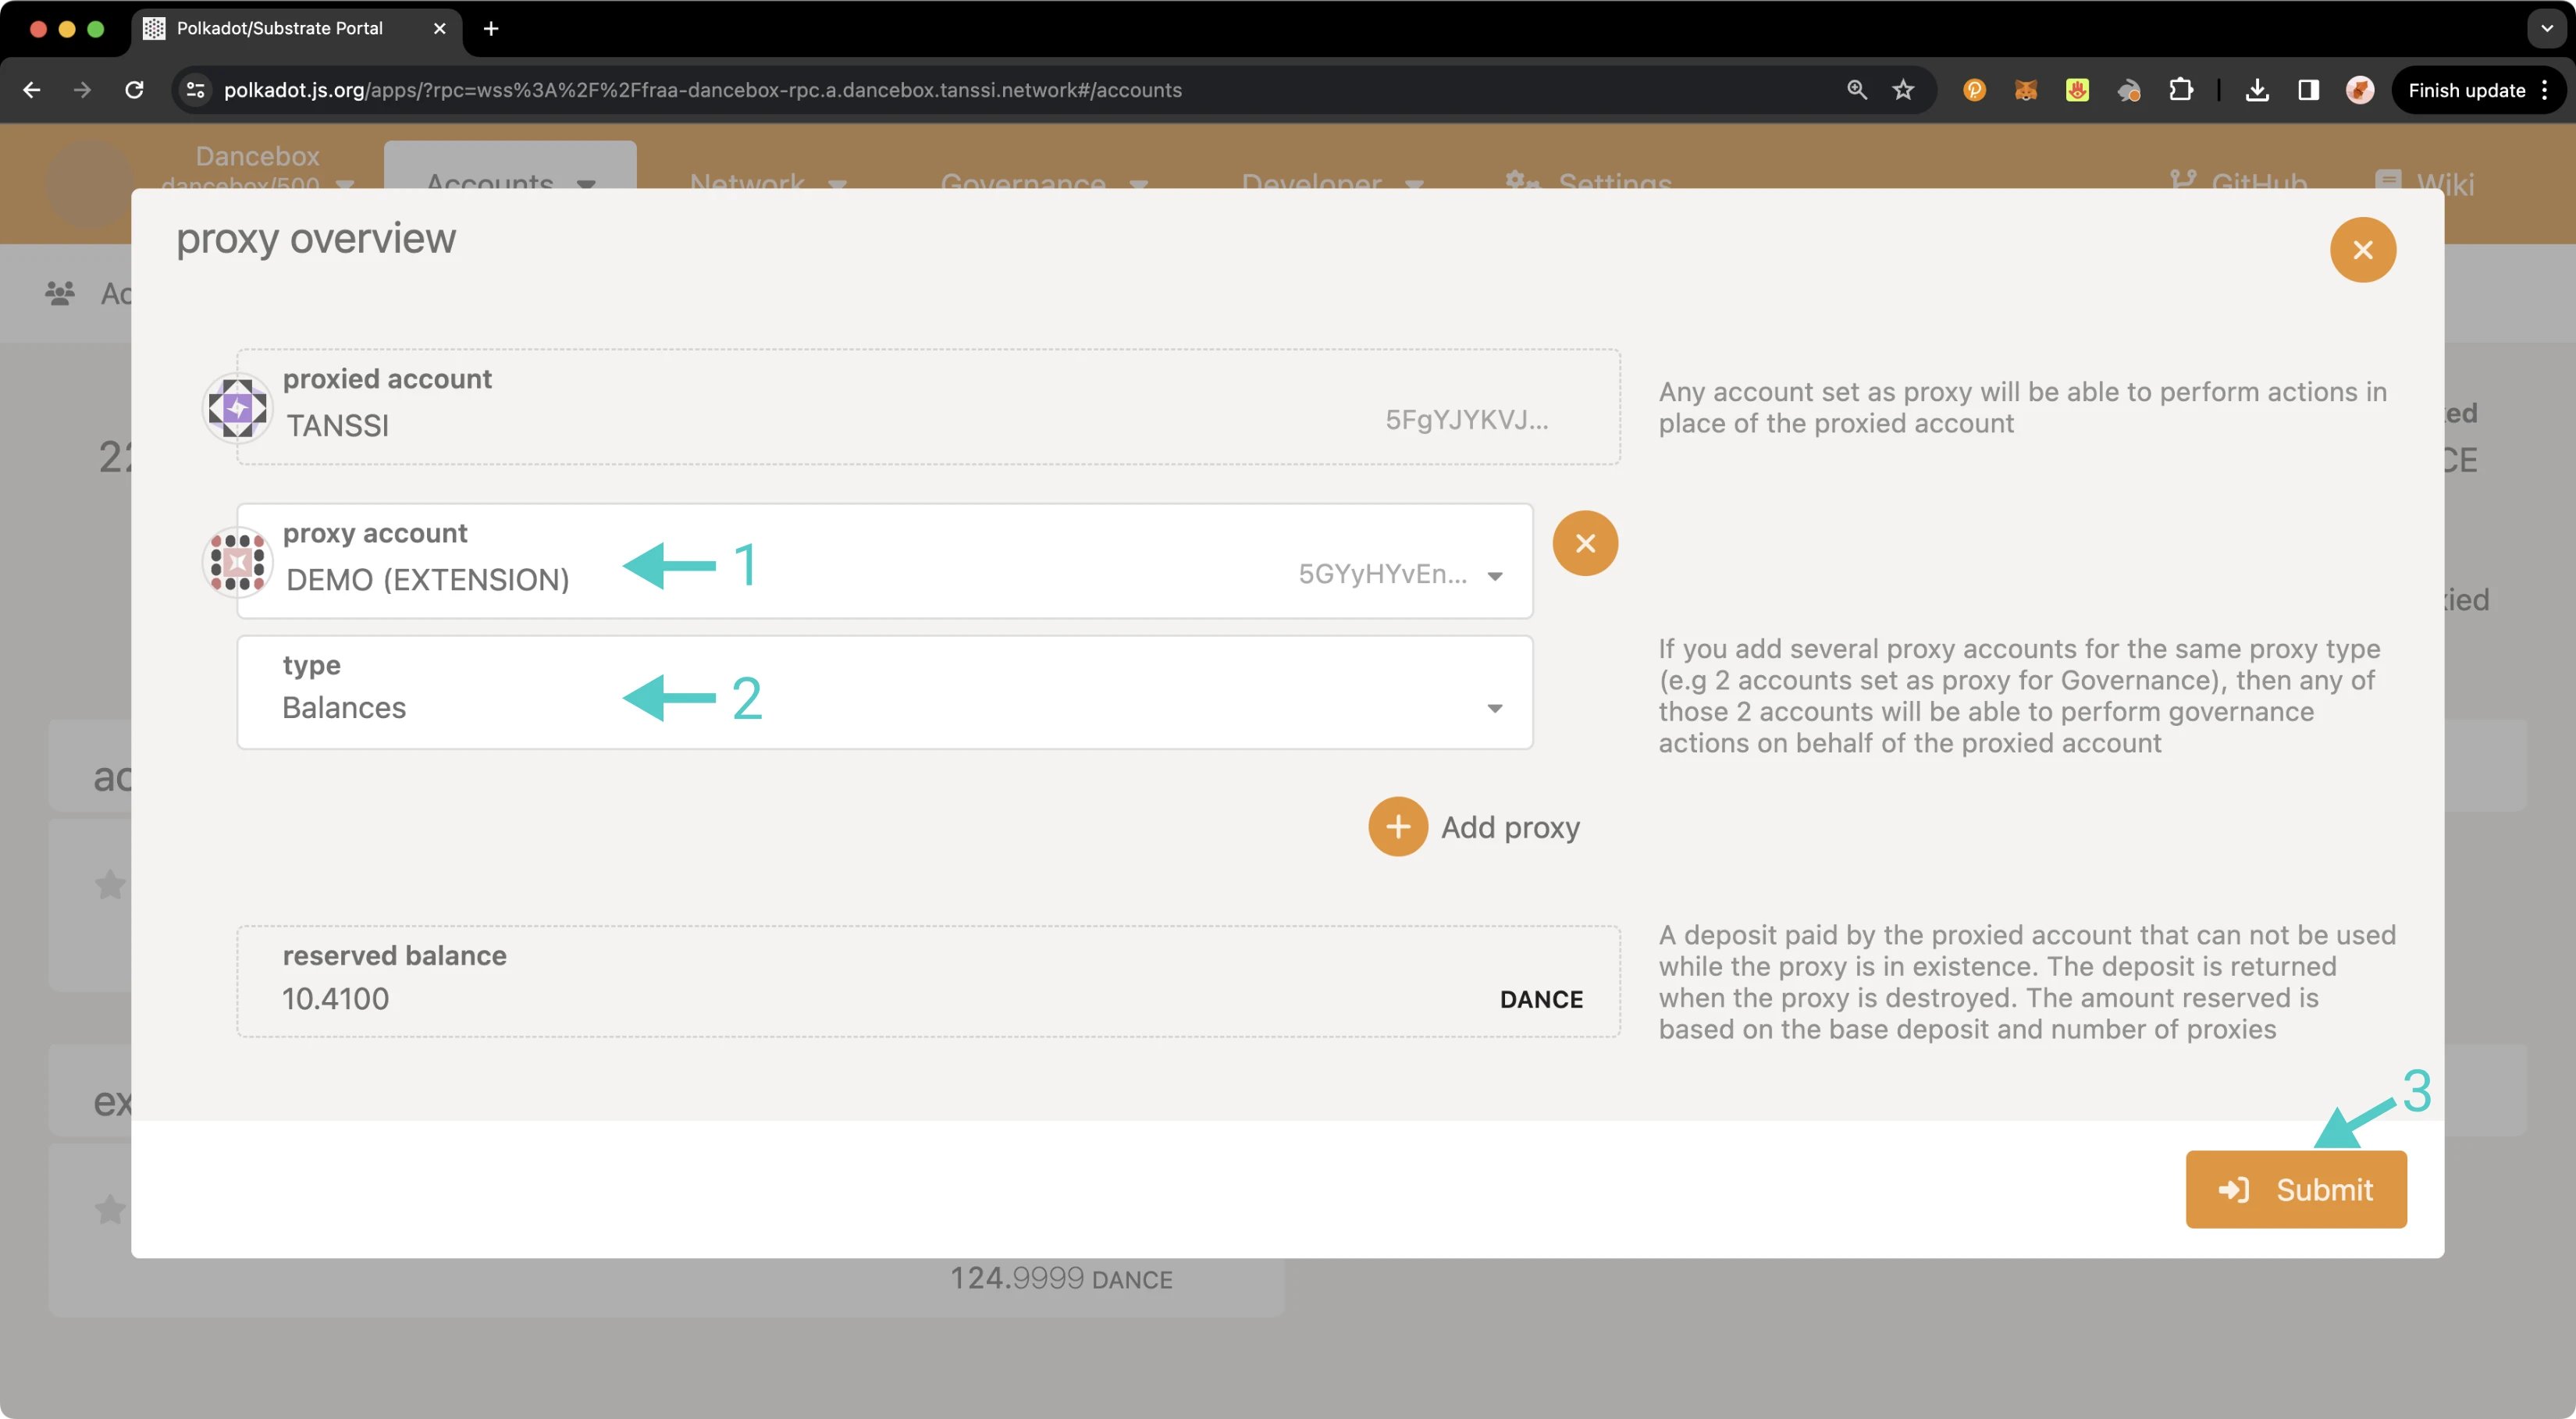
Then, take the following steps:
- Select the account you would like to set as a proxy.
- Select the proxy type.
- Click Submit and sign the transaction.
In the next section, you will learn how to verify that your proxy account was set up successfully.
Verifying Your Proxy Account
You can verify that your proxy account has been successfully set up in a couple of ways: either through the Accounts page or via the Chain state page.
To check your proxy accounts from the Chain state page, you can take the following steps:
- From the selected state query dropdown, select proxy.
- Choose the proxies extrinsic.
- Select your primary/proxied account.
- Click on the + button to send the query.
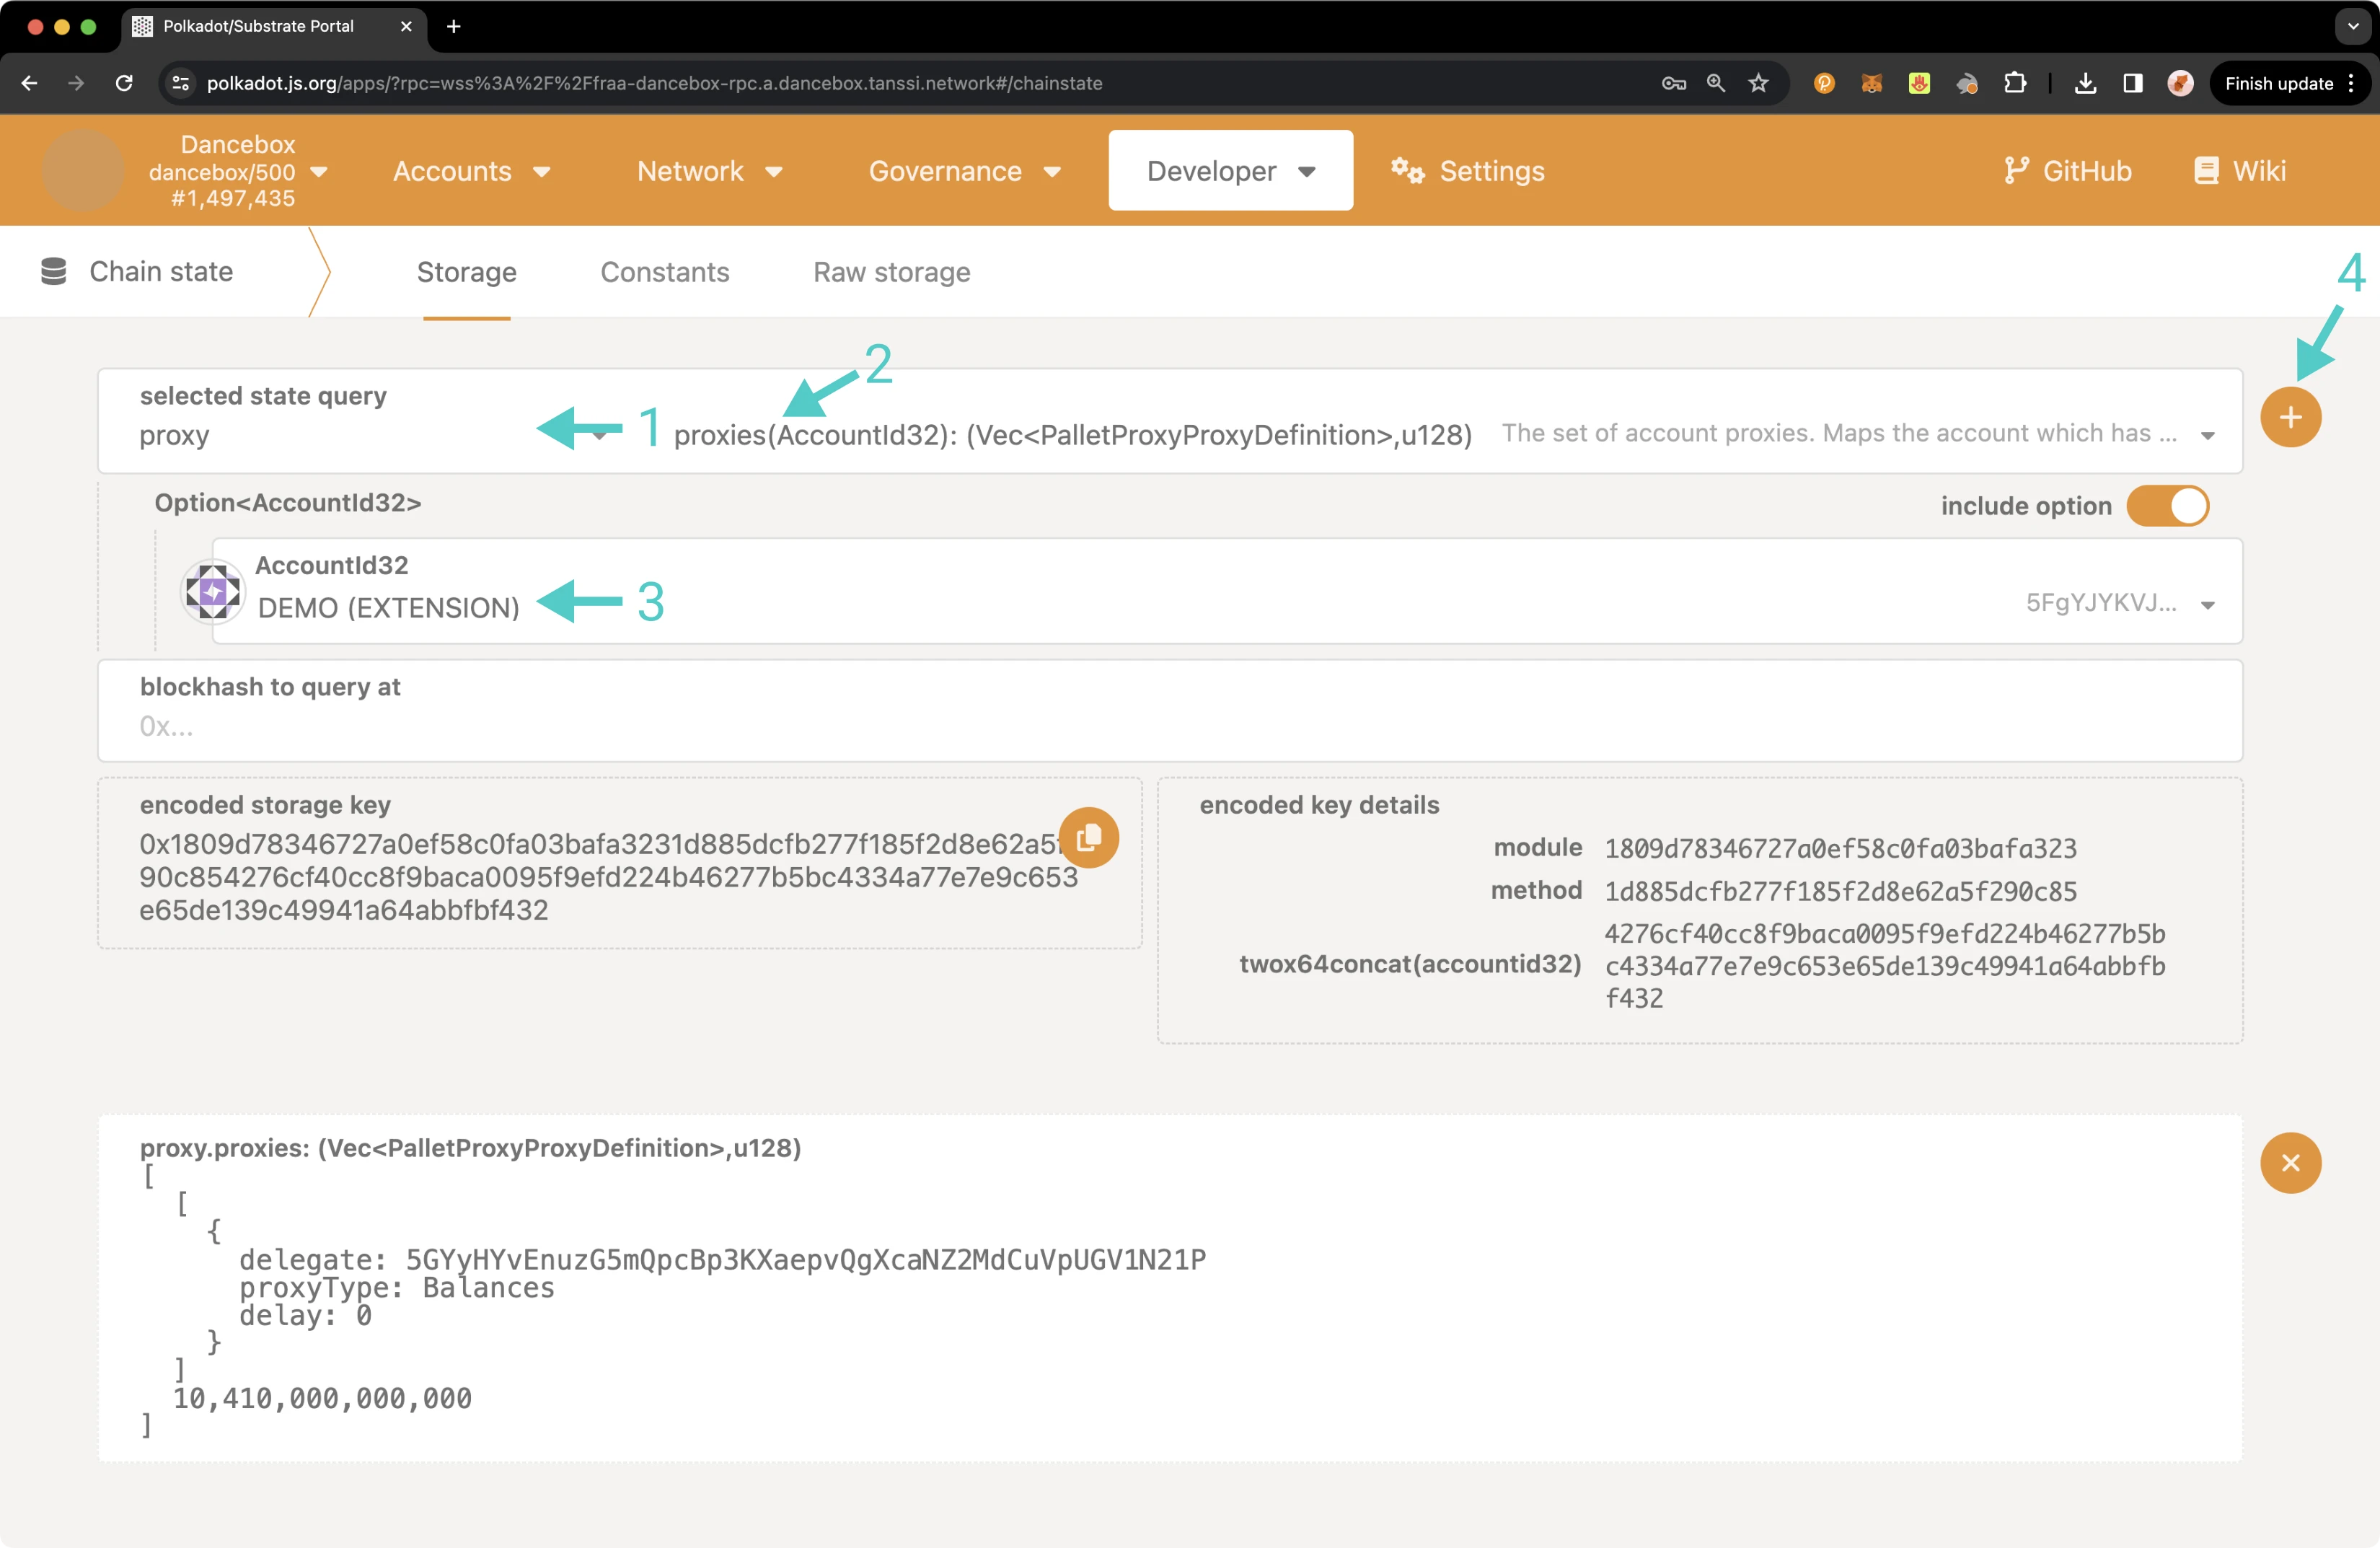
The result will appear on the page showing you information about all of your proxies, including the delegate/proxy account address, the proxy type, the delay period if one was specified, and the total bond amount for all of your proxies in Planck.
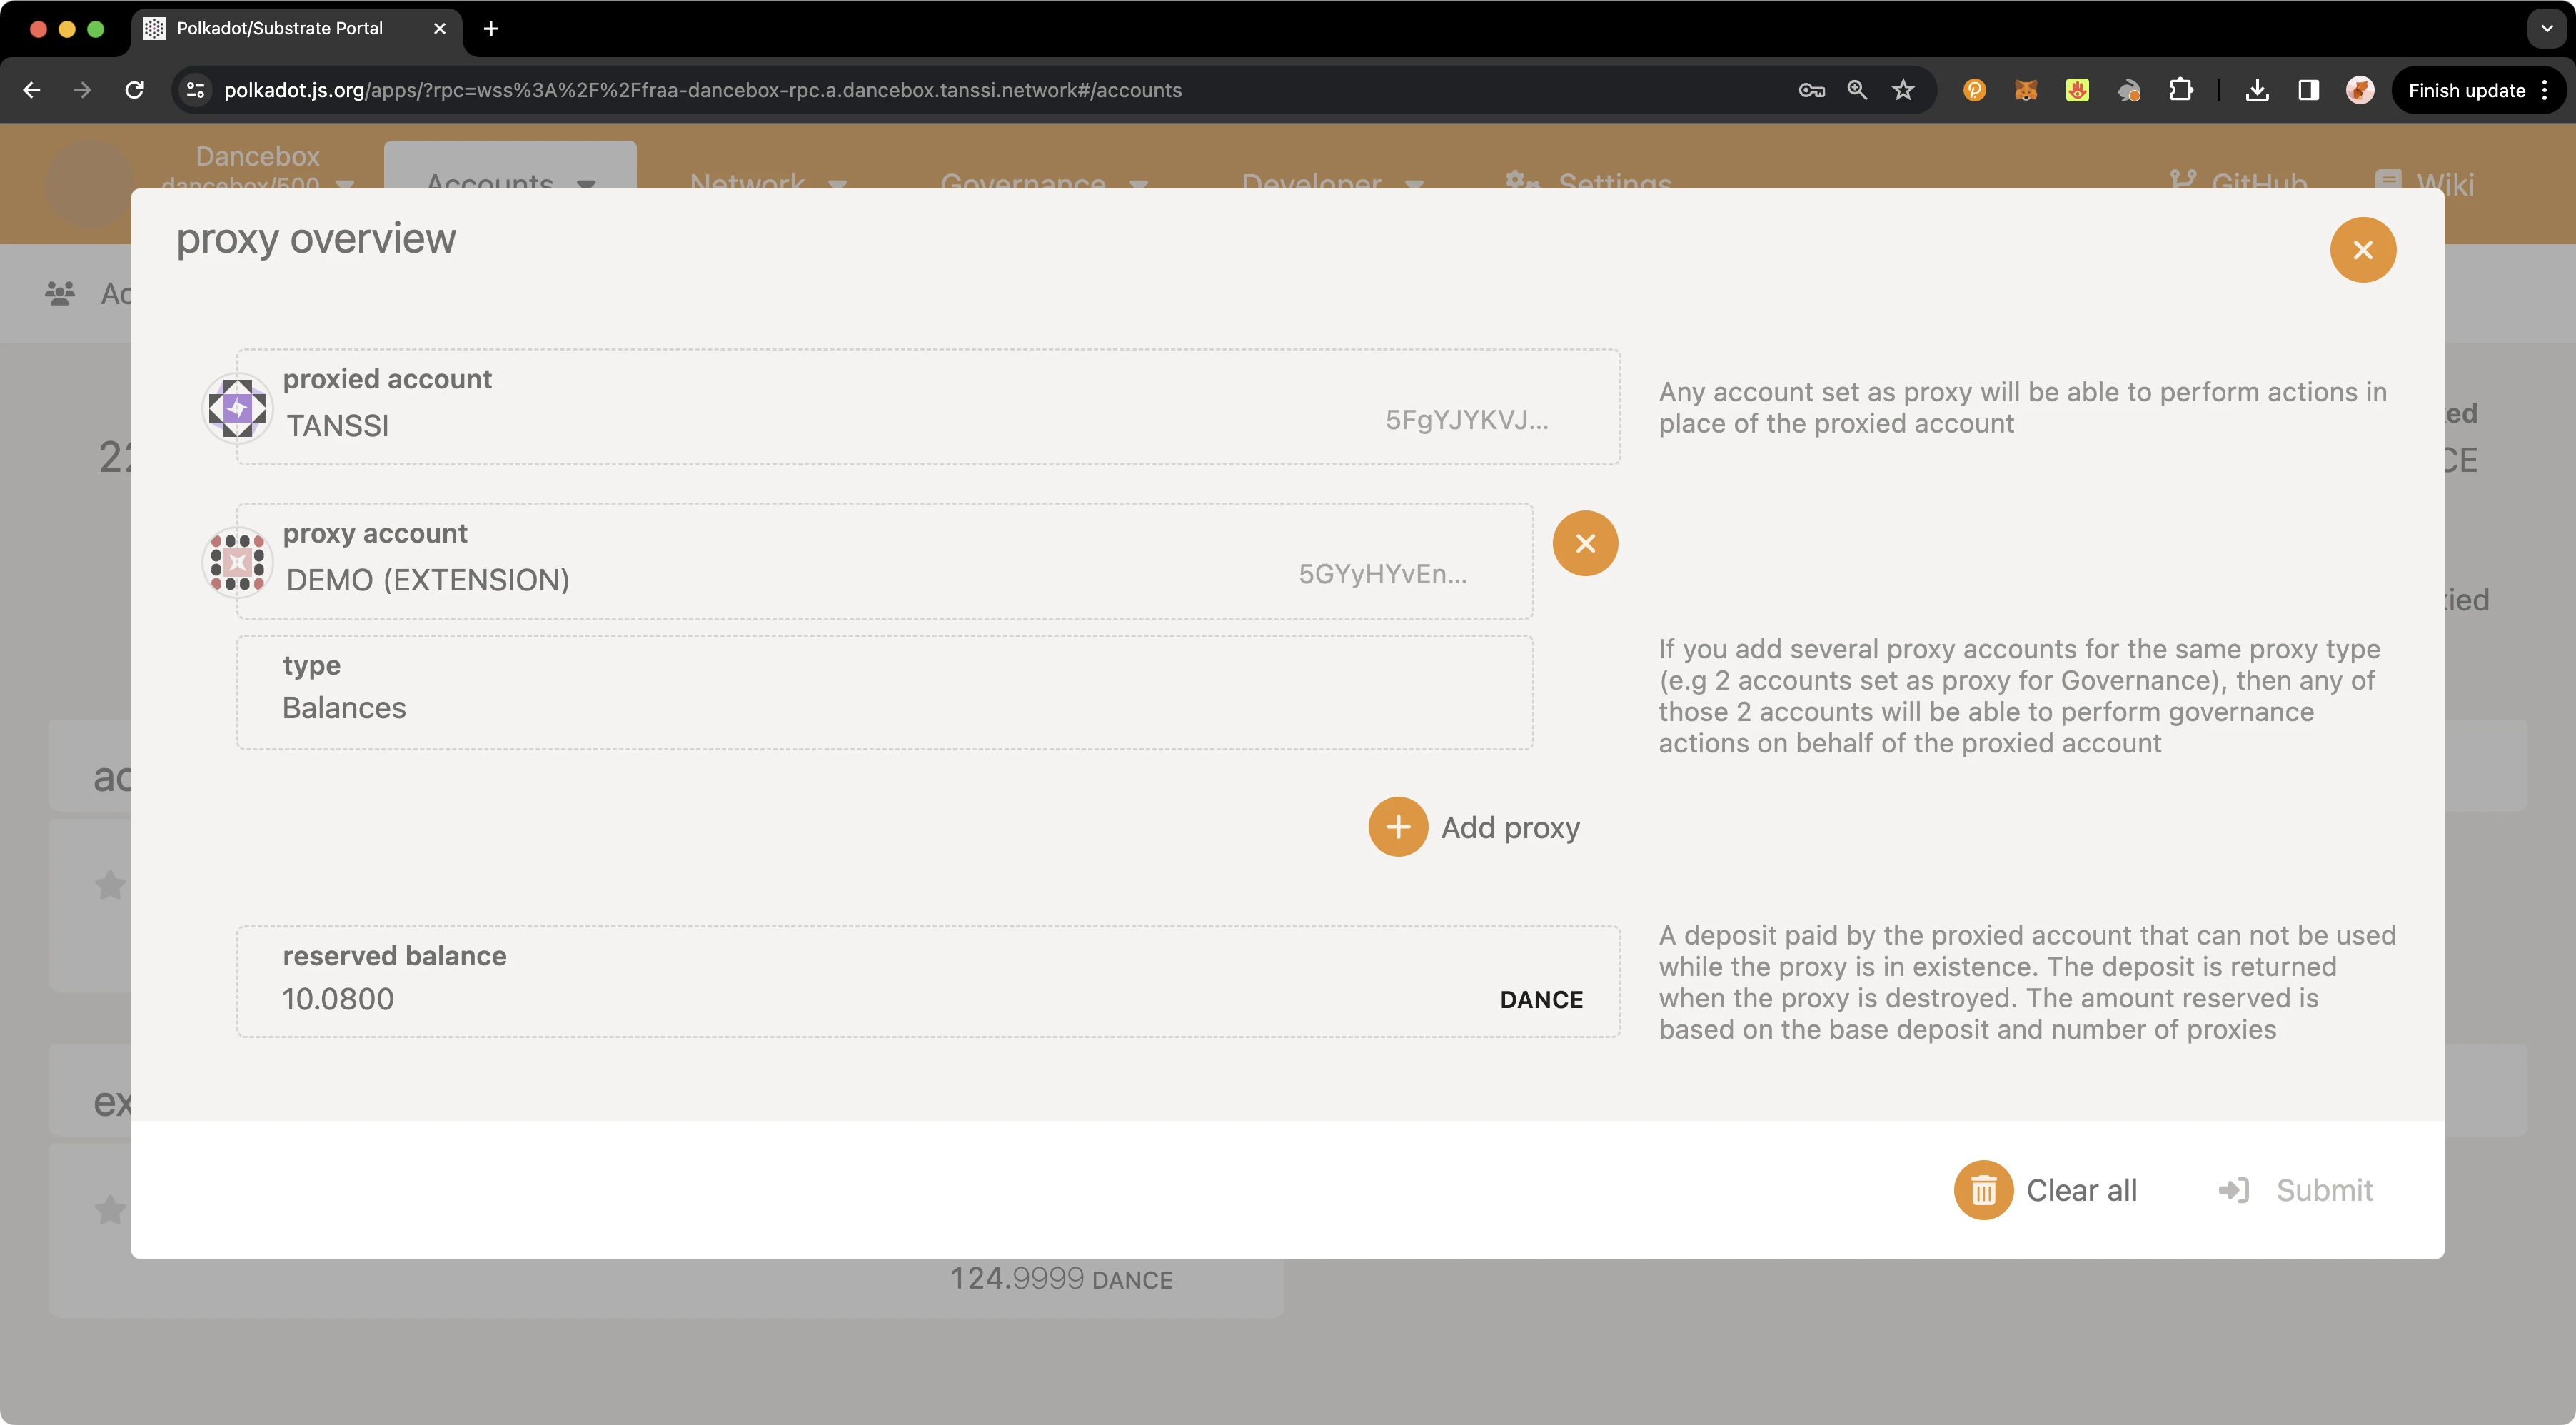
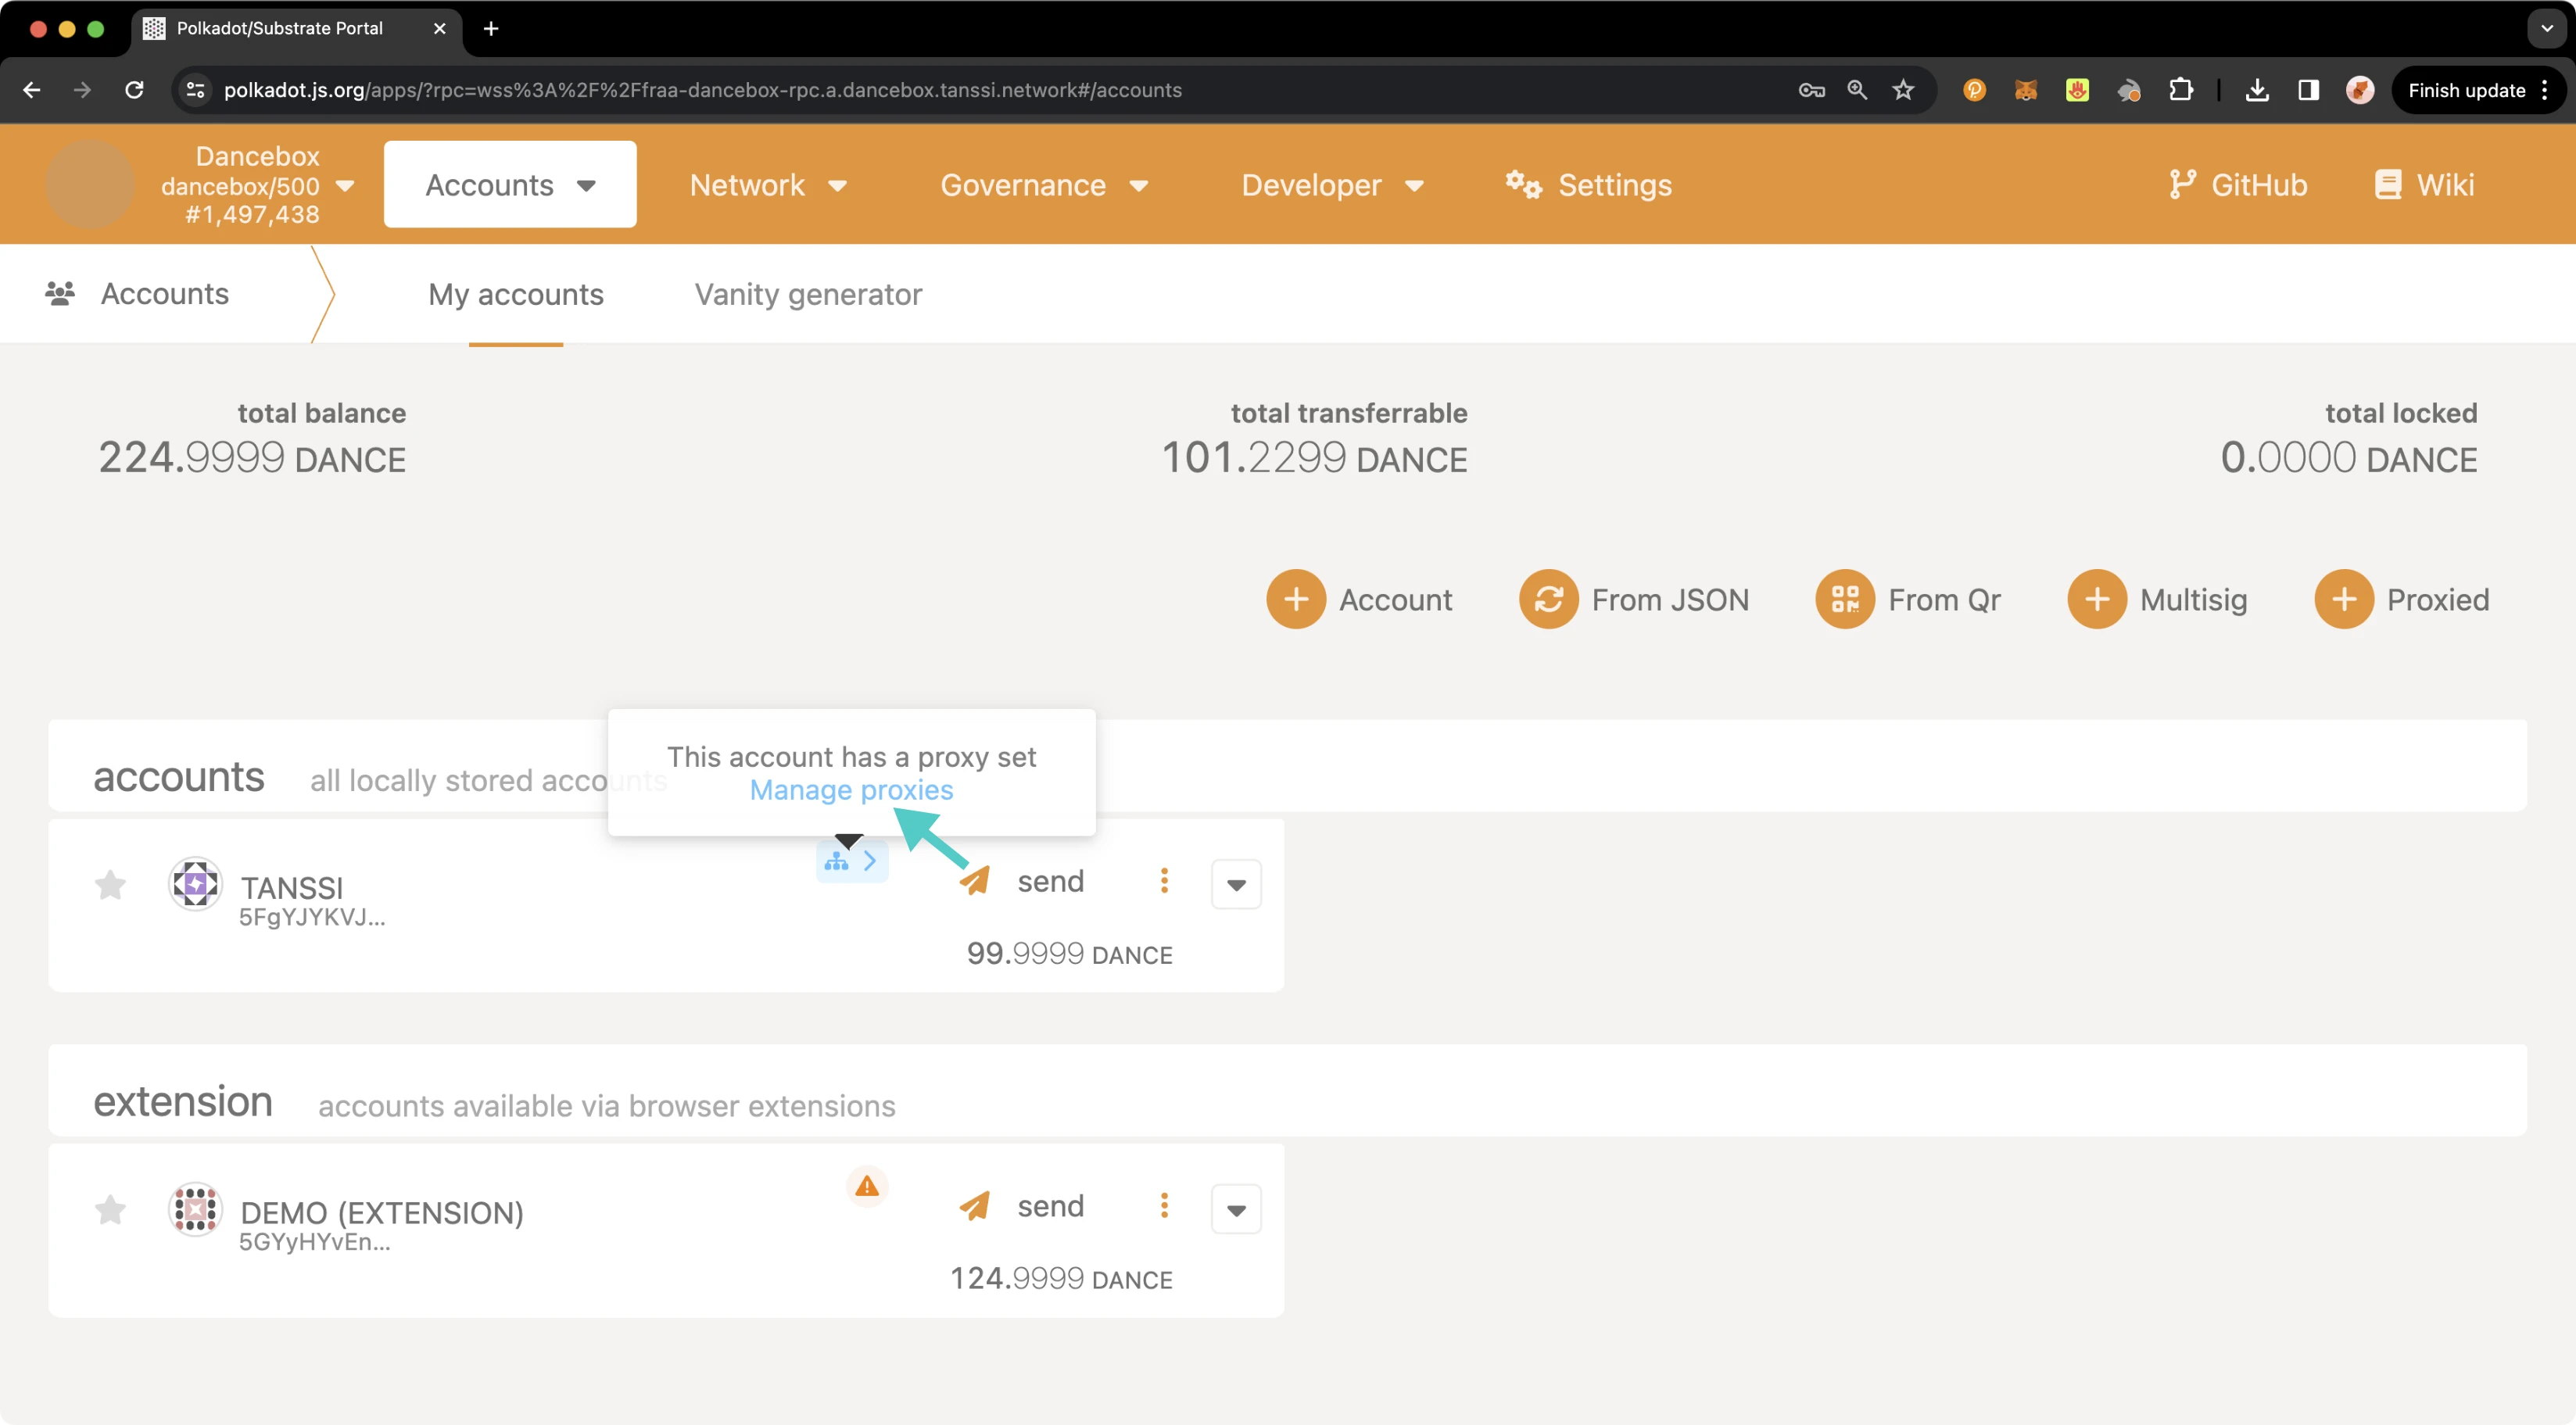
You can also check your proxy accounts from the Accounts page. To do so, navigate to the Accounts page, and there should be a Proxy symbol next to the primary account. Hover over the icon and click on Manage proxies to review your proxies.

A pop-up will appear where you can see an overview of all of your proxy accounts.
Executing a Proxy Transaction
Now that you have created a proxy account and verified that it was successfully set up, you can execute a transaction using the proxy account on behalf of the primary account.
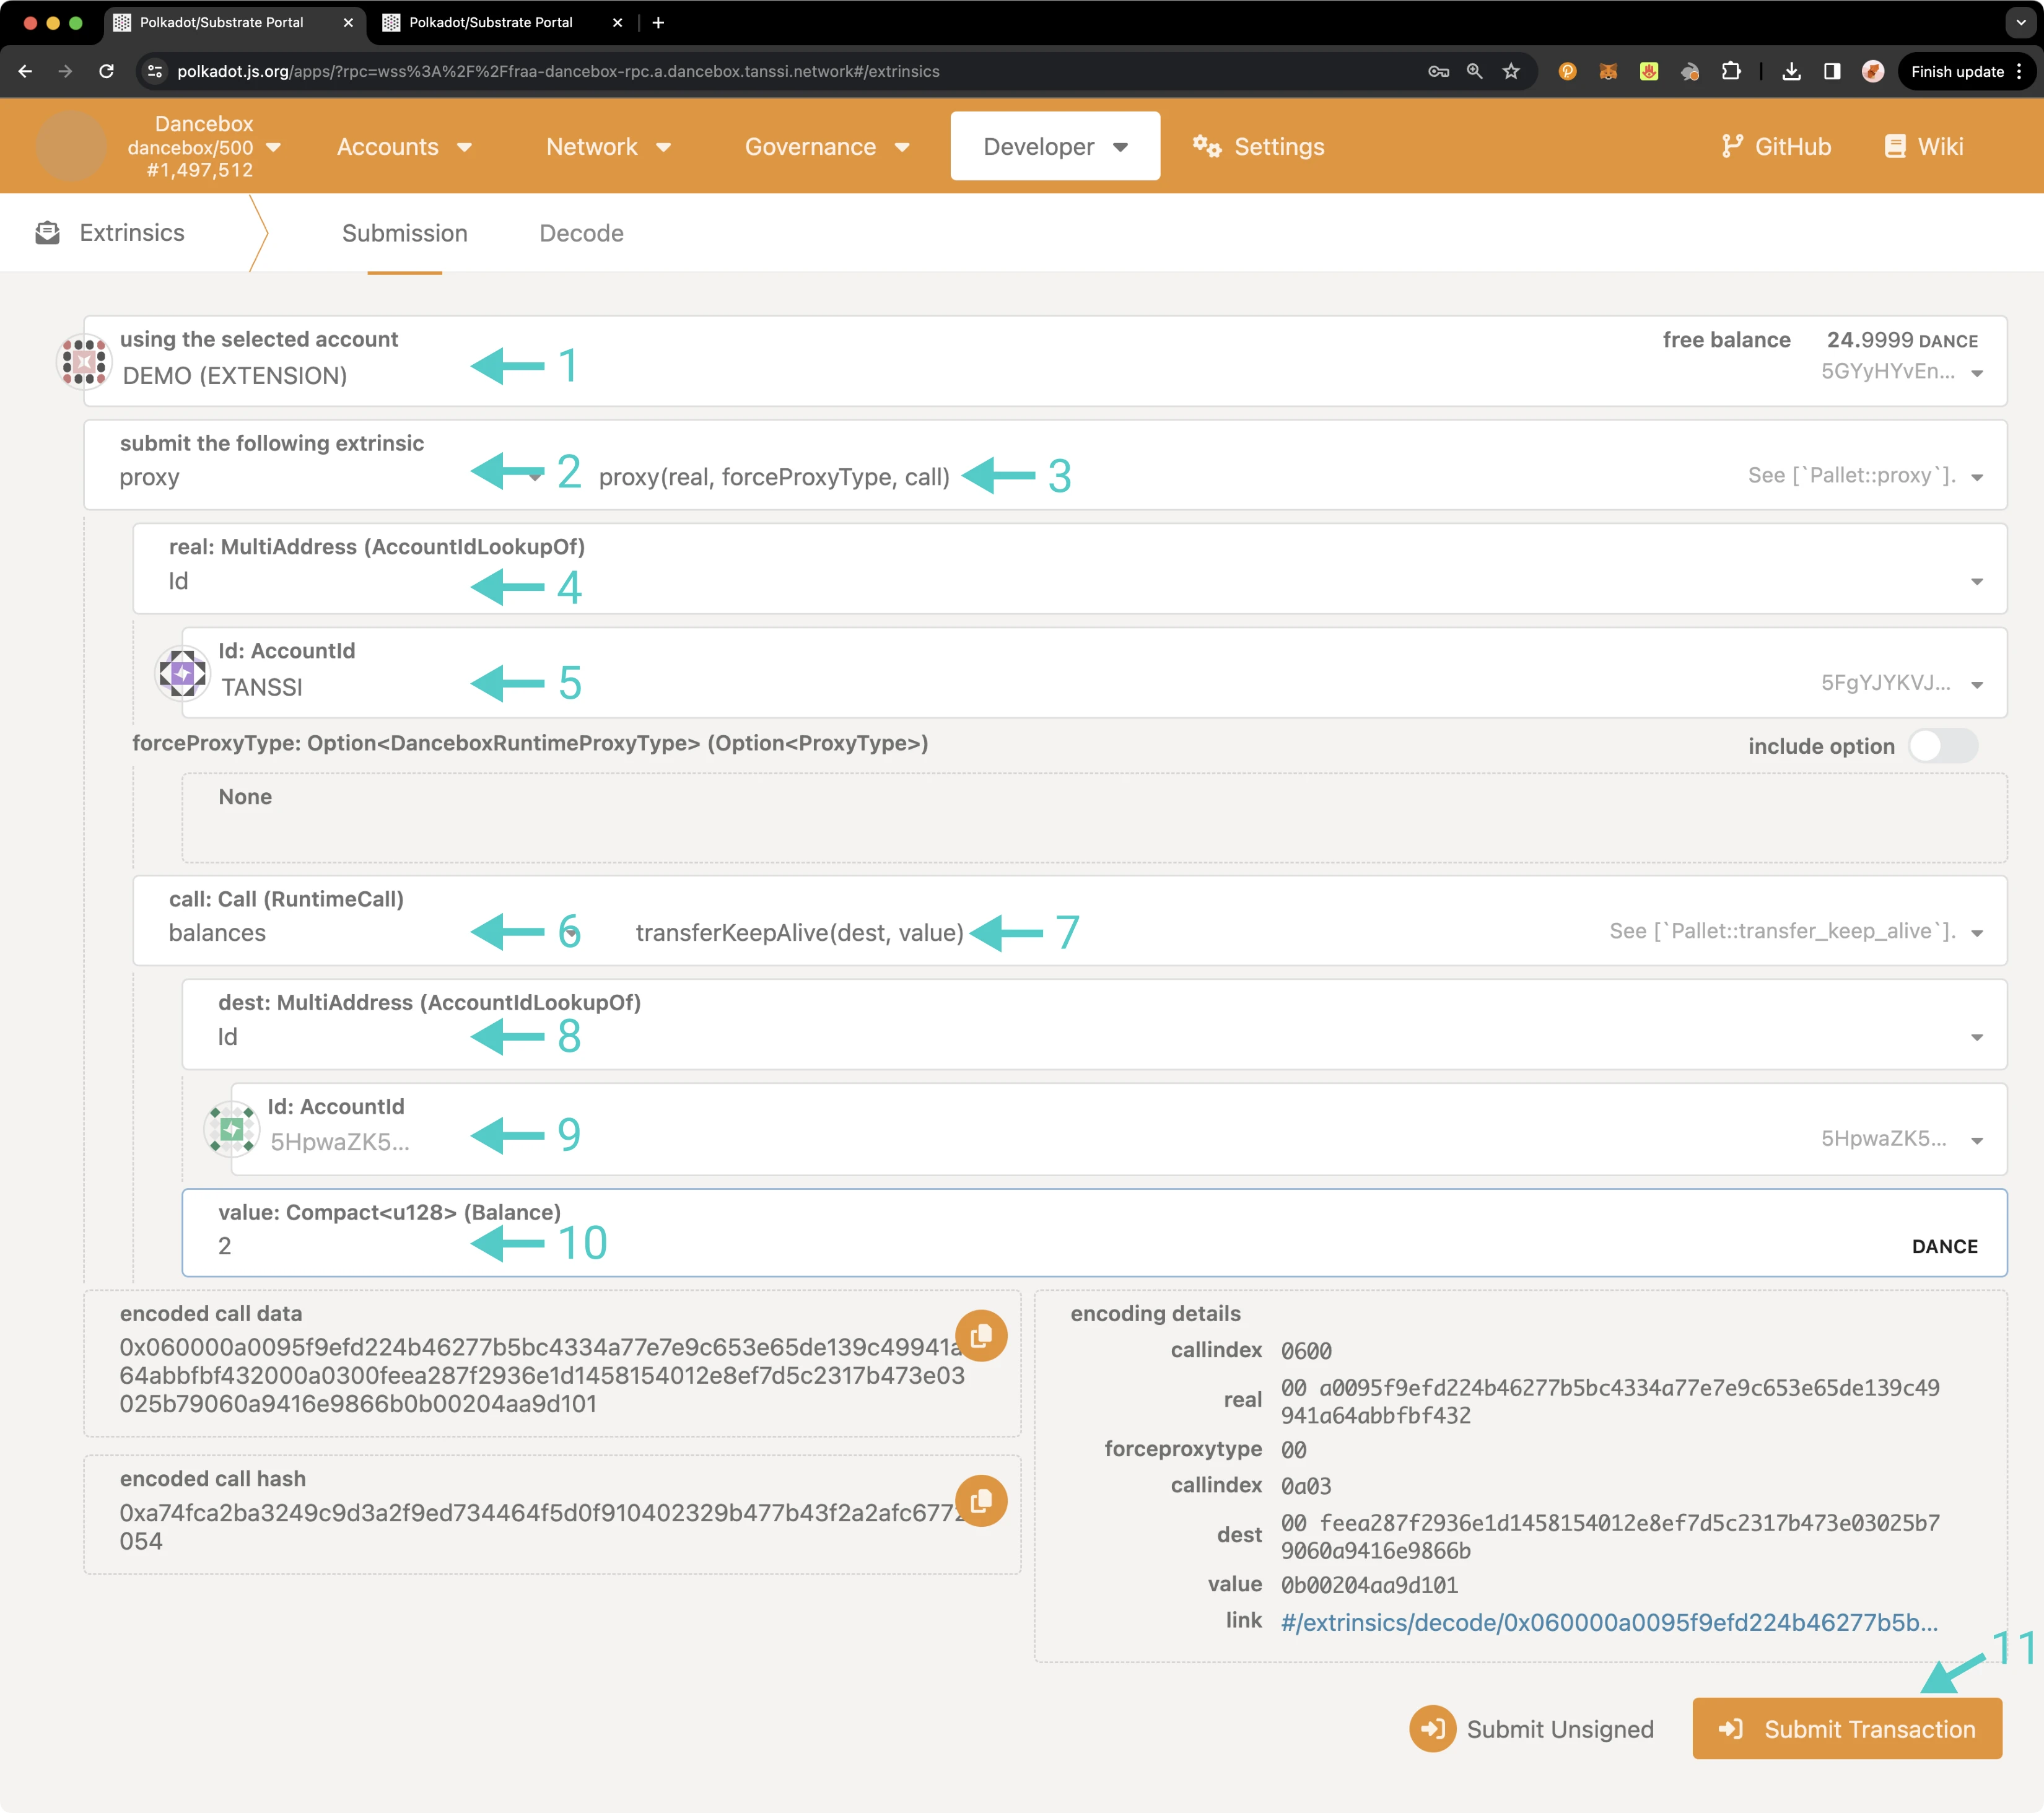
To execute a transaction, you can navigate back to the Extrinsics page and take the following steps:
- Select the proxy account to submit the transaction from the using the select account dropdown.
- From the submit the following extrinsic menu, select proxy.
- Choose the proxy extrinsic.
- Choose Id from the AccountIdLookupOf dropdown.
- Select the primary account from the real dropdown.
- Select the balances call.
- Choose the transferKeepAlive extrinsic.
- Choose Id from the AccountIdLookupOf dropdown.
- In the dest field, enter the address you would like to send funds to.
- In the value field, enter the amount of STAR tokens to send. For this example, you can send
2STAR tokens. - Click Submit Transaction.
A pop-up will appear for you to authorize and sign the transaction. Enter your password for the proxy account and click Sign and Submit.
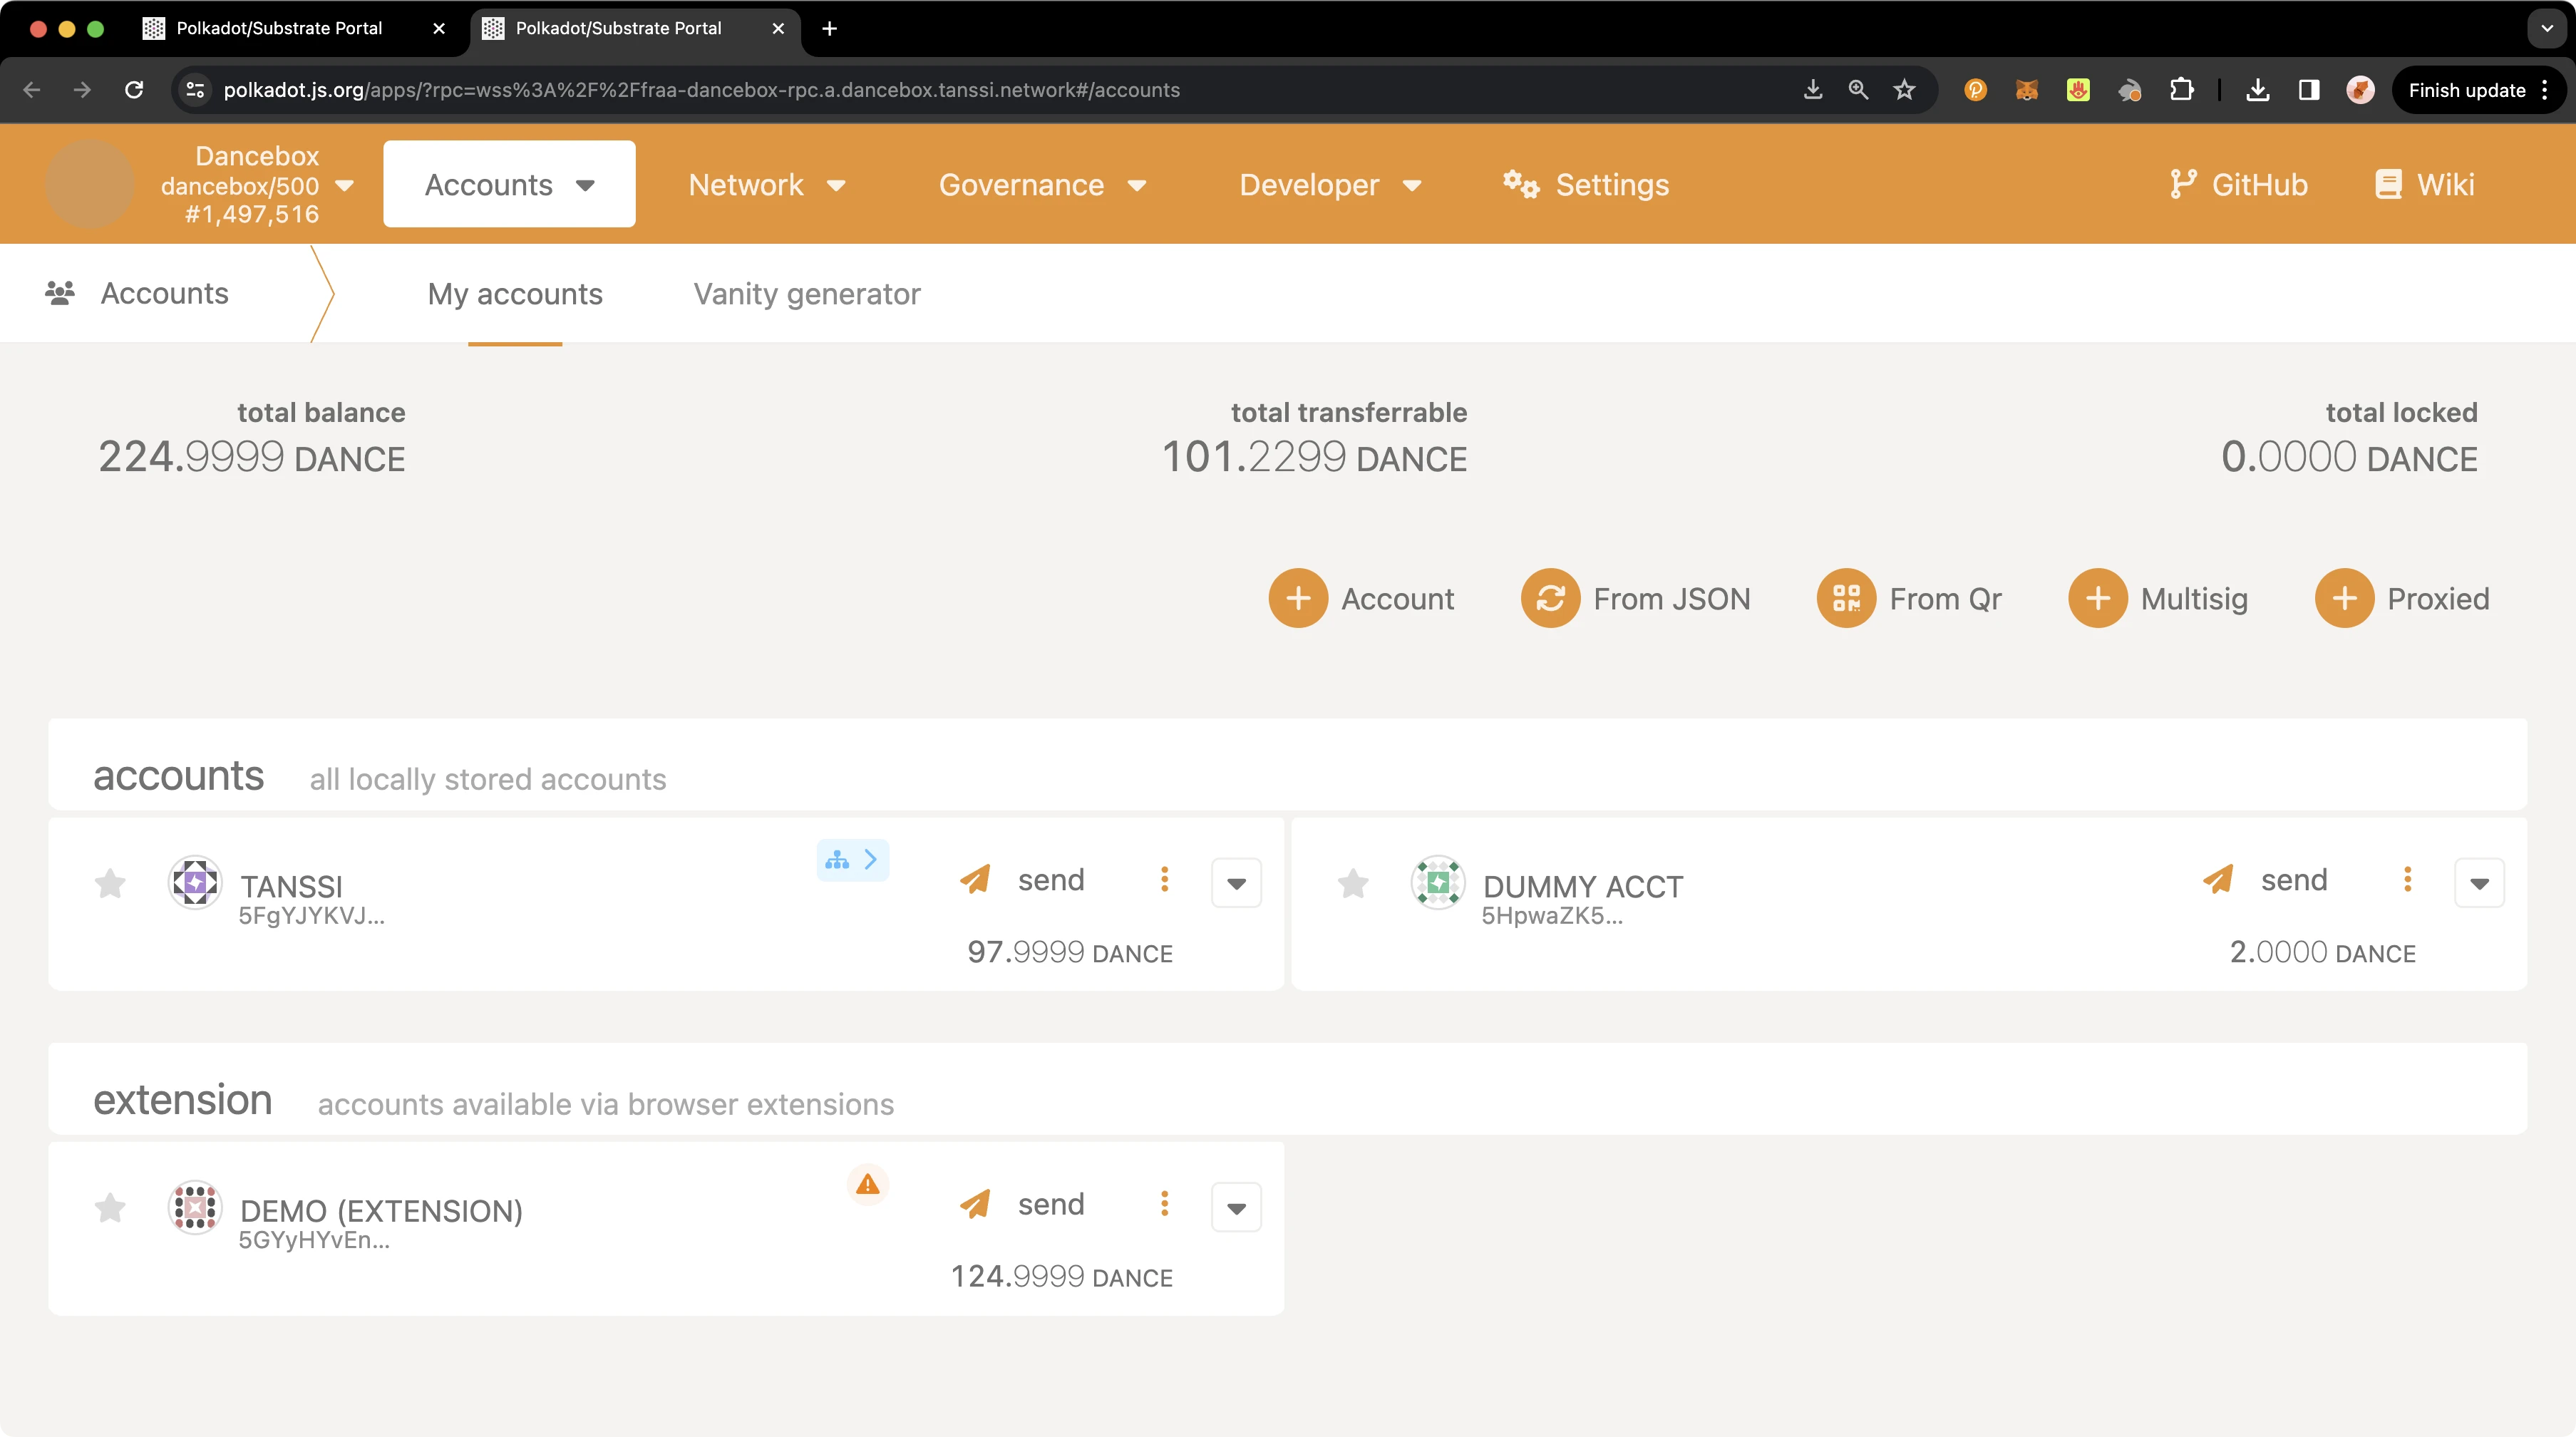
If the transaction successfully went through, you should see a couple of notification pop-ups. If you head over to the Accounts page, you'll see that your primary account balance has decreased. If you check the account balance where you sent the funds, you'll notice the balance there has increased.
That's it! You've successfully executed a transaction using a proxy account on behalf of your primary account.
Removing a Proxy Account
Similarly to adding a proxy account, there are a couple of ways that you can remove a proxy account, either from the Extrinsics page or the Accounts page. Regardless of which page you use, you can elect to remove a single proxy account or all proxies associated with your primary account.
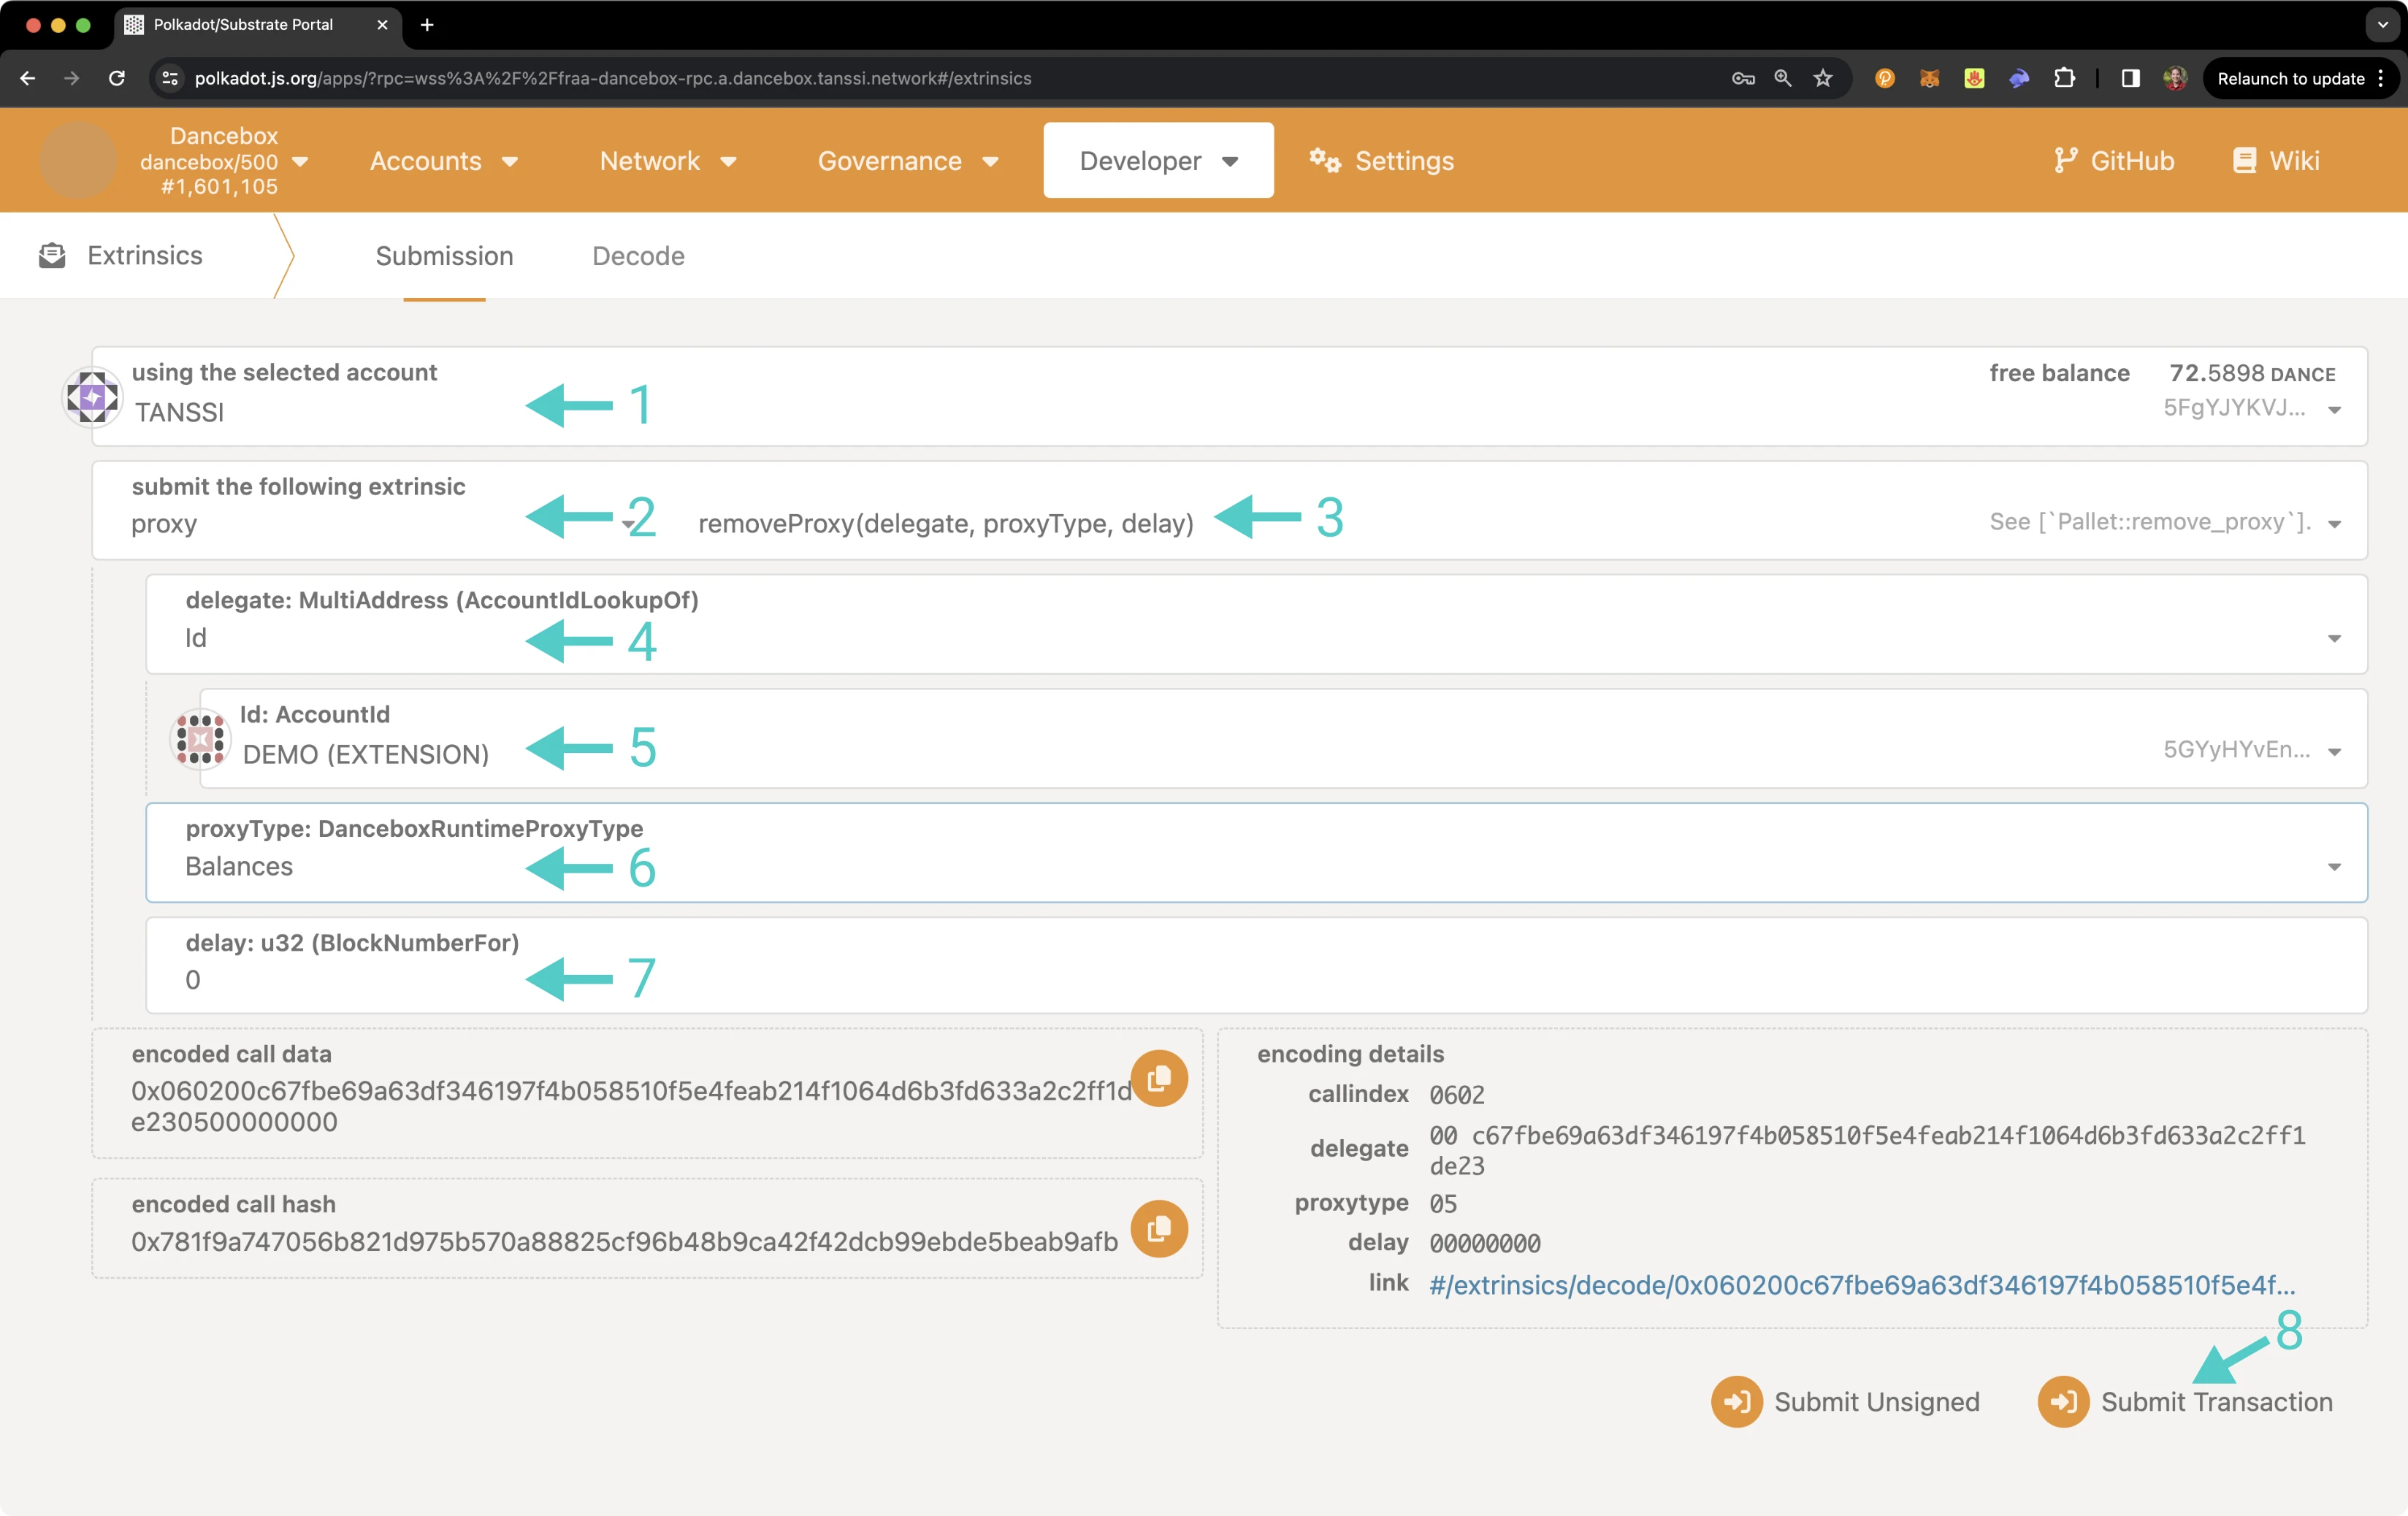
To remove a proxy from the Extrinsics page, you can take the following steps:
- From the using the selected account dropdown, select your primary account.
- Then select proxy.
- Choose removeProxy to remove a single proxy or removeProxies to remove all associated proxies.
- Choose Id from the AccountIdLookupOf dropdown.
- If removing a single proxy, enter the proxy account to remove in the delegate field.
- Select the proxyType to remove, in this case choose Balances.
- Optionally, select a delay period in block numbers.
- Click Submit Transaction.
A pop-up will appear asking you to authorize and sign the transaction. You can sign and send the transaction from the primary or proxy account, but the call to remove the proxy must be sent from the primary account. Enter your password and click Sign and Submit.
To check that the proxy or proxy accounts have been removed, follow the steps in the Verifying your Proxy Account section.
As previously mentioned, you can also remove a proxy from the Accounts page. To do so, on the Accounts page, select the three vertical dots next to the primary account and select Manage Proxies.
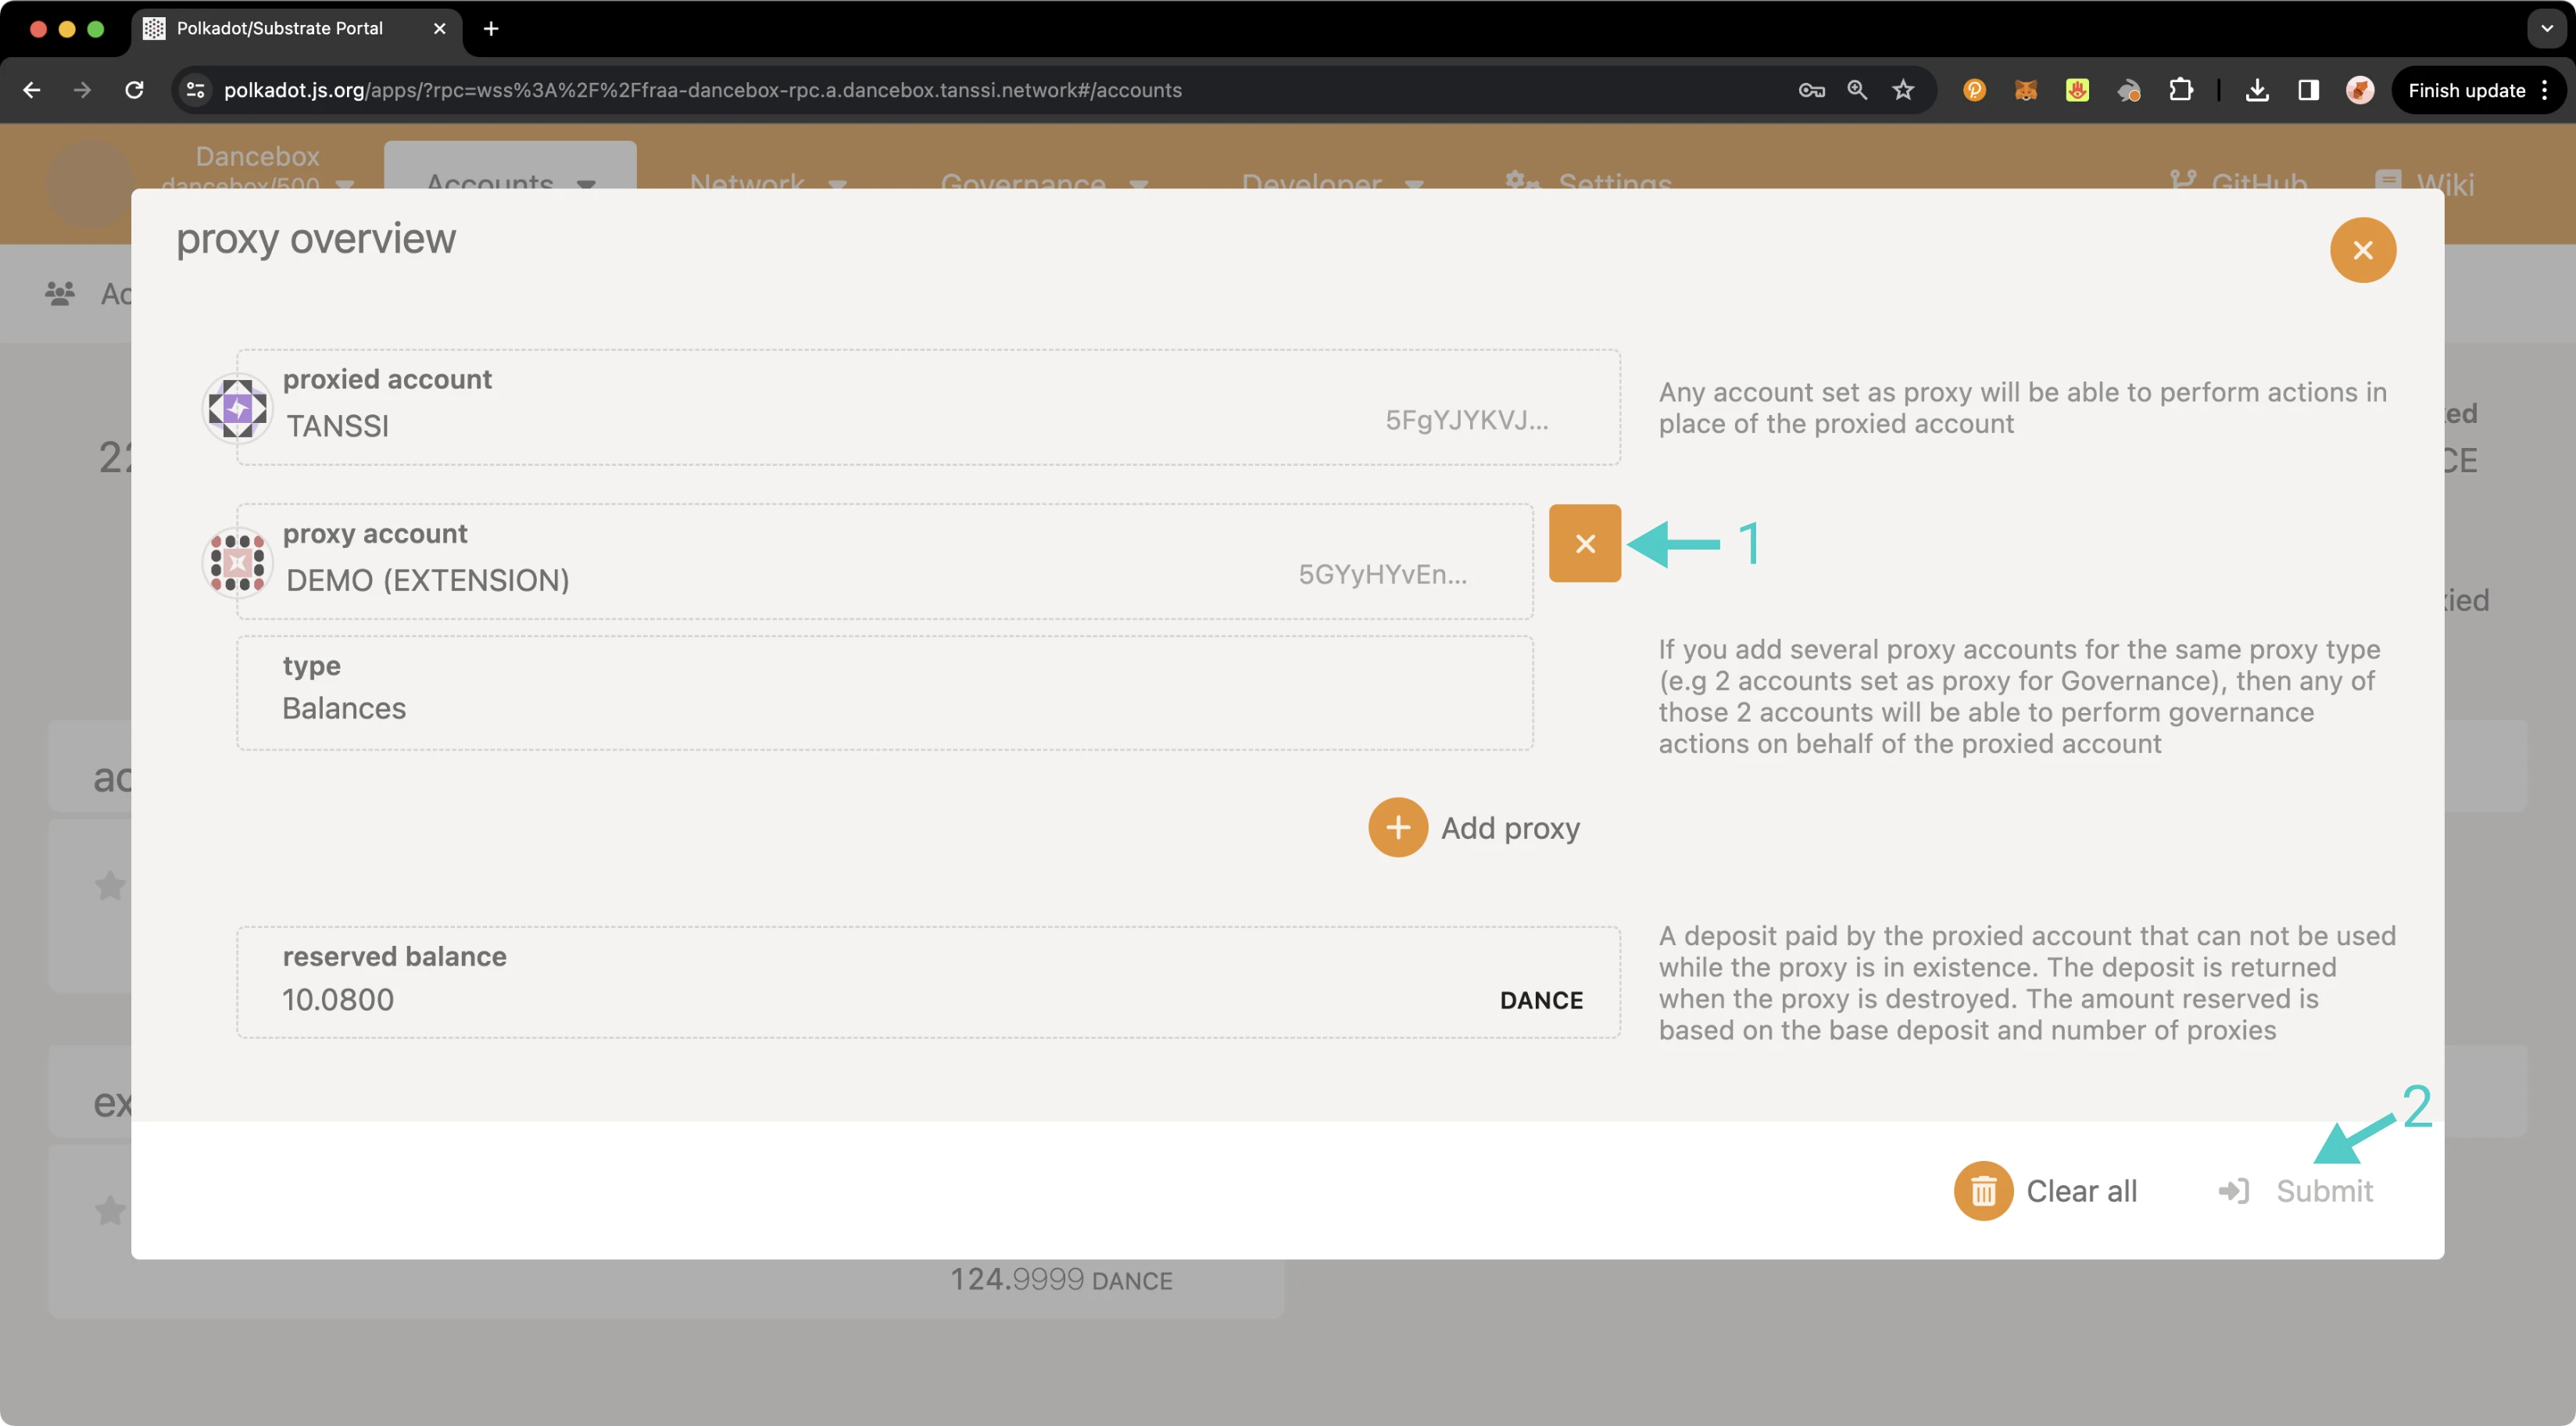
A pop-up will appear showing an overview of your proxy accounts. To remove all proxies, you can click on Clear all, then you will automatically be prompted to enter your password and submit the transaction. To remove a single proxy, take the following steps:
- Click the X button next to the proxy to remove
- Press Submit
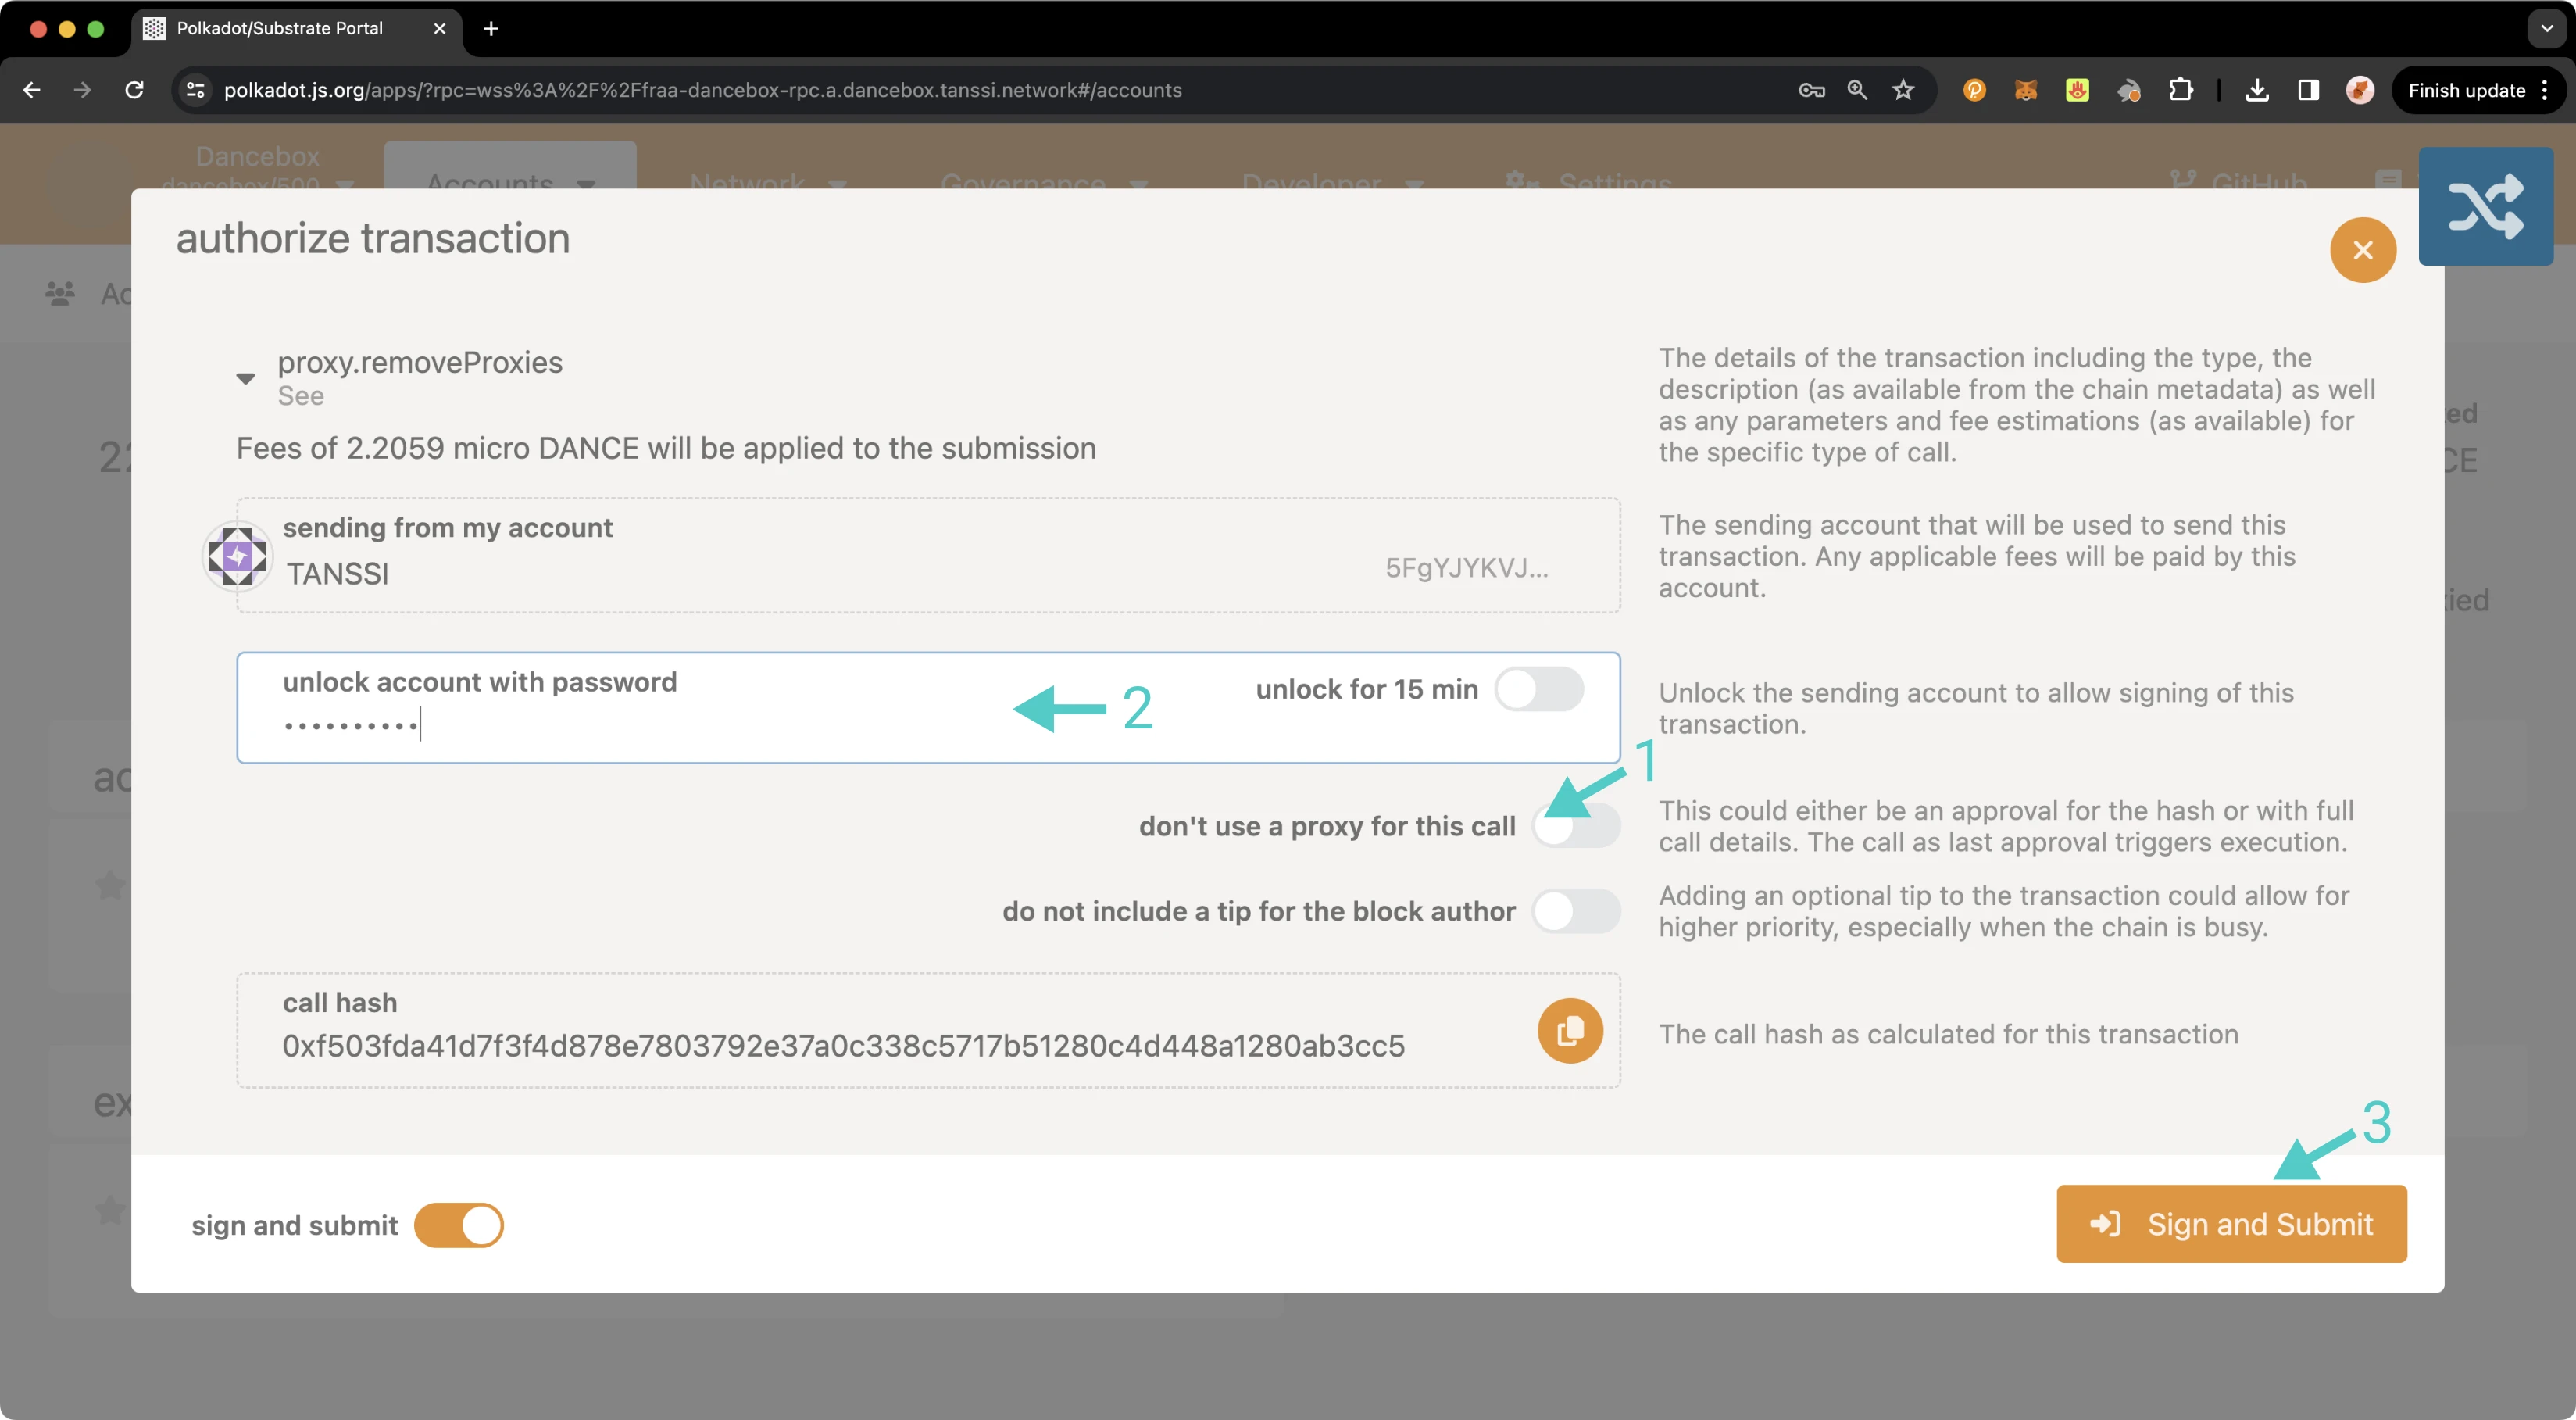
On the transaction confirmation screen, take the following steps:
- Ensure that you do not use a proxy for this call (as this example is a balances proxy, the call to remove the proxy needs to come from the primary account rather than the proxy account).
- Enter your password for the respective account.
- Press Sign and Submit.
Once the transaction has successfully been submitted, you can review your current proxies, or if you removed all proxies, you will notice the proxy icon is no longer being displayed next to the primary account. And that's it! You've successfully created a proxy, reviewed all proxy accounts associated with your primary account, executed a proxy transaction, and removed a proxy account!
| Created: March 22, 2024