Deploy Your Appchain via the Tanssi DApp
Introduction
Tanssi aims to lower the barrier to entry for building decentralized appchains by streamlining the onboarding process and abstracting away the technical details of launching a Tanssi-powered appchain. The Tanssi dApp allows you to spin up an appchain in just minutes. This guide will walk you through the steps required to launch an appchain on Dancelight, the Tanssi TestNet, via the Tanssi dApp.
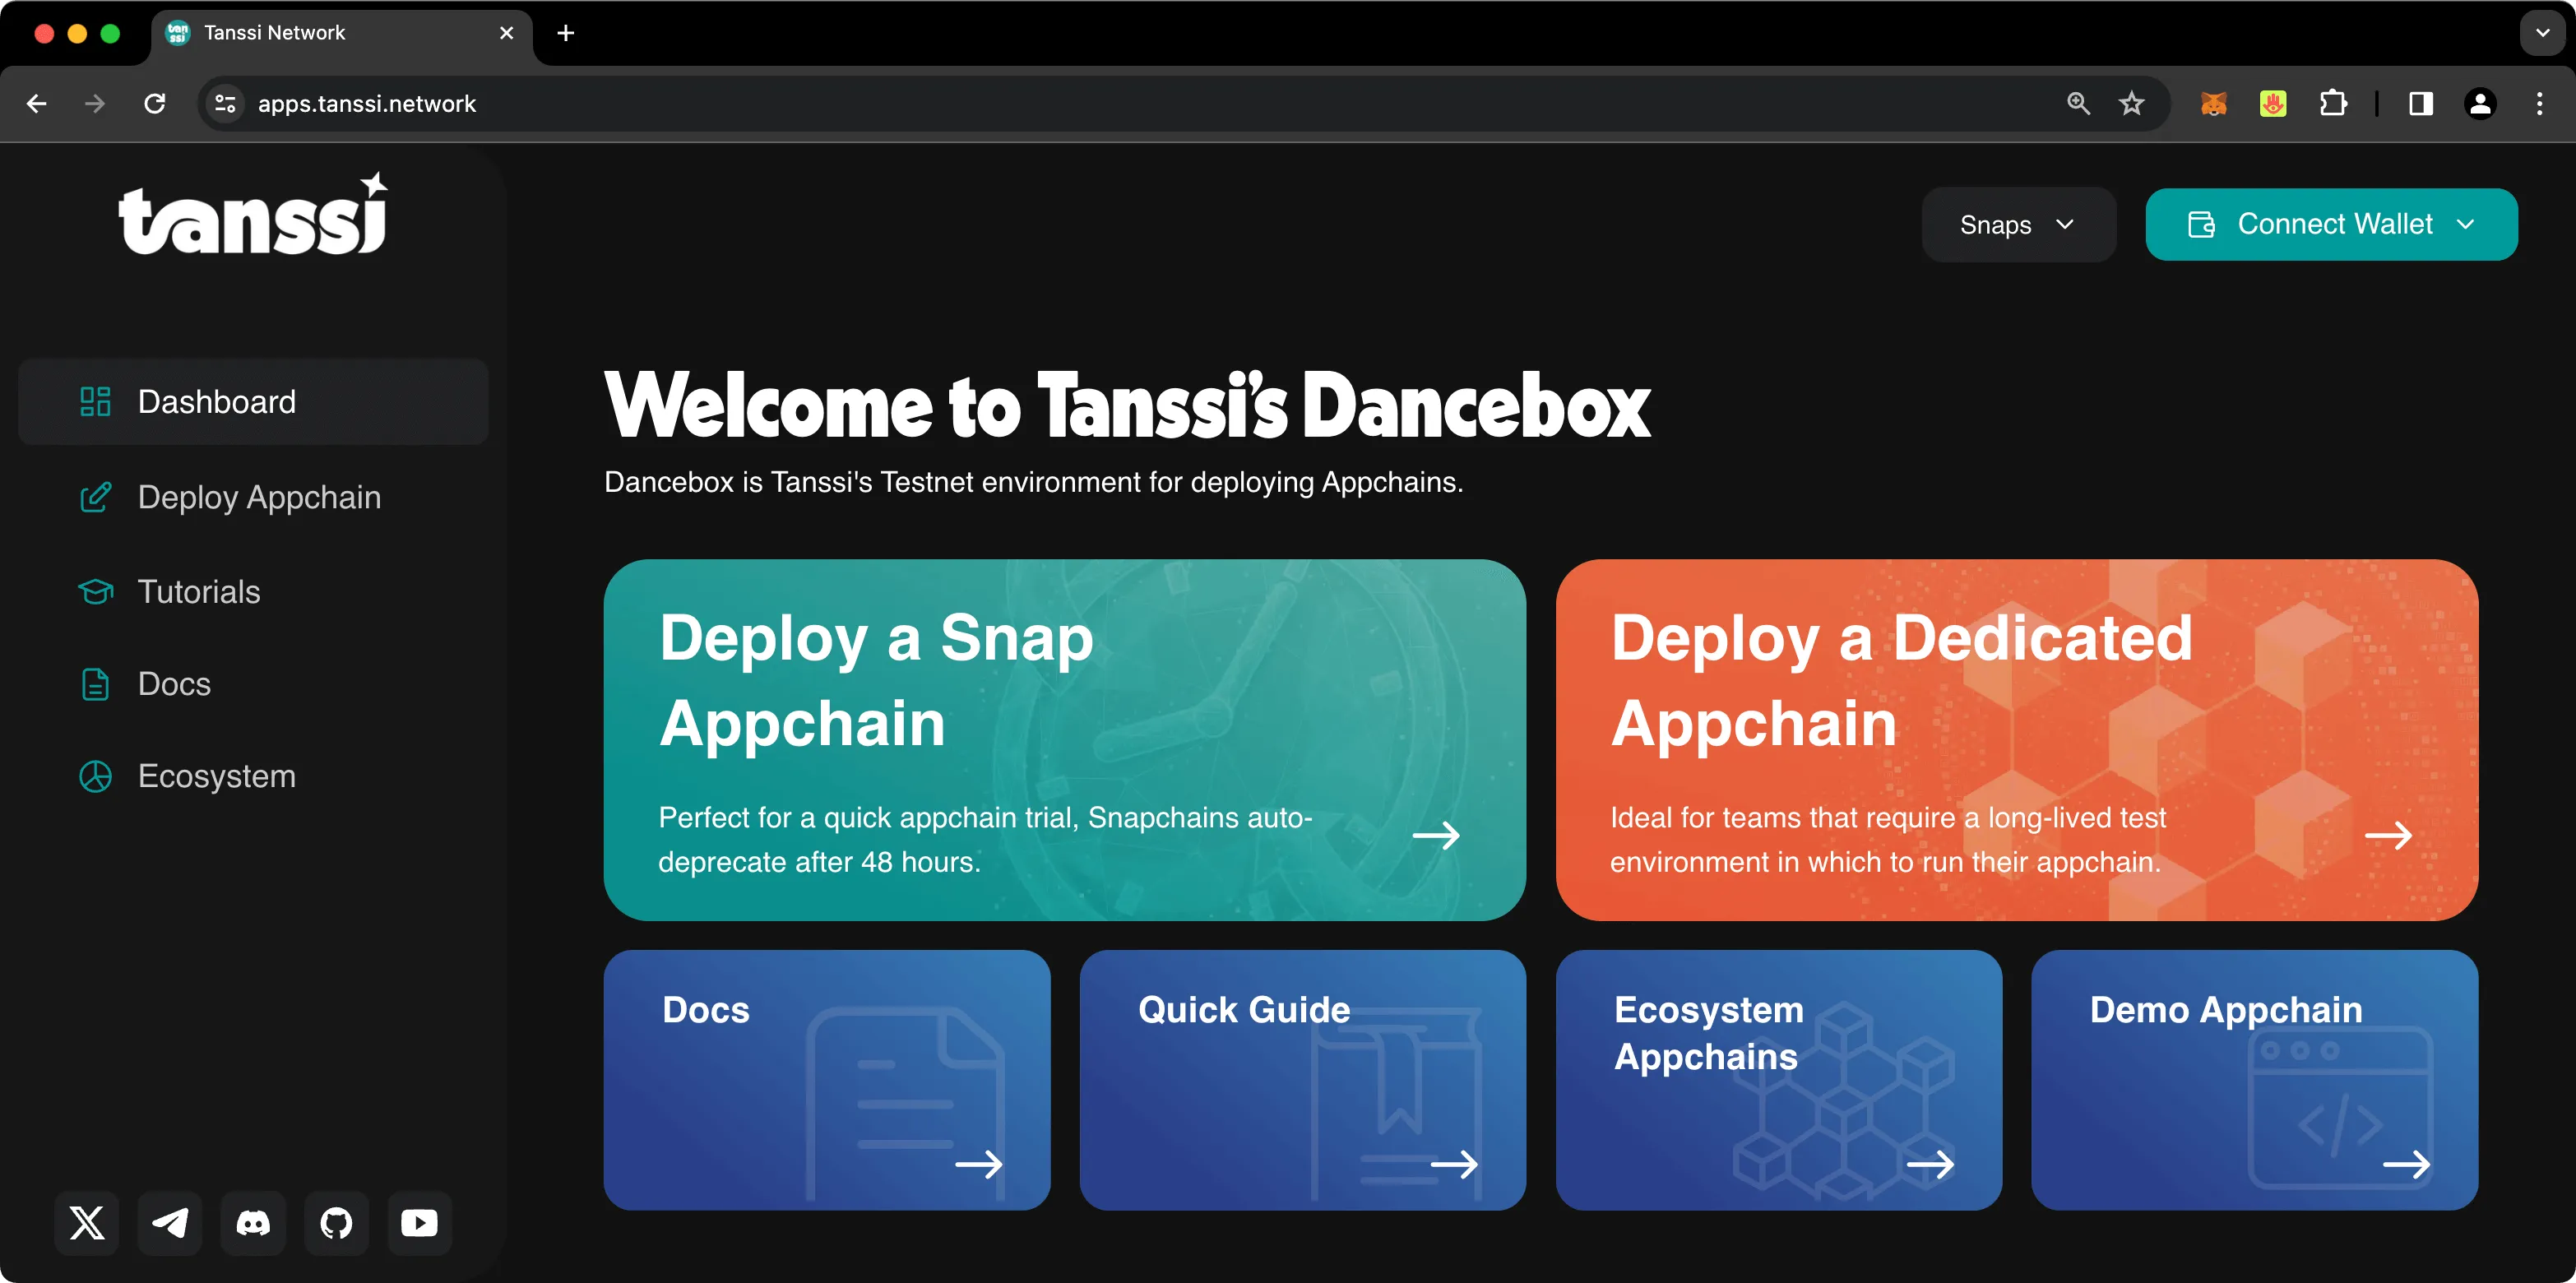
Quick Trials vs. Dedicated appchains
The Tanssi dApp supports the creation of two different types of appchains, namely:
- Quick trial - a temporary appchain that self-destructs after 48 hours
- Dedicated - a long-lasting appchain for Tanssi ecosystem builders
Both types of Tanssi appchains behave identically, with the only difference being the ephemeral nature of the quick trials. Generally speaking, quick trial appchains are best for most builders who want to test out a Tanssi-powered appchain. However, if you require a long-lasting test environment, the Tanssi team will happily assist you with setting up a dedicated appchain.
The screenshots and content in this guide will showcase quick trial appchains, but you can follow the same process to configure a dedicated Tanssi appchain.
Prerequisites
Supported Wallets
Since Tanssi is built with Substrate, you'll need to use a Substrate-compatible wallet to deploy and manage your Tanssi appchain. Supported wallets include:
If you deploy a Tanssi-powered EVM appchain, your users won't need a Substrate wallet. They can interact with your Tanssi appchain using Ethereum-compatible wallets like MetaMask.
Connect Your Wallet to the DApp
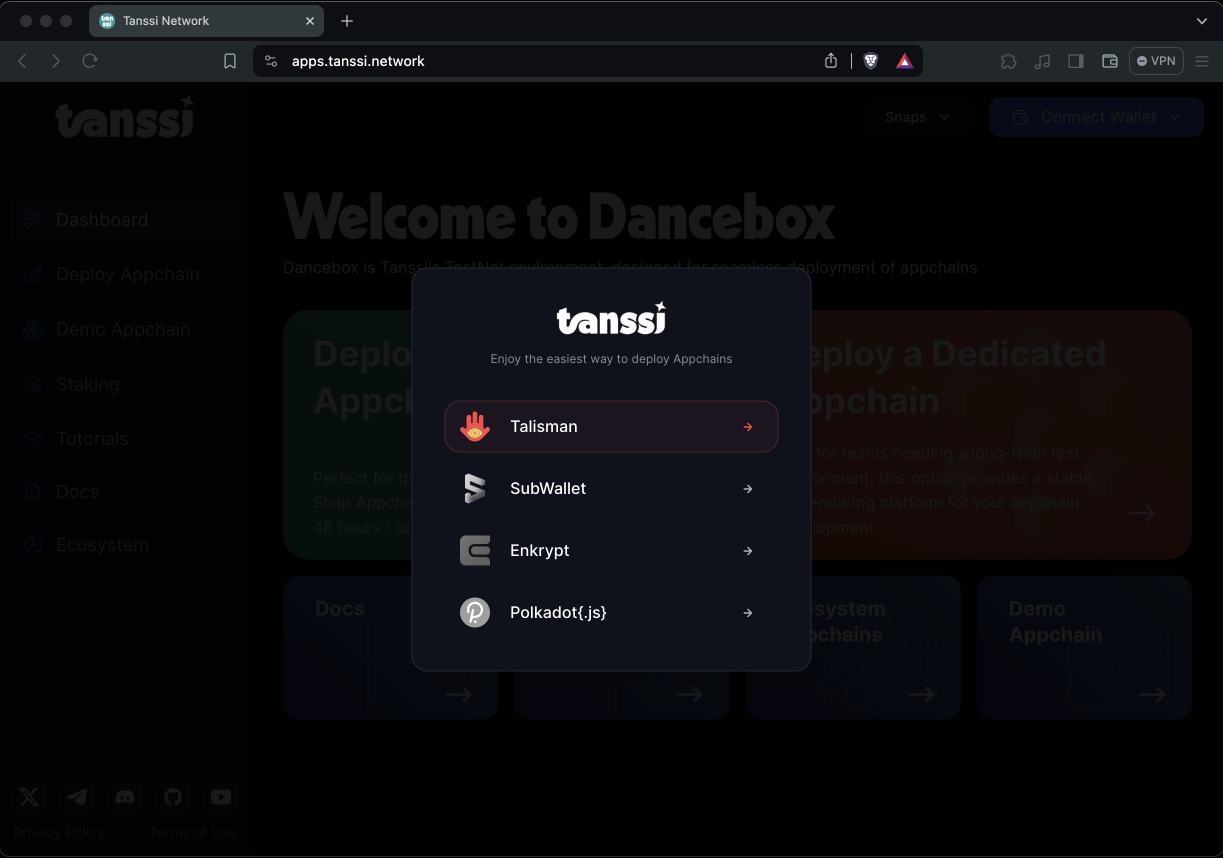
To connect your wallet to the Tanssi dApp, click Connect Wallet in the upper-right corner. Select the desired wallet type. Then, take the following steps:
- Choose your account from the dropdown
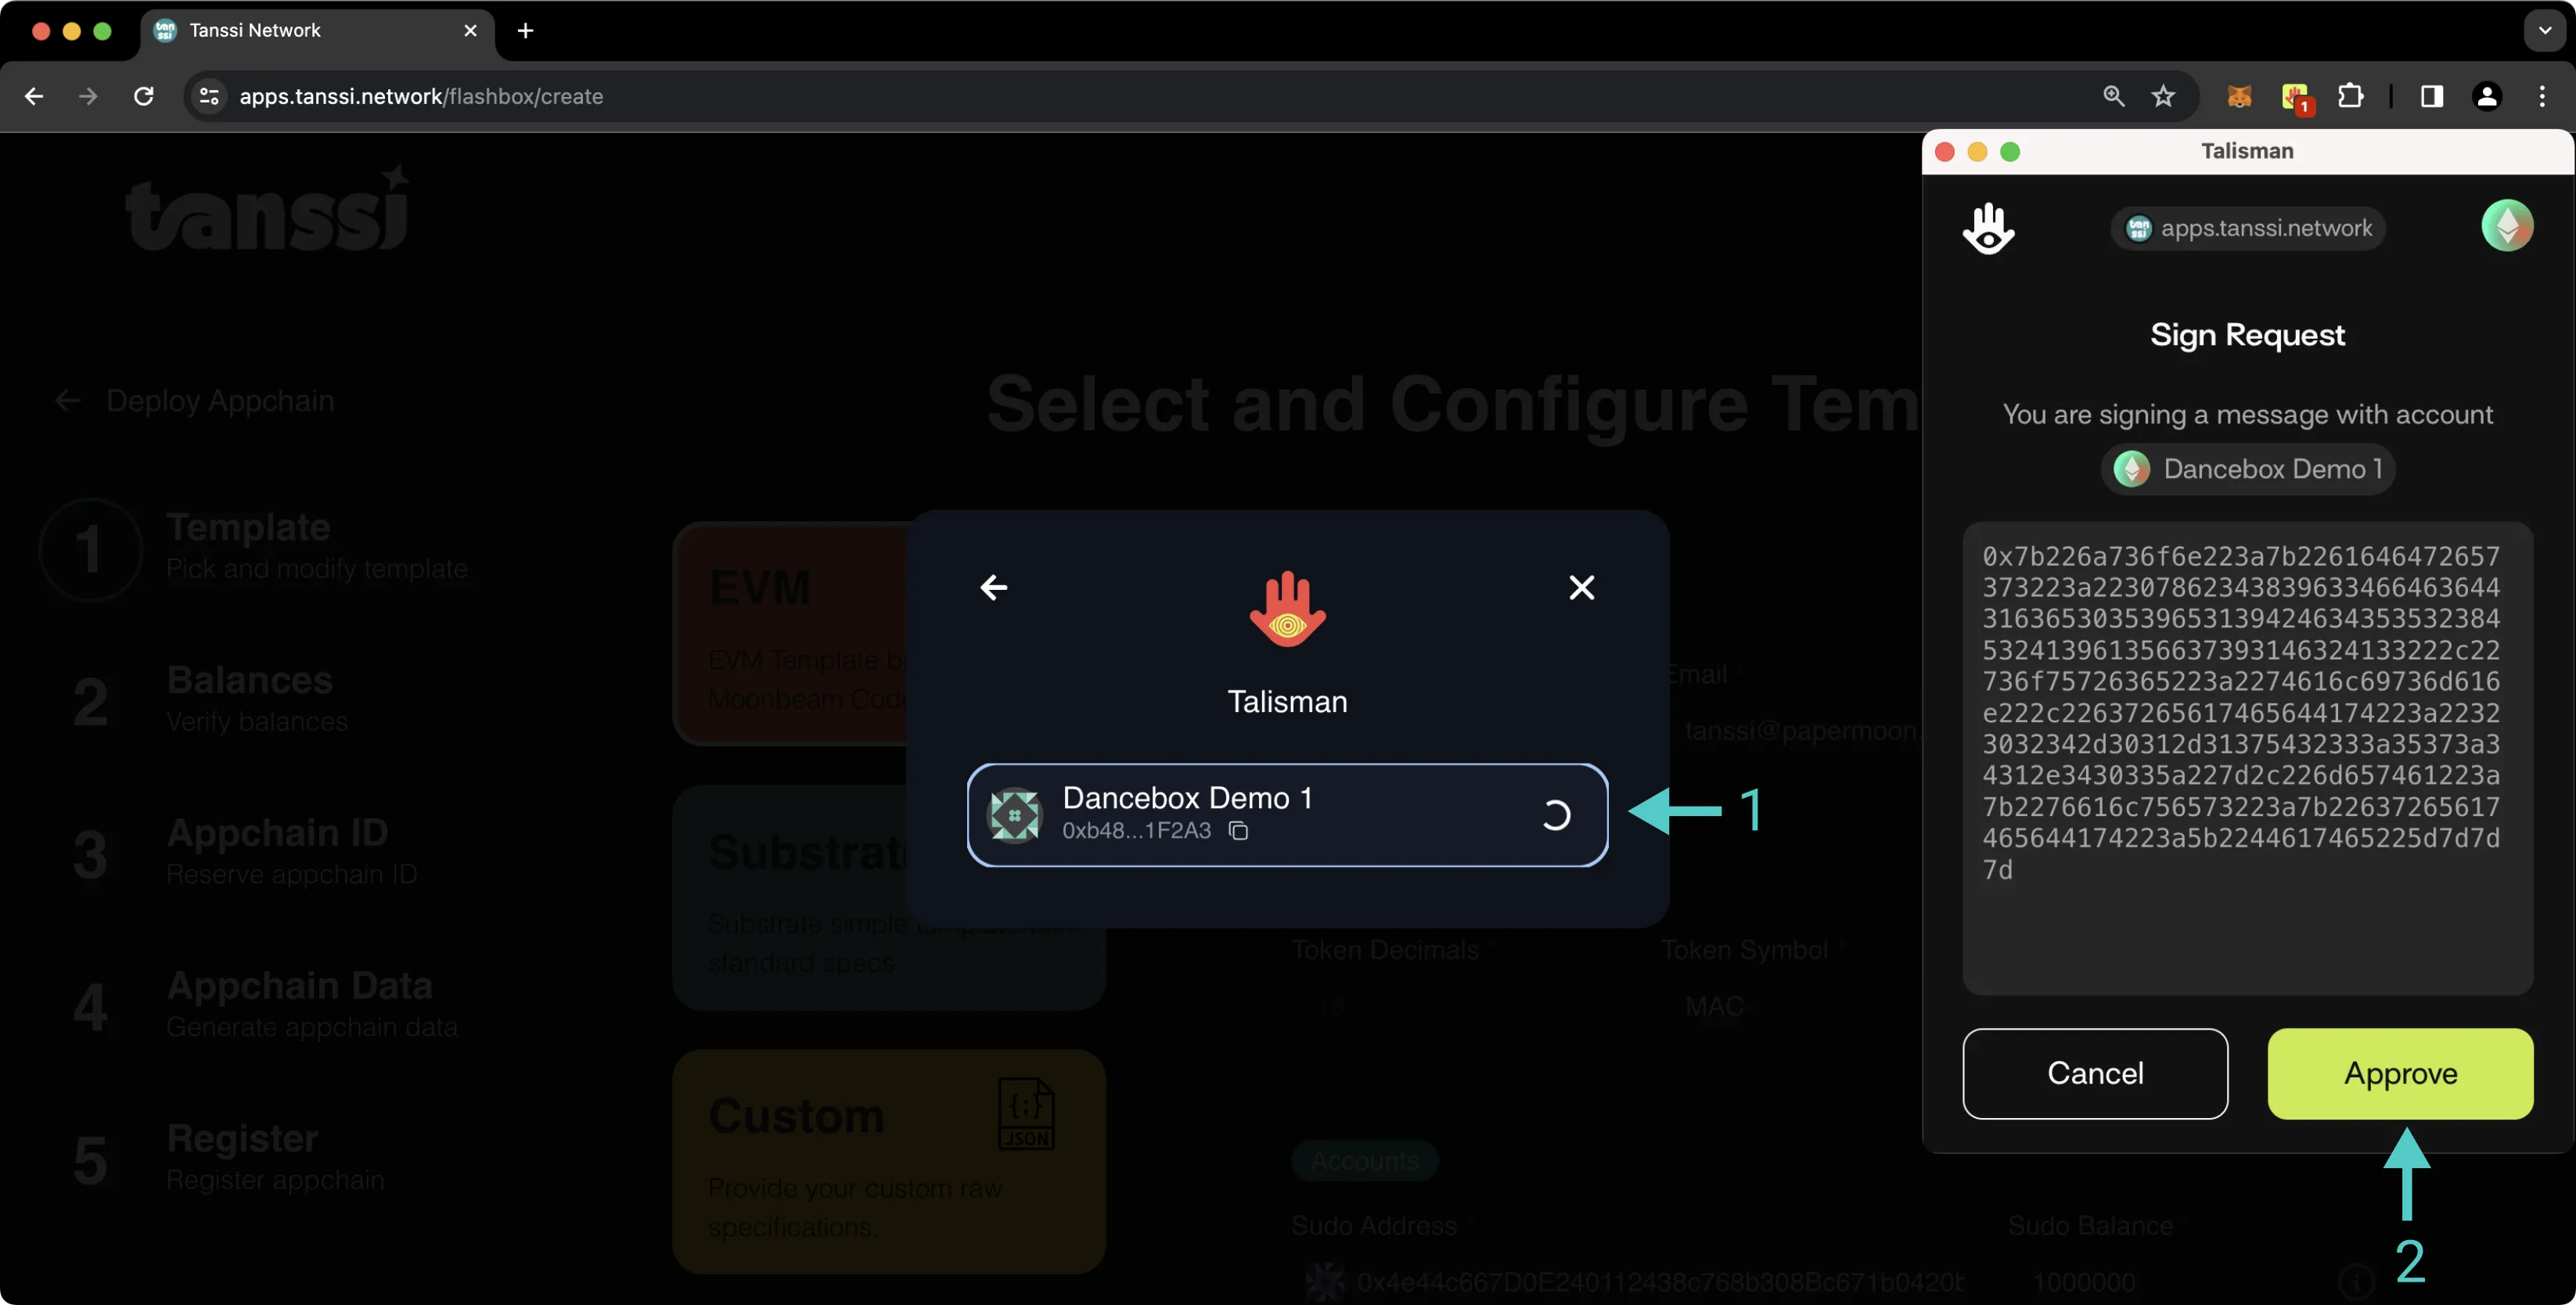
- You'll be prompted to sign a message to log you into the Tanssi dApp. Go ahead and sign the message
Once connected, you'll see your address in the top-right corner. If you've connected multiple accounts and want to switch accounts, you can click on your address and choose an account from the dropdown menu.
Configure Your Appchain
On the dApp Home page, click the Start Building button in the Launch Network block to start configuring your Tanssi appchain immediately. You have to choose between a Quick Trial or a Dedicated appchain. You can read more about the differences between these two available types on the Tanssi Testnet.
Next, select a template that best fits your use case and configure your Tanssi appchain's properties accordingly. You can choose from the EVM or Substrate template or upload a raw specification file. Please refer to the Templates documentation to learn more about the available templates.
EVM Template
The EVM template provides all the necessary components to add an Ethereum compatibility layer to your Tanssi appchain.
As part of the setup process, you'll need a unique EVM chain ID (EIP-155) that is distinct from all other EVM chains. You can verify that another chain does not already use your EVM chain ID on Chainlist. When launching your Tanssi appchain in production, it's critical that you open a PR to reserve your chain ID on the ethereum-lists/chains GitHub repository immediately after your RPC endpoint spins up. This is part of the validation process and is required for the PR to be accepted and merged.
Note
A registered EVM chain ID is only necessary for Tanssi appchains deployed on the MainNet. When testing or deploying on the TestNet, you can choose any available ID and move forward.
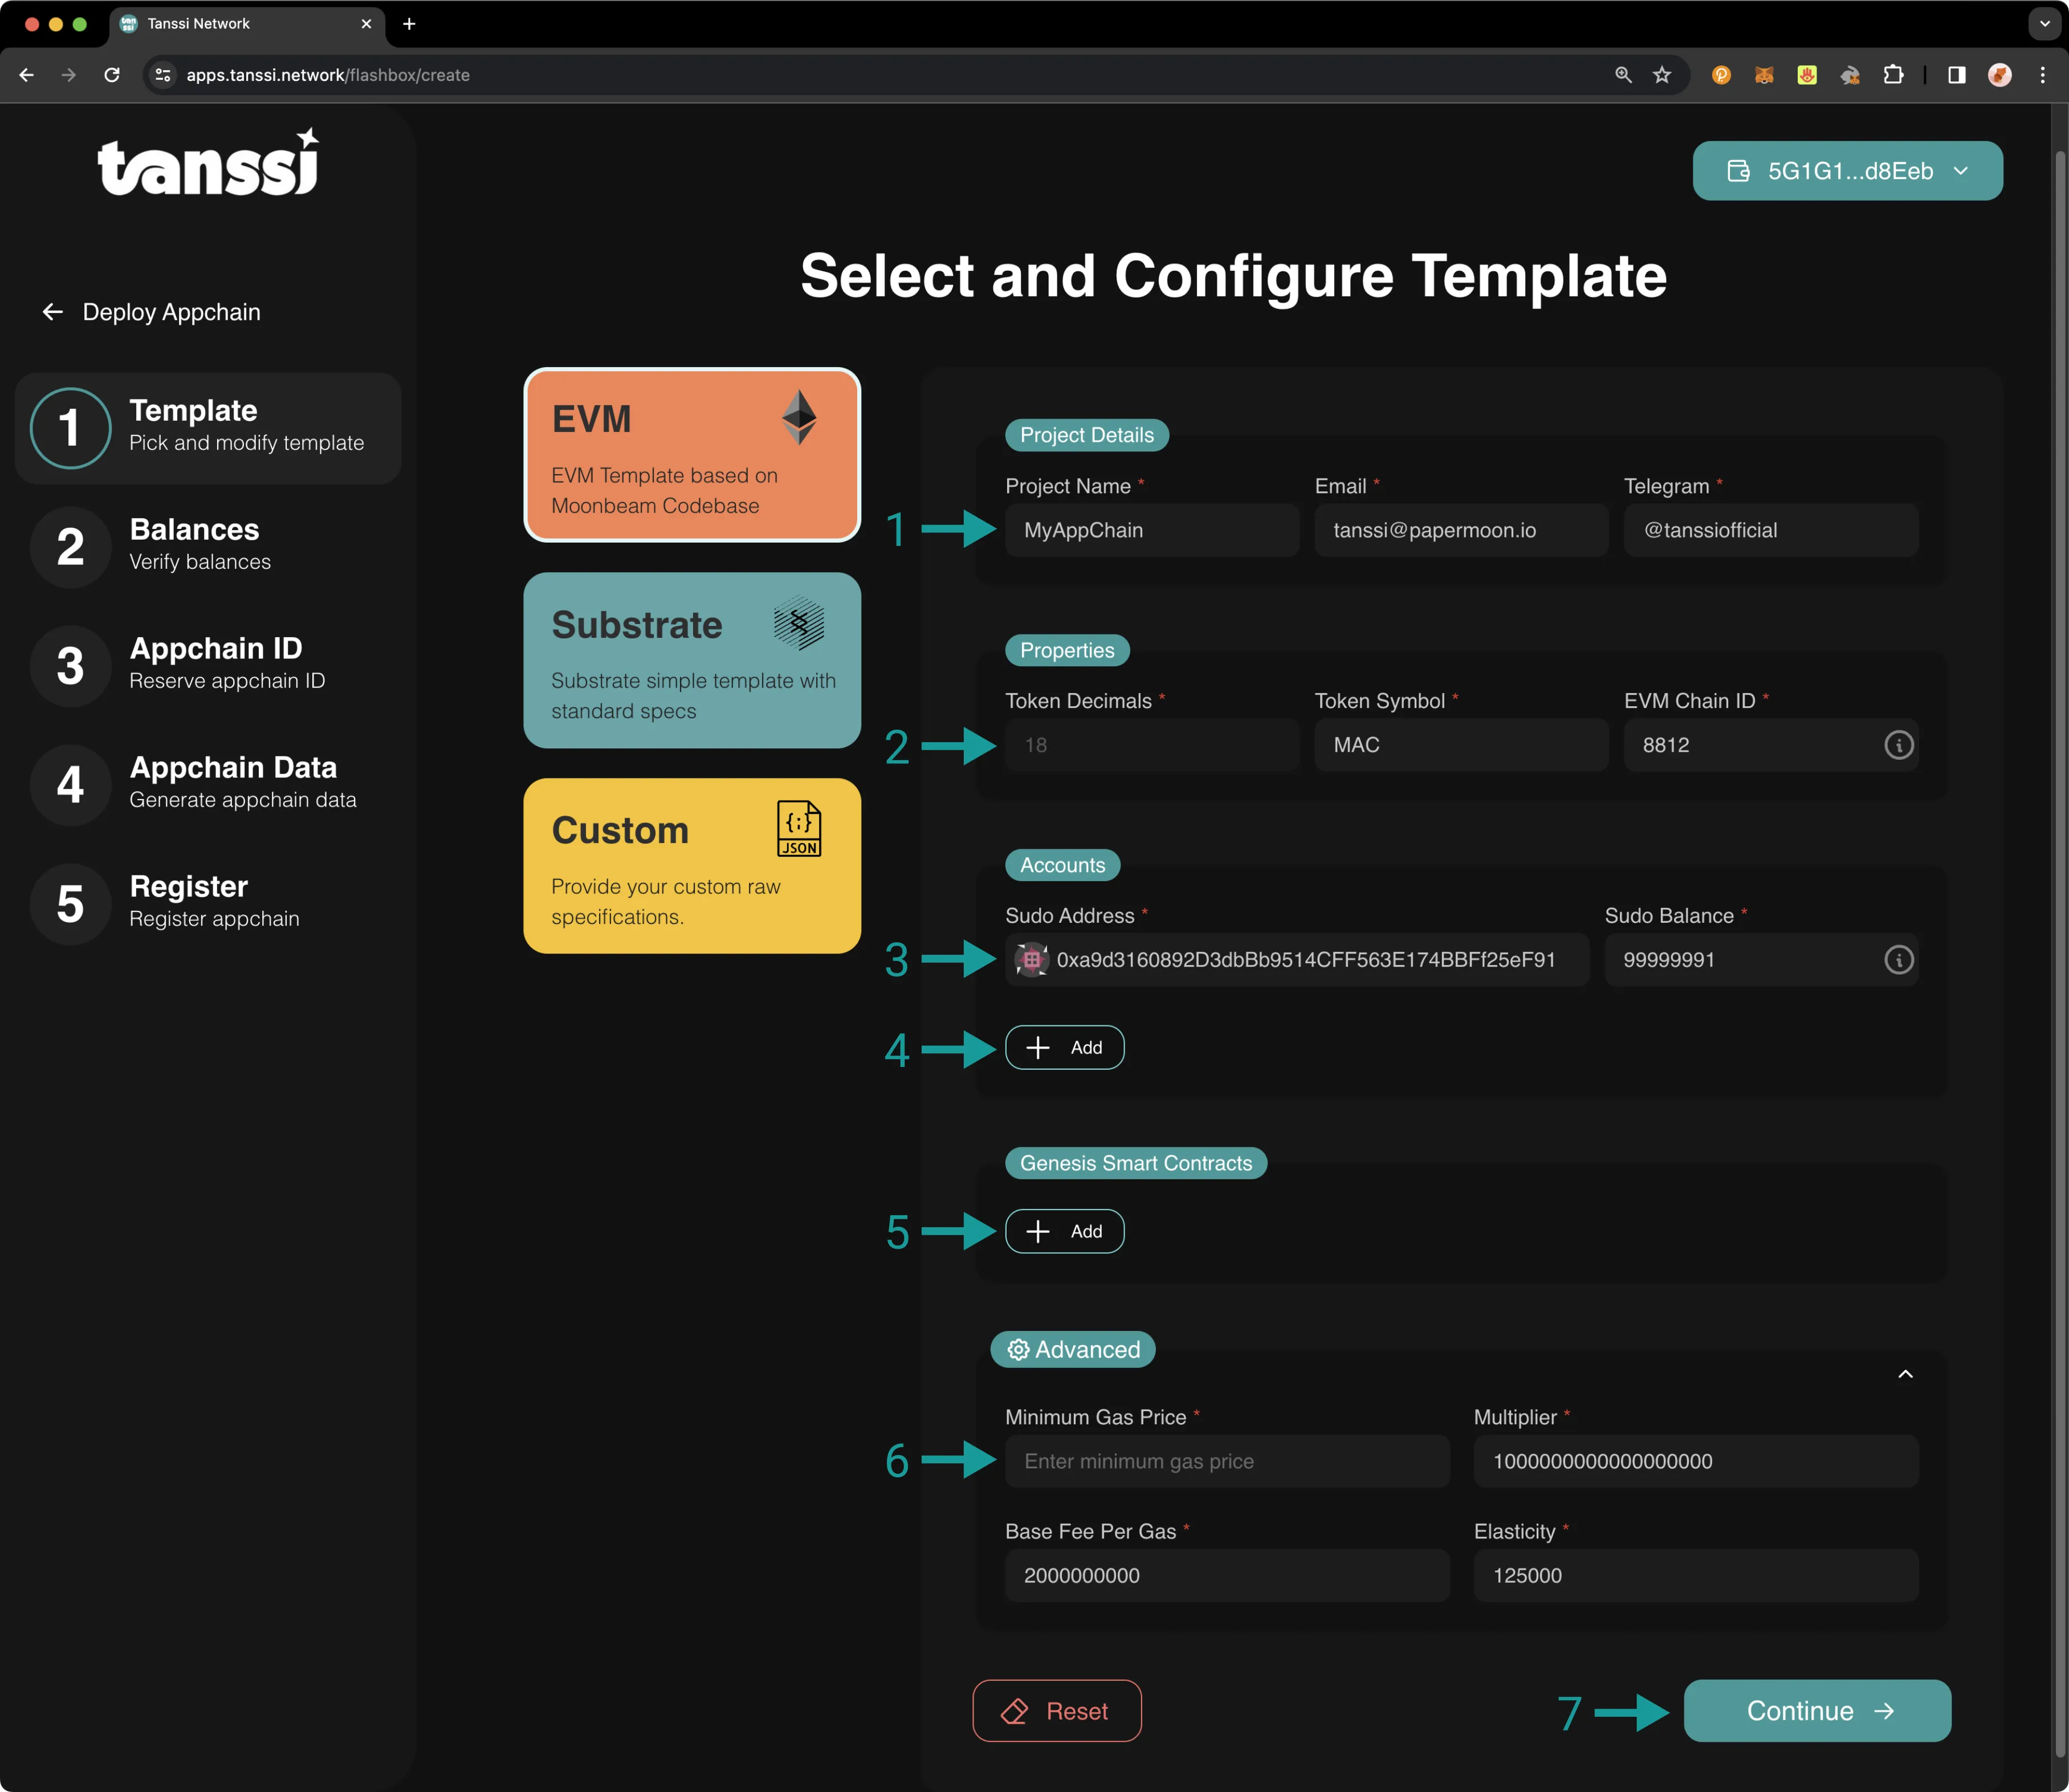
To get started, select the EVM template from the left-side menu. Then take the following steps:
- In the Network Details section, provide your project's name, your unique EVM chain ID, and select the category that best fits your use case
- In the Gas Token section, enter the symbol of your appchain's native token. Decimal places are fixed to 18 digits, the same as Ether, to preserve compatibility across EVM tooling
- (Optional) You can adjust the EIP-1559 configurations in the Advanced settings. You can choose to change the Base fee per gas and Max base fee change
- In the Accounts section, provide the Ethereum-style address of the account you want to use as the sudo account and its corresponding initial balance. This account will be able to dispatch privileged functions that require Root permissions. There can only be one sudo account at a time. The sudo account can be changed at any time to a new one by the current sudo account. Once the Tanssi appchain is launched, you can easily migrate to a fully decentralized system using specific democracy-related modules
- (Optional) In the Advanced section, click on Add to add genesis accounts and balances. If you choose to skip this step, you can use the sudo account to create accounts and transfer funds at a later time
- (Optional) In the Genesis Smart Contracts, click on Add to add genesis smart contracts by providing an address to use and the bytecode for the smart contract. When providing the bytecode, you'll need to remove the
0xfrom the beginning of the bytecode - Once you have configured the template for your Tanssi appchain, select Continue and proceed to the Check Balances section
Substrate Template
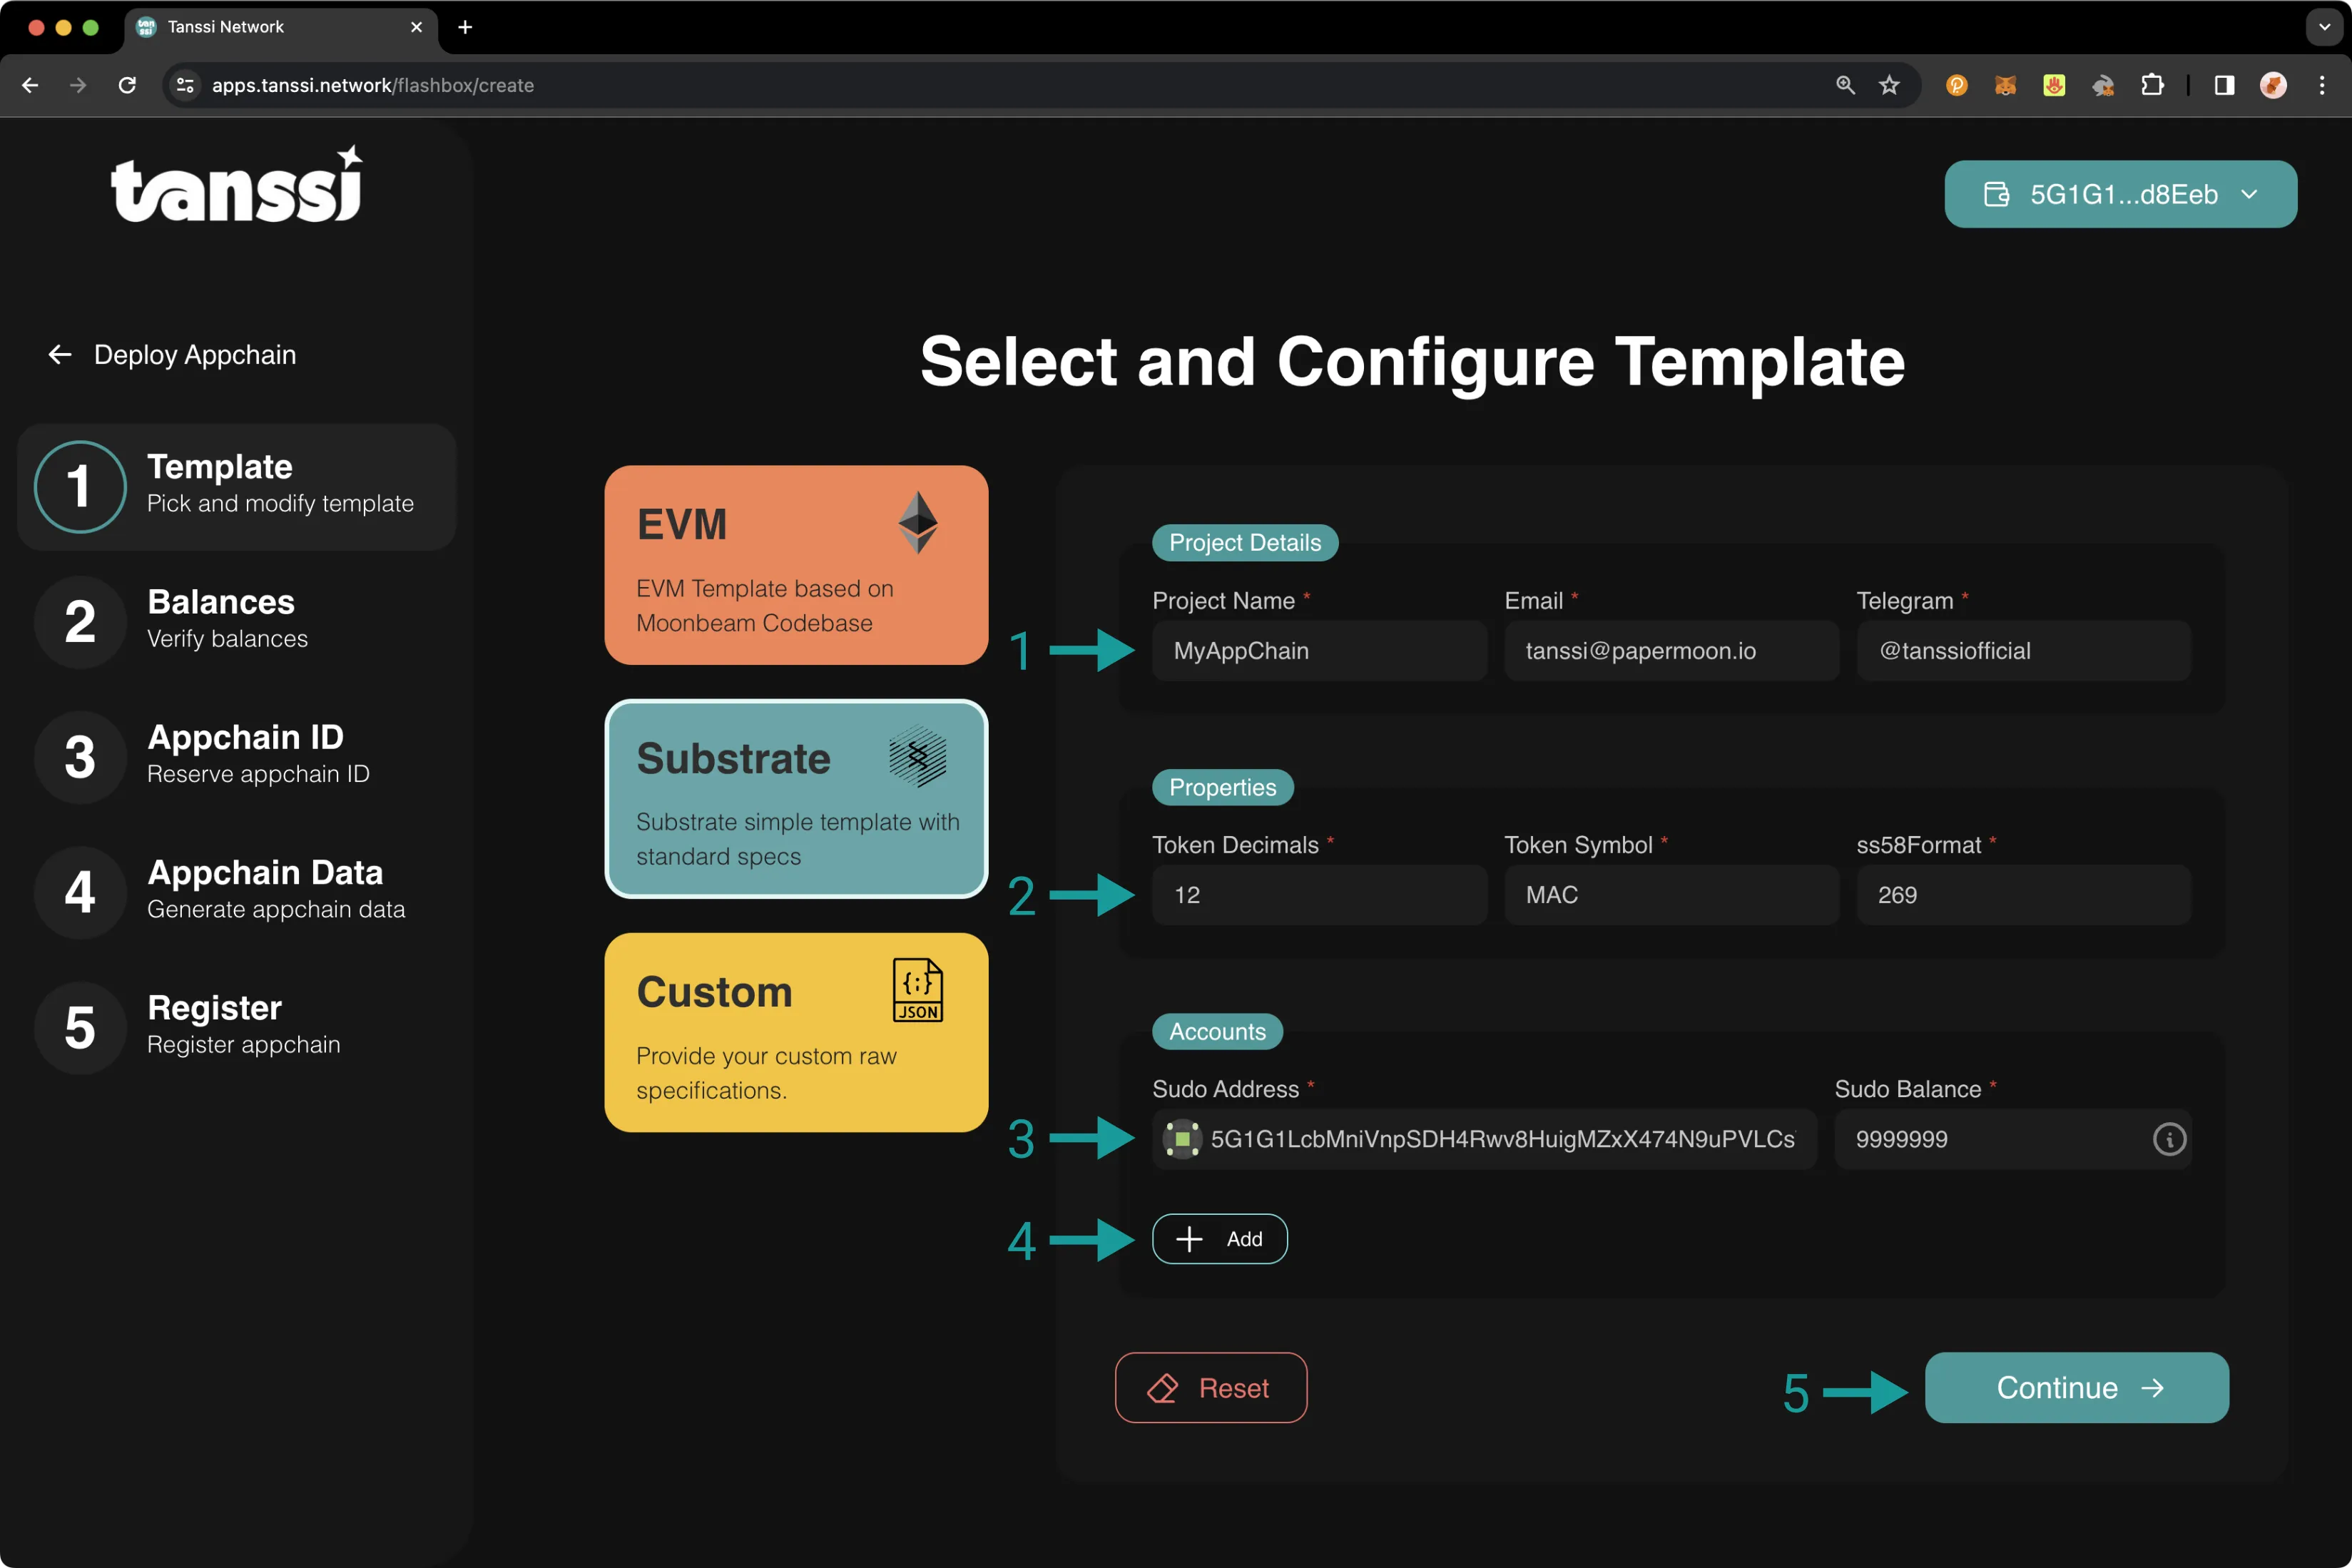
The Substrate template includes all the configurations for seamless integration with Tanssi. It can be used as the baseline specification to build a custom Tanssi-powered appchain leveraging the modularity and scalability of the Substrate framework.
To get started, select the Substrate template from the left-side menu. Then take the following steps:
- In the Network Details section, enter your project's name and select the category that best fits your use case
- In the Gas Token section, enter the token decimals, symbol, and the SS58 address format
- In the Accounts section, provide the Substrate-style address of the account you want to use as the sudo account and its initial balance. This account will be able to dispatch privileged functions that require Root permissions. There can only be one sudo account at a time. The sudo account can be changed at any time to a new one by the current sudo account. Once the appchain is launched, you can easily migrate to a fully decentralized system using specific democracy-related modules
- (Optional) In the Advanced section, click on Add to add genesis accounts and balances. If you choose to skip this step, you can use the sudo account to create accounts and transfer funds at a later time
- Once you have configured the template for your Tanssi appchain, you can select Continue to proceed to the Check Balances section
Custom
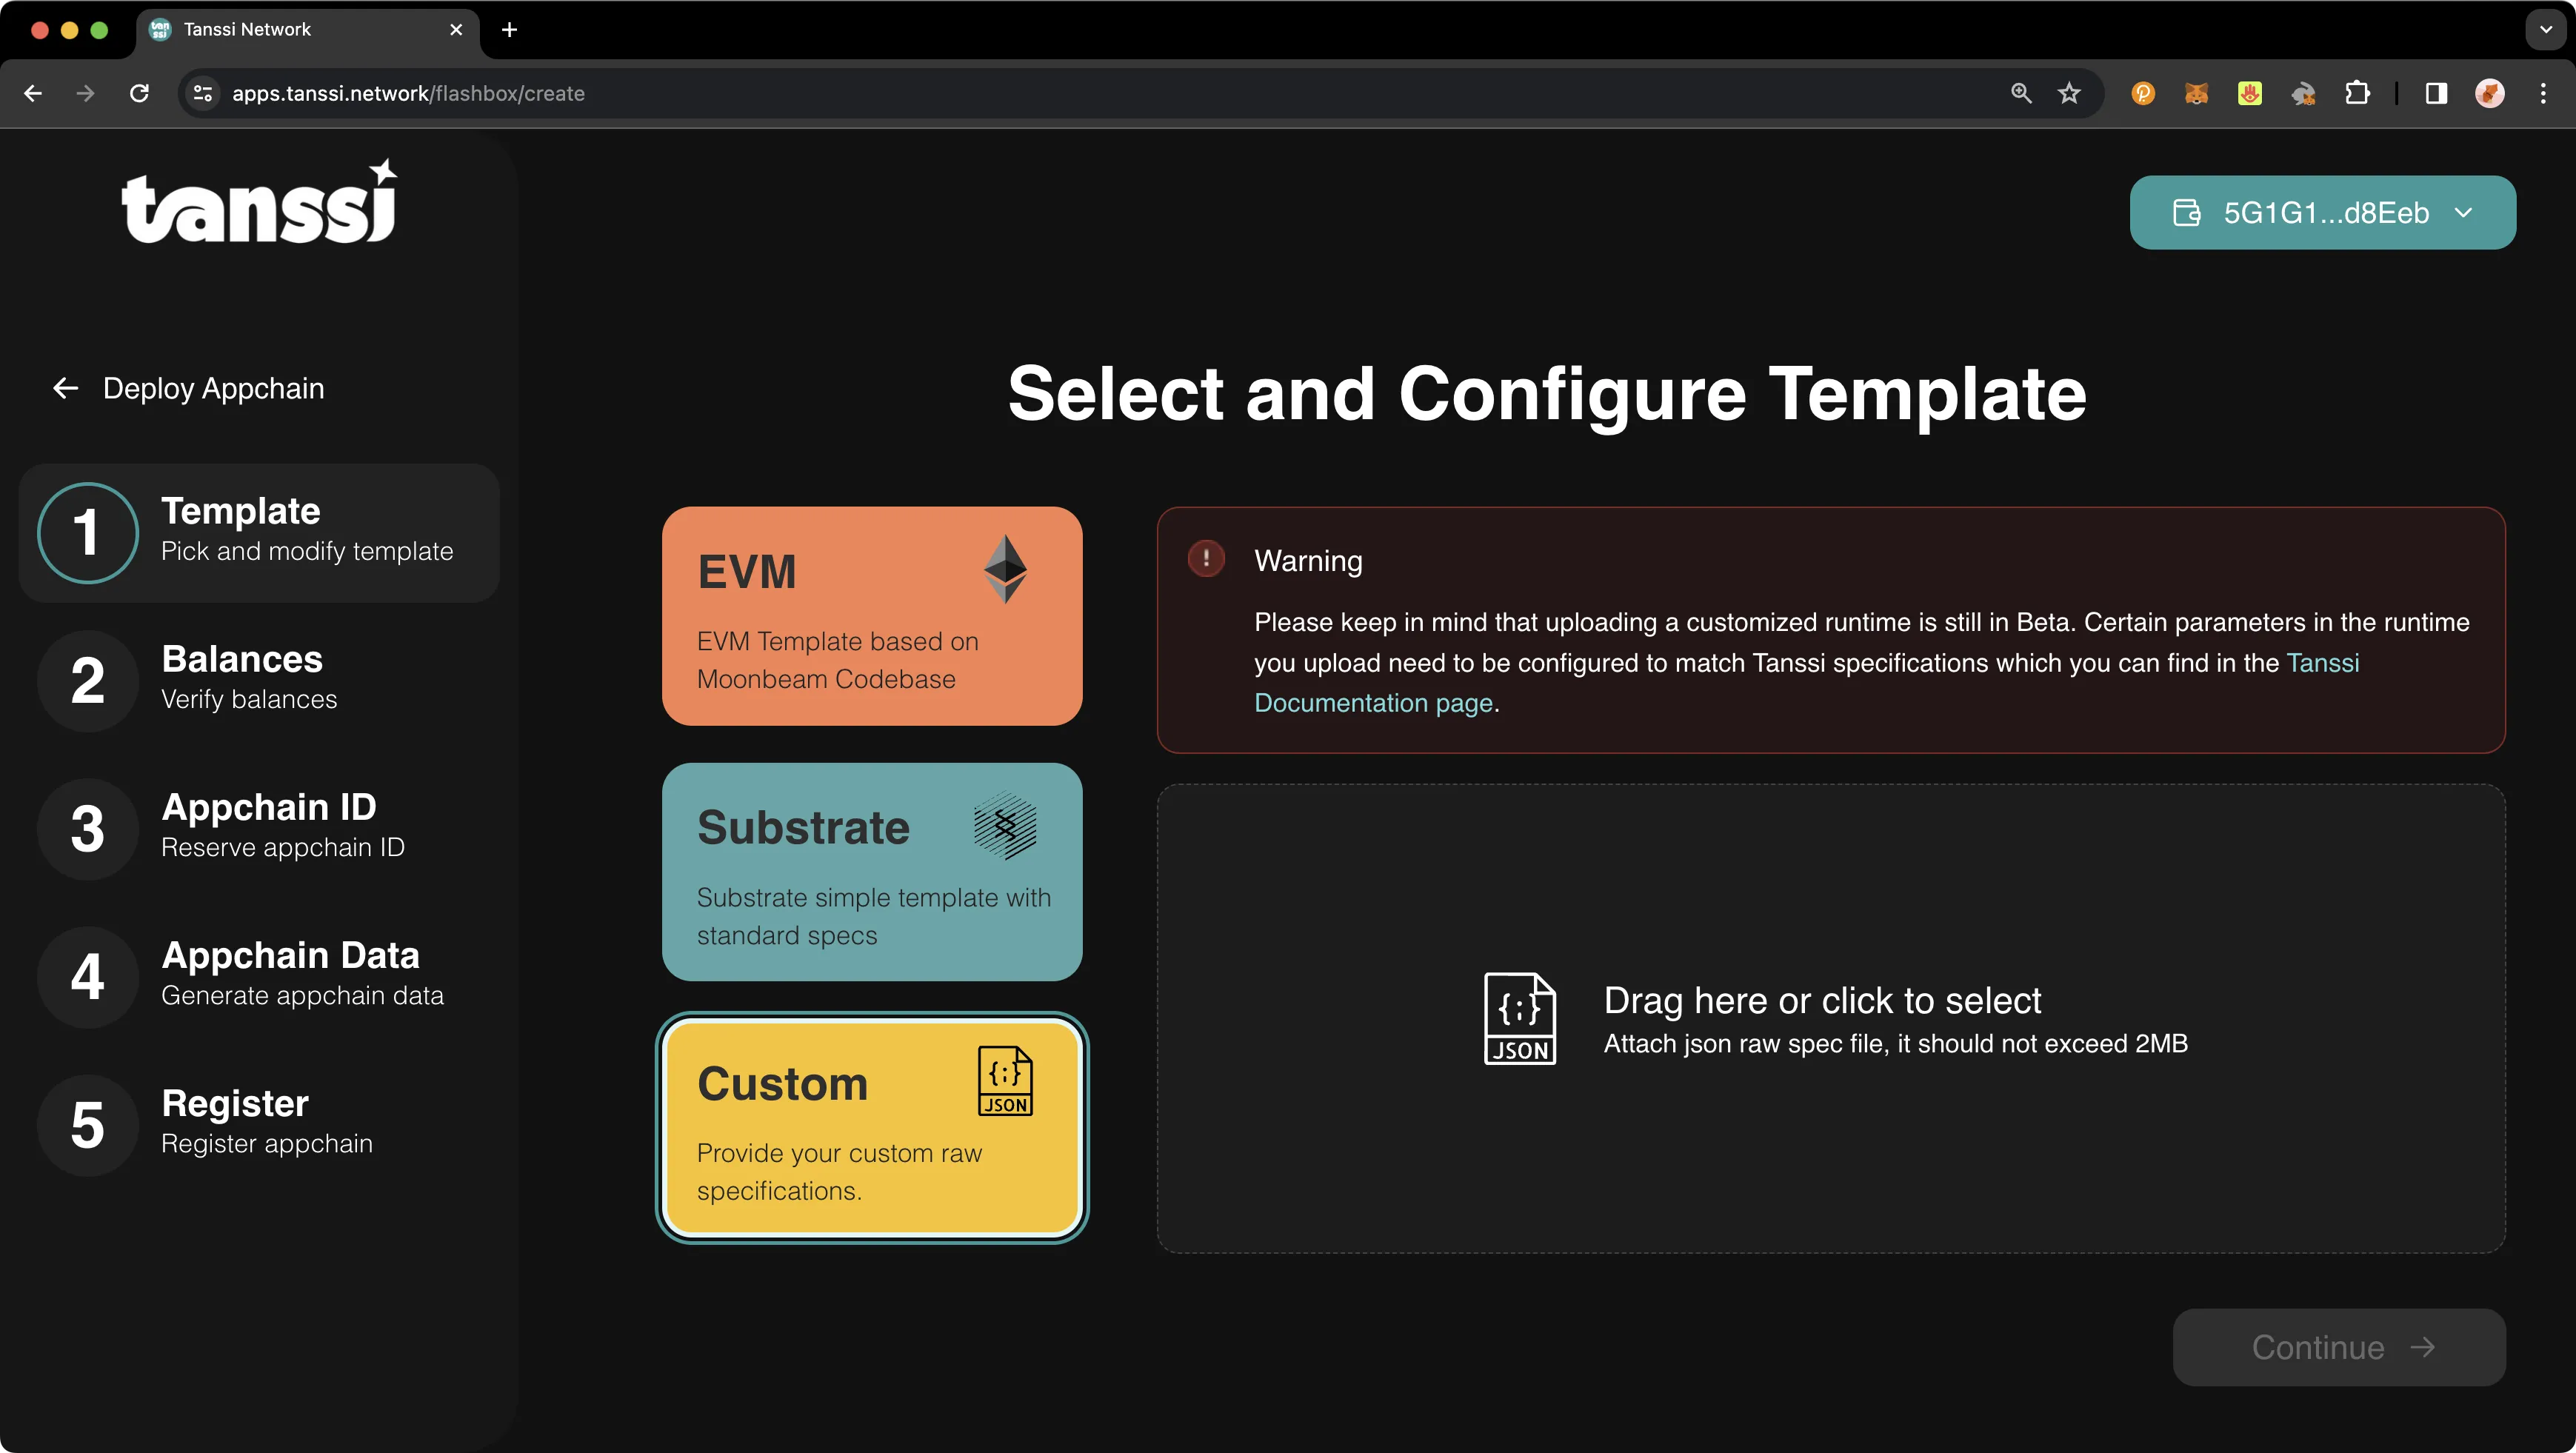
If you already have a Substrate runtime built and have chosen to upload your own custom specification file, there are some requirements you should be aware of to ensure the runtime can evolve into a Tanssi-powered appchain and run properly.
Your runtime must implement the following:
- The Cumulus SDK, as outlined in the Base Setup to Connect to Polkadot section of the Templates page
- Tanssi modules for block production, as outlined in the Base Setup to Support the Tanssi Protocol section of the Templates page
Other required changes in the runtime include:
-
To verify the author's eligibility to produce a block, set the following type as shown in the snippet, in the
timestampmodule configuration section of the runtime:type OnTimestampSet = tp_consensus::OnTimestampSet< <Self as pallet_author_inherent::Config>::SlotBeacon, ConstU64<{ SLOT_DURATION }>, >; -
Remove all the modules related to block production and consensus (such as
AuraandGrandpa), leaving Tanssi to take over the burden. If the starting point for your project was the parachain template, the following modules are included by default in the runtime and must be removed:// Collator support. The order of these 4 are important and shall not change. #[runtime::pallet_index(20)] pub type Authorship = pallet_authorship; #[runtime::pallet_index(21)] pub type CollatorSelection = pallet_collator_selection; #[runtime::pallet_index(22)] pub type Session = pallet_session; #[runtime::pallet_index(23)] pub type Aura = pallet_aura; #[runtime::pallet_index(24)] pub type AuraExt = cumulus_pallet_aura_ext;
Finally, generate and edit the chain specification paying special attention to:
para_id- within this custom flow, a pre-registered appchain id is required. You can get an appchain ID moving forward with the registration to the Reserve your Network ID step. After you reserve the ID, start over the process to get back to this pointis_ethereum- totrueif exposing Ethereum compatible RPC endpoints is needed
And, depending on whether you are deploying a quick trial appchain or a dedicated one, also adjust these attributes:
{
    ...
    "relay_chain": "rococo_flashbox_relay_testnet",
    "chainType": "Live",
    "genesis": {
        "runtime": {
            ...
            "authoritiesNoting": {
                "orchestratorParaId": 1000
            },
            ...
        }
    }
    ...
}
{
    ...
    "relay_chain": "rococo-local",
    "chainType": "Live",
    "genesis": {
        "runtime": {
            ...
            "authoritiesNoting": {
                "orchestratorParaId": 0
            },
            ...
        }
    }
    ...
}
Now, you can upload your custom raw specification file by selecting the Custom template and adding your JSON specification file.
Note
The size of a raw chain specifications file should not exceed 2MB.
Check Balances
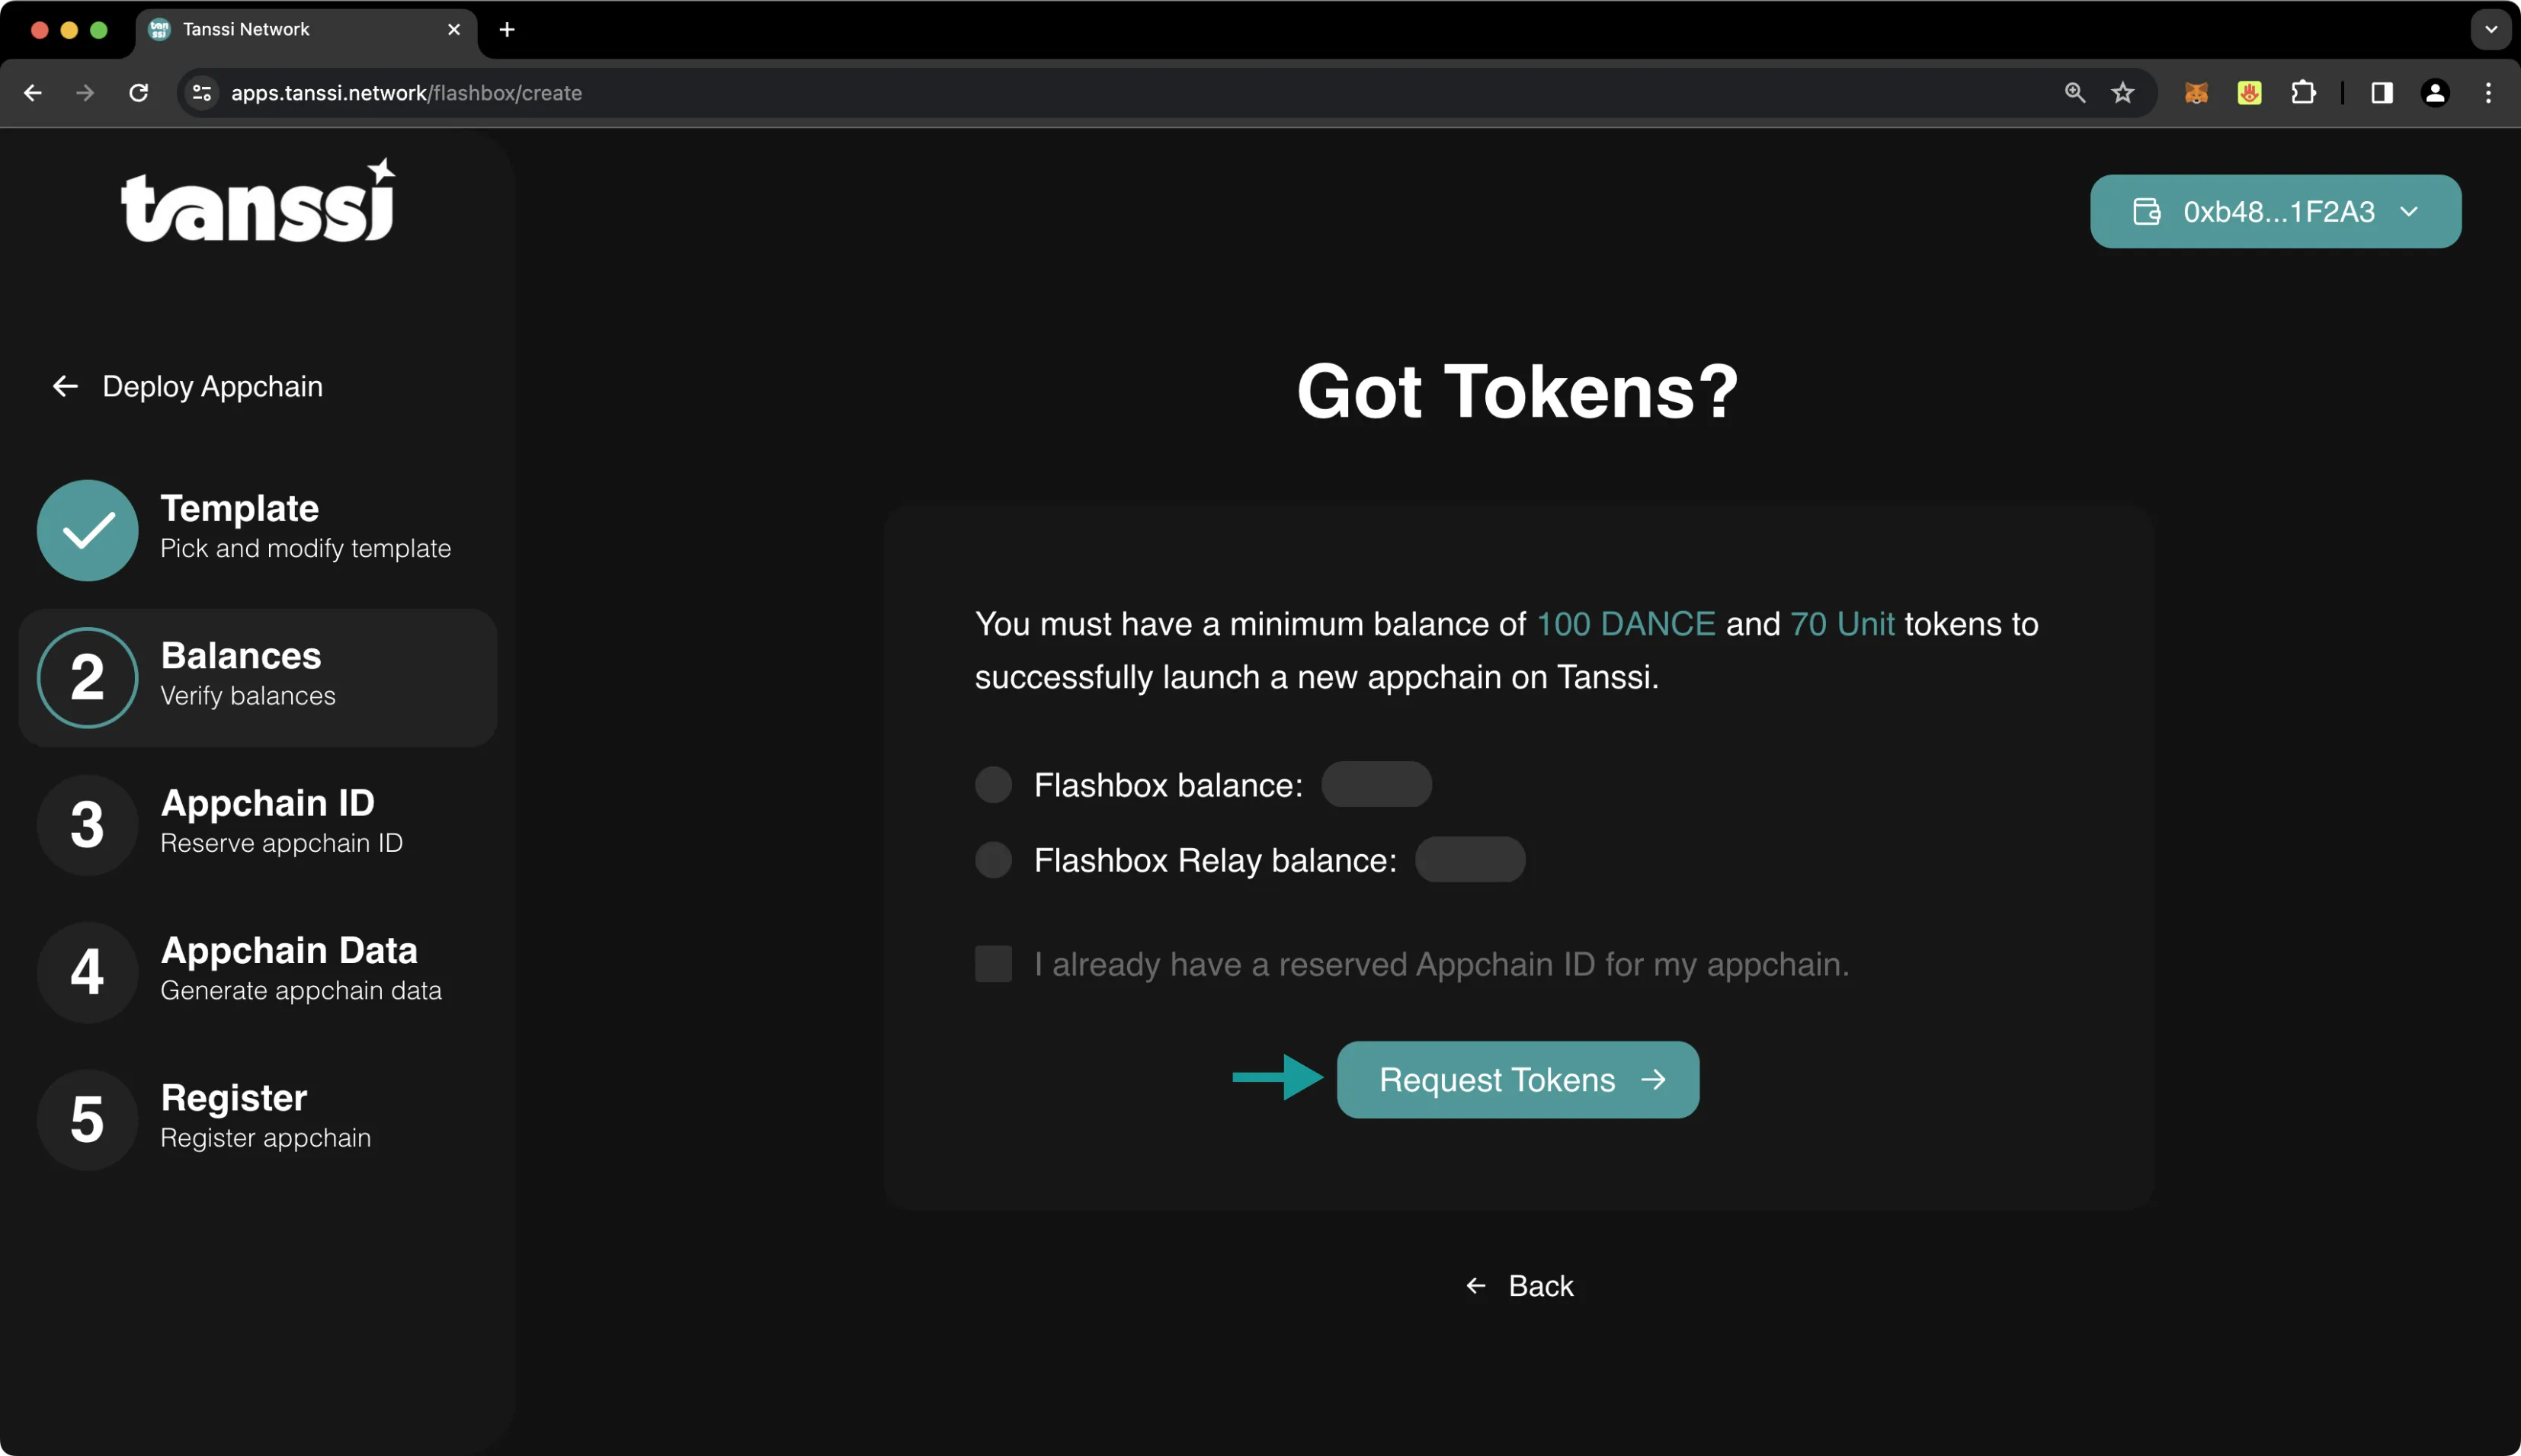
Next, you'll need to verify that you have sufficient balance. If you don't, you can press Request Tokens and complete the following login with GitHub or Google. You'll need to complete a few quick onboarding questions, and then you'll be able to press Request Tokens again, and they will be delivered to your connected wallet.
If you're setting up a dedicated Tanssi appchain, you'll need to fill out an application form. The Tanssi team will review your application and send the necessary tokens within one business day.
The required minimum balances to launch a Tanssi appchain are as follows:
| Chain | Balance Required |
|---|---|
| Orchestration layer | 70 UNIT |
| Tanssi TestNet | 100 SNAP |
| Chain | Balance Required |
|---|---|
| Tanssi TestNet | 100 STAR |
Note
Quick trial appchains use an additional orchestration layer, therefore two different tokens, SNAP and UNIT, will be sent to your account. For dedicated appchains only STAR tokens are required.
Reserve your Appchain ID
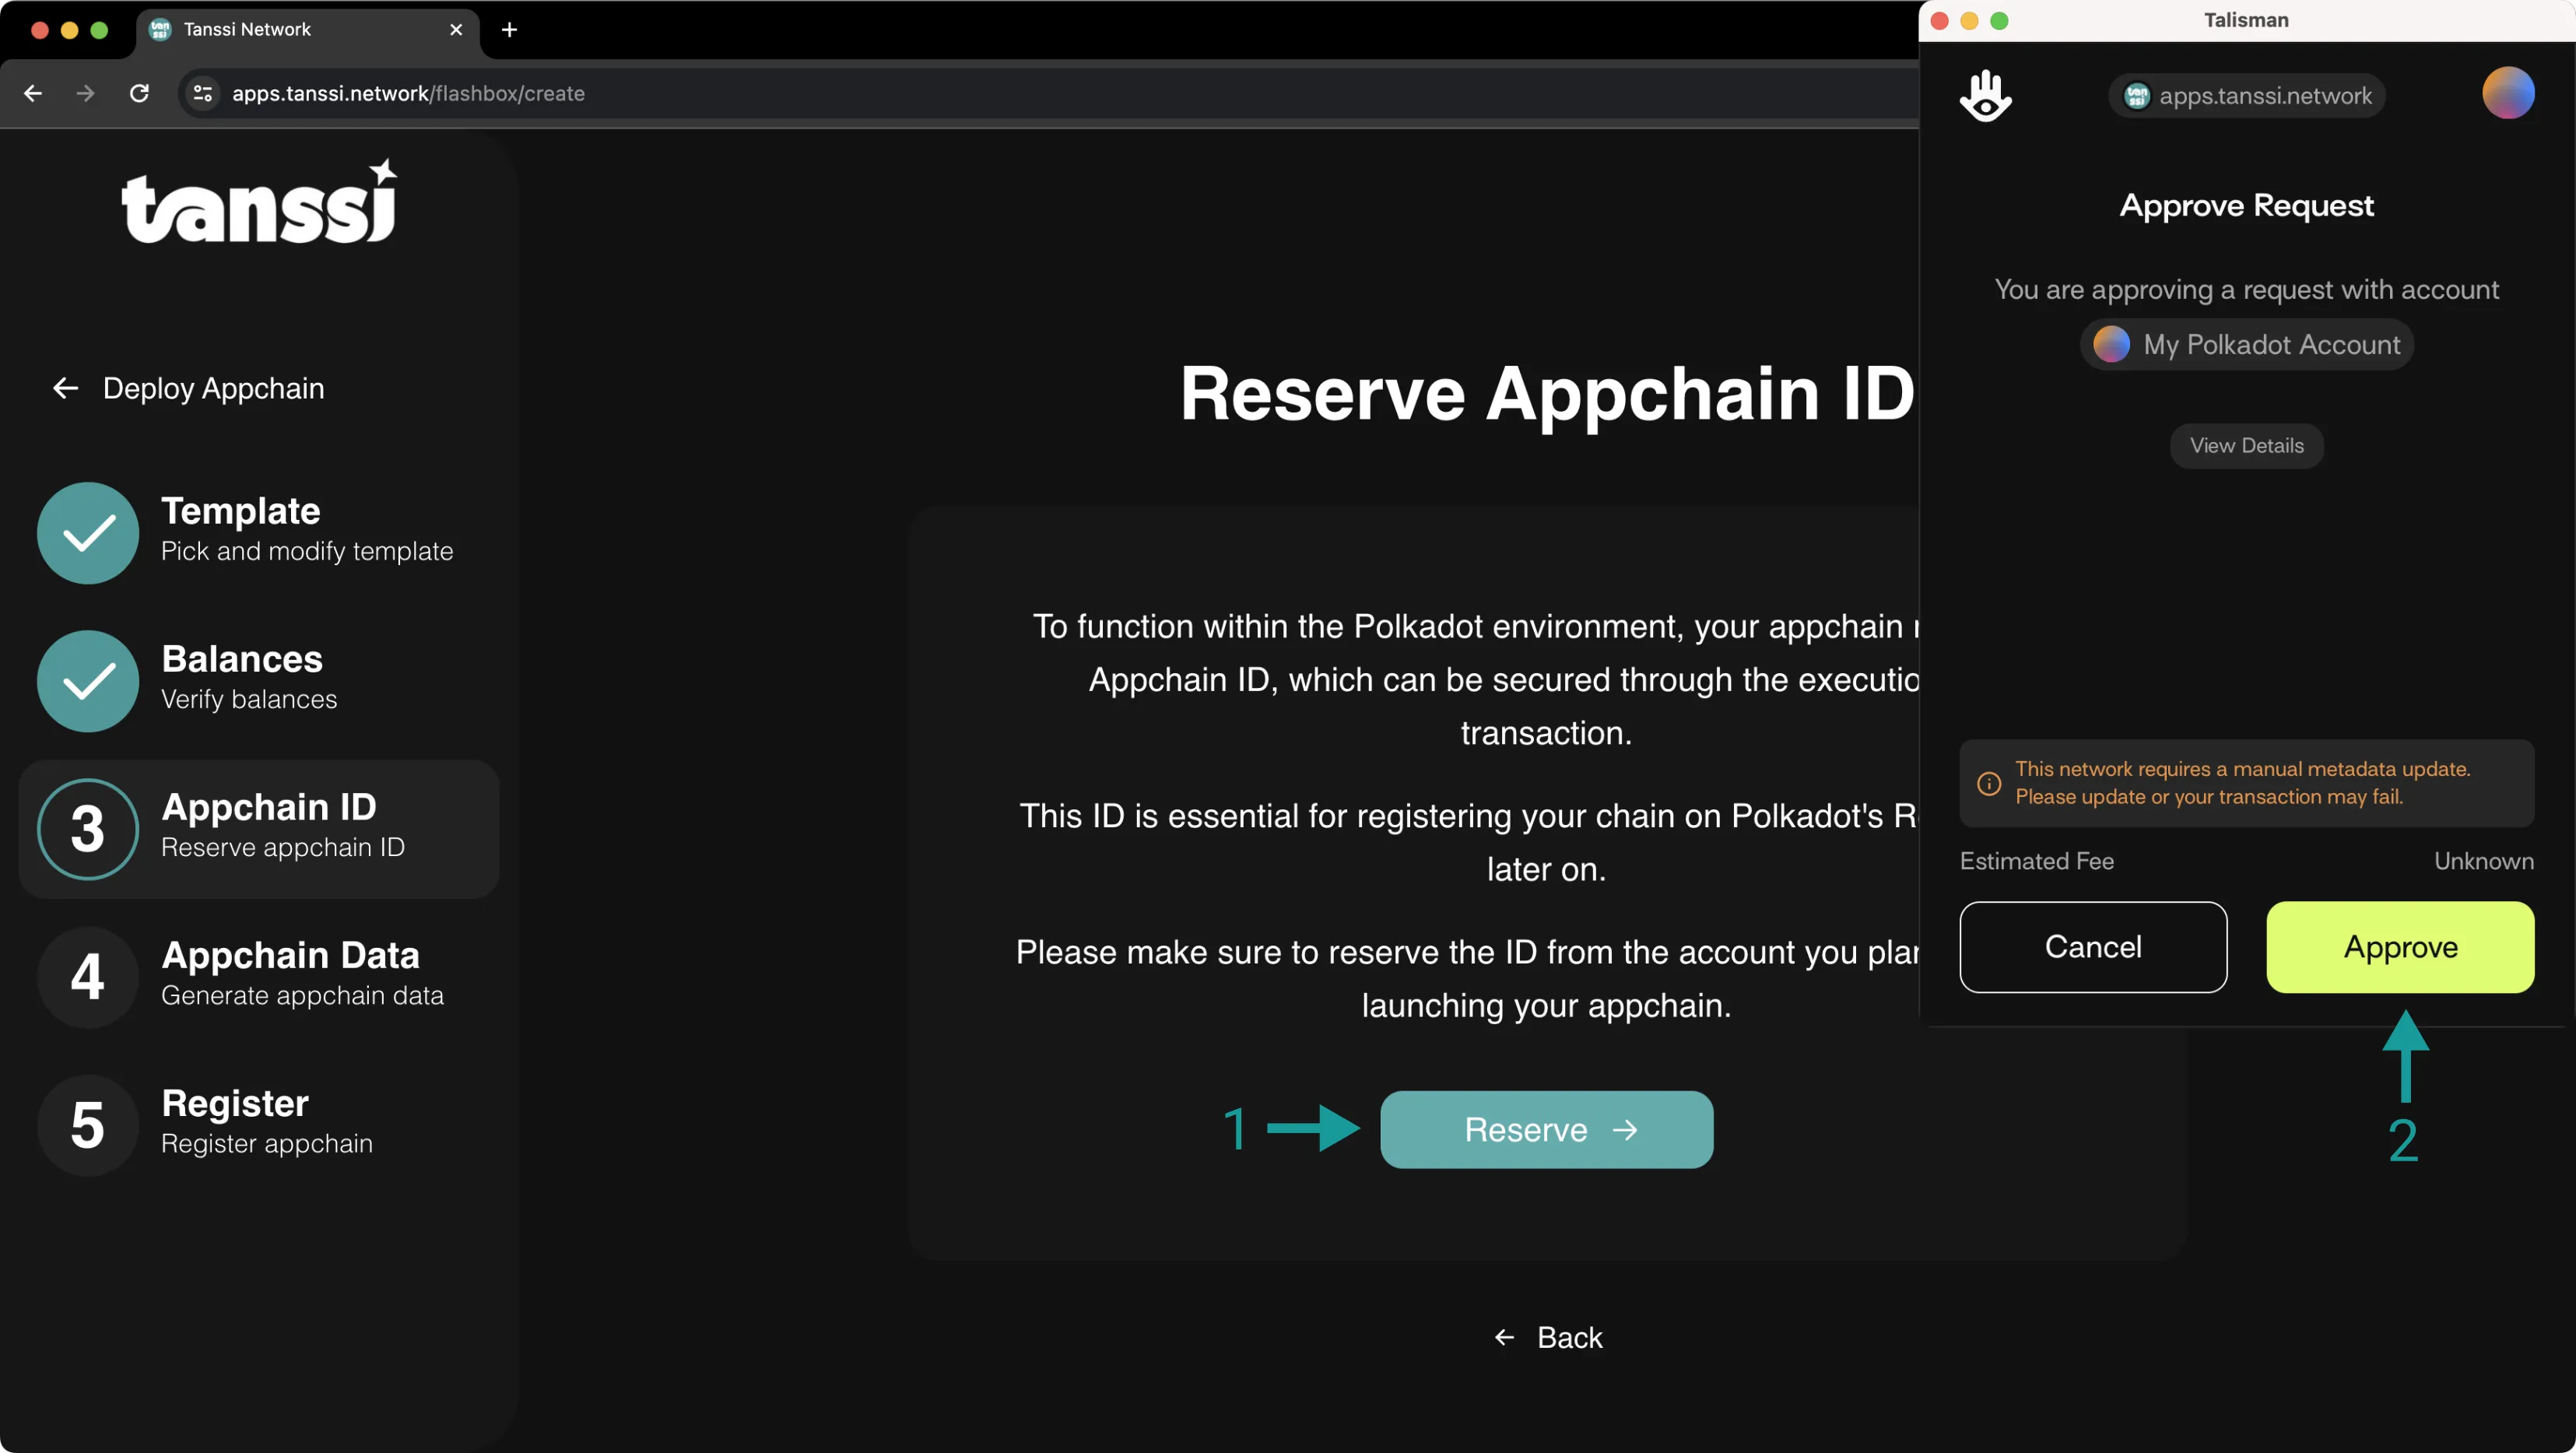
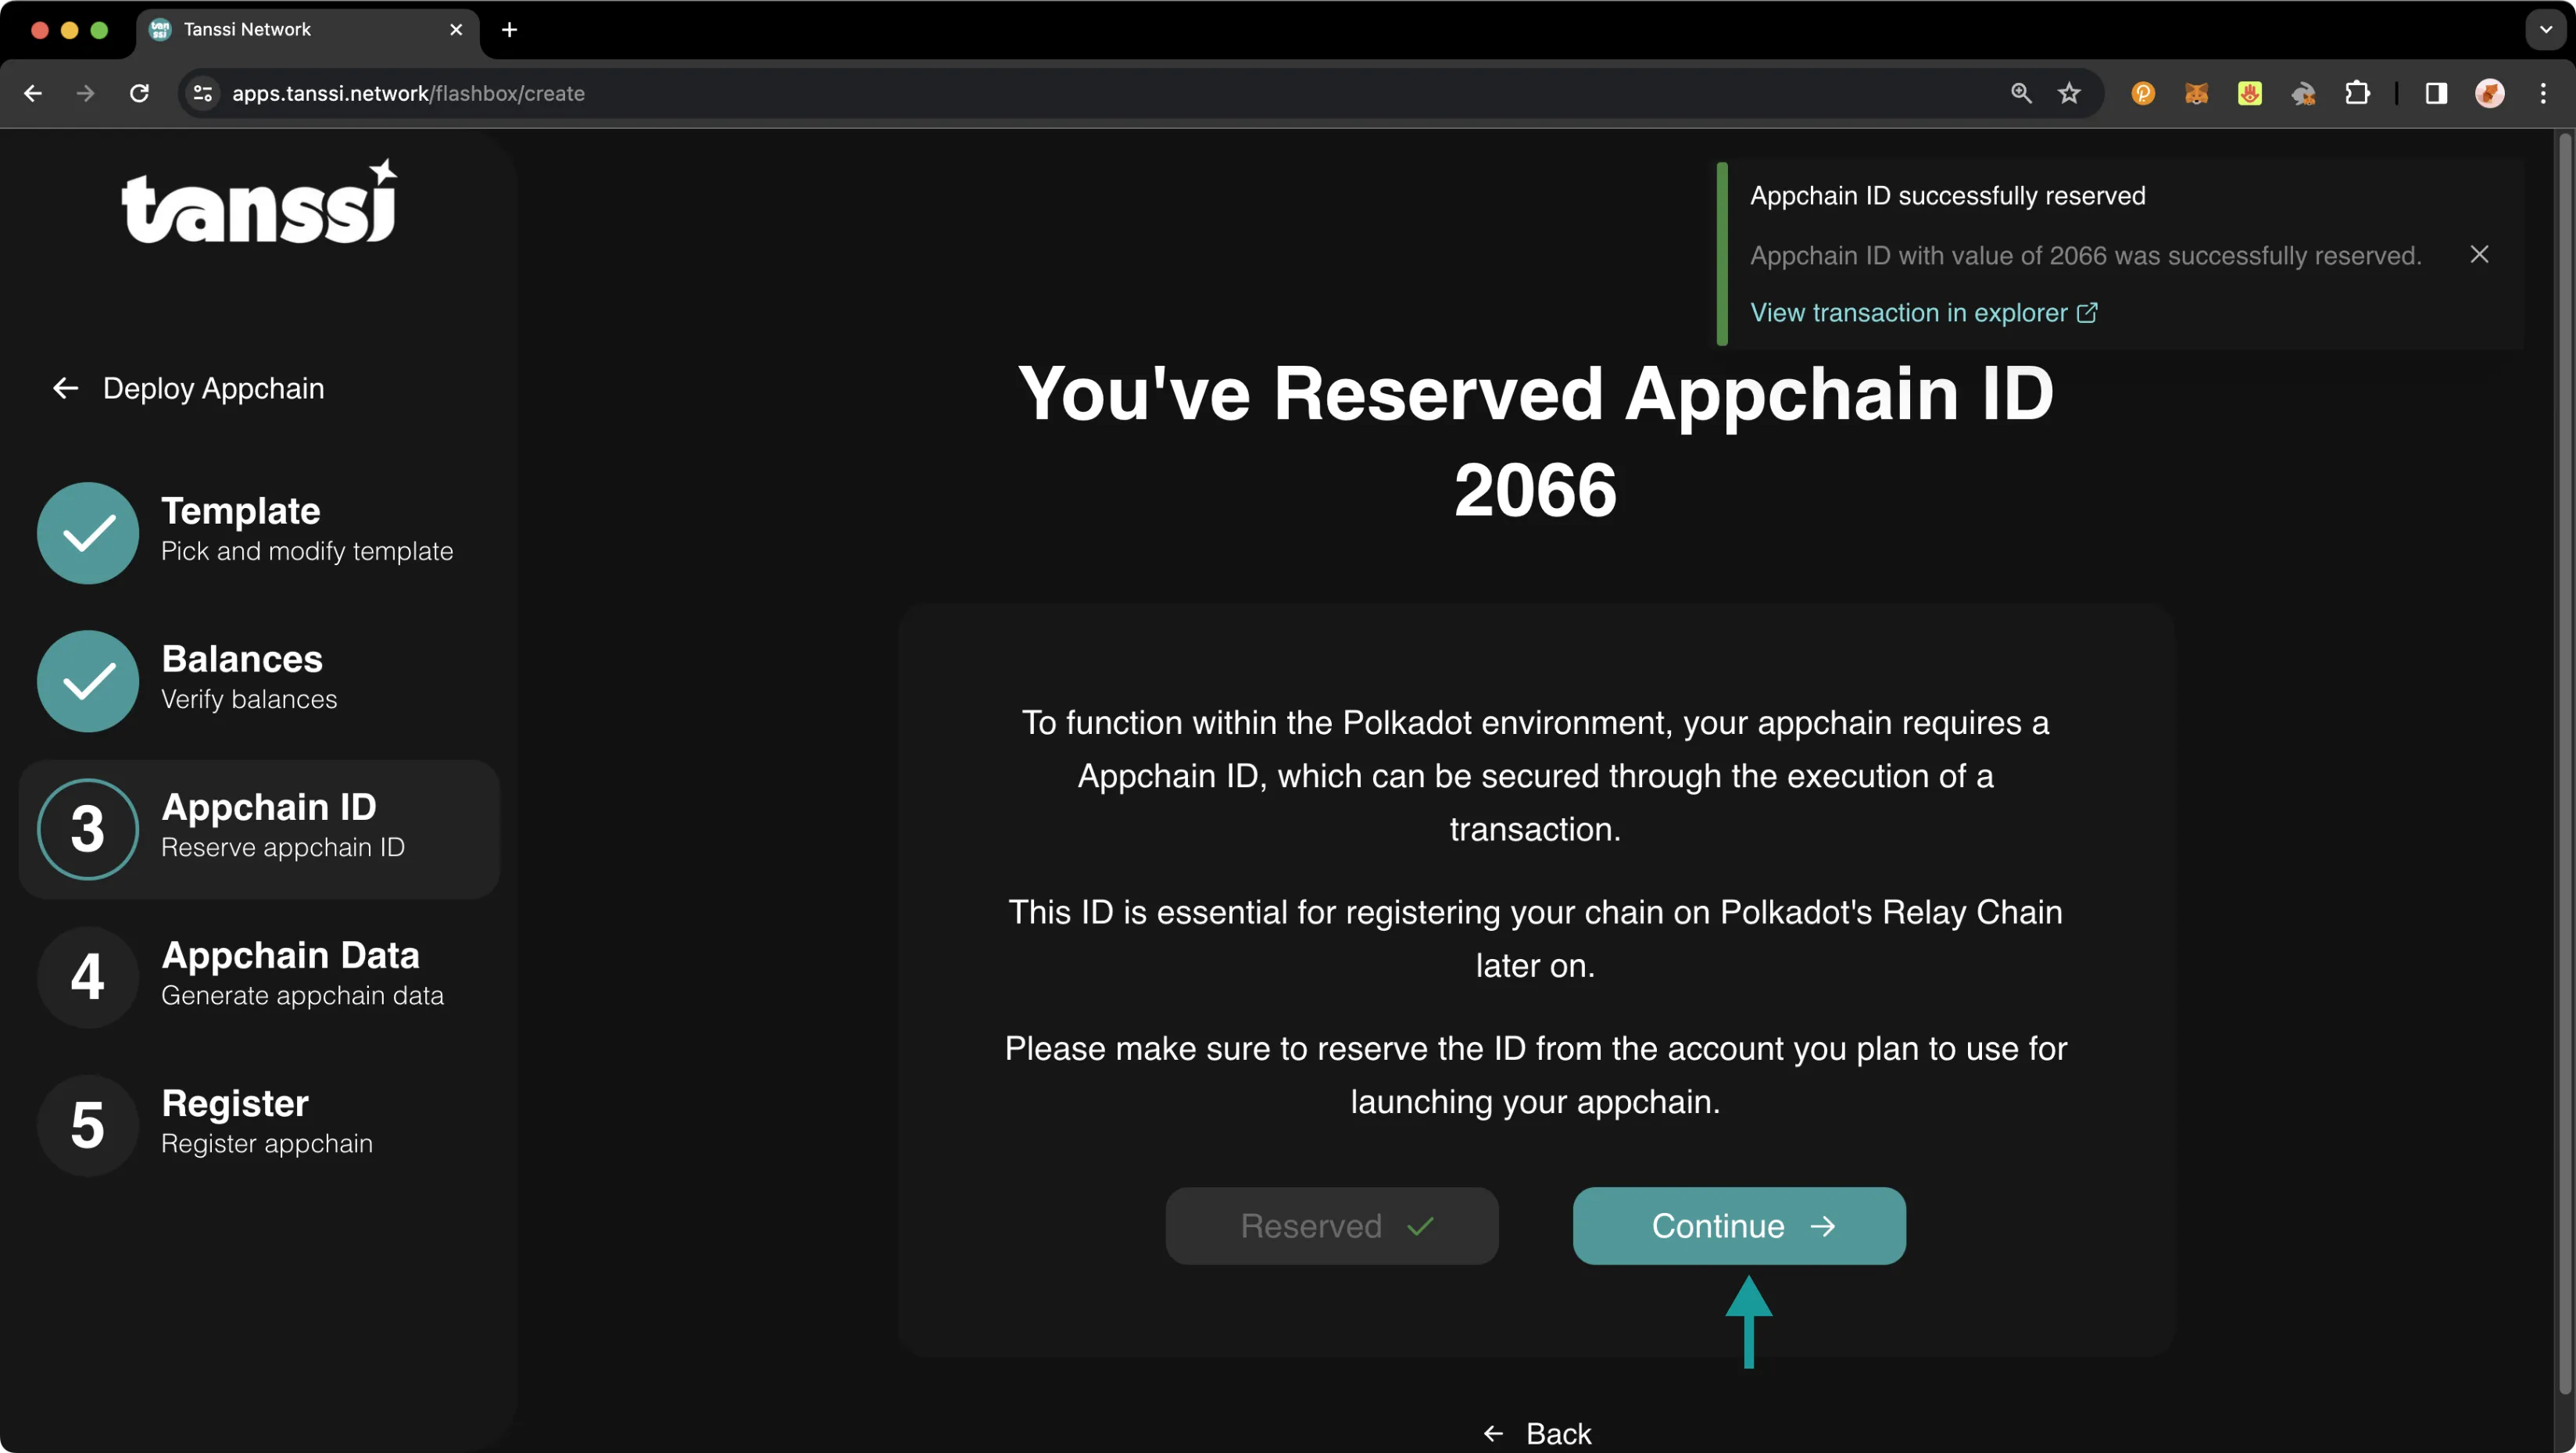
If you haven't already done so, you must to reserve your Tanssi appchain ID, which will identify your chain within the Tanssi ecosystem.
To reserve your Tanssi appchain ID, you'll need to submit a transaction. Please make sure to use the account you plan to launch your Tanssi appchain with when submitting the transaction.
- To initiate the transaction, click on Reserve Network ID
- Your wallet will pop up, and you'll need to submit the transaction
Once the transaction has successfully gone through, your Tanssi appchain ID will be displayed on the dApp, and you'll be able to click Continue to proceed to the next step. You'll notice that some of your UNIT (or STAR if registering a dedicated Appchain) tokens have been removed from your transferable balance and are now reserved.
Generate Your Appchain Files
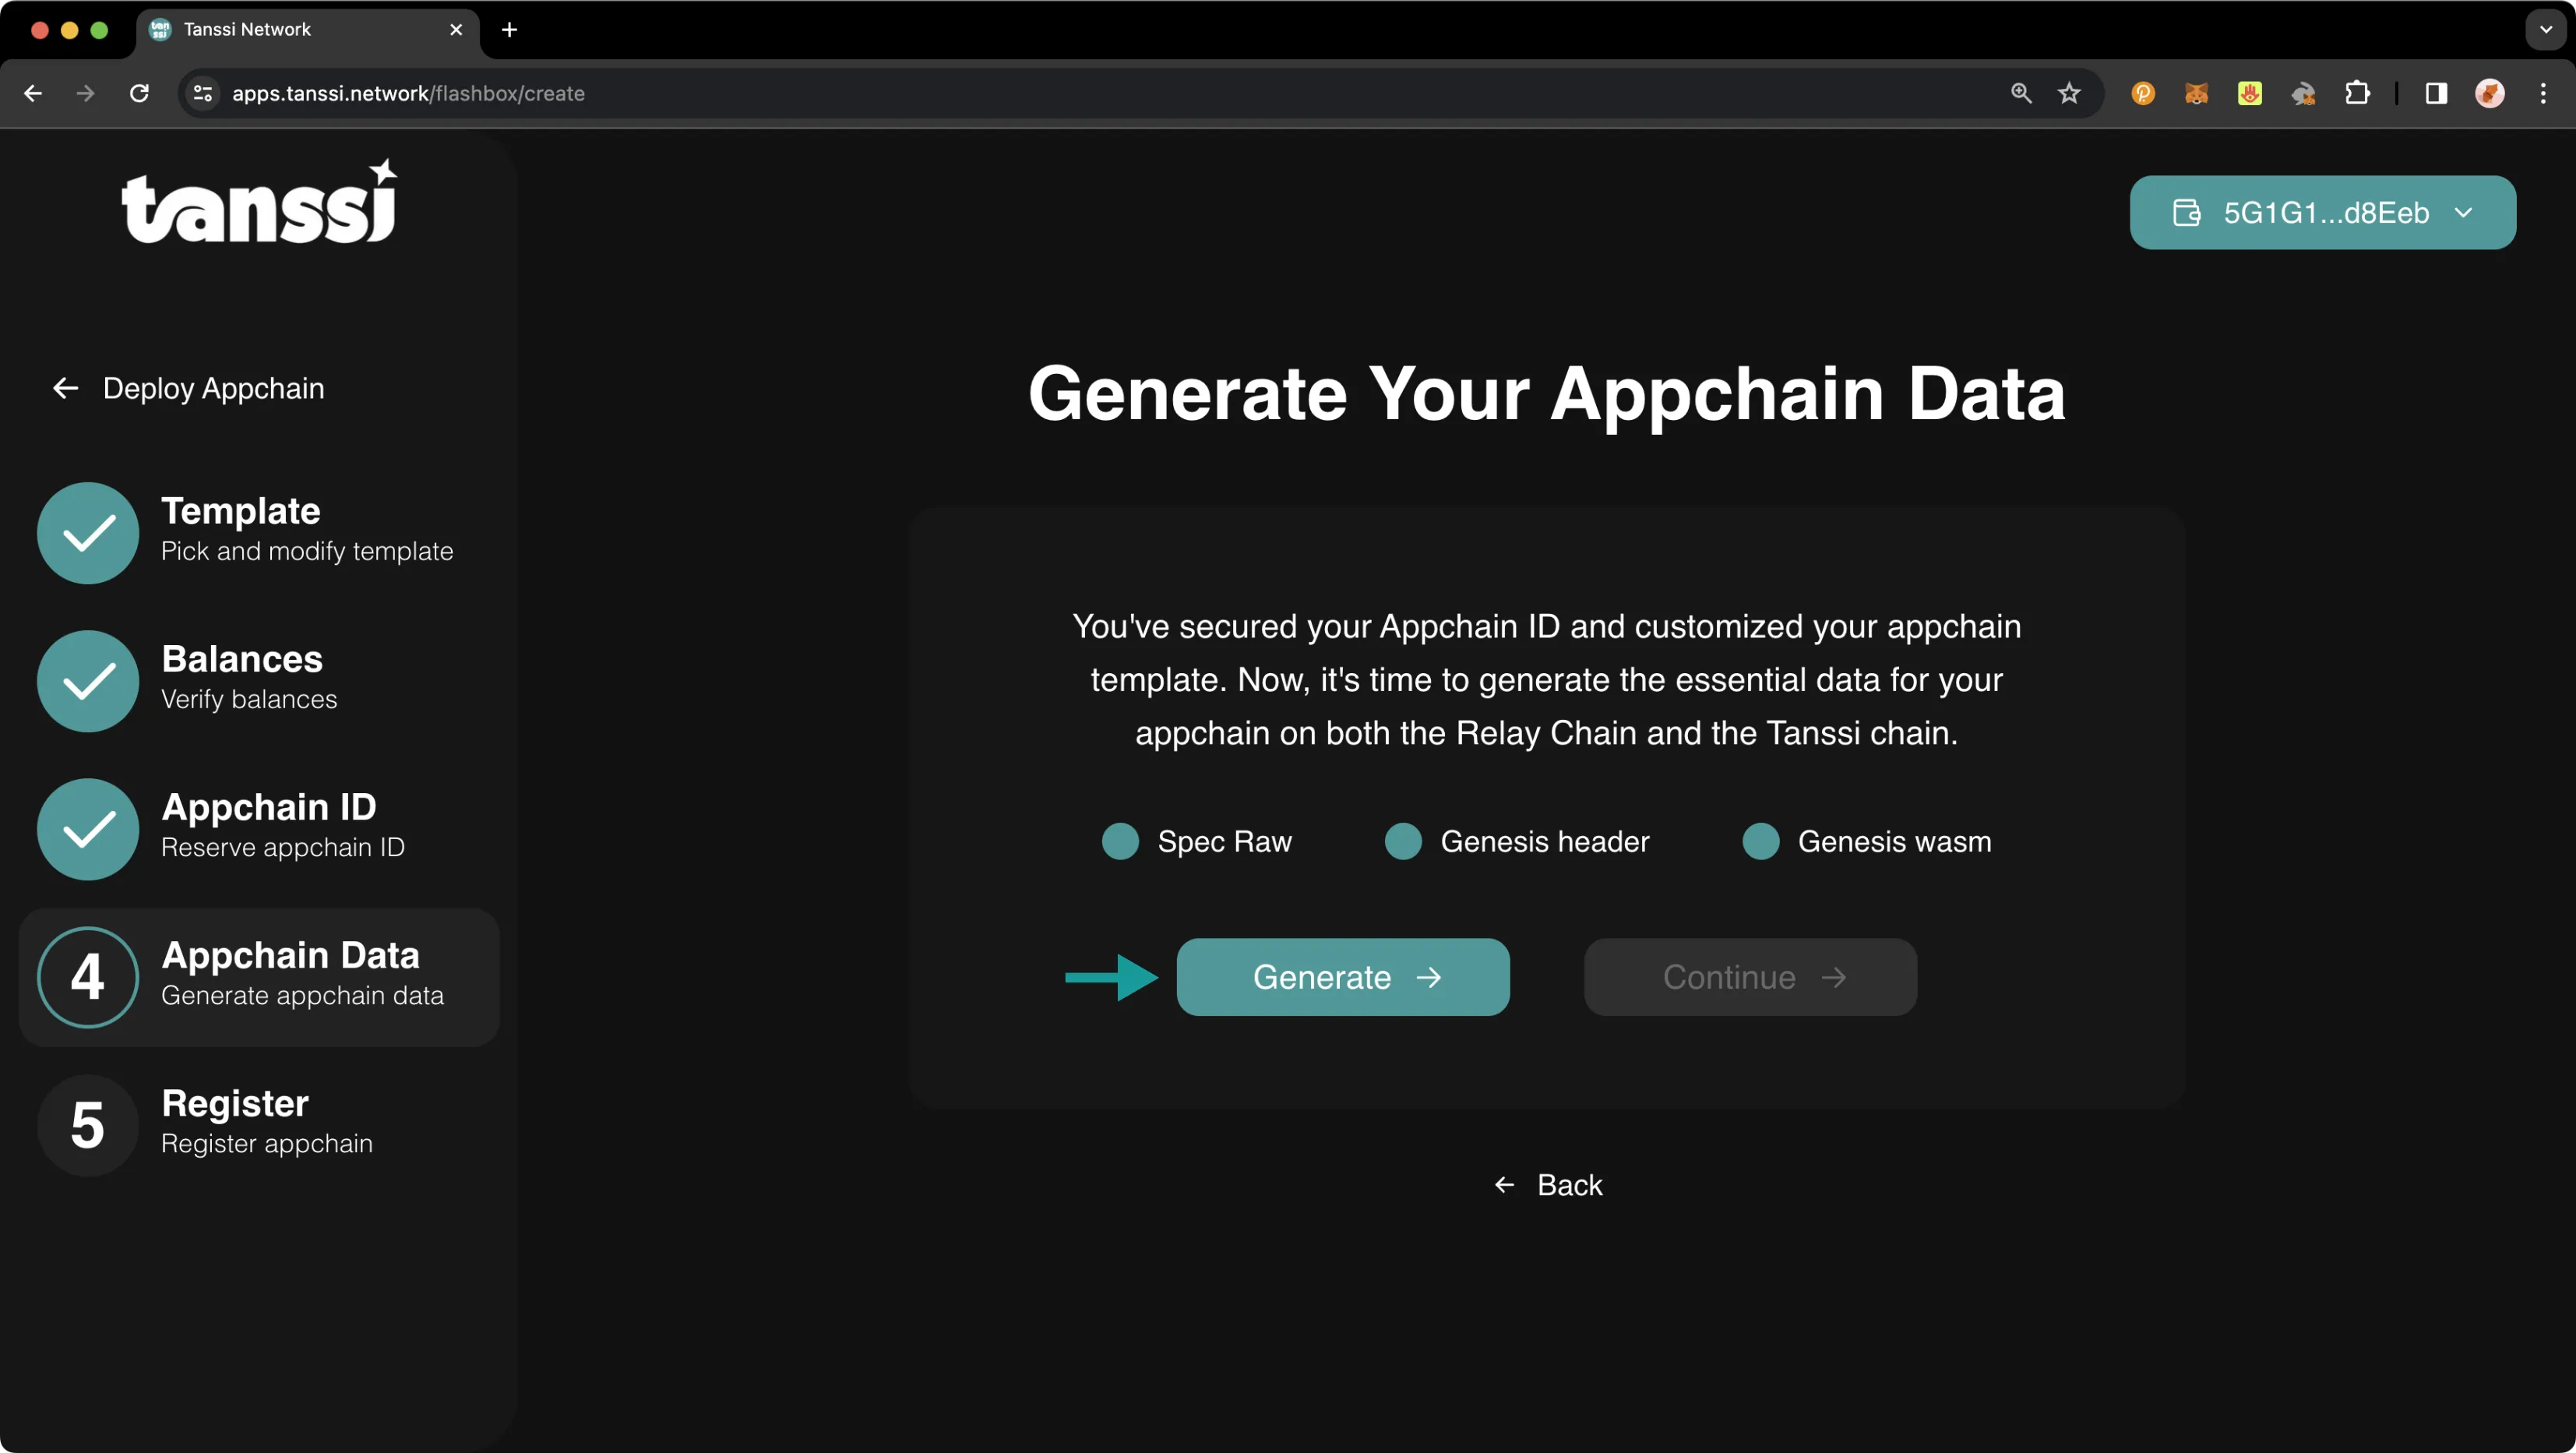
Before you can deploy your Tanssi appchain, you'll need to generate three configuration files:
- The raw chain specification - a compact version of the JSON specification file, which defines the initial settings and state that all nodes participating in the network must agree on to reach consensus and produce blocks
- The genesis state header - defines the initial state upon which all transactions and state transitions are executed
- The genesis Wasm - a WebAssembly (Wasm) blob that defines the runtime logic
These files will automatically be generated for you based on your Tanssi appchain ID and your customized template configurations. All you need to do is click Generate, and the dApp will generate the required files for you.
Once the files have been generated, please click Continue to go on to the final step.
Deploy Your appchain
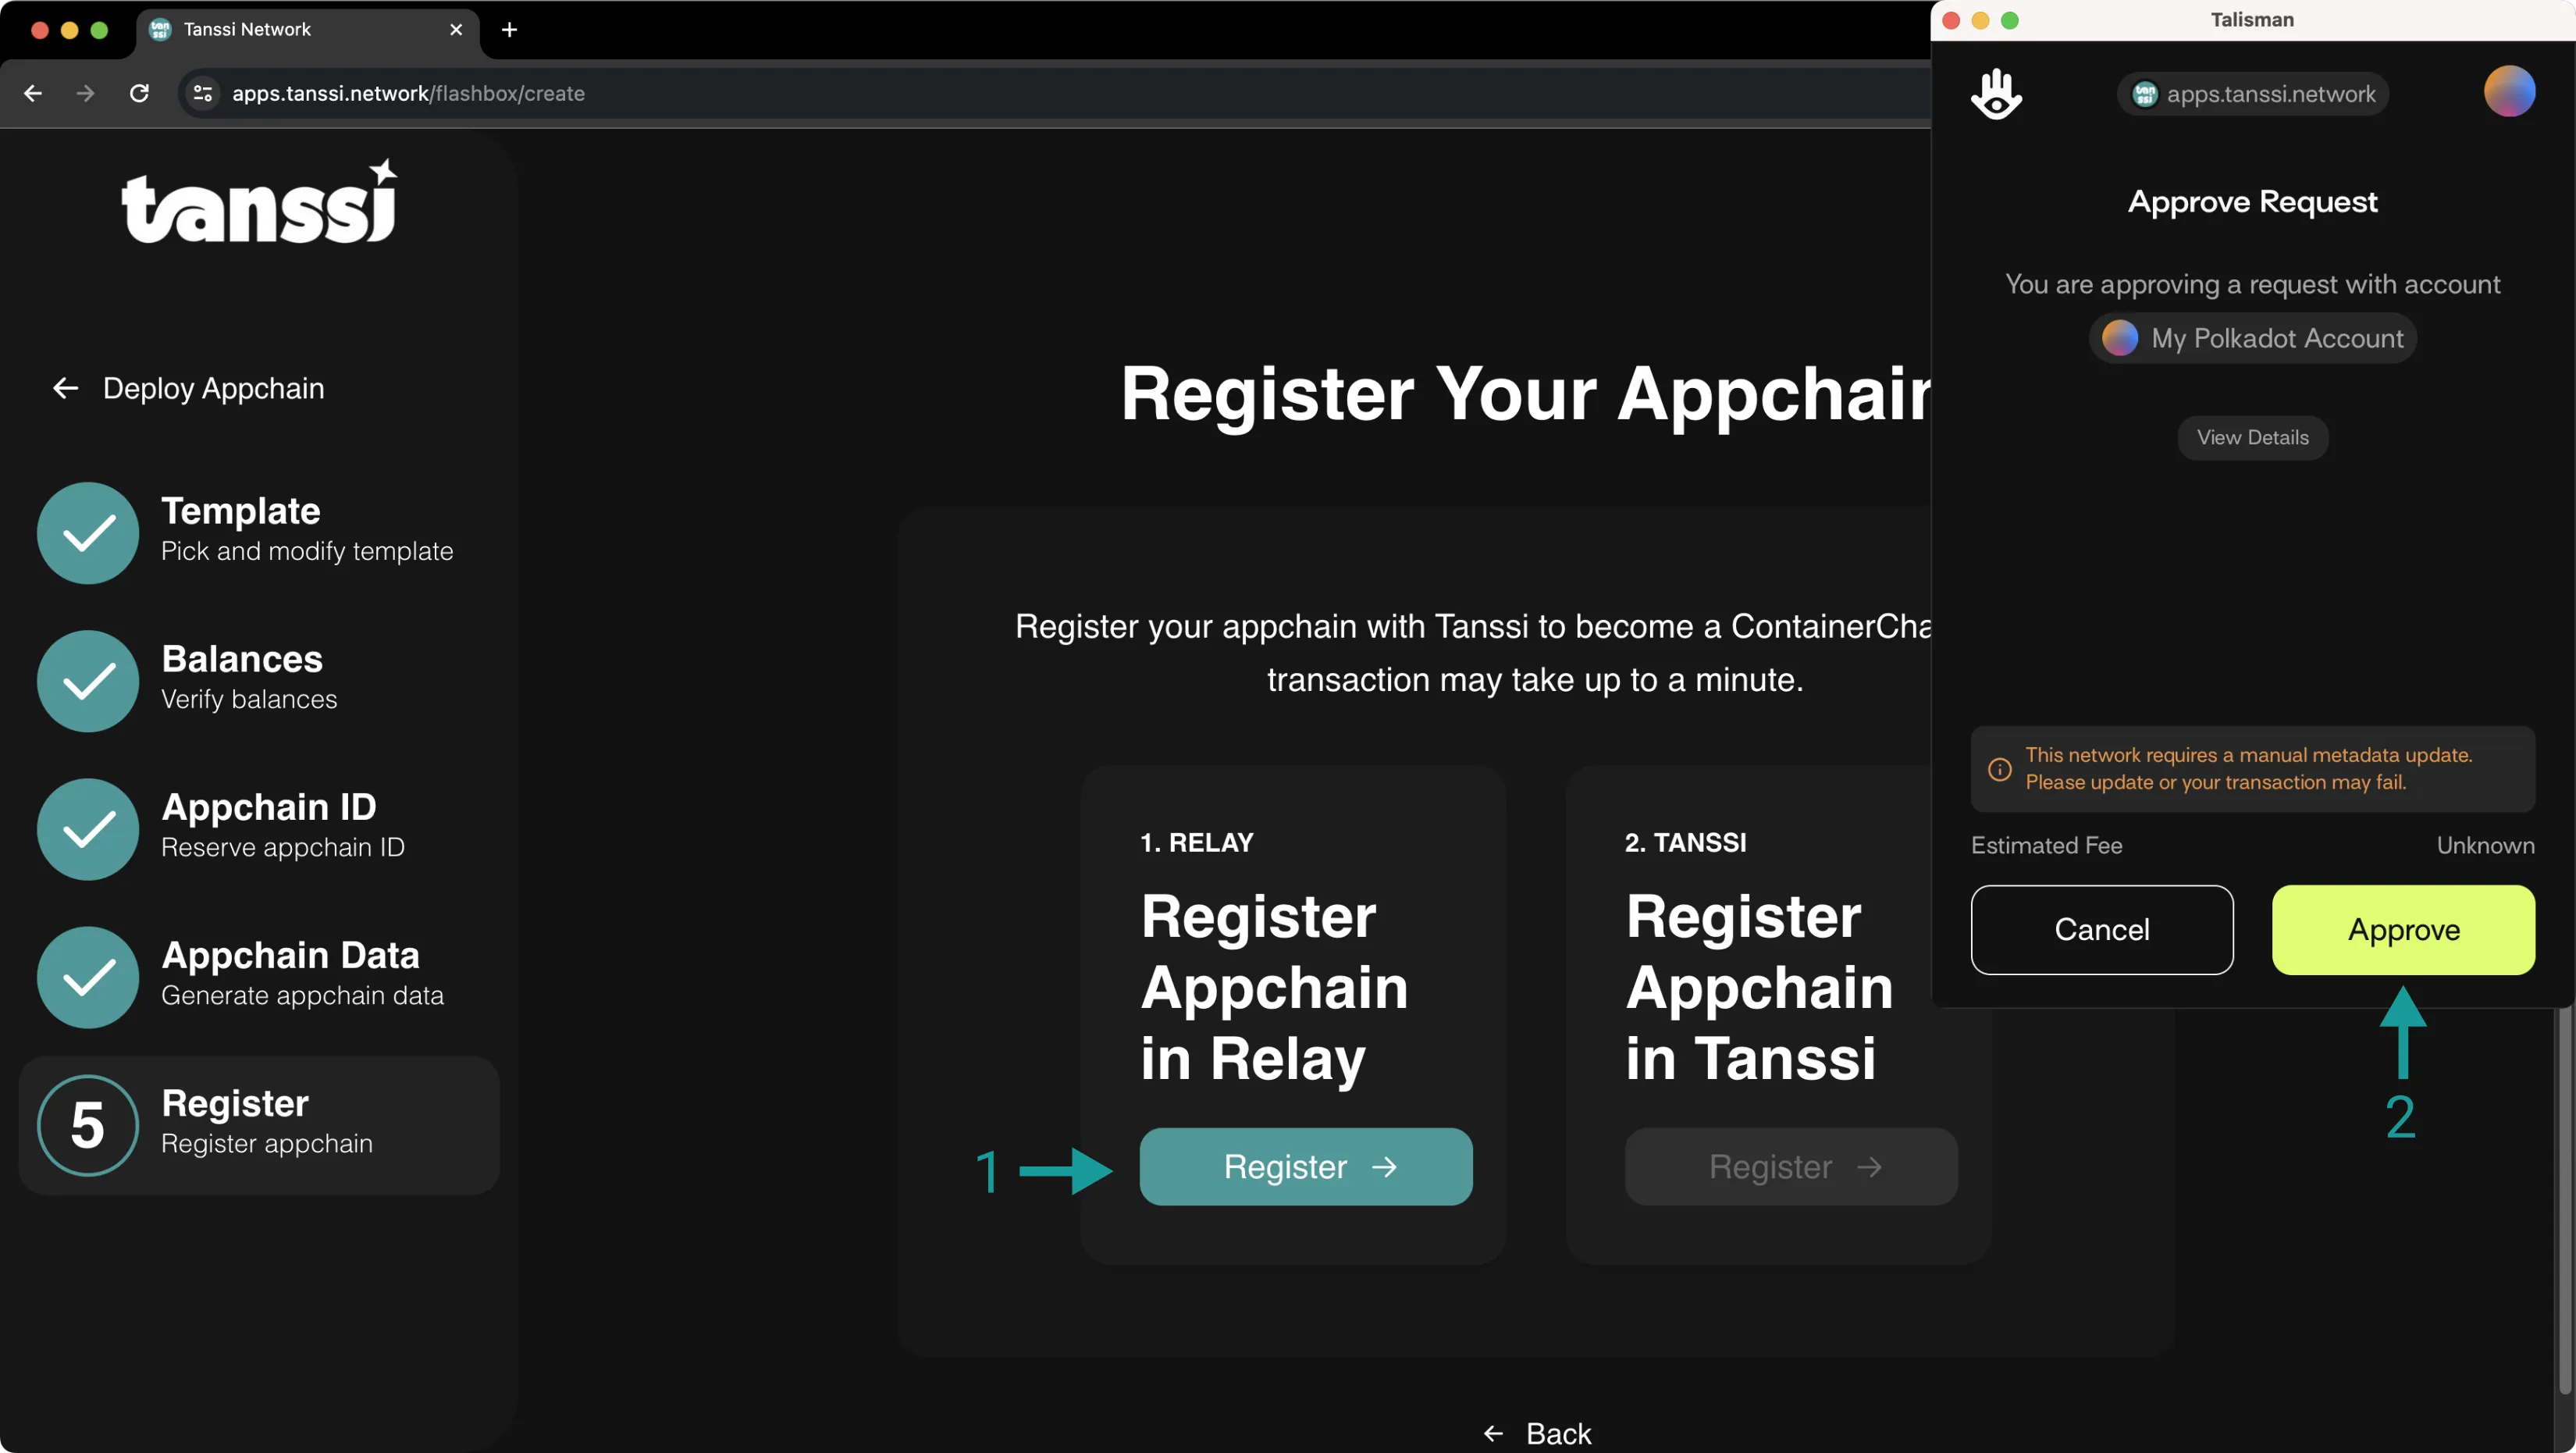
You're finally ready to take your last step towards preparing your appchain as it evolves into a Tanssi-powered appchain! For this final step, when registering a quick trial you'll need to submit two transactions: one to register your appchain on the orchestration layer and another to register your appchain on the Tanssi TestNet.
To register your appchain on the orchestration layer, take the following steps:
- Click Register under the Register Network in Relay section
- Confirm the transaction in your wallet
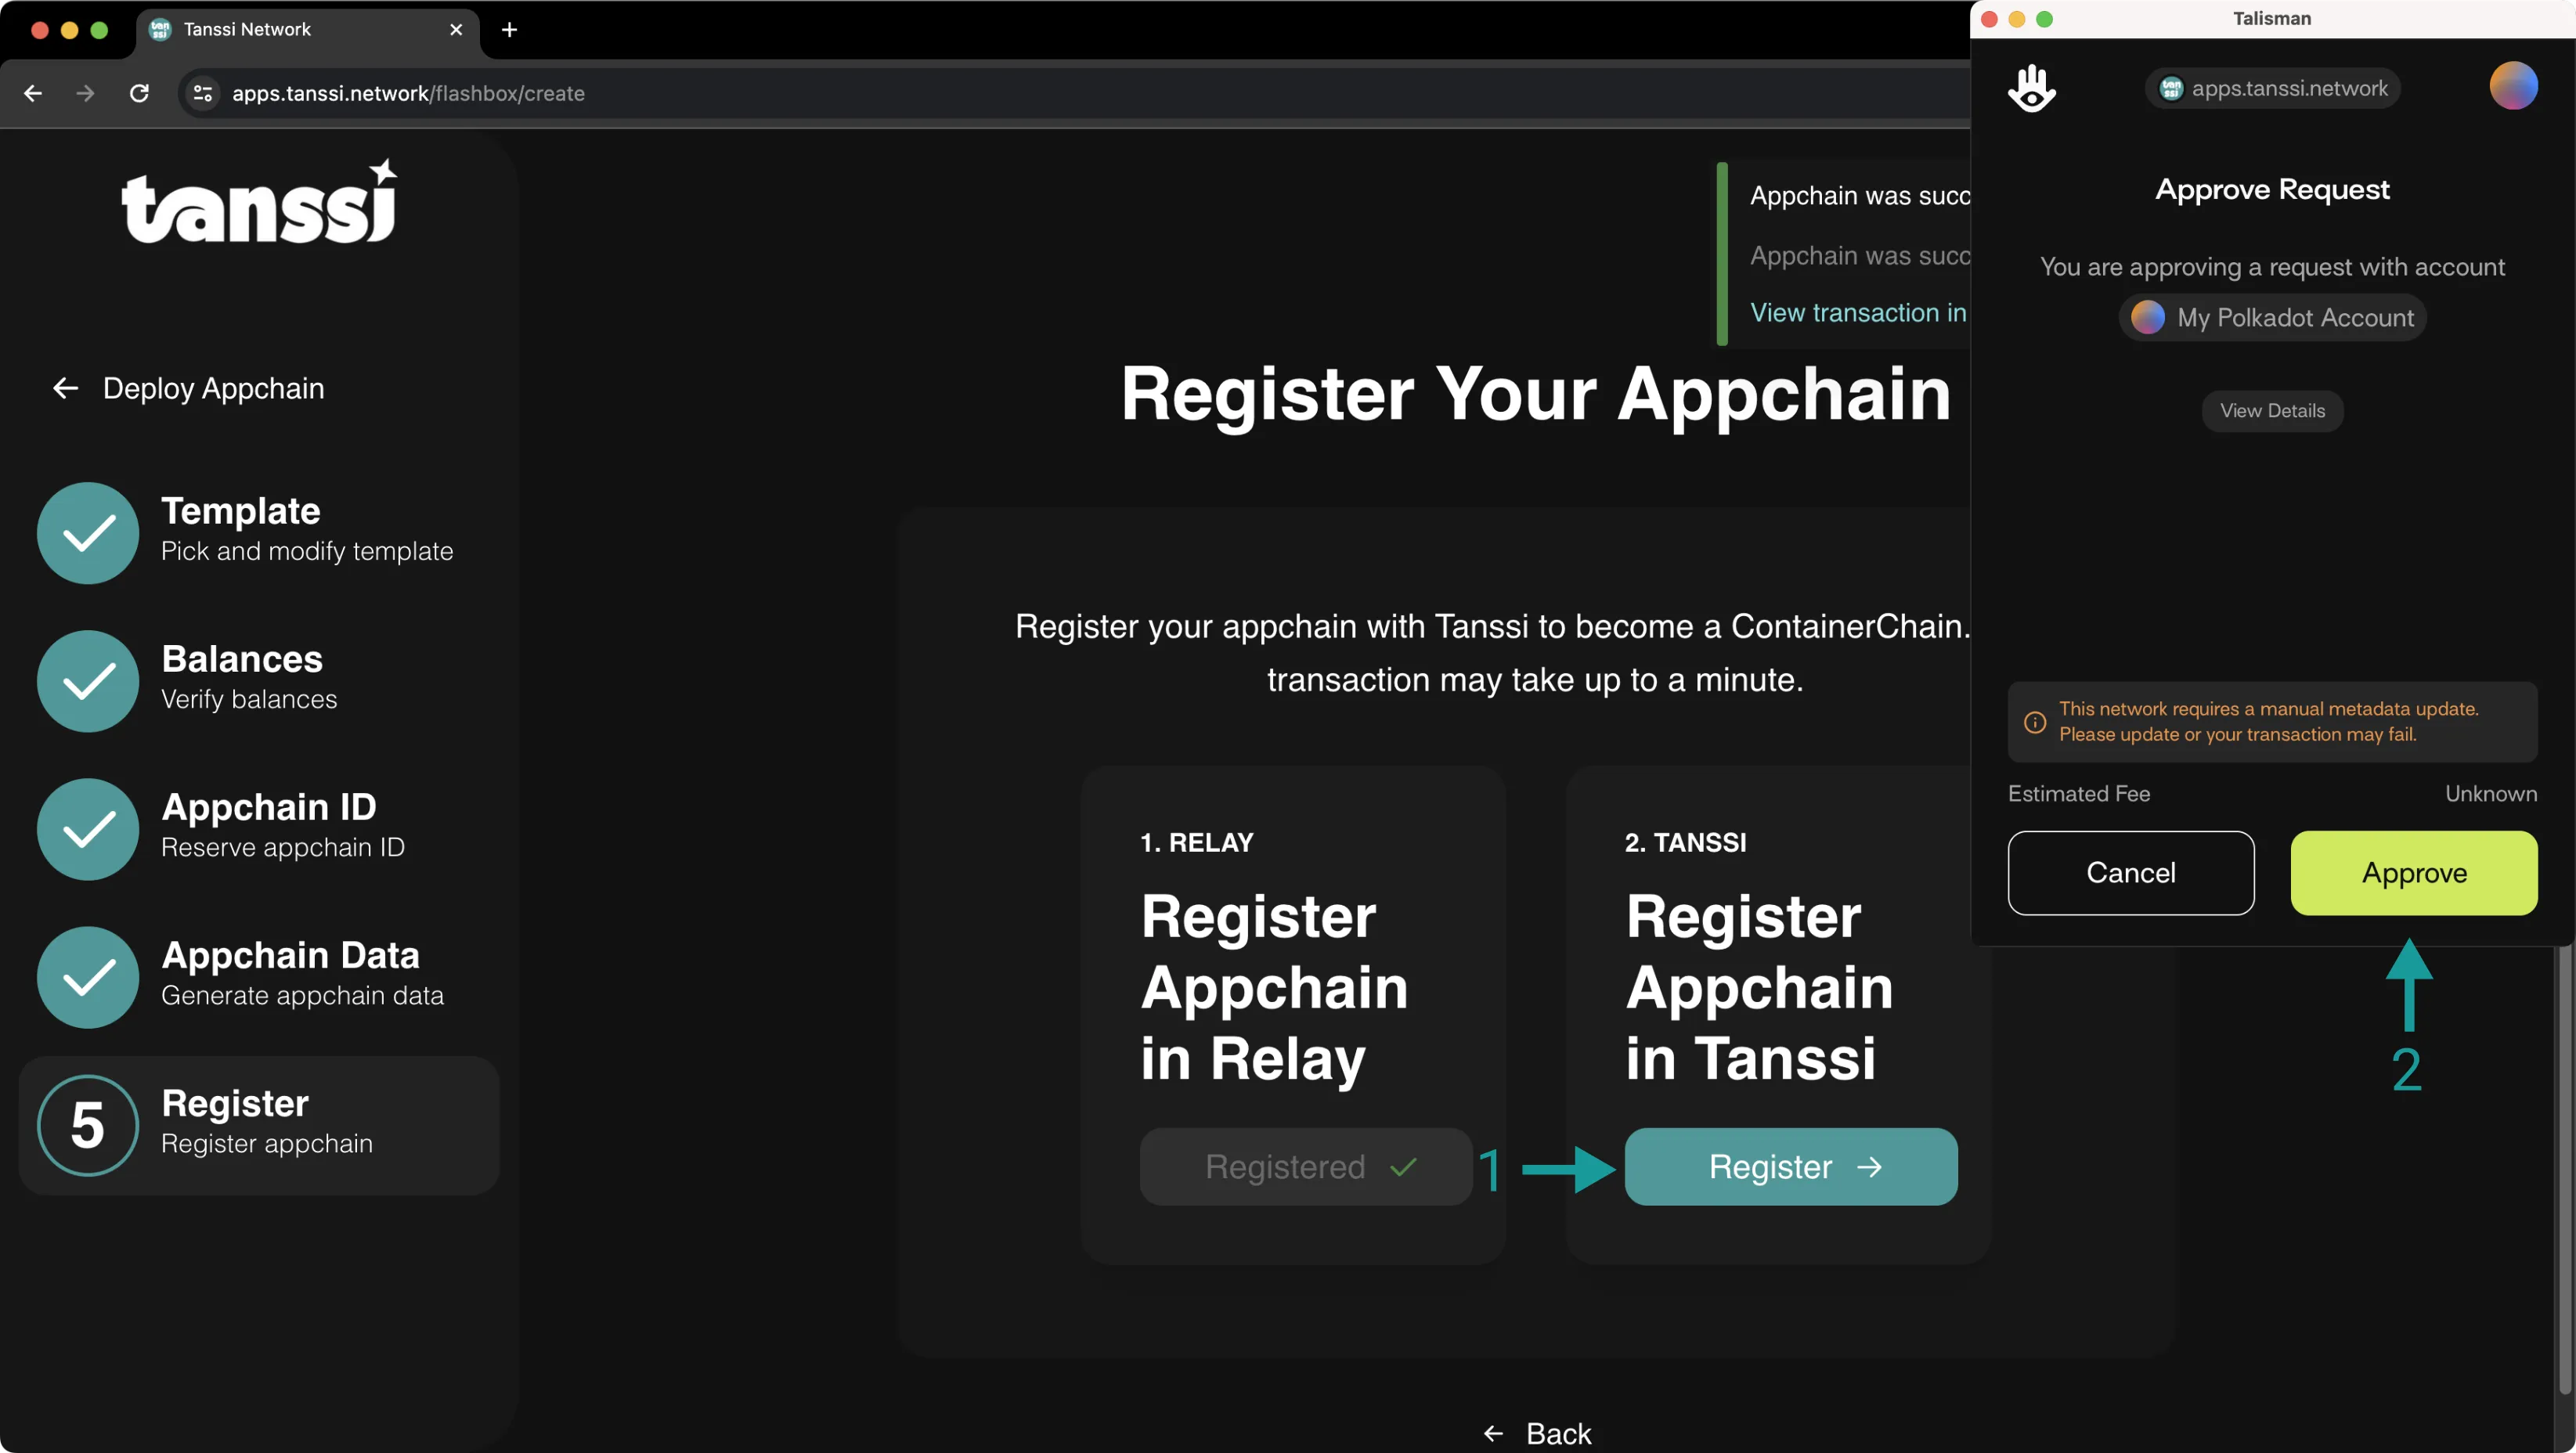
Once the transaction has gone through successfully, the dApp will update to show that you have successfully registered your Tanssi appchain under the Register Network in Relay section.
Lastly, to register your appchain on Tanssi, take the following steps:
- Click Register under the Register Network in Tanssi section
- Confirm the transaction in your wallet
Once the transaction has gone through successfully, the dApp will update to show that you have registered your Tanssi-powered appchain. Congratulations! On the dashboard, you can check the status of your deployment and view relevant information, such as the latest block information, RPC and WS endpoints, and more.
And that's it! You've successfully registered your Tanssi appchain! The launch process will automatically begin once the Tanssi team has verified your registration. Once your appchain is live, you can return to the Dashboard to view the RPC URL and other pertinent chain information.
| Created: September 12, 2023
