Integrate RainbowKit with a Tanssi Network
Introduction
RainbowKit is a React library that adds wallet connection capabilities to a dApp. It supports numerous wallets and enables features such as switching connection chains, ENS address resolution, and balance display out-of-the-box. RainbowKit offers customization options for all EVM-compatible chains, making it possible to connect wallets to a network easily.
RainbowKit bundles together multiple tools to simplify adding wallet connections to a dApp:
- Wagmi - a React Hooks library for interacting with Ethereum accounts, wallets, contracts, transactions, signing, ENS, and more
- viem - TypeScript interface which provides low-level stateless primitives for interacting with Ethereum
- WalletConnect - adds encrypted connections and enhanced UX experiences like connecting a mobile wallet by scanning a QR code
- TanStack Query - helps manage and update server state within the application
This guide explains how to add RainbowKit to a dApp running on top of a Tanssi-powered network using the CLI, along with options for further customizing the integration.
Quick Start
To start a new project, RainbowKit can scaffold a project using the CLI, combining RainbowKit and Wagmi in a Next.js application. Use your preferred package manager to run the CLI command and start the project:
npm init @rainbow-me/rainbowkit@latest
pnpm create @rainbow-me/rainbowkit@latest
yarn create @rainbow-me/rainbowkit
The script will prompt for a project name, generate a new directory with the boilerplate starter code, and install all required dependencies.
Navigate to the project directory, start the development server, and open http://localhost:3000 to view the project locally:
cd INSERT_PROJECT_NAME
npm run dev
cd INSERT_PROJECT_NAME
pnpm run dev
cd INSERT_PROJECT_NAME
yarn dev
The starting screen should look like this:
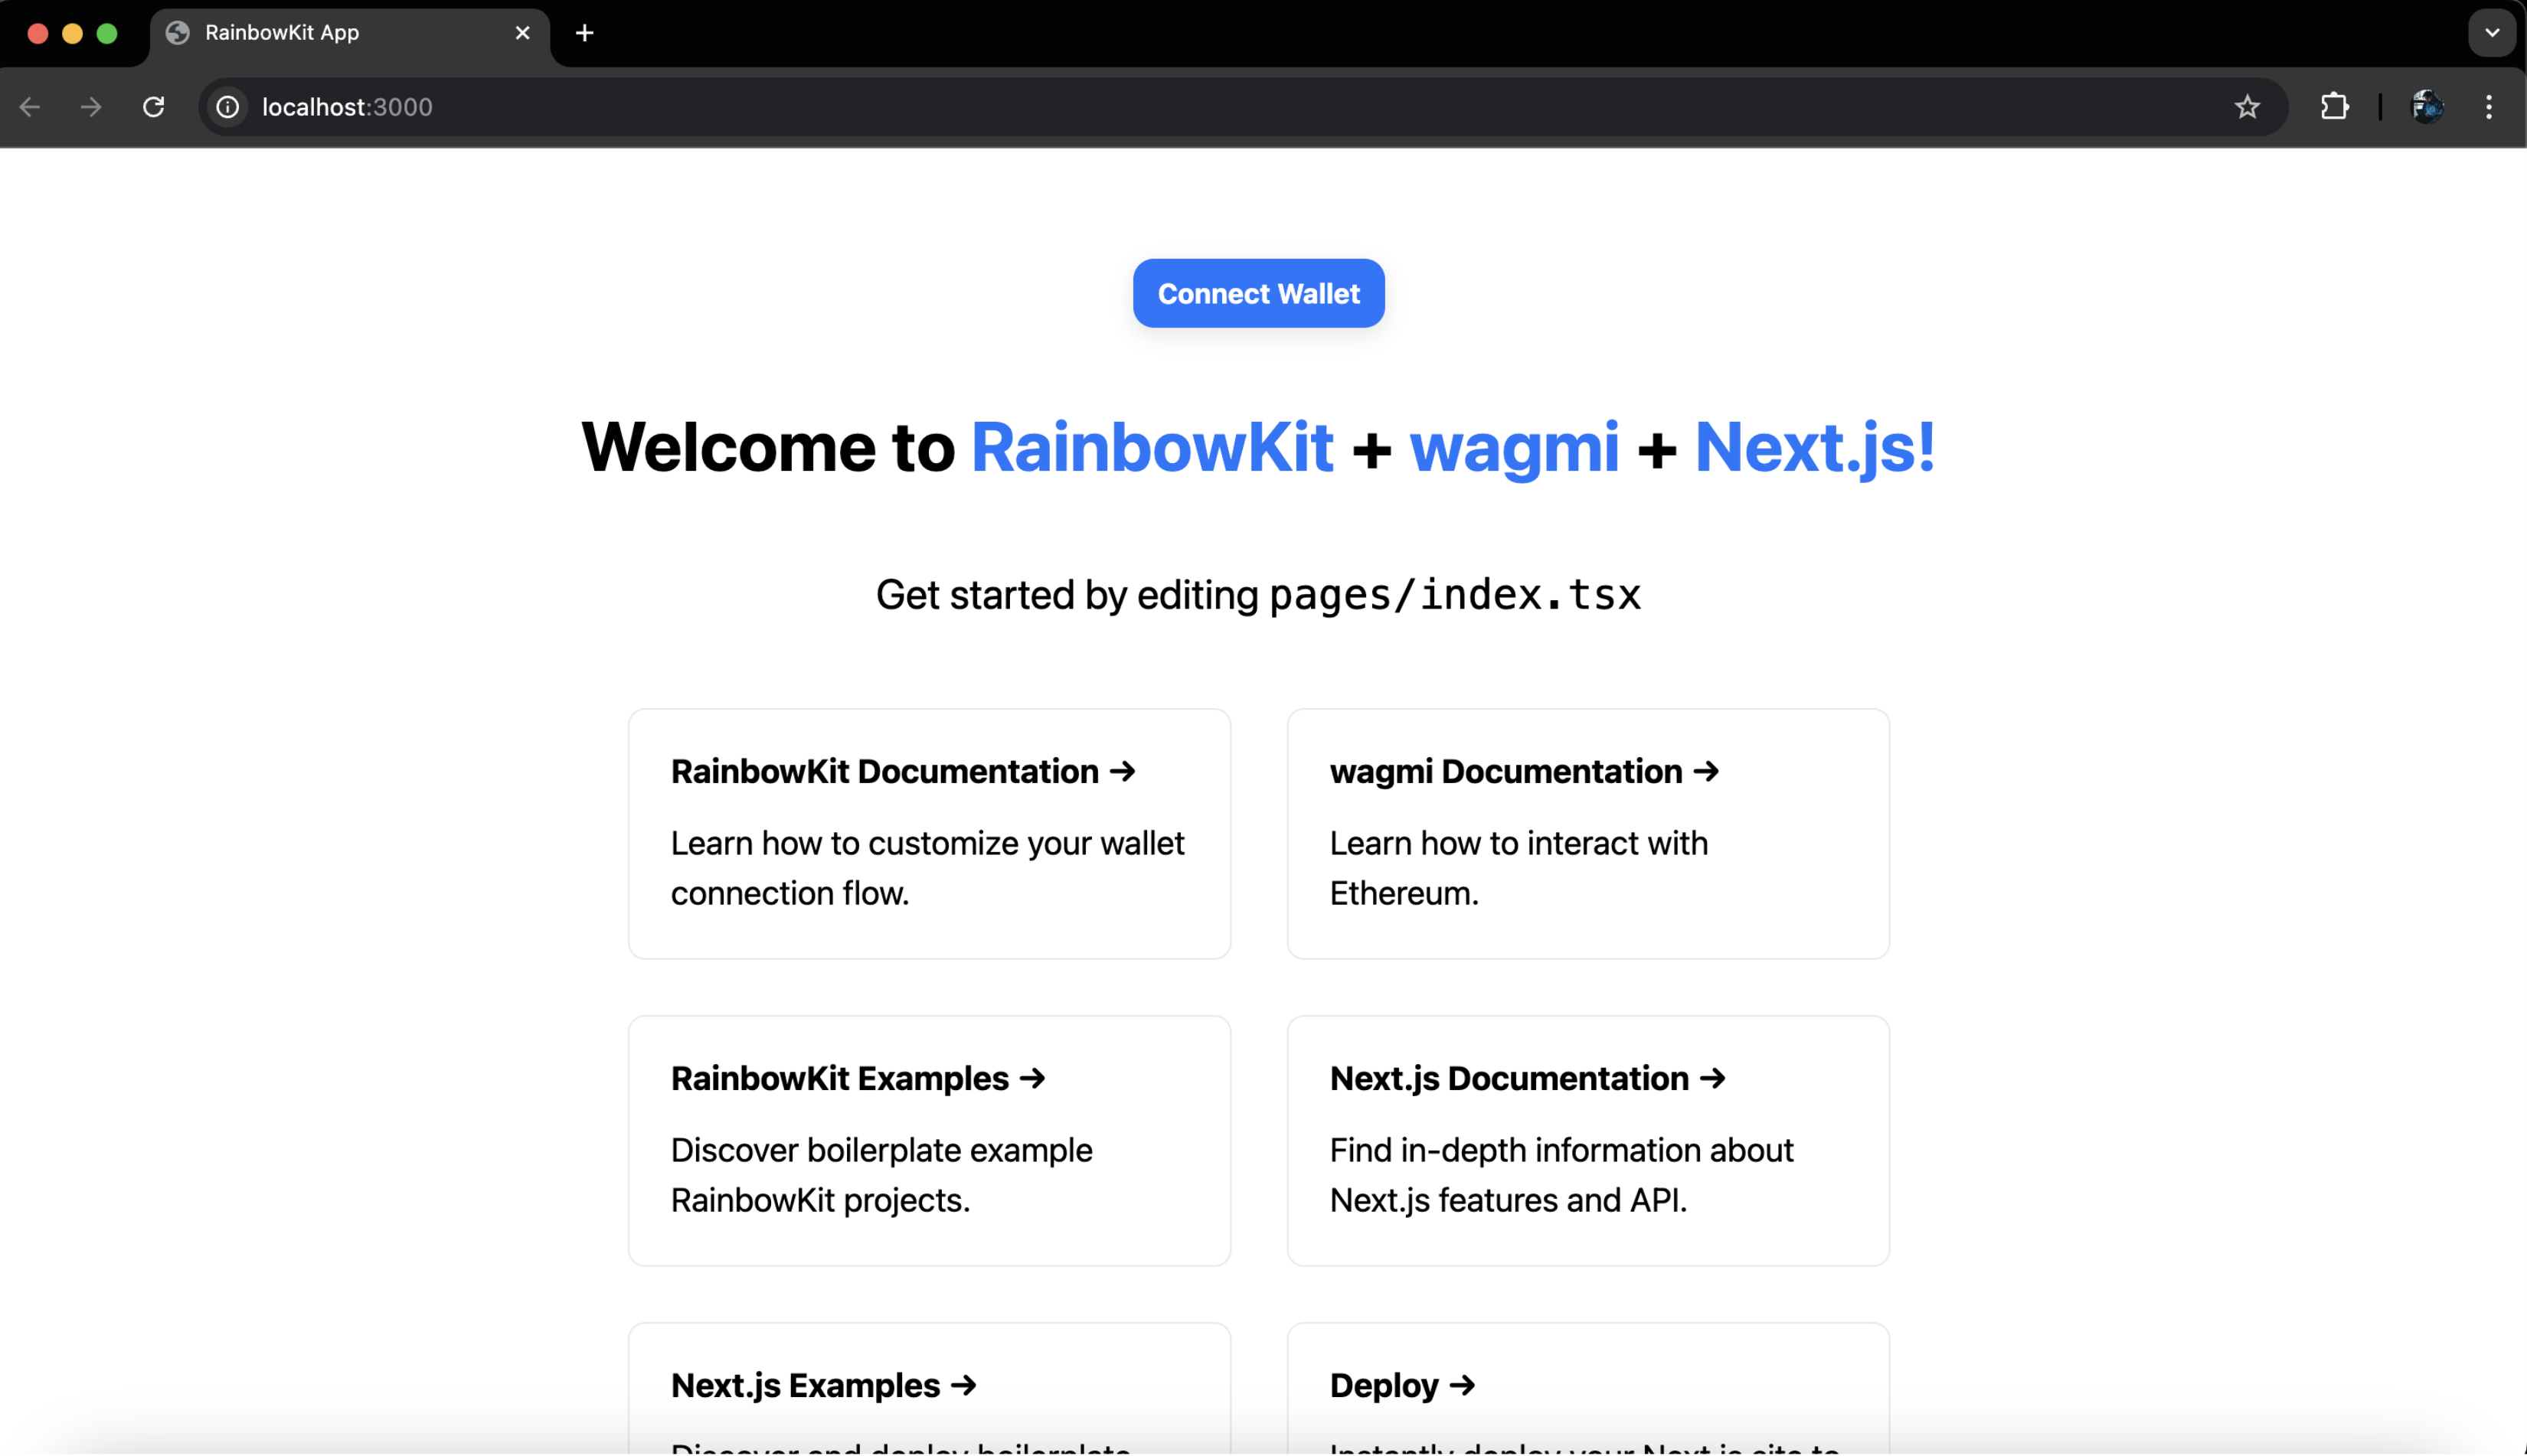
Open the project in a code editor and examine the directory and file structure, paying particular attention to the wagmi.ts file. This file allows configuration of the chains included in the list of networks that users can connect to via the dApp.
Since the demo EVM network is a custom network on Tanssi, it cannot be imported directly from wagmi/chains. Instead, define the chain manually in the wagmi.ts file. For example, if the network uses the Tanssi demo network or another EVM-compatible chain, the necessary configurations must be added manually.
Here is the configuration for the demo EVM network on Tanssi:
import '@rainbow-me/rainbowkit/styles.css';
import { getDefaultConfig, RainbowKitProvider } from '@rainbow-me/rainbowkit';
import { WagmiProvider } from 'wagmi';
import { QueryClientProvider, QueryClient } from '@tanstack/react-query';

import { type Chain } from 'viem'

export const demoEVMChain = {
  id: 5678,
  name: "Tanssi demo EVM Network",
  nativeCurrency: { name: "TANGO", symbol: "TANGO", decimals: 18 },
  rpcUrls: {
    default: { http: ['https://services.tanssi-testnet.network/dancelight-2001'] }
  },
  blockExplorers: {
    default: { name: 'Demo EVM Explorer', url: 'https://dancelight-2001-blockscout.tanssi-chains.network/' }
  },
} as const satisfies Chain


export const config = getDefaultConfig({
  appName: 'My Tanssi-powered Network',
  projectId: 'TODO: get project id from...',
  chains: [demoEVMChain],
  ssr: true,
});
To add support for the demo EVM network on Tanssi, update wagmi.ts as shown above. The following section explains how to generate the projectId value for WalletConnect.
Manual Setup
The following sections will walk you through the steps to integrate RainbowKit into an existing React application, such as installing and importing the necessary dependencies, configuring chain connections, and making the RainbowKit functionality available to users in the dApp. The setup will also include steps to specify which chain the Connect Wallet button should connect to by default and how to customize the RainbowKit theme to fit the project. This guide is based on the Tanssi demo EVM network, but can be adapted for your own Tanssi-powered EVM network by changing the RPC URL parameter.
Checking Prerequisites
Before proceeding, ensure the following prerequisites are met:
-
A Tanssi EVM-compatible network
-
An existing dApp built with React
-
The RainbowKit examples repository includes templates for multiple React frameworks
-
To follow this guide, visit Next.js and follow the Automatic Installation instructions, selecting Typescript and the App Router options during setup
-
The wallet must support custom networks, as the Tanssi demo EVM network will be added manually
-
A WalletConnect
projectId- every dApp relying on WalletConnect is required to have an associatedprojectId. It is free to create an account, and an ID can be generated instantlyTo obtain a WalletConnect
projectId:- Visit WalletConnect Cloud
- On the Projects page, select Create
- Add the project information (leaving the Homepage URL blank if the dApp is not deployed)
- Select the AppKit SDK
- Select a coding environment or platform (React is used in this guide)
- Locate the
projectIdin the left menu. or find it in the Get started code snippet of WalletConnect Quickstart
Getting Started
Ensure that the project is in the root directory before proceeding, then install RainbowKit and its peer dependencies:
npm install @rainbow-me/rainbowkit wagmi viem@2.x @tanstack/react-query
pnpm install @rainbow-me/rainbowkit wagmi viem@2.x @tanstack/react-query
yarn add @rainbow-me/rainbowkit wagmi viem@2.x @tanstack/react-query
These packages provide the core functionality for wallet connections (RainbowKit), Ethereum interactions (wagmi and viem), and state management (TanStack Query).
Next, start the development server to create a local dApp instance:
npm run dev
pnpm run dev
yarn dev
After starting the server, open http://localhost:3000 to view the Next.js application in the browser.
To test the RainbowKit connection, the MetaMask app can be used. Ensure that the Tanssi demo EVM network is connected in the MetaMask wallet.
To add the Tanssi demo EVM network to MetaMask:
- Open MetaMask and go to Settings > Networks > Add Network.
- Input the following information:
- Network Name:
Demo EVM Chain - RPC URL:
https://services.tanssi-testnet.network/dancelight-2001/ - Chain ID:
5678 - Currency Symbol:
TANGO - Block Explorer URL:
https://dancelight-2001-blockscout.tanssi-chains.network/
- Network Name:
For detailed instructions on connecting MetaMask to the Tanssi demo EVM network, refer to the guide Connect MetaMask to your Tanssi EVM Network.
After connecting, the projectId can be safely added to the application:
-
Create a
.env.localfile in the root directory of the projecttouch .env.local -
Add the
projectIdto this file.env.localNEXT_PUBLIC_PROJECT_ID='INSERT_PROJECT_ID' -
Locate the
.gitignorefile in this same directory and ensure.env*.localis included in the list of files to ignore. This will prevent committing theprojectIdto GitHub
The stored projectId will be required for configuring the wagmi settings in the upcoming section.
Connect DApp to MetaMask
With the development environment set up and MetaMask configured for the Tanssi demo EVM network, the next step is to configure the dApp to connect with MetaMask's wallet using RainbowKit. This process involves the following key steps:
- Import RainbowKit, Wagmi, and TanStack Query
- Setup configuration for Wagmi
- Wrap the application with providers
- Add the connect button
Import RainbowKit, Wagmi, and TanStack Query
To proceed, ensure the project is in the root directory, and then create a new file called wagmi.ts. This file will contain the necessary imports and configurations to connect the dApp to wallets and interact with blockchains.
touch wagmi.ts
wagmi.ts, import the necessary libraries and define Demo EVM Chain as the supported chain: import '@rainbow-me/rainbowkit/styles.css';
import { getDefaultConfig, RainbowKitProvider } from '@rainbow-me/rainbowkit';
import { WagmiProvider } from 'wagmi';
import { QueryClientProvider, QueryClient } from '@tanstack/react-query';
import { type Chain } from 'viem'
export const demoEVMChain = {
id: 5678,
name: "Tanssi demo EVM Network",
nativeCurrency: { name: "TANGO", symbol: "TANGO", decimals: 18 },
rpcUrls: {
default: { http: ['https://services.tanssi-testnet.network/dancelight-2001'] }
},
blockExplorers: {
default: { name: 'Demo EVM Explorer', url: 'https://dancelight-2001-blockscout.tanssi-chains.network/' }
},
} as const satisfies Chain
export const config = getDefaultConfig({
appName: 'My Tanssi-powered Network',
projectId: 'process.env.NEXT_PUBLIC_PROJECT_ID',
chains: [demoEVMChain ],
ssr: true,
});
Wrap the Application with Providers
Next, create a file named providers.tsx to wrap the application with the necessary providers: WagmiProvider, and QueryClientProvider.
cd app &&
touch providers.tsx
Open providers.tsx add the following code to manage the providers
'use client';

import { QueryClient, QueryClientProvider } from '@tanstack/react-query';
import { WagmiProvider } from 'wagmi';
import { RainbowKitProvider } from '@rainbow-me/rainbowkit';
import { config } from '../wagmi';

const queryClient = new QueryClient();

export function Providers({ children }: { children: React.ReactNode }) {
  return (
    <WagmiProvider config={config}>
      <QueryClientProvider client={queryClient}>
        <RainbowKitProvider>{children}</RainbowKitProvider>
      </QueryClientProvider>
    </WagmiProvider>
  );
}
Now locate the layout.tsx file inside the app directory and modify the code to import Providers and wrap the application:
import type { Metadata } from 'next';
import { Inter } from 'next/font/google';
import './globals.css';
import '@rainbow-me/rainbowkit/styles.css';
import { Providers } from './providers';

const inter = Inter({ subsets: ['latin'] });

export const metadata: Metadata = {
  title: 'My Tanssi dApp',
  description: 'Generated by create next app',
};

export default function RootLayout({
  children,
}: {
  children: React.ReactNode;
}) {
  return (
    <html lang='en'>
      <body>
        <Providers>{children}</Providers>
      </body>
    </html>
  );
}
Add the Connect Button
RainbowKit offers a ConnectButton component, which renders the Connect and Disconnect buttons and UI elements for switching chains. This example imports the ConnectButton into the existing page.tsx file for simplicity, though it can also be added to an element like a Header or Navbar to appear at the top of every page. Update the code in page.tsx as follows:
import { ConnectButton } from '@rainbow-me/rainbowkit';

export default function Home() {
  return (
    <div className="flex h-screen items-center justify-center">
      <ConnectButton />
    </div>
  );
}
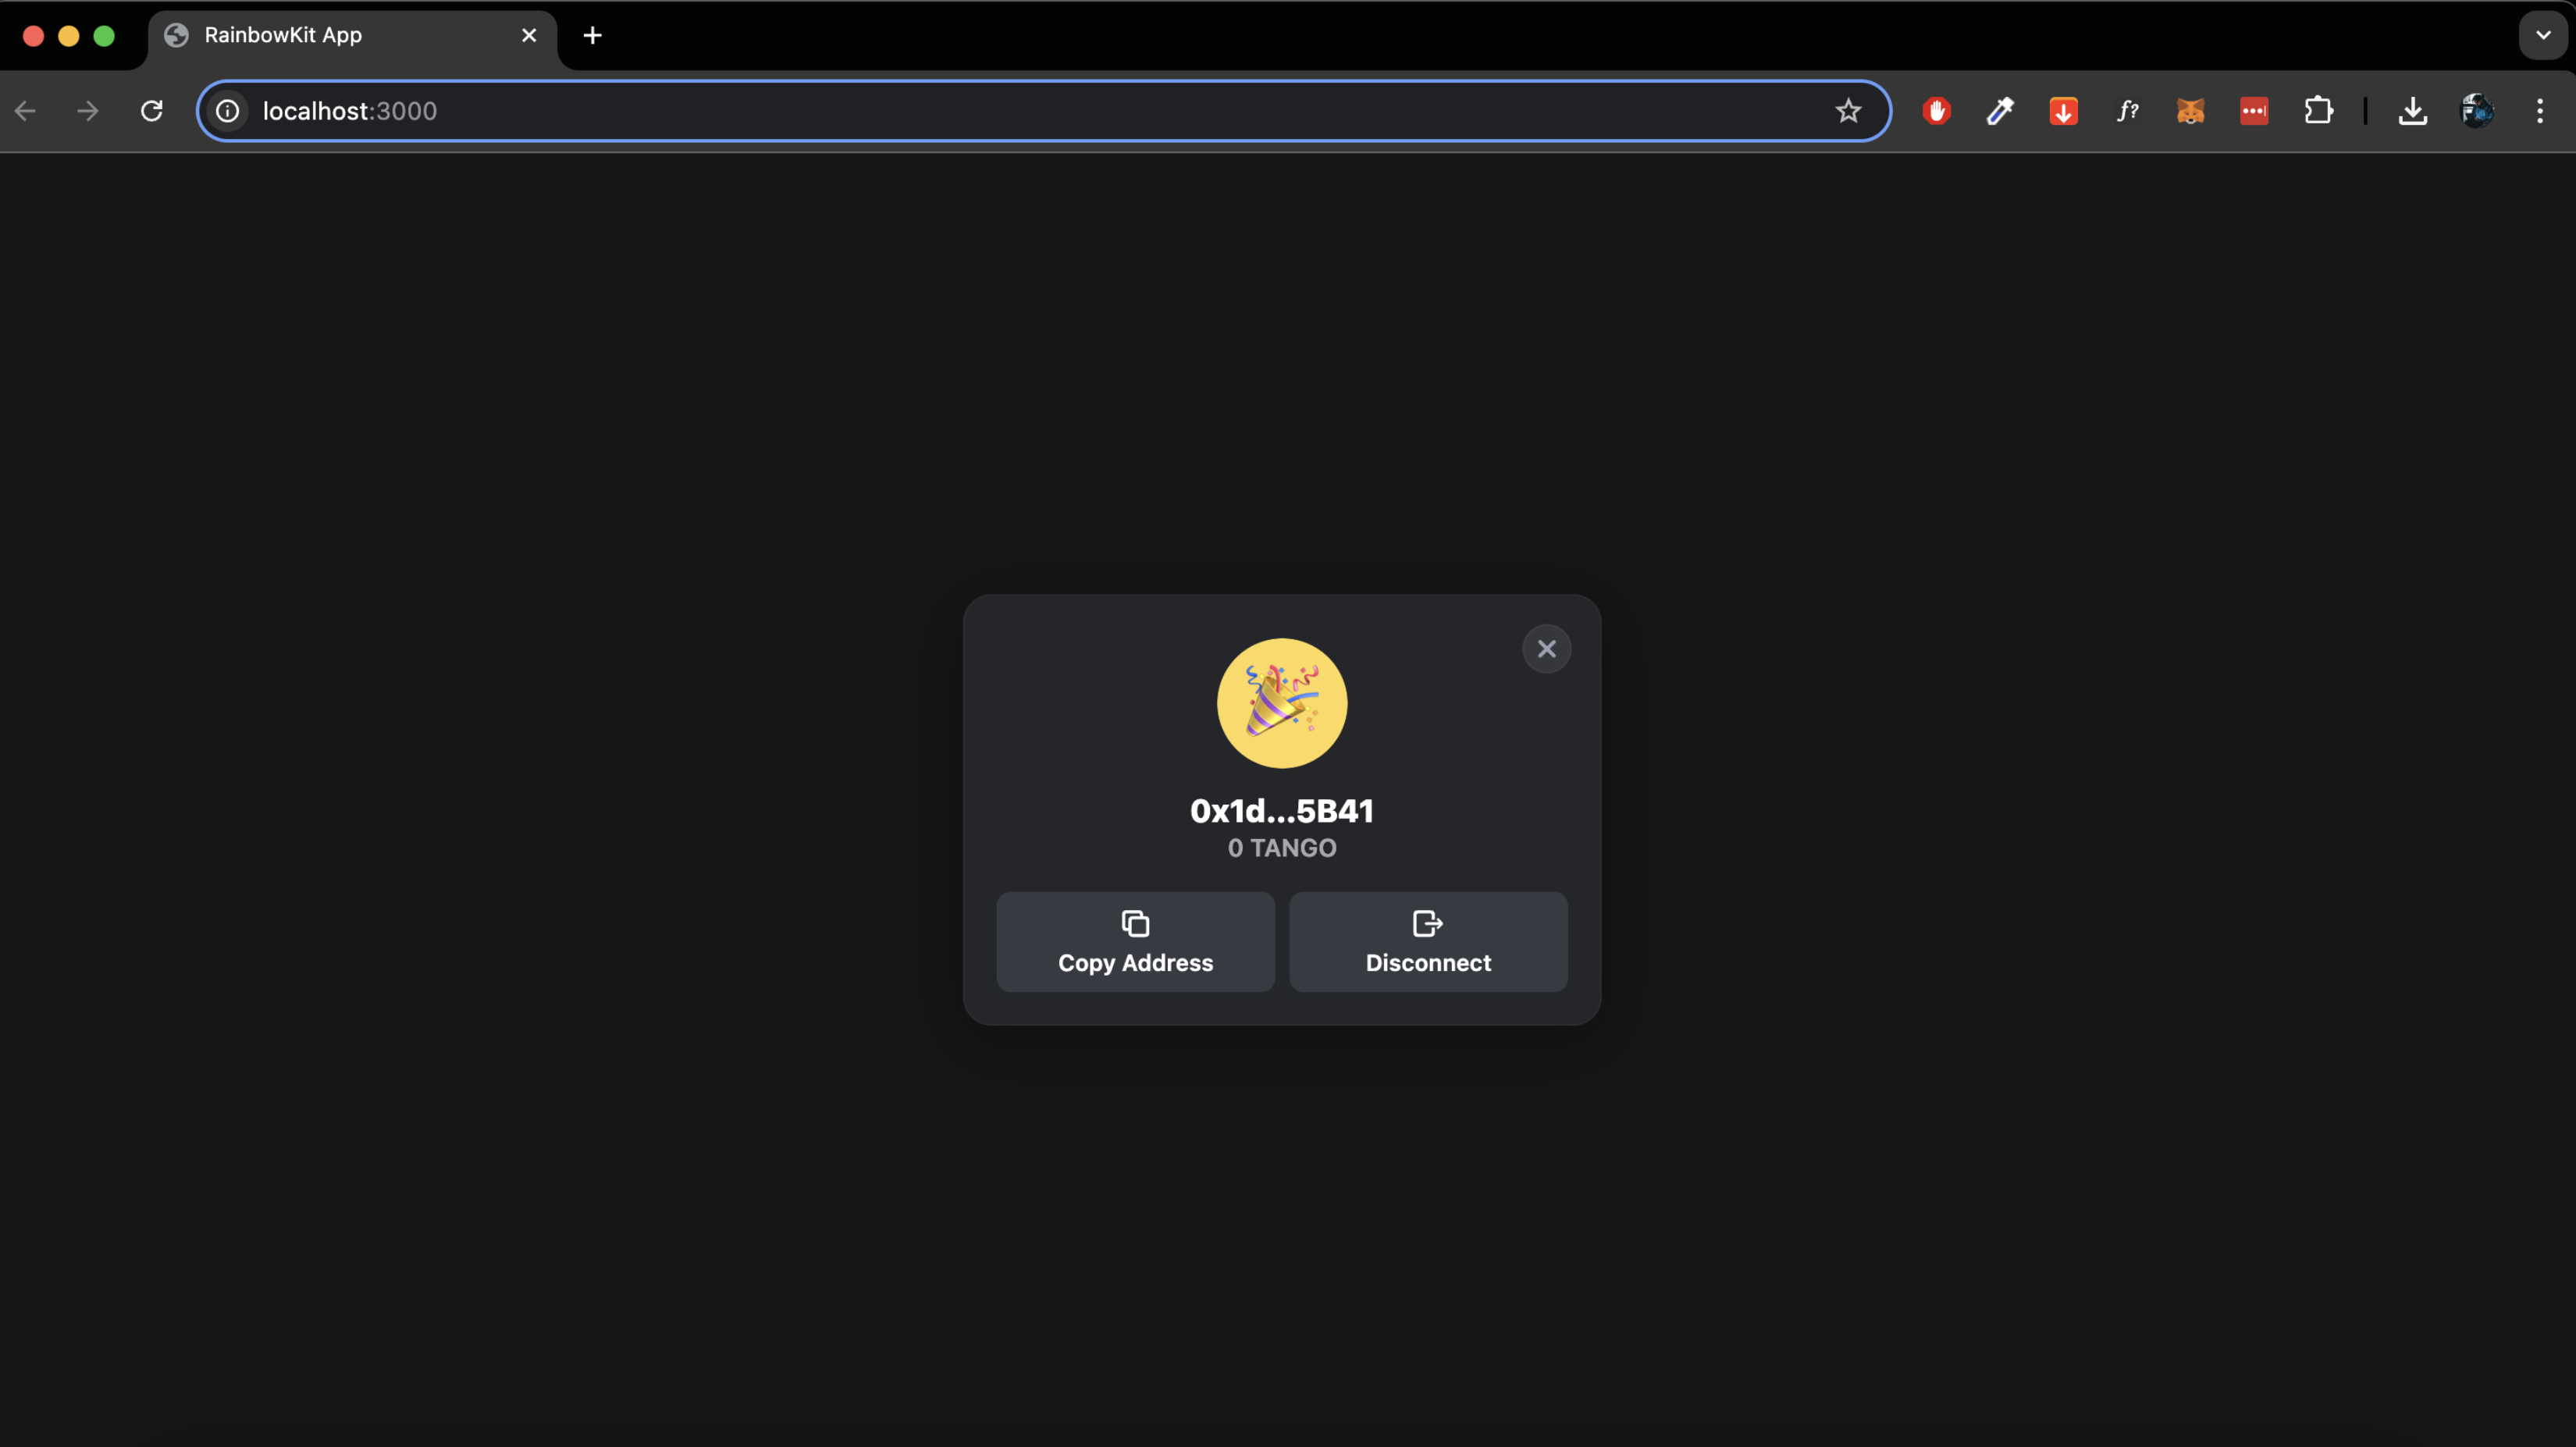
Once the development server is running, the home page will display a Connect Wallet button. Clicking this button will open the RainbowKit modal, providing options to either connect an existing wallet or get a new one. Select MetaMask and follow the on-screen instructions to complete the connection process.
The current configuration defaults to connecting to Demo EVM Chain and displays the current network, the native token balance, and the connected wallet address. If multiple networks are supported, selecting the arrow next to it will open the Switch Networks modal. This allows users to select another network and authorize the change.
Once connected, users will see their TANGO token balance and wallet address.
Customize RainbowKit
RainbowKit simplifies the complexities of managing wallet connections while offering various options for customizing UI and functionality to fit the needs of a dApp. A full list of customization options can be found in the RainbowKit documentation. This section covers customizing the Connect Wallet button to connect initially to the Demo EVM Chain and render it in a custom color.
Set Custom Initial Chain
By default, RainbowKit connects to the first chain supplied to Wagmi in the config. The order of chains listed in wagmi.ts will match the order displayed in the Switch Networks modal. To ensure that the Tanssi demo EVM network is always the default connection, simply move it to the top of the chain list. However, Relying solely on this default behavior might not be the best option.
A better approach is to use the initialChain prop in the RainbowKitProvider component. This prop defines which chain the wallet will connect to initially when Connect Wallet is selected. To configure this, open the providers.tsx file and update the code by passing the initialChain prop with the custom Tanssi demo EVM network object defined earlier:
'use client';

import { QueryClient, QueryClientProvider } from '@tanstack/react-query';
import { WagmiProvider } from 'wagmi';
import { RainbowKitProvider, darkTheme } from '@rainbow-me/rainbowkit';
import { config, demoEVMChain } from '../wagmi';

const queryClient = new QueryClient();

export function Providers({ children }: { children: React.ReactNode }) {
  return (
    <WagmiProvider config={config}>
      <QueryClientProvider client={queryClient}>
        <RainbowKitProvider initialChain={demoEVMChain}>
          {children}
        </RainbowKitProvider>
      </QueryClientProvider>
    </WagmiProvider>
  );

}
By setting initialChain={demoEVMChain}, RainbowKit will attempt to connect to the Tanssi demo EVM network first whenever the Connect Wallet button is clicked.
Define Custom Theme Colors
RainbowKit provides three built-in theme functions: lightTheme, darkTheme, and midnightTheme. These functions return a theme object that can be passed to the RainbowKitProvider prop theme to customize colors, border radius, font stack, and overlay blur. Update providers.tsx with the following code and ensure that darkTheme is added to the @rainbow-me/rainbowkit import statement for the changes to apply correctly. After customizing the initial chain and theme, the providers.tsx file will look like this:
'use client';

import { QueryClient, QueryClientProvider } from '@tanstack/react-query';
import { WagmiProvider } from 'wagmi';
import { RainbowKitProvider, darkTheme } from '@rainbow-me/rainbowkit';
import { config, demoEVMChain } from '../wagmi';

const queryClient = new QueryClient();

export function Providers({ children }: { children: React.ReactNode }) {
  return (
    <WagmiProvider config={config}>
      <QueryClientProvider client={queryClient}>
        <RainbowKitProvider
          initialChain={demoEVMChain}
          theme={darkTheme({
            accentColor: '#189B9B', // Tanssi accent color
            accentColorForeground: 'white',
            borderRadius: 'medium',
            fontStack: 'system',
            overlayBlur: 'small'
          })}
        >
          {children}
        </RainbowKitProvider>
      </QueryClientProvider>
    </WagmiProvider>
  );
}
accentColor- the primary highlight color. In this example, Tanssi's accent color (#189B9B) is used, but it can be adjusted to match the branding of the dAppaccentColorForeground- the text color used on top of the accent colorborderRadius- controls the roundness of UI elements. Options are 'none', 'small', 'medium', or 'large'fontStack- defines the fonts used. 'system' uses the default system fontsoverlayBlur- the blur effect applied to the background when modals are open
Tip
Experiment with different theme functions (lightTheme, darkTheme, midnightTheme) and color combinations to find the best match for the visual style of the dApp.
Handle Disconnections
To disconnect MetaMask from the dApp and reconnect for testing purposes, two methods can be used to complete this process.
Disconnect from DApp
RainbowKit includes a Disconnect button out of the box. To open the modal, select the arrow next to the account number. Click the Disconnect button. At this point, the Connect Wallet option will reappear, and the account information will no longer be visible.
Disconnect from MetaMask
Some users prefer to disconnect from their wallet rather than use a button within a dApp. To use this method:
- Select the MetaMask extension in the browser to open the modal
- Select the three dots in the upper right corner of the MetaMask modal
- Select Connected sites
- Review the list of sites connected to the wallet
- Select Disconnect for each site that should be disconnected
Final Result
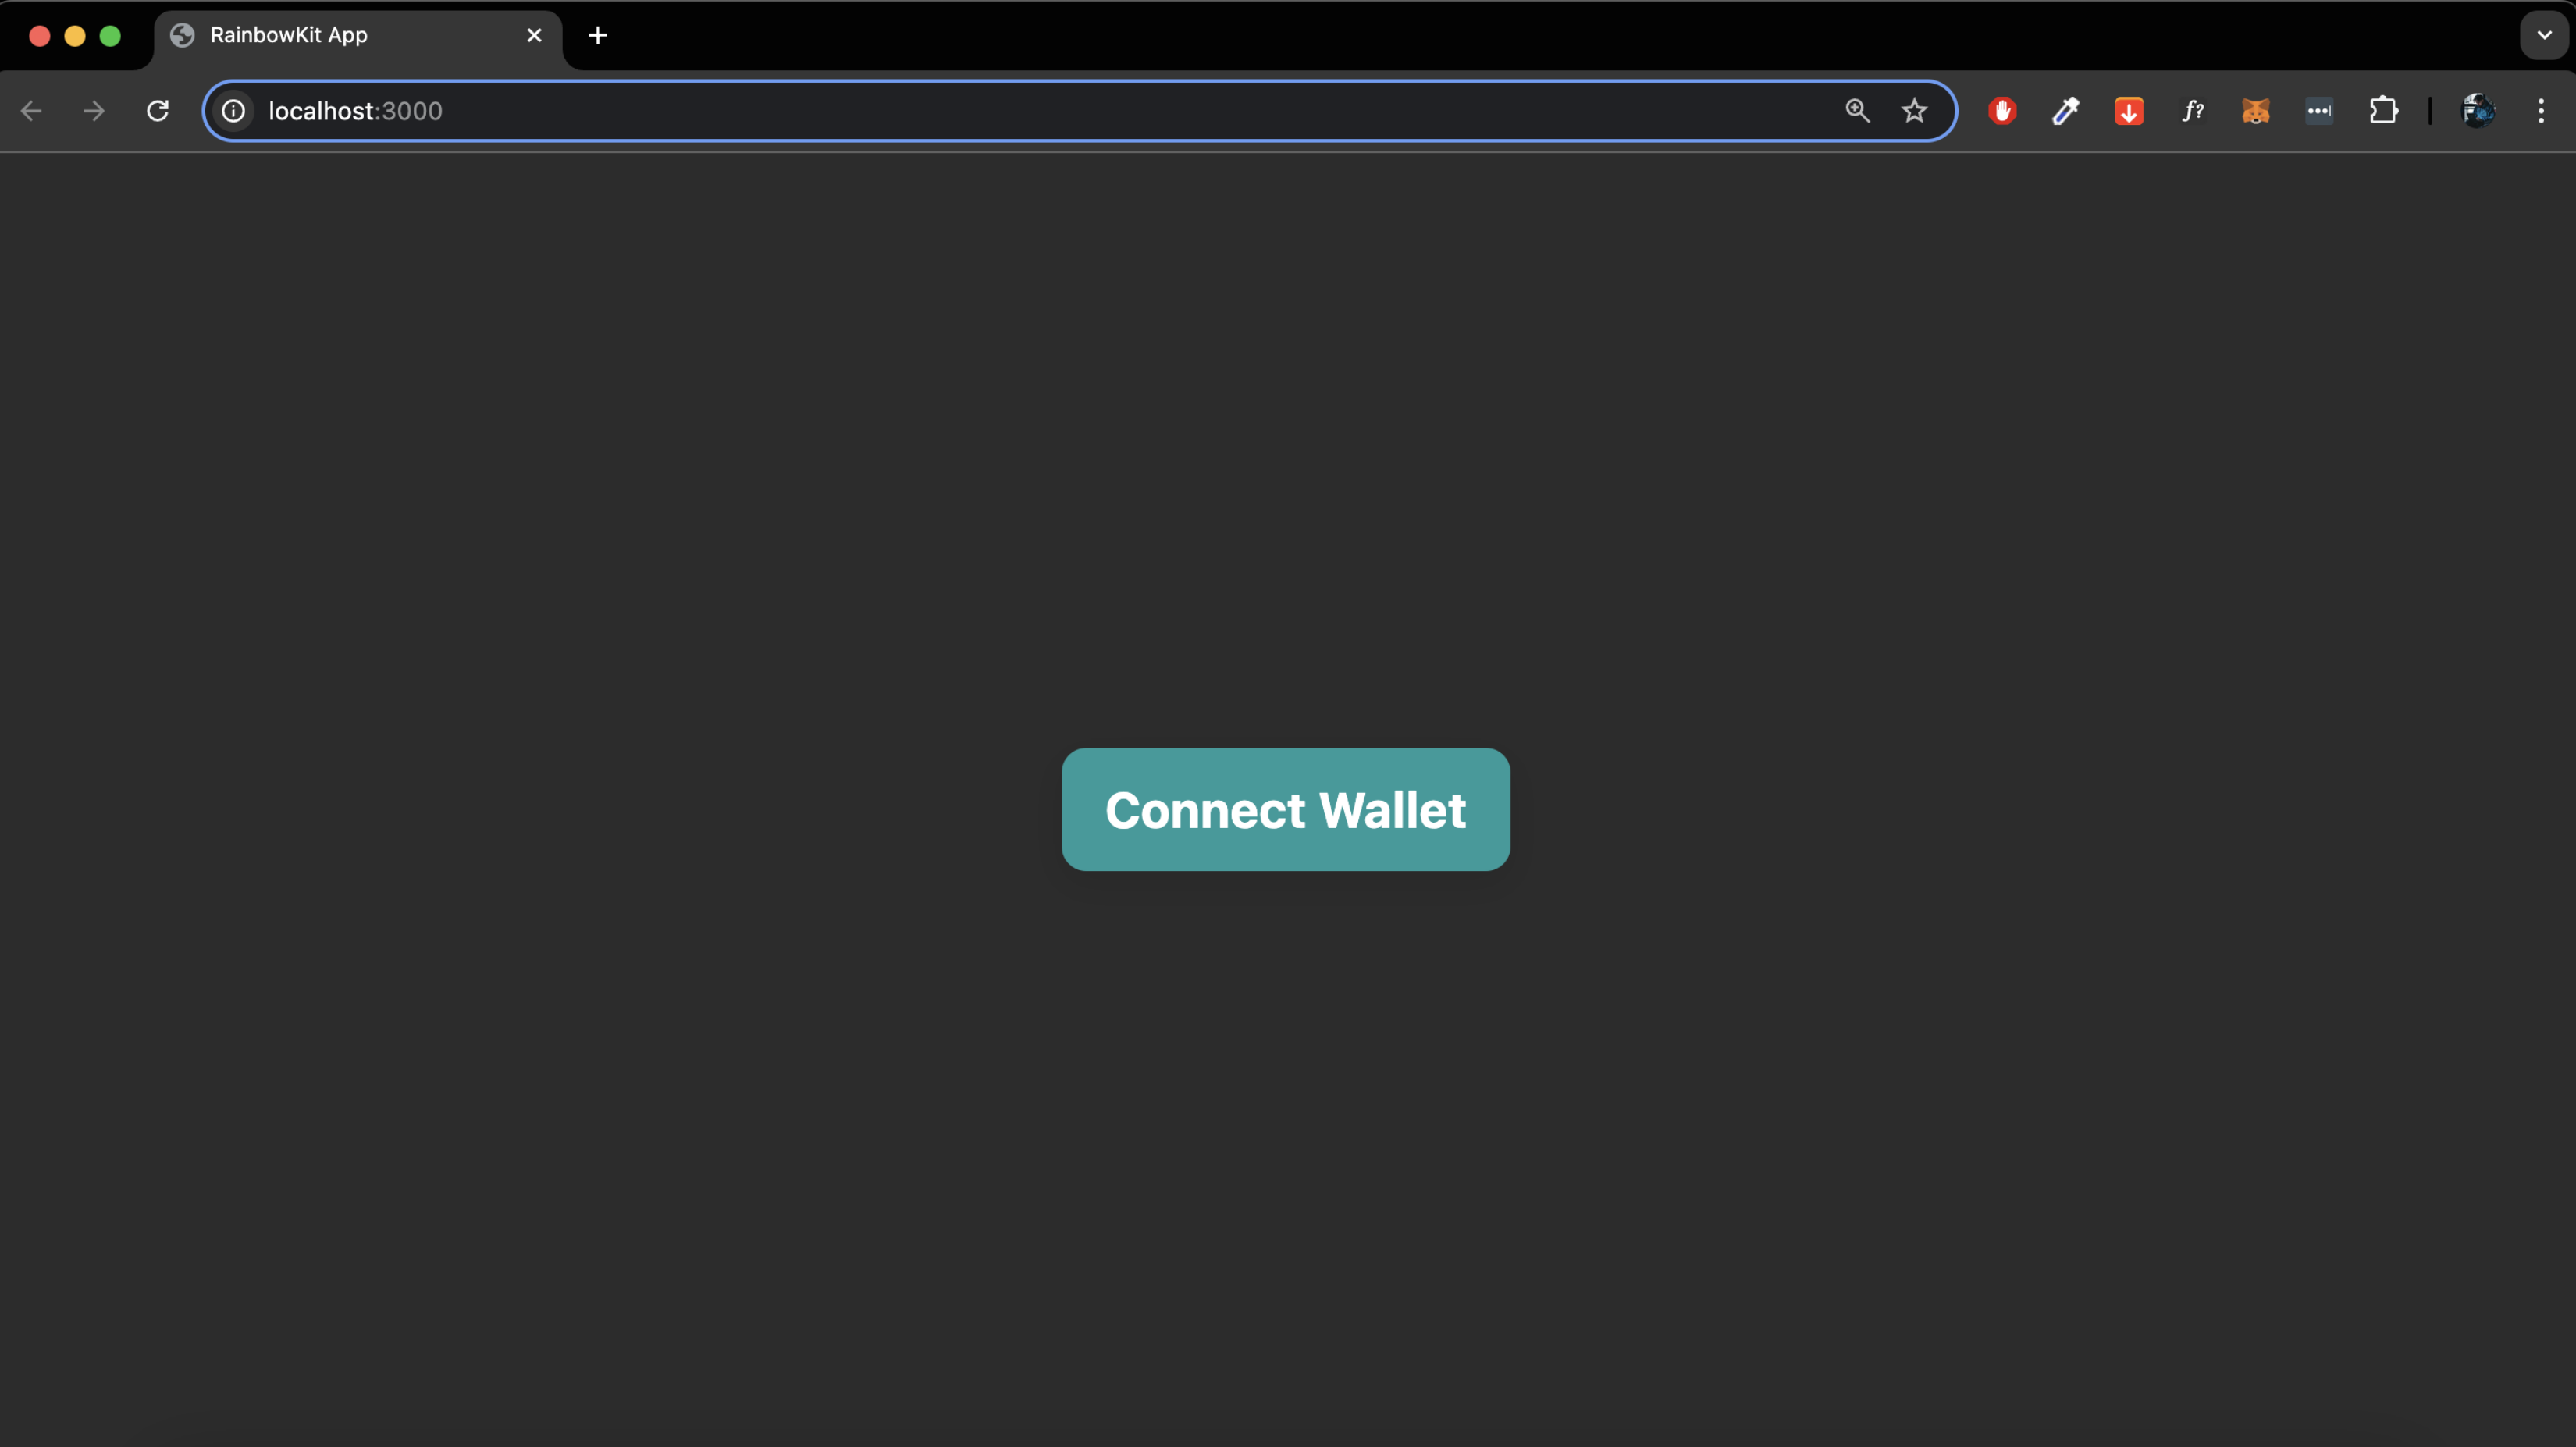
The Connect Wallet button on the home page should now render in the color specified for accentColor during theme customization. After selecting Connect Wallet, the same accent color will be displayed in the modal. MetaMask can be chosen, and signing the transaction will authorize the connection. The Tanssi demo EVM network will appear as the connected network, along with the TANGO token balance, without the need for manual network switching.
This guide includes only a few of the customization options available through RainbowKit. More information about the library's capabilities and options can be found in the RainbowKit Docs.
The complete example code is available in the rainbow-manual-build-demo repository.
| Created: October 10, 2024