# Tanssi Developer Documentation (LLMS Format)
This file contains documentation for Tanssi (https://docs.tanssi.network). Tanssi is a decentralized infrastructure protocol designed to enable the rapid deployment of sovereign appchains.
It is intended for use with large language models (LLMs) to support developers working with Tanssi. The content includes selected pages from the official docs, organized by section.
This file includes documentation related to the product: EVM-Template
## AI Prompt Template
You are an AI developer assistant for Tanssi (https://docs.tanssi.network). Your task is to assist developers in understanding and using the product described in this file.
- Provide accurate answers based on the included documentation.
- Do not assume undocumented features, behaviors, or APIs.
- If unsure, respond with “Not specified in the documentation.
## List of doc pages:
Doc-Page: https://raw.githubusercontent.com/moondance-labs/tanssi-docs/refs/heads/main/builders/build/templates/evm.md [type: builders]
Doc-Page: https://raw.githubusercontent.com/moondance-labs/tanssi-docs/refs/heads/main/builders/manage/developer-portal/smart-contracts-creation-filter.md [type: builders]
Doc-Page: https://raw.githubusercontent.com/moondance-labs/tanssi-docs/refs/heads/main/builders/tanssi-network/testnet/demo-evm-network.md [type: builders]
Doc-Page: https://raw.githubusercontent.com/moondance-labs/tanssi-docs/refs/heads/main/builders/toolkit/ethereum-api/dev-env/foundry.md [type: builders]
Doc-Page: https://raw.githubusercontent.com/moondance-labs/tanssi-docs/refs/heads/main/builders/toolkit/ethereum-api/dev-env/hardhat.md [type: builders]
Doc-Page: https://raw.githubusercontent.com/moondance-labs/tanssi-docs/refs/heads/main/builders/toolkit/ethereum-api/dev-env/remix.md [type: builders]
Doc-Page: https://raw.githubusercontent.com/moondance-labs/tanssi-docs/refs/heads/main/builders/toolkit/ethereum-api/dev-env/thirdweb.md [type: builders]
Doc-Page: https://raw.githubusercontent.com/moondance-labs/tanssi-docs/refs/heads/main/builders/toolkit/ethereum-api/libraries/ethersjs.md [type: builders]
Doc-Page: https://raw.githubusercontent.com/moondance-labs/tanssi-docs/refs/heads/main/builders/toolkit/ethereum-api/libraries/viem.md [type: builders]
Doc-Page: https://raw.githubusercontent.com/moondance-labs/tanssi-docs/refs/heads/main/builders/toolkit/ethereum-api/libraries/web3js.md [type: builders]
Doc-Page: https://raw.githubusercontent.com/moondance-labs/tanssi-docs/refs/heads/main/builders/toolkit/ethereum-api/libraries/web3py.md [type: builders]
Doc-Page: https://raw.githubusercontent.com/moondance-labs/tanssi-docs/refs/heads/main/builders/toolkit/ethereum-api/precompiles/batch.md [type: builders]
Doc-Page: https://raw.githubusercontent.com/moondance-labs/tanssi-docs/refs/heads/main/builders/toolkit/ethereum-api/precompiles/call-permit.md [type: builders]
Doc-Page: https://raw.githubusercontent.com/moondance-labs/tanssi-docs/refs/heads/main/builders/toolkit/ethereum-api/precompiles/cross-chain-transfers.md [type: builders]
Doc-Page: https://raw.githubusercontent.com/moondance-labs/tanssi-docs/refs/heads/main/builders/toolkit/ethereum-api/precompiles/erc20.md [type: builders]
Doc-Page: https://raw.githubusercontent.com/moondance-labs/tanssi-docs/refs/heads/main/builders/toolkit/ethereum-api/precompiles/external-assets-erc20.md [type: builders]
Doc-Page: https://raw.githubusercontent.com/moondance-labs/tanssi-docs/refs/heads/main/builders/toolkit/ethereum-api/precompiles/proxy.md [type: builders]
Doc-Page: https://raw.githubusercontent.com/moondance-labs/tanssi-docs/refs/heads/main/builders/toolkit/ethereum-api/wallets/ledger.md [type: builders]
Doc-Page: https://raw.githubusercontent.com/moondance-labs/tanssi-docs/refs/heads/main/builders/toolkit/ethereum-api/wallets/metamask.md [type: builders]
Doc-Page: https://raw.githubusercontent.com/moondance-labs/tanssi-docs/refs/heads/main/builders/toolkit/ethereum-api/wallets/subwallet.md [type: builders]
Doc-Page: https://raw.githubusercontent.com/moondance-labs/tanssi-docs/refs/heads/main/builders/toolkit/ethereum-api/wallets/talisman.md [type: builders]
Doc-Page: https://raw.githubusercontent.com/moondance-labs/tanssi-docs/refs/heads/main/builders/toolkit/integrations/indexers/sqd/erc20-transfers.md [type: builders]
Doc-Page: https://raw.githubusercontent.com/moondance-labs/tanssi-docs/refs/heads/main/builders/toolkit/integrations/indexers/sqd/quick-start.md [type: builders]
Doc-Page: https://raw.githubusercontent.com/moondance-labs/tanssi-docs/refs/heads/main/builders/toolkit/integrations/oracles/acurast.md [type: builders]
Doc-Page: https://raw.githubusercontent.com/moondance-labs/tanssi-docs/refs/heads/main/builders/toolkit/integrations/oracles/band.md [type: builders]
Doc-Page: https://raw.githubusercontent.com/moondance-labs/tanssi-docs/refs/heads/main/builders/toolkit/integrations/oracles/phala.md [type: builders]
Doc-Page: https://raw.githubusercontent.com/moondance-labs/tanssi-docs/refs/heads/main/builders/toolkit/integrations/wallet-integrations/rainbowkit.md [type: builders]
Doc-Page: https://raw.githubusercontent.com/moondance-labs/tanssi-docs/refs/heads/main/builders/toolkit/substrate-api/dev-env/chopsticks.md [type: builders]
## Full content for each doc page
Doc-Content: https://docs.tanssi.network/builders/build/templates/evm/
--- BEGIN CONTENT ---
---
title: Baseline EVM Template
description: The Tanssi repository includes an EVM template that provides all the necessary configurations to launch a network that is fully compatible with Ethereum.
icon: material-ethereum
categories: EVM-Template
---
# Baseline EVM Template {: #baseline-evm-template }
## Introduction {: #introduction }
Tanssi's EVM (Ethereum Virtual Machine) network template is designed for teams developing their applications on top of EVM smart contracts. It includes all the essential components needed for a full Ethereum-compatible network:
- **EVM** - adds an Ethereum Virtual Machine execution layer for EVM-based smart contract applications
- **Etherum JSON RPC Support** - Tanssi-powered EVM networks are fully [Ethereum JSON RPC](https://ethereum.org/en/developers/docs/apis/json-rpc){target=\_blank} compliant. Consequently, all Ethereum-based tools like [MetaMask](https://metamask.io){target=\_blank}, [Ethers.js](https://docs.ethers.org/v6/){target=\_blank}, [Viem](https://viem.sh){target=\_blank}, [Hardhat](https://hardhat.org){target=\_blank}, [Foundry](https://getfoundry.sh/){target=\_blank} and more, work seamlessly out of the box
- **Unified Accounts** - allows Tanssi-powered EVM networks to feature Ethereum-styled ECDSA accounts
## EVM Network Template {: #evm-network-template }
The template already includes the necessary configuration for seamless integration with the Tanssi protocol and the security provider of choice, for example, [Symbiotic](https://symbiotic.fi/){target=\_blank} on Ethereum. Therefore, this template requires no additional changes in the runtime if the application is built on top of the EVM.
This means that this template is ready to be deployed as-is through Tanssi, unlocking many features, such as:
- Utilize Tanssi's [block production as a service](/learn/tanssi/network-services/block-production/){target=\_blank}
- Get deterministic transaction finality in seconds
- Choose the security provider that best fits your needs. For example, leverage Ethereum-grade security from [Symbiotic](https://symbiotic.fi/){target=\_blank}
- Build dApps interacting with your network through an [API](/builders/toolkit/substrate-api/libraries/polkadot-js-api/){target=\_blank}
- Connect any Ethereum wallet, such as [Metamask](/builders/toolkit/ethereum-api/wallets/metamask/){target=\_blank} and Ledger
- Use well-known Ethereum libraries like [Ethers.js](/builders/toolkit/ethereum-api/libraries/ethersjs/){target=\_blank}, [Web3.js](/builders/toolkit/ethereum-api/libraries/web3js/){target=\_blank}, [Web3.py](/builders/toolkit/ethereum-api/libraries/web3py/){target=\_blank}, and more
- Deploy EVM smart contracts with tools like [Remix](https://remix.ethereum.org){target=\_blank}, [Hardhat](https://hardhat.org){target=\_blank}, [Foundry](https://github.com/foundry-rs/foundry){target=\_blank}, and more
## Included Modules {: #included-modules }
Besides the modules and configurations that make the Tanssi EVM network template compatible with the Tanssi protocol, it also includes [many modules](/builders/build/templates/overview/#included-modules){target=\_blank} to provide basic functionalities.
To reach full Ethereum compatibility, these specific modules are also included:
- **[EVM](https://docs.rs/pallet-evm/latest/pallet_evm){target=\_blank}** - it adds support for unmodified EVM bytecode execution on a Tanssi-powered network. It uses the Rust-based [SputnikVM](https://github.com/rust-ethereum/evm){target=\_blank} as the underlying EVM engine
- **[Ethereum](https://docs.rs/pallet-ethereum/latest/pallet_ethereum){target=\_blank}** - it works alongside the EVM module to provide full emulation for Ethereum block processing. Among many other tasks, it is responsible for creating emulated Ethereum blocks for Ethereum-specific components such as EVM logs
Both modules are part of the [Frontier](https://github.com/polkadot-evm/frontier){target=\_blank} project, which is the backbone of Ethereum-compatible Tanssi-powered networks.
--- END CONTENT ---
Doc-Content: https://docs.tanssi.network/builders/manage/developer-portal/smart-contracts-creation-filter/
--- BEGIN CONTENT ---
---
title: Smart EVM - Whitelist Contract Deployments
description: Learn how to use Sudo to whitelist smart contract deployers for your Smart EVM Tanssi-powered network, increasing overall security.
icon: octicons-file-binary-24
categories: Appchain, EVM-Template
---
# Smart EVM - Whitelist Contract Deployments
## Introduction {: #introduction }
EVM-compatible Tanssi-powered networks benefit from a unique feature: the network governor can define which accounts are authorized to deploy smart contracts, forbidding the action for any other non-whitelisted account.
This feature brings several key benefits that might be a great fit for different use cases or contexts. Some of those benefits are:
- **Enhanced Security** - by restricting deployment to trusted accounts, the risk of deploying malicious or vulnerable smart contracts is reduced
- **Quality Assurance** - known and vetted accounts can be required to follow specific coding standards and undergo thorough testing before deployment
- **Regulatory Compliance** - uses cases that are highly regulated can limit deployment to ensure that smart contracts meet legal and compliance requirements
- **Spam and Abuse Prevention** - prevent bad actors from deploying large numbers of unnecessary or harmful contracts
In this guide, you'll learn how to use the Sudo account to manage the whitelisted accounts that can deploy smart contracts on your network.
## Checking Prerequisites {: #checking-prerequisites }
For the examples in this guide, you will need to have the following:
- An EVM-compatible Tanssi-powered network (Quick Trial or Dedicated) running [runtime 700](https://github.com/moondance-labs/tanssi/releases/tag/runtime-700){target=\_blank} or above. Any new network deployment based on the [EVM template](/builders/build/templates/evm/){target=\_blank} will do
- Your network's Sudo account connected to your network's Polkadot.js Apps. You can refer to the [Managing Sudo guide](/builders/manage/developer-portal/sudo/#configuring-polkadotjs-apps){target=\_blank} for instructions on injecting your Sudo account into Polkadot.js Apps
If you're unsure what your Tanssi network's Sudo account is, you can find it in your [Tanssi Dashboard](https://apps.tanssi.network){target=\_blank} underneath the **Properties** section.
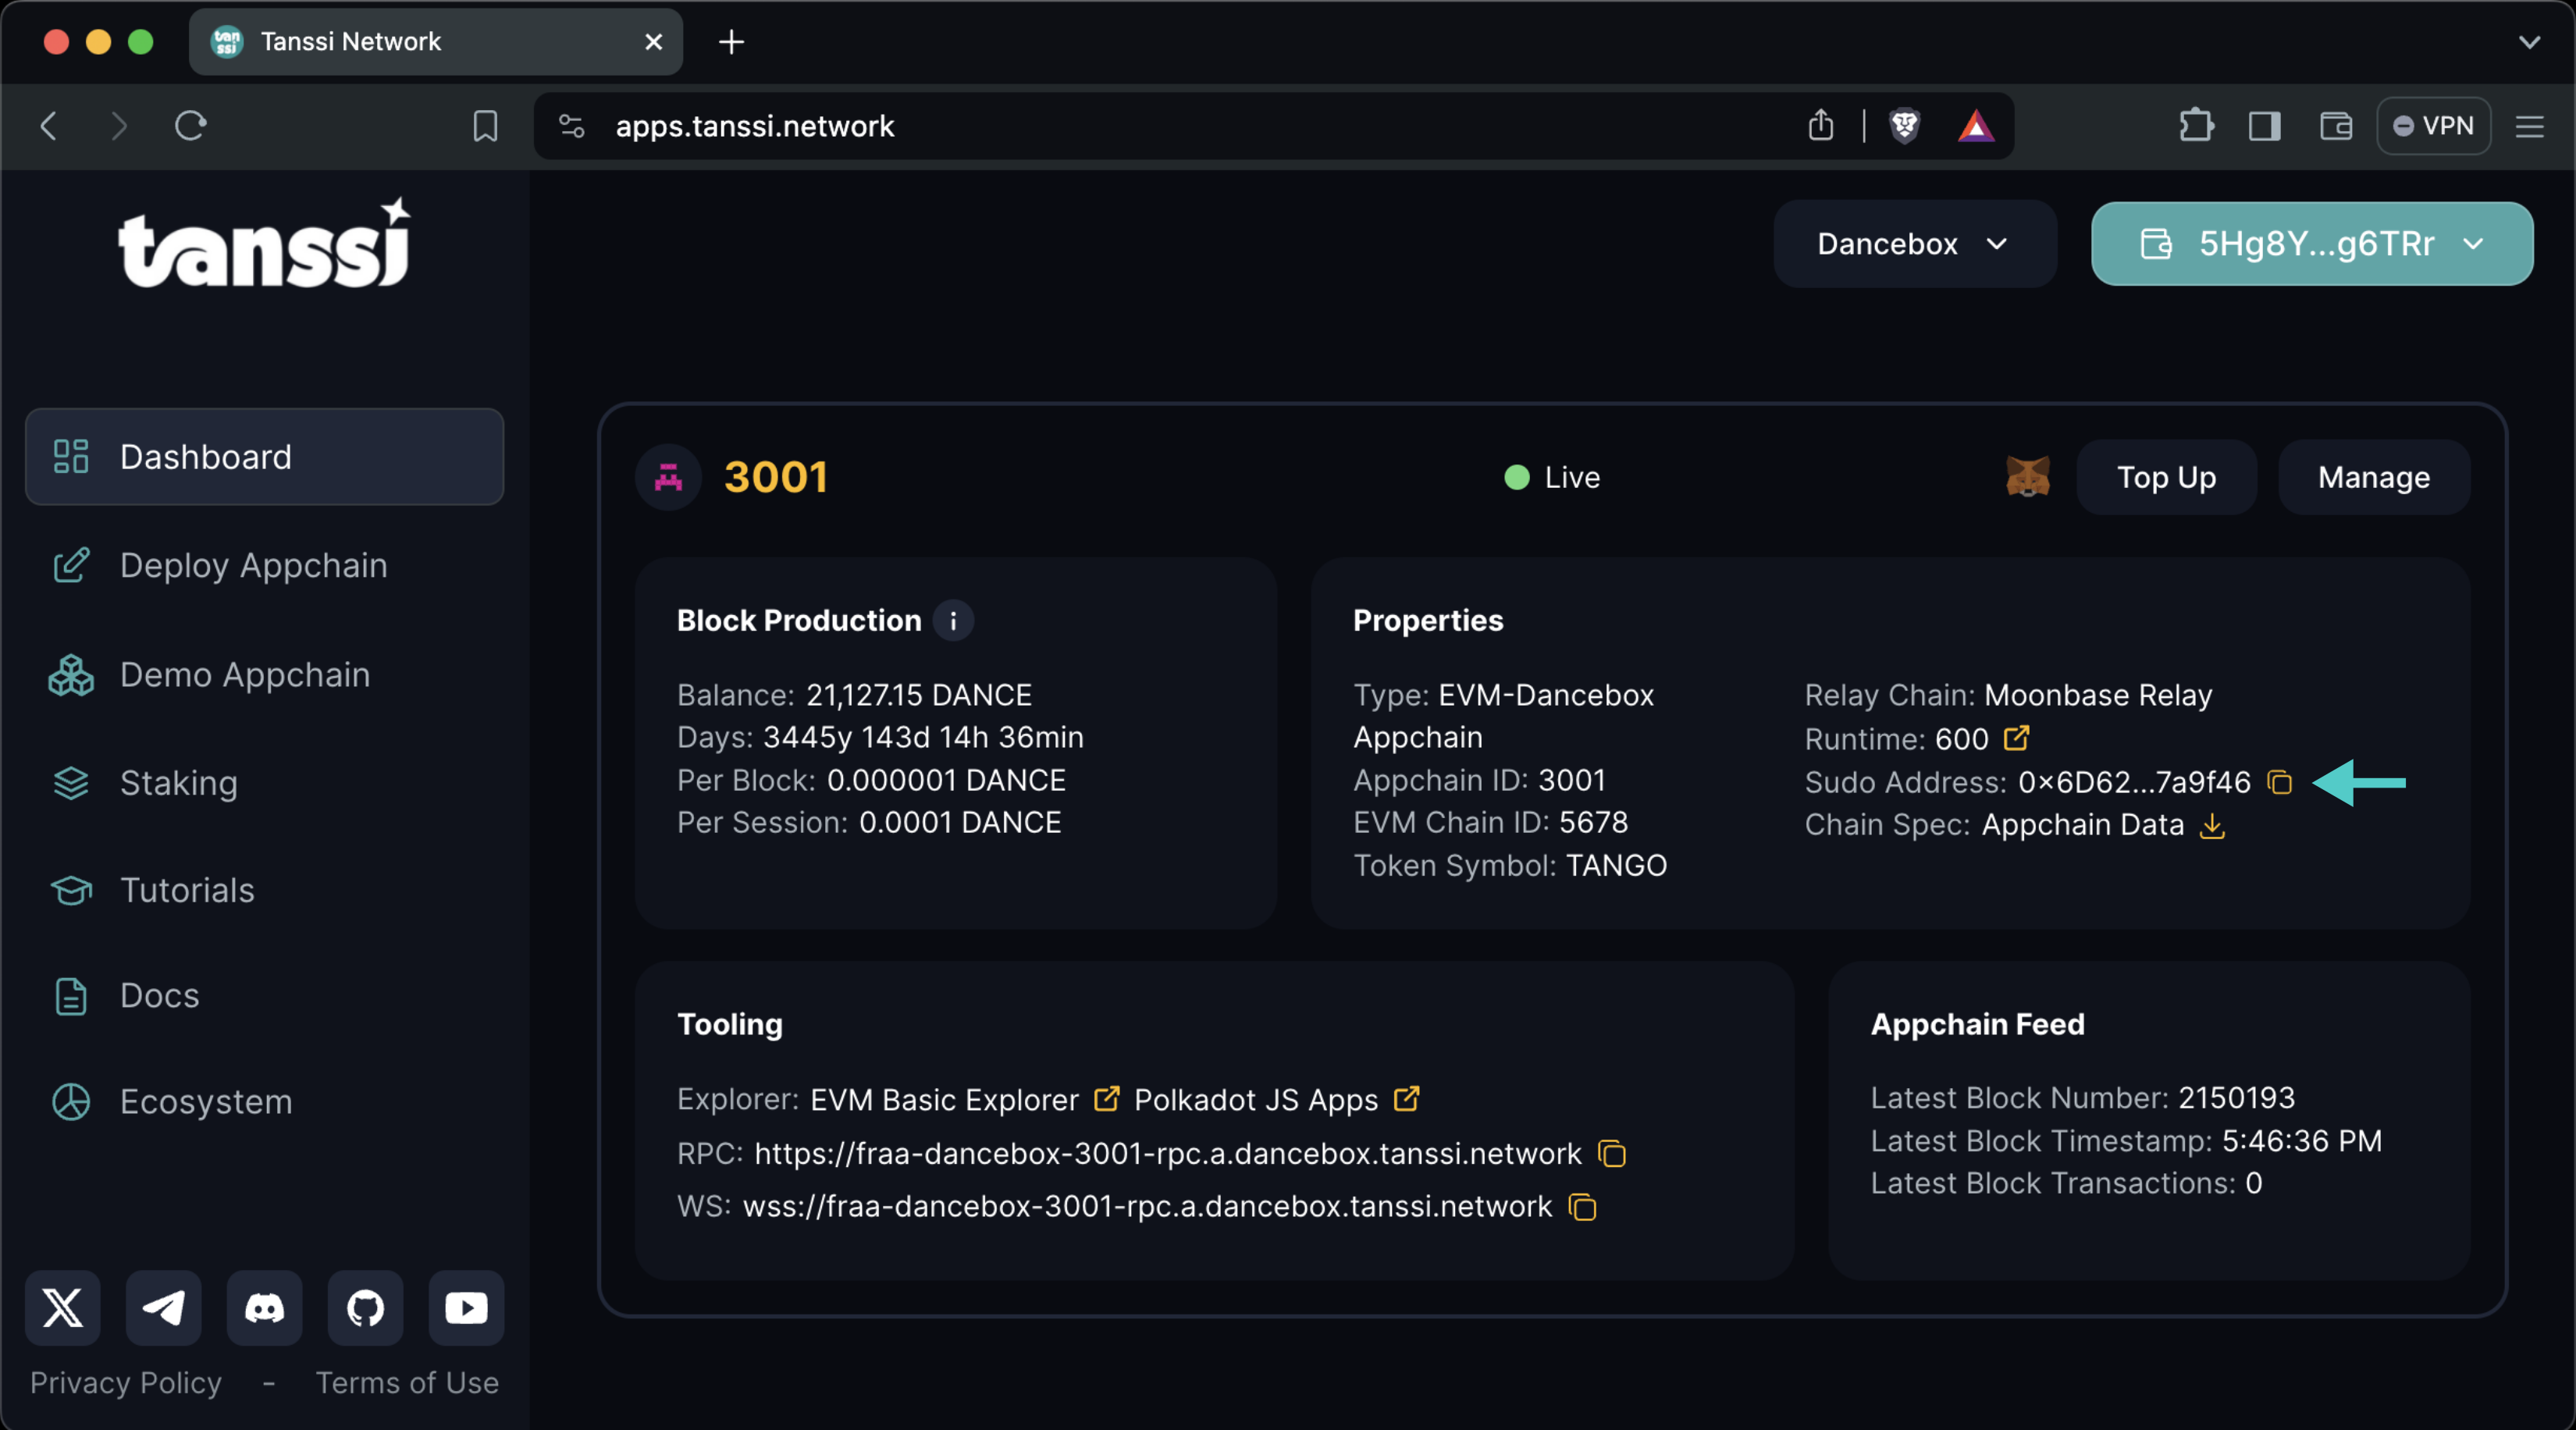
!!! warning
It's critical to protect your Sudo account key with the utmost security precautions, as it grants privileged access to your Tanssi network.
## Getting Started {: #getting-started }
To follow the next sections of this guide, head to Polkadot.js Apps for your Tanssi network. The Polkadot.js Apps link for your Tanssi network can be found in your [Tanssi Dashboard](https://apps.tanssi.network){target=\_blank} underneath the **Tooling** section.
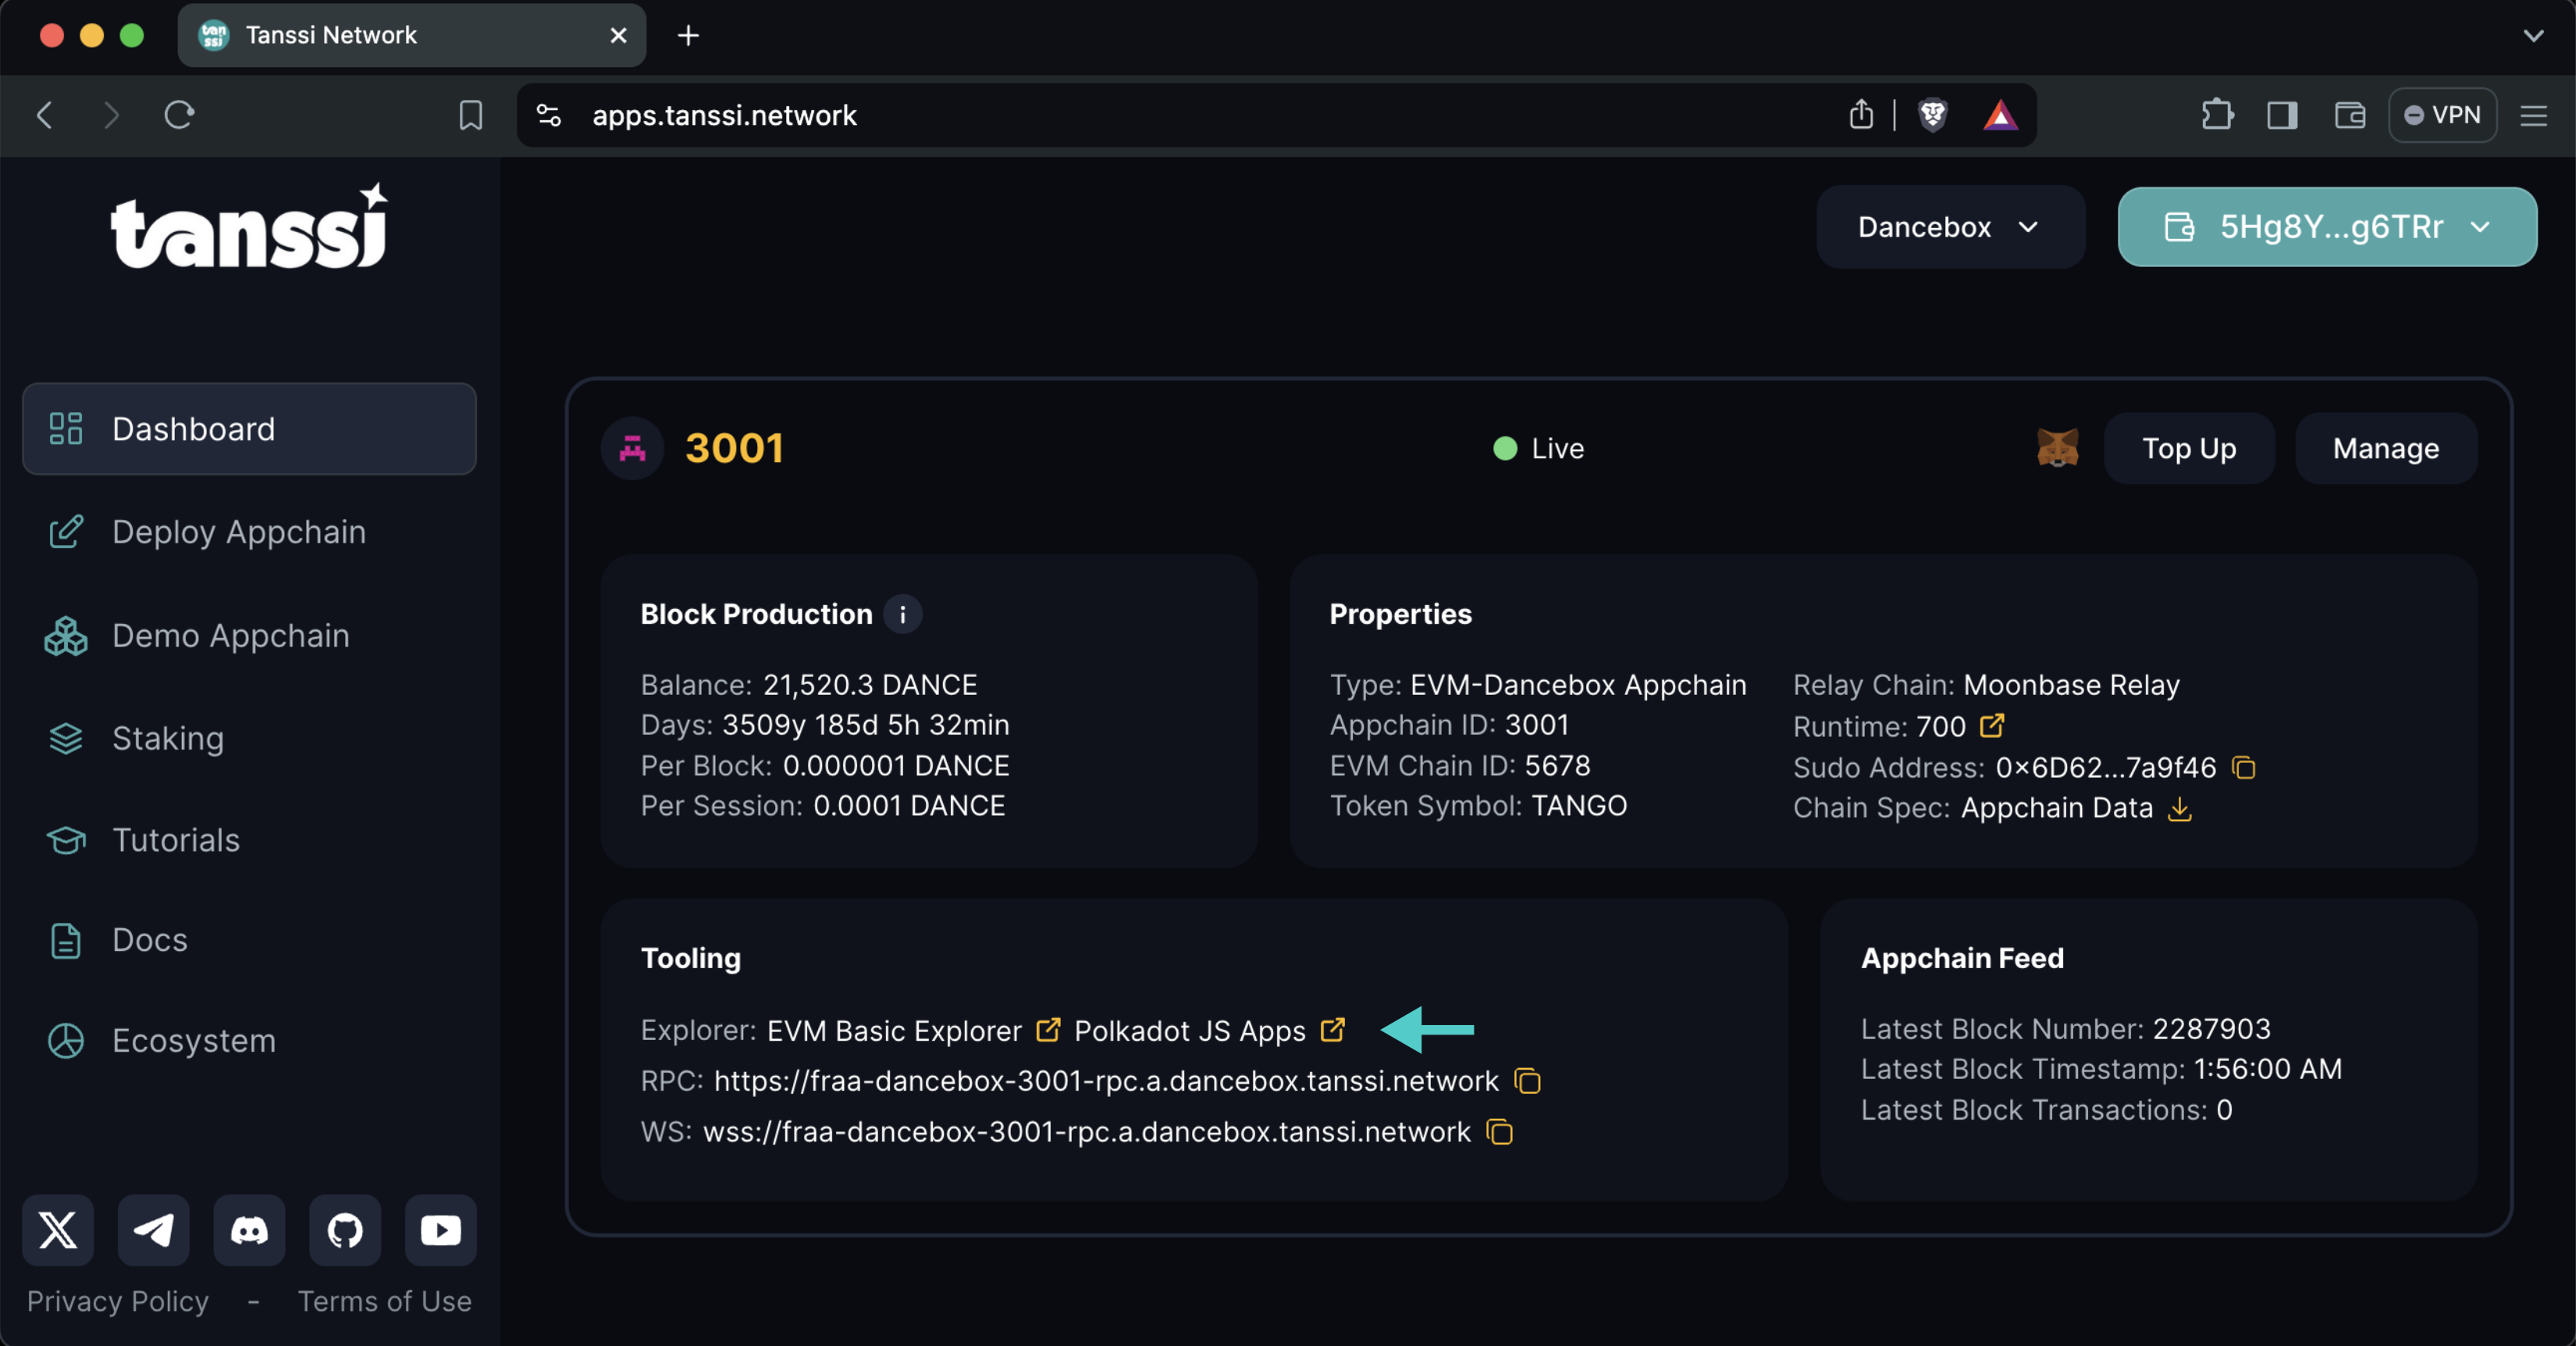
Once in Polkadot.js Apps, navigate to the **Developer** tab and click on **Sudo**.
!!! note
If you do not see **Sudo** in this menu, then you have not associated the Sudo account with Polkadot.js Apps. Make sure that your [Sudo account is injected by your wallet and connected to Polkadot.js Apps](/builders/manage/developer-portal/sudo/#configuring-polkadotjs-apps){target=\_blank}.
## Whitelisting Accounts {: #whitelist-accounts }
To define the accounts that will have authorization to deploy smart contracts, [get your Polkadot.js Apps started](#getting-started) and then take the following steps:
1. Select the **parameters** pallet. **setParameter** will be automatically selected in the functions selector and **ContractDeployFilter** in the **keyValue** parameter
2. Two options will be available in the **ContractDeployFilter** selector: **AllowedAddressesToCreate** and **AllowedAddressesToCreateInner**. Select the **AllowedAddressesToCreate** option if you want to whitelist the accounts for smart contract deployments and the latter to whitelist the accounts for indirect (via a smart contract call) smart contract deployments
3. Toggle the **Include option** switch
4. Select the **Whitelisted** option
5. Insert the whitelisted account
6. If you need to insert more than one account, click on **Add item**
7. Press **Submit Sudo** and confirm the transaction in your wallet
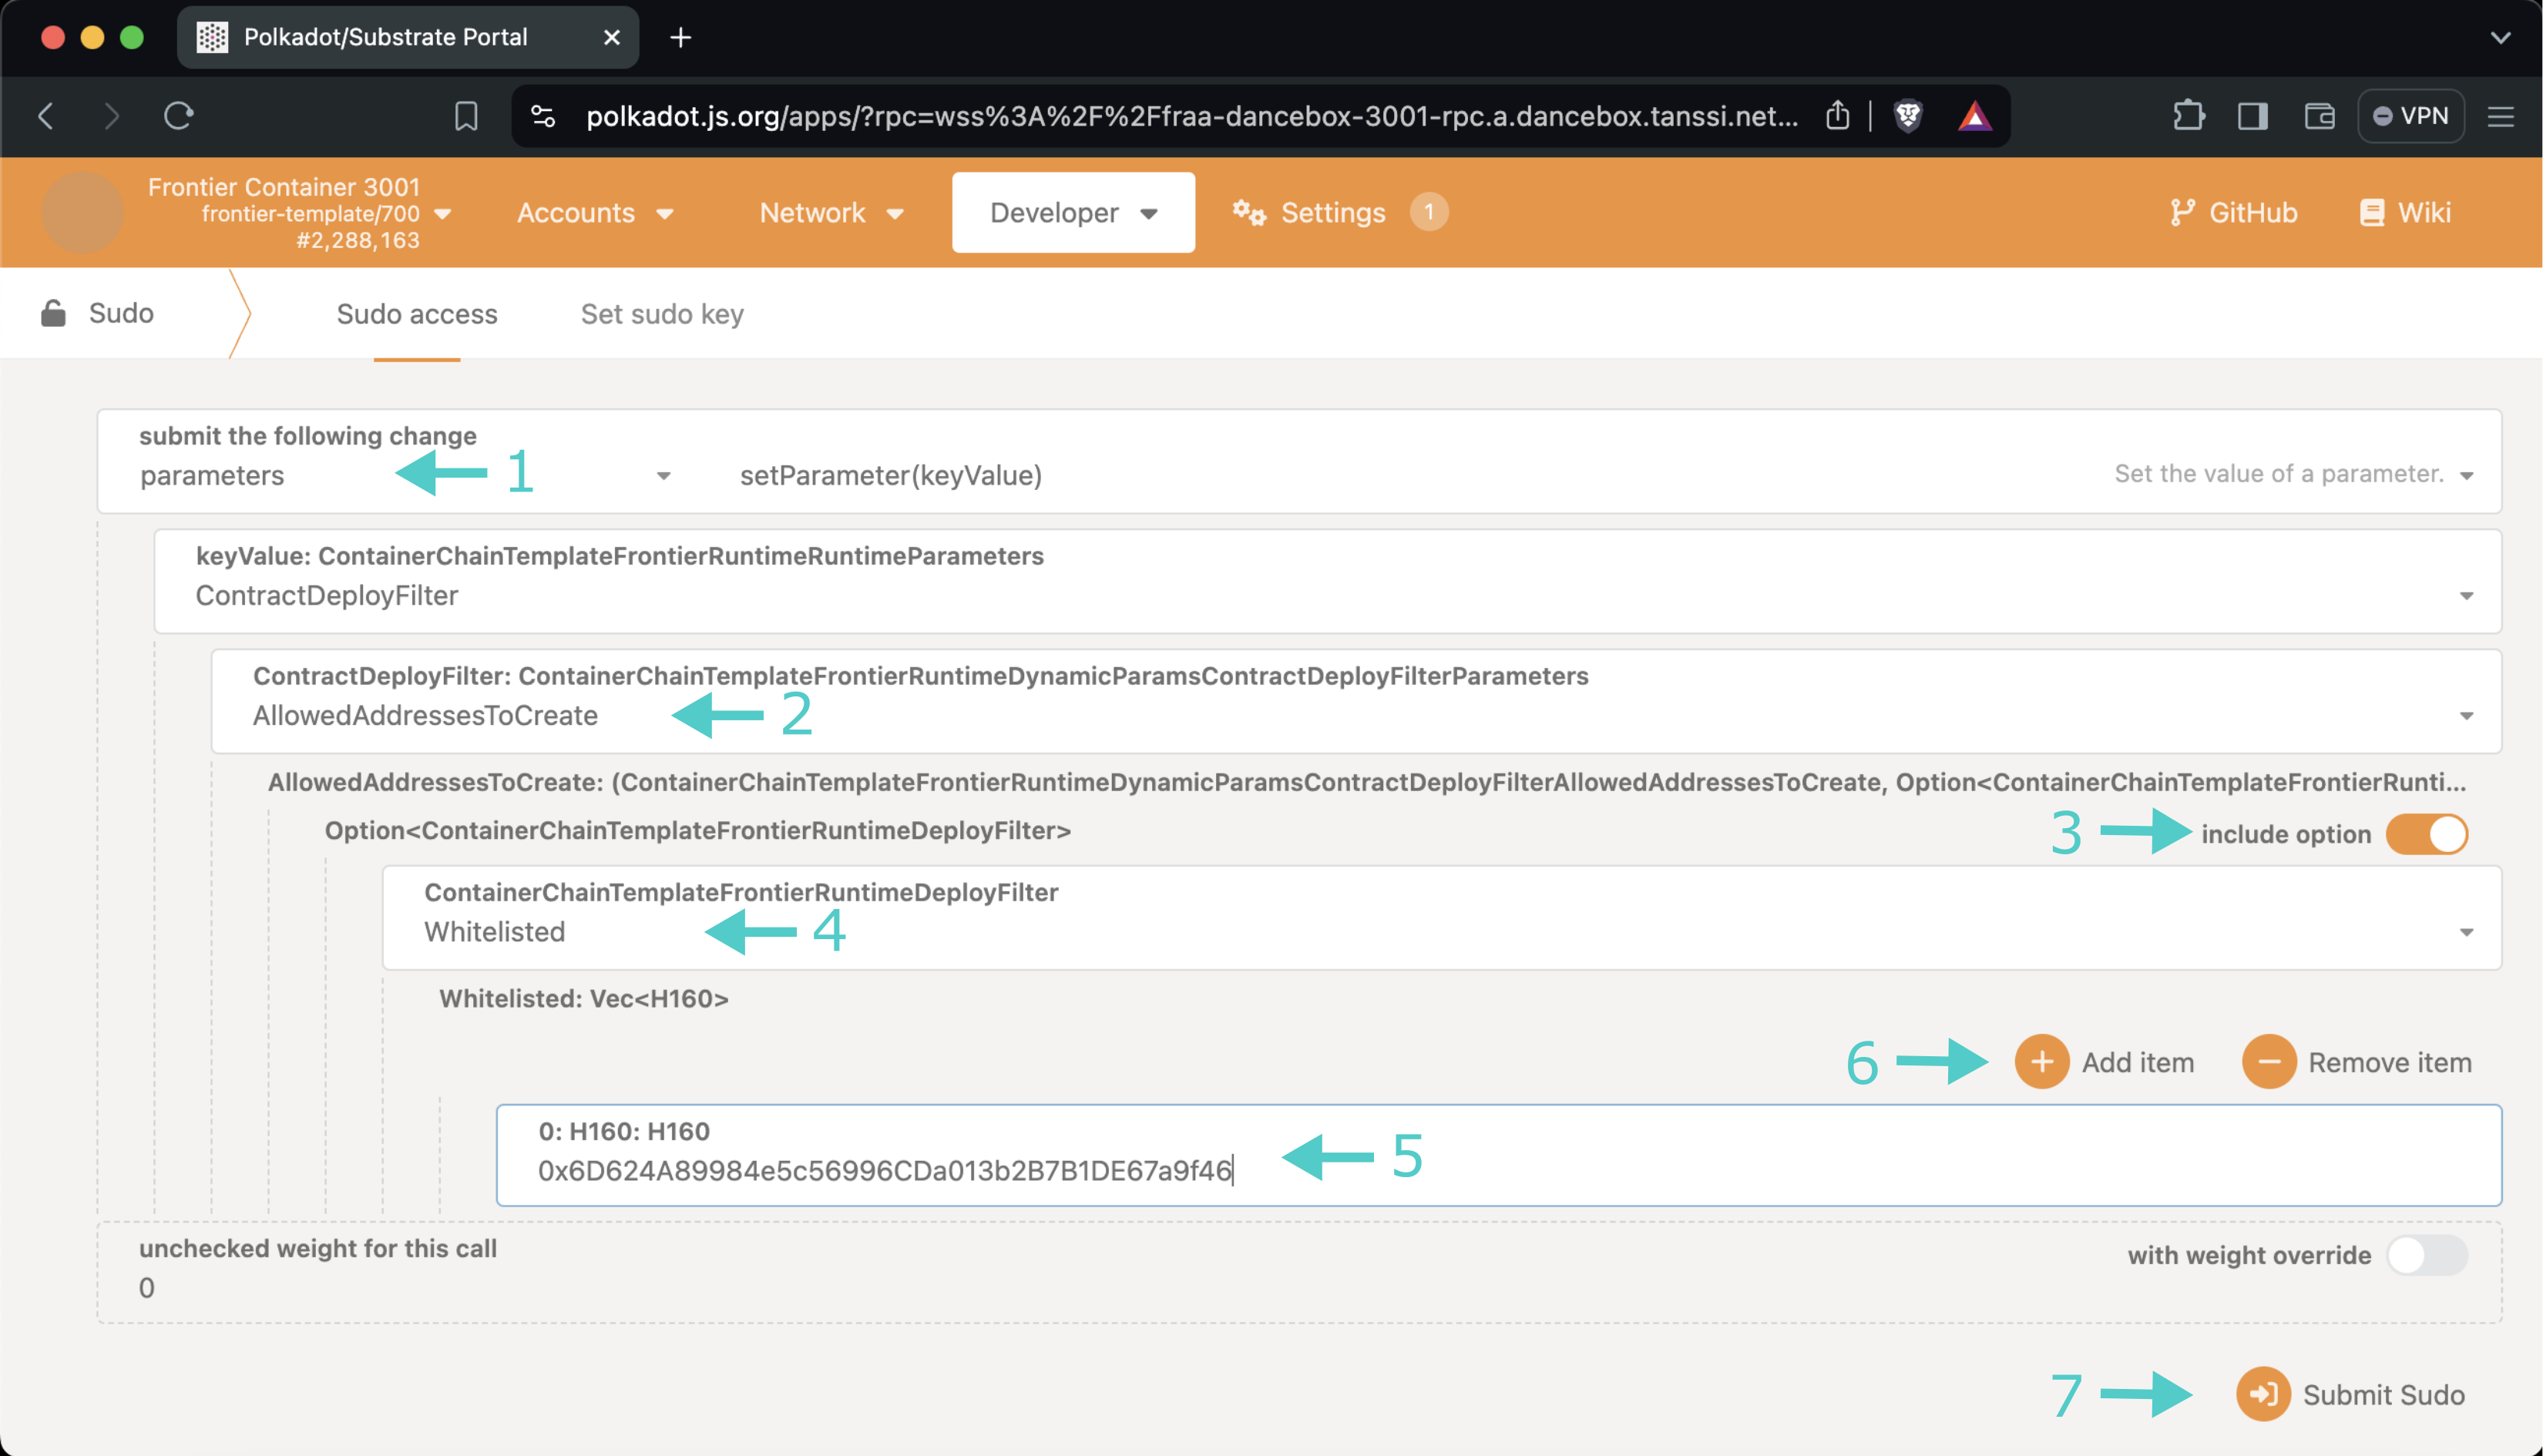
These same steps can be repeated at any moment to remove an account from the whitelist or to add new ones.
## Restoring Permissions to Deploy Smart Contracts {: #restoring-permission}
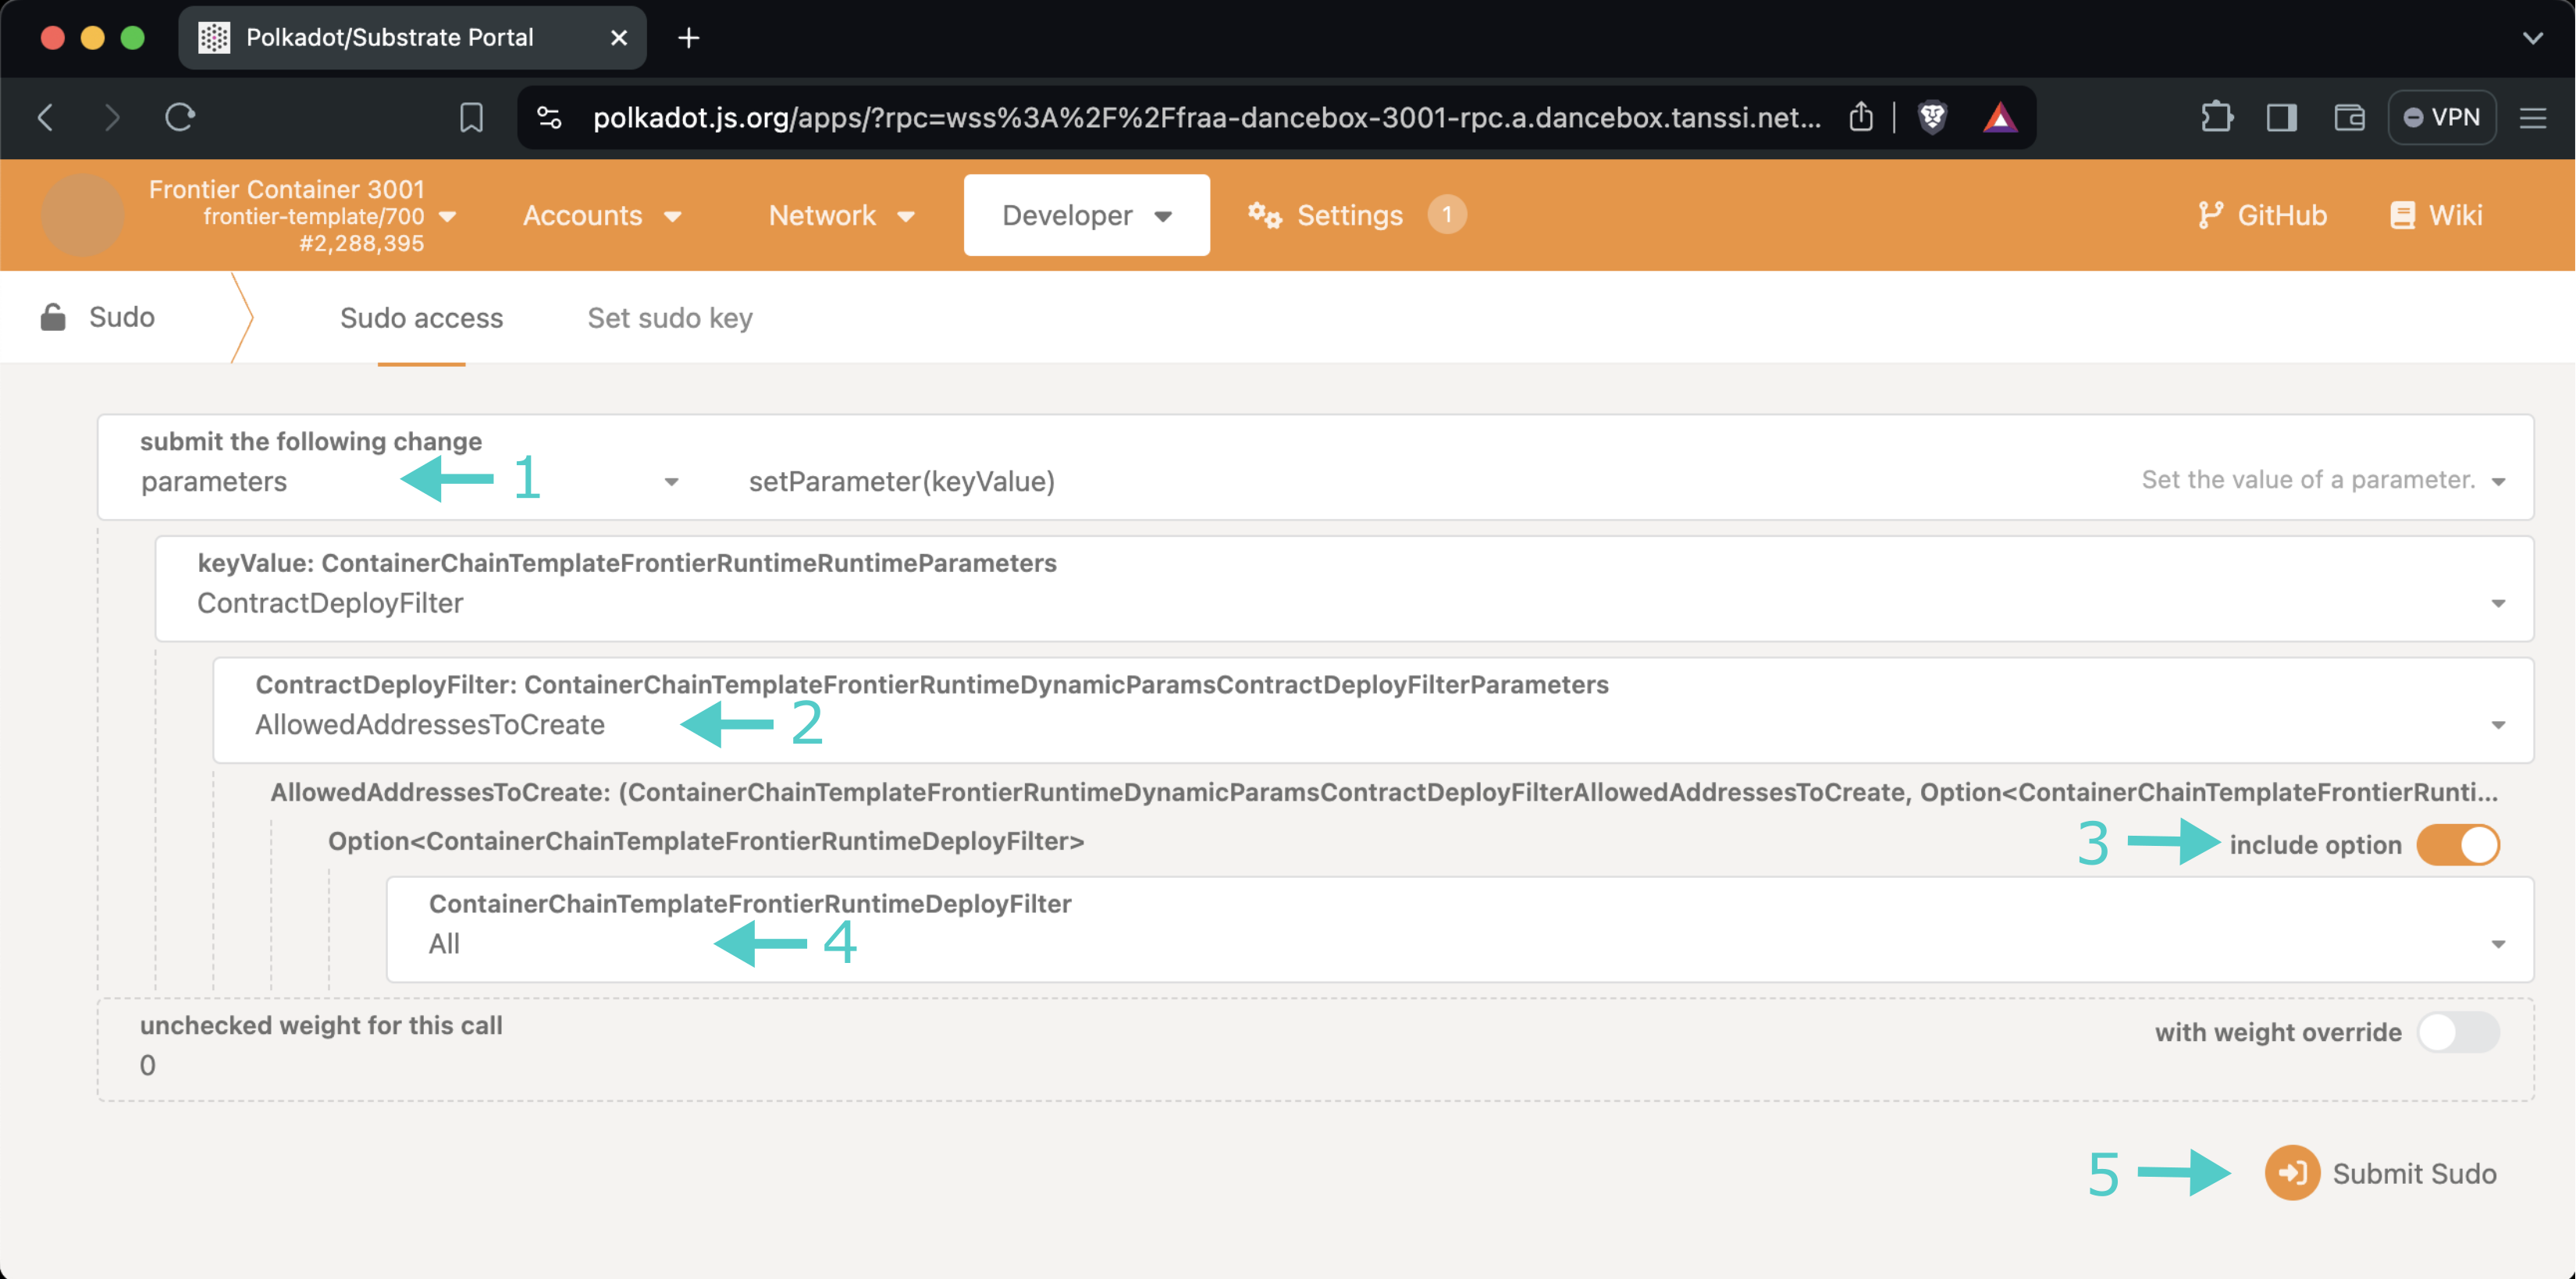
If you previously authorized some accounts to deploy smart contracts and want to allow any account to deploy smart contracts (as long as they can cover regular transaction fees), then [get your Polkadot.js Apps started](#getting-started) and take the following steps:
1. Select the **parameters** pallet. **setParameter** will be automatically selected in the functions selector and **ContractDeployFilter** in the **keyValue** parameter
2. Two options will be available in the **ContractDeployFilter** selector: **AllowedAddressesToCreate** and **AllowedAddressesToCreateInner**. Select the **AllowedAddressesToCreate** option if you want to clear the whitelist for smart contract deployments and the latter to clear the whitelist for indirect (via a smart contract call) smart contract deployments
3. Toggle the **Include option** switch
4. Select the **All** option
5. Press **Submit Sudo** and confirm the transaction in your wallet
## Query the Whitelisted Accounts {: #query-whitelisted-accounts }
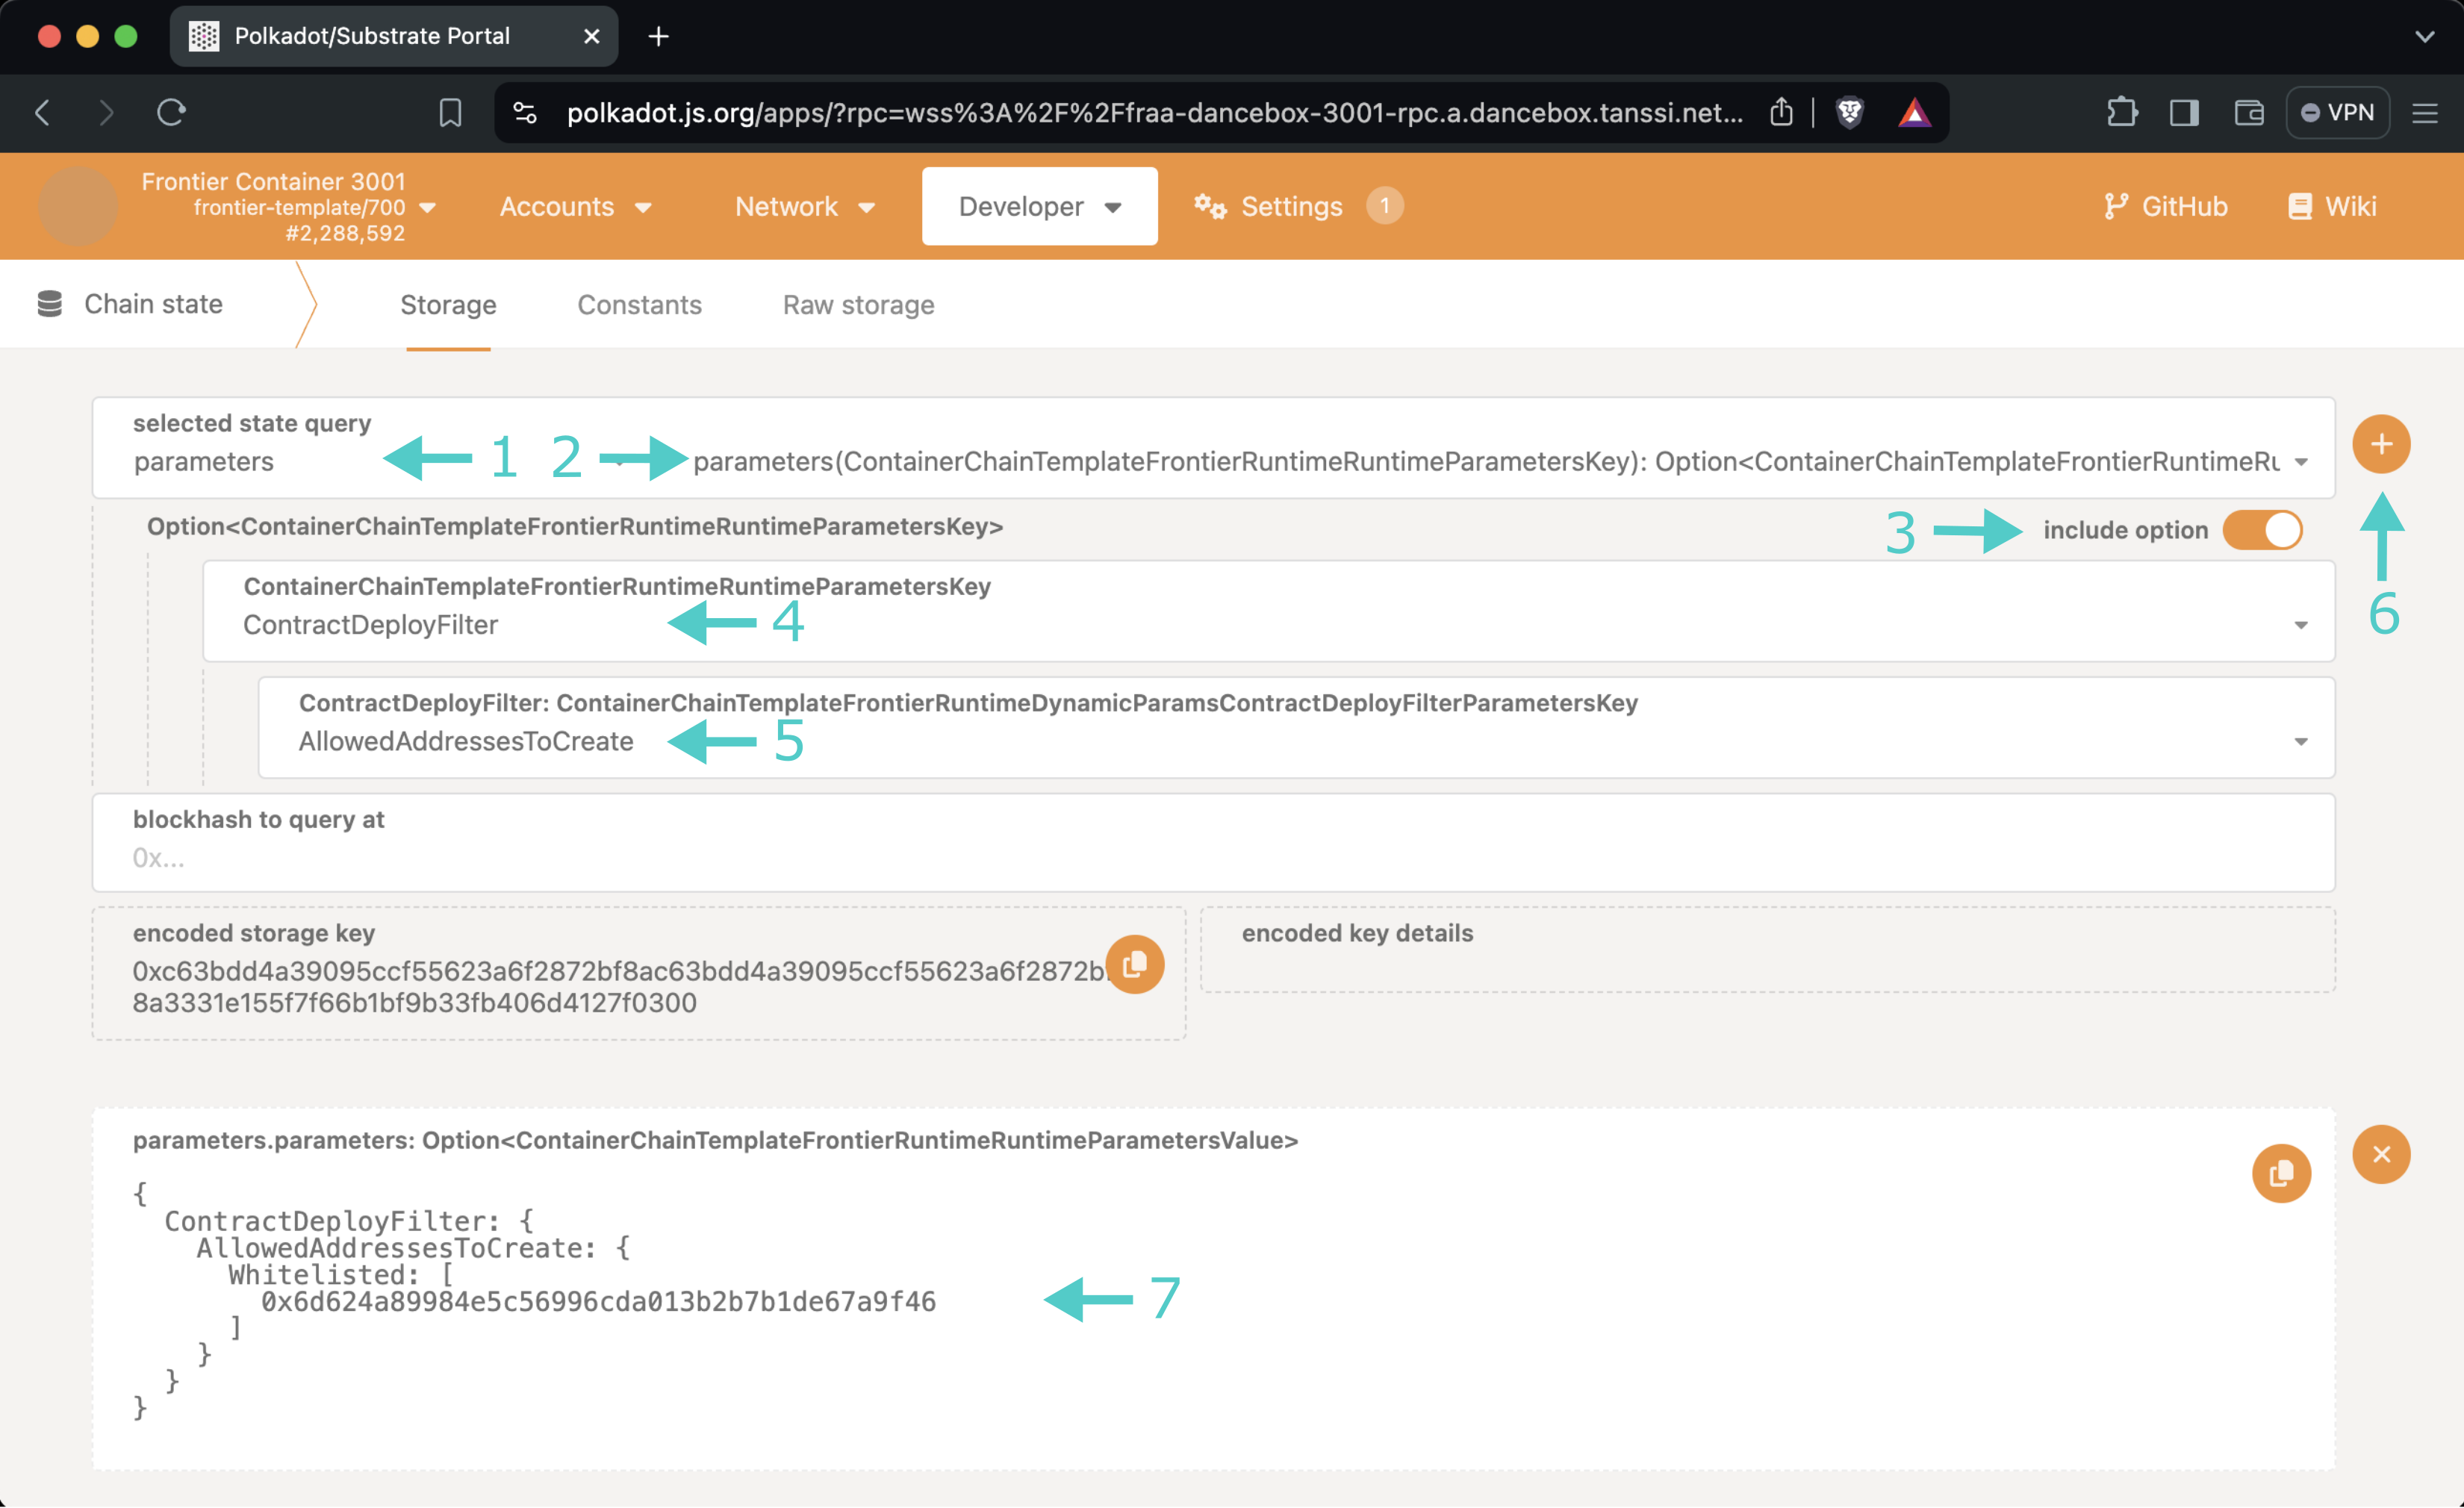
To get the current configuration containing the whitelisted accounts that can deploy smart contracts, go to Polkadot.js Apps (as explained in the [Getting Started](#getting-started) section), navigate to the **Developer** tab, click on **Chain state**, and take the following steps:
1. Select the **parameters** storage
2. Select the **parameters(ContainerChainTemplateFrontierRuntimeParametersKey)** option
3. Make sure that the **Include option** switch is on
4. Make sure that the **ContractDeployFilter** option is selected
5. Two options will be available in the **ContractDeployFilter** selector: **AllowedAddressesToCreate** and **AllowedAddressesToCreateInner**. Select the **AllowedAddressesToCreate** option if you want to query the whitelist for smart contract deployments and the latter to query the whitelist for indirect (via a smart contract call) smart contract deployments
6. Click the **+** button
7. The current configuration will be displayed
--- END CONTENT ---
Doc-Content: https://docs.tanssi.network/builders/tanssi-network/testnet/demo-evm-network/
--- BEGIN CONTENT ---
---
title: Demo EVM Tanssi Network
description: Test our demo EVM Tanssi network to discover the capabilities of a fully Ethereum-compatible network deployed through Tanssi in just a few minutes.
icon: material-ethereum
categories: Appchain, EVM-Template
---
## Introduction
Explore the functionalities of a fully Ethereum-compatible network deployed through Tanssi by interacting with the demo EVM network on [Dancelight](/builders/tanssi-network/testnet/dancelight/){target=\_blank}.
This quick reference page offers all the essentials you need to interact with this demo network.
## Faucet for TestNet Tokens {: #faucet }
You can access {{ networks.dancelight.demo_evm_token_symbol }} tokens, the native currency of the EVM demo network, at the faucet on the [Tanssi dApp](https://apps.tanssi.network/demo){target=\_blank}. You can receive up to 100 {{ networks.dancelight.demo_evm_token_symbol }} tokens every 12 hours.
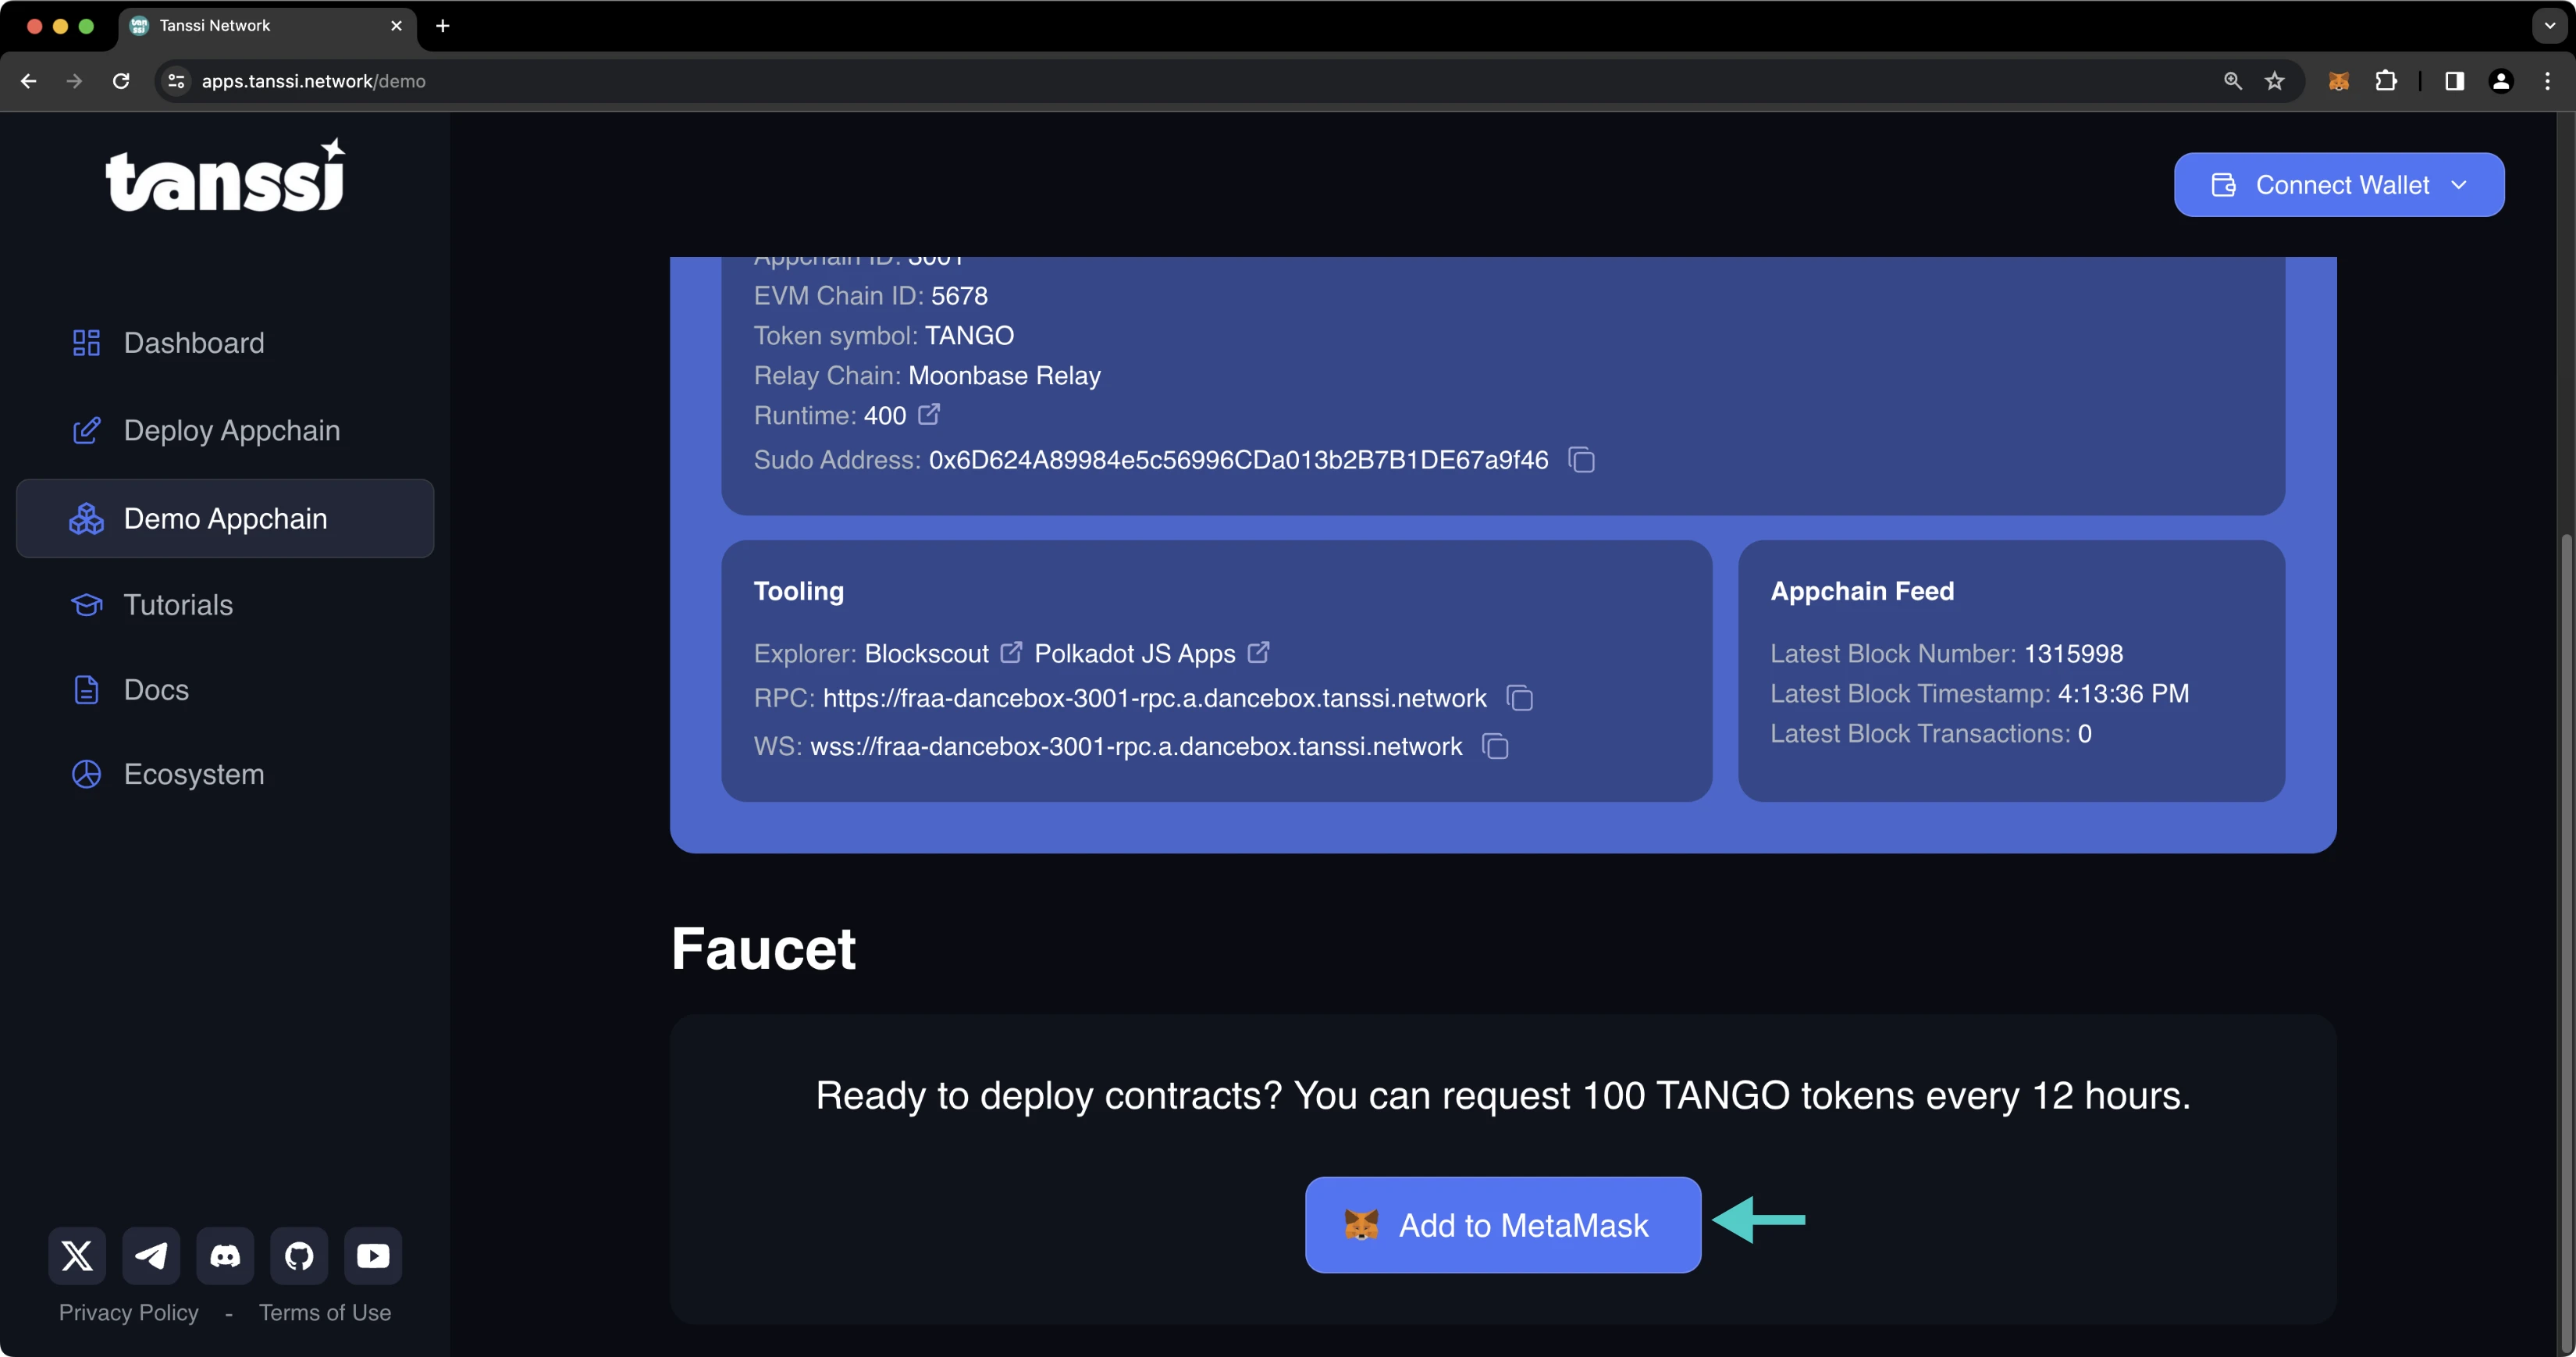
To request tokens from the faucet, head to the [Tanssi dApp](https://apps.tanssi.network/demo){target=\_blank} and press **Add to MetaMask**.
Then, take the following steps:
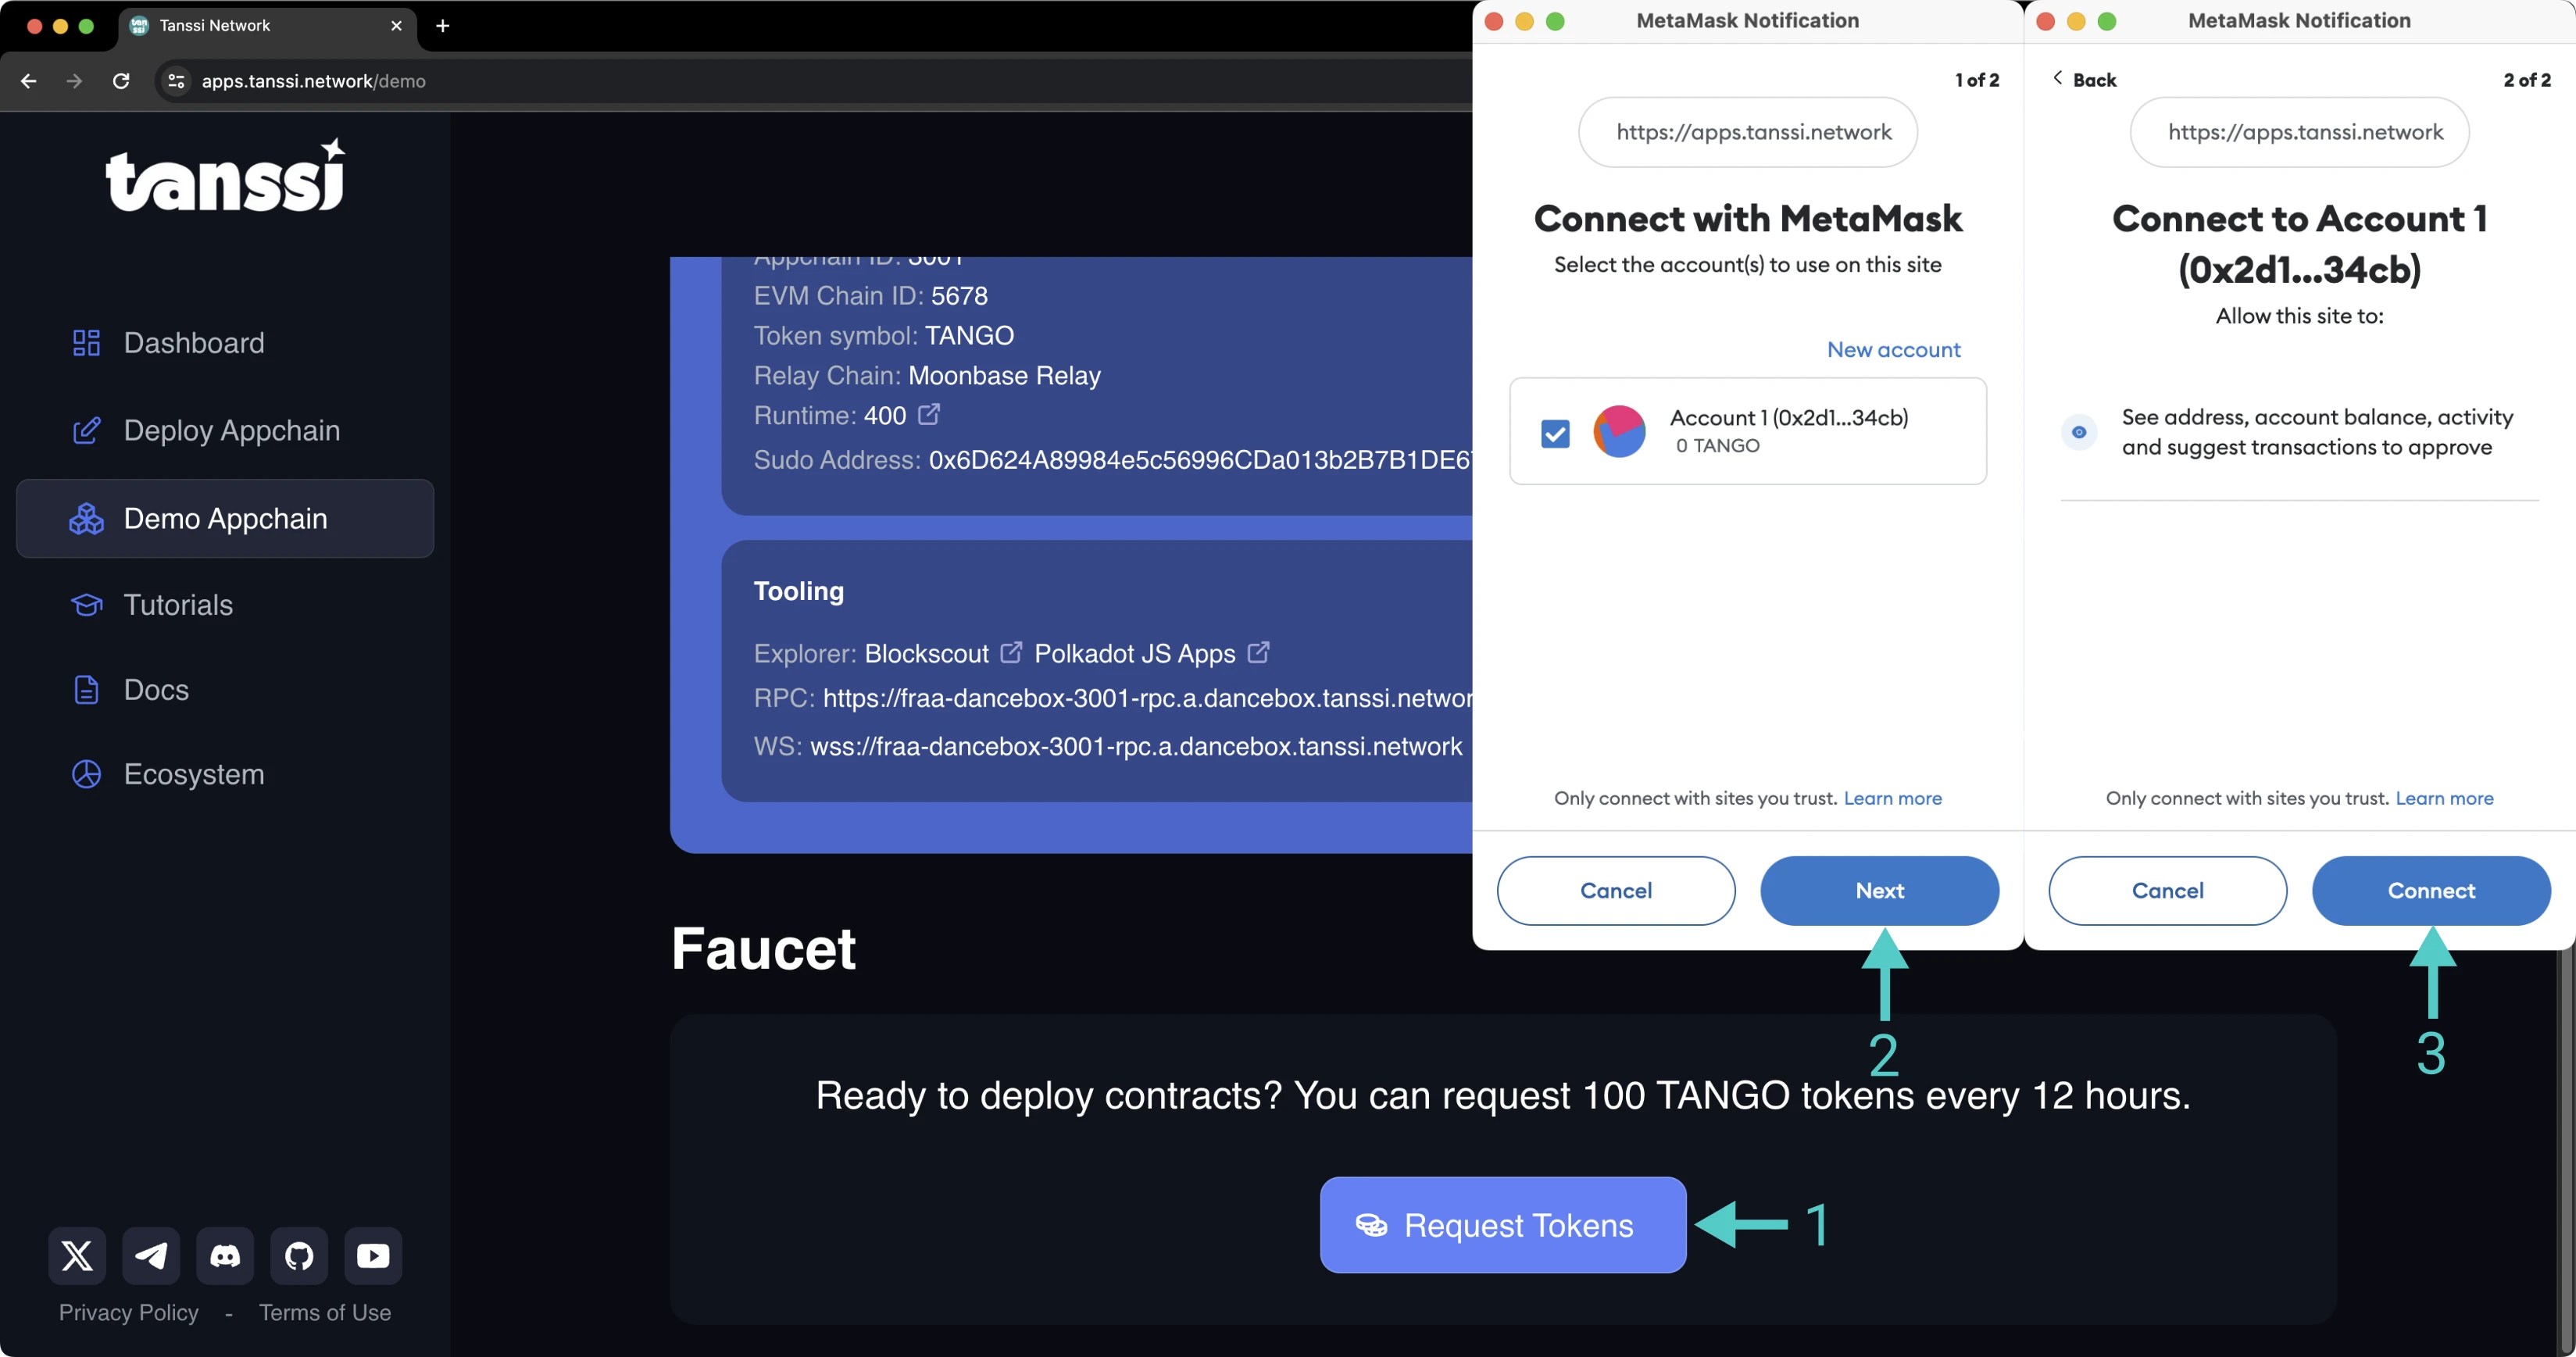
1. Press **Request Tokens**
2. Select the account you'd like to receive {{ networks.dancelight.demo_evm_token_symbol }} tokens and press **Next**
3. Press **Connect**
!!! note
{{ networks.dancelight.demo_evm_token_symbol }} tokens have no value. Please don't spam the faucet with unnecessary requests.
Your tokens will be disbursed shortly, and you can verify your {{ networks.dancelight.demo_evm_token_symbol }} token balance by looking up your address on the [explorer]({{ networks.dancelight.demo_evm_blockscout_url }}){target=\_blank}.
## Network Endpoints {: #network-endpoints }
The demo EVM network HTTPS and WSS endpoints are as follows:
=== "HTTPS"
```text
{{ networks.dancelight.demo_evm_rpc_url }}
```
=== "WSS"
```text
{{ networks.dancelight.demo_evm_rpc_wss_url }}
```
## Block Explorers {: #block-explorers }
For the demo EVM network, you can use any of the following explorers:
- [Polkadot.js Apps](https://polkadot.js.org/apps/?rpc={{ networks.dancelight.demo_evm_rpc_wss_url }}){target=\_blank} (Substrate API)
- [Blockscout]({{ networks.dancelight.demo_evm_blockscout_url }}){target=\_blank} (Ethereum API)
- [Expedition](https://evmexplorer.tanssi-chains.network/?rpcUrl={{ networks.dancelight.demo_evm_rpc_url }}){target=\_blank} (Ethereum API)
## Chain ID {: #chain-id }
The demo EVM network has a [chain ID](https://chainlist.org/chain/{{ networks.dancelight.demo_evm_chain_id }}){target=\_blank} of: `{{ networks.dancelight.demo_evm_chain_id }}`, which is `{{ networks.dancelight.demo_evm_chain_hex_id }}` in hex.
## Quick Start {: #quick-start }
You can interact with a Tanssi-powered EVM network using standard Ethereum libraries, like [Ethers.js](/builders/toolkit/ethereum-api/libraries/ethersjs/){target=\_blank}, [Web3.js](/builders/toolkit/ethereum-api/libraries/web3js/){target=\_blank}, and [Web3.py](/builders/toolkit/ethereum-api/libraries/web3py/){target=\_blank}. To quickly get started, you'll need to create a provider connected to a Tanssi EVM network:
=== "Ethers.js"
```js
import { ethers } from "ethers";
const providerRPC = {
evmNetwork: {
name: 'dancelight-evm-network',
// Insert your RPC URL here
rpc: '{{ networks.dancelight.demo_evm_rpc_url }}',
chainId: {{ networks.dancelight.demo_evm_chain_id }}, // {{ networks.dancelight.demo_evm_chain_hex_id }} in hex,
},
};
const provider = new ethers.JsonRpcProvider(
providerRPC.evmNetwork.rpc,
{
chainId: providerRPC.evmNetwork.chainId,
name: providerRPC.evmNetwork.name,
}
);
```
=== "Web3.js"
```js
const Web3 = require('web3');
const web3 = new Web3(
'{{ networks.dancelight.demo_evm_rpc_url }}'
);
```
=== "Web3.py"
```python
from web3 import Web3
web3 = Web3(Web3.HTTPProvider('{{ networks.dancelight.demo_evm_rpc_url }}'))
```
--- END CONTENT ---
Doc-Content: https://docs.tanssi.network/builders/toolkit/ethereum-api/dev-env/foundry/
--- BEGIN CONTENT ---
---
title: Deploy Contracts with Foundry
description: Learn how to use Foundry, an Ethereum development environment, to compile, deploy, and interact with Solidity smart contracts on your Tanssi EVM network.
icon: octicons-code-square-24
categories: EVM-Template
---
# Using Foundry to Deploy to Your EVM Network
## Introduction {: #introduction }
[Foundry](https://github.com/foundry-rs/foundry){target=\_blank} is an Ethereum development environment written in Rust that helps developers manage dependencies, compile projects, run tests, deploy contracts, and interact with blockchains from the command line. Foundry can directly interact with the Ethereum API of Tanssi-powered EVM networks, so it can be used to deploy and interact with smart contracts on your Tanssi network.
There are four tools that make up Foundry:
- **[Forge](https://getfoundry.sh/forge/overview/){target=\_blank}** - compiles, tests, and deploys contracts
- **[Cast](https://getfoundry.sh/cast/overview/){target=\_blank}** - a command line interface for interacting with contracts
- **[Anvil](https://getfoundry.sh/anvil/overview/){target=\_blank}** - a local TestNet node for development purposes that can fork preexisting networks
- **[Chisel](https://getfoundry.sh/chisel/overview/){target=\_blank}** - a Solidity REPL for quickly testing Solidity snippets
This guide will cover how to use Foundry to compile, deploy, and debug Ethereum smart contracts on the demo EVM network. You can follow the same steps to perform these actions on your Tanssi EVM network by replacing the RPC URL and Chain ID shown in the examples.
## Checking Prerequisites {: #checking-prerequisites }
To get started, you will need the following:
- An account with funds
- [Foundry installed](https://getfoundry.sh/introduction/installation/){target=\_blank}
## Creating a Foundry Project {: #creating-a-foundry-project }
You will need to create a Foundry project if you don't already have one. You can create one by completing the following steps:
1. Install Foundry with the below commands. The Windows instructions are noticeably different as you'll have to install Rust and then build Foundry from source
=== "Ubuntu"
```bash
curl -L https://foundry.paradigm.xyz | bash foundryup
```
=== "MacOS"
```bash
curl -L https://foundry.paradigm.xyz | bash foundryup
```
=== "Windows"
```bash
curl --proto '=https' --tlsv1.2 -sSf https://sh.rustup.rs/ | sh
cargo install --git https://github.com/foundry-rs/foundry foundry-cli anvil --bins --locked
```
After installing, you may need to restart your terminal session or add `foundryup` to your PATH.
2. Create the project, which will create a folder with three folders within it:
```bash
forge init foundry
```
You may get an error, such as `The target directory is a part of or on its own an already initialized git repository,
and it requires clean working and staging areas, including no untracked files.` To solve this, you can add files and make a commit if you are maintaining this project within a GitHub repository. Otherwise, you can make a dummy commit without pushing. If you run `forge init foundry` once more, you'll no longer have the error.
With the default project created, you should see three folders.
- `lib` - all of the project's dependencies in the form of git submodules
- `src` - where to put your smart contracts (with functionality)
- `test` - where to put the forge tests for your project, which are written in Solidity
In addition to these three folders, a git project will also be created along with a prewritten `.gitignore` file with relevant file types and folders ignored.
## The Source Folder {: #the-src-folder }
The preconfigured `foundry` repo includes `Counter.sol` in the `src` folder, as well as a `Counter.s.sol` in the `script` folder and `Counter.t.sol` in the `test` folder. You should delete these files to avoid errors when trying to compile and deploy `MyToken.sol`. You can do so with the following command:
```bash
rm src/Counter.sol script/Counter.s.sol test/Counter.t.sol
```
In the following steps, you will be deploying an ERC-20 contract. In the contracts directory, you can create the `MyToken.sol` file:
```bash
cd src
touch MyToken.sol
```
Open the file and add the following contract to it:
```solidity
pragma solidity ^0.8.0;
// Import OpenZeppelin Contract
import "openzeppelin-contracts/contracts/token/ERC20/ERC20.sol";
// This ERC-20 contract mints the specified amount of tokens to the contract creator
contract MyToken is ERC20 {
constructor(uint256 initialSupply) ERC20("MyToken", "MYTOK") {
_mint(msg.sender, initialSupply);
}
}
```
Before you attempt to compile, install OpenZeppelin contracts as a dependency. You may have to commit previous changes to git beforehand. By default, Foundry uses git submodules instead of npm packages, so the traditional npm import path and command are not used. Instead, use the name of OpenZeppelin's GitHub repository:
```bash
forge install OpenZeppelin/openzeppelin-contracts
```
## Compiling Solidity {: #compiling-solidity }
Once all dependencies have been installed, you can compile the contract:
```bash
forge build
```

After compilation, two folders will be created: `out` and `cache`. The ABI and bytecode for your contracts will be contained within the `out` folder. These two folders are already ignored by the `.gitignore` included in the default Foundry project initialization.
## Deploying the Contract {: #deploying-the-contract }
Deploying the contract with Forge takes a single command, but you will need to include an RPC endpoint, a funded private key, and constructor arguments. `MyToken.sol` asks for an initial supply of tokens in its constructor, so the following command includes 100 as a constructor argument. You can deploy the `MyToken.sol` contract using the following command modified for the correct network:
```bash
forge create --rpc-url {{ networks.dancelight.demo_evm_rpc_url }} \
--constructor-args 100 \
--private-key INSERT_YOUR_PRIVATE_KEY \
src/MyToken.sol:MyToken
```
After a few seconds, the contract is deployed, and you should see the address in the terminal.

Congratulations, your contract is live! Save the address, as you will use it to interact with this contract instance in the next step.
## Interacting with the Contract {: #interacting-with-the-contract }
Foundry includes [Cast](https://getfoundry.sh/cast/overview/){target=\_blank}, a CLI for performing Ethereum RPC calls.
Try to retrieve your token's name using Cast, where `INSERT_YOUR_CONTRACT_ADDRESS` is the address of the contract that you deployed in the previous section:
```bash
cast call INSERT_YOUR_CONTRACT_ADDRESS "name()" --rpc-url {{ networks.dancelight.demo_evm_rpc_url }}
```
You should get this data in hexadecimal format:
```text
0x000000000000000000000000000000000000000000000000000000000000002000000000000000000000000000000000000000000000000000000000000000074d79546f6b656e00000000000000000000000000000000000000000000000000
```
This is far from readable, but you can use Cast to convert it into your desired format. In this case, the data is text, so you can convert it into ASCII characters to see "My Token":

```bash
cast --to-ascii 0x000000000000000000000000000000000000000000000000000000000000002000000000000000000000000000000000000000000000000000000000000000074d79546f6b656e00000000000000000000000000000000000000000000000000
```
You can also mutate data with Cast as well. Try burning tokens by sending them to the zero address.
```bash
cast send --private-key INSERT_YOUR_PRIVATE_KEY \
--rpc-url {{ networks.dancelight.demo_evm_rpc_url }} \
--chain {{ networks.dancelight.demo_evm_chain_id }} \
INSERT_YOUR_CONTRACT_ADDRESS \
"transfer(address,uint256)" 0x0000000000000000000000000000000000000001 1
```
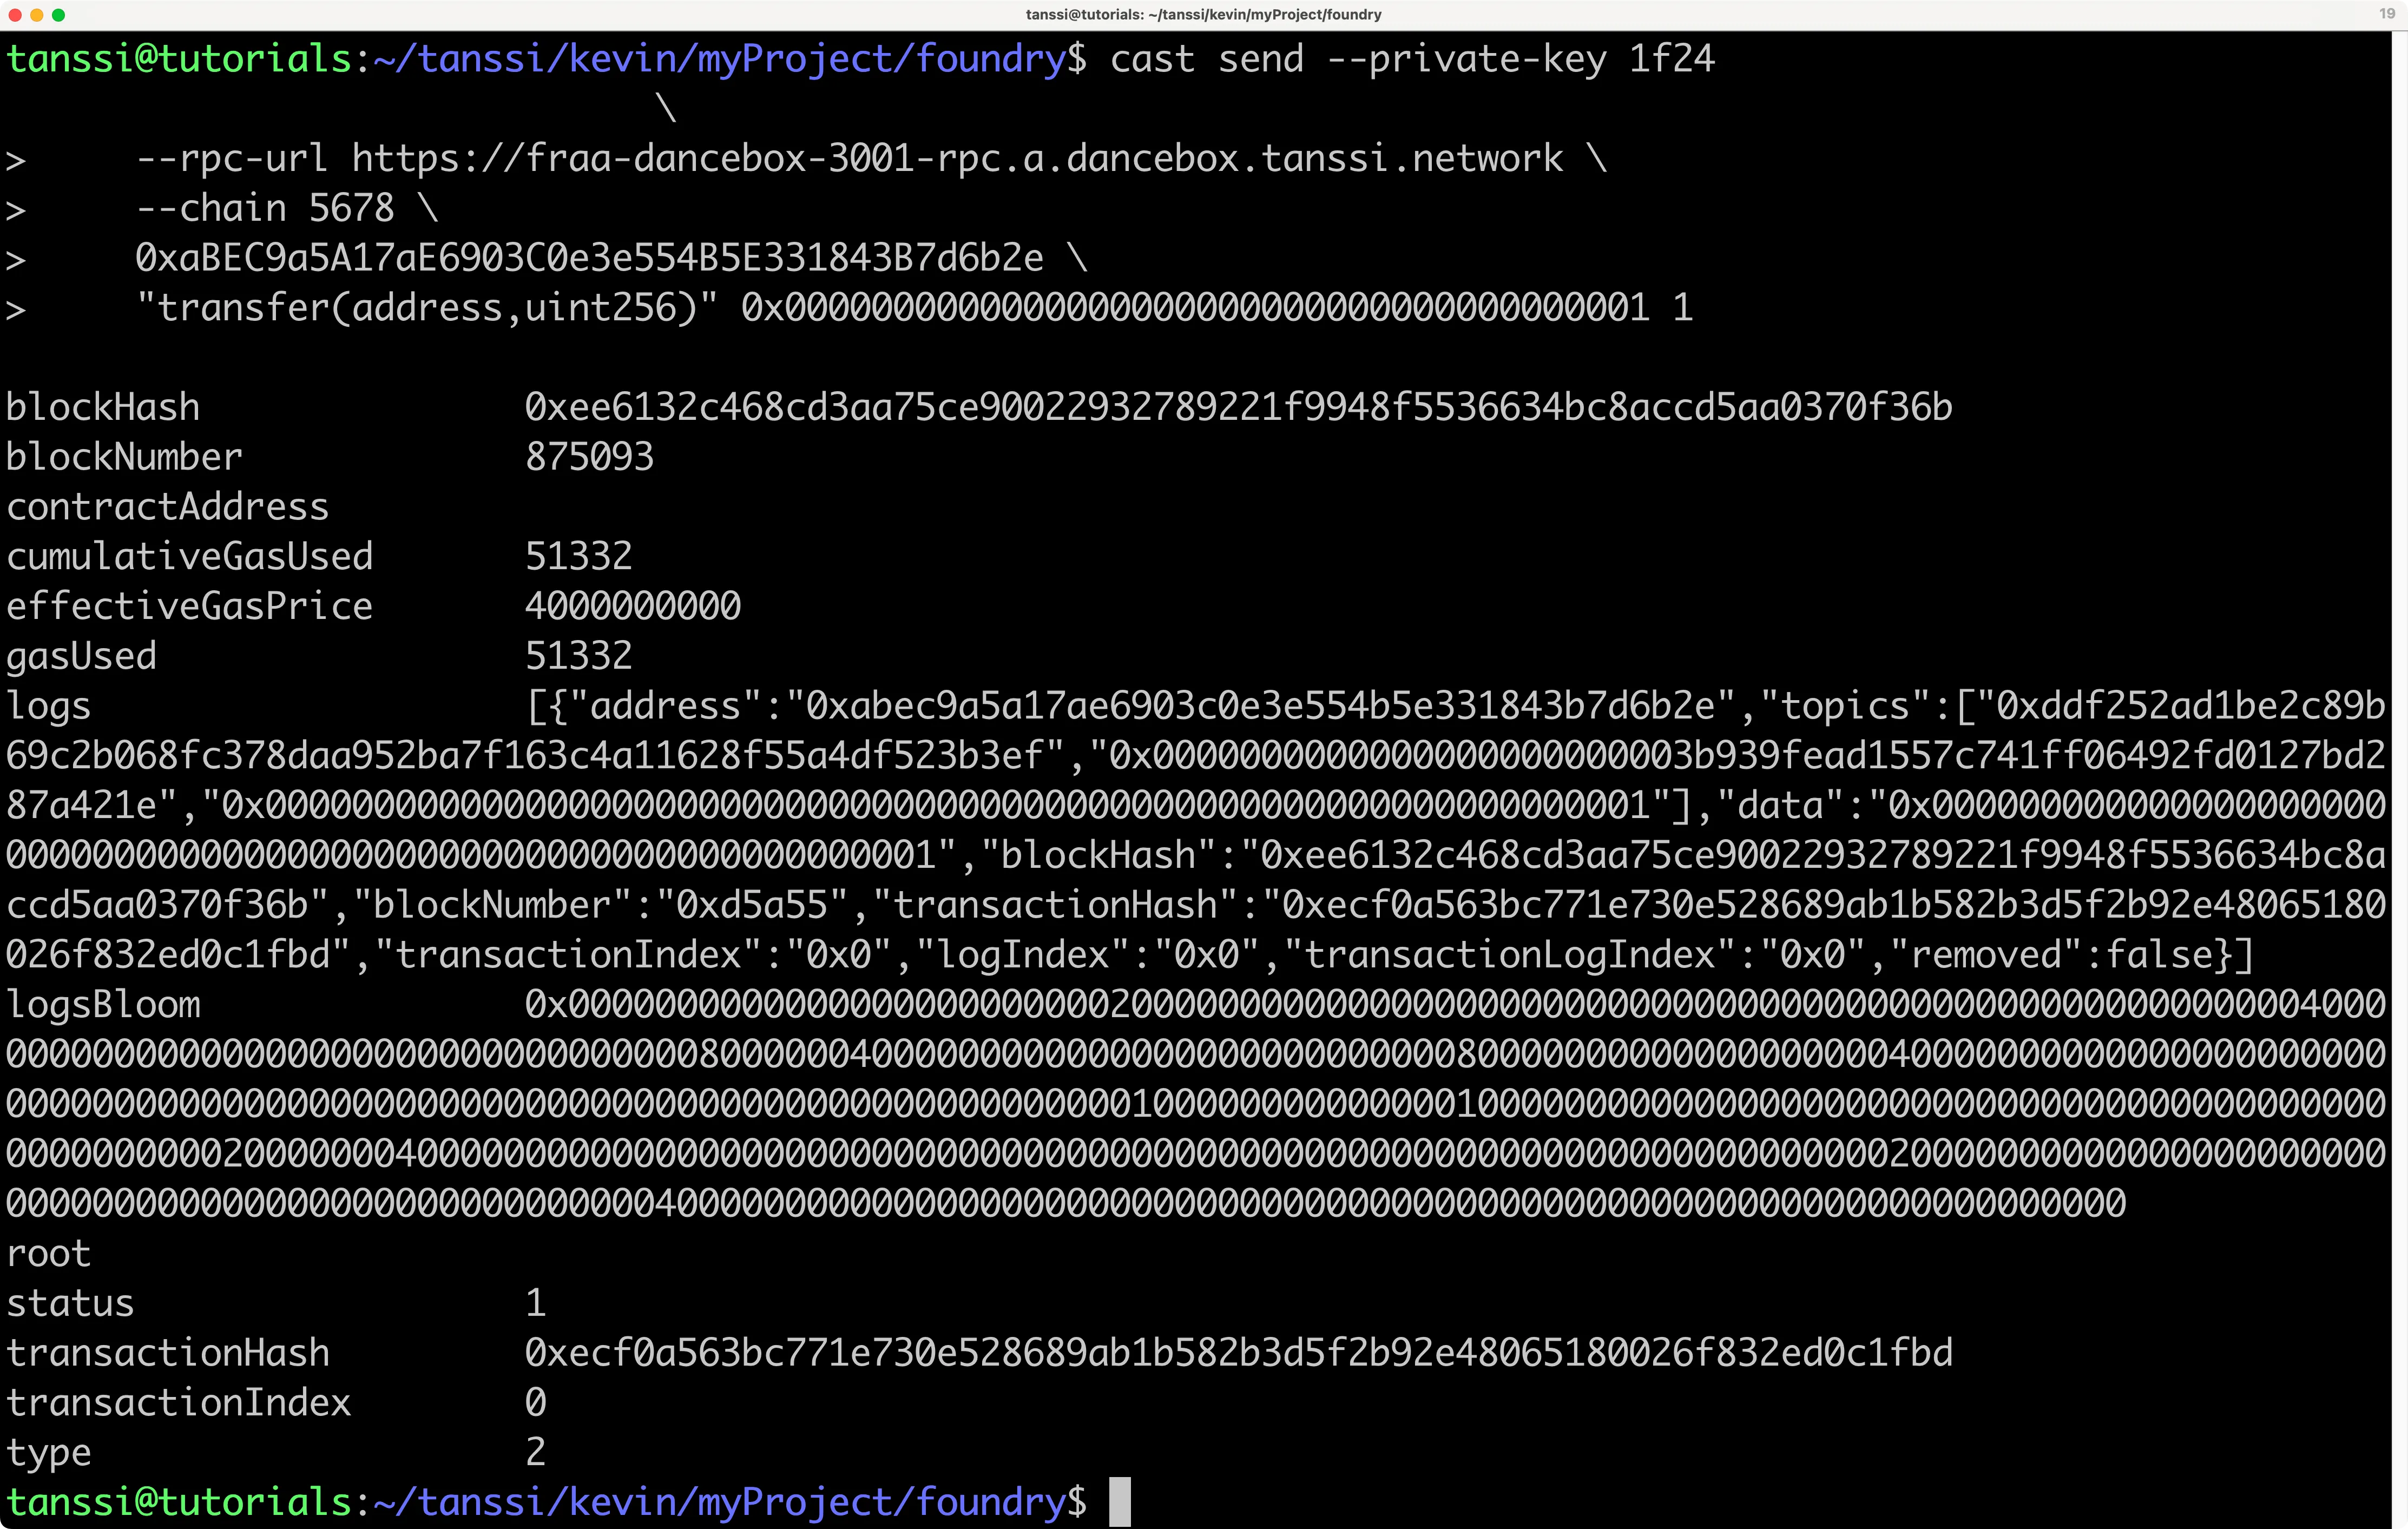
The transaction will be signed by your EVM account and be broadcast to the network. The output should look similar to:
Congratulations, you have successfully deployed and interacted with a contract using Foundry!
## Forking with Anvil {: #forking-with-anvil }
As previously mentioned, [Anvil](https://getfoundry.sh/anvil/overview/){target=\_blank} is a local TestNet node for development purposes that can fork preexisting networks. Forking the demo EVM network allows you to interact with live contracts deployed on the network.
To fork the demo EVM network from the command line, you can run the following command from within your Foundry project directory. You can also replace the RPC URL with the RPC URL of your Tanssi EVM network.
```bash
anvil --fork-url {{ networks.dancelight.demo_evm_rpc_url }}
```
Your forked instance will have 10 development accounts that are pre-funded with 10,000 test tokens. The forked instance is available at `http://127.0.0.1:8545/`. The output in your terminal should resemble the following:
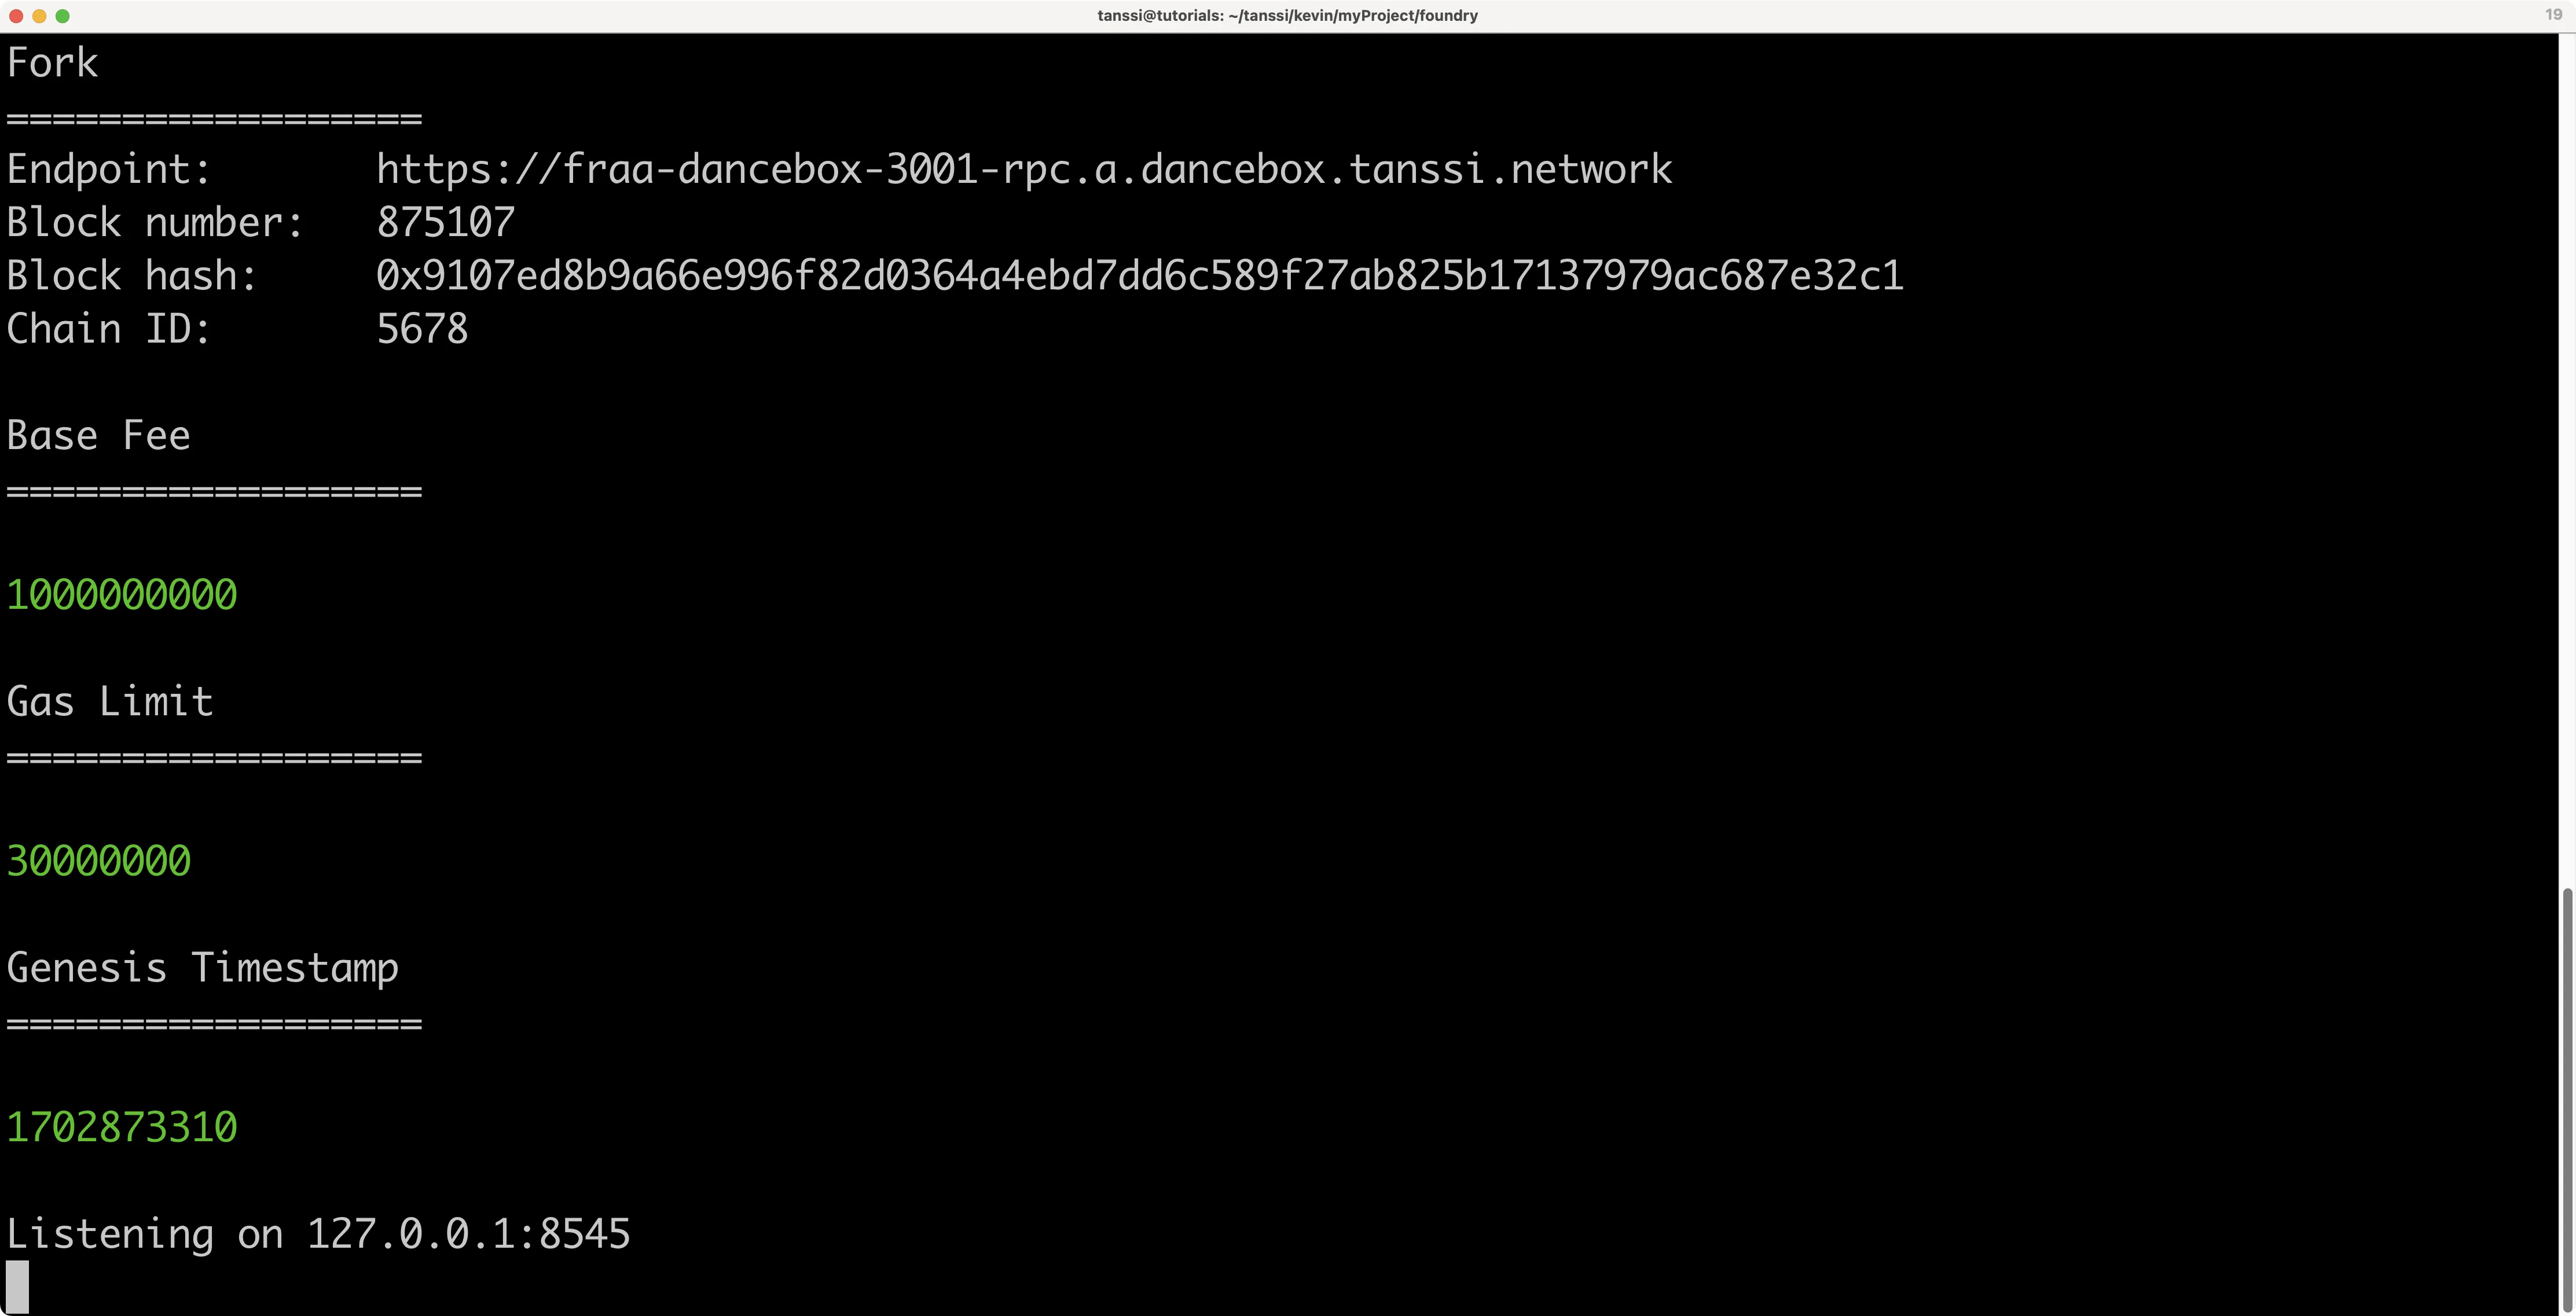
To verify you have forked the network, you can query the latest block number and compare it to the current block number of the [demo EVM network]({{ networks.dancelight.demo_evm_blockscout_url }}){target=\_blank}.
```bash
curl --data '{"method":"eth_blockNumber","params":[],"id":1,"jsonrpc":"2.0"}' -H "Content-Type: application/json" -X POST localhost:8545
```
If you convert the `result` from [hex to decimal](https://www.rapidtables.com/convert/number/hex-to-decimal.html){target=\_blank}, you should get the latest block number from the time you forked the network.
From here, you can deploy new contracts to your forked instance of the demo EVM network (or any other Tanssi-powered EVM network) or interact with contracts already deployed. Building off of the previous example in this guide, you can make a call using Cast to check the balance of the minted MYTOK tokens in the account you deployed the contract with:
```bash
cast call INSERT_CONTRACT_ADDRESS "balanceOf(address)(uint256)" \
INSERT_YOUR_ADDRESS --rpc-url http://localhost:8545
```
## Using Chisel {: #using-chisel }
[Chisel](https://getfoundry.sh/chisel/overview/){target=\_blank} is a Solidity REPL or shell. It allows a developer to write Solidity directly in the console for testing small snippets of code, letting developers skip the project setup and contract deployment steps for what should be a quick process.
Since Chisel is mainly useful for quick testing, it can be used outside of a Foundry project. But, if executed within a Foundry project, it will keep the configurations within `foundry.toml` when running.
For this example, you will be testing out some of the features of `abi` within Solidity because it is complex enough to demonstrate how Chisel could be useful. To get started using Chisel, run the following in the command line to start the shell:
```bash
chisel
```
In the shell, you can write Solidity code as if it were running within a function:
```solidity
bytes memory myData = abi.encode(100, true, "Build with Tanssi");
```
Let's say you were interested in how `abi` encoded data because you're looking into how to most efficiently store data on the blockchain and thus save gas. To view how the `myData` is stored in memory, you can use the following command while in the Chisel shell:
```bash
!memdump
```
`memdump` will dump all of the data in your current session. You'll likely see something like this below. If you aren't good at reading hexadecimal or if you don't know how ABI encoding works, then you might not be able to find where the `myData` variable has been stored.
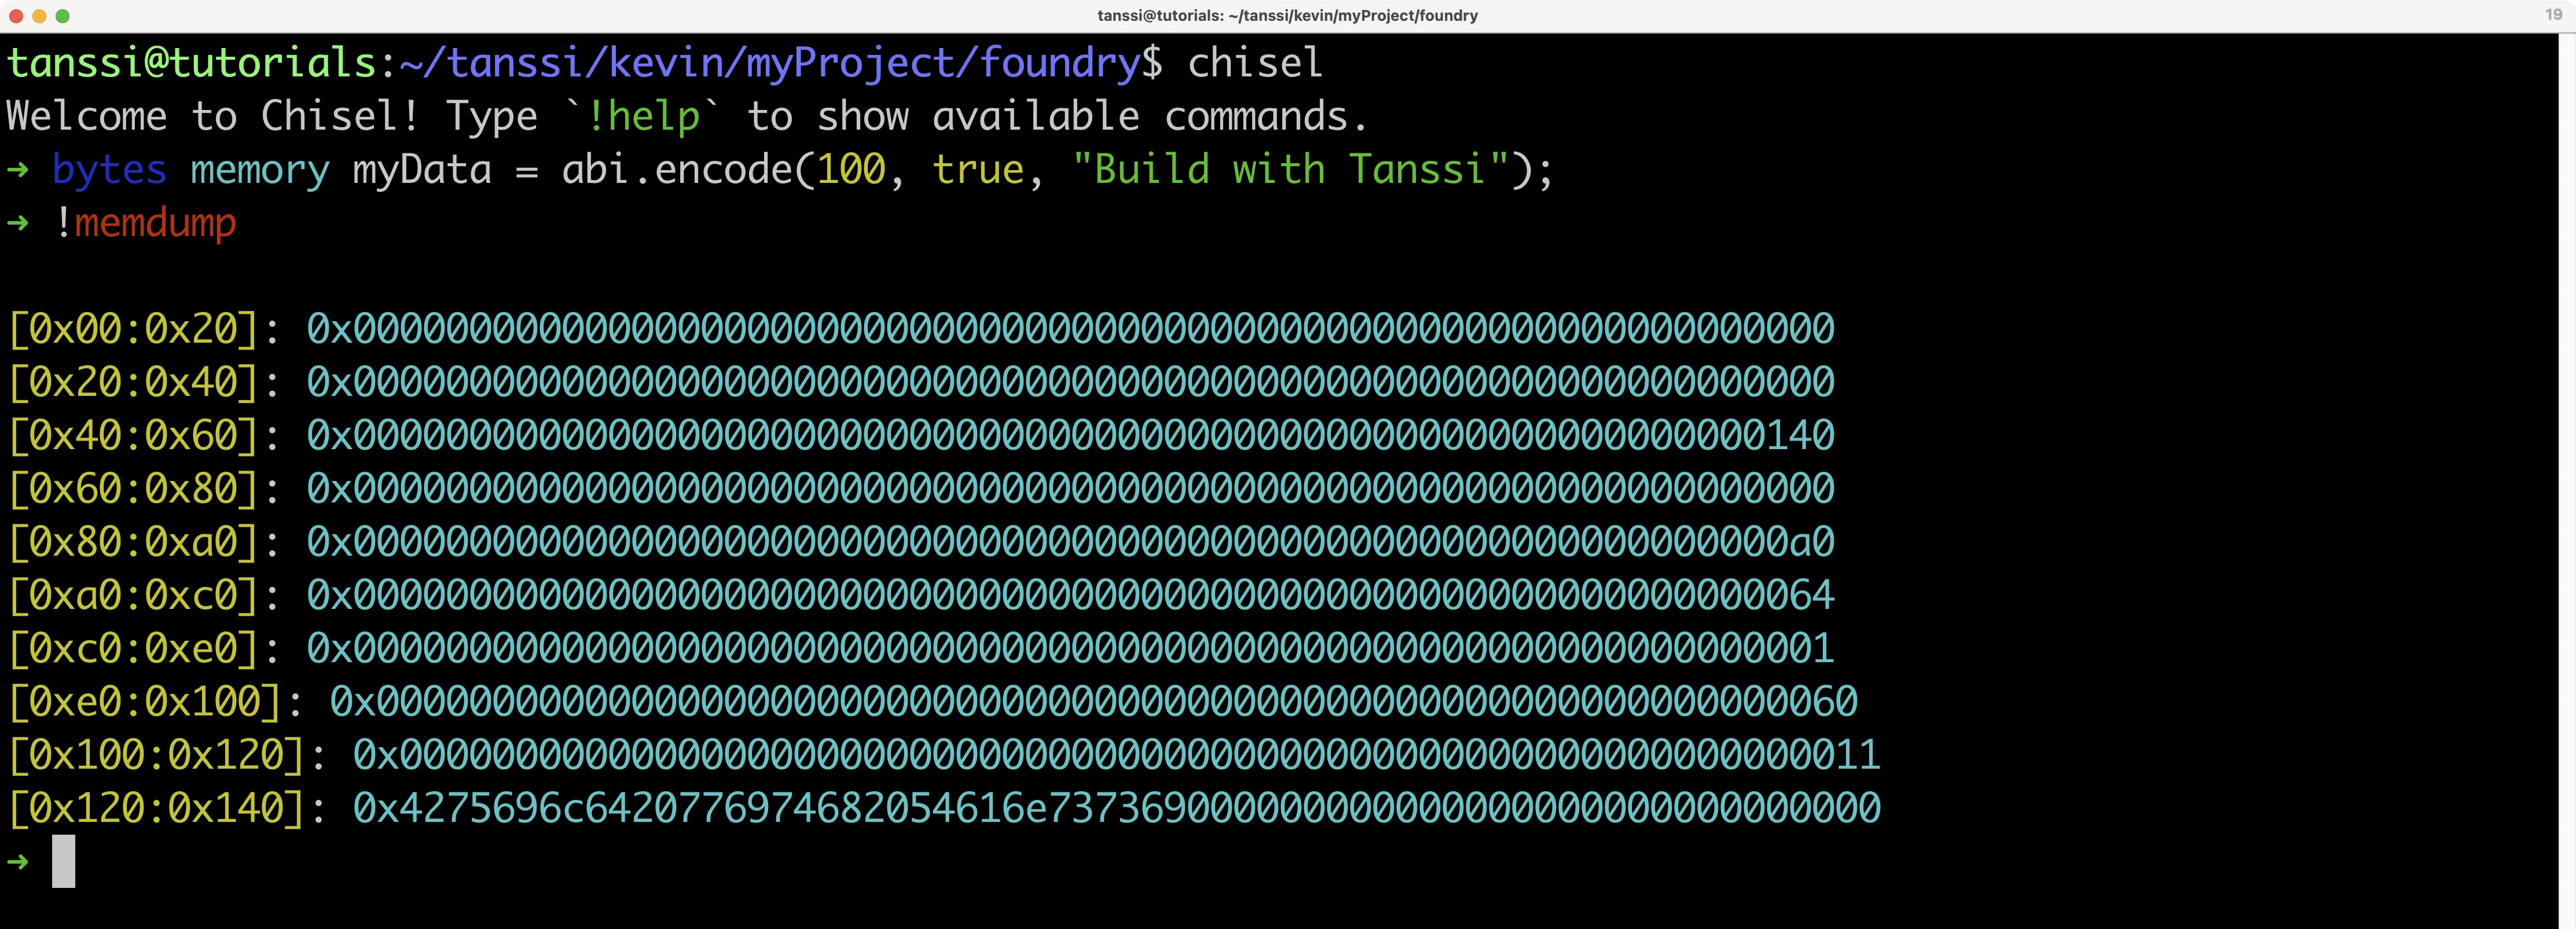
Fortunately, Chisel lets you easily figure out where this information is stored. Using the `!rawstack` command, you can find the location in the stack where the value of a variable is:
```bash
!rawstack myData
```
In this situation, since `myData` is over 32 bytes in length, the memory pointer is displayed instead. But that's exactly what's needed since you already know the entirety of the stack from the `!memdump` command.
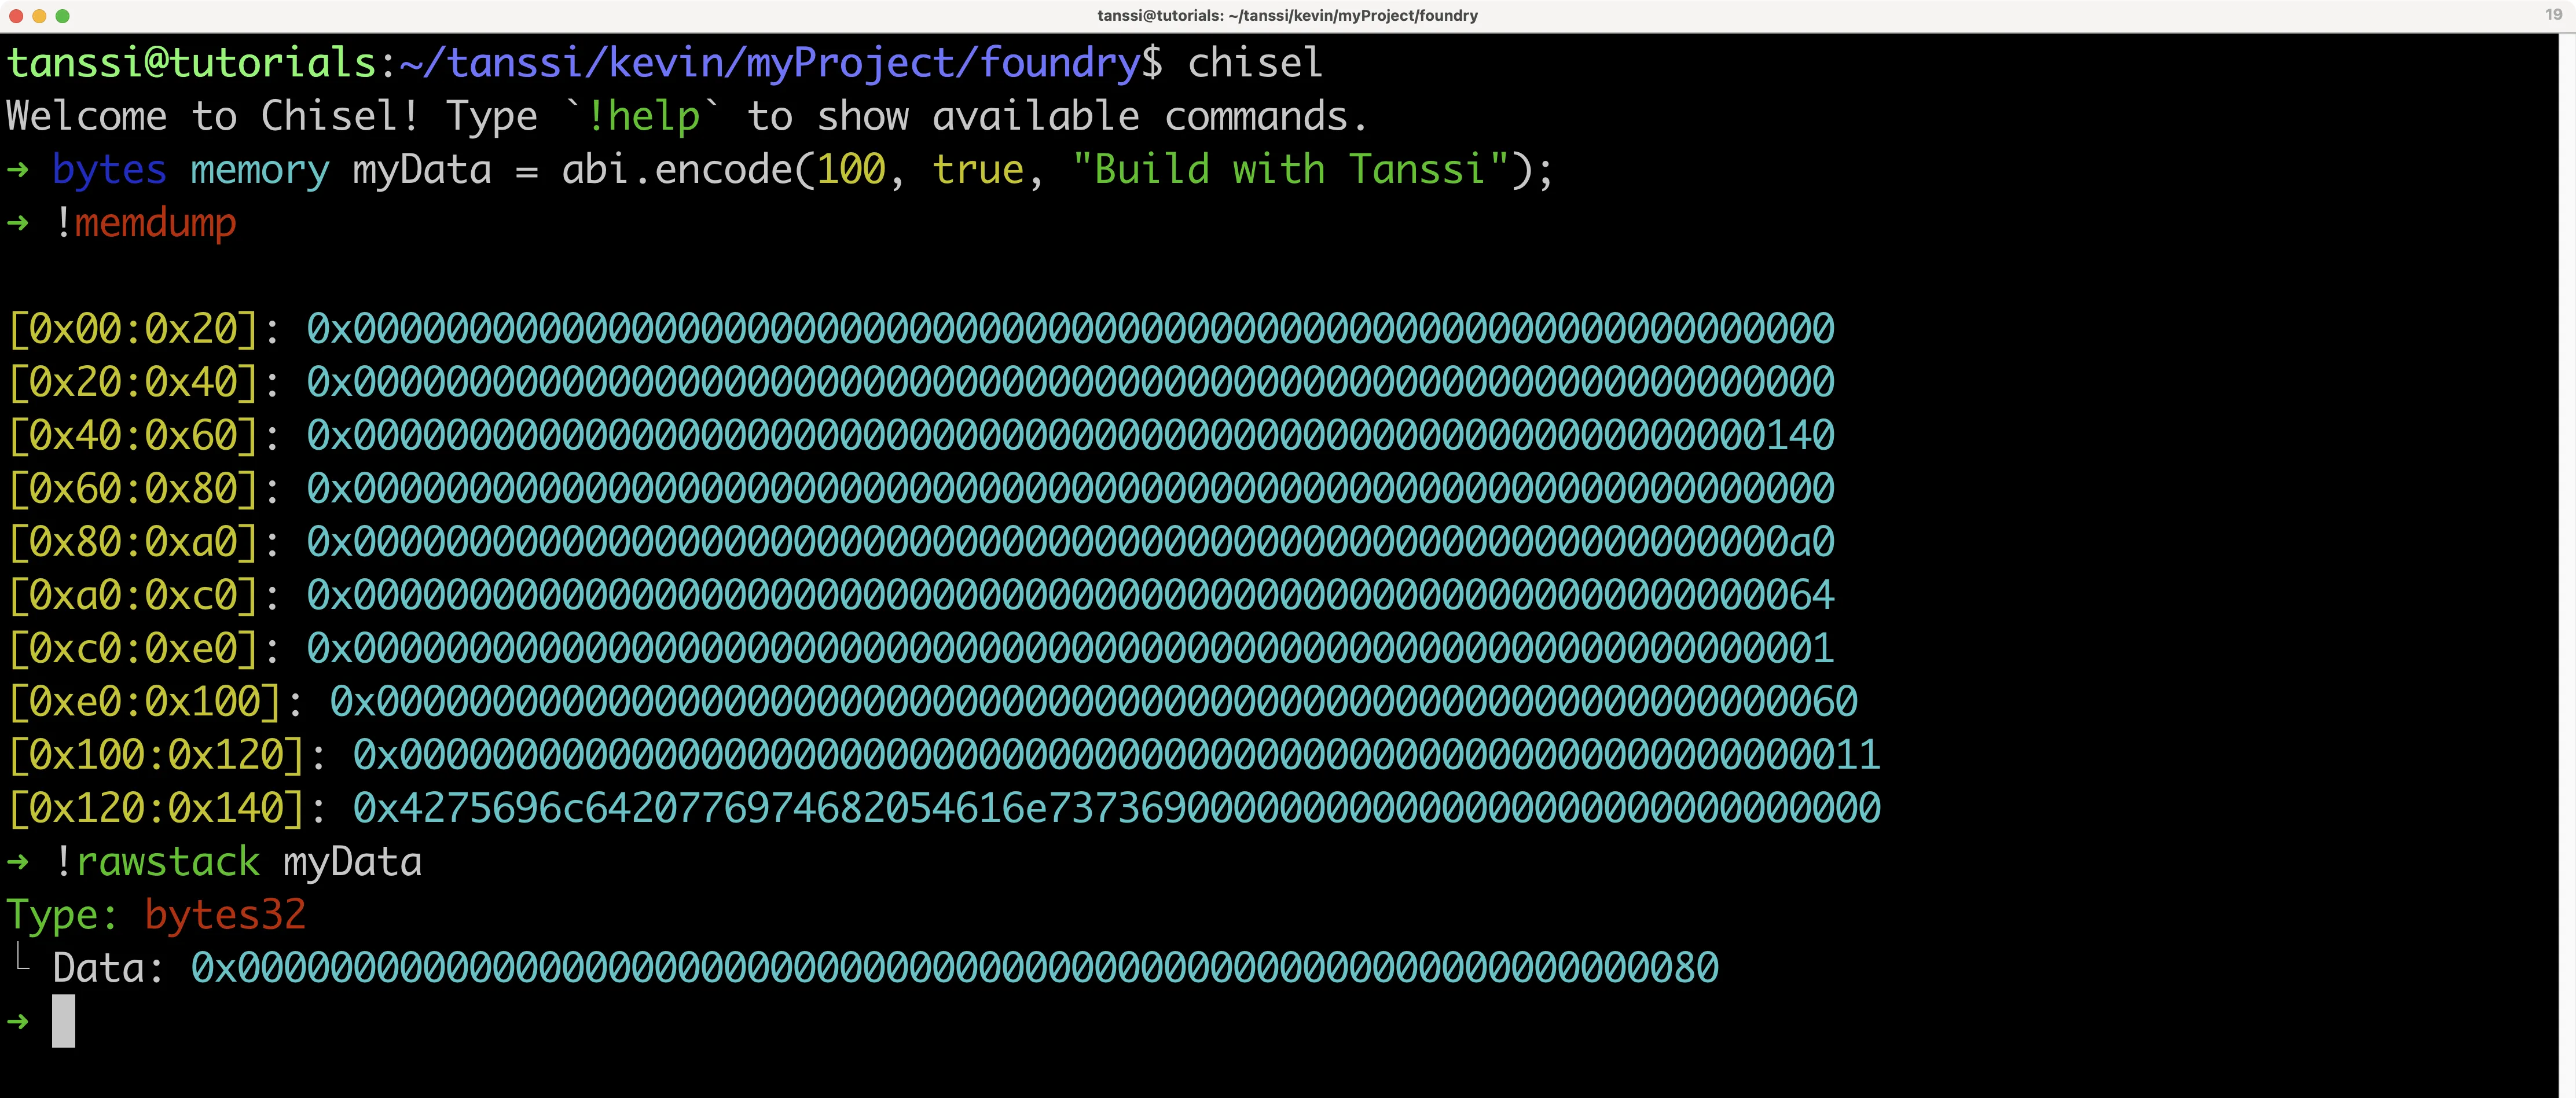
The `!rawstack` command shows that the `myData` variable is stored at `0x80`, so when comparing this with the memory dump retrieved from the `!memdump` command, it looks like `myData` is stored like this:
```text
[0x80:0xa0]: 0x00000000000000000000000000000000000000000000000000000000000000a0
[0xa0:0xc0]: 0x0000000000000000000000000000000000000000000000000000000000000064
[0xc0:0xe0]: 0x0000000000000000000000000000000000000000000000000000000000000001
[0xe0:0x100]: 0x0000000000000000000000000000000000000000000000000000000000000060
[0x100:0x120]: 0x0000000000000000000000000000000000000000000000000000000000000011
[0x120:0x140]: 0x4275696c6420776974682054616e737369000000000000000000000000000000
```
At first glance, this makes sense since `0xa0` has a value of `0x64`, which is equal to 100, and `0xc0` has a value of `0x01`, which is equal to true. If you want to learn more about how ABI-encoding works, the [Solidity documentation for ABI is helpful](https://docs.soliditylang.org/en/v0.8.18/abi-spec.html){target=\_blank}. In this case, there are a lot of zeros in this method of data packing, so as a smart contract developer, you might instead try to use structs or pack the data together more efficiently with bitwise code.
Since you're done with this code, you can clear the state of Chisel so that it doesn't mess with any future logic that you want to try out (while running the same instance of Chisel):
```bash
!clear
```
There's an even easier way to test with Chisel. When writing code that ends with a semicolon, `;`, Chisel will run it as a statement, storing its value in Chisel's runtime state. But if you only needed to see how the ABI-encoded data was represented, then you could get away with running the code as an expression. To try this out with the same `abi` example, write the following in the Chisel shell:
```bash
abi.encode(100, true, "Build with Tanssi")
```
You should see something like the following:
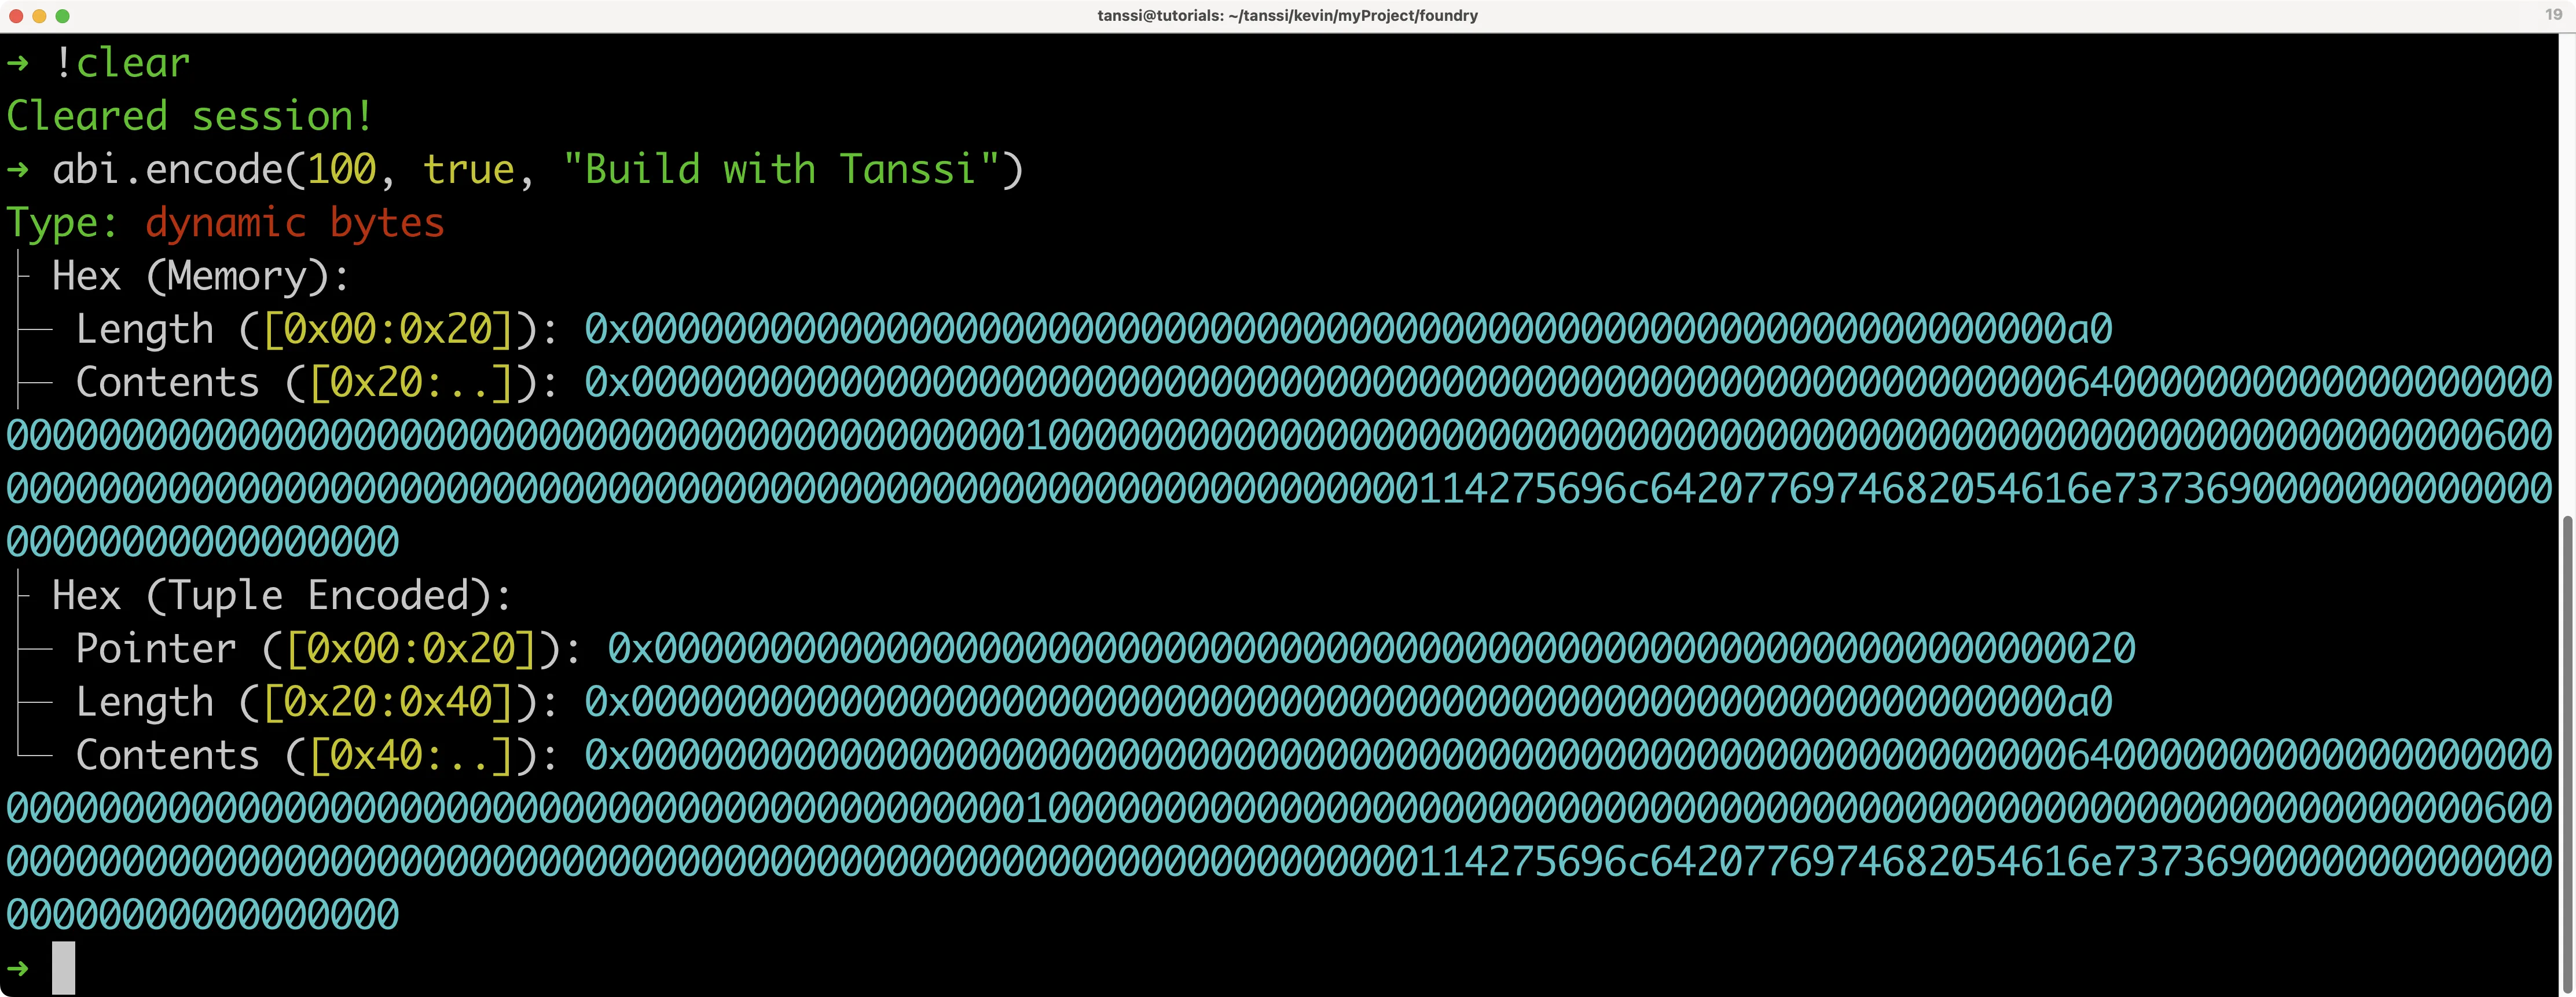
While it doesn't display the data in the same way, you still get the contents of the data, and it also further breaks down how the information is coded, such as letting you know that the `0xa0` value defines the length of the data.
By default, when you leave the Chisel shell, none of the data persists. But you can instruct Chisel to do so. For example, you can take the following steps to store a variable:
1. Store a `uint256` in Chisel
```bash
uint256 myNumber = 101;
```
2. Store the session with `!save`. For this example, you can use the number `1` as a save ID
```bash
!save 1
```
3. Quit the session
```bash
!quit
```
Then to view and interact with your stored Chisel states, you can take the following steps:
1. View a list of saved Chisel states
```bash
chisel list
```
2. Load your stored state by providing the `chisel load` command followed by the ID of the state
```bash
chisel load 1
```
3. View the `uint256` saved in Chisel from the previous set of steps
```bash
!rawstack myNumber
```

You can even fork networks while using Chisel:
```bash
!fork {{ networks.dancelight.demo_evm_rpc_url }}
```
Then, for example, you can query the balance of the Alice account on the demo EVM network:
```text
0x44236223aB4291b93EEd10E4B511B37a398DEE55.balance
```

If you want to learn more about Chisel, download Foundry and refer to its [official reference page](https://getfoundry.sh/chisel/reference/){target=\_blank}.
## Foundry with Hardhat {: #foundry-with-hardhat }
Often, there will be the case where a project that you wish to integrate with has all of its setup within [Hardhat](/builders/toolkit/ethereum-api/dev-env/hardhat/){target=\_blank}, making it an arduous task to convert the entirety of the project into Foundry. This additional work is avoidable by creating a hybrid project that uses both Hardhat and Foundry features together. This is possible with Hardhat's [hardhat-foundry plugin](https://hardhat.org/hardhat-runner/plugins/nomicfoundation-hardhat-foundry){target=\_blank}.
To convert your preexisting Foundry project to a hybrid project, you will essentially have to install a Hardhat project into the same folder:
```bash
npm init
npm install --save-dev hardhat @nomicfoundation/hardhat-foundry
npx hardhat init
```
For more information, please refer to our documentation on [Creating a Hardhat Project](/builders/toolkit/ethereum-api/dev-env/hardhat/#creating-a-hardhat-project){target=\_blank}.
After initializing the new Hardhat project, a few new folders and files should appear: `contracts`, `hardhat.config.js`, `scripts`, and `test/Lock.js`. You'll need to make a few modifications to create a hybrid project:
1. Edit the `hardhat.config.js` file within your repository. Open it up, and at the top, add the following:
```javascript
require('@nomicfoundation/hardhat-foundry');
```
After adding the `hardhat-foundry` plugin, the typical `contracts` folders for Hardhat will not work because now Hardhat expects all smart contracts to be stored within Foundry's `src` folder
2. Move all smart contracts within the `contracts` folder into the `src` folder, and then delete the `contracts` folder
3. Edit the `foundry.toml` file to ensure that dependencies installed via Git submodules and npm can be compiled by the Forge tool. Edit the `profile.default` to ensure that the `libs` entry has both `lib` and `node_modules`:
```toml
[profile.default]
src = 'src'
out = 'out'
libs = ['lib', 'node_modules']
solc = '0.8.20'
evm_version = 'london'
```
Now both `forge build` and `npx hardhat compile` should work regardless of the dependencies.
Both `forge test` and `npx hardhat test` should now be able to access all smart contracts and dependencies. `forge test` will only test the Solidity tests, whereas `npx hardhat test` will only test the JavaScript tests. If you would like to use them in conjunction, then you can create a new script within your `package.json` file:
```json
"scripts": {
"test": "npx hardhat test && forge test"
}
```
You can run this command with:
```bash
npm run test
```
Finally, while not necessary, it could be worthwhile to move all JavaScript scripts from the `scripts` folder into Foundry's `script` folder and delete the `scripts` folder so that you don't have two folders that serve the same purpose.
Congratulations, you have successfully deployed and interacted with smart contracts on your Tanssi EVM network using Foundry! For more information, be sure to check out the [Foundry Book](https://getfoundry.sh/){target=\_blank}.
The information presented herein has been provided by third parties and is made available solely for general information purposes. Tanssi does not endorse any project listed and described on the Tanssi Doc Website (https://docs.tanssi.network/). Tanssi Foundation does not warrant the accuracy, completeness or usefulness of this information. Any reliance you place on such information is strictly at your own risk. Tanssi Foundation disclaims all liability and responsibility arising from any reliance placed on this information by you or by anyone who may be informed of any of its contents. All statements and/or opinions expressed in these materials are solely the responsibility of the person or entity providing those materials and do not necessarily represent the opinion of Tanssi Foundation. The information should not be construed as professional or financial advice of any kind. Advice from a suitably qualified professional should always be sought in relation to any particular matter or circumstance. The information herein may link to or integrate with other websites operated or content provided by third parties, and such other websites may link to this website. Tanssi Foundation has no control over any such other websites or their content and will have no liability arising out of or related to such websites or their content. The existence of any such link does not constitute an endorsement of such websites, the content of the websites, or the operators of the websites. These links are being provided to you only as a convenience and you release and hold Tanssi Foundation harmless from any and all liability arising from your use of this information or the information provided by any third-party website or service.
--- END CONTENT ---
Doc-Content: https://docs.tanssi.network/builders/toolkit/ethereum-api/dev-env/hardhat/
--- BEGIN CONTENT ---
---
title: Deploy Contracts with Hardhat
description: Learn how to use Hardhat, an Ethereum development environment, to compile, deploy, and interact with Solidity smart contracts on your Tanssi EVM network.
icon: octicons-code-square-24
categories: EVM-Template
---
# Using Hardhat to Deploy to Your EVM Network
## Introduction {: #introduction }
[Hardhat](https://hardhat.org){target=\_blank} is an Ethereum development environment that helps developers manage and automate the recurring tasks inherent to building smart contracts and dApps. Hardhat can be used with any EVM network to build, compile, and deploy smart contracts, thanks to the seamless compatibility of Tanssi-powered EVM networks.
This guide will cover how to use Hardhat to compile, deploy, and interact with Ethereum smart contracts deployed to the demo Tanssi EVM network. This guide can be adapted for your own Tanssi-powered EVM network by simply adding the RPC URL of your Tanssi network to your EVM Wallet and switching networks to it.
## Checking Prerequisites {: #checking-prerequisites }
For this guide, you'll need to have MetaMask installed and configured to work with your Tanssi EVM network. You can follow [this guide to configure MetaMask for Tanssi with the demo EVM network](/builders/toolkit/ethereum-api/wallets/metamask/){target=\_blank}.
## Creating a Hardhat Project {: #creating-a-hardhat-project }
You must create a Hardhat project if you don't already have one. You can create one by completing the following steps:
1. Create a directory for your project
```sh
mkdir hardhat && cd hardhat
```
2. Initialize the project, which will create a `package.json` file
```sh
npm init -y
```
3. Install Hardhat
```sh
npm install hardhat
```
4. Create a project
```sh
npx hardhat init
```
!!! note
`npx` is used to run executables installed locally in your project. Although Hardhat can be installed globally, installing it locally in each project is recommended so you can control the version on a project-by-project basis.
5. A menu will appear allowing you to create a new project or use a sample project. For this example, you can choose **Create an empty hardhat.config.js**
This will create a Hardhat config file (`hardhat.config.js`) in your project directory.
Once you have your Hardhat project, you can also install the [Ethers plugin](https://hardhat.org/hardhat-runner/plugins/nomicfoundation-hardhat-ethers){target=\_blank}. This provides a convenient way to use the [Ethers.js](/builders/toolkit/ethereum-api/libraries/ethersjs/){target=\_blank} library to interact with the network. To install it, run the following command:
```sh
npm install @nomicfoundation/hardhat-ethers ethers
```
Additionally, you'll need to install the `hardhat-ignition-ethers` plugin to enable deployment of smart contracts with Hardhat Ignition. You can install it with the following command:
```sh
npm install --save-dev @nomicfoundation/hardhat-ignition-ethers
```
## The Contract File {: #the-contract-file }
With your empty project created, you will create a `contracts` directory next. You can do so by running the following command:
```sh
mkdir contracts && cd contracts
```
The smart contract that you'll deploy as an example will be called `Box`, it will let you store a value that can be retrieved later. In the `contracts` directory, you can create the `Box.sol` file:
```sh
touch Box.sol
```
Open the file and add the following contract to it:
```solidity
// contracts/Box.sol
// SPDX-License-Identifier: MIT
pragma solidity ^0.8.1;
contract Box {
uint256 private value;
// Emitted when the stored value changes
event ValueChanged(uint256 newValue);
// Stores a new value in the contract
function store(uint256 newValue) public {
value = newValue;
emit ValueChanged(newValue);
}
// Reads the last stored value
function retrieve() public view returns (uint256) {
return value;
}
}
```
## The Hardhat Configuration File {: #hardhat-configuration-file }
Before you can deploy the contract to your Tanssi network, you'll need to modify the Hardhat configuration file and create a secure file to store your private key in.
You can modify the `hardhat.config.js` file to use either the Tanssi demo EVM network or your own Tanssi network:
```js
// 1. Import the Ethers and Hardhat Ignition plugins required to interact with the contract
require('@nomicfoundation/hardhat-ethers');
require('@nomicfoundation/hardhat-ignition-ethers');
// 2. Add your private key that is funded with tokens of your Tanssi network
// This is for example purposes only - **never store your private keys in a JavaScript file**
const privateKey = 'INSERT_PRIVATE_KEY';
module.exports = {
// 3. Specify the Solidity version
solidity: '0.8.1',
networks: {
// 4. Add the network specification for your Tanssi EVM network
dancelight: {
url: '{{ networks.dancelight.demo_evm_rpc_url }}',
chainId: {{ networks.dancelight.demo_evm_chain_id }}, // Fill in the EVM ChainID for your Tanssi network
accounts: [privateKey]
}
}
};
```
Congratulations! You are now ready for deployment!
## Compiling Solidity {: #compiling-solidity }
To compile the contract you can simply run:
```sh
npx hardhat compile
```
After compilation, an `artifacts` directory is created: it holds the bytecode and metadata of the contract, which are `.json` files. Adding this directory to your `.gitignore` is a good idea.
## Deploying the Contract {: #deploying-the-contract }
To deploy the contract, you'll use Hardhat Ignition, a declarative framework for deploying smart contracts. Hardhat Ignition is designed to make managing recurring tasks surrounding smart contract deployment and testing easy. For more information, be sure to check out the [Hardhat Ignition docs](https://hardhat.org/ignition/docs/getting-started#overview){target=\_blank}.
To set up the proper file structure for your Ignition module, create a folder named `ignition` and a subdirectory called `modules`. Then add a new file to it called `Box.js`. You can take all three of these steps with the following command:
```sh
mkdir ignition ignition/modules && touch ignition/modules/Box.js
```
Next, you can write your Hardhat Ignition module. To get started, take the following steps:
1. Import the `buildModule` function from the Hardhat Ignition module
2. Export a module using `buildModule`
3. Use the `getAccount` method to select the deployer account
4. Specify custom gas price and gas limit settings for the deployment
5. Deploy the `Box` contract
6. Return an object from the module. This makes the `Box` contract accessible for interaction in Hardhat tests and scripts
```js
// 1. Import the `buildModule` function from the Hardhat Ignition module
const { buildModule } = require('@nomicfoundation/hardhat-ignition/modules');
// 2. Export a module using `buildModule`
module.exports = buildModule('BoxModule', (m) => {
// 3. Use the `getAccount` method to select the deployer account
const deployer = m.getAccount(0);
// 4. Specify custom gas price and gas limit settings for the deployment
const customGasPrice = 50000000000n;
const customGasLimit = 1000000;
// 5. Deploy the `Box` contract using the selected deployer account and custom gas settings
const box = m.contract('Box', [], {
from: deployer,
gasPrice: customGasPrice,
gasLimit: customGasLimit,
});
// 6. Return an object from the module including references to deployed contracts. This makes the deployed `Box` contract accessible for interaction in tests and scripts
return { box };
});
```
To run the script and deploy the `Box.sol` contract, use the following command, which requires you to specify the network name as defined in your `hardhat.config.js`. Hardhat will deploy the contract to a local hardhat network by default if you don't specify a network.
```sh
npx hardhat ignition deploy ./ignition/modules/Box.js --network dancelight
```
You'll be prompted to confirm the network you wish to deploy to. After a few seconds after you confirm, the contract is deployed, and you'll see the contract address in the terminal. If you're deploying to another Tanssi network, make sure that you specify the correct network. The network name must match how it's defined in `hardhat.config.js`. After a few seconds, the contract is deployed, and you should see the address in the terminal.
Congratulations, your contract is live! Save the address, as you will use it to interact with this contract instance in the next step.
## Interacting with the Contract {: #interacting-with-the-contract }
To interact with your newly deployed contract on your Tanssi network, you can launch the Hardhat `console` by running:
```sh
npx hardhat console --network dancelight
```
Next, you can take the following steps, entering one line at a time:
1. Create a local instance of the `Box.sol` contract
```js
const Box = await ethers.getContractFactory('Box');
```
2. Connect the local instance to the deployed contract, using the address of the contract
```js
const box = await Box.attach('0xa84caB60db6541573a091e5C622fB79e175E17be');
```
3. Interact with the attached contract. For this example, you can call the `store` method and store a simple value
```js
await box.store(5);
```
Your EVM account will sign the transaction and broadcast it to the network. The output should look similar to:
Notice your address labeled `from`, the contract's address, and the `data` being passed. Now, you can retrieve the value by running:
```js
await box.retrieve();
```
You should see `5` or the value you initially stored.
!!! note
If you run the retrieve command immediately after storing the value, you may see the old value. Rerunning the retrieval command after waiting a moment will return the correct value.
Congratulations, you have successfully deployed and interacted with a contract using Hardhat!
The information presented herein has been provided by third parties and is made available solely for general information purposes. Tanssi does not endorse any project listed and described on the Tanssi Doc Website (https://docs.tanssi.network/). Tanssi Foundation does not warrant the accuracy, completeness or usefulness of this information. Any reliance you place on such information is strictly at your own risk. Tanssi Foundation disclaims all liability and responsibility arising from any reliance placed on this information by you or by anyone who may be informed of any of its contents. All statements and/or opinions expressed in these materials are solely the responsibility of the person or entity providing those materials and do not necessarily represent the opinion of Tanssi Foundation. The information should not be construed as professional or financial advice of any kind. Advice from a suitably qualified professional should always be sought in relation to any particular matter or circumstance. The information herein may link to or integrate with other websites operated or content provided by third parties, and such other websites may link to this website. Tanssi Foundation has no control over any such other websites or their content and will have no liability arising out of or related to such websites or their content. The existence of any such link does not constitute an endorsement of such websites, the content of the websites, or the operators of the websites. These links are being provided to you only as a convenience and you release and hold Tanssi Foundation harmless from any and all liability arising from your use of this information or the information provided by any third-party website or service.
--- END CONTENT ---
Doc-Content: https://docs.tanssi.network/builders/toolkit/ethereum-api/dev-env/remix/
--- BEGIN CONTENT ---
---
title: Deploy Smart Contracts with Remix
description: Learn how to use one of the most popular Ethereum developer tools, the Remix IDE, to interact with your Tanssi-powered EVM network.
icon: octicons-code-square-24
categories: EVM-Template
---
# Using Remix to Deploy to Your Tanssi EVM Network
## Introduction {: #introduction }
Developers building dApps on top of Tanssi-powered EVM networks can use [Remix](https://remix.ethereum.org){target=\_blank}, one of the most popular Ethereum development environments, to build, compile, and deploy their smart contracts. Remix can be used with any EVM network, thanks to the seamless compatibility of Tanssi-powered EVM networks.
This guide walks through the process of creating and deploying a Solidity-based smart contract to the Tanssi demo EVM network using the Remix IDE. This guide can be adapted for your own Tanssi EVM network by simply adding the RPC URL of your network to your EVM Wallet and switching networks to it.
## Checking Prerequisites {: #checking-prerequisites }
For this guide, you'll need to have MetaMask installed and configured to work with your Tanssi EVM network. You can follow [this guide to configure MetaMask for Tanssi with the demo EVM network](/builders/toolkit/ethereum-api/wallets/metamask/){target=\_blank}.
## Getting Started with Remix {: #getting-started-with-remix }
Now, you can head to [Remix](https://remix.ethereum.org){target=\_blank} to get started. On the main screen, navigate to the **File Explorer** tab.
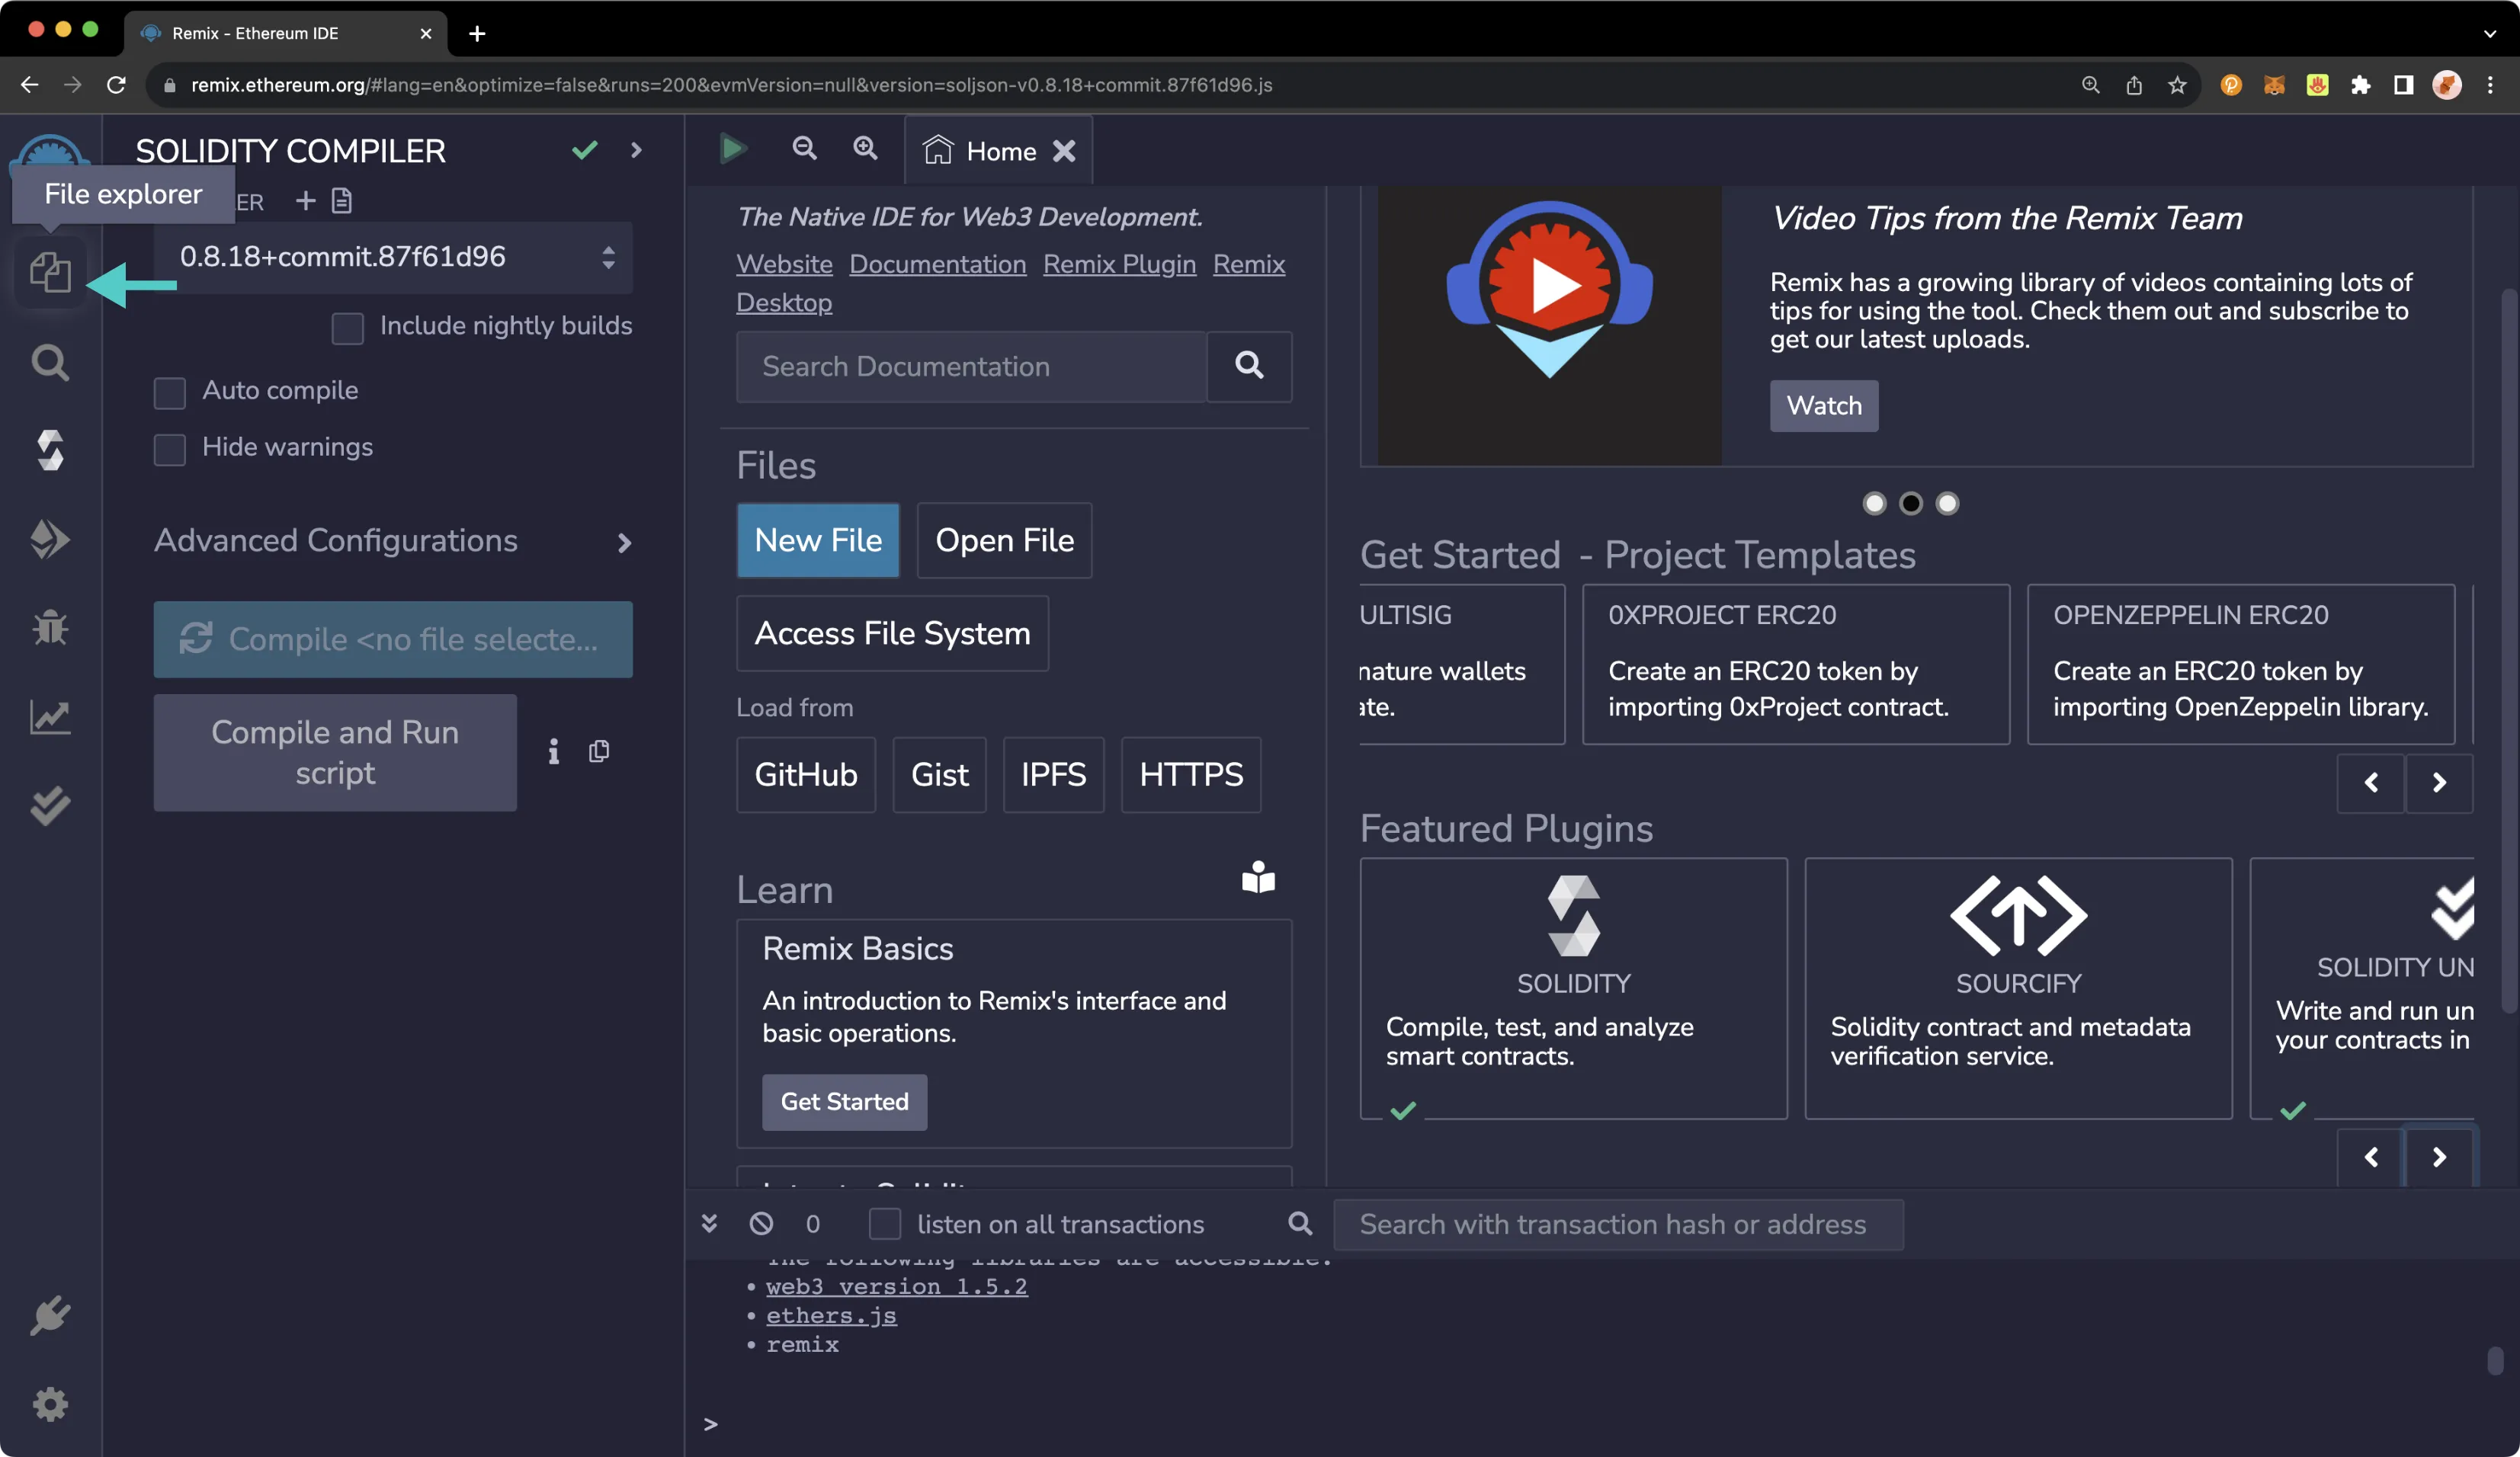
Next, you can create a new file to save the Solidity smart contract. To do so, take the following steps:
1. Press the **Create New File** button on the left-hand side of **File Explorer**
2. Enter your desired filename, such as `MyToken.sol`
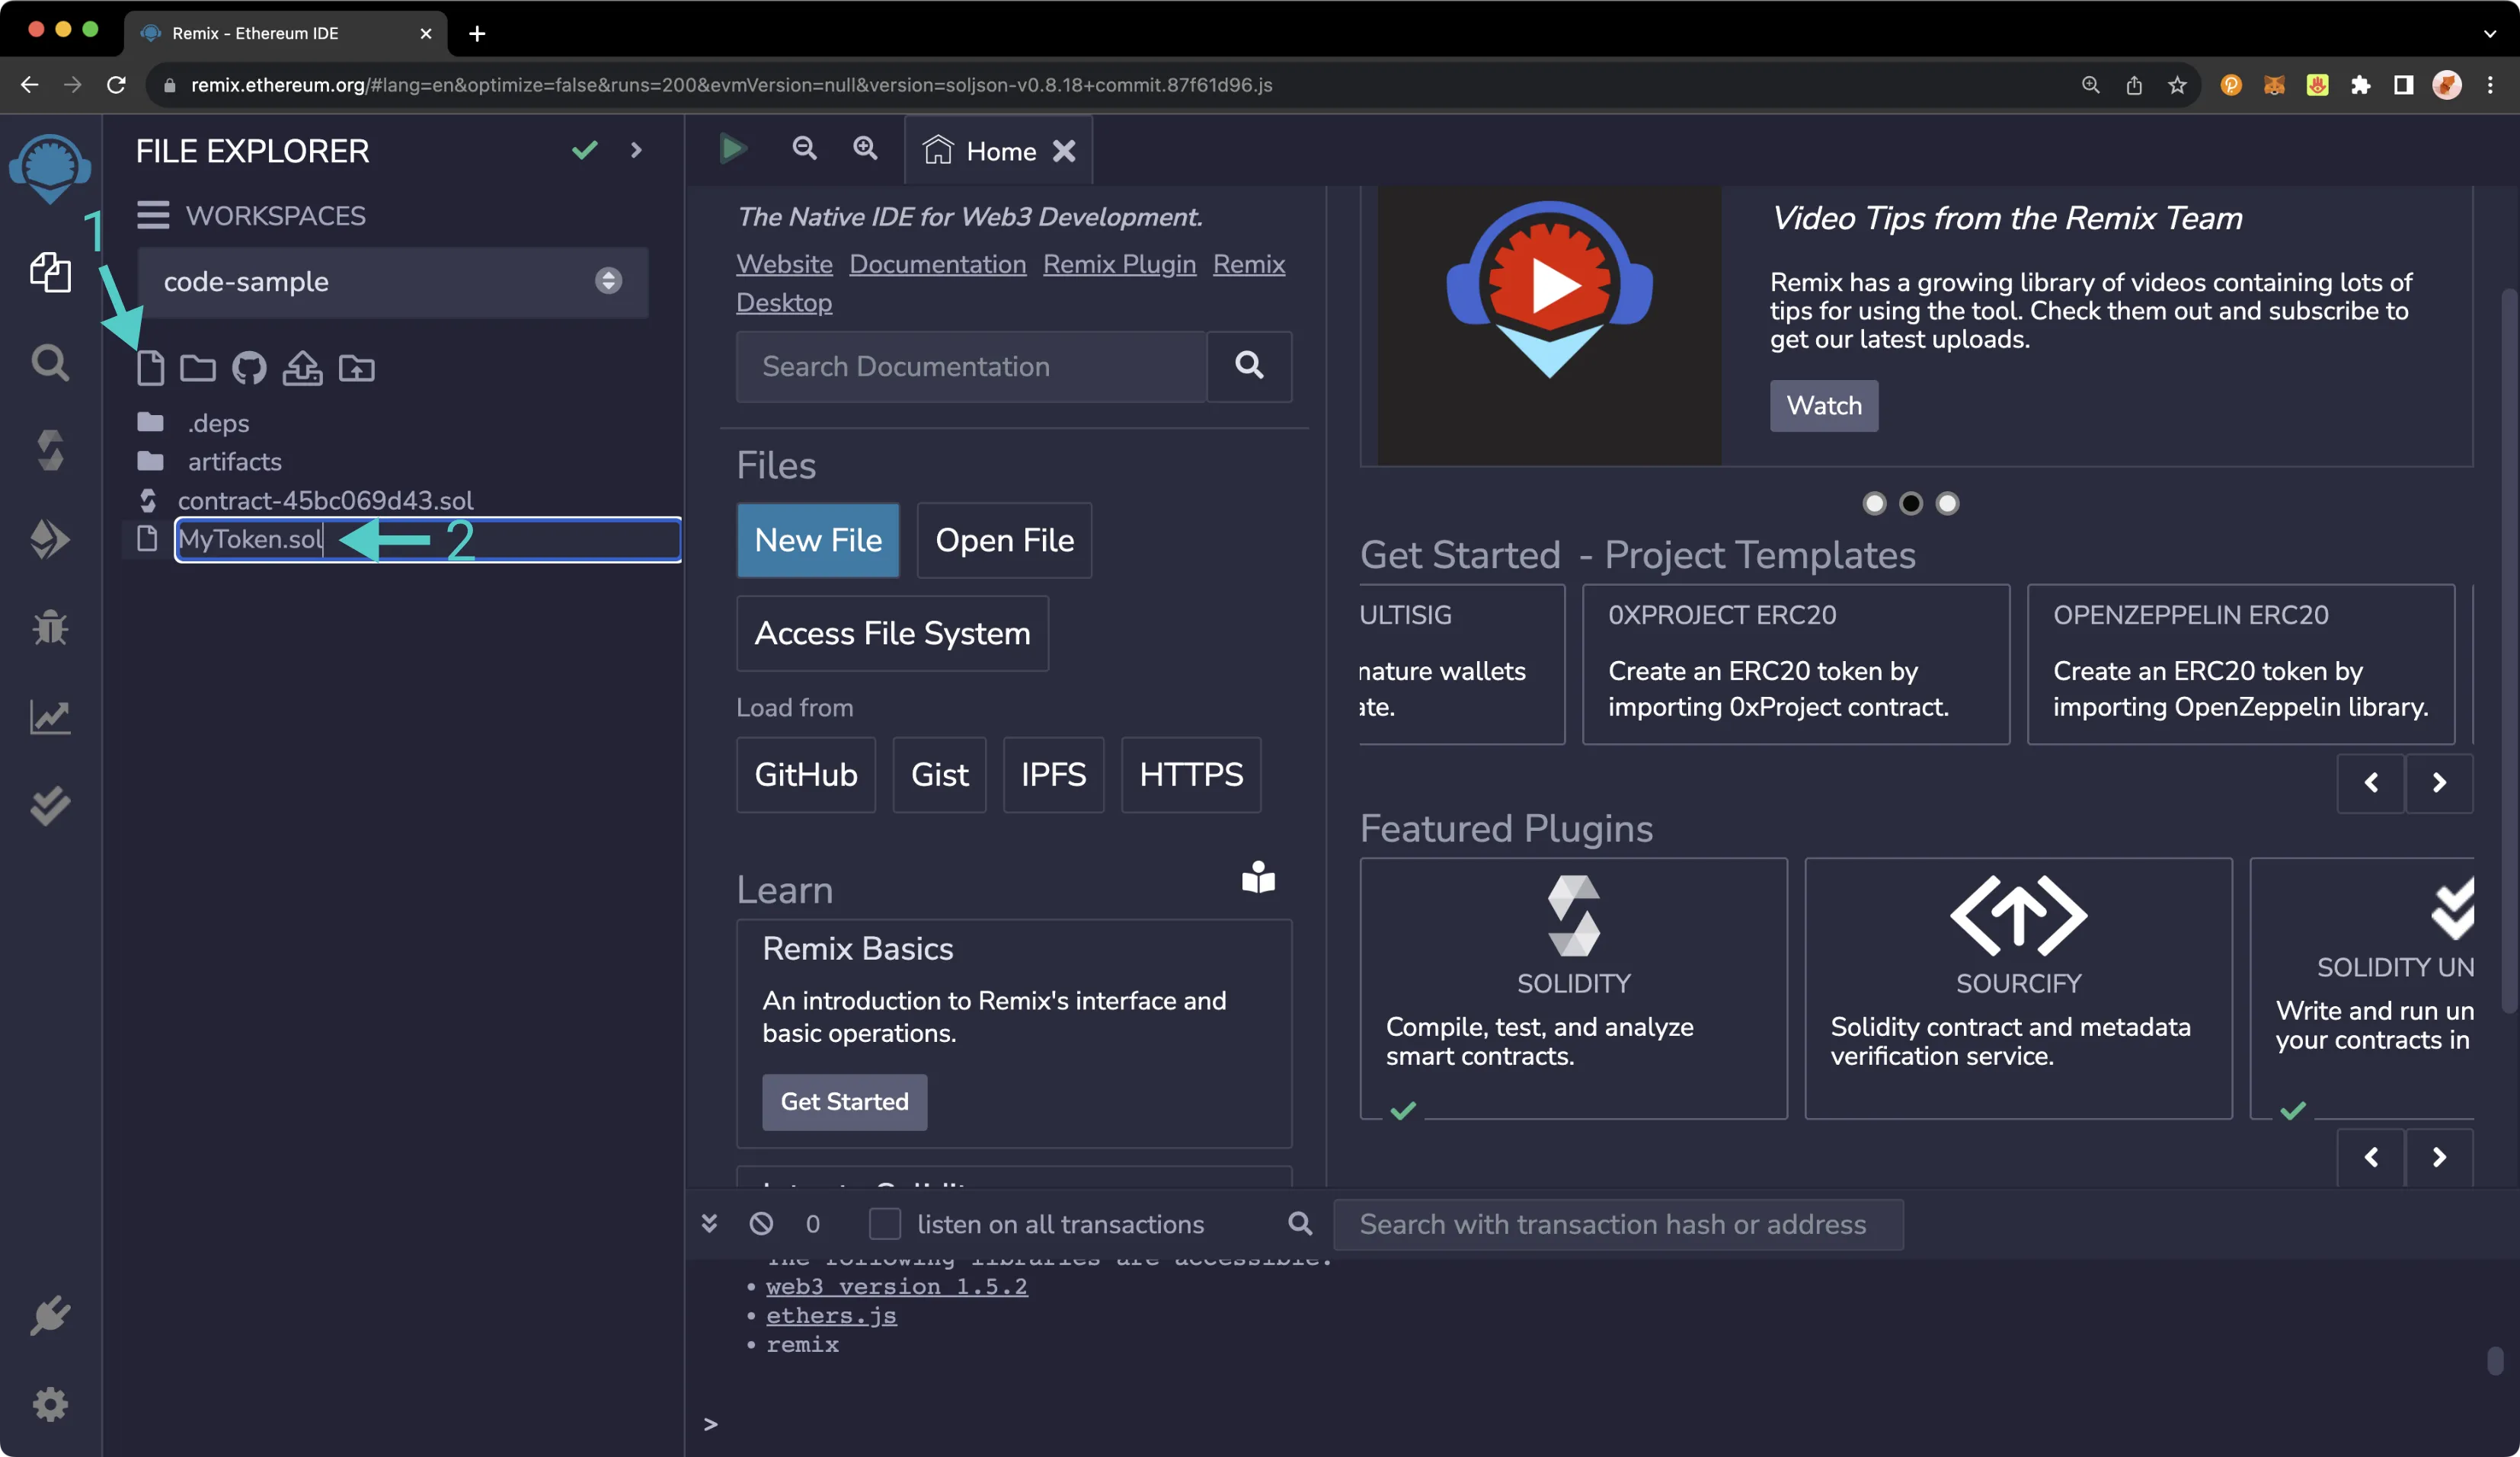
Next, paste the following smart contract into the editor tab:
```solidity
// SPDX-License-Identifier: MIT
pragma solidity ^0.8.0;
import 'https://github.com/OpenZeppelin/openzeppelin-contracts/blob/audit/2023-03/contracts/token/ERC20/ERC20.sol';
// This ERC-20 contract mints the specified amount of tokens to the contract creator.
contract MyToken is ERC20 {
constructor(uint256 initialSupply) ERC20("MyToken", "MYTOK") {
_mint(msg.sender, initialSupply);
}
}
```
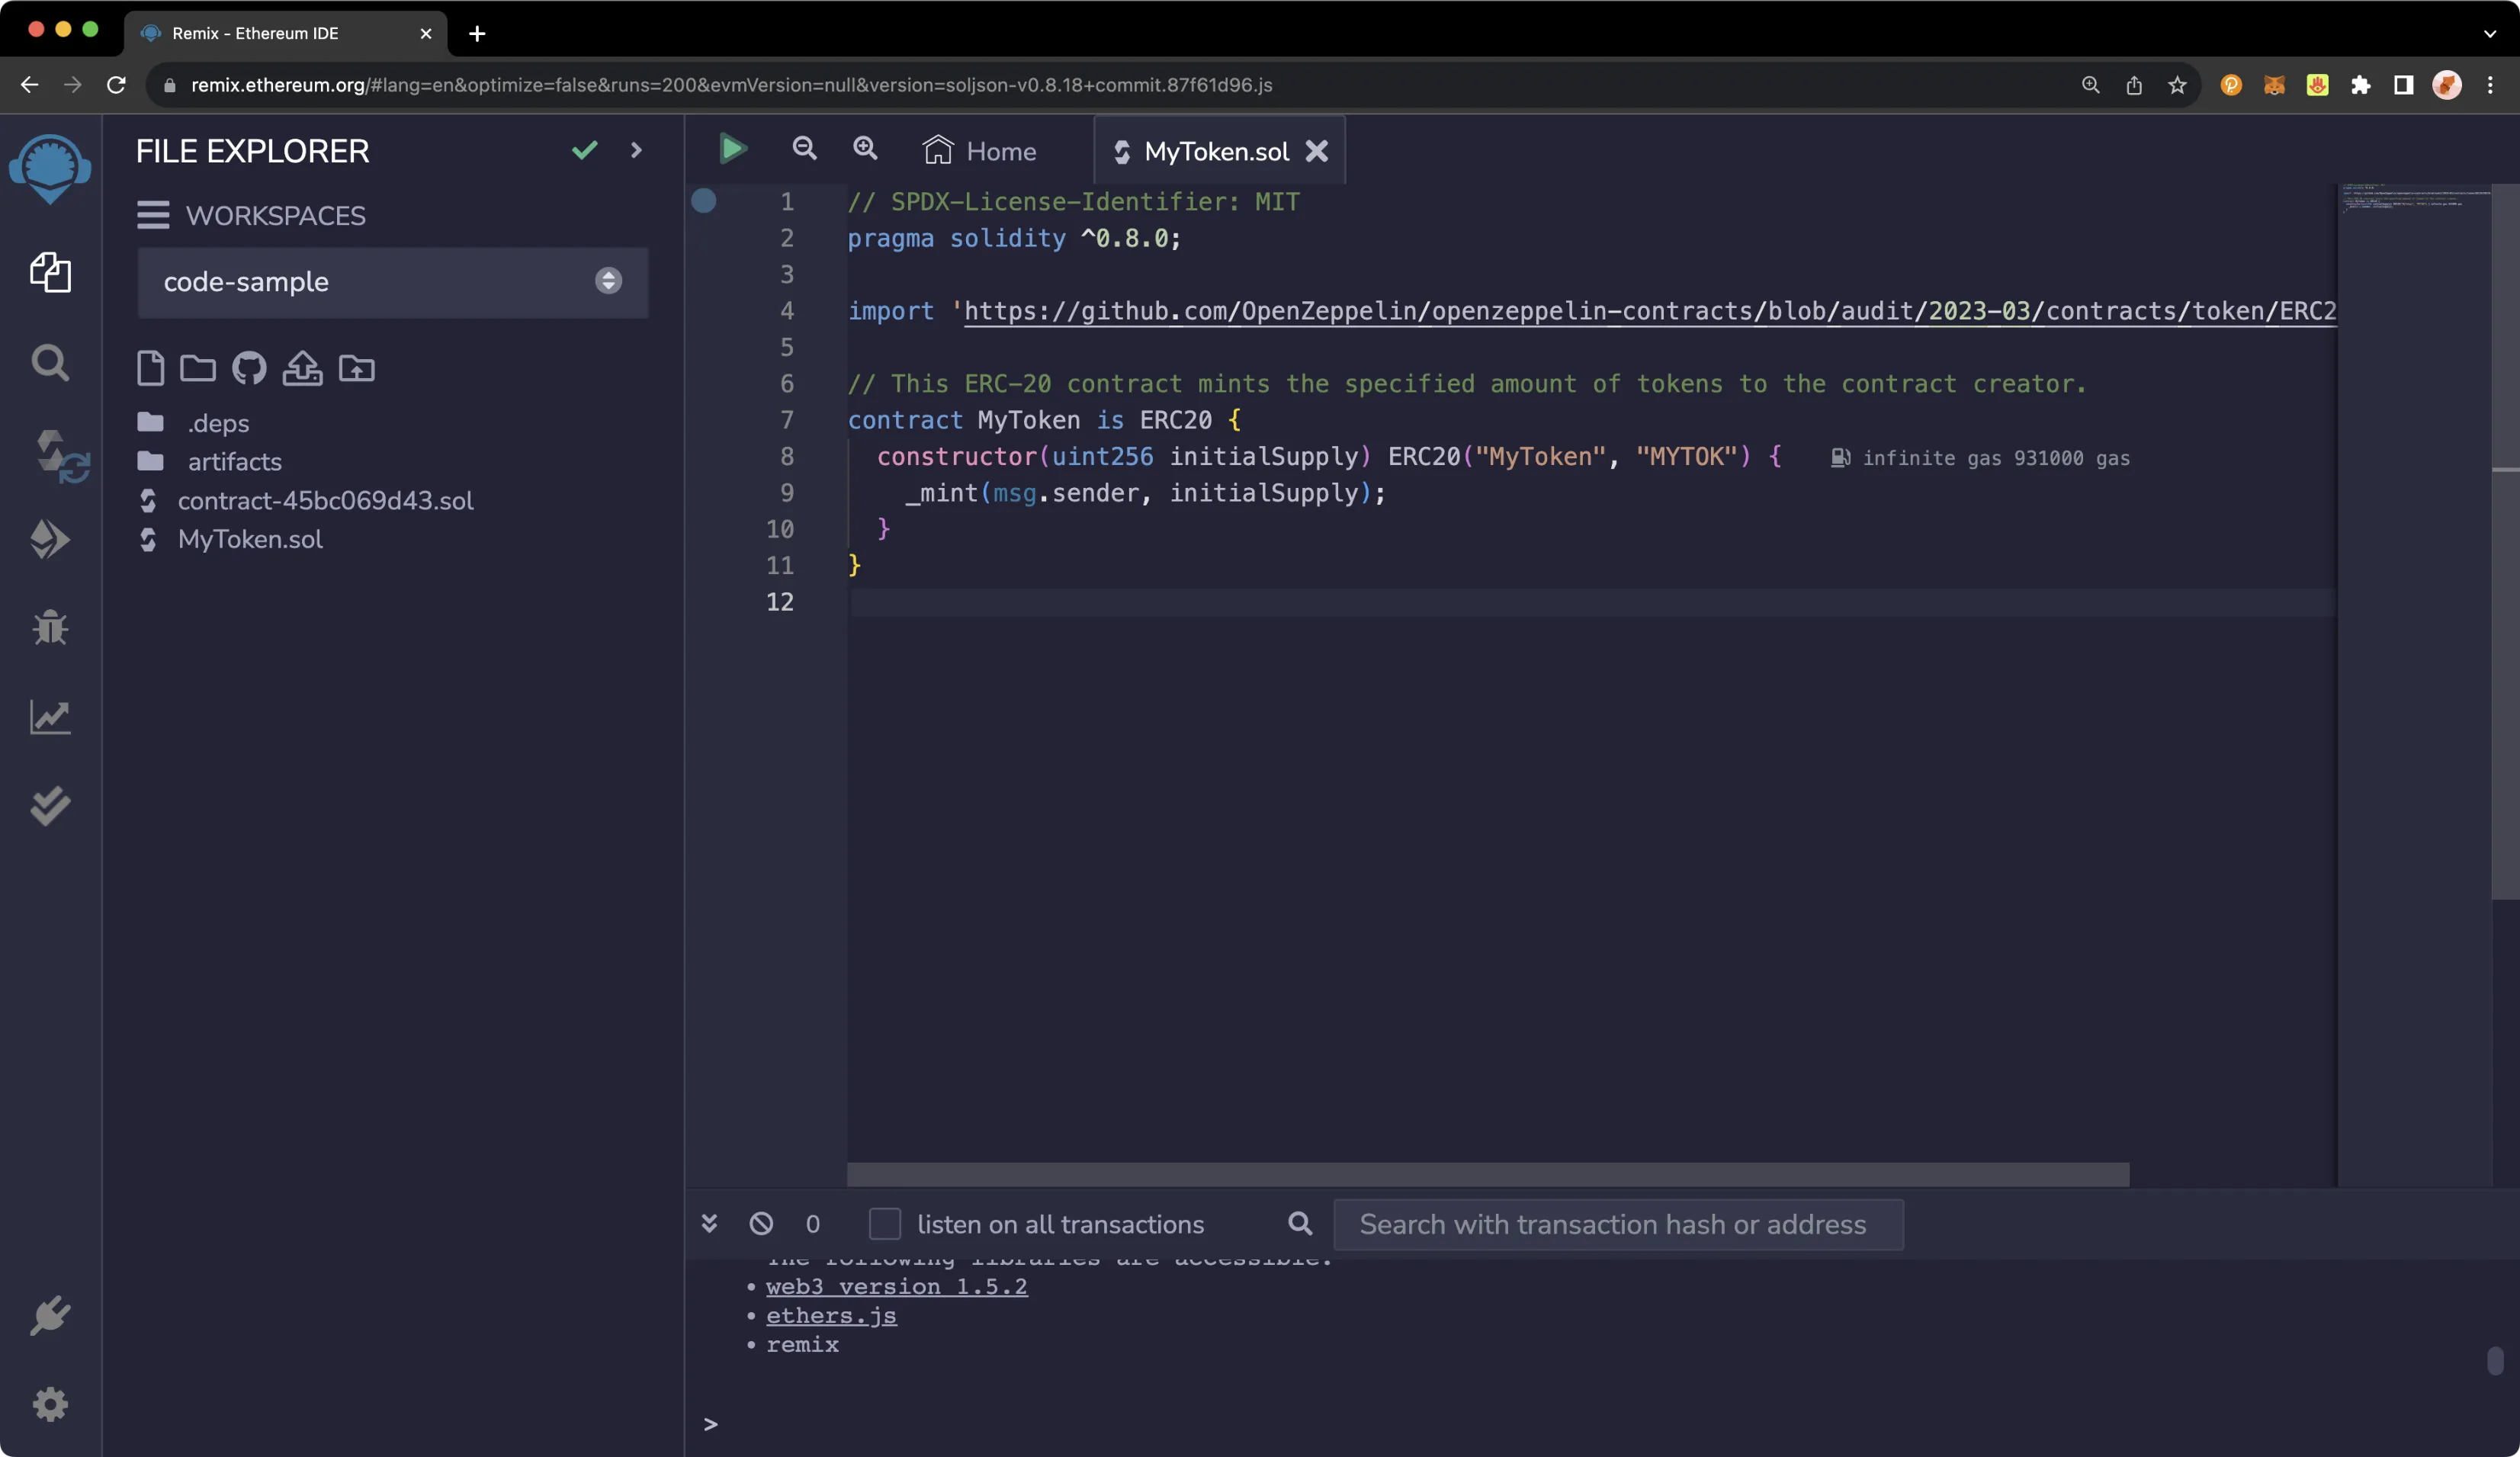
This is a simple ERC-20 contract based on the [current OpenZeppelin ERC-20 template](https://github.com/OpenZeppelin/openzeppelin-contracts/blob/master/contracts/token/ERC20/ERC20.sol){target=\_blank}. It creates `MyToken` with symbol `MYTOK` and mints the entirety of the initial supply to the creator of the contract.
To compile your smart contract, take the following steps:
1. Navigate to the **Solidity compiler** tab
2. Press the **Compile MyToken.sol** button
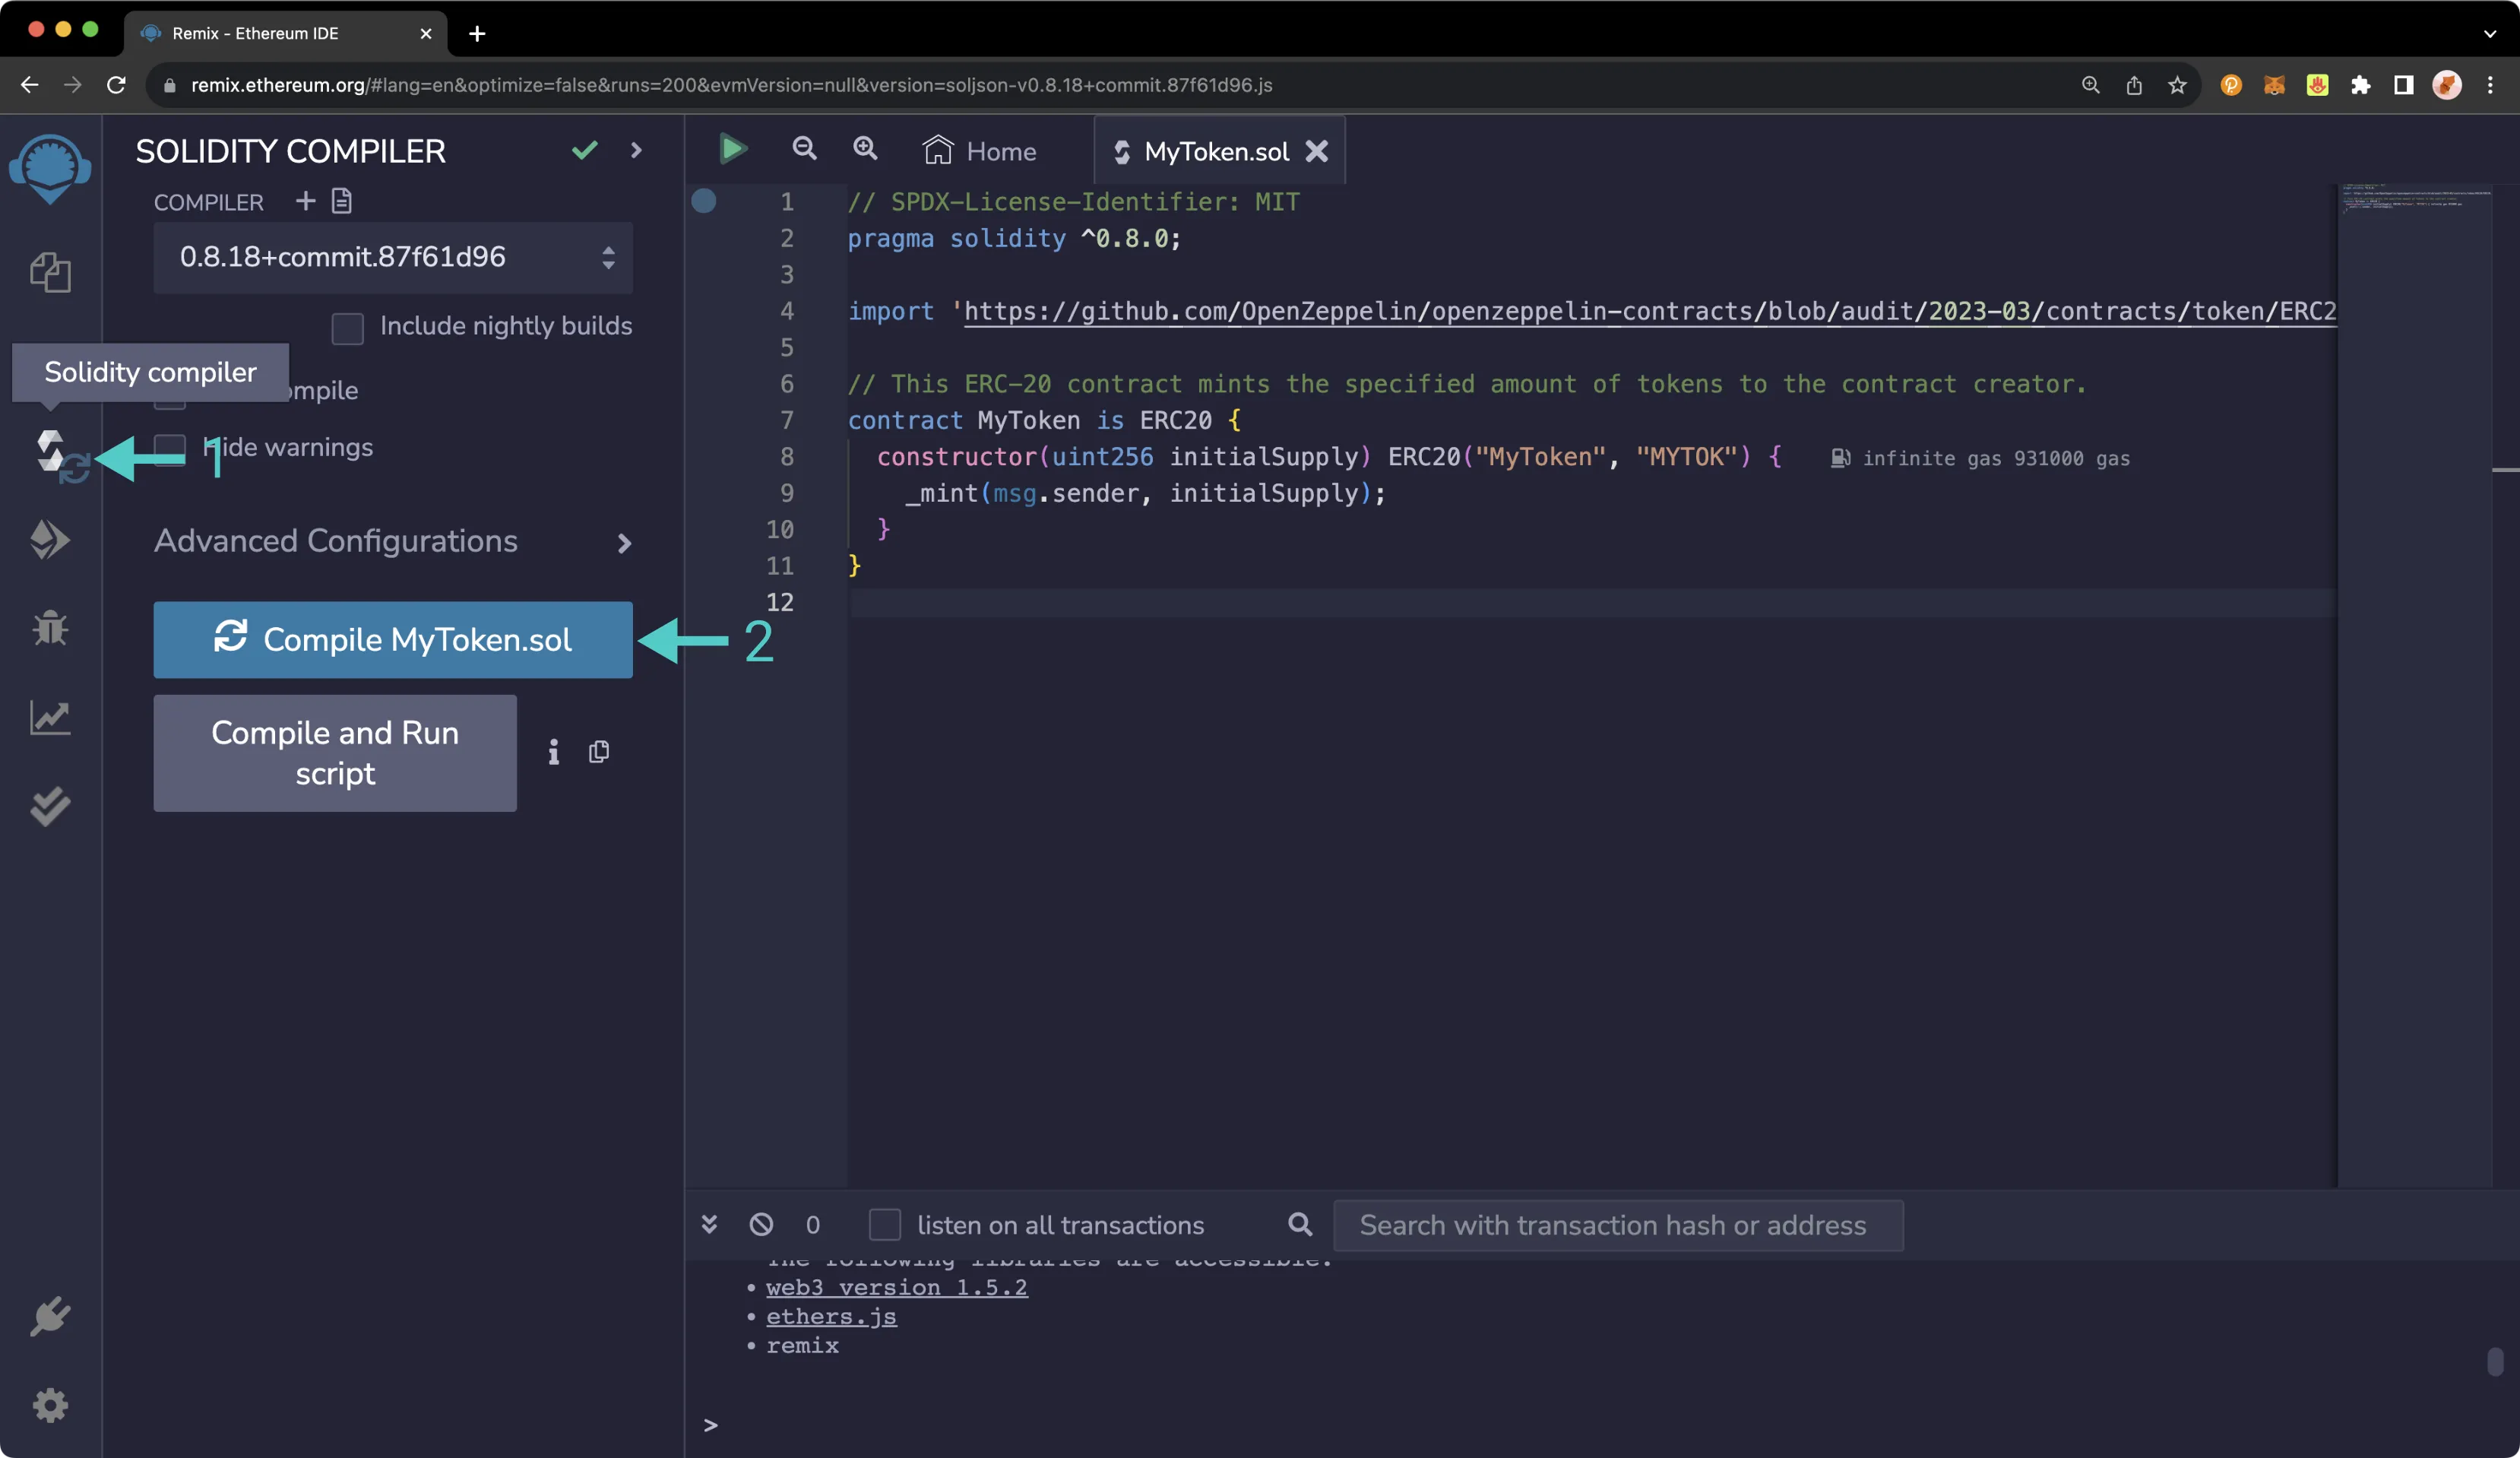
Your contract is now compiled and ready to be deployed to your Tanssi network.
## Deploying a Contract to Your Network Using Remix {: #deploying-a-contract-to-your-network-using-remix }
Now you can deploy the contract by navigating to the **Deployment** sidebar option. You need to change the topmost **ENVIRONMENT** dropdown from **JavaScript VM** to **Injected Web3**. This tells Remix to use the MetaMask injected provider, which will point it to your Tanssi-powered EVM network, so long as the selected network in your MetaMask is your Tanssi EVM network. If you need to change your network in MetaMask, you can easily do so, and Remix will update your account balances to reflect the network change.
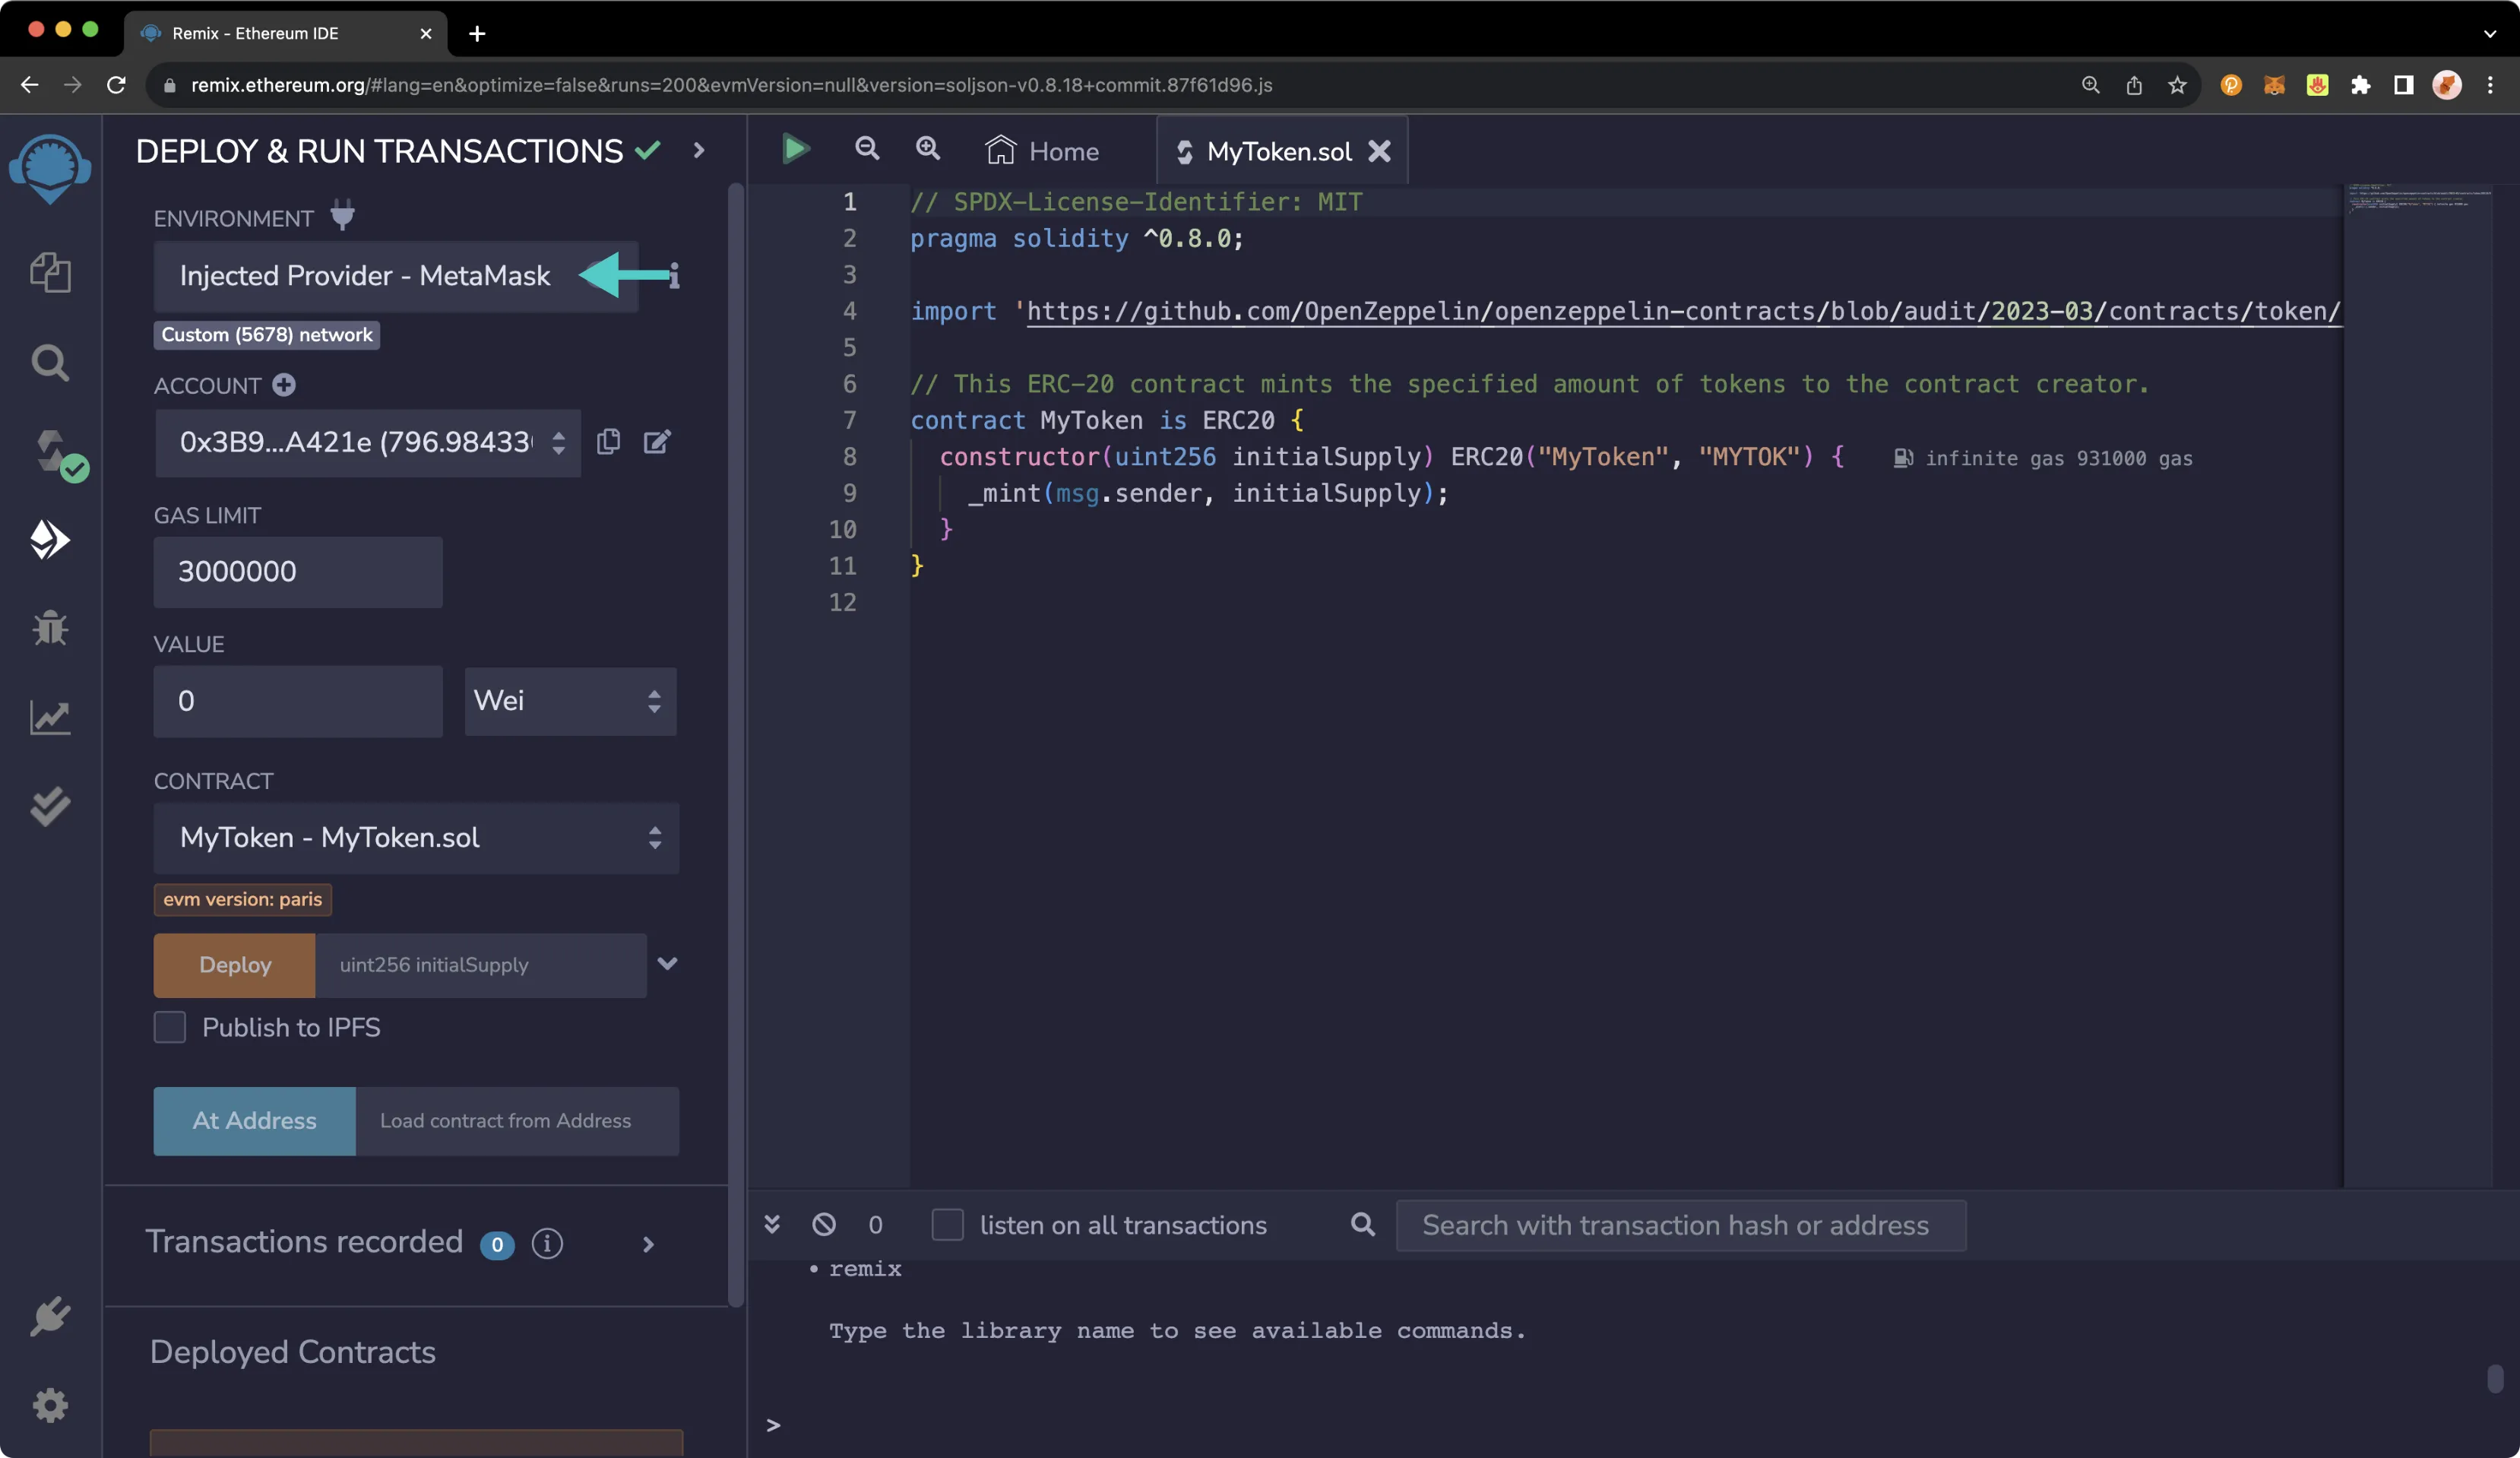
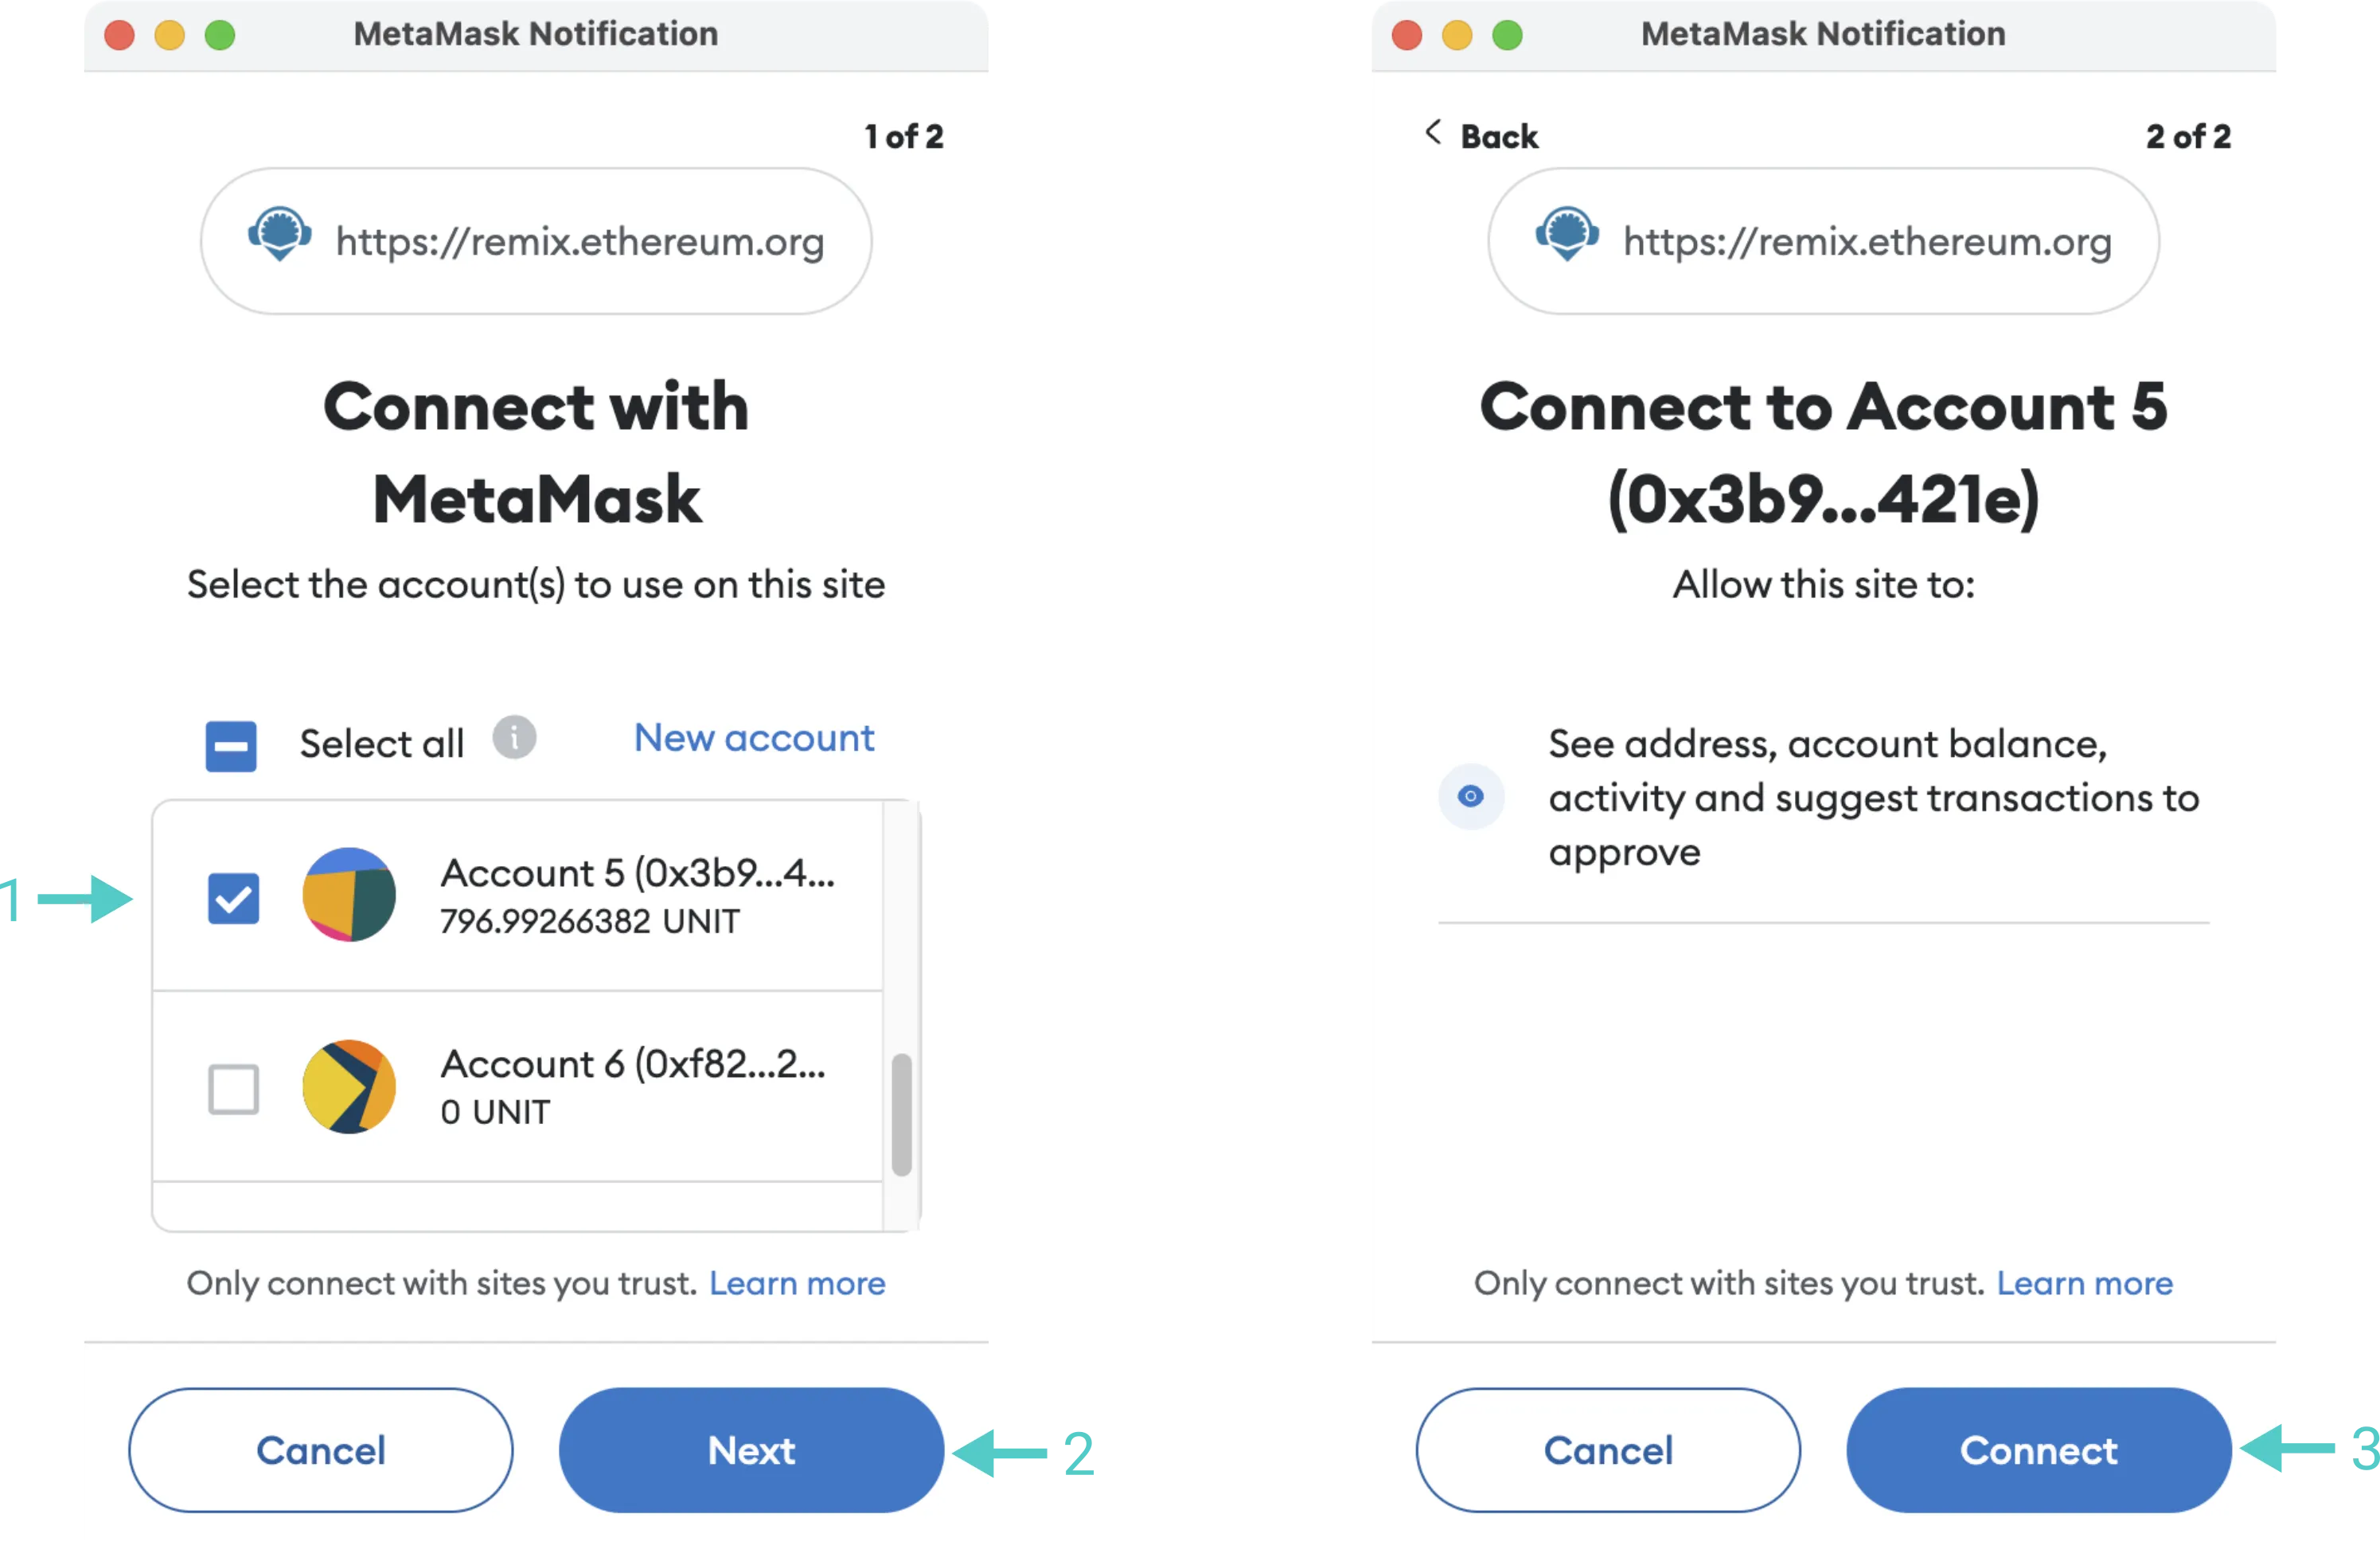
As soon as you select **Injected Web3**, you will be prompted to allow Remix to connect to your MetaMask account. Then, take the following steps:
1. Select the account(s) that you would like to use with Remix
2. Press **Next**
3. Press **Connect**
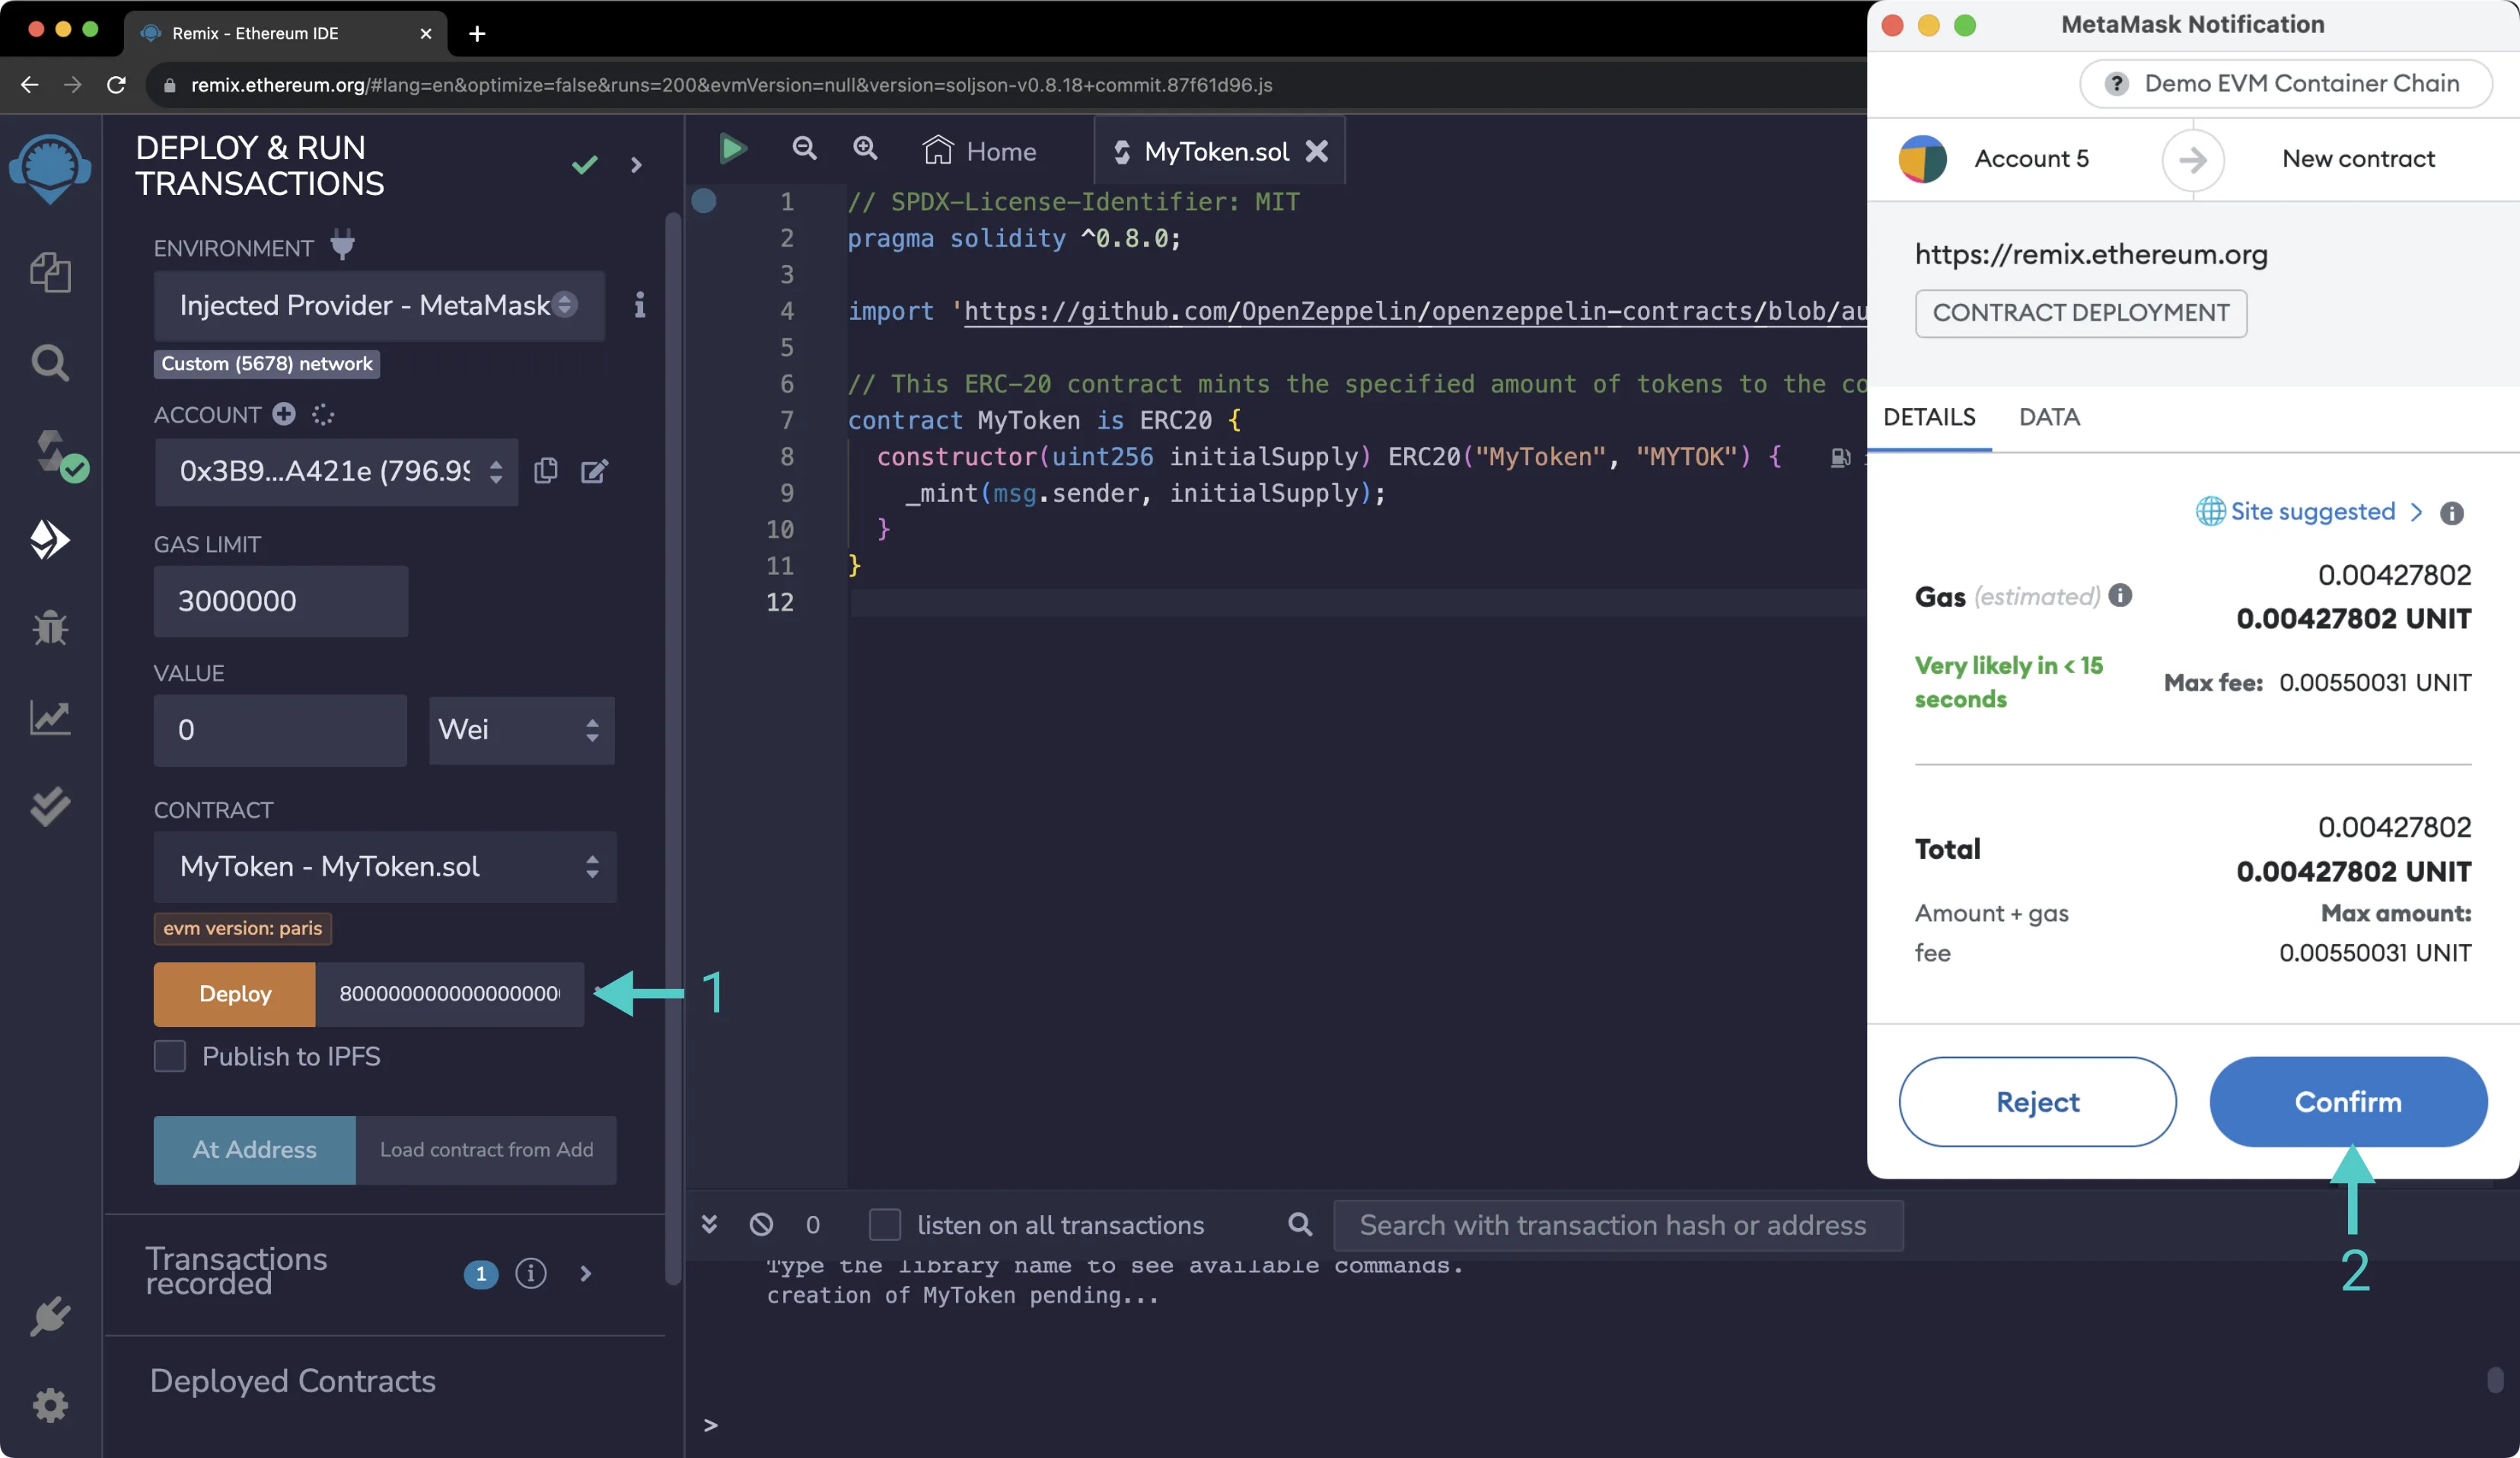
Back on Remix, you should see the account you wish to use for deployment is now managed by MetaMask. To deploy your token contract, take the following steps:
1. Next to the **Deploy** button, specify an initial supply of 8 million tokens. Since this contract uses the default of 18 decimals, the value to put in the box is `8000000000000000000000000`. Once you have entered this value, press **Deploy**
2. Confirm the contract deployment transaction in MetaMask.
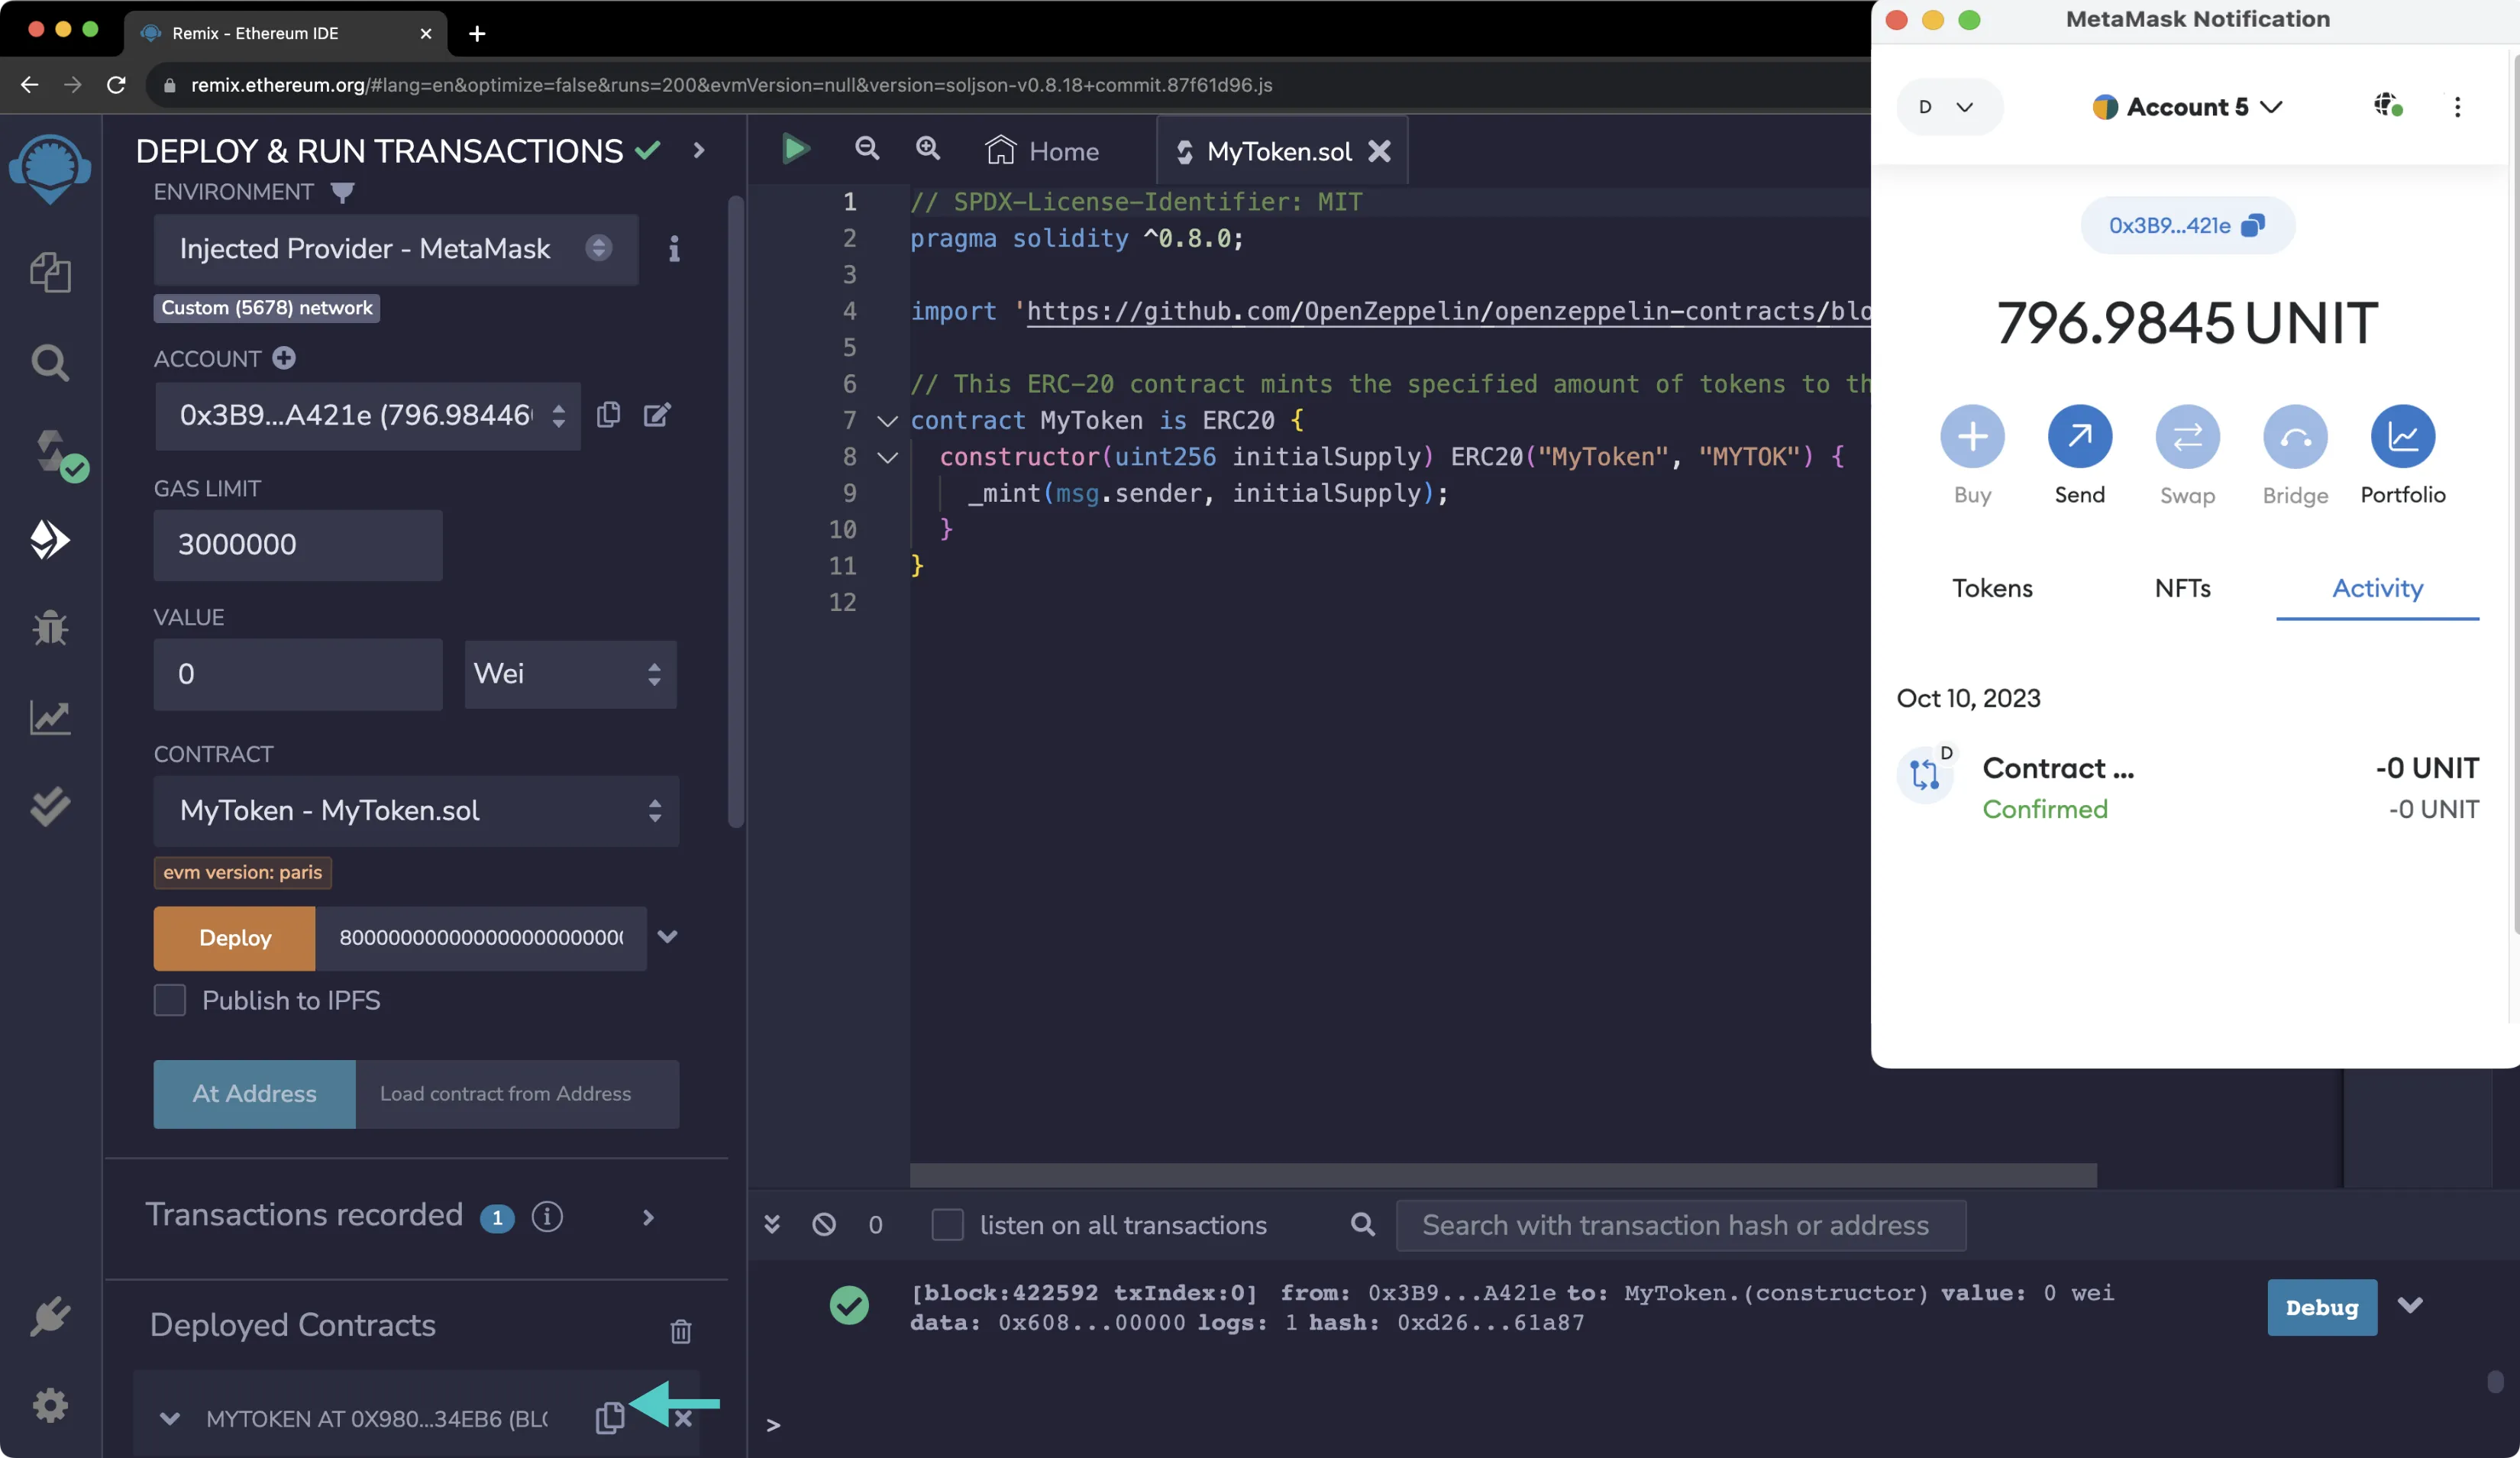
After you press **Confirm** and the deployment is complete, you will see the transaction listed in MetaMask. The contract will appear under **Deployed Contracts** in Remix. You can access the address of the deployed contract by pressing the copy button.
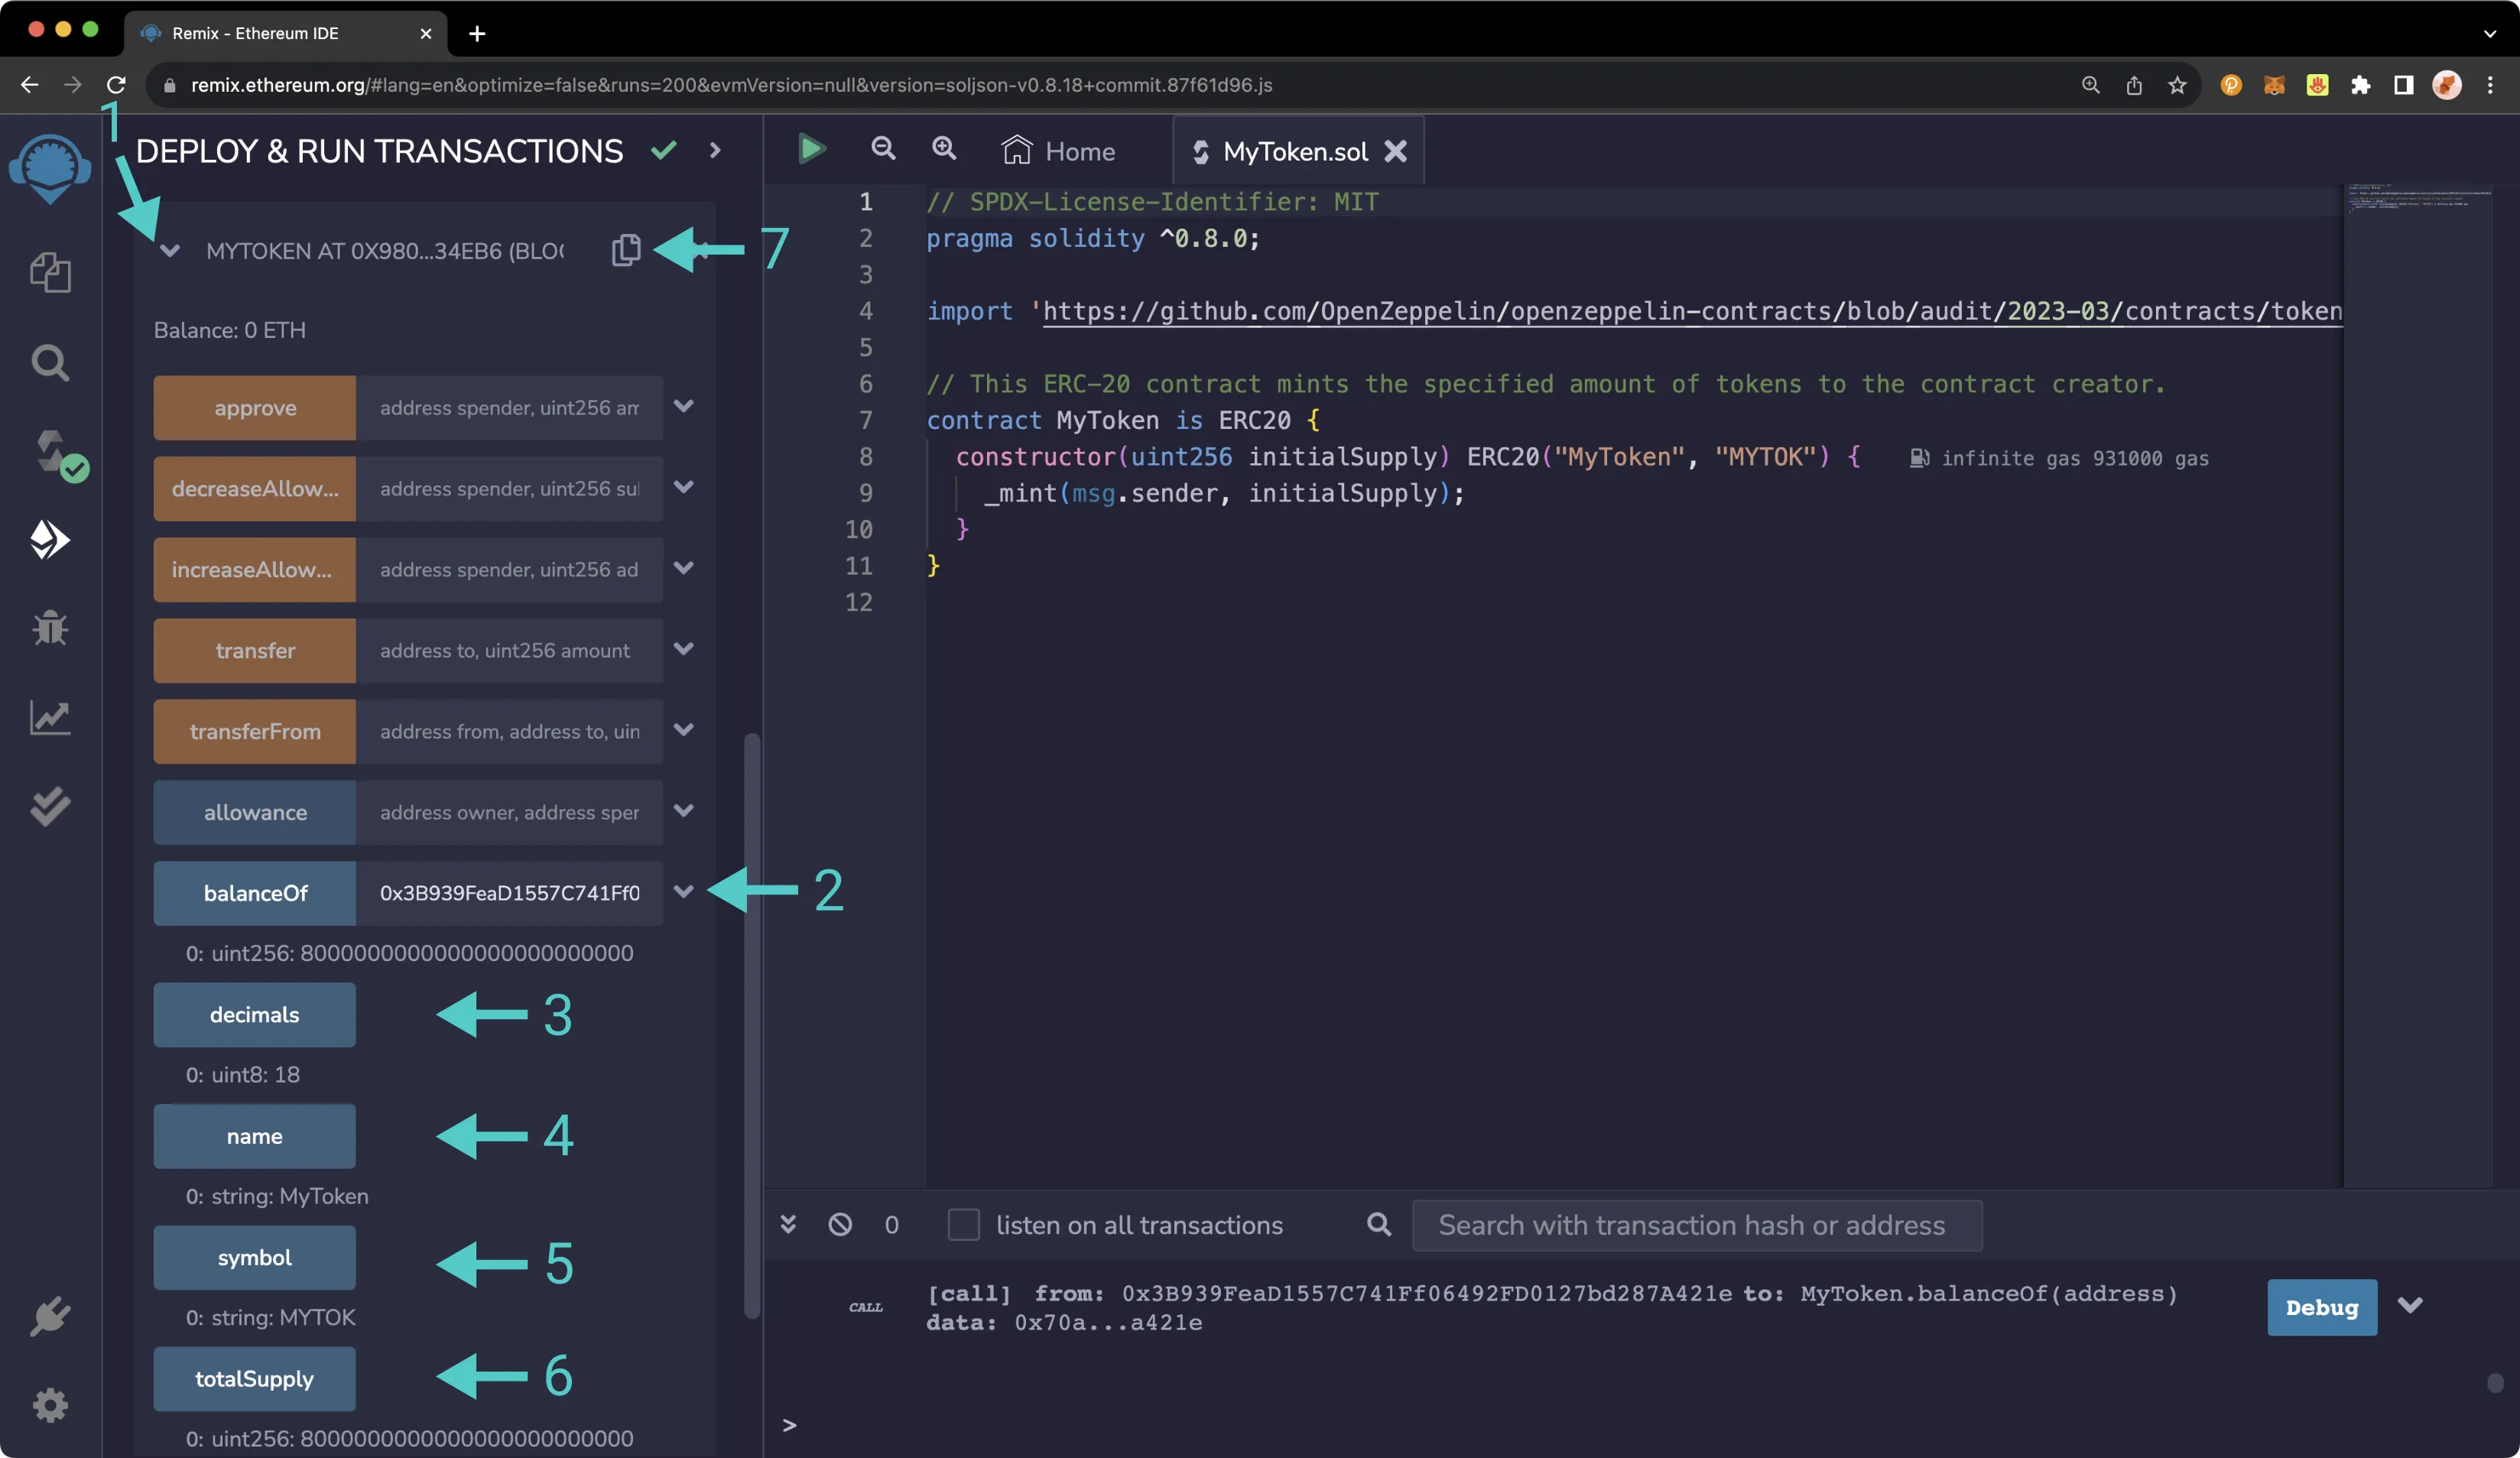
Once the contract is deployed, you can interact with it from within Remix. To familiarize yourself with interacting with a smart contract from Remix, take the following steps:
1. Expand the contract under the **Deployed Contracts** section
2. Paste in your address (the address that deployed the token contract) next to the balanceOf method and press **balanceOf**. You should see the entirety of the balance of the ERC-20 belonging to that address
3. Press **Decimals** to see the number of decimal points the token has
4. Press **Name** to see the name you assigned the token
5. Press **Symbol** to see the token symbol
6. Press **Initial Supply** and you should see `8000000000000000000000000`
7. Copy the contract address by clicking the button next to the contract name and address. You'll need it in the next section
## Interacting with an ERC-20 on Your Network from MetaMask {: #interacting-with-an-erc-20-on-your-network-from-metamask }
Now, open MetaMask to add the newly deployed ERC-20 tokens. Make sure you are connected to the account that deployed the token contract. Additionally, make sure you have copied the contract's address from Remix.
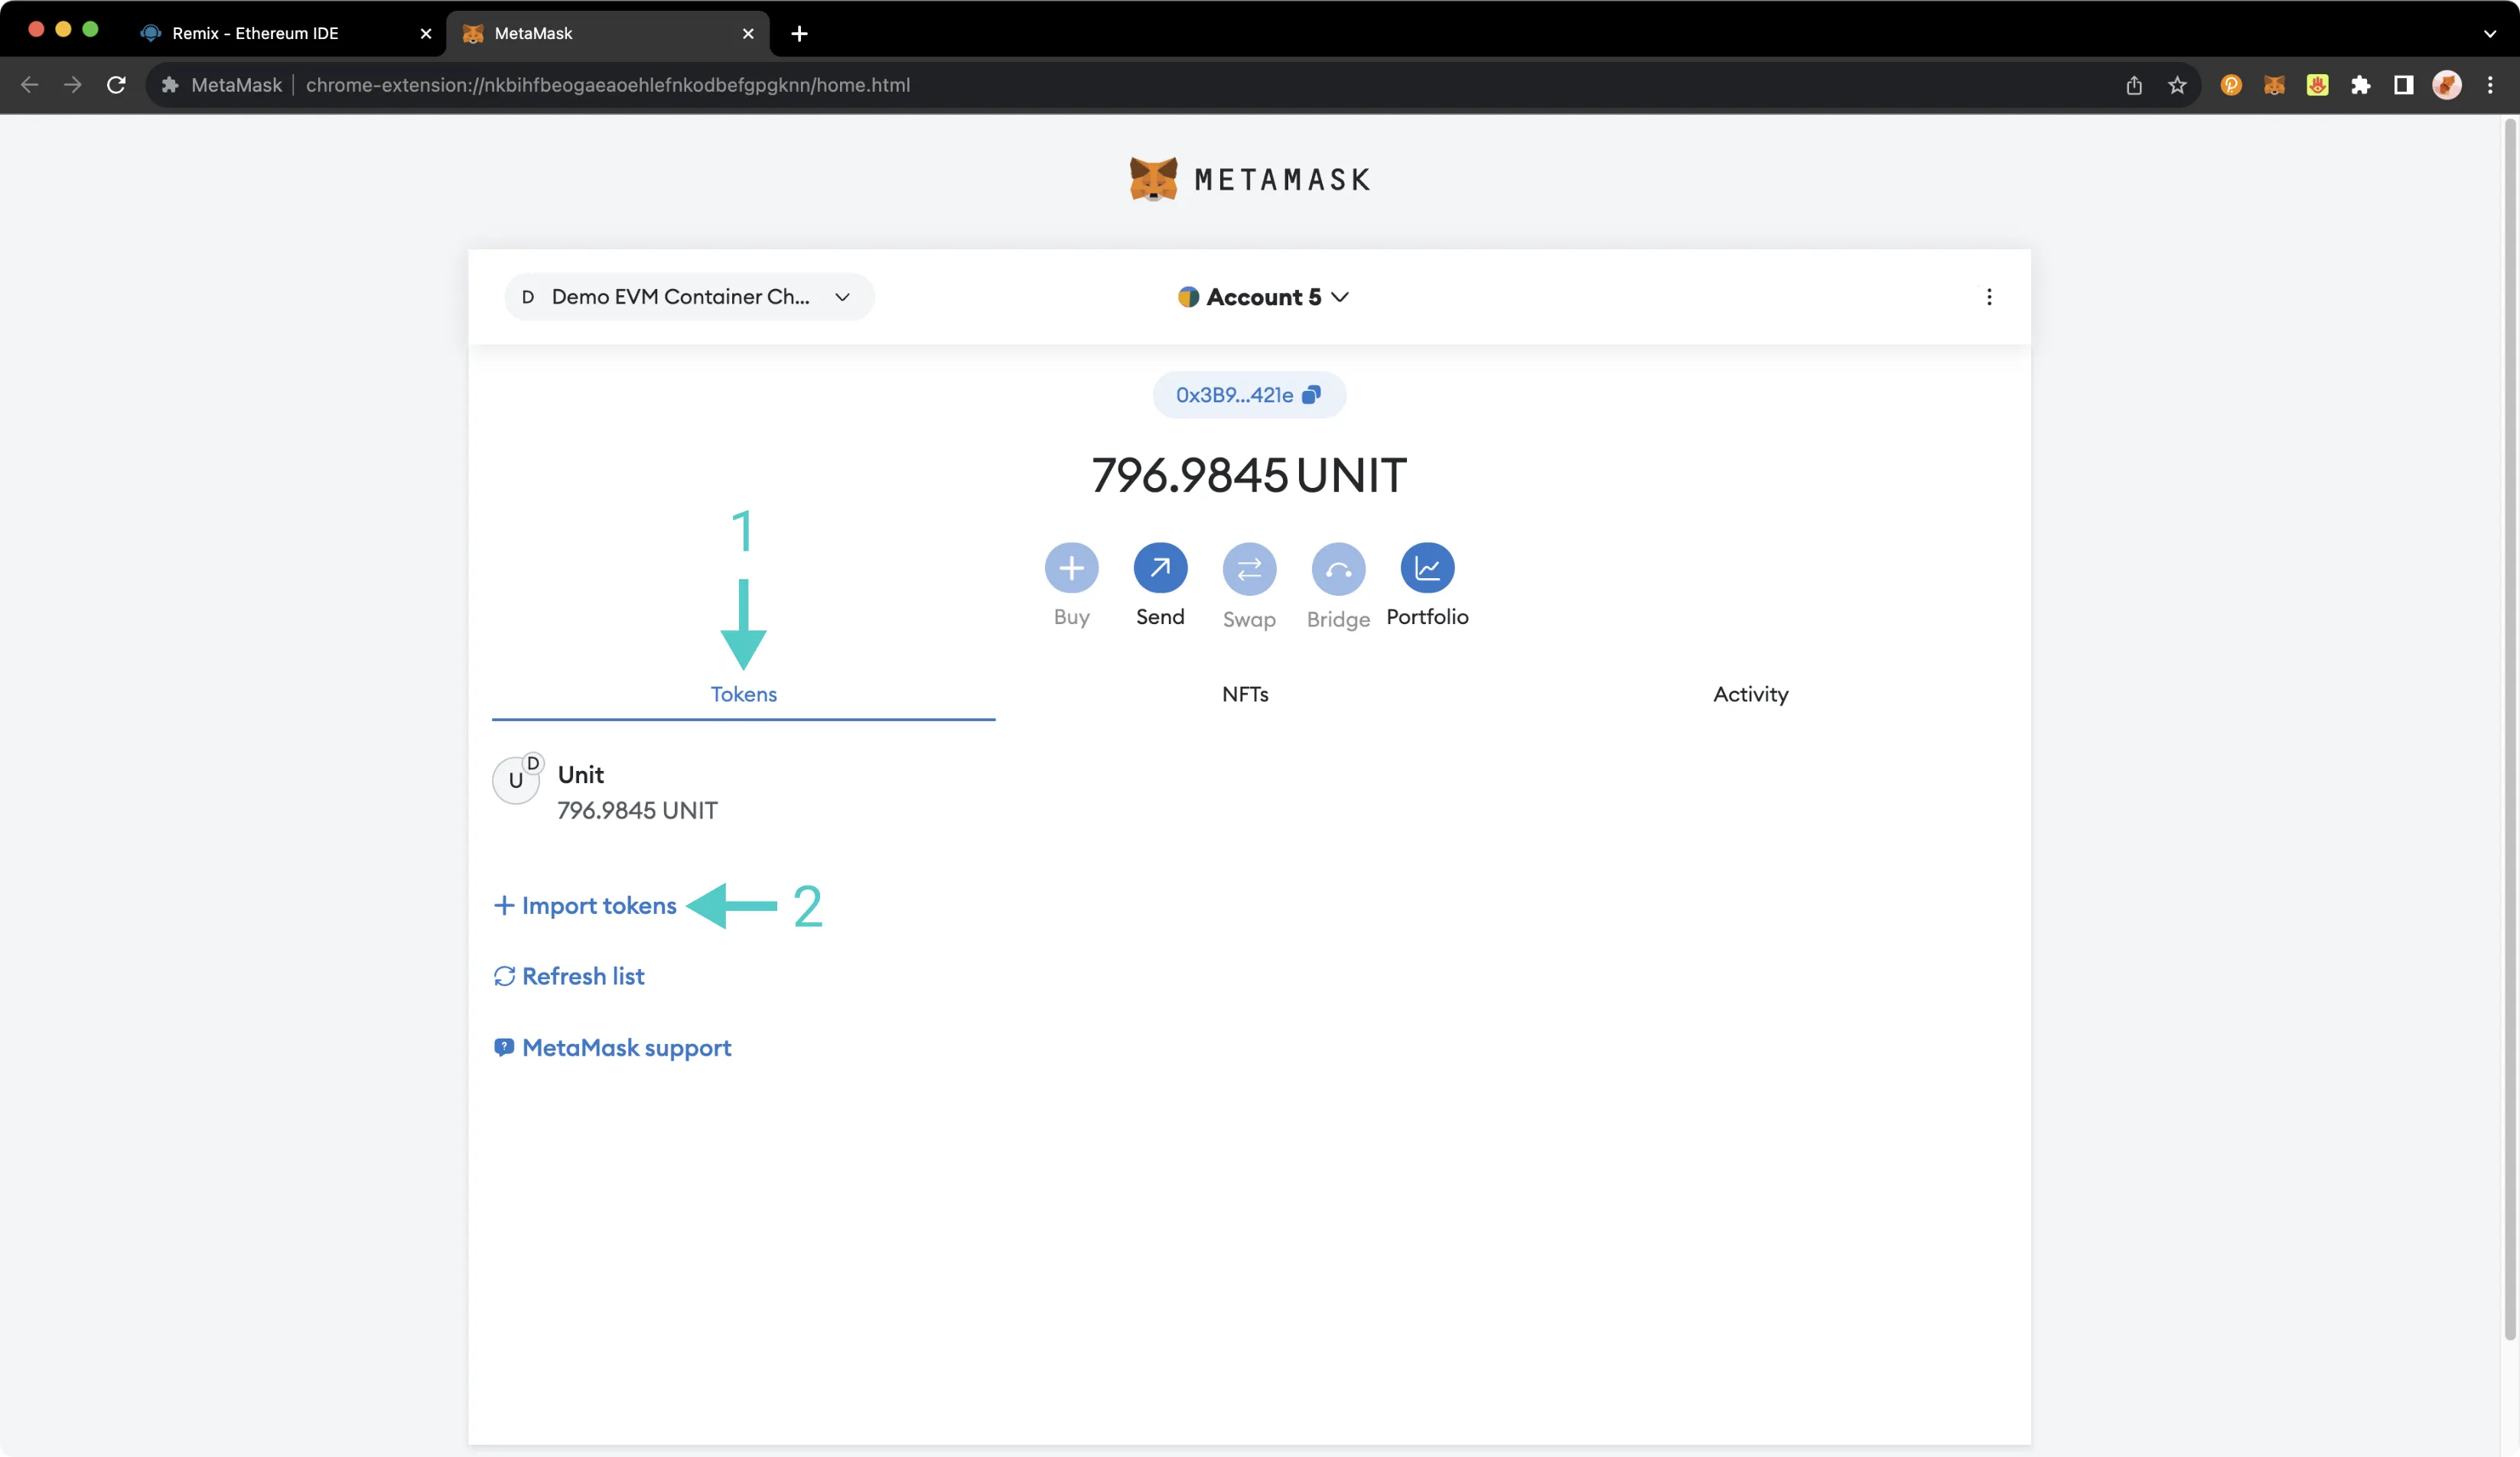
To add the token to MetaMask, take the following steps:
1. Click on the **Tokens** tab as shown below
2. Press **Import tokens**
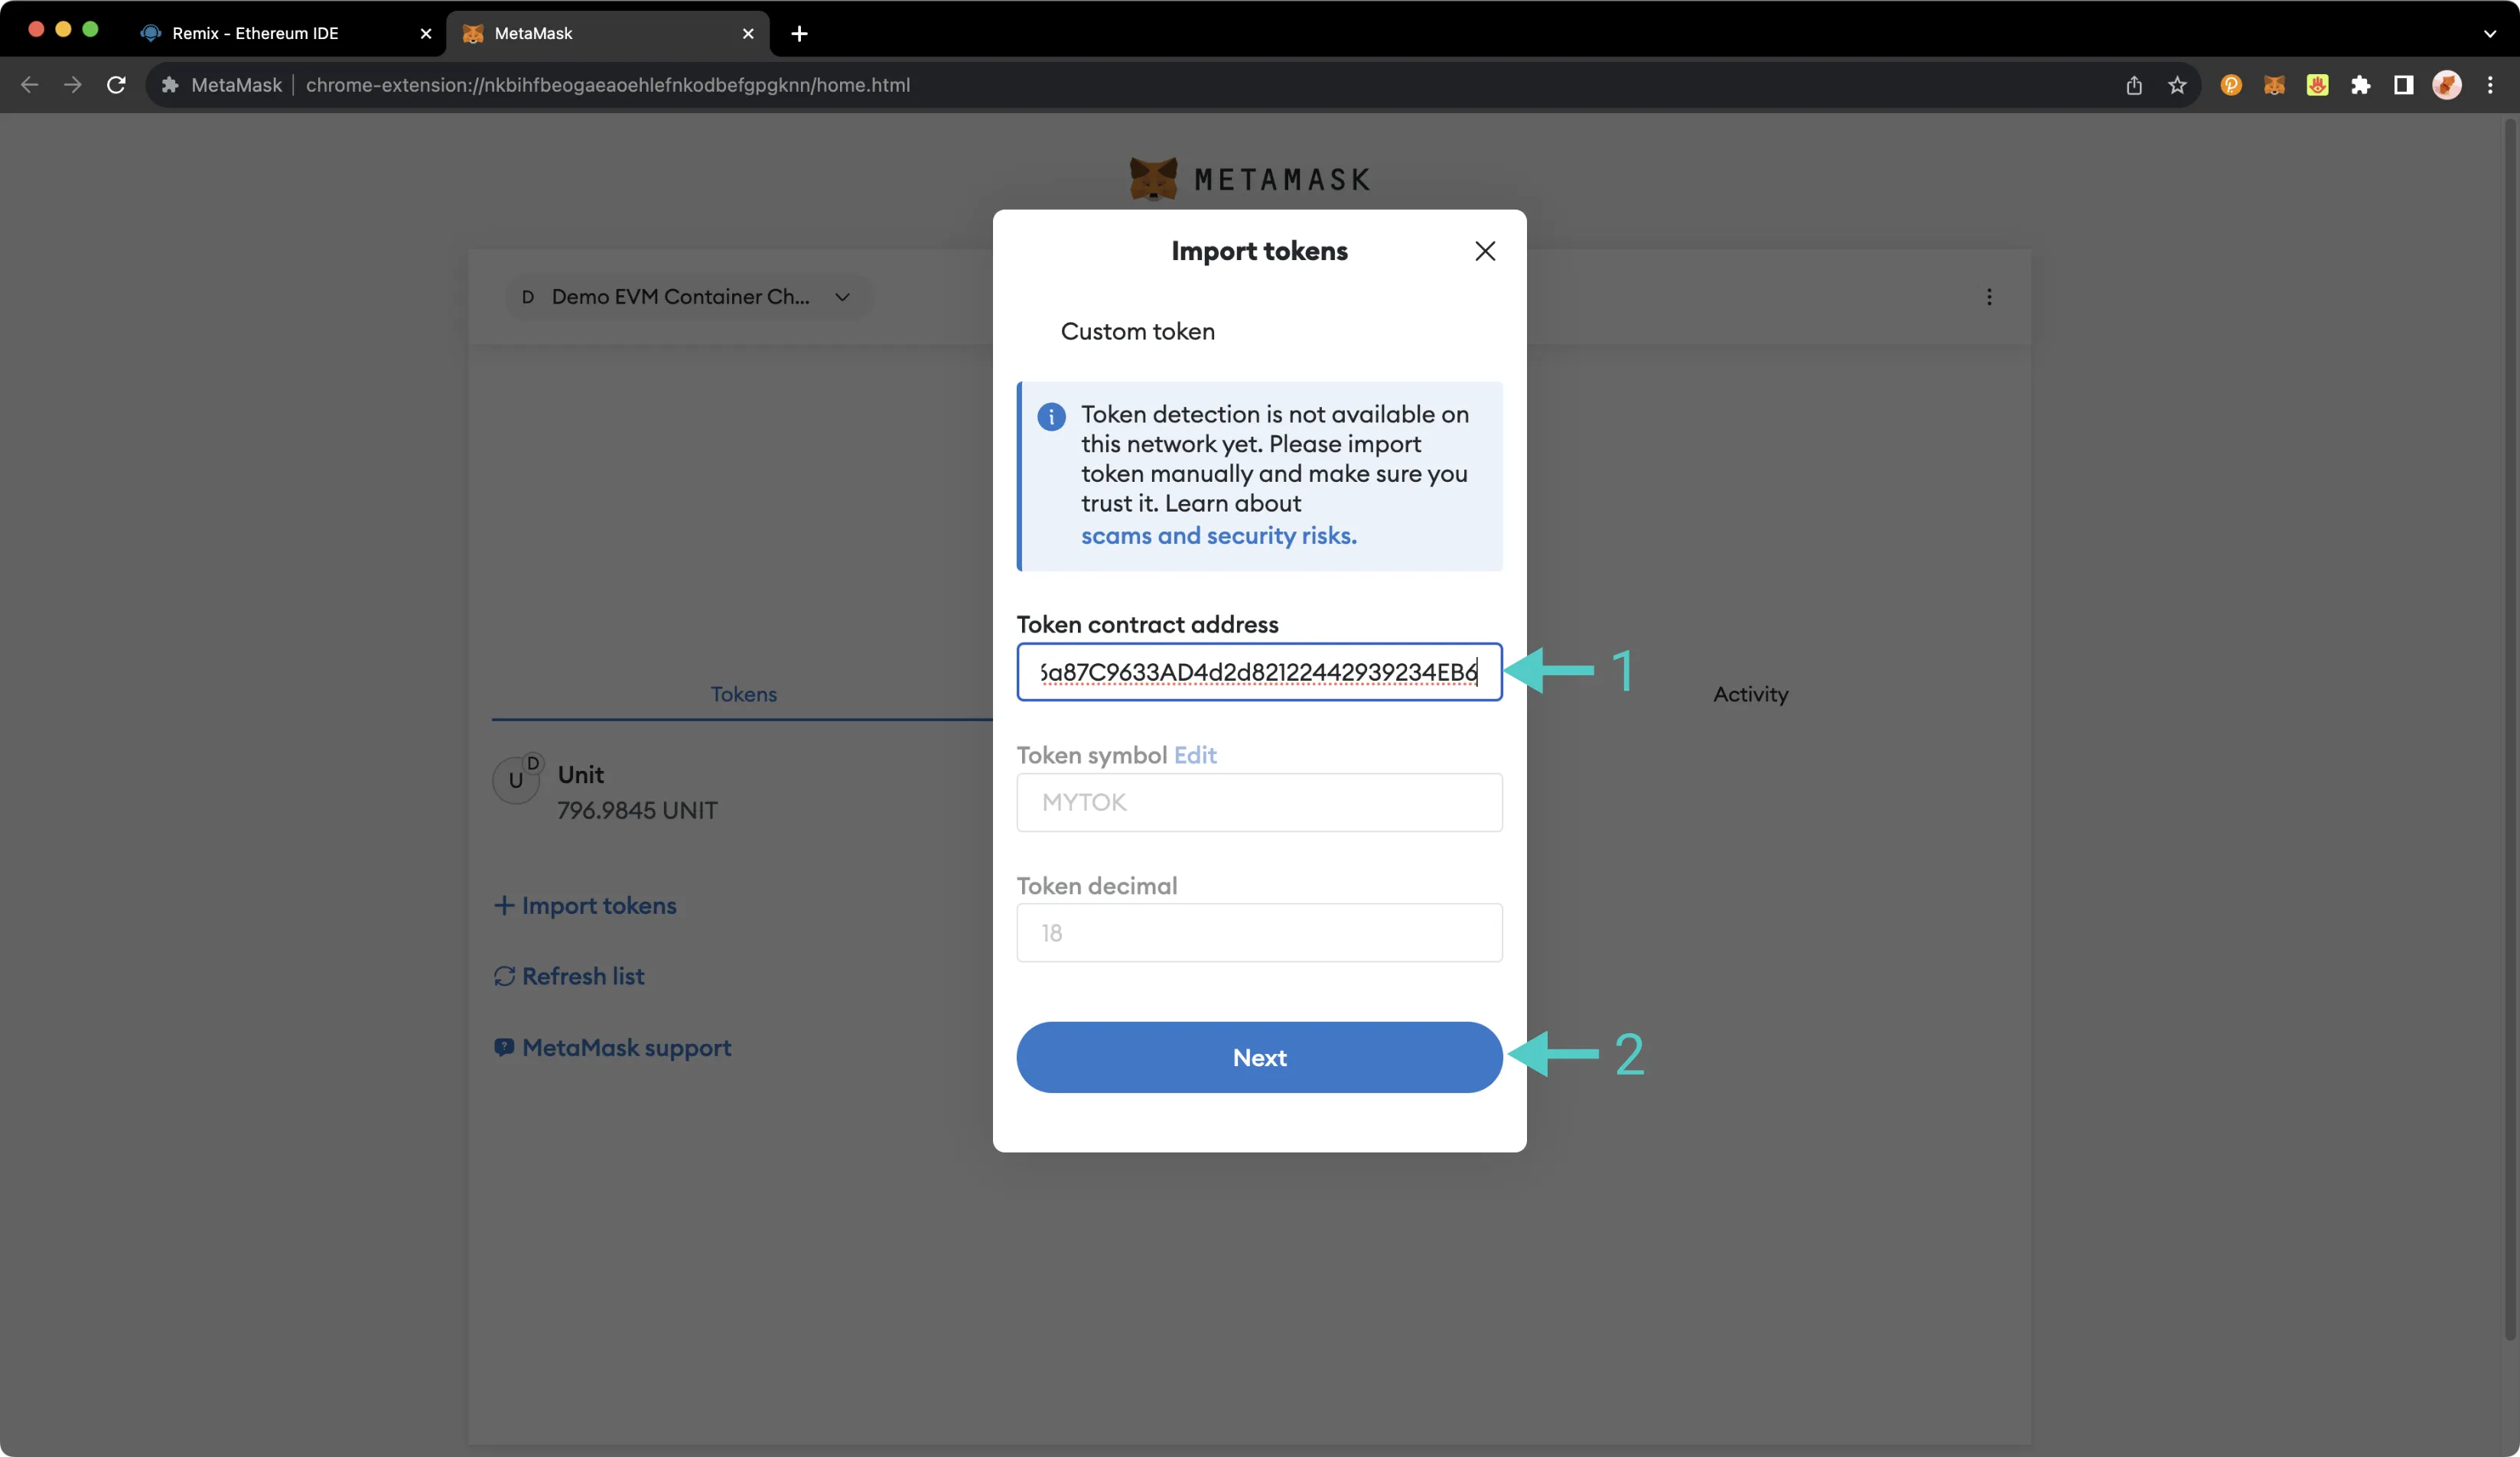
Then, take the following steps:
1. Paste the copied contract address into the **Token contract address** field. The **Token symbol** and **Token decimal** fields should be automatically populated
2. Press **Next**
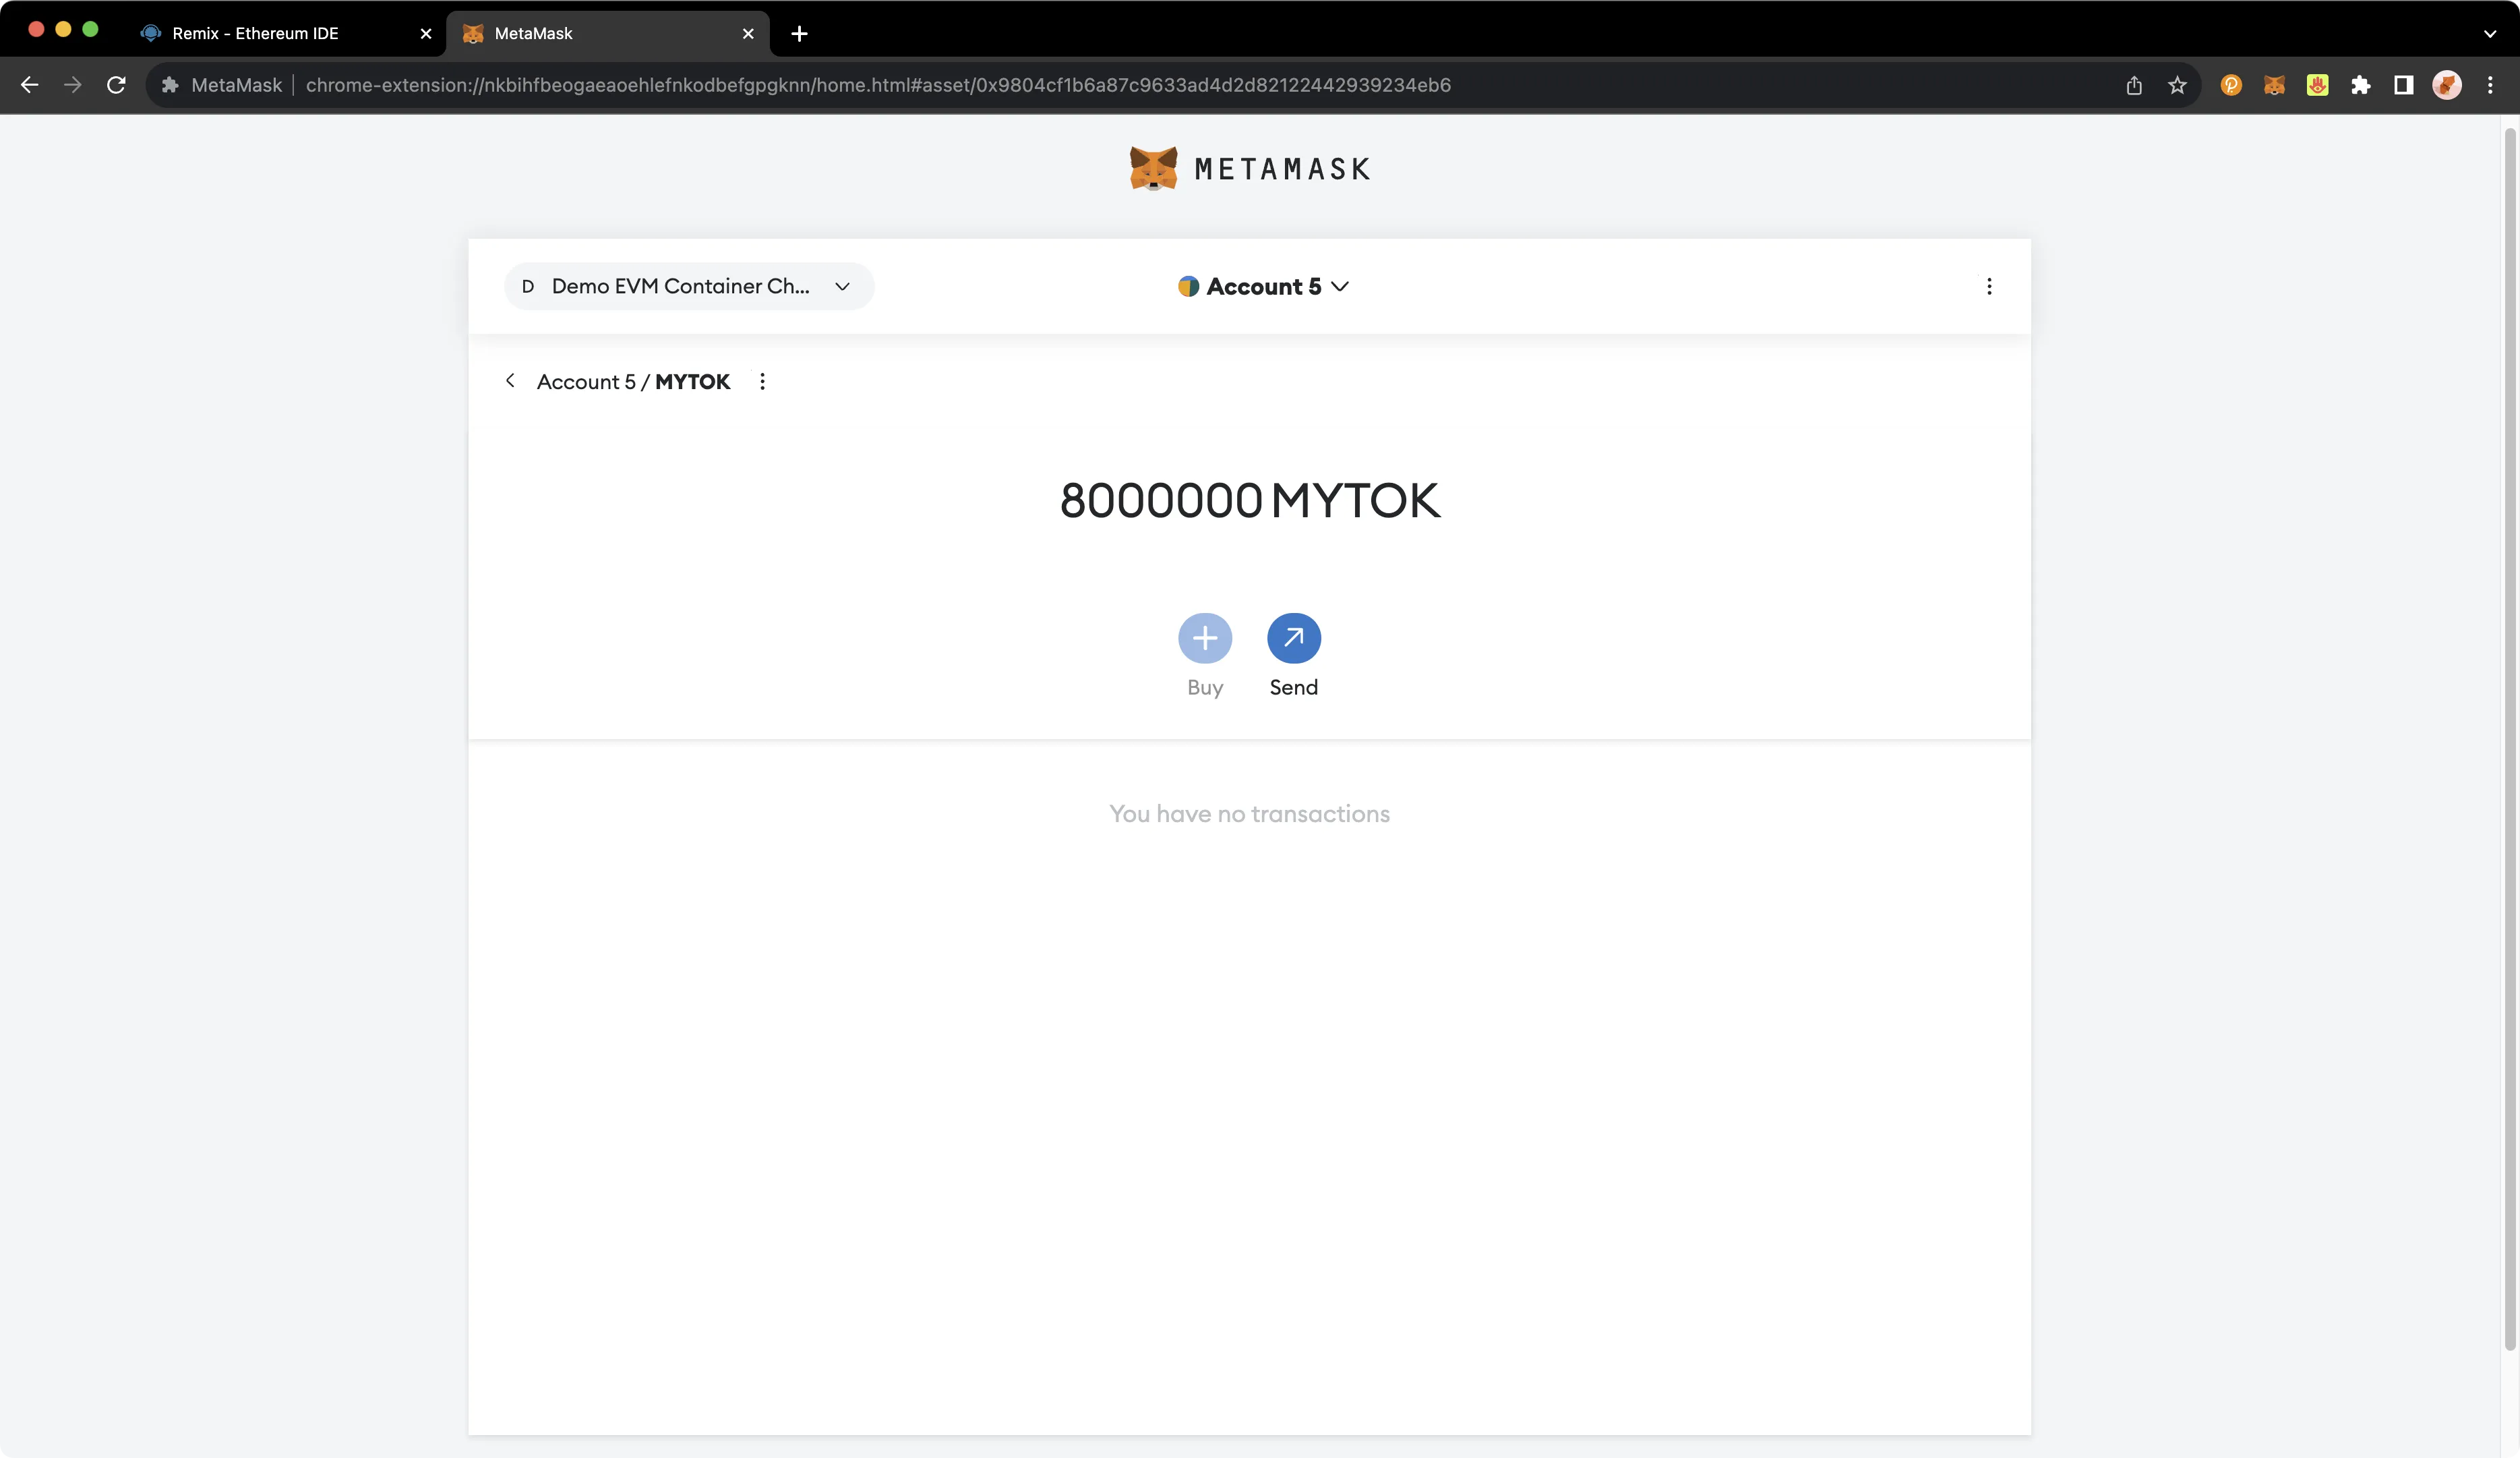
After clicking **Next**, you will need to confirm that you want to add these tokens to your MetaMask account. Click **Import** and you should see a balance of 8 million MyTokens in MetaMask:
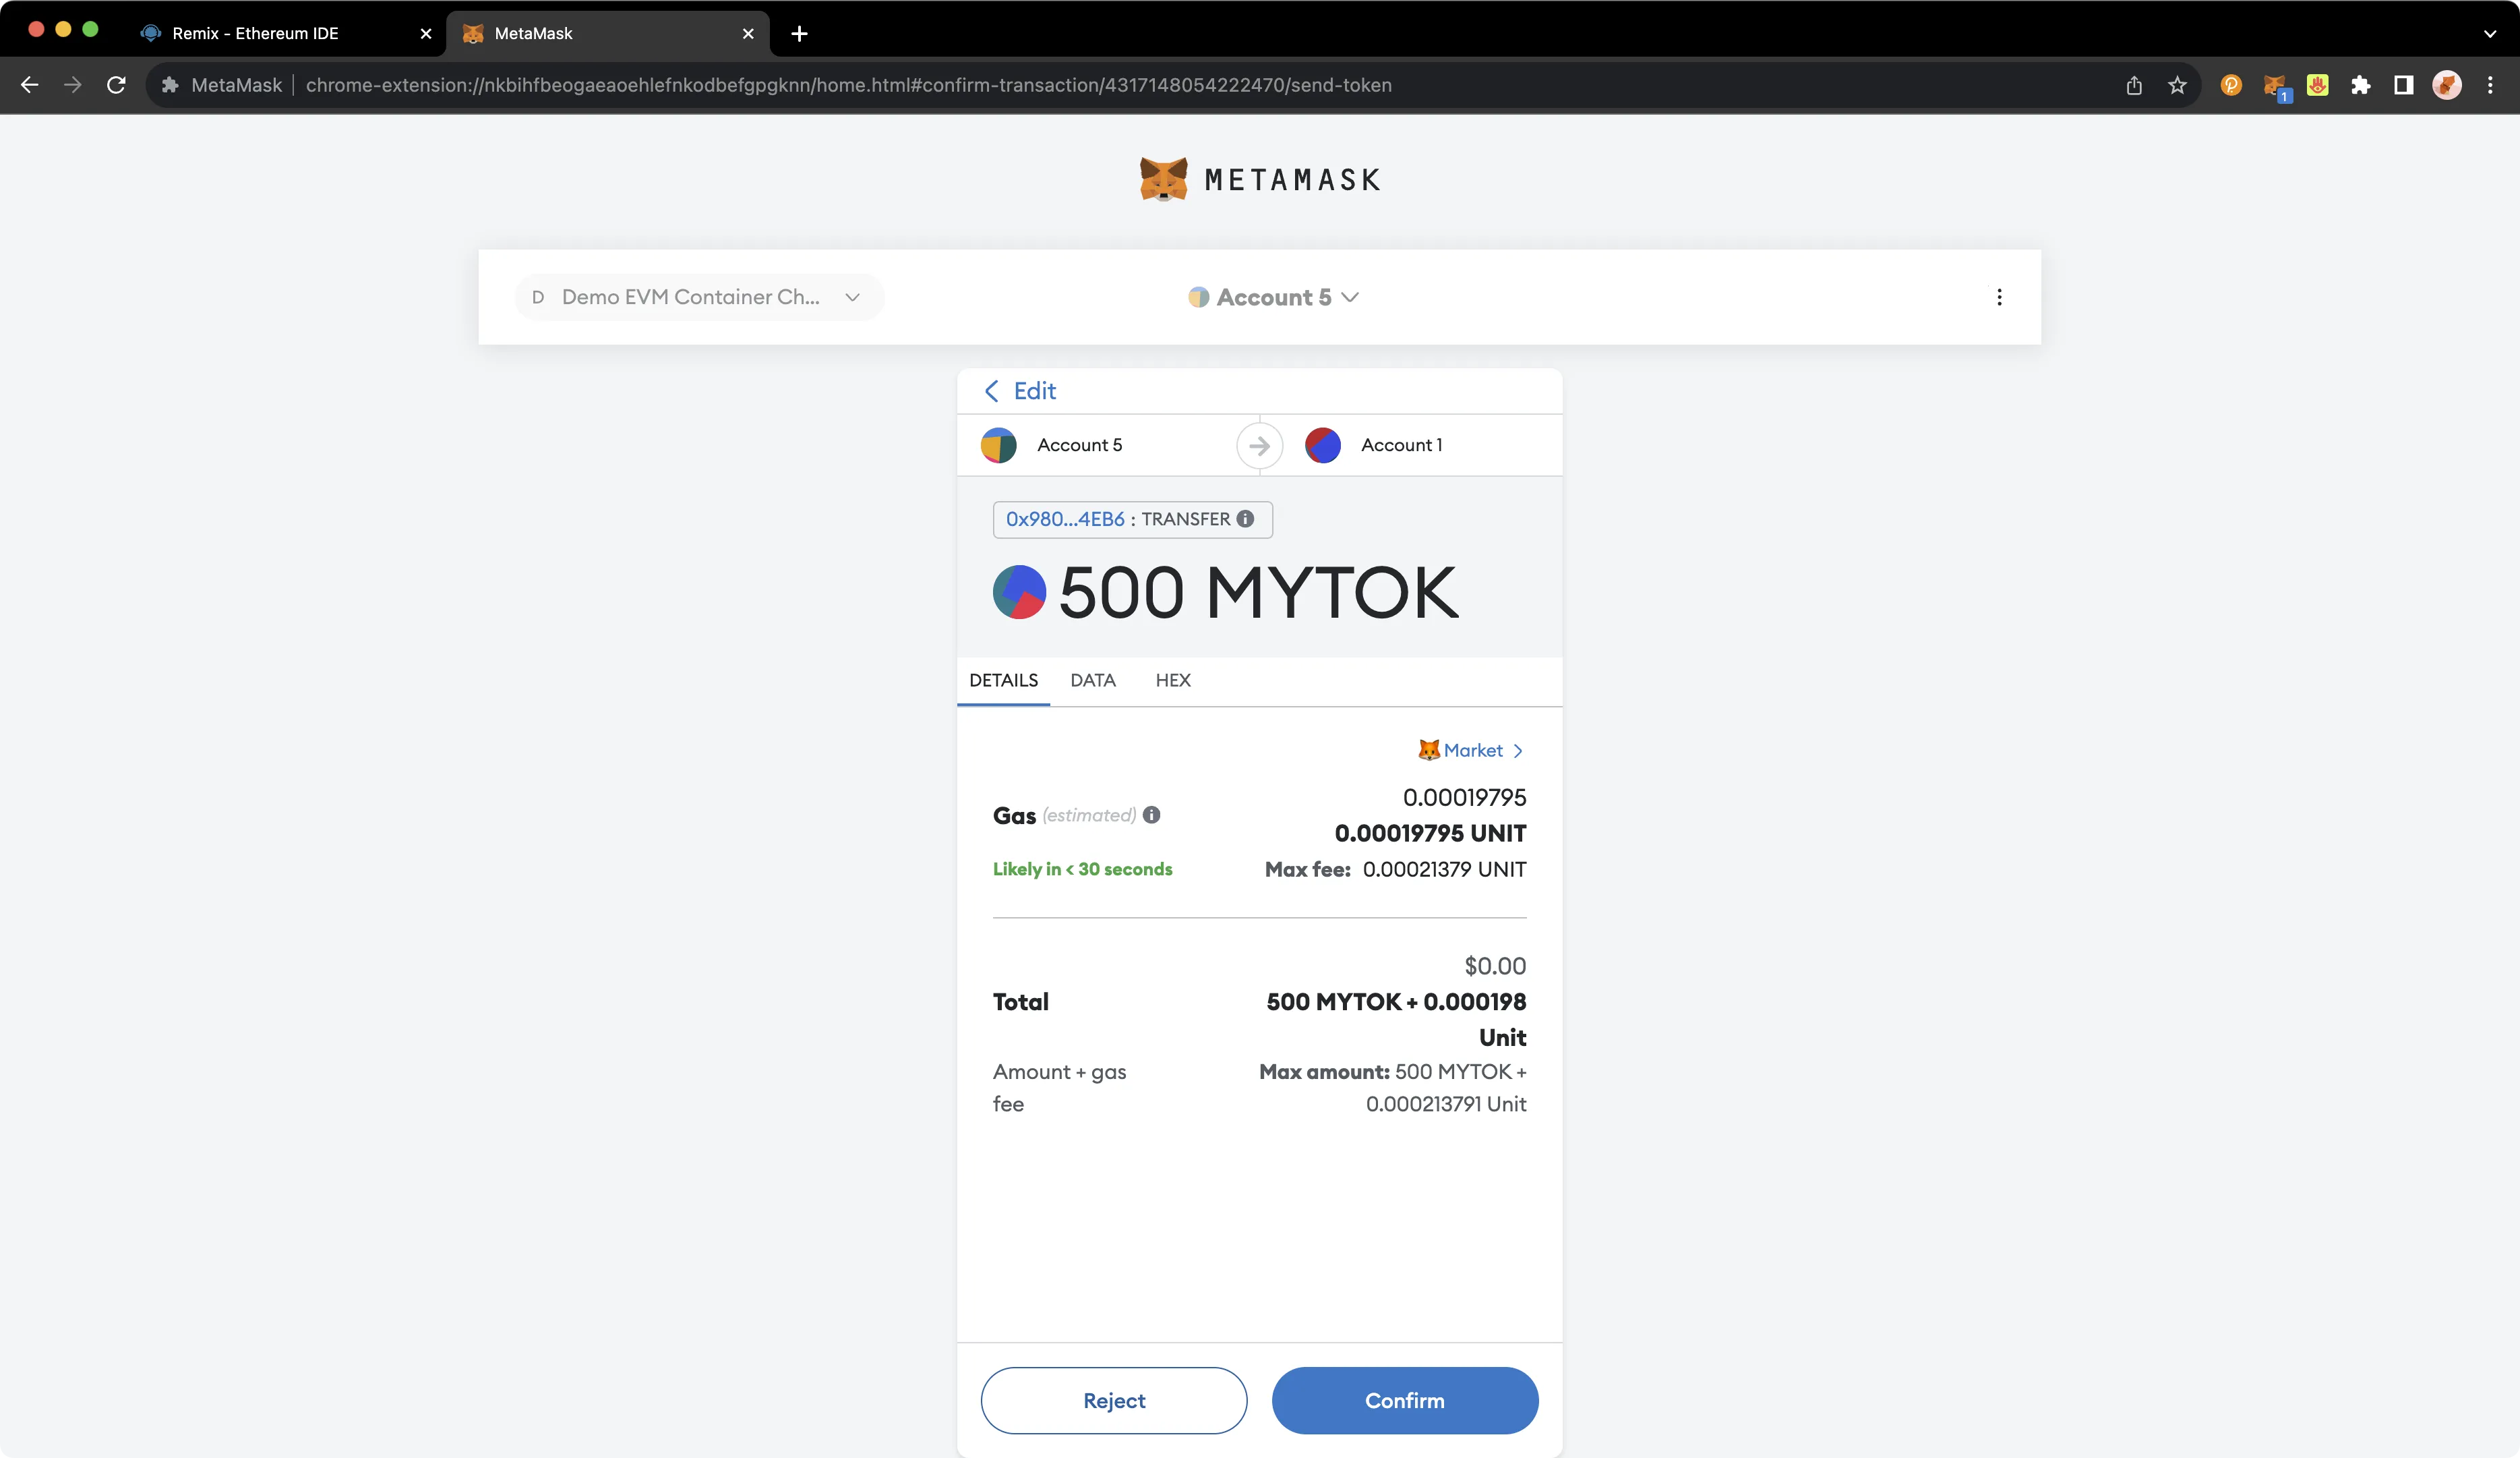
Now you can send some of these ERC-20 tokens to the other account that you have set up in MetaMask. Click **Send** to initiate the transfer of 500 MyTokens and select the destination account.
After clicking **Next**, you will be asked to confirm (similar to what is pictured below).
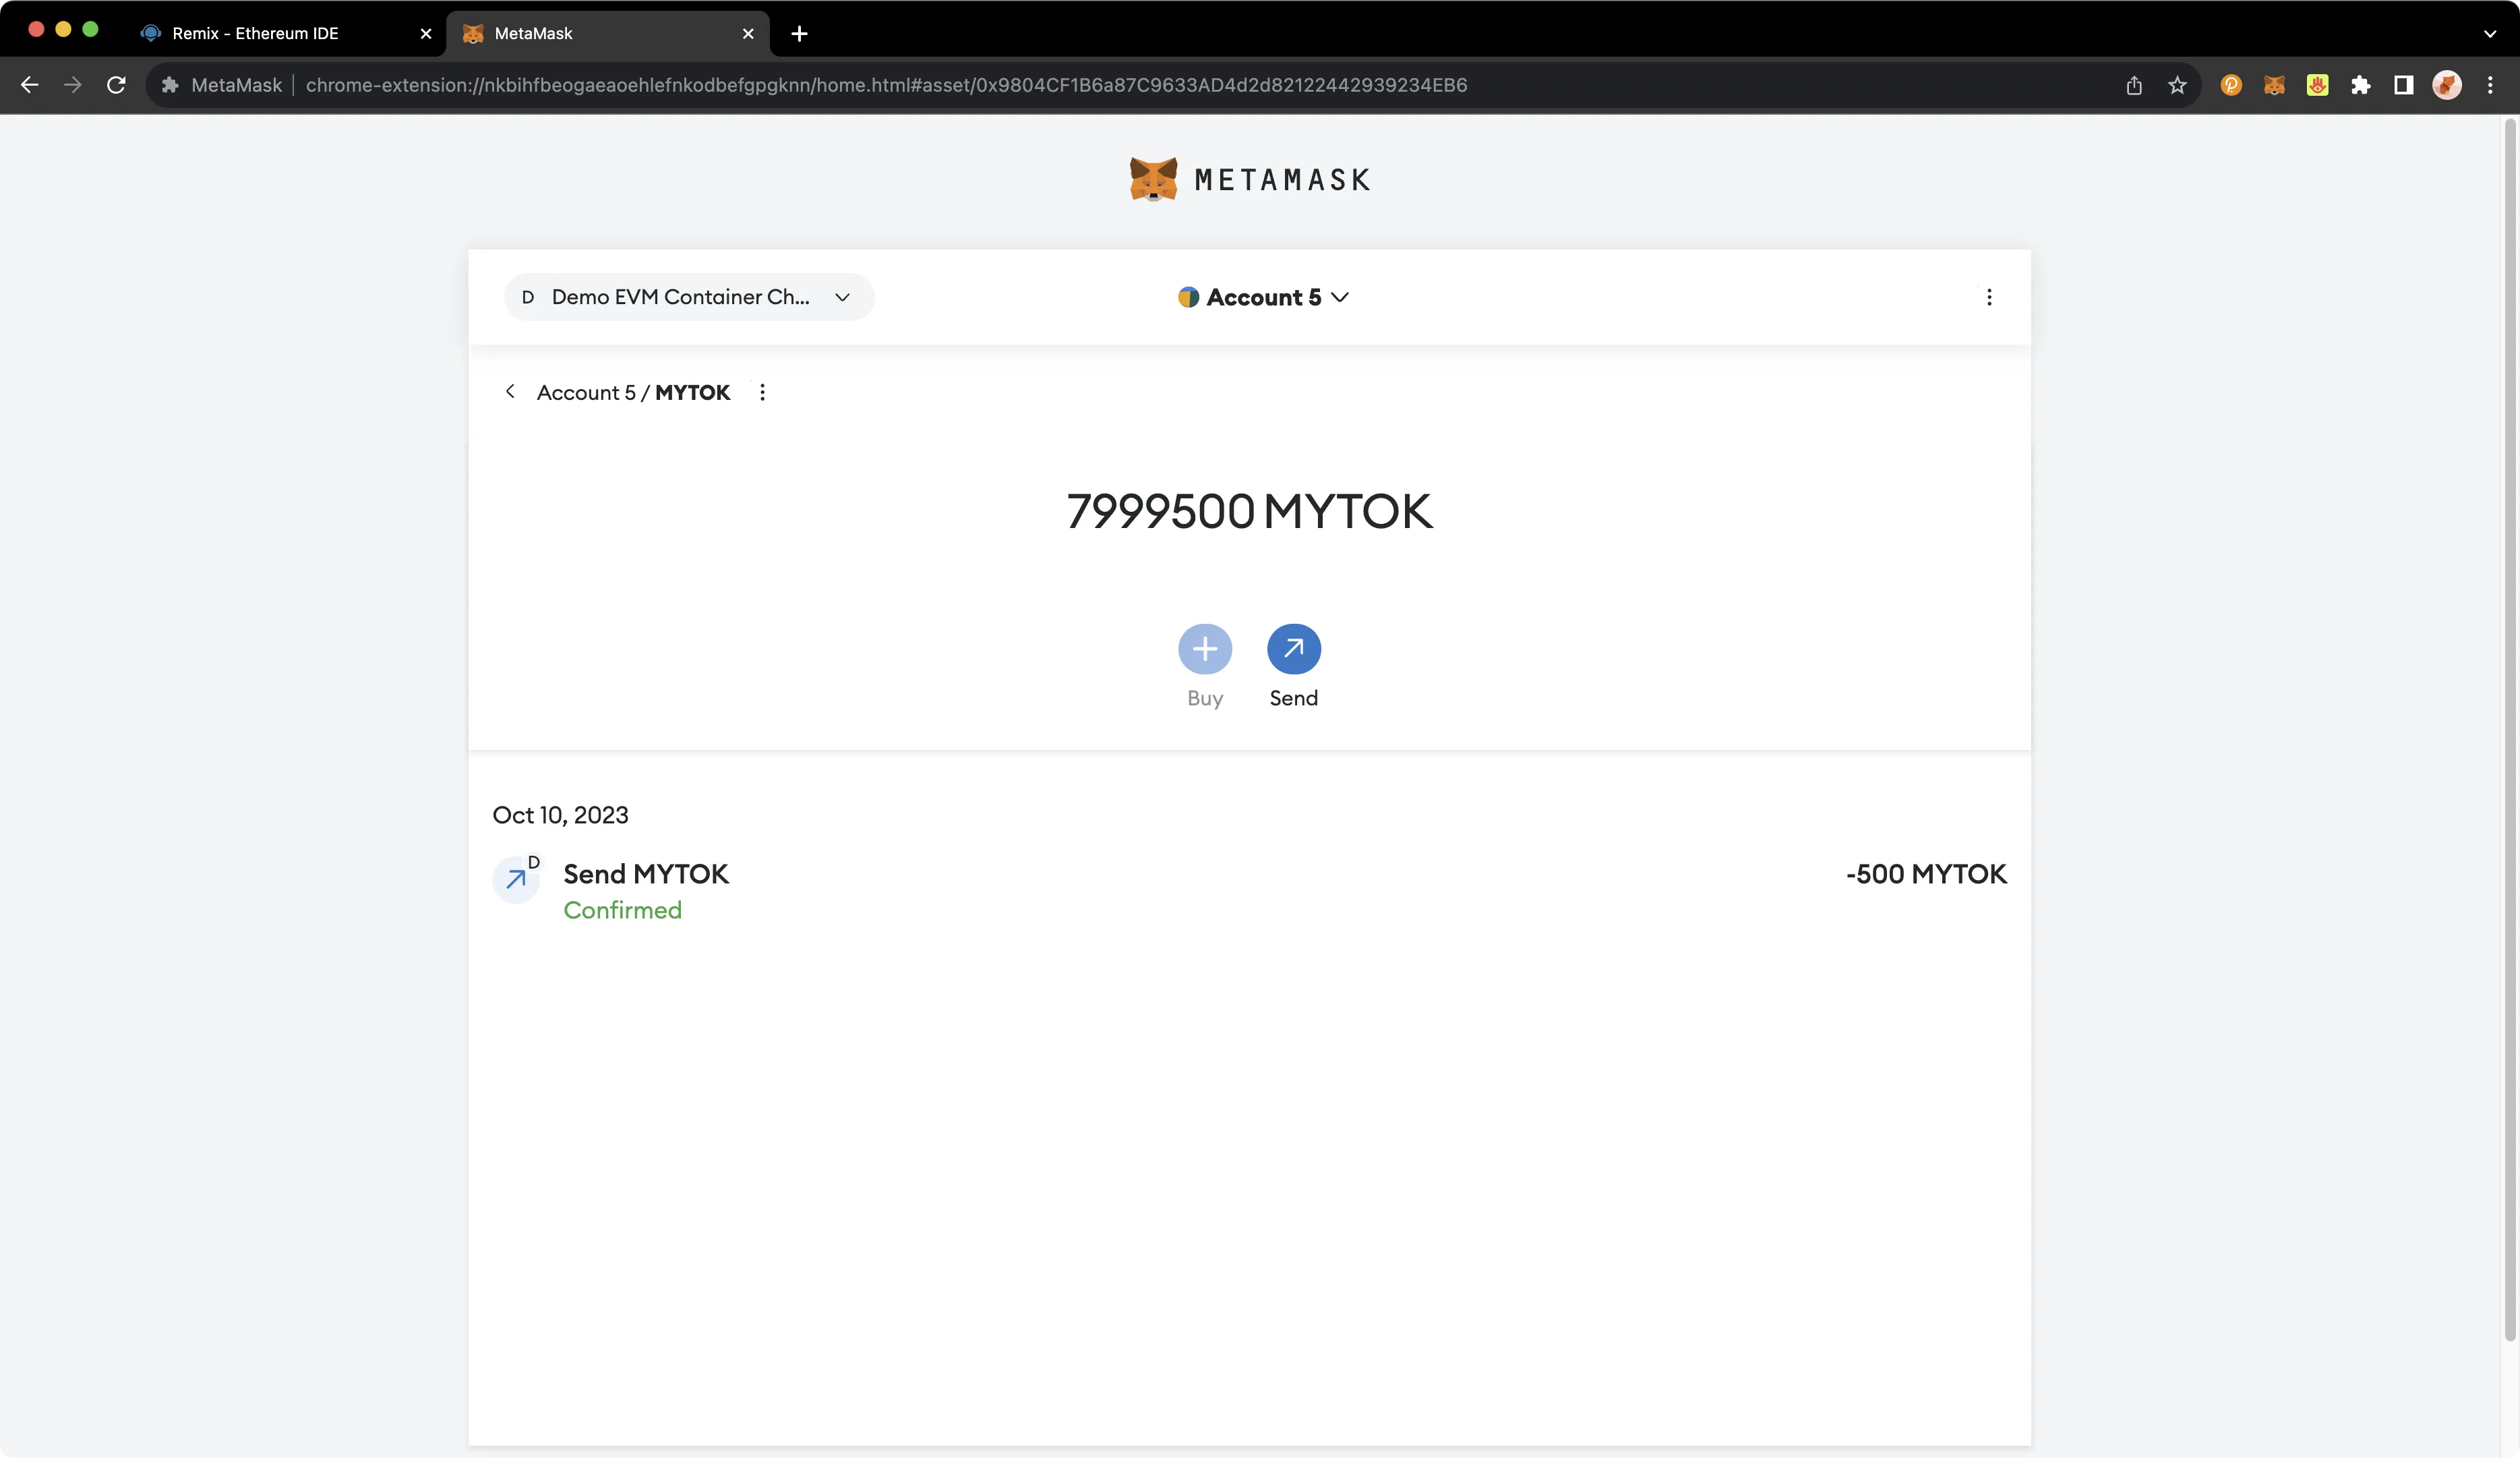
Click **Confirm** and, after the transaction is complete, you will see a confirmation and a reduction of the MyToken account balance from the sender account in MetaMask.
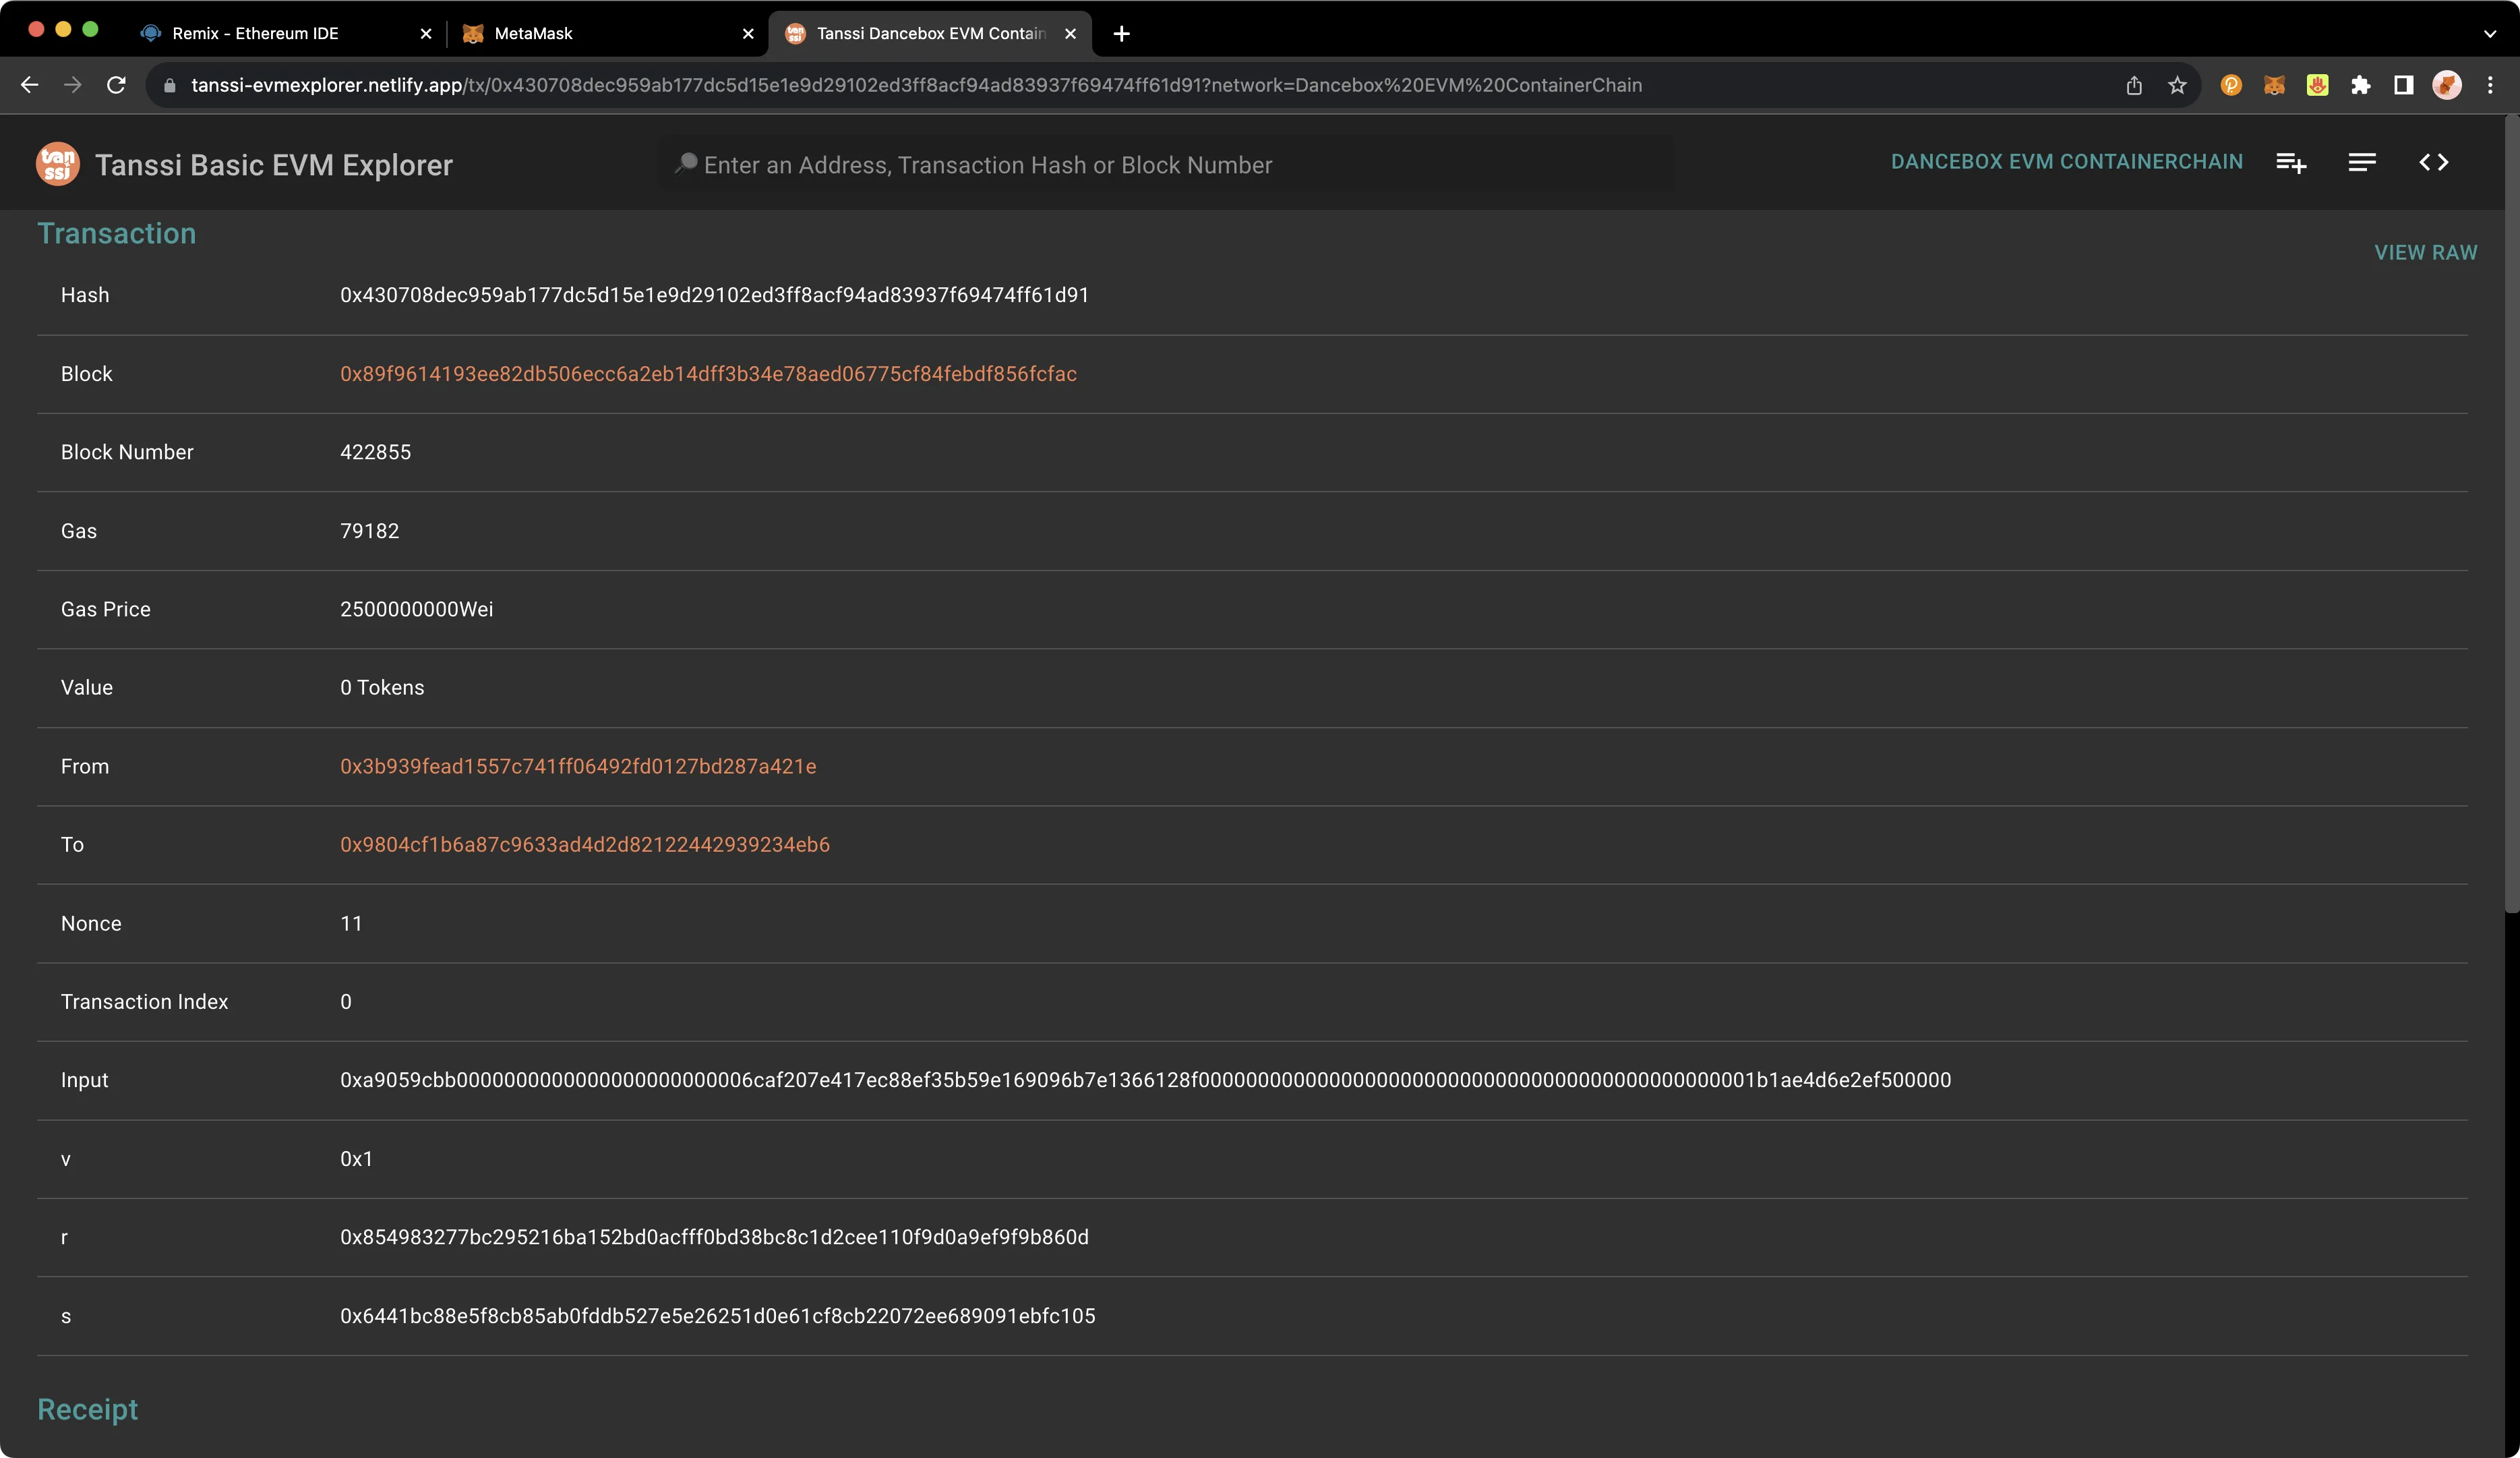
You can also look up the transaction on [your Tanssi network's explorer](https://tanssi-evmexplorer.netlify.app){target=\_blank} to verify the transaction status.
The information presented herein has been provided by third parties and is made available solely for general information purposes. Tanssi does not endorse any project listed and described on the Tanssi Doc Website (https://docs.tanssi.network/). Tanssi Foundation does not warrant the accuracy, completeness or usefulness of this information. Any reliance you place on such information is strictly at your own risk. Tanssi Foundation disclaims all liability and responsibility arising from any reliance placed on this information by you or by anyone who may be informed of any of its contents. All statements and/or opinions expressed in these materials are solely the responsibility of the person or entity providing those materials and do not necessarily represent the opinion of Tanssi Foundation. The information should not be construed as professional or financial advice of any kind. Advice from a suitably qualified professional should always be sought in relation to any particular matter or circumstance. The information herein may link to or integrate with other websites operated or content provided by third parties, and such other websites may link to this website. Tanssi Foundation has no control over any such other websites or their content and will have no liability arising out of or related to such websites or their content. The existence of any such link does not constitute an endorsement of such websites, the content of the websites, or the operators of the websites. These links are being provided to you only as a convenience and you release and hold Tanssi Foundation harmless from any and all liability arising from your use of this information or the information provided by any third-party website or service.
--- END CONTENT ---
Doc-Content: https://docs.tanssi.network/builders/toolkit/ethereum-api/dev-env/thirdweb/
--- BEGIN CONTENT ---
---
title: How to use thirdweb
description: This guide will show you some of thirdweb's features, including building, testing, and deploying smart contract templates to launch dApps on Tanssi.
icon: octicons-code-square-24
categories: EVM-Template
---
# Using thirdweb on Tanssi
## Introduction {: #introduction }
[thirdweb](https://thirdweb.com){target=\_blank} is a complete Web3 development framework that provides everything you need to develop smart contracts, build dApps, and more.
With thirdweb, you can access tools to help you through every phase of the dApp development cycle. You can create your own custom smart contracts or use any of thirdweb's prebuilt contracts to get started quickly. From there, you can use thirdweb's CLI to deploy your smart contracts. Then you can interact with your smart contracts by creating a Web3 application using the language of your choice, including but not limited to React and TypeScript.
This guide will show you some of the thirdweb features you can use to develop smart contracts and dApps on Tanssi EVM networks. To check out all of the features thirdweb has to offer, please refer to the [thirdweb documentation site](https://portal.thirdweb.com){target=\_blank}.
## Create Contract {: #create-contract }
To create a new smart contract using the [thirdweb CLI](https://portal.thirdweb.com/cli){target=\_blank}, follow these steps:
1. In your CLI, run the following command:
```bash
npx thirdweb create contract
```
2. Input your preferences for the command line prompts:
1. Give your project a name
2. Choose your preferred framework: **Hardhat** or **Foundry**
3. Name your smart contract
4. Choose the type of base contract: **Empty**, **ERC20**, **ERC721**, or **ERC1155**
5. Add any desired [extensions](https://portal.thirdweb.com/contracts/extensions){target=\_blank}
3. Once created, navigate to your project’s directory and open in your preferred code editor
4. If you open the `contracts` folder, you will find your smart contract; this is your smart contract written in Solidity
The following is code for an `ERC721Base` contract without specified extensions. It implements all of the logic inside the [`ERC721Base.sol`](https://github.com/thirdweb-dev/contracts/blob/main/contracts/base/ERC721Base.sol){target=\_blank} contract; which implements the [`ERC721A`](https://github.com/thirdweb-dev/contracts/blob/main/contracts/eip/ERC721A.sol){target=\_blank} standard.
```solidity
// SPDX-License-Identifier: MIT
pragma solidity ^0.8.0;
import '@thirdweb-dev/contracts/base/ERC721Base.sol';
contract Contract is ERC721Base {
constructor(
string memory _name,
string memory _symbol,
address _royaltyRecipient,
uint128 _royaltyBps
) ERC721Base(_name, _symbol, _royaltyRecipient, _royaltyBps) {}
}
```
This contract inherits the functionality of `ERC721Base` through the following steps:
- Importing the `ERC721Base` contract
- Inheriting the contract by declaring that your contract is an `ERC721Base` contract
- Implementing any required methods, such as the constructor
5. After modifying your contract with your desired custom logic, you can deploy it to a Tanssi EVM network using [Deploy](#deploy-contract). That will be covered in the next section!
5. After modifying your contract with your desired custom logic, you can deploy it to a Tanssi EVM network using [Deploy](#deploy-contract). That will be covered in the next section!
Alternatively, you can deploy a prebuilt contract for NFTs, tokens, or marketplace directly from the thirdweb Explore page:
1. Go to the [thirdweb Explore page](https://thirdweb.com/explore){target=\_blank}
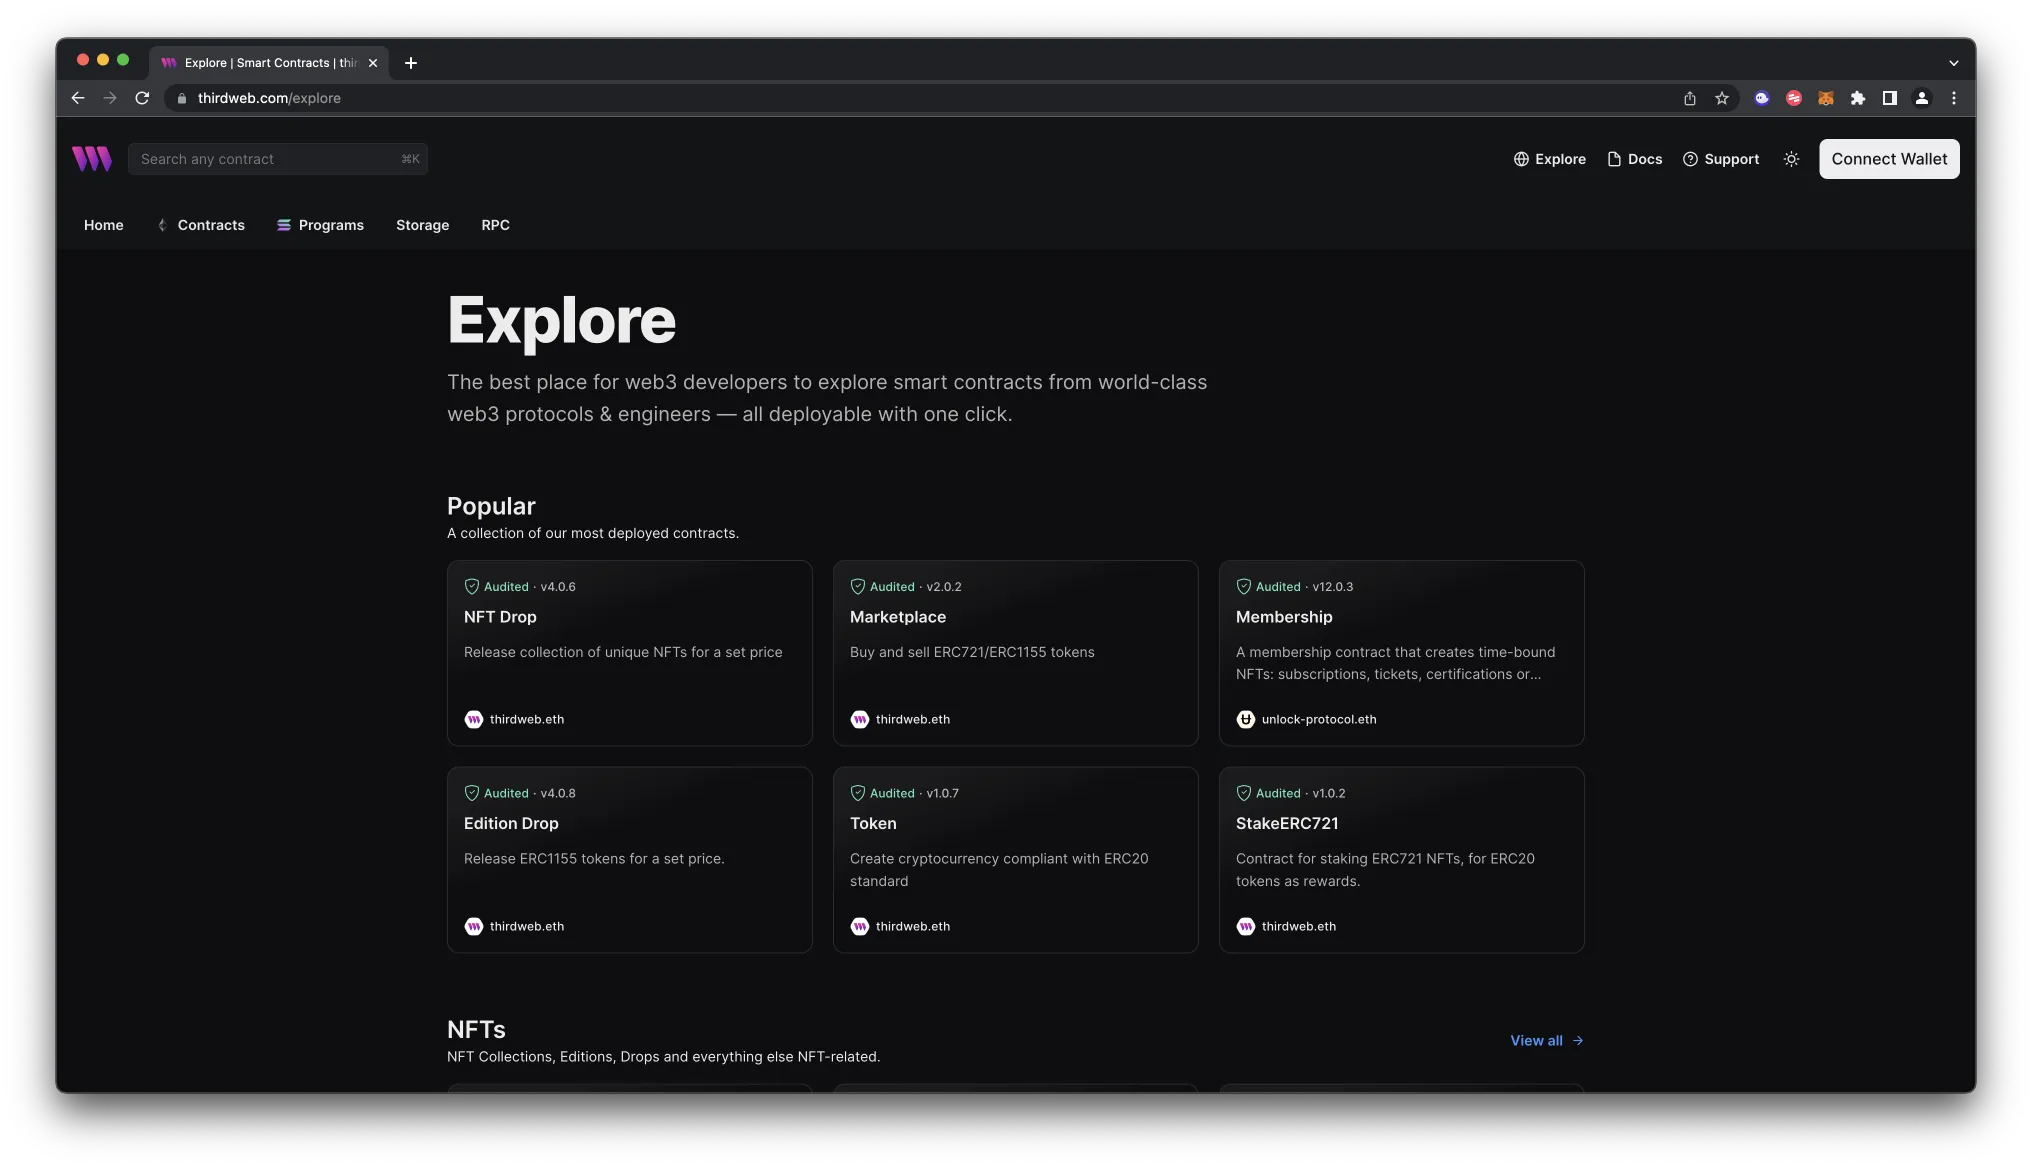
2. Choose the type of contract you want to deploy from the available options: NFTs, tokens, marketplace, and more
3. Follow the on-screen prompts to configure and deploy your contract
For more information on different contracts available on Explore, check out [thirdweb’s documentation on prebuilt contracts](https://portal.thirdweb.com/contracts){target=\_blank}.
## Deploy Contract {: #deploy-contract }
Deploy is thirdweb's tool that allows you to easily deploy a smart contract to any EVM compatible network without configuring RPC URLs, exposing your private keys, writing scripts, and other additional setup such as verifying your contract.
Deploy is thirdweb's tool that allows you to easily deploy a smart contract to any EVM compatible network without configuring RPC URLs, exposing your private keys, writing scripts, and other additional setup such as verifying your contract.
1. To deploy your smart contract using deploy, navigate to the `contracts` directory of your project and execute the following command:
```bash
npx thirdweb deploy
```
Executing this command will trigger the following actions:
- Compiling all the contracts in the current directory
- Providing the option to select which contract(s) you wish to deploy
- Uploading your contract source code (ABI) to IPFS
2. When it is completed, it will open a dashboard interface to finish filling out the parameters
- `_name` - contract name
- `_symbol` - symbol or "ticker"
- `_royaltyRecipient` - wallet address to receive royalties from secondary sales
- `_royaltyBps` - basis points (bps) that will be given to the royalty recipient for each secondary sale, e.g. 500 = 5%
3. Select the desired network, e.g., the Tanssi demo EVM network or your own network
4. Manage additional settings on your contract’s dashboard as needed such as uploading NFTs, configuring permissions, and more
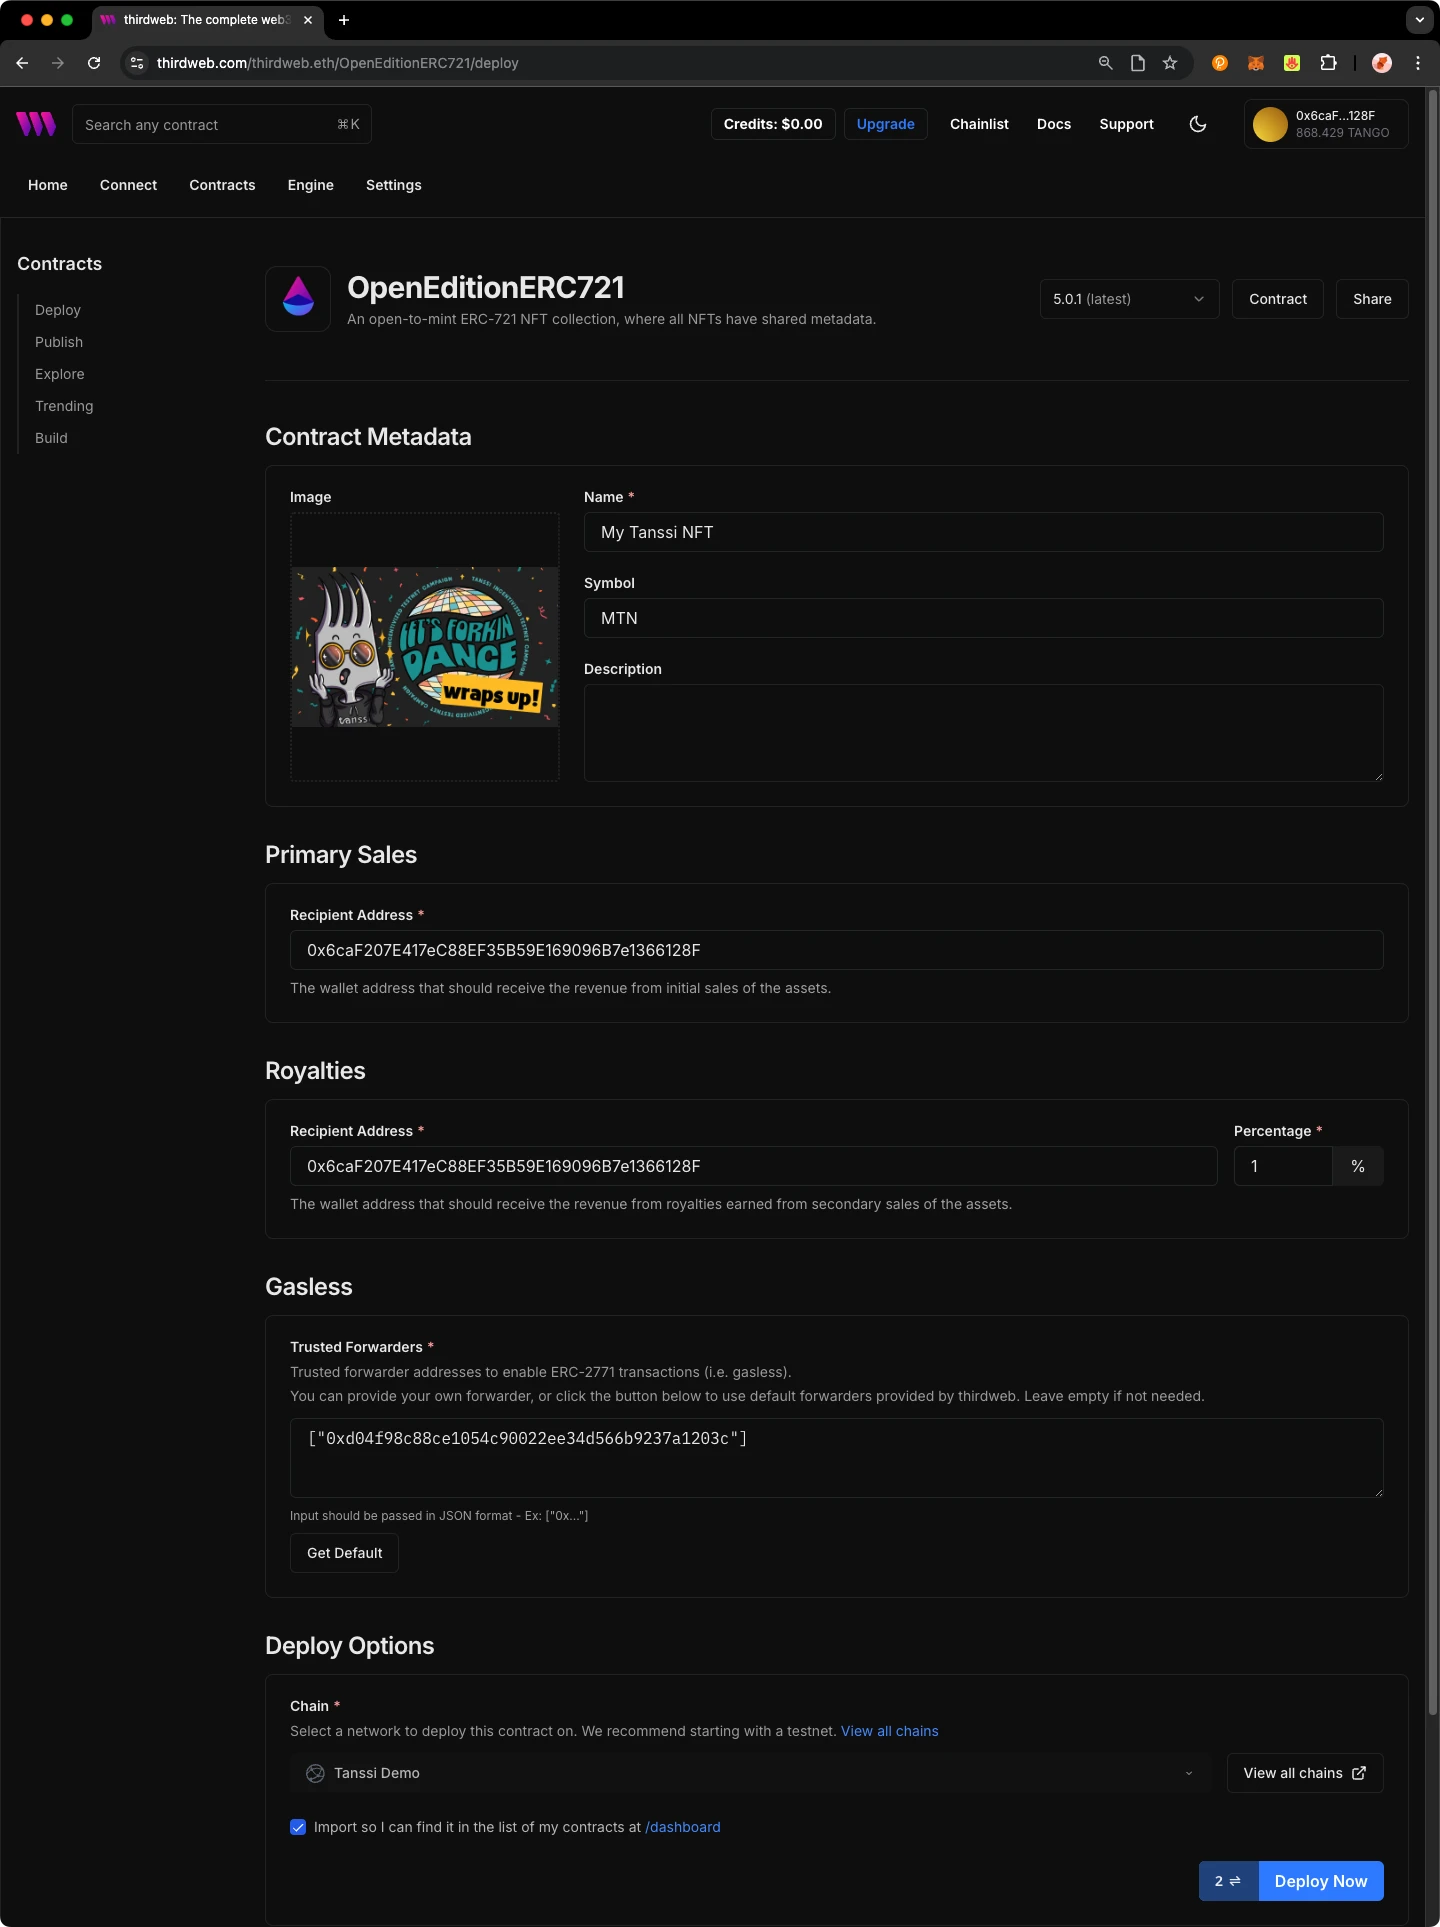
For additional information on Deploy, please reference [thirdweb’s documentation](https://portal.thirdweb.com/contracts/){target=\_blank}.
## Create Application {: #create-application }
thirdweb offers SDKs for a range of programming languages, such as React, React Native, TypeScript, and Unity. You'll start off by creating an application and then you can choose which SDK to use:
1. In your CLI run the following command:
```bash
npx thirdweb create --app
```
2. Input your preferences for the command line prompts:
1. Give your project a name
2. Choose your preferred framework: **Next.js**, **Vite**, or **React Native**. For this example, select **Vite**
3. Use the React or TypeScript SDK to interact with your application’s functions. This will be covered in the following section on interacting with a contract
### Specify Client ID {: #specify-client-id }
Before you launch your dApp (locally or publicly deployed), you must have a thirdweb Client ID associated with your project. A thirdweb Client ID is synonymous with an API key. You can create a free API key by [signing into your thirdweb account, navigating to **Settings**, and clicking on **API Keys**](https://thirdweb.com/dashboard/settings/api-keys){target=\_blank}.
Press **Create API Key** then take the following steps:
1. Give your API key a name
2. Enter the allowed domains that the API key should accept requests from. It's recommended that you allow only necessary domains, but for development purposes, you can select **Allow all domains**
3. Press **Next** and confirm the prompt on the next page
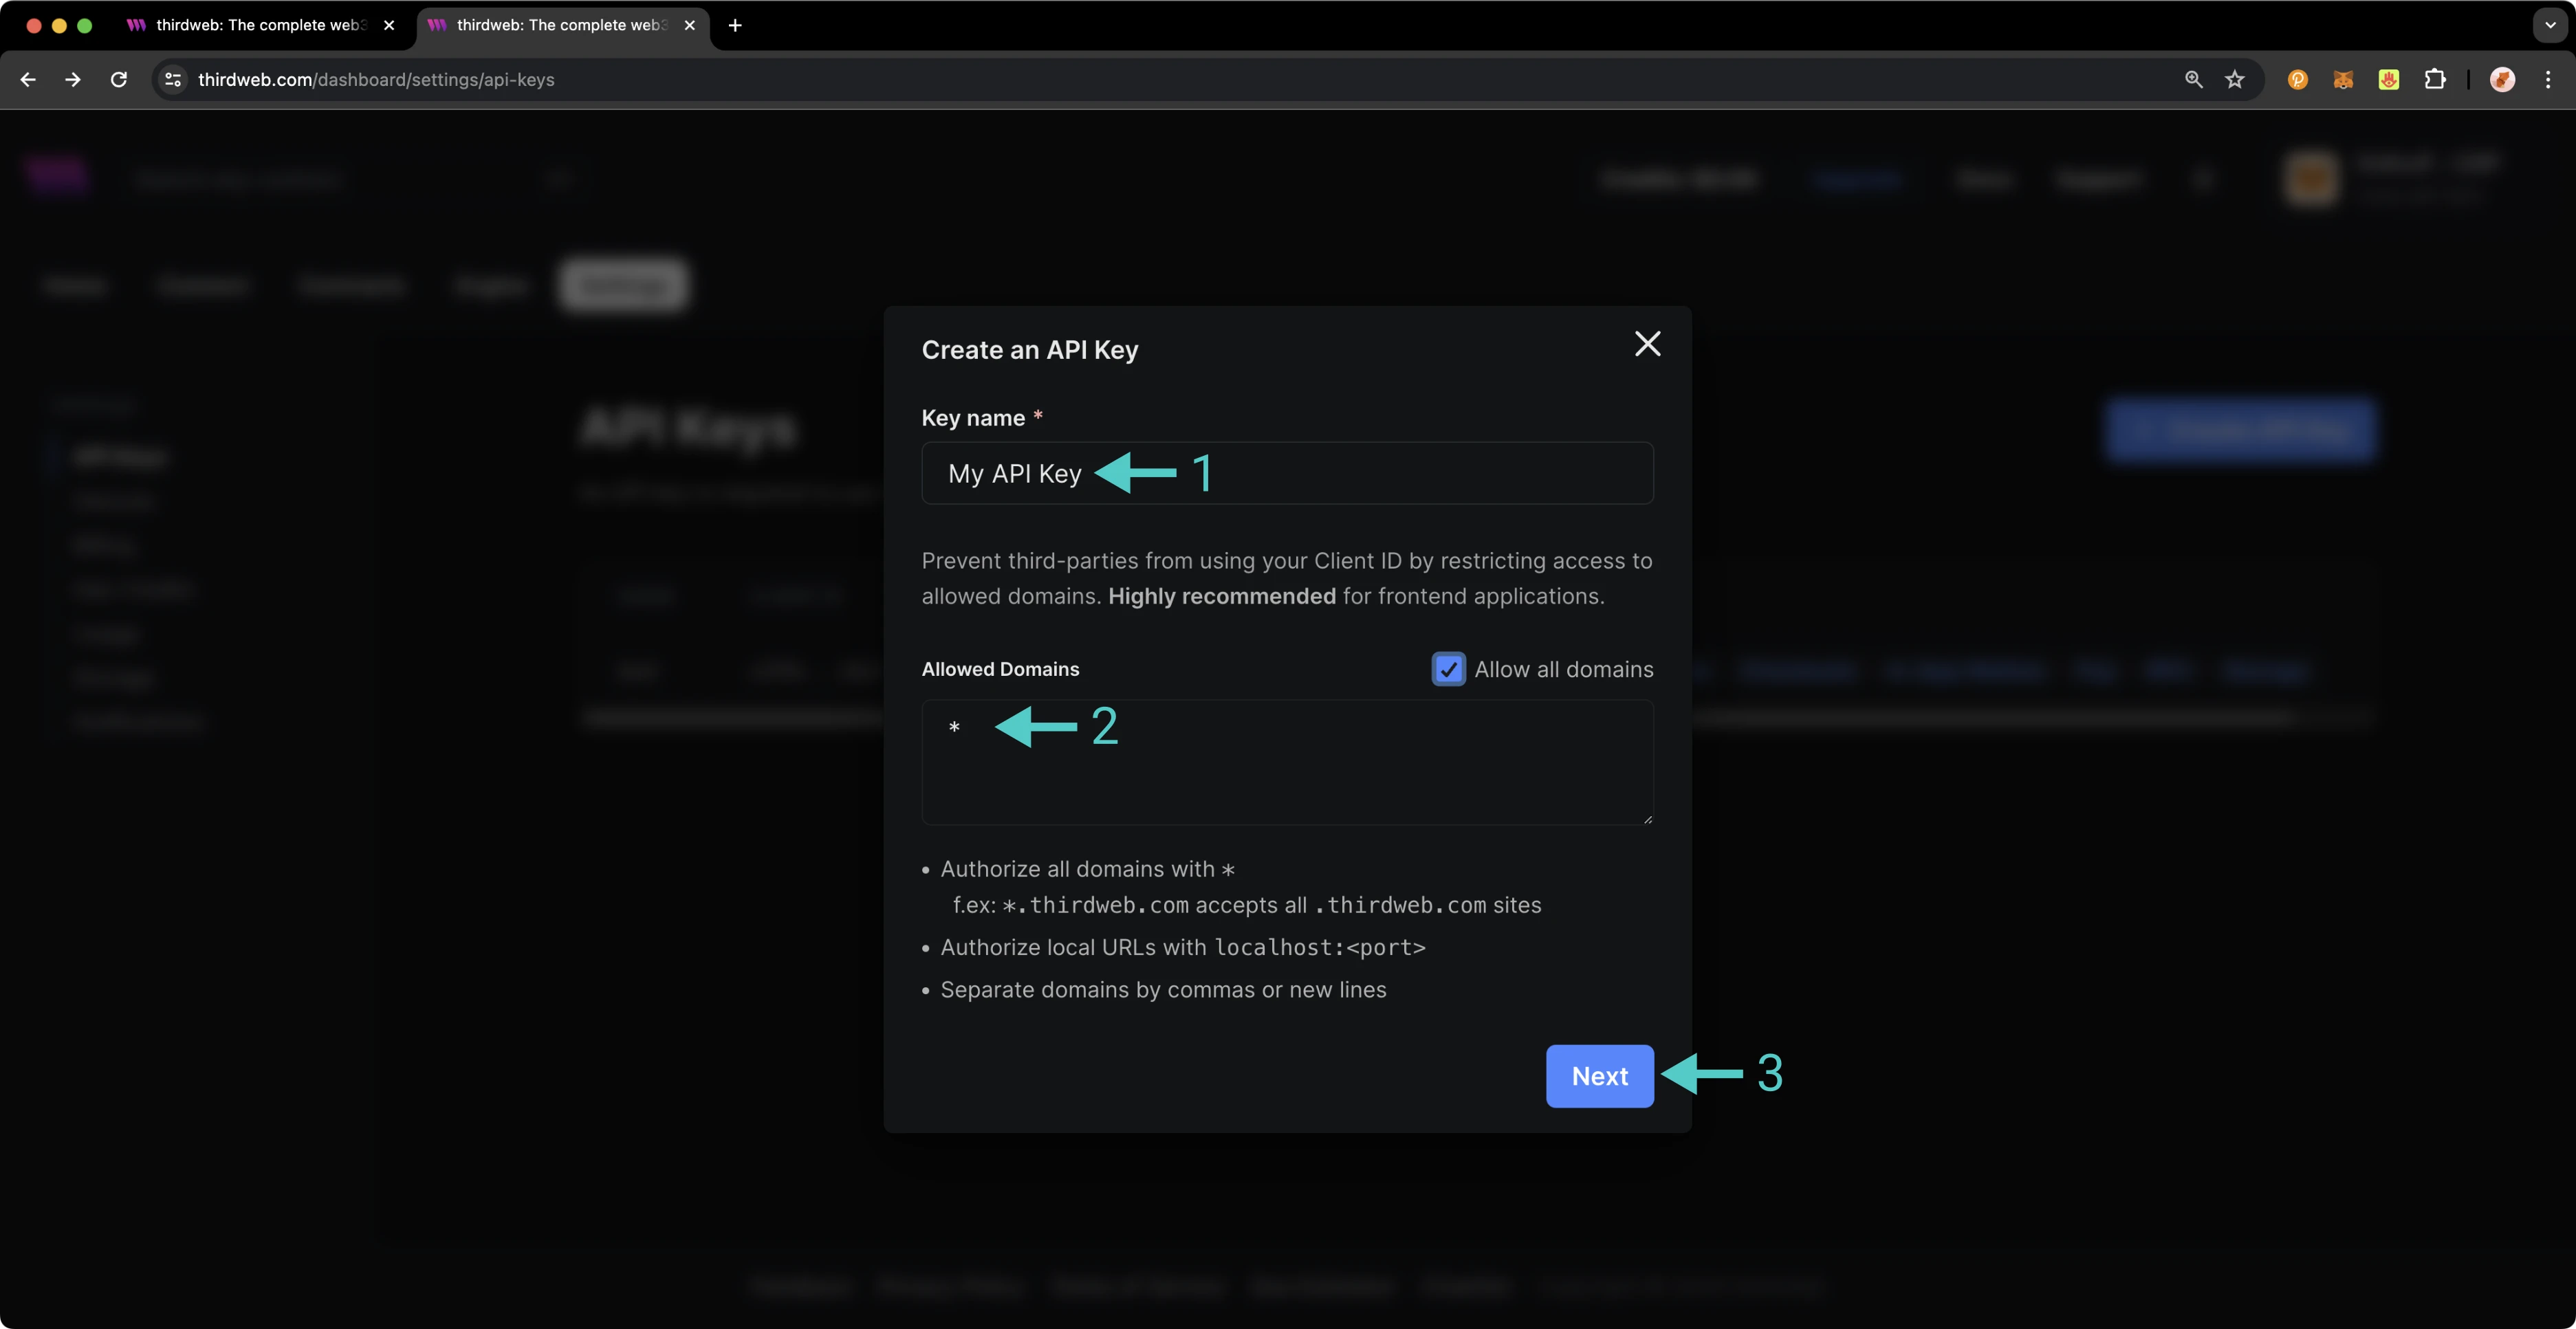
!!! note
The respective name for your Client ID variable will vary with the framework you've chosen, e.g., Vite will be `VITE_TEMPLATE_CLIENT_ID`, Next.js will be `NEXT_PUBLIC_TEMPLATE_CLIENT_ID`, and React Native will be `EXPO_PUBLIC_THIRDWEB_CLIENT_ID`.
Finally, specify your Client ID (API Key) in your `.env` file. Your `.env` file must be located at the root directory of the project (e.g., not the `src` folder).
If you generated your thirdweb app with Vite, you'll have a `client.ts` file that looks like the below. As long you've created a `.env` file with your thirdweb API Key (Client ID) defined in `VITE_TEMPLATE_CLIENT_ID`, you can leave the `client.ts` as is and proceed to the next section.
```typescript title="client.ts"
import { createThirdwebClient } from 'thirdweb';
// Replace this with your client ID string.
// Refer to https://portal.thirdweb.com/typescript/v5/client on how to get a client ID
const clientId = import.meta.env.VITE_TEMPLATE_CLIENT_ID;
export const client = createThirdwebClient({
clientId: clientId,
});
```
!!! note
If you don't create a Client ID and specify is correctly in your `.env` file, you'll get a blank screen when trying to build the web app. There is no error message shown without digging into the console, so ensure you've set your Client ID correctly first and foremost.
### Run Locally {: #run-locally }
To run your dApp locally for testing and debugging purposes, use the command:
```bash
yarn dev
```
The app will compile and specify the localhost and port number for you to visit in your browser.
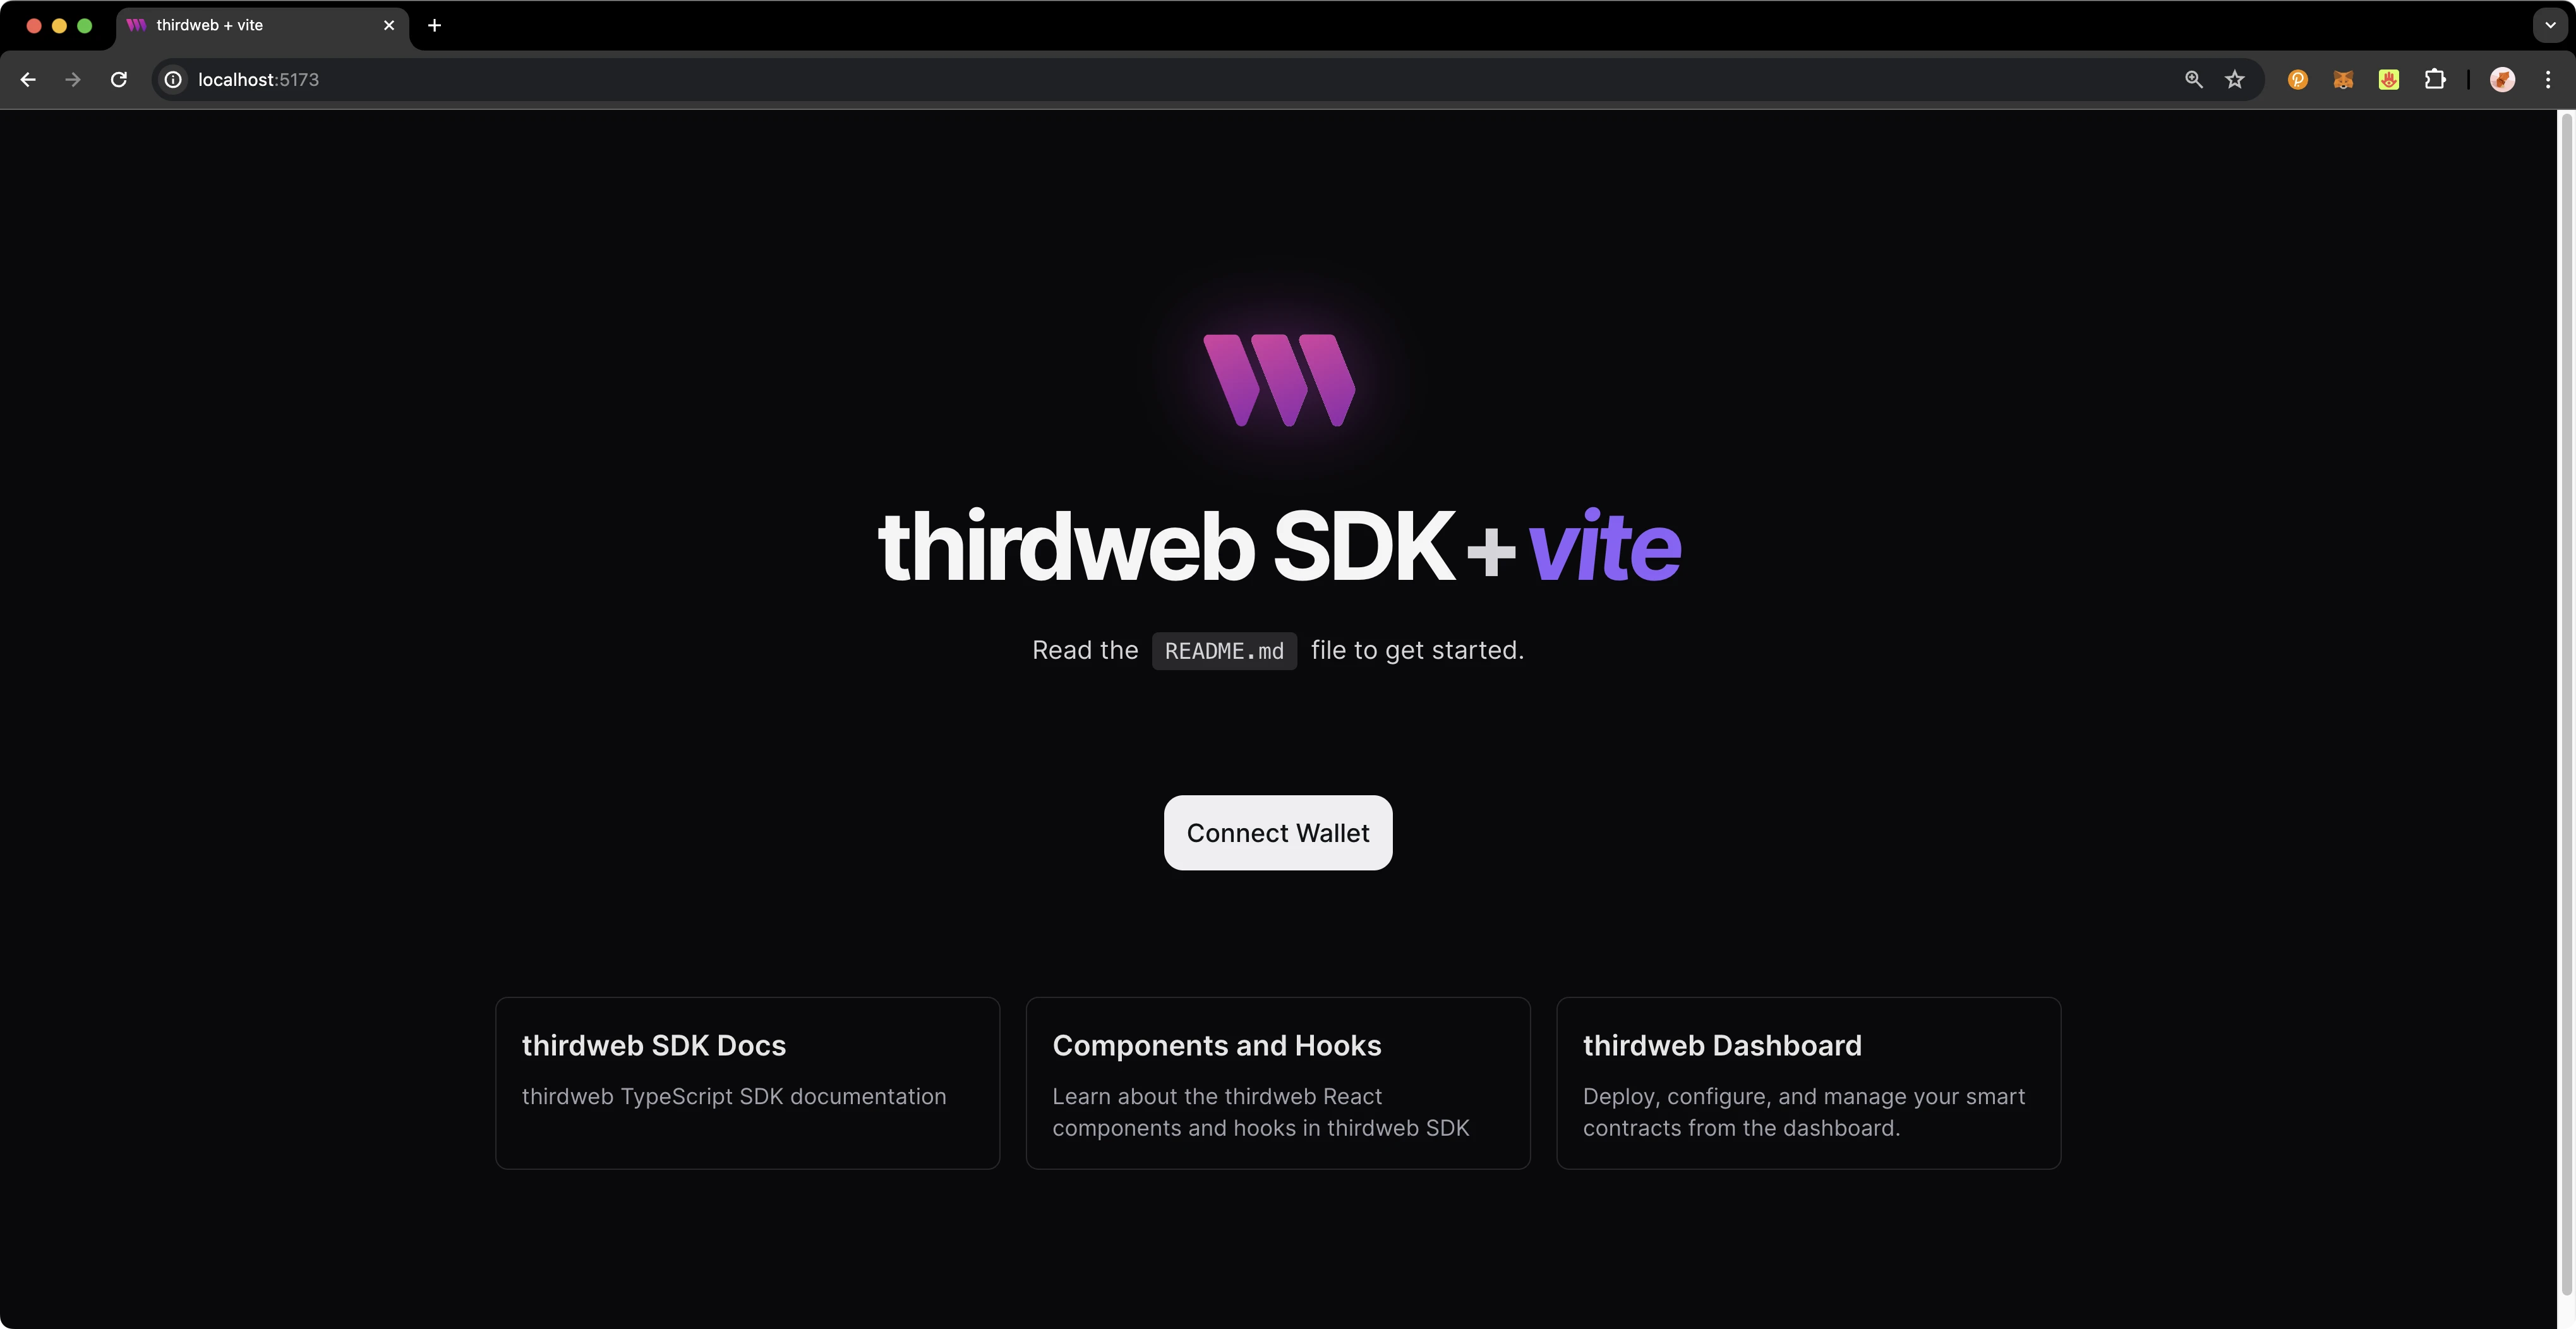
### Configure Chain {: #configure-chain }
thirdweb offers a small number of chains from `@thirdweb/chains` and does not include Tanssi networks in that list, so you'll need to specify the network details including chain ID and RPC URL. You can create a custom chain with [`defineChain`](https://portal.thirdweb.com/references/typescript/v5/defineChain){target=\_blank} as follows:
```typescript title="chains.ts"
import { defineChain } from 'thirdweb';
const tanssi = defineChain({
id: {{ networks.dancelight.demo_evm_chain_id }},
rpc: '{{ networks.dancelight.demo_evm_rpc_url }}',
});
```
## thirdweb SDK {: #thirdweb-sdk }
The following sections will provide an overview of fundamental methods of the thirdweb SDK and how to interact with them. Each code snippet will showcase the relevant import statements and demonstrate using the method in a typical scenario. This guide is intended to be a quick reference guide to the most common thirdweb methods that dApp developers will use. However, it does not include information on each and every thirdweb offering. For details on the entirety of thirdweb's offerings, be sure to visit the [thirdweb documentation site](https://portal.thirdweb.com/){target=\_blank}.
### Accounts and Wallets {: #accounts-and-wallets }
thirdweb distinguishes between accounts and wallets in the SDK. In the eyes of the thirdweb SDK, an account always has a single blockchain address and can sign messages, transactions, and typed data, but it cannot be "connected" or "disconnected." In contrast, a wallet contains one or more accounts, can be connected or disconnected, and delegates the signing tasks to its accounts.
The below code snippet demonstrates how to initialize and connect a MetaMask wallet using the thirdweb SDK, then sign and send a transaction, retrieving the transaction hash. This process is applicable to any of the 300+ wallet connectors supported by the SDK.
???+ code "initialize.ts"
```typescript
import { sendTransaction } from 'thirdweb';
// MetaMask wallet used for example, the pattern is the same for all wallets
import { createWallet } from 'thirdweb/wallets';
// Initialize the wallet. thirdweb supports 300+ wallet connectors
const wallet = createWallet('io.metamask');
// Connect the wallet. This returns a promise that resolves to the connected account
const account = await wallet.connect({
// Pass the client you created with `createThirdwebClient()`
client,
});
// Sign and send a transaction with the account. Returns the transaction hash
const { transactionHash } = await sendTransaction({
// Assuming you have called `prepareTransaction()` or `prepareContractCall()` before, which returns the prepared transaction to send
transaction,
// Pass the account to sign the transaction with
account,
});
```
### Get Contract {: #get-contract }
To connect to your contract, use the SDK’s [`getContract`](https://portal.thirdweb.com/references/typescript/v5/getContract){target=\_blank} method. As an example, you could fetch data from an [incrementer contract on the Tanssi demo EVM network]({{ networks.dancelight.demo_evm_blockscout_url }}address/0xC12f6fA2d1CA8f875bD25555e8883f1dDa40a93D?tab=contract){target=\_blank}.
```typescript
import { getContract } from 'thirdweb';
import { client } from './client';
const myContract = getContract({
client,
chain: tanssi,
address: 0xC12f6fA2d1CA8f875bD25555e8883f1dDa40a93D, // Incrementer contract address on demo EVM network
abi: '[{"inputs":[],"name":"increment","outputs":[],"stateMutability":"nonpayable","type":"function"},{"inputs":[],"name":"number","outputs":[{"internalType":"uint256","name":"","type":"uint256"}],"stateMutability":"view","type":"function"},{"inputs":[],"name":"timestamp","outputs":[{"internalType":"uint256","name":"","type":"uint256"}],"stateMutability":"view","type":"function"}]';
});
```
### Calling Contract Functions {: #calling-contract-functions }
To call a contract in the latest version of the SDK, you can use [`prepareContractCall`](https://portal.thirdweb.com/typescript/v5/transactions/prepare){target=\_blank}.
```typescript
import { prepareContractCall, toWei } from 'thirdweb';
const tx = prepareContractCall({
contract,
// Pass the method signature that you want to call
method: 'function mintTo(address to, uint256 amount)',
// Pass the params for that method.
// Their types are automatically inferred based on the method signature
params: ['0x123...', toWei('100')],
});
```
Returning to our [incrementer contract]({{ networks.dancelight.demo_evm_blockscout_url }}address/0xC12f6fA2d1CA8f875bD25555e8883f1dDa40a93D?tab=contract){target=\_blank}, preparing a call to increment the contract looks like the following:
```typescript
import { prepareContractCall } from 'thirdweb';
const tx = prepareContractCall({
contract,
// Pass the method signature that you want to call
method: 'function increment()',
// Increment takes no params so we are leaving an empty array
params: [],
});
```
### Preparing Raw Transactions {: #preparing-raw-transactions }
You can also prepare a transaction directly with encoded data. To do so, you'll use thirdweb's [`prepareTransaction` method](https://portal.thirdweb.com/typescript/v5/transactions/prepare){target=\_blank} and specify the `to`, `value`, `chain`, and `client` values directly.
```typescript
import { prepareTransaction, toWei } from 'thirdweb';
const transaction = prepareTransaction({
// The account that will be the receiver
to: '0x456...',
// The value is the amount of ether you want to send with the transaction
value: toWei('1'),
// The chain to execute the transaction on. This assumes you already set up
// the Tanssi demo EVM network as a custom chain, as shown in the configure chain section
chain: tanssi,
// Your thirdweb client
client,
});
```
### Reading Contract State {: #read-contract-state }
Use the [`readContract` function](https://portal.thirdweb.com/typescript/v5/transactions/read){target=\_blank} to call any read functions on your contract by passing in the Solidity method signature and any parameters.
```typescript
import { readContract } from 'thirdweb';
const balance = await readContract({
contract: contract,
method: 'function balanceOf(address) view returns (uint256)',
params: ['0x123...'],
});
```
For a function that takes no parameters, such as the number function that returns the current number stored in the [incrementer contract]({{ networks.dancelight.demo_evm_blockscout_url }}address/0xC12f6fA2d1CA8f875bD25555e8883f1dDa40a93D?tab=contract){target=\_blank}, you simply need to provide the function name as follows:
```typescript
import { readContract } from 'thirdweb';
const number = await readContract({
contract: contract,
method: 'number',
params: [],
});
```
Did you know? With the [thirdweb CLI](https://portal.thirdweb.com/cli){target=\_blank}, you can easily generate functions for all of the possible calls to a contract. To do so, run the following command in the command line:
```bash
npx thirdweb generate INSERT_CHAIN_ID/INSERT_CONTRACT_ADDRESS
```
Both the chain ID and the contract address are required. As an example, if you wanted to generate the functions for the [incrementer contract on the Tanssi demo EVM network]({{ networks.dancelight.demo_evm_blockscout_url }}address/0xC12f6fA2d1CA8f875bD25555e8883f1dDa40a93D?tab=contract){target=\_blank} , you would use the following command:
```bash
npx thirdweb generate {{ networks.dancelight.demo_evm_chain_id }}/0xC12f6fA2d1CA8f875bD25555e8883f1dDa40a93D
```
The file generated with all of the corresponding methods will be placed in a directory labelled `thirdweb/CHAIN_ID/CONTRACT_ADDRESS`. In the example shown above, the output file is located at `thirdweb/{{ networks.dancelight.demo_evm_chain_id }}/0xC12f6fA2d1CA8f875bD25555e8883f1dDa40a93D.ts`. For more information, see the [thirdweb's docs on the CLI](https://portal.thirdweb.com/cli/generate){target=\_blank}.
### Sending a Transaction {: #sending-a-transaction }
Every transaction sent using the SDK must first be prepared. This preparation process is synchronous and lightweight, requiring no network requests. Additionally, it provides type-safe definitions for your contract calls.
You can prepare a transaction as follows:
```typescript title="Prepare a transaction"
import { prepareTransaction, toWei } from 'thirdweb';
const transaction = prepareTransaction({
to: '0x1234567890123456789012345678901234567890',
chain: tanssi,
client: thirdwebClient,
value: toWei('1.0'),
gasPrice: 150n,
});
```
After the transaction is prepared, you can send it as follows:
```typescript title="Send a transaction"
import { sendTransaction } from 'thirdweb';
const { transactionHash } = await sendTransaction({
account,
transaction,
});
```
You can optionally use `sendAndConfirmTransaction` to wait for the transaction to be mined. This is relevant if you want to block the user from continuing until the transaction is confirmed.
```typescript title="Send and Confirm a Transaction"
import { sendAndConfirmTransaction } from 'thirdweb';
import { createWallet } from 'thirdweb/wallets';
const wallet = createWallet('io.metamask');
const account = await wallet.connect({ client });
const receipt = await sendAndConfirmTransaction({
transaction,
account,
});
```
### Transaction Utilities {: #transaction-utilites }
thirdweb provides a number of helpful utility methods surrounding preparing and sending transactions.
You can estimate the gas used by a transaction as follows:
```typescript title="Estimating gas"
import { estimateGas } from 'thirdweb';
const gasEstimate = await estimateGas({ transaction });
console.log('estmated gas used', gasEstimate);
```
You can estimate the gas cost in Ether and Wei as follows:
```typescript title="Estimating gas cost"
import { estimateGas } from 'thirdweb';
const gasCost = await estimateGasCost({ transaction });
console.log('cost in ether', gasCost.ether);
```
thirdweb also provides a handy way to simulate transactions and verify their integrity before actually submitting it to the blockchain. You can simulate a transaction as follows:
```typescript title="Simulate a transaction"
import { simulateTransaction } from 'thirdweb';
const result = await simulateTransaction({ transaction });
console.log('simulation result', result);
```
You can encode transaction data to act on later by taking the following steps:
```typescript title="Encode transaction data"
import { encode } from 'thirdweb';
const data = await encode(transaction);
console.log('encoded data', data);
```
### ConnectButton {: #connect-button }
Perhaps the first and most important interaction users will have with your dApp is connecting their wallet. thirdweb provides an easy and highly customizable way for you to enable this. thirdweb provides a highly customizable [`ConnectButton`](https://portal.thirdweb.com/react/v5/components/ConnectButton){target=\_blank} to tailor it to your desired wallets. The `ConnectButton` accepts an optional `wallets` parameter with an array of wallets. You can add or remove wallets from the `wallets` array to change the options available to users. thirdweb also offers a [`ConnectButton` Playground](https://thirdweb.com/dashboard/connect/playground){target=\_blank} to customize and view changes for the `ConnectButton` in real-time, given the button's high degree of flexibility.
```typescript title="ConnectButton"
import { ConnectButton } from 'thirdweb/react';
import { createWallet, inAppWallet } from 'thirdweb/wallets';
const wallets = [
inAppWallet(),
createWallet('io.metamask'),
createWallet('com.coinbase.wallet'),
createWallet('me.rainbow'),
];
function Example() {
return (
);
}
```
## Deploy Application {: #deploy-application }
As a reminder, you can build your example project locally by running:
```bash
yarn dev
```
To host your static web application on decentralized storage, run:
```bash
npx thirdweb deploy --app
```
By running this command, your application is built for production and stored using [Storage](https://portal.thirdweb.com/infrastructure/storage/overview){target=\_blank}, thirdweb's decentralized file management solution. The built application is uploaded to IPFS, a decentralized storage network, and a unique URL is generated for your application. This URL serves as a permanent hosting location for your application on the web.
If you have any further questions or encounter any issues during the process, please reach out to thirdweb support at [support.thirdweb.com](http://support.thirdweb.com){target=\_blank}.
The information presented herein has been provided by third parties and is made available solely for general information purposes. Tanssi does not endorse any project listed and described on the Tanssi Doc Website (https://docs.tanssi.network/). Tanssi Foundation does not warrant the accuracy, completeness or usefulness of this information. Any reliance you place on such information is strictly at your own risk. Tanssi Foundation disclaims all liability and responsibility arising from any reliance placed on this information by you or by anyone who may be informed of any of its contents. All statements and/or opinions expressed in these materials are solely the responsibility of the person or entity providing those materials and do not necessarily represent the opinion of Tanssi Foundation. The information should not be construed as professional or financial advice of any kind. Advice from a suitably qualified professional should always be sought in relation to any particular matter or circumstance. The information herein may link to or integrate with other websites operated or content provided by third parties, and such other websites may link to this website. Tanssi Foundation has no control over any such other websites or their content and will have no liability arising out of or related to such websites or their content. The existence of any such link does not constitute an endorsement of such websites, the content of the websites, or the operators of the websites. These links are being provided to you only as a convenience and you release and hold Tanssi Foundation harmless from any and all liability arising from your use of this information or the information provided by any third-party website or service.
--- END CONTENT ---
Doc-Content: https://docs.tanssi.network/builders/toolkit/ethereum-api/libraries/ethersjs/
--- BEGIN CONTENT ---
---
title: EVM Transactions & Contracts with Ethers.js
description: Learn how to use the Ethereum EtherJS Library to send transactions and deploy Solidity smart contracts to your Tanssi-powered Ethereum compatible network.
icon: octicons-code-24
categories: EVM-Template
---
# Ethers.js JavaScript Library
## Introduction {: #introduction }
The [Ethers.js](https://docs.ethers.org/v6/){target=\_blank} library provides a set of tools to interact with Ethereum nodes with JavaScript, similar to [Web3.js](/builders/toolkit/ethereum-api/libraries/web3js/){target=\_blank}. Tanssi-powered EVM networks have an Ethereum-like API available that is fully compatible with Ethereum-style JSON RPC invocations. Therefore, developers can leverage this compatibility and use the Ethers.js library to interact with a Tanssi EVM network node as if they were doing so on Ethereum. For more information on Ethers.js, check their [documentation site](https://docs.ethers.org/v6){target=\_blank}.
In this guide, you'll learn how to use the Ethers.js library for your Tanssi EVM network. Next, to showcase the library in action, you'll use Ethers.js to send a transaction and deploy a contract on a Tanssi demo EVM appchain running on [Dancelight](/builders/tanssi-network/testnet/dancelight/){target=\_blank}. This guide can be adapted for your own Tanssi EVM appchain by simply changing the endpoint.
If you prefer video tutorials, you can follow along with the corresponding videos at the top of this page for [Sending Transactions with Ethers.js](#send-a-transaction) and [Deploying Contracts with Ethers.js](#deploy-a-contract).
!!! note
The examples in this guide are based on a MacOS or Ubuntu 20.04 environment. If you're using Windows, you'll need to adapt them accordingly.
Furthermore, please ensure that you have Node.js and a package manager (such as npm or yarn) installed. To learn how to install Node.js, please check their [official documentation](https://nodejs.org/en/download){target=\blank}.
Also, make sure you've initialized a `package.json` file for ES6 modules. You can initialize a default `package.json` file using npm by running the following command `npm init --yes`.
## Checking Prerequisites {: #checking-prerequisites }
For the examples in this guide, you will need to have the following:
- An account with funds in the Tanssi EVM network you are testing with
## Installing Ethers.js {: #install-ethersjs }
For this guide, you'll need to install the Ethers.js library and the Solidity compiler. To install both NPM packages, you can run the following command:
=== "npm"
```bash
npm install ethers solc@0.8.0
```
=== "yarn"
```bash
yarn add ethers solc@0.8.0
```
## Setting up the Ethers Provider {: #setting-up-the-ethers-provider }
Throughout this guide, you'll create several scripts that provide various functionalities, such as sending a transaction, deploying a contract, and interacting with a deployed contract. In most of these scripts you'll need to create an [Ethers provider](https://docs.ethers.org/v6/api/providers/){target=\_blank} to interact with the network.
To create a provider, you can take the following steps:
1. Import the `ethers` library
2. Define the `providerRPC` object, which can include the network configurations for any of the networks you want to send a transaction on. You'll include the `name`, `rpc`, and `chainId` for each network
3. Create the `provider` using the `ethers.JsonRpcProvider` method
```js
// 1. Import ethers
import { ethers } from "ethers";
// 2. Define network configurations
const providerRPC = {
evmNetwork: {
name: 'dancelight-evm-network',
// Insert your RPC URL here
rpc: '{{ networks.dancelight.demo_evm_rpc_url }}',
chainId: {{ networks.dancelight.demo_evm_chain_id }}, // {{ networks.dancelight.demo_evm_chain_hex_id }} in hex,
},
};
// 3. Create ethers provider
const provider = new ethers.JsonRpcProvider(
providerRPC.evmNetwork.rpc,
{
chainId: providerRPC.evmNetwork.chainId,
name: providerRPC.evmNetwork.name,
}
);
```
Save this code snippet as you'll need it for the scripts that are used in the following sections.
## Send a Transaction {: #send-a-transaction }
During this section, you'll be creating a couple of scripts. The first one will be to check the balances of your accounts before trying to send a transaction. The second script will actually send the transaction.
You can also use the balance script to check the account balances after the transaction has been sent.
### Check Balances Script {: #check-balances-script }
You'll only need one file to check the balances of both addresses before and after the transaction is sent. To get started, you can create a `balances.js` file by running:
```bash
touch balances.js
```
Next, you will create the script for this file and complete the following steps:
1. [Set up the Ethers provider](#setting-up-the-ethers-provider)
2. Define the `addressFrom` and `addressTo` variables
3. Create the asynchronous `balances` function which wraps the `provider.getBalance` method
4. Use the `provider.getBalance` function to fetch the balances for the `addressFrom` and `addressTo` addresses. You can also leverage the `ethers.formatEther` function to transform the balance into a more readable number in ETH
5. Lastly, run the `balances` function
```js
// 1. Add the Ethers provider logic here:
// {...}
// 2. Create address variables
const addressFrom = 'INSERT_ADDRESS_FROM';
const addressTo = 'INSERT_ADDRESS_TO';
// 3. Create balances function
const balances = async () => {
// 4. Fetch balances
const balanceFrom = ethers.formatEther(await provider.getBalance(addressFrom));
const balanceTo = ethers.formatEther(await provider.getBalance(addressTo));
console.log(`The balance of ${addressFrom} is: ${balanceFrom} {{ networks.dancelight.demo_evm_token_symbol }}`);
console.log(`The balance of ${addressTo} is: ${balanceTo} {{ networks.dancelight.demo_evm_token_symbol }}`);
};
// 5. Call the balances function
balances();
```
??? code "View the complete script"
```js
// Import ethers
import { ethers } from 'ethers';
// Define network configurations
const providerRPC = {
evmNetwork: {
name: 'dancelight-evm-network',
rpc: 'https://services.tanssi-testnet.network/dancelight-2001', // Insert your RPC URL here
chainId: 5678, // 0x162E in hex,
},
};
// Create ethers provider
const provider = new ethers.JsonRpcProvider(providerRPC.evmNetwork.rpc, {
chainId: providerRPC.evmNetwork.chainId,
name: providerRPC.evmNetwork.name,
});
// Define addresses
const addressFrom = 'INSERT_ADDRESS_FROM';
const addressTo = 'INSERT_ADDRESS_TO';
// Create balances function
const balances = async () => {
// Fetch balances
const balanceFrom = ethers.formatEther(
await provider.getBalance(addressFrom)
);
const balanceTo = ethers.formatEther(await provider.getBalance(addressTo));
console.log(`The balance of ${addressFrom} is: ${balanceFrom} TANGO`);
console.log(`The balance of ${addressTo} is: ${balanceTo} TANGO`);
};
// Call the balances function
balances();
```
To run the script and fetch the account balances, you can run the following command:
```bash
node balances.js
```
If successful, the balances for the origin and receiving address will be displayed in your terminal in {{ networks.dancelight.demo_evm_token_symbol }}.
node balances.jsThe balance of 0x44236223aB4291b93EEd10E4B511B37a398DEE55 is: 20.0 TANGO
The balance of 0x8841701Dba3639B254D9CEe712E49D188A1e941e is: 1.0 TANGO
### Send Transaction Script {: #send-transaction-script }
You'll only need one file for executing a transaction between accounts. For this example, you'll be transferring 1 {{ networks.dancelight.demo_evm_token_symbol }} token from an origin address (from which you hold the private key) to another address. To get started, you can create a `transaction.js` file by running:
```bash
touch transaction.js
```
Next, you will create the script for this file and complete the following steps:
1. [Set up the Ethers provider](#setting-up-the-ethers-provider)
2. Define the `privateKey` and the `addressTo` variables. The private key is required to create a wallet instance. **Note: This is for example purposes only. Never store your private keys in a JavaScript file**
3. Create a wallet using the `privateKey` and `provider` from the previous steps. The wallet instance is used to sign transactions
4. Create the asynchronous `send` function, which wraps the transaction object and the `wallet.sendTransaction` method
5. Create the transaction object, which only requires the recipient's address and the amount to send. Note that `ethers.parseEther` can be used, which handles the necessary unit conversions from Ether to Wei - similar to using `ethers.parseUnits(value, 'ether')`
6. Send the transaction using the `wallet.sendTransaction` method and then use `await` to wait until the transaction is processed and the transaction receipt is returned
7. Lastly, run the `send` function
```js
// 1. Add the Ethers provider logic here:
// {...}
// 2. Create account variables
const accountFrom = {
privateKey: 'INSERT_YOUR_PRIVATE_KEY',
};
const addressTo = 'INSERT_ADDRESS_TO';
// 3. Create wallet
let wallet = new ethers.Wallet(accountFrom.privateKey, provider);
// 4. Create send function
const send = async () => {
console.log(`Attempting to send transaction from ${wallet.address} to ${addressTo}`);
// 5. Create tx object
const tx = {
to: addressTo,
value: ethers.parseEther('1'),
};
// 6. Sign and send tx - wait for receipt
const createReceipt = await wallet.sendTransaction(tx);
await createReceipt.wait();
console.log(`Transaction successful with hash: ${createReceipt.hash}`);
};
// 7. Call the send function
send();
```
??? code "View the complete script"
```js
// Import ethers
import { ethers } from 'ethers';
// Define network configurations
const providerRPC = {
evmNetwork: {
name: 'dancelight-evm-network',
rpc: 'https://services.tanssi-testnet.network/dancelight-2001', // Insert your RPC URL here
chainId: 5678, // 0x162E in hex,
},
};
// Create ethers provider
const provider = new ethers.JsonRpcProvider(providerRPC.evmNetwork.rpc, {
chainId: providerRPC.evmNetwork.chainId,
name: providerRPC.evmNetwork.name,
});
// Define accounts and wallet
const accountFrom = {
privateKey: 'INSERT_YOUR_PRIVATE_KEY',
};
const addressTo = 'INSERT_ADDRESS_TO';
const wallet = new ethers.Wallet(accountFrom.privateKey, provider);
// Create send function
const send = async () => {
console.log(
`Attempting to send transaction from ${wallet.address} to ${addressTo}`
);
// Create transaction
const tx = {
to: addressTo,
value: ethers.parseEther('1'),
};
// Send transaction and get hash
const createReceipt = await wallet.sendTransaction(tx);
await createReceipt.wait();
console.log(`Transaction successful with hash: ${createReceipt.hash}`);
};
// Call the send function
send();
```
To run the script, you can run the following command in your terminal:
```bash
node transaction.js
```
If the transaction was succesful, in your terminal you'll see the transaction hash has been printed out.
You can also use the `balances.js` script to check that the balances for the origin and receiving accounts have changed. The entire workflow would look like this:
node transaction.jsAttempting to send transaction from 0x44236223aB4291b93EEd10E4B511B37a398DEE55 to 0x8841701 Dba3639B254D9CEe712E49D188A1e941e
Transaction successful with hash: 0x29d87c00704b949cb4cc04fdc6c98d53b3c0ec4fb3ffe0c52864a73 b586f563c
node balances.jsThe balance of 0x44236223aB4291b93EEd10E4B511B37a398DEE55 is: 18.999958 TANGO
The balance of 0x8841701Dba3639B254D9CEe712E49D188A1e941e is: 2.0 TANGO
## Deploy a Contract {: #deploy-a-contract }
The contract you'll be compiling and deploying in the next couple of sections is a simple incrementer contract, arbitrarily named `Incrementer.sol`. You can get started by creating a file for the contract:
```
touch Incrementer.sol
```
Next, you can add the Solidity code to the file:
```solidity
// SPDX-License-Identifier: MIT
pragma solidity ^0.8.0;
contract Incrementer {
uint256 public number;
constructor(uint256 _initialNumber) {
number = _initialNumber;
}
function increment(uint256 _value) public {
number = number + _value;
}
function reset() public {
number = 0;
}
}
```
The `constructor` function, which runs when the contract is deployed, sets the initial value of the number variable stored on-chain (default is 0). The `increment` function adds the `_value` provided to the current number, but a transaction needs to be sent, which modifies the stored data. Lastly, the `reset` function resets the stored value to zero.
!!! note
This contract is a simple example for illustration purposes only.
### Compile Contract Script {: #compile-contract-script }
In this section, you'll create a script that uses the Solidity compiler to output the bytecode and interface (ABI) for the `Incrementer.sol` contract. To get started, you can create a `compile.js` file by running:
```
touch compile.js
```
Next, you will create the script for this file and complete the following steps:
1. Import the `fs` and `solc` packages
2. Using the `fs.readFileSync` function, you'll read and save the file contents of `Incrementer.sol` to `source`
3. Build the `input` object for the Solidity compiler by specifying the `language`, `sources`, and `settings` to be used
4. Using the `input` object, you can compile the contract using `solc.compile`
5. Extract the compiled contract file and export it to be used in the deployment script
```js
// 1. Import packages
import fs from 'fs';
import solc from 'solc';
// 2. Get path and load contract
const source = fs.readFileSync('Incrementer.sol', 'utf8');
// 3. Create input object
const input = {
language: 'Solidity',
sources: {
'Incrementer.sol': {
content: source,
},
},
settings: {
outputSelection: {
'*': {
'*': ['*'],
},
},
},
};
// 4. Compile the contract
const tempFile = JSON.parse(solc.compile(JSON.stringify(input)));
const contractFile = tempFile.contracts['Incrementer.sol']['Incrementer'];
// 5. Export contract data
export default contractFile;
```
### Deploy Contract Script {: #deploy-contract-script }
With the script for compiling the `Incrementer.sol` contract in place, you can then use the results to send a signed transaction that deploys it. To do so, you can create a file for the deployment script called `deploy.js`:
```bash
touch deploy.js
```
Next, you will create the script for this file and complete the following steps:
1. Import the contract file from `compile.js`
2. [Set up the Ethers provider](#setting-up-the-ethers-provider)
3. Define the `privateKey` for the origin account. The private key is required to create a wallet instance. **Note: This is for example purposes only. Never store your private keys in a JavaScript file**
4. Save the `bytecode` and `abi` for the compiled contract
5. Create a wallet using the `privateKey` and `provider` from the previous steps. The wallet instance is used to sign transactions
6. Create a contract instance with signer using the `ethers.ContractFactory` function, providing the `abi`, `bytecode`, and `wallet` as parameters
7. Create the asynchronous `deploy` function that will be used to deploy the contract
8. Within the `deploy` function, use the `incrementer` contract instance to call `deploy` and pass in the initial value. For this example, you can set the initial value to `5`. This will send the transaction for contract deployment. To wait for a transaction receipt you can use the `deployed` method of the contract deployment transaction
9. Lastly, run the `deploy` function
```js
// 1. Import the contract file
import contractFile from './compile';
// 2. Add the Ethers provider logic here:
// {...}
// 3. Create account variables
const accountFrom = {
privateKey: 'INSERT_YOUR_PRIVATE_KEY',
};
// 4. Save the bytecode and ABI
const bytecode = contractFile.evm.bytecode.object;
const abi = contractFile.abi;
// 5. Create wallet
let wallet = new ethers.Wallet(accountFrom.privateKey, provider);
// 6. Create contract instance with signer
const incrementer = new ethers.ContractFactory(abi, bytecode, wallet);
// 7. Create deploy function
const deploy = async () => {
console.log(`Attempting to deploy from account: ${wallet.address}`);
// 8. Send tx (initial value set to 5) and wait for receipt
const contract = await incrementer.deploy(5);
const txReceipt = await contract.deploymentTransaction().wait();
console.log(`Contract deployed at address: ${txReceipt.contractAddress}`);
};
// 9. Call the deploy function
deploy();
```
??? code "View the complete script"
```js
// Import ethers and compile
import { ethers } from 'ethers';
import contractFile from './compile.js';
// Define network configurations
const providerRPC = {
evmNetwork: {
name: 'dancelight-evm-network',
rpc: 'https://services.tanssi-testnet.network/dancelight-2001', // Insert your RPC URL here
chainId: 5678, // 0x162E in hex,
},
};
// Create ethers provider
const provider = new ethers.JsonRpcProvider(providerRPC.evmNetwork.rpc, {
chainId: providerRPC.evmNetwork.chainId,
name: providerRPC.evmNetwork.name,
});
// Define accounts and wallet
const accountFrom = {
privateKey: 'INSERT_YOUR_PRIVATE_KEY',
};
let wallet = new ethers.Wallet(accountFrom.privateKey, provider);
// Load contract info
const bytecode = contractFile.evm.bytecode.object;
const abi = contractFile.abi;
// Create contract instance with signer
const incrementer = new ethers.ContractFactory(abi, bytecode, wallet);
// Create deploy function
const deploy = async () => {
console.log(`Attempting to deploy from account: ${wallet.address}`);
// Send tx (initial value set to 5) and wait for receipt
const contract = await incrementer.deploy(5);
const txReceipt = await contract.deploymentTransaction().wait();
console.log(`Contract deployed at address: ${txReceipt.contractAddress}`);
};
// Call the deploy function
deploy();
```
To run the script, you can enter the following command into your terminal:
```bash
node deploy.js
```
If successful, the contract's address will be displayed in the terminal.
node deploy.jsAttempting to deploy from account: 0x44236223aB4291b93EEd10E4B511B37a398DEE55
Contract deployed at address: 0x2EF0C649C08D55637dec9fCcebCFeD27F2F2a5F2
### Read Contract Data (Call Methods) {: #read-contract-data }
Call methods are the type of interaction that don't modify the contract's storage (change variables), meaning no transaction needs to be sent. They simply read various storage variables of the deployed contract.
To get started, you can create a file and name it `get.js`:
```bash
touch get.js
```
Then you can take the following steps to create the script:
1. Import the `contractFile` from the `compile.js` file, where the ABI of the contract is
2. [Set up the Ethers provider](#setting-up-the-ethers-provider)
3. Create the `contractAddress` variable using the address of the deployed contract
4. Create an instance of the contract using the `ethers.Contract` function and passing in the `contractAddress`, `abi`, and `provider`
5. Create the asynchronous `get` function
6. Use the contract instance to call one of the contract's methods and pass in any inputs if necessary. For this example, you'll call the `number` method, which requires no inputs, and `await`, which will return the requested value once the request promise resolves
7. Lastly, call the `get` function
```js
// 1. Import the ABI
import contractFile from './compile';
// 2. Add the Ethers provider logic here:
// {...}
// 3. Contract address variable
const contractAddress = 'INSERT_CONTRACT_ADDRESS';
// 4. Create contract instance
const incrementer = new ethers.Contract(
contractAddress,
contractFile.abi,
provider
);
// 5. Create get function
const get = async () => {
console.log(`Making a call to contract at address: ${contractAddress}`);
// 6. Call contract
const data = await incrementer.number();
console.log(`The current number stored is: ${data}`);
};
// 7. Call get function
get();
```
??? code "View the complete script"
```js
// Import ethers and compile
import { ethers } from 'ethers';
import contractFile from './compile.js';
// Define network configurations
const providerRPC = {
evmNetwork: {
name: 'dancelight-evm-network',
rpc: 'https://services.tanssi-testnet.network/dancelight-2001', // Insert your RPC URL here
chainId: 5678, // 0x162E in hex,
},
};
// Create ethers provider
const provider = new ethers.JsonRpcProvider(providerRPC.evmNetwork.rpc, {
chainId: providerRPC.evmNetwork.chainId,
name: providerRPC.evmNetwork.name,
});
// Contract address variable
const contractAddress = 'INSERT_CONTRACT_ADDRESS';
// Create contract instance
const incrementer = new ethers.Contract(
contractAddress,
contractFile.abi,
provider
);
// Create get function
const get = async () => {
console.log(`Making a call to contract at address: ${contractAddress}`);
// Call contract
const data = await incrementer.number();
console.log(`The current number stored is: ${data}`);
};
// Call get function
get();
```
To run the script, you can enter the following command in your terminal:
```bash
node get.js
```
If successful, the value will be displayed in the terminal.
node get.jsMaking a call to contract at address: 0x2EF0C649C08D55637dec9fCcebCFeD27F2F2a5F2
The current number stored is: 5
### Interact with Contract (Send Methods) {: #interact-with-contract }
Send methods are the type of interaction that modify the contract's storage (change variables), meaning a transaction needs to be signed and sent. In this section, you'll create two scripts: one to increment and one to reset the incrementer. To get started, you can create a file for each script and name them `increment.js` and `reset.js`:
```bash
touch increment.js reset.js
```
Open the `increment.js` file and take the following steps to create the script:
1. Import the `contractFile` from the `compile.js` file, where the ABI of the contract is
2. [Set up the Ethers provider](#setting-up-the-ethers-provider)
3. Define the `privateKey` for the origin account, the `contractAddress` of the deployed contract, and the `_value` to increment by. The private key is required to create a wallet instance. **Note: This is for example purposes only. Never store your private keys in a JavaScript file**
4. Create a wallet using the `privateKey` and `provider` from the previous steps. The wallet instance is used to sign transactions
5. Create an instance of the contract using the `ethers.Contract` function and passing in the `contractAddress`, `abi`, and `provider`
6. Create the asynchronous `increment` function
7. Use the contract instance to call one of the contract's methods and pass in any inputs if necessary. For this example, you'll call the `increment` method, providing the value to increment by as an input, and `await`, which will return the requested value once the request promise resolves
8. Lastly, call the `increment` function
```js
// 1. Import the contract ABI
import contractFile from './compile';
// 2. Add the Ethers provider logic here:
// {...}
// 3. Create variables
const accountFrom = {
privateKey: 'INSERT_YOUR_PRIVATE_KEY',
};
const contractAddress = 'INSERT_CONTRACT_ADDRESS';
const _value = 3;
// 4. Create wallet
let wallet = new ethers.Wallet(accountFrom.privateKey, provider);
// 5. Create contract instance with signer
const incrementer = new ethers.Contract(
contractAddress,
contractFile.abi,
wallet
);
// 6. Create increment function
const increment = async () => {
console.log(
`Calling the increment by ${_value} function in contract at address: ${contractAddress}`
);
// 7. Sign and send tx and wait for receipt
const createReceipt = await incrementer.increment(_value);
await createReceipt.wait();
console.log(`Tx successful with hash: ${createReceipt.hash}`);
};
// 8. Call the increment function
increment();
```
??? code "View the complete script"
```js
// Import ethers and compile
import { ethers } from 'ethers';
import contractFile from './compile.js';
// Define network configurations
const providerRPC = {
evmNetwork: {
name: 'dancelight-evm-network',
rpc: 'https://services.tanssi-testnet.network/dancelight-2001', // Insert your RPC URL here
chainId: 5678, // 0x162E in hex,
},
};
// Create ethers provider
const provider = new ethers.JsonRpcProvider(providerRPC.evmNetwork.rpc, {
chainId: providerRPC.evmNetwork.chainId,
name: providerRPC.evmNetwork.name,
});
// Create variables
const accountFrom = {
privateKey: 'INSERT_YOUR_PRIVATE_KEY',
};
const contractAddress = 'INSERT_CONTRACT_ADDRESS';
const _value = 3;
// Create wallet
let wallet = new ethers.Wallet(accountFrom.privateKey, provider);
// Create contract instance with signer
const incrementer = new ethers.Contract(
contractAddress,
contractFile.abi,
wallet
);
// Create increment function
const increment = async () => {
console.log(
`Calling the increment by ${_value} function in contract at address: ${contractAddress}`
);
// Sign and send tx and wait for receipt
const createReceipt = await incrementer.increment(_value);
await createReceipt.wait();
console.log(`Tx successful with hash: ${createReceipt.hash}`);
};
// Call the increment function
increment();
```
To run the script, you can enter the following command in your terminal:
```bash
node increment.js
```
If successful, the transaction hash will be displayed in the terminal. You can use the `get.js` script alongside the `increment.js` script to make sure that the value is changing as expected:
node increment.jsCalling the increment by 3 function in contract at address: 0x2EF0C649C08D55637dec9fCcebCFe D27F2F2a5F2
Tx successful with hash: 0x8aa7ccb4613ac92713bcc6ff064f1b0c978e24b3f6acb6d6bfa730a10af522bb
node get.jsMaking a call to contract at address: 0x2EF0C649C08D55637dec9fCcebCFeD27F2F2a5F2
The current number stored is: 8
Next you can open the `reset.js` file and take the following steps to create the script:
1. Import the `contractFile` from the `compile.js` file, where the ABI of the contract is
2. [Set up the Ethers provider](#setting-up-the-ethers-provider)
3. Define the `privateKey` for the origin account and the `contractAddress` of the deployed contract. The private key is required to create a wallet instance. **Note: This is for example purposes only. Never store your private keys in a JavaScript file**
4. Create a wallet using the `privateKey` and `provider` from the previous steps. The wallet instance is used to sign transactions
5. Create an instance of the contract using the `ethers.Contract` function and passing in the `contractAddress`, `abi`, and `provider`
6. Create the asynchronous `reset` function
7. Use the contract instance to call one of the contract's methods and pass in any inputs if necessary. For this example, you will call the `reset` method which doesn't require any inputs. You can use `await` which will return the value requested once the request promise resolves
8. Lastly, call the `reset` function
```js
// 1. Import the contract ABI
import contractFile from './compile';
// 2. Add the Ethers provider logic here:
// {...}
// 3. Create variables
const accountFrom = {
privateKey: 'INSERT_YOUR_PRIVATE_KEY',
};
const contractAddress = 'INSERT_CONTRACT_ADDRESS';
// 4. Create wallet
let wallet = new ethers.Wallet(accountFrom.privateKey, provider);
// 5. Create contract instance with signer
const incrementer = new ethers.Contract(
contractAddress,
contractFile.abi,
wallet
);
// 6. Create reset function
const reset = async () => {
console.log(`Calling the reset function in contract at address: ${contractAddress}`);
// 7. sign and send tx and wait for receipt
const createReceipt = await incrementer.reset();
await createReceipt.wait();
console.log(`Tx successful with hash: ${createReceipt.hash}`);
};
// 8. Call the reset function
reset();
```
??? code "View the complete script"
```js
// Import ethers and compile
import { ethers } from 'ethers';
import contractFile from './compile.js';
// Define network configurations
const providerRPC = {
evmNetwork: {
name: 'dancelight-evm-network',
rpc: 'https://services.tanssi-testnet.network/dancelight-2001', // Insert your RPC URL here
chainId: 5678, // 0x162E in hex,
},
};
// Create ethers provider
const provider = new ethers.JsonRpcProvider(providerRPC.evmNetwork.rpc, {
chainId: providerRPC.evmNetwork.chainId,
name: providerRPC.evmNetwork.name,
});
// Create variables
const accountFrom = {
privateKey: 'INSERT_YOUR_PRIVATE_KEY',
};
const contractAddress = 'INSERT_CONTRACT_ADDRESS';
// Create wallet
let wallet = new ethers.Wallet(accountFrom.privateKey, provider);
// Create contract instance with signer
const incrementer = new ethers.Contract(
contractAddress,
contractFile.abi,
wallet
);
// Create reset function
const reset = async () => {
console.log(
`Calling the reset function in contract at address: ${contractAddress}`
);
// Sign and send tx and wait for receipt
const createReceipt = await incrementer.reset();
await createReceipt.wait();
console.log(`Tx successful with hash: ${createReceipt.hash}`);
};
// Call the reset function
reset();
```
To run the script, you can enter the following command in your terminal:
```bash
node reset.js
```
If successful, the transaction hash will be displayed in the terminal. You can use the `get.js` script alongside the `reset.js` script to make sure that value is changing as expected:
node increment.jsCalling the reset function in contract at address: 0x2EF0C649C08D55637dec9fCcebCFe D27F2F2a5F2
Tx successful with hash: 0xb689da50a43e98b5a83ff64757afbf100be12e2db6ff4d0504168f262cc08fb0
node get.jsMaking a call to contract at address: 0x2EF0C649C08D55637dec9fCcebCFeD27F2F2a5F2
The current number stored is: 0
The information presented herein has been provided by third parties and is made available solely for general information purposes. Tanssi does not endorse any project listed and described on the Tanssi Doc Website (https://docs.tanssi.network/). Tanssi Foundation does not warrant the accuracy, completeness or usefulness of this information. Any reliance you place on such information is strictly at your own risk. Tanssi Foundation disclaims all liability and responsibility arising from any reliance placed on this information by you or by anyone who may be informed of any of its contents. All statements and/or opinions expressed in these materials are solely the responsibility of the person or entity providing those materials and do not necessarily represent the opinion of Tanssi Foundation. The information should not be construed as professional or financial advice of any kind. Advice from a suitably qualified professional should always be sought in relation to any particular matter or circumstance. The information herein may link to or integrate with other websites operated or content provided by third parties, and such other websites may link to this website. Tanssi Foundation has no control over any such other websites or their content and will have no liability arising out of or related to such websites or their content. The existence of any such link does not constitute an endorsement of such websites, the content of the websites, or the operators of the websites. These links are being provided to you only as a convenience and you release and hold Tanssi Foundation harmless from any and all liability arising from your use of this information or the information provided by any third-party website or service.
--- END CONTENT ---
Doc-Content: https://docs.tanssi.network/builders/toolkit/ethereum-api/libraries/viem/
--- BEGIN CONTENT ---
---
title: How to use viem Ethereum Library
description: In this tutorial use the viem TypeScript interface for Ethereum to send transactions and deploy Solidity smart contracts to your Tanssi-powered EVM network.
icon: octicons-code-24
categories: EVM-Template
---
# viem TypeScript Ethereum Library
## Introduction {: #introduction }
[viem](https://viem.sh){target=\_blank} is a modular TypeScript library that allows developers to interact with abstractions over the JSON-RPC API, making it easy to interact with Ethereum nodes. Since Tanssi-powered EVM networks have an Ethereum API available that is fully compatible with Ethereum-style JSON-RPC invocations, developers can leverage this compatibility to interact with any Tanssi EVM network. For more information on viem, check out their [documentation site](https://viem.sh/docs/getting-started){target=\_blank}.
In this guide, you'll learn how to use viem to send a transaction and deploy a contract on the demo EVM network. This guide can be adapted for use with any Tanssi-powered EVM network.
!!! note
The examples in this guide are based on a MacOS or Ubuntu 20.04 environment. If you're using Windows, you'll need to adapt them accordingly.
Furthermore, please ensure that you have Node.js and a package manager (such as npm or yarn) installed. To learn how to install Node.js, please check their [official documentation](https://nodejs.org/en/download){target=\blank}.
Also, make sure you've initialized a `package.json` file for ES6 modules. You can initialize a default `package.json` file using npm by running the following command `npm init --yes`.
## Checking Prerequisites {: #checking-prerequisites }
For the examples in this guide, you will need to have the following:
- An account with funds in the Tanssi EVM network you are testing with
## Installing viem {: #installing-viem }
To get started, you'll need to create a basic TypeScript project. First, create a directory to store all of the files you'll be creating throughout this guide, and initialize the project with the following command:
```bash
mkdir viem-examples && cd viem-examples && npm init --y
```
For this guide, you'll need to install the viem library and the Solidity compiler. To install both packages, you can run the following command:
=== "npm"
```bash
npm install typescript ts-node viem solc@0.8.0
```
=== "yarn"
```bash
yarn add typescript ts-node viem solc@0.8.0
```
You can create a TypeScript configuration file by running:
```bash
npx tsc --init
```
!!! note
This tutorial was created using Node.js v18.18.0.
## Set Up a viem Client (Provider) {: #setting-up-a-viem-provider }
Throughout this guide, you'll be creating a bunch of scripts that provide different functionality, such as sending a transaction, deploying a contract, and interacting with a deployed contract. In most of these scripts, you'll need to create a [viem client](https://docs.ethers.org/v6/api/providers/){target=\_blank} to interact with the network.
You can create a viem client for reading chain data, like balances or contract data, using the `createPublicClient` function, or you can create a viem client for writing chain data, like sending transactions, using the `createWalletClient` function.
Creating a viem client to interact with your Tanssi EVM network is a two-step process. First, you'll need to import the `defineChain` function from viem. This will allow you to specify the details of your Tanssi EVM network (or any arbitrary EVM chain). You'll then need to provide all of the chain details, as shown in the next section.
### For Reading Chain Data {: #for-reading-chain-data }
To create a client for reading chain data, you can take the following steps:
1. Import the `createPublicClient`, `http`, and `defineChain`functions from `viem`
2. Define the chain details of your Tanssi EVM network, making sure to include all fields shown below. Both `public` and `default` RPC URLs are required to be listed, even if they are the same
3. Create the `client` using the `createPublicClient` function and pass in the network and the HTTP RPC endpoint
```ts
// 1. Import the necessary components from viem
import { createPublicClient, http, defineChain } from 'viem';
// 2. Specify the details of your EVM network
export const demoEVM = defineChain({
id: 5678,
name: 'demo',
network: 'demo',
nativeCurrency: {
decimals: 18,
name: 'TANGO',
symbol: 'TANGO',
},
rpcUrls: {
default: {
http: ['https://services.tanssi-testnet.network/dancelight-2001'],
webSocket: ['wss://services.tanssi-testnet.network/dancelight-2001'],
},
public: {
http: ['https://services.tanssi-testnet.network/dancelight-2001'],
webSocket: ['wss://services.tanssi-testnet.network/dancelight-2001'],
},
},
blockExplorers: {
default: {
name: 'Explorer',
url: 'https://dancelight-2001-blockscout.tanssi-chains.network/',
},
},
});
// 3. Create a public client for reading chain data
const rpcUrl = 'https://services.tanssi-testnet.network/dancelight-2001';
const publicClient = createPublicClient({
chain: demoEVM,
transport: http(rpcUrl),
});
```
### For Writing Chain Data {: #for-writing-chain-data }
To create a client for writing chain data, you can take the following steps:
1. Import the `createWalletClient`, `http`, and `defineChain` functions from `viem`, and the `privateKeyToAccount` function from `viem/accounts`
2. Define the chain details of your Tanssi EVM network, making sure to include all fields shown below. Both `public` and `default` RPC URLs are required to be listed, even if they are the same
3. Create your account using the `privateKeyToAccount` function
4. Create the `client` using the `createWalletClient` function and pass in the account, network, and the HTTP RPC endpoint
!!! remember
This is for demo purposes only. Never store your private key in a TypeScript file.
```ts
// 1. Import the necessary components from viem and viem/accounts
import { createWalletClient, http, defineChain } from 'viem';
import { privateKeyToAccount } from 'viem/accounts';
// 2. Specify the details of your EVM network
export const demoEVM = defineChain({
id: 5678,
name: 'demo',
network: 'demo',
nativeCurrency: {
decimals: 18,
name: 'TANGO',
symbol: 'TANGO',
},
rpcUrls: {
default: {
http: ['https://services.tanssi-testnet.network/dancelight-2001'],
webSocket: ['wss://services.tanssi-testnet.network/dancelight-2001'],
},
public: {
http: ['https://services.tanssi-testnet.network/dancelight-2001'],
webSocket: ['wss://services.tanssi-testnet.network/dancelight-2001'],
},
},
blockExplorers: {
default: {
name: 'Explorer',
url: 'https://dancelight-2001-blockscout.tanssi-chains.network/',
},
},
});
// 3. Create your account using the privateKeyToAccount function
const account = privateKeyToAccount('INSERT_PRIVATE_KEY');
const rpcUrl = 'https://services.tanssi-testnet.network/dancelight-2001';
//4. Create a wallet client for writing chain data
const walletClient = createWalletClient({
account,
chain: demoEVM,
transport: http(rpcUrl),
});
```
!!! note
To interact with browser-based wallets, you can use the following code to create an account. In this snippet, `demo` refers to the demo EVM network created with `defineChain`.
```ts
const [account] = await window.ethereum.request({
method: 'eth_requestAccounts',
});
const walletClient = createWalletClient({
account,
chain: demo,
transport: custom(window.ethereum),
});
```
## Send a Transaction {: #send-transaction }
During this section, you'll be creating a couple of scripts. The first one will check the balances of your accounts before trying to send a transaction. The second script will send the transaction. You can also use the balance script to check the account balances after the transaction has been sent.
### Check Balances Script {: #check-balances-script }
You'll only need one file to check the balances of both addresses before and after the transaction is sent. To get started, you can create a `balances.ts` file by running:
```bash
touch balances.ts
```
Next, you will create the script for this file and complete the following steps:
1. Update your imports to include the `createPublicClient`, `http`,`formatEther`, and `defineChain `functions from `viem`
2. Define the chain details of your Tanssi EVM network, making sure to include all fields shown below. Both `public` and `default` RPC URLs are required to be listed, even if they are the same
3. [Set up a public viem client](#for-reading-chain-data), which can be used for reading chain data, such as account balances
4. Define the `addressFrom` and `addressTo` variables
5. Create the asynchronous `balances` function that wraps the `publicClient.getBalance` method
6. Use the `publicClient.getBalance` function to fetch the balances for the `addressFrom` and `addressTo` addresses. You can also leverage the `formatEther` function to transform the balance into a more readable number (in {{ networks.dancelight.demo_evm_token_symbol }} for the demo EVM network)
7. Lastly, run the `balances` function
???+ code "View balances.ts"
```ts
// 1. Import the necessary components from viem
import { createPublicClient, http, formatEther, defineChain } from 'viem';
// 2. Specify the details of your EVM network
export const demoEVM = defineChain({
id: 5678,
name: 'demo',
network: 'demo',
nativeCurrency: {
decimals: 18,
name: 'UNIT',
symbol: 'UNIT',
},
rpcUrls: {
default: {
http: ['https://services.tanssi-testnet.network/dancelight-2001'],
webSocket: ['wss://services.tanssi-testnet.network/dancelight-2001'],
},
public: {
http: ['https://services.tanssi-testnet.network/dancelight-2001'],
webSocket: ['wss://services.tanssi-testnet.network/dancelight-2001'],
},
},
blockExplorers: {
default: {
name: 'Explorer',
url: 'https://dancelight-2001-blockscout.tanssi-chains.network/',
},
},
});
// 3. Create a public client for reading chain data
const rpcUrl = 'https://services.tanssi-testnet.network/dancelight-2001';
const publicClient = createPublicClient({
chain: demoEVM,
transport: http(rpcUrl),
});
// 4. Create address variables
const addressFrom = 'INSERT_ADDRESS_FROM';
const addressTo = 'INSERT_ADDRESS_TO';
// 5. Create balances function
const balances = async () => {
// 6. Fetch balances
const balanceFrom = formatEther(
await publicClient.getBalance({ address: addressFrom })
);
const balanceTo = formatEther(
await publicClient.getBalance({ address: addressTo })
);
console.log(`The balance of ${addressFrom} is: ${balanceFrom} TANGO`);
console.log(`The balance of ${addressTo} is: ${balanceTo} TANGO`);
};
// 7. Call the balances function
balances();
```
To run the script and fetch the account balances, you can run the following command:
```bash
npx ts-node balances.ts
```
If successful, the balances for the origin and receiving address will be displayed in your terminal in {{ networks.dancelight.demo_evm_token_symbol }}.

### Send Transaction Script {: #send-transaction-script }
You'll only need one file to execute a transaction between accounts. For this example, you'll be transferring 1 {{ networks.dancelight.demo_evm_token_symbol }} token from an origin address on the demo EVM network (from which you hold the private key) to another address. To get started, you can create a `transaction.ts` file by running:
```bash
touch transaction.ts
```
Next, you will create the script for this file and complete the following steps:
1. Update your imports to include `createPublicClient`, `createWalletClient`, `http`, `parseEther`, and `defineChain` functions from `viem`, as well as the `privateKeyToAccount` function from `viem/accounts`
2. Define the chain details of your Tanssi EVM network, making sure to include all fields shown below. Both `public` and `default` RPC URLs are required to be listed, even if they are the same
3. [Set up a viem wallet client](#for-writing-chain-data) for writing chain data, which can be used along with your private key to send transactions. **Note: This is for example purposes only. Never store your private keys in a TypeScript file**
4. [Set up a public viem client](#for-reading-chain-data) for reading chain data, which will be used to wait for the transaction receipt
5. Define the `addressTo` variable
6. Create the asynchronous `send` function, which wraps the transaction object and the `walletClient.sendTransaction` method
7. Use the `walletClient.sendTransaction` function to sign and send the transaction. You'll need to pass in the transaction object, which only requires the recipient's address and the amount to send. Note that `parseEther` can be used, which handles the necessary unit conversions from Ether to Wei, similar to using `parseUnits(value, decimals)`. Use `await` to wait until the transaction is processed and the transaction hash is returned
8. Use the `publicClient.waitForTransactionReceipt` function to wait for the transaction receipt, signaling that the transaction has been completed. This is particularly helpful if you need the transaction receipt or if you're running the `balances.ts` script directly after this one to check if the balances have been updated as expected
9. Lastly, run the `send` function
???+ code "View transaction.ts"
```ts
// 1. Import the necessary components from viem and viem/accounts
import {
createPublicClient,
createWalletClient,
http,
parseEther,
defineChain,
} from 'viem';
import { privateKeyToAccount } from 'viem/accounts';
// 2. Specify the details of your EVM network
export const demoEVM = defineChain({
id: 5678,
name: 'demo',
network: 'demo',
nativeCurrency: {
decimals: 18,
name: 'TANGO',
symbol: 'TANGO',
},
rpcUrls: {
default: {
http: ['https://services.tanssi-testnet.network/dancelight-2001'],
webSocket: ['wss://services.tanssi-testnet.network/dancelight-2001'],
},
public: {
http: ['https://services.tanssi-testnet.network/dancelight-2001'],
webSocket: ['wss://services.tanssi-testnet.network/dancelight-2001'],
},
},
blockExplorers: {
default: {
name: 'Explorer',
url: 'https://dancelight-2001-blockscout.tanssi-chains.network/',
},
},
});
// 3. Create a wallet client for writing chain data
// The private key must be prepended with `0x` to avoid errors
const account = privateKeyToAccount('INSERT_PRIVATE_KEY');
const rpcUrl = 'https://services.tanssi-testnet.network/dancelight-2001';
const walletClient = createWalletClient({
account,
chain: demoEVM,
transport: http(rpcUrl),
});
// 4. Create a public client for reading chain data
const publicClient = createPublicClient({
chain: demoEVM,
transport: http(rpcUrl),
});
// 5. Create to address variable
const addressTo = 'INSERT_ADDRESS_TO';
// 6. Create send function
const send = async () => {
console.log(
`Attempting to send transaction from ${account.address} to ${addressTo}`
);
// 7. Sign and send transaction
const hash = await walletClient.sendTransaction({
to: addressTo,
value: parseEther('1'),
});
// 8. Wait for the transaction receipt
await publicClient.waitForTransactionReceipt({
hash,
});
console.log(`Transaction successful with hash: ${hash}`);
};
// 9. Call the send function
send();
```
To run the script, you can run the following command in your terminal:
```bash
npx ts-node transaction.ts
```
If the transaction was successful, in your terminal, you'll see the transaction hash has been printed out. You can also use the `balances.ts` script to check that the balances for the origin and receiving accounts have changed. The entire workflow would look like this:

## Deploy a Contract {: #deploy-contract }
The contract you'll be compiling and deploying in the next couple of sections is a simple incrementer contract, arbitrarily named `Incrementer.sol`. You can get started by creating a file for the contract:
```
touch Incrementer.sol
```
Next, you can add the Solidity code to the file:
```solidity
// SPDX-License-Identifier: MIT
pragma solidity ^0.8.0;
contract Incrementer {
uint256 public number;
constructor(uint256 _initialNumber) {
number = _initialNumber;
}
function increment(uint256 _value) public {
number = number + _value;
}
function reset() public {
number = 0;
}
}
```
The `constructor` function, which runs when the contract is deployed, sets the initial value of the number variable stored on-chain (default is 0). The `increment` function adds the `_value` provided to the current number, but a transaction needs to be sent, which modifies the stored data. Lastly, the `reset` function resets the stored value to zero.
!!! note
This contract is a simple example for illustration purposes only.
### Compile Contract Script {: #compile-contract-script }
In this section, you'll create a script that uses the Solidity compiler to output the bytecode and interface (ABI) for the `Incrementer.sol` contract. To get started, you can create a `compile.ts` file by running:
```bash
touch compile.ts
```
Next, you will create the script for this file and complete the following steps:
1. Import the `fs` and `solc` packages
2. Using the `fs.readFileSync` function, you'll read and save the file contents of `Incrementer.sol` to `source`
3. Build the `input` object for the Solidity compiler by specifying the `language`, `sources`, and `settings` to be used
4. Using the `input` object, you can compile the contract using `solc.compile`
5. Extract the compiled contract file and export it to be used in the deployment script
```js
// 1. Import packages
const fs = require('fs');
const solc = require('solc');
// 2. Get path and load contract
const source = fs.readFileSync('Incrementer.sol', 'utf8');
// 3. Create input object
const input = {
language: 'Solidity',
sources: {
'Incrementer.sol': {
content: source,
},
},
settings: {
outputSelection: {
'*': {
'*': ['*'],
},
},
},
};
// 4. Compile the contract
const tempFile = JSON.parse(solc.compile(JSON.stringify(input)));
const contractFile = tempFile.contracts['Incrementer.sol']['Incrementer'];
// 5. Export contract data
export default contractFile;
```
### Deploy Contract Script {: #deploy-contract-script }
With the script for compiling the `Incrementer.sol` contract in place, you can then use the results to send a signed transaction that deploys it. To do so, you can create a file for the deployment script called `deploy.ts`:
```bash
touch deploy.ts
```
Next, you will create the script for this file and complete the following steps:
1. Update your imports to include the `createPublicClient`, `createWalletClient`, `http`, and `defineChain` functions from `viem`, the `privateKeyToAccount` function from `viem/accounts`, and the `contractFile` from the `compile.ts` file you created in the [Compile Contract Script](#compile-contract-script) section
2. Define the chain details of your Tanssi EVM network, making sure to include all fields shown below. Both `public` and `default` RPC URLs are required to be listed, even if they are the same
3. [Set up a viem wallet client](#for-writing-chain-data) for writing chain data, which will be used along with your private key to deploy the `Incrementer` contract. **Note: This is for example purposes only. Never store your private keys in a TypeScript file**
4. [Set up a public viem client](#for-reading-chain-data) for reading chain data, which will be used to read the transaction receipt for the deployment
5. Load the contract `bytecode` and `abi` for the compiled contract
6. Create the asynchronous `deploy` function that will be used to deploy the contract via the `walletClient.deployContract` method
7. Use the `walletClient.deployContract` function to sign and send the transaction. You'll need to pass in the contract's ABI and bytecode, the account to deploy the transaction from, and the initial value for the incrementer. Use `await` to wait until the transaction is processed and the transaction hash is returned
8. Use the `publicClient.readContract` function to get the transaction receipt for the deployment. Use `await` to wait until the transaction is processed and the contract address is returned
9. Lastly, run the `deploy` function
???+ code "View deploy.ts"
```ts
// 1. Update import
import {
createPublicClient,
createWalletClient,
http,
defineChain,
} from 'viem';
import { privateKeyToAccount } from 'viem/accounts';
import contractFile from './compile';
// 2. Specify the details of your EVM network
export const demoEVM = defineChain({
id: 5678,
name: 'demo',
network: 'demo',
nativeCurrency: {
decimals: 18,
name: 'TANGO',
symbol: 'TANGO',
},
rpcUrls: {
default: {
http: ['https://services.tanssi-testnet.network/dancelight-2001'],
webSocket: ['wss://services.tanssi-testnet.network/dancelight-2001'],
},
public: {
http: ['https://services.tanssi-testnet.network/dancelight-2001'],
webSocket: ['wss://services.tanssi-testnet.network/dancelight-2001'],
},
},
blockExplorers: {
default: {
name: 'Explorer',
url: 'https://dancelight-2001-blockscout.tanssi-chains.network/',
},
},
});
// 3. Create a wallet client for writing chain data
// The private key must be prepended with `0x` to avoid errors
const account = privateKeyToAccount('INSERT_PRIVATE_KEY');
const rpcUrl = 'https://services.tanssi-testnet.network/dancelight-2001';
const walletClient = createWalletClient({
account,
chain: demoEVM,
transport: http(rpcUrl),
});
// 4. Create a public client for reading chain data
const publicClient = createPublicClient({
chain: demoEVM,
transport: http(rpcUrl),
});
// 5. Load contract information
const bytecode = contractFile.evm.bytecode.object;
const abi = contractFile.abi;
const _initialNumber = 5;
// 6. Create deploy function
const deploy = async () => {
console.log(`Attempting to deploy from account: ${account.address}`);
// 7. Send transaction (initial value set to 5)
const contract = await walletClient.deployContract({
abi,
account,
bytecode,
args: [_initialNumber],
});
// 8. Get the transaction receipt for the deployment
const transaction = await publicClient.waitForTransactionReceipt({
hash: contract,
});
console.log(`Contract deployed at address: ${transaction.contractAddress}`);
};
// 9. Call the deploy function
deploy();
```
To run the script, you can enter the following command into your terminal:
```bash
npx ts-node deploy.ts
```
If successful, the contract's address will be displayed in the terminal.

### Read Contract Data (Call Methods) {: #read-contract-data }
Call methods are the type of interaction that doesn't modify the contract's storage (change variables), meaning no transaction needs to be sent. They simply read various storage variables of the deployed contract.
To get started, you can create a file and name it `get.ts`:
```bash
touch get.ts
```
Then you can take the following steps to create the script:
1. Update your imports to include the `createPublicClient`, `http`, and `defineChain` functions from `viem`, and the `contractFile` from the `compile.ts` file you created in the [Compile Contract Script](#compile-contract-script) section
2. Define the chain details of your Tanssi EVM network, making sure to include all fields shown below. Both `public` and `default` RPC URLs are required to be listed, even if they are the same
3. [Set up a public viem client](#for-reading-chain-data) for reading chain data, which will be used to read the current number of the `Incrementer` contract
4. Create the `contractAddress` variable using the address of the deployed contract and the `abi` variable using the `contractFile` from the `compile.ts` file
5. Create the asynchronous `get` function
6. Call the contract using the `publicClient.readContract` function, passing in the `abi`, the name of the function, the `contractAddress`, and any arguments (if needed). You can use `await`, which will return the value requested once the request promise resolves
7. Lastly, call the `get` function
???+ code "View get.ts"
```ts
// 1. Update import
import { createPublicClient, http, defineChain } from 'viem';
import contractFile from './compile';
// 2. Specify the details of your EVM network
export const demoEVM = defineChain({
id: 5678,
name: 'demo',
network: 'demo',
nativeCurrency: {
decimals: 18,
name: 'TANGO',
symbol: 'TANGO',
},
rpcUrls: {
default: {
http: ['https://services.tanssi-testnet.network/dancelight-2001'],
webSocket: ['wss://services.tanssi-testnet.network/dancelight-2001'],
},
public: {
http: ['https://services.tanssi-testnet.network/dancelight-2001'],
webSocket: ['wss://services.tanssi-testnet.network/dancelight-2001'],
},
},
blockExplorers: {
default: {
name: 'Explorer',
url: 'https://dancelight-2001-blockscout.tanssi-chains.network/',
},
},
});
// 3. Create a public client for reading chain data
const rpcUrl = 'https://services.tanssi-testnet.network/dancelight-2001';
const publicClient = createPublicClient({
chain: demoEVM,
transport: http(rpcUrl),
});
// 4. Create contract variables
const contractAddress = 'INSERT_CONTRACT_ADDRESS';
const abi = contractFile.abi;
// 5. Create get function
const get = async () => {
console.log(`Making a call to contract at address: ${contractAddress}`);
// 6. Call contract
const data = await publicClient.readContract({
abi,
functionName: 'number',
address: contractAddress,
args: [],
});
console.log(`The current number stored is: ${data}`);
};
// 7. Call get function
get();
```
To run the script, you can enter the following command in your terminal:
```bash
npx ts-node get.ts
```
If successful, the value will be displayed in the terminal.

### Interact with Contract (Send Methods) {: #interact-with-contract }
Send methods are the type of interactions that modify the contract's storage (change variables), meaning a transaction needs to be signed and sent. In this section, you'll create two scripts: one to increment and one to reset the incrementer. To get started, you can create a file for each script and name them `increment.ts` and `reset.ts`:
```bash
touch increment.ts reset.ts
```
Open the `increment.ts` file and take the following steps to create the script:
1. Update your imports to include the `createPublicClient`, `createWalletClient` `http`, and `defineChain` functions from `viem`, the `privateKeyToAccount` from `viem/accounts'` and the `contractFile` from the `compile.ts` file you created in the [Compile Contract Script](#compile-contract-script) section
2. Define the chain details of your Tanssi EVM network, making sure to include all fields shown below. Both `public` and `default` RPC URLs are required to be listed, even if they are the same
3. [Set up a viem wallet client](#for-writing-chain-data) for writing chain data, which will be used along with your private key to send a transaction. **Note: This is for example purposes only. Never store your private keys in a TypeScript file**
4. [Set up a public viem client](#for-reading-chain-data) for reading chain data, which will be used to wait for the transaction receipt
5. Create the `contractAddress` variable using the address of the deployed contract, the `abi` variable using the `contractFile` from the `compile.ts` file, and the `_value` to increment the contract by
6. Create the asynchronous `increment` function
7. Call the contract using the `walletClient.writeContract` function, passing in the `abi`, the name of the function, the `contractAddress`, and the `_value`. You can use `await`, which will return the transaction hash once the request promise resolves
8. Use the `publicClient.waitForTransactionReceipt` function to wait for the transaction receipt, signaling that the transaction has been completed. This is particularly helpful if you need the transaction receipt or if you're running the `get.ts` script directly after this one to check that the current number has been updated as expected
9. Lastly, call the `increment` function
???+ code "View increment.ts"
```ts
// 1. Update import
import {
createPublicClient,
createWalletClient,
http,
defineChain,
} from 'viem';
import { privateKeyToAccount } from 'viem/accounts';
import contractFile from './compile';
// 2. Specify the details of your EVM network
export const demoEVM = defineChain({
id: 5678,
name: 'demo',
network: 'demo',
nativeCurrency: {
decimals: 18,
name: 'TANGO',
symbol: 'TANGO',
},
rpcUrls: {
default: {
http: ['https://services.tanssi-testnet.network/dancelight-2001'],
webSocket: ['wss://services.tanssi-testnet.network/dancelight-2001'],
},
public: {
http: ['https://services.tanssi-testnet.network/dancelight-2001'],
webSocket: ['wss://services.tanssi-testnet.network/dancelight-2001'],
},
},
blockExplorers: {
default: {
name: 'Explorer',
url: 'https://dancelight-2001-blockscout.tanssi-chains.network/',
},
},
});
// 3. Create a wallet client for writing chain data
// The private key must be prepended with `0x` to avoid errors
const account = privateKeyToAccount('INSERT_PRIVATE_KEY');
const rpcUrl = 'https://services.tanssi-testnet.network/dancelight-2001';
const walletClient = createWalletClient({
account,
chain: demoEVM,
transport: http(rpcUrl),
});
// 4. Create a public client for reading chain data
const publicClient = createPublicClient({
chain: demoEVM,
transport: http(rpcUrl),
});
// 5. Create contract variables
const contractAddress = 'INSERT_CONTRACT_ADDRESS';
const abi = contractFile.abi;
const _value = 3;
// 6. Create increment function
const increment = async () => {
console.log(
`Calling the increment by ${_value} function in contract at address: ${contractAddress}`
);
// 7. Call contract
const hash = await walletClient.writeContract({
abi,
functionName: 'increment',
address: contractAddress,
args: [_value],
});
// 8. Wait for the transaction receipt
await publicClient.waitForTransactionReceipt({
hash,
});
console.log(`Transaction successful with hash: ${hash}`);
};
// 9. Call increment function
increment();
```
To run the script, you can enter the following command in your terminal:
```bash
npx ts-node increment.ts
```
If successful, the transaction hash will be displayed in the terminal. You can use the `get.ts` script alongside the `increment.ts` script to make sure that value is changing as expected.

Next, you can open the `reset.ts` file and take the following steps to create the script:
1. Update your imports to include the `createPublicClient`, `createWalletClient` `http`, and `defineChain` functions from `viem`, the `privateKeyToAccount` from `viem/accounts'` and the `contractFile` from the `compile.ts` file you created in the [Compile Contract Script](#compile-contract-script) section
2. Define the chain details of your Tanssi EVM network, making sure to include all fields shown below. Both `public` and `default` RPC URLs are required to be listed, even if they are the same
3. [Set up a viem wallet client](#for-writing-chain-data) for writing chain data, which will be used along with your private key to send a transaction. **Note: This is for example purposes only. Never store your private keys in a TypeScript file**
4. [Set up a public viem client](#for-reading-chain-data) for reading chain data, which will be used to wait for the transaction receipt
5. Create the `contractAddress` variable using the address of the deployed contract and the `abi` variable using the `contractFile` from the `compile.ts` file to increment the contract by
6. Create the asynchronous `reset` function
7. Call the contract using the `walletClient.writeContract` function, passing in the `abi`, the name of the function, the `contractAddress`, and an empty array for the arguments. You can use `await`, which will return the transaction hash once the request promise resolves
8. Use the `publicClient.waitForTransactionReceipt` function to wait for the transaction receipt, signaling that the transaction has been completed. This is particularly helpful if you need the transaction receipt or if you're running the `get.ts` script directly after this one to check that the current number has been reset to `0`
9. Lastly, call the `reset` function
???+ code "View reset.ts"
```ts
// 1. Update import
import {
createPublicClient,
createWalletClient,
http,
defineChain,
} from 'viem';
import { privateKeyToAccount } from 'viem/accounts';
import contractFile from './compile';
// 2. Specify the details of your EVM network
export const demoEVM = defineChain({
id: 5678,
name: 'demo',
network: 'demo',
nativeCurrency: {
decimals: 18,
name: 'TANGO',
symbol: 'TANGO',
},
rpcUrls: {
default: {
http: ['https://services.tanssi-testnet.network/dancelight-2001'],
webSocket: ['wss://services.tanssi-testnet.network/dancelight-2001'],
},
public: {
http: ['https://services.tanssi-testnet.network/dancelight-2001'],
webSocket: ['wss://services.tanssi-testnet.network/dancelight-2001'],
},
},
blockExplorers: {
default: {
name: 'Explorer',
url: 'https://dancelight-2001-blockscout.tanssi-chains.network/',
},
},
});
// 3. Create a wallet client for writing chain data
// The private key must be prepended with `0x` to avoid errors
const account = privateKeyToAccount('INSERT_PRIVATE_KEY');
const rpcUrl = 'https://services.tanssi-testnet.network/dancelight-2001';
const walletClient = createWalletClient({
account,
chain: demoEVM,
transport: http(rpcUrl),
});
// 4. Create a public client for reading chain data
const publicClient = createPublicClient({
chain: demoEVM,
transport: http(rpcUrl),
});
// 5. Create contract variables
const contractAddress = 'INSERT_CONTRACT_ADDRESS';
const abi = contractFile.abi;
// 6. Create reset function
const reset = async () => {
console.log(
`Calling the reset function in contract at address: ${contractAddress}`
);
// 7. Call contract
const hash = await walletClient.writeContract({
abi,
functionName: 'reset',
address: contractAddress,
args: [],
});
// 8. Wait for the transaction receipt
await publicClient.waitForTransactionReceipt({
hash,
});
console.log(`Transaction successful with hash: ${hash}`);
};
// 9. Call reset function
reset();
```
To run the script, you can enter the following command in your terminal:
```bash
npx ts-node reset.ts
```
If successful, the transaction hash will be displayed in the terminal. You can use the `get.ts` script alongside the `reset.ts` script to make sure that value is changing as expected.

The information presented herein has been provided by third parties and is made available solely for general information purposes. Tanssi does not endorse any project listed and described on the Tanssi Doc Website (https://docs.tanssi.network/). Tanssi Foundation does not warrant the accuracy, completeness or usefulness of this information. Any reliance you place on such information is strictly at your own risk. Tanssi Foundation disclaims all liability and responsibility arising from any reliance placed on this information by you or by anyone who may be informed of any of its contents. All statements and/or opinions expressed in these materials are solely the responsibility of the person or entity providing those materials and do not necessarily represent the opinion of Tanssi Foundation. The information should not be construed as professional or financial advice of any kind. Advice from a suitably qualified professional should always be sought in relation to any particular matter or circumstance. The information herein may link to or integrate with other websites operated or content provided by third parties, and such other websites may link to this website. Tanssi Foundation has no control over any such other websites or their content and will have no liability arising out of or related to such websites or their content. The existence of any such link does not constitute an endorsement of such websites, the content of the websites, or the operators of the websites. These links are being provided to you only as a convenience and you release and hold Tanssi Foundation harmless from any and all liability arising from your use of this information or the information provided by any third-party website or service.
--- END CONTENT ---
Doc-Content: https://docs.tanssi.network/builders/toolkit/ethereum-api/libraries/web3js/
--- BEGIN CONTENT ---
---
title: EVM Transactions & Contracts with Web3.js
description: Learn how to use the Ethereum Web3 JavaScript Library to send transactions and deploy Solidity smart contracts to your Tanssi-powered EVM-compatible network.
icon: octicons-code-24
categories: EVM-Template
---
# Web3.js JavaScript Library
## Introduction {: #introduction }
[Web3.js](https://web3js.readthedocs.io){target=\_blank} is a set of libraries that allow developers to interact with Ethereum nodes using HTTP, IPC, or WebSocket protocols with JavaScript. Tanssi-powered EVM networks have an Ethereum-like API that is fully compatible with Ethereum-style JSON RPC invocations. Therefore, developers can leverage this compatibility and use the Web3.js library to interact with a Tanssi EVM network node as if they were doing so on Ethereum. For more information on Web3.js, check out their [documentation site](https://web3js.readthedocs.io/en/v1.10.0){target=\_blank}.
In this guide, you'll learn how to set up the Web3.js library for your Tanssi EVM network. Next, to showcase the library in action, you'll use the Web3.js library to send a transaction and deploy a contract on a Tanssi demo EVM network running on [Dancelight](/builders/tanssi-network/testnet/dancelight/){target=\_blank}. This guide can be adapted for your own Tanssi EVM network by simply changing the endpoint.
!!! note
The examples in this guide are based on a MacOS or Ubuntu 20.04 environment. If you're using Windows, you'll need to adapt them accordingly.
Furthermore, please ensure that you have Node.js and a package manager (such as npm or yarn) installed. To learn how to install Node.js, please check their [official documentation](https://nodejs.org/en/download){target=\blank}.
Also, make sure you've initialized a `package.json` file for ES6 modules. You can initialize a default `package.json` file using npm by running the following command `npm init --yes`.
## Checking Prerequisites {: #checking-prerequisites }
For the examples in this guide, you will need to have the following:
- An account with funds in the Tanssi EVM network you are testing with
## Installing Web3Js {: #installing-web3js }
For this guide, you'll need to install the Web3.js library and the Solidity compiler. To install both NPM packages, you can run the following command:
=== "npm"
```bash
npm install web3 solc@0.8.0
```
=== "yarn"
```bash
yarn add web3 solc@0.8.0
```
## Setting up the Web3 Provider {: #setting-up-the-web3-provider }
Throughout this guide, you'll be creating a bunch of scripts that provide different functionality such as sending a transaction, deploying a contract, and interacting with a deployed contract. In most of these scripts you'll need to create an Web3.js provider to interact with the network.
To set up a Web3 provider, you can take the following steps:
1. Import the `Web3` library.
2. Create the Web3 provider and specify the RPC url. You can configure Web3.js to work with the Tanssi demo EVM network running on Dancelight, or your own Tanssi EVM network by simply changing the endpoint.
```js
// 1. Import Web3
const Web3 = require('web3');
// 2. Create Web3 provider and insert your RPC url
const web3 = new Web3(
'{{ networks.dancelight.demo_evm_rpc_url }}'
);
```
Save this code snippet as you'll need it for the scripts that are used in the following sections.
## Send a Transaction {: #send-a-transaction }
During this section, you'll be creating a couple of scripts. The first one will be to check the balances of your accounts before trying to send a transaction. The second script will actually send the transaction.
You can also use the balance script to check the account balances after the transaction has been sent.
### Check Balances Script {: #check-balances-script }
You'll only need one file to check the balances of both addresses before and after the transaction is sent. To get started, you can create a `balances.js` file by running:
```bash
touch balances.js
```
Next, you will create the script for this file and complete the following steps:
1. [Set up the Web3 provider](#setting-up-the-web3-provider)
2. Define the `addressFrom` and `addressTo` variables
3. Create the asynchronous `balances` function which wraps the `web3.eth.getBalance` method
4. Use the `web3.eth.getBalance` function to fetch the balances for the `addressFrom` and `addressTo` addresses. You can also leverage the `web3.utils.fromWei` function to transform the balance into a more readable number in `{{ networks.dancelight.demo_evm_token_symbol }}`
5. Lastly, run the `balances` function
```js
// 1. Add the Web3 provider logic here:
// {...}
// 2. Create address variables
const addressFrom = 'INSERT_ADDRESS_FROM';
const addressTo = 'INSERT_ADDRESS_TO';
// 3. Create balances function
const balances = async () => {
// 4. Fetch balance info
const balanceFrom = web3.utils.fromWei(
await web3.eth.getBalance(addressFrom),
'ether'
);
const balanceTo = web3.utils.fromWei(
await web3.eth.getBalance(addressTo),
'ether'
);
console.log(`The balance of ${addressFrom} is: ${balanceFrom} {{ networks.dancelight.demo_evm_token_symbol }}`);
console.log(`The balance of ${addressTo} is: ${balanceTo} {{ networks.dancelight.demo_evm_token_symbol }}`);
};
// 5. Call balances function
balances();
```
??? code "View the complete script"
```js
// Import Web3
const Web3 = require('web3');
// Add the Web3 provider logic here:
const providerRPC = {
evmNetwork: 'https://services.tanssi-testnet.network/dancelight-2001', // Insert your RPC URL here
};
const web3 = new Web3(providerRPC.evmNetwork);
// Create address variables
const addressFrom = 'INSERT_ADDRESS_FROM';
const addressTo = 'INSERT_ADDRESS_TO';
// Create balances function
const balances = async () => {
// Fetch balance info
const balanceFrom = web3.utils.fromWei(
await web3.eth.getBalance(addressFrom),
'ether'
);
const balanceTo = web3.utils.fromWei(
await web3.eth.getBalance(addressTo),
'ether'
);
console.log(`The balance of ${addressFrom} is: ${balanceFrom} TANGO`);
console.log(`The balance of ${addressTo} is: ${balanceTo} TANGO`);
};
// Call balances function
balances();
```
To run the script and fetch the account balances, you can run the following command:
```bash
node balances.js
```
If successful, the balances for the origin and receiving address will be displayed in your terminal in ETH.

### Send Transaction Script {: #send-transaction-script }
You'll only need one file to execute a transaction between accounts. For this example, you'll be transferring 1 {{ networks.dancelight.demo_evm_token_symbol }} token from an origin address (from which you hold the private key) to another address. To get started, you can create a `transaction.js` file by running:
```bash
touch transaction.js
```
Next, you will create the script for this file and complete the following steps:
1. [Set up the Web3 provider](#setting-up-the-web3-provider)
2. Define the `addressFrom`, including the `privateKey`, and the `addressTo` variables. The private key is required to create a wallet instance. **Note: This is for example purposes only. Never store your private keys in a JavaScript file**
3. Create the asynchronous `send` function, which wraps the transaction object, and the sign and send transaction functions
4. Create and sign the transaction using the `web3.eth.accounts.signTransaction` function. Pass in the `gas`, `addressTo`, and `value` for the transaction along with the sender's `privateKey`
5. Send the signed transaction using the `web3.eth.sendSignedTransaction` method and pass in the raw transaction. Then use `await` to wait until the transaction is processed and the transaction receipt is returned
6. Lastly, run the `send` function
```js
// 1. Add the Web3 provider logic here:
// {...}
// 2. Create account variables
const accountFrom = {
privateKey: 'INSERT_YOUR_PRIVATE_KEY',
address: 'INSERT_PUBLIC_ADDRESS_OF_PK',
};
const addressTo = 'INSERT_ADDRESS_TO'; // Change to address
// 3. Create send function
const send = async () => {
console.log(
`Attempting to send transaction from ${accountFrom.address} to ${addressTo}`
);
// 4. Sign tx with PK
const createTransaction = await web3.eth.accounts.signTransaction(
{
gas: 21000,
to: addressTo,
value: web3.utils.toWei('1', 'ether'),
},
accountFrom.privateKey
);
// 5. Send tx and wait for receipt
const createReceipt = await web3.eth.sendSignedTransaction(
createTransaction.rawTransaction
);
console.log(
`Transaction successful with hash: ${createReceipt.transactionHash}`
);
};
// 6. Call send function
send();
```
??? code "View the complete script"
```js
// Import Web3
const Web3 = require('web3');
// Add the Web3 provider logic here:
const providerRPC = {
evmNetwork: 'https://services.tanssi-testnet.network/dancelight-2001', // Insert your RPC URL here
};
const web3 = new Web3(providerRPC.evmNetwork);
// Create account variables
const accountFrom = {
privateKey: 'INSERT_YOUR_PRIVATE_KEY',
address: 'INSERT_PUBLIC_ADDRESS_OF_PK',
};
const addressTo = 'INSERT_ADDRESS_TO';
// Create send function
const send = async () => {
console.log(
`Attempting to send transaction from ${accountFrom.address} to ${addressTo}`
);
// Sign tx with PK
const createTransaction = await web3.eth.accounts.signTransaction(
{
gas: 21000,
to: addressTo,
value: web3.utils.toWei('1', 'ether'),
},
accountFrom.privateKey
);
// Send tx and wait for receipt
const createReceipt = await web3.eth.sendSignedTransaction(
createTransaction.rawTransaction
);
console.log(
`Transaction successful with hash: ${createReceipt.transactionHash}`
);
};
// Call send function
send();
```
To run the script, you can run the following command in your terminal:
```bash
node transaction.js
```
If the transaction was successful, in your terminal, you'll see the transaction hash has been printed out.
You can also use the `balances.js` script to check that the balances for the origin and receiving accounts have changed. The entire workflow would look like this:

## Deploy a Contract {: #deploy-a-contract }
The contract you'll be compiling and deploying in the next couple of sections is a simple incrementer contract, arbitrarily named `Incrementer.sol`. You can get started by creating a file for the contract:
```
touch Incrementer.sol
```
Next, you can add the Solidity code to the file:
```solidity
// SPDX-License-Identifier: MIT
pragma solidity ^0.8.0;
contract Incrementer {
uint256 public number;
constructor(uint256 _initialNumber) {
number = _initialNumber;
}
function increment(uint256 _value) public {
number = number + _value;
}
function reset() public {
number = 0;
}
}
```
The `constructor` function, which runs when the contract is deployed, sets the initial value of the number variable stored on-chain (default is 0). The `increment` function adds the `_value` provided to the current number, but a transaction needs to be sent, which modifies the stored data. Lastly, the `reset` function resets the stored value to zero.
!!! note
This contract is a simple example for illustration purposes only.
### Compile Contract Script {: #compile-contract-script }
In this section, you'll create a script that uses the Solidity compiler to output the bytecode and interface (ABI) for the `Incrementer.sol` contract. To get started, you can create a `compile.js` file by running:
```
touch compile.js
```
Next, you will create the script for this file and complete the following steps:
1. Import the `fs` and `solc` packages
2. Using the `fs.readFileSync` function, you'll read and save the file contents of `Incrementer.sol` to `source`
3. Build the `input` object for the Solidity compiler by specifying the `language`, `sources`, and `settings` to be used
4. Using the `input` object, you can compile the contract using `solc.compile`
5. Extract the compiled contract file and export it to be used in the deployment script
```js
// 1. Import packages
import fs from 'fs';
import solc from 'solc';
// 2. Get path and load contract
const source = fs.readFileSync('Incrementer.sol', 'utf8');
// 3. Create input object
const input = {
language: 'Solidity',
sources: {
'Incrementer.sol': {
content: source,
},
},
settings: {
outputSelection: {
'*': {
'*': ['*'],
},
},
},
};
// 4. Compile the contract
const tempFile = JSON.parse(solc.compile(JSON.stringify(input)));
const contractFile = tempFile.contracts['Incrementer.sol']['Incrementer'];
// 5. Export contract data
export default contractFile;
```
### Deploy Contract Script {: #deploy-contract-script }
With the script for compiling the `Incrementer.sol` contract in place, you can then use the results to send a signed transaction that deploys it. To do so, you can create a file for the deployment script called `deploy.js`:
```bash
touch deploy.js
```
Next, you will create the script for this file and complete the following steps:
1. Import the contract file from `compile.js`
2. [Set up the Web3 provider](#setting-up-the-web3-provider)
3. Define the `addressFrom`, including the `privateKey`, and the `addressTo` variables. The private key is required to create a wallet instance. **Note: This is for example purposes only. Never store your private keys in a JavaScript file**
4. Save the `bytecode` and `abi` for the compiled contract
5. Create the asynchronous `deploy` function that will be used to deploy the contract
6. Create the contract instance using the `web3.eth.Contract` function
7. Create the constructor and pass in the `bytecode` and the initial value for the incrementer. For this example, you can set the initial value to `5`
8. Create and sign the transaction using the `web3.eth.accounts.signTransaction` function. Pass in the `data` and the `gas` for the transaction along with the sender's `privateKey`
9. Send the signed transaction using the `web3.eth.sendSignedTransaction` method and pass in the raw transaction. Then use `await` to wait until the transaction is processed and the transaction receipt is returned
10. Lastly, run the `deploy` function
```js
// 1. Import the contract file
const contractFile = require('./compile');
// 2. Add the Web3 provider logic here:
// {...}
// 3. Create address variables
const accountFrom = {
privateKey: 'INSERT_PRIVATE_KEY',
address: 'INSERT_PUBLIC_ADDRESS_OF_PK',
};
// 4. Get the bytecode and API
const bytecode = contractFile.evm.bytecode.object;
const abi = contractFile.abi;
// 5. Create deploy function
const deploy = async () => {
console.log(`Attempting to deploy from account ${accountFrom.address}`);
// 6. Create contract instance
const incrementer = new web3.eth.Contract(abi);
// 7. Create constructor tx
const incrementerTx = incrementer.deploy({
data: bytecode,
arguments: [5],
});
// 8. Sign transacation and send
const createTransaction = await web3.eth.accounts.signTransaction(
{
data: incrementerTx.encodeABI(),
gas: await incrementerTx.estimateGas(),
},
accountFrom.privateKey
);
// 9. Send tx and wait for receipt
const createReceipt = await web3.eth.sendSignedTransaction(
createTransaction.rawTransaction
);
console.log(`Contract deployed at address: ${createReceipt.contractAddress}`);
};
// 10. Call deploy function
deploy();
```
??? code "View the complete script"
```js
// Import web3 and the contract file
const Web3 = require('web3');
const contractFile = require('./compile');
// Add the Web3 provider logic here
const providerRPC = {
evmNetwork: 'https://services.tanssi-testnet.network/dancelight-2001', // Insert your RPC URL here
};
const web3 = new Web3(providerRPC.evmNetwork);
// Create address variables
const accountFrom = {
privateKey: 'INSERT_PRIVATE_KEY',
address: 'INSERT_PUBLIC_ADDRESS_OF_PK',
};
// Get the bytecode and API
const bytecode = contractFile.evm.bytecode.object;
const abi = contractFile.abi;
// Create deploy function
const deploy = async () => {
console.log(`Attempting to deploy from account ${accountFrom.address}`);
// Create contract instance
const incrementer = new web3.eth.Contract(abi);
// Create constructor tx with initial value of 5
const incrementerTx = incrementer.deploy({
data: bytecode,
arguments: [5],
});
// Sign transacation and send
const createTransaction = await web3.eth.accounts.signTransaction(
{
data: incrementerTx.encodeABI(),
gas: await incrementerTx.estimateGas(),
},
accountFrom.privateKey
);
// Send tx and wait for receipt
const createReceipt = await web3.eth.sendSignedTransaction(
createTransaction.rawTransaction
);
console.log(`Contract deployed at address: ${createReceipt.contractAddress}`);
};
// Call deploy function
deploy();
```
To run the script, you can enter the following command into your terminal:
```bash
node deploy.js
```
If successful, the contract's address will be displayed in the terminal.

### Read Contract Data (Call Methods) {: #read-contract-data }
Call methods are the type of interactions that don't modify the contract's storage (change variables), meaning no transaction needs to be sent. They simply read various storage variables of the deployed contract.
To get started, you can create a file and name it `get.js`:
```bash
touch get.js
```
Then you can take the following steps to create the script:
1. Import the `abi` from the `compile.js` file
2. [Set up the Web3 provider](#setting-up-the-web3-provider)
3. Create the `contractAddress` variable using the address of the deployed contract
4. Create an instance of the contract using the `web3.eth.Contract` function and passing in the `abi` and `contractAddress`
5. Create the asynchronous `get` function
6. Use the contract instance to call one of the contract's methods and pass in any inputs if necessary. For this example, you will call the `number` method, which doesn't require any inputs. You can use `await`, which will return the value requested once the request promise resolves
7. Lastly, call the `get` function
```js
// 1. Import the contract abi
const { abi } = require('./compile');
// 2. Add the Web3 provider logic here:
// {...}
// 3. Create address variables
const contractAddress = 'INSERT_CONTRACT_ADDRESS';
// 4. Create contract instance
const incrementer = new web3.eth.Contract(abi, contractAddress);
// 5. Create get function
const get = async () => {
console.log(`Making a call to contract at address: ${contractAddress}`);
// 6. Call contract
const data = await incrementer.methods.number().call();
console.log(`The current number stored is: ${data}`);
};
// 7. Call get function
get();
```
??? code "View the complete script"
```js
// Import web3 and the contract file
const Web3 = require('web3');
const { abi } = require('./compile');
// Add the Web3 provider logic here:
const providerRPC = {
evmNetwork: 'https://services.tanssi-testnet.network/dancelight-2001', // Insert your RPC URL here
};
const web3 = new Web3(providerRPC.evmNetwork);
// Create address variables
const contractAddress = 'INSERT_CONTRACT_ADDRESS';
// Create contract instance
const incrementer = new web3.eth.Contract(abi, contractAddress);
// Create get function
const get = async () => {
console.log(`Making a call to contract at address: ${contractAddress}`);
// Call contract
const data = await incrementer.methods.number().call();
console.log(`The current number stored is: ${data}`);
};
// Call get function
get();
```
To run the script, you can enter the following command in your terminal:
```bash
node get.js
```
If successful, the value will be displayed in the terminal.

### Interact with Contract (Send Methods) {: #interact-with-contract }
Send methods are the type of interactions that modify the contract's storage (change variables), meaning a transaction needs to be signed and sent. In this section, you'll create two scripts: one to increment and one to reset the incrementer. To get started, you can create a file for each script and name them `increment.js` and `reset.js`:
```bash
touch increment.js reset.js
```
Open the `increment.js` file and take the following steps to create the script:
1. Import the `abi` from the `compile.js` file
2. [Set up the Web3 provider](#setting-up-the-web3-provider)
3. Define the `privateKey` for the origin account, the `contractAddress` of the deployed contract, and the `_value` to increment by. The private key is required to create a wallet instance. **Note: This is for example purposes only. Never store your private keys in a JavaScript file**
4. Create an instance of the contract using the `web3.eth.Contract` function and passing in the `abi` and `contractAddress`
5. Use the contract instance to build the increment transaction using the `methods.increment` function and passing in the `_value` as an input
6. Create the asynchronous `increment` function
7. Use the contract instance and the increment transaction you previously created to sign the transaction with the sender's private key. You'll use the `web3.eth.accounts.signTransaction` function and specify the `to` address, the `data`, and the `gas` for the transaction
8. Send the signed transaction using the `web3.eth.sendSignedTransaction` method and pass in the raw transaction. Then use `await` to wait until the transaction is processed and the transaction receipt is returned
9. Lastly, call the `increment` function
```js
// 1. Import the contract abi
const { abi } = require('./compile');
// 2. Add the Web3 provider logic here:
// {...}
// 3. Create variables
const accountFrom = {
privateKey: 'INSERT_YOUR_PRIVATE_KEY',
};
const contractAddress = 'INSERT_CONTRACT_ADDRESS';
const _value = 3;
// 4. Create contract instance
const incrementer = new web3.eth.Contract(abi, contractAddress);
// 5. Build increment tx
const incrementTx = incrementer.methods.increment(_value);
// 6. Create increment function
const increment = async () => {
console.log(
`Calling the increment by ${_value} function in contract at address: ${contractAddress}`
);
// 7. Sign Tx with PK
const createTransaction = await web3.eth.accounts.signTransaction(
{
to: contractAddress,
data: incrementTx.encodeABI(),
gas: await incrementTx.estimateGas(),
},
accountFrom.privateKey
);
// 8. Send Tx and Wait for Receipt
const createReceipt = await web3.eth.sendSignedTransaction(
createTransaction.rawTransaction
);
console.log(`Tx successful with hash: ${createReceipt.transactionHash}`);
};
// 9. Call increment function
increment();
```
??? code "View the complete script"
```js
// Import Web3 and the contract abi
const Web3 = require('web3');
const { abi } = require('./compile');
// Add the Web3 provider logic here:
const providerRPC = {
evmNetwork: 'https://services.tanssi-testnet.network/dancelight-2001', // Insert your RPC URL here
};
const web3 = new Web3(providerRPC.evmNetwork);
// Create variables
const accountFrom = {
privateKey: 'INSERT_YOUR_PRIVATE_KEY',
};
const contractAddress = 'INSERT_CONTRACT_ADDRESS';
const _value = 3;
// Create contract instance
const incrementer = new web3.eth.Contract(abi, contractAddress);
// Build increment tx
const incrementTx = incrementer.methods.increment(_value);
// Create increment function
const increment = async () => {
console.log(
`Calling the increment by ${_value} function in contract at address: ${contractAddress}`
);
// Sign Tx with PK
const createTransaction = await web3.eth.accounts.signTransaction(
{
to: contractAddress,
data: incrementTx.encodeABI(),
gas: await incrementTx.estimateGas(),
},
accountFrom.privateKey
);
// Send Tx and Wait for Receipt
const createReceipt = await web3.eth.sendSignedTransaction(
createTransaction.rawTransaction
);
console.log(`Tx successful with hash: ${createReceipt.transactionHash}`);
};
// Call increment function
increment();
```
To run the script, you can enter the following command in your terminal:
```bash
node increment.js
```
If successful, the transaction hash will be displayed in the terminal. You can use the `get.js` script alongside the `increment.js` script to make sure that the value is changing as expected.

Next you can open the `reset.js` file and take the following steps to create the script:
1. Import the `abi` from the `compile.js` file
2. [Set up the Web3 provider](#setting-up-the-web3-provider)
3. Define the `privateKey` for the origin account and the `contractAddress` of the deployed contract. The private key is required to create a wallet instance. **Note: This is for example purposes only. Never store your private keys in a JavaScript file**
4. Create an instance of the contract using the `web3.eth.Contract` function and passing in the `abi` and `contractAddress`
5. Use the contract instance to build the reset transaction using the `methods.reset` function
6. Create the asynchronous `reset` function
7. Use the contract instance and the reset transaction you previously created to sign the transaction with the sender's private key. You'll use the `web3.eth.accounts.signTransaction` function and specify the `to` address, the `data`, and the `gas` for the transaction
8. Send the signed transaction using the `web3.eth.sendSignedTransaction` method and pass in the raw transaction. Then use `await` to wait until the transaction is processed and the transaction receipt is returned
9. Lastly, call the `reset` function
```js
// 1. Import the contract abi
const { abi } = require('./compile');
// 2. Add the Web3 provider logic here:
// {...}
// 3. Create variables
const accountFrom = {
privateKey: 'INSERT_YOUR_PRIVATE_KEY',
};
const contractAddress = 'INSERT_CONTRACT_ADDRESS';
// 4. Create Contract Instance
const incrementer = new web3.eth.Contract(abi, contractAddress);
// 5. Build reset tx
const resetTx = incrementer.methods.reset();
// 6. Create reset function
const reset = async () => {
console.log(
`Calling the reset function in contract at address: ${contractAddress}`
);
// 7. Sign tx with PK
const createTransaction = await web3.eth.accounts.signTransaction(
{
to: contractAddress,
data: resetTx.encodeABI(),
gas: await resetTx.estimateGas(),
},
accountFrom.privateKey
);
// 8. Send tx and wait for receipt
const createReceipt = await web3.eth.sendSignedTransaction(
createTransaction.rawTransaction
);
console.log(`Tx successful with hash: ${createReceipt.transactionHash}`);
};
// 9. Call reset function
reset();
```
??? code "View the complete script"
```js
// Import Web3 and the contract abi
const Web3 = require('web3');
const { abi } = require('./compile');
// Add the Web3 provider logic here:
const providerRPC = {
evmNetwork: 'https://services.tanssi-testnet.network/dancelight-2001', // Insert your RPC URL here
};
const web3 = new Web3(providerRPC.evmNetwork);
// Create variables
const accountFrom = {
privateKey: 'INSERT_YOUR_PRIVATE_KEY',
};
const contractAddress = 'INSERT_CONTRACT_ADDRESS';
// Create Contract Instance
const incrementer = new web3.eth.Contract(abi, contractAddress);
// Build reset tx
const resetTx = incrementer.methods.reset();
// Create reset function
const reset = async () => {
console.log(
`Calling the reset function in contract at address: ${contractAddress}`
);
// Sign tx with PK
const createTransaction = await web3.eth.accounts.signTransaction(
{
to: contractAddress,
data: resetTx.encodeABI(),
gas: await resetTx.estimateGas(),
},
accountFrom.privateKey
);
// Send tx and wait for receipt
const createReceipt = await web3.eth.sendSignedTransaction(
createTransaction.rawTransaction
);
console.log(`Tx successful with hash: ${createReceipt.transactionHash}`);
};
// Call reset function
reset();
```
To run the script, you can enter the following command in your terminal:
```bash
node reset.js
```
If successful, the transaction hash will be displayed in the terminal. You can use the `get.js` script alongside the `reset.js` script to make sure that the value is changing as expected.

The information presented herein has been provided by third parties and is made available solely for general information purposes. Tanssi does not endorse any project listed and described on the Tanssi Doc Website (https://docs.tanssi.network/). Tanssi Foundation does not warrant the accuracy, completeness or usefulness of this information. Any reliance you place on such information is strictly at your own risk. Tanssi Foundation disclaims all liability and responsibility arising from any reliance placed on this information by you or by anyone who may be informed of any of its contents. All statements and/or opinions expressed in these materials are solely the responsibility of the person or entity providing those materials and do not necessarily represent the opinion of Tanssi Foundation. The information should not be construed as professional or financial advice of any kind. Advice from a suitably qualified professional should always be sought in relation to any particular matter or circumstance. The information herein may link to or integrate with other websites operated or content provided by third parties, and such other websites may link to this website. Tanssi Foundation has no control over any such other websites or their content and will have no liability arising out of or related to such websites or their content. The existence of any such link does not constitute an endorsement of such websites, the content of the websites, or the operators of the websites. These links are being provided to you only as a convenience and you release and hold Tanssi Foundation harmless from any and all liability arising from your use of this information or the information provided by any third-party website or service.
--- END CONTENT ---
Doc-Content: https://docs.tanssi.network/builders/toolkit/ethereum-api/libraries/web3py/
--- BEGIN CONTENT ---
---
title: EVM Transactions & Contracts with Web3.py
description: Learn how to use the Ethereum Web3 Python Library to send transactions and deploy Solidity smart contracts to your Tanssi-powered Ethereum compatible network.
icon: octicons-code-24
categories: EVM-Template
---
# Web3.py Python Library
## Introduction {: #introduction }
[Web3.py](https://web3py.readthedocs.io/en/stable/){target=\_blank} is a set of libraries that allow developers to interact with Ethereum nodes using HTTP, IPC, or WebSocket protocols with Python. Tanssi EVM networks have an Ethereum-like API available that is fully compatible with Ethereum-style JSON RPC invocations. Therefore, developers can leverage this compatibility and use the Ethers.js library to interact with a Tanssi EVM network node as if they were doing so on Ethereum. For more information on Web3.py, check their [documentation site](https://web3py.readthedocs.io/en/stable/){target=\_blank}.
In this guide, you'll learn how to use setup the Web3.py library for your Tanssi-powered EVM network. Next, to showcase the library in action, you'll use Web3.py to send a transaction and deploy a contract on a Tanssi demo EVM appchain running on [Dancelight](/builders/tanssi-network/testnet/dancelight/){target=\_blank}. This guide can be adapted for your own Tanssi EVM appchain by simply changing the endpoint.
!!! note
The examples in this guide are based on a MacOS or Ubuntu 20.04 environment. If you're using Windows, you'll need to adapt them accordingly.
Furthermore, please ensure that you have Python3 and a package manager like pip installed.
## Checking Prerequisites {: #checking-prerequisites }
For the examples in this guide, you will need to have the following:
- An account with funds in the Tanssi EVM network you are testing with
## Installing Web3.py {: #install-web3py }
For this guide, you'll need to install the Web3.py library and the Solidity compiler. To install both packages, you can run the following command:
```bash
pip3 install web3 py-solc-x
```
## Setting up the Web3.py Provider {: #setting-up-the-web3py-provider }
Throughout this guide, you'll be creating a bunch of scripts that provide different functionality such as sending a transaction, deploying a contract, and interacting with a deployed contract. In most of these scripts you'll need to create an [Web3.py provider](https://web3py.readthedocs.io/en/stable/providers.html){target=\_blank} to interact with the network.
To create a provider, you can take the following steps:
1. Import the `web3` library
2. Create the `web3` provider suing using the `Web3(Web3.HTTPProvider()))` method and providing the Tanssi EVM network URL
```python
# 1. Import web3.py
from web3 import Web3
# 2. Create web3.py provider
# Insert your RPC URL here
web3 = Web3(Web3.HTTPProvider('{{ networks.dancelight.demo_evm_rpc_url }}'))
```
Save this code snippet, as you'll need it for the scripts that are used in the following sections.
## Send a Transaction {: #send-a-transaction }
During this section, you'll be creating a couple of scripts. The first one will be to check the balances of your accounts before trying to send a transaction. The second script will actually send the transaction.
You can also use the balance script to check the account balances after the transaction has been sent.
### Check Balances Script {: #check-balances-script }
You'll only need one file to check the balances of both addresses before and after the transaction is sent. To get started, you can create a `balances.py` file by running:
``` bash
touch balances.py
```
Next, you will create the script for this file and complete the following steps:
1. [Set up the Web3 provider](#setting-up-the-web3py-provider)
2. Define the `address_from` and `address_to` variables
3. Get the balance for the accounts using the `web3.eth.get_balance` function and format the results using the `web3.from_wei`
```python
# 1. Import web3.py
from web3 import Web3
# 2. Create web3.py provider
provider_rpc = {
# Insert your RPC URL here
"evm_network": "https://services.tanssi-testnet.network/dancelight-2001",
}
web3 = Web3(Web3.HTTPProvider(provider_rpc["evm_network"]))
# 2. Create address variables
address_from = "INSERT_ADDRESS_FROM"
address_to = "INSERT_ADDRESS_TO"
# 4. Fetch balance data
balance_from = web3.from_wei(
web3.eth.get_balance(Web3.to_checksum_address(address_from)), "ether"
)
balance_to = web3.from_wei(
web3.eth.get_balance(Web3.to_checksum_address(address_to)), "ether"
)
print(f"The balance of { address_from } is: { balance_from } TANGO")
print(f"The balance of { address_to } is: { balance_to } TANGO")
```
To run the script and fetch the account balances, you can run the following command:
```bash
python3 balances.py
```
If successful, the balances for the origin and receiving address will be displayed in your terminal in {{ networks.dancelight.demo_evm_token_symbol }}.

### Send Transaction Script {: #send-transaction-script }
You'll only need one file for executing a transaction between accounts. For this example, you'll be transferring 1 DEV token from an origin address (from which you hold the private key) to another address. To get started, you can create a `transaction.py` file by running:
```bash
touch transaction.py
```
Next, you will create the script for this file and complete the following steps:
1. Add imports, including Web3.py and the `rpc_gas_price_strategy`, which will be used in the following steps to get the gas price used for the transaction
2. [Set up the Web3 provider](#setting-up-the-web3py-provider)
3. Define the `account_from`, including the `private_key`, and the `address_to` variables. The private key is required to sign the transaction. **Note: This is for example purposes only. Never store your private keys in a Python file**
4. Use the [Web3.py Gas Price API](https://web3py.readthedocs.io/en/stable/gas_price.html){target=\_blank} to set a gas price strategy. For this example, you'll use the imported `rpc_gas_price_strategy`
5. Create and sign the transaction using the `web3.eth.account.sign_transaction` function. Pass in the `nonce` `gas`, `gasPrice`, `to`, and `value` for the transaction along with the sender's `private_key`. To get the `nonce` you can use the `web3.eth.get_transaction_count` function and pass in the sender's address. To predetermine the `gasPrice` you'll use the `web3.eth.generate_gas_price` function. For the `value`, you can format the amount to send from an easily readable format to Wei using the `web3.to_wei` function
6. Using the signed transaction, you can then send it using the `web3.eth.send_raw_transaction` function and wait for the transaction receipt by using the `web3.eth.wait_for_transaction_receipt` function
```python
# 1. Add imports
from web3 import Web3
from web3.gas_strategies.rpc import rpc_gas_price_strategy
# 2. Create web3.py provider
provider_rpc = {
# Insert your RPC URL here
"evm_network": "https://services.tanssi-testnet.network/dancelight-2001",
}
web3 = Web3(Web3.HTTPProvider(provider_rpc["evm_network"]))
# 3. Create address variables
account_from = {
"private_key": "INSERT_ YOUR_PRIVATE_KEY",
"address": "INSERT_ PUBLIC_ADDRESS_OF_PK",
}
address_to = "INSERT_ ADDRESS_TO"
print(
f'Attempting to send transaction from { account_from["address"] } to { address_to }'
)
# 4. Set the gas price strategy
web3.eth.set_gas_price_strategy(rpc_gas_price_strategy)
# 5. Sign tx with PK
tx_create = web3.eth.account.sign_transaction(
{
"nonce": web3.eth.get_transaction_count(
Web3.to_checksum_address(account_from["address"])
),
"gasPrice": web3.eth.generate_gas_price(),
"gas": 21000,
"to": Web3.to_checksum_address(address_to),
"value": web3.to_wei("1", "ether"),
},
account_from["private_key"],
)
# 6. Send tx and wait for receipt
tx_hash = web3.eth.send_raw_transaction(tx_create.rawTransaction)
tx_receipt = web3.eth.wait_for_transaction_receipt(tx_hash)
print(f"Transaction successful with hash: { tx_receipt.transactionHash.hex() }")
```
To run the script, you can run the following command in your terminal:
```bash
python3 transaction.py
```
If the transaction was succesful, in your terminal you'll see the transaction hash has been printed out.
You can also use the `balances.py` script to check that the balances for the origin and receiving accounts have changed. The entire workflow would look like this:

## Deploy a Contract {: #deploy-a-contract }
The contract you'll be compiling and deploying in the next couple of sections is a simple incrementer contract, arbitrarily named `Incrementer.sol`. You can get started by creating a file for the contract:
```
touch Incrementer.sol
```
Next, you can add the Solidity code to the file:
```solidity
// SPDX-License-Identifier: MIT
pragma solidity ^0.8.0;
contract Incrementer {
uint256 public number;
constructor(uint256 _initialNumber) {
number = _initialNumber;
}
function increment(uint256 _value) public {
number = number + _value;
}
function reset() public {
number = 0;
}
}
```
The `constructor` function, which runs when the contract is deployed, sets the initial value of the number variable stored on-chain (default is 0). The `increment` function adds the `_value` provided to the current number, but a transaction needs to be sent, which modifies the stored data. Lastly, the `reset` function resets the stored value to zero.
!!! note
This contract is a simple example for illustration purposes only.
### Compile Contract Script {: #compile-contract-script }
In this section, you'll create a script that uses the Solidity compiler to output the bytecode and interface (ABI) for the `Incrementer.sol` contract. To get started, you can create a `compile.py` file by running:
```bash
touch compile.py
```
Next, you will create the script for this file and complete the following steps:
1. Import the `solcx` package
2. **Optional** - If you haven't already installed the Solidity compiler, you can do so with by using the `solcx.install_solc` function
3. Compile the `Incrementer.sol` function using the `solcx.compile_files` function
4. Export the contract's ABI and bytecode
```python
# 1. Import solcx
import solcx
# 2. If you haven't already installed the Solidity compiler, uncomment the following line
# solcx.install_solc()
# 3. Compile contract
temp_file = solcx.compile_files(
"Incrementer.sol",
output_values=["abi", "bin"],
# solc_version='0.8.19'
)
# 4. Export contract data
abi = temp_file["Incrementer.sol:Incrementer"]["abi"]
bytecode = temp_file["Incrementer.sol:Incrementer"]["bin"]
```
!!! note
If you see an error stating that `Solc is not installed`, uncomment the step 2 described in the code snippet.
### Deploy Contract Script {: #deploy-contract-script }
With the script for compiling the `Incrementer.sol` contract in place, you can then use the results to send a signed transaction that deploys it. To do so, you can create a file for the deployment script called `deploy.py`:
```bash
touch deploy.py
```
Next, you will create the script for this file and complete the following steps:
1. Add imports, including Web3.py and the ABI and bytecode of the `Incrementer.sol` contract
2. [Set up the Web3 provider](#setting-up-the-web3py-provider)
3. Define the `account_from`, including the `private_key`. The private key is required to sign the transaction. **Note: This is for example purposes only. Never store your private keys in a Python file**
4. Create a contract instance using the `web3.eth.contract` function and passing in the ABI and bytecode of the contract
5. Build a constructor transaction using the contract instance and passing in the value to increment by. For this example, you can use `5`. You'll then use the `build_transaction` function to pass in the transaction information including the `from` address and the `nonce` for the sender. To get the `nonce` you can use the `web3.eth.get_transaction_count` function
6. Sign the transaction using the `web3.eth.account.sign_transaction` function and pass in the constructor transaction and the `private_key` of the sender
7. Using the signed transaction, you can then send it using the `web3.eth.send_raw_transaction` function and wait for the transaction receipt by using the `web3.eth.wait_for_transaction_receipt` function
```python
# 1. Add imports
from compile import abi, bytecode
from web3 import Web3
# 2. Create web3.py provider
provider_rpc = {
# Insert your RPC URL here
"evm_network": "https://services.tanssi-testnet.network/dancelight-2001",
}
web3 = Web3(Web3.HTTPProvider(provider_rpc["evm_network"]))
# 3. Create address variable
account_from = {
"private_key": "INSERT_YOUR_PRIVATE_KEY",
"address": "INSERT_PUBLIC_ADDRESS_OF_PK",
}
print(f'Attempting to deploy from account: { account_from["address"] }')
# 4. Create contract instance
Incrementer = web3.eth.contract(abi=abi, bytecode=bytecode)
# 5. Build constructor tx
construct_txn = Incrementer.constructor(5).build_transaction(
{
"from": Web3.to_checksum_address(account_from["address"]),
"nonce": web3.eth.get_transaction_count(
Web3.to_checksum_address(account_from["address"])
),
}
)
# 6. Sign tx with PK
tx_create = web3.eth.account.sign_transaction(
construct_txn, account_from["private_key"]
)
# 7. Send tx and wait for receipt
tx_hash = web3.eth.send_raw_transaction(tx_create.rawTransaction)
tx_receipt = web3.eth.wait_for_transaction_receipt(tx_hash)
print(f"Contract deployed at address: { tx_receipt.contractAddress }")
```
To run the script, you can enter the following command into your terminal:
```bash
python3 deploy.py
```
If successful, the contract's address will be displayed in the terminal.

### Read Contract Data (Call Methods) {: #read-contract-data }
Call methods are the type of interaction that don't modify the contract's storage (change variables), meaning no transaction needs to be sent. They simply read various storage variables of the deployed contract.
To get started, you can create a file and name it `get.py`:
```bash
touch get.py
```
Then you can take the following steps to create the script:
1. Add imports, including Web3.py and the ABI of the `Incrementer.sol` contract
2. [Set up the Web3 provider](#setting-up-the-web3py-provider)
3. Define the `contract_address` of the deployed contract
4. Create a contract instance using the `web3.eth.contract` function and passing in the ABI and address of the deployed contract
5. Using the contract instance, you can then call the `number` function
```python
# 1. Import the ABI
from compile import abi
from web3 import Web3
# 2. Create web3.py provider
provider_rpc = {
# Insert your RPC URL here
"evm_network": "https://services.tanssi-testnet.network/dancelight-2001",
}
web3 = Web3(Web3.HTTPProvider(provider_rpc["evm_network"]))
# 3. Create address variable
contract_address = "INSERT_CONTRACT_ADDRESS"
print(f"Making a call to contract at address: { contract_address }")
# 4. Create contract instance
Incrementer = web3.eth.contract(address=contract_address, abi=abi)
# 5. Call Contract
number = Incrementer.functions.number().call()
print(f"The current number stored is: { number } ")
```
To run the script, you can enter the following command in your terminal:
```bash
python3 get.py
```
If successful, the value will be displayed in the terminal.

### Interact with Contract (Send Methods) {: #interact-with-contract }
Send methods are the type of interaction that modify the contract's storage (change variables), meaning a transaction needs to be signed and sent. In this section, you'll create two scripts: one to increment and one to reset the incrementer. To get started, you can create a file for each script and name them `increment.py` and `reset.py`:
```bash
touch increment.py reset.py
```
Open the `increment.py` file and take the following steps to create the script:
1. Add imports, including Web3.py and the ABI of the `Incrementer.sol` contract
2. [Set up the Web3 provider](#setting-up-the-web3py-provider)
3. Define the `account_from`, including the `private_key`, the `contract_address` of the deployed contract, and the `value` to increment by. The private key is required to sign the transaction. **Note: This is for example purposes only. Never store your private keys in a Python file**
4. Create a contract instance using the `web3.eth.contract` function and passing in the ABI and address of the deployed contract
5. Build the increment transaction using the contract instance and passing in the value to increment by. You'll then use the `build_transaction` function to pass in the transaction information including the `from` address and the `nonce` for the sender. To get the `nonce` you can use the `web3.eth.get_transaction_count` function
6. Sign the transaction using the `web3.eth.account.sign_transaction` function and pass in the increment transaction and the `private_key` of the sender
7. Using the signed transaction, you can then send it using the `web3.eth.send_raw_transaction` function and wait for the transaction receipt by using the `web3.eth.wait_for_transaction_receipt` function
```python
# 1. Add imports
from compile import abi
from web3 import Web3
# 2. Create web3.py provider
provider_rpc = {
# Insert your RPC URL here
"evm_network": "https://services.tanssi-testnet.network/dancelight-2001",
}
web3 = Web3(Web3.HTTPProvider(provider_rpc["evm_network"]))
# 3. Create variables
account_from = {
"private_key": "INSERT_YOUR_PRIVATE_KEY",
"address": "INSERT_PUBLIC_ADDRESS_OF_PK",
}
contract_address = "INSERT_CONTRACT_ADDRESS"
value = 3
print(
f"Calling the increment by { value } function in contract at address: { contract_address }"
)
# 4. Create contract instance
Incrementer = web3.eth.contract(address=contract_address, abi=abi)
# 5. Build increment tx
increment_tx = Incrementer.functions.increment(value).build_transaction(
{
"from": Web3.to_checksum_address(account_from["address"]),
"nonce": web3.eth.get_transaction_count(
Web3.to_checksum_address(account_from["address"])
),
}
)
# 6. Sign tx with PK
tx_create = web3.eth.account.sign_transaction(increment_tx, account_from["private_key"])
# 7. Send tx and wait for receipt
tx_hash = web3.eth.send_raw_transaction(tx_create.rawTransaction)
tx_receipt = web3.eth.wait_for_transaction_receipt(tx_hash)
print(f"Tx successful with hash: { tx_receipt.transactionHash.hex() }")
```
To run the script, you can enter the following command in your terminal:
```bash
python3 increment.py
```
If successful, the transaction hash will be displayed in the terminal. You can use the `get.py` script alongside the `increment.py` script to make sure that value is changing as expected:

Next you can open the `reset.py` file and take the following steps to create the script:
1. Add imports, including Web3.py and the ABI of the `Incrementer.sol` contract
2. [Set up the Web3 provider](#setting-up-the-web3py-provider)
3. Define the `account_from`, including the `private_key`, and the `contract_address` of the deployed contract. The private key is required to sign the transaction. **Note: This is for example purposes only. Never store your private keys in a Python file**
4. Create a contract instance using the `web3.eth.contract` function and passing in the ABI and address of the deployed contract
5. Build the reset transaction using the contract instance. You'll then use the `build_transaction` function to pass in the transaction information including the `from` address and the `nonce` for the sender. To get the `nonce` you can use the `web3.eth.get_transaction_count` function
6. Sign the transaction using the `web3.eth.account.sign_transaction` function and pass in the reset transaction and the `private_key` of the sender
7. Using the signed transaction, you can then send it using the `web3.eth.send_raw_transaction` function and wait for the transaction receipt by using the `web3.eth.wait_for_transaction_receipt` function
```python
# 1. Add imports
from compile import abi
from web3 import Web3
# 2. Create web3.py provider
provider_rpc = {
# Insert your RPC URL here
"evm_network": "https://services.tanssi-testnet.network/dancelight-2001",
}
web3 = Web3(Web3.HTTPProvider(provider_rpc["evm_network"]))
# 3. Create variables
account_from = {
"private_key": "INSERT_YOUR_PRIVATE_KEY",
"address": "INSERT_PUBLIC_ADDRESS_OF_PK",
}
contract_address = "INSERT_CONTRACT_ADDRESS"
print(f"Calling the reset function in contract at address: { contract_address }")
# 4. Create contract instance
Incrementer = web3.eth.contract(address=contract_address, abi=abi)
# 5. Build reset tx
reset_tx = Incrementer.functions.reset().build_transaction(
{
"from": Web3.to_checksum_address(account_from["address"]),
"nonce": web3.eth.get_transaction_count(
Web3.to_checksum_address(account_from["address"])
),
}
)
# 6. Sign tx with PK
tx_create = web3.eth.account.sign_transaction(reset_tx, account_from["private_key"])
# 7. Send tx and wait for receipt
tx_hash = web3.eth.send_raw_transaction(tx_create.rawTransaction)
tx_receipt = web3.eth.wait_for_transaction_receipt(tx_hash)
print(f"Tx successful with hash: { tx_receipt.transactionHash.hex() }")
```
To run the script, you can enter the following command in your terminal:
```bash
python3 reset.py
```
If successful, the transaction hash will be displayed in the terminal. You can use the `get.py` script alongside the `reset.py` script to make sure that value is changing as expected:

The information presented herein has been provided by third parties and is made available solely for general information purposes. Tanssi does not endorse any project listed and described on the Tanssi Doc Website (https://docs.tanssi.network/). Tanssi Foundation does not warrant the accuracy, completeness or usefulness of this information. Any reliance you place on such information is strictly at your own risk. Tanssi Foundation disclaims all liability and responsibility arising from any reliance placed on this information by you or by anyone who may be informed of any of its contents. All statements and/or opinions expressed in these materials are solely the responsibility of the person or entity providing those materials and do not necessarily represent the opinion of Tanssi Foundation. The information should not be construed as professional or financial advice of any kind. Advice from a suitably qualified professional should always be sought in relation to any particular matter or circumstance. The information herein may link to or integrate with other websites operated or content provided by third parties, and such other websites may link to this website. Tanssi Foundation has no control over any such other websites or their content and will have no liability arising out of or related to such websites or their content. The existence of any such link does not constitute an endorsement of such websites, the content of the websites, or the operators of the websites. These links are being provided to you only as a convenience and you release and hold Tanssi Foundation harmless from any and all liability arising from your use of this information or the information provided by any third-party website or service.
--- END CONTENT ---
Doc-Content: https://docs.tanssi.network/builders/toolkit/ethereum-api/precompiles/batch/
--- BEGIN CONTENT ---
---
title: Batch Precompile
description: Learn how to combine multiple transfers and contract interactions together via a Solidity interface with Tanssi's Batch Precompile for your EVM network.
keywords: solidity, ethereum, batch, transaction, moonbeam, precompiled, contracts
icon: octicons-stack-24
categories: EVM-Template
---
# Interacting with the Batch Precompile
## Introduction {: #introduction }
The Batch Precompile contract on Tanssi-powered EVM networks allows developers to combine multiple EVM calls into one.
Currently, having users interact with multiple contracts would require multiple transaction confirmations in the user's wallet. An example would be approving a smart contract's access to a token and then immediately transferring it. With the Batch Precompile, developers can enhance user experience with batched transactions as it minimizes the number of transactions a user is required to confirm. Additionally, the gas fees paid by a user can be reduced since batching avoids multiple base gas fees (the initial 21000 units of gas spent to begin a transaction).
The precompile interacts directly with [Substrate's EVM pallet](https://polkadot-evm.github.io/frontier){target=\_blank}. The caller of the batch function will have their address act as the `msg.sender` for all subtransactions, but unlike [delegate calls](https://docs.soliditylang.org/en/v0.8.15/introduction-to-smart-contracts.html#delegatecall-callcode-and-libraries){target=\_blank}, the target contract will still affect its own storage. It is effectively the same as if the user signed multiple transactions but with only one confirmation.
The Batch Precompile is located at the following address:
```text
{{ networks.demo_evm.precompiles.batch }}
```
!!! note
There can be some unintended consequences when using precompiles. Tanssi's precompiles are derived from Moonbeam's, and as such, please familiarize yourself with [Moonbeam's Precompile Security Considerations](https://docs.moonbeam.network/builders/get-started/eth-compare/security){target=\_blank}.
## The Batch Solidity Interface {: #the-batch-interface }
[`Batch.sol`](https://github.com/moondance-labs/tanssi/blob/master/test/contracts/solidity/Batch.sol){target=\_blank} is a Solidity interface that allows developers to interact with the precompile's three methods.
??? code "Batch.sol"
```solidity
// SPDX-License-Identifier: GPL-3.0-only
pragma solidity >=0.8.3;
/// @dev The Batch contract's address.
address constant BATCH_ADDRESS = 0x0000000000000000000000000000000000000801;
/// @dev The Batch contract's instance.
Batch constant BATCH_CONTRACT = Batch(BATCH_ADDRESS);
/// @author The Moonbeam Team
/// @title Batch precompile
/// @dev Allows to perform multiple calls throught one call to the precompile.
/// Can be used by EOA to do multiple calls in a single transaction.
/// @custom:address 0x0000000000000000000000000000000000000801
interface Batch {
/// @dev Batch multiple calls into a single transaction.
/// All calls are performed from the address calling this precompile.
///
/// In case of one subcall reverting following subcalls will still be attempted.
///
/// @param to List of addresses to call.
/// @param value List of values for each subcall. If array is shorter than "to" then additional
/// calls will be performed with a value of 0.
/// @param callData Call data for each `to` address. If array is shorter than "to" then
/// additional calls will be performed with an empty call data.
/// @param gasLimit Gas limit for each `to` address. Use 0 to forward all the remaining gas.
/// If array is shorter than "to" then the remaining gas available will be used.
/// @custom:selector 79df4b9c
function batchSome(
address[] memory to,
uint256[] memory value,
bytes[] memory callData,
uint64[] memory gasLimit
) external;
/// @dev Batch multiple calls into a single transaction.
/// All calls are performed from the address calling this precompile.
///
/// In case of one subcall reverting, no more subcalls will be executed but
/// the batch transaction will succeed. Use batchAll to revert on any subcall revert.
///
/// @param to List of addresses to call.
/// @param value List of values for each subcall. If array is shorter than "to" then additional
/// calls will be performed with a value of 0.
/// @param callData Call data for each `to` address. If array is shorter than "to" then
/// additional calls will be performed with an empty call data.
/// @param gasLimit Gas limit for each `to` address. Use 0 to forward all the remaining gas.
/// If array is shorter than "to" then the remaining gas available will be used.
/// @custom:selector cf0491c7
function batchSomeUntilFailure(
address[] memory to,
uint256[] memory value,
bytes[] memory callData,
uint64[] memory gasLimit
) external;
/// @dev Batch multiple calls into a single transaction.
/// All calls are performed from the address calling this precompile.
///
/// In case of one subcall reverting, the entire batch will revert.
///
/// @param to List of addresses to call.
/// @param value List of values for each subcall. If array is shorter than "to" then additional
/// calls will be performed with a value of 0.
/// @param callData Call data for each `to` address. If array is shorter than "to" then
/// additional calls will be performed with an empty call data.
/// @param gasLimit Gas limit for each `to` address. Use 0 to forward all the remaining gas.
/// If array is shorter than "to" then the remaining gas available will be used.
/// @custom:selector 96e292b8
function batchAll(
address[] memory to,
uint256[] memory value,
bytes[] memory callData,
uint64[] memory gasLimit
) external;
/// Emitted when a subcall succeeds.
event SubcallSucceeded(uint256 index);
/// Emitted when a subcall fails.
event SubcallFailed(uint256 index);
}
```
The interface includes the following functions:
???+ function "**batchSome**(*address[]* to, *uint256[]* value, *bytes[]* callData, *uint64[]* gasLimit) — performs multiple calls, where the same index of each array combine into the information required for a single subcall. If a subcall reverts, following subcalls will still be attempted"
=== "Parameters"
- `to` - an array of addresses to direct subtransactions to, where each entry is a subtransaction
- `value` - an array of native currency values to send in the subtransactions, where the index corresponds to the subtransaction of the same index in the *to* array. If this array is shorter than the *to* array, all the following subtransactions will default to a value of 0
- `callData` - an array of call data to include in the subtransactions, where the index corresponds to the subtransaction of the same index in the *to* array. If this array is shorter than the *to* array, all of the following subtransactions will include no call data
- `gasLimit` - an array of gas limits in the subtransactions, where the index corresponds to the subtransaction of the same index in the *to* array. Values of 0 are interpreted as unlimited and will have all remaining gas of the batch transaction forwarded. If this array is shorter than the *to* array, all of the following subtransactions will have all remaining gas forwarded
??? function "**batchSomeUntilFailure**(*address[]* to, *uint256[]* value, *bytes[]* callData, *uint64[]* gasLimit) — performs multiple calls, where the same index of each array combine into the information required for a single subcall. If a subcall reverts, no following subcalls will be executed"
=== "Parameters"
- `to` - an array of addresses to direct subtransactions to, where each entry is a subtransaction
- `value` - an array of native currency values to send in the subtransactions, where the index corresponds to the subtransaction of the same index in the *to* array. If this array is shorter than the *to* array, all the following subtransactions will default to a value of 0
- `callData` - an array of call data to include in the subtransactions, where the index corresponds to the subtransaction of the same index in the *to* array. If this array is shorter than the *to* array, all of the following subtransactions will include no call data
- `gasLimit` - an array of gas limits in the subtransactions, where the index corresponds to the subtransaction of the same index in the *to* array. Values of 0 are interpreted as unlimited and will have all remaining gas of the batch transaction forwarded. If this array is shorter than the *to* array, all of the following subtransactions will have all remaining gas forwarded
??? function "**batchAll**(*address[]* to, *uint256[]* value, *bytes[]* callData, *uint64[]* gasLimit) — performs multiple calls atomically, where the same index of each array combine into the information required for a single subcall. If a subcall reverts, all subcalls will revert"
=== "Parameters"
- `to` - an array of addresses to direct subtransactions to, where each entry is a subtransaction
- `value` - an array of native currency values to send in the subtransactions, where the index corresponds to the subtransaction of the same index in the *to* array. If this array is shorter than the *to* array, all the following subtransactions will default to a value of 0
- `callData` - an array of call data to include in the subtransactions, where the index corresponds to the subtransaction of the same index in the *to* array. If this array is shorter than the *to* array, all of the following subtransactions will include no call data
- `gasLimit` - an array of gas limits in the subtransactions, where the index corresponds to the subtransaction of the same index in the *to* array. Values of 0 are interpreted as unlimited and will have all remaining gas of the batch transaction forwarded. If this array is shorter than the *to* array, all of the following subtransactions will have all remaining gas forwarded
The interface also includes the following required events:
- **SubcallSucceeded**(*uint256* index) - emitted when a subcall of the given index succeeds
- **SubcallFailed**(*uint256* index) - emitted when a subcall of the given index fails
## Interact with the Solidity Interface {: #interact-with-the-solidity-interface }
### Checking Prerequisites {: #checking-prerequisites }
To follow along with this tutorial, you will need to have your wallet configured to work with your EVM network and an account funded with native tokens. You can add your EVM network to MetaMask with one click on the [Tanssi dApp](https://apps.tanssi.network){target=\_blank}. Or, you [configure MetaMask for Tanssi with the demo EVM network](/builders/toolkit/ethereum-api/wallets/metamask/){target=\_blank}.
### Example Contract {: #example-contract}
The contract `SimpleContract.sol` will be used as an example of batching contract interactions, but in practice, any contract can be interacted with.
```solidity
// SPDX-License-Identifier: GPL-3.0-only
pragma solidity >=0.8.0;
contract SimpleContract {
mapping(uint256 => string) public messages;
function setMessage(uint256 id, string calldata message) external {
messages[id] = message;
}
}
```
### Remix Set Up {: #remix-set-up }
You can interact with the Batch Precompile using [Remix](https://remix.ethereum.org){target=\_blank}. You'll need a copy of [`Batch.sol`](https://github.com/moondance-labs/tanssi/blob/master/test/contracts/solidity/Batch.sol){target=\_blank} and `SimpleContract.sol`. To add the precompile to Remix and follow along with the tutorial, you will need to:
1. Click on the **File explorer** tab
2. Paste the `Batch.sol` contract into a Remix file named **Batch.sol**
3. Paste the `SimpleContract.sol` contract into a Remix file named **SimpleContract.sol**
### Compile the Contract {: #compile-the-contract }
Next, you will need to compile both files in Remix:
1. Make sure that you have the **Batch.sol** file open
2. Click on the **Compile** tab, second from top
3. To compile the contract, click on **Compile Batch.sol**
If the interface was compiled successfully, you will see a green checkmark next to the **Compile** tab.
### Access the Precompile {: #access-the-precompile }
Instead of deploying the Batch Precompile, you will access the interface given the address of the precompiled contract:
1. Click on the **Deploy and Run** tab directly below the **Compile** tab in Remix. Please note that the precompiled contract is already deployed
2. Make sure **Injected Provider - MetaMask** is selected in the **ENVIRONMENT** dropdown. Once you select **Injected Provider - MetaMask**, you might be prompted by MetaMask to connect your account to Remix
3. Make sure the correct account is displayed under **ACCOUNT**
4. Ensure **Batch.sol** is selected in the **CONTRACT** dropdown. Since this is a precompiled contract, there is no need to deploy any code. Instead, we are going to provide the address of the precompile in the **At Address** field
5. Provide the address of the Batch Precompile: `{{networks.demo_evm.precompiles.batch}}` and click **At Address**
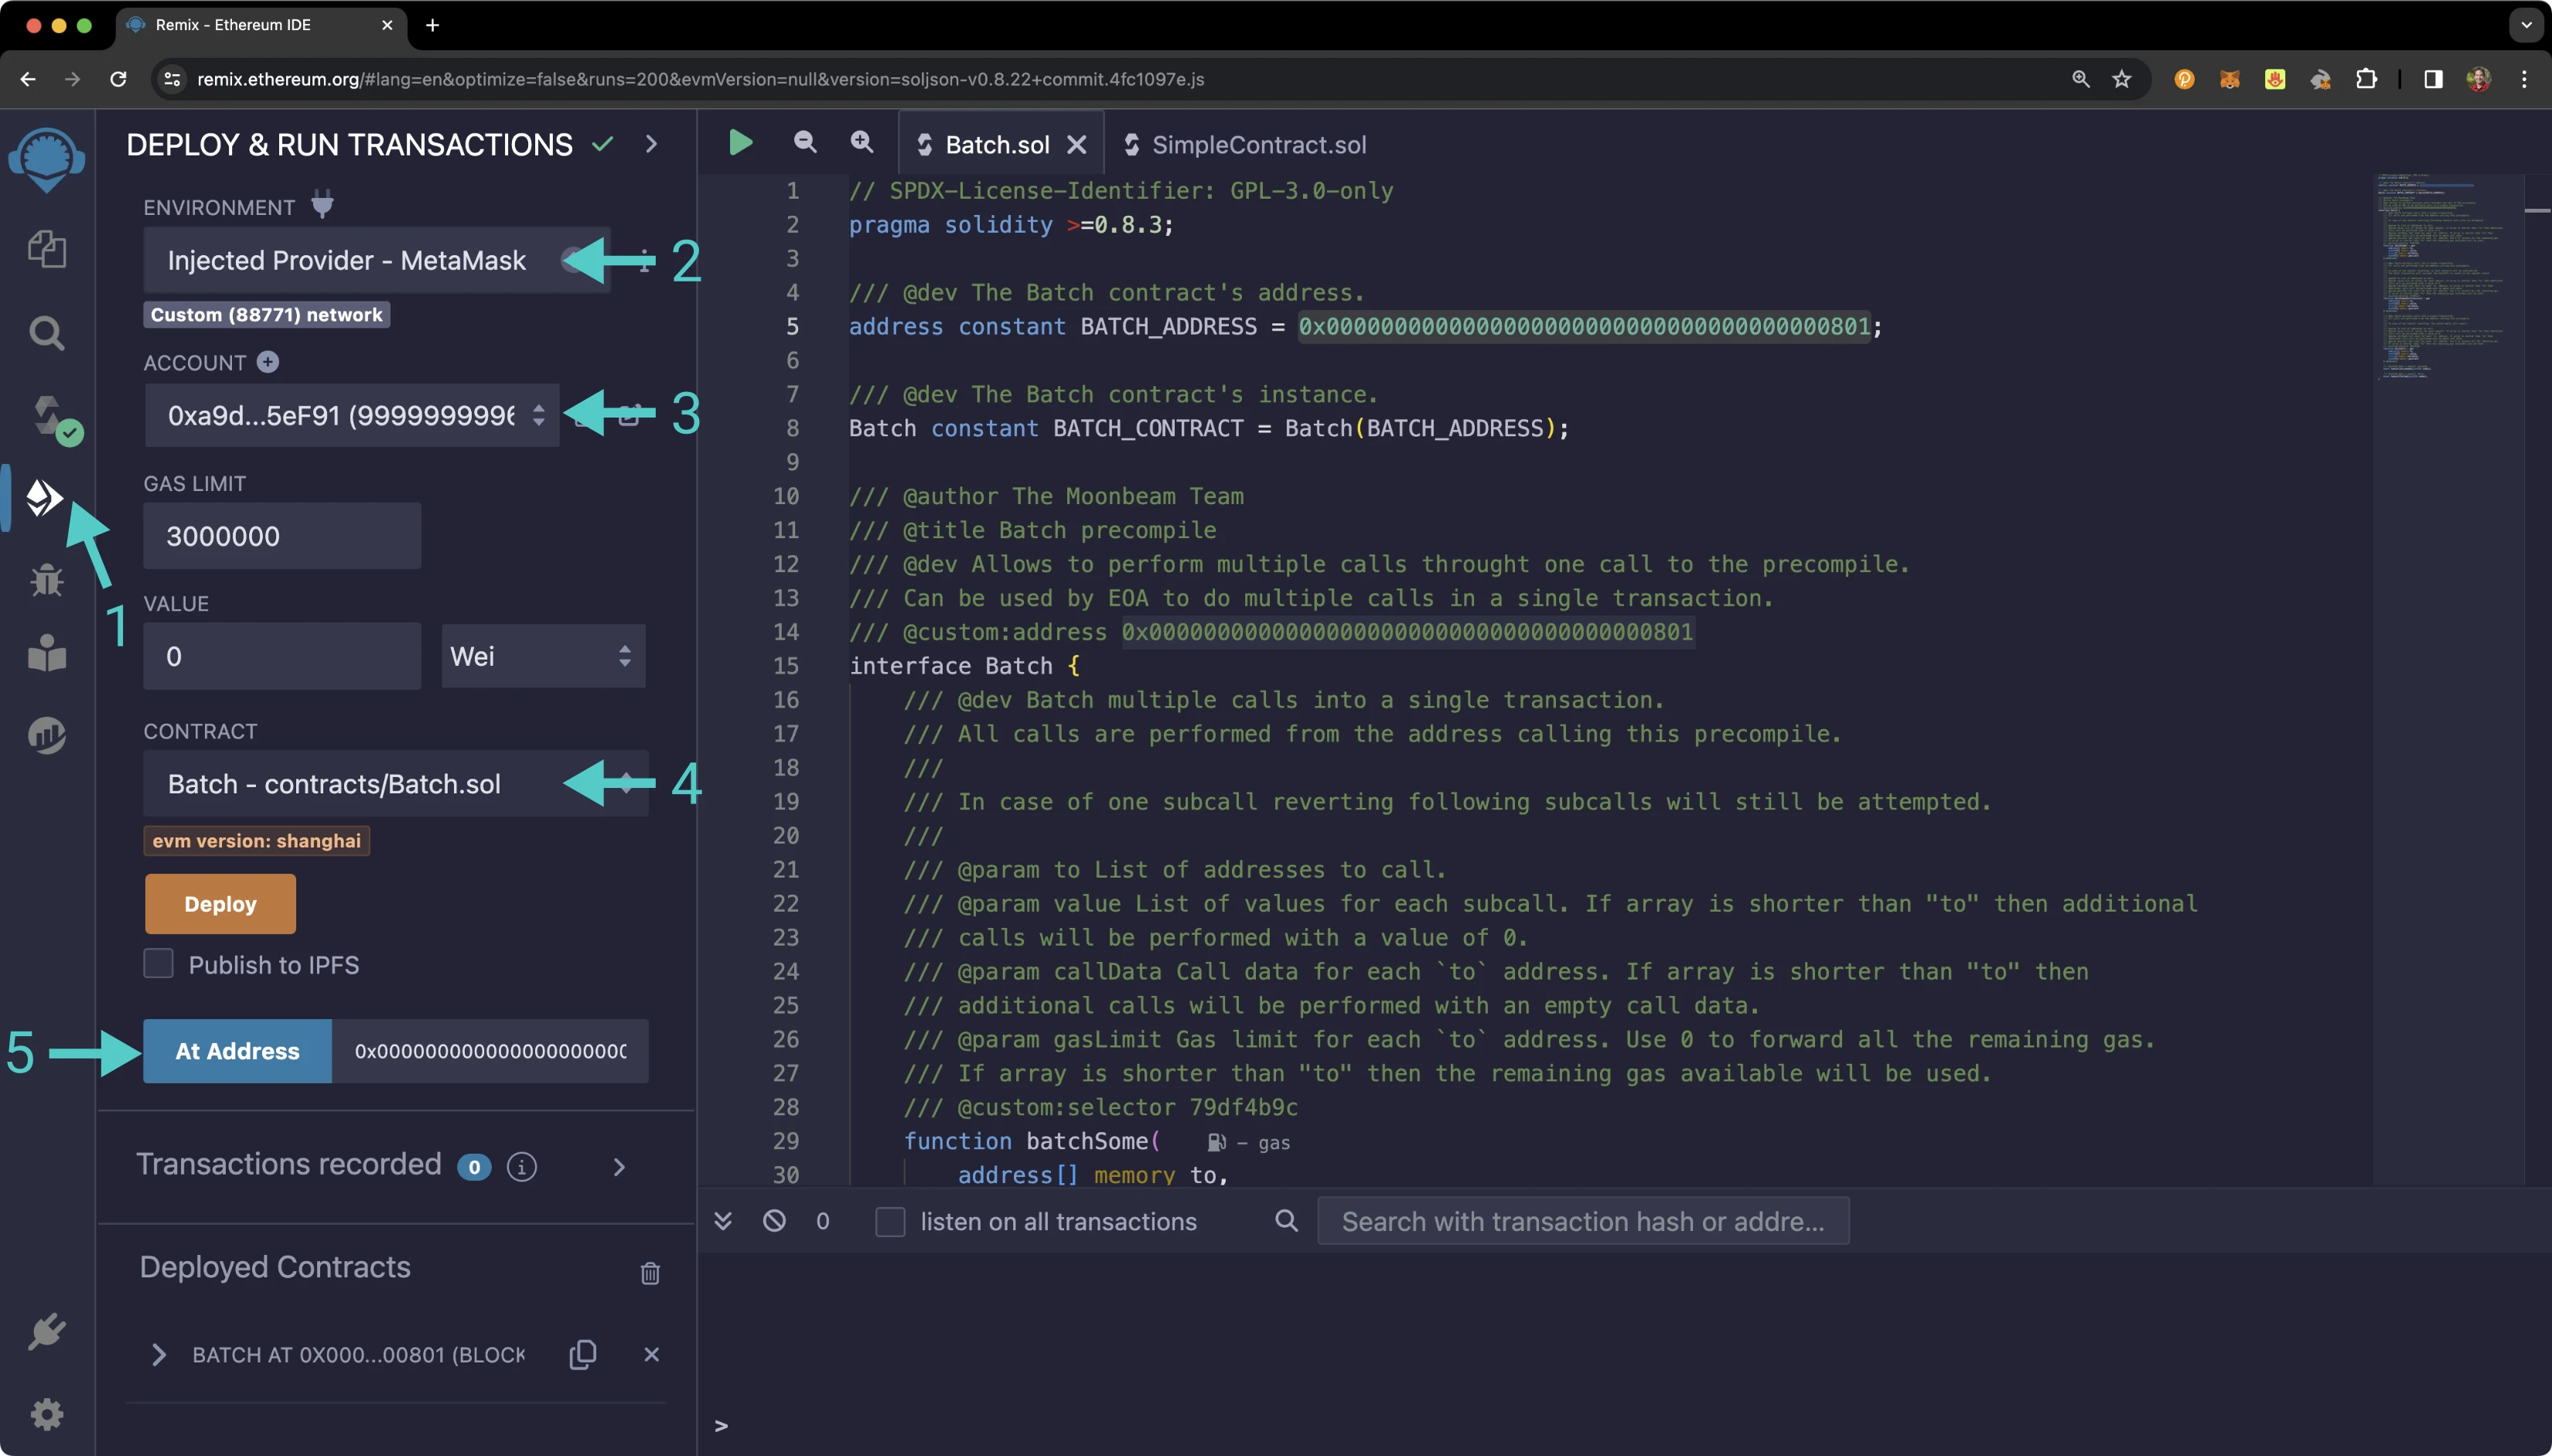
The **BATCH** precompile will appear in the list of **Deployed Contracts**.
### Deploy Example Contract {: #deploy-example-contract }
On the other hand, `SimpleContract.sol` will be deployed as a new contract. Before starting this section, repeat the [compilation step](#compile-the-contract) with the `SimpleContract.sol` file.
1. Click on the **Deploy and Run** tab directly below the **Compile** tab in Remix
2. Make sure **Injected Provider - MetaMask** is selected in the **ENVIRONMENT** dropdown. Once you select **Injected Provider - MetaMask**, you might be prompted by MetaMask to connect your account to Remix
3. Make sure the correct account is displayed under **ACCOUNT**
4. Ensure **SimpleContract** is selected in the **CONTRACT** dropdown
5. Click **Deploy**
6. Confirm the MetaMask transaction that appears by clicking **Confirm**
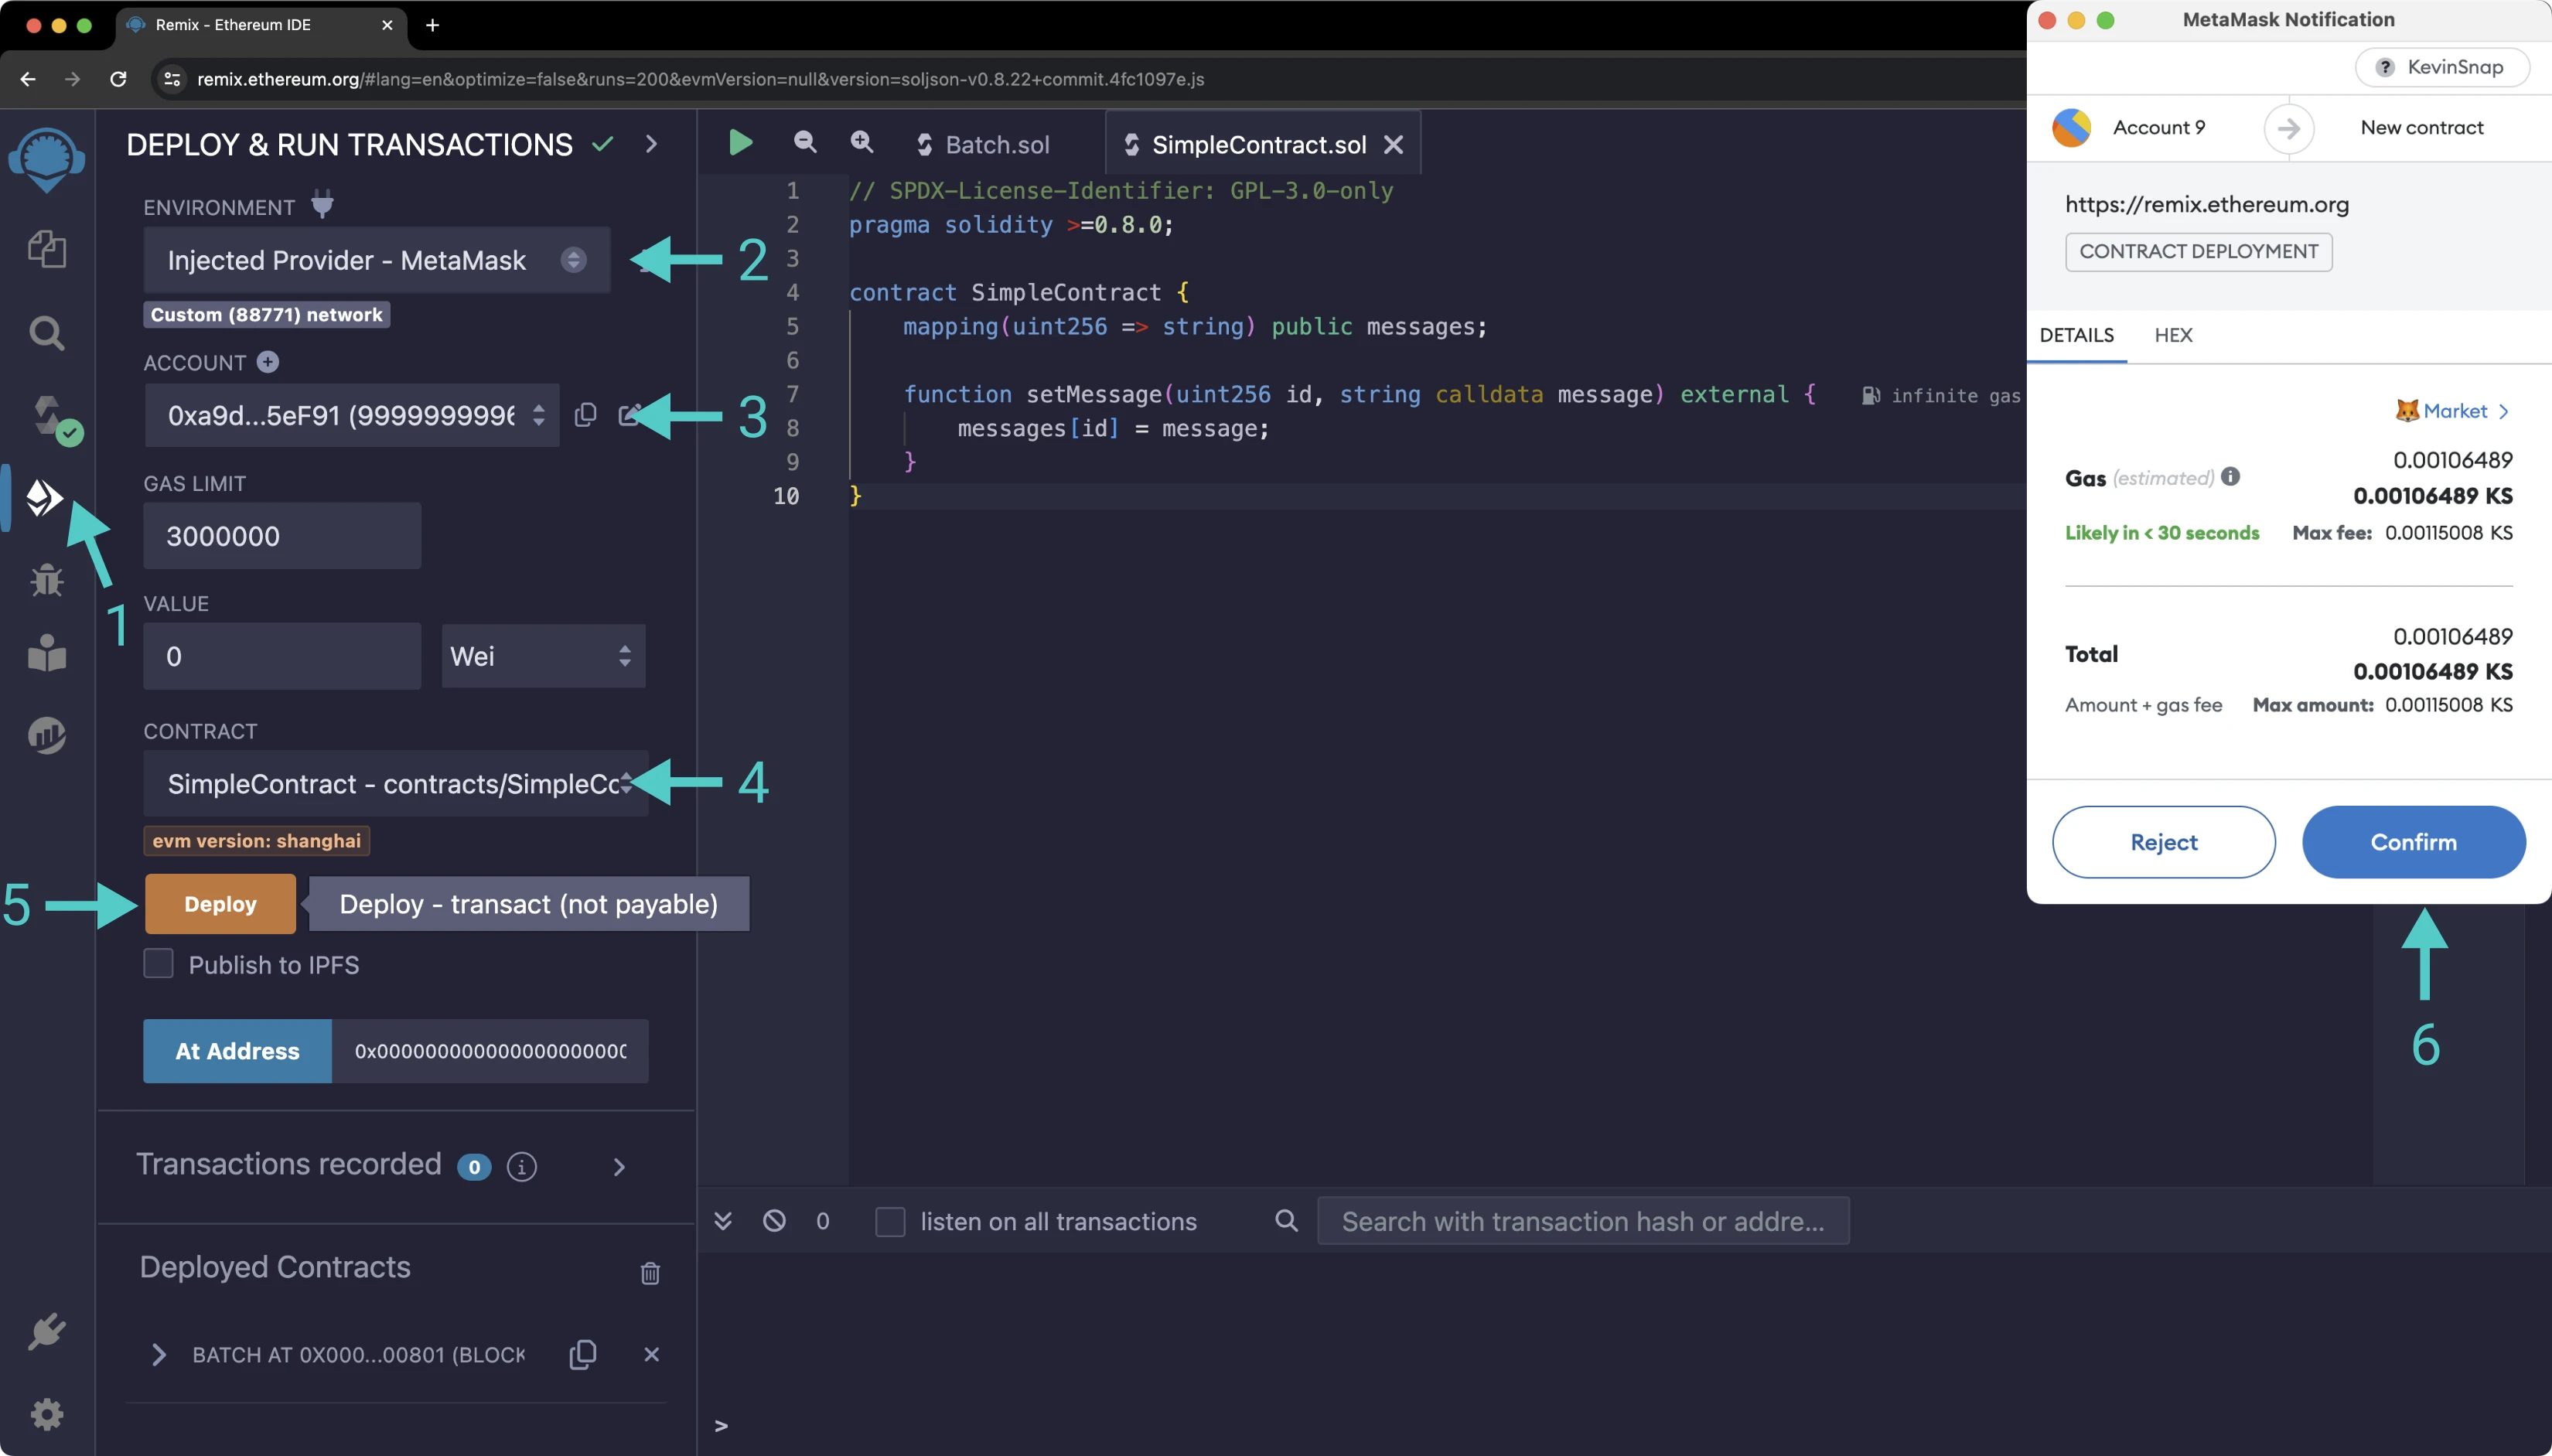
The **SIMPLECONTRACT** contract will appear in the list of **Deployed Contracts**.
### Send Native Currency via Precompile {: #send-native-currency-via-precompile }
Sending native currency with the Batch Precompile involves more than pressing a few buttons in Remix or MetaMask. For this example, you will be using the **batchAll** function to send native currency atomically.
Transactions have a value field to specify the amount of native currency sent. In Remix, this is determined by the **VALUE** input in the **DEPLOY & RUN TRANSACTIONS** tab. However, for the Batch Precompile, this data is provided within the **value** array input of the batch functions.
Try transferring the native token of your network to two wallets of your choice via the Batch Precompile:
1. Expand the batch contract under **Deployed Contracts**
2. Expand the **batchAll** function
3. For the **to** input, insert your addresses in the following format: `["INSERT_ADDRESS_1", "INSERT_ADDRESS_2"]`, where the first address corresponds to the first wallet of your choice and the second address corresponds to the second wallet of your choice
4. For the **value** input, insert the amount you wish to transfer in Wei for each address. For example, `["1000000000000000000", "2000000000000000000"]` will transfer 1 native token to the first address and 2 native tokens to the second address
5. For **callData**, insert `[]`. Call data is not relevant for simply transferring the native token
6. For the **gasLimit** inputs, insert `[]`
7. Press **transact**
8. Press **Confirm** in the MetaMask extension to confirm the transaction
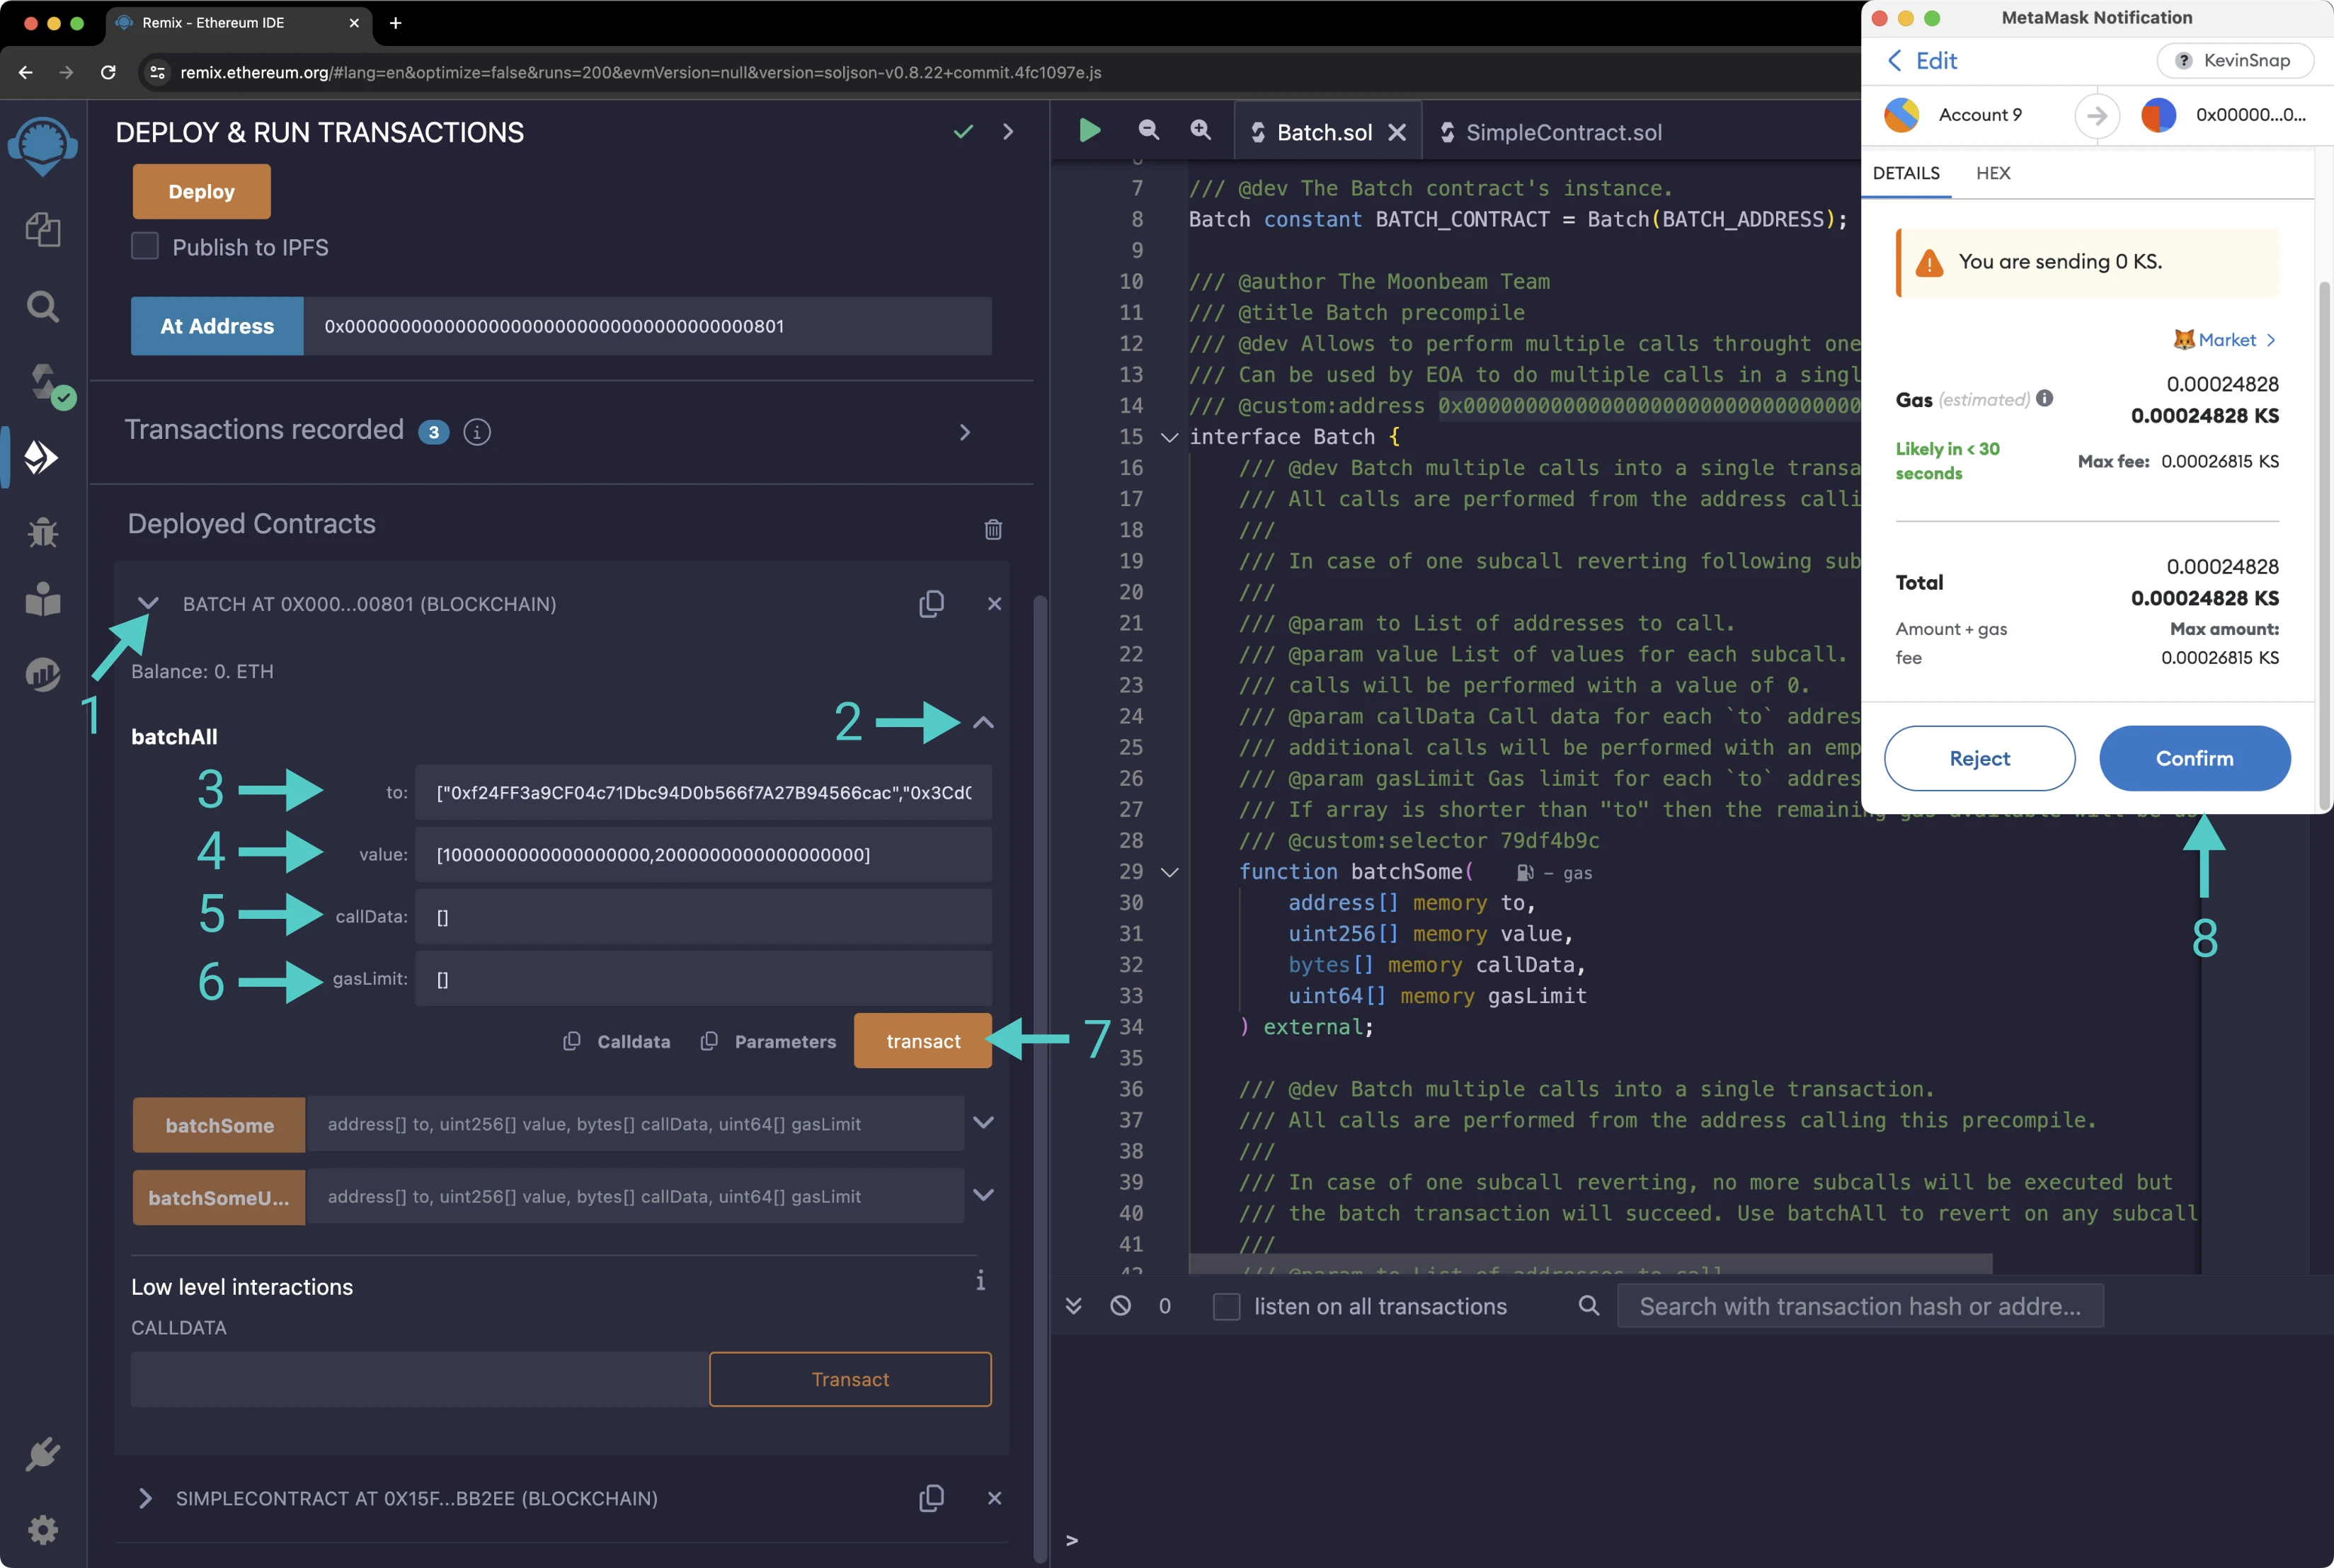
Once the transaction is complete, you can check both of the accounts' balances, either in MetaMask or in your network's block explorer, a link to which can be found on the [Tanssi dApp](https://apps.tanssi.network){target=\_blank}. Congratulations! You've now sent a batched transfer via the Batch Precompile.
!!! note
Typically if you wanted to send the native currency to or through a contract, you would have to set the value within the overall transaction object and interact with a payable function. However, since the Batch Precompile interacts directly with Substrate code, this is not a typical Ethereum transaction and is thus not necessary.
### Find a Contract Interaction's Call Data {: #find-a-contract-interactions-call-data }
Visual interfaces like [Remix](/builders/toolkit/ethereum-api/dev-env/remix/){target=\_blank} and handy libraries like [Ethers.js](/builders/toolkit/ethereum-api/libraries/ethersjs/){target=\_blank} hide the way that Ethereum transactions interact with Solidity smart contracts. The name and input types of a function are hashed into a [function selector](https://docs.soliditylang.org/en/latest/abi-spec.html#function-selector-and-argument-encoding){target=\_blank} and the input data is encoded. These two pieces are then combined and sent as the transaction's call data. To send a subtransaction within a batch transaction, the sender needs to know its call data beforehand.
Try finding a transaction's call data using Remix:
1. Expand the `SimpleContract.sol` contract under **Deployed Contracts**
2. Expand the **setMessage** function
3. Enter the desired **id**, such as `1`
4. Enter the desired **message**, such as `"tanssi"`
5. Instead of sending the transaction, click the copy button next to the **transact** button to copy the call data
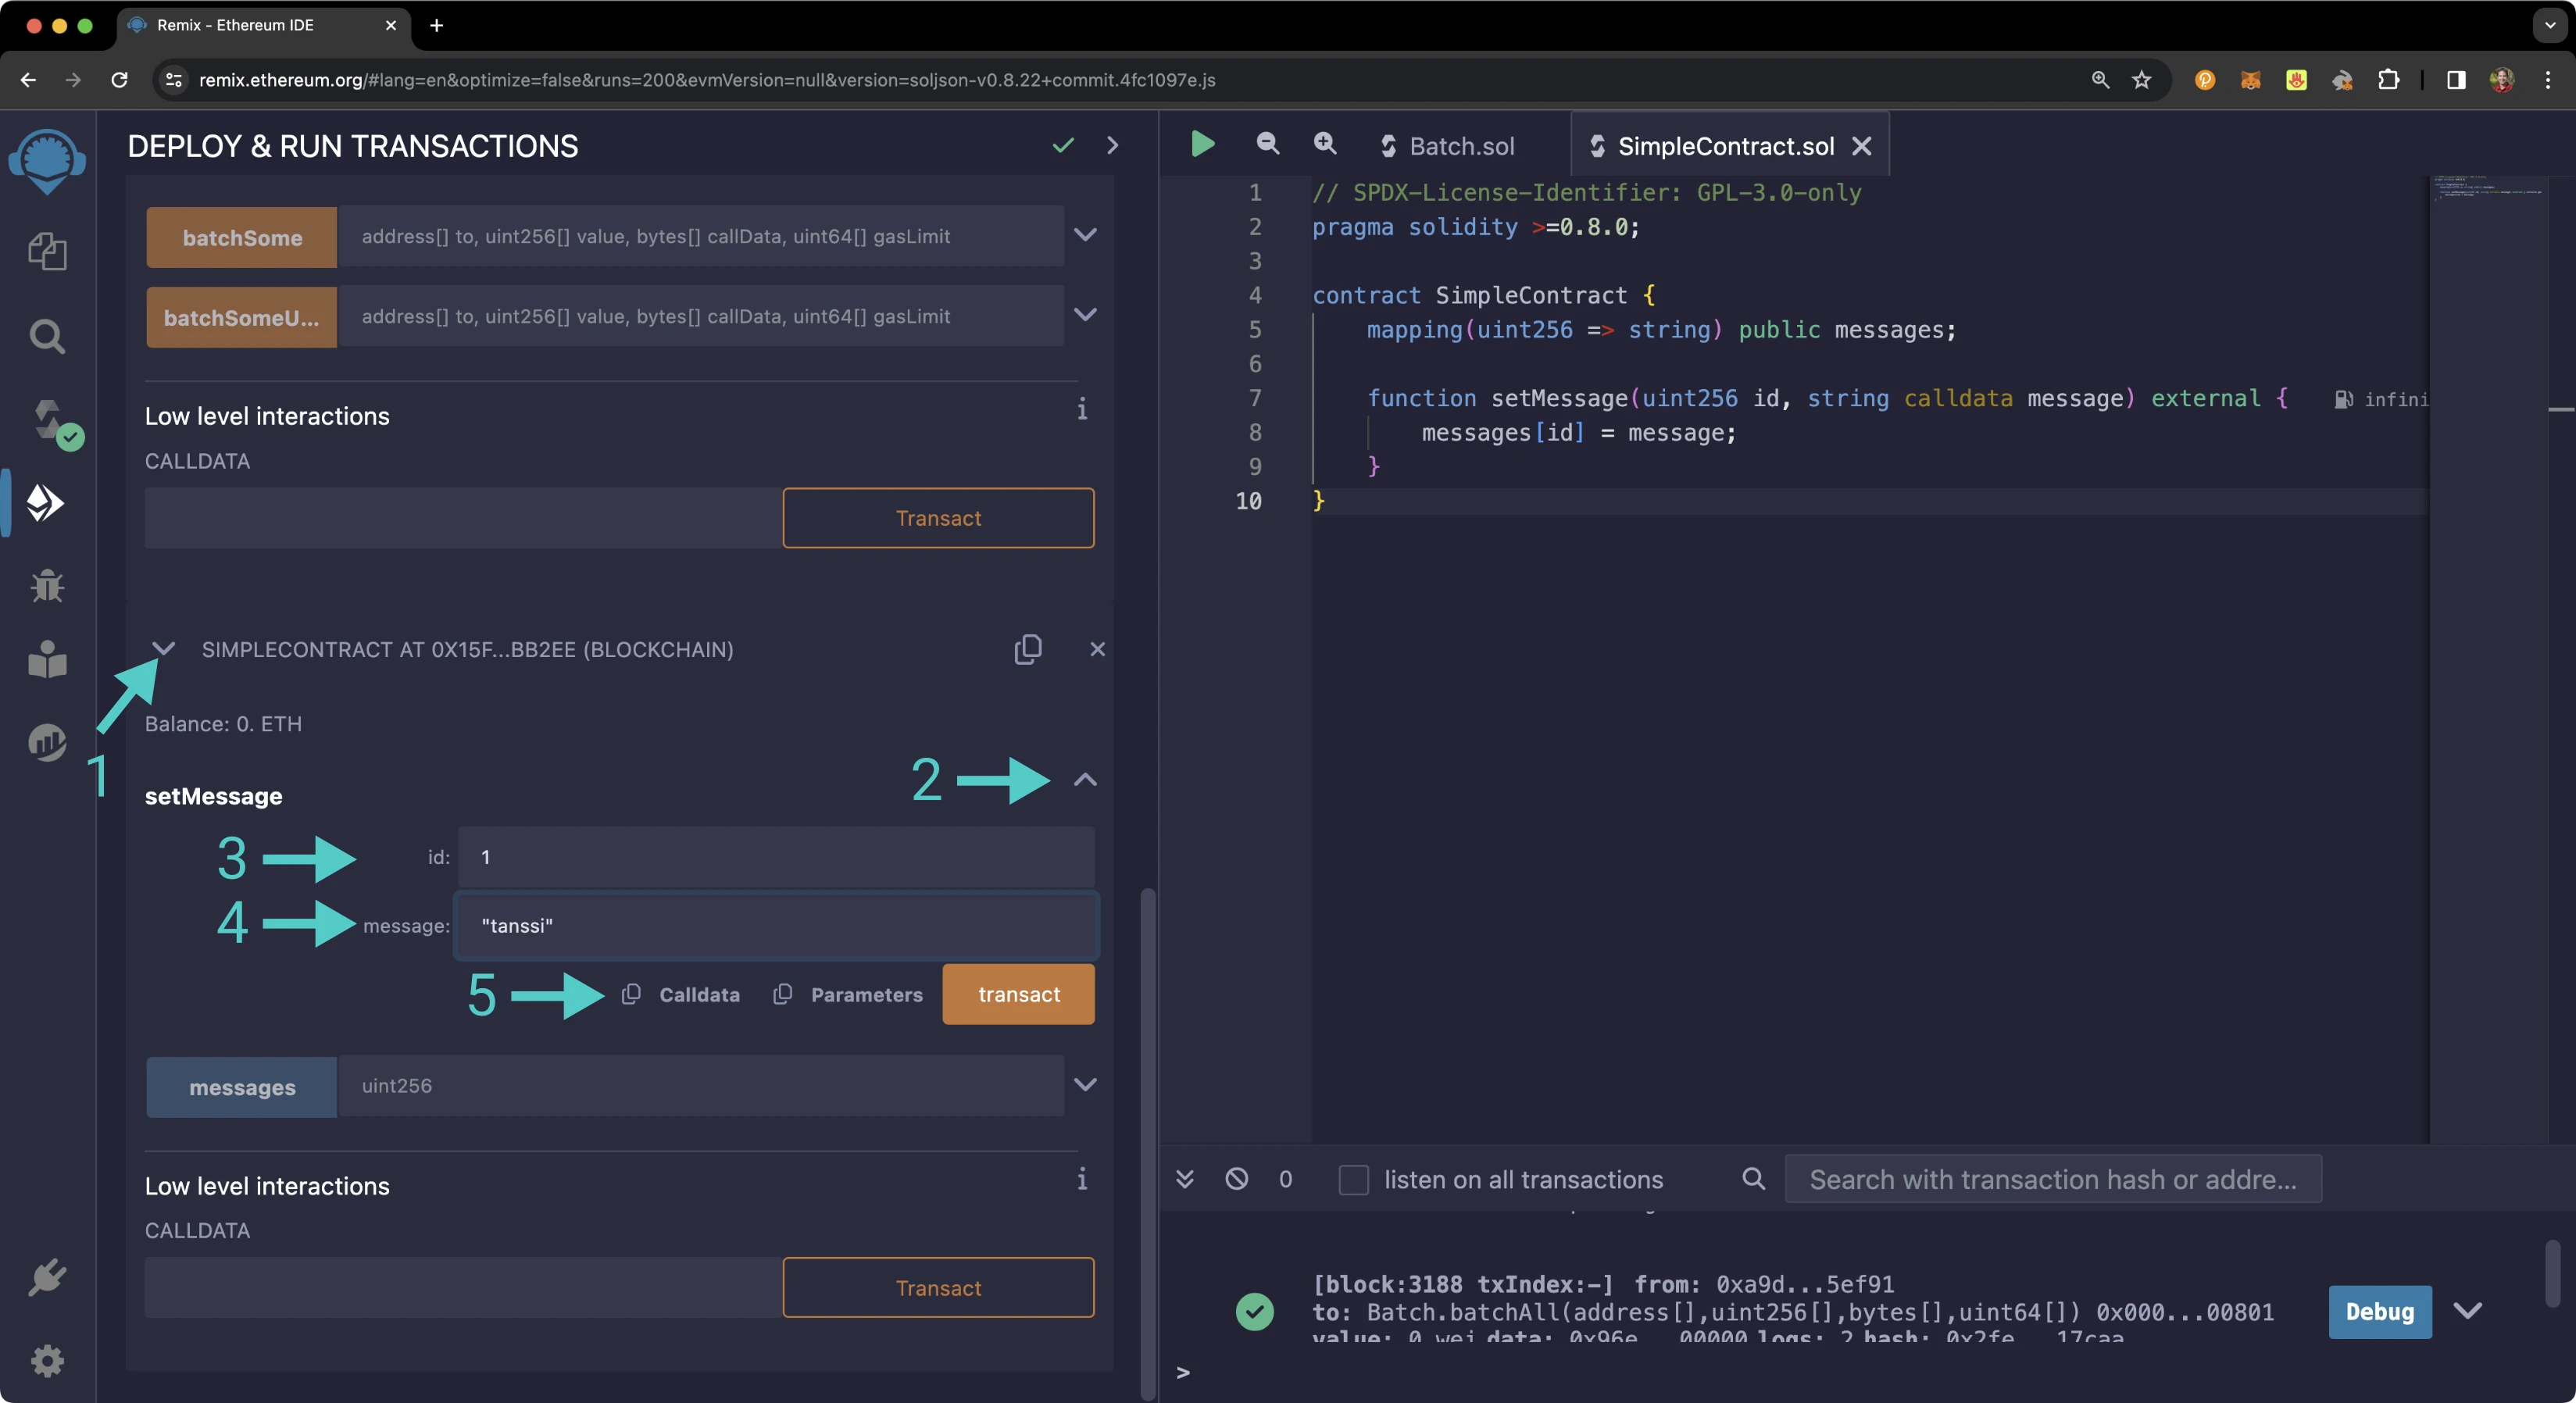
Now you have the transaction's call data! Considering the example values of `1` and `"tanssi"`, we can keep an eye out for their encoded values in the call data:
```text
0x648345c8 // function selector
0000000000000000000000000000000000000000000000000000000000000001 // 1 id
0000000000000000000000000000000000000000000000000000000000000040 // 32 byte offset
000000000000000000000000000000000000000000000000000000000000000 // 32 byte length
674616e7373690000000000000000000000000000000000000000000000000000 // "tanssi" in bytes
```
The call data can be broken into five lines where:
- The first line is the function selector
- The second line is equal to 1, which is the **id** that was provided
- What's left involves the **message** input. These last three lines are tricky since strings are a [dynamic type](https://docs.soliditylang.org/en/v0.8.15/abi-spec.html#use-of-dynamic-types){target=\_blank} with a dynamic length. The third line refers to an offset to define where the string's data starts. The fourth line refers to the length of the message in the following line, which is 32 bytes total - the "tanssi" message plus padding
You can repeat the above steps to capture the call data for values of `2` and `"hello"` such that multiple subcalls can be submitted atomically with the Batch Precompile in the next section.
### Function Interaction via Precompile {: #function-interaction-via-precompile }
This section's example will be using the **batchAll** function that will ensure the transactions are resolved atomically. Keep in mind that there are also two other batch functions that can either continue subtransactions despite errors or halt subsequent subtransactions but not revert previous ones.
Interacting with a function is very similar to [sending a native currency](#send-native-currency-via-precompile), since they are both transactions. However, call data is required to provide input to functions properly and a sender may desire to limit the amount of gas spent in each subtransaction.
The `callData` and `gasLimit` fields are more relevant for subtransactions that interact with contracts. For each function in the batch interface, the `callData` input is an array where each index corresponds to the call data for each recipient of the subtransaction, that is, each `to` input. If the size of the `callData` array is less than the `to` array, the remaining subtransactions will have no call data (functions with no inputs). The `gasLimit` input is an array that corresponds to the amount of gas that each can spend for each subtransaction. If its value at an index is 0 or the index is the size of the array or greater (and smaller than the `to` array's size), all of the remaining gas from the previous subtransaction is forwarded.
To use the precompile to send an atomic batch transaction combining two contract interactions, take the following steps:
1. Copy the `SimpleContract.sol` contract's address with the copy button on the right side of its header. Be sure also to have the [call data from the previous section](#find-a-contract-interactions-call-data)
2. Expand the batch contract under **Deployed Contracts**
3. Expand the **batchAll** function
4. For the **to** input, paste the address `SimpleContract.sol` as follows: `["INSERT_SIMPLE_CONTRACT_ADDRESS","INSERT_SIMPLE_CONTRACT_ADDRESS"]`. Note that you'll need to repeat the address for as many transactions you are batching together, even if the contract address is the same
5. For the value input, since `SimpleContract.sol` does not require any native currency to be paid to it, insert `[0,0]` for 0 Wei
6. For the **callData** input, insert your call data from the previous section in the following format: `["INSERT_FIRST_CALL_DATA","INSERT_SECOND_CALL_DATA"]`
7. For the **gasLimit** input, insert `[]`. You can put in a gas limit value for each subcall, or leave it as an empty array
8. Press **transact**
9. Press **Confirm** in the MetaMask extension to confirm the transaction
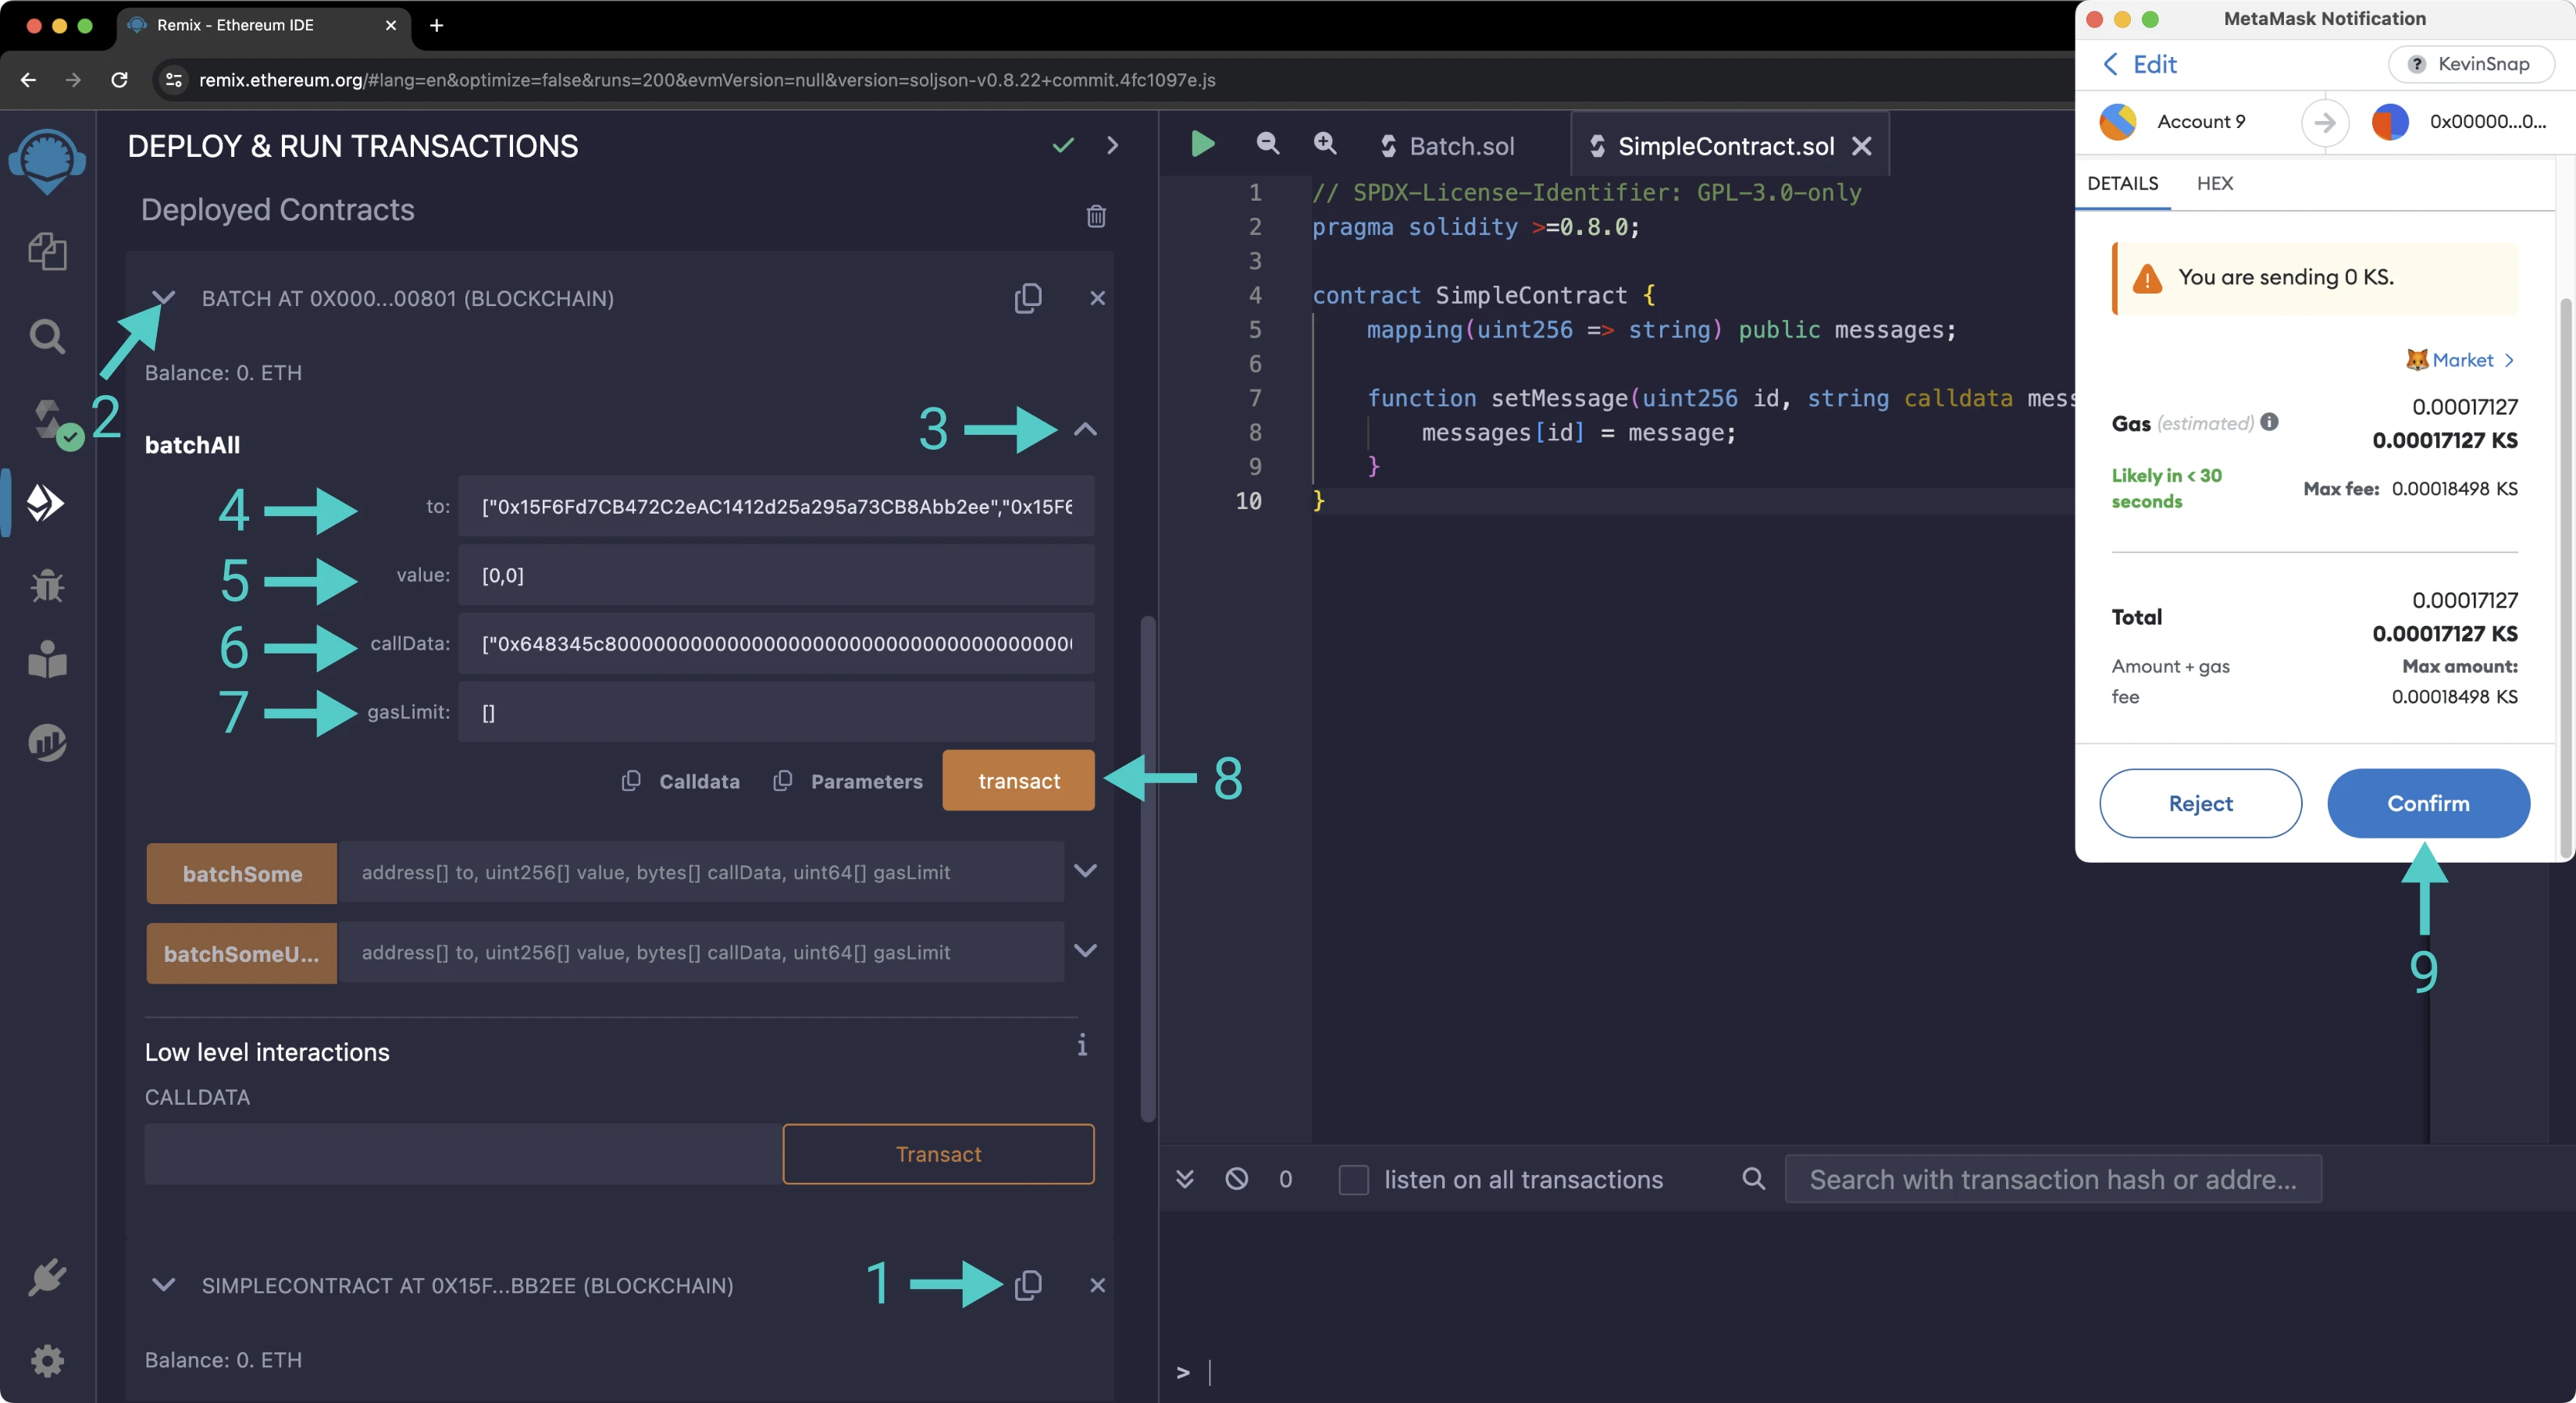
If you used the same call data as the tutorial, you can check to make sure that the transaction has been successful as follows:
1. Expand the `SimpleContract.sol` contract under **Deployed Contracts**
2. To the right of the **messages** button, insert `1`
3. Press the blue **messages** button
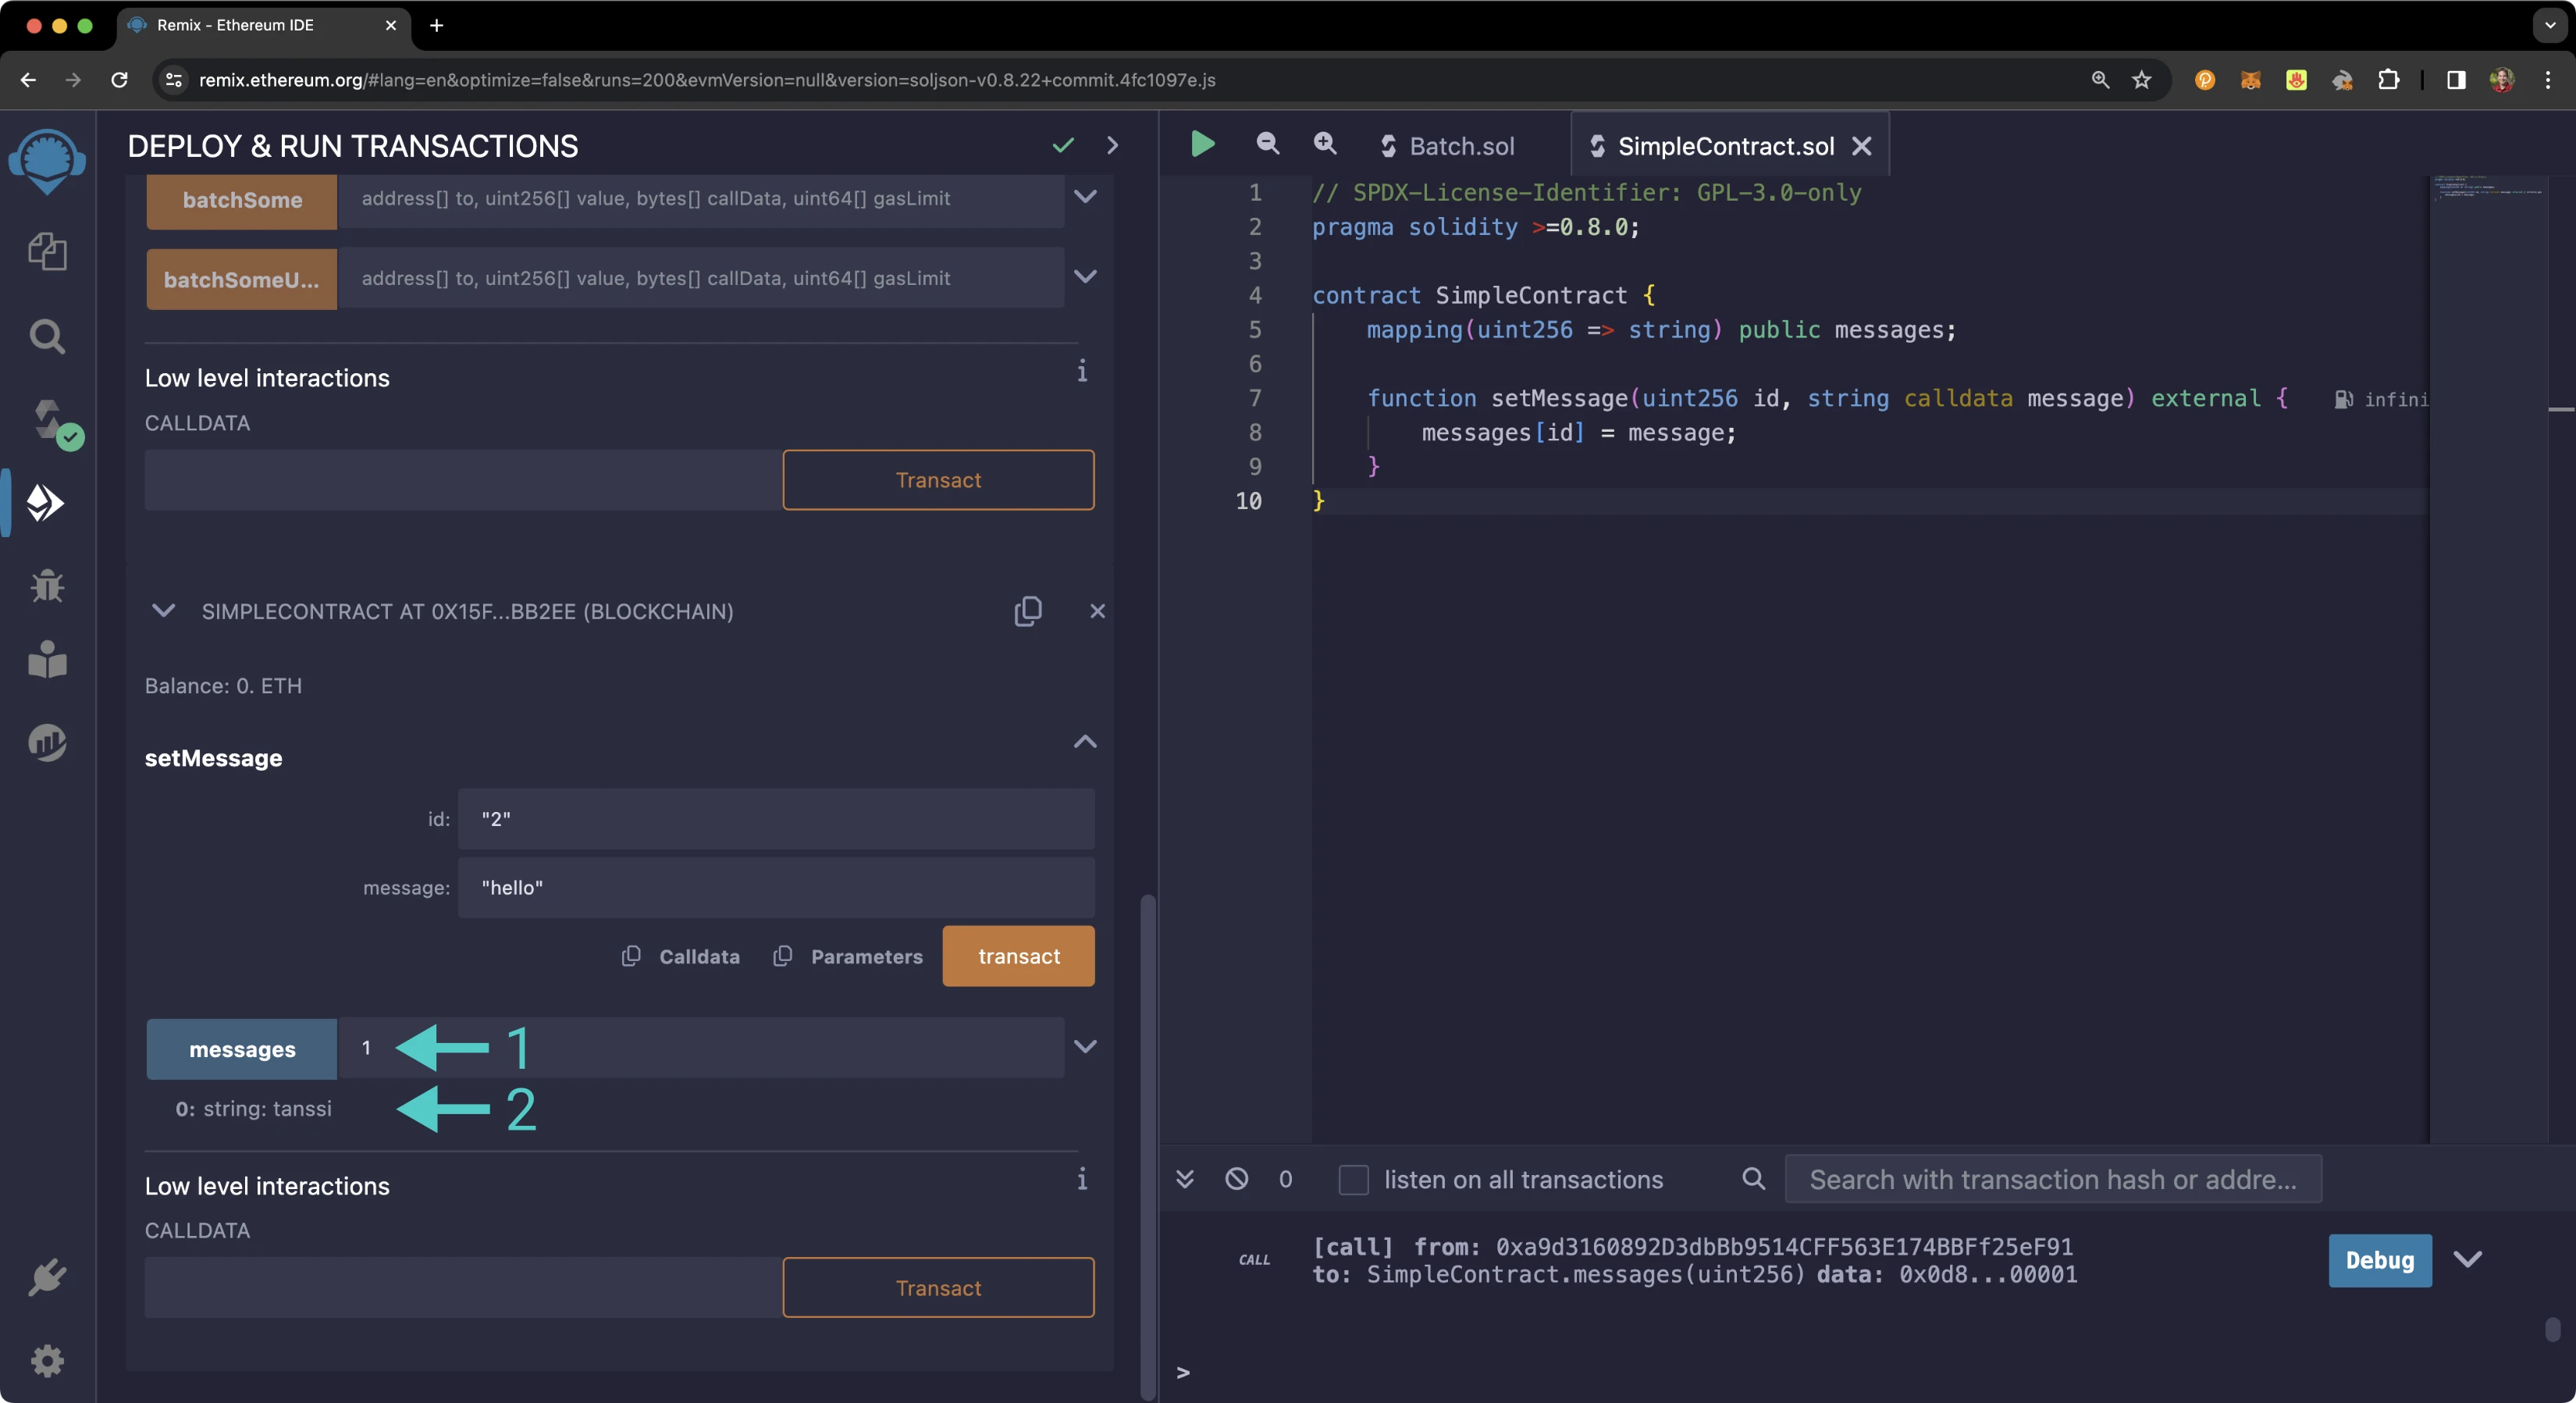
The phrase **"tanssi"** should appear underneath it. You can repeat the above steps with an id of "2", and you should see **"hello"**. Congratulations! You have interacted with a function with the Batch Precompile.
### Combining Subtransactions {: combining-subtransactions }
So far, transferring native currency and interacting with functions have been separate, but they can be intertwined.
The following four strings can be combined as inputs for a batch transaction. They will send 1 native token to the public Gerald (`0x6Be02d1d3665660d22FF9624b7BE0551ee1Ac91b`) account and interact with a predeployed `SimpleContract.sol` contract twice. Here is a break-down:
There are three subtransactions which correspond to three addresses in the `to` input array. The first is the public Gerald account and the following two are a `SimpleContract.sol` contract. You can replace the last two with your own instance of `SimpleContract.sol` if you wish. Or, replace only one: you can interact with multiple contracts in a single message.
```text
[
"0x6Be02d1d3665660d22FF9624b7BE0551ee1Ac91b",
"0xd14b70a55F6cBAc06d4FA49b99be0370D0e1BD39",
"0xd14b70a55F6cBAc06d4FA49b99be0370D0e1BD39"
]
```
There will also be three values for the `value` array. The first address in the `to` input array indicates `1000000000000000000` wei or `1` UNIT of the native token. Remember that the native tokens of Tanssi-powered EVM networks have [18 decimal points just like Ethereum](https://eth-converter.com){target=\_blank}. The following two values are `0` because the function that their subtransactions are interacting with does not accept or require native currency.
```text
["1000000000000000000", "0", "0"]
```
You will need three values for the `callData` array. Since transferring native currency does not require call data, the string is simply blank. The second and third values in the array correspond to invocations of **setMessage** that set messages to IDs 5 and 6.
```text
[
"0x",
"0x648345c8000000000000000000000000000000000000000000000000000000000000000500000000000000000000000000000000000000000000000000000000000000400000000000000000000000000000000000000000000000000000000000000009796f752061726520610000000000000000000000000000000000000000000000",
"0x648345c800000000000000000000000000000000000000000000000000000000000000060000000000000000000000000000000000000000000000000000000000000040000000000000000000000000000000000000000000000000000000000000000e61206d6f6f6e6265616d2070726f000000000000000000000000000000000000"
]
```
The final input is for `gas_input`. This array will be left empty to forward all remaining gas to each subtransaction.
```text
[]
```
Try sending a batched transaction with these inputs in Remix the same way [you batched a function call](#function-interaction-via-precompile).
And that's it! You've successfully interacted with the ERC-20 precompile using MetaMask and Remix!
## Ethereum Development Libraries {: #ethereum-development-libraries }
If you have followed the [Ethers.js tutorial](/builders/toolkit/ethereum-api/libraries/ethersjs/){target=\_blank}, you may find it difficult to find the call data for a function. The answer is hidden within Ether's `Interface` object, where the [encodeFunctionData](https://docs.ethers.org/v6/api/abi/#Interface-encodeFunctionData){target=\_blank} function allows you to input your function name and inputs to receive the resultant call data. [Web3.js](/builders/toolkit/ethereum-api/libraries/web3js/){target=\_blank} has a similar function, [encodeFunctionCall](https://web3js.readthedocs.io/en/v1.2.11/web3-eth-abi.html#encodefunctioncall){target=\_blank}.
!!! note
The code snippets presented in the following sections are not meant for production environments. Please make sure you adapt it for each use case.
=== "Ethers.js"
```js
// Import the contract ABI
const { abi } = require('./INSERT_ABI_PATH');
// Use ABI to create an interface
const yourContractInterface = new ethers.Interface(abi);
// Find call data for the setMessage function
const callData = yourContractInterface.encodeFunctionData(
'INSERT_FUNCTION_NAME',
[
'INSERT_INPUT_1',
'INSERT_INPUT_2',
// ...
]
);
```
=== "Web3.js"
```js
// Import the contract ABI
const { abi } = require('./INSERT_ABI_PATH');
// Find call data for the setMessage function
const callData = web3.eth.abi.encodeFunctionCall(abi, [
'INSERT_INPUT_1',
'INSERT_INPUT_2',
// ...
]);
```
=== "Web3.py"
```py
# Import the ABI and bytecode
from compile import abi, bytecode
# Create contract instance
your_contract = web3.eth.contract(abi=abi, bytecode=bytecode)
# Encode the contract call
call_data = your_contract.encodeABI(
fn_name="INSERT_FUNCTION_NAME", args=["INSERT_INPUT_1", "INSERT_INPUT_2", ...]
)
```
Afterwards, you should be all set to interact with the Batch Precompile as one typically would with a contract in [Ethers](/builders/toolkit/ethereum-api/libraries/ethersjs/){target=\_blank}.
The information presented herein has been provided by third parties and is made available solely for general information purposes. Tanssi does not endorse any project listed and described on the Tanssi Doc Website (https://docs.tanssi.network/). Tanssi Foundation does not warrant the accuracy, completeness or usefulness of this information. Any reliance you place on such information is strictly at your own risk. Tanssi Foundation disclaims all liability and responsibility arising from any reliance placed on this information by you or by anyone who may be informed of any of its contents. All statements and/or opinions expressed in these materials are solely the responsibility of the person or entity providing those materials and do not necessarily represent the opinion of Tanssi Foundation. The information should not be construed as professional or financial advice of any kind. Advice from a suitably qualified professional should always be sought in relation to any particular matter or circumstance. The information herein may link to or integrate with other websites operated or content provided by third parties, and such other websites may link to this website. Tanssi Foundation has no control over any such other websites or their content and will have no liability arising out of or related to such websites or their content. The existence of any such link does not constitute an endorsement of such websites, the content of the websites, or the operators of the websites. These links are being provided to you only as a convenience and you release and hold Tanssi Foundation harmless from any and all liability arising from your use of this information or the information provided by any third-party website or service.
--- END CONTENT ---
Doc-Content: https://docs.tanssi.network/builders/toolkit/ethereum-api/precompiles/call-permit/
--- BEGIN CONTENT ---
---
title: Call Permit
description: Learn how to use the Call Permit Precompile on Tanssi EVM networks to sign a permit for any EVM call that can be dispatched by anyone or any smart contract.
keywords: solidity, ethereum, call permit, permit, gasless transaction, moonbeam, precompiled, contracts, tanssi
icon: octicons-arrow-up-right-24
categories: EVM-Template
---
# Interacting with the Call Permit Precompile
## Introduction {: #introduction }
The Call Permit Precompile on Tanssi-powered EVM networks allows a user to sign a permit, an [EIP-712](https://eips.ethereum.org/EIPS/eip-712){target=\_blank} signed message, for any EVM call and it can be dispatched by anyone or any smart contract. It is similar to the Permit Signing of ERC-20 approvals introduced in [EIP-2612](https://eips.ethereum.org/EIPS/eip-2612){target=\_blank}, except it applies to any EVM call instead of only approvals.
When the call permit is dispatched, it is done so on behalf of the user who signed the permit and the user or contract that dispatches the permit is responsible for paying transaction fees. As such, the precompile can be used to perform gas-less transactions.
For example, Alice signs a call permit and Bob dispatches it and performs the call on behalf of Alice. Bob pays for the transaction fees and as such, Alice doesn't need to have any of the native currency to pay for the transaction, unless the call includes a transfer.
The Call Permit Precompile is located at the following address:
```text
{{ networks.demo_evm.precompiles.call_permit }}
```
!!! note
There can be some unintended consequences when using precompiles. Tanssi's precompiles are derived from Moonbeam's, and as such, please familiarize yourself with [Moonbeam's Precompile Security Considerations](https://docs.moonbeam.network/builders/get-started/eth-compare/security){target=\_blank}.
## The Call Permit Solidity Interface {: #the-call-permit-interface }
[`CallPermit.sol`](https://github.com/moondance-labs/tanssi/blob/master/test/contracts/solidity/CallPermit.sol){target=\_blank} is a Solidity interface that allows developers to interact with the precompile's three methods.
??? code "CallPermit.sol"
```solidity
// SPDX-License-Identifier: GPL-3.0-only
pragma solidity >=0.8.3;
/// @dev The CallPermit contract's address.
address constant CALL_PERMIT_ADDRESS = 0x0000000000000000000000000000000000000802;
/// @dev The CallPermit contract's instance.
CallPermit constant CALL_PERMIT_CONTRACT = CallPermit(CALL_PERMIT_ADDRESS);
/// @author The Moonbeam Team
/// @title Call Permit Interface
/// @dev The interface aims to be a general-purpose tool to perform gas-less transactions. It uses the EIP-712 standard,
/// and signed messages can be dispatched by another network participant with a transaction
/// @custom:address 0x0000000000000000000000000000000000000802
interface CallPermit {
/// @dev Dispatch a call on the behalf of an other user with a EIP712 permit.
/// Will revert if the permit is not valid or if the dispatched call reverts or errors (such as
/// out of gas).
/// If successful the EIP712 nonce is increased to prevent this permit to be replayed.
/// @param from Who made the permit and want its call to be dispatched on their behalf.
/// @param to Which address the call is made to.
/// @param value Value being transferred from the "from" account.
/// @param data Call data
/// @param gaslimit Gaslimit the dispatched call requires.
/// Providing it prevents the dispatcher to manipulate the gaslimit.
/// @param deadline Deadline in UNIX seconds after which the permit will no longer be valid.
/// @param v V part of the signature.
/// @param r R part of the signature.
/// @param s S part of the signature.
/// @return output Output of the call.
/// @custom:selector b5ea0966
function dispatch(
address from,
address to,
uint256 value,
bytes memory data,
uint64 gaslimit,
uint256 deadline,
uint8 v,
bytes32 r,
bytes32 s
) external returns (bytes memory output);
/// @dev Returns the current nonce for given owner.
/// A permit must have this nonce to be consumed, which will
/// increase the nonce by one.
/// @custom:selector 7ecebe00
function nonces(address owner) external view returns (uint256);
/// @dev Returns the EIP712 domain separator. It is used to avoid replay
/// attacks across assets or other similar EIP712 message structures.
/// @custom:selector 3644e515
function DOMAIN_SEPARATOR() external view returns (bytes32);
}
```
The interface includes the following functions:
???+ function "**dispatch**(*address* from, *address* to, *uint256* value, *bytes* data, *uint64[]* gaslimit, *uint256* deadline, *uint8* v, *bytes32* r, *bytes32* s) — dispatches a call on the behalf of another user with a EIP-712 permit. This function can be called by anyone or any smart contract. The transaction will revert if the permit is not valid or if the dispatched call reverts or errors (such as out of gas). If successful, the nonce of the signer is increased to prevent this permit to be replayed"
=== "Parameters"
- `from` - the signer of the permit. The call will be dispatched on behalf of this address
- `to` - the address the call is made to
- `value` - the value being transferred from the `from` account
- `data` - the call data, or action to be executed
- `value` - the value being transferred from the `from` account
- `gasLimit` - the gas limit the dispatched call requires. Providing an argument for this parameter prevents the dispatcher from manipulating the gas limit
- `deadline` - the time in UNIX seconds after which the permit will no longer be valid. In JavaScript, you can get the current time in UNIX seconds by running `console.log(Date.now())` in a JavaScript script or a browser console
- `v` - the recovery ID of the signature. The last one byte of the concatenated signature
- `r` - the first 32 bytes of the concatenated signature
- `s` - the second 32 bytes of the concatenated signature
??? function "**nonces**(*address* owner) — returns the current nonce for given owner"
=== "Parameters"
- `owner` - the address of the account to check
??? function "**DOMAIN_SEPARATOR**() — returns the EIP-712 domain separator which is used to avoid replay attacks. It follows the [EIP-2612](https://eips.ethereum.org/EIPS/eip-2612#specification){target=\_blank} implementation"
=== "Parameters"
None
=== "Returns"
The EIP-712 domain separator which is used to avoid replay attacks.
The domain separator is defined in the [EIP-712 standard](https://eips.ethereum.org/EIPS/eip-712){target=\_blank} and is calculated as:
```text
keccak256(PERMIT_DOMAIN, name, version, chain_id, address)
```
The parameters of the hash can be broken down as follows:
- **PERMIT_DOMAIN** - is the `keccak256` of `EIP712Domain(string name,string version,uint256 chainId,address verifyingContract)`
- **name** - is the name of the signing domain and must be `'Call Permit Precompile'` exactly
- **version** - is the version of the signing domain. For this case **version** is set to `1`
- **chainId** - is the chain ID of your network
- **verifyingContract** - is the address of the contract that will verify the signature. In this case, the Call Permit Precompile address
When `dispatch` is called, the permit needs to be verified before the call is dispatched. The first step is to [compute the domain separator](https://github.com/moonbeam-foundation/moonbeam/blob/ae705bb2e9652204ace66c598a00dcd92445eb81/precompiles/call-permit/src/lib.rs#L138){target=\_blank}. The calculation can be seen in [Moonbeam's implementation](https://github.com/moonbeam-foundation/moonbeam/blob/ae705bb2e9652204ace66c598a00dcd92445eb81/precompiles/call-permit/src/lib.rs#L112-L126){target=\_blank} or you can check out a practical example in [OpenZeppelin's EIP712 contract](https://github.com/OpenZeppelin/openzeppelin-contracts/blob/4a9cc8b4918ef3736229a5cc5a310bdc17bf759f/contracts/utils/cryptography/draft-EIP712.sol#L70-L84){target=\_blank}.
From there, a [hash of the signature and the given arguments](https://github.com/moonbeam-foundation/moonbeam/blob/ae705bb2e9652204ace66c598a00dcd92445eb81/precompiles/call-permit/src/lib.rs#L140-L151){target=\_blank} is generated which guarantees that the signature can only be used for the call permit. It uses a given nonce to ensure the signature is not subject to a replay attack. It is similar to [OpenZeppelin's `ERC20Permit` contract](https://github.com/OpenZeppelin/openzeppelin-contracts/blob/4a9cc8b4918ef3736229a5cc5a310bdc17bf759f/contracts/token/ERC20/extensions/draft-ERC20Permit.sol#L52){target=\_blank}, except the `PERMIT_TYPEHASH` is for a call permit, and the arguments match that of the dispatch function plus the nonce.
The domain separator and the hash struct can be used to build the [final hash](https://github.com/moonbeam-foundation/moonbeam/blob/ae705bb2e9652204ace66c598a00dcd92445eb81/precompiles/call-permit/src/lib.rs#L153-L157){target=\_blank} of the fully encoded message. A practical example is shown in [OpenZeppelin's EIP712 contract](https://github.com/OpenZeppelin/openzeppelin-contracts/blob/4a9cc8b4918ef3736229a5cc5a310bdc17bf759f/contracts/utils/cryptography/draft-EIP712.sol#L101){target=\_blank}.
With the final hash and the v, r, and s values, the signature can be [verified and recovered](https://github.com/moonbeam-foundation/moonbeam/blob/ae705bb2e9652204ace66c598a00dcd92445eb81/precompiles/call-permit/src/lib.rs#L211-L223){target=\_blank}. If successfully verified, the nonce will increase by one and the call will be dispatched.
## Setup the Contracts {: #setup-the-example-contract }
For this example, you'll learn how to sign a call permit that updates a message in a simple example contract, [`SetMessage.sol`](#example-contract). Before you can generate the call permit signature, you'll need to deploy the contract and define the `dispatch` function arguments for the call permit.
Once you've set up the example contract, then you can set up the Call Permit Precompile contract.
### Checking Prerequisites {: #checking-prerequisites }
To follow along with this tutorial, you will need to have your wallet configured to work with your EVM network and an account funded with native tokens. You can add your EVM network to MetaMask with one click on the [Tanssi dApp](https://apps.tanssi.network/){target=\_blank}. Or, you can [configure MetaMask for Tanssi with the demo EVM network](/builders/toolkit/ethereum-api/wallets/metamask/){target=\_blank}.
### Example Contract {: #example-contract }
The `SetMessage.sol` contract is a perfect example to demonstrate use of the Call Permit Precompile.
```solidity
// SPDX-License-Identifier: GPL-3.0
pragma solidity 0.8.7;
contract SetMessage {
string storedMessage;
function set(string calldata x) public {
storedMessage = x;
}
function get() public view returns (string memory) {
return storedMessage;
}
}
```
### Remix Set Up {: #remix-set-up }
You can use [Remix](https://remix.ethereum.org/){target=\_blank} to compile the example contract and deploy it. You'll need a copy of [`SetMessage.sol`](#example-contract){target=\_blank} and [`CallPermit.sol`](https://github.com/moondance-labs/tanssi/blob/master/test/contracts/solidity/CallPermit.sol){target=\_blank}. To add the contracts to Remix, you can take the following steps:
1. Click on the **File explorer** tab
2. Paste the `CallPermit.sol` contract into a Remix file named `CallPermit.sol`
3. Paste the `SetMessage.sol` contract into a Remix file named `SetMessage.sol`
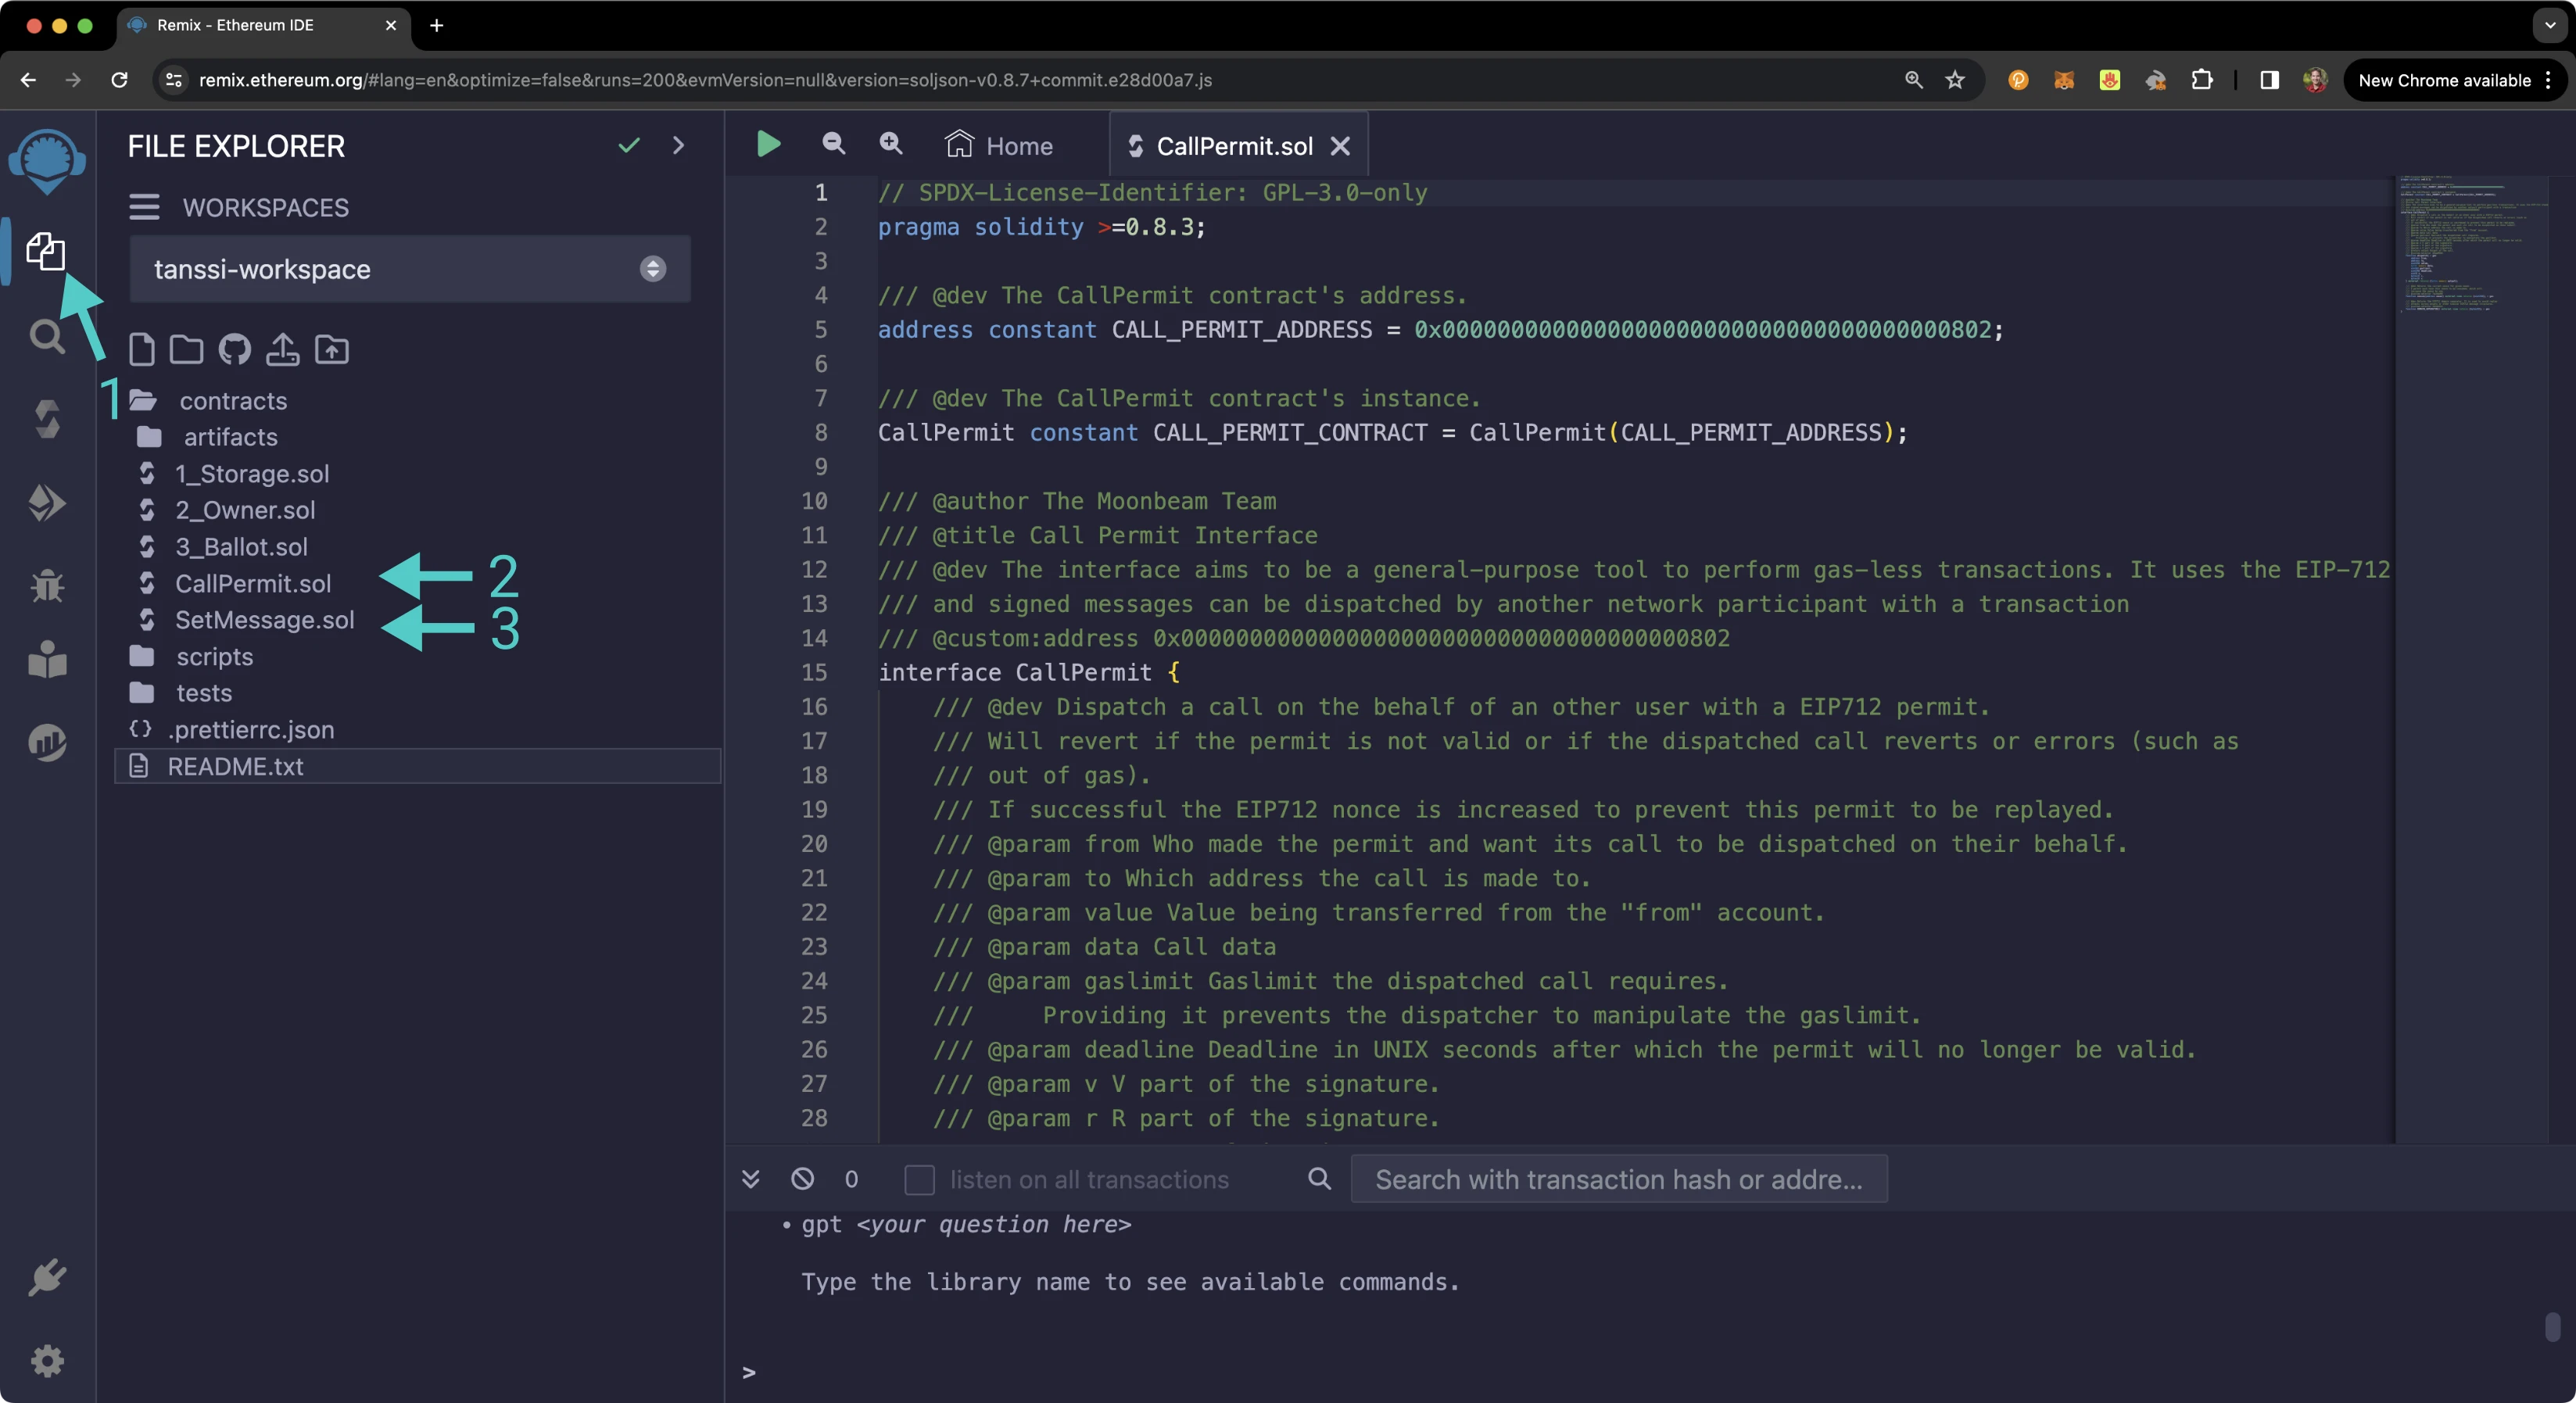
### Compile & Deploy the Example Contract {: #compile-deploy-example-contract }
First, you'll need to compile the example contract:
1. Click on the **Compile** tab
2. Then to compile the interface, click on **Compile SetMessage.sol**
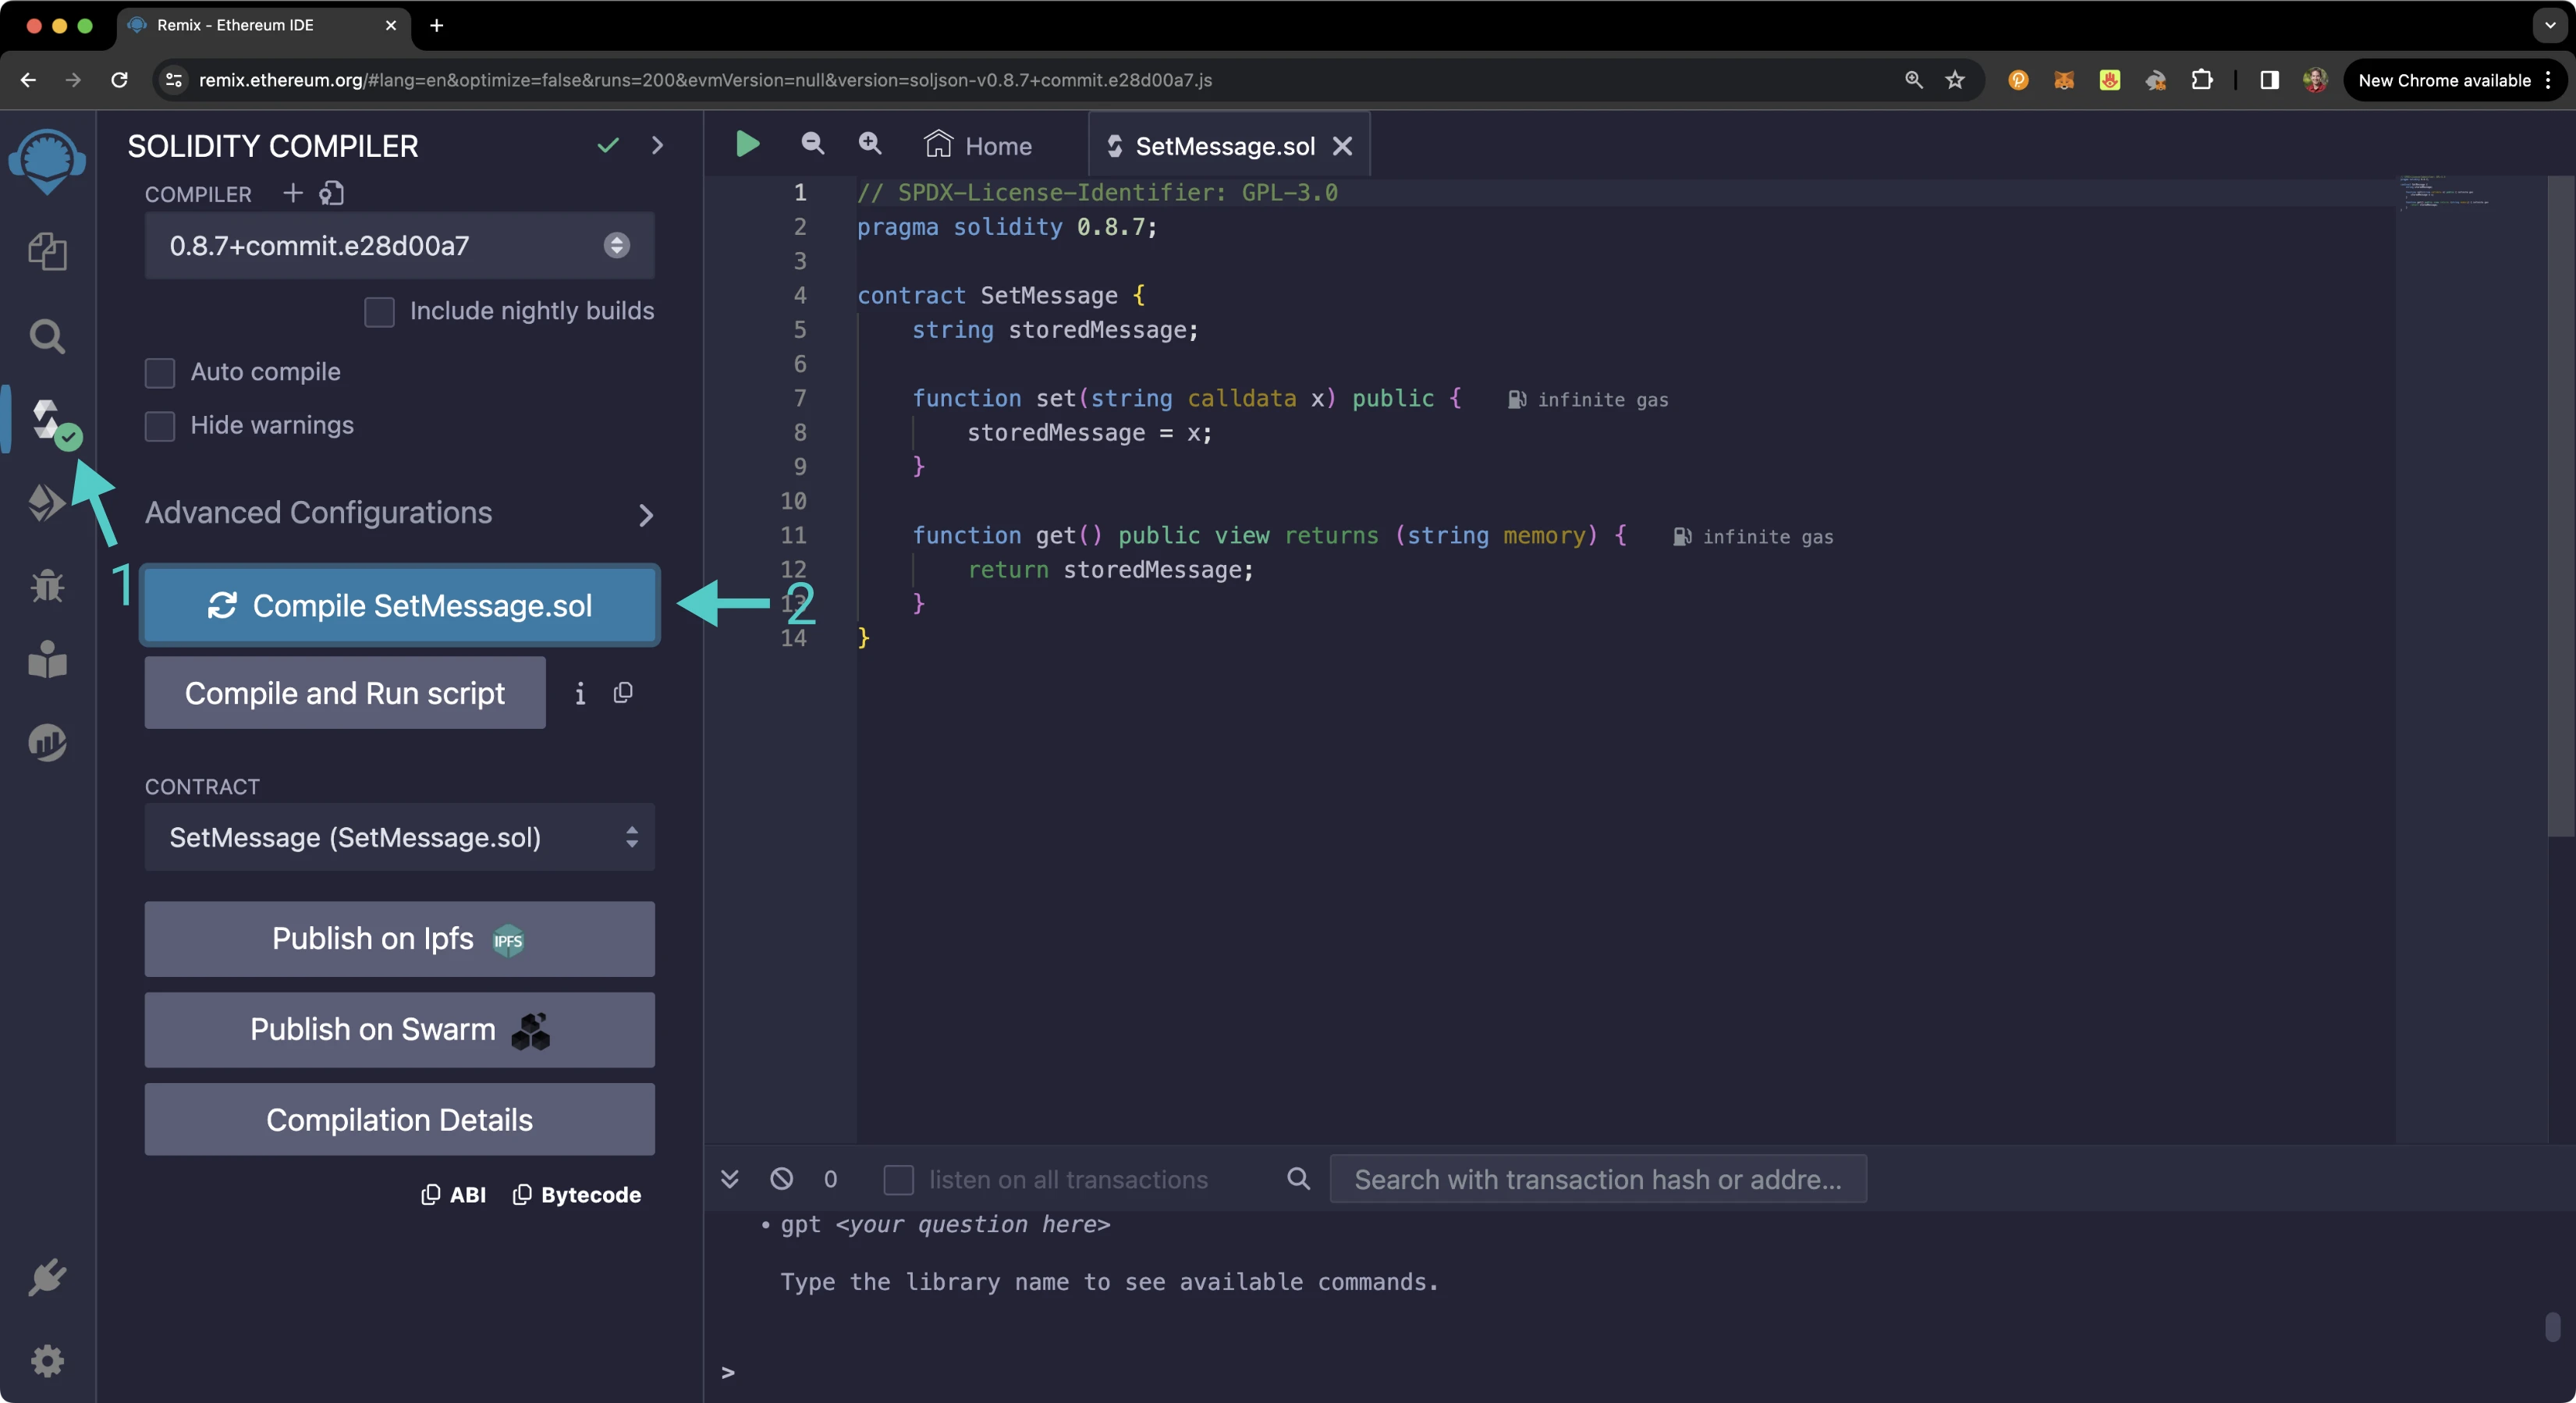
Then you can deploy it:
1. Click on the **Deploy and Run** tab, directly below the **Compile** tab in Remix. Note: you are not deploying a contract here, instead you are accessing a precompiled contract that is already deployed
2. Make sure **Injected Provider - Metamask** is selected in the **ENVIRONMENT** drop down
3. Ensure **SetMessage.sol** is selected in the **CONTRACT** dropdown
4. Click **Deploy**
5. MetaMask will pop up and you'll need to **Confirm** the transaction
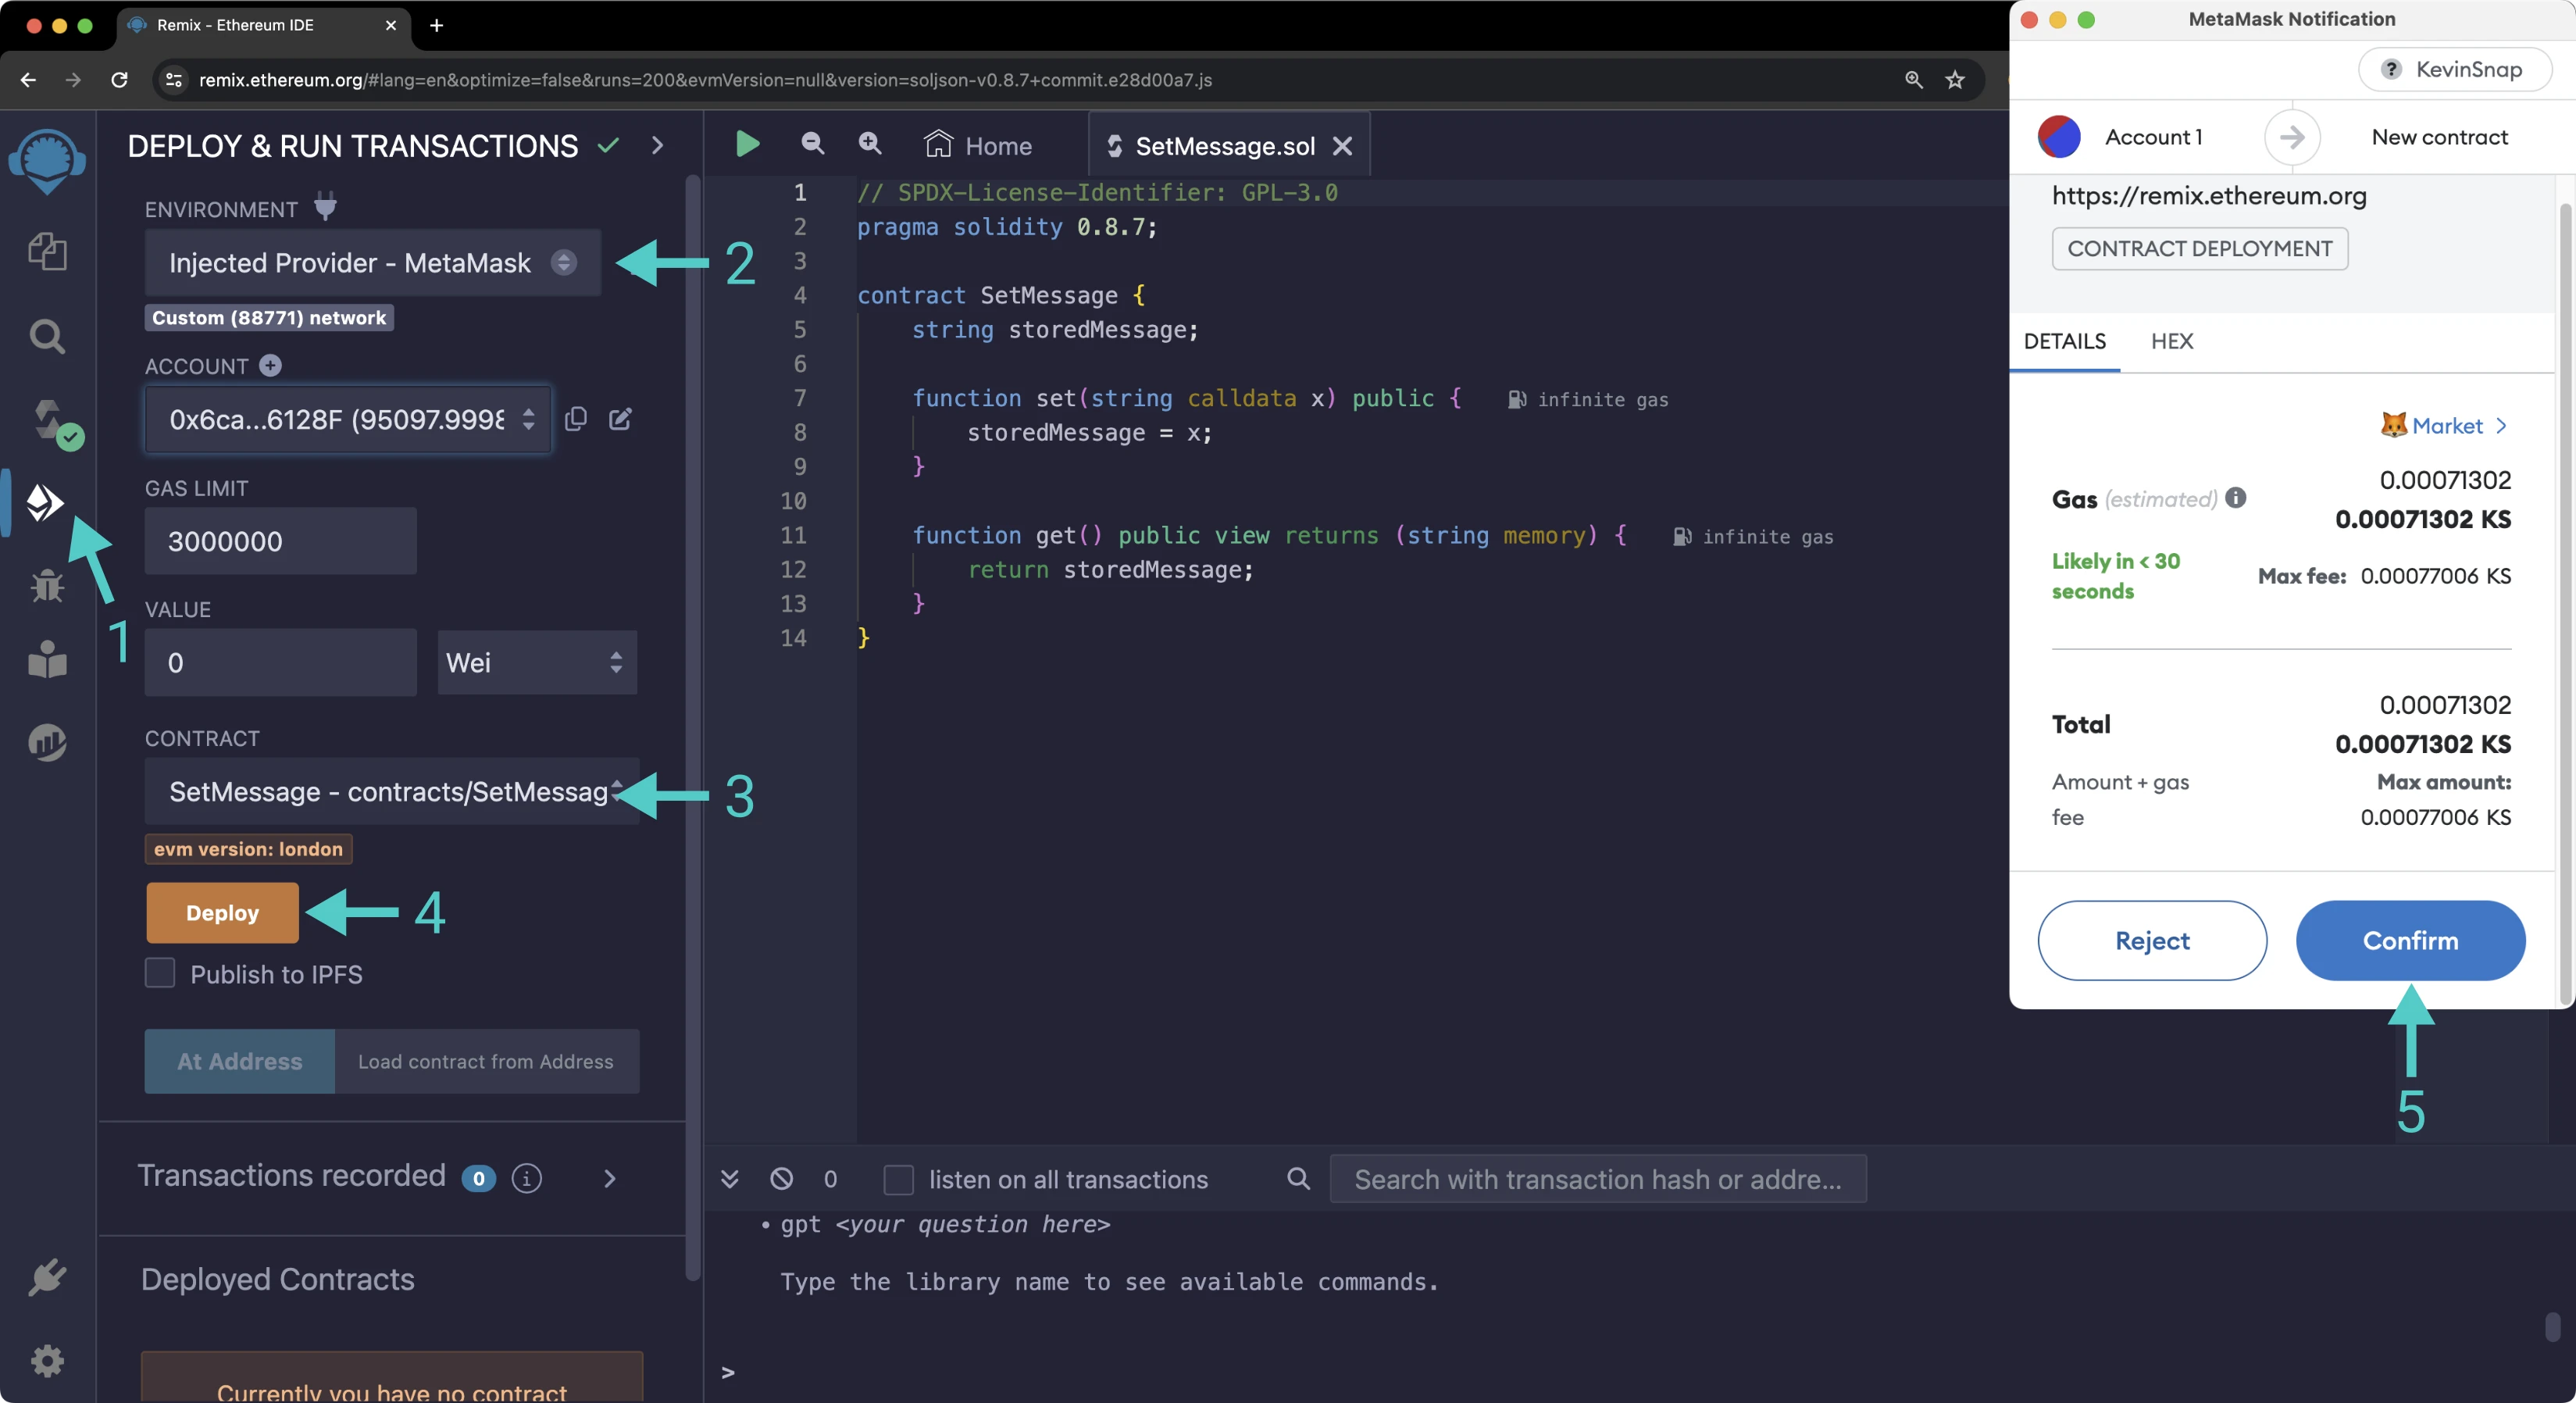
The contract will appear under the list of **Deployed Contracts** on the left side panel. Copy the contract address as you will need to use it to generate the call permit signature in the next section.
### Compile & Access the Call Permit Precompile {: #compile-access-call-permit }
First you'll need to compile the Call Permit Precompile contract:
1. Click on the **Compile** tab
2. Then to compile the interface, click on **Compile CallPermit.sol**
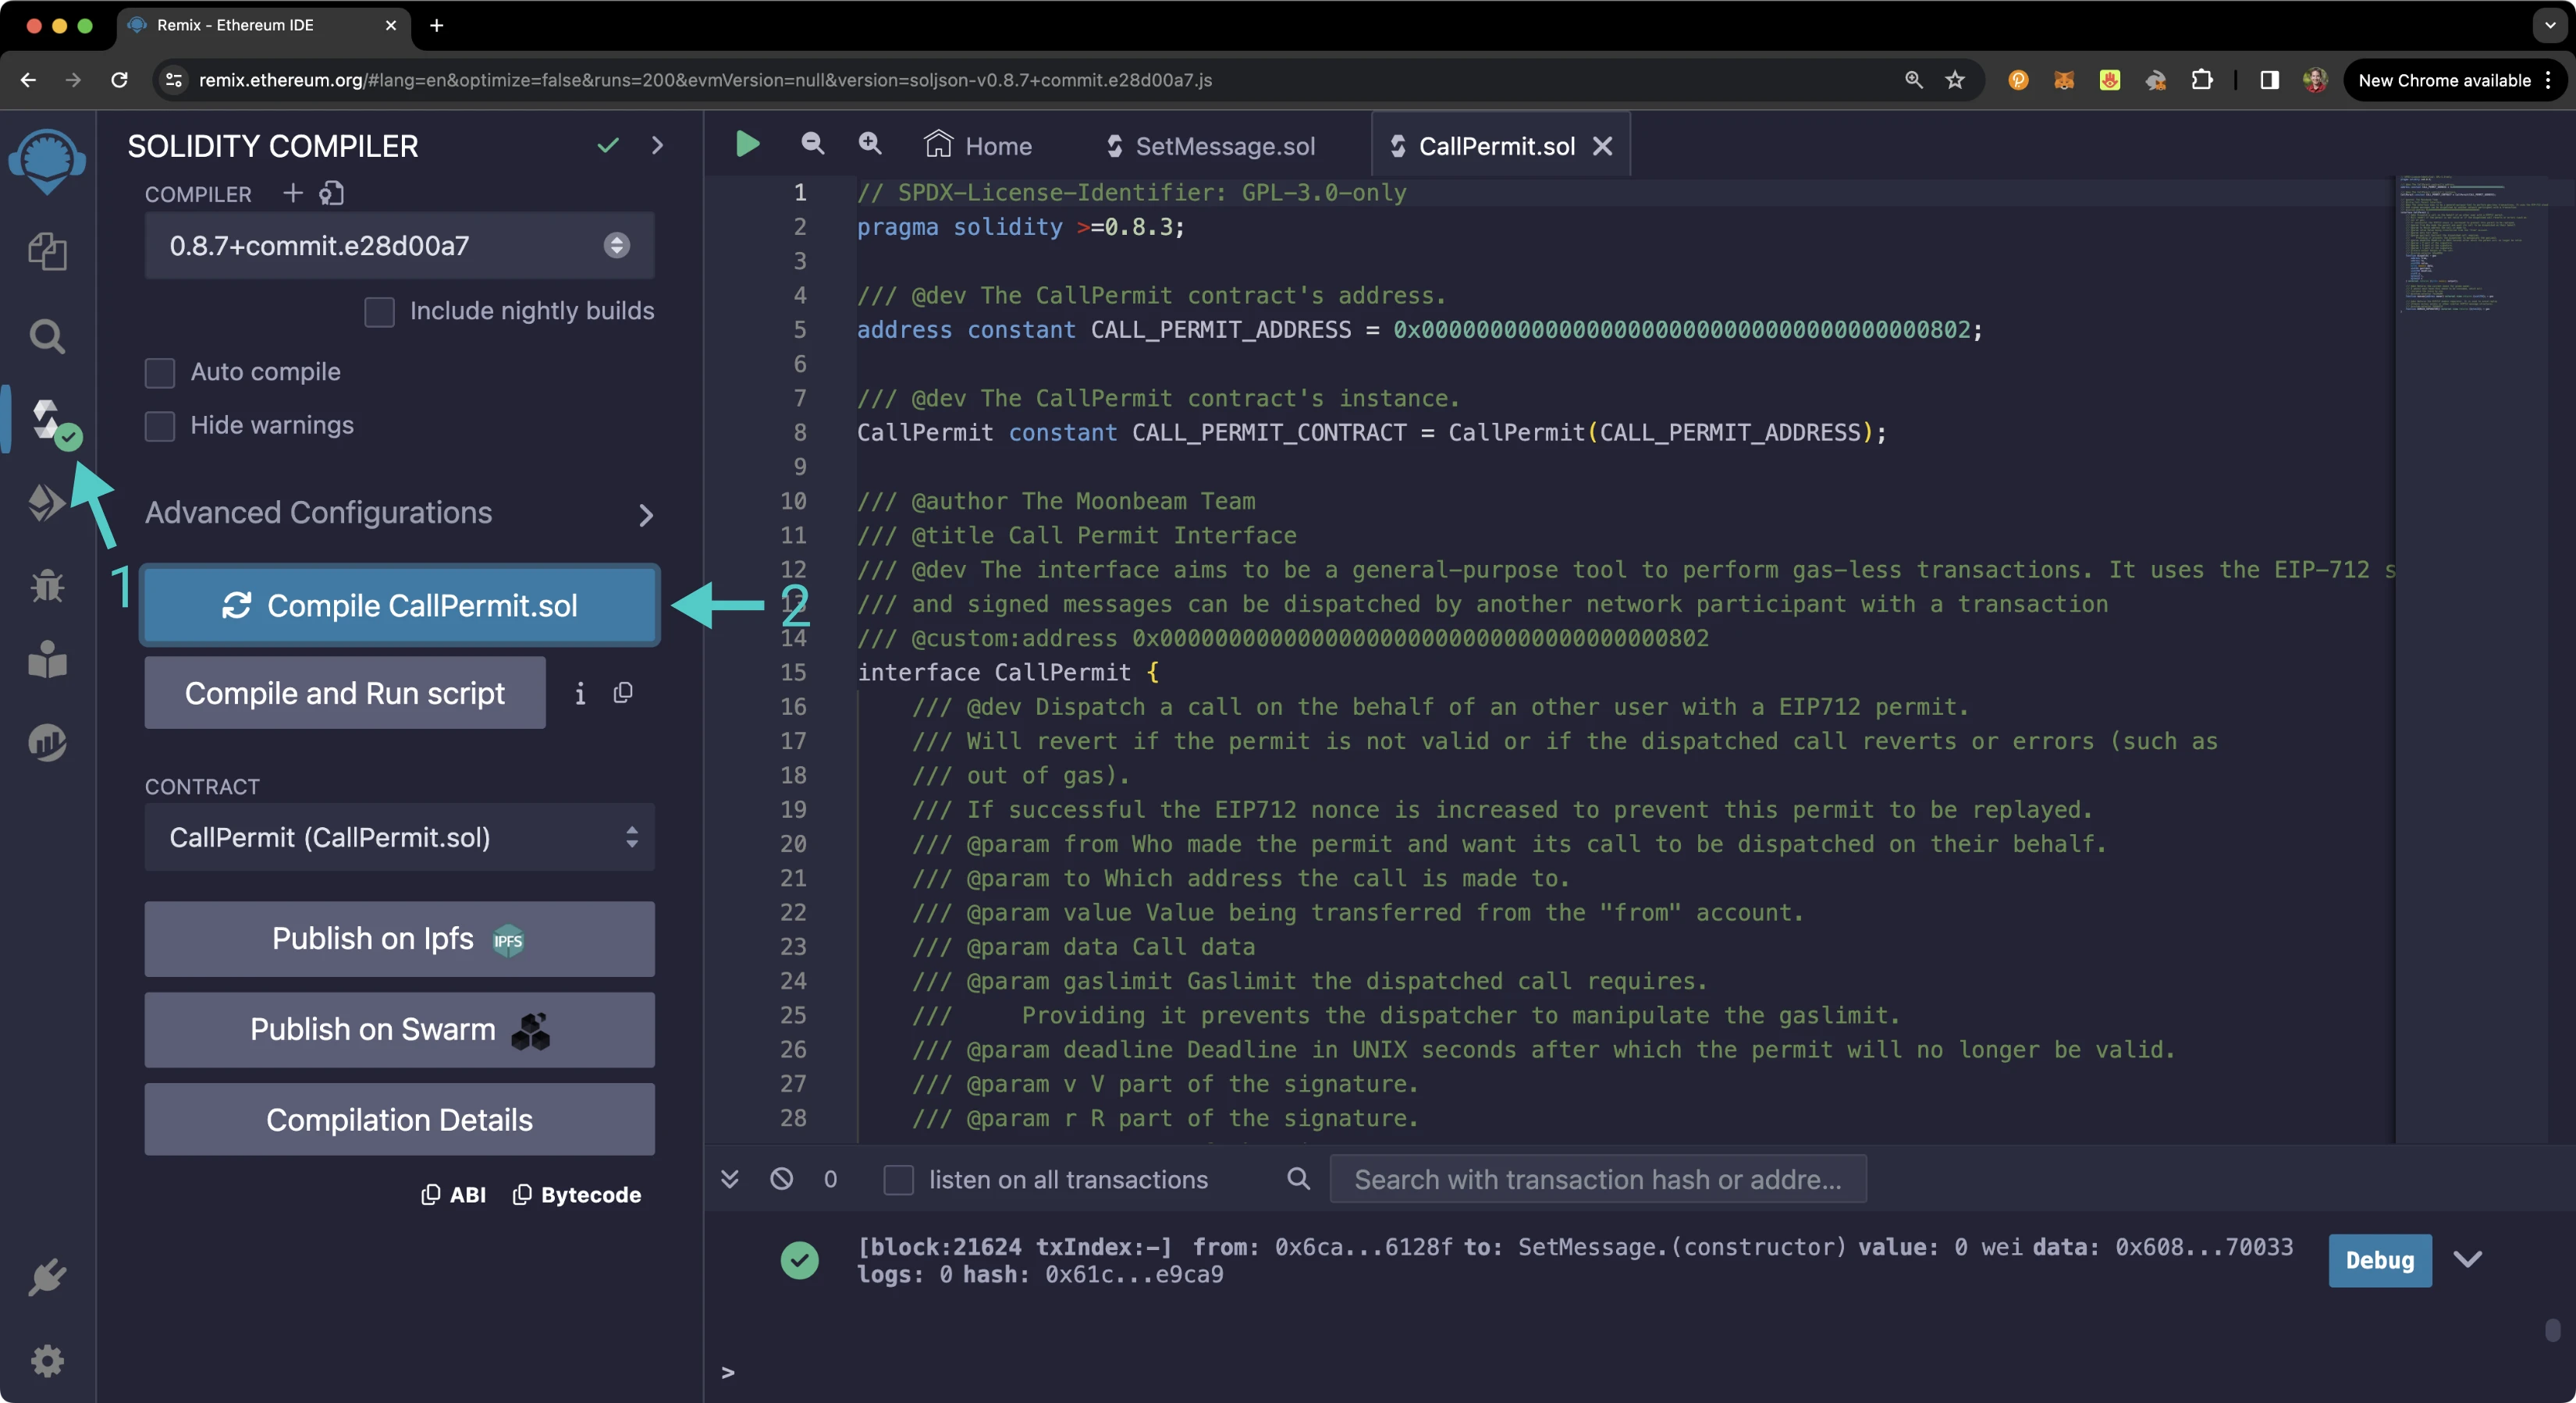
Then, instead of deploying the contract, you'll just need to access it given the address of the precompile:
1. Click on the **Deploy and Run** tab, directly below the **Compile** tab in Remix. Note: you are not deploying a contract here, instead you are accessing a precompiled contract that is already deployed
2. Make sure **Injected Provider - Metamask** is selected in the **ENVIRONMENT** drop down
3. Ensure **CallPermit.sol** is selected in the **CONTRACT** dropdown. Since this is a precompiled contract, there is no deployment step. Rather you'll provide the address of the precompile in the **At Address** field
4. Provide the address of the Call Permit Precompile for Tanssi-powered EVM networks: `{{networks.demo_evm.precompiles.call_permit}}` and click **At Address**
5. The Call Permit Precompile will appear in the list of **Deployed Contracts**
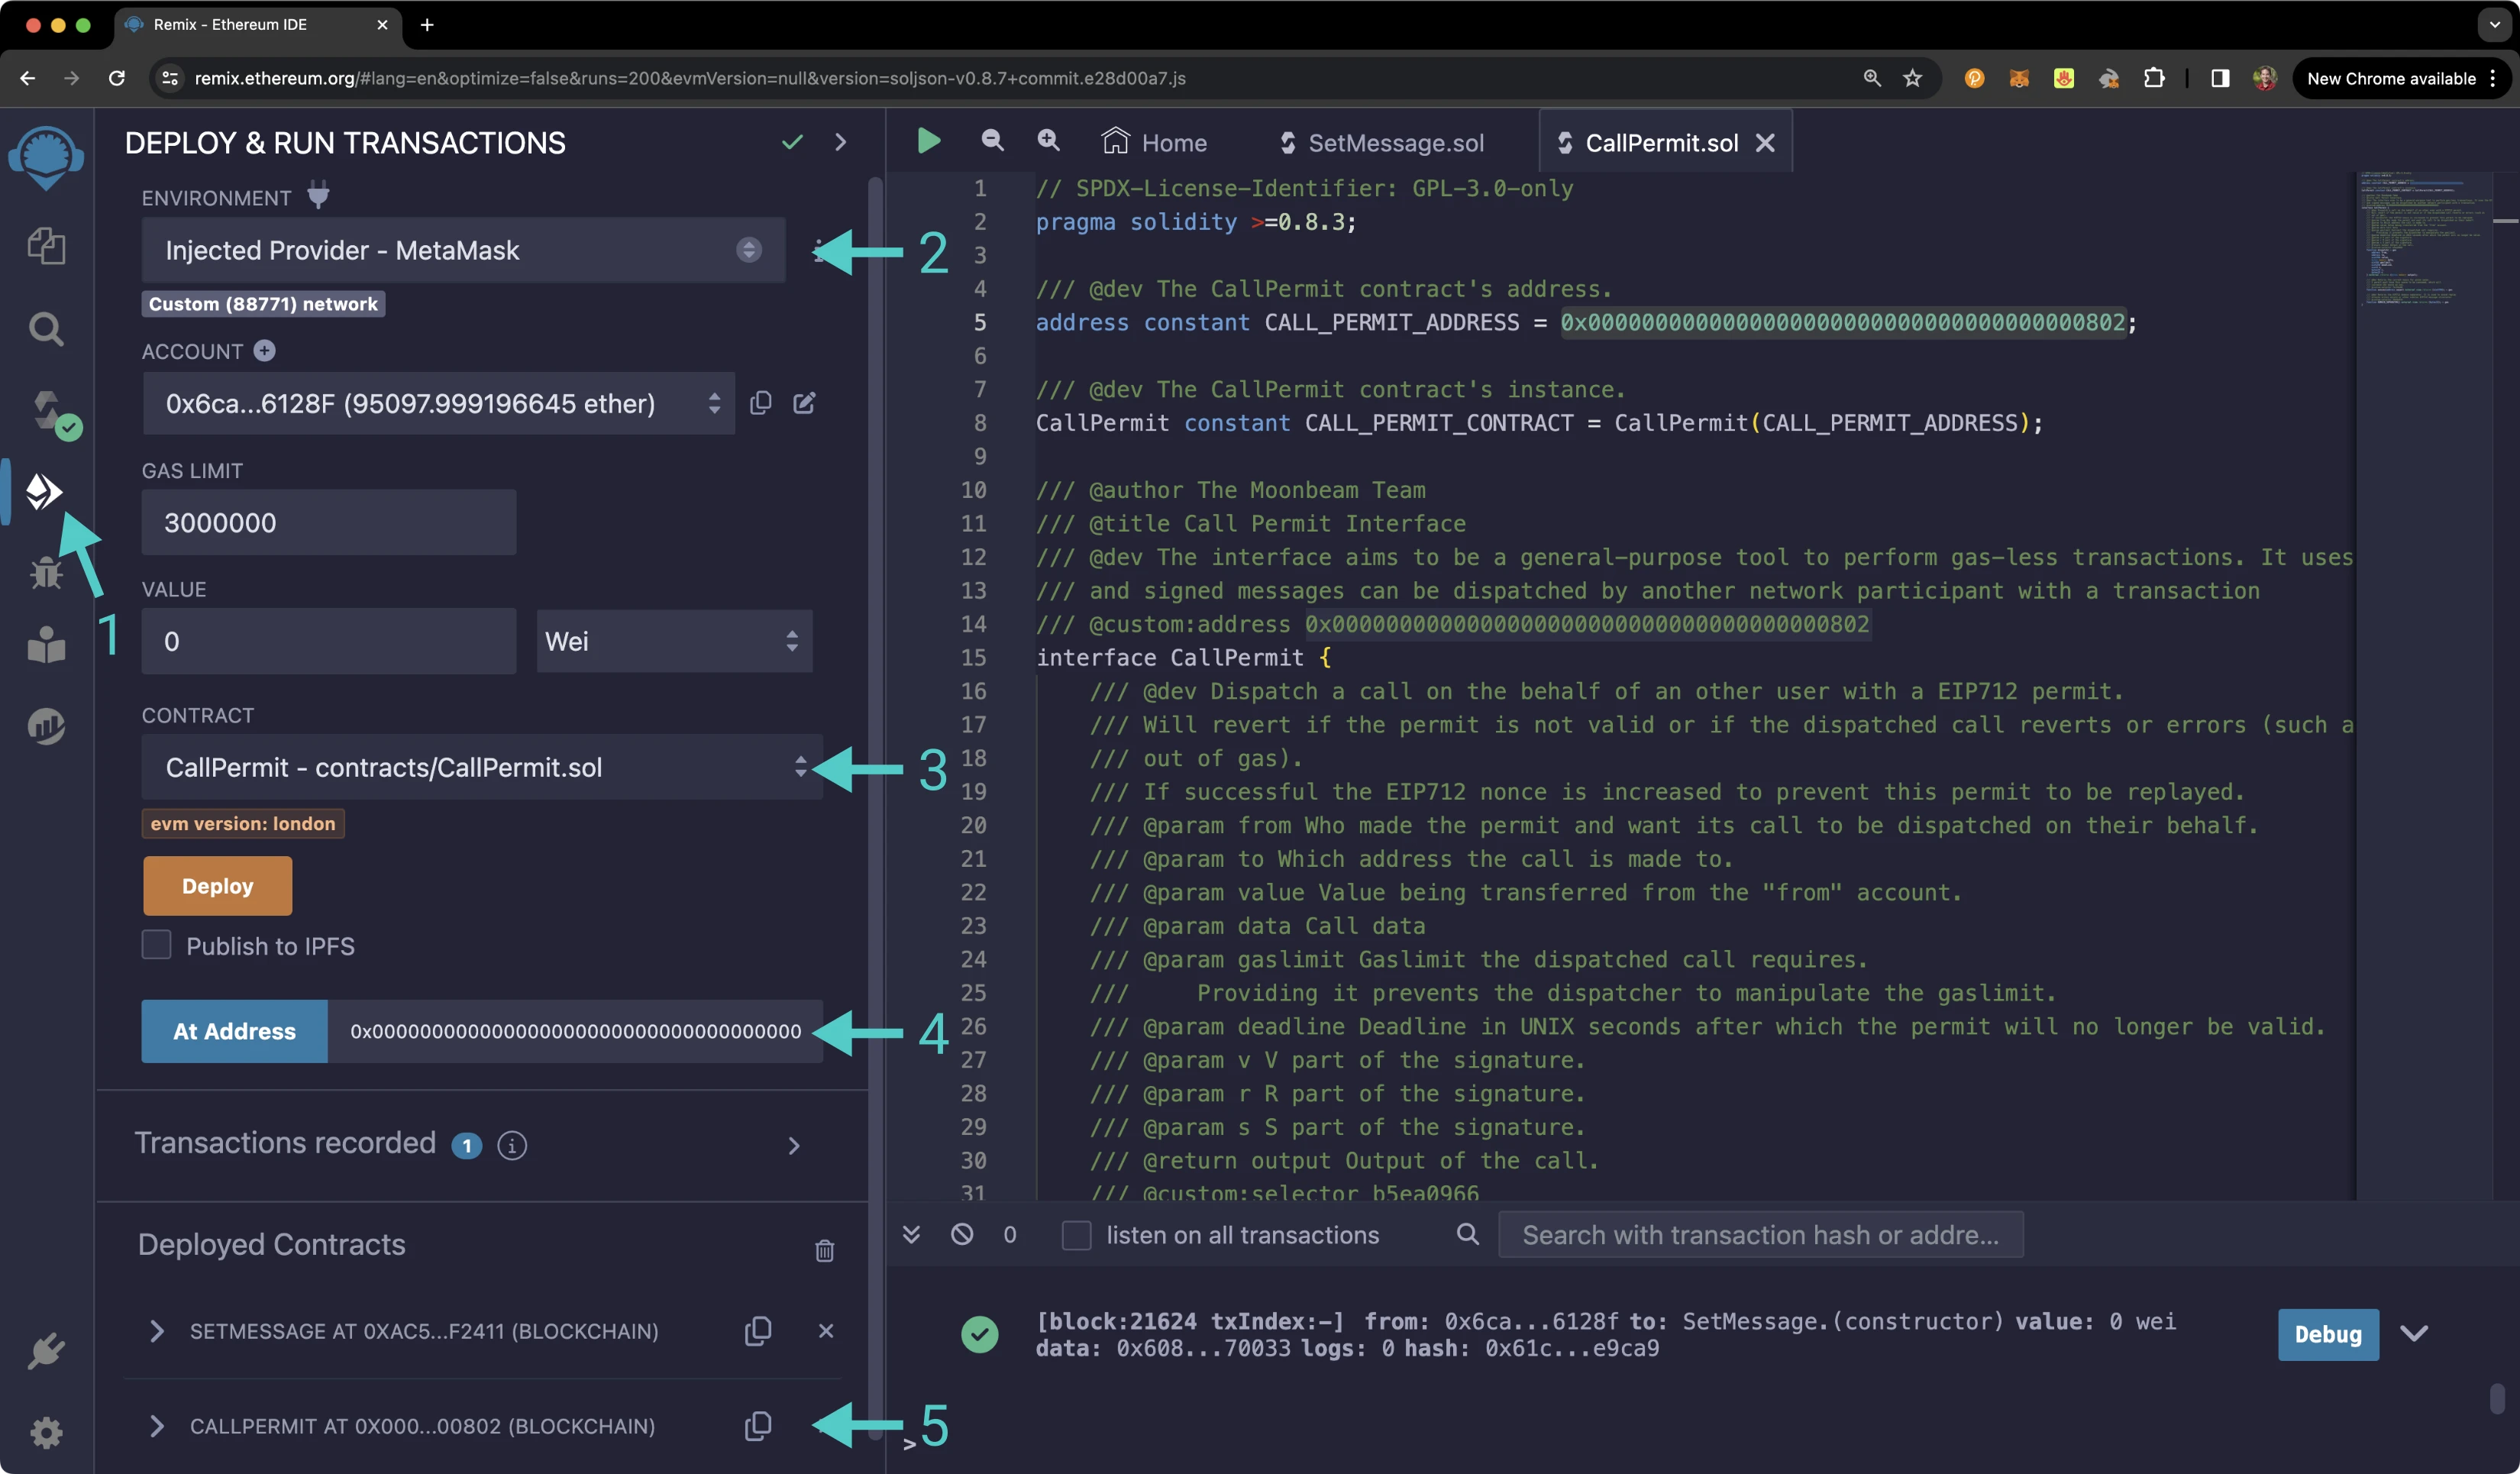
## Generate Call Permit Signature {: #generate-call-permit-signature}
In order to interact with the Call Permit Precompile, you have to have or generate a signature to dispatch the call permit. There are several ways you can generate the signature. This guide will show how to generate the signature using [Ethers.js](https://docs.ethers.org/v6/){target=\_blank}.
Here's an overview of the steps that you'll need to take to obtain the signature:
1. The `message` will be created and includes some of the data that is needed to create the call permit. It includes the arguments that will be passed into the `dispatch` function and the nonce of the signer
2. A JSON structure of the data the user needs to sign will be assembled for the call permit and include all of the types for the `dispatch` arguments and the nonce. This will result in the `CallPermit` type and will be saved as the `primaryType`
3. The domain separator will be created using `"Call Permit Precompile"` exactly for the name, the version of your dApp or platform, the chain ID of the network the signature is to be used on, and the address of the contract that will verify the signature. Note that you'll need to specify the chain ID of your network in the script to generate the correct signature
4. All of the assembled data will be signed using Ethers.js
5. The signature will be returned and you can use [Ethers.js](https://docs.ethers.org/v6/){target=\_blank} [`Signature.from` method](https://docs.ethers.org/v6/api/crypto/#Signature_from){target=\_blank} to return the `v`, `r`, and `s` values of the signature
### The Call Permit Arguments {: #call-permit-arguments }
As seen in the [Call Permit Interface](#the-call-permit-interface) section, the `dispatch` function takes the following parameters: `from`, `to`, `value`, `data`, `gasLimit`, `deadline`, `v`, `r`, and `s`.
In order to get the signature arguments (`v`, `r`, and `s`), you'll need to sign a message containing the arguments for the remainder of the aforementioned parameters, plus the nonce of the signer.
- `from` - the address of the account you want to sign the call permit with
- `to` - the contract address for the `SetMessage.sol` contract
- `value` - can be `0` for this example as you'll just be setting a message instead of transferring any funds
- `data` - you can send any message you would like. You'll just need the hex representation of the message you want to set using the `SetMessage.sol` contract. This will contain the function selector of the `set` function and the string of the message. For this example, you can send `hello world`. To do so, you can use this hex representation:
```text
0x4ed3885e0000000000000000000000000000000000000000000000000000000000000020000000000000000000000000000000000000000000000000000000000000000b68656c6c6f20776f726c64000000000000000000000000000000000000000000
```
- `gasLimit` - `100000` will be enough to send the dispatched call
- `deadline` - you can get the current time in UNIX seconds by running `console.log(Date.now())` in a JavaScript script or a browser console. Once you have the current time, you should generously add additional seconds to represent when the call permit will expire
The nonce of the signer will also be needed. If this is your first time signing a call permit the nonce will be `0`. You can also check the nonce in Remix:
1. Expand the call permit contract
2. Next to the **nonces** function, enter the address of the signer and click on **nonces**
3. The result will be returned directly under the function
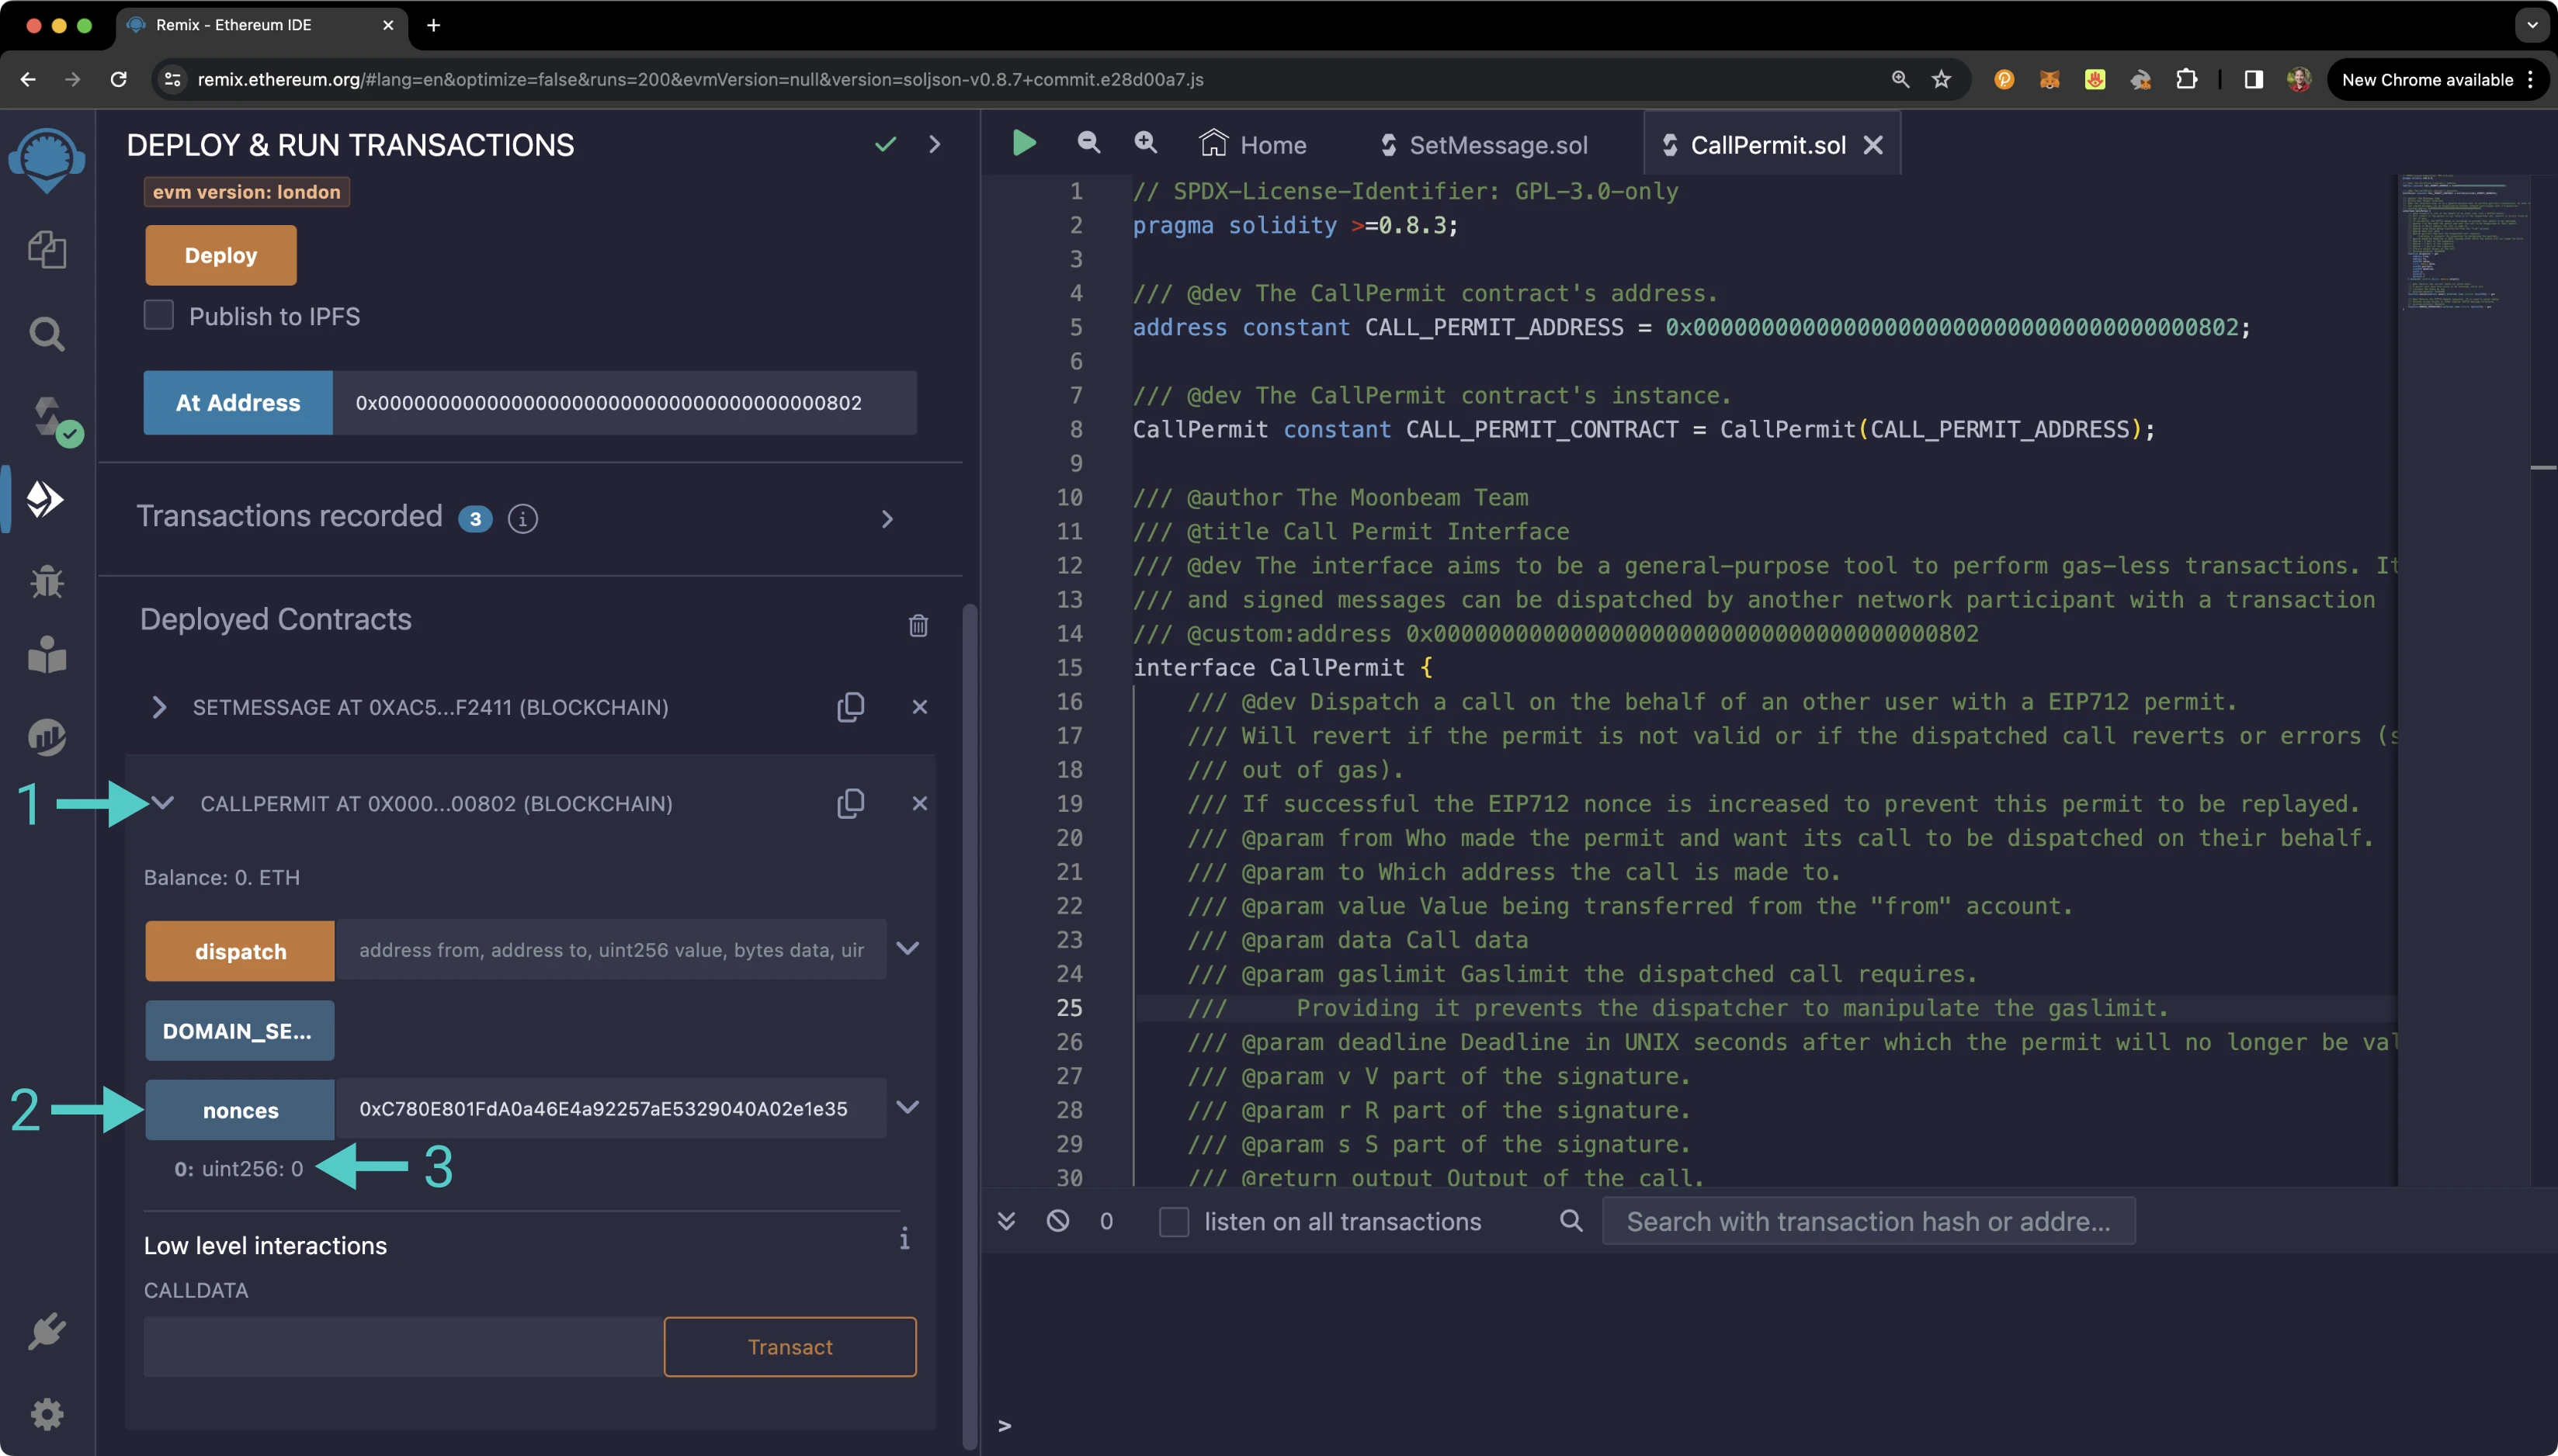
### Use Ethers to Create the Signature {: #use-ethers-to-create-the-signature }
To generate the call permit signature using JavaScript and Ethers, you'll first need to create a project locally. You can do so with the following commands:
```bash
mkdir call-permit-example && cd call-permit-example && touch getSignature.js
npm init -y
```
You should now have a file where you can create the script to get the signature along with a `package.json` file. Open the `package.json` file, and below the `"dependencies"` section, add:
```json
"type": "module"
```
Next, you can install [Ethers.js](https://docs.ethers.org/v6/){target=\_blank}:
```bash
npm i ethers
```
!!! remember
Never reveal your private keys, as they give direct access to your funds. The following steps are for demonstration purposes only.
In the `getSignature.js` file, you can copy and edit the following code snippet. In addition to the fields discussed above in the [Call Permit arguments section](#call-permit-arguments), you'll need to insert the Chain ID of your network in the Domain Separator component to properly generate the signature. If you use an incorrect Chain ID, the generated signature will be invalid and no transaction can be dispatched.
???+ code "getSignature.js"
```js
import { ethers } from 'ethers';
const from = 'INSERT_FROM_ADDRESS';
const to = 'INSERT_TO_ADDRESS';
const value = 0;
const data =
'0x4ed3885e0000000000000000000000000000000000000000000000000000000000000020000000000000000000000000000000000000000000000000000000000000000b68656c6c6f20776f726c64000000000000000000000000000000000000000000';
const gaslimit = 100000;
const nonce = 'INSERT_SIGNERS_NONCE';
const deadline = 'INSERT_DEADLINE';
const createPermitMessageData = () => {
const message = {
from: from,
to: to,
value: value,
data: data,
gaslimit: gaslimit,
nonce: nonce,
deadline: deadline,
};
const typedData = {
types: {
CallPermit: [
{ name: 'from', type: 'address' },
{ name: 'to', type: 'address' },
{ name: 'value', type: 'uint256' },
{ name: 'data', type: 'bytes' },
{ name: 'gaslimit', type: 'uint64' },
{ name: 'nonce', type: 'uint256' },
{ name: 'deadline', type: 'uint256' },
],
},
primaryType: 'CallPermit',
domain: {
name: 'Call Permit Precompile',
version: '1',
chainId: INSERT-CHAIN-ID,
verifyingContract: '0x0000000000000000000000000000000000000802',
},
message: message,
};
return {
typedData,
message,
};
};
const messageData = createPermitMessageData();
// For demo purposes only. Never store your private key in a JavaScript/TypeScript file
const privateKey = 'INSERT_PRIVATE_KEY';
const wallet = new ethers.Wallet(privateKey);
const signature = await wallet.signTypedData(messageData.typedData.domain, messageData.typedData.types, messageData.message);
console.log(`Transaction successful with hash: ${signature}`);
const ethersSignature = ethers.Signature.from(signature);
const formattedSignature = {
r: ethersSignature.r,
s: ethersSignature.s,
v: ethersSignature.v,
};
console.log(formattedSignature);
```
To run the script, use the following command:
```bash
node getSignature.js
```
In the console, you should see the concatenated signature along with the values for the signature including the `v`, `r`, and `s` values. Copy these values as you'll need them when interacting with the Call Permit Precompile in the following sections.

!!! note
Take care when copying the `v`, `r`, and `s` values to the `dispatch` method of the precompile. The ordering of `v`, `r`, and `s` values in the precompile may not be the same as output by the script.
## Interact with the Solidity Interface {: #interact-with-the-solidity-interface }
Now that you have generated the call permit signature, you will be able to test out calling the `dispatch` function of the Call Permit Precompile.
### Dispatch a Call {: #dispatch-a-call }
When you send the `dispatch` function, you'll need the same arguments as you used to sign the call permit. To get started, go back to the **Deploy and Run** tab in Remix, and under the **Deployed Contracts** section, expand the call permit contract. Make sure that you're connected to the account that you want to consume the call permit and pay the transaction fees. Then take the following steps:
1. For the **from** field, enter the account address you used to sign the call permit with
2. Copy and paste the contract address of `SetMessage.sol`
3. Enter `0` for the **value** field
4. Enter the hex representation of the function selector for the `set` function and the string you want to set as the message for the `SetMessage.sol` contract. For this example, `hello world` can be used:
```text
0x4ed3885e0000000000000000000000000000000000000000000000000000000000000020000000000000000000000000000000000000000000000000000000000000000b68656c6c6f20776f726c64000000000000000000000000000000000000000000
```
5. Enter `100000` for the **gasLimit** field
6. Enter the `deadline` you used when signing the call permit
7. Copy the `v` value you should have retrieved while generating the call permit signature and paste it into the **v** field
8. Copy the `r` value you should have retrieved while generating the call permit signature and paste it into the **r** field
9. Copy the `s` value you should have retrieved while generating the call permit signature and paste it into the **s** field
10. Click **transact** to send the transaction
11. MetaMask should pop up and you can confirm the transaction
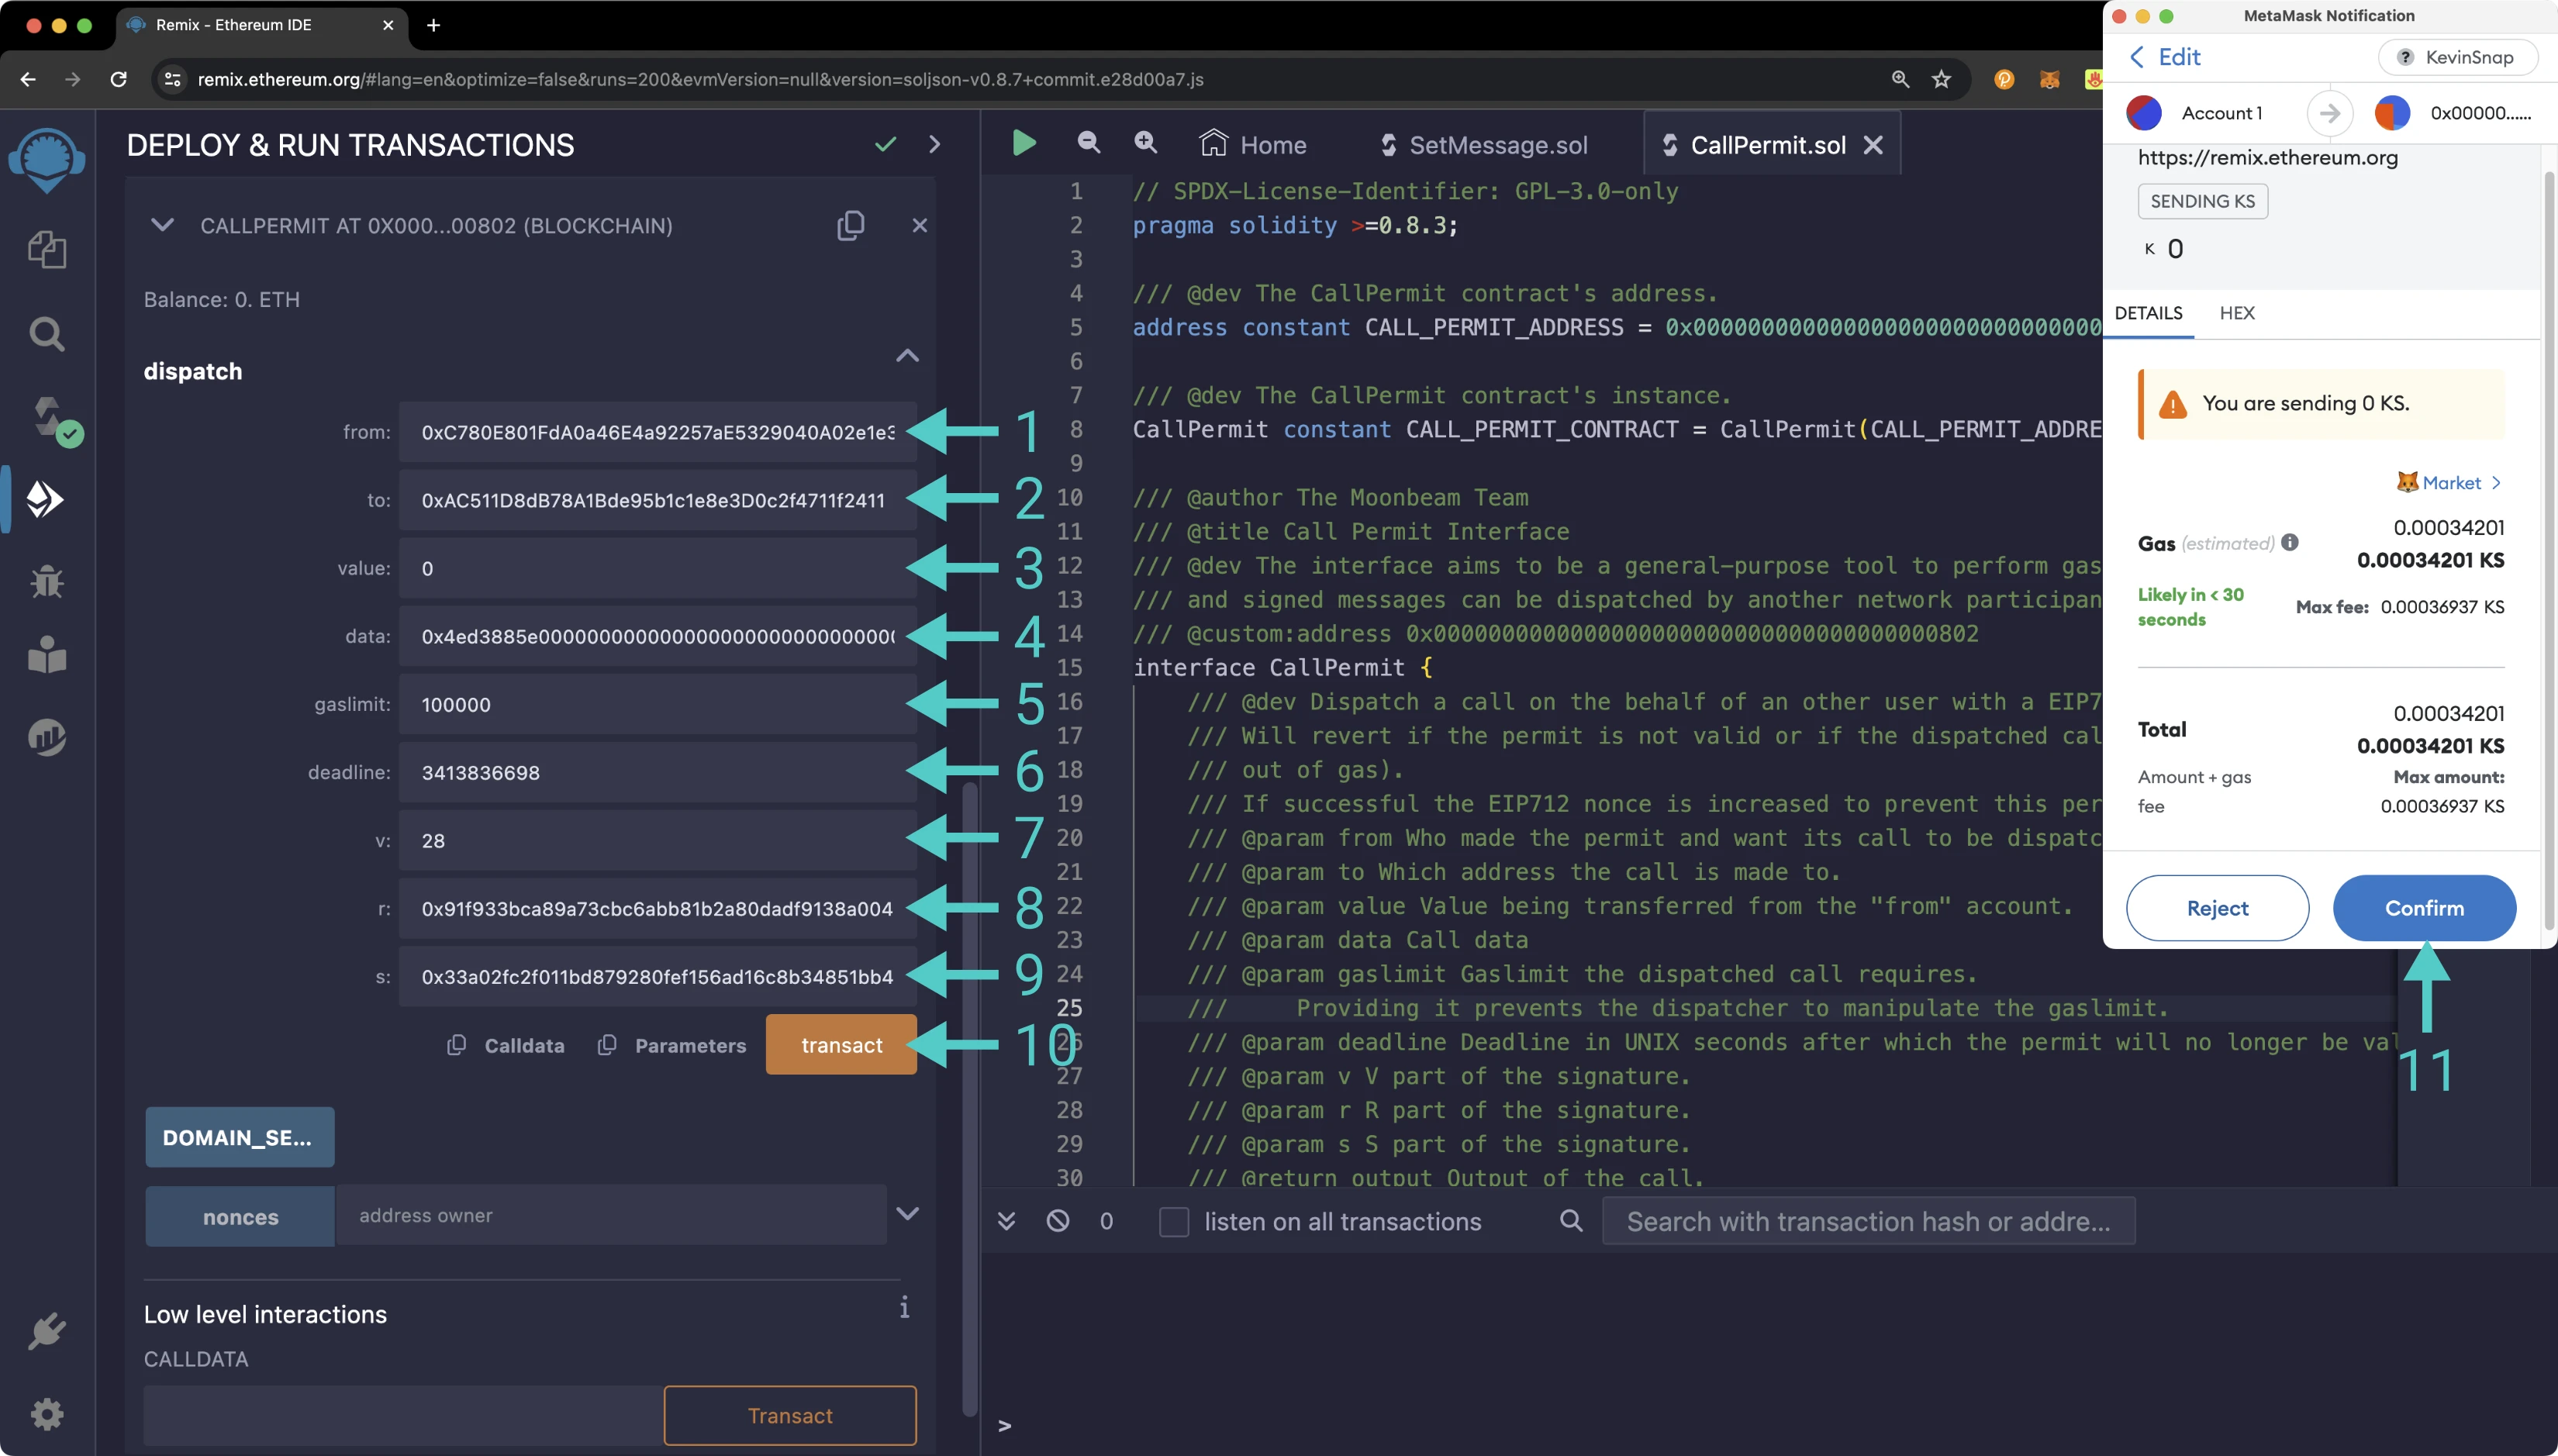
Once the transaction goes through, you can verify that the message was updated to `hello world`. To do so, you can:
1. Expand the `SetMessage.sol` contract
2. Click on **get**
3. The result will appear below the function, and it should show `hello world`
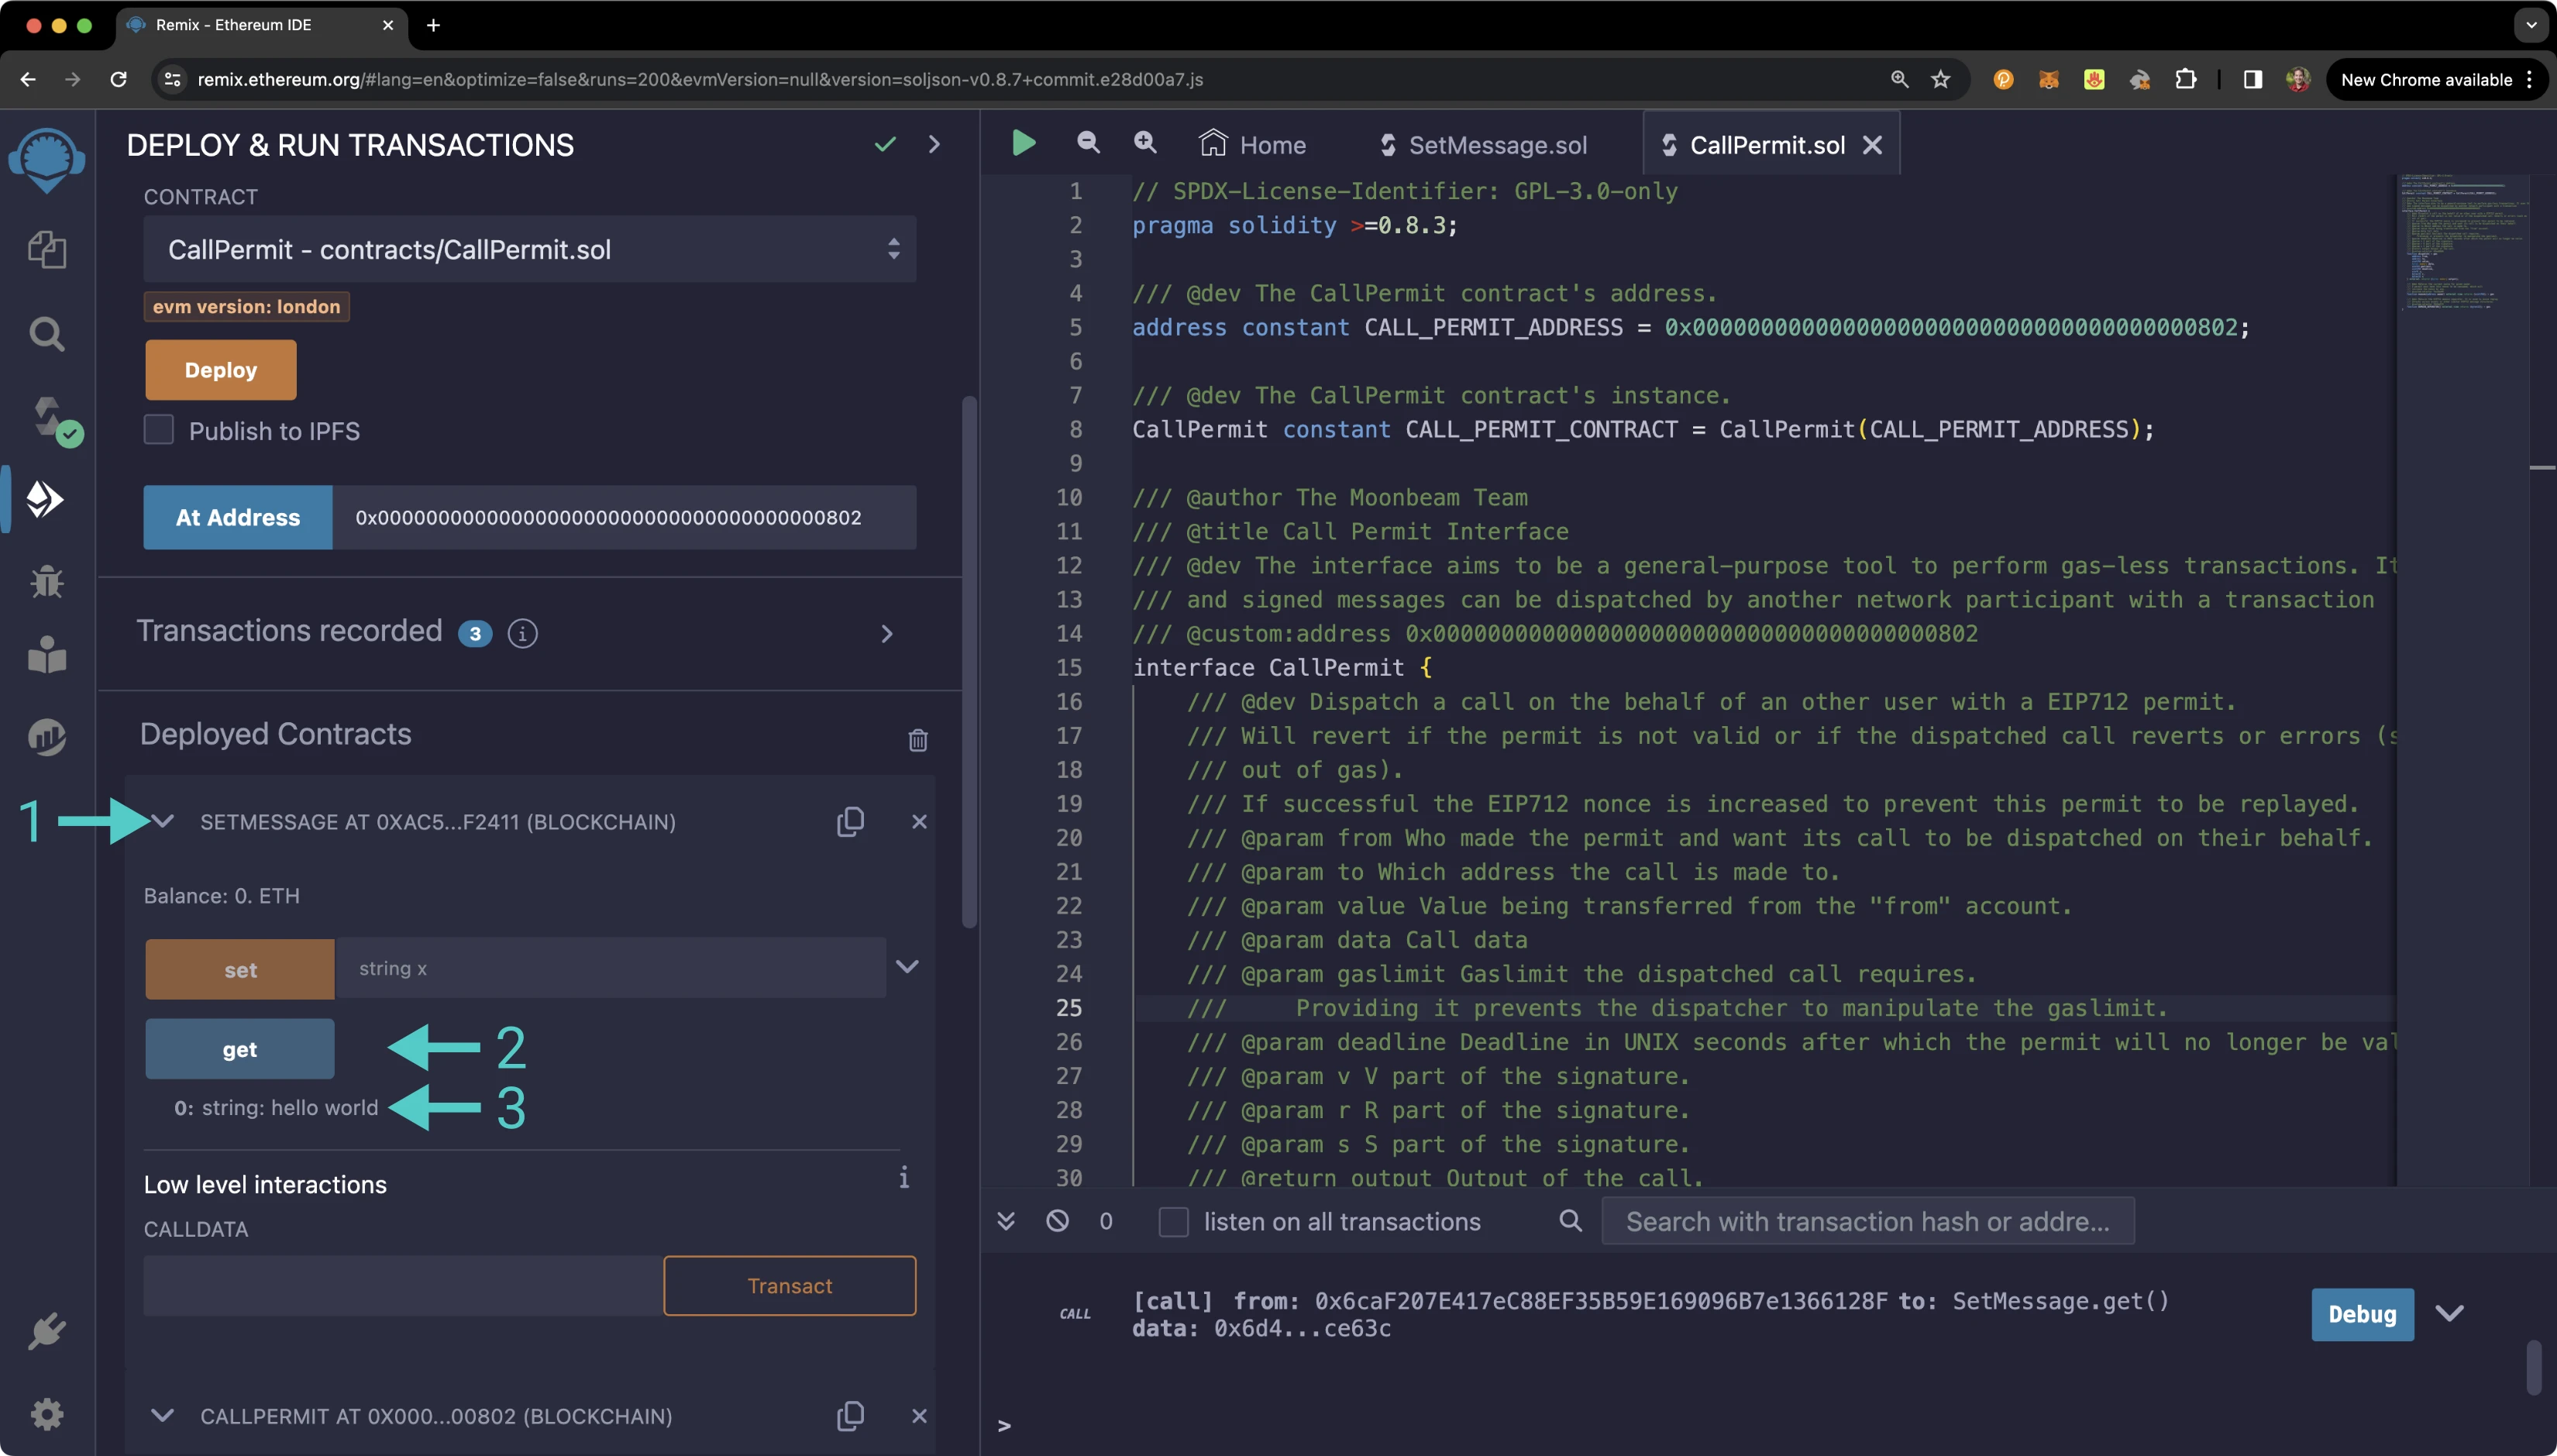
Congratulations! You've successfully generated a call permit signature and used it to dispatch a call on behalf of the call permit signer.
The information presented herein has been provided by third parties and is made available solely for general information purposes. Tanssi does not endorse any project listed and described on the Tanssi Doc Website (https://docs.tanssi.network/). Tanssi Foundation does not warrant the accuracy, completeness or usefulness of this information. Any reliance you place on such information is strictly at your own risk. Tanssi Foundation disclaims all liability and responsibility arising from any reliance placed on this information by you or by anyone who may be informed of any of its contents. All statements and/or opinions expressed in these materials are solely the responsibility of the person or entity providing those materials and do not necessarily represent the opinion of Tanssi Foundation. The information should not be construed as professional or financial advice of any kind. Advice from a suitably qualified professional should always be sought in relation to any particular matter or circumstance. The information herein may link to or integrate with other websites operated or content provided by third parties, and such other websites may link to this website. Tanssi Foundation has no control over any such other websites or their content and will have no liability arising out of or related to such websites or their content. The existence of any such link does not constitute an endorsement of such websites, the content of the websites, or the operators of the websites. These links are being provided to you only as a convenience and you release and hold Tanssi Foundation harmless from any and all liability arising from your use of this information or the information provided by any third-party website or service.
--- END CONTENT ---
Doc-Content: https://docs.tanssi.network/builders/toolkit/ethereum-api/precompiles/cross-chain-transfers/
--- BEGIN CONTENT ---
---
title: Native Cross-Chain Token Transfers
description: Learn how to use the XCM interface precompile to transfer tokens from any Tanssi-powered EVM network, leveraging their inherent native cross-chain capabilities.
categories: EVM-Template
---
# Native Cross-Chain Token Transfers
## Introduction {: #introduction }
As presented in the [Native Cross-Chain Communication](/learn/framework/xcm/){target=\_blank} article from the Learn section, Tanssi-powered networks benefit from an inherent capability to communicate and interoperate with any other network in the ecosystem. This native cross-chain communication allows safe and fast token transfers leveraging the Cross-Consensus Message format (XCM for short), which facilitates communication between different consensus systems.
The communication protocol enabling token transfers is built on [Substrate](/learn/framework/overview/#substrate-framework){target=\_blank} and runs on a lower level than the EVM, making it harder for EVM developers to access.
Nevertheless, EVM networks have an XCM precompile that fills the gap between execution layers, exposing a smart contract interface that abstracts away the underlying complexities, making the execution of cross-chain token transfers as easy as any other smart contract call.
This guide will show you how to interact with the [XCM Interface](https://github.com/moondance-labs/tanssi/blob/master/test/contracts/solidity/XcmInterface.sol){target=\_blank} precompile to execute cross-chain token transfers through the Ethereum API.
The XCM precompile is located at the following address:
```text
{{networks.demo_evm.precompiles.xcm_interface }}
```
!!! note
There can be some unintended consequences when using precompiles. Tanssi's precompiles are derived from Moonbeam's, and as such, please familiarize yourself with [Moonbeam's Precompile Security Considerations](https://docs.moonbeam.network/builders/get-started/eth-compare/security){target=\_blank}.
## The XCM Solidity Interface {: #the-xcm-solidity-interface }
The [`XCMInterface.sol`](https://github.com/moondance-labs/tanssi/blob/master/test/contracts/solidity/XcmInterface.sol){target=\_blank} interface on Tanssi EVM networks is a Solidity interface that allows developers to interact with the precompile's functions.
??? code "XCMInterface.sol"
```solidity
// SPDX-License-Identifier: GPL-3.0-only
pragma solidity >=0.8.3;
/// @dev The XCM contract's address.
address constant XCM_CONTRACT_ADDRESS = 0x0000000000000000000000000000000000000804;
/// @dev The XCM contract's instance.
XCM constant XCM_CONTRACT = XCM(XCM_CONTRACT_ADDRESS);
/// @author The Moonbeam Team
/// @title XCM precompile Interface
/// @dev The interface that Solidity contracts use to interact with the substrate pallet-xcm.
interface XCM {
// A location is defined by its number of parents and the encoded junctions (interior)
struct Location {
uint8 parents;
bytes[] interior;
}
// Support for Weights V2
struct Weight {
uint64 refTime;
uint64 proofSize;
}
// A way to represent fungible assets in XCM using Location format
struct AssetLocationInfo {
Location location;
uint256 amount;
}
// A way to represent fungible assets in XCM using address format
struct AssetAddressInfo {
address asset;
uint256 amount;
}
/// @dev Function to send assets via XCM using transfer_assets() pallet-xcm extrinsic.
/// @custom:selector 59df8416
/// @param dest The destination chain.
/// @param beneficiary The actual account that will receive the tokens on dest.
/// @param assets The combination (array) of assets to send.
/// @param feeAssetItem The index of the asset that will be used to pay for fees.
/// @param weight The weight to be used for the whole XCM operation.
/// (uint64::MAX in refTime means Unlimited weight)
function transferAssetsLocation(
Location memory dest,
Location memory beneficiary,
AssetLocationInfo[] memory assets,
uint32 feeAssetItem,
Weight memory weight
) external;
/// @dev Function to send assets via XCM to a 20 byte-like parachain
/// using transfer_assets() pallet-xcm extrinsic.
/// @custom:selector b489262e
/// @param paraId The para-id of the destination chain.
/// @param beneficiary The actual account that will receive the tokens on paraId destination.
/// @param assets The combination (array) of assets to send.
/// @param feeAssetItem The index of the asset that will be used to pay for fees.
/// @param weight The weight to be used for the whole XCM operation.
/// (uint64::MAX in refTime means Unlimited weight)
function transferAssetsToPara20(
uint32 paraId,
address beneficiary,
AssetAddressInfo[] memory assets,
uint32 feeAssetItem,
Weight memory weight
) external;
/// @dev Function to send assets via XCM to a 32 byte-like parachain
/// using transfer_assets() pallet-xcm extrinsic.
/// @custom:selector 4461e6f5
/// @param paraId The para-id of the destination chain.
/// @param beneficiary The actual account that will receive the tokens on paraId destination.
/// @param assets The combination (array) of assets to send.
/// @param feeAssetItem The index of the asset that will be used to pay for fees.
/// @param weight The weight to be used for the whole XCM operation.
/// (uint64::MAX in refTime means Unlimited weight)
function transferAssetsToPara32(
uint32 paraId,
bytes32 beneficiary,
AssetAddressInfo[] memory assets,
uint32 feeAssetItem,
Weight memory weight
) external;
/// @dev Function to send assets via XCM to the relay chain
/// using transfer_assets() pallet-xcm extrinsic.
/// @custom:selector d7c89659
/// @param beneficiary The actual account that will receive the tokens on the relay chain.
/// @param assets The combination (array) of assets to send.
/// @param feeAssetItem The index of the asset that will be used to pay for fees.
/// @param weight The weight to be used for the whole XCM operation.
/// (uint64::MAX in refTime means Unlimited weight)
function transferAssetsToRelay(
bytes32 beneficiary,
AssetAddressInfo[] memory assets,
uint32 feeAssetItem,
Weight memory weight
) external;
}
```
The interface includes the necessary data structures along with the following functions:
???+ function "**transferAssetsToPara20**(_paraId, beneficiary, assets, feeAssetItem, weight_) — sends assets to another EVM-compatible network using the underlying `transfer_assets()` transaction included in the XCM pallet module"
=== "Parameters"
- `paraId` ++"uint32"++ - the destination's network ID
- `beneficiary` ++"address"++ - the ECDSA-type account in the destination chain that will receive the tokens
- `assets` ++"AssetAddressInfo[] memory"++ - an array of assets to send
- `feeAssetItem` ++"uint32"++ - the index of the asset that will be used to pay fees
- `weight` ++"Weight memory"++- the maximum gas to use in the whole operation. Setting uint64::MAX to `refTime` acts in practice as *unlimited weight*
=== "Example"
- `paraId` - 888
- `beneficiary` - 0x3f0Aef9Bd799F1291b80376aD57530D353ab0217
- `assets` - [["0x0000000000000000000000000000000000000800", 1000000000000000000]]
- `feeAssetItem` - 0
- `weight` - [9223372036854775807, 9223372036854775807]
??? function "**transferAssetsToPara32**(_paraId, beneficiary, assets,feeAssetItem, weight_) — sends assets to a Substrate network using the underlying `transfer_assets()` transaction included in the XCM pallet module"
=== "Parameters"
- `paraId` ++"uint32"++ - the destination's network ID
- `beneficiary` ++"bytes32"++ - the Substrate's SR25519-type account in the destination chain that will receive the tokens
- `assets` ++"AssetAddressInfo[] memory"++ - an array of assets to send
- `feeAssetItem` ++"uint32"++ - the index of the asset that will be used to pay fees
- `weight` ++"Weight memory"++ - the maximum gas to use in the whole operation. Setting uint64::MAX to `refTime` acts in practice as *unlimited weight*
=== "Example"
- `paraId` - 888
- `beneficiary` - 0xf831d83025f527daeed39a644d64d335a4e627b5f4becc78fb67f05976889a06
- `assets` - [["0x0000000000000000000000000000000000000800", 1000000000000000000]]
- `feeAssetItem` - 0
- `weight` - [9223372036854775807, 9223372036854775807]
??? function "**transferAssetsToRelay**(_beneficiary, assets, feeAssetItem, weight_) — sends assets to the relay chain using the underlying `transfer_assets()` transaction included in the XCM pallet module"
=== "Parameters"
- `beneficiary` ++"bytes32"++ - the Substrate's sr25519-type account in the relay chain that will receive the tokens
- `assets` ++"AssetAddressInfo[] memory"++ - an array of assets to send
- `feeAssetItem` ++"uint32"++ - the index of the asset that will be used to pay fees
- `weight` ++"Weight memory"++ - the maximum gas to use in the whole operation. Setting uint64::MAX to `refTime` acts in practice as *unlimited weight*
=== "Example"
- `beneficiary` - 0xf831d83025f527daeed39a644d64d335a4e627b5f4becc78fb67f05976889a06
- `assets` - [["0x0000000000000000000000000000000000000800", 1000000000000000000]]
- `feeAssetItem` - 0
- `weight` - [9223372036854775807, 9223372036854775807]
??? function "**transferAssetsLocation**(_dest, beneficiary, assets, feeAssetItem, weight_) — sends assets using the underlying `transfer_assets()` transaction included in the XCM pallet module"
=== "Parameters"
- `dest` ++"Location memory"++ - the destination chain
- `beneficiary` ++"Location memory"++ - the account in the destination chain that will receive the tokens
- `assets` ++"AssetLocationInfo[] memory"++ - an array of assets to send
- `feeAssetItem` ++"uint32"++ - the index of the asset that will be used to pay fees
- `weight` ++"Weight memory"++ - the maximum gas to use in the whole operation. Setting uint64::MAX to `refTime` acts in practice as *unlimited weight*
=== "Example"
- `dest` - ["1",[]]
- `beneficiary` - [0, ["0x01f831d83025f527daeed39a644d64d335a4e627b5f4becc78fb67f05976889a0600"]]
- `assets` - [[[1, ["0x010000000000000000000000000000000000000800"]], 1000000000000000000]]
- `feeAssetItem` - 0
- `weight` - [9223372036854775807, 9223372036854775807]
## Interact with the Solidity Interface {: #interact-with-the-solidity-interface }
### Checking Prerequisites {: #checking-prerequisites }
To follow along with this tutorial, you will need to have your wallet configured to work with your EVM network and an account funded with native tokens. You can add your EVM network to MetaMask with one click on the [Tanssi dApp](https://apps.tanssi.network){target=\_blank}. Or, you can [configure MetaMask for Tanssi with the demo EVM network](/builders/toolkit/ethereum-api/wallets/metamask/){target=\_blank}.
!!! note
It is necessary to have previously established communication channels with the destination chain before using this precompile's functionality. To do so, refer to the [Manage Cross-Chain Communication Channels](/builders/manage/dapp/xcm-channels/){target=\_blank} guide.
Also, if the token being transferred is native to your network, the destination chain must have registered the foreign asset.
### Remix Set Up {: #remix-set-up }
You can interact with the XCM Interface precompile using [Remix](https://remix.ethereum.org){target=\_blank}. To add the precompile to Remix, you will need to:
1. Get a copy of [`XCMInterface.sol`](https://github.com/moondance-labs/tanssi/blob/master/test/contracts/solidity/XcmInterface.sol){target=\_blank}
2. Paste the file contents into a Remix file named `XcmInterface.sol`
### Compile the Contract {: #compile-the-contract }
Next, you will need to compile the interface in Remix:
1. Click on the **Compile** tab, second from top
2. Compile the interface by clicking on **Compile XCMInterface.sol**
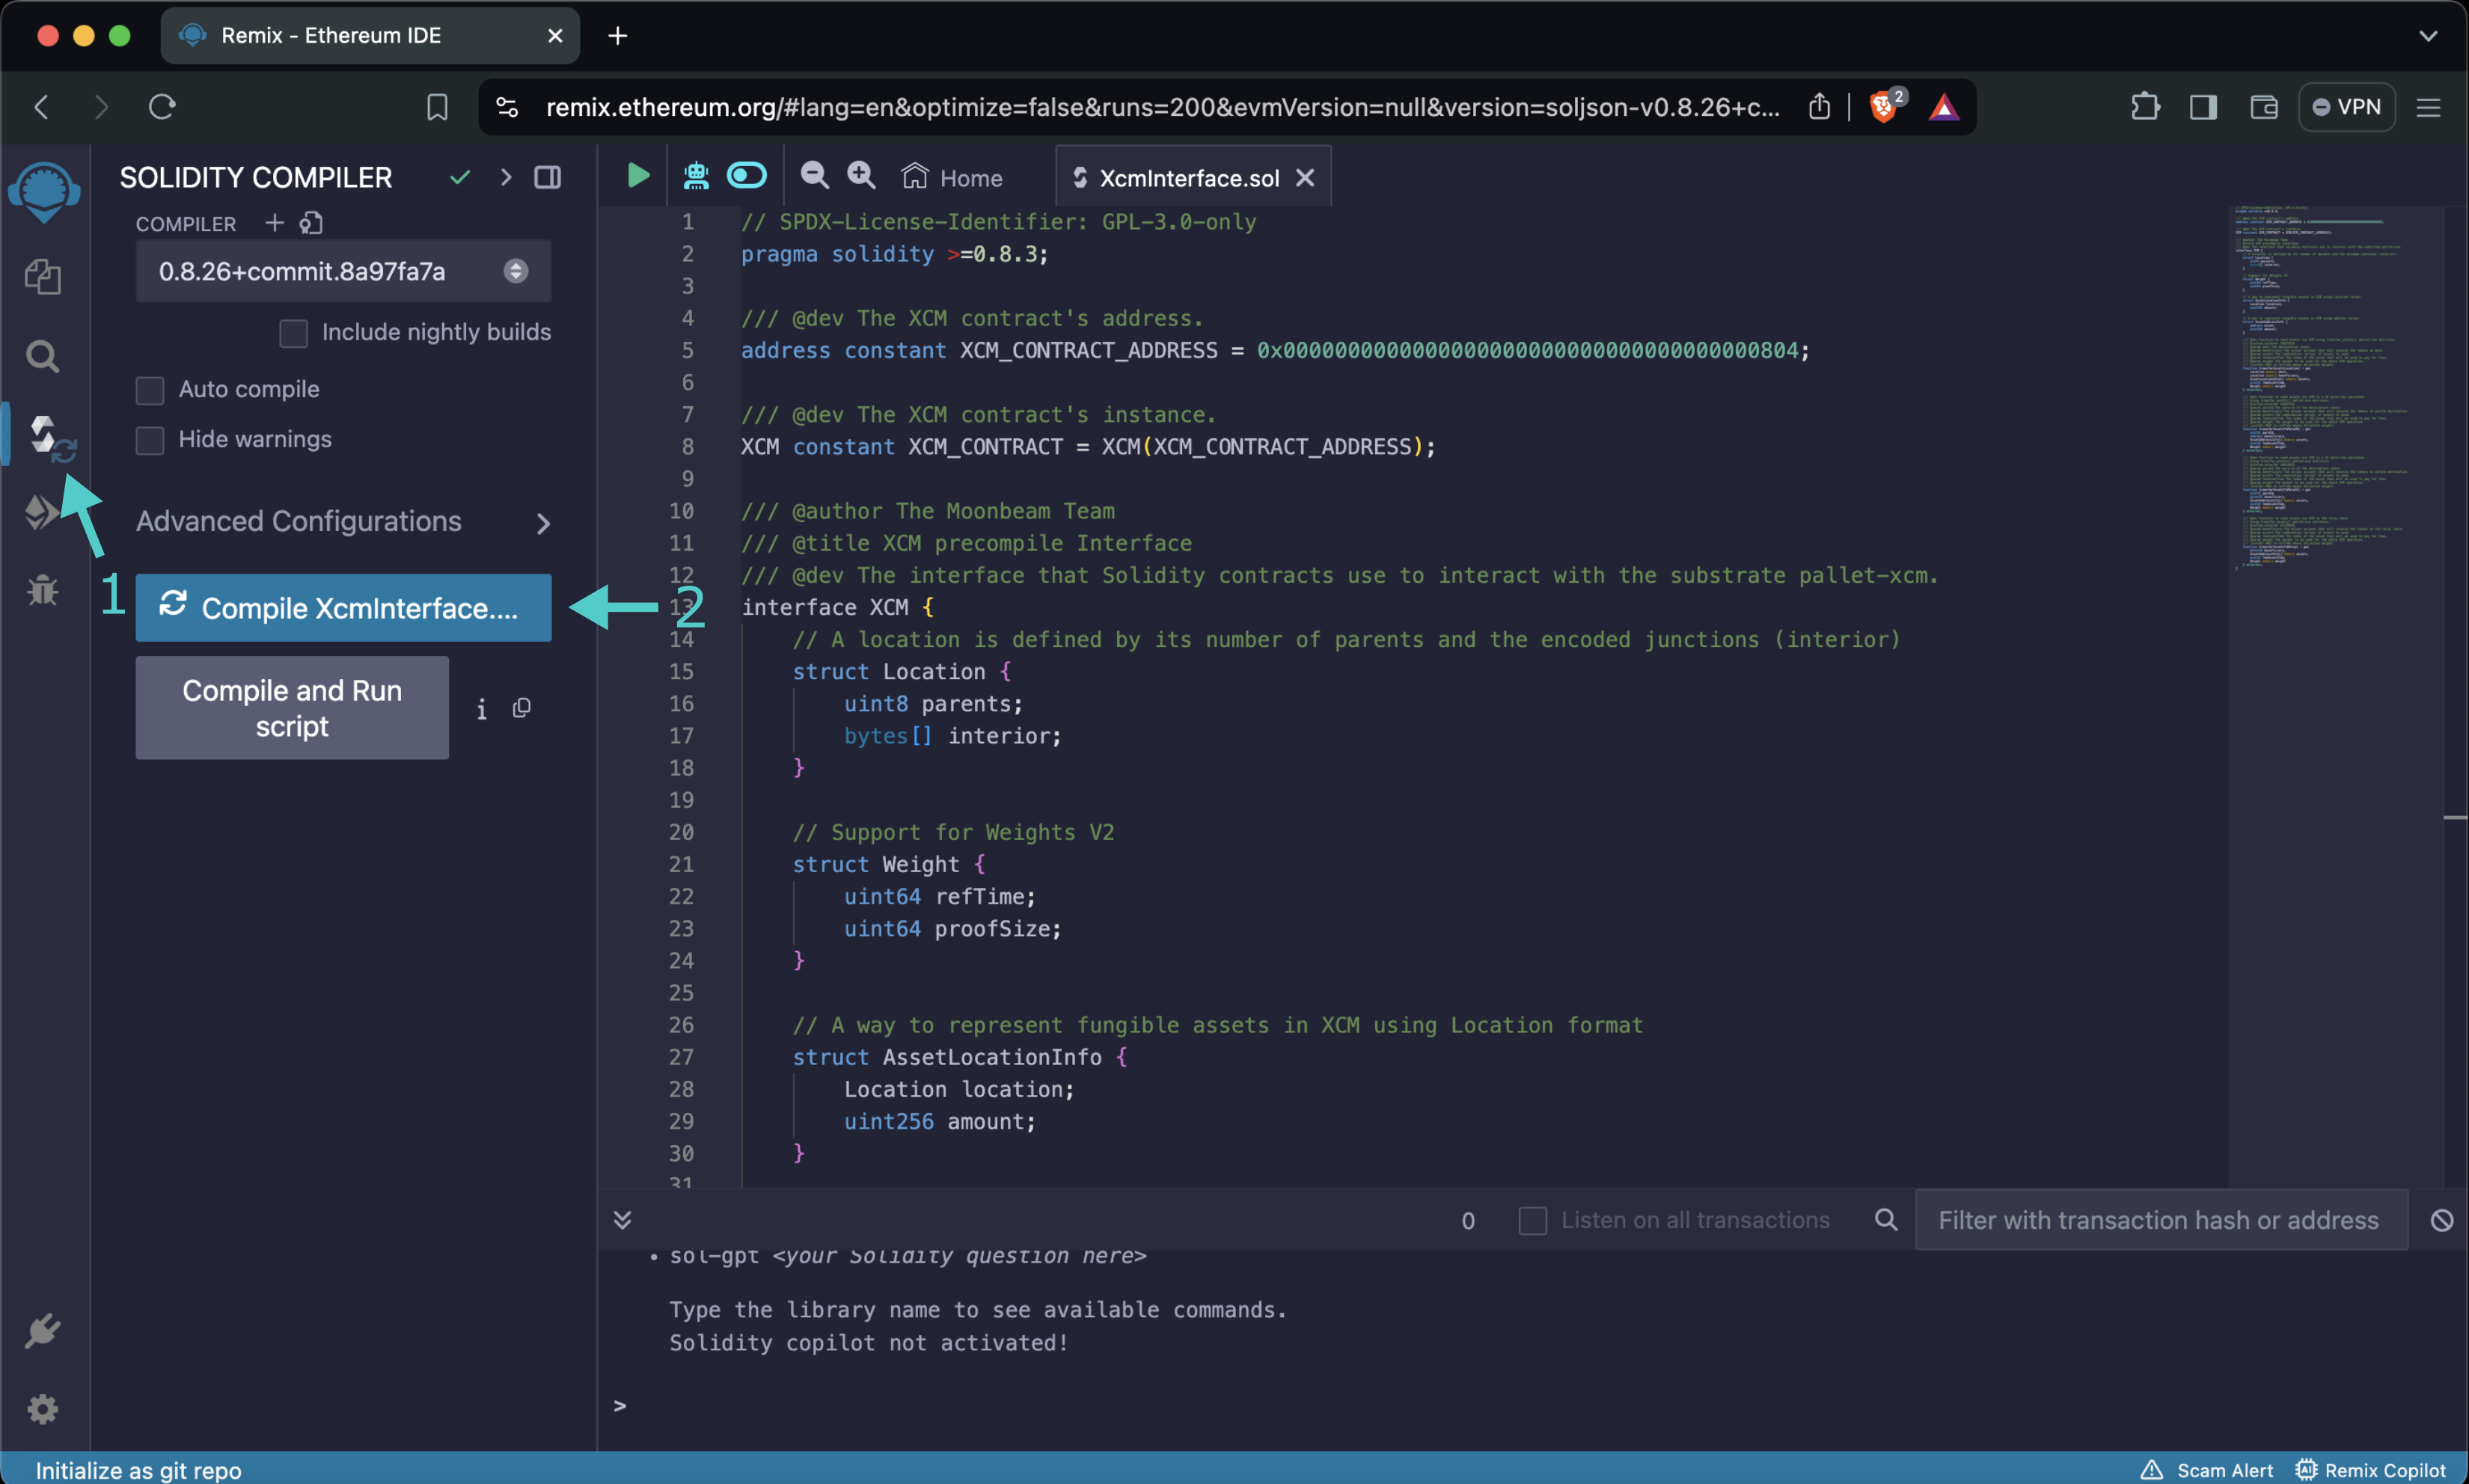
When the compilation is completed, you will see a green checkmark next to the **Compile** tab.
### Access the Contract {: #access-the-contract }
Instead of deploying the precompile, you will access the interface given the address of the precompiled contract:
1. Click on the **Deploy and Run** tab directly below the **Compile** tab in Remix. Please note that the precompiled contracts are already accessible at their respective addresses. Therefore, there is no deployment step
2. Make sure **Injected Provider - Metamask** is selected in the **ENVIRONMENT** dropdown. Once you select **Injected Provider - Metamask**, you may be prompted by MetaMask to connect your account to Remix if it's not already connected
3. Make sure the correct account is displayed under **ACCOUNT**
4. Ensure **XCM - XCMInterface.sol** is selected in the **CONTRACT** dropdown. Given that it is a precompiled contract, there is no deployment step. Instead, you are going to provide the address of the precompile in the **At Address** field
5. Provide the address of the precompile: `{{networks.demo_evm.precompiles.xcm_interface}}` and click **At Address**
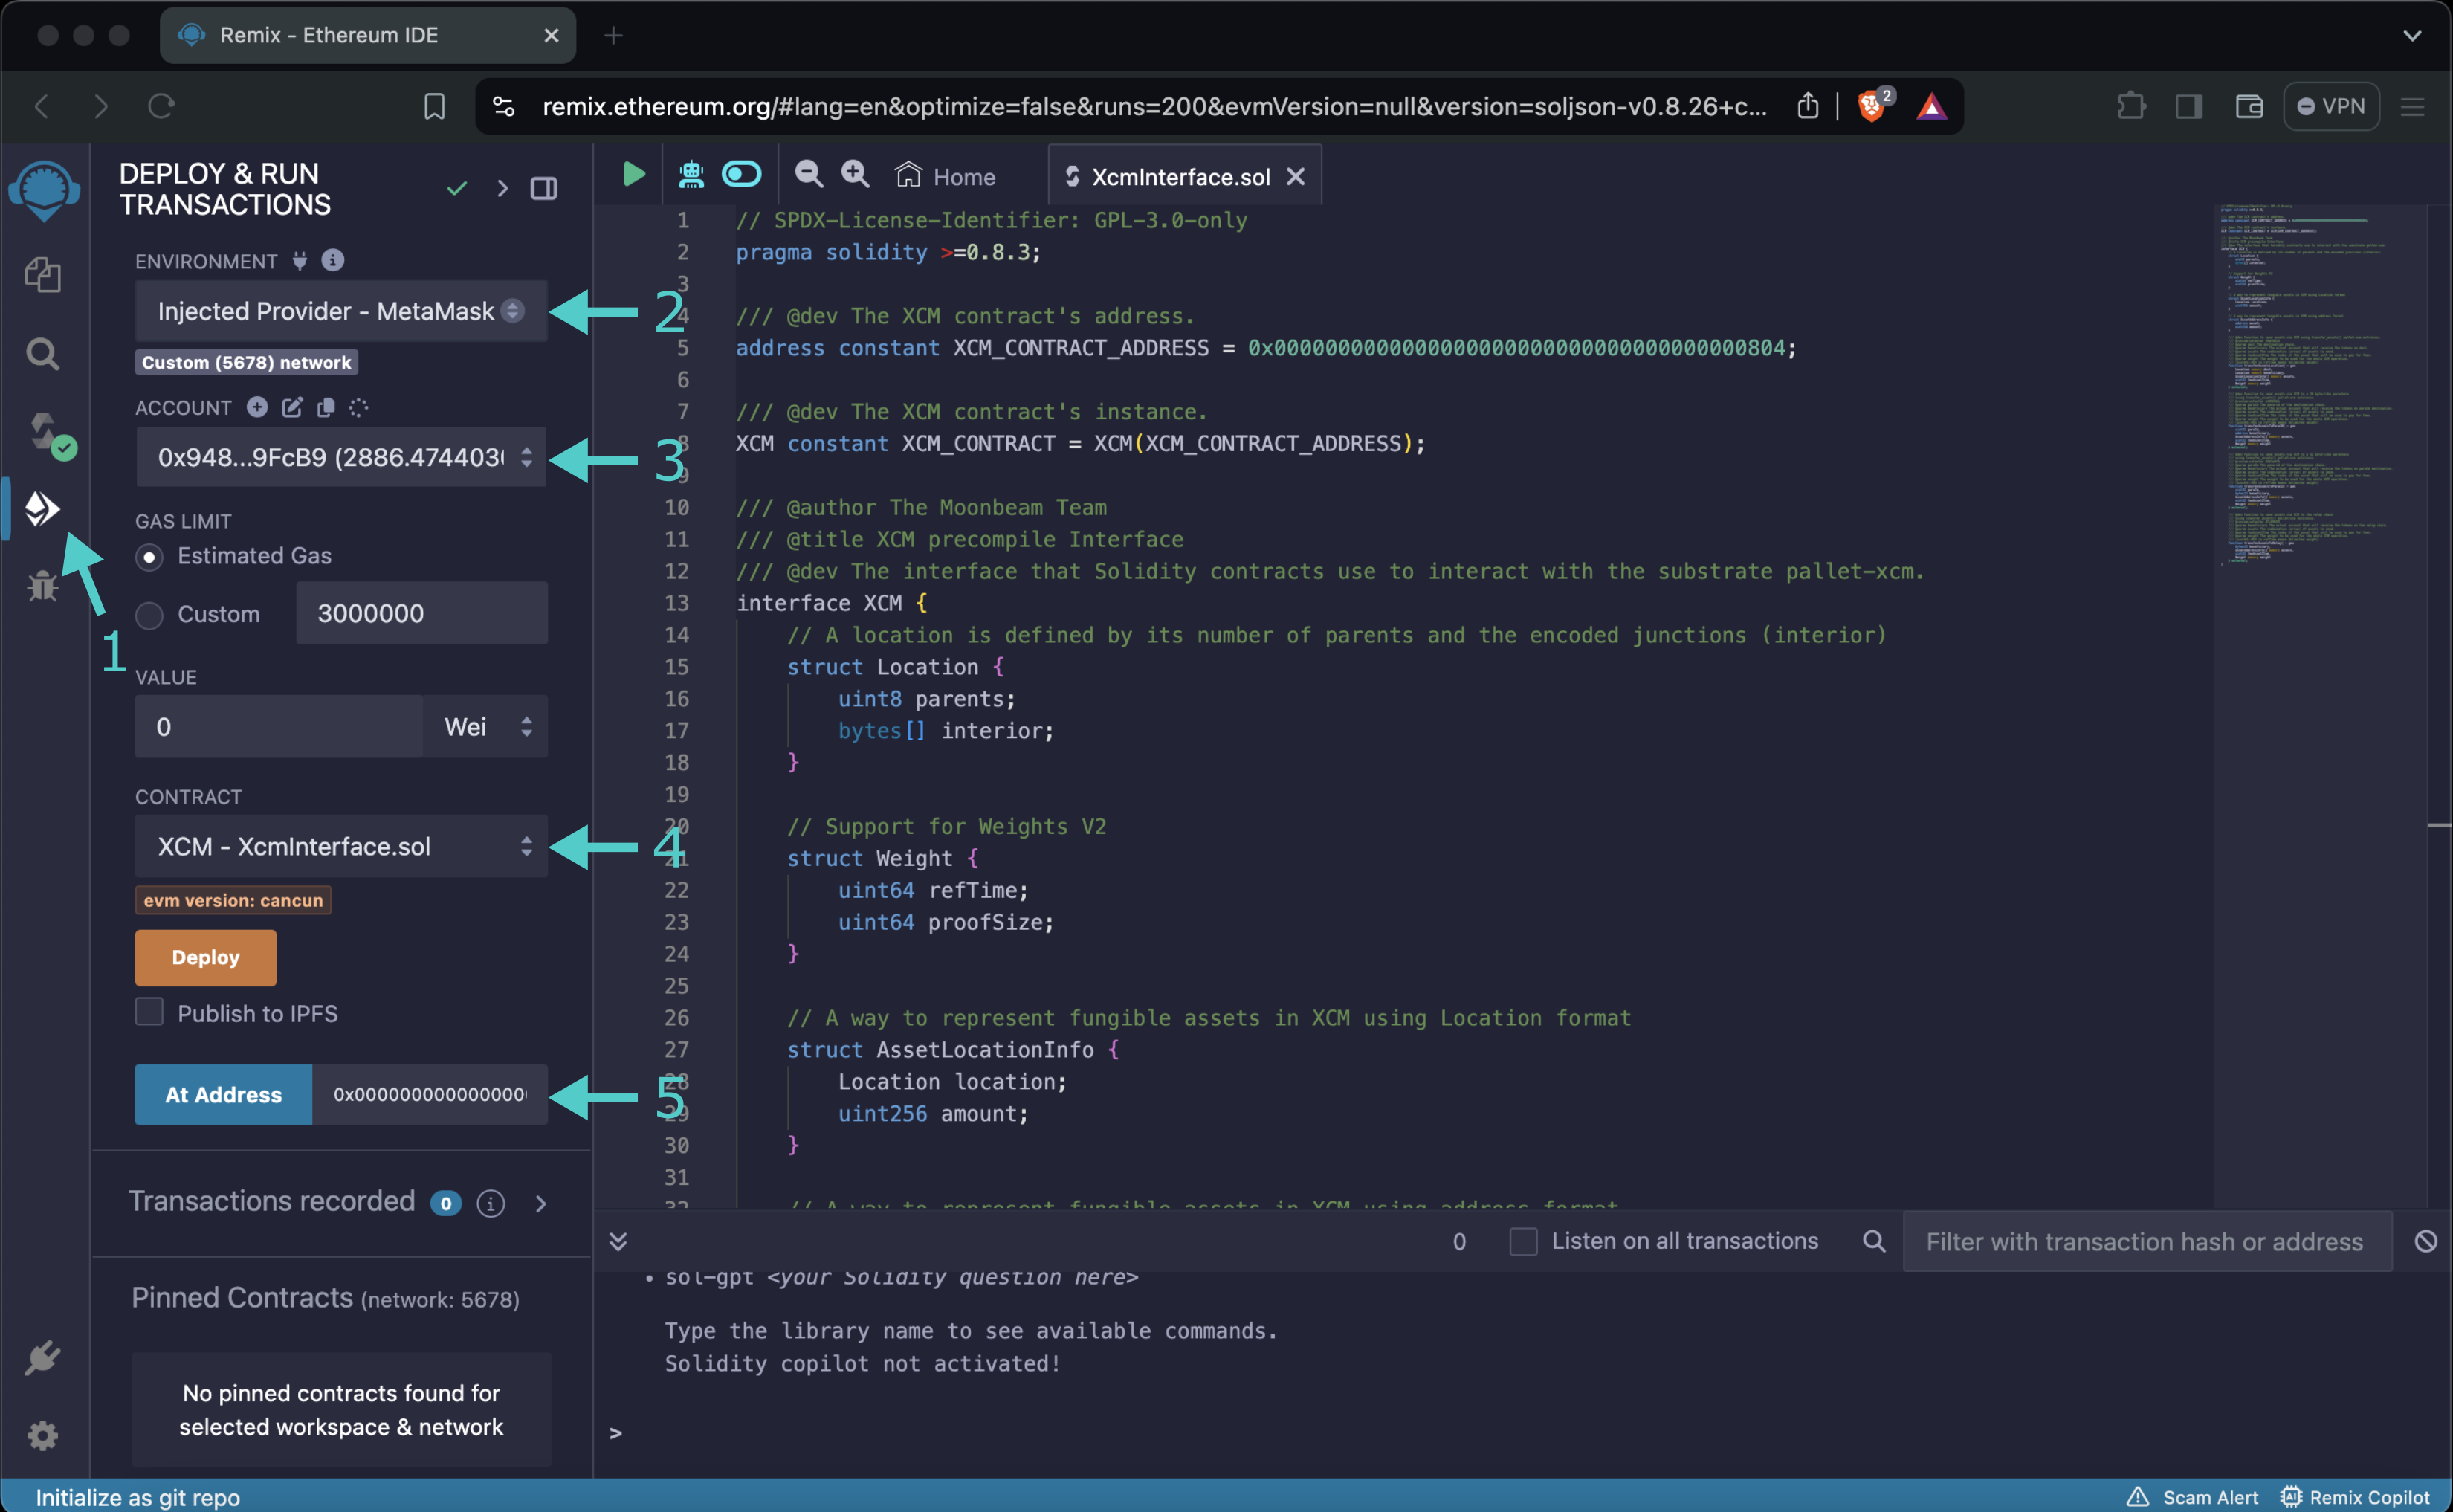
The **XCM Interface** precompile will appear in the list of **Deployed Contracts**.
### Send Tokens Over to Another EVM-Compatible Network {: #transfer-to-evm-chains }
To send tokens over to an account in another EVM-compatible network, please follow these steps:
1. Expand the **transferAssetsToPara20** function
2. Enter the network ID (paraId)
3. Enter the 20-bytes (Ethereum-like) destination account (beneficiary)
4. Specify the tokens to be transferred. Note that this parameter is an array that contains at least one asset. Each asset is specified by its address and the total amount to transfer
!!! note
Tokens are specified by their ERC-20 address. If the token you want to transfer is the network's native one, the [Native Token ERC-20 Precompile](/builders/toolkit/ethereum-api/precompiles/erc20/){target=\_blank} will help you reference it through an ERC-20 interface.
5. Enter the index of the asset that will be used to pay the fees. This index is zero-based, so the first element is `0`, the second is `1`, and so on
6. Enter the maximum gas to pay for the transaction. This gas is derived from two parameters, the processing time (`refTime`) and the proof size (`proofSize`). In practice, setting refTime to `uint64::MAX` is equal to *unlimited weight*
7. Click **transact**
8. MetaMask will pop up, and you will be prompted to review the transaction details. Click **Confirm** to send the transaction
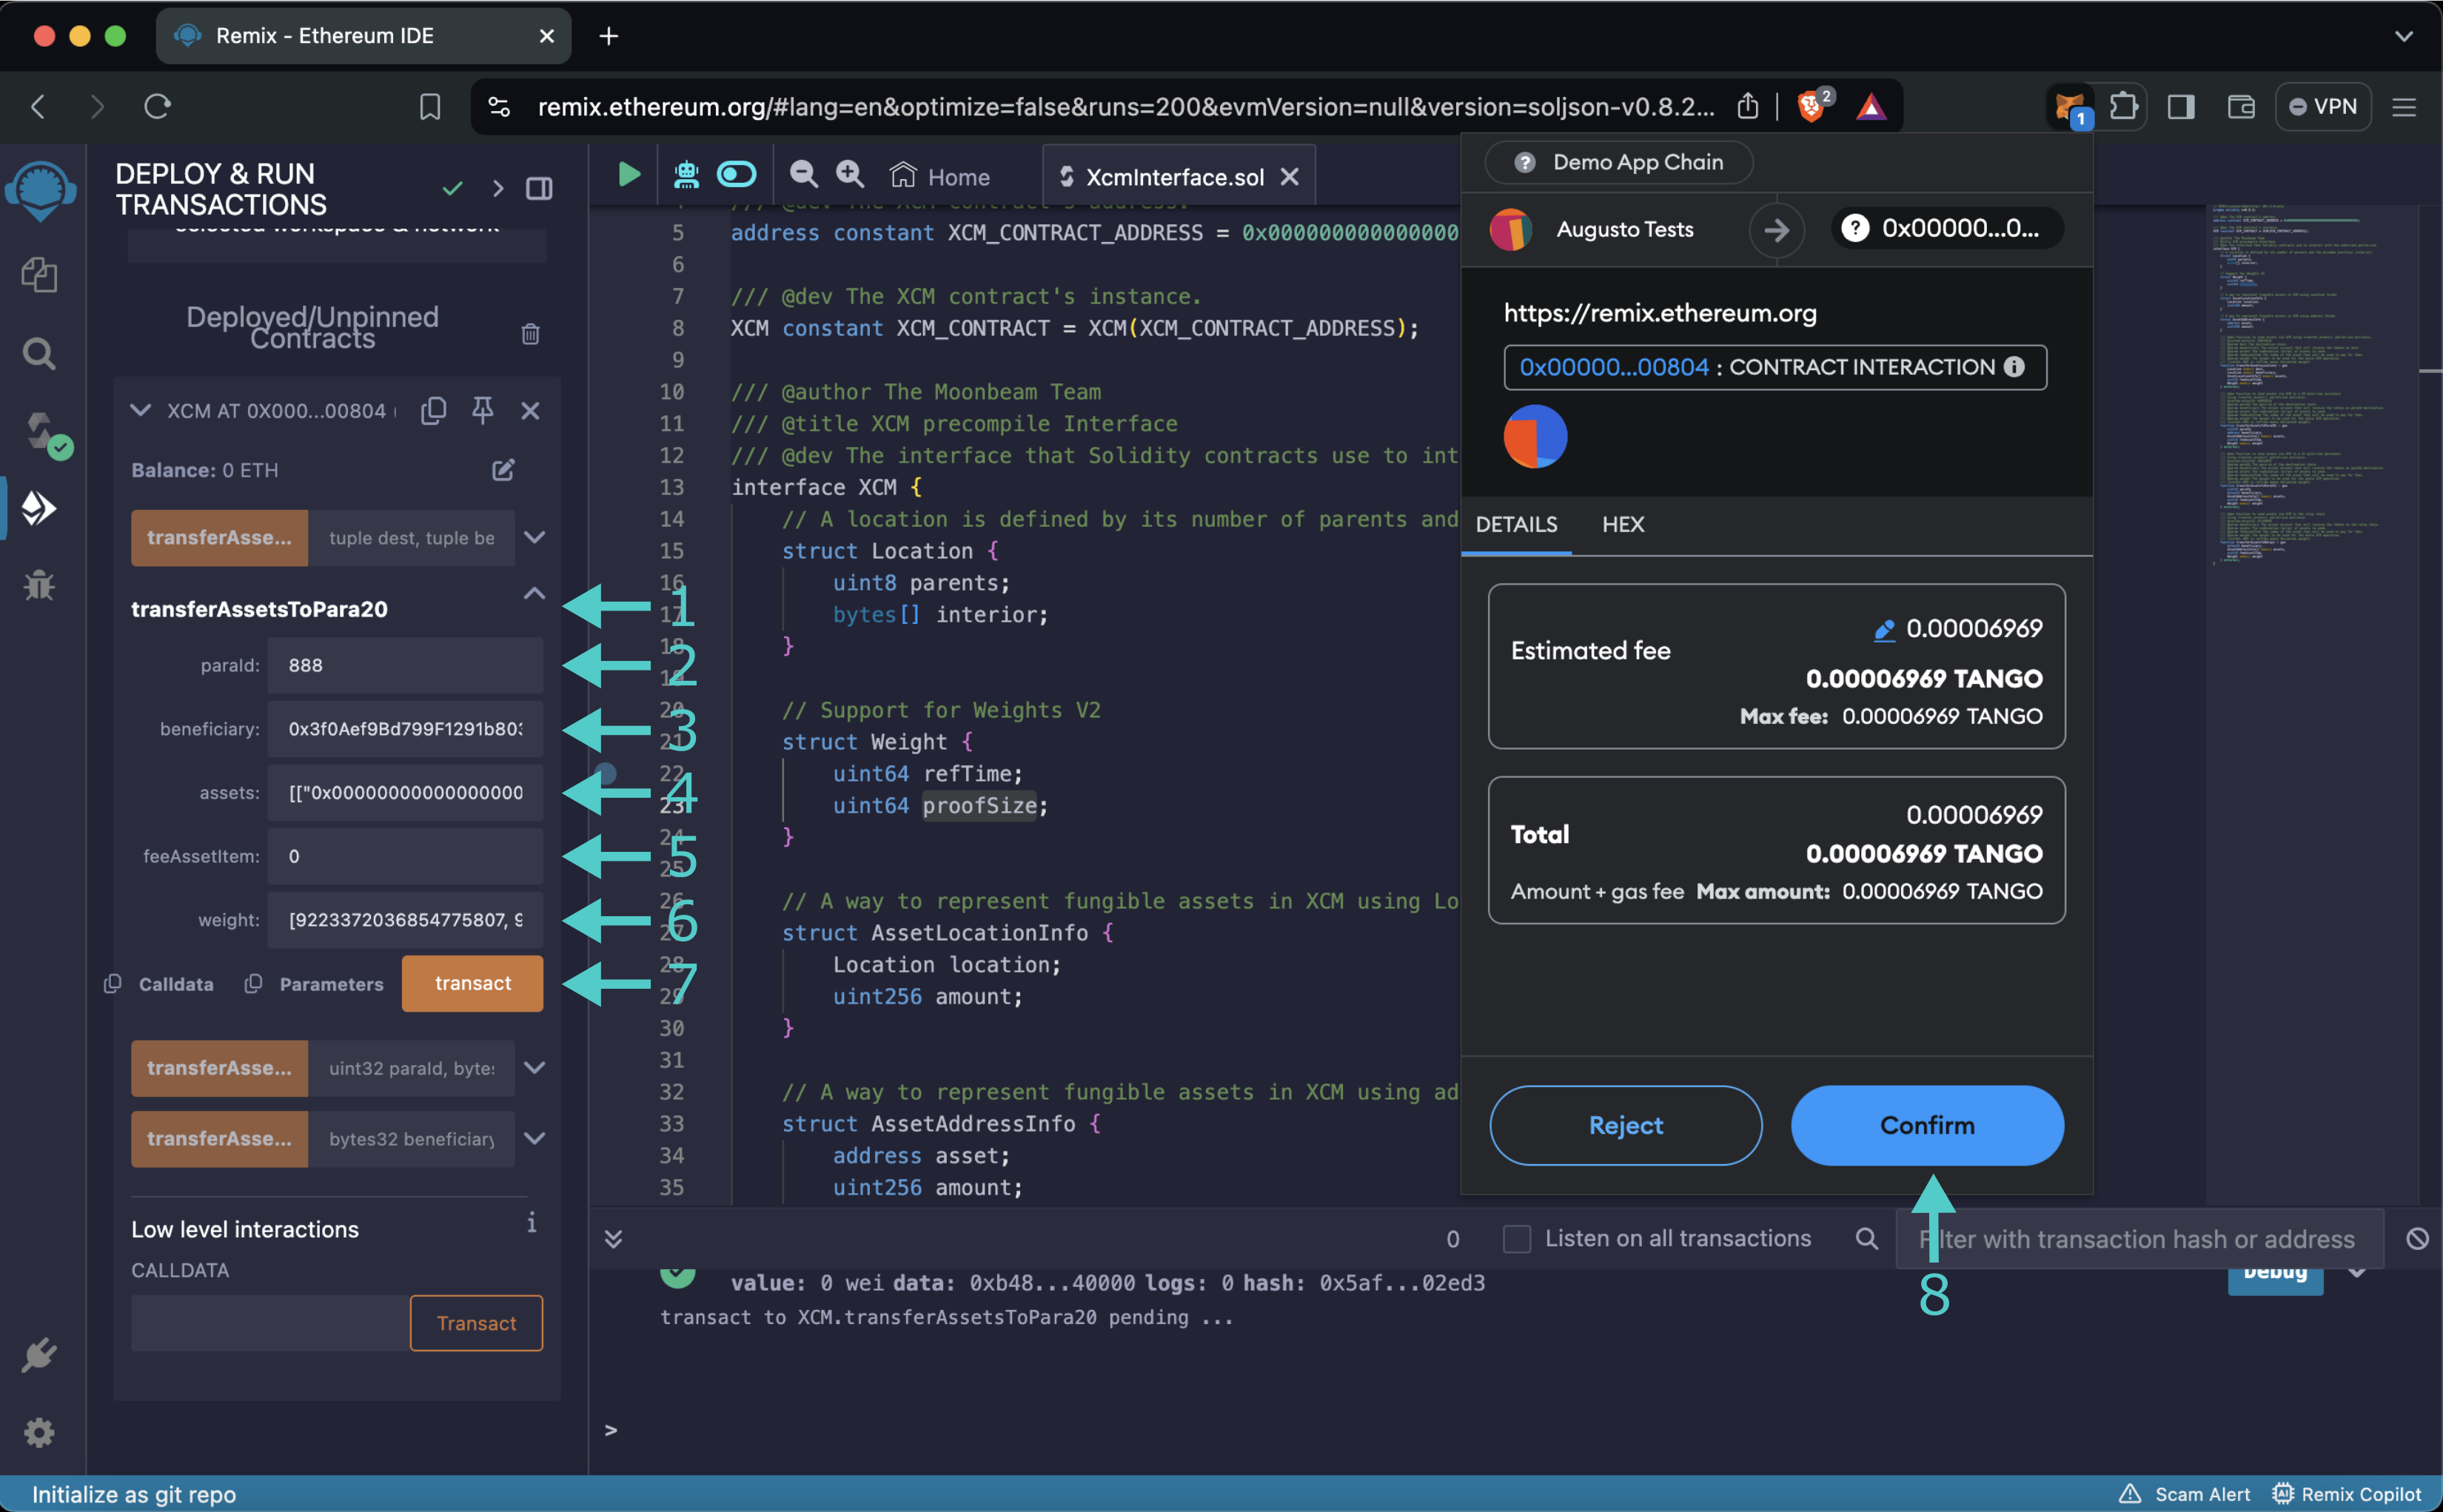
After the transaction is confirmed, wait for a few blocks for the transfer to reach the destination chain and reflect the new balance.
### Send Tokens Over to a Substrate Network {: #transfer-to-substrate-chains }
To send tokens over to an account in a Substrate network, please follow these steps:
1. Expand the **transferAssetsToPara32** function
2. Enter the network ID (`paraId`)
3. Enter the sr25519-type destination account (beneficiary)
4. Specify the tokens to be transferred. Note that this parameter is an array that contains at least one asset. Each asset is specified by its address and the total amount to transfer
!!! note
Tokens are specified by their ERC-20 address. If the token you want to transfer is the network's native one, the [Native Token ERC-20 Precompile](/builders/toolkit/ethereum-api/precompiles/erc20/){target=\_blank} will help you reference it through an ERC-20 interface.
5. Enter the index of the asset that will be used to pay the fees. This index is zero-based, so the first element is `0`, the second is `1`, and so on
6. Enter the maximum gas to pay for the transaction. This gas is derived from two parameters, the processing time (refTime) and the proof size (proofSize). In practice, setting refTime to `uint64::MAX` is equal to *unlimited weight*
7. Click **transact**
8. MetaMask will pop up, and you will be prompted to review the transaction details. Click **Confirm** to send the transaction
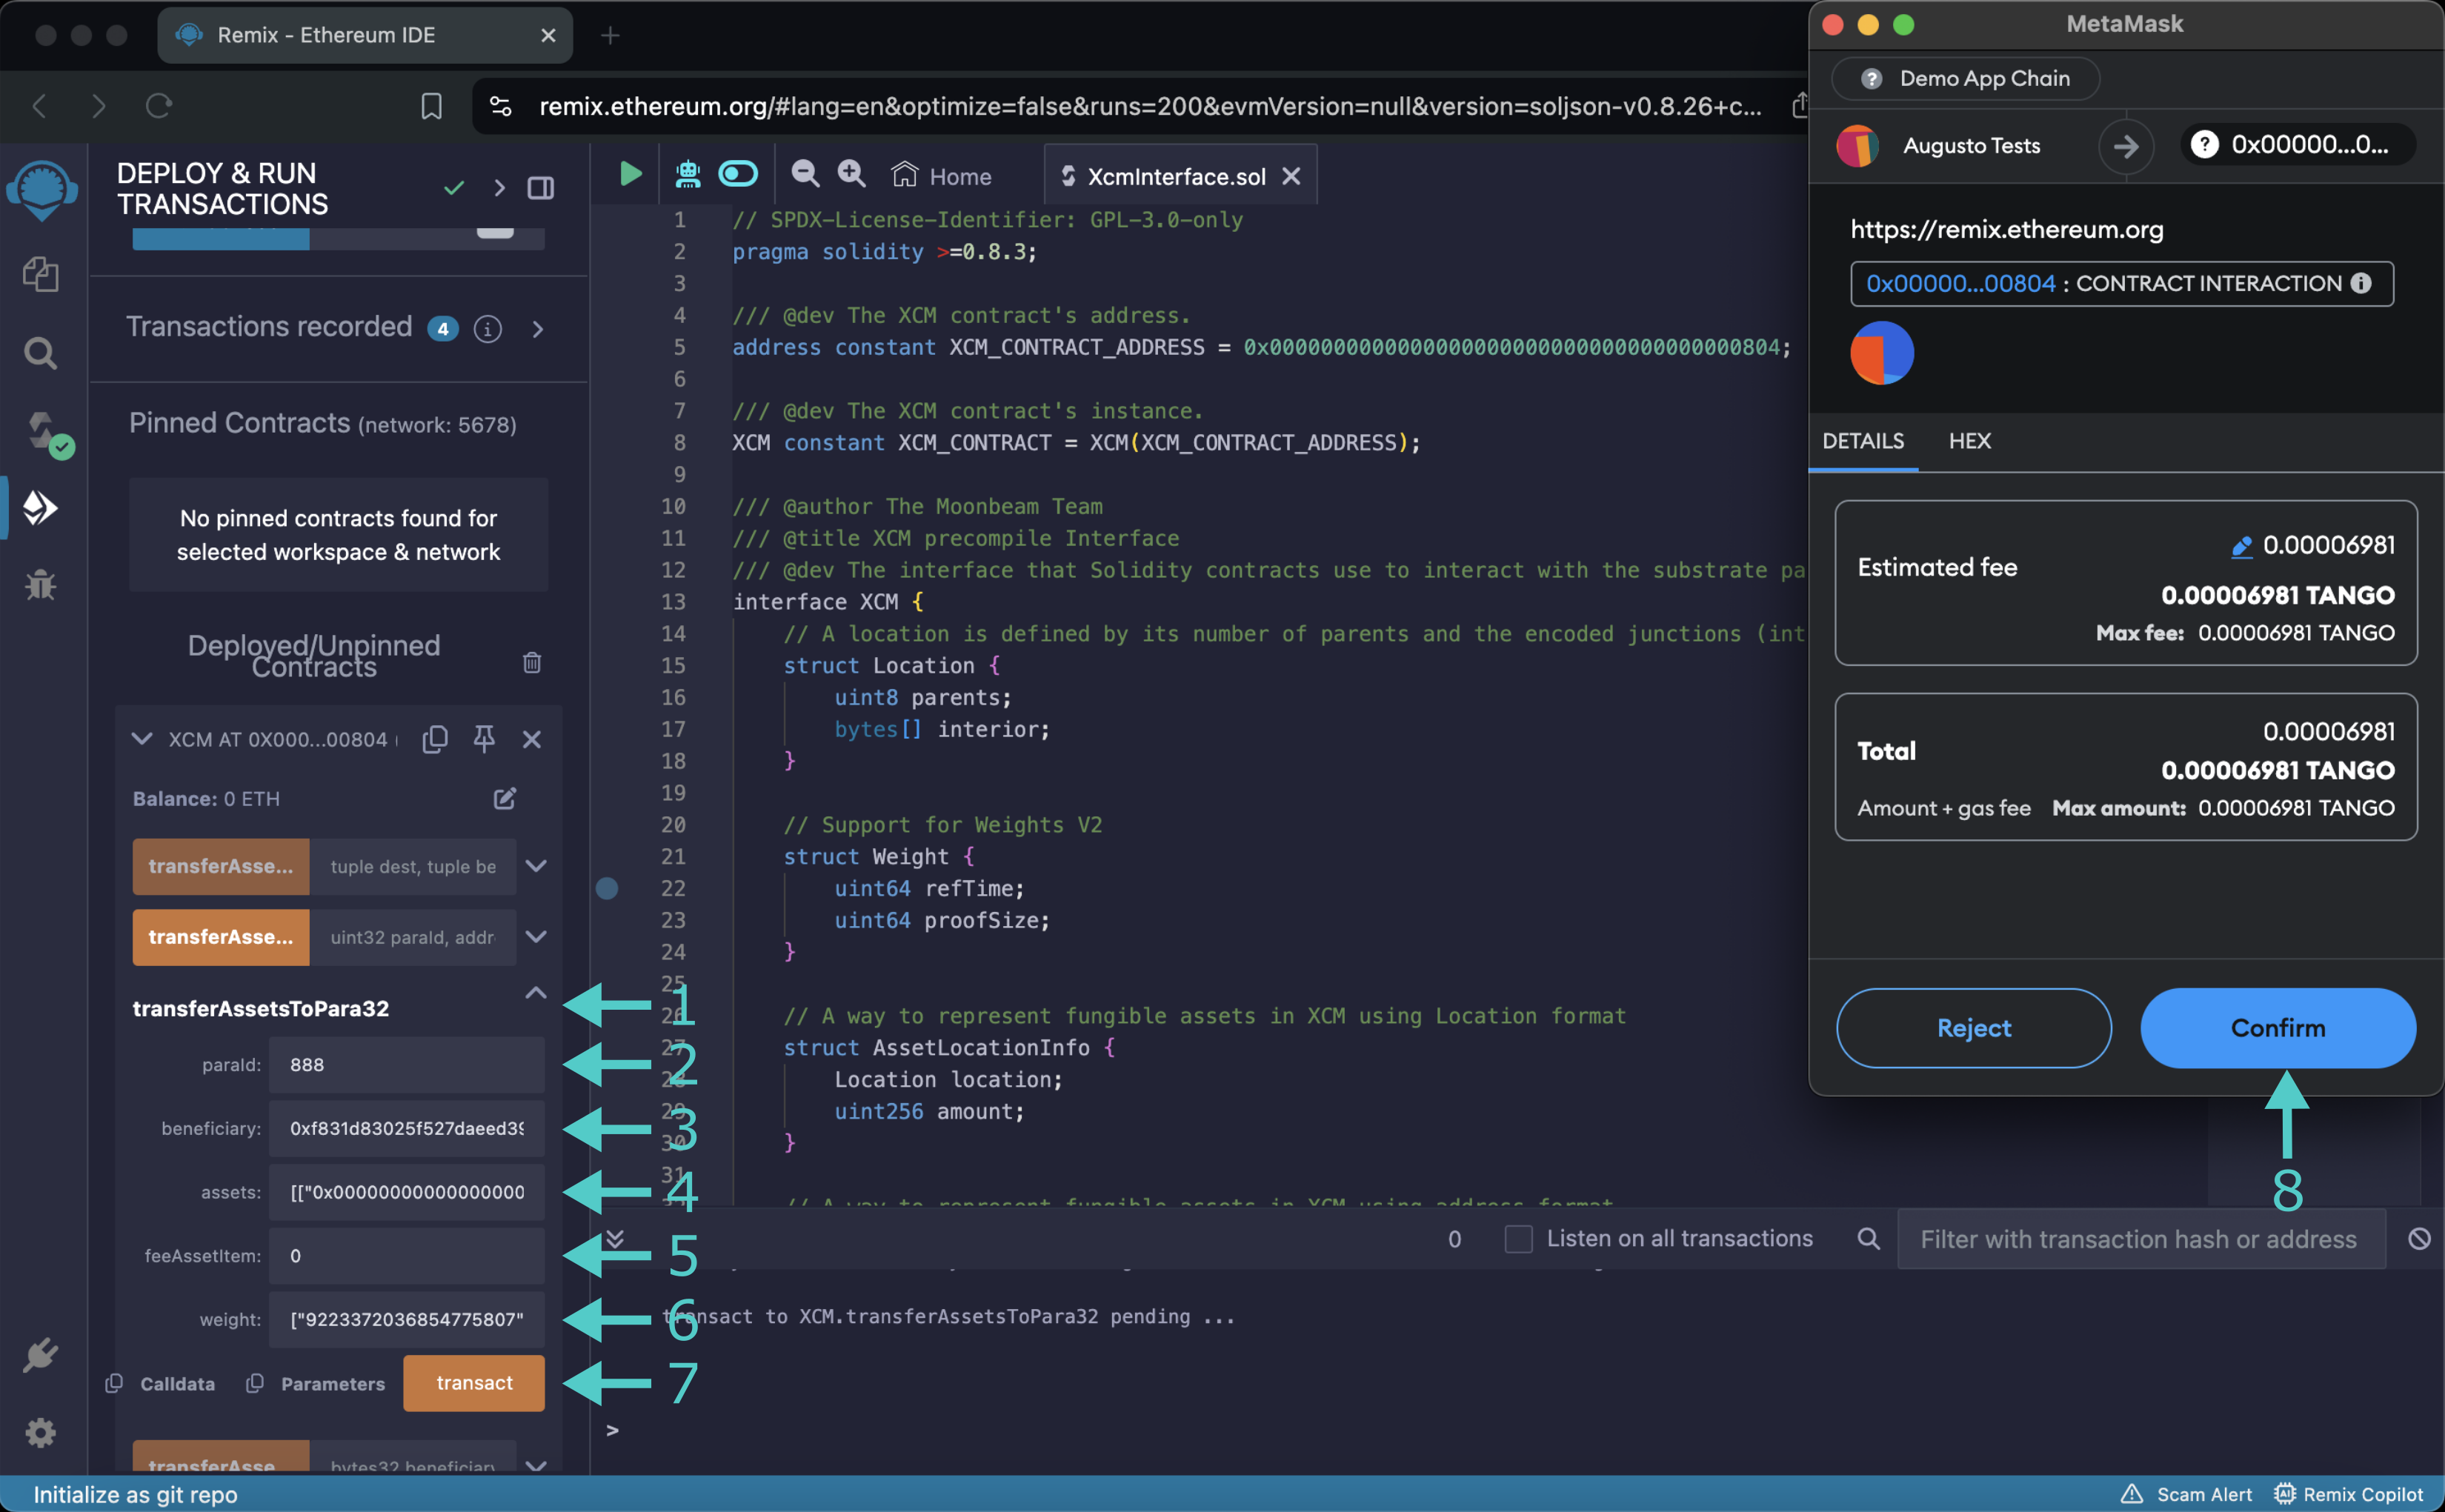
After the transaction is confirmed, wait for a few blocks for the transfer to reach the destination chain and reflect the new balance.
### Send Tokens Over to the Relay Chain {: #transfer-to-relay-chain }
To send tokens over to an account in the relay chain, please follow these steps:
1. Expand the **transferAssetsToRelay** function
2. Enter the sr25519-type destination account (beneficiary)
3. Specify the tokens to be transferred. Note that this parameter is an array that contains at least one asset. Each asset is specified by its address and the total amount to transfer
!!! note
Tokens are specified by their ERC-20 address. If the token you want to transfer is the network's native one, the [Native Token ERC-20 Precompile](/builders/toolkit/ethereum-api/precompiles/erc20/){target=\_blank} will help you reference it through an ERC-20 interface.
4. Enter the index of the asset that will be used to pay the fees. This index is zero-based, so the first element is `0`, the second is `1`, and so on
5. Enter the maximum gas to pay for the transaction. This gas is derived from two parameters, the processing time (refTime) and the proof size (proofSize). In practice, setting refTime to `uint64::MAX` is equal to *unlimited weight*
6. Click **transact**
7. MetaMask will pop up, and you will be prompted to review the transaction details. Click **Confirm** to send the transaction
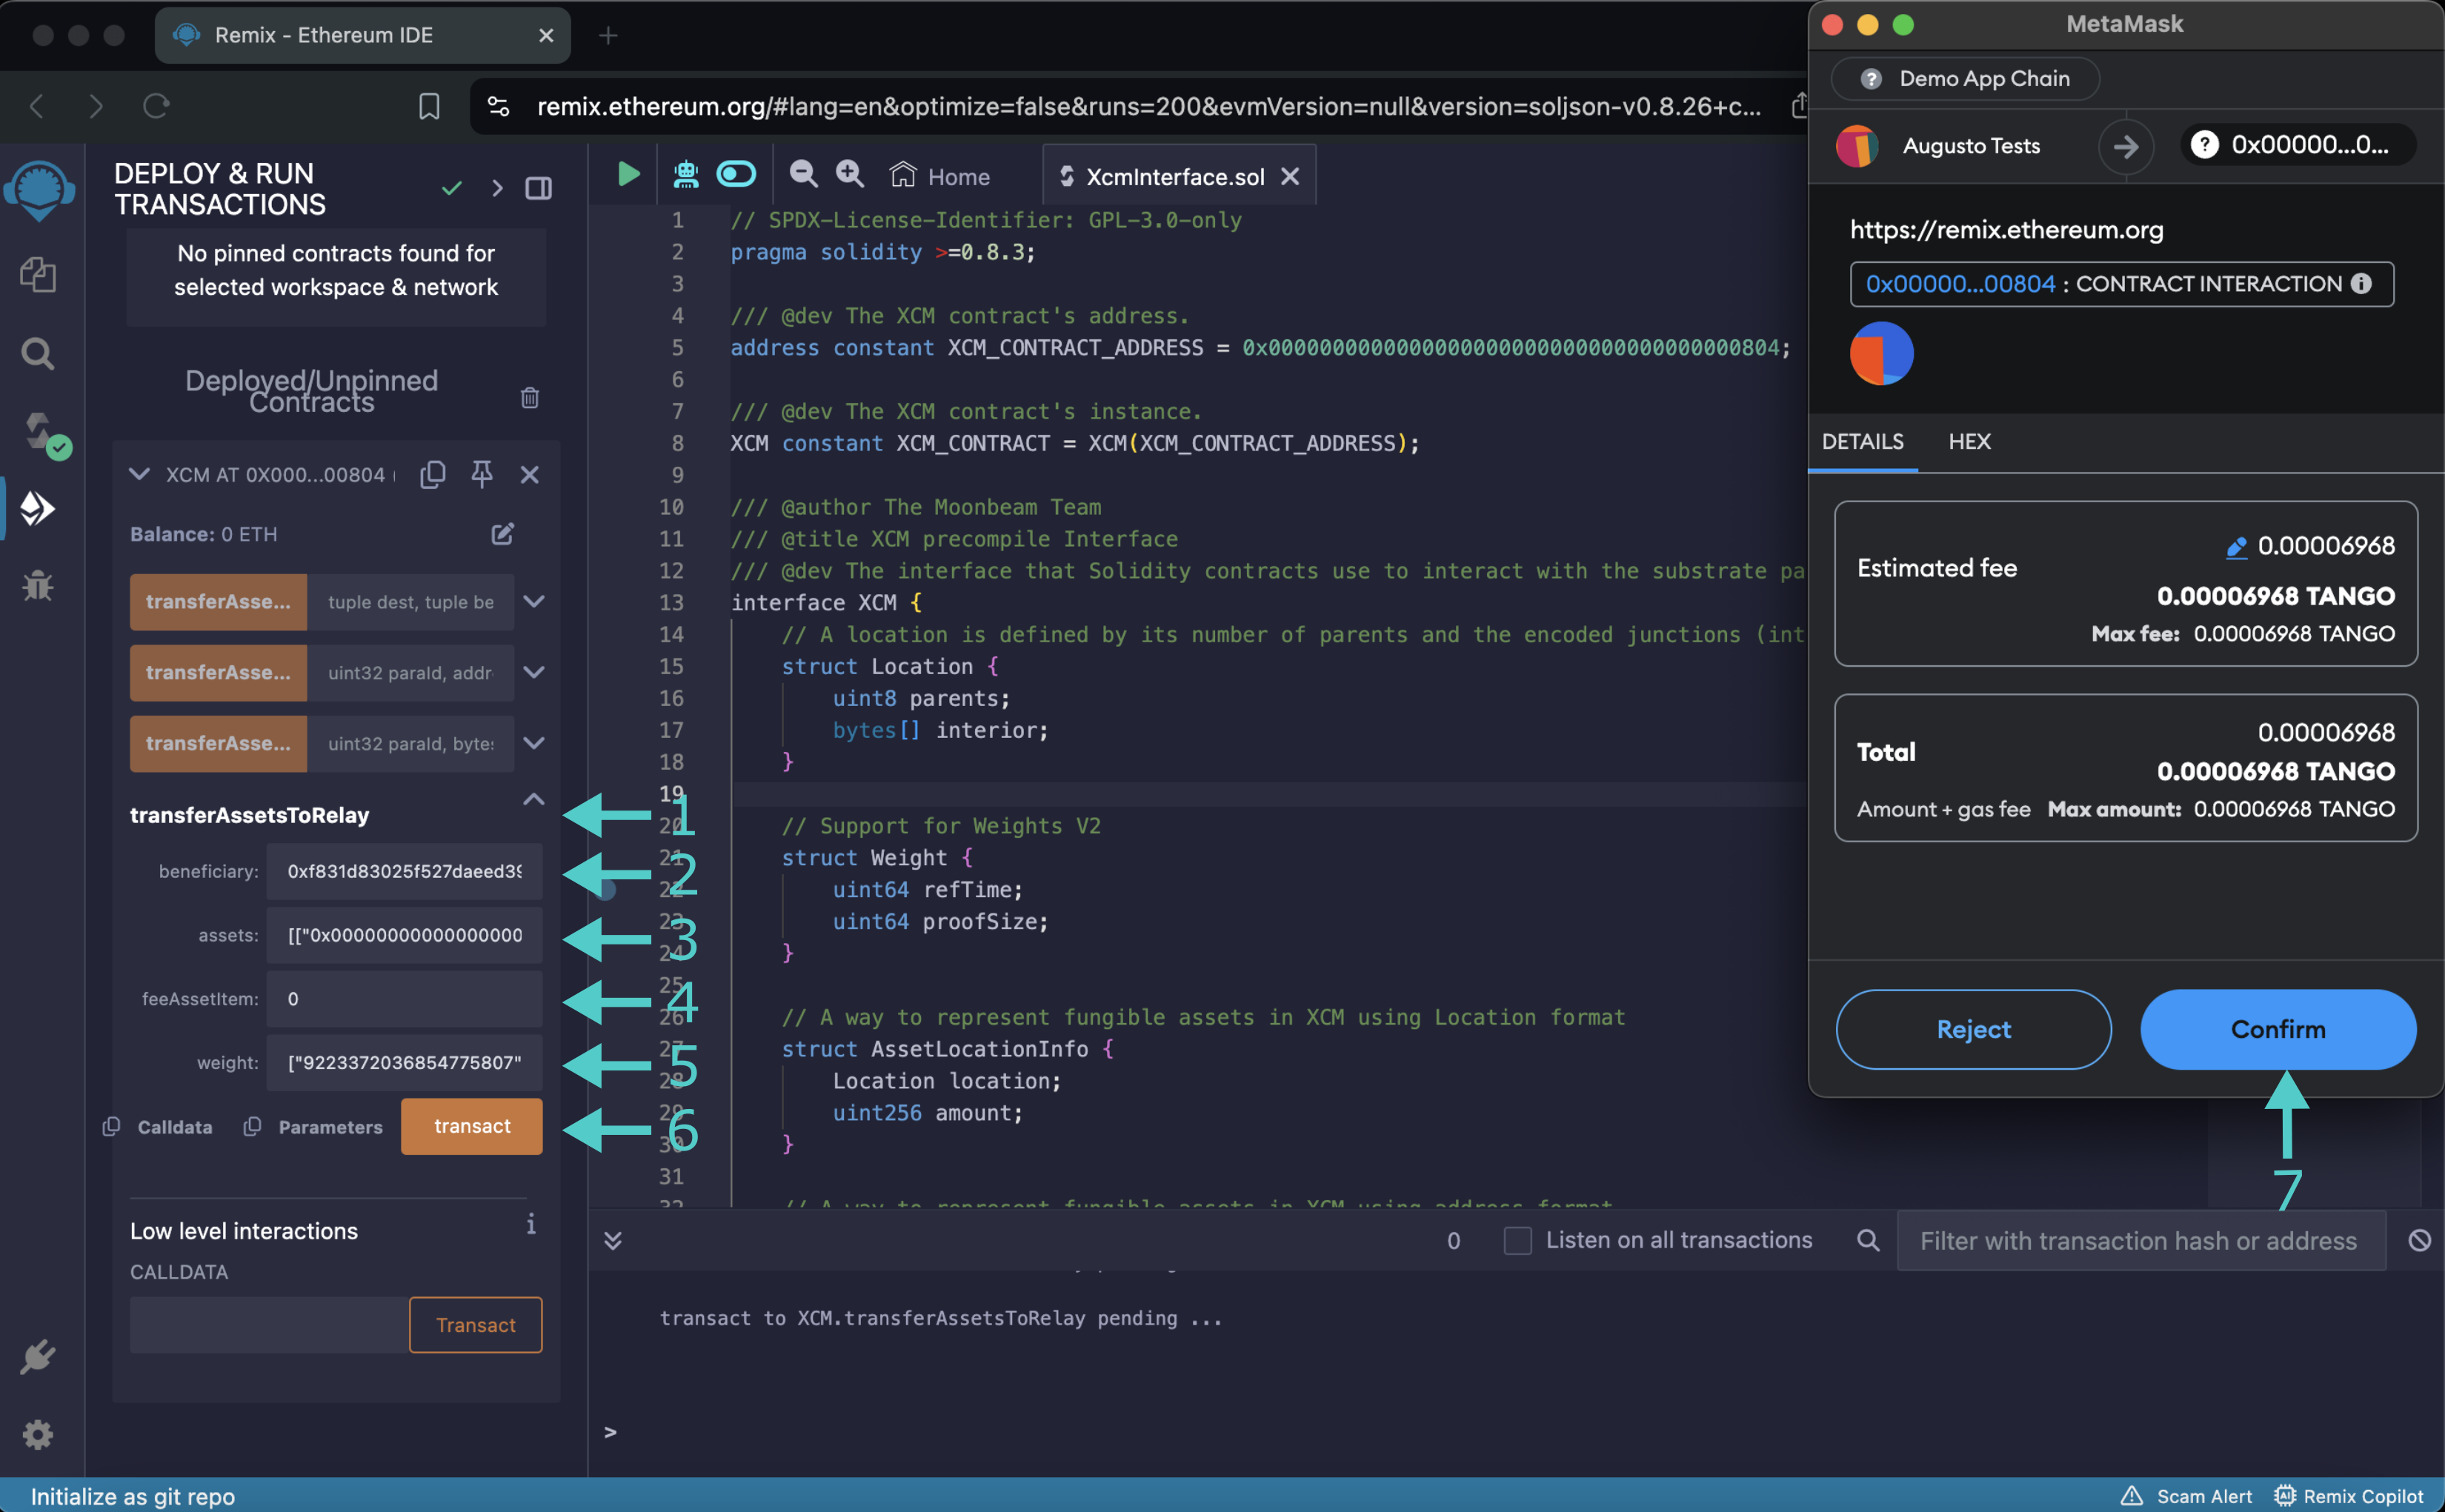
After the transaction is confirmed, wait for a few blocks for the transfer to reach the destination chain and reflect the new balance.
### Send Tokens Over Specific Locations {: #transfer-locations }
This function is more generic than the others, allowing the destination chain, destination account, and assets to be specified using [XCM Multilocations](/learn/framework/xcm/#message-destinations){target=\_blank}.
To send tokens to specific locations, please follow these steps:
1. Expand the **transferAssetsLocation** function
2. Enter the multilocation that specifies the destination chain. Note that any chain can be specified, regardless of its configuration or type
3. Enter the Multilocation that specifies the destination account. Note that any account can be specified, regardless of its type (ECDSA, sr25519, or any other)
4. Specify the tokens to be transferred. Note that this parameter is an array that contains at least one asset and each asset is specified by its Multilocation and the total amount to transfer
!!! note
Tokens are specified by their ERC-20 address. If the token you want to transfer is the network's native one, the [Native Token ERC-20 Precompile](/builders/toolkit/ethereum-api/precompiles/erc20/){target=\_blank} will help you reference it through an ERC-20 interface.
5. Enter the index of the asset that will be used to pay the fees. This index is zero-based, so the first element is `0`, the second is `1`, and so on
6. Enter the maximum gas to pay for the transaction. This gas is derived from two parameters, the processing time (refTime) and the proof size (proofSize). In practice, setting refTime to `uint64::MAX` is equal to *unlimited weight*
7. Click **transact**
8. MetaMask will pop up, and you will be prompted to review the transaction details. Click **Confirm** to send the transaction
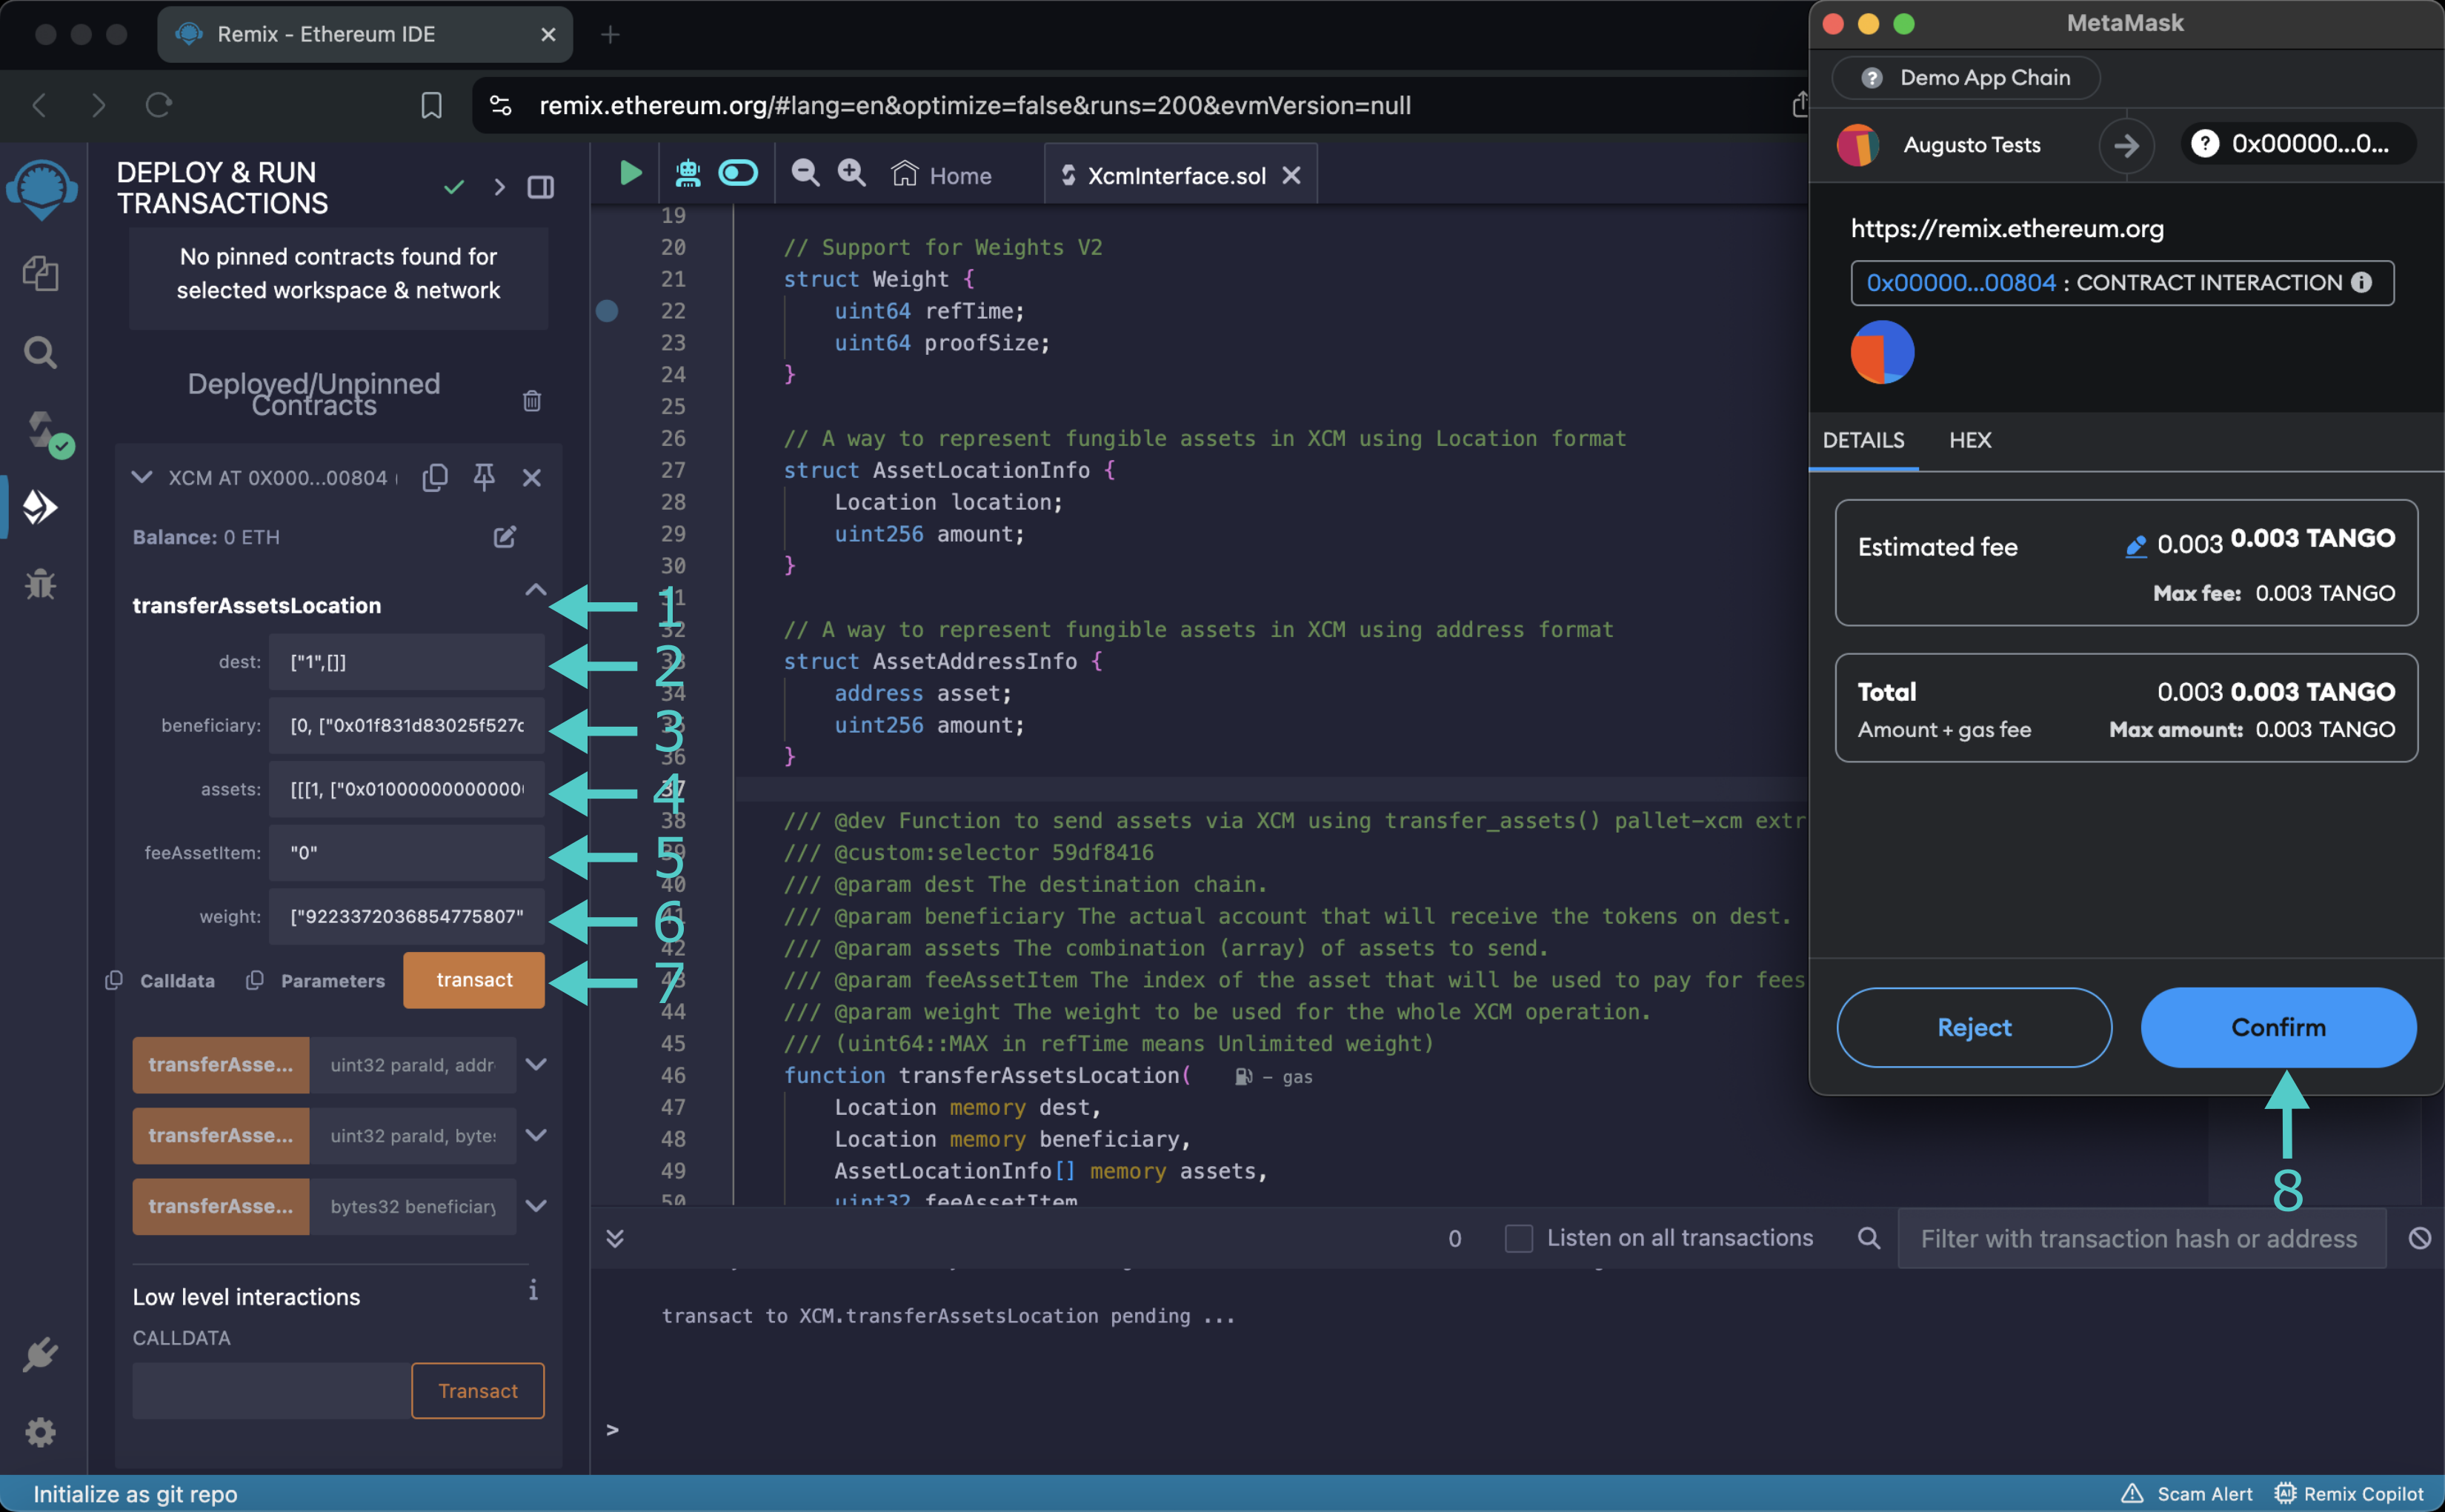
After the transaction is confirmed, wait for a few blocks for the transfer to reach the destination chain and reflect the new balance.
The information presented herein has been provided by third parties and is made available solely for general information purposes. Tanssi does not endorse any project listed and described on the Tanssi Doc Website (https://docs.tanssi.network/). Tanssi Foundation does not warrant the accuracy, completeness or usefulness of this information. Any reliance you place on such information is strictly at your own risk. Tanssi Foundation disclaims all liability and responsibility arising from any reliance placed on this information by you or by anyone who may be informed of any of its contents. All statements and/or opinions expressed in these materials are solely the responsibility of the person or entity providing those materials and do not necessarily represent the opinion of Tanssi Foundation. The information should not be construed as professional or financial advice of any kind. Advice from a suitably qualified professional should always be sought in relation to any particular matter or circumstance. The information herein may link to or integrate with other websites operated or content provided by third parties, and such other websites may link to this website. Tanssi Foundation has no control over any such other websites or their content and will have no liability arising out of or related to such websites or their content. The existence of any such link does not constitute an endorsement of such websites, the content of the websites, or the operators of the websites. These links are being provided to you only as a convenience and you release and hold Tanssi Foundation harmless from any and all liability arising from your use of this information or the information provided by any third-party website or service.
--- END CONTENT ---
Doc-Content: https://docs.tanssi.network/builders/toolkit/ethereum-api/precompiles/erc20/
--- BEGIN CONTENT ---
---
title: Native Token ERC-20 Precompile
description: Learn how to access and interact with an ERC-20 representation of the native token on Tanssi-powered EVM networks through the precompiled ERC-20 Interface.
keywords: solidity, ethereum, native, token, moonbeam, precompiled, contracts
icon: material-circle-outline
categories: EVM-Template
---
# Native Token ERC-20 Precompile
## Introduction {: #introduction }
The native token ERC-20 precompiled contract on Tanssi-powered EVM networks allows developers to interact with the native protocol token through an ERC-20 interface. Although your network's native token is not an ERC-20 token, now you can interact with it as if it was a vanilla ERC-20.
One of the main benefits of this precompile is that it removes the necessity of having a wrapped representation of the protocol token as an ERC-20 smart contract, such as WETH on Ethereum. Furthermore, it minimizes the need for multiple wrapped representations of the same protocol token. Consequently, dApps that need to interact with the protocol token via an ERC-20 interface can do so without needing a separate smart contract.
Under the hood, the [ERC-20 precompile](https://github.com/moondance-labs/tanssi/blob/master/test/contracts/solidity/ERC20.sol){target=\_blank} executes specific Substrate actions related to the Substrate balances module, which is coded in Rust. The balances module provides functionality for handling the various types of balances.
This guide will show you how to interact with UNIT tokens, the native protocol tokens for quick trial networks on [Dancelight](/builders/tanssi-network/testnet/dancelight/){target=\_blank}, via the ERC-20 precompile. You can follow along and adapt this guide to interacting with your own network.
The precompile is located at the following address:
```text
{{networks.demo_evm.precompiles.erc20 }}
```
!!! note
There can be some unintended consequences when using precompiles. Tanssi's precompiles are derived from Moonbeam's, and as such, please familiarize yourself with [Moonbeam's Precompile Security Considerations](https://docs.moonbeam.network/builders/get-started/eth-compare/security){target=\_blank}.
## The ERC-20 Solidity Interface {: #the-erc20-interface }
The [`ERC20.sol`](https://github.com/moondance-labs/tanssi/blob/master/test/contracts/solidity/ERC20.sol){target=\_blank} interface on Tanssi EVM networks follows the [EIP-20 Token Standard](https://eips.ethereum.org/EIPS/eip-20){target=\_blank}, which is the standard API interface for tokens within smart contracts. The standard defines the required functions and events a token contract must implement to be interoperable with different applications.
??? code "ERC20.sol"
```solidity
/ SPDX-License-Identifier: GPL-3.0-only
pragma solidity >=0.8.3;
/// @dev The IERC20 contract's address.
address constant IERC20_ADDRESS = 0x0000000000000000000000000000000000000800;
/// @dev The IERC20 contract's instance.
IERC20 constant IERC20_CONTRACT = IERC20(IERC20_ADDRESS);
/// @title ERC20 interface
/// @dev see https://github.com/ethereum/EIPs/issues/20
/// @dev copied from https://github.com/OpenZeppelin/openzeppelin-contracts
/// @custom:address 0x0000000000000000000000000000000000000800
interface IERC20 {
/// @dev Returns the name of the token.
/// @custom:selector 06fdde03
function name() external view returns (string memory);
/// @dev Returns the symbol of the token.
/// @custom:selector 95d89b41
function symbol() external view returns (string memory);
/// @dev Returns the decimals places of the token.
/// @custom:selector 313ce567
function decimals() external view returns (uint8);
/// @dev Total number of tokens in existence
/// @custom:selector 18160ddd
function totalSupply() external view returns (uint256);
/// @dev Gets the balance of the specified address.
/// @custom:selector 70a08231
/// @param owner The address to query the balance of.
/// @return An uint256 representing the amount owned by the passed address.
function balanceOf(address owner) external view returns (uint256);
/// @dev Function to check the amount of tokens that an owner allowed to a spender.
/// @custom:selector dd62ed3e
/// @param owner address The address which owns the funds.
/// @param spender address The address which will spend the funds.
/// @return A uint256 specifying the amount of tokens still available for the spender.
function allowance(address owner, address spender)
external
view
returns (uint256);
/// @dev Transfer token for a specified address
/// @custom:selector a9059cbb
/// @param to The address to transfer to.
/// @param value The amount to be transferred.
/// @return true if the transfer was succesful, revert otherwise.
function transfer(address to, uint256 value) external returns (bool);
/// @dev Approve the passed address to spend the specified amount of tokens on behalf of msg.sender.
/// Beware that changing an allowance with this method brings the risk that someone may use both the old
/// and the new allowance by unfortunate transaction ordering. One possible solution to mitigate this
/// race condition is to first reduce the spender's allowance to 0 and set the desired value afterwards:
/// https://github.com/ethereum/EIPs/issues/20#issuecomment-263524729
/// @custom:selector 095ea7b3
/// @param spender The address which will spend the funds.
/// @param value The amount of tokens to be spent.
/// @return true, this cannot fail
function approve(address spender, uint256 value) external returns (bool);
/// @dev Transfer tokens from one address to another
/// @custom:selector 23b872dd
/// @param from address The address which you want to send tokens from
/// @param to address The address which you want to transfer to
/// @param value uint256 the amount of tokens to be transferred
/// @return true if the transfer was succesful, revert otherwise.
function transferFrom(
address from,
address to,
uint256 value
) external returns (bool);
/// @dev Event emited when a transfer has been performed.
/// @custom:selector ddf252ad1be2c89b69c2b068fc378daa952ba7f163c4a11628f55a4df523b3ef
/// @param from address The address sending the tokens
/// @param to address The address receiving the tokens.
/// @param value uint256 The amount of tokens transfered.
event Transfer(address indexed from, address indexed to, uint256 value);
/// @dev Event emited when an approval has been registered.
/// @custom:selector 8c5be1e5ebec7d5bd14f71427d1e84f3dd0314c0f7b2291e5b200ac8c7c3b925
/// @param owner address Owner of the tokens.
/// @param spender address Allowed spender.
/// @param value uint256 Amount of tokens approved.
event Approval(
address indexed owner,
address indexed spender,
uint256 value
);
}
/// @title Native currency wrapper interface.
/// @dev Allow compatibility with dApps expecting this precompile to be
/// a WETH-like contract.
interface WrappedNativeCurrency {
/// @dev Provide compatibility for contracts that expect wETH design.
/// Returns funds to sender as this precompile tokens and the native tokens are the same.
/// @custom:selector d0e30db0
function deposit() external payable;
/// @dev Provide compatibility for contracts that expect wETH design.
/// Does nothing.
/// @custom:selector 2e1a7d4d
/// @param value uint256 The amount to withdraw/unwrap.
function withdraw(uint256 value) external;
/// @dev Event emited when deposit() has been called.
/// @custom:selector e1fffcc4923d04b559f4d29a8bfc6cda04eb5b0d3c460751c2402c5c5cc9109c
/// @param owner address Owner of the tokens
/// @param value uint256 The amount of tokens "wrapped".
event Deposit(address indexed owner, uint256 value);
/// @dev Event emited when withdraw(uint256) has been called.
/// @custom:selector 7fcf532c15f0a6db0bd6d0e038bea71d30d808c7d98cb3bf7268a95bf5081b65
/// @param owner address Owner of the tokens
/// @param value uint256 The amount of tokens "unwrapped".
event Withdrawal(address indexed owner, uint256 value);
}
```
!!! note
The ERC-20 precompile does not include `deposit` and `withdraw` functions and subsequent events expected from a wrapped token contract, such as WETH.
## Interact with the Solidity Interface {: #interact-with-the-solidity-interface }
### Checking Prerequisites {: #checking-prerequisites }
To follow along with this tutorial, you will need to have your wallet configured to work with your Tanssi-powered EVM network and an account funded with native tokens. You can add your EVM network to MetaMask with one click on the [Tanssi dApp](https://apps.tanssi.network){target=\_blank}. Or, you can [configure MetaMask for Tanssi with the demo EVM network](/builders/toolkit/ethereum-api/wallets/metamask/){target=\_blank}.
### Add Token to an EVM Wallet {: #add-token-to-evm-wallet }
If you want to interact with your network's native token like you would with an ERC-20, you can add a custom token to your EVM-compatible wallet using the precompile address. This section will walk you through adding an external asset to [MetaMask](/builders/toolkit/ethereum-api/wallets/metamask/){target=\_blank}.
To get started, open up MetaMask and make sure you are connected to your network and:
1. Switch to the **Assets** tab
2. Click on **Import tokens**
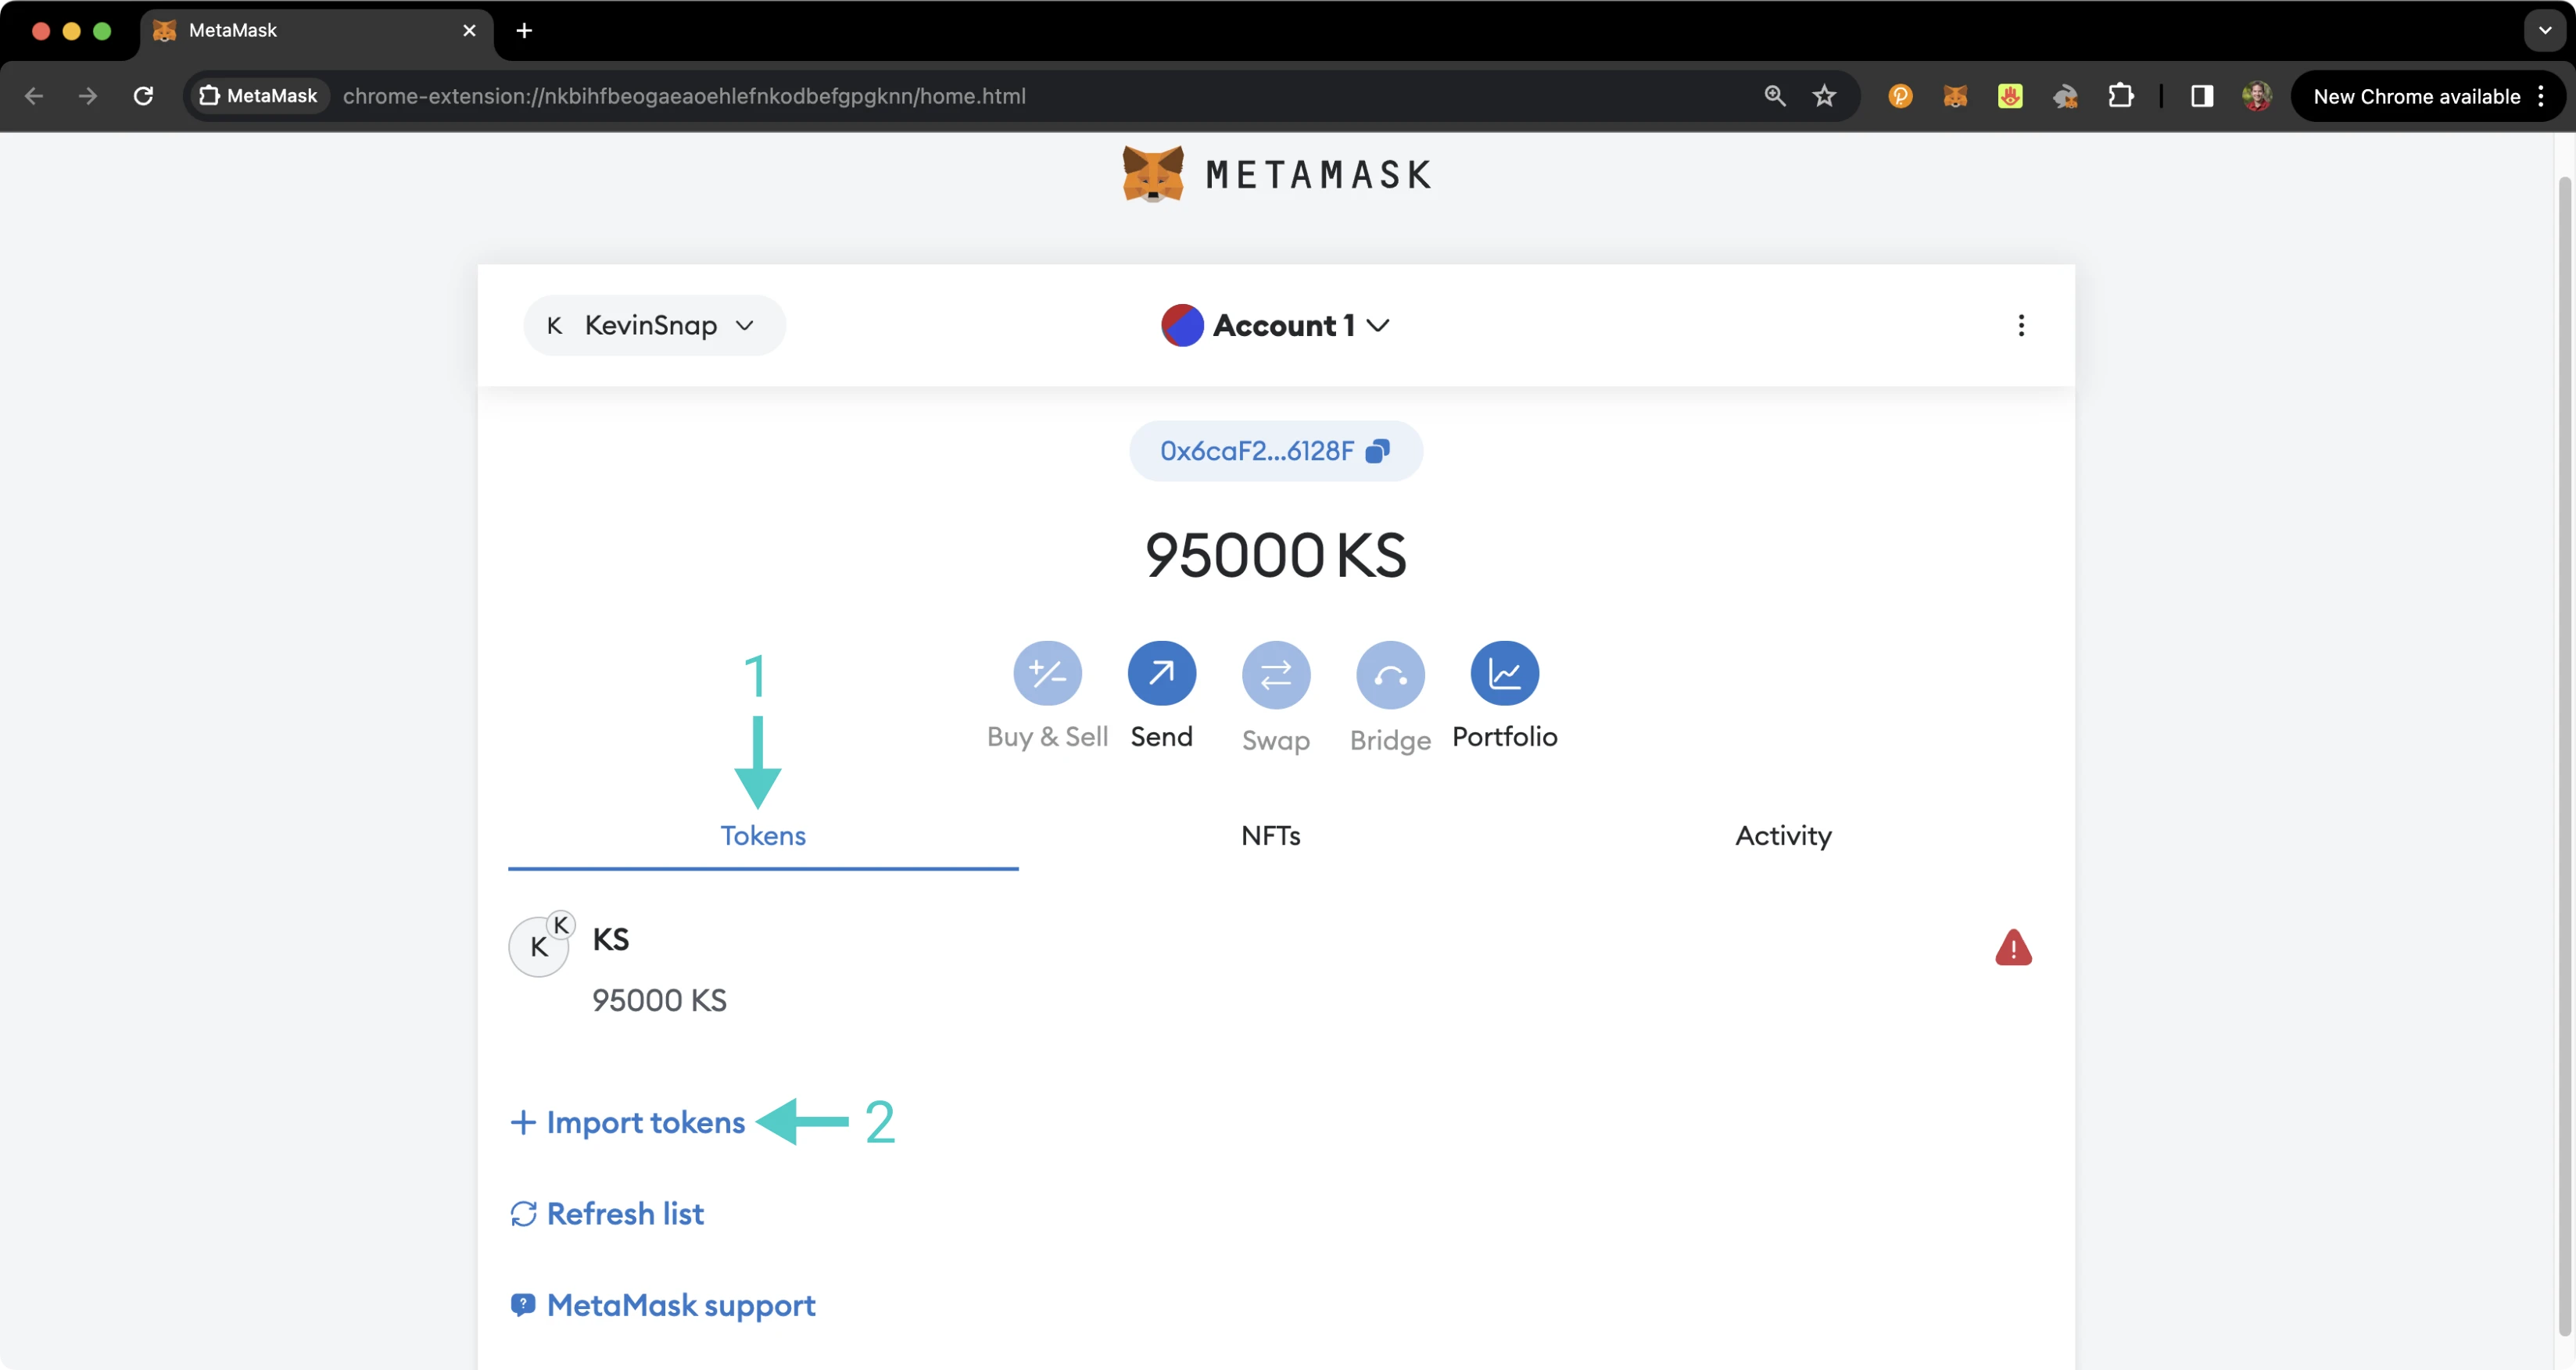
Now, you can create a custom token:
1. Enter the precompile address for the token contract address - `{{networks.demo_evm.precompiles.erc20 }}`. When you enter the address, the **Token Symbol** and **Token Decimal** fields should automatically populate. If they do not, you can enter `UNIT` for the symbol and `18` for the decimal places. Recall that the default number of decimals for Tanssi EVM networks is `18`, the same as Ethereum's token decimals
2. Click **Next**
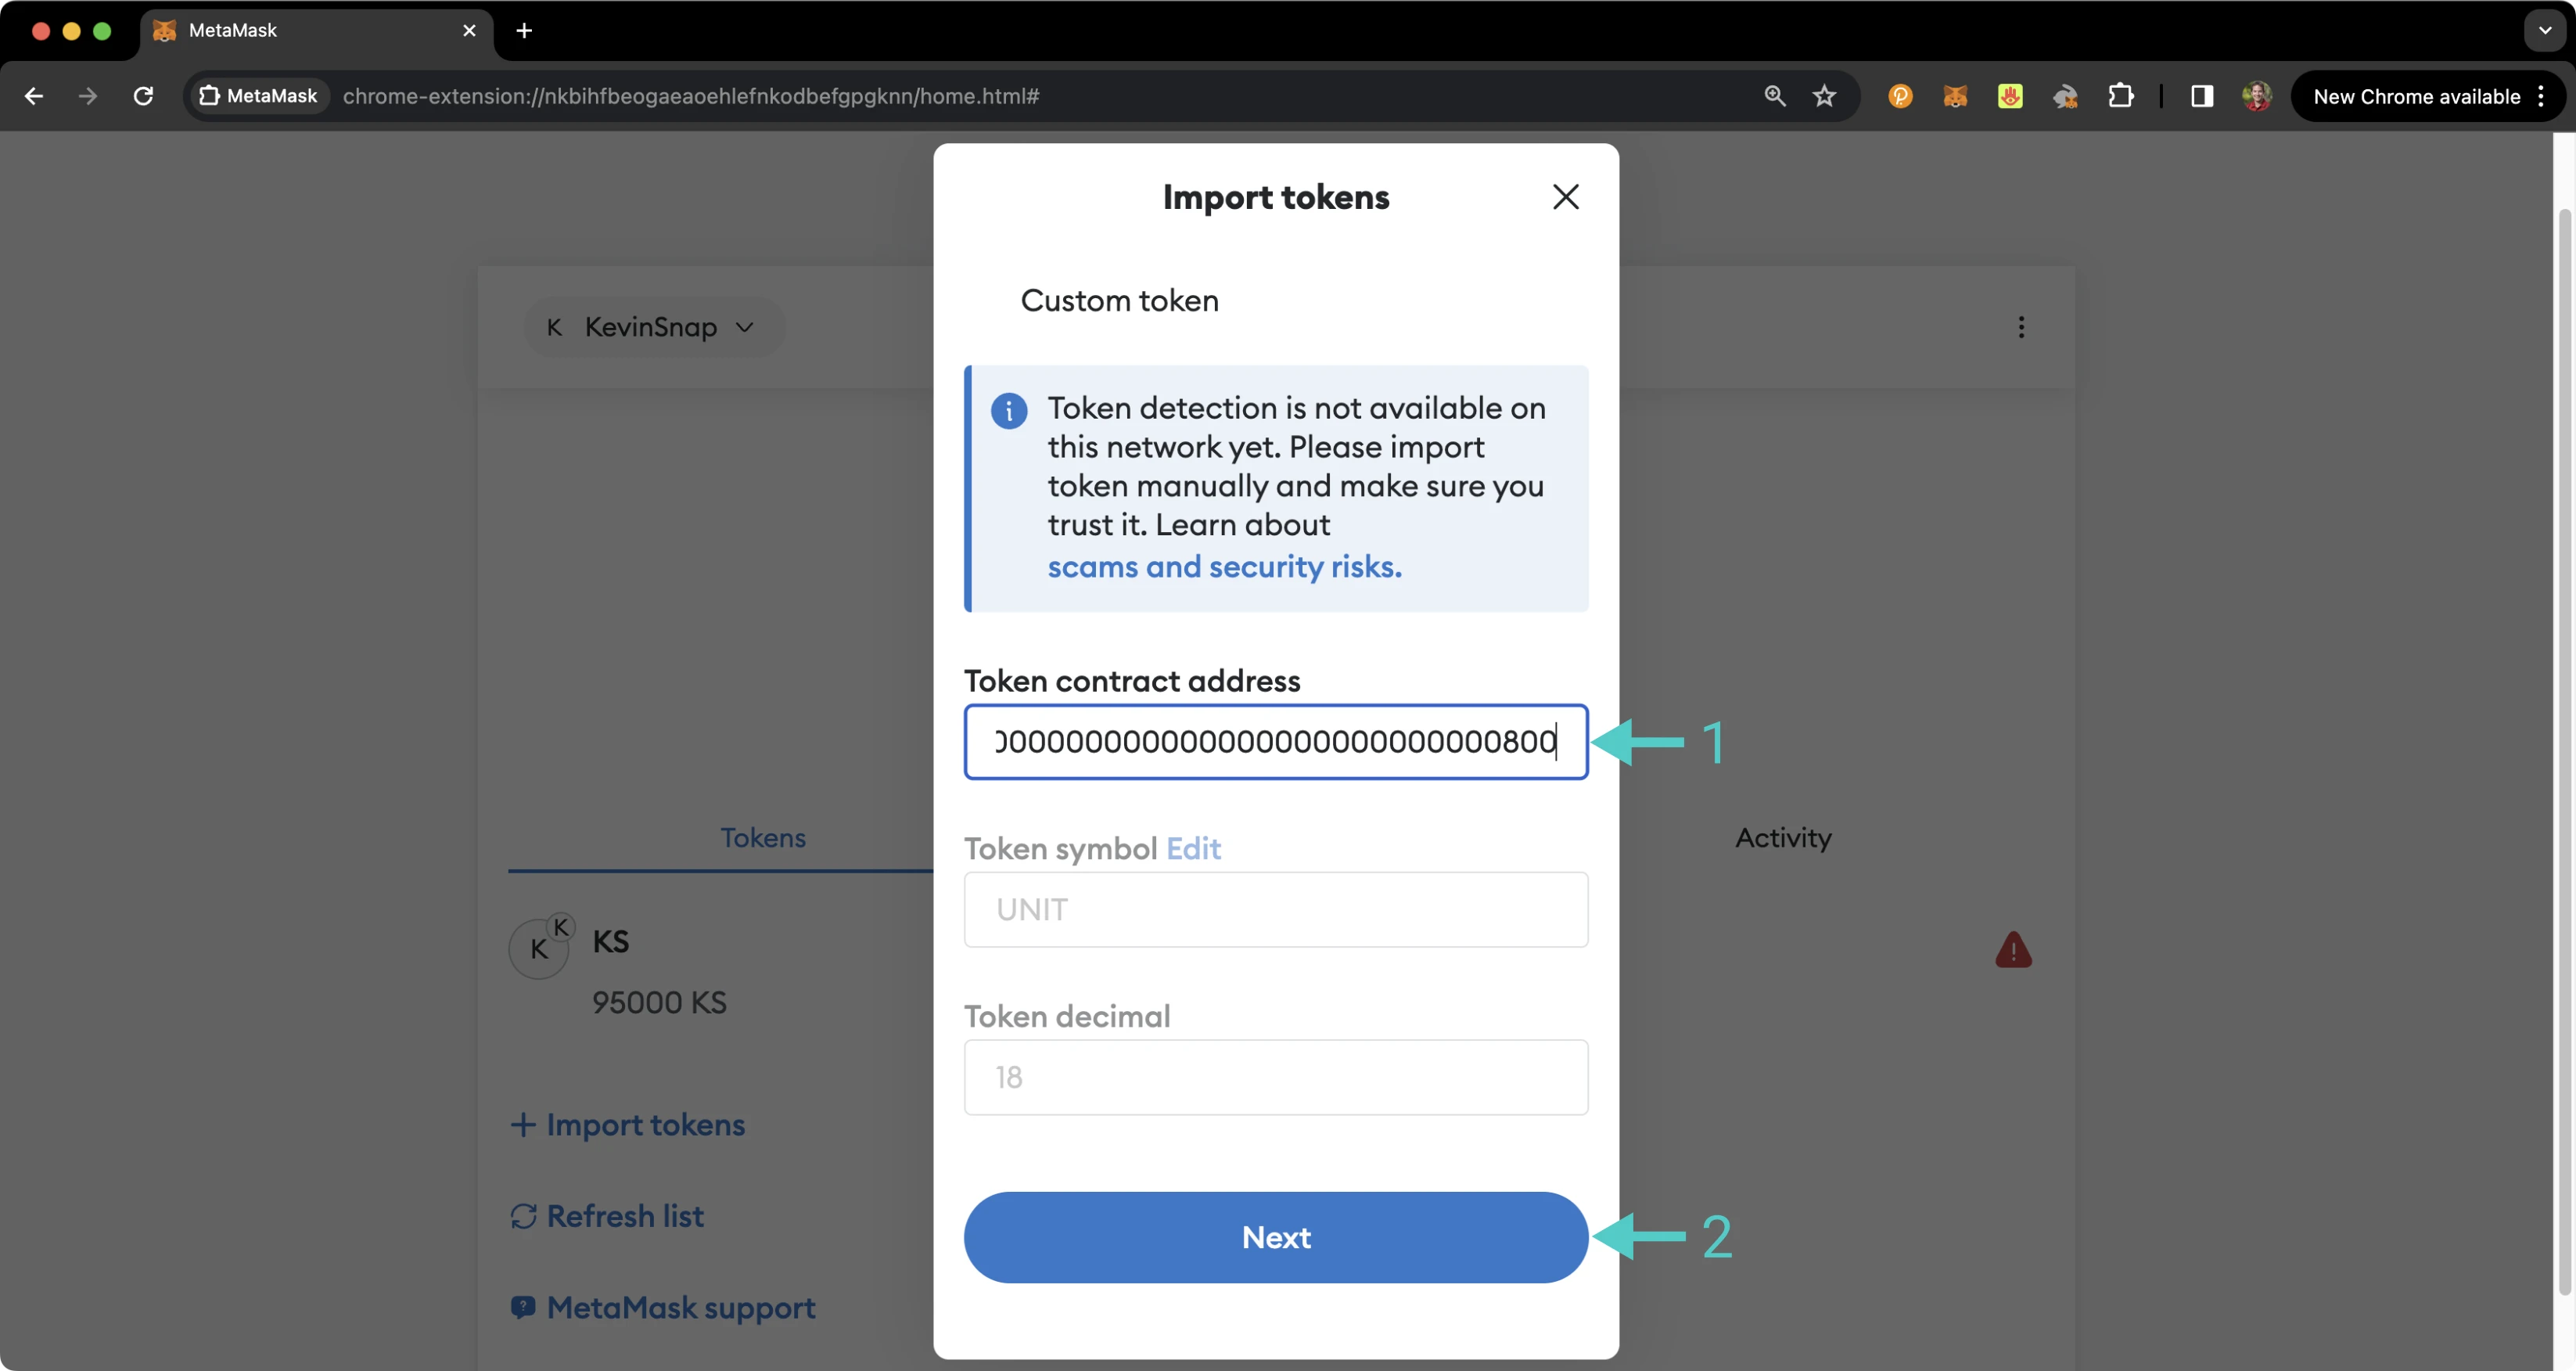
MetaMask will prompt you to confirm the import. You can review the token details and click **Import Tokens** to import UNIT tokens into your wallet.
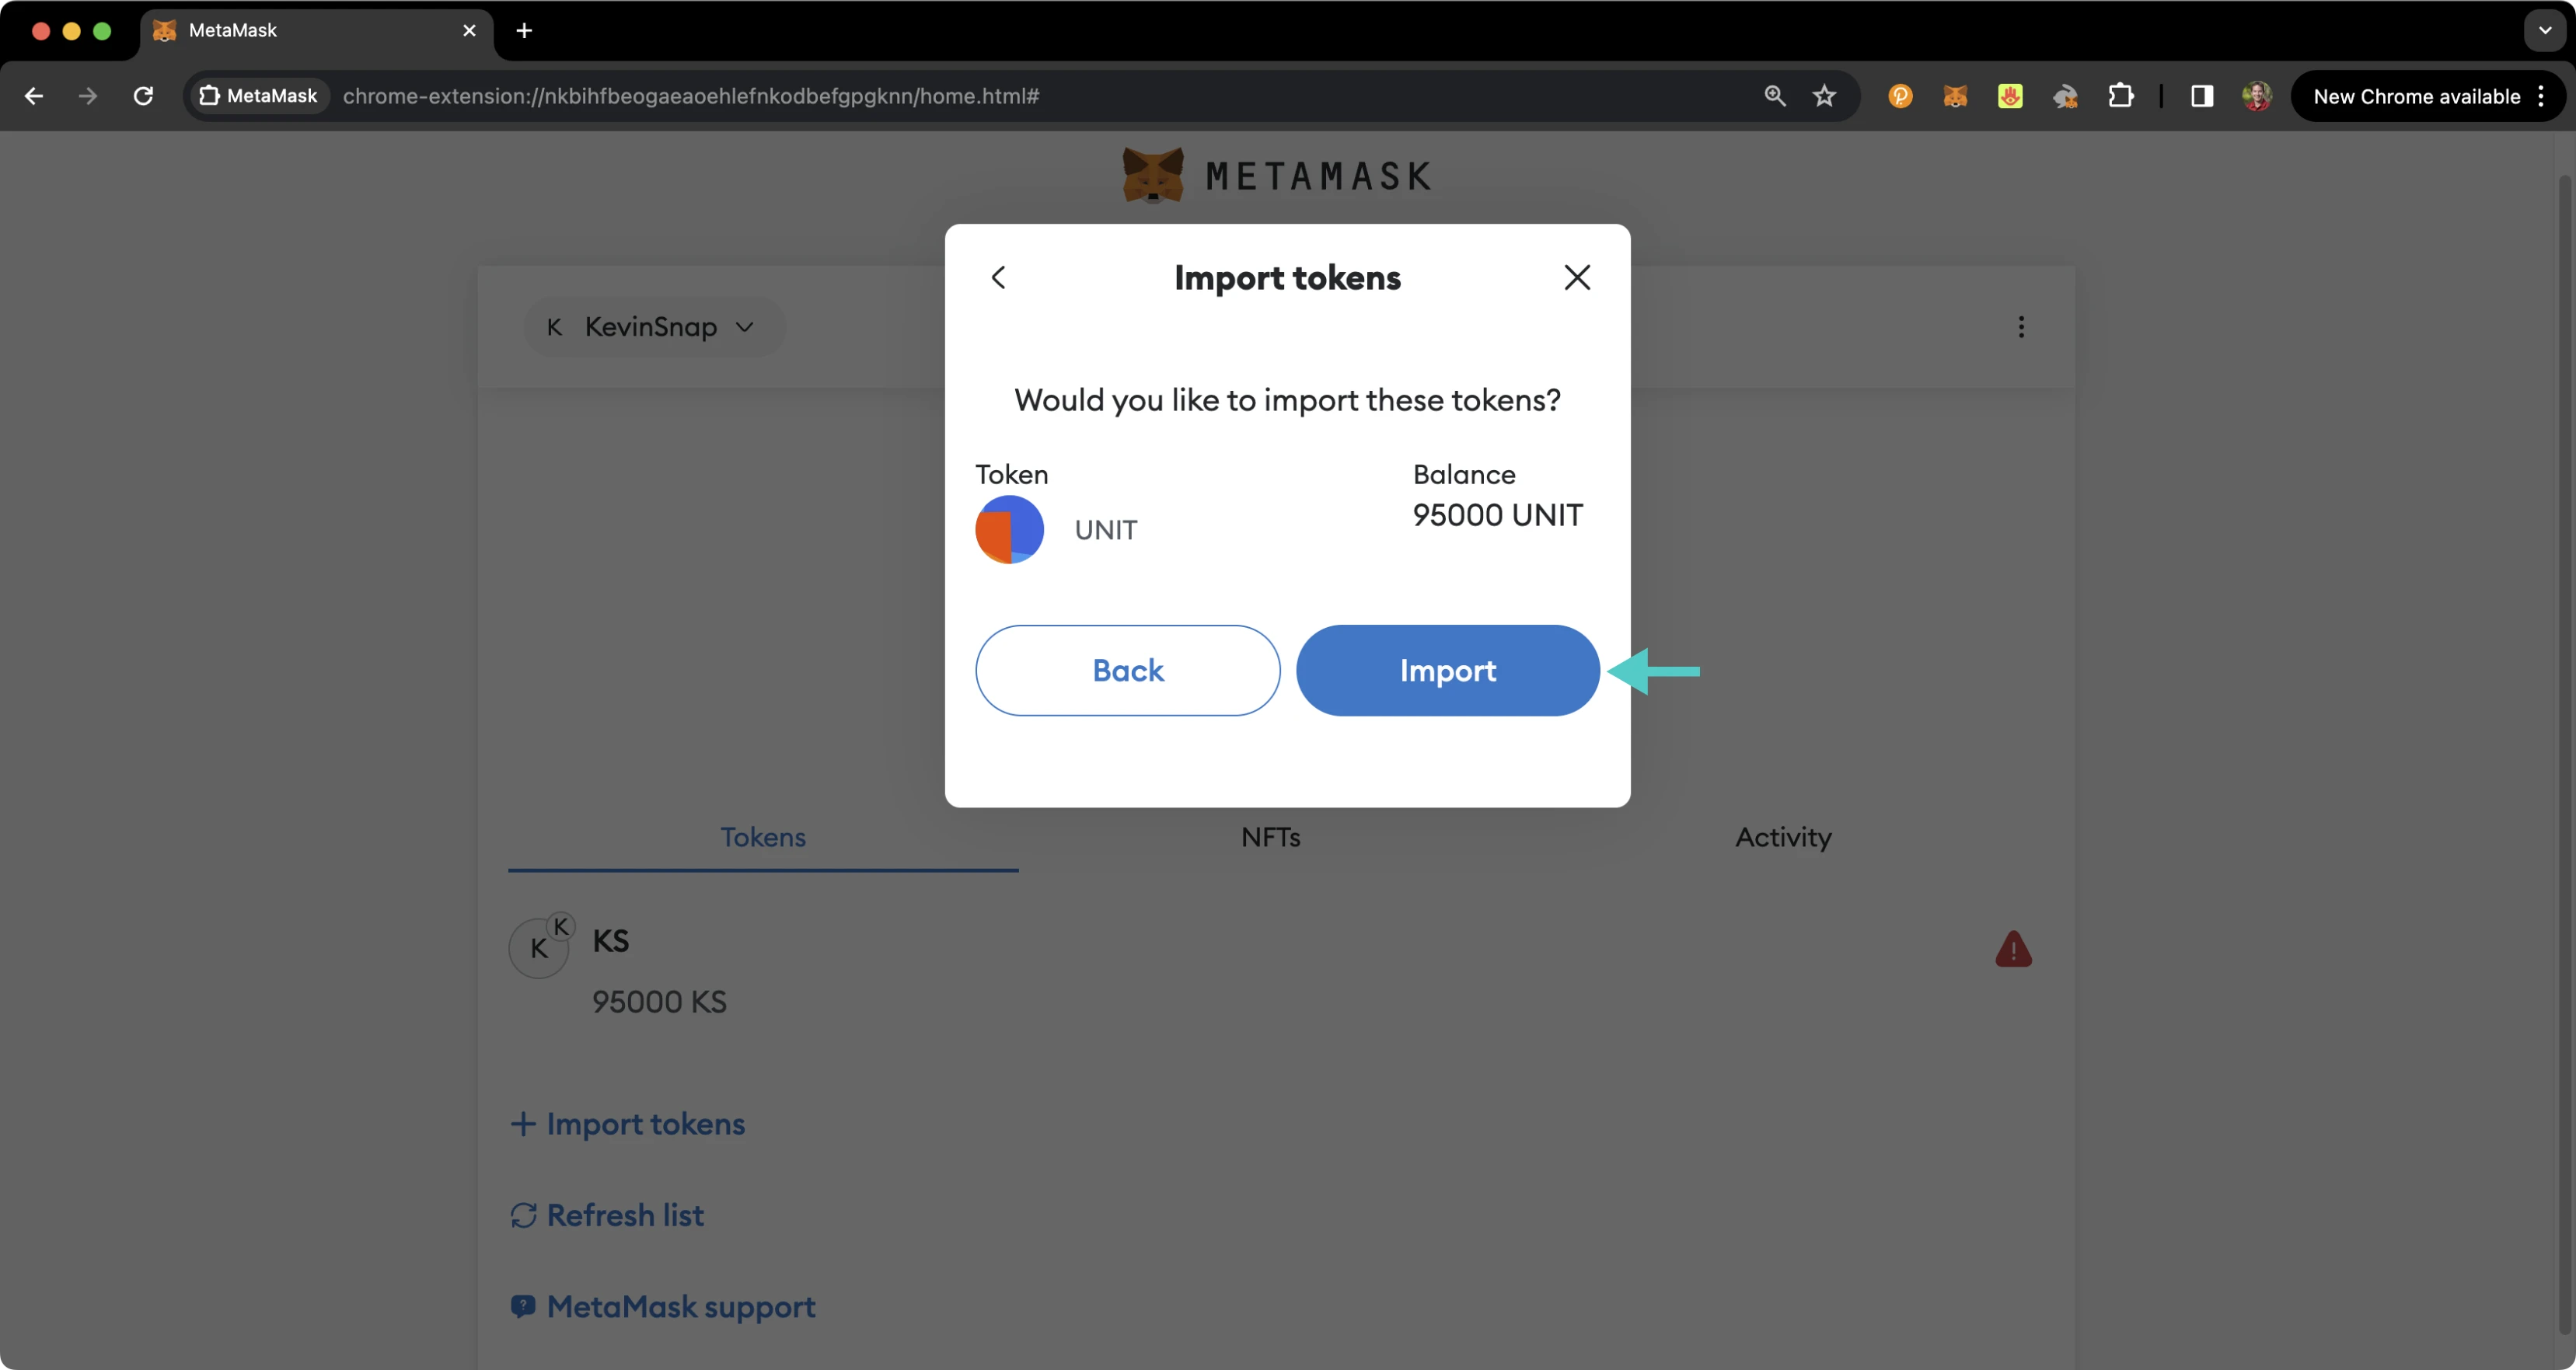
And that's it! You've successfully added the UNIT token as a custom ERC-20 token on your Tanssi EVM network.
### Remix Set Up {: #remix-set-up }
You can interact with the ERC-20 precompile using [Remix](https://remix.ethereum.org){target=\_blank}. To add the precompile to Remix, you will need to:
1. Get a copy of [`ERC20.sol`](https://github.com/moondance-labs/tanssi/blob/master/test/contracts/solidity/ERC20.sol){target=\_blank}
2. Paste the file contents into a Remix file named `IERC20.sol`
### Compile the Contract {: #compile-the-contract }
Next, you will need to compile the interface in Remix:
1. Click on the **Compile** tab, second from top
2. Compile the interface by clicking on **Compile IERC20.sol**
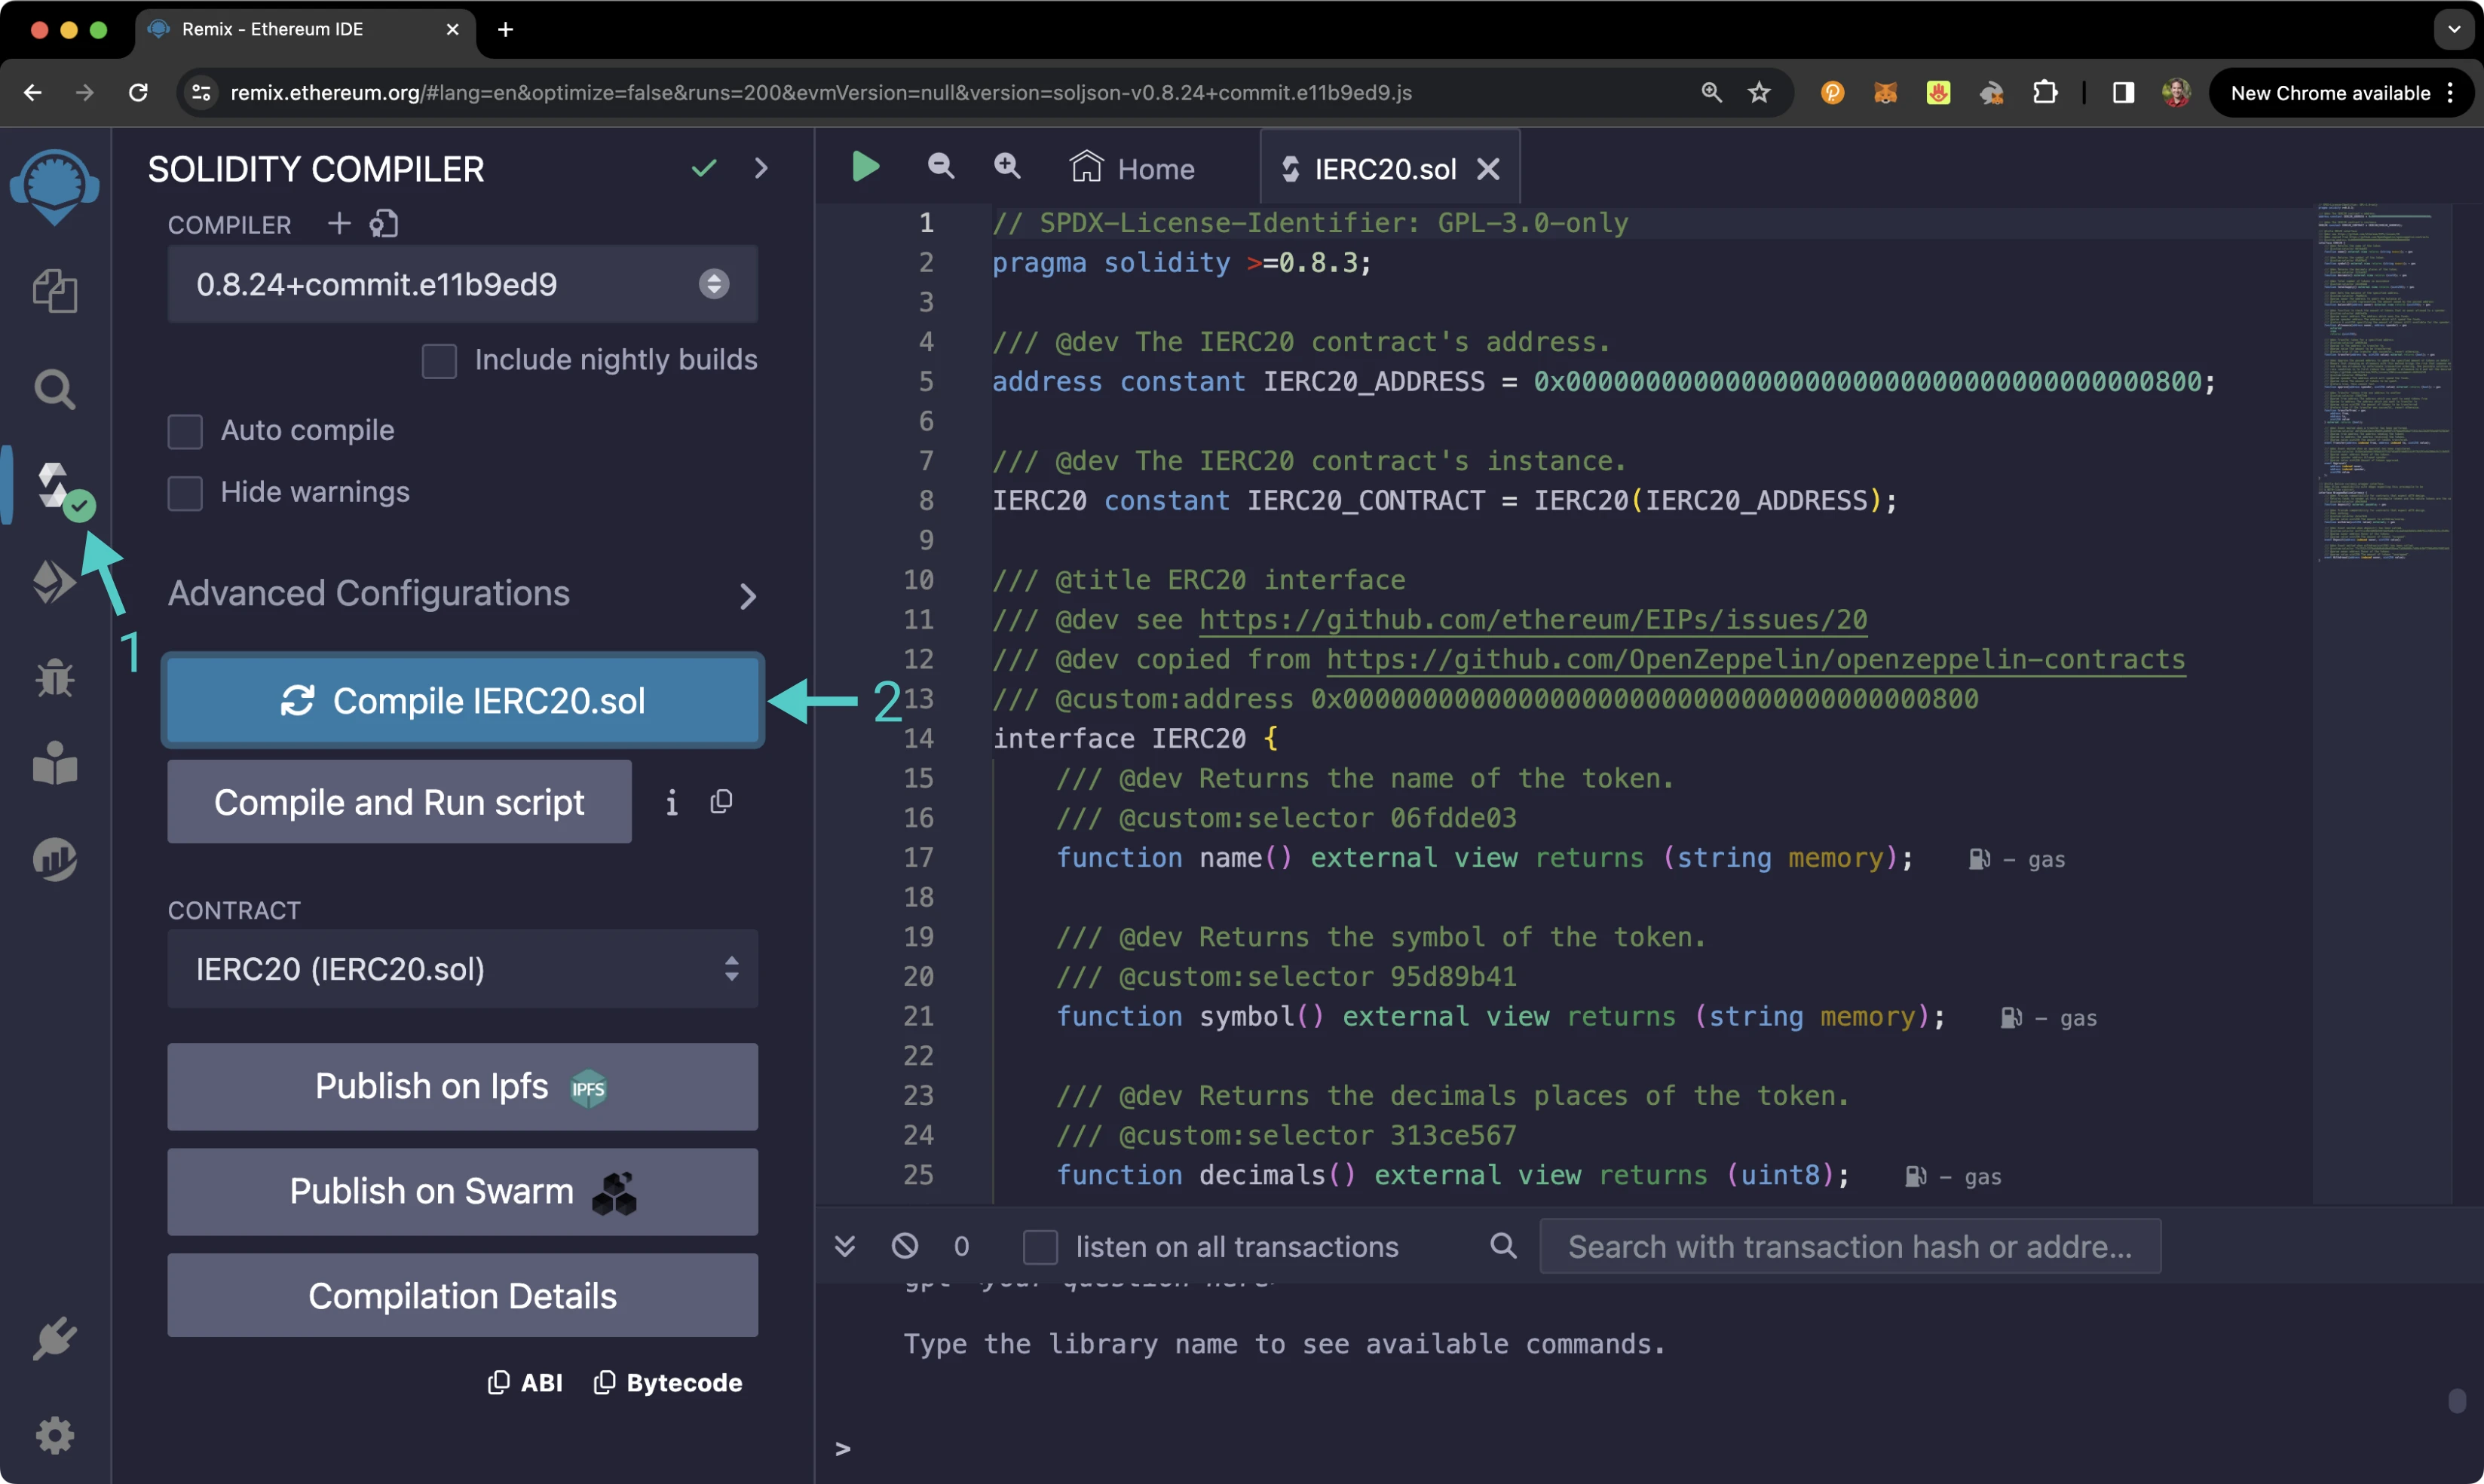
When compilation is completed, you will see a green checkmark next to the **Compile** tab.
### Access the Contract {: #access-the-contract }
Instead of deploying the ERC-20 precompile, you will access the interface given the address of the precompiled contract:
1. Click on the **Deploy and Run** tab directly below the **Compile** tab in Remix. Please note that the precompiled contracts are already accessible at their respective addresses. Therefore, there is no deployment step
2. Make sure **Injected Web3** is selected in the **ENVIRONMENT** dropdown. Once you select **Injected Web3**, you may be prompted by MetaMask to connect your account to Remix if it's not already connected
3. Make sure the correct account is displayed under **ACCOUNT**
4. Ensure **IERC20 - IERC20.sol** is selected in the **CONTRACT** dropdown. Given that it is a precompiled contract, there is no deployment step. Instead, you are going to provide the address of the precompile in the **At Address** field
5. Provide the address of the ERC-20 precompile: `{{networks.demo_evm.precompiles.erc20}}` and click **At Address**
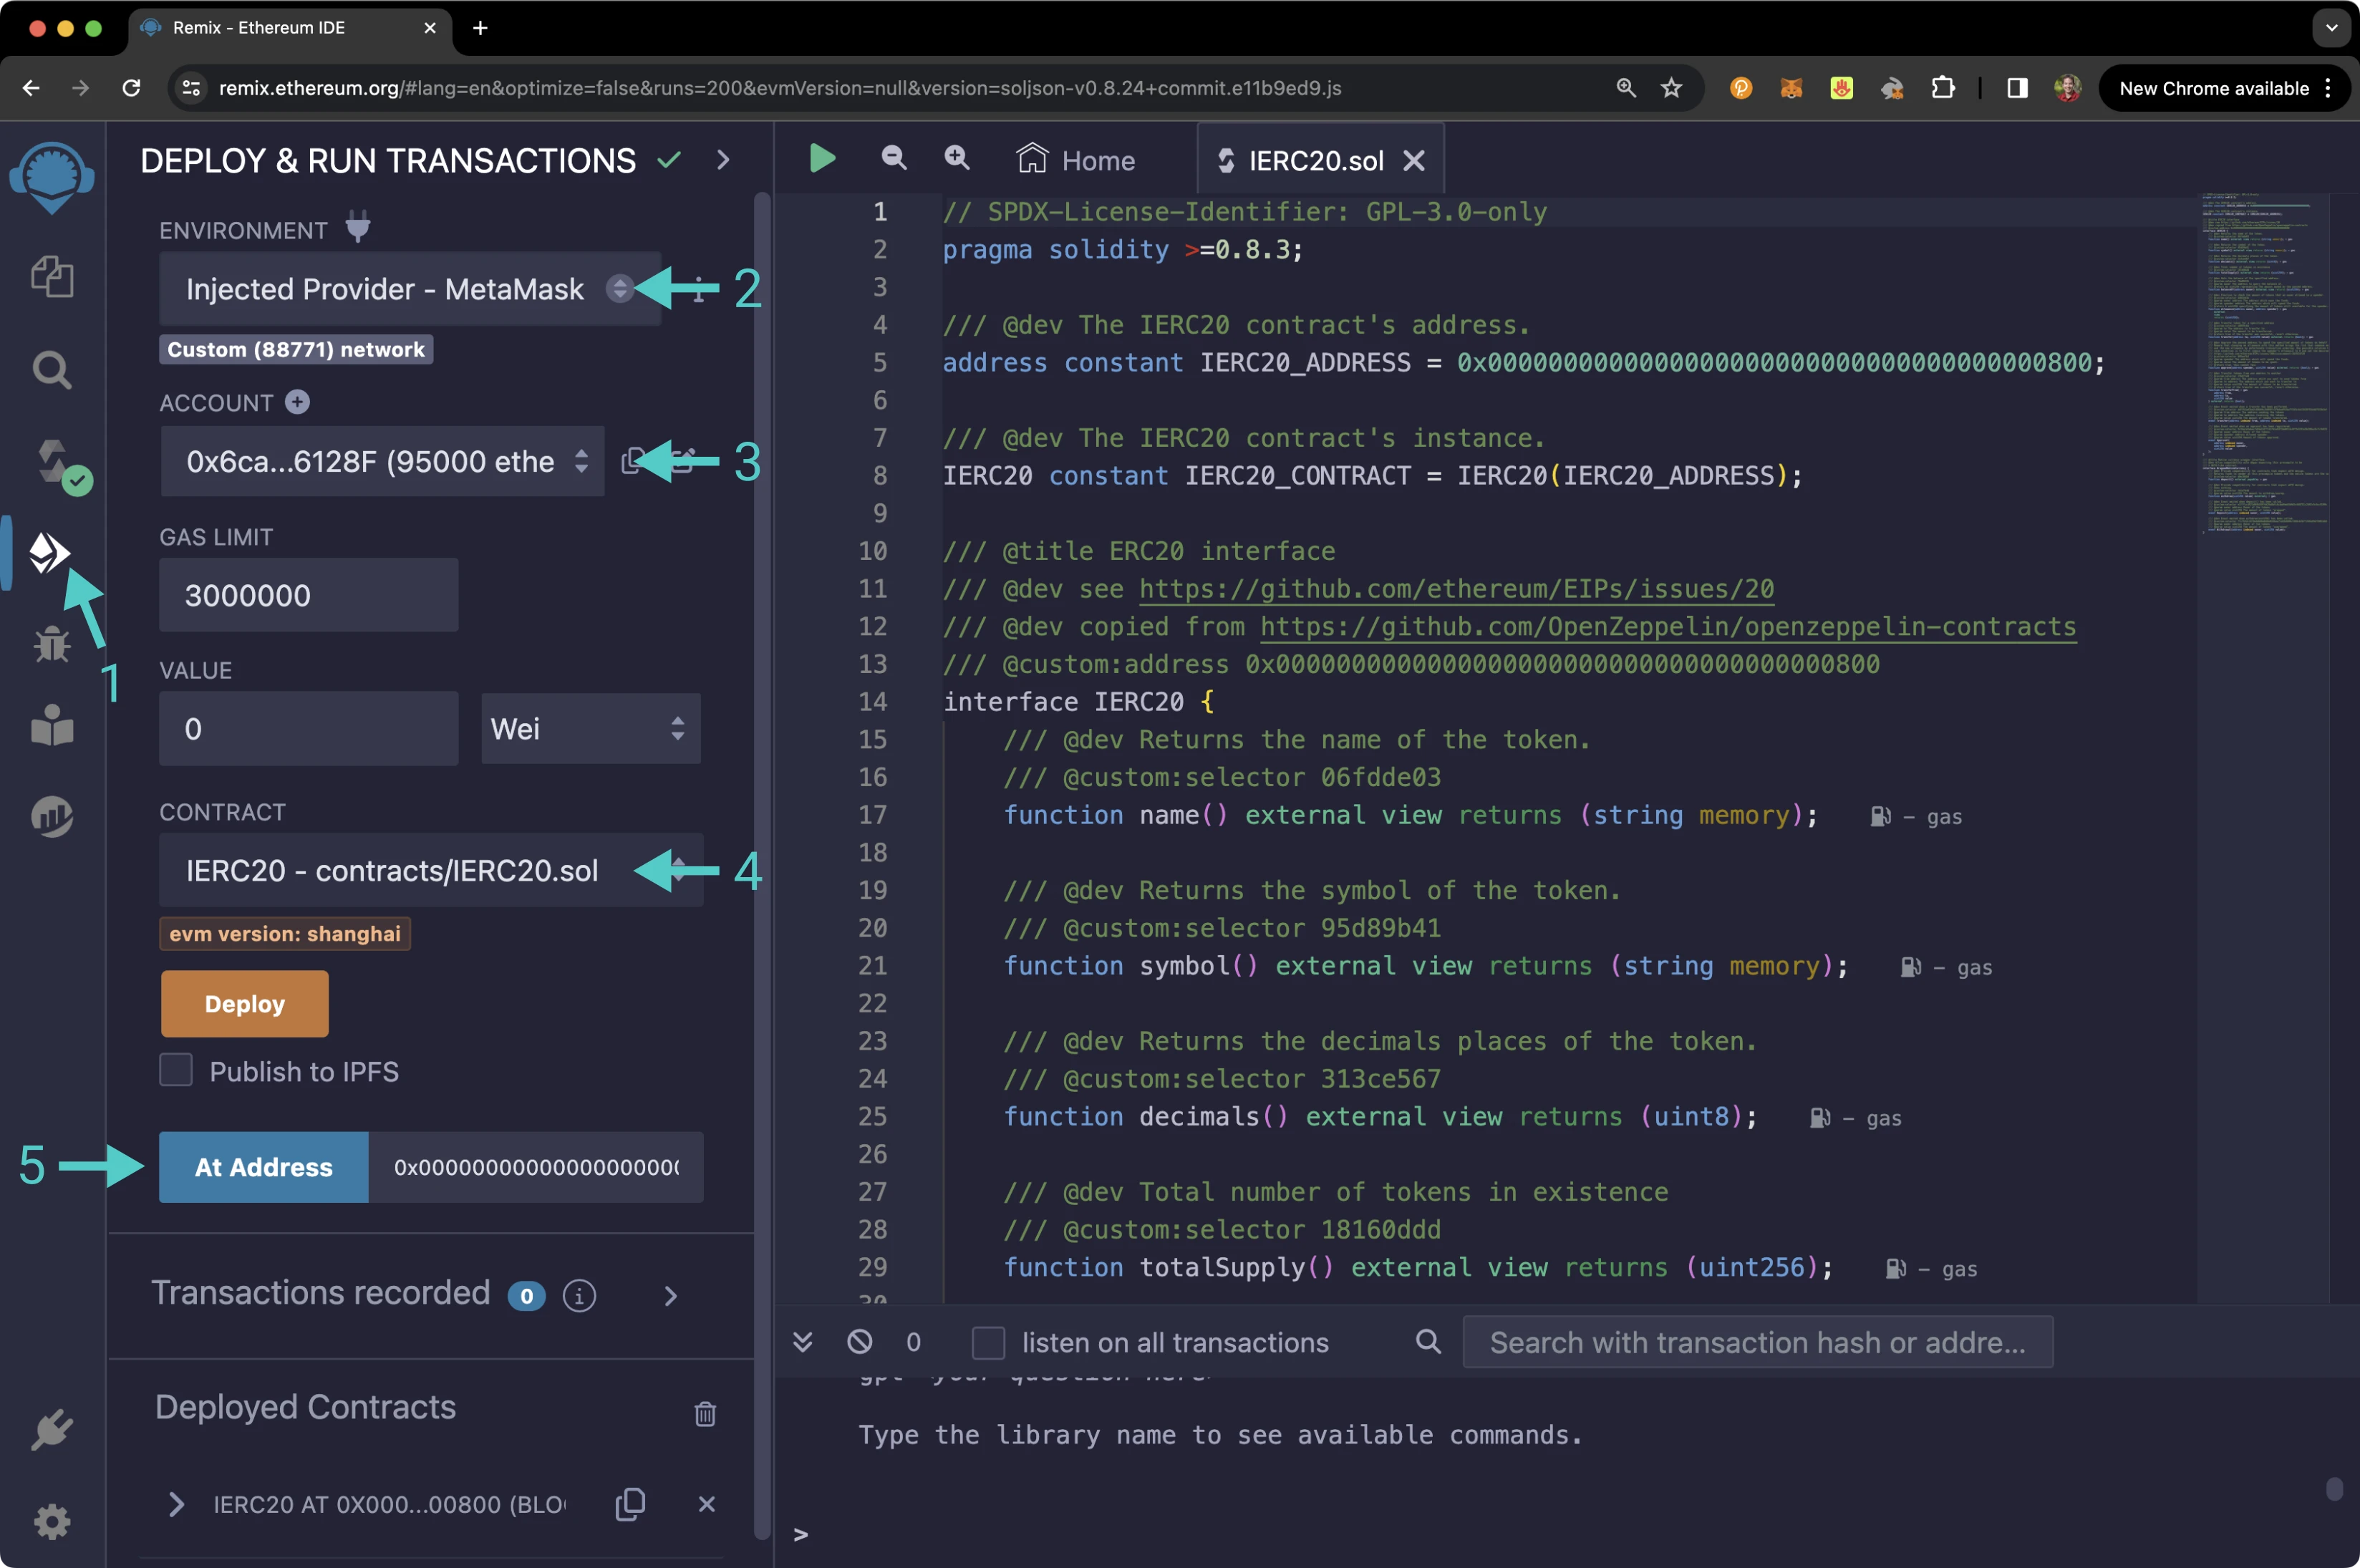
The **IERC20** precompile will appear in the list of **Deployed Contracts**.
### Get Basic Token Information {: #get-basic-token-information }
The ERC-20 interface lets you quickly obtain token information, including the token's total supply, name, symbol, and decimal places. You can retrieve this information by following these steps:
1. Expand the **IERC20** contract under **Deployed Contracts**
2. Click **decimals** to get the decimal places of your network's native protocol token
3. Click **name** to get the name of the token
4. Click **symbol** to get the symbol of the token
5. Click **totalSupply** to obtain the total supply of native tokens on your network
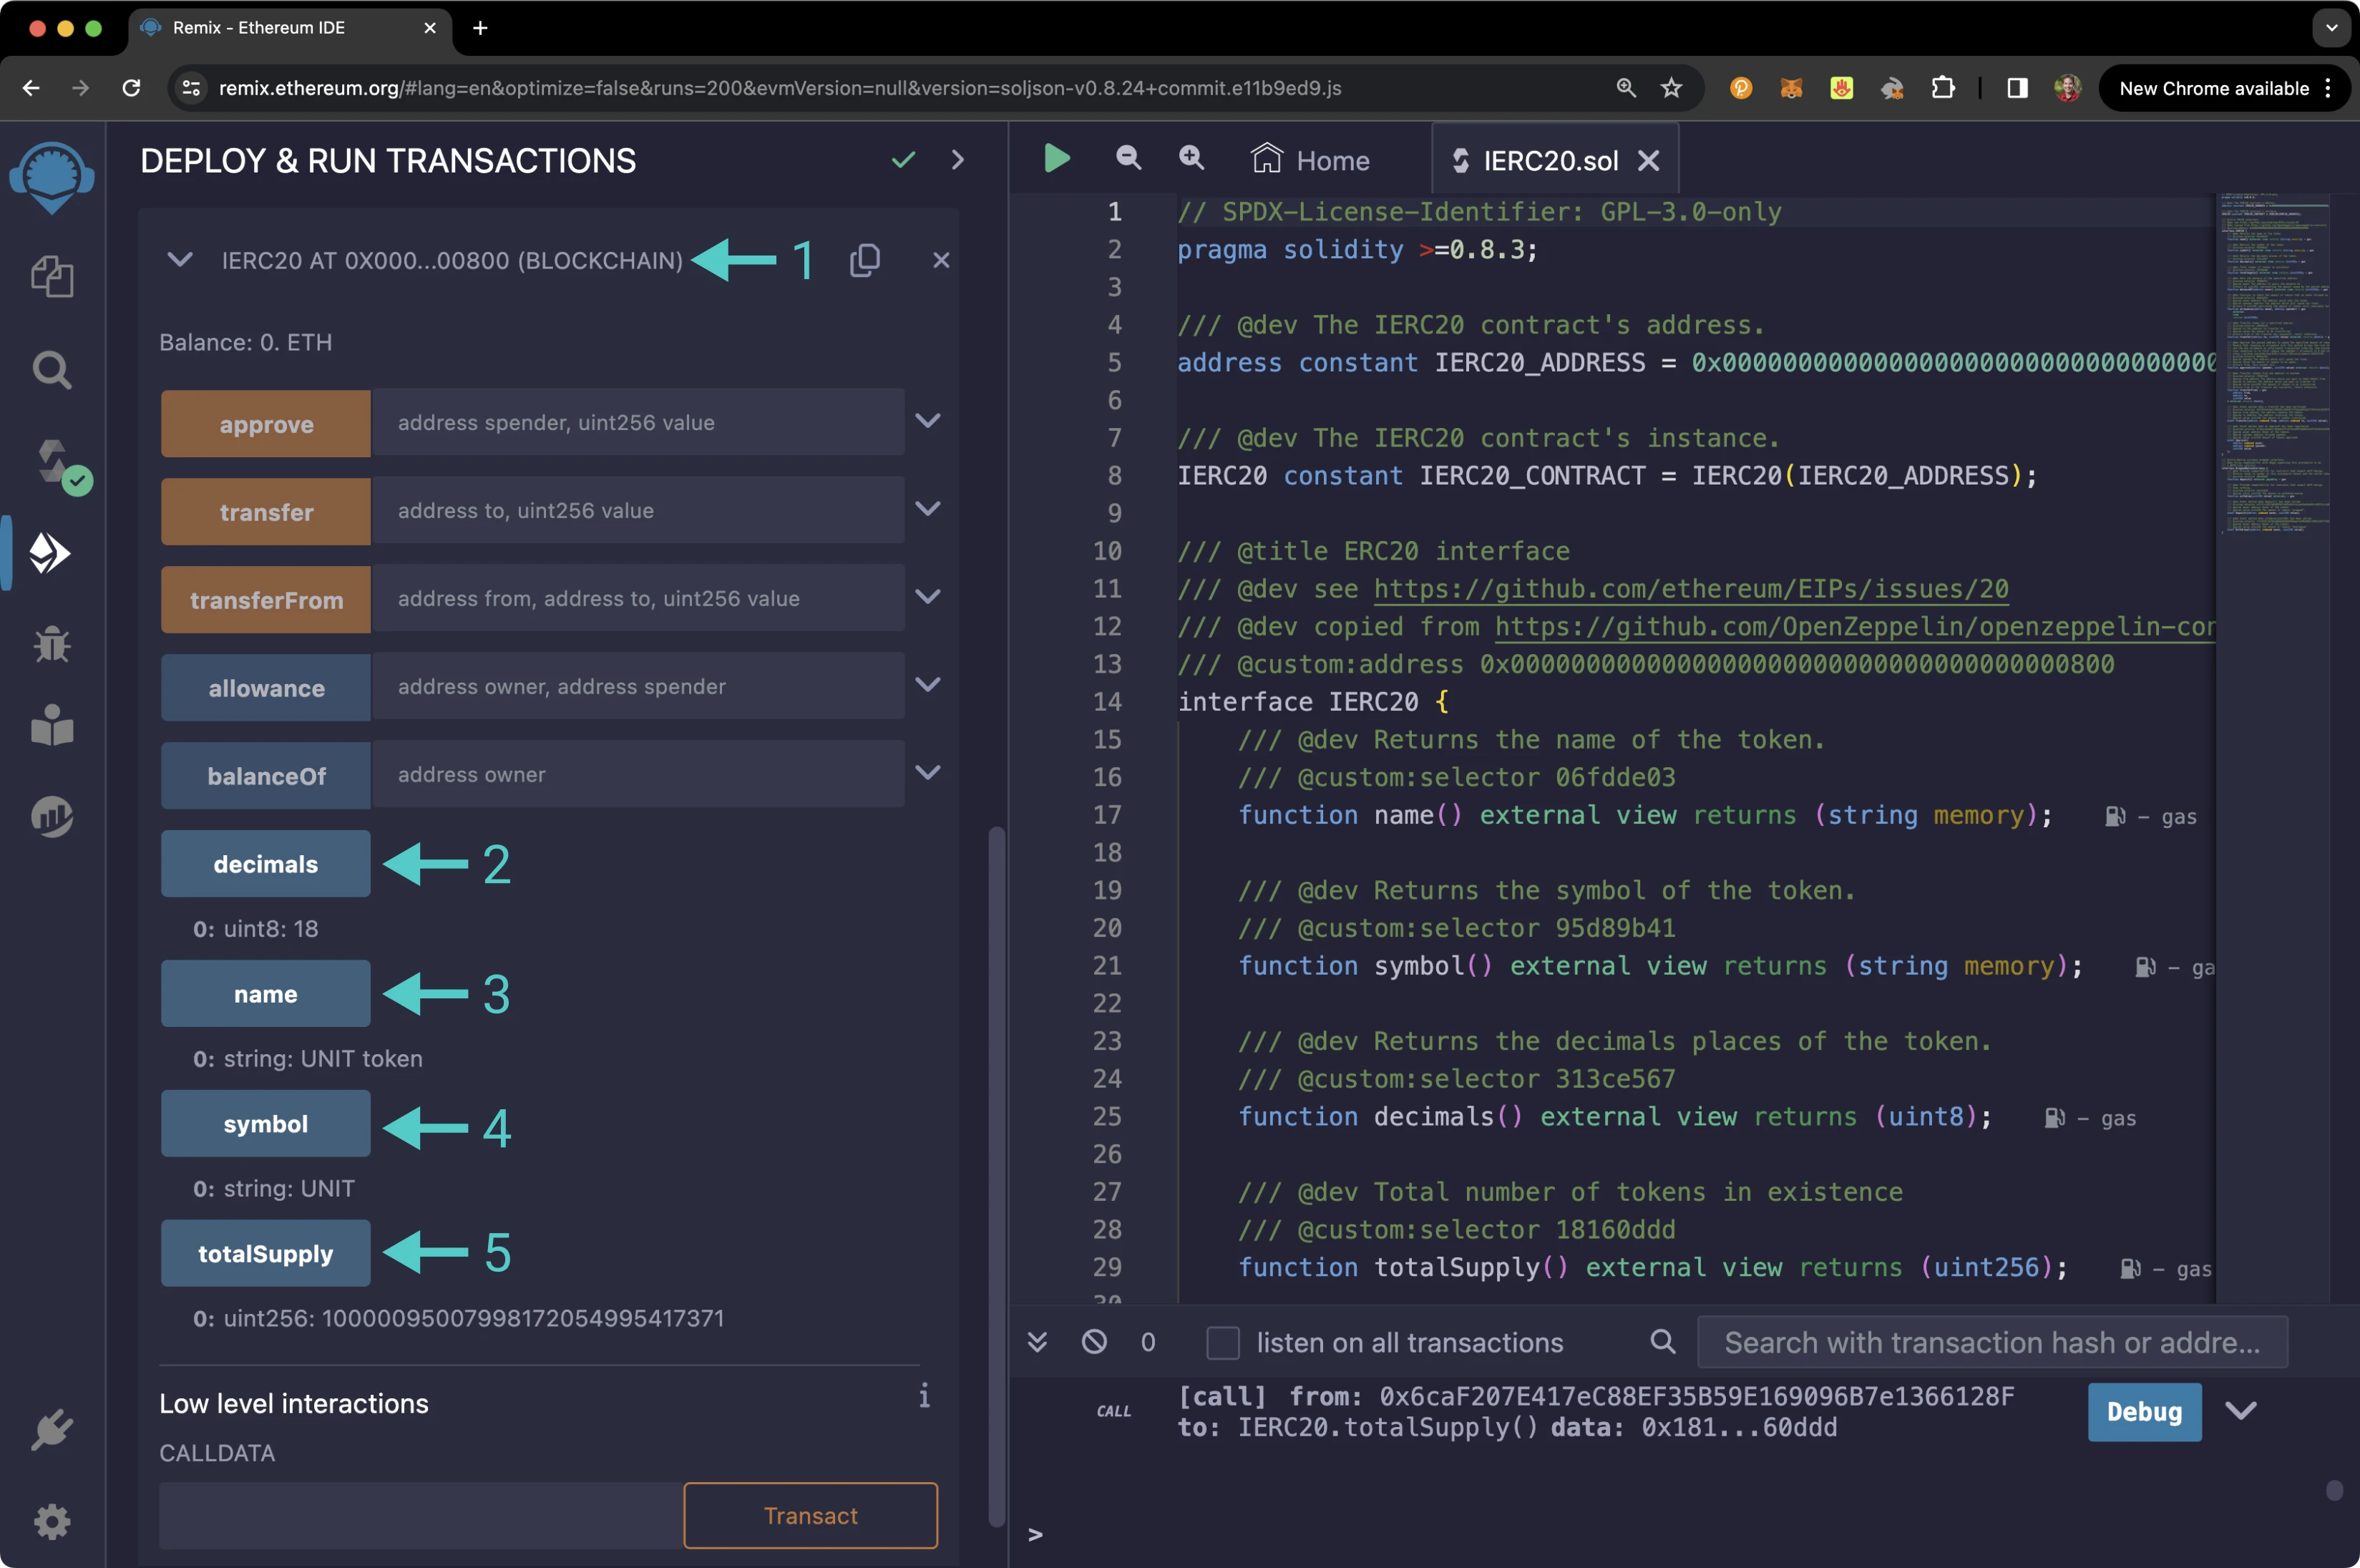
The results of each function call are displayed under the respective functions.
### Get Account Balance {: #get-account-balance }
You can check the balance of any address on your network by calling the `balanceOf` function and passing in an address:
1. Expand the **balanceOf** function
2. Enter an address you would like to check the balance of for the **owner**
2. Click **call**
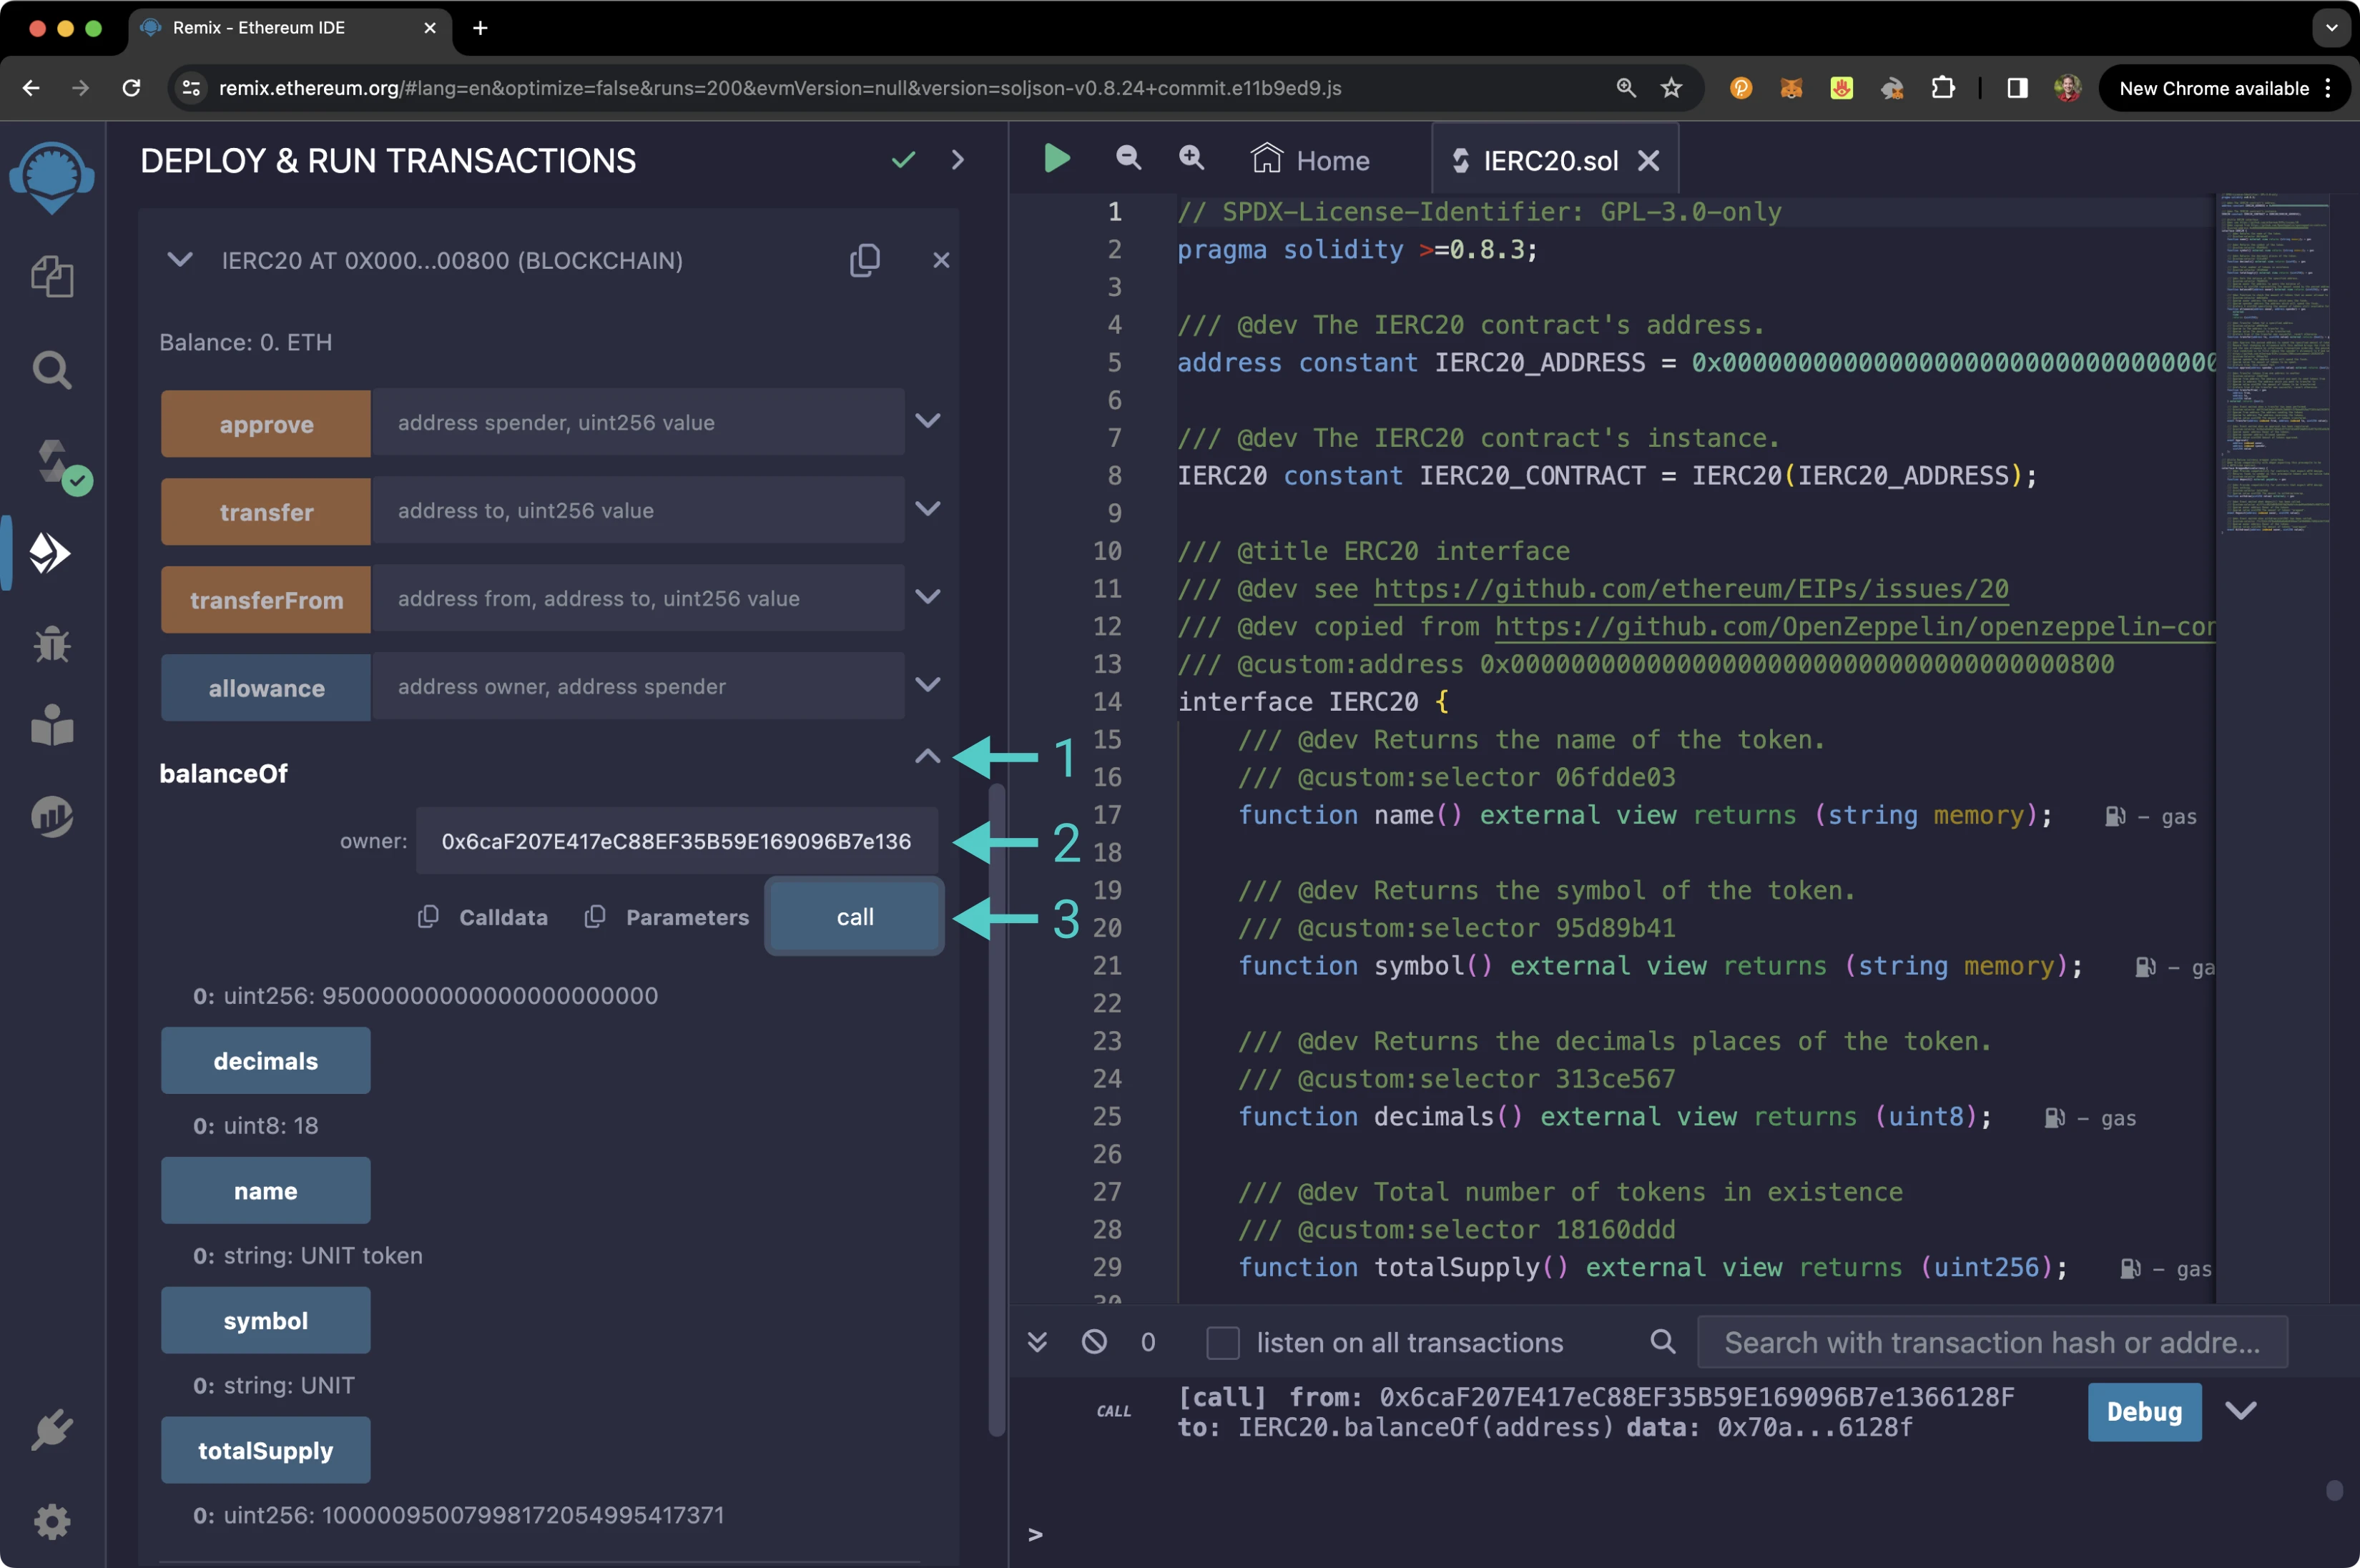
Your balance will be displayed under the `balanceOf` function.
### Approve a Spend {: #approve-a-spend }
To approve a token spend allowance, you'll need to provide an address for the spender and the number of tokens the spender is allowed to spend. The spender can be an externally owned account (EOA) or a smart contract. For this example, you can approve the spender with an allowance of 1 UNIT token. To get started, please follow these steps:
1. Expand the **approve** function
2. Enter the address of the spender. You should have created two accounts before starting, so you can use the second account as the spender
3. Enter the amount of tokens the spender can spend for the **value**. For this example, you can allow the spender to spend 1 UNIT token in Wei units (`1000000000000000000`)
4. Click **transact**
5. MetaMask will pop up, and you will be prompted to review the transaction details. Click **Confirm** to send the transaction
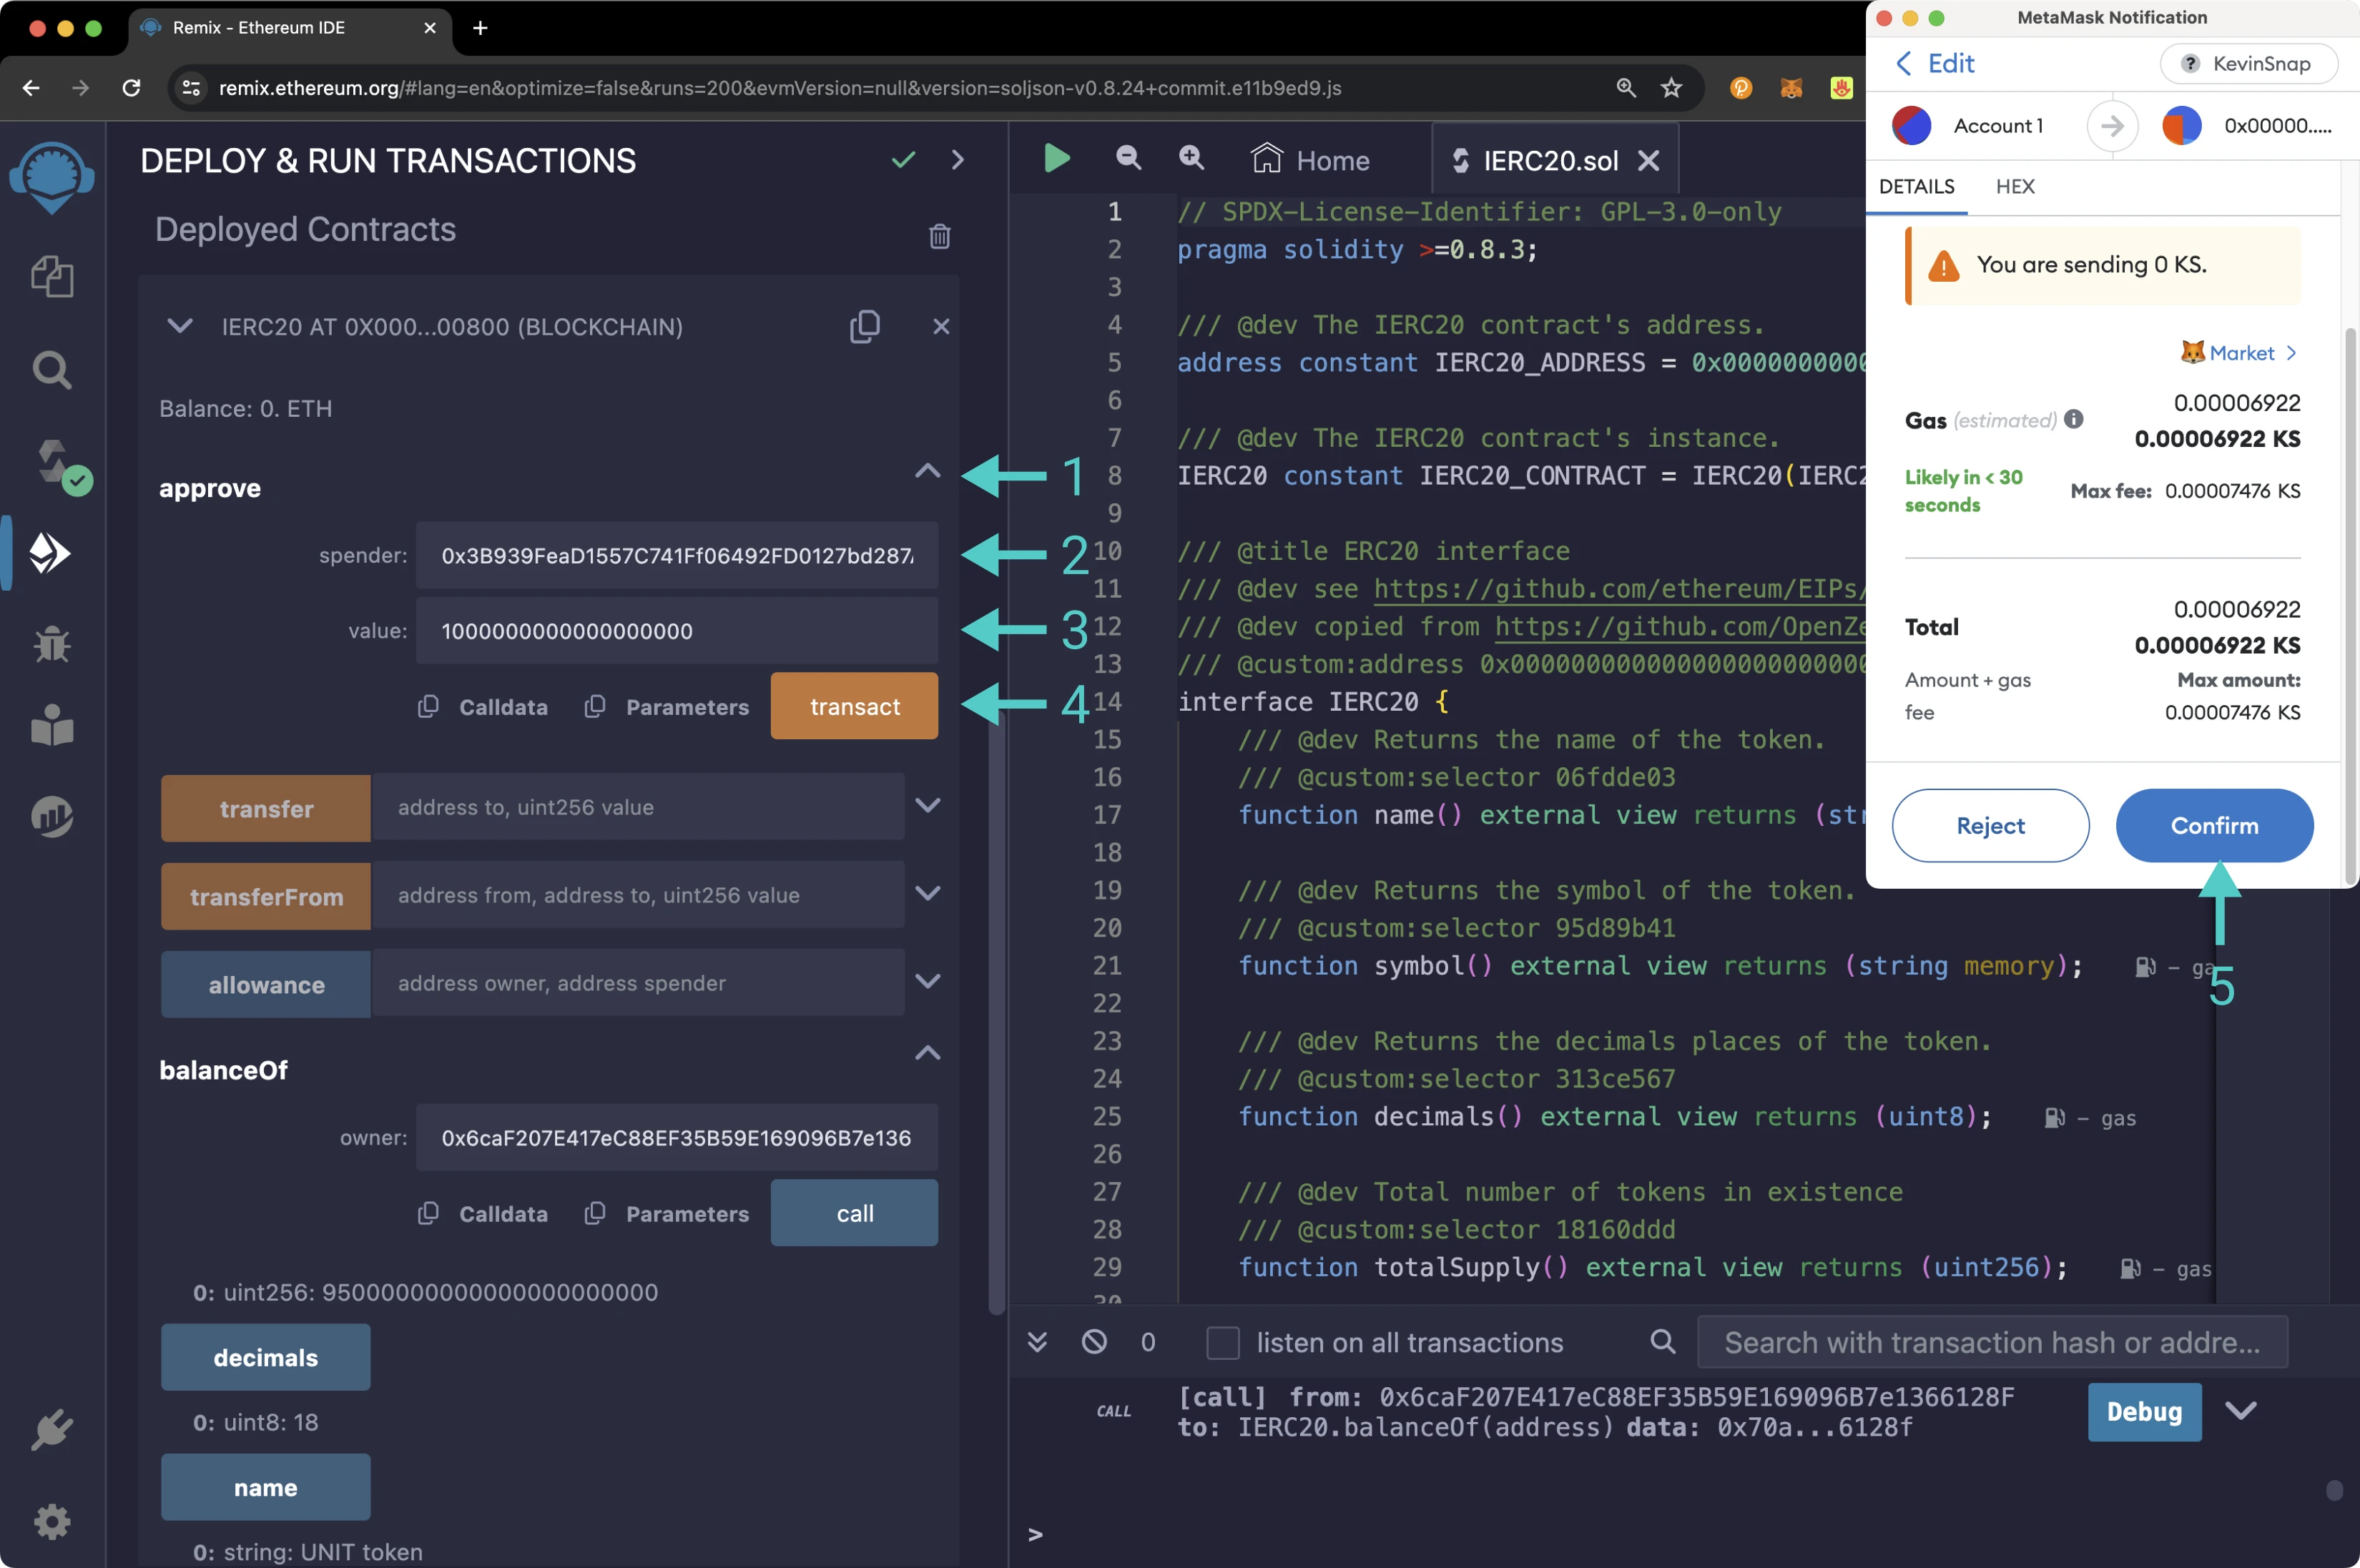
After the transaction is confirmed, you'll notice that the balance of your account has stayed the same. This is because you have only approved the allowance for the given amount, and the spender hasn't spent the funds. In the next section, you will use the `allowance` function to verify that the spender can spend 1 UNIT token on your behalf.
### Get Allowance of Spender {: #get-allowance-of-spender }
To check that the spender received the allowance approved in the [Approve a Spend](#approve-a-spend) section, you can:
1. Expand the **allowance** function
2. Enter your address for the **owner**
3. Enter the address of the **spender** that you used in the previous section
4. Click **call**
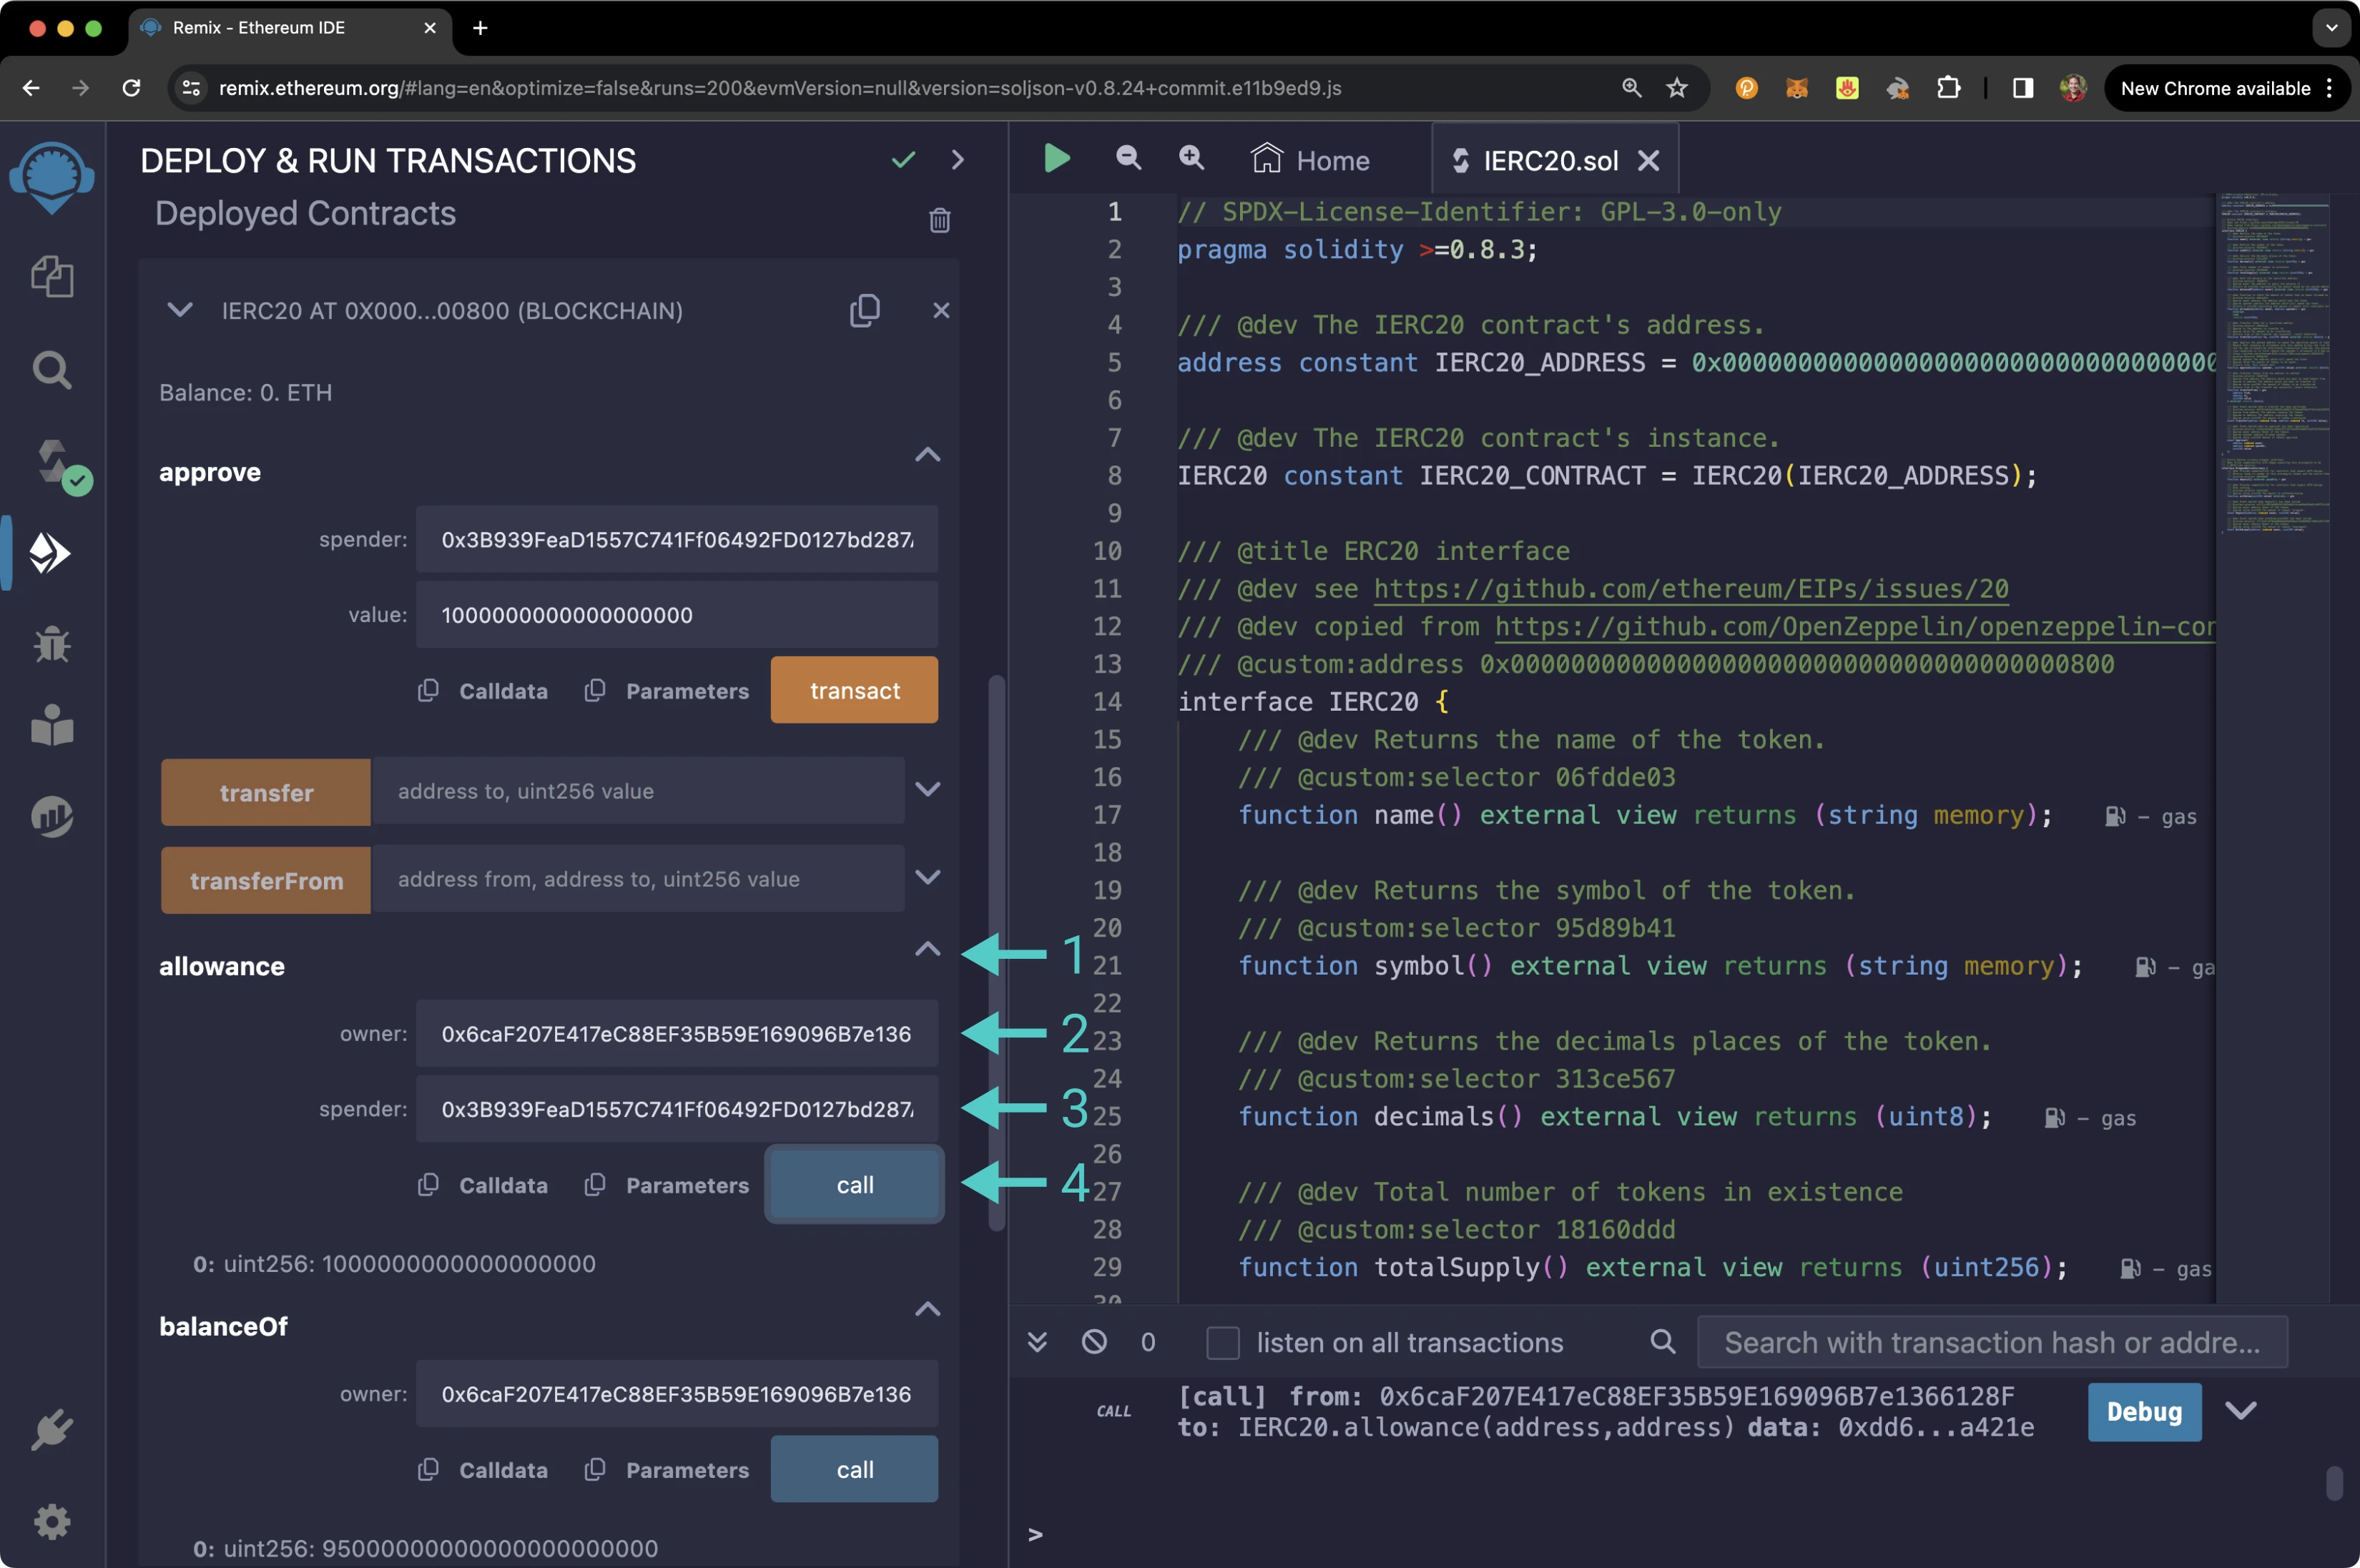
Once the call is complete, the allowance of the spender will be displayed, which should be equivalent to 1 UNIT token (`1000000000000000000`).
### Send Transfer {: #send-transfer }
To send tokens from your account directly to another account, you can call the `transfer` function by following these steps:
1. Expand the **transfer** function
2. Enter the address to send UNIT tokens to
3. Enter the amount of UNIT tokens to send. For this example, you can send 1 UNIT token (`1000000000000000000`)
4. Click **transact**
5. MetaMask will pop up, and you will be prompted to review the transaction details. Click **Confirm** to send the transaction
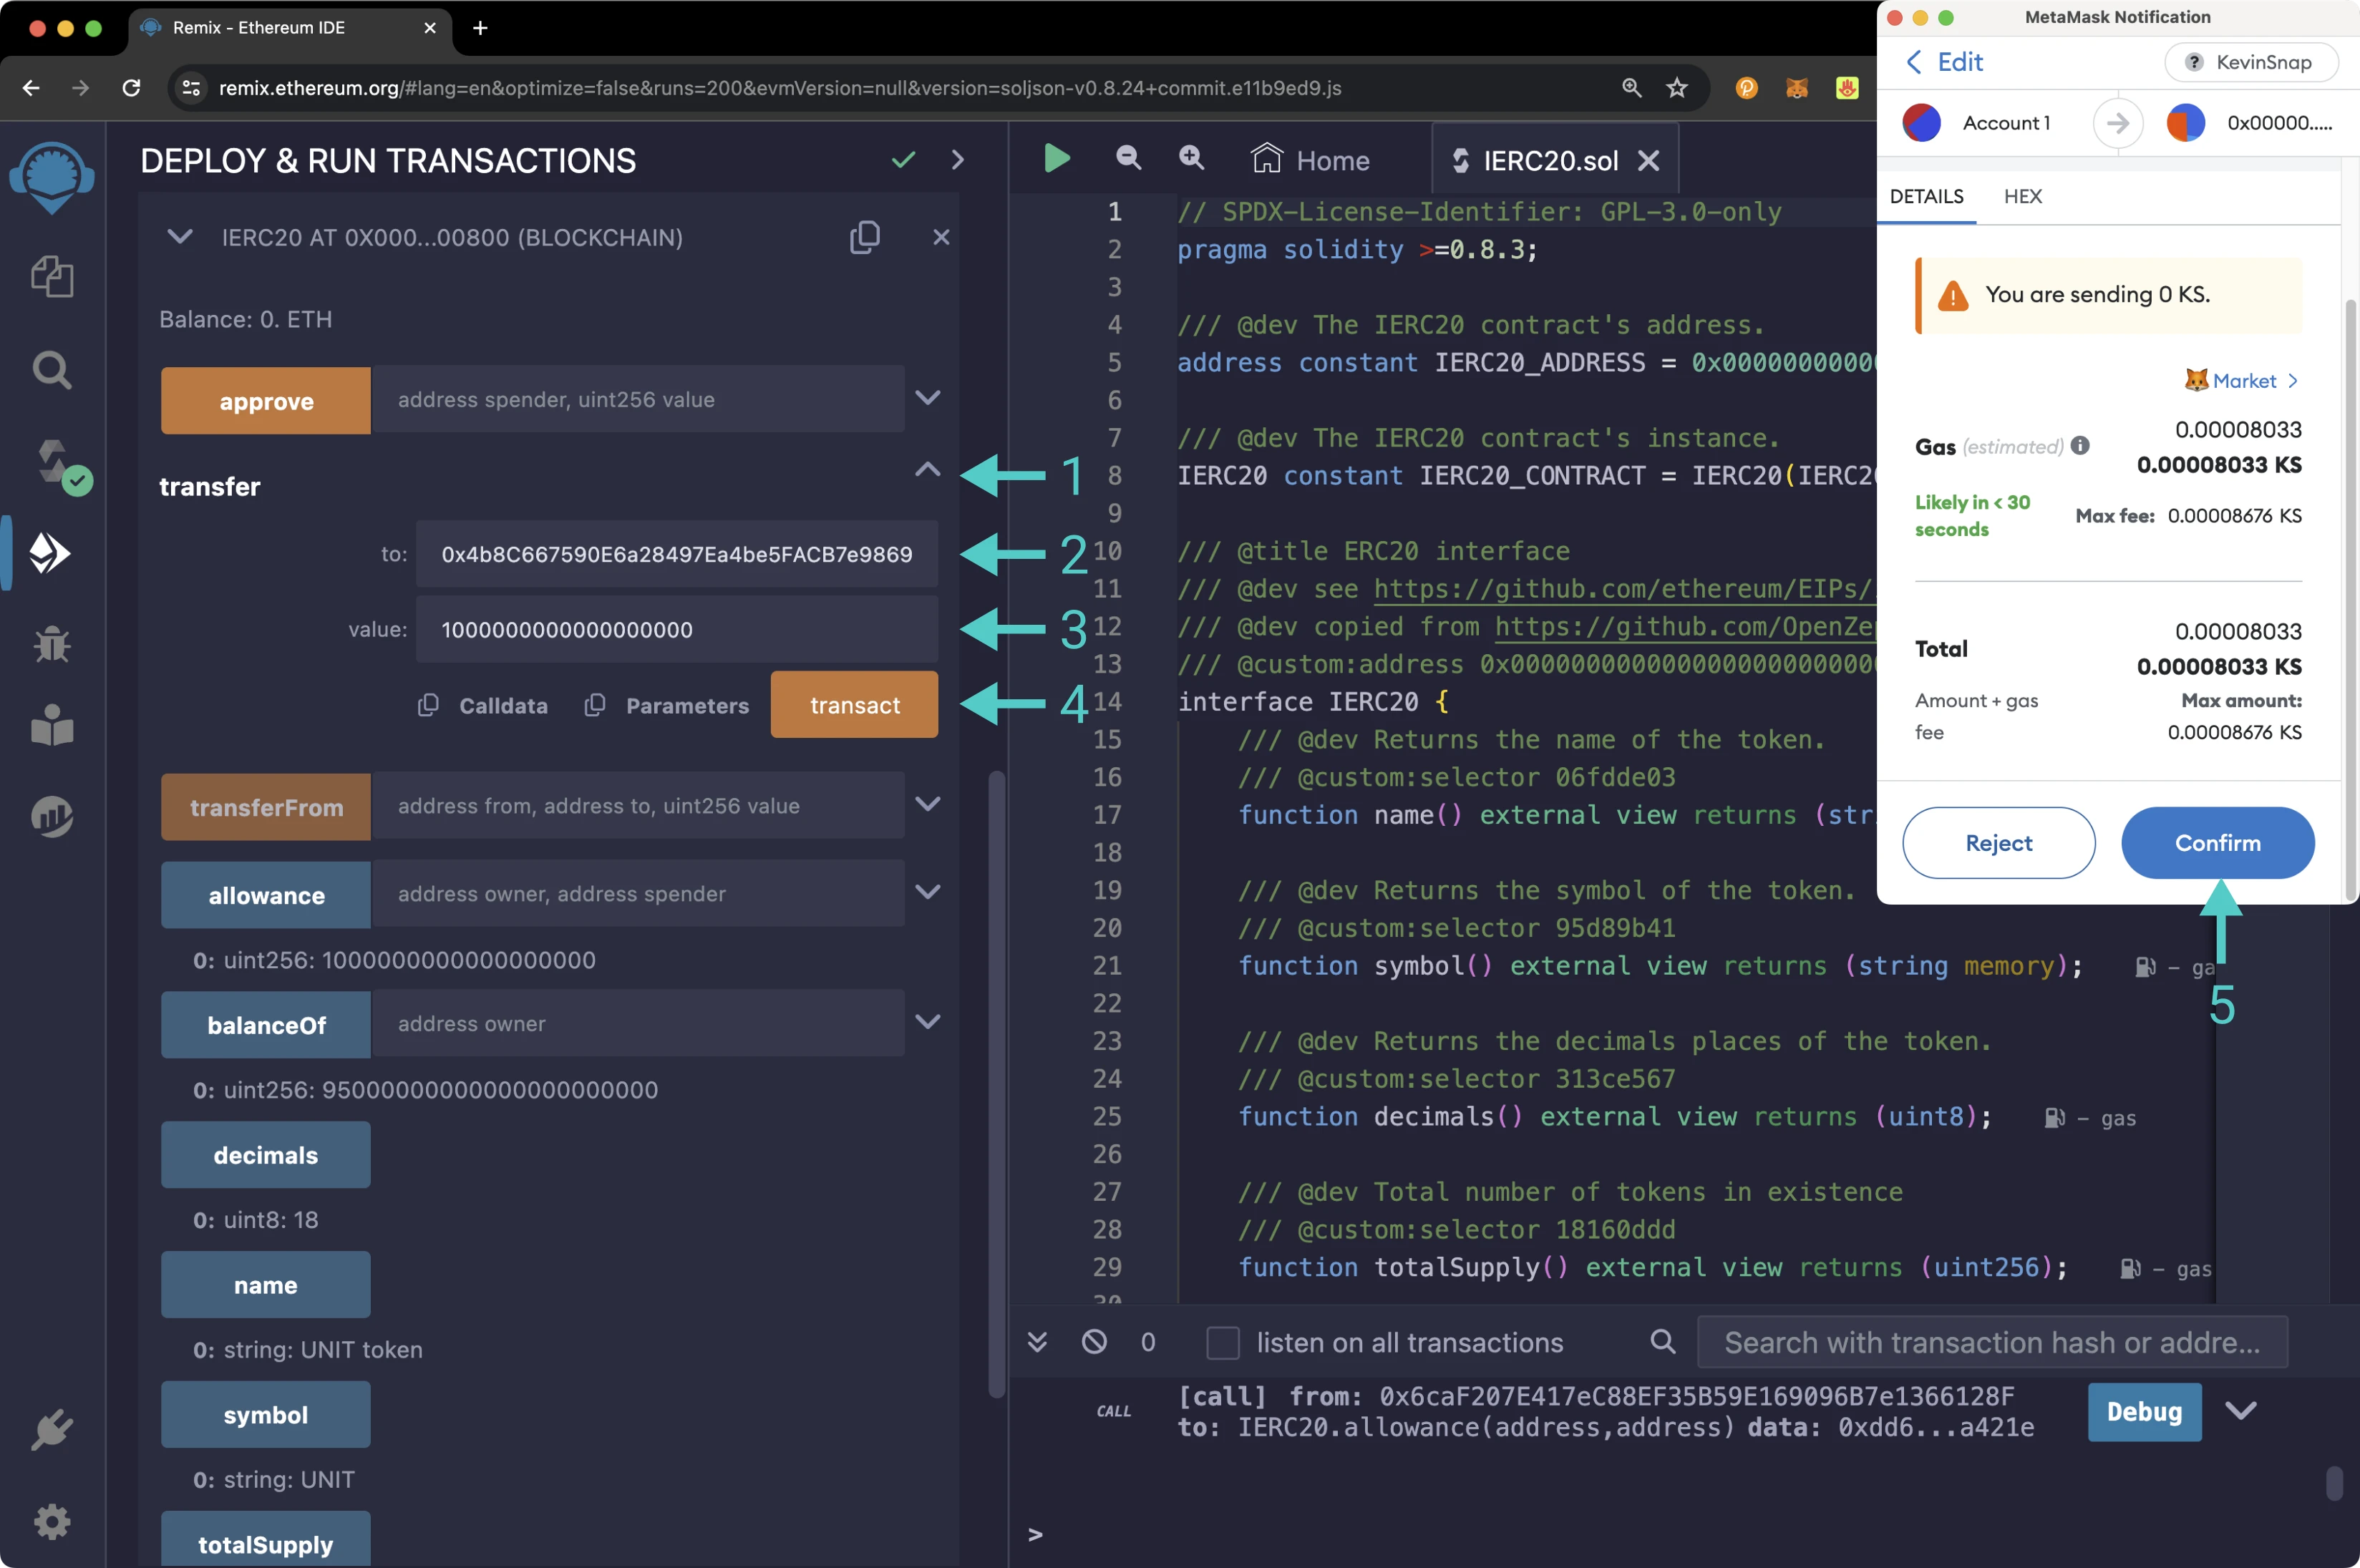
Once the transaction is complete, you can [check your balance](#get-account-balance) using the `balanceOf` function or by looking at MetaMask. You'll notice that your balance has decreased by 1 UNIT token. You can also use the `balanceOf` function to ensure that the recipients balance has increased by 1 UNIT token as expected.
### Send Transfer From Specific Account {: #send-transferfrom }
So far, you have approved an allowance of 1 UNIT token for the spender and sent 1 UNIT token via the standard `transfer` function. The `transferFrom` function varies from the standard `transfer` function as it allows you to define the address to which you want to send the tokens. So you can specify an address with an allowance or your address as long as you have funds. For this example, you will use the spender's account to initiate a transfer of the allowed funds from the owner to the spender. The spender can send the funds to any account, but you can send the funds from the owner to the spender for this example.
First, you need to switch to the spender's account in MetaMask. Once you switch to the spender's account, you'll notice that the selected address in Remix under the **Accounts** tab is now the spender's.
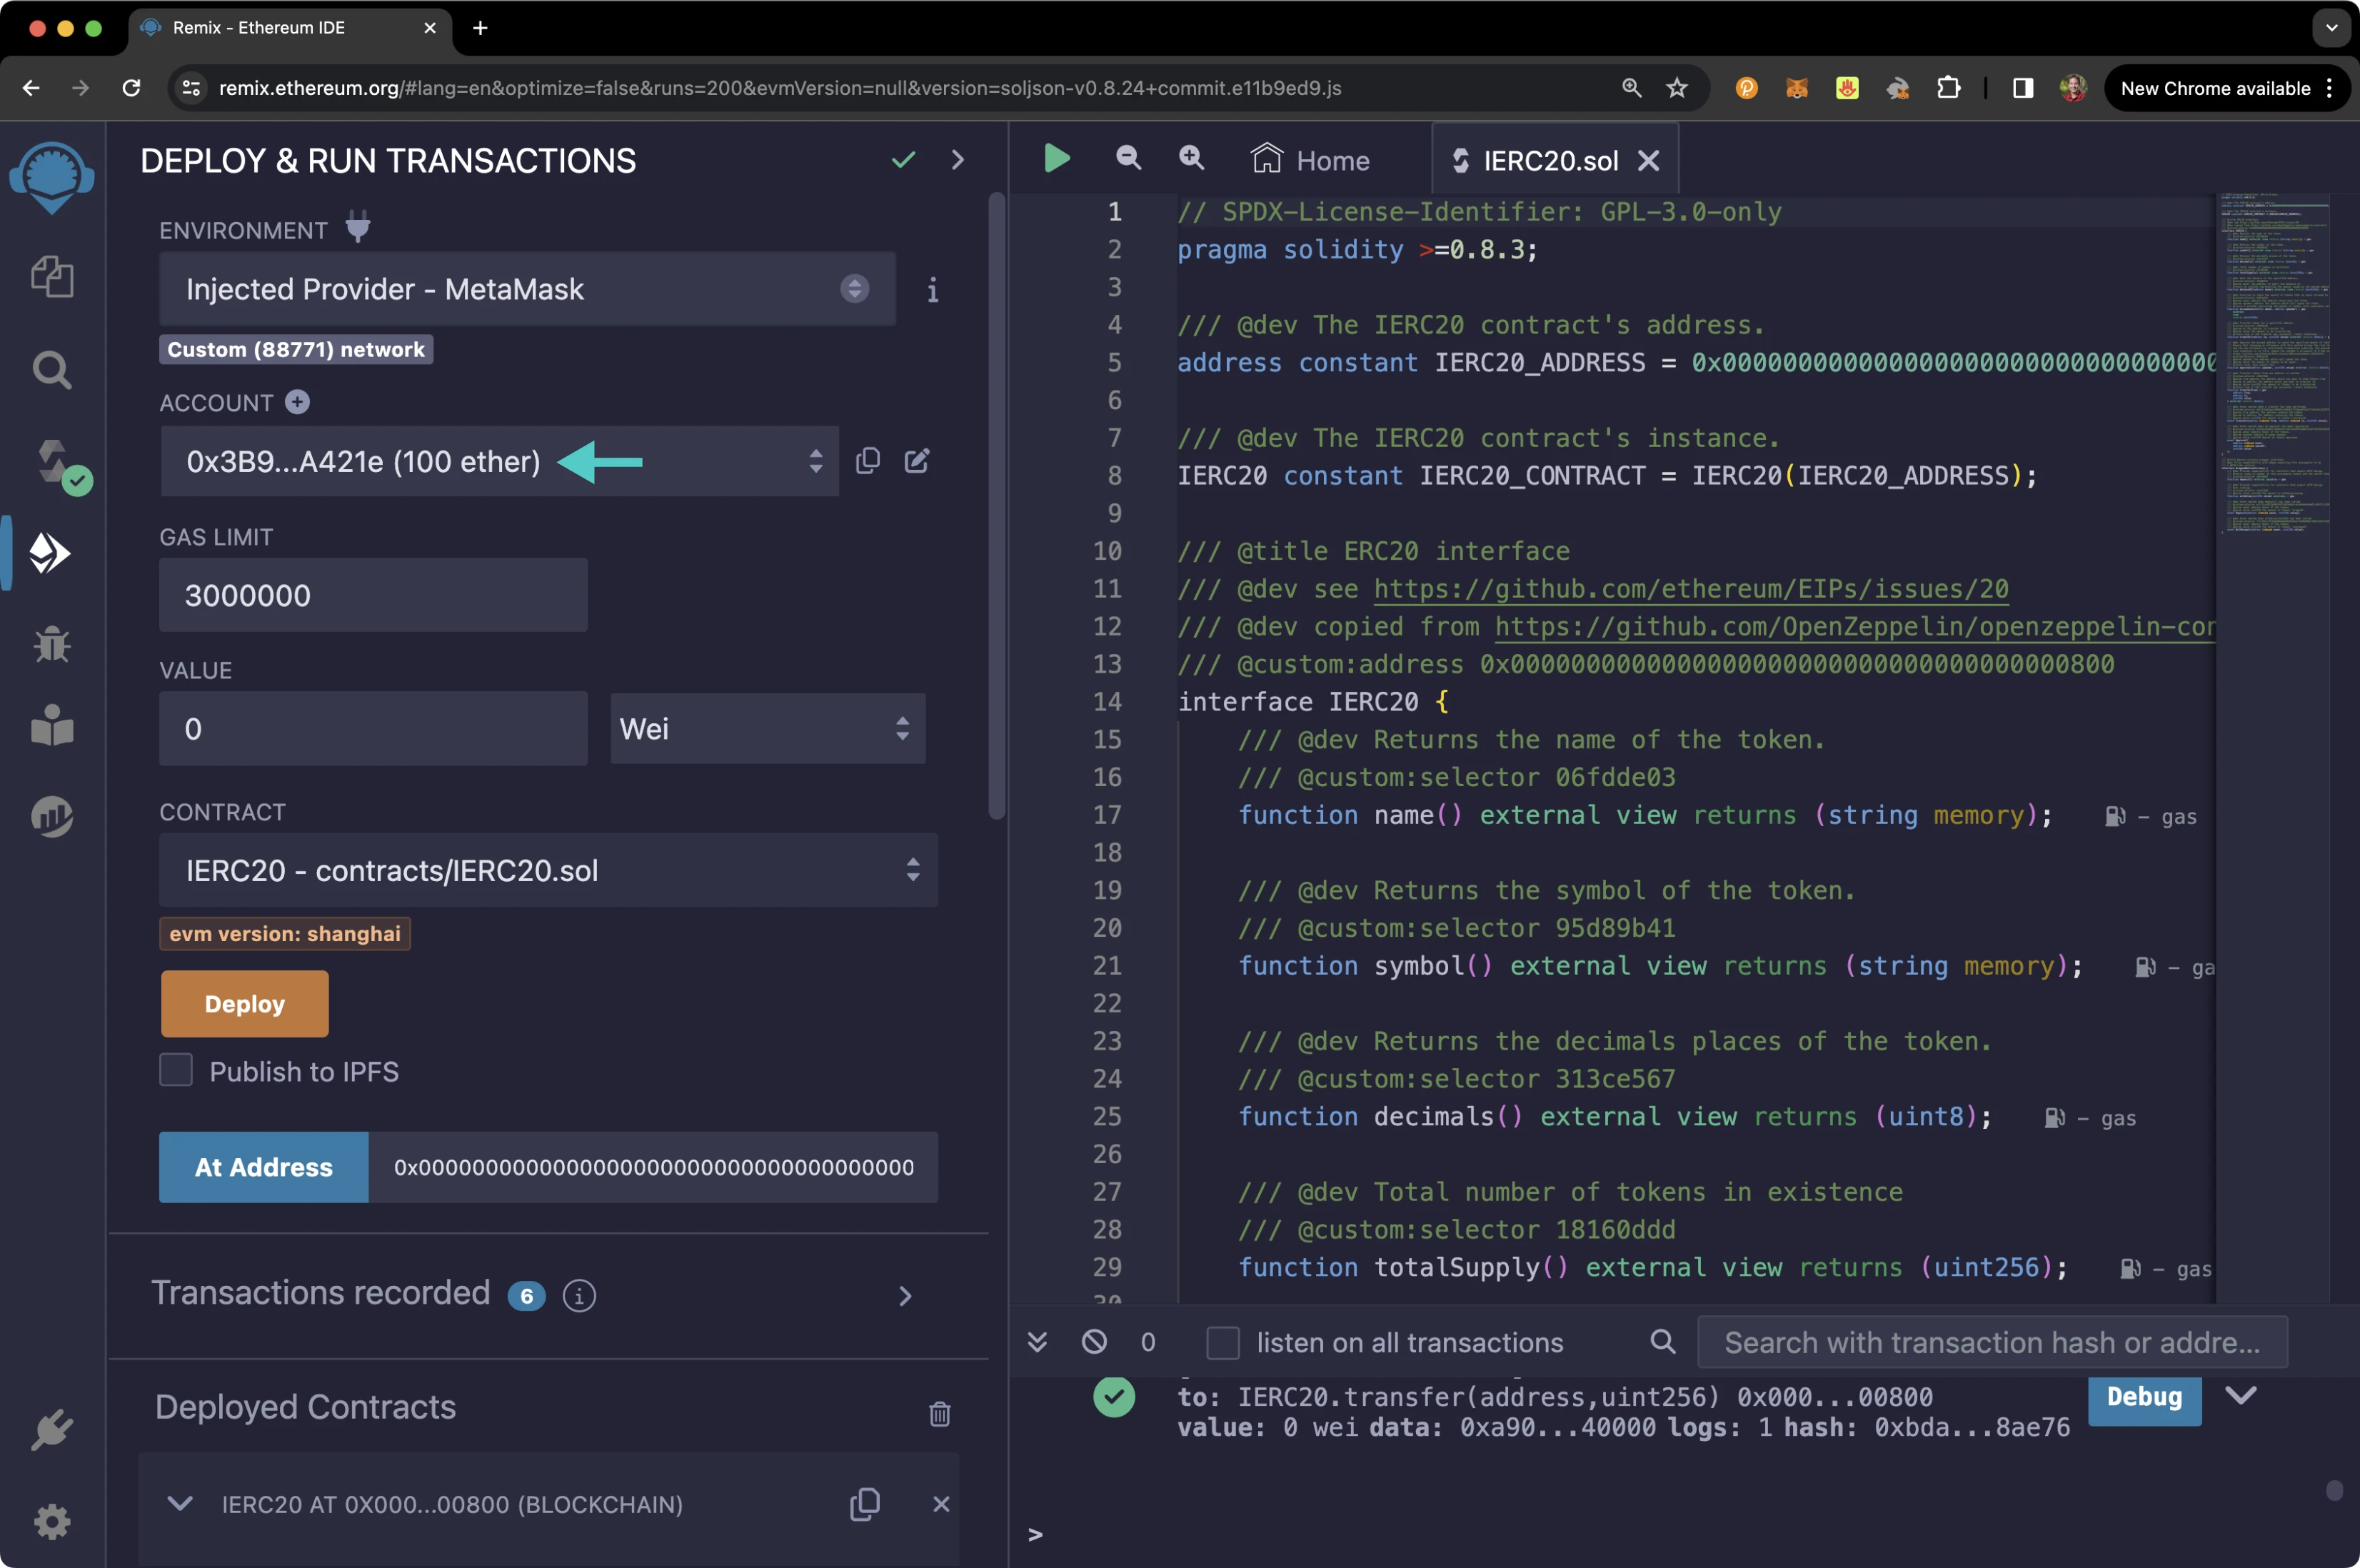
Next, you can initiate and send the transfer. To do so, take the following steps:
1. Expand the **transferFrom** function
2. Enter your address as the owner in the **from** field
3. Enter the recipient address, which should be the spender's address, in the **to** field
4. Enter the amount of UNIT tokens to send. Again, the spender is currently only allowed to send 1 UNIT token, so enter `1000000000000000000`
5. Click **transact**
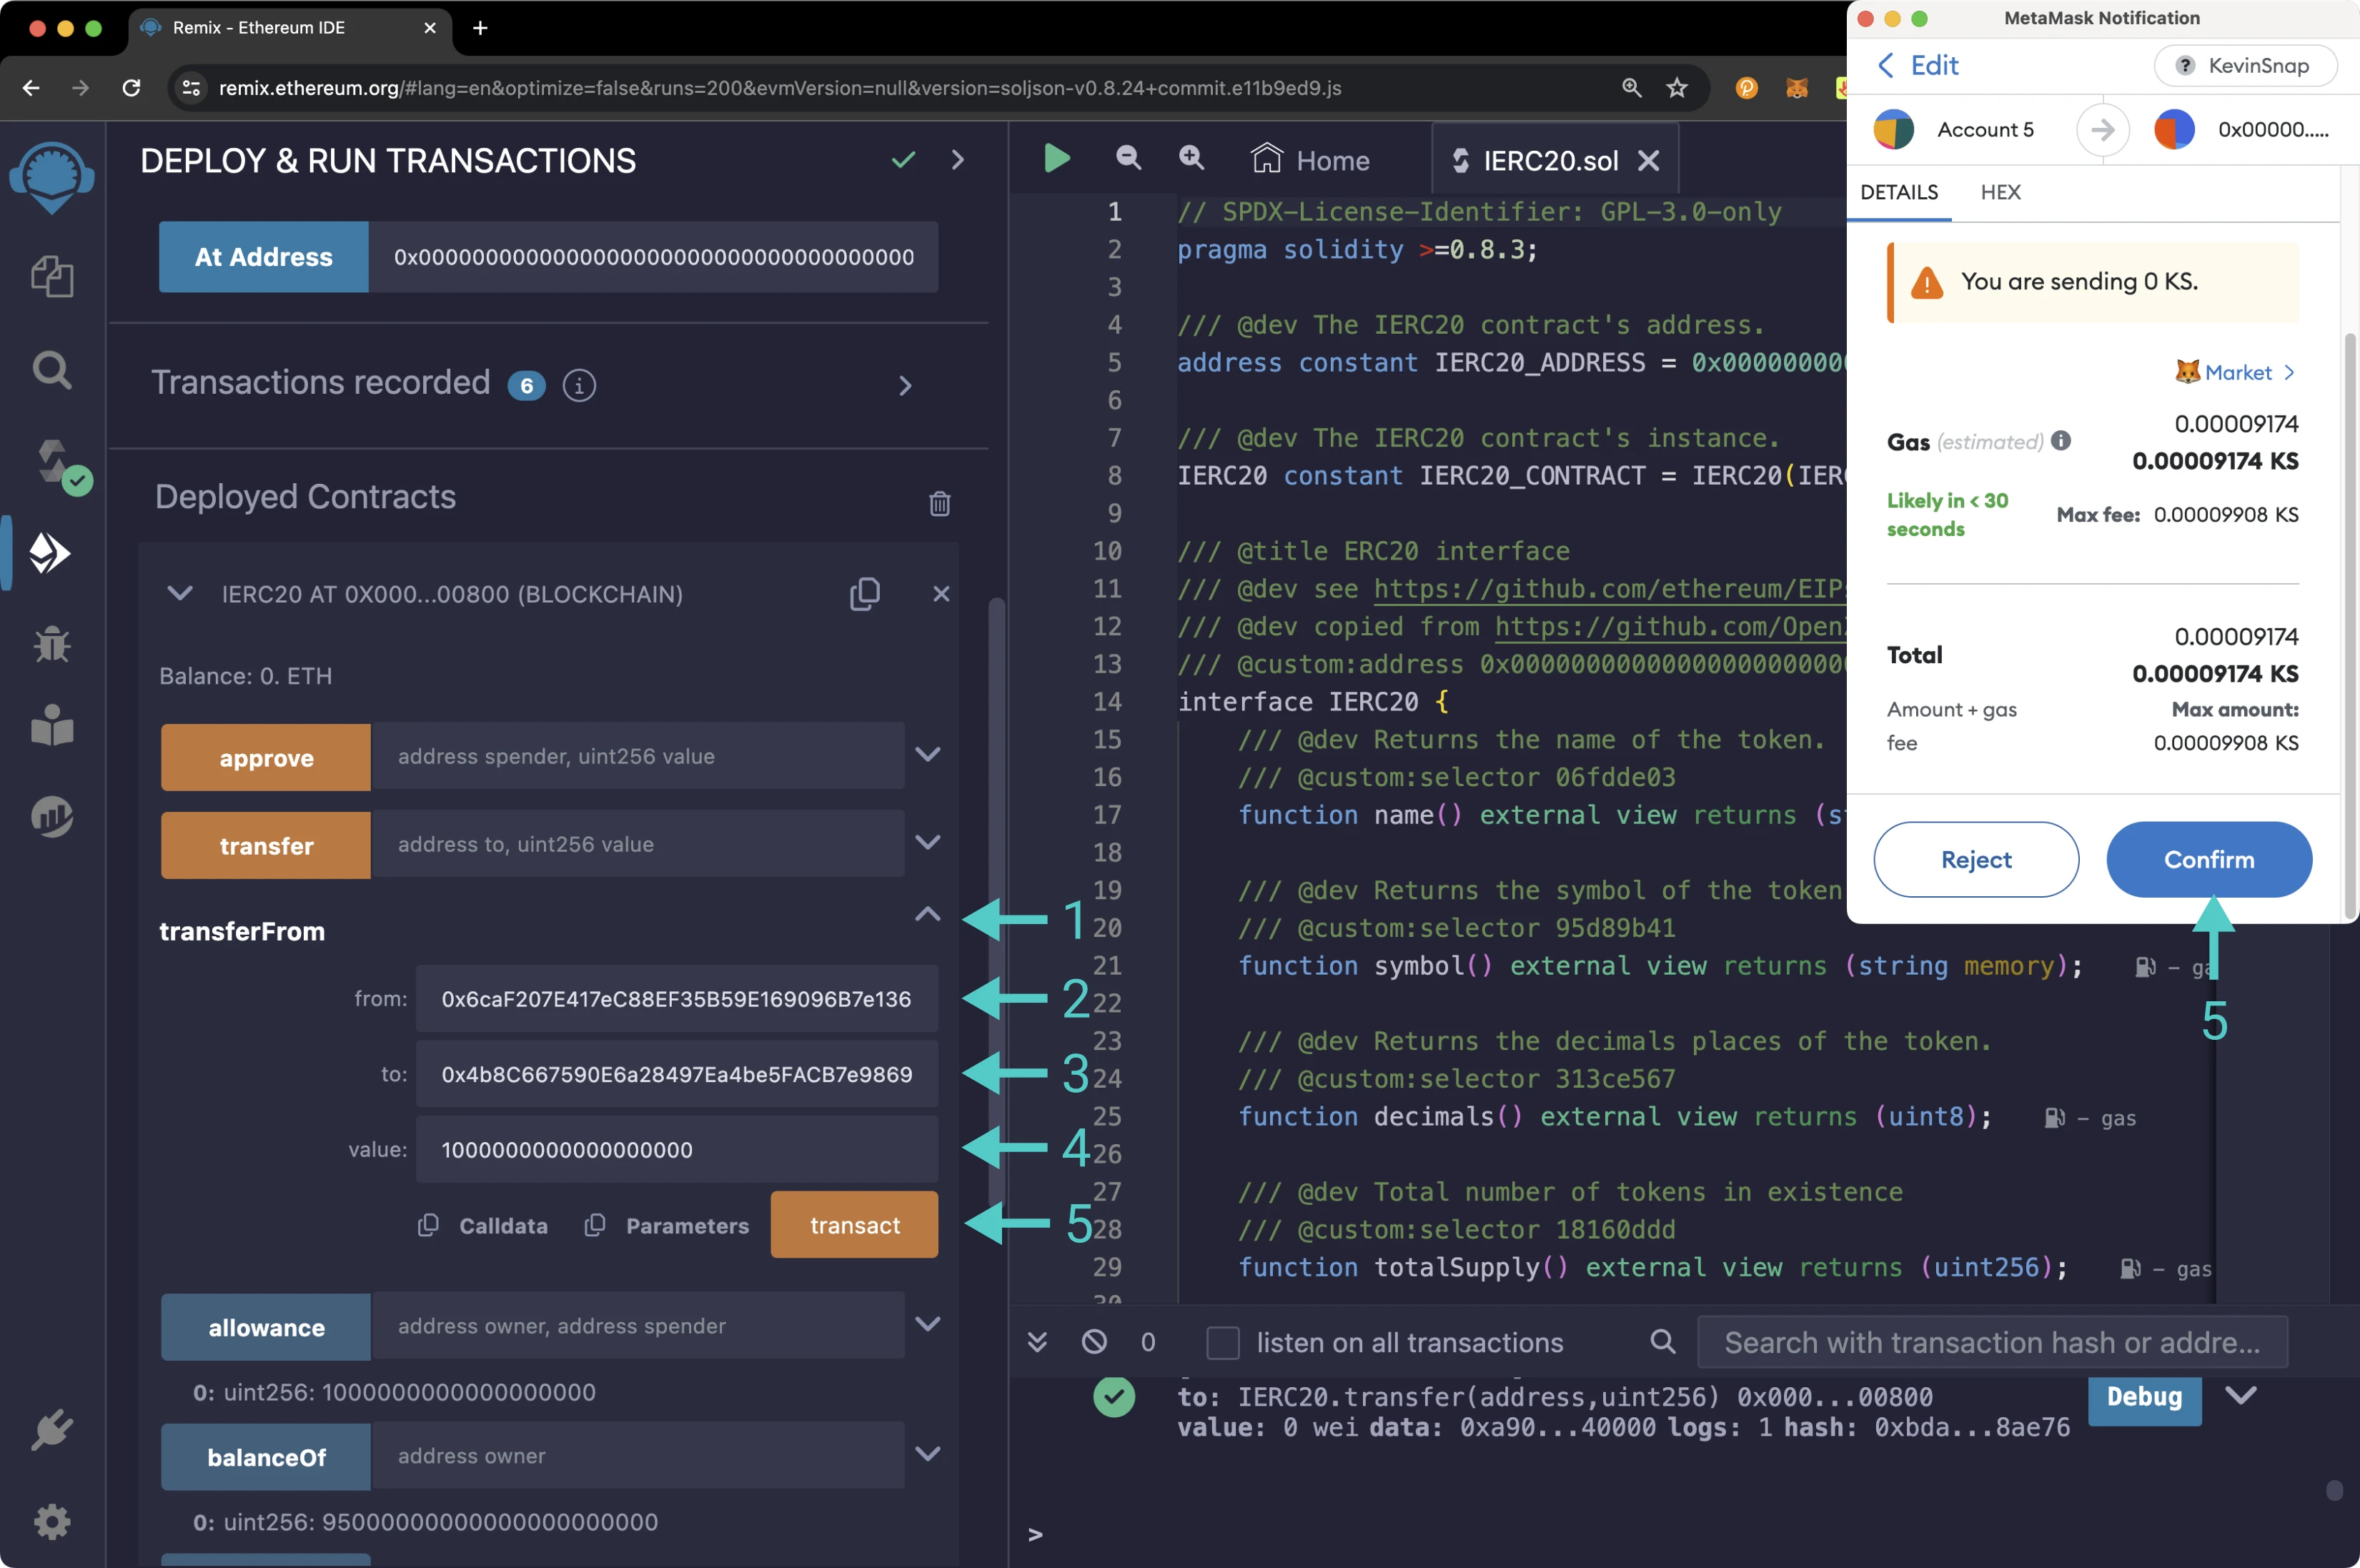
Once the transaction is complete, you can [check the balance](#get-account-balance) of the owner and spender using the `balanceOf` function. The spender's balance should have increased by 1 UNIT token, and their allowance should now be depleted. To verify that the spender no longer has an allowance, you can call the `allowance` function by passing in the owner and spender's addresses. You should receive a result of 0.
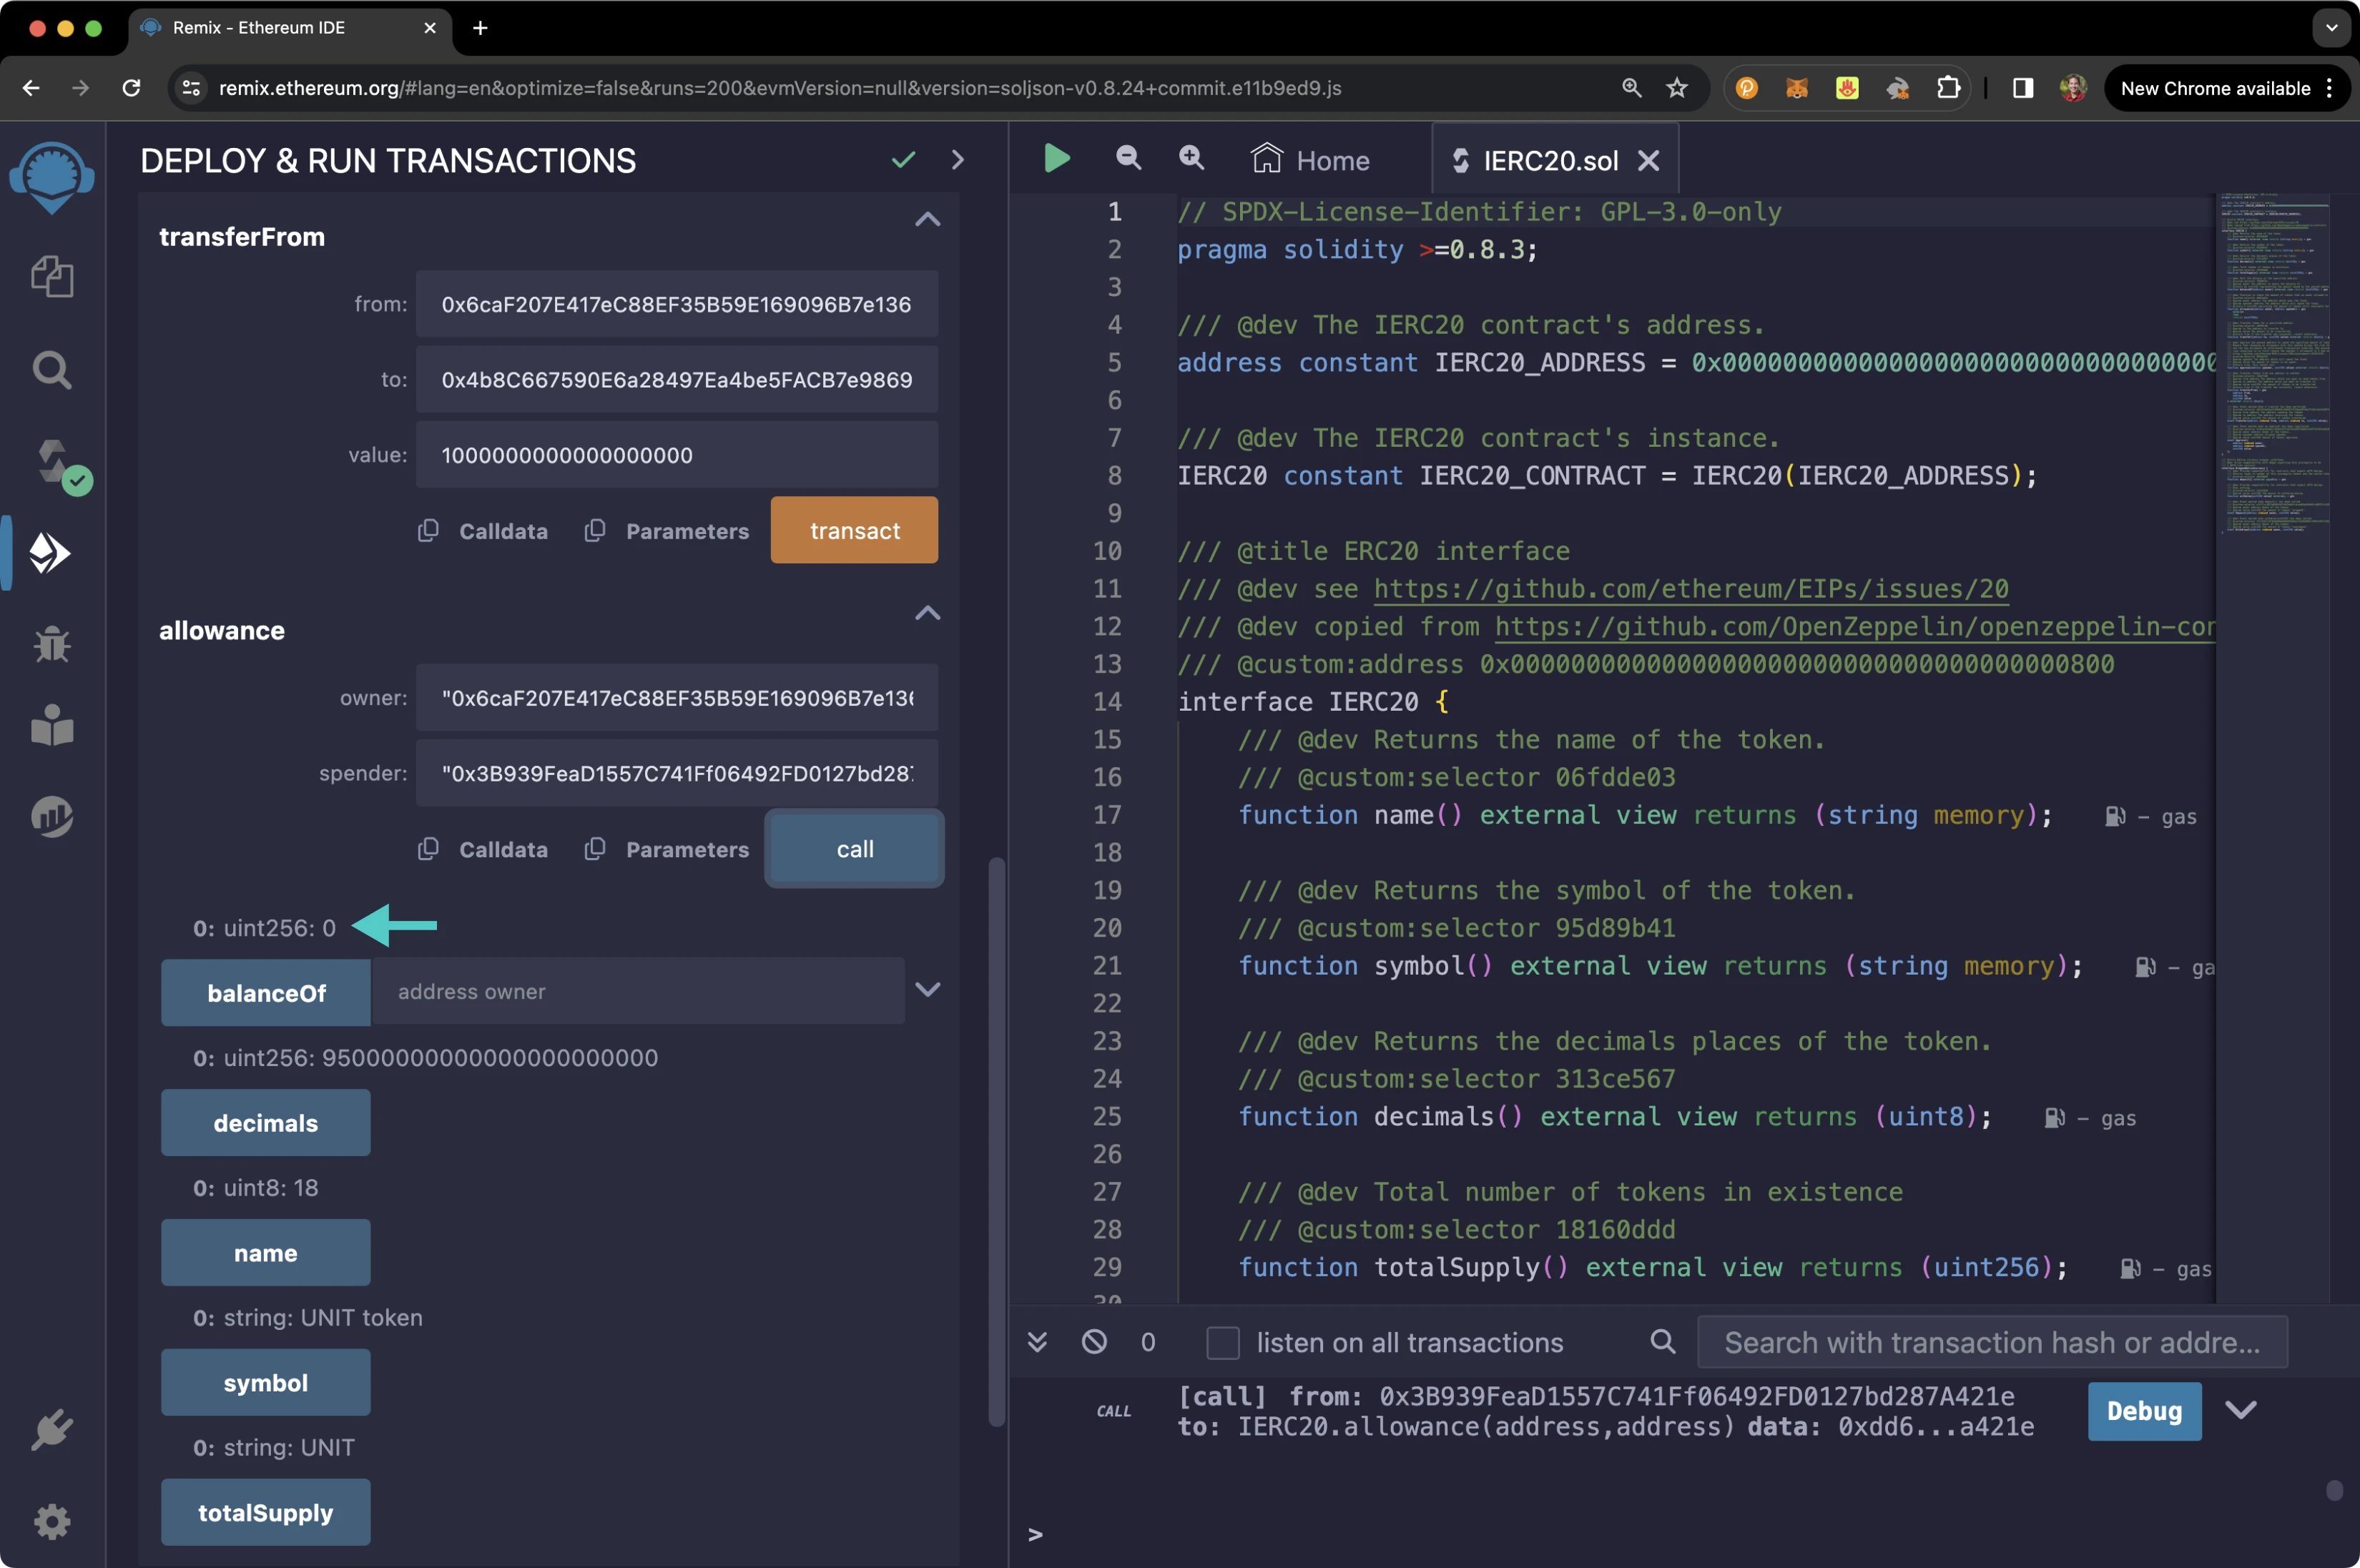
And that's it! You've successfully interacted with the ERC-20 precompile using MetaMask and Remix!
The information presented herein has been provided by third parties and is made available solely for general information purposes. Tanssi does not endorse any project listed and described on the Tanssi Doc Website (https://docs.tanssi.network/). Tanssi Foundation does not warrant the accuracy, completeness or usefulness of this information. Any reliance you place on such information is strictly at your own risk. Tanssi Foundation disclaims all liability and responsibility arising from any reliance placed on this information by you or by anyone who may be informed of any of its contents. All statements and/or opinions expressed in these materials are solely the responsibility of the person or entity providing those materials and do not necessarily represent the opinion of Tanssi Foundation. The information should not be construed as professional or financial advice of any kind. Advice from a suitably qualified professional should always be sought in relation to any particular matter or circumstance. The information herein may link to or integrate with other websites operated or content provided by third parties, and such other websites may link to this website. Tanssi Foundation has no control over any such other websites or their content and will have no liability arising out of or related to such websites or their content. The existence of any such link does not constitute an endorsement of such websites, the content of the websites, or the operators of the websites. These links are being provided to you only as a convenience and you release and hold Tanssi Foundation harmless from any and all liability arising from your use of this information or the information provided by any third-party website or service.
--- END CONTENT ---
Doc-Content: https://docs.tanssi.network/builders/toolkit/ethereum-api/precompiles/external-assets-erc20/
--- BEGIN CONTENT ---
---
title: External Assets as ERC-20
description: Learn how to access and interact with an ERC-20 representation of any external assets on Tanssi EVM networks through the precompiled ERC-20 Interface.
keywords: solidity, ethereum, native, token, moonbeam, precompiled, contracts, assets, erc20
categories: EVM-Template
---
# External Assets as ERC-20
## Introduction {: #introduction }
As presented in the [Native Cross-Chain Communication](/learn/framework/xcm/){target=\_blank} article, networks deployed through Tanssi can communicate and interoperate with any other network in the ecosystem. This multi-chain environment leads to a multi-asset world, where seamless transfer of assets, data, and value across different networks widens the possibilities to build use cases across diverse industries such as finance (DeFi), real-world assets (RWAs), and others.
External assets are tokens native to another blockchain, or, in other words, assets whose reserve chain is not the chain you are interacting with. Tanssi networks can register external assets to enable their inflow. To do so, it is necessary to [establish an XCM channel](/learn/framework/xcm/#channel-registration){target=\_blank} with the other chain and then register one of its native assets as an external asset. Registered external assets behave, to some extent, the same way as local ones.
The [ERC-20 assets precompile](https://github.com/moondance-labs/tanssi/blob/master/test/contracts/solidity/ERC20Instance.sol){target=\_blank} allows networks based on the [Tanssi EVM template](/builders/build/templates/evm/){target=\_blank} to access any registered external asset through the standard ERC-20 interface. Consequently, smart contracts deployed to the network can interact with such assets as they would with any other regular ERC-20.
The address representing the ERC-20 contract is formed with the first thirty-six positions (eighteen bytes) set to the maximum value and the last four positions (two bytes) replaced with the hexadecimal representation of the registered asset identifier:
```text
{{networks.demo_evm.precompiles.external_assets_erc20}}
```
For example, for the asset whose ID is `1`, the last four positions must be replaced with `0001`, and for an asset with an ID of `10`, those four positions must be replaced with `000A`.
!!! note
There can be some unintended consequences when using precompiles. Tanssi's precompiles are derived from Moonbeam's, and as such, please familiarize yourself with [Moonbeam's Precompile Security Considerations](https://docs.moonbeam.network/builders/get-started/eth-compare/security){target=\_blank}.
## Prerequisites {: #prerequisites }
Tto follow along with the contents in this guide, you'll need:
- Access to a Tanssi EVM network running [runtime 500](https://github.com/moondance-labs/tanssi/releases/tag/runtime-500){target=\_blank} or above
- An established bidirectional XCM channel to another chain. To manage your network's channels, refer to the [Manage Cross-Chain Communication Channels](/builders/manage/dapp/xcm-channels/){target=\_blank} article
- A registered external asset. Once the XCM channels are open, asset registration can be easily done using the [dApp](https://apps.tanssi.network/){target=\_blank} as explained in the [Register External Assets](/builders/manage/dapp/register-external-assets/){target=\_blank} guide
- Finally, you'll need an [EVM-compatible wallet](/builders/toolkit/ethereum-api/wallets/){target=\_blank} configured to work with your network. You can also connect your wallet to the [demo EVM network](https://apps.tanssi.network/demo){target=\_blank}.
The examples in this guide are based on the Tanssi demo EVM network, which already has open channels to other networks and registered external assets, as the following picture shows:
1. The registered external asset (UNIT) which will be used in the following sections
2. Other available external assets not yet registered
## The ERC-20 Solidity Interface {: #the-erc20-interface }
The [`ERC20.sol`](https://github.com/moondance-labs/tanssi/blob/master/test/contracts/solidity/ERC20.sol){target=\_blank} interface on Tanssi EVM networks follows the [EIP-20 Token Standard](https://eips.ethereum.org/EIPS/eip-20){target=\_blank}, which is the standard API interface for tokens within smart contracts. The standard defines the required functions and events a token contract must implement to be interoperable with different applications.
??? code "ERC20.sol"
```solidity
/ SPDX-License-Identifier: GPL-3.0-only
pragma solidity >=0.8.3;
/// @dev The IERC20 contract's address.
address constant IERC20_ADDRESS = 0x0000000000000000000000000000000000000800;
/// @dev The IERC20 contract's instance.
IERC20 constant IERC20_CONTRACT = IERC20(IERC20_ADDRESS);
/// @title ERC20 interface
/// @dev see https://github.com/ethereum/EIPs/issues/20
/// @dev copied from https://github.com/OpenZeppelin/openzeppelin-contracts
/// @custom:address 0x0000000000000000000000000000000000000800
interface IERC20 {
/// @dev Returns the name of the token.
/// @custom:selector 06fdde03
function name() external view returns (string memory);
/// @dev Returns the symbol of the token.
/// @custom:selector 95d89b41
function symbol() external view returns (string memory);
/// @dev Returns the decimals places of the token.
/// @custom:selector 313ce567
function decimals() external view returns (uint8);
/// @dev Total number of tokens in existence
/// @custom:selector 18160ddd
function totalSupply() external view returns (uint256);
/// @dev Gets the balance of the specified address.
/// @custom:selector 70a08231
/// @param owner The address to query the balance of.
/// @return An uint256 representing the amount owned by the passed address.
function balanceOf(address owner) external view returns (uint256);
/// @dev Function to check the amount of tokens that an owner allowed to a spender.
/// @custom:selector dd62ed3e
/// @param owner address The address which owns the funds.
/// @param spender address The address which will spend the funds.
/// @return A uint256 specifying the amount of tokens still available for the spender.
function allowance(address owner, address spender)
external
view
returns (uint256);
/// @dev Transfer token for a specified address
/// @custom:selector a9059cbb
/// @param to The address to transfer to.
/// @param value The amount to be transferred.
/// @return true if the transfer was succesful, revert otherwise.
function transfer(address to, uint256 value) external returns (bool);
/// @dev Approve the passed address to spend the specified amount of tokens on behalf of msg.sender.
/// Beware that changing an allowance with this method brings the risk that someone may use both the old
/// and the new allowance by unfortunate transaction ordering. One possible solution to mitigate this
/// race condition is to first reduce the spender's allowance to 0 and set the desired value afterwards:
/// https://github.com/ethereum/EIPs/issues/20#issuecomment-263524729
/// @custom:selector 095ea7b3
/// @param spender The address which will spend the funds.
/// @param value The amount of tokens to be spent.
/// @return true, this cannot fail
function approve(address spender, uint256 value) external returns (bool);
/// @dev Transfer tokens from one address to another
/// @custom:selector 23b872dd
/// @param from address The address which you want to send tokens from
/// @param to address The address which you want to transfer to
/// @param value uint256 the amount of tokens to be transferred
/// @return true if the transfer was succesful, revert otherwise.
function transferFrom(
address from,
address to,
uint256 value
) external returns (bool);
/// @dev Event emited when a transfer has been performed.
/// @custom:selector ddf252ad1be2c89b69c2b068fc378daa952ba7f163c4a11628f55a4df523b3ef
/// @param from address The address sending the tokens
/// @param to address The address receiving the tokens.
/// @param value uint256 The amount of tokens transfered.
event Transfer(address indexed from, address indexed to, uint256 value);
/// @dev Event emited when an approval has been registered.
/// @custom:selector 8c5be1e5ebec7d5bd14f71427d1e84f3dd0314c0f7b2291e5b200ac8c7c3b925
/// @param owner address Owner of the tokens.
/// @param spender address Allowed spender.
/// @param value uint256 Amount of tokens approved.
event Approval(
address indexed owner,
address indexed spender,
uint256 value
);
}
/// @title Native currency wrapper interface.
/// @dev Allow compatibility with dApps expecting this precompile to be
/// a WETH-like contract.
interface WrappedNativeCurrency {
/// @dev Provide compatibility for contracts that expect wETH design.
/// Returns funds to sender as this precompile tokens and the native tokens are the same.
/// @custom:selector d0e30db0
function deposit() external payable;
/// @dev Provide compatibility for contracts that expect wETH design.
/// Does nothing.
/// @custom:selector 2e1a7d4d
/// @param value uint256 The amount to withdraw/unwrap.
function withdraw(uint256 value) external;
/// @dev Event emited when deposit() has been called.
/// @custom:selector e1fffcc4923d04b559f4d29a8bfc6cda04eb5b0d3c460751c2402c5c5cc9109c
/// @param owner address Owner of the tokens
/// @param value uint256 The amount of tokens "wrapped".
event Deposit(address indexed owner, uint256 value);
/// @dev Event emited when withdraw(uint256) has been called.
/// @custom:selector 7fcf532c15f0a6db0bd6d0e038bea71d30d808c7d98cb3bf7268a95bf5081b65
/// @param owner address Owner of the tokens
/// @param value uint256 The amount of tokens "unwrapped".
event Withdrawal(address indexed owner, uint256 value);
}
```
!!! note
The external assets ERC-20 precompile does not include `deposit` and `withdraw` functions and subsequent events expected from a wrapped token contract, such as WETH.
## Add Token to an EVM Wallet {: #add-token-to-evm-wallet }
If you want to interact with your network's registered external assets like you would with an ERC-20, you can add them to your wallet using the precompile address prefix and the asset ID. This section will walk you through adding an external asset to [MetaMask](/builders/toolkit/ethereum-api/wallets/metamask/){target=\_blank}.
To get started, open up MetaMask and make sure you are connected to your network and:
1. Switch to the **Tokens** tab
2. Click on **Import tokens**
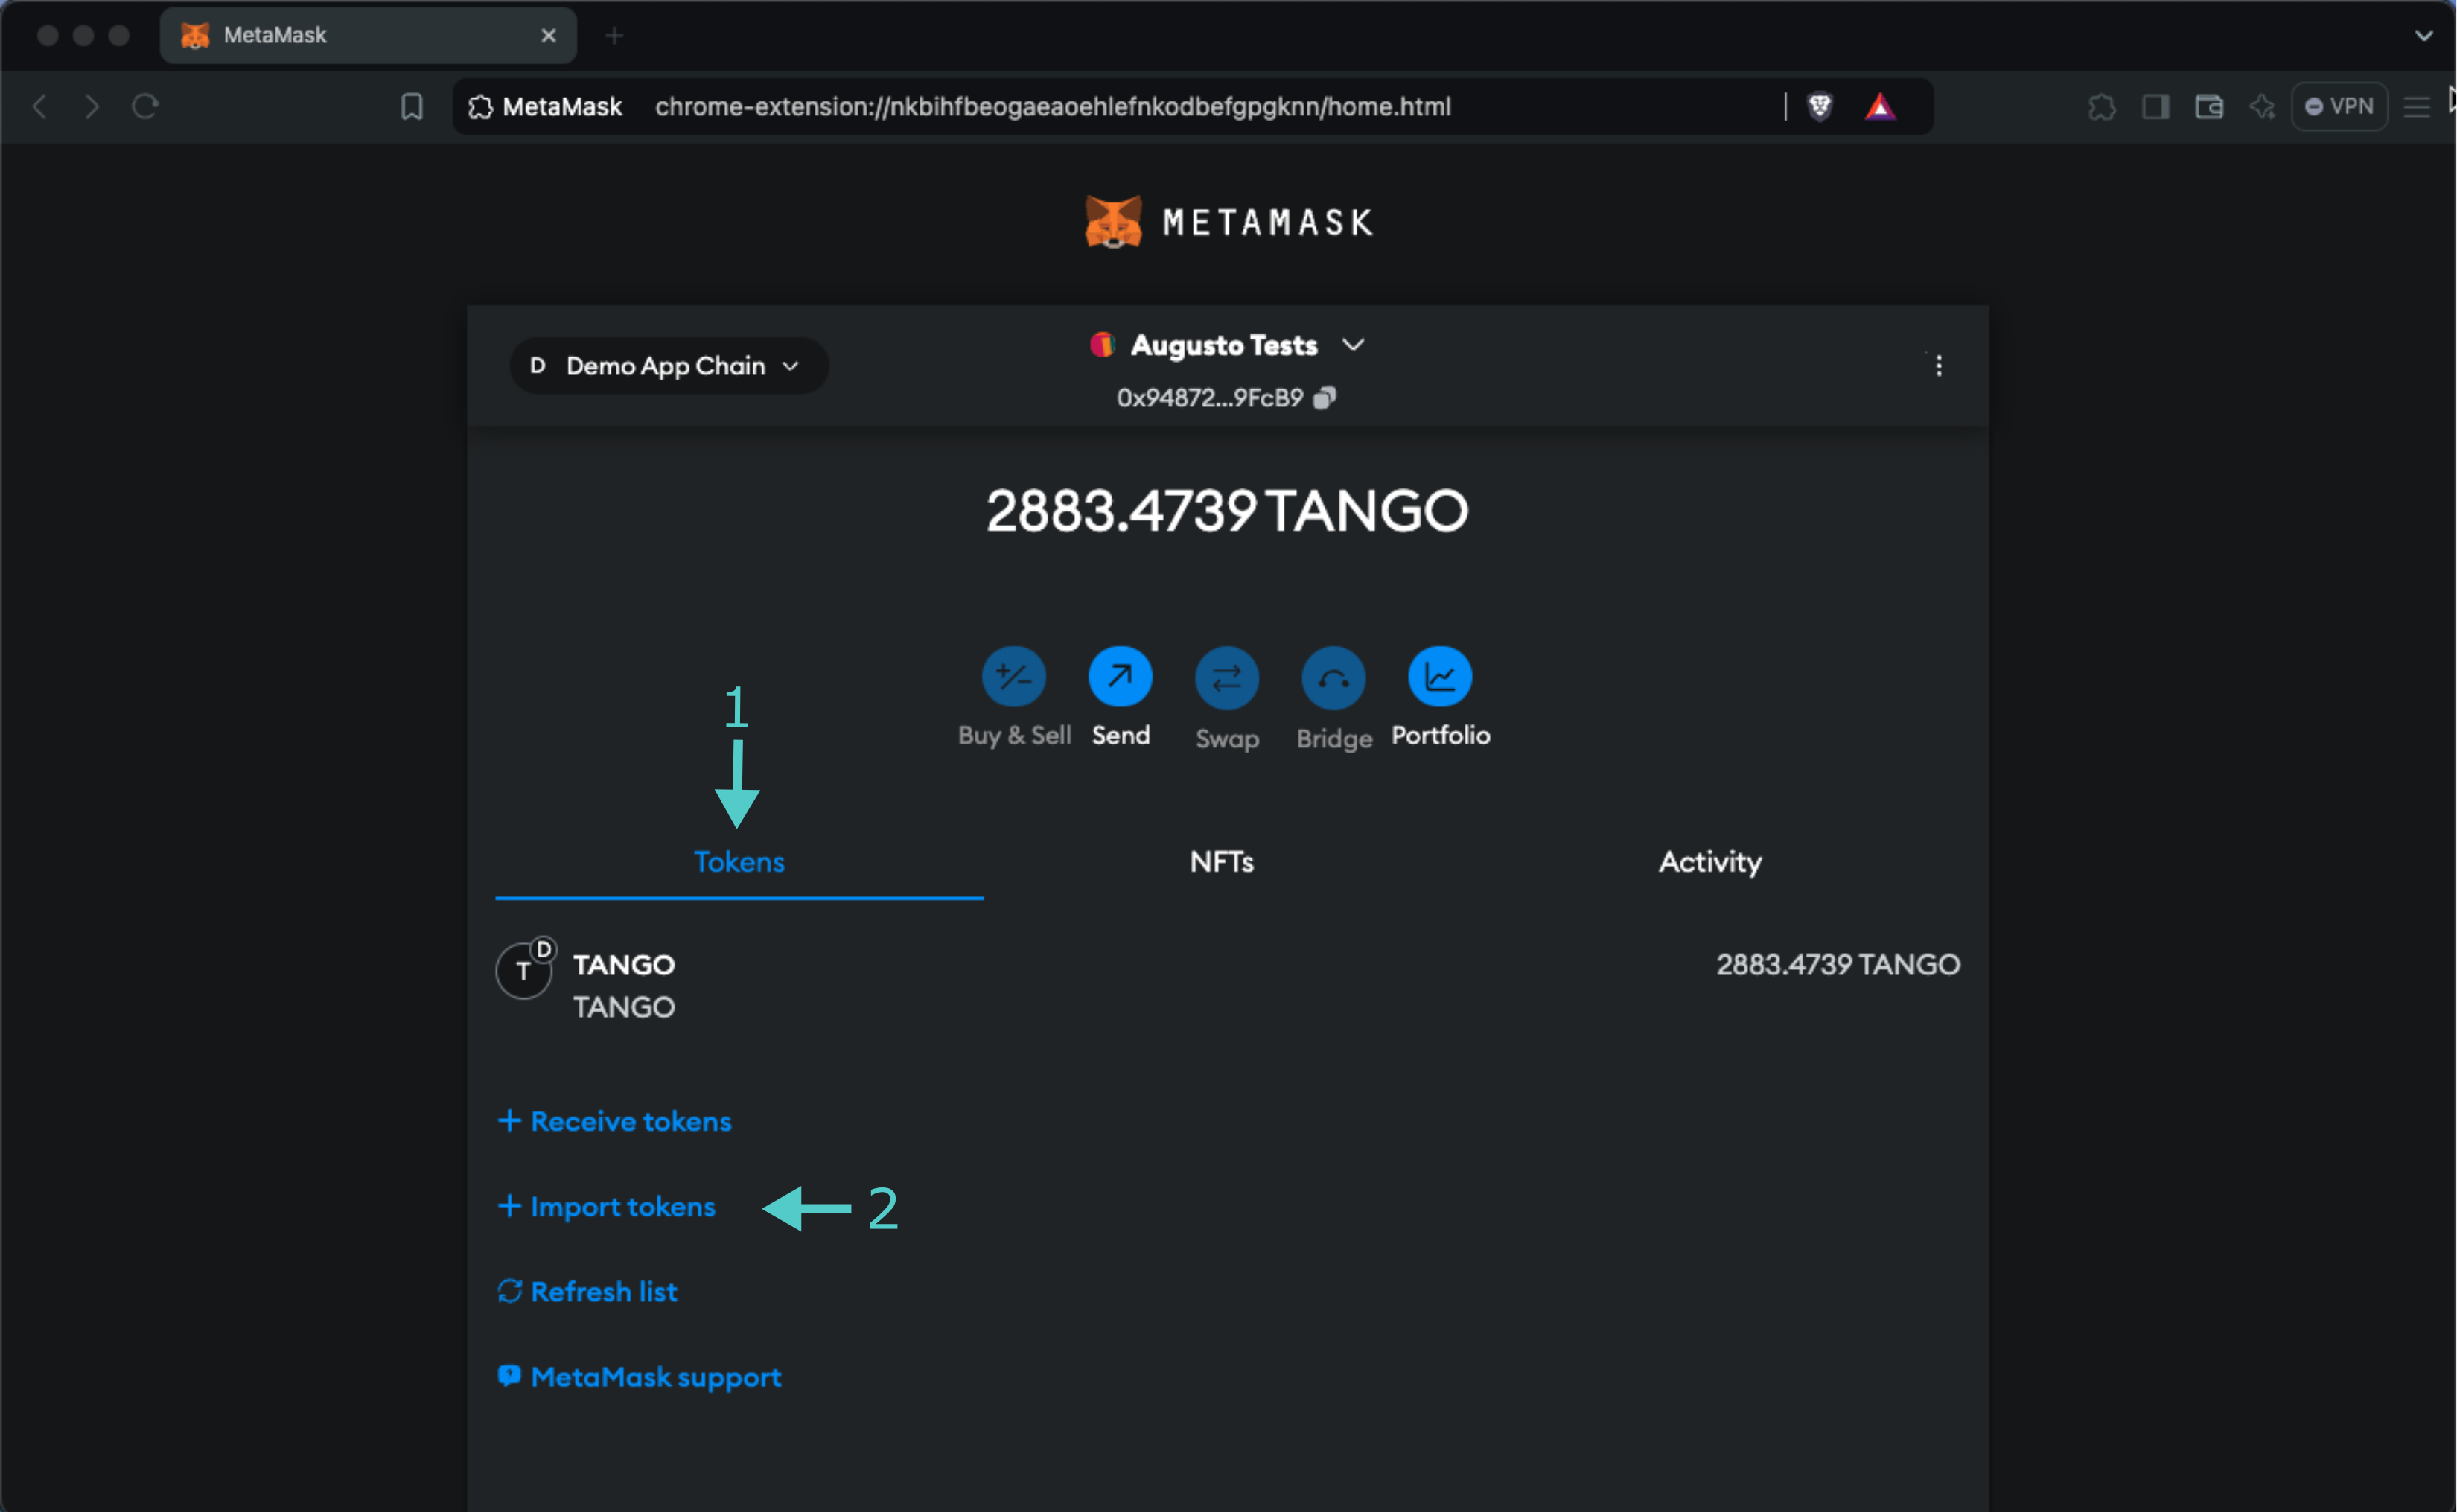
Before continuing, you'll need the token's address, which, considering that in this example the external asset has an ID of `1`, will be:
```text
{{networks.demo_evm.precompiles.external_assets_erc20_example}}
```
1. Enter the precompile address for the token contract address. When you enter the address, the **Token Symbol** and **Token Decimal** fields should automatically populate. If they do not, you can enter `UNIT` for the symbol and `12` for the decimal places
2. Click **Next**
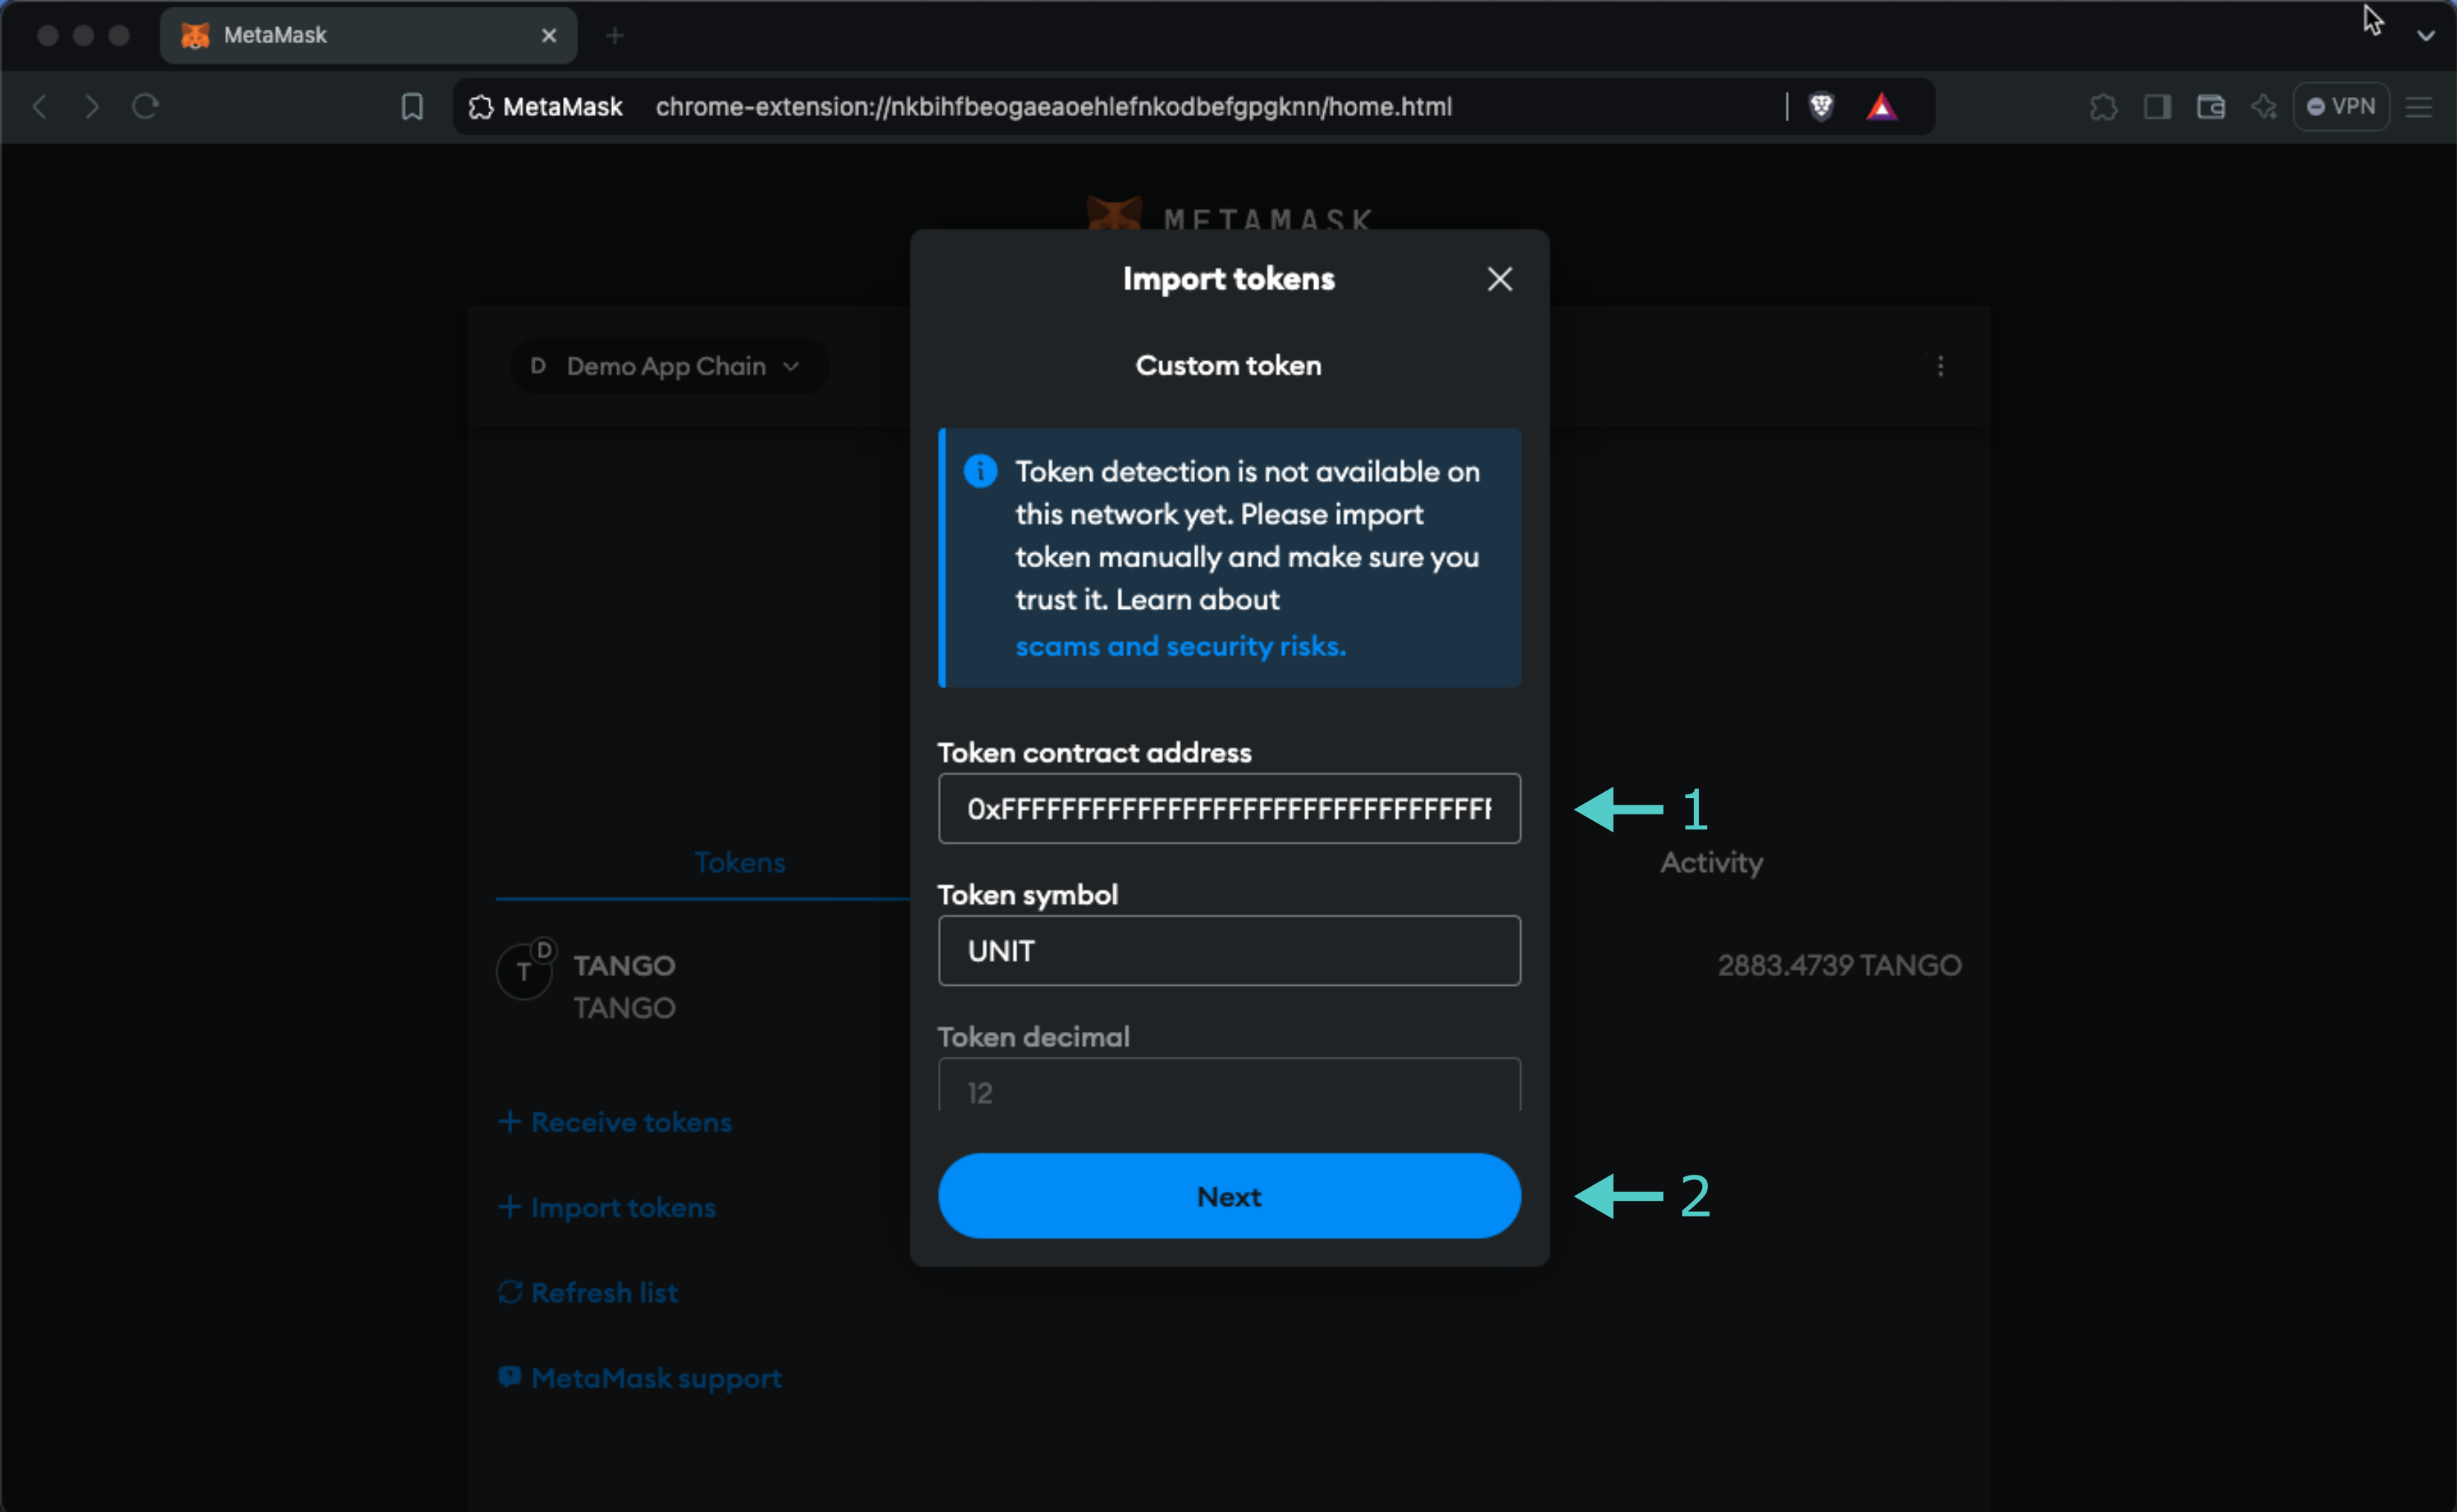
MetaMask will prompt you to confirm the import. You can review the token details and click **Import Tokens** to import UNIT tokens into your wallet.
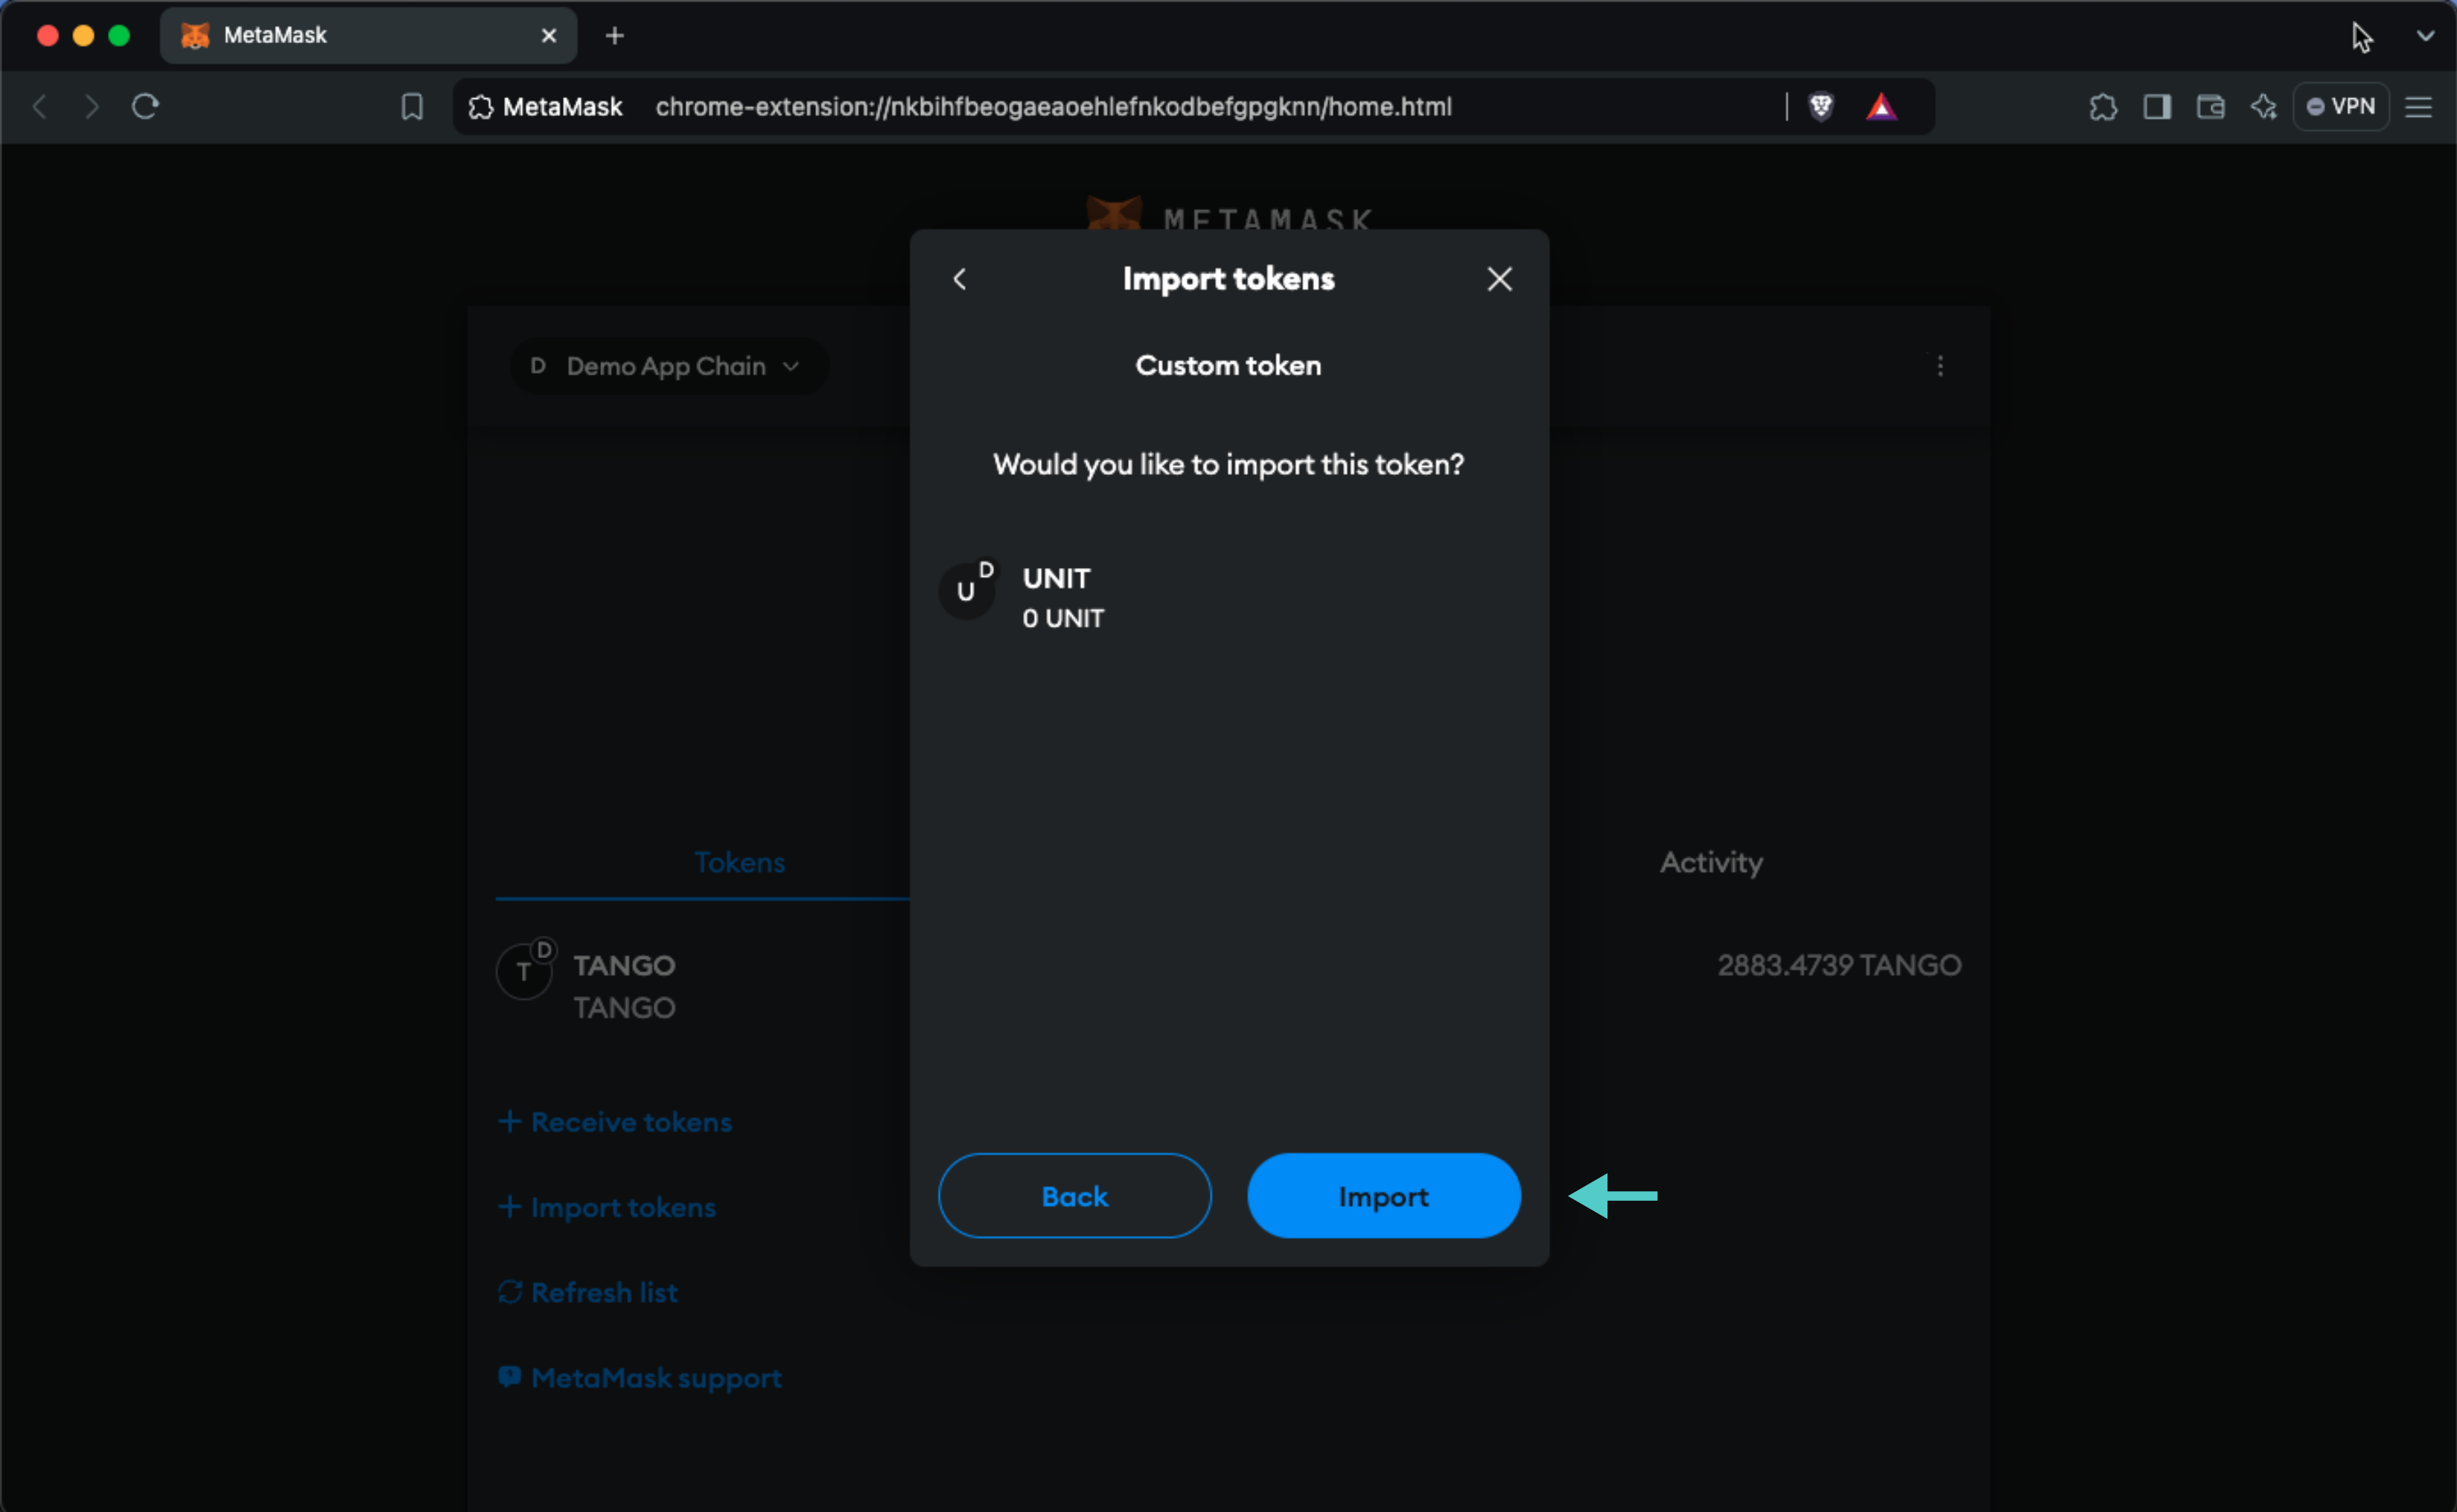
And that's it! You've successfully added the UNIT token external asset as a custom ERC-20 token on the Tanssi demo EVM network.
## Interact with the Solidity Interface via Remix {: #interact-with-the-solidity-interface-via-remix }
### Remix Set Up {: #remix-set-up }
You can interact with the external assets ERC-20 precompile using [Remix](https://remix.ethereum.org){target=\_blank}. To add the precompile to Remix, you will need to:
1. Get a copy of [`ERC20.sol`](https://github.com/moondance-labs/tanssi/blob/master/test/contracts/solidity/ERC20.sol){target=\_blank}
2. Paste the file contents into a Remix file named `IERC20.sol`
### Compile the Contract {: #compile-the-contract }
Next, you will need to compile the interface in Remix:
1. Click on the **Compile** tab, second from top
2. Compile the interface by clicking on **Compile IERC20.sol**
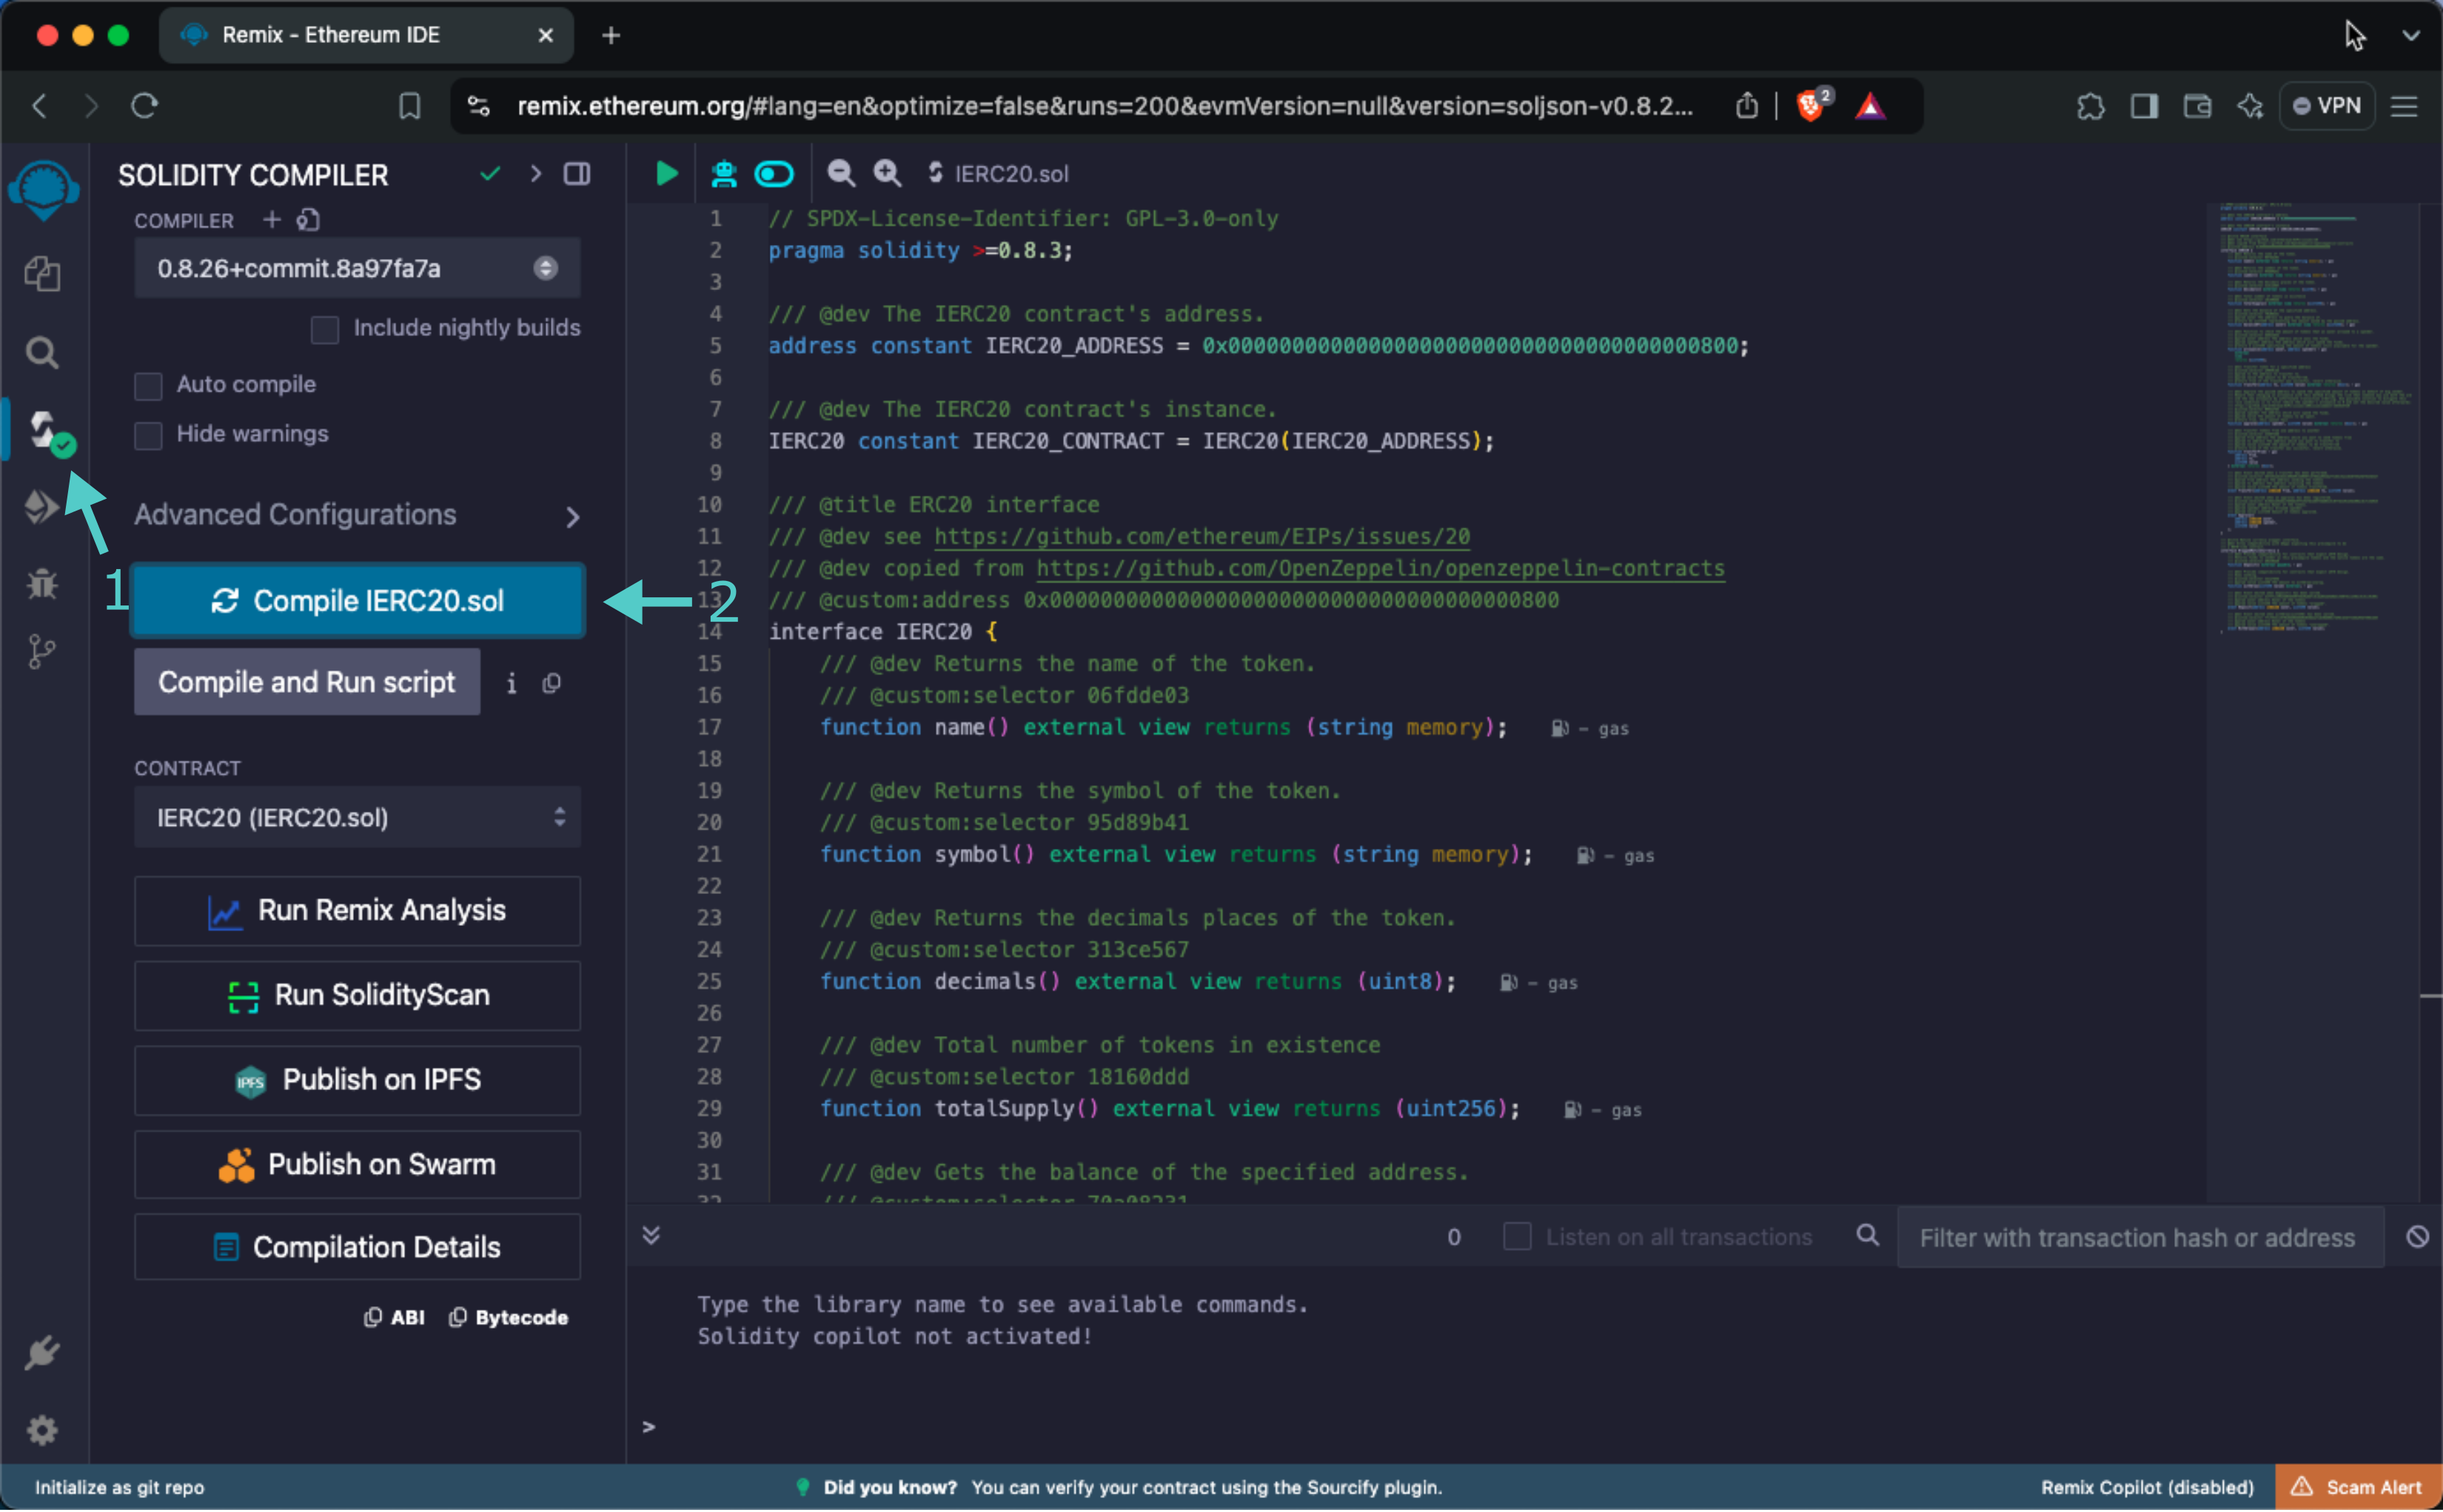
When compilation is completed, you will see a green checkmark next to the **Compile** tab.
### Access the Contract {: #access-the-contract }
Instead of deploying the smart contract, you will access the interface through the address of external asset precompile:
1. Click on the **Deploy and Run** tab directly below the **Compile** tab in Remix. Please note that the precompiled contracts are already accessible at their respective addresses. Therefore, there is no deployment step
2. Make sure **Injected Web3** is selected in the **ENVIRONMENT** dropdown. Once you select **Injected Web3**, you may be prompted by MetaMask to connect your account to Remix if it's not already connected
3. Make sure the correct account is displayed under **ACCOUNT**
4. Ensure **IERC20 - IERC20.sol** is selected in the **CONTRACT** dropdown. Given that it is a precompiled contract, there is no deployment step. Instead, you are going to provide the address of the precompile in the **At Address** field
5. Provide the address of the ERC-20 precompile (which is `{{networks.demo_evm.precompiles.external_assets_erc20_example}}` in this example) and click **At Address**
6. The **IERC20** precompile will appear in the list of **Deployed Contracts**
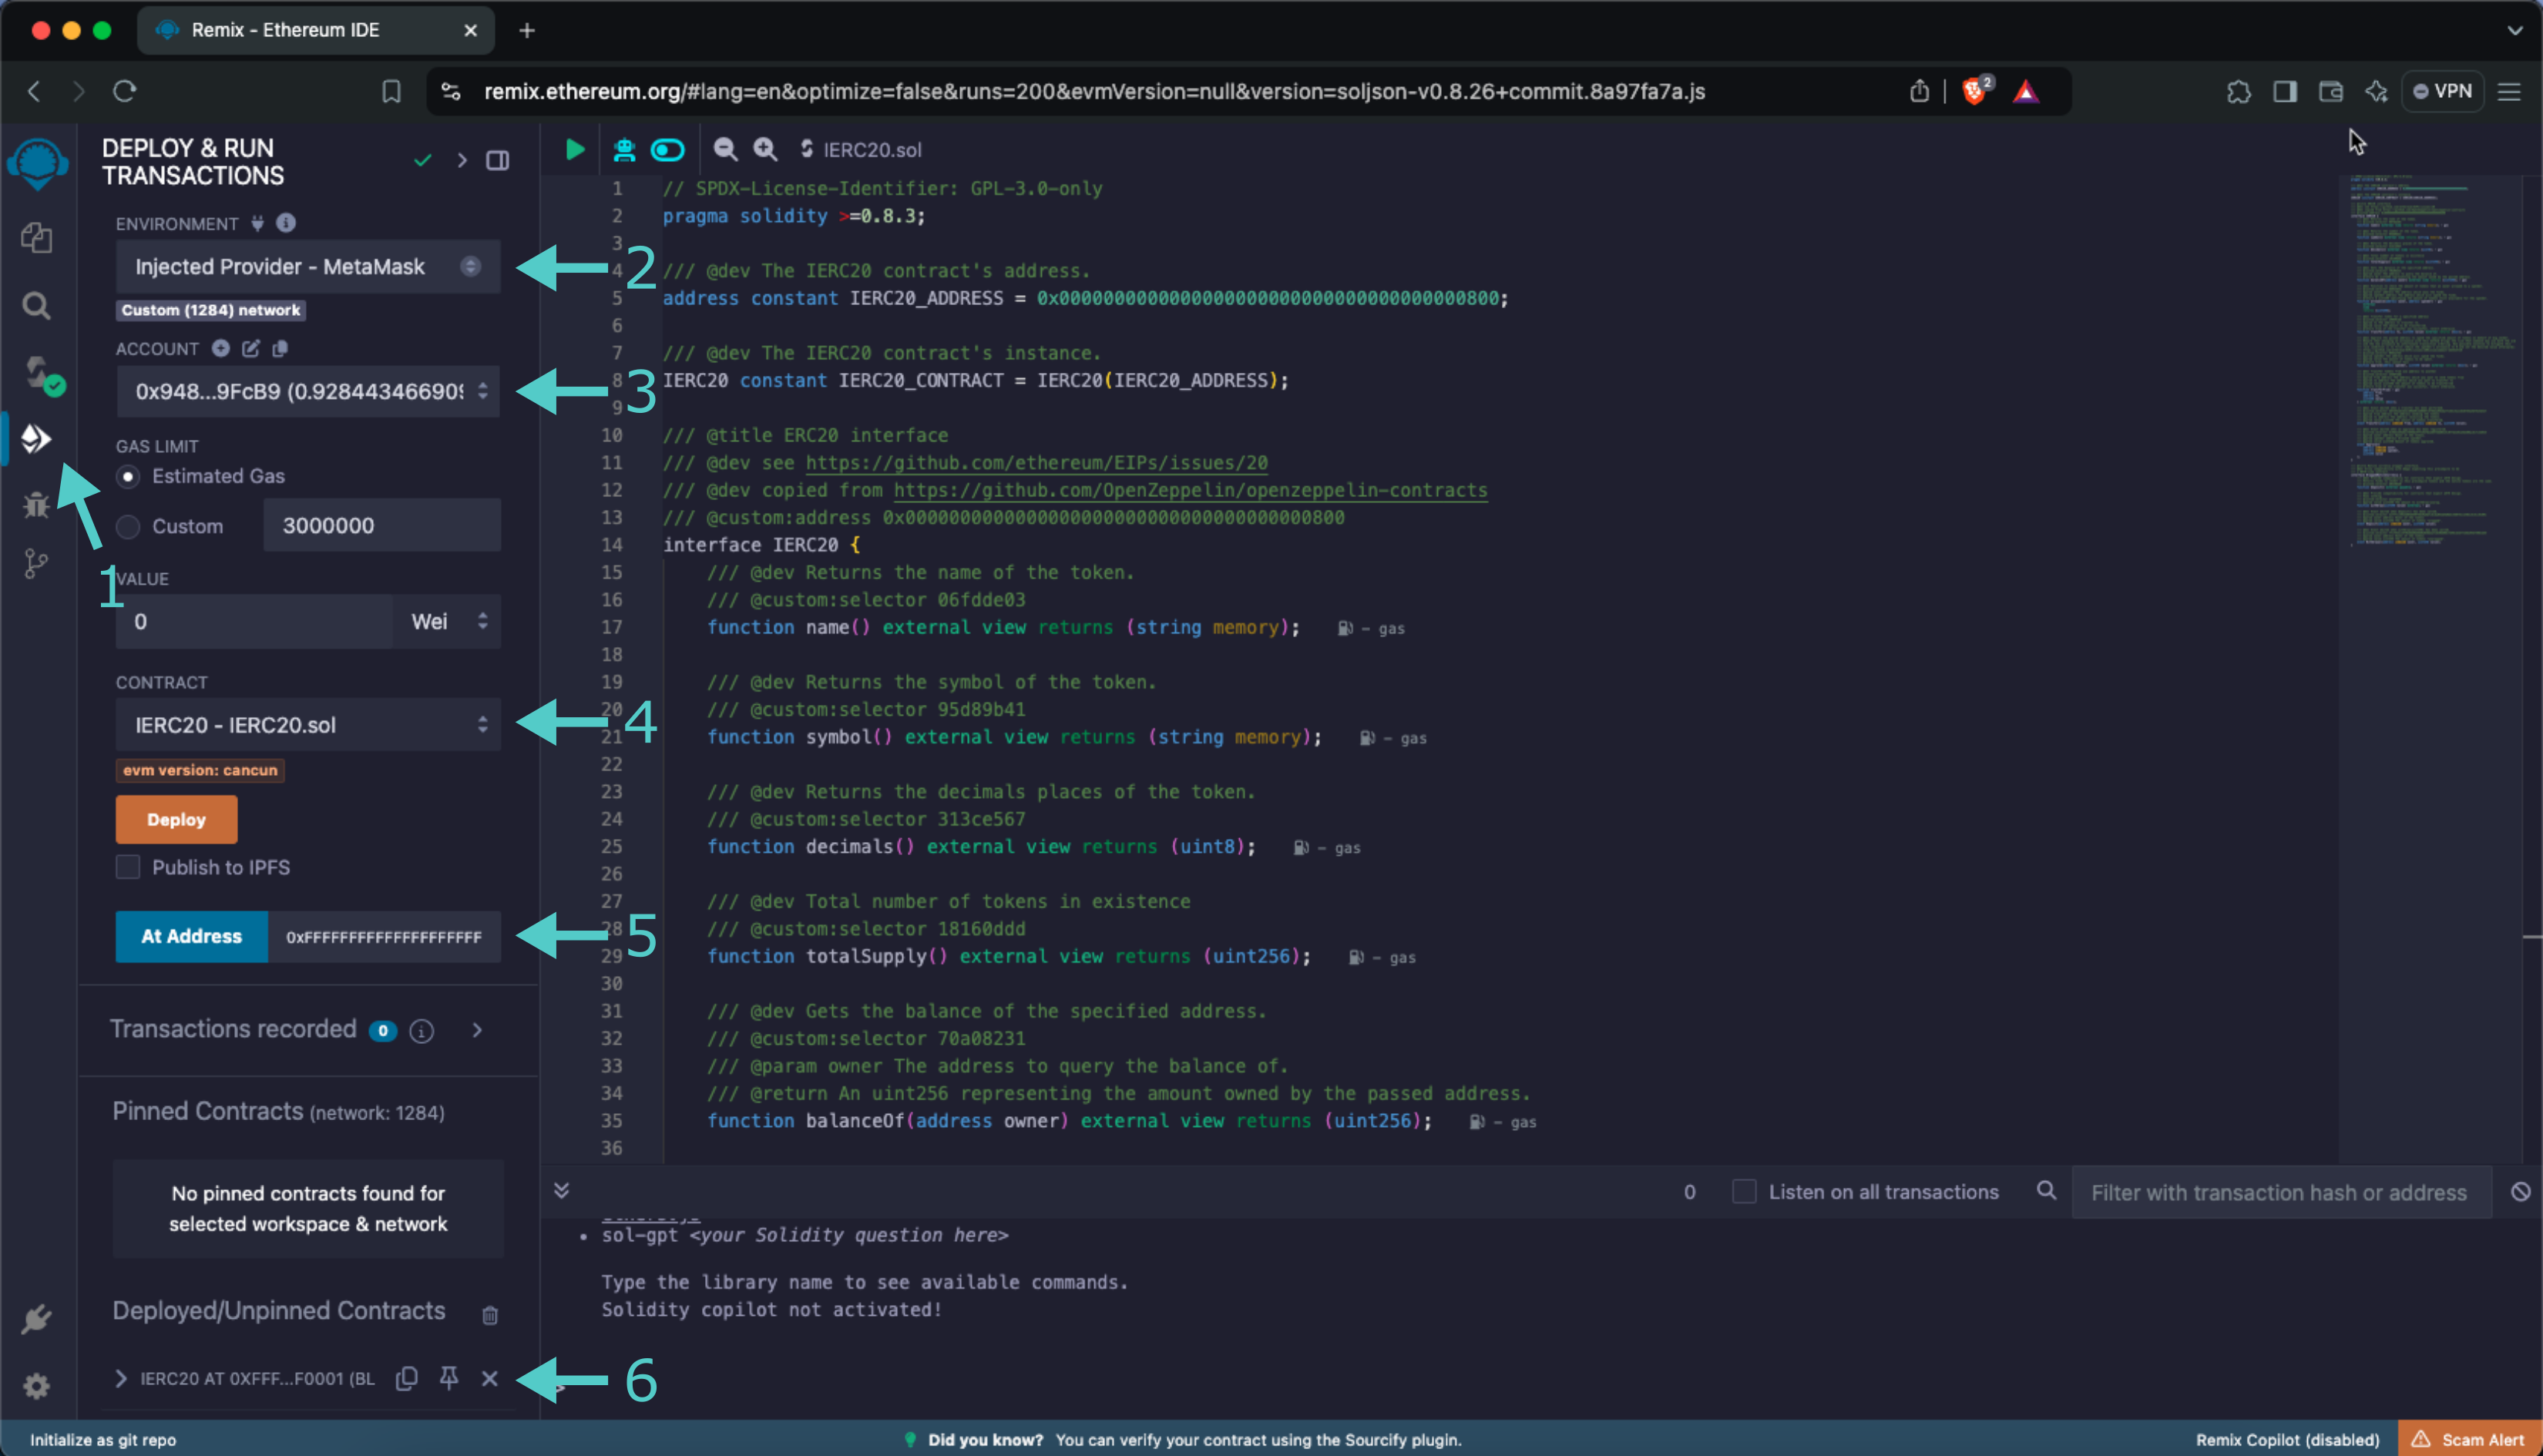
### Get Basic Token Information {: #get-basic-token-information }
The ERC-20 interface lets you quickly obtain token information, including the token's total supply, name, symbol, and decimal places. You can retrieve this information by following these steps:
1. Expand the **IERC20** contract under **Deployed Contracts**
2. Click **decimals** to get the decimal places of your network's native protocol token
3. Click **name** to get the name of the token
4. Click **symbol** to get the symbol of the token
5. Click **totalSupply** to obtain the total supply of native tokens on your network
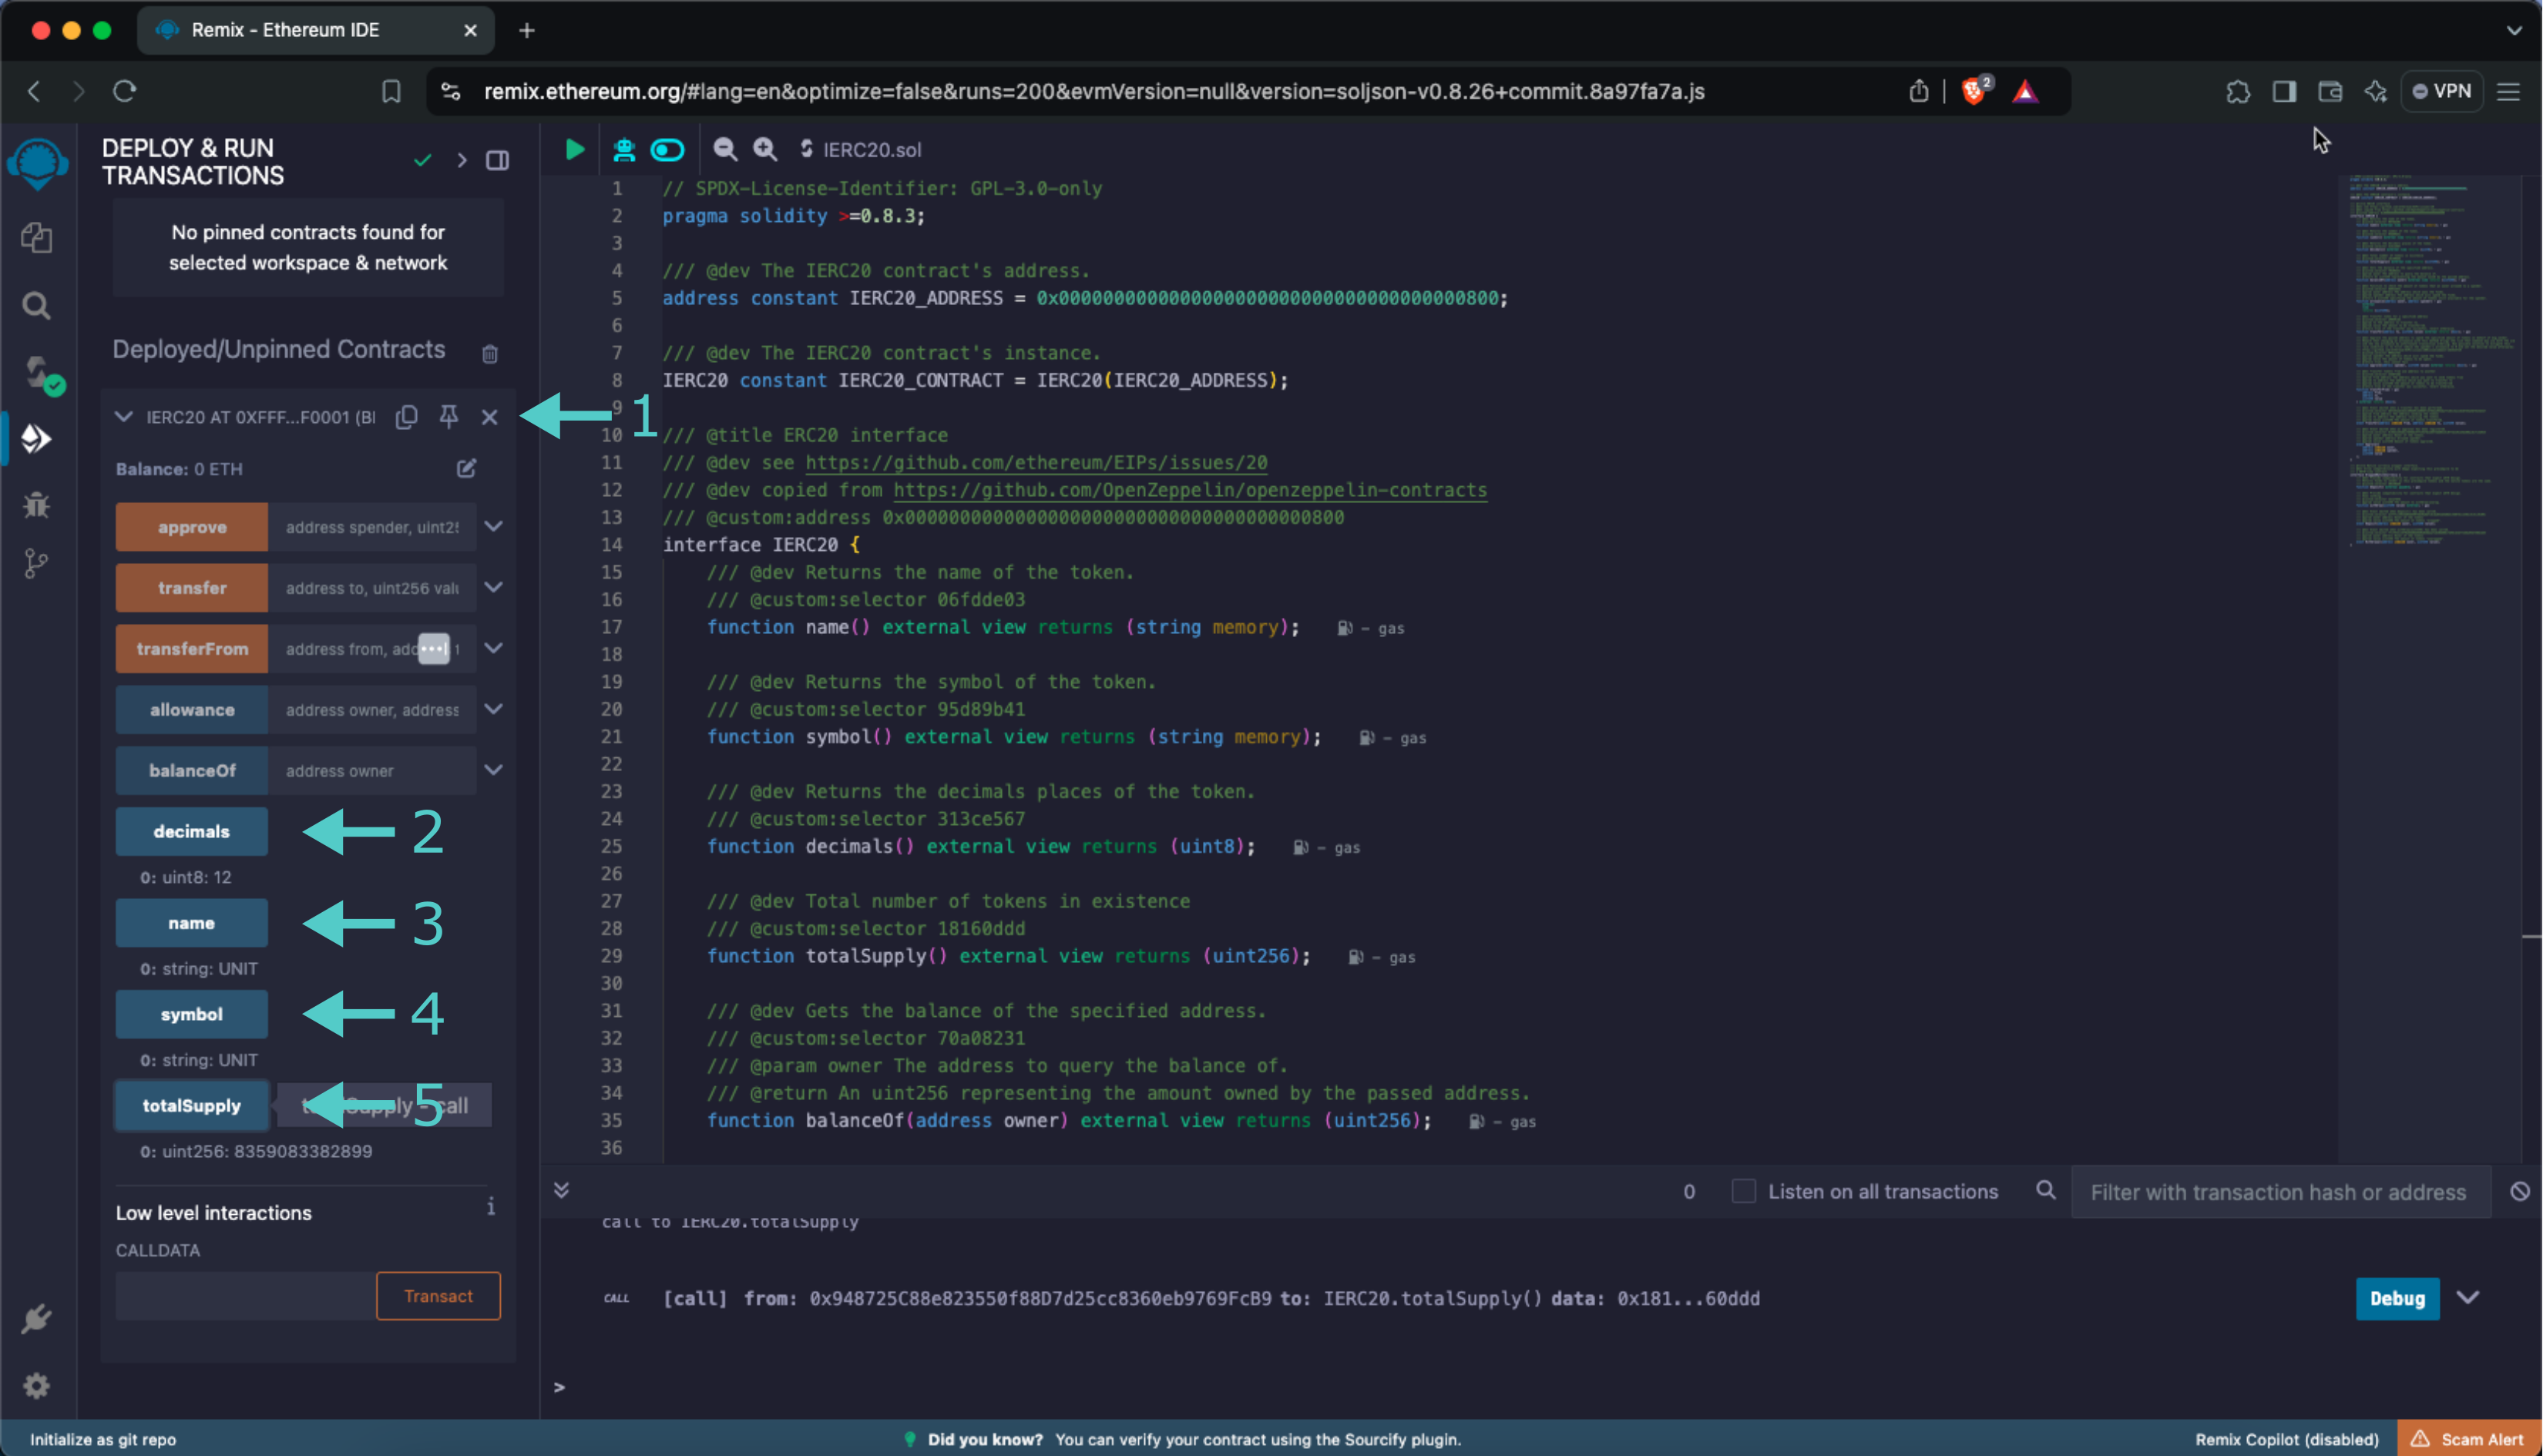
The results of each function call are displayed under the respective functions.
### Get Account Balance {: #get-account-balance }
You can check the balance of any address on your network by calling the `balanceOf` function and passing in an address:
1. Expand the **balanceOf** function
2. Enter an address you would like to check the balance of for the **owner**
2. Click **call**
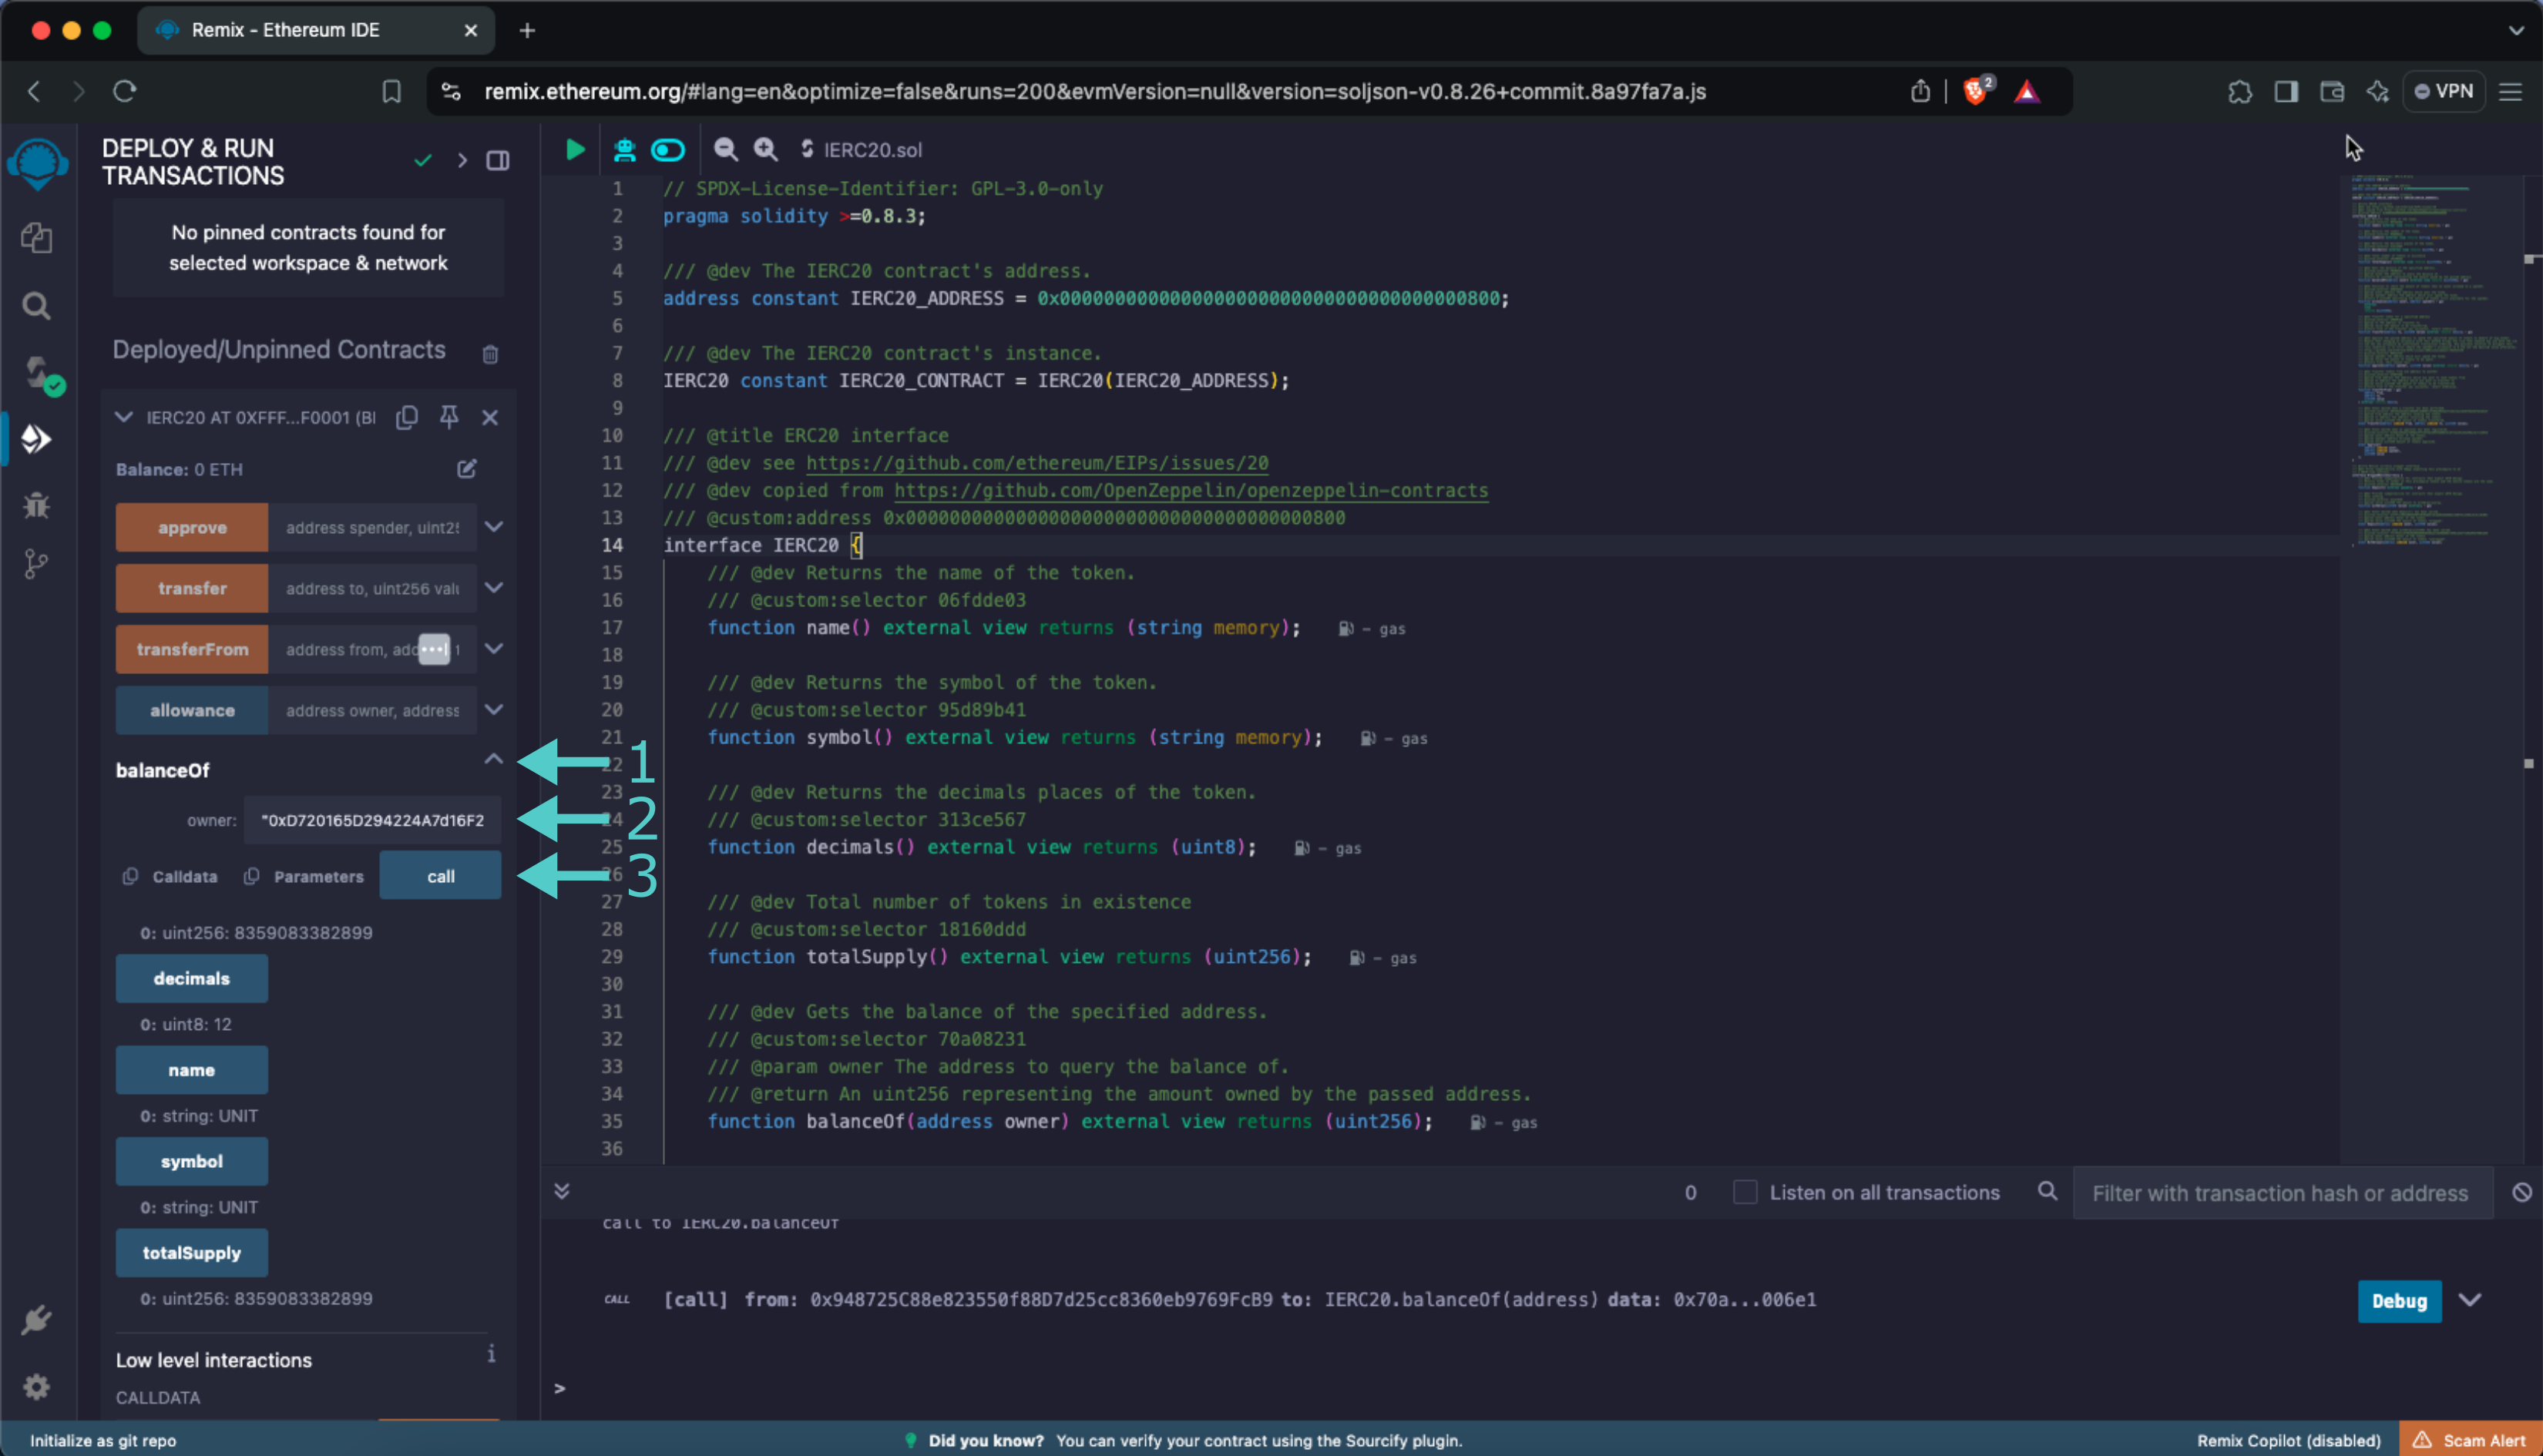
Your balance will be displayed under the `balanceOf` function.
### Send Transfer {: #send-transfer }
To send tokens from your account directly to another account, you can call the `transfer` function by following these steps:
1. Expand the **transfer** function
2. Enter the address to send UNIT tokens to
3. Enter the amount of UNIT tokens to send. For this example, you can send 1 UNIT token (`1000000000000`)
4. Click **transact**
5. MetaMask will pop up, and you will be prompted to review the transaction details. Click **Confirm** to send the transaction
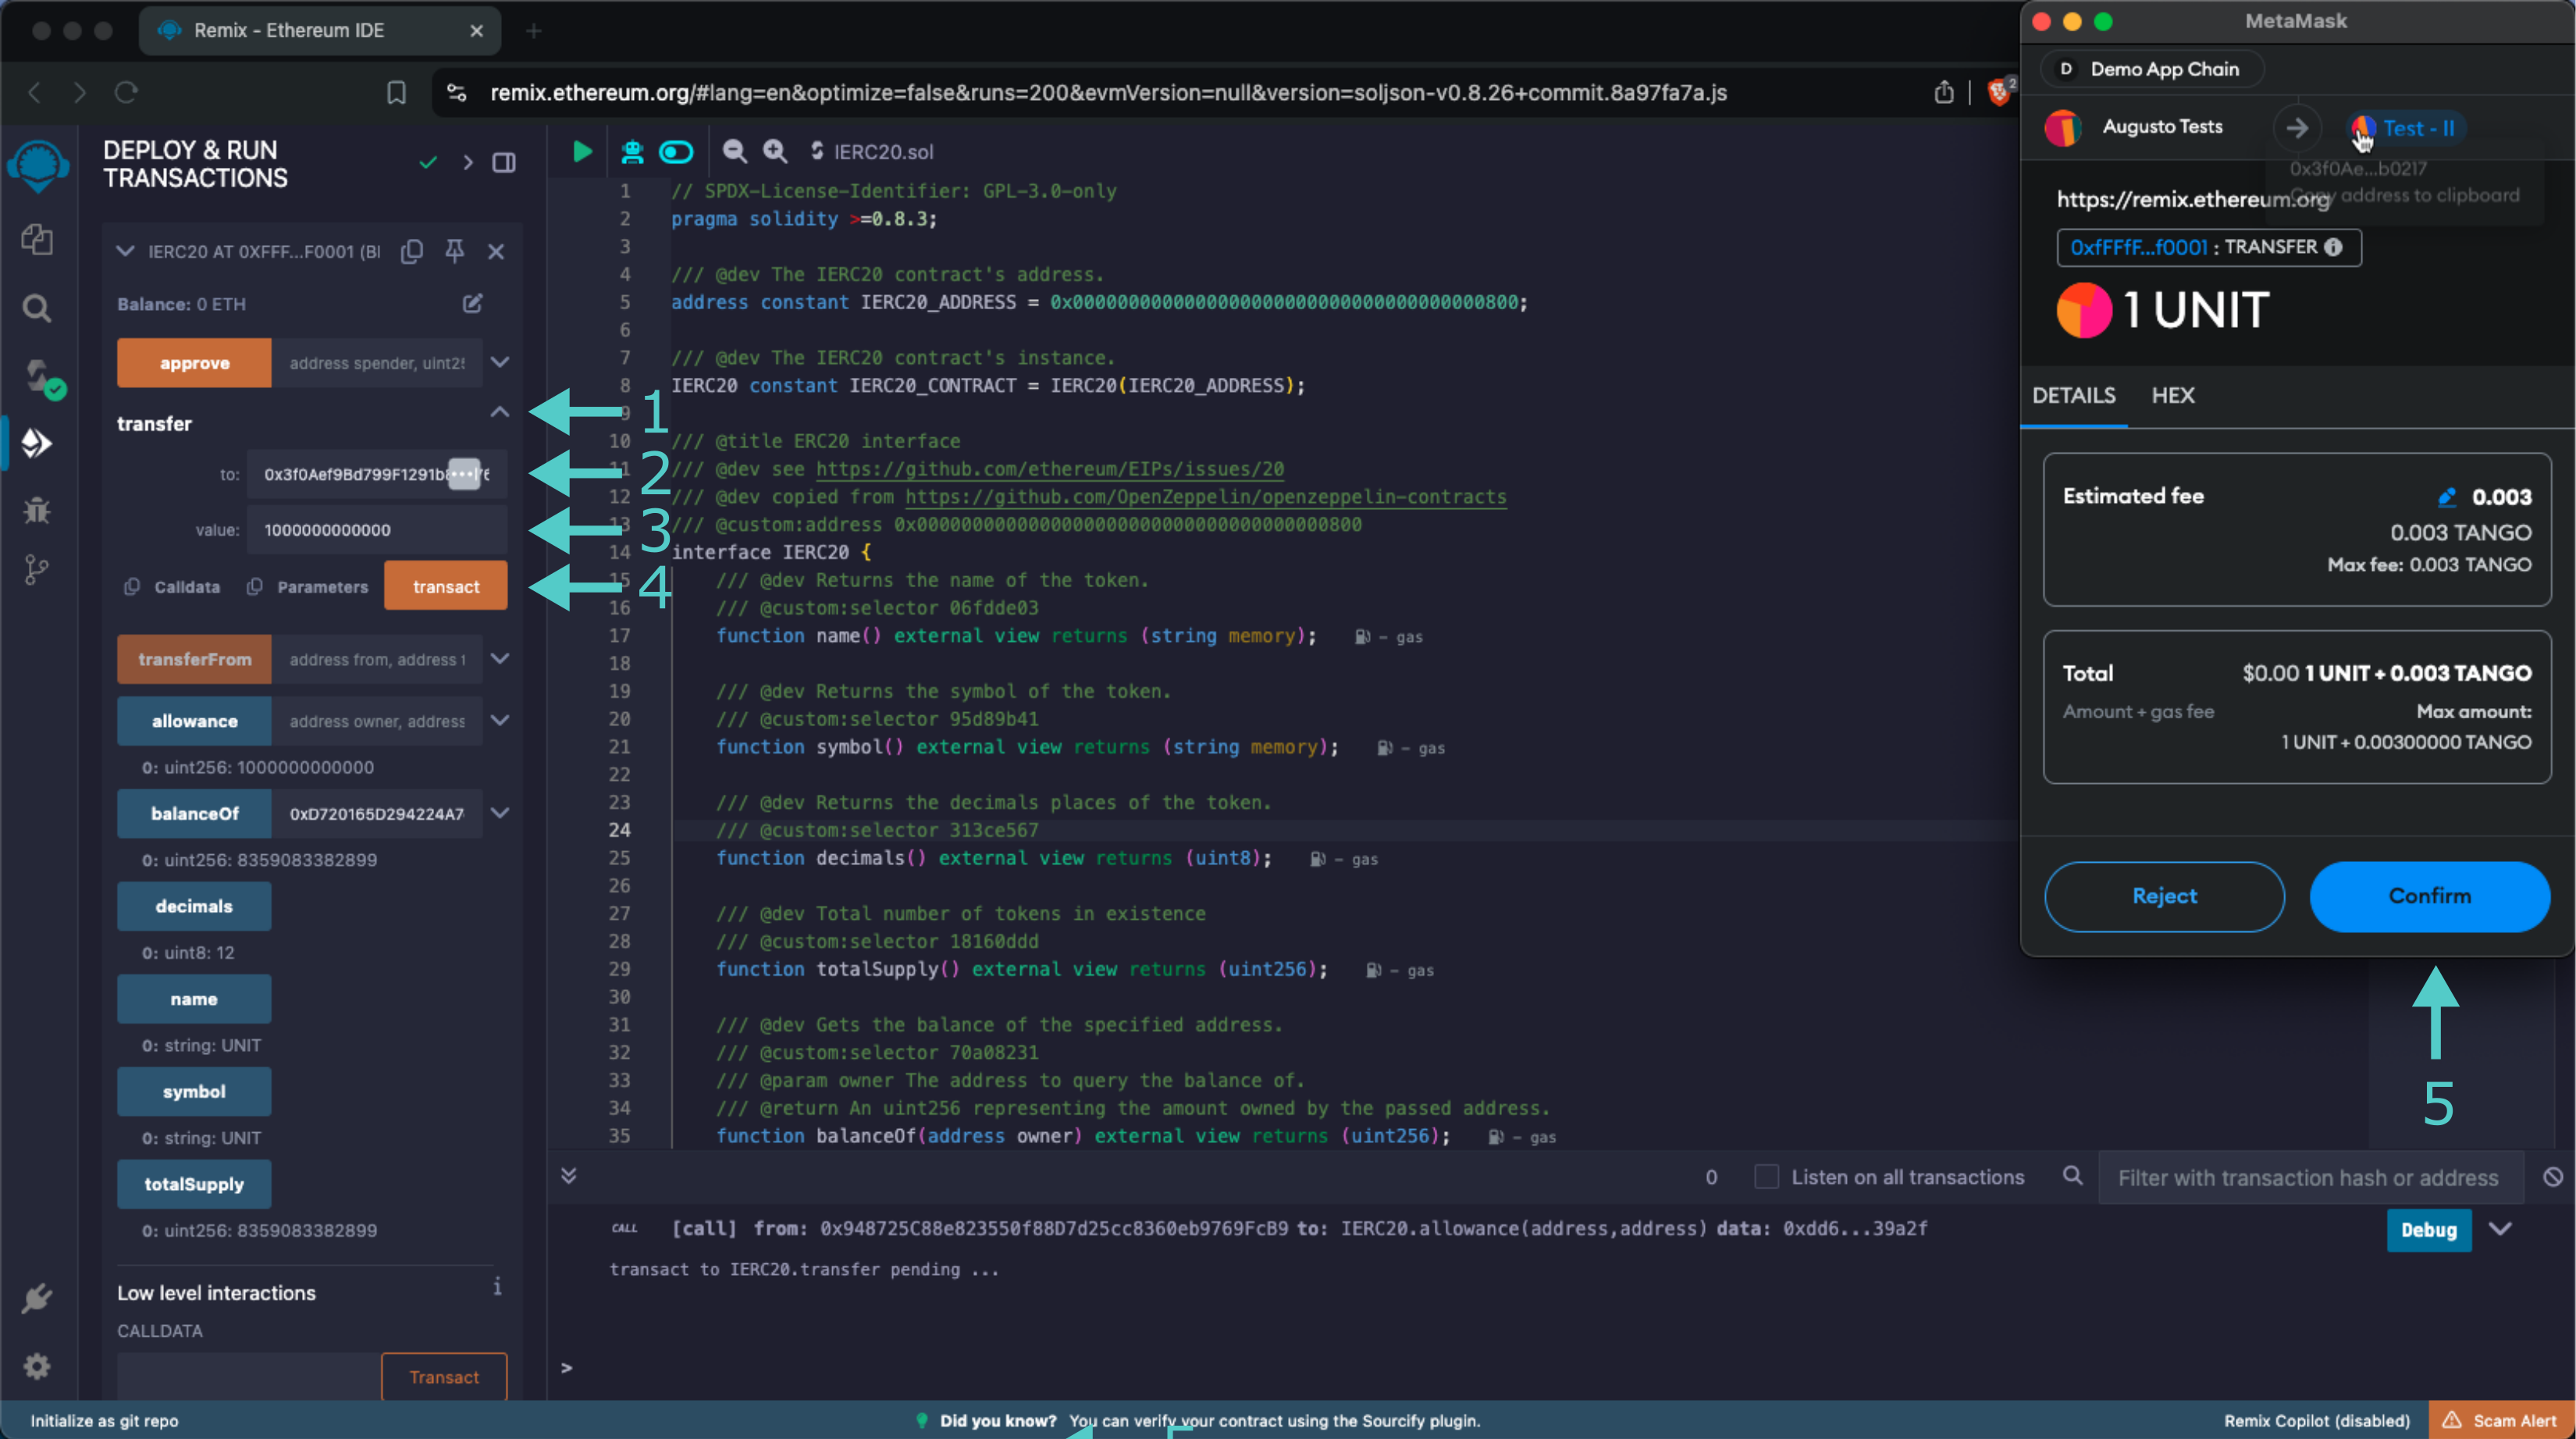
Once the transaction is complete, you can [check your balance](#get-account-balance) using the `balanceOf` function or by looking at MetaMask. You'll notice that your balance has decreased by 1 UNIT token. You can also use the `balanceOf` function to ensure that the recipients balance has increased by 1 UNIT token as expected.
And that's it! You've successfully interacted with the external assets ERC-20 precompile using MetaMask and Remix!
The information presented herein has been provided by third parties and is made available solely for general information purposes. Tanssi does not endorse any project listed and described on the Tanssi Doc Website (https://docs.tanssi.network/). Tanssi Foundation does not warrant the accuracy, completeness or usefulness of this information. Any reliance you place on such information is strictly at your own risk. Tanssi Foundation disclaims all liability and responsibility arising from any reliance placed on this information by you or by anyone who may be informed of any of its contents. All statements and/or opinions expressed in these materials are solely the responsibility of the person or entity providing those materials and do not necessarily represent the opinion of Tanssi Foundation. The information should not be construed as professional or financial advice of any kind. Advice from a suitably qualified professional should always be sought in relation to any particular matter or circumstance. The information herein may link to or integrate with other websites operated or content provided by third parties, and such other websites may link to this website. Tanssi Foundation has no control over any such other websites or their content and will have no liability arising out of or related to such websites or their content. The existence of any such link does not constitute an endorsement of such websites, the content of the websites, or the operators of the websites. These links are being provided to you only as a convenience and you release and hold Tanssi Foundation harmless from any and all liability arising from your use of this information or the information provided by any third-party website or service.
--- END CONTENT ---
Doc-Content: https://docs.tanssi.network/builders/toolkit/ethereum-api/precompiles/proxy/
--- BEGIN CONTENT ---
---
title: The Proxy Precompile
description: Learn how to interact with the Proxy precompile to add and remove proxy accounts that can execute specific transactions on behalf of other account.
keywords: solidity, ethereum, proxy, moonbeam, precompiled, contracts, substrate
icon: octicons-shield-lock-24
categories: EVM-Template
---
# Interacting with the Proxy Precompile
## Introduction {: #introduction }
The Proxy Precompile allows accounts to set proxy accounts via the Ethereum API. Proxy accounts can perform limited actions on behalf of the proxied account, such as governance, balance transfers, management or privileged transactions, and others.
If a user wanted to provide another user access to a limited number of actions on their behalf, traditionally, the only method to do so would be to share that account's private key. However, Tanssi-powered EVM networks include the proxy module, providing an additional layer of security. With proxies, many accounts can perform actions for a primary account, and such permissions can be revoked at any time. This is best if, for example, a user wants to keep their wallet safe in cold storage but still wants to access parts of the wallet's functionality, like governance or staking.
!!! note
The Proxy Precompile can only be called from an Externally Owned Account (EOA) or by the [Batch Precompile](/builders/toolkit/ethereum-api/precompiles/batch/){target=\_blank}.
To learn more about proxy accounts and how to set them up for your own purposes without use of the Proxy Precompile, visit the [Proxy Accounts](/builders/account-management/proxy-accounts/){target=\_blank} page.
The Proxy Precompile is located at the following address:
```text
{{networks.demo_evm.precompiles.proxy}}
```
!!! note
There can be some unintended consequences when using precompiles. Tanssi's precompiles are derived from Moonbeam's, and as such, please familiarize yourself with [Moonbeam's Precompile Security Considerations](https://docs.moonbeam.network/builders/get-started/eth-compare/security){target=\_blank}.
## Prerequisites {: #prerequisites }
Tto follow along with the contents in this guide, you'll need:
- Access to a Tanssi-powered EVM network running [runtime 700](https://github.com/moondance-labs/tanssi/releases/tag/runtime-700){target=\_blank} or above
- An [EVM-compatible wallet](/builders/toolkit/ethereum-api/wallets/){target=\_blank} configured to work with your network. You can also connect your wallet to the [demo EVM network](https://apps.tanssi.network/demo){target=\_blank}
- An account with enough funds to pay the required fees and deposits
- A second account that you control to use as a proxy
## The Proxy Solidity Interface {: #the-proxy-solidity-interface }
[`Proxy.sol`](https://github.com/moondance-labs/tanssi/blob/master/test/contracts/solidity/Proxy.sol){target=\_blank} is an interface that allows developers to interact with the precompile's functions.
??? code "Proxy.sol"
```solidity
// SPDX-License-Identifier: GPL-3.0-only
pragma solidity >=0.8.3;
/// @author The Moonsong Labs Team
/// @title Pallet Proxy Interface
/// @title The interface through which solidity contracts will interact with the Proxy pallet
interface Proxy {
/// @dev Defines the proxy permission types.
/// The values start at `0` (most permissive) and are represented as `uint8`
enum ProxyType {
Any,
NonTransfer,
Governance,
Staking,
CancelProxy,
Balances,
AuthorMapping,
IdentityJudgement
}
/// @dev Register a proxy account for the sender that is able to make calls on its behalf
/// @custom:selector 74a34dd3
/// @param delegate The account that the caller would like to make a proxy
/// @param proxyType The permissions allowed for this proxy account
/// @param delay The announcement period required of the initial proxy, will generally be zero
function addProxy(
address delegate,
ProxyType proxyType,
uint32 delay
) external;
/// @dev Removes a proxy account from the sender
/// @custom:selector fef3f708
/// @param delegate The account that the caller would like to remove as a proxy
/// @param proxyType The permissions currently enabled for the removed proxy account
/// @param delay The announcement period required of the initial proxy, will generally be zero
function removeProxy(
address delegate,
ProxyType proxyType,
uint32 delay
) external;
/// @dev Unregister all proxy accounts for the sender
/// @custom:selector 14a5b5fa
function removeProxies() external;
/// @dev Dispatch the given subcall (`callTo`, `callData`) from an account that the sender
/// is authorised for through `addProxy`
/// @custom:selector 0d3cff86
/// @param real The account that the proxy will make a call on behalf of
/// @param callTo Recipient of the call to be made by the `real` account
/// @param callData Data of the call to be made by the `real` account
function proxy(
address real,
address callTo,
bytes memory callData
) external payable;
/// @dev Dispatch the given subcall (`callTo`, `callData`) from an account that the sender
/// is authorised for through `addProxy`
/// @custom:selector 685b9d2f
/// @param real The account that the proxy will make a call on behalf of
/// @param forceProxyType Specify the exact proxy type to be used and checked for this call
/// @param callTo Recipient of the call to be made by the `real` account
/// @param callData Data of the call to be made by the `real` account
function proxyForceType(
address real,
ProxyType forceProxyType,
address callTo,
bytes memory callData
) external payable;
/// @dev Checks if the caller has an account proxied with a given proxy type
/// @custom:selector e26d38ed
/// @param real The real account that maybe has a proxy
/// @param delegate The account that the caller has maybe proxied
/// @param proxyType The permissions allowed for the proxy
/// @param delay The announcement period required of the initial proxy, will generally be zero
/// @return exists True if a proxy exists, False otherwise
function isProxy(
address real,
address delegate,
ProxyType proxyType,
uint32 delay
) external view returns (bool exists);
}
```
The interface includes the necessary data structures along with the following functions:
???+ function "**addProxy**(delegate, proxyType, delay) — registers a proxy account for the sender after a specified number of `delay` blocks (generally zero). Will fail if a proxy for the caller already exists"
=== "Parameters"
- `delegate` ++"address"++ - the proxy address
- `proxyType` ++"ProxyType"++ - the delegation type that defines the specific functions the proxy will be granted permission to execute
- `delay` ++"uint32"++ - number of blocks to wait until the proxy is enabled
=== "Example"
- `delegate` - 0x3f0Aef9Bd799F1291b80376aD57530D353ab0217
- `proxyType` - "Any"
- `delay` - 0
??? function "**removeProxy**(delegate, proxyType, delay) — removes a registered proxy for the sender"
=== "Parameters"
- `delegate` ++"address"++ - the proxy address to remove
- `proxyType` ++"ProxyType"++ - the delegation type to remove
- `delay` ++"uint32"++ - number of blocks to wait until the removal is in effect
=== "Example"
- `delegate` - 0x3f0Aef9Bd799F1291b80376aD57530D353ab0217
- `proxyType` - "Any"
- `delay` - 0
??? function "**removeProxies**() — removes all of the proxy accounts delegated to the sender"
??? function "**isProxy**(real, delegate, proxyType, delay) — returns `true` if the delegate address is a proxy of type `proxyType`, for address `real`, with the specified `delay`"
=== "Parameters"
- `real` ++"address"++ - the account granting permissions to the proxy
- `delegate` ++"address"++ - the proxy address
- `proxyType` ++"ProxyType"++ - the delegation type
- `delay` ++"uint32"++ - number of blocks to wait
=== "Example"
- `delegate` - 0xbB8919d5DDfc85F4D15820a9e58018f1cfB39a2F
- `delegate` - 0x3f0Aef9Bd799F1291b80376aD57530D353ab0217
- `proxyType` - "Any"
- `delay` - 0
[The `proxyType` parameter](#proxy-types) is defined by the following `ProxyType` enum, where the values start at `0` with the most permissive proxy type and are represented as `uint8` values:
```solidity
enum ProxyType {
Any,
NonTransfer,
Governance,
Staking,
CancelProxy,
Balances,
AuthorMapping,
IdentityJudgement
}
```
### Proxy Types {: #proxy-types }
There are multiple types of proxy roles that can be delegated to accounts, represented in `Proxy.sol` through the `ProxyType` enum. The following list includes all of the possible proxies and the type of transactions they can make on behalf of the primary account:
- **Any** — the any proxy will allow the proxy account to make any type of transaction. Note that balance transfers are only allowed to EOAs, not contracts or Precompiles
- **NonTransfer** — the non-transfer proxy allows the proxy account to make any type of transaction where the `msg.value` is checked to be zero
- **Governance** - the governance proxy will allow the proxy account to make any type of governance related transaction
- **CancelProxy** - the cancel proxy will allow the proxy account to reject and remove delayed proxy announcements (of the primary account). Currently, this is not an action supported by the Proxy Precompile
- **Balances** - the balances proxy will allow the proxy account to only make balance transfers to EOAs
!!! note
The Solidity interface contains more proxy types than those listed above. The previous list includes only those proxy types implemented in the [baseline EVM Template](/builders/build/templates/evm/){target=\_blank}.
## Interact with the Solidity Interface via Remix {: #interact-with-the-solidity-interface-via-remix }
This section will walk you through the steps to create a proxy, verify its creation, and revoke the proxy privileges. These examples are based on the [Tanssi demo EVM Network](https://apps.tanssi.network/demo){target=\_blank} and use [Metamask](/builders/toolkit/ethereum-api/wallets/metamask/){target=\_blank}. This guide can be adapted for your own Tanssi-powered EVM network by adding the RPC URL of your network to the EVM Wallet of your choosing.
### Remix Set Up {: #remix-set-up }
You can interact with the Proxy precompile using [Remix](https://remix.ethereum.org){target=\_blank}. To add the precompile to Remix, you will need to:
1. Get a copy of [`Proxy.sol`](https://github.com/moondance-labs/tanssi/blob/master/test/contracts/solidity/Proxy.sol){target=\_blank}
2. Paste the file contents into a Remix file named `Proxy.sol`
### Compile the Contract {: #compile-the-contract }
Next, you will need to compile the interface in Remix:
1. Click on the **Compile** tab, second from top
2. Then to compile the interface, click on **Compile Proxy.sol**
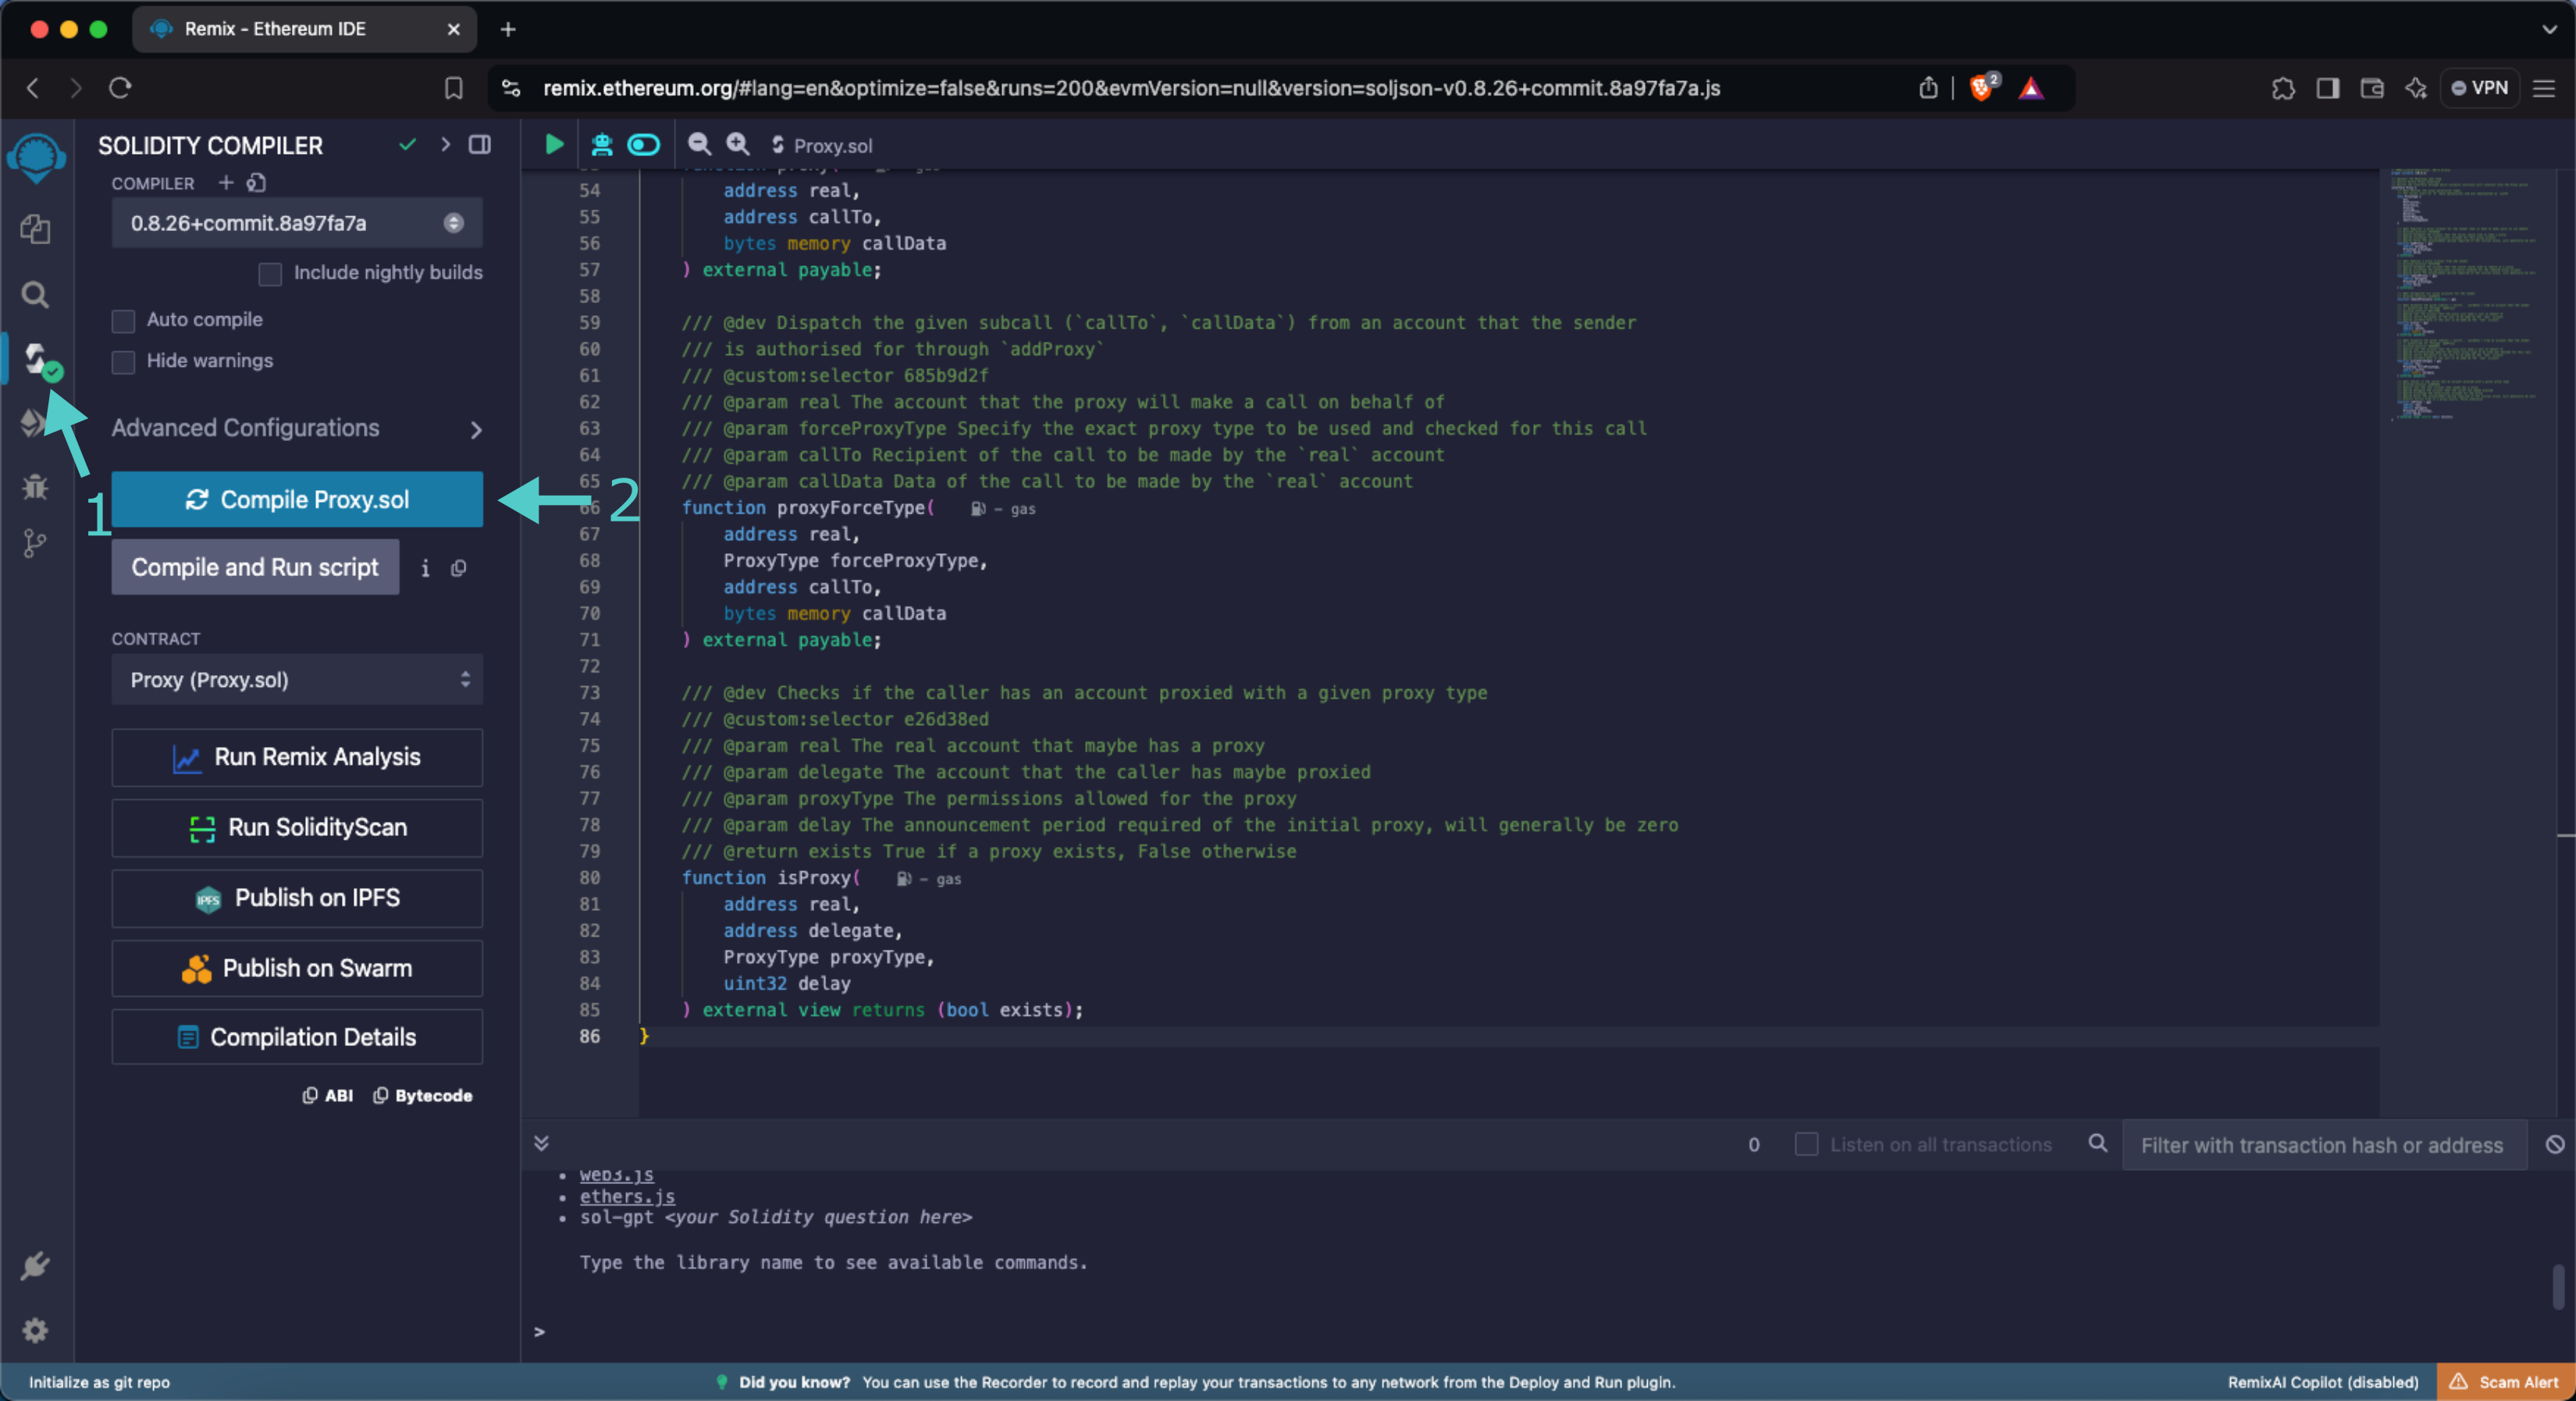
When compilation is completed, you will see a green checkmark next to the **Compile** tab.
### Access the Contract {: #access-the-contract }
Instead of deploying the smart contract, you will access the interface through its address:
1. Click on the **Deploy and Run** tab directly below the **Compile** tab in Remix
2. Make sure **Injected Provider - Metamask** is selected in the **ENVIRONMENT** dropdown. You may be prompted by MetaMask to connect your account to Remix if it's not already connected
3. Make sure the priimary account is displayed under **ACCOUNT**
4. Ensure **Proxy - Proxy.sol** is selected in the **CONTRACT** dropdown. Given that it is a precompiled contract, there is no deployment step. Instead, you are going to provide the address of the precompile in the **At Address** field
5. Provide the address of the Proxy precompile (which is `{{networks.demo_evm.precompiles.proxy}}` in this example) and click **At Address**
6. The **Proxy** precompile will appear in the list of **Deployed Contracts**
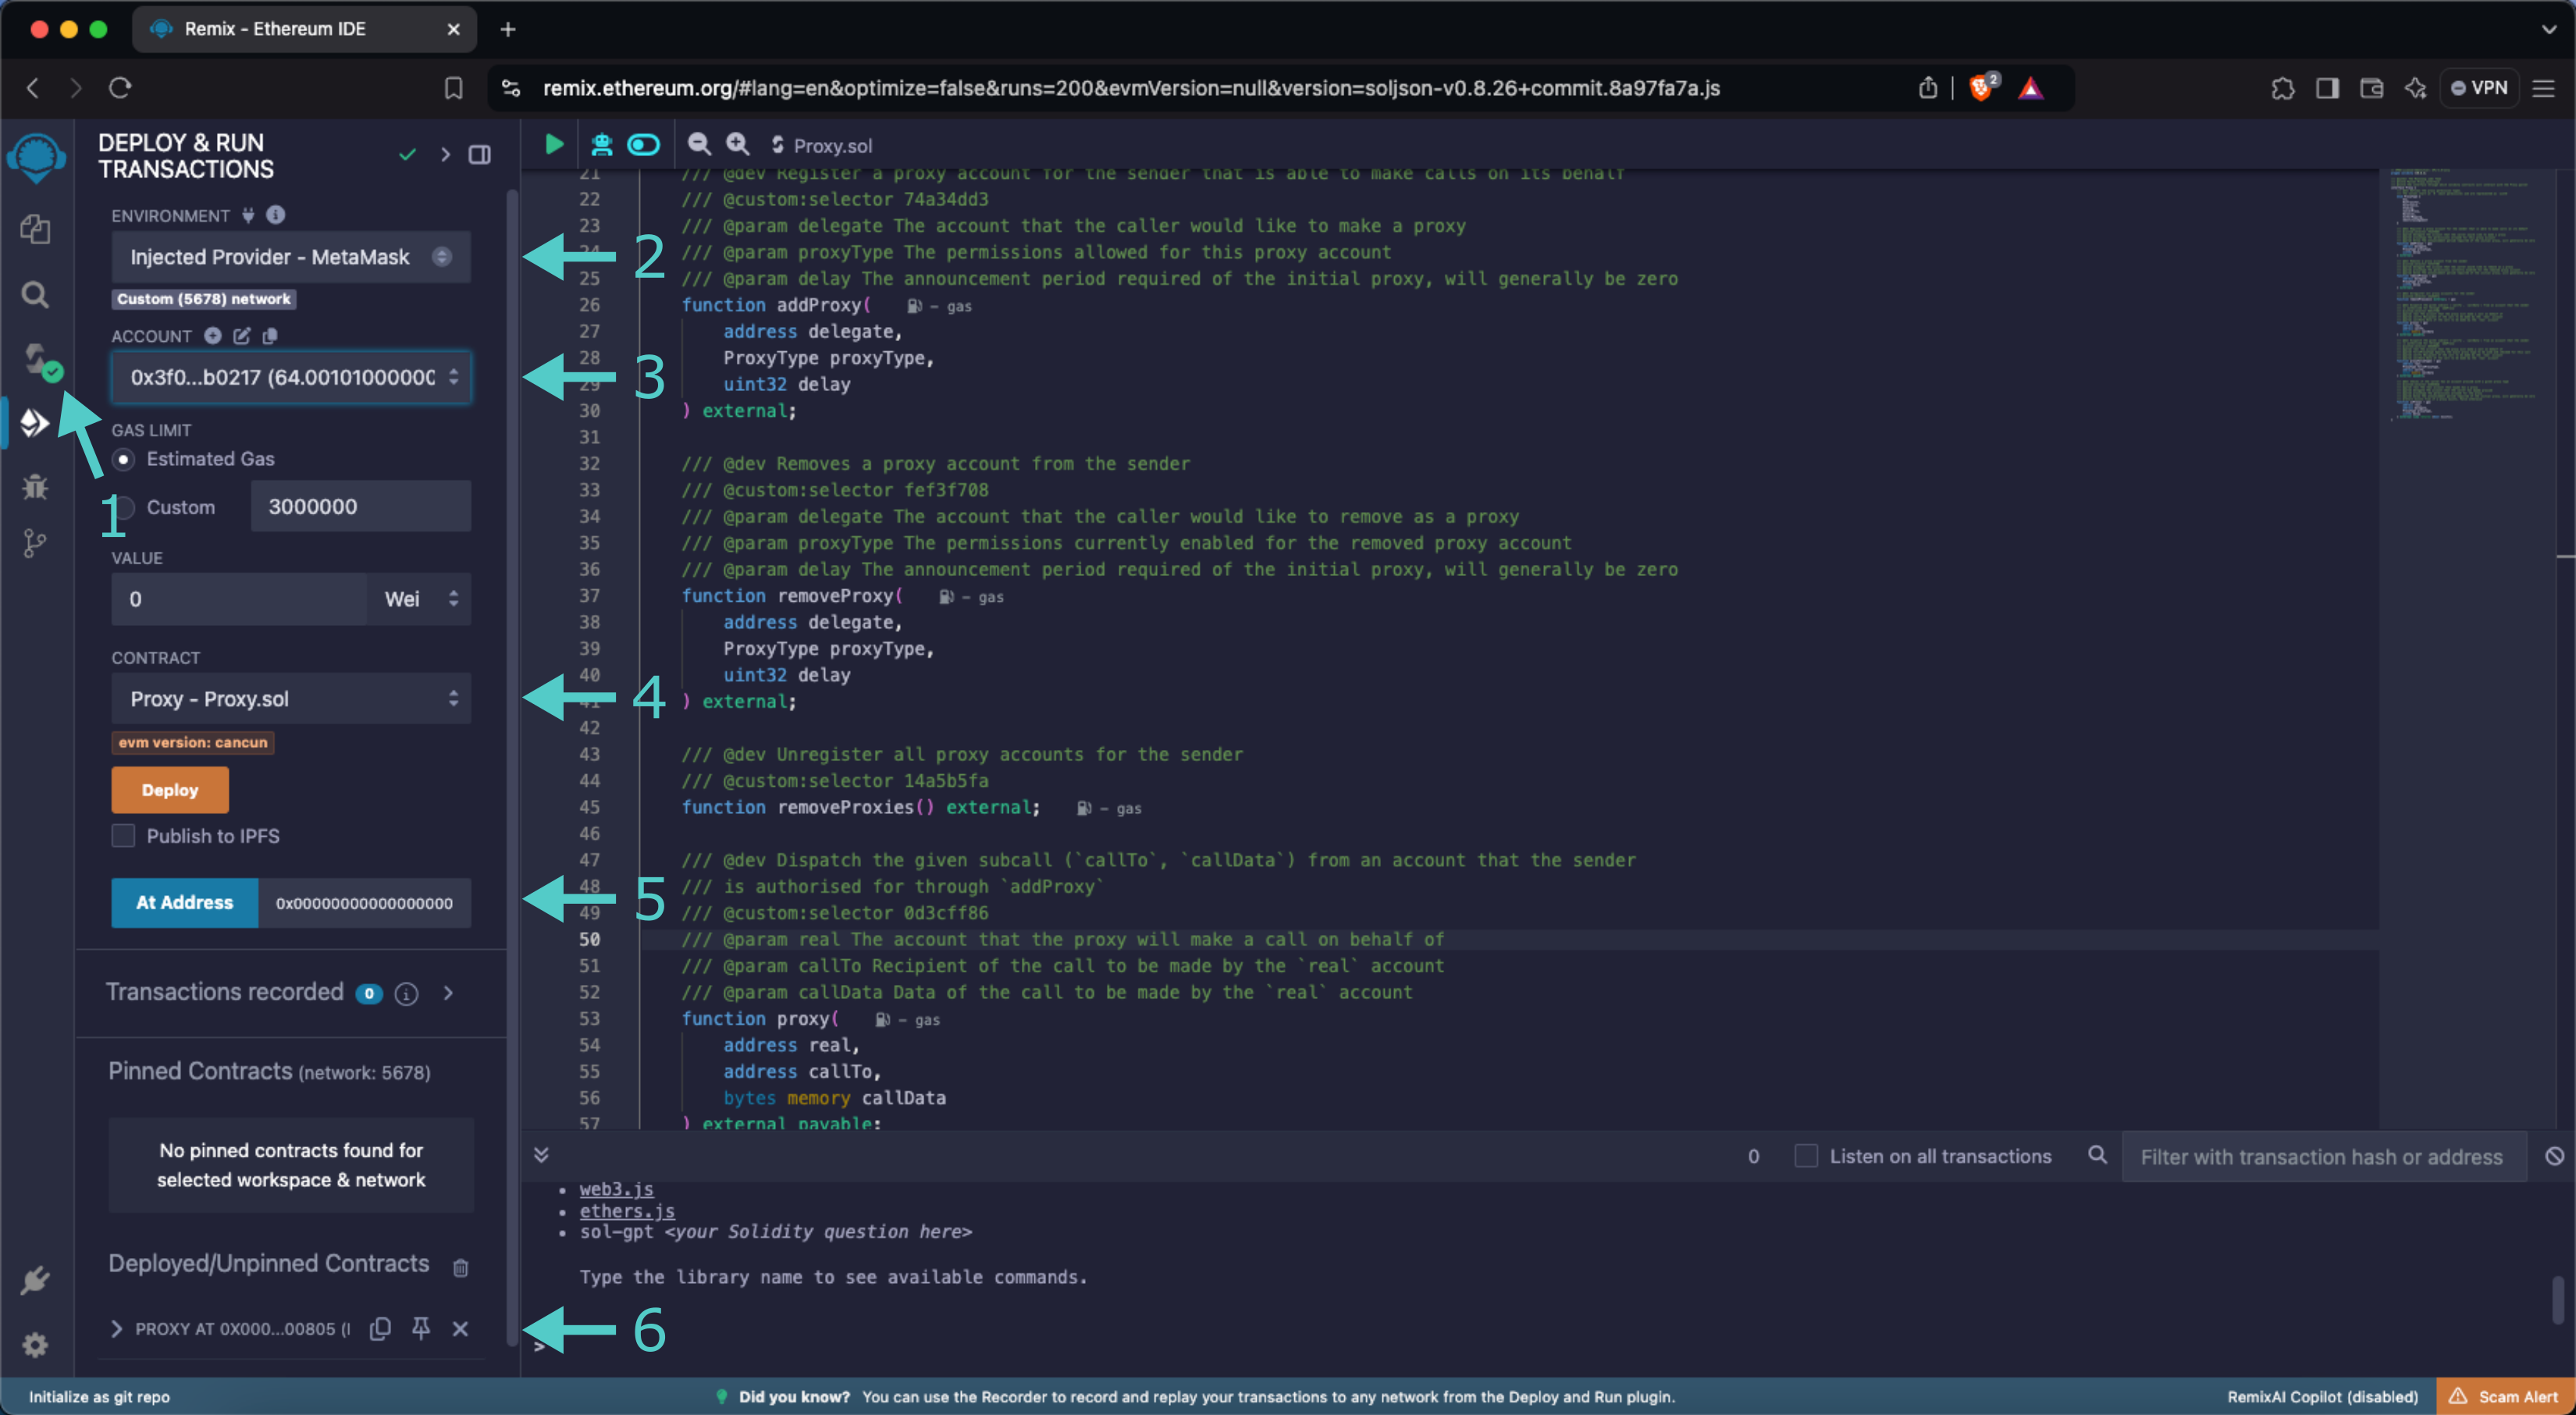
### Add a Proxy {: #add-proxy }
You can add a proxies for your account calling the precompile functions. In the following example, you will add a proxy allowed to execute any transaction on your behalf:
1. Expand the Proxy Precompile contract to see the available functions
2. Find the **addProxy** function and press the button to expand the section
3. Insert your second account's address as the **delegate**, `0` as **proxyType**, meaning `any`, and `0` as **delay**
4. Click **transact**
5. MetaMask will pop up, and you will be prompted to review the transaction details. Click Confirm to execute the transaction
!!! note
When constructing the transaction in Remix, the **proxyType** is represented as a `uint8`, instead of the expected enum `ProxyType`. In Solidity, enums are compiled as `uint8`, so when you pass in `0` for **proxyType**, you indicate the first element in the `ProxyType` enum, which is the `any` proxy.
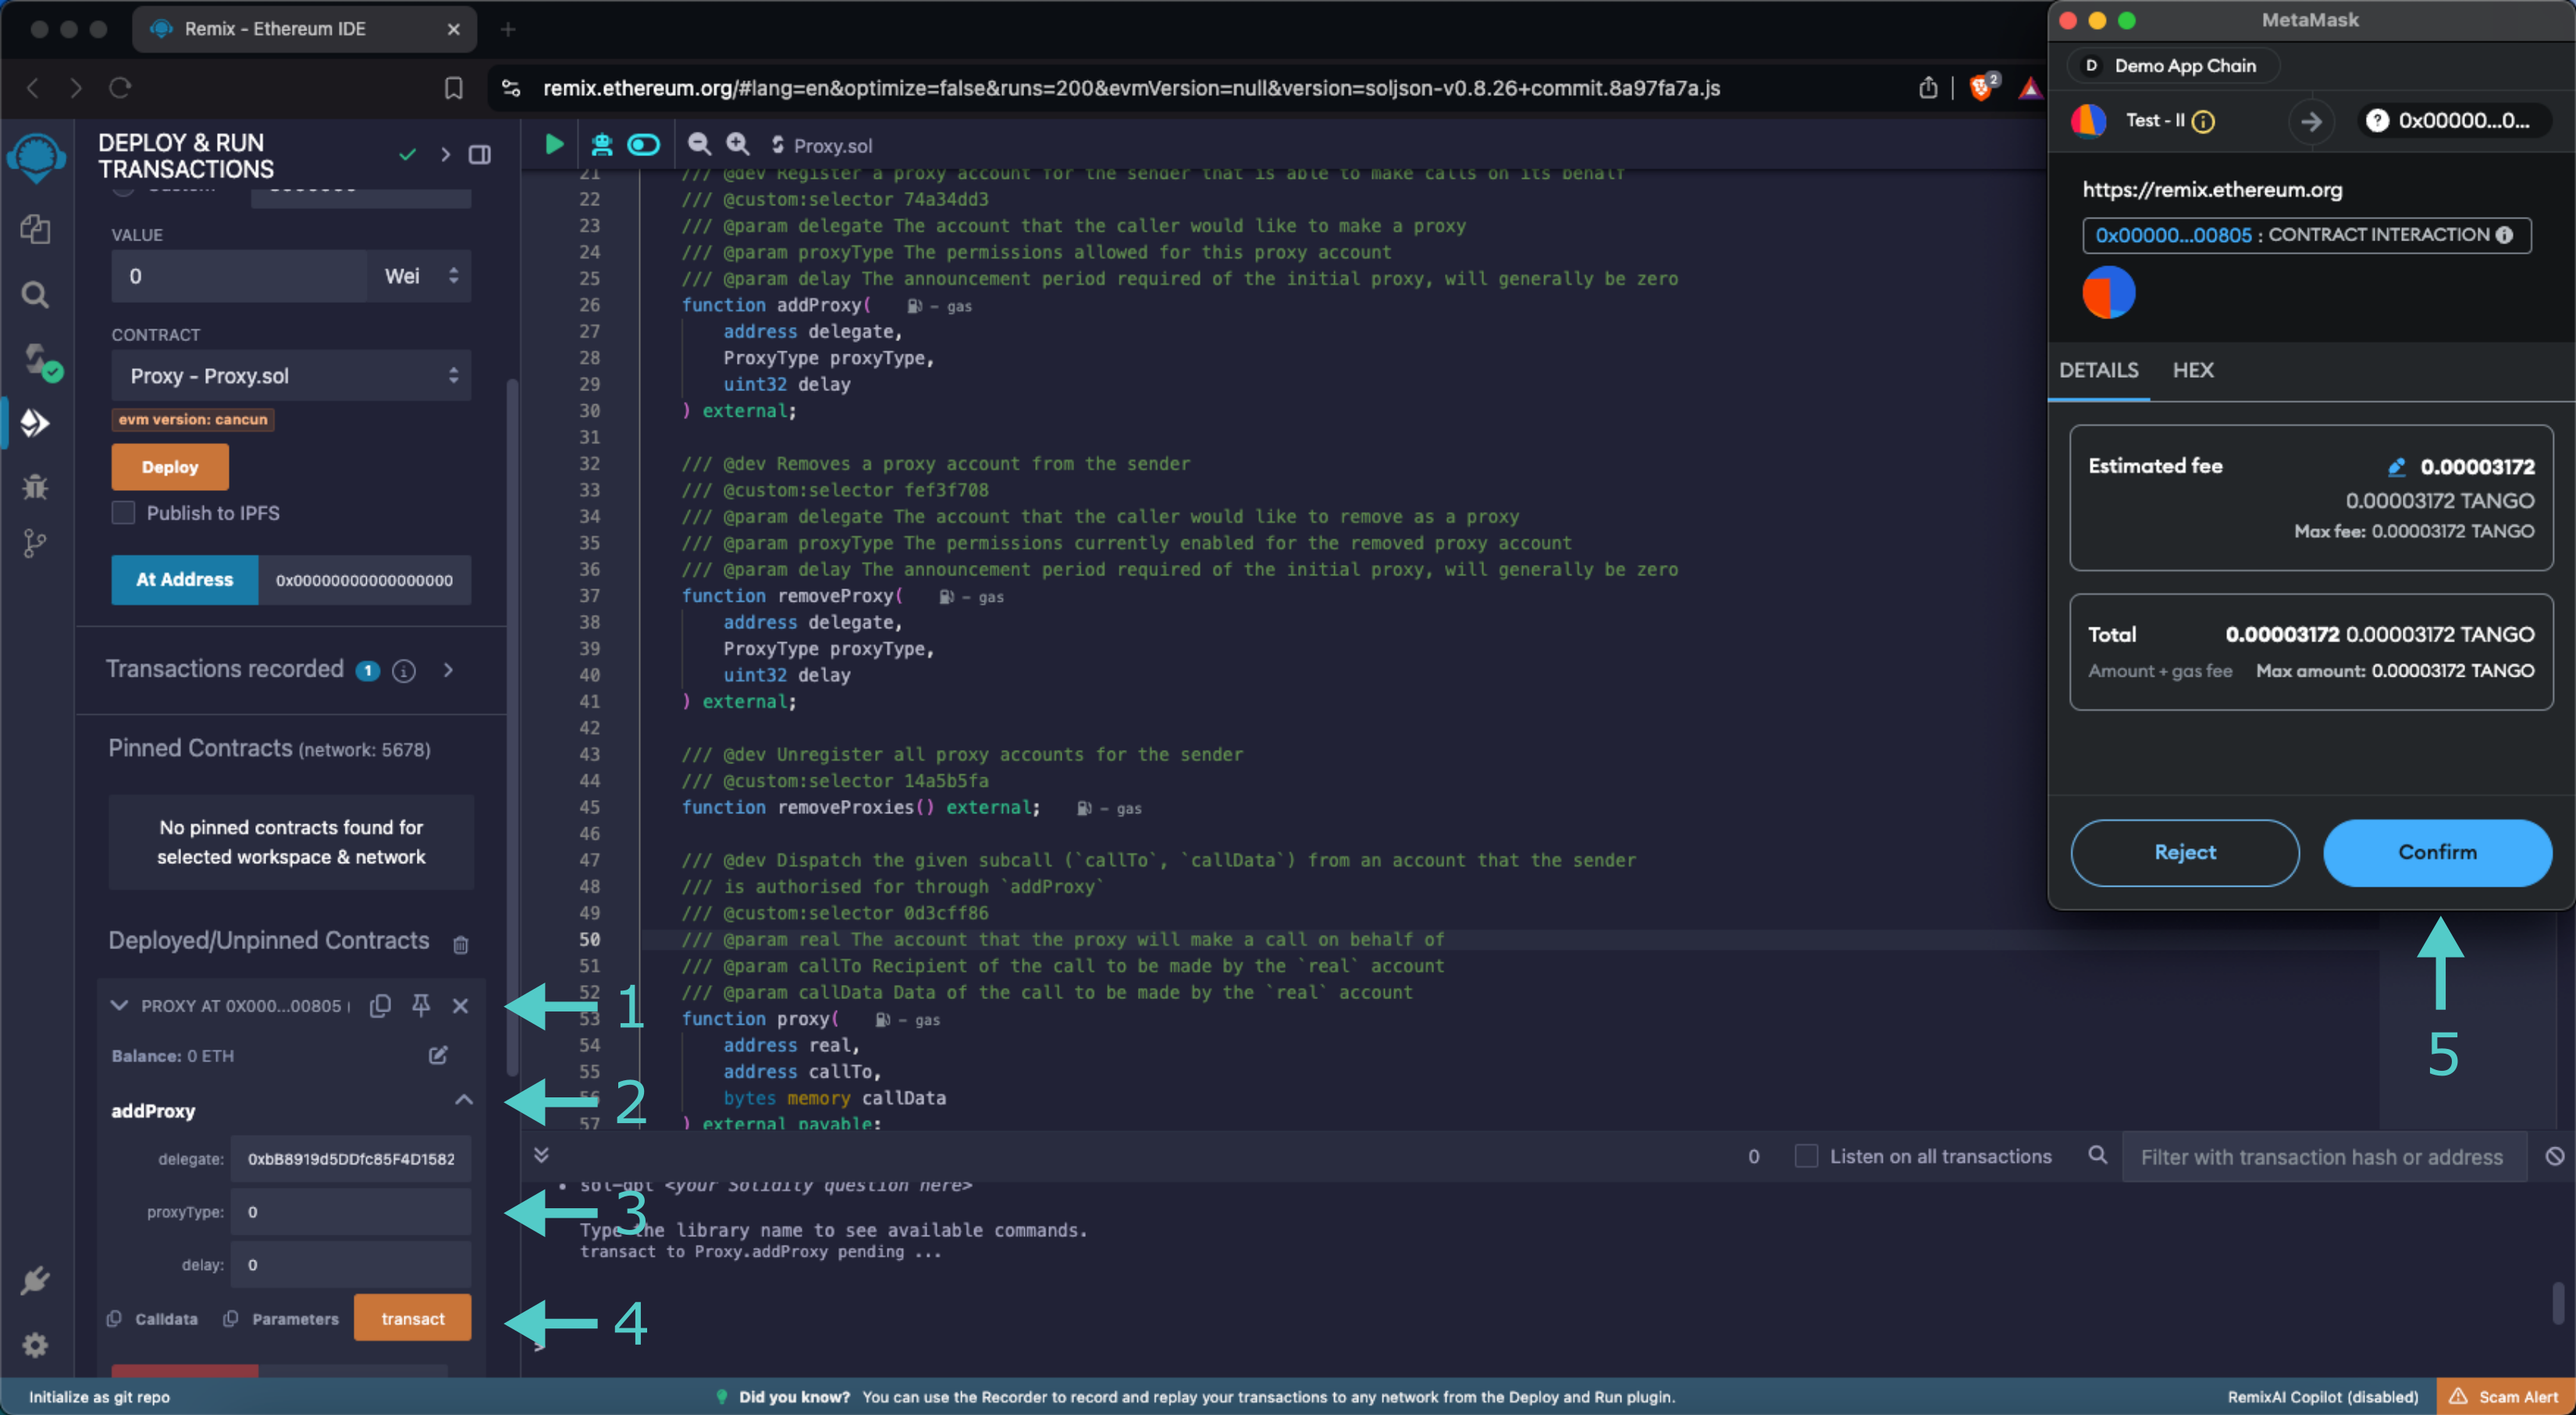
### Check a Proxy Existence {: #check-proxy }
The function `isProxy` checks if a proxy account exists. After creating a proxy in the [previous step](#add-proxy), use the same parameters to verify that the proxy was successfully added:
1. Expand the **isProxy** function
2. Insert your primary account as **real**, your second account (proxy) as **delegate**, `0` as **proxyType**, and `0` as **delay**
3. Click **call**
4. The functions returns whether there is a proxy or not. In this example, the proxy exists, hence the function returns `true`
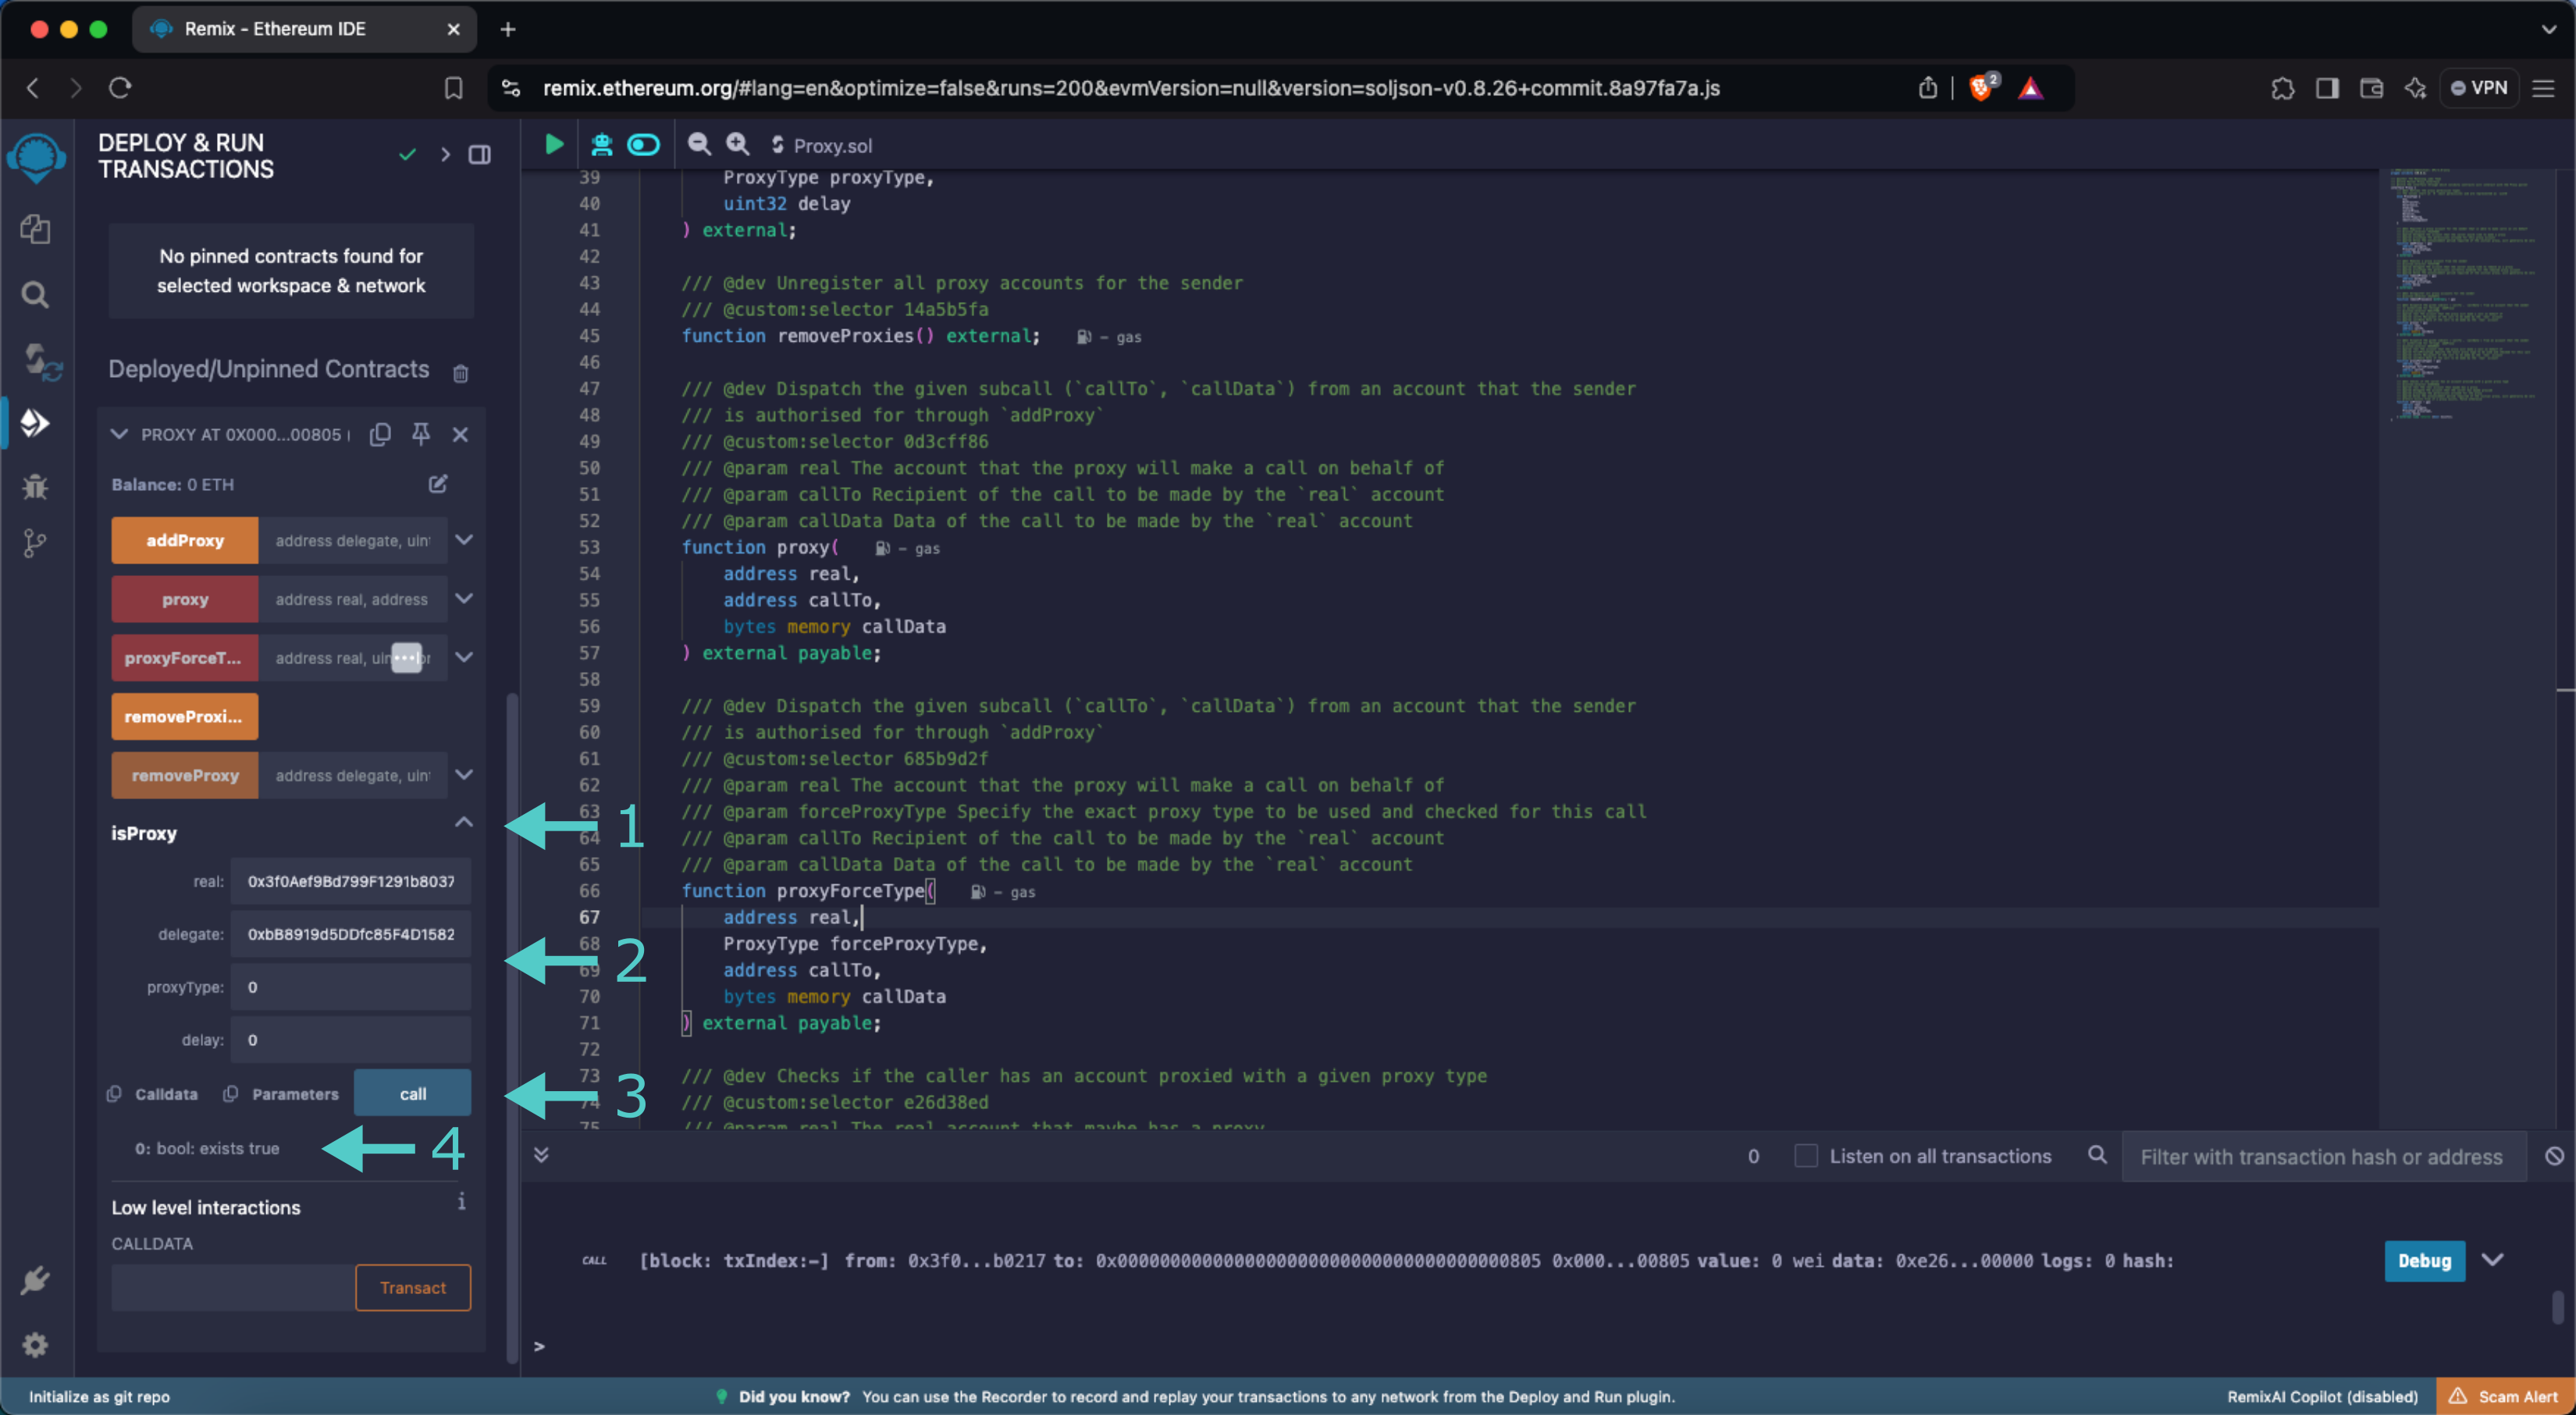
### Remove a Proxy {: #remove-proxy }
You can revoke a proxy permission when it's no longer needed. After creating a proxy in the [Add Proxy](#add-proxy), step, it can be removed following these steps:
1. Expand the **removeProxy** function
2. Insert the proxy account as the **delegate**, `0` as **proxyType**, `0` and as **delay**
3. Click **transact**
4. MetaMask will pop up, and you will be prompted to review the transaction details. Click Confirm to execute the transaction
After the transaction is confirmed, if you repeat the steps to [check for a proxy existence](#check-proxy), the result should be `false`.
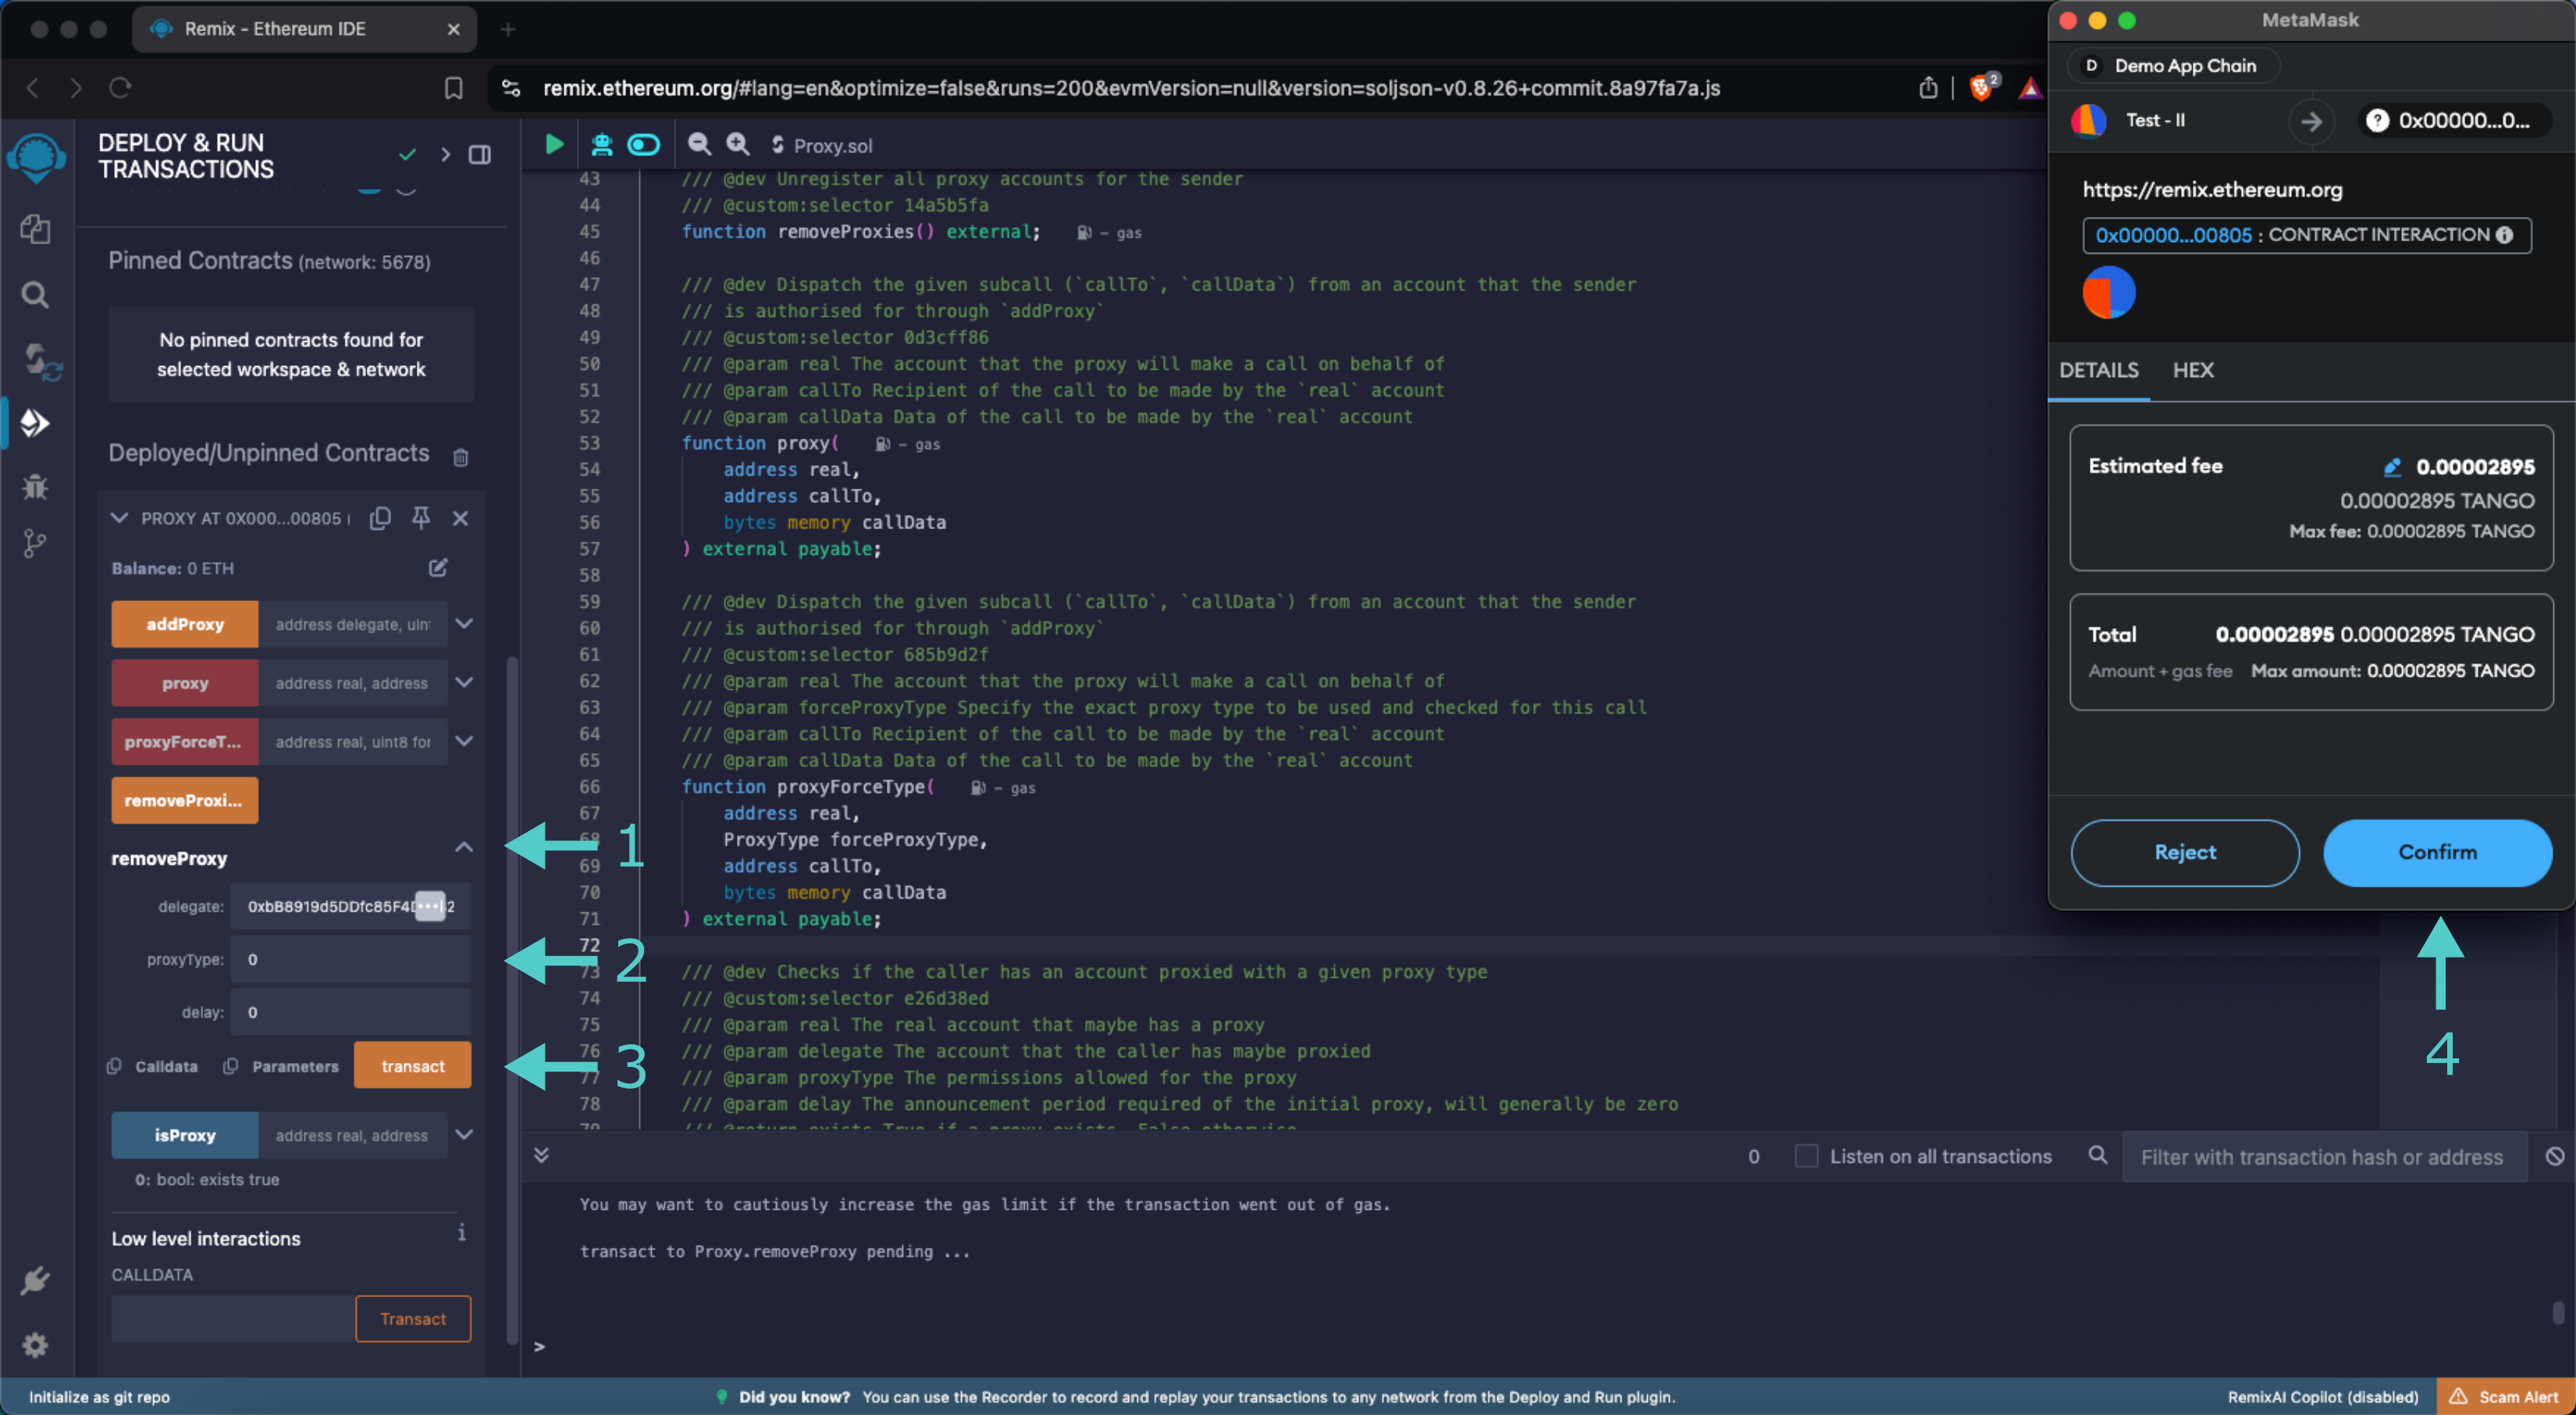
And that's it! You've successfully interacted with the Proxy precompile using MetaMask and Remix!
The information presented herein has been provided by third parties and is made available solely for general information purposes. Tanssi does not endorse any project listed and described on the Tanssi Doc Website (https://docs.tanssi.network/). Tanssi Foundation does not warrant the accuracy, completeness or usefulness of this information. Any reliance you place on such information is strictly at your own risk. Tanssi Foundation disclaims all liability and responsibility arising from any reliance placed on this information by you or by anyone who may be informed of any of its contents. All statements and/or opinions expressed in these materials are solely the responsibility of the person or entity providing those materials and do not necessarily represent the opinion of Tanssi Foundation. The information should not be construed as professional or financial advice of any kind. Advice from a suitably qualified professional should always be sought in relation to any particular matter or circumstance. The information herein may link to or integrate with other websites operated or content provided by third parties, and such other websites may link to this website. Tanssi Foundation has no control over any such other websites or their content and will have no liability arising out of or related to such websites or their content. The existence of any such link does not constitute an endorsement of such websites, the content of the websites, or the operators of the websites. These links are being provided to you only as a convenience and you release and hold Tanssi Foundation harmless from any and all liability arising from your use of this information or the information provided by any third-party website or service.
--- END CONTENT ---
Doc-Content: https://docs.tanssi.network/builders/toolkit/ethereum-api/wallets/ledger/
--- BEGIN CONTENT ---
---
title: Using Ledger With Your EVM Appchain
description: Learn to set up and use Ledger hardware wallets with Tanssi-powered EVM appchains for secure offline key storage and transaction signing.
icon: material-wallet-outline
categories: EVM-Template
---
# Interacting with Tanssi-powered EVM appchains Using Ledger
## Introduction {: #introduction }
Developers and users of Tanssi-powered EVM appchains, such as the [Tanssi demo](https://apps.tanssi.network/demo){target=\_blank} EVM appchain, have a variety of options when it comes to wallets. Regarding cold wallets, which store your private keys in a secure, offline environment, [Ledger](https://www.ledger.com/){target=\_blank} is one of the most popular options. Ledger provides full support for Substrate blockchains, such as the Tanssi network.
Ledger devices are hardware wallets designed to store the private keys offline. They are used to verify and sign the transactions, but they still need a software layer to provide the UI that interacts with the networks, builds the transactions, and sends the signed transactions back to the network once the user has verified them.
This guide takes you through all the necessary steps to use your Ledger device with Tanssi-powered EVM appchains.
## Setting Up Your Ledger Device {: #setting-up-ledger-device }
If you have a brand new Ledger device, refer to the [official website](https://support.ledger.com/article/4404389503889-zd){target=\_blank} for a guide on getting it started with the initial setup.
Now, with your Ledger already initiated, install the _Ethereum_ app taking the following steps:
1. Open the Ledger Live App on your computer.
2. Go to My Ledger.
3. Connect and unlock the device.
Finally, search for the **Ethereum (ETH)** app in Ledger Live and install it on your device.
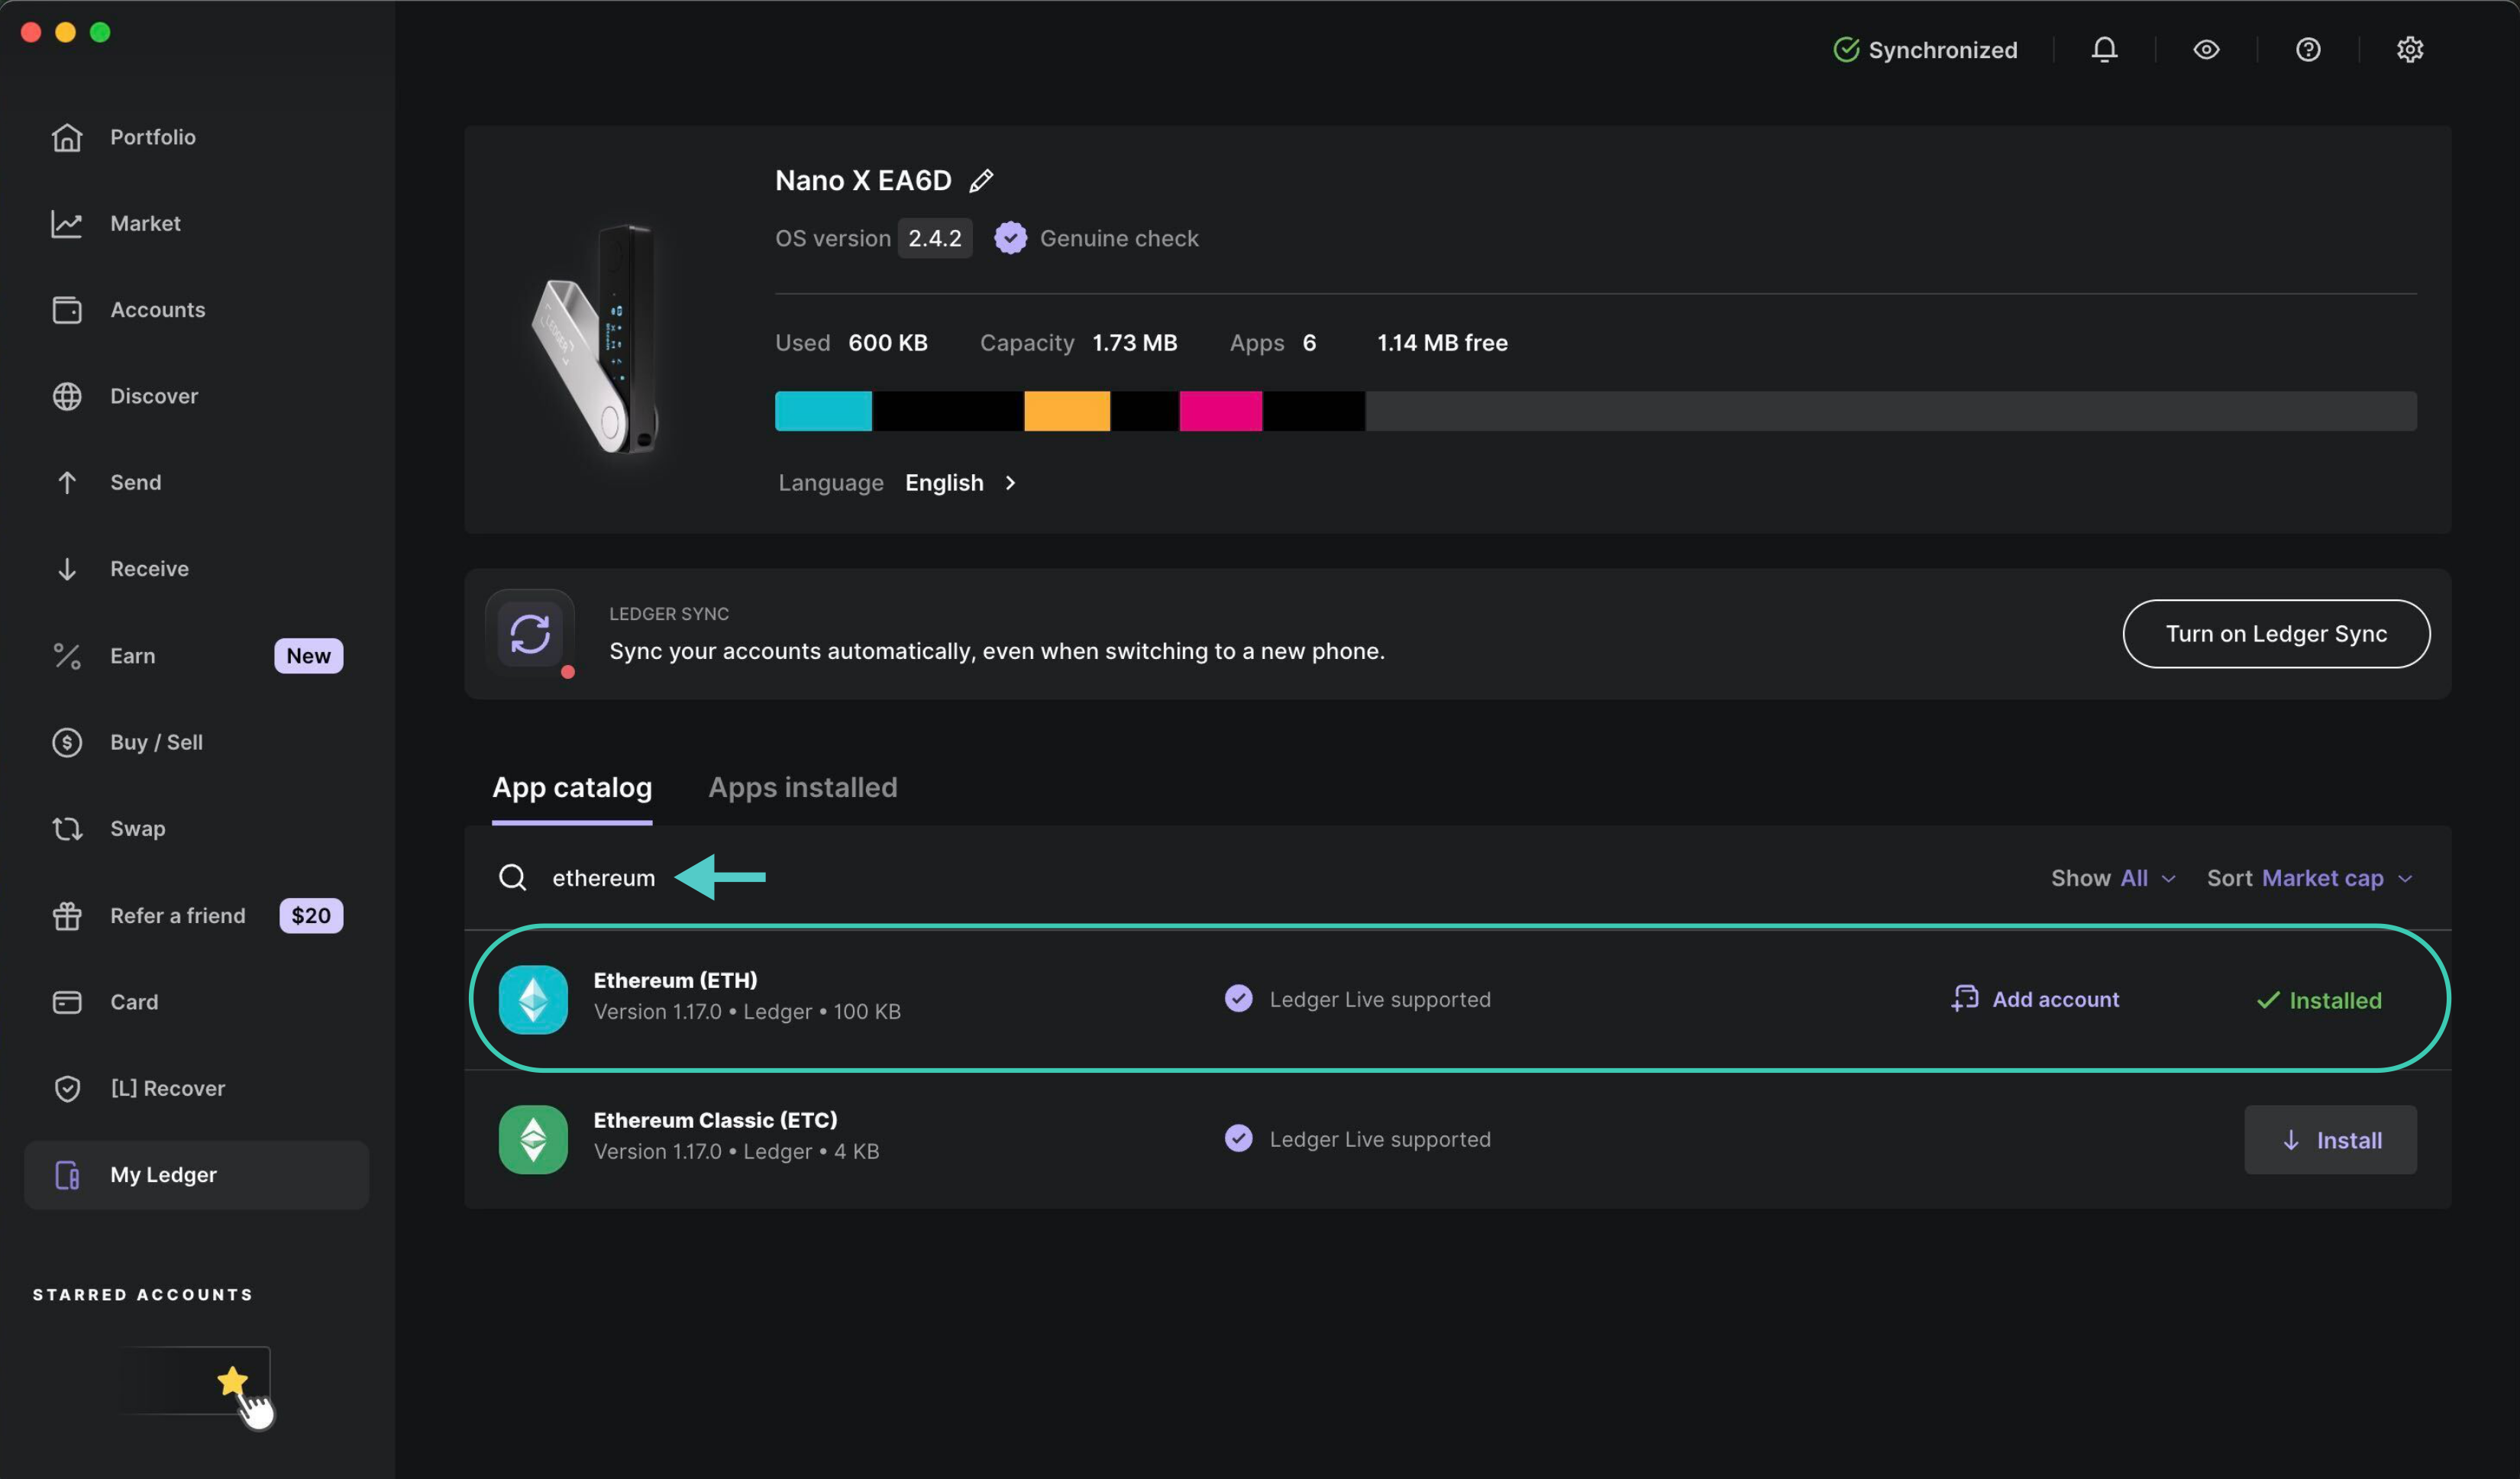
And that's it. Your device now has an Ethereum account and is able to sign transactions on any Tanssi-powered EVM appchain.
## Adding the Ledger to a Hot Wallet {: #adding-Ledger-hot-wallet }
As presented in the [introduction](#introduction), a Ledger hardware wallet provides secure, offline storage for private keys, allowing users to verify and sign transactions. However, by design, it can't interact with blockchains or dApps by itself, nor does it offer a UI for managing assets. To complement the device, a hot wallet is required. The user can choose any Ethereum-compatible wallet.
For demonstration purposes, we'll show how to configure [Metamask](/builders/toolkit/ethereum-api/wallets/metamask/){target=\_blank} to work with your hardware wallet, but these steps are generally applicable to any other wallet that supports Ledger. To follow along with the steps, make sure you have Metamask installed in your browser, then open the extension and click on the dropdown icon next to the account name.
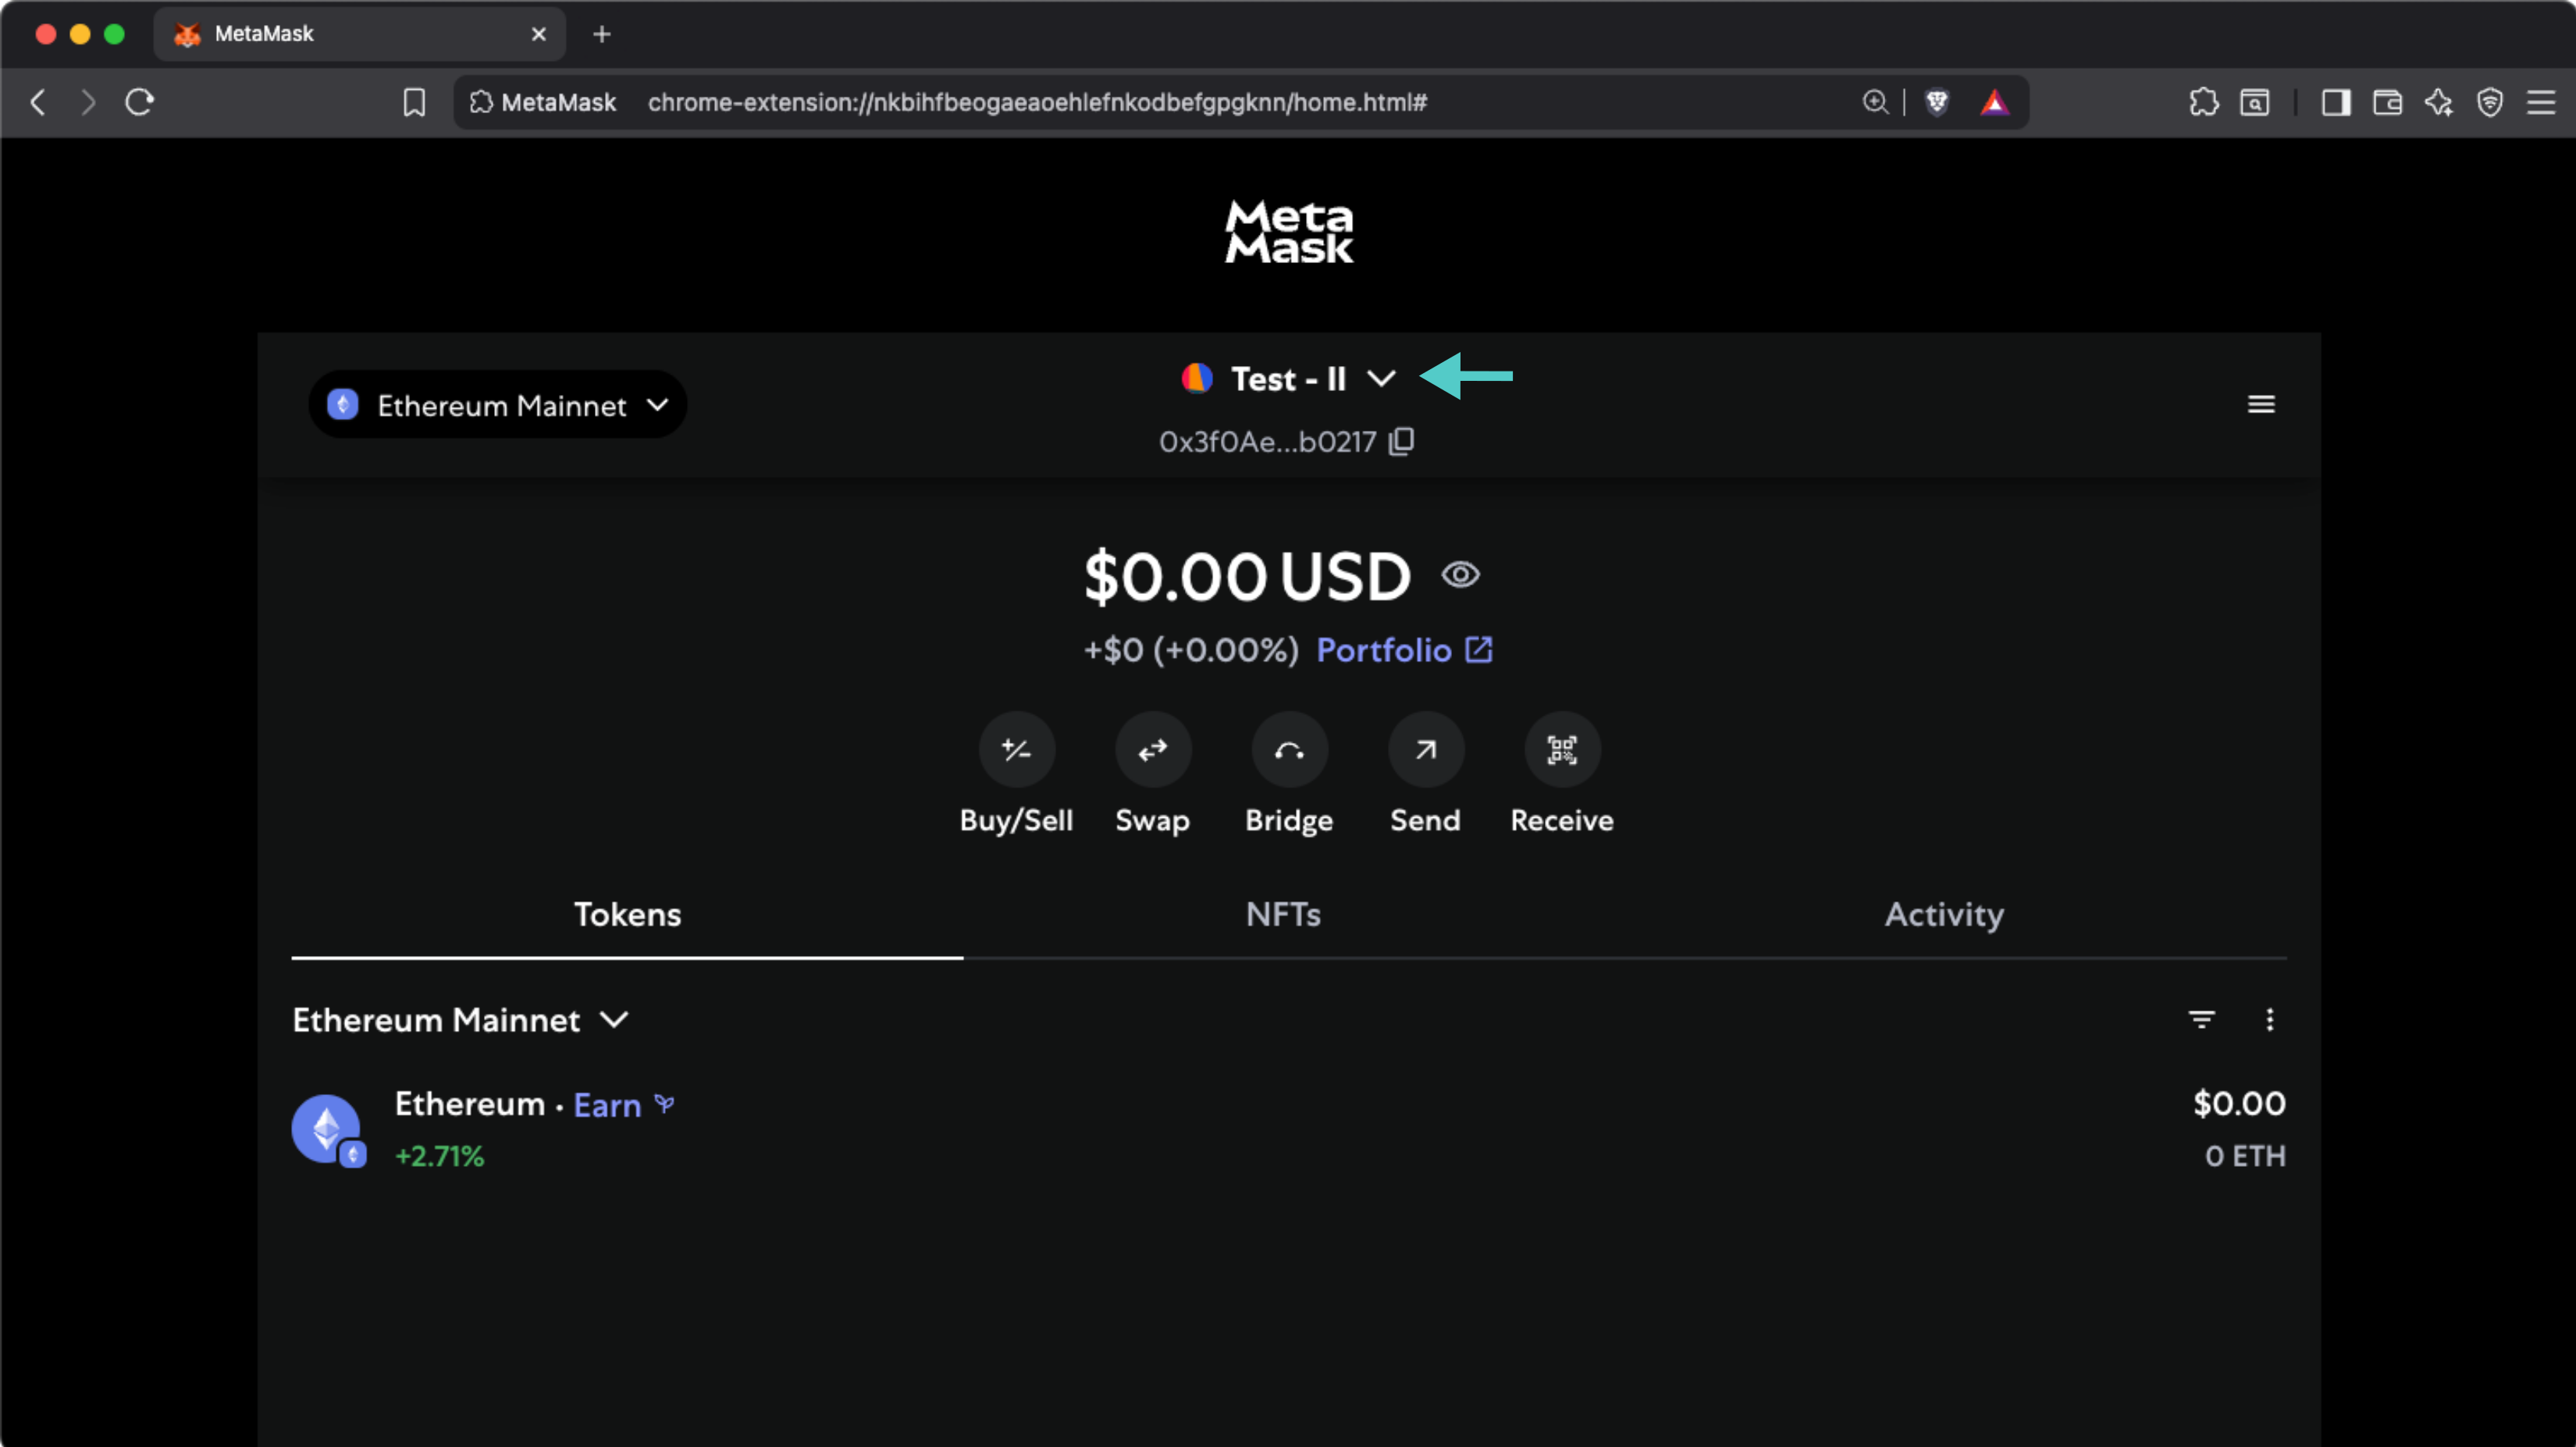
Now click on the **+ Add account or hardware wallet** button.
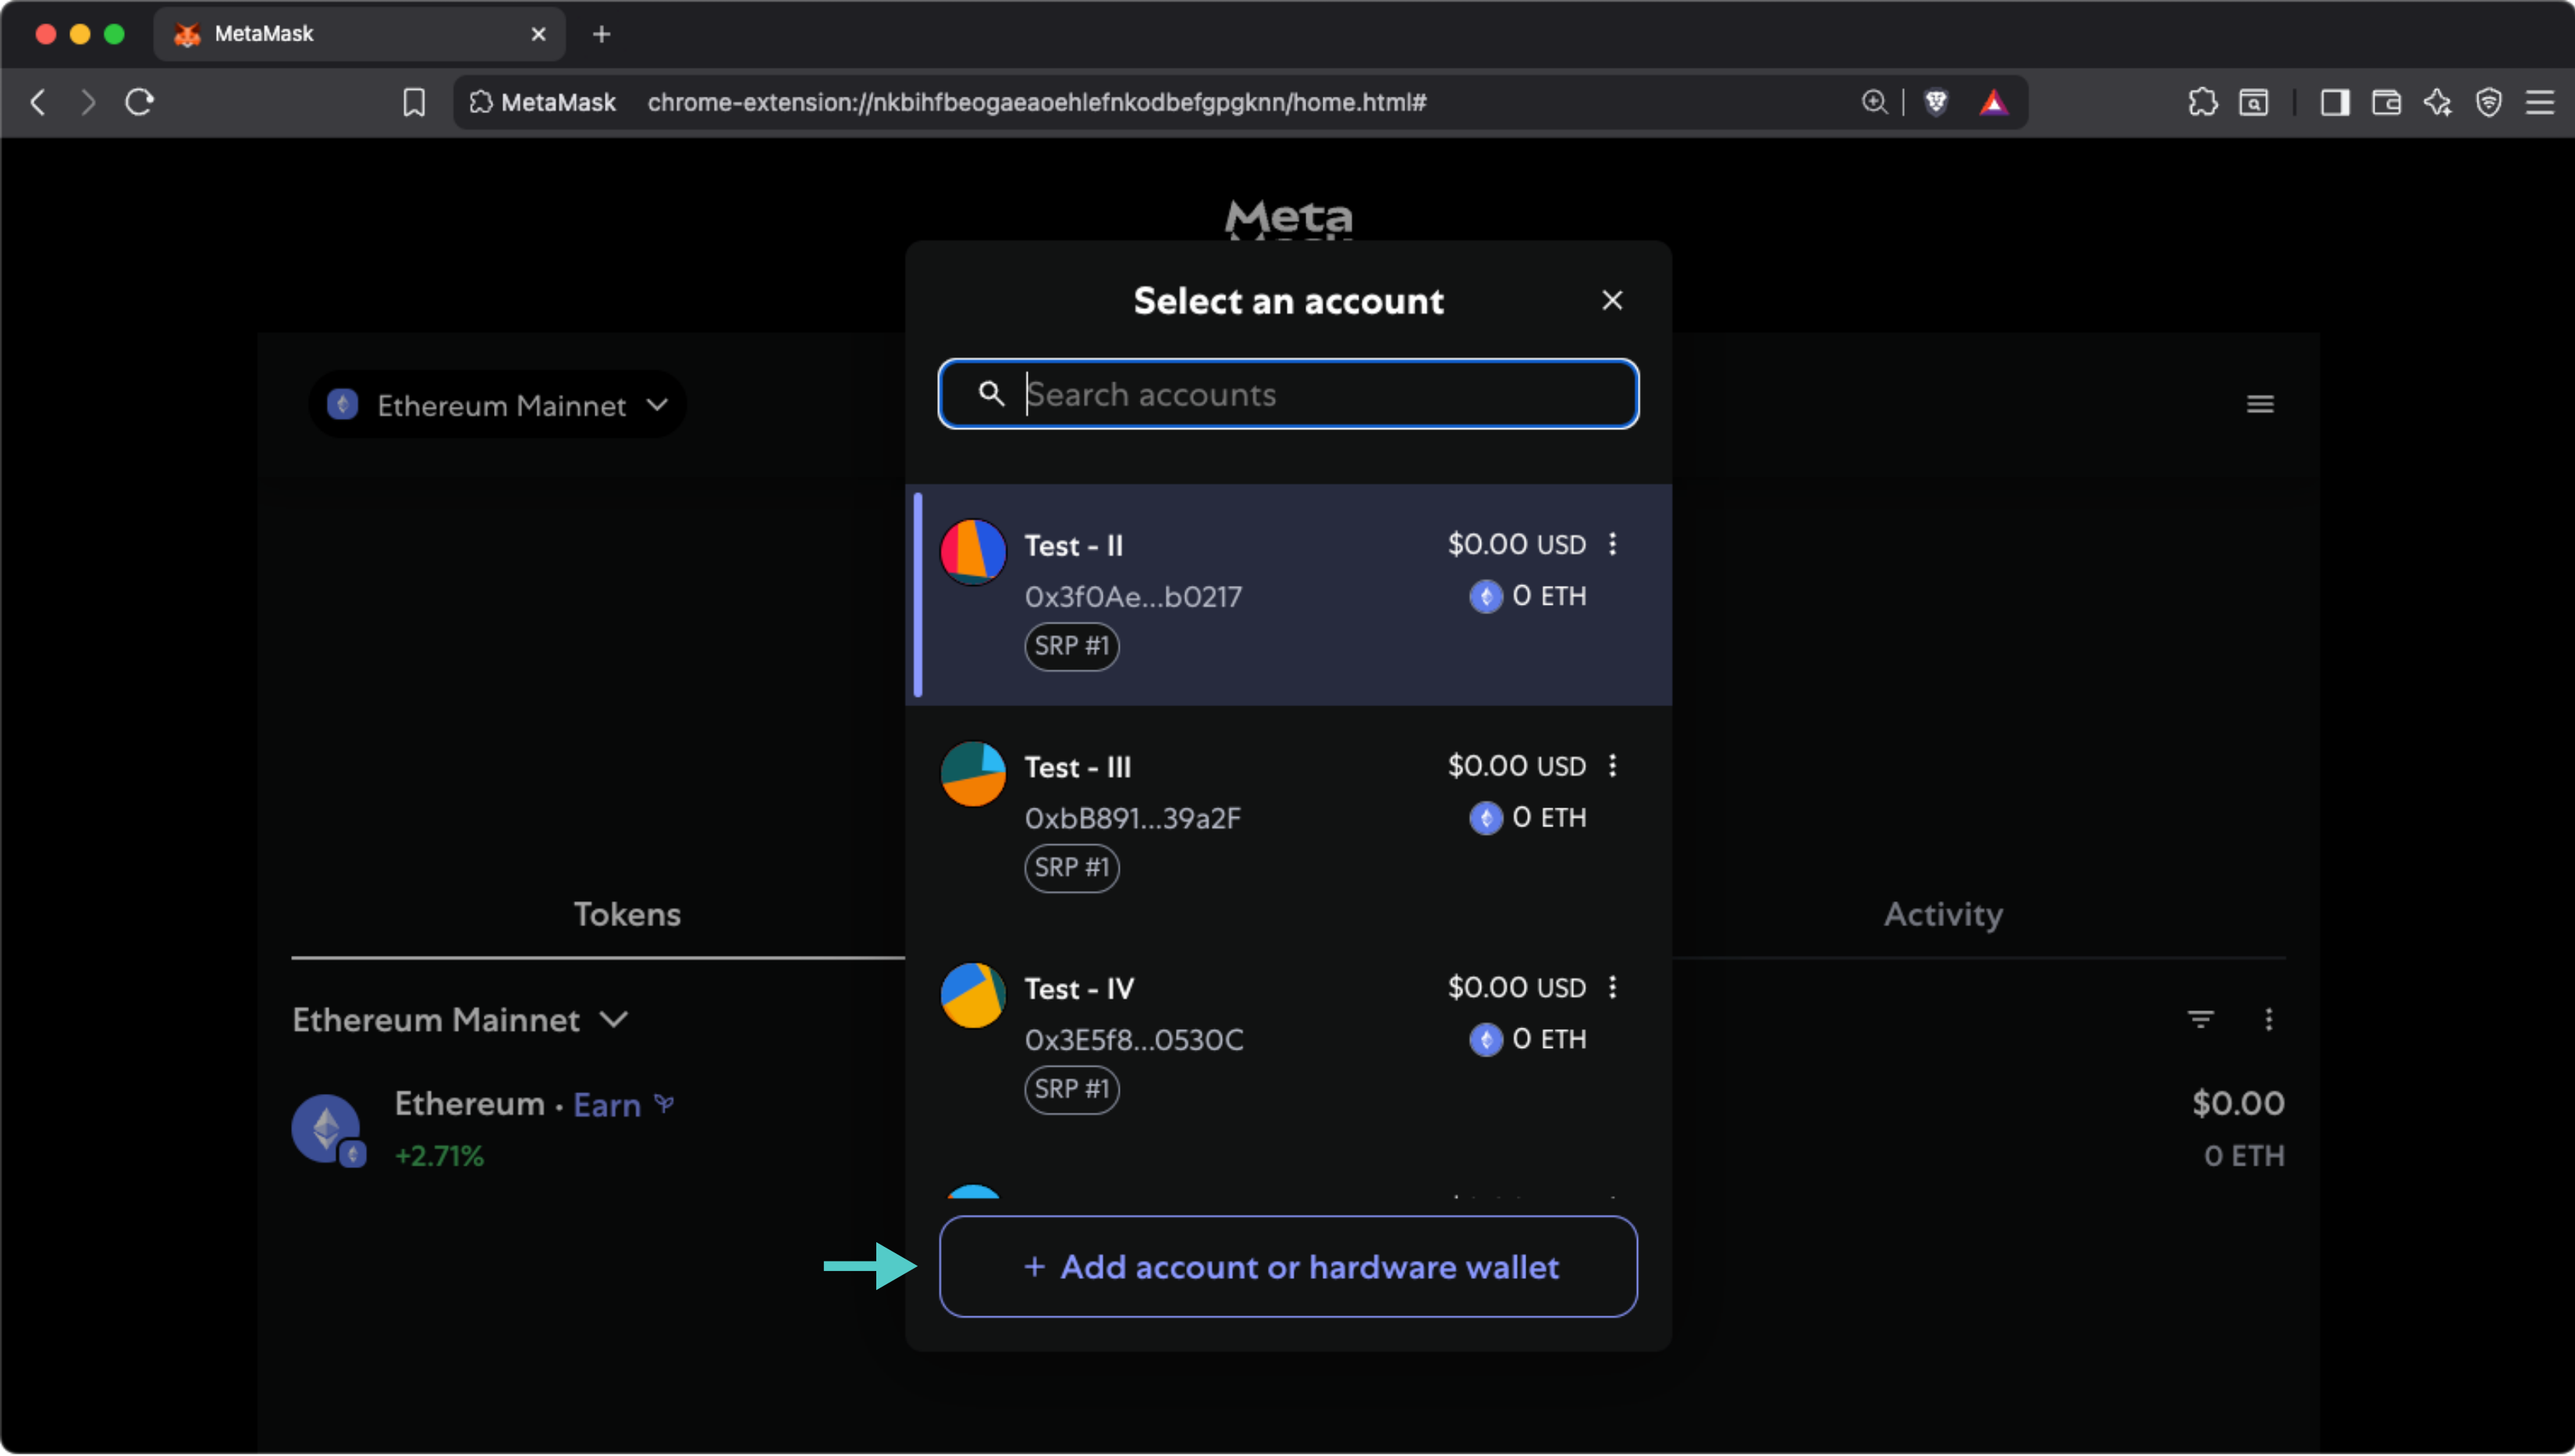
Select **Hardware wallet** from the available options.
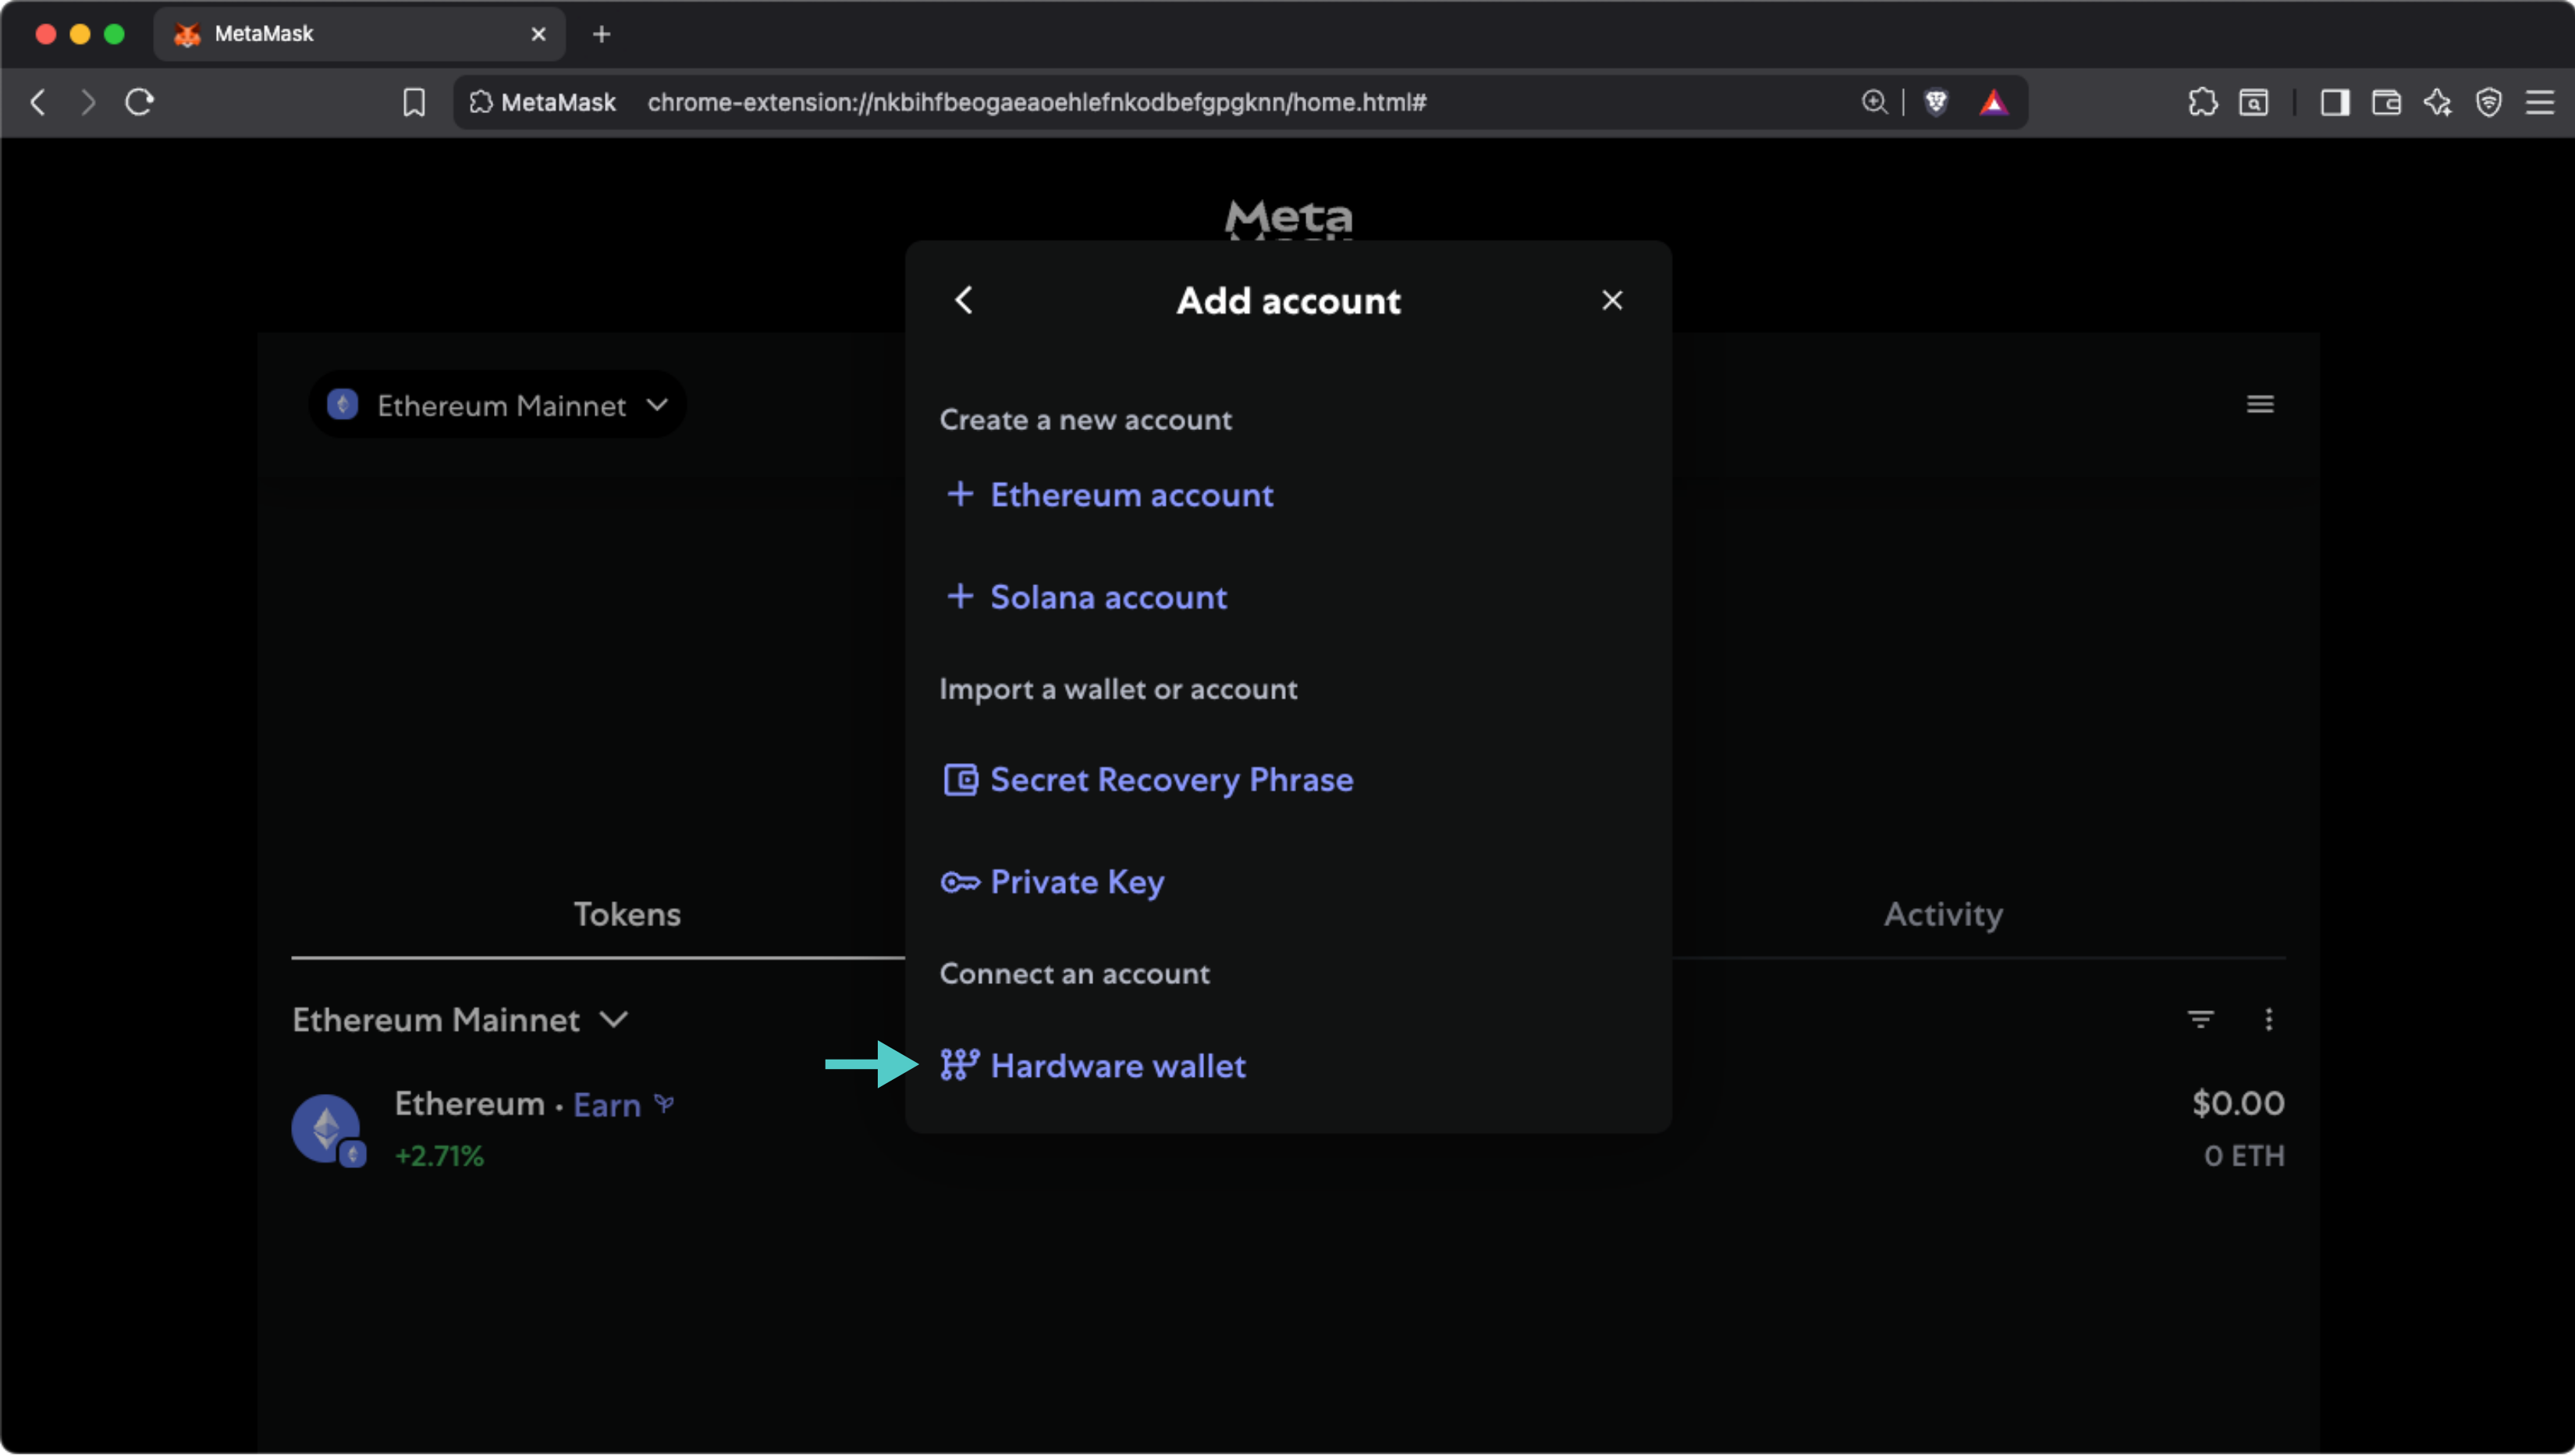
On the following screen:
1. Select the **LEDGER** box. You'll be prompted to connect your Ledger, unlock it, and open the Ethereum app.
2. Click on **Continue**.
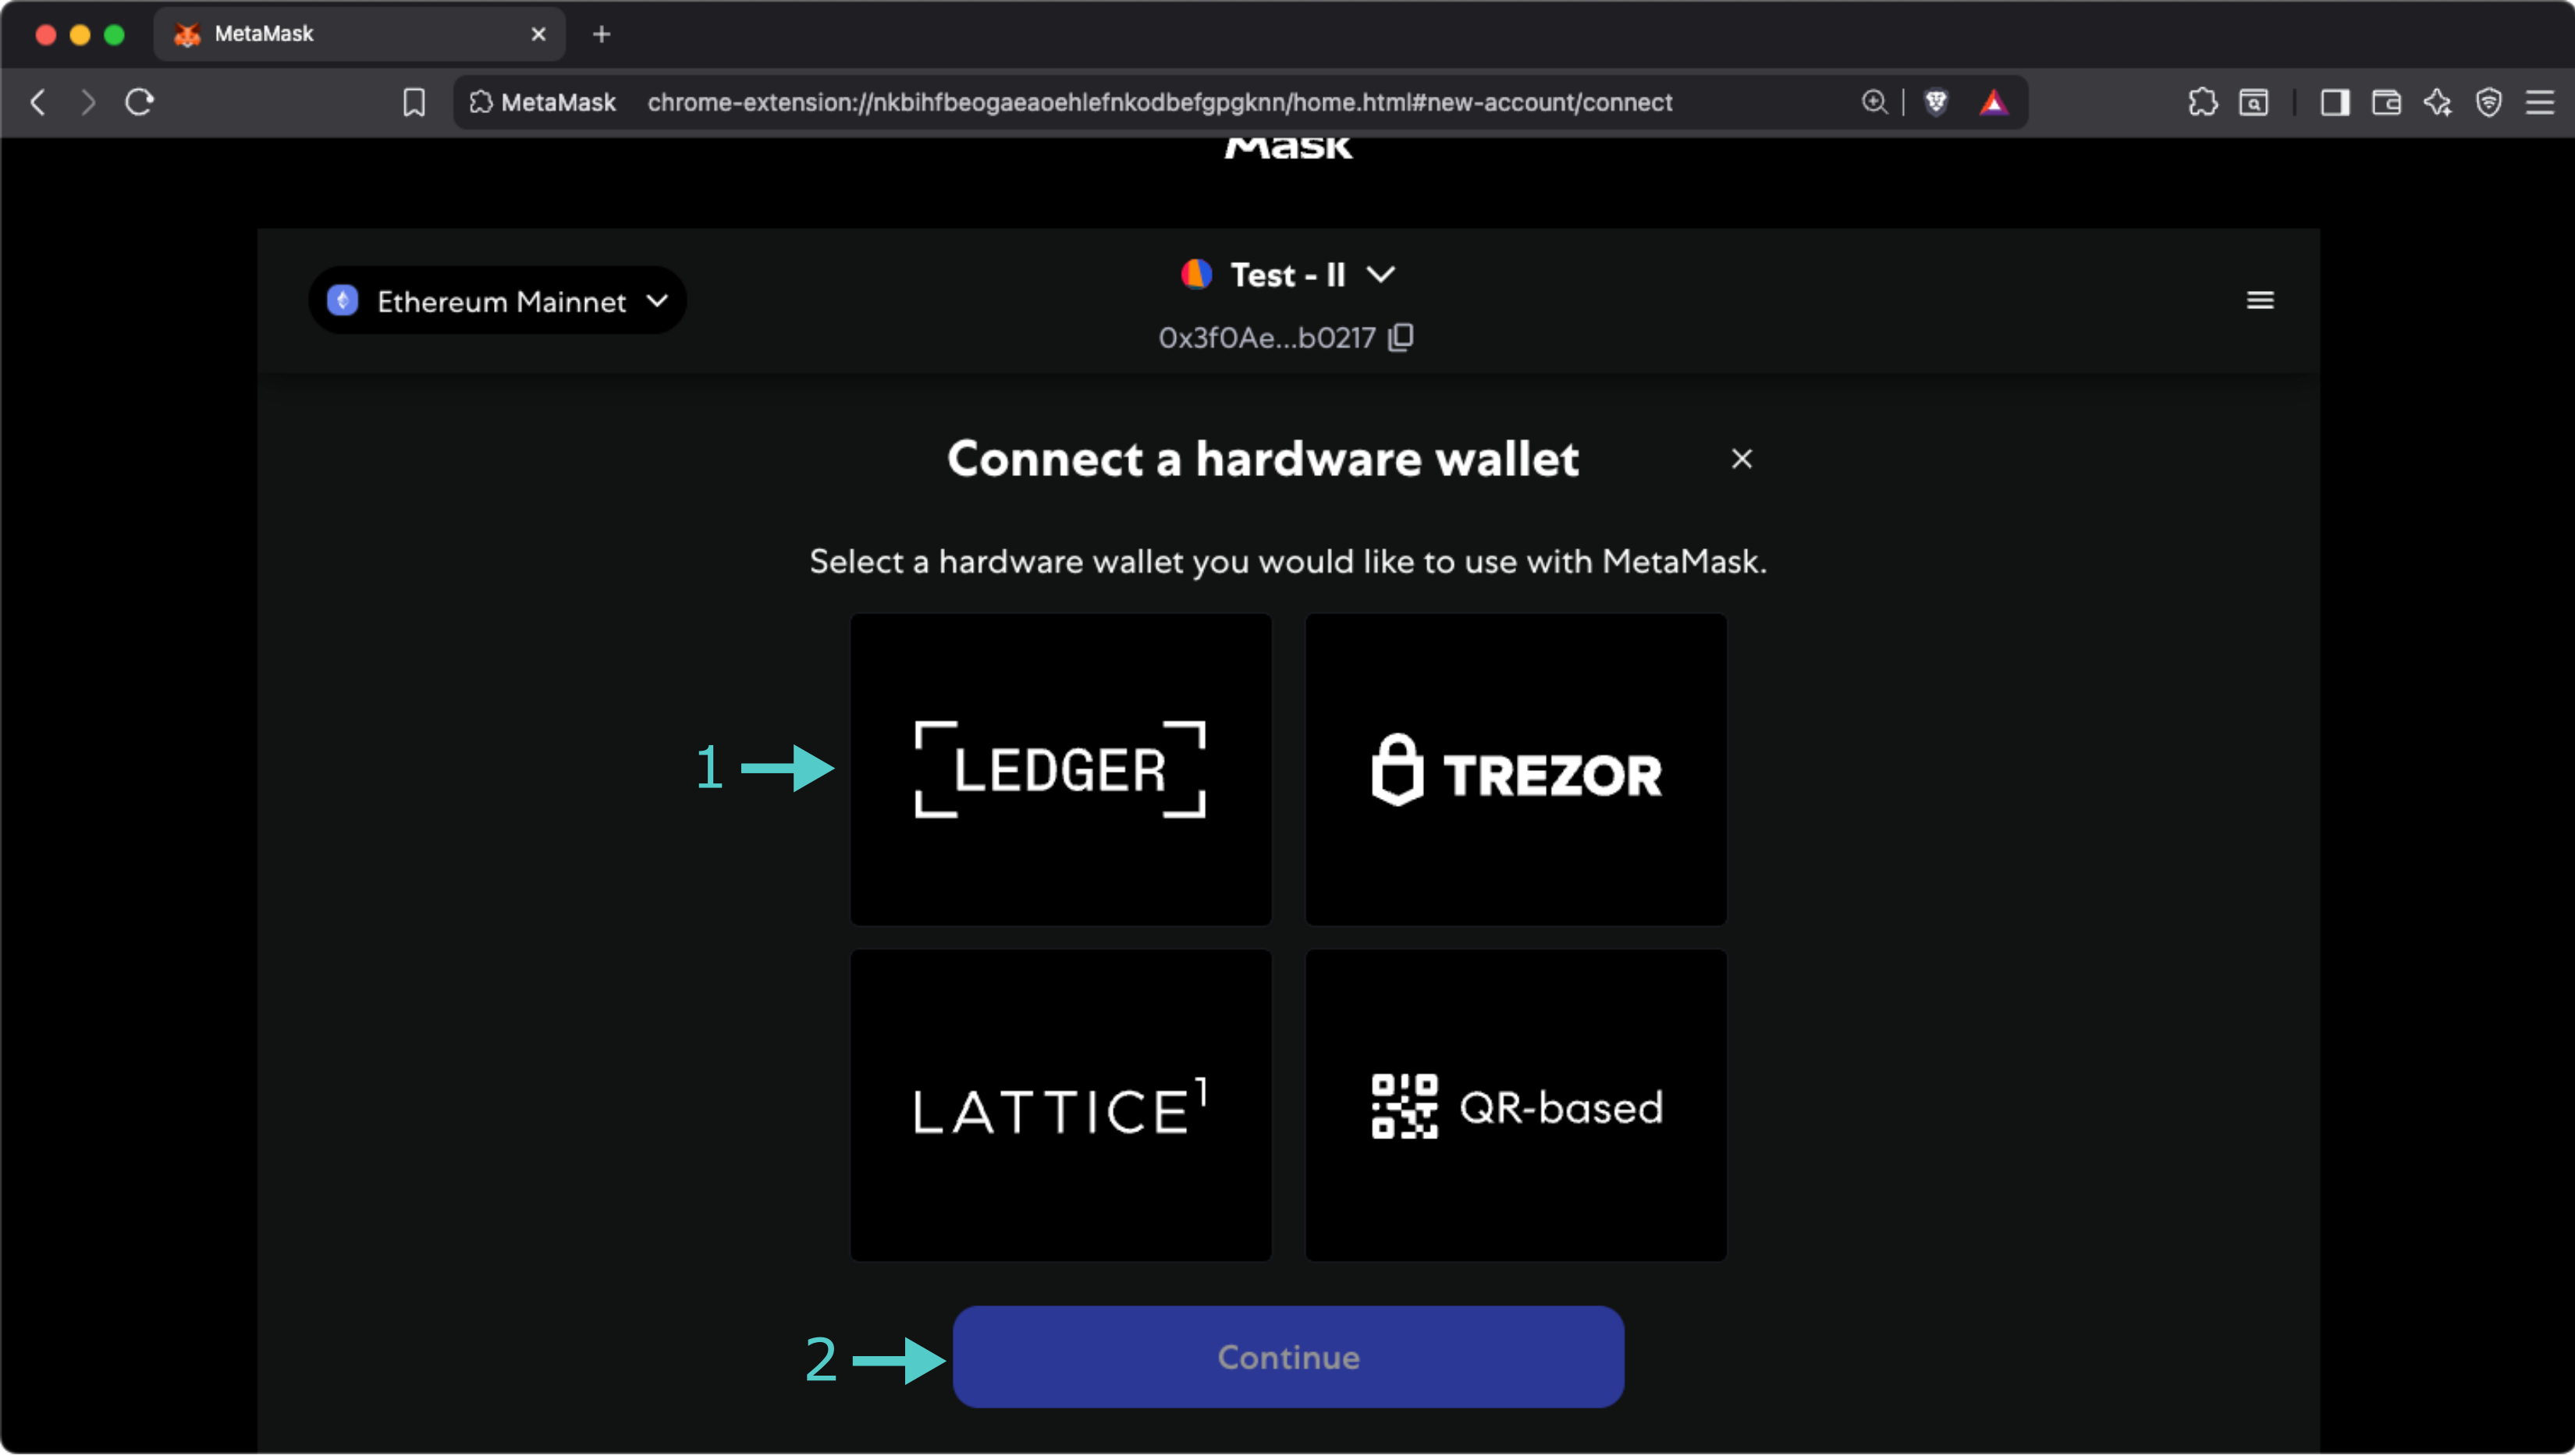
Finally, you will be presented with a list of derived accounts. Select the one you want to import, click **Unlock**, and that's all! Your Metamask wallet can now sign transactions using your Ledger device.
The information presented herein has been provided by third parties and is made available solely for general information purposes. Tanssi does not endorse any project listed and described on the Tanssi Doc Website (https://docs.tanssi.network/). Tanssi Foundation does not warrant the accuracy, completeness or usefulness of this information. Any reliance you place on such information is strictly at your own risk. Tanssi Foundation disclaims all liability and responsibility arising from any reliance placed on this information by you or by anyone who may be informed of any of its contents. All statements and/or opinions expressed in these materials are solely the responsibility of the person or entity providing those materials and do not necessarily represent the opinion of Tanssi Foundation. The information should not be construed as professional or financial advice of any kind. Advice from a suitably qualified professional should always be sought in relation to any particular matter or circumstance. The information herein may link to or integrate with other websites operated or content provided by third parties, and such other websites may link to this website. Tanssi Foundation has no control over any such other websites or their content and will have no liability arising out of or related to such websites or their content. The existence of any such link does not constitute an endorsement of such websites, the content of the websites, or the operators of the websites. These links are being provided to you only as a convenience and you release and hold Tanssi Foundation harmless from any and all liability arising from your use of this information or the information provided by any third-party website or service.
--- END CONTENT ---
Doc-Content: https://docs.tanssi.network/builders/toolkit/ethereum-api/wallets/metamask/
--- BEGIN CONTENT ---
---
title: How to Connect MetaMask
description: This guide walks you through how to connect MetaMask, a browser-based Ethereum wallet, to your Tanssi-powered EVM-compatible network and how to transfer funds.
icon: material-wallet-outline
categories: EVM-Template
---
# Interacting with your Tanssi EVM Network Using MetaMask
## Introduction {: #introduction }
Developers building dApps on top of Tanssi-powered EVM networks can leverage their Ethereum compatibility features by integrating known Ethereum wallets, such as [MetaMask](https://metamask.io){target=\_blank}. By doing so, they can use the injected library MetaMask provides to interact with the Tanssi EVM network.
This guide takes you through all the necessary steps: from installing Metamask, to setting up a wallet, and finally connecting it to your Tanssi EVM network.
!!! note
You should never share your seed phrase (mnemonic) or private key with anyone. This gives them direct access to your funds. This guide is for educational purposes only.
## Install the MetaMask Extension {: #install-the-metamask-extension }
First, you'll start with a fresh and default [MetaMask](https://metamask.io){target=\_blank} installation from the Chrome store. After downloading, installing, and initializing the extension, follow the **Get Started** steps to [setup the wallet](#setup-a-wallet). In there, you need to create a wallet, set a password, and store your secret backup phrase (this gives direct access to your funds, so make sure to store these in a secure place).
!!! note
The Metamask browser extension is compatible with Chrome, Chromium based browsers (such as Microsoft Edge and Opera), and Firefox. Metamask is also available as a mobile app for iOS and Android devices.
## Setup a Wallet {: #setup-a-wallet }
After installing [MetaMask](https://metamask.io){target=\_blank}, the setup will automatically open a new task with a welcome screen. Here, you are offered two options:
- **Create a new wallet** - you'll go through some steps to get a new seed phrase. Ensure you store this phrase securely and you don't share it publicly
- **Import an existing wallet** - you already have a seed phrase stored, and you want to restore an account from that recovery phrase
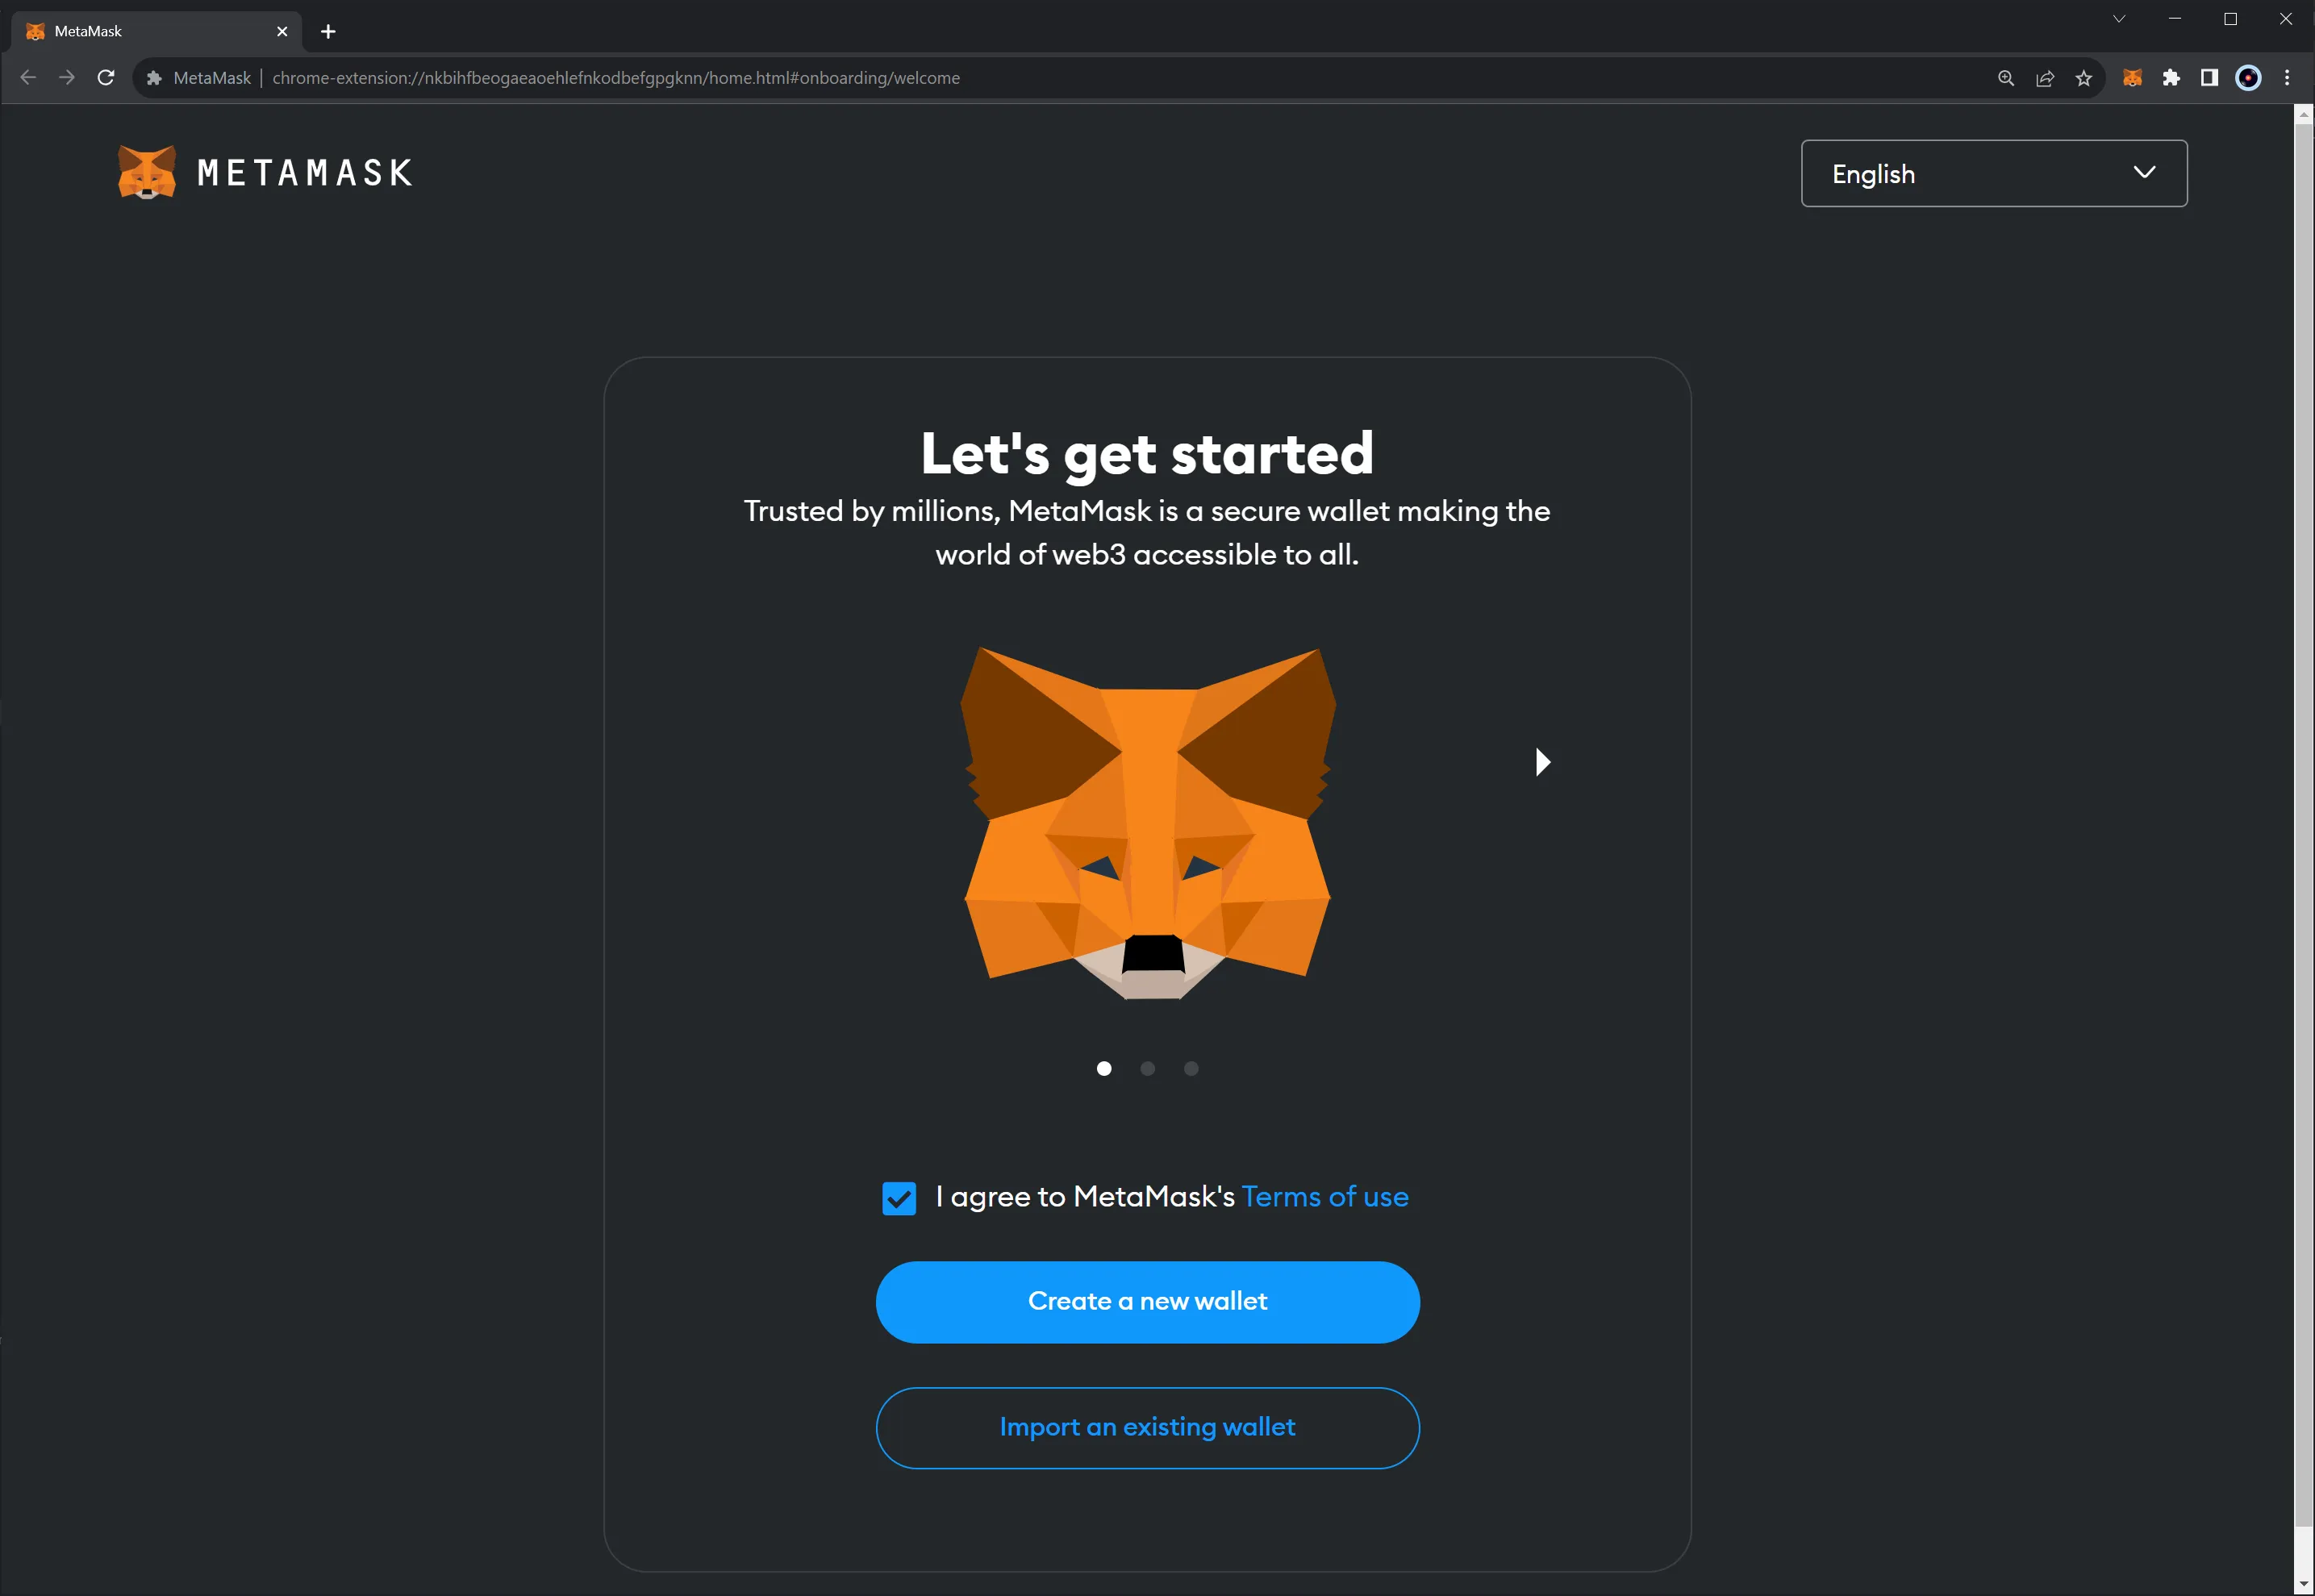
Once you've clicked on the option that adapts to your needs, follow the steps, and you should be all setup.
!!! note
Multiple accounts can be derived from a seed phrase by changing what is known as the address index. By default, when creating or importing an account from the seed phrase, you get the account with the address index 0. You can get the other indexes by just adding new accounts in the main Metamask screen.
## Import Accounts {: #import-accounts }
Once you've created a wallet or imported an existing one, you can also import any account into MetaMask if you hold the private keys.
For this example, you'll use private keys from the development account. Click the account switcher button to import an account using its private keys. That is where it says **Account 1**.
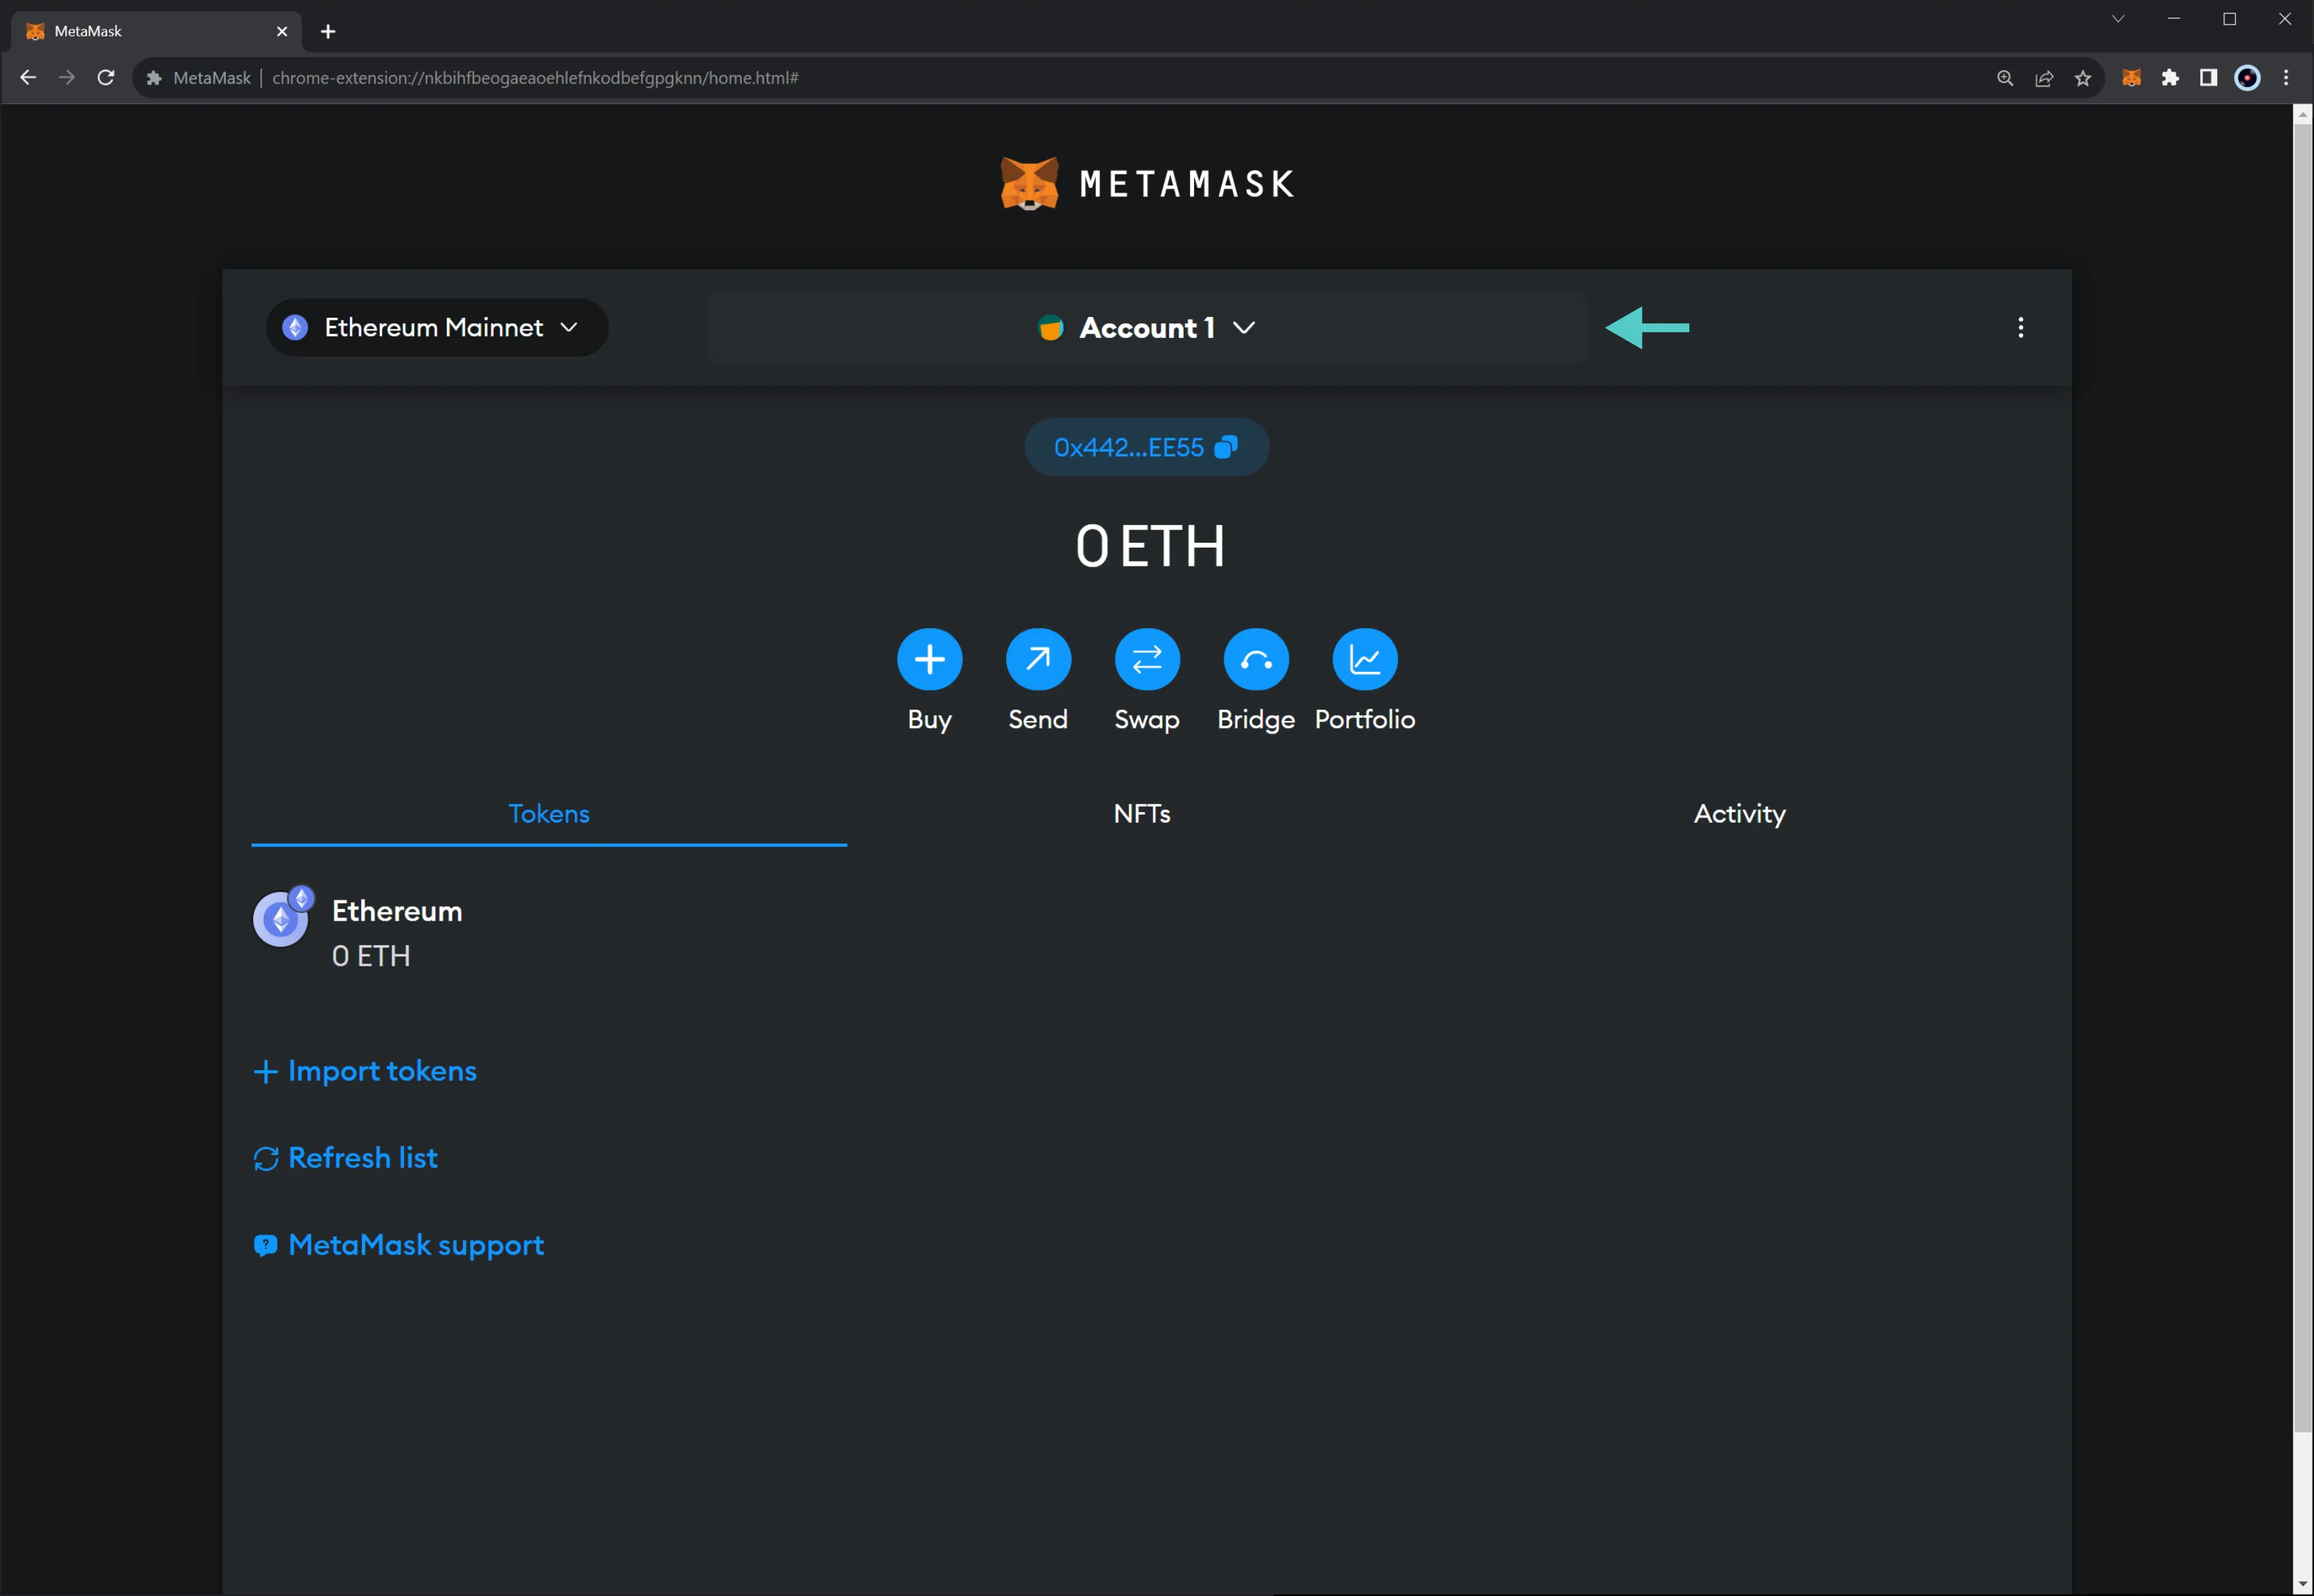
Next, click on **Import Account**.
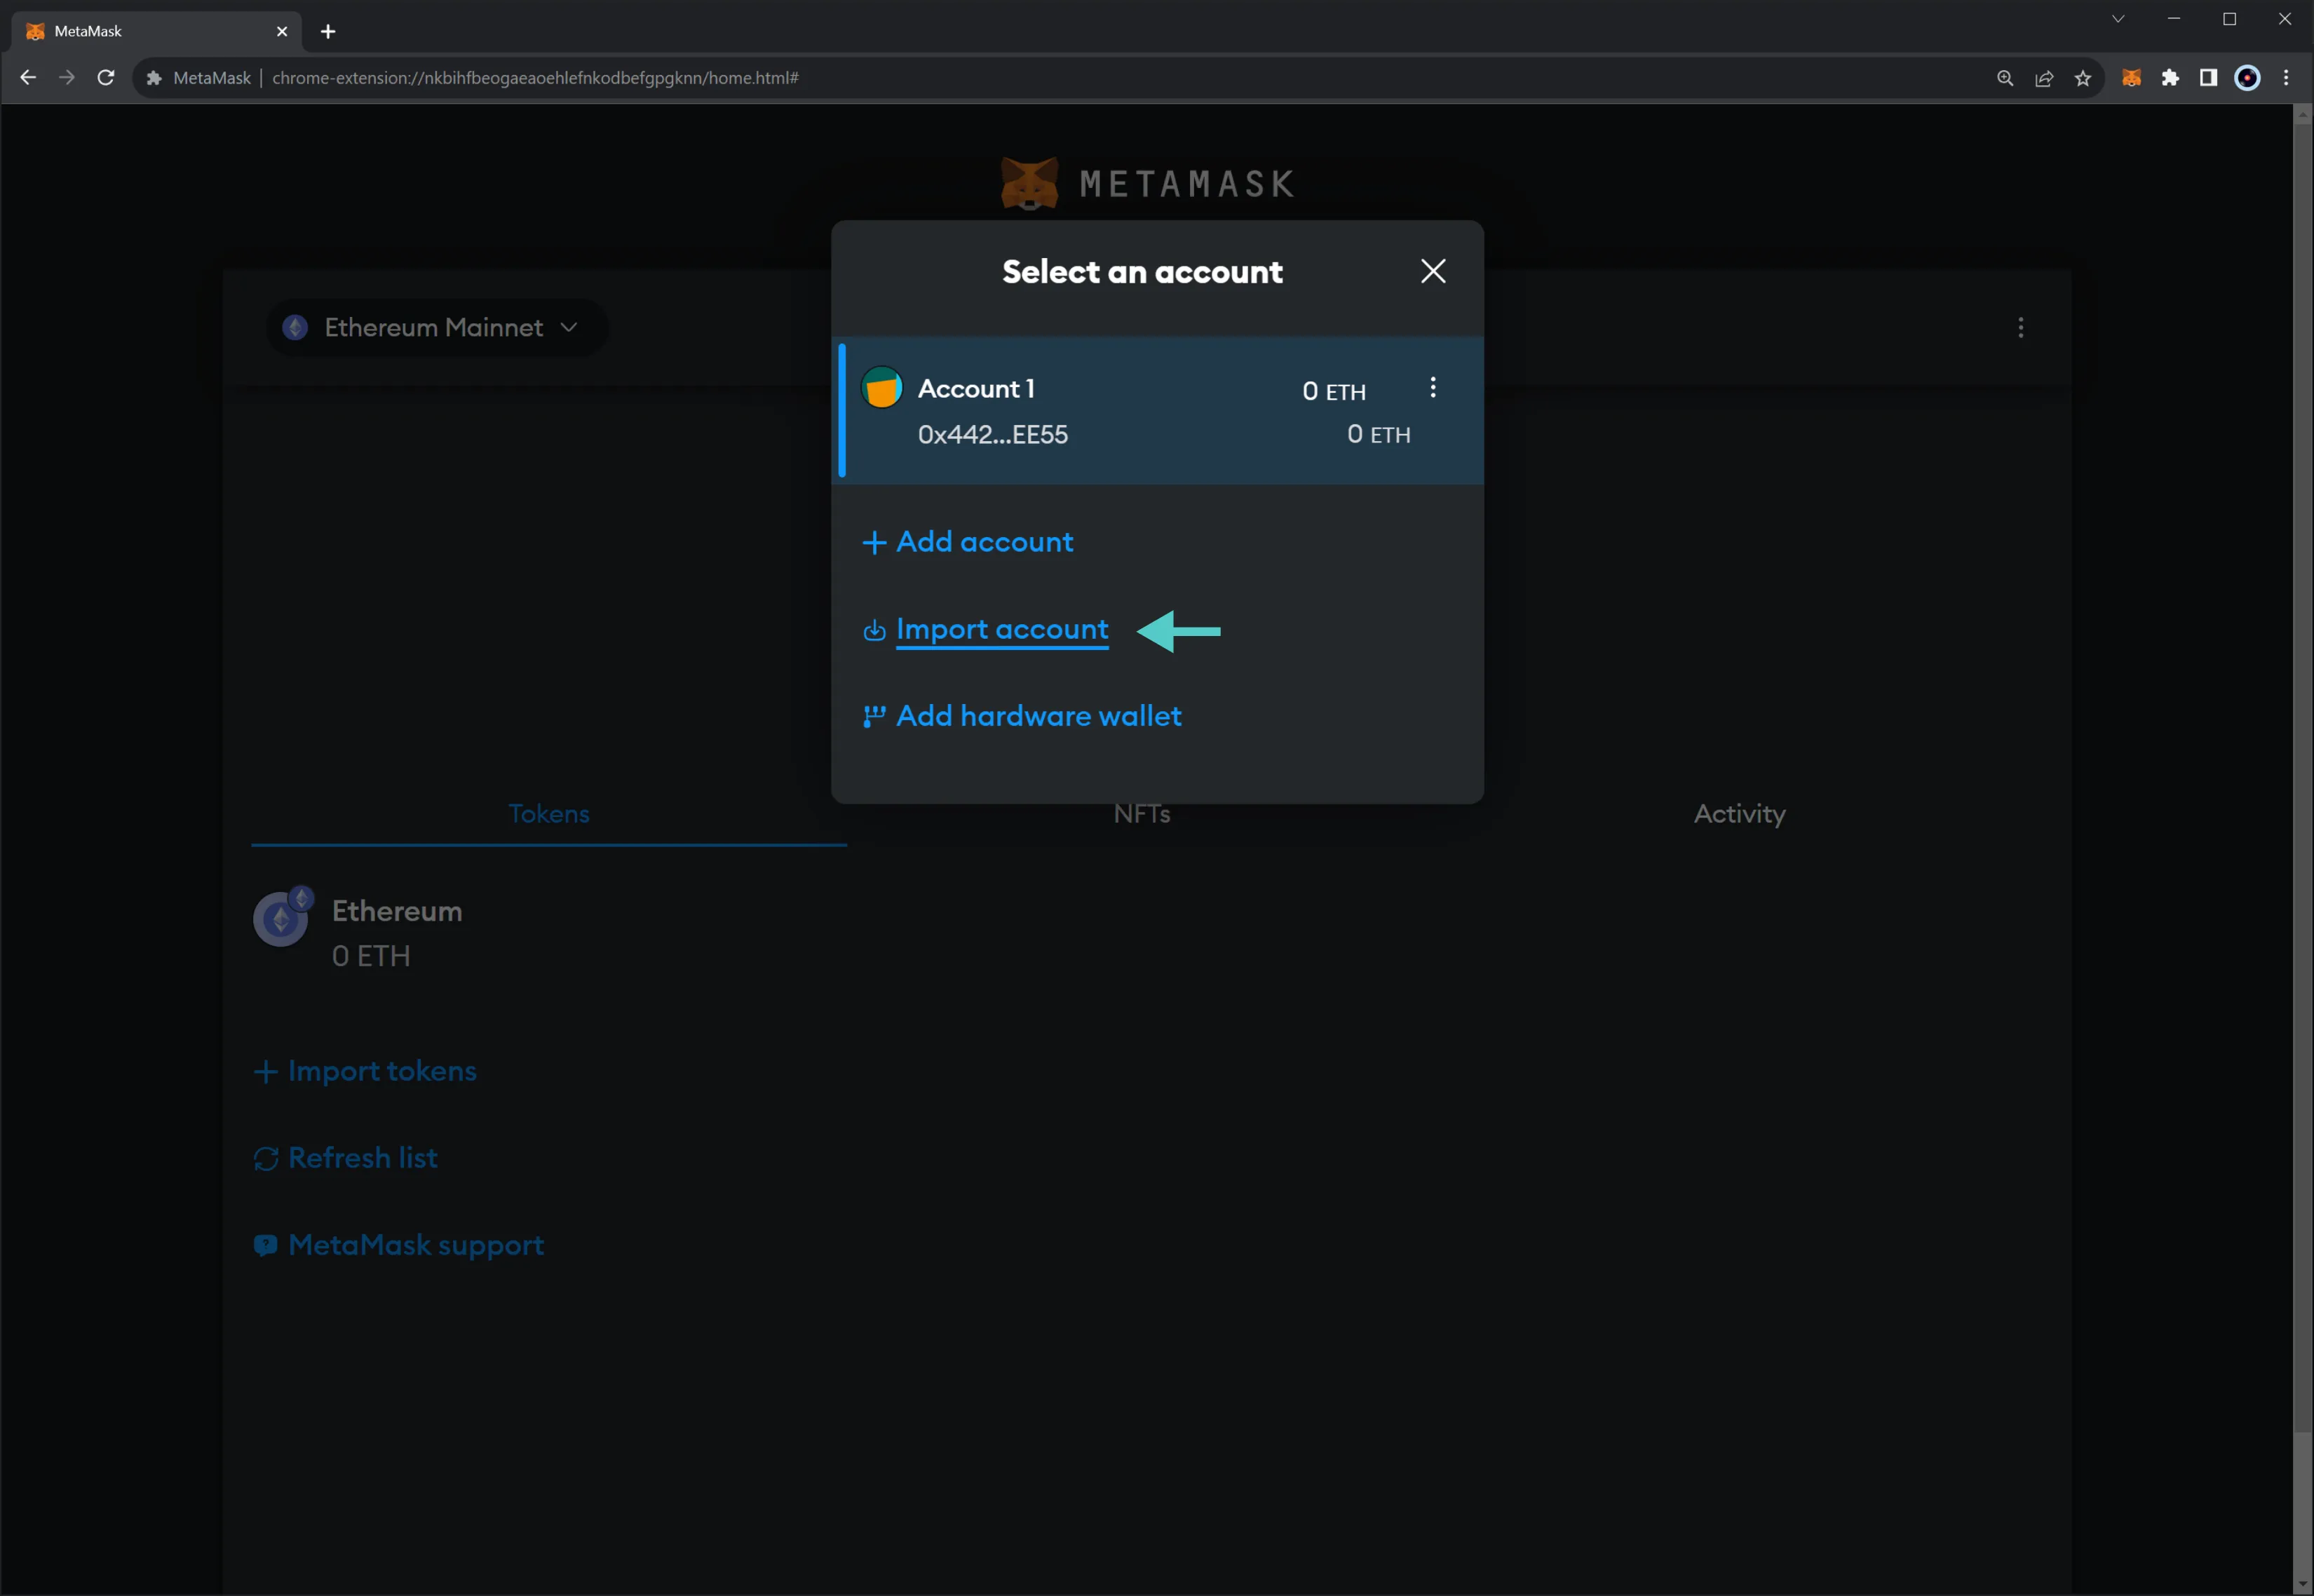
Finally, enter the private keys of the account you are trying to import. Once you've entered the private key, click on **Import**.
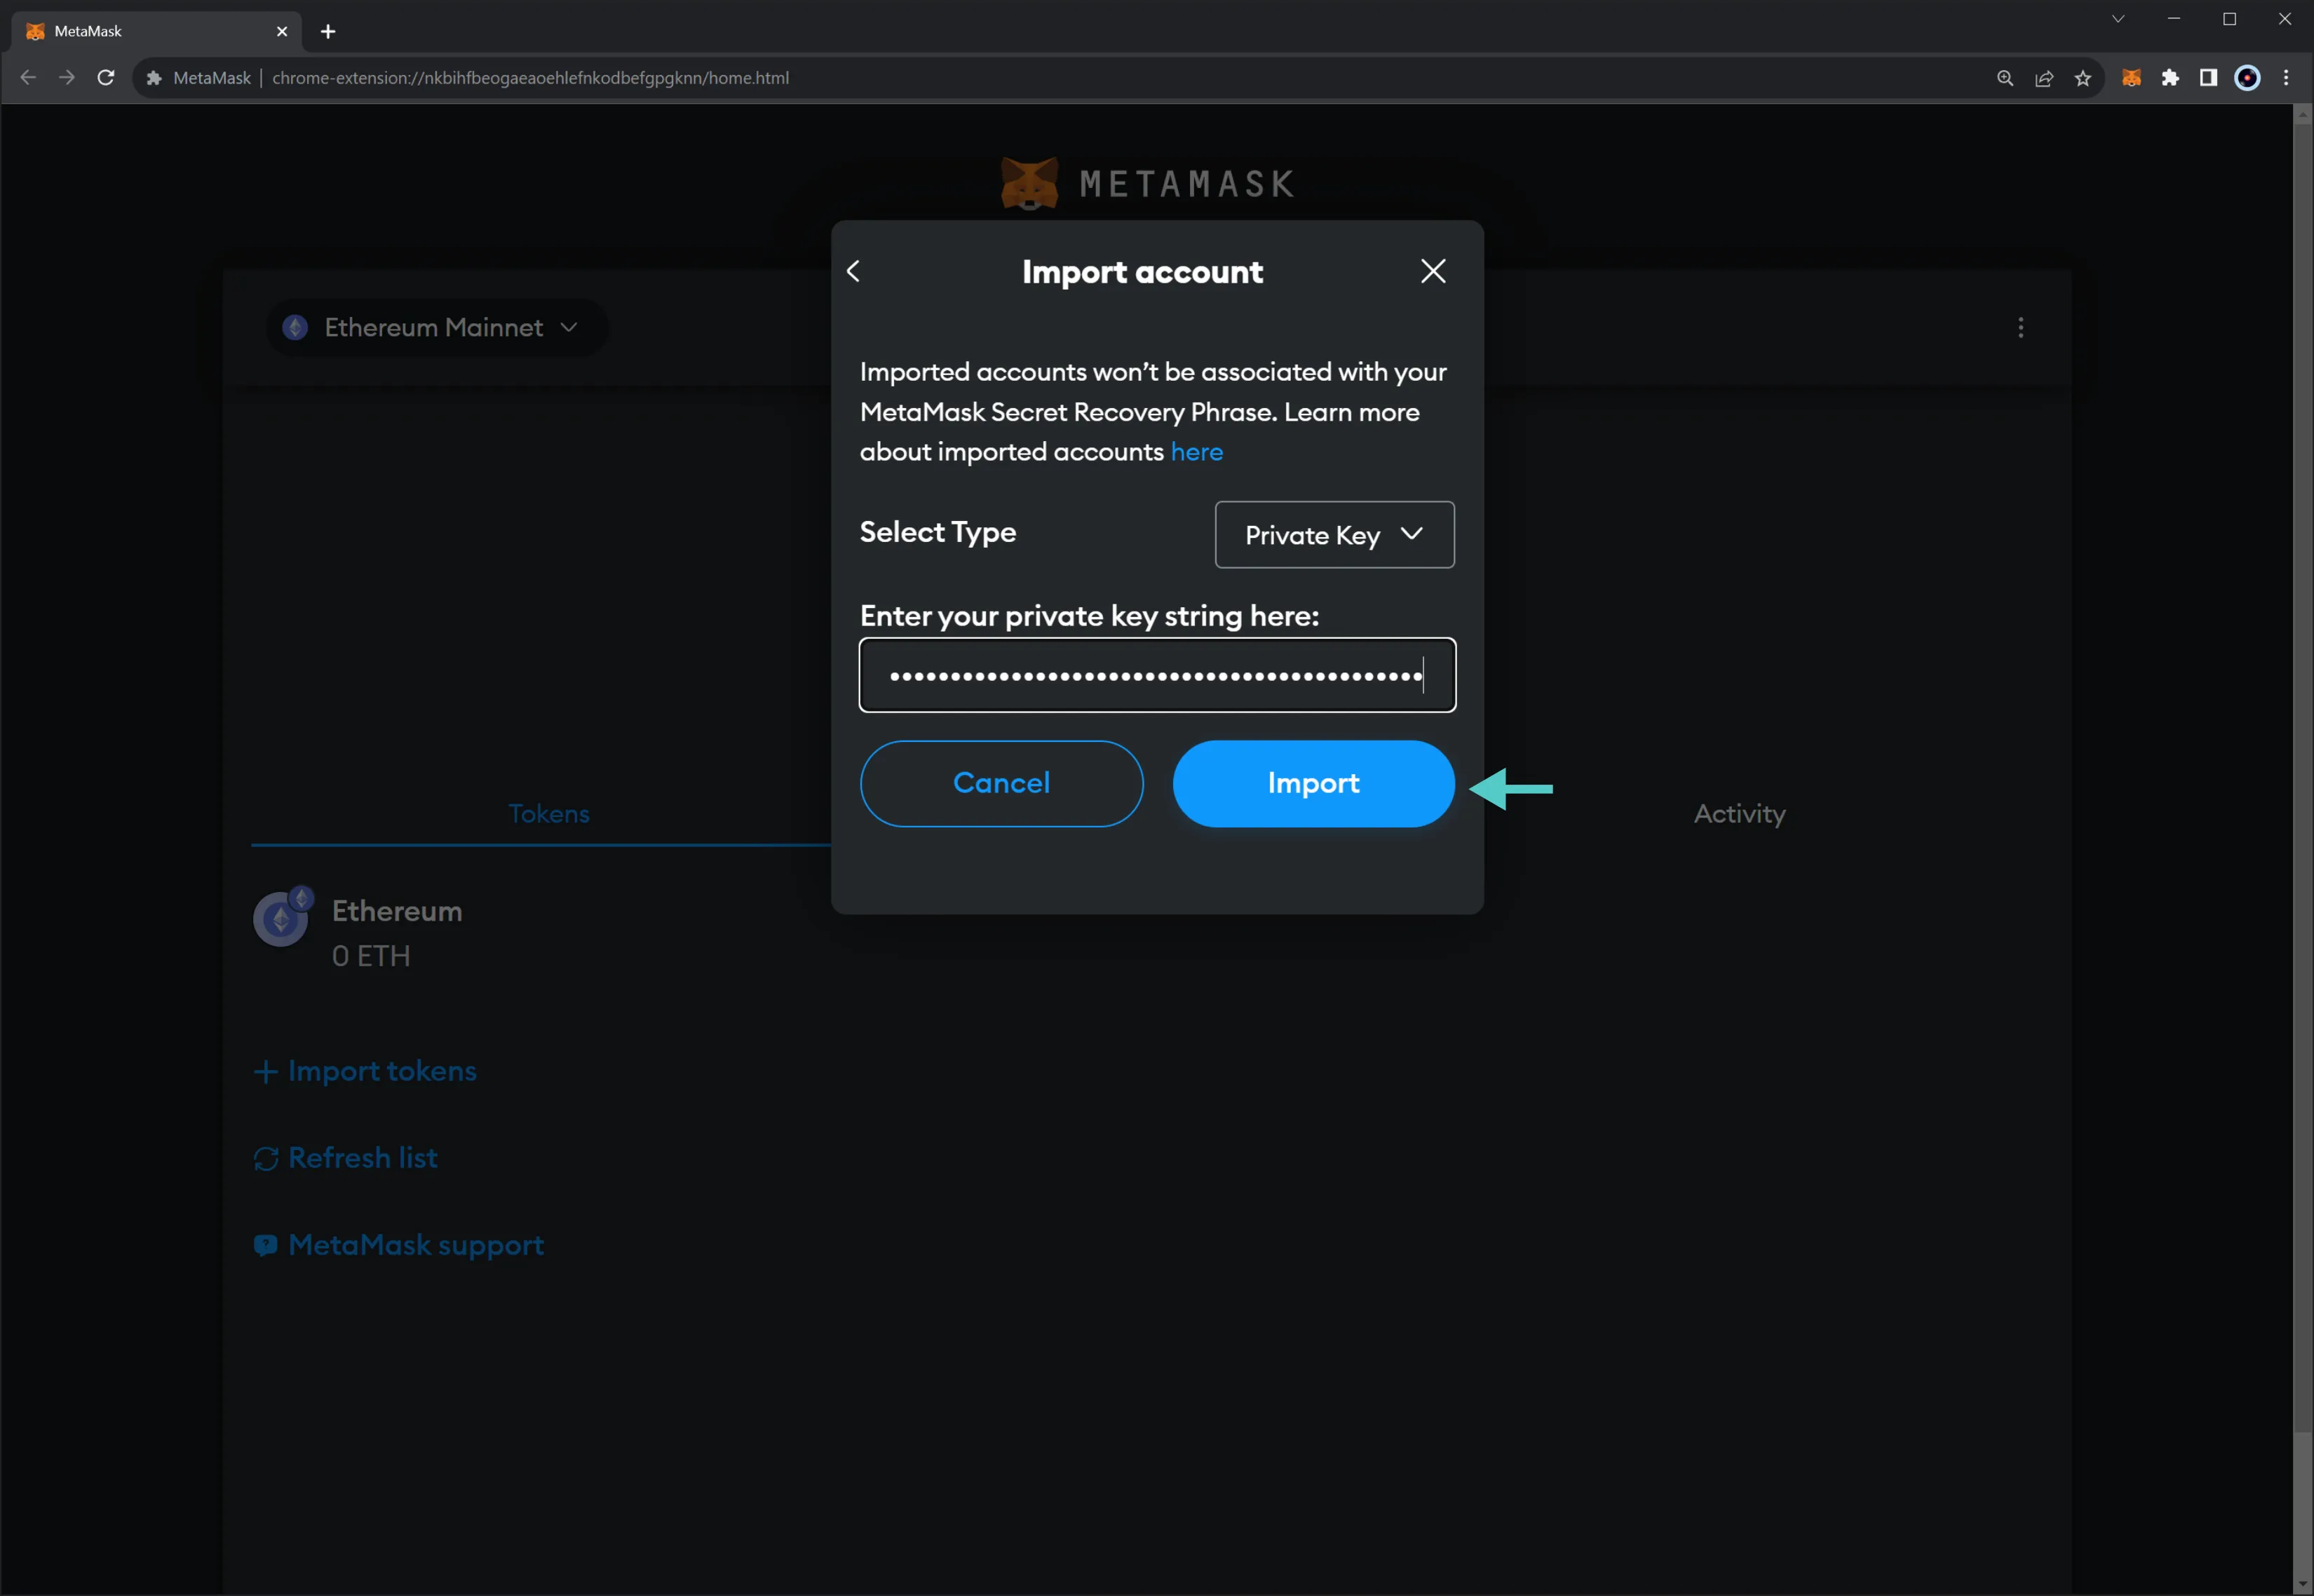
You should end up with an imported **Account 2** that looks like this:
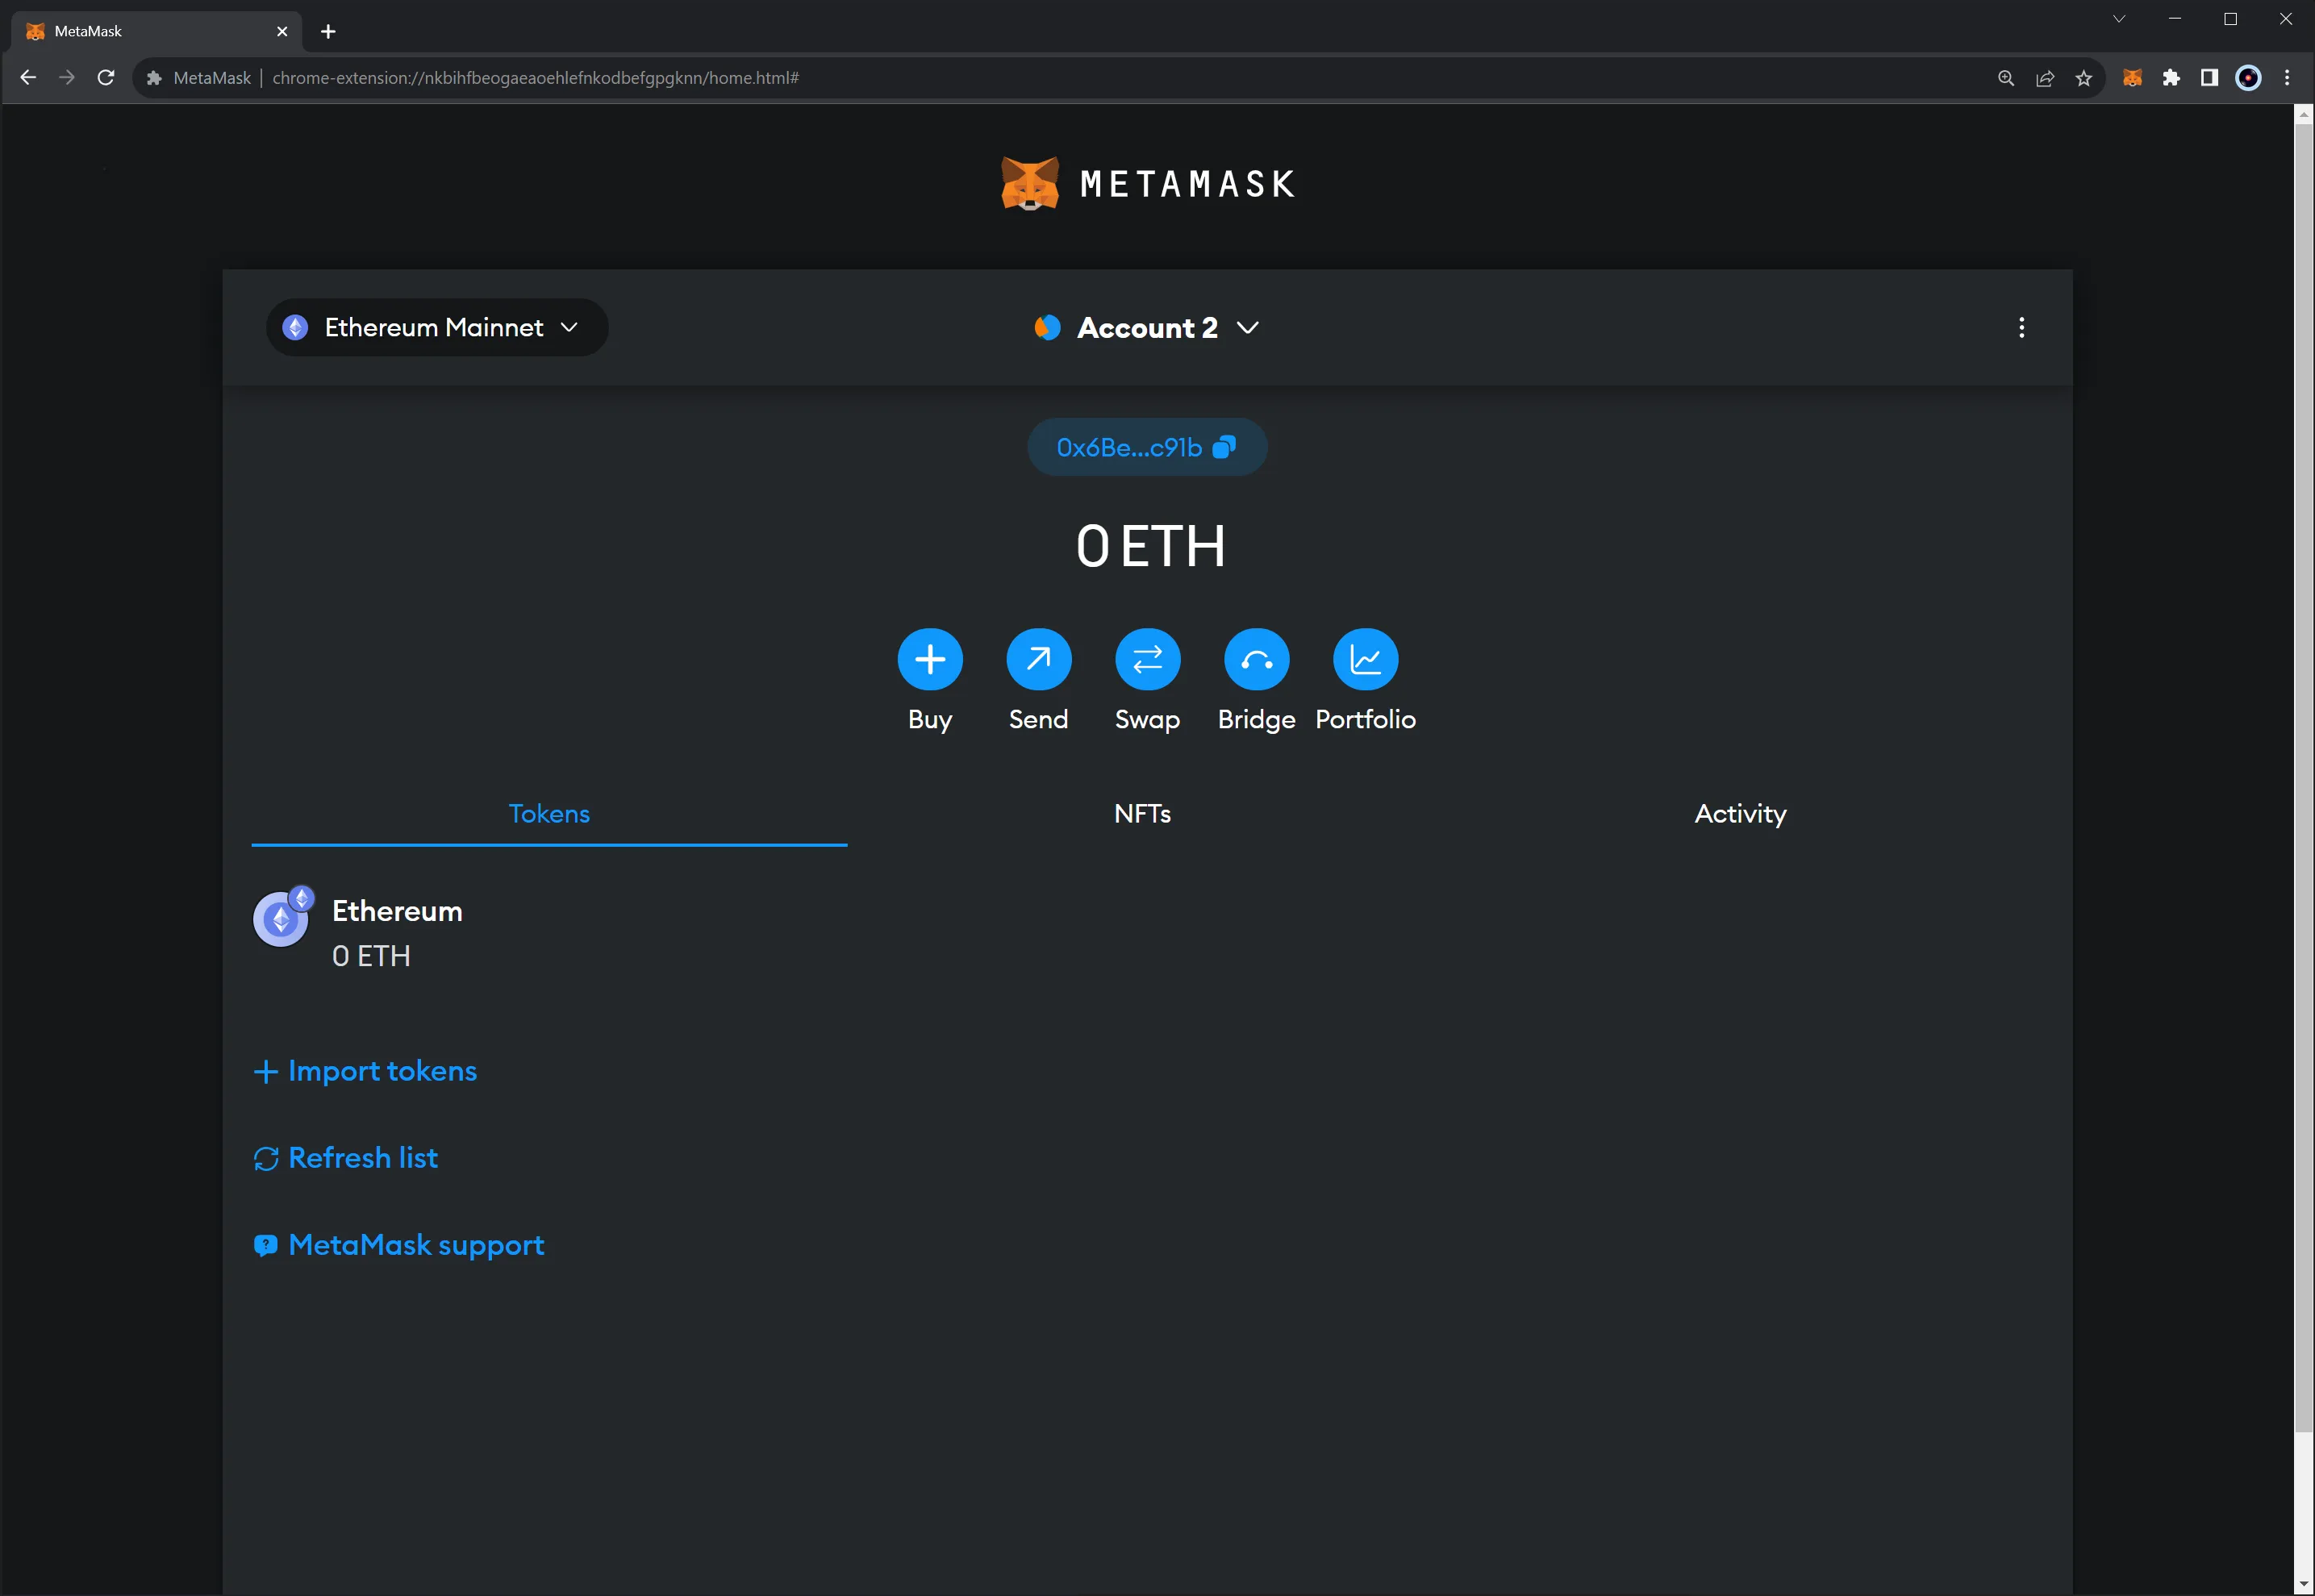
## Connect MetaMask to your Tanssi EVM Network {: #connect-metamask-to-evm-network }
Once you have [MetaMask](https://metamask.io){target=\_blank} installed and have created or imported an account, you can connect it to your Tanssi EVM network. To do so, take the following steps:
1. Click in the upper left network selector menu
2. Select **Add Network**
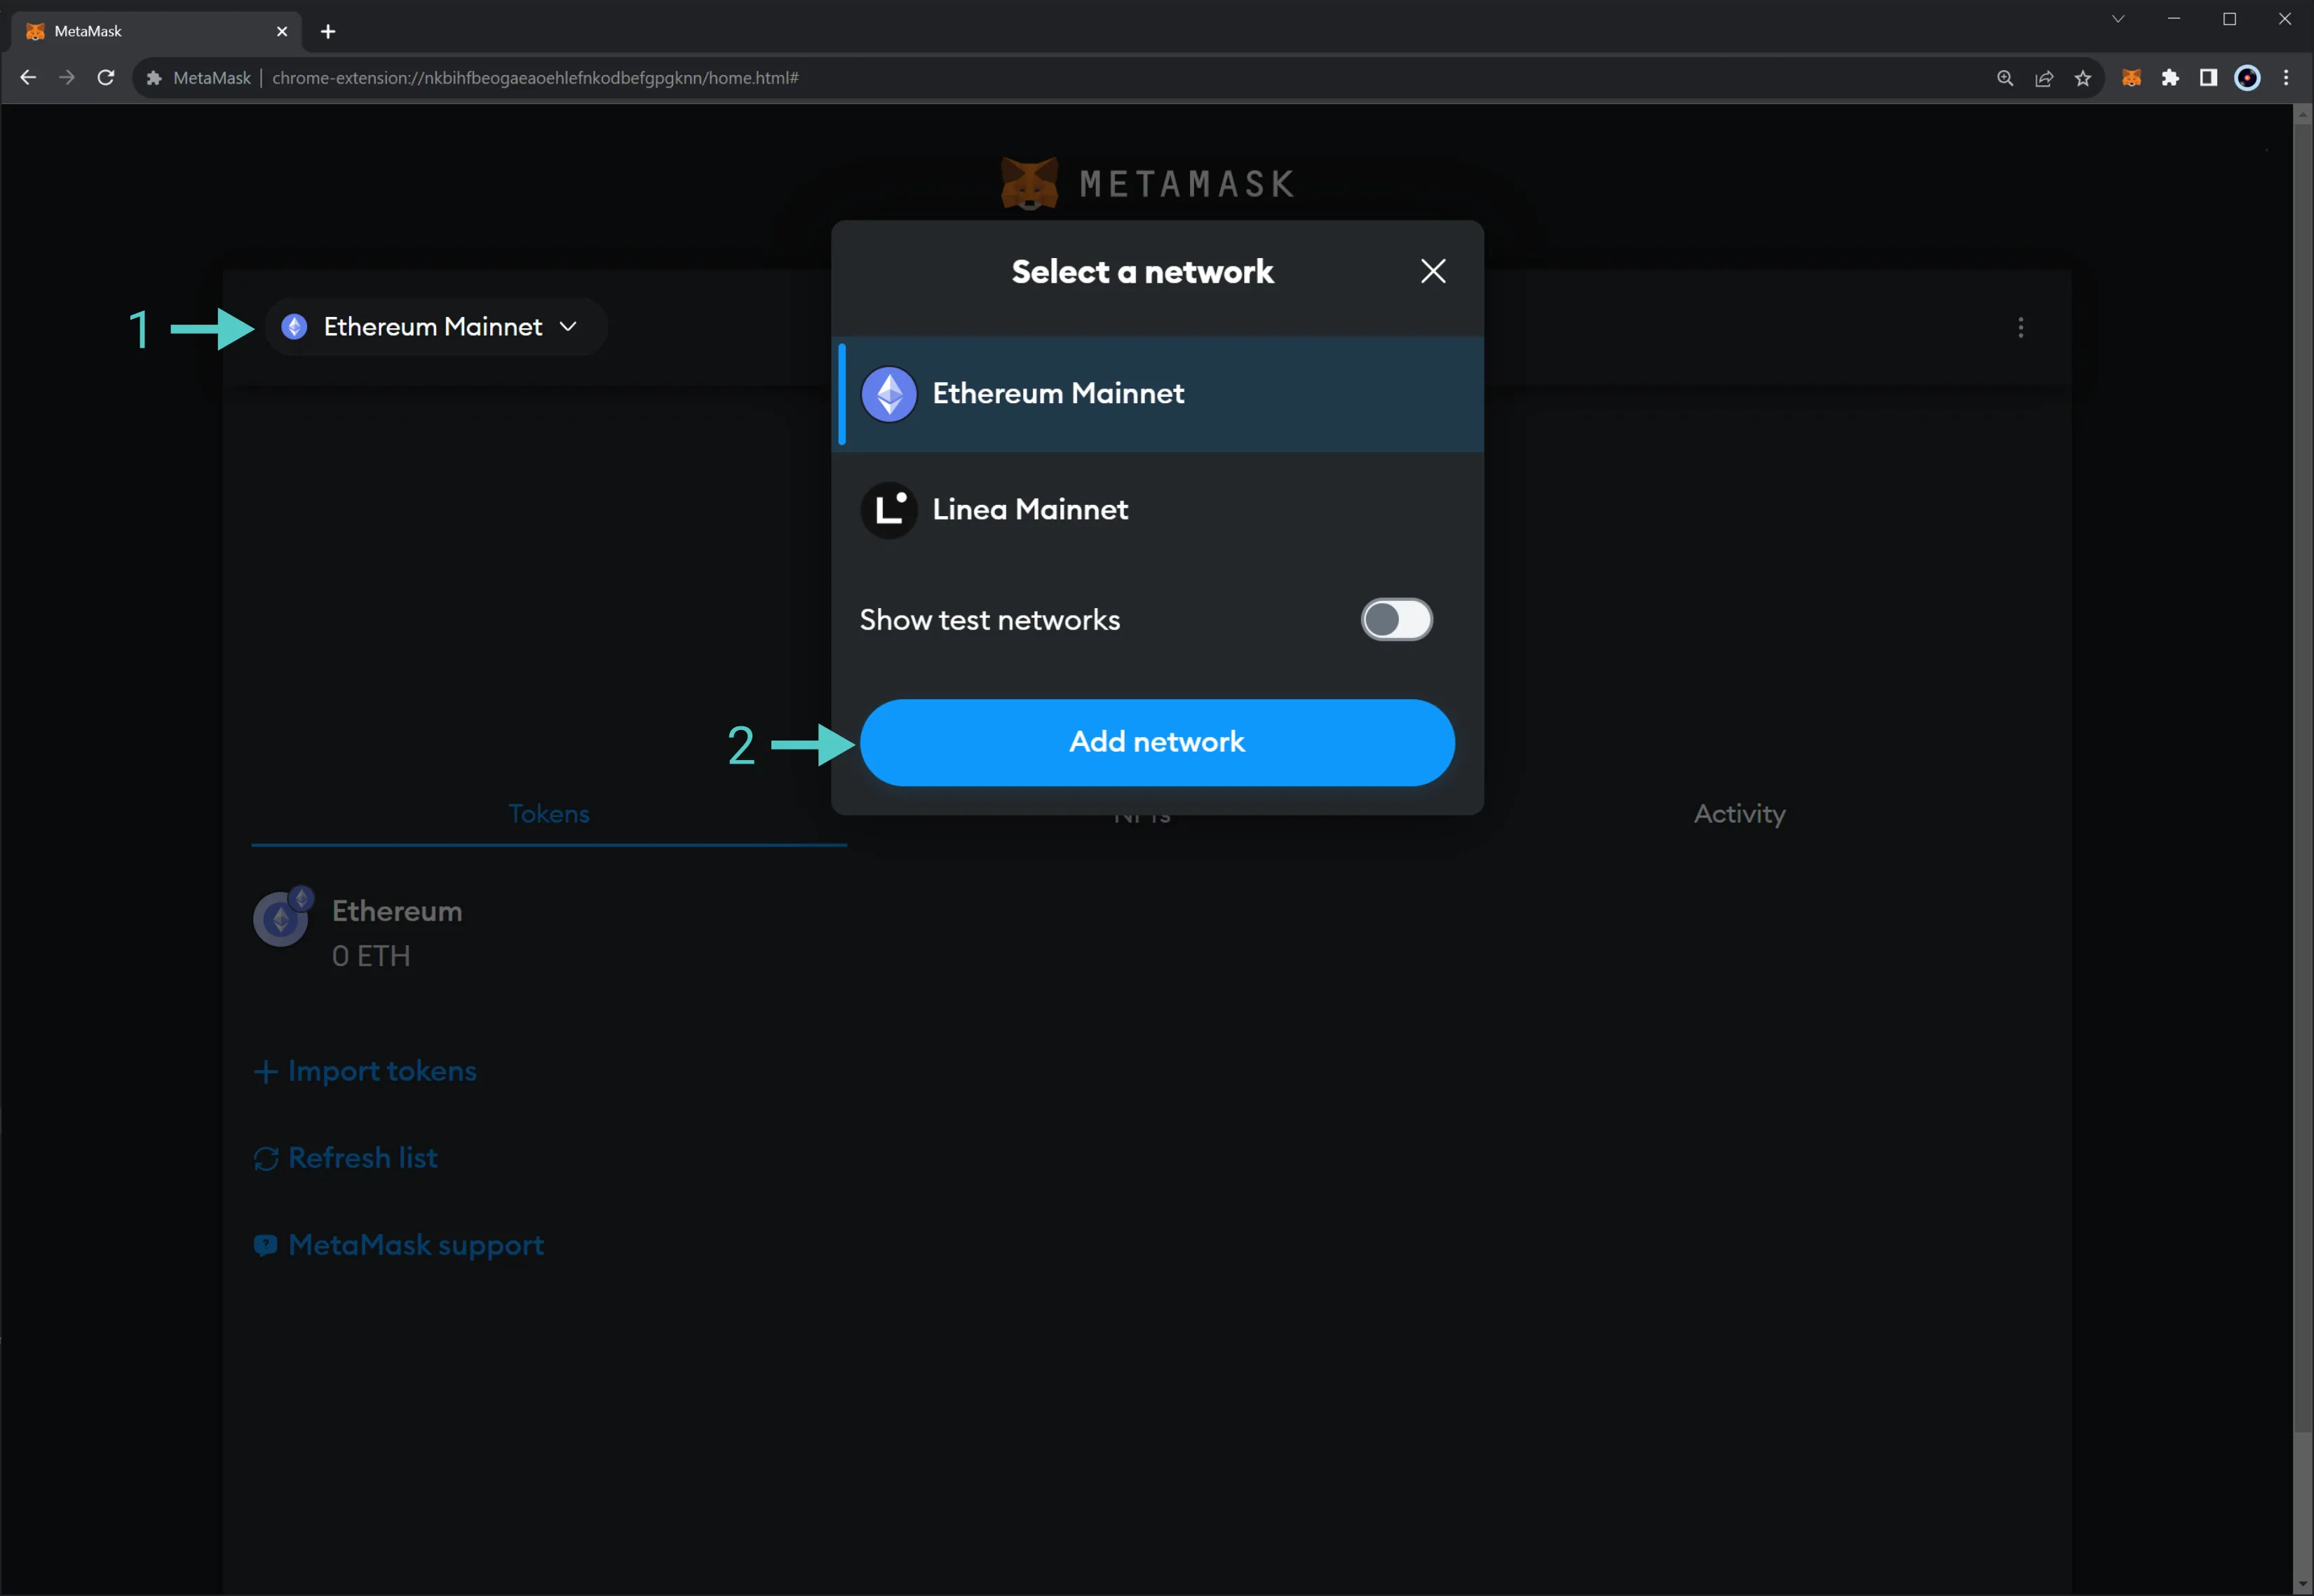
Next, go to the bottom of the page and click on **Add network manually**:
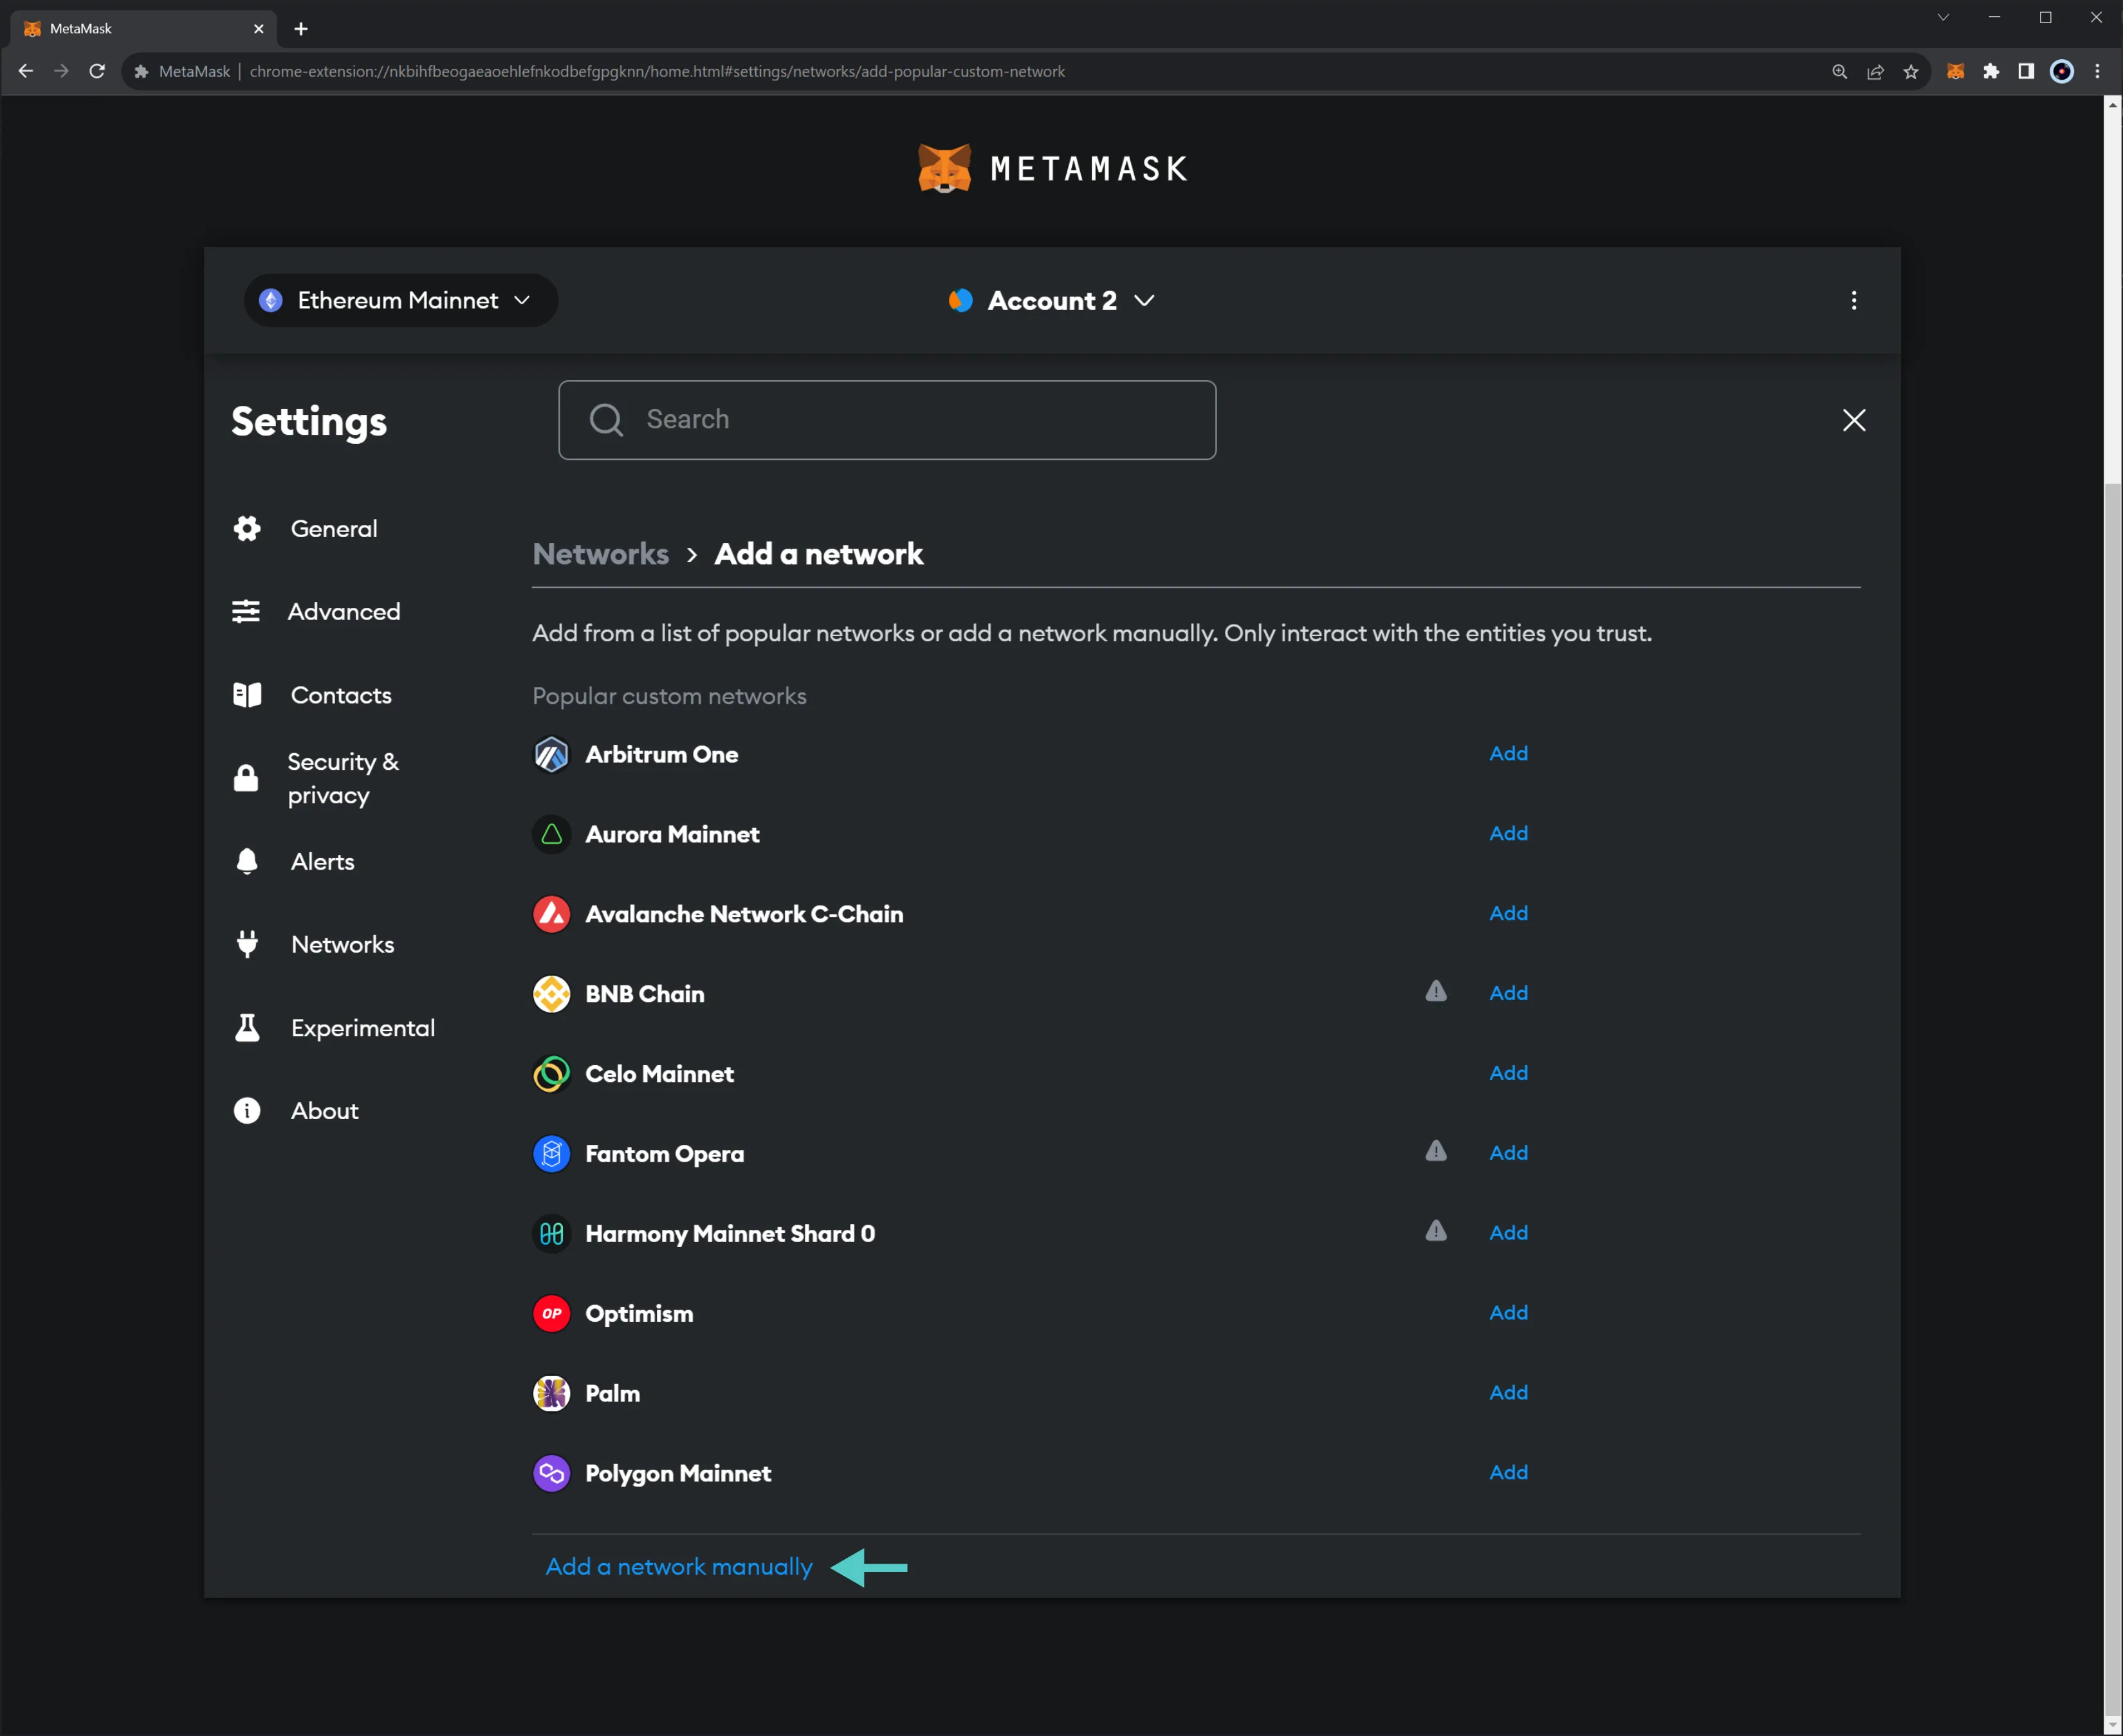
Here, you can configure MetaMask for the following networks:
| Variable | Value |
|:-------------------------:|:---------------------------------------------------:|
| Network Name | `Tanssi demo EVM appchain` |
| RPC URL | `{{ networks.dancelight.demo_evm_rpc_url }}` |
| Chain ID | `{{ networks.dancelight.demo_evm_chain_id }}` |
| Symbol (Optional) | `{{ networks.dancelight.demo_evm_token_symbol }}` |
| Block Explorer (Optional) | `{{ networks.dancelight.demo_evm_blockscout_url }}` |
To do so, fill in the following information:
1. **Network name** - name that represents the network you are connecting to
2. **RPC URL** - RPC endpoint of the network
3. **Chain ID** - chain ID of the Ethereum compatible network
4. **Symbol** - (optional) symbol of the native token of the network
5. **Block Explorer** - (optional) URL of the block explorer
6. Once you've verified all the information, click on **Save**
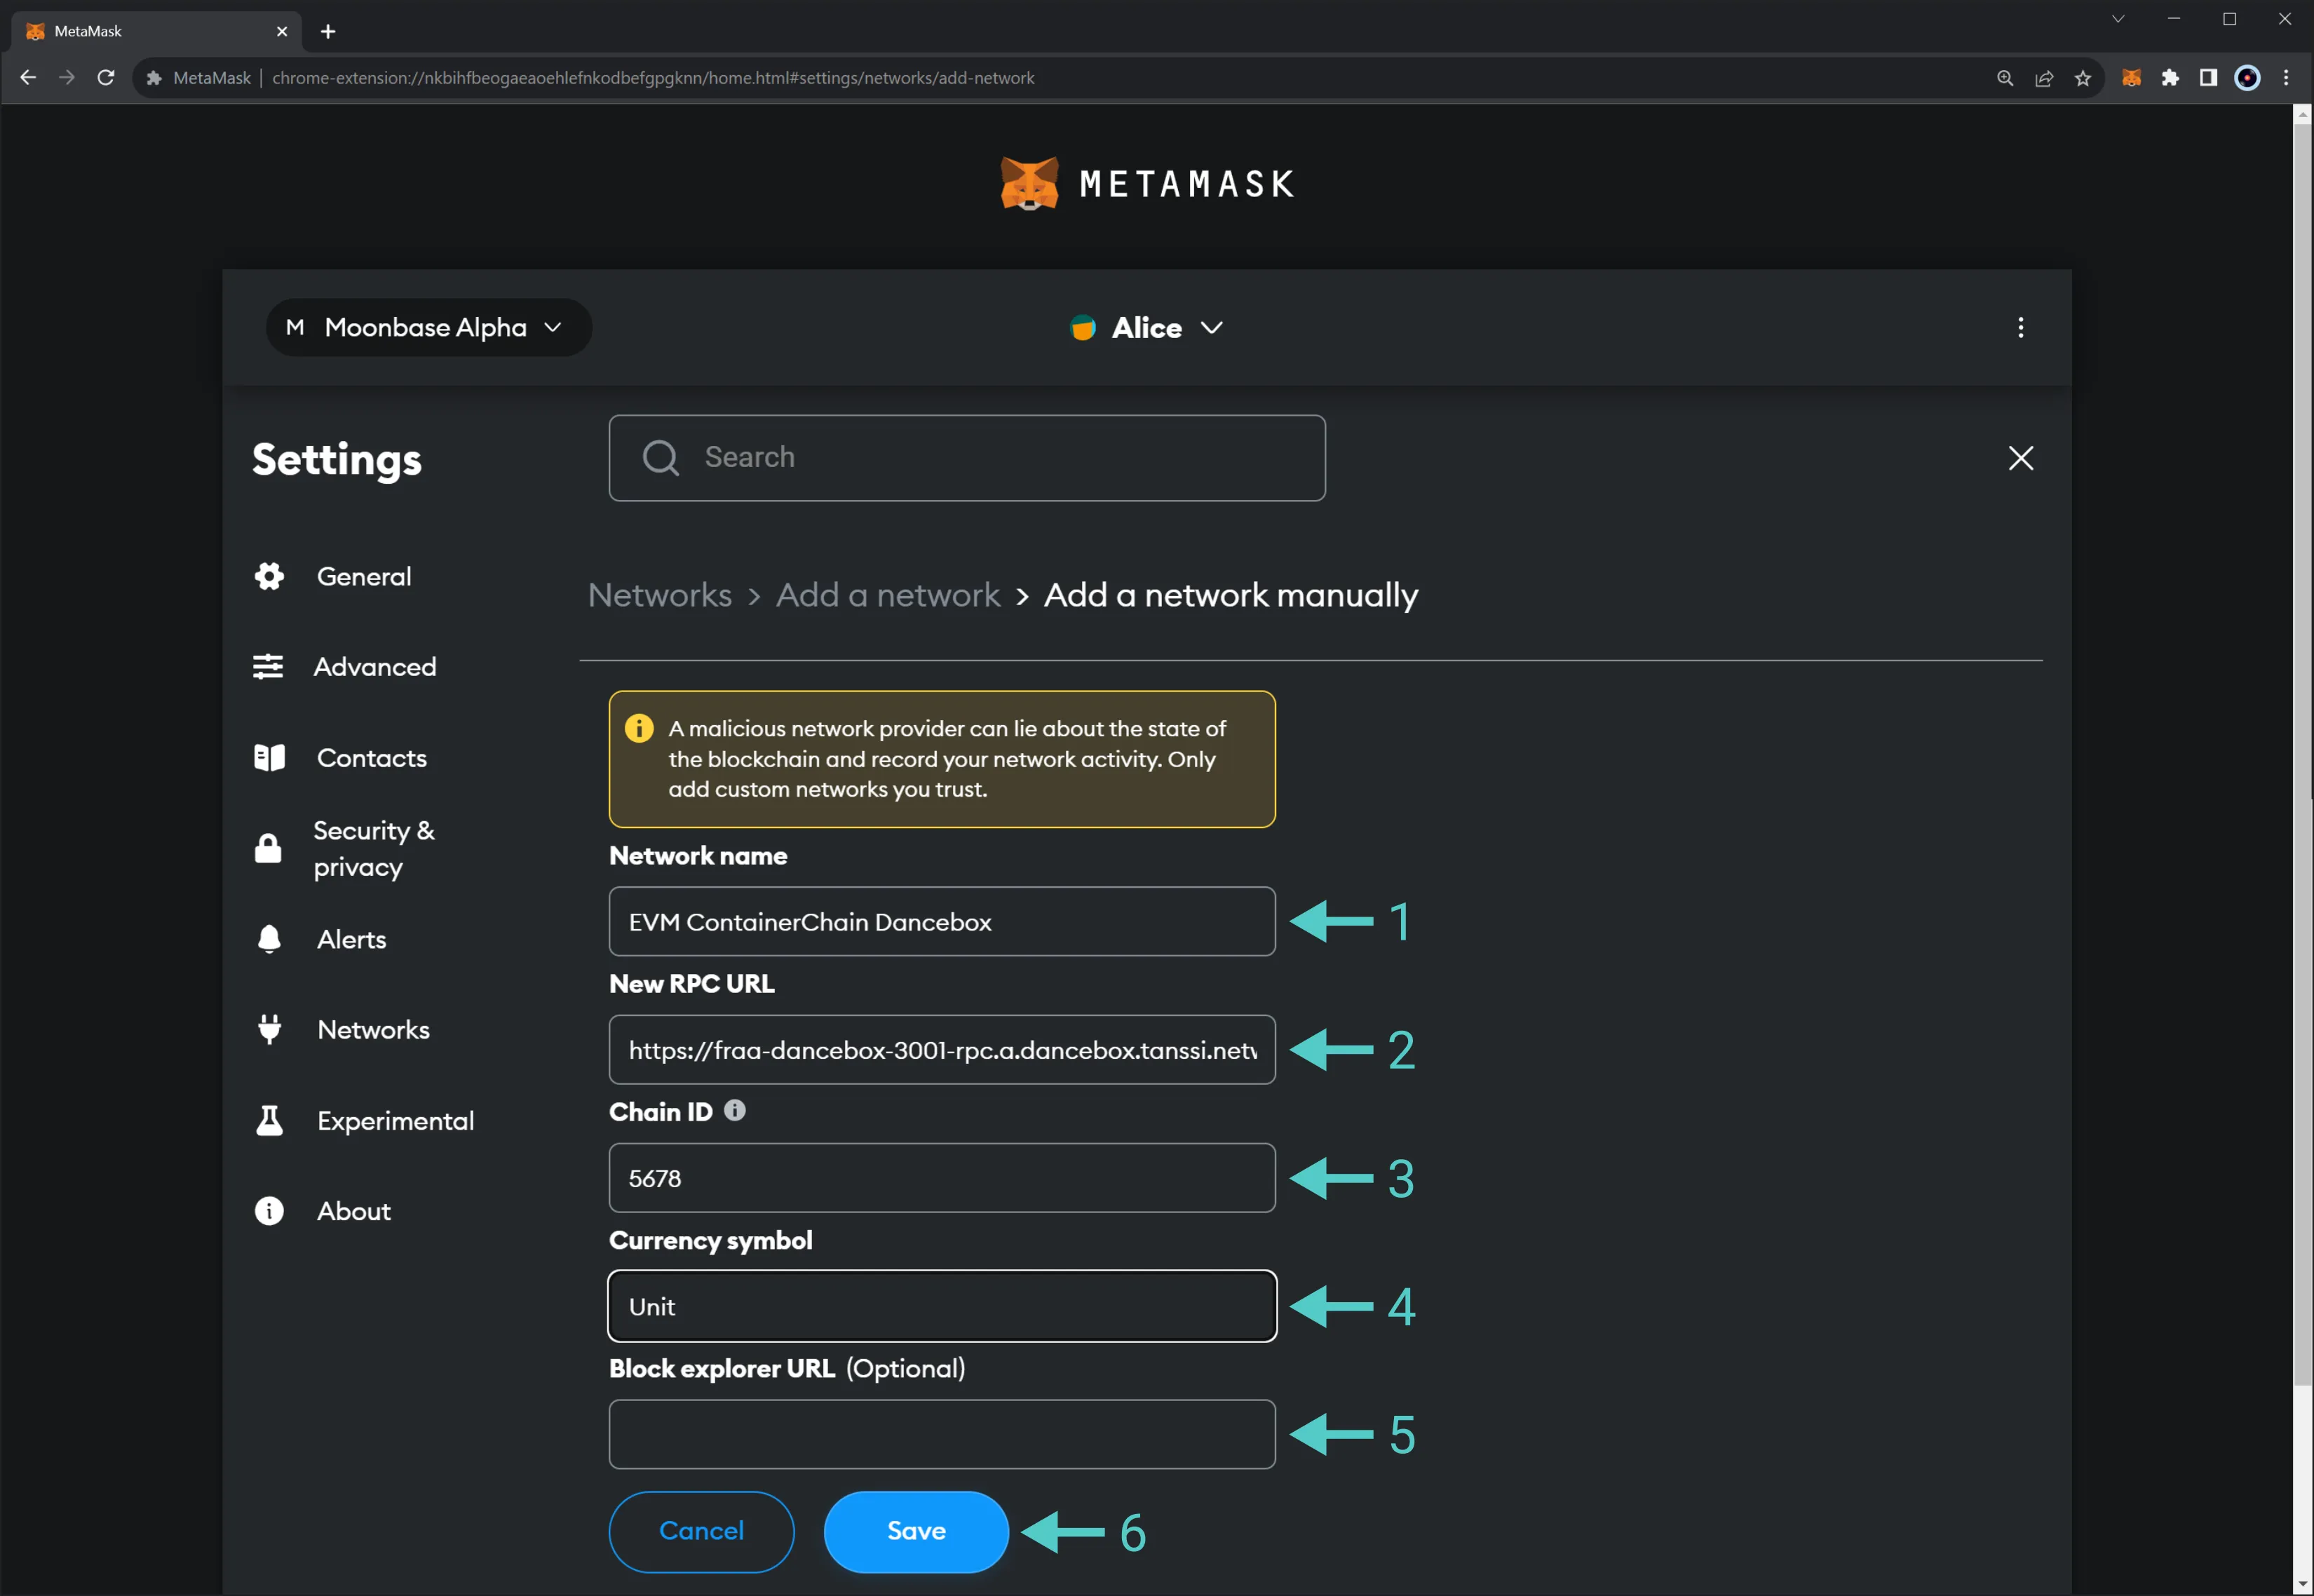
Once you've added the network, you'll be redirected to a screen stating that you've successfully added a network. Furthermore, you'll be prompted to **Switch to Tanssi demo EVM appchain**, the network added in this example.
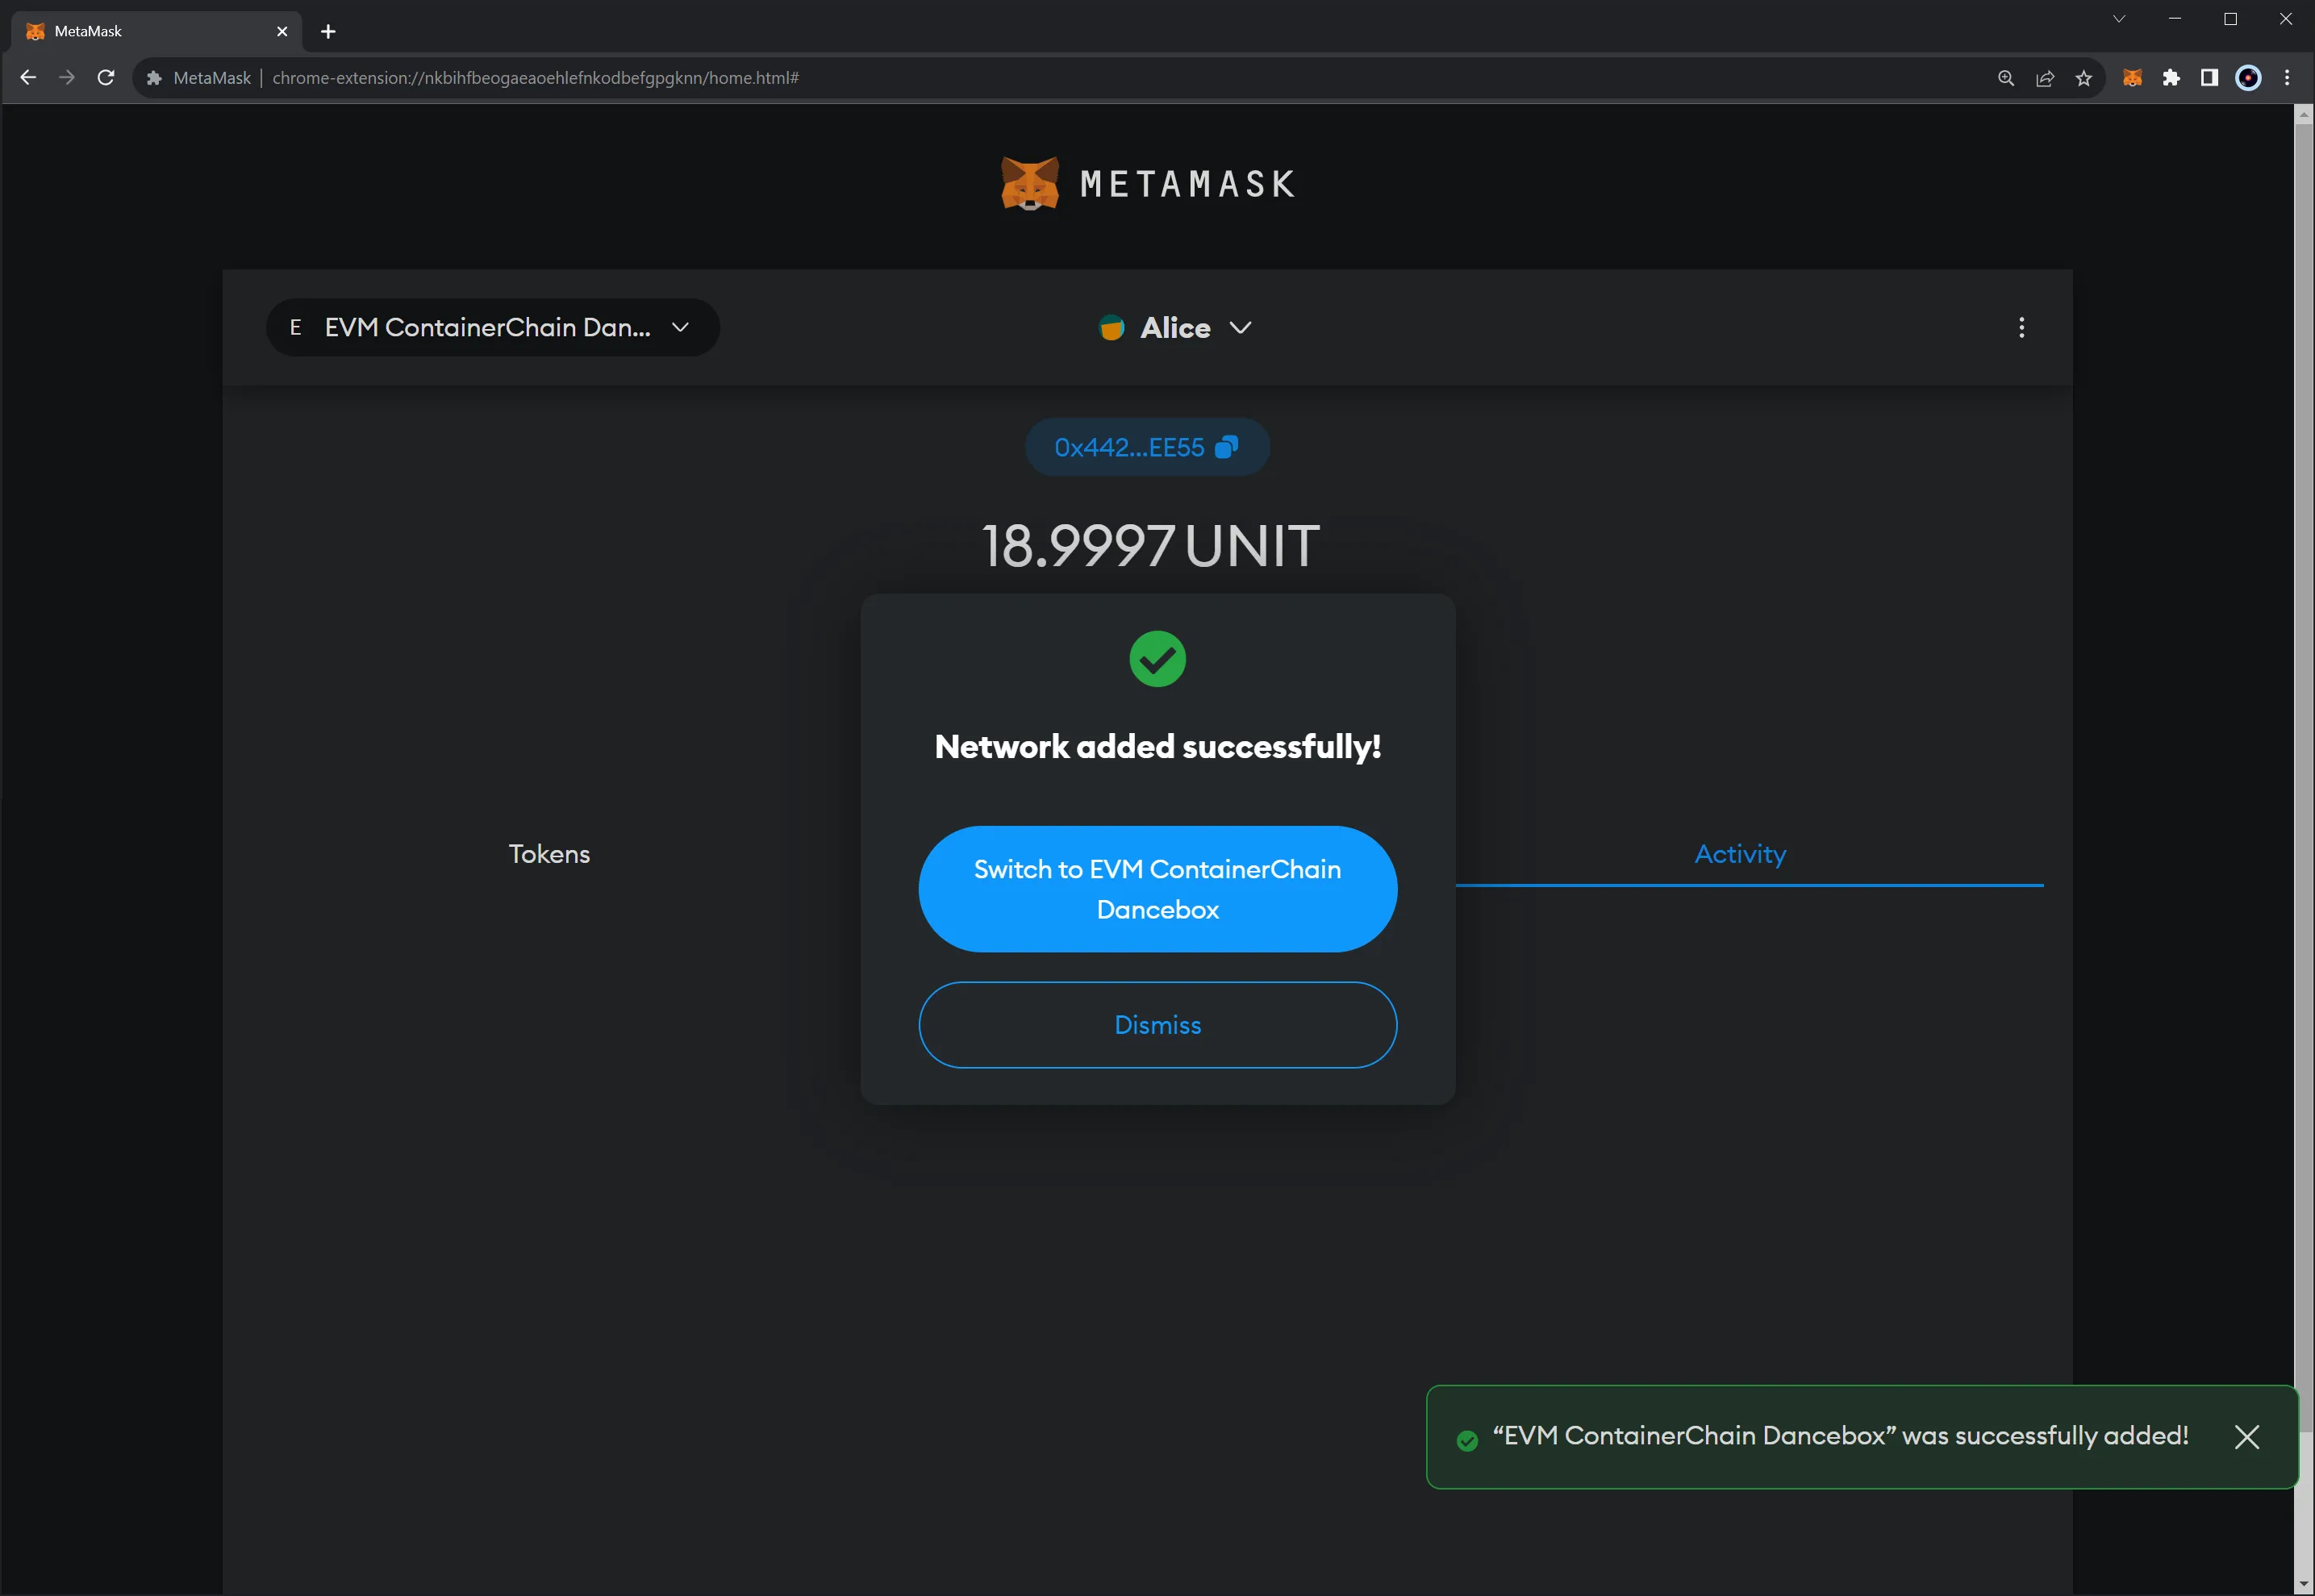
## Interact with the Network {: #interact-with-network }
Once you've [connected Metamask](#connect-metamask-to-evm-network) to your Tanssi EVM network, you can start using your wallet by:
- Requesting {{ networks.dancelight.demo_evm_token_symbol }} tokens from the [demo EVM network faucet](/builders/tanssi-network/testnet/demo-evm-network/#faucet)
- Sending a token transfer to another address
- Adding ERC-20s to Metamask and interacting with them
- Adding ERC-721s to Metamask and interacting with them
The information presented herein has been provided by third parties and is made available solely for general information purposes. Tanssi does not endorse any project listed and described on the Tanssi Doc Website (https://docs.tanssi.network/). Tanssi Foundation does not warrant the accuracy, completeness or usefulness of this information. Any reliance you place on such information is strictly at your own risk. Tanssi Foundation disclaims all liability and responsibility arising from any reliance placed on this information by you or by anyone who may be informed of any of its contents. All statements and/or opinions expressed in these materials are solely the responsibility of the person or entity providing those materials and do not necessarily represent the opinion of Tanssi Foundation. The information should not be construed as professional or financial advice of any kind. Advice from a suitably qualified professional should always be sought in relation to any particular matter or circumstance. The information herein may link to or integrate with other websites operated or content provided by third parties, and such other websites may link to this website. Tanssi Foundation has no control over any such other websites or their content and will have no liability arising out of or related to such websites or their content. The existence of any such link does not constitute an endorsement of such websites, the content of the websites, or the operators of the websites. These links are being provided to you only as a convenience and you release and hold Tanssi Foundation harmless from any and all liability arising from your use of this information or the information provided by any third-party website or service.
--- END CONTENT ---
Doc-Content: https://docs.tanssi.network/builders/toolkit/ethereum-api/wallets/subwallet/
--- BEGIN CONTENT ---
---
title: How to Connect SubWallet to Tanssi
description: This guide walks you through how to connect SubWallet, a comprehensive Polkadot, Substrate, and Ethereum wallet, to your Tanssi-powered EVM-compatible network.
icon: material-wallet-outline
categories: EVM-Template
---
# Interacting with Your Tanssi EVM Network Using SubWallet
## Introduction {: #introduction }
Developers and users of Tanssi-powered EVM networks have a variety of options when it comes to wallets. Thanks to their seamless Ethereum compatibility, Tanssi EVM networks support a great variety of popular wallets, including SubWallet.
SubWallet is a comprehensive Web3 wallet that natively supports Substrate (Polkadot) and Ethereum accounts. This tutorial centers on the Ethereum API, but you can check out a similar [tutorial for interacting with SubWallet using the Substrate API](/builders/toolkit/substrate-api/wallets/subwallet/){target=\_blank}. The SubWallet wallet browser extension [can be downloaded](https://www.subwallet.app/download.html){target=\_blank} for all supported browsers, including Chrome, Brave, Firefox, and MS Edge. SubWallet also has a mobile app for both iOS and Android, but that is beyond the scope of this guide. A complete online asset dashboard is accessible at [web.subwallet.app](https://web.subwallet.app){target=\_blank}.
This guide takes you through all the necessary steps, from installing SubWallet to setting up a wallet, connecting it to your Tanssi EVM network, and sending funds.
## Creating Your First Ethereum Account {: #creating-your-first-ethereum-account }
First, download and install the [SubWallet extension](https://www.subwallet.app/download.html){target=\_blank}. Creating a new account will generate a seed phrase that can derive multiple Ethereum and Substrate accounts. By default, SubWallet will generate a single Ethereum and a single Substrate account, but you can easily derive more from the same seed phrase. Click **Create a new account** to get started.
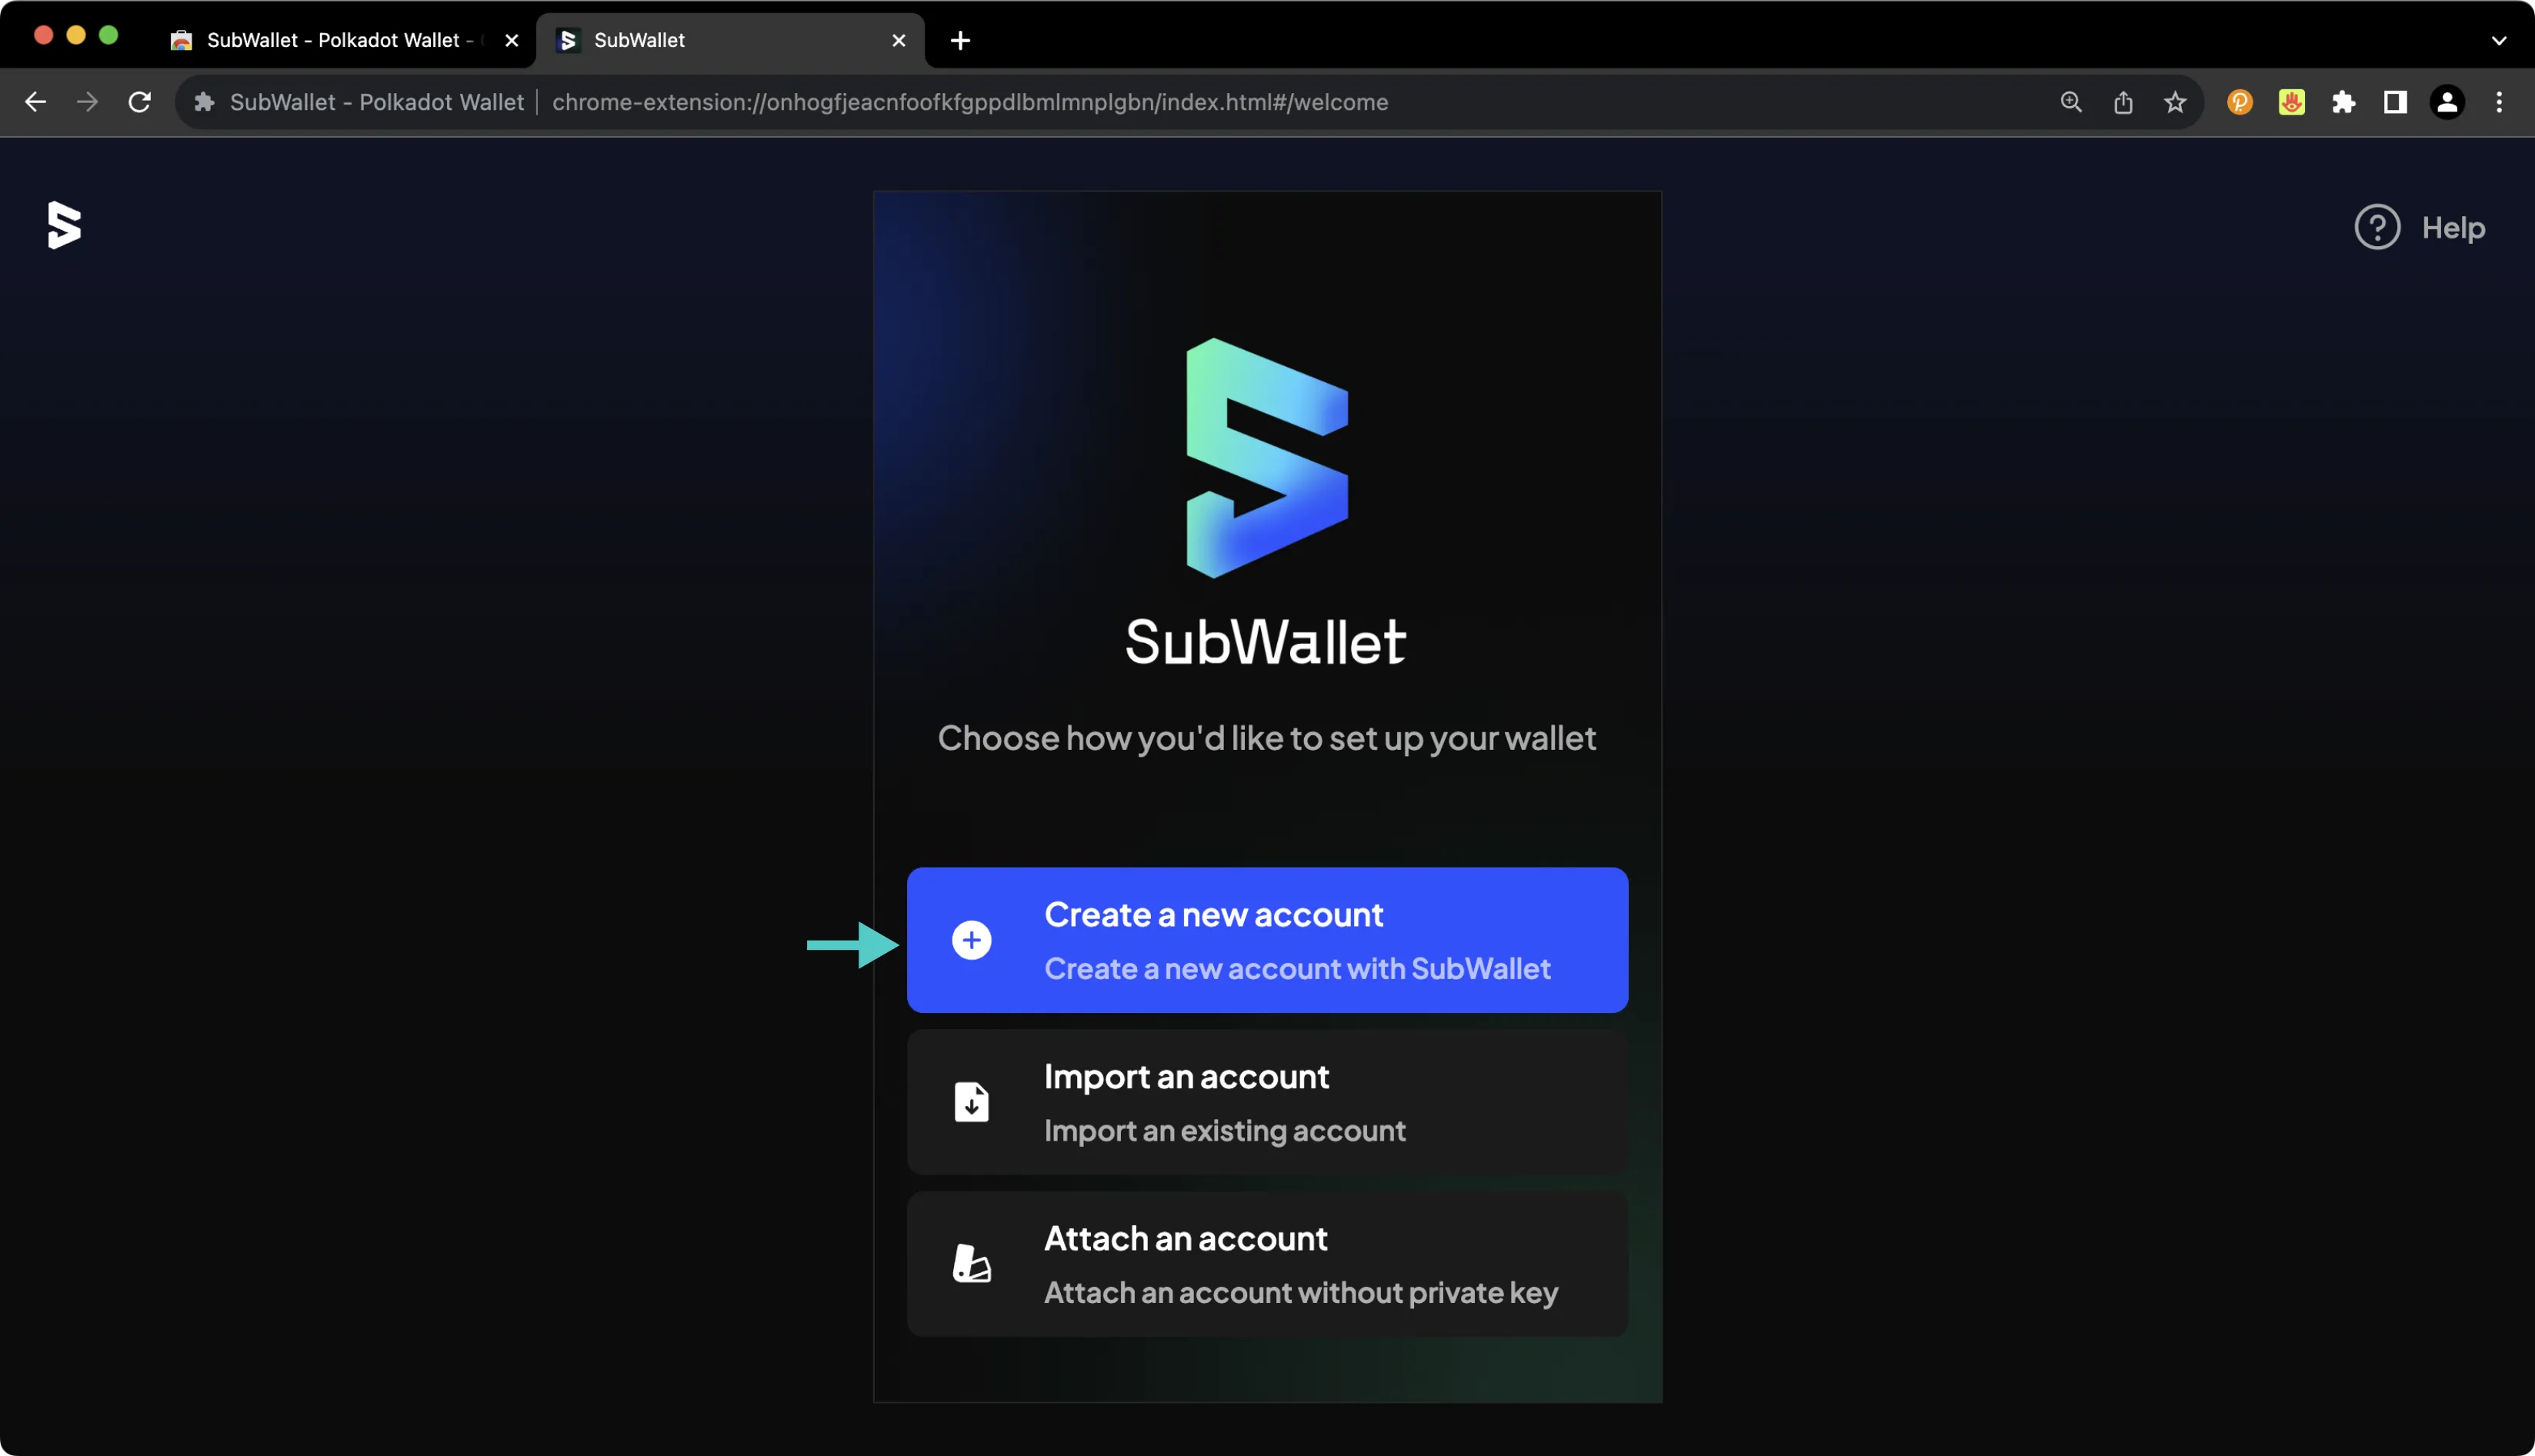
On the following screen, you'll be prompted to create a password to secure your new wallet.
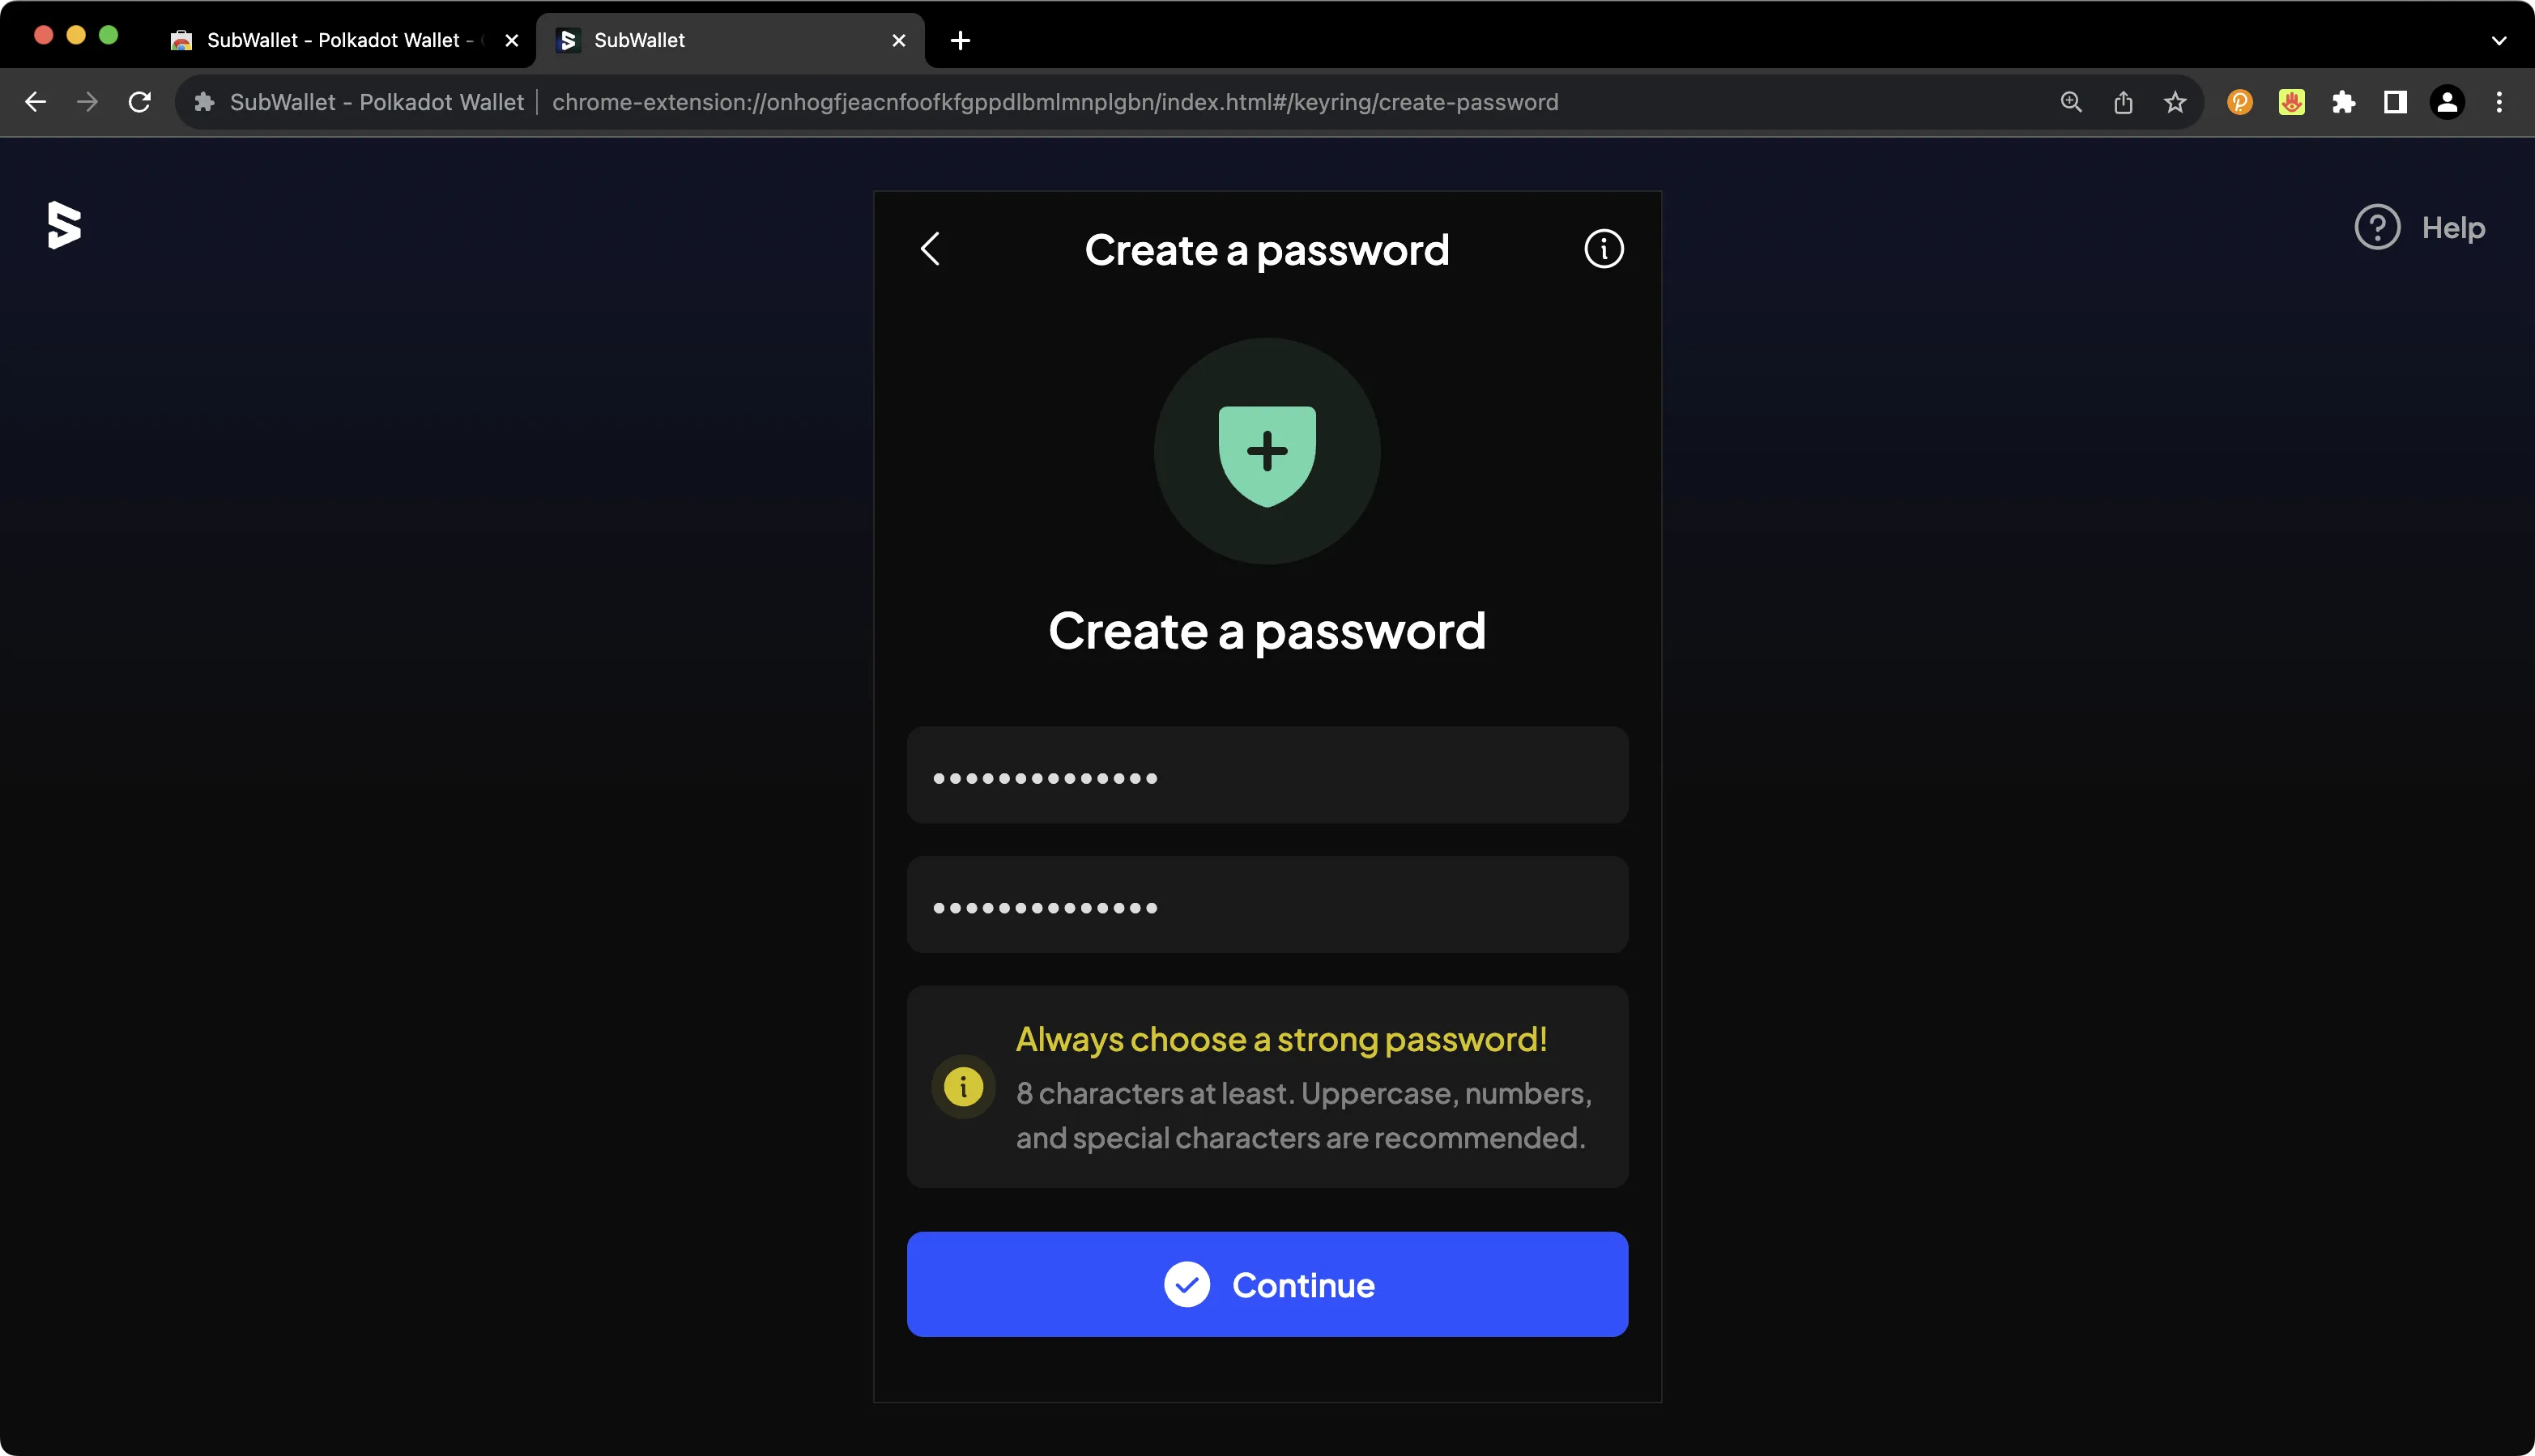
You'll then be prompted to back up your seed phrase. This is an important step, especially because you have the option to later derive additional accounts from this seed phrase.
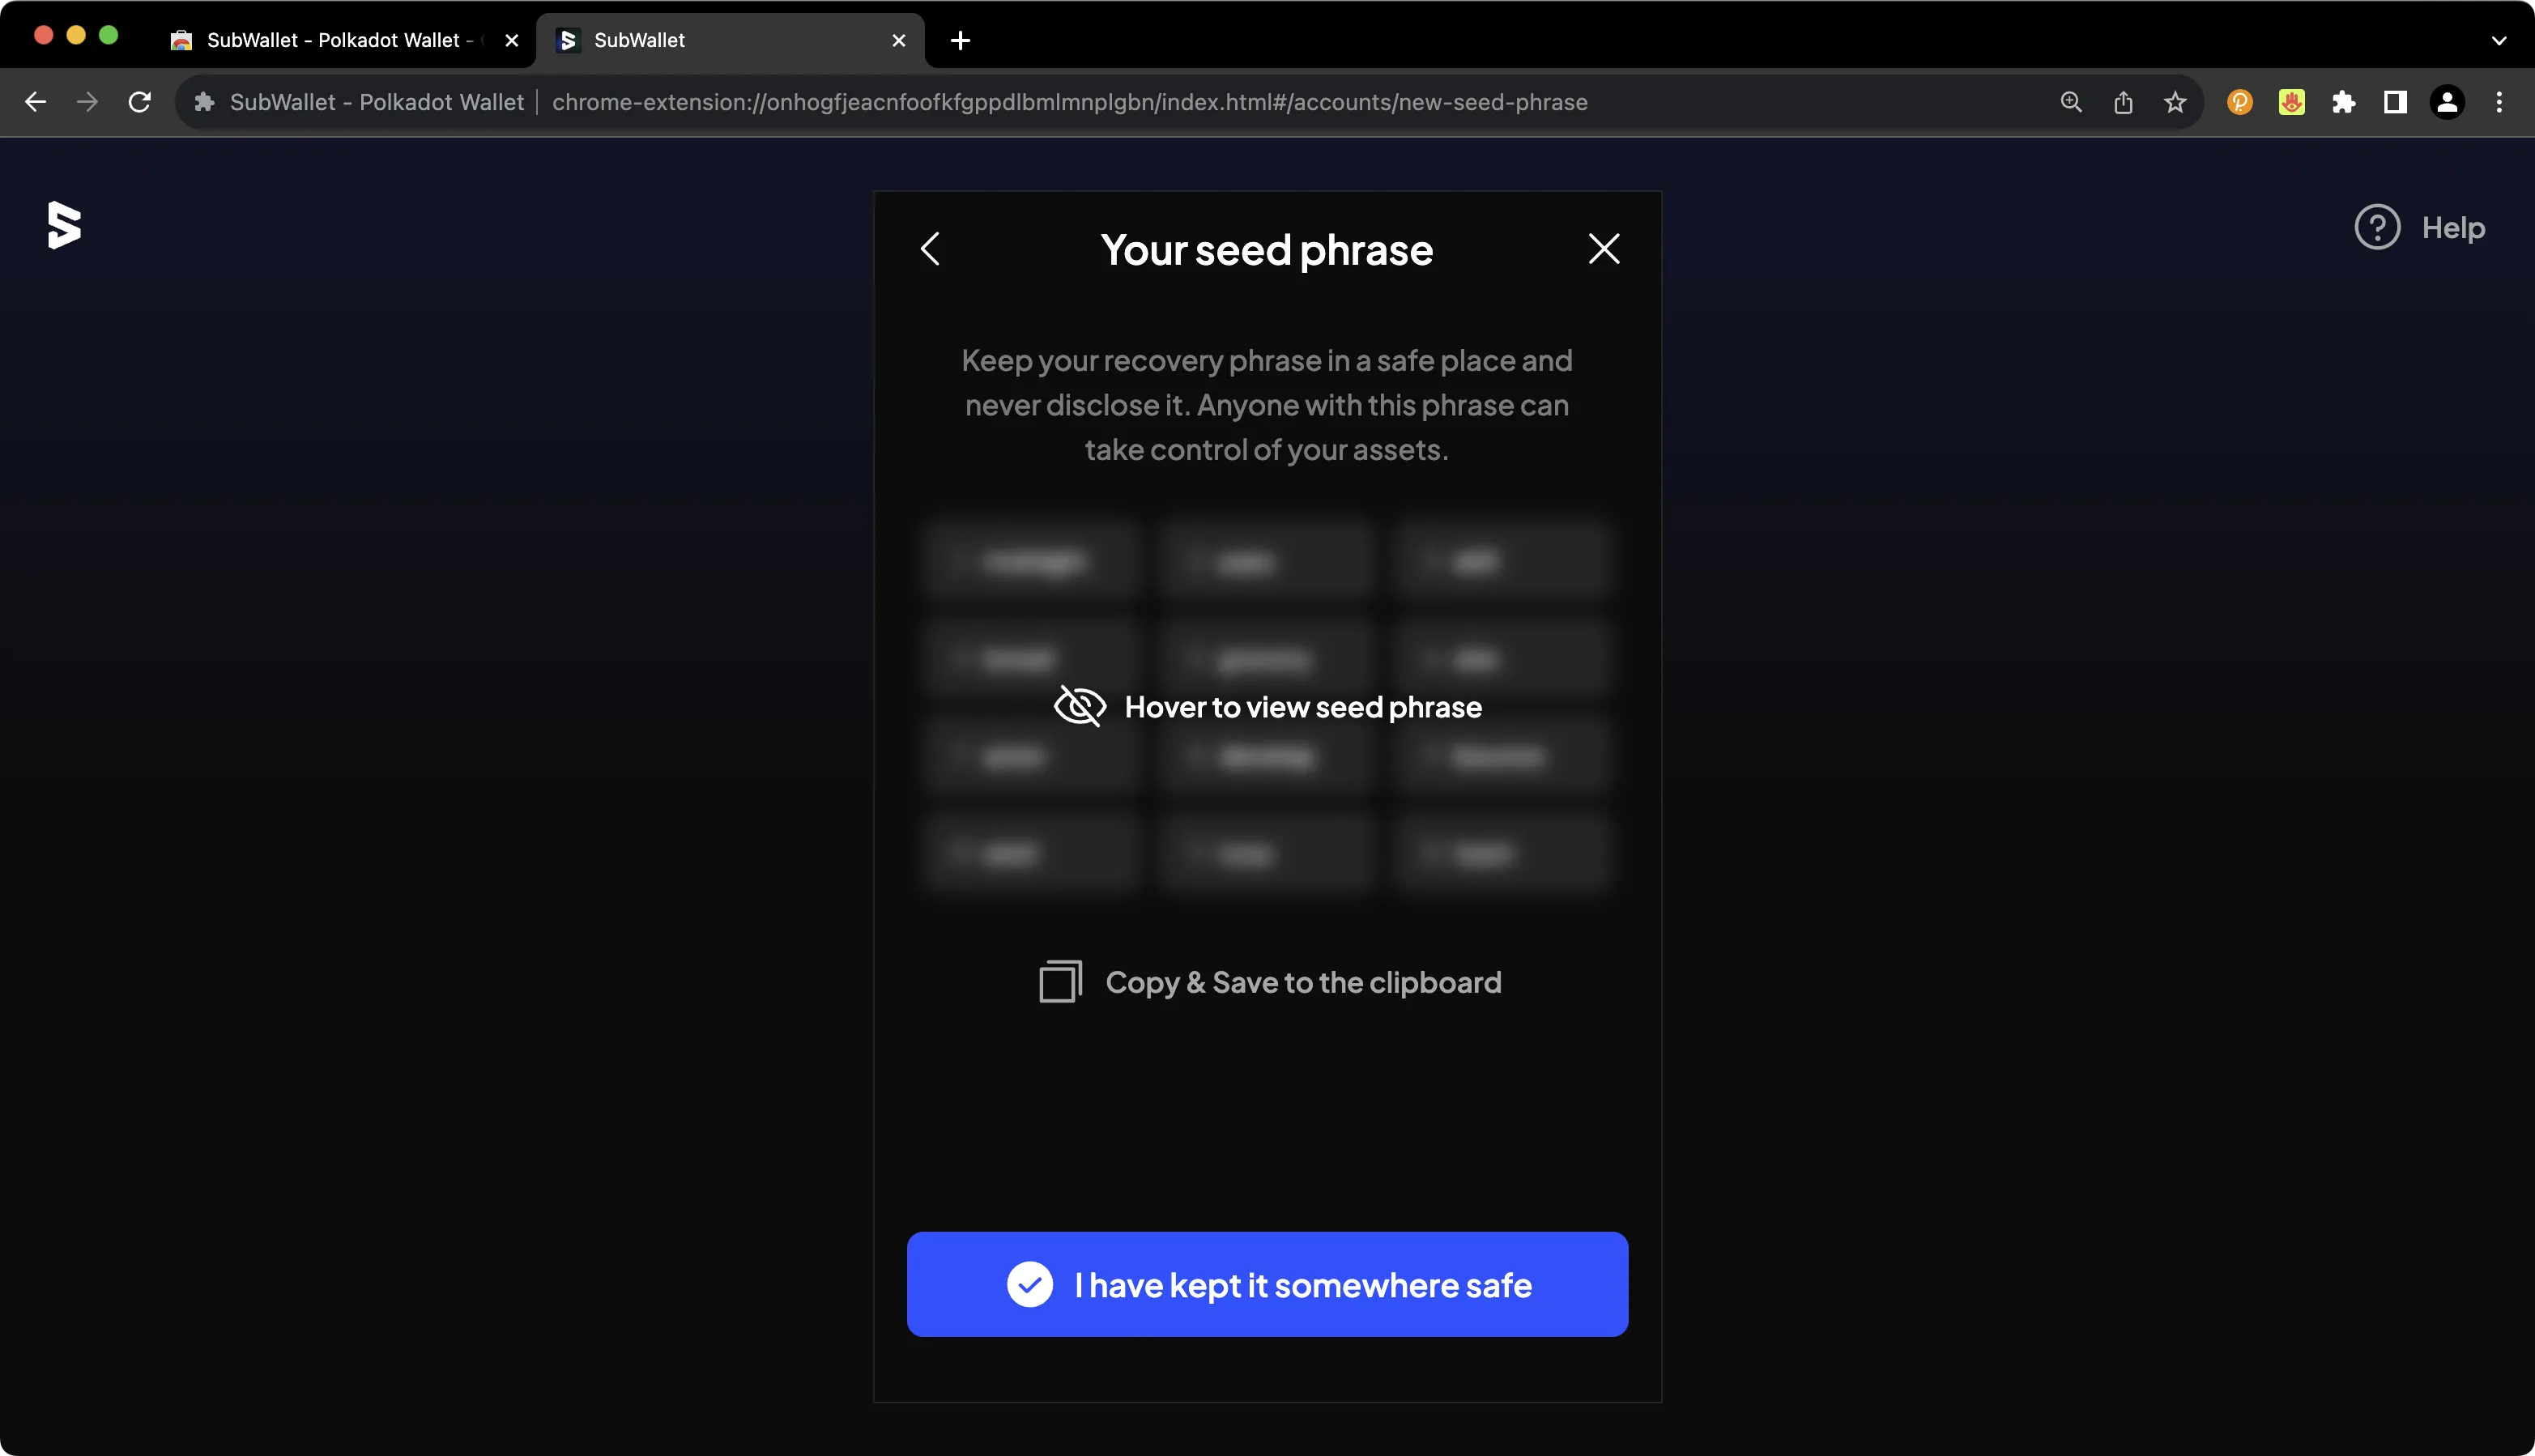
!!! note
You should never share your seed phrase (mnemonic) or private key with anyone. This gives them direct access to your funds. This guide is for educational purposes only.
## Importing an Existing EVM Account {: #importing-an-existing-evm-account }
Of course, you can import an existing EVM account into SubWallet. To get started, take the following steps:
1. Press the **All accounts** button at the top
2. Press the **Import account** icon
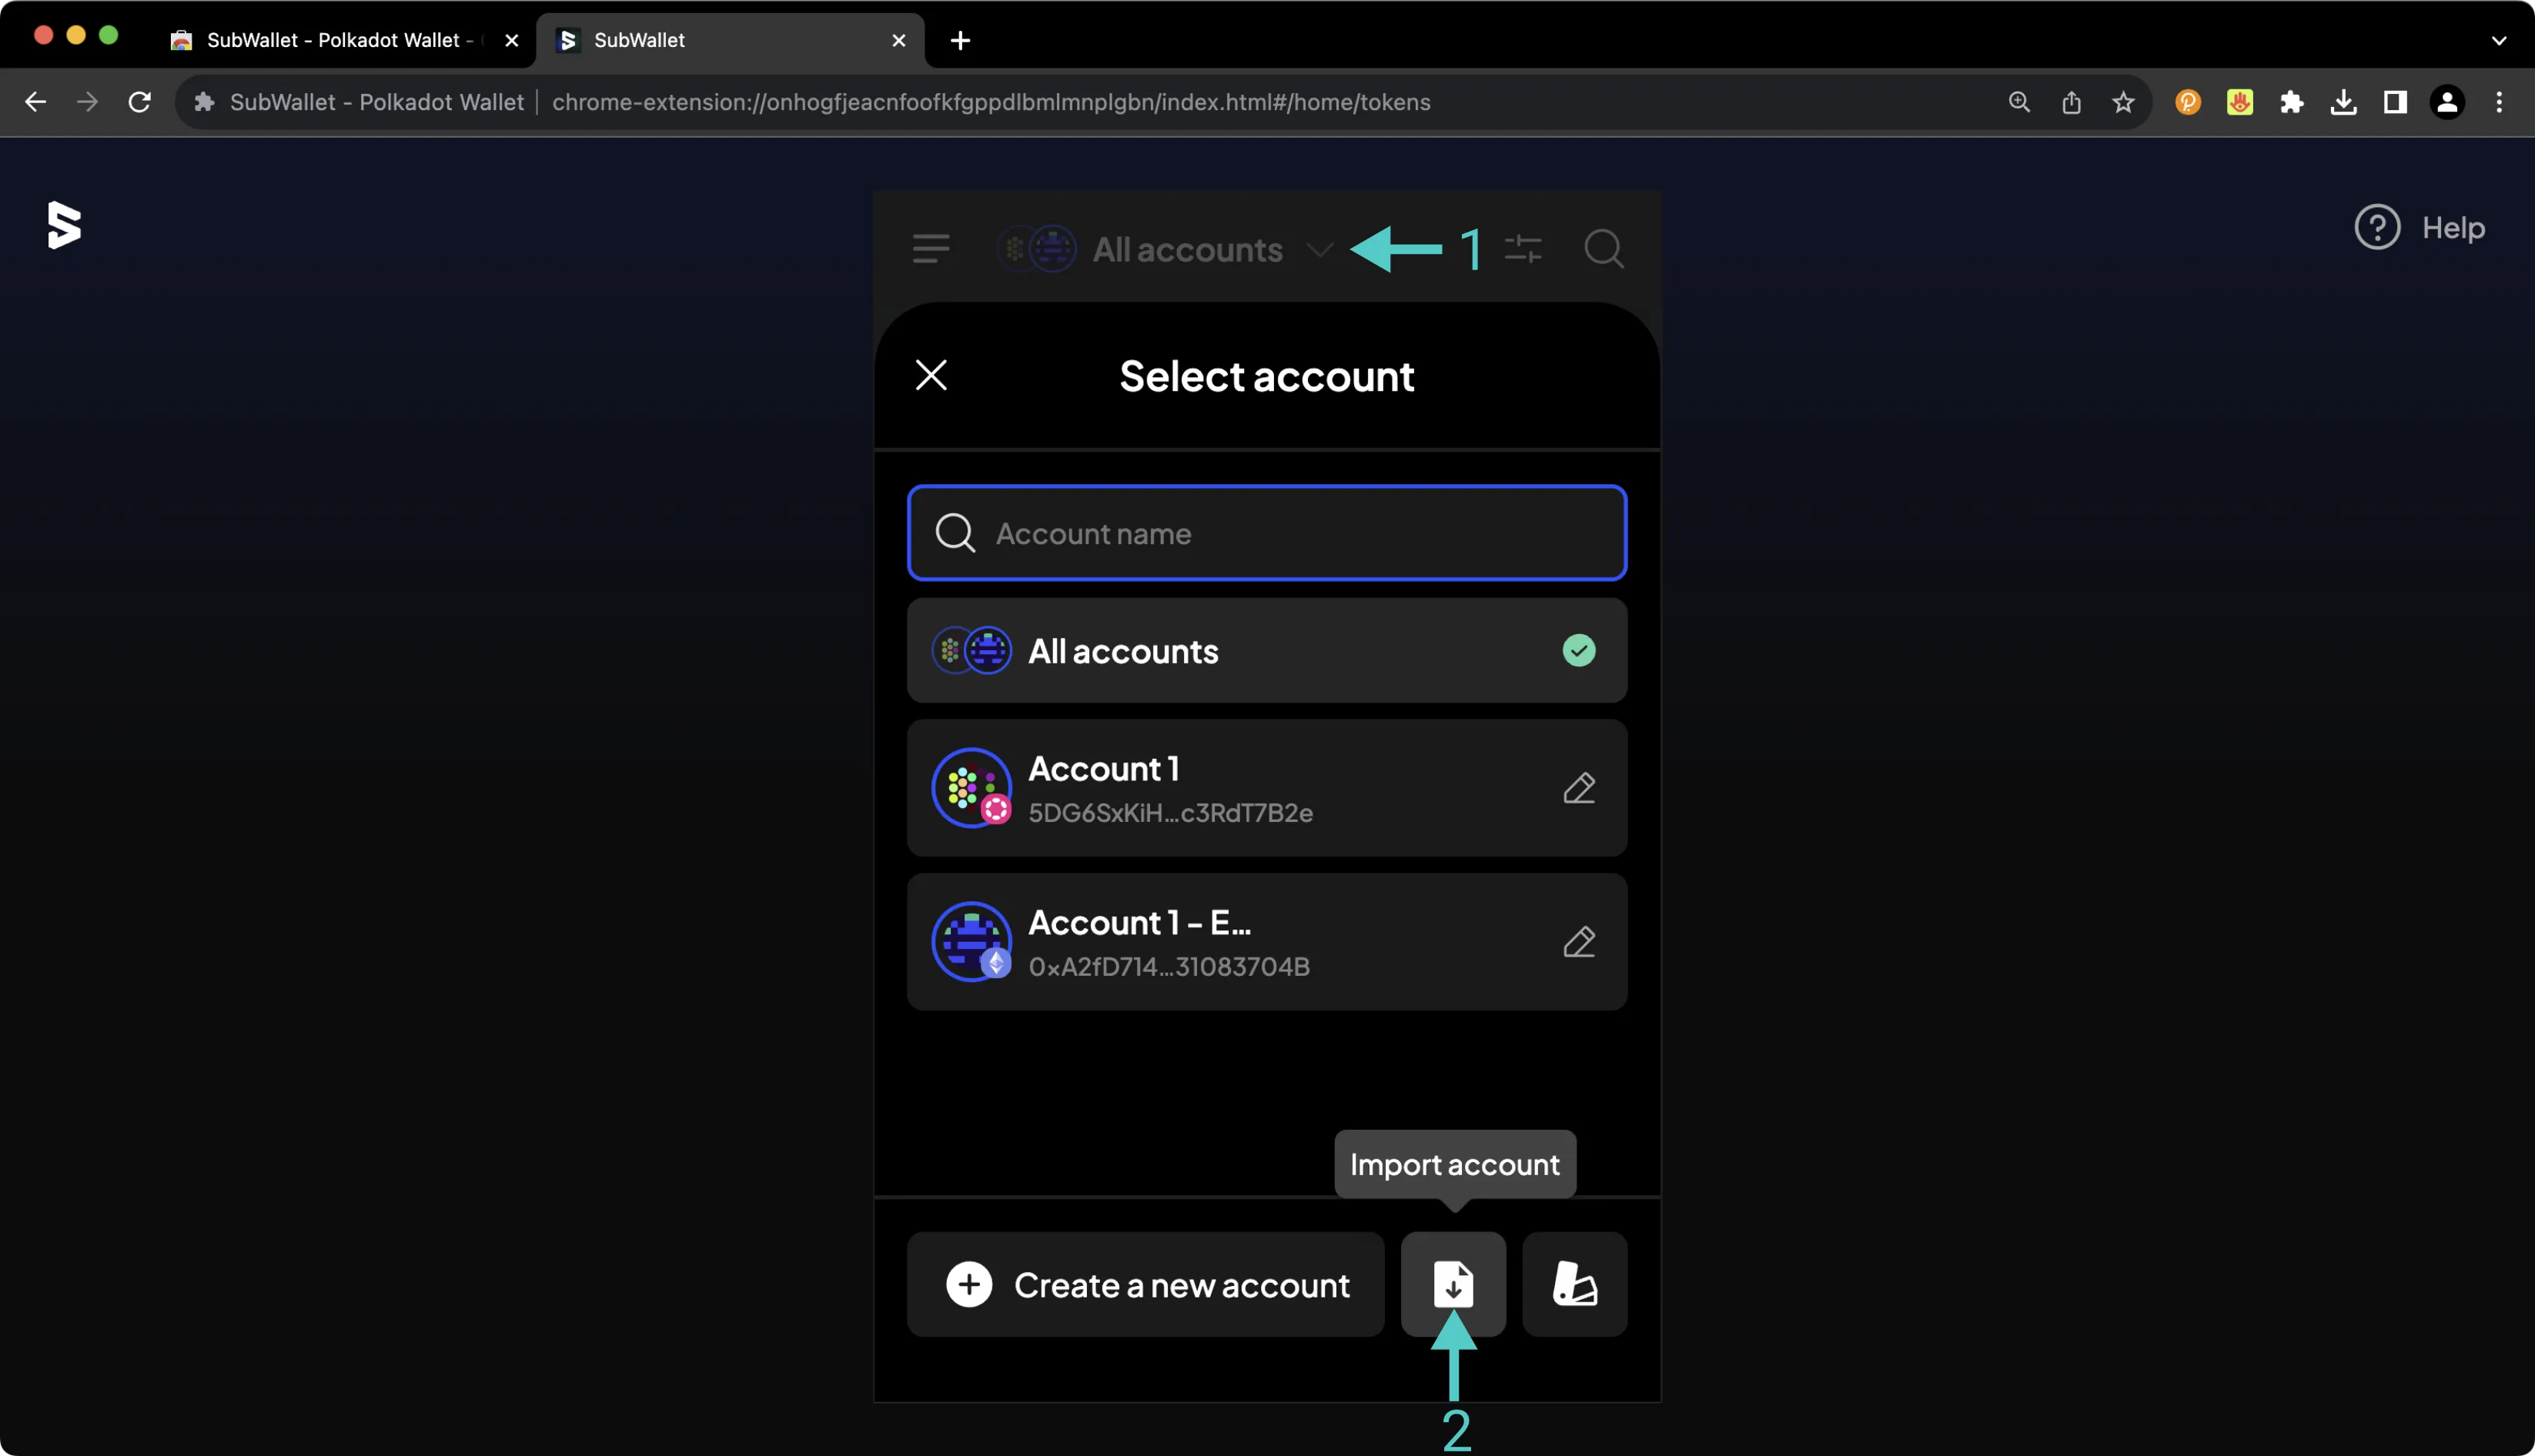
On the following screen, select the method by which you would like to import the existing account.
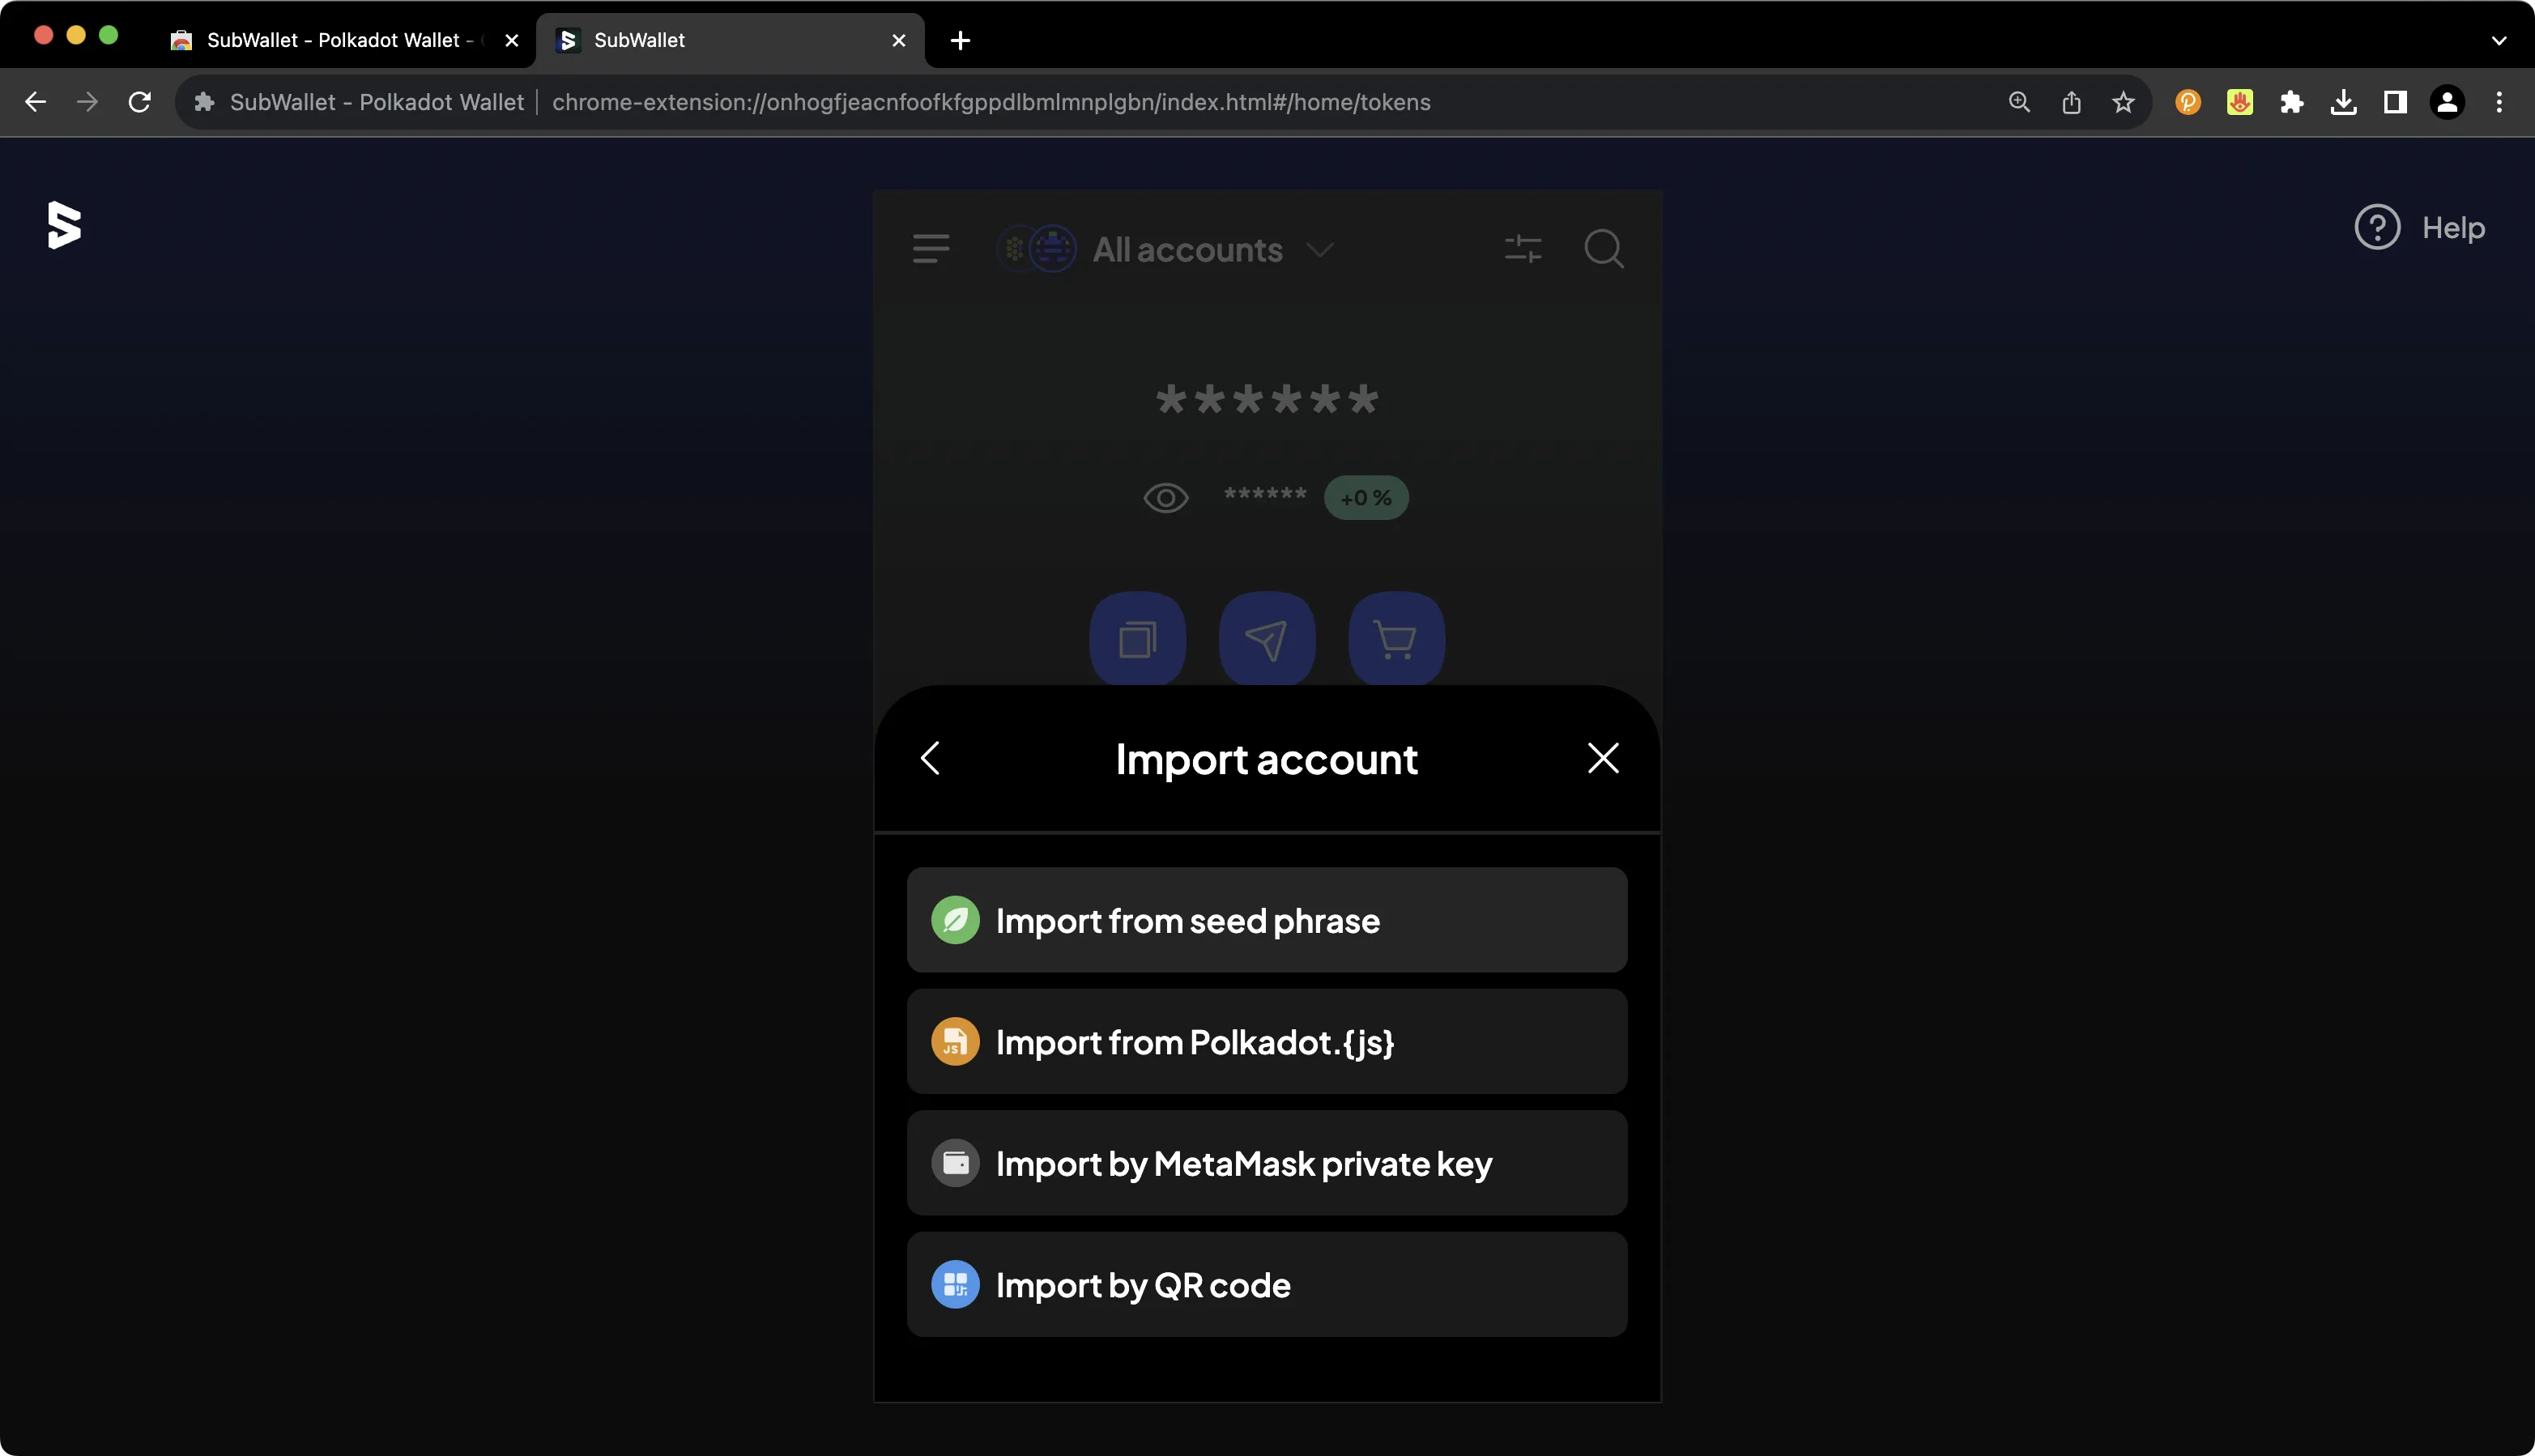
On the following screen, you'll be able to provide the relevant seed phrase, private key, JSON file, or QR code, and you can begin using your new account right away.
## Configuring SubWallet for Your EVM Network {: #configuring-subwallet-for-your-evm-network }
To configure SubWallet for your Tanssi-powered EVM network, press the **More Options** icon in the upper left corner. Then click **Manage networks**. Press the **+** icon. On the following page, you'll then be prompted to enter the network details for your Tanssi network. For demonstration purposes, the demo EVM network is used here, but you can substitute these details for your own Tanssi network. To add your Tanssi network to SubWallet, take the following steps:
1. Paste in the HTTPS RPC URL of your Tanssi network. The demo EVM network's RPC URL is `{{ networks.dancelight.demo_evm_rpc_url }}`. Other parameters will be auto-populated
2. Paste in the block explorer URL of your Tanssi network. The demo EVM network's block explorer URL is `{{ networks.dancelight.demo_evm_blockscout_url }}`
3. Press **Save**
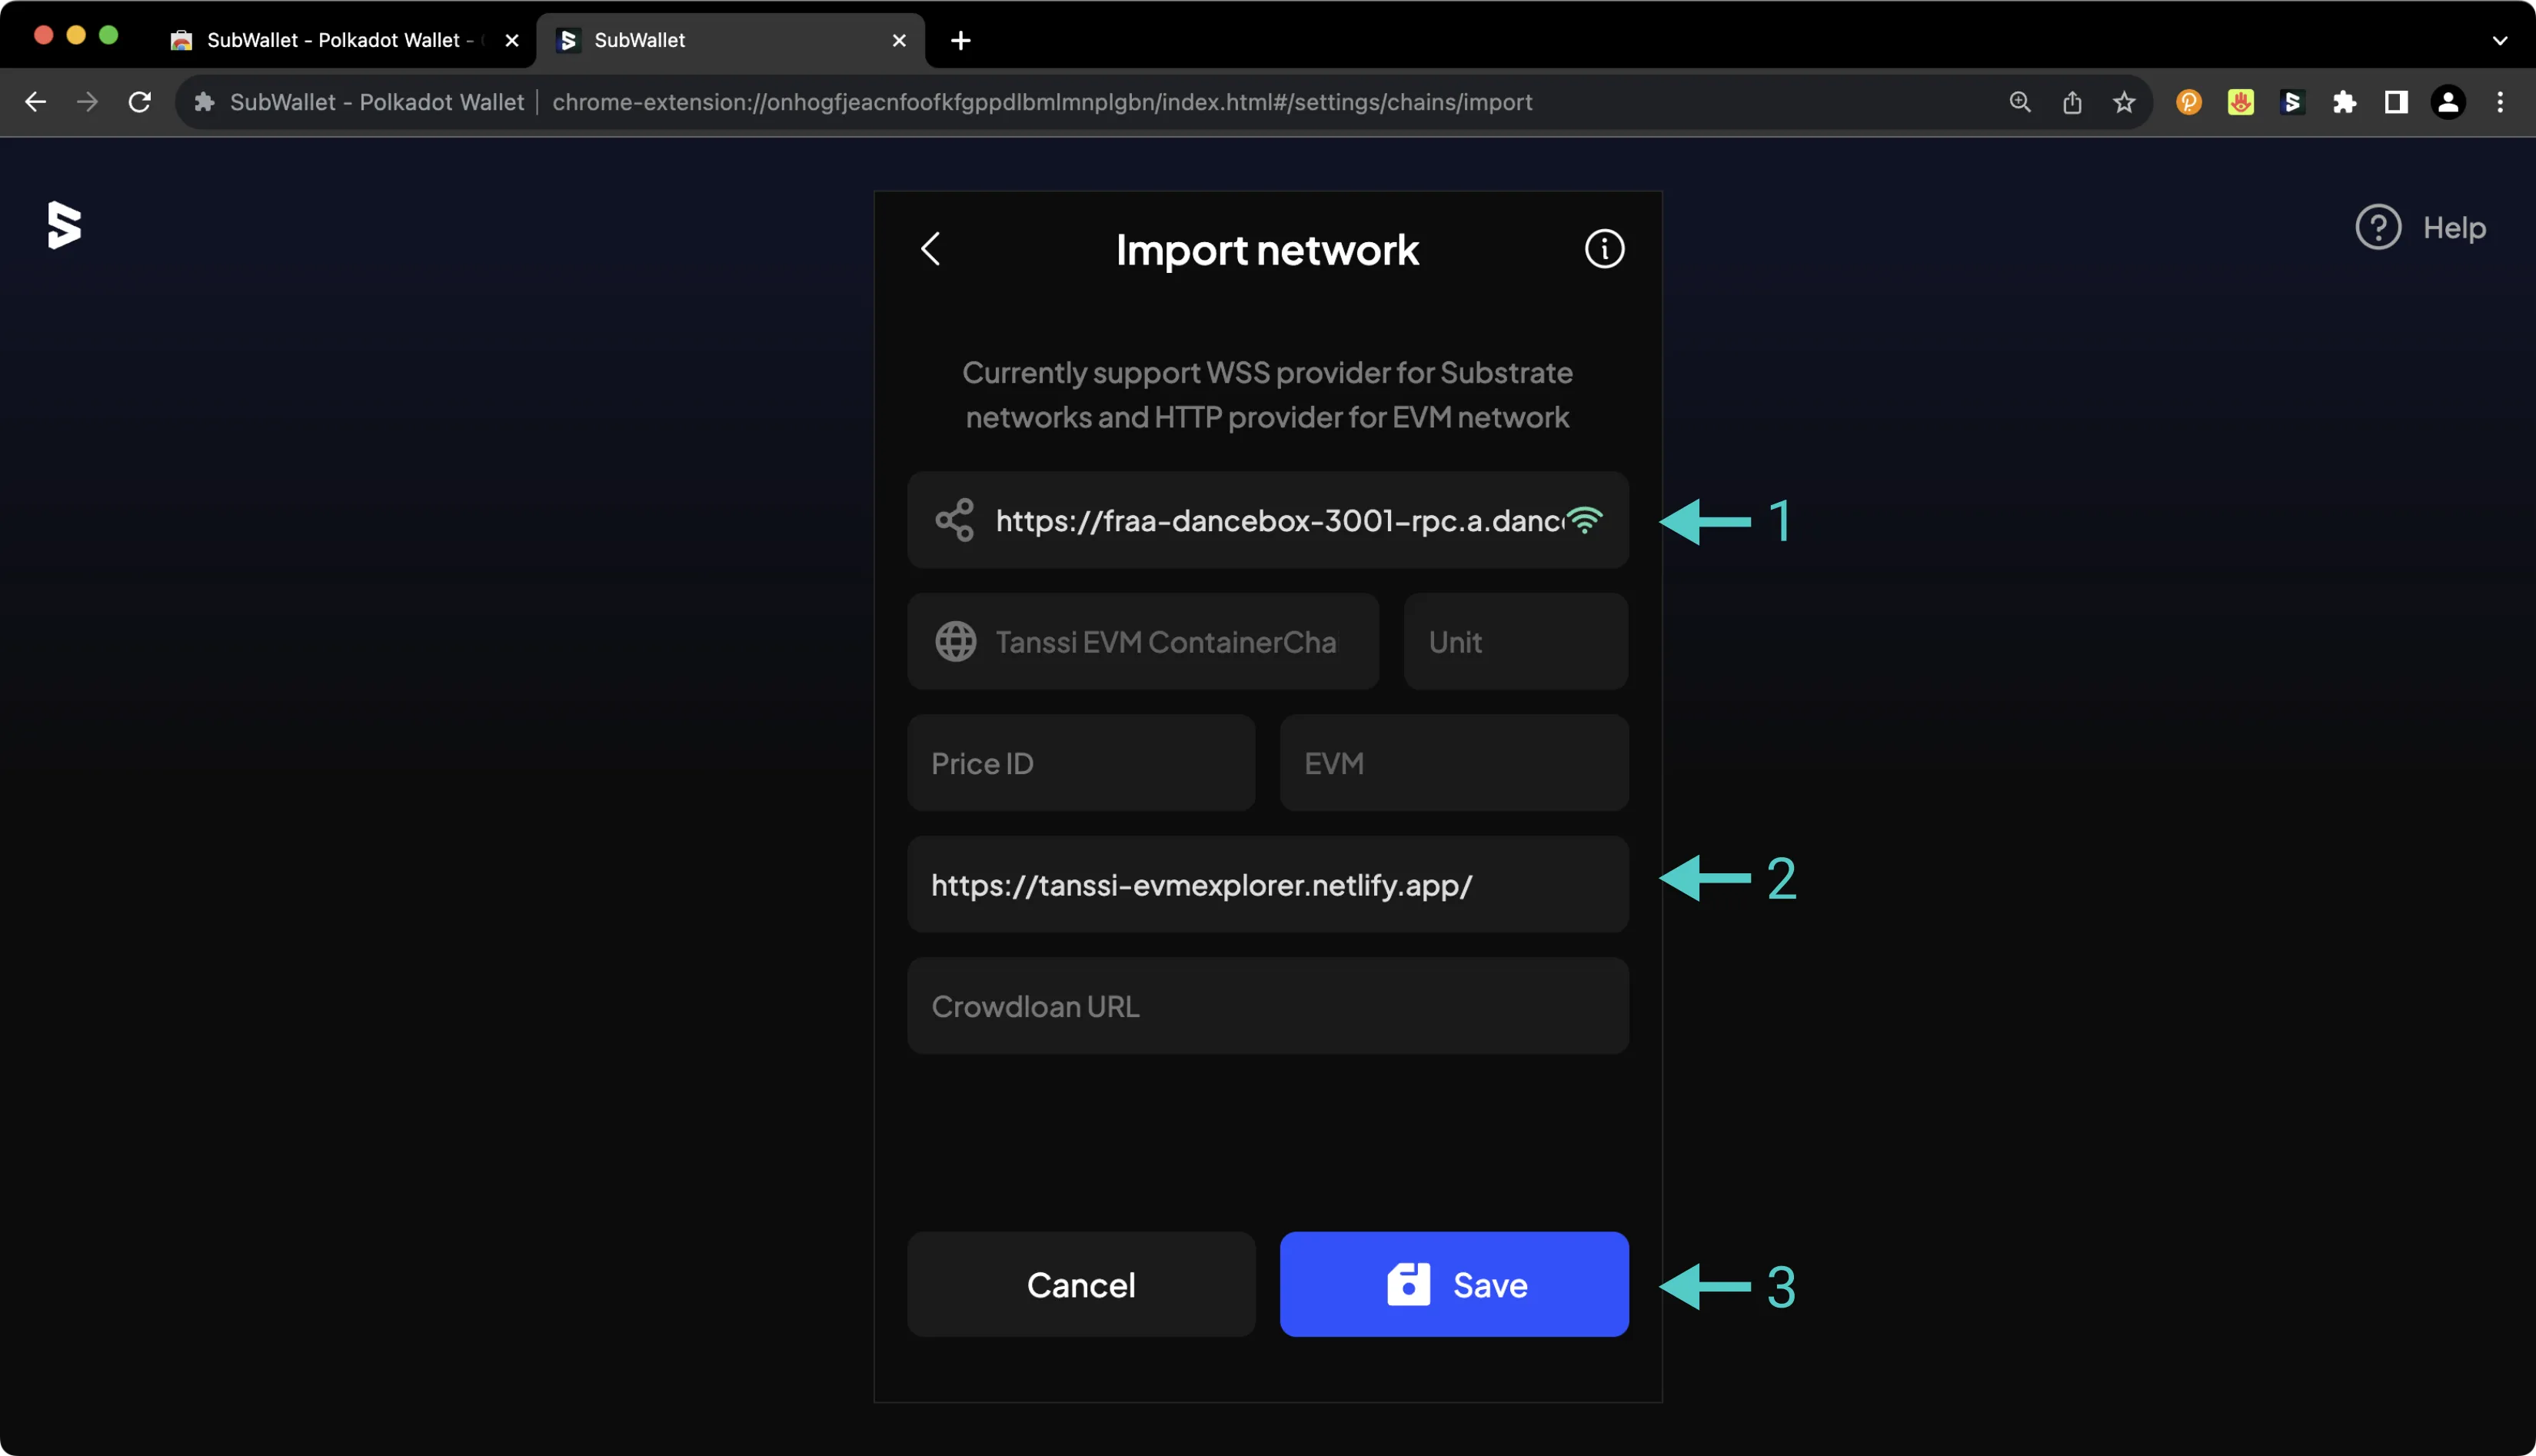
By default, all balances are hidden in SubWallet, but if you press the eye icon, you can toggle balance visibility.
## Sending Assets on Your EVM Network {: #sending-assets-on-your-evm-network }
To transfer the native token of your Tanssi network, take the following steps:
1. Specify the asset to send
2. Specify the destination chain (in this case, the same chain that you're sending from)
3. Enter the destination address
4. Enter the number of tokens to send
5. Look over the transaction details, then press **Transfer** and subsequently **Approve**
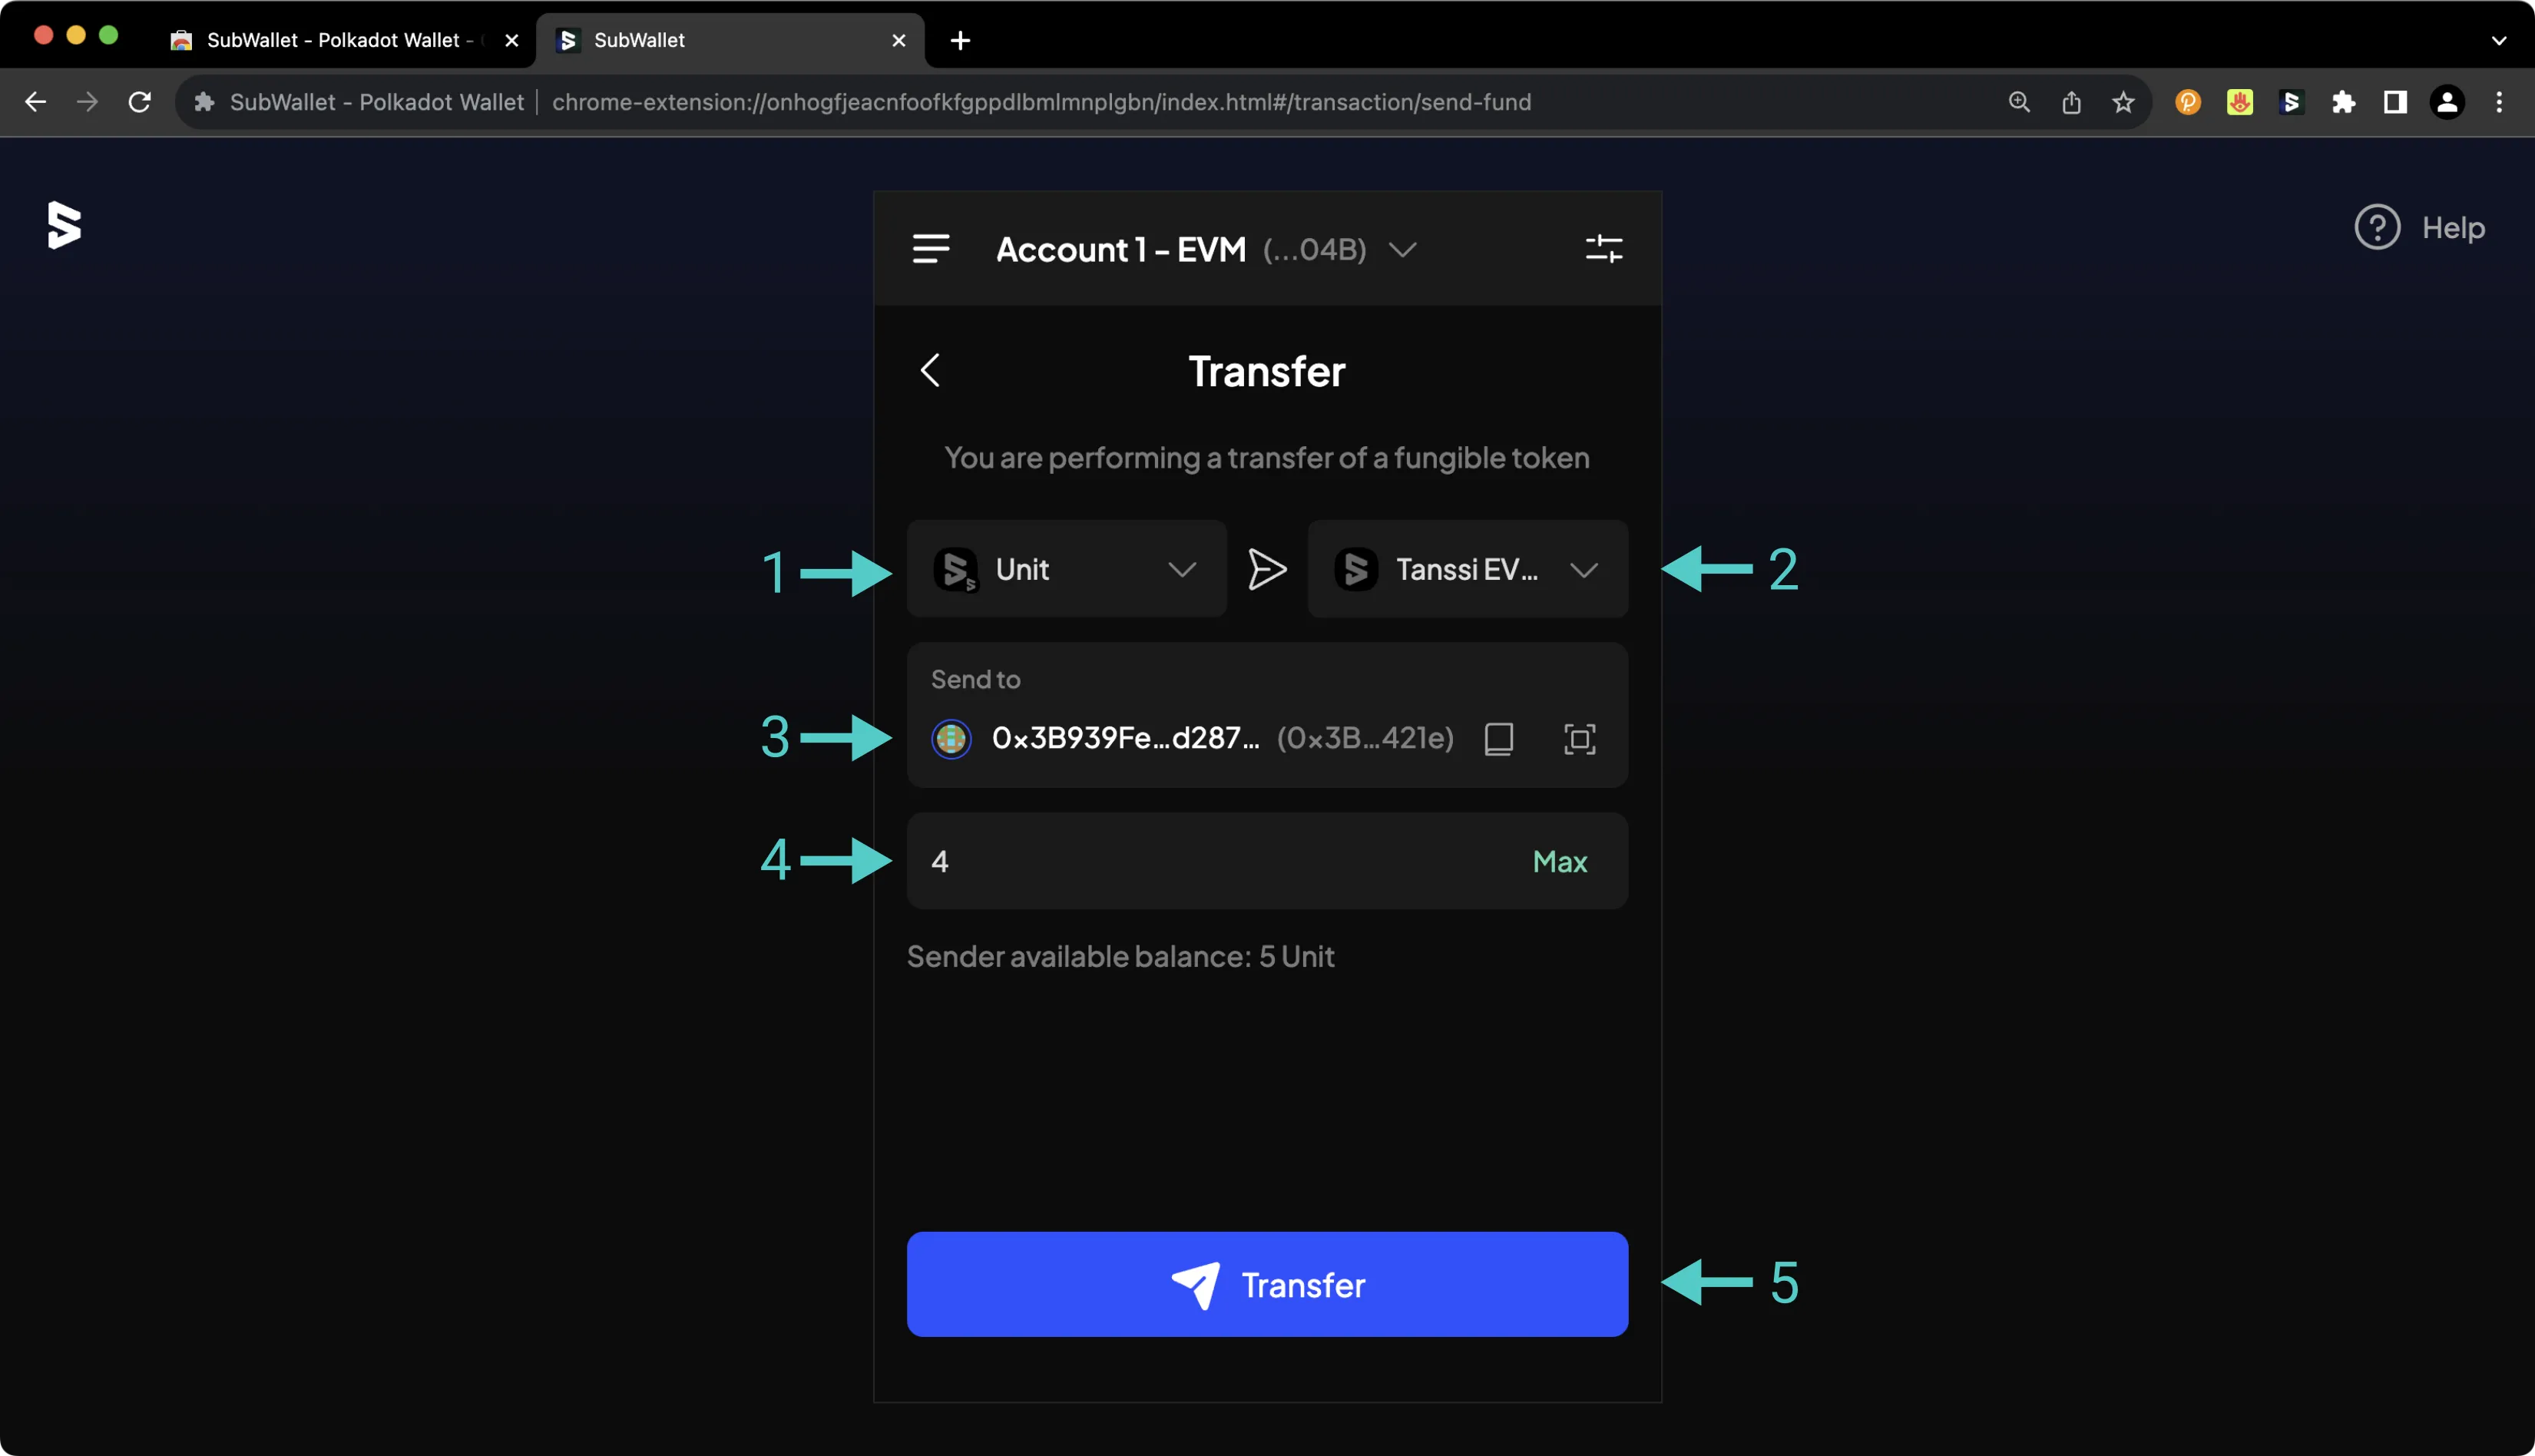
This guide focused specifically on configuring SubWallet to work with your Tanssi EVM network, but SubWallet is also a full-featured wallet for Substrate (Polkadot) accounts. Under the Substrate API section, you'll find a [similar guide for configuring SubWallet for use with your Substrate network](/builders/toolkit/substrate-api/wallets/subwallet/){target=\_blank}.
The information presented herein has been provided by third parties and is made available solely for general information purposes. Tanssi does not endorse any project listed and described on the Tanssi Doc Website (https://docs.tanssi.network/). Tanssi Foundation does not warrant the accuracy, completeness or usefulness of this information. Any reliance you place on such information is strictly at your own risk. Tanssi Foundation disclaims all liability and responsibility arising from any reliance placed on this information by you or by anyone who may be informed of any of its contents. All statements and/or opinions expressed in these materials are solely the responsibility of the person or entity providing those materials and do not necessarily represent the opinion of Tanssi Foundation. The information should not be construed as professional or financial advice of any kind. Advice from a suitably qualified professional should always be sought in relation to any particular matter or circumstance. The information herein may link to or integrate with other websites operated or content provided by third parties, and such other websites may link to this website. Tanssi Foundation has no control over any such other websites or their content and will have no liability arising out of or related to such websites or their content. The existence of any such link does not constitute an endorsement of such websites, the content of the websites, or the operators of the websites. These links are being provided to you only as a convenience and you release and hold Tanssi Foundation harmless from any and all liability arising from your use of this information or the information provided by any third-party website or service.
--- END CONTENT ---
Doc-Content: https://docs.tanssi.network/builders/toolkit/ethereum-api/wallets/talisman/
--- BEGIN CONTENT ---
---
title: How to Connect Talisman to Tanssi
description: This guide walks you through how to connect Talisman, a comprehensive Polkadot, Substrate, and Ethereum wallet, to your Tanssi-powered EVM-compatible network.
icon: material-wallet-outline
categories: EVM-Template
---
# Interacting with Your Tanssi EVM Network Using Talisman
## Introduction {: #introduction }
Developers and users of Tanssi-powered EVM networks have a variety of options when it comes to wallets. Thanks to their seamless Ethereum compatibility, Tanssi EVM networks support a great variety of popular wallets, such as Talisman.
Talisman is a Web3 wallet that natively supports Substrate (Polkadot) and Ethereum accounts. This tutorial centers on the Ethereum API, but you can check out a similar [tutorial for interacting with Talisman using the Substrate API](/builders/toolkit/substrate-api/wallets/talisman/){target=\_blank}. The Talisman wallet browser extension is available on [Google Chrome](https://chromewebstore.google.com/detail/talisman-wallet/fijngjgcjhjmmpcmkeiomlglpeiijkld){target=\_blank} and [Brave](https://chromewebstore.google.com/detail/talisman-wallet/fijngjgcjhjmmpcmkeiomlglpeiijkld){target=\_blank}, and a corresponding asset dashboard is accessible at [app.talisman.xyz](https://app.talisman.xyz){target=\_blank}
This guide takes you through all the necessary steps, from installing Talisman to setting up a wallet, connecting it to your Tanssi EVM network, and sending funds.
## Setting Up Talisman {: #setting-up-talisman }
First, download and install the [Talisman extension](https://talisman.xyz/){target=\_blank}. This guide will first cover creating a new wallet and later address importing an existing one. Review the terms and conditions, then press **Get Started**.
On the following screen, you'll be prompted to create a password to secure your new wallet.
## Creating an Ethereum Account {: #creating-an-ethereum-account }
To create your first Ethereum account, take the following steps:
1. Select the **Ethereum** option
2. Give your account a name
3. Press **Create**
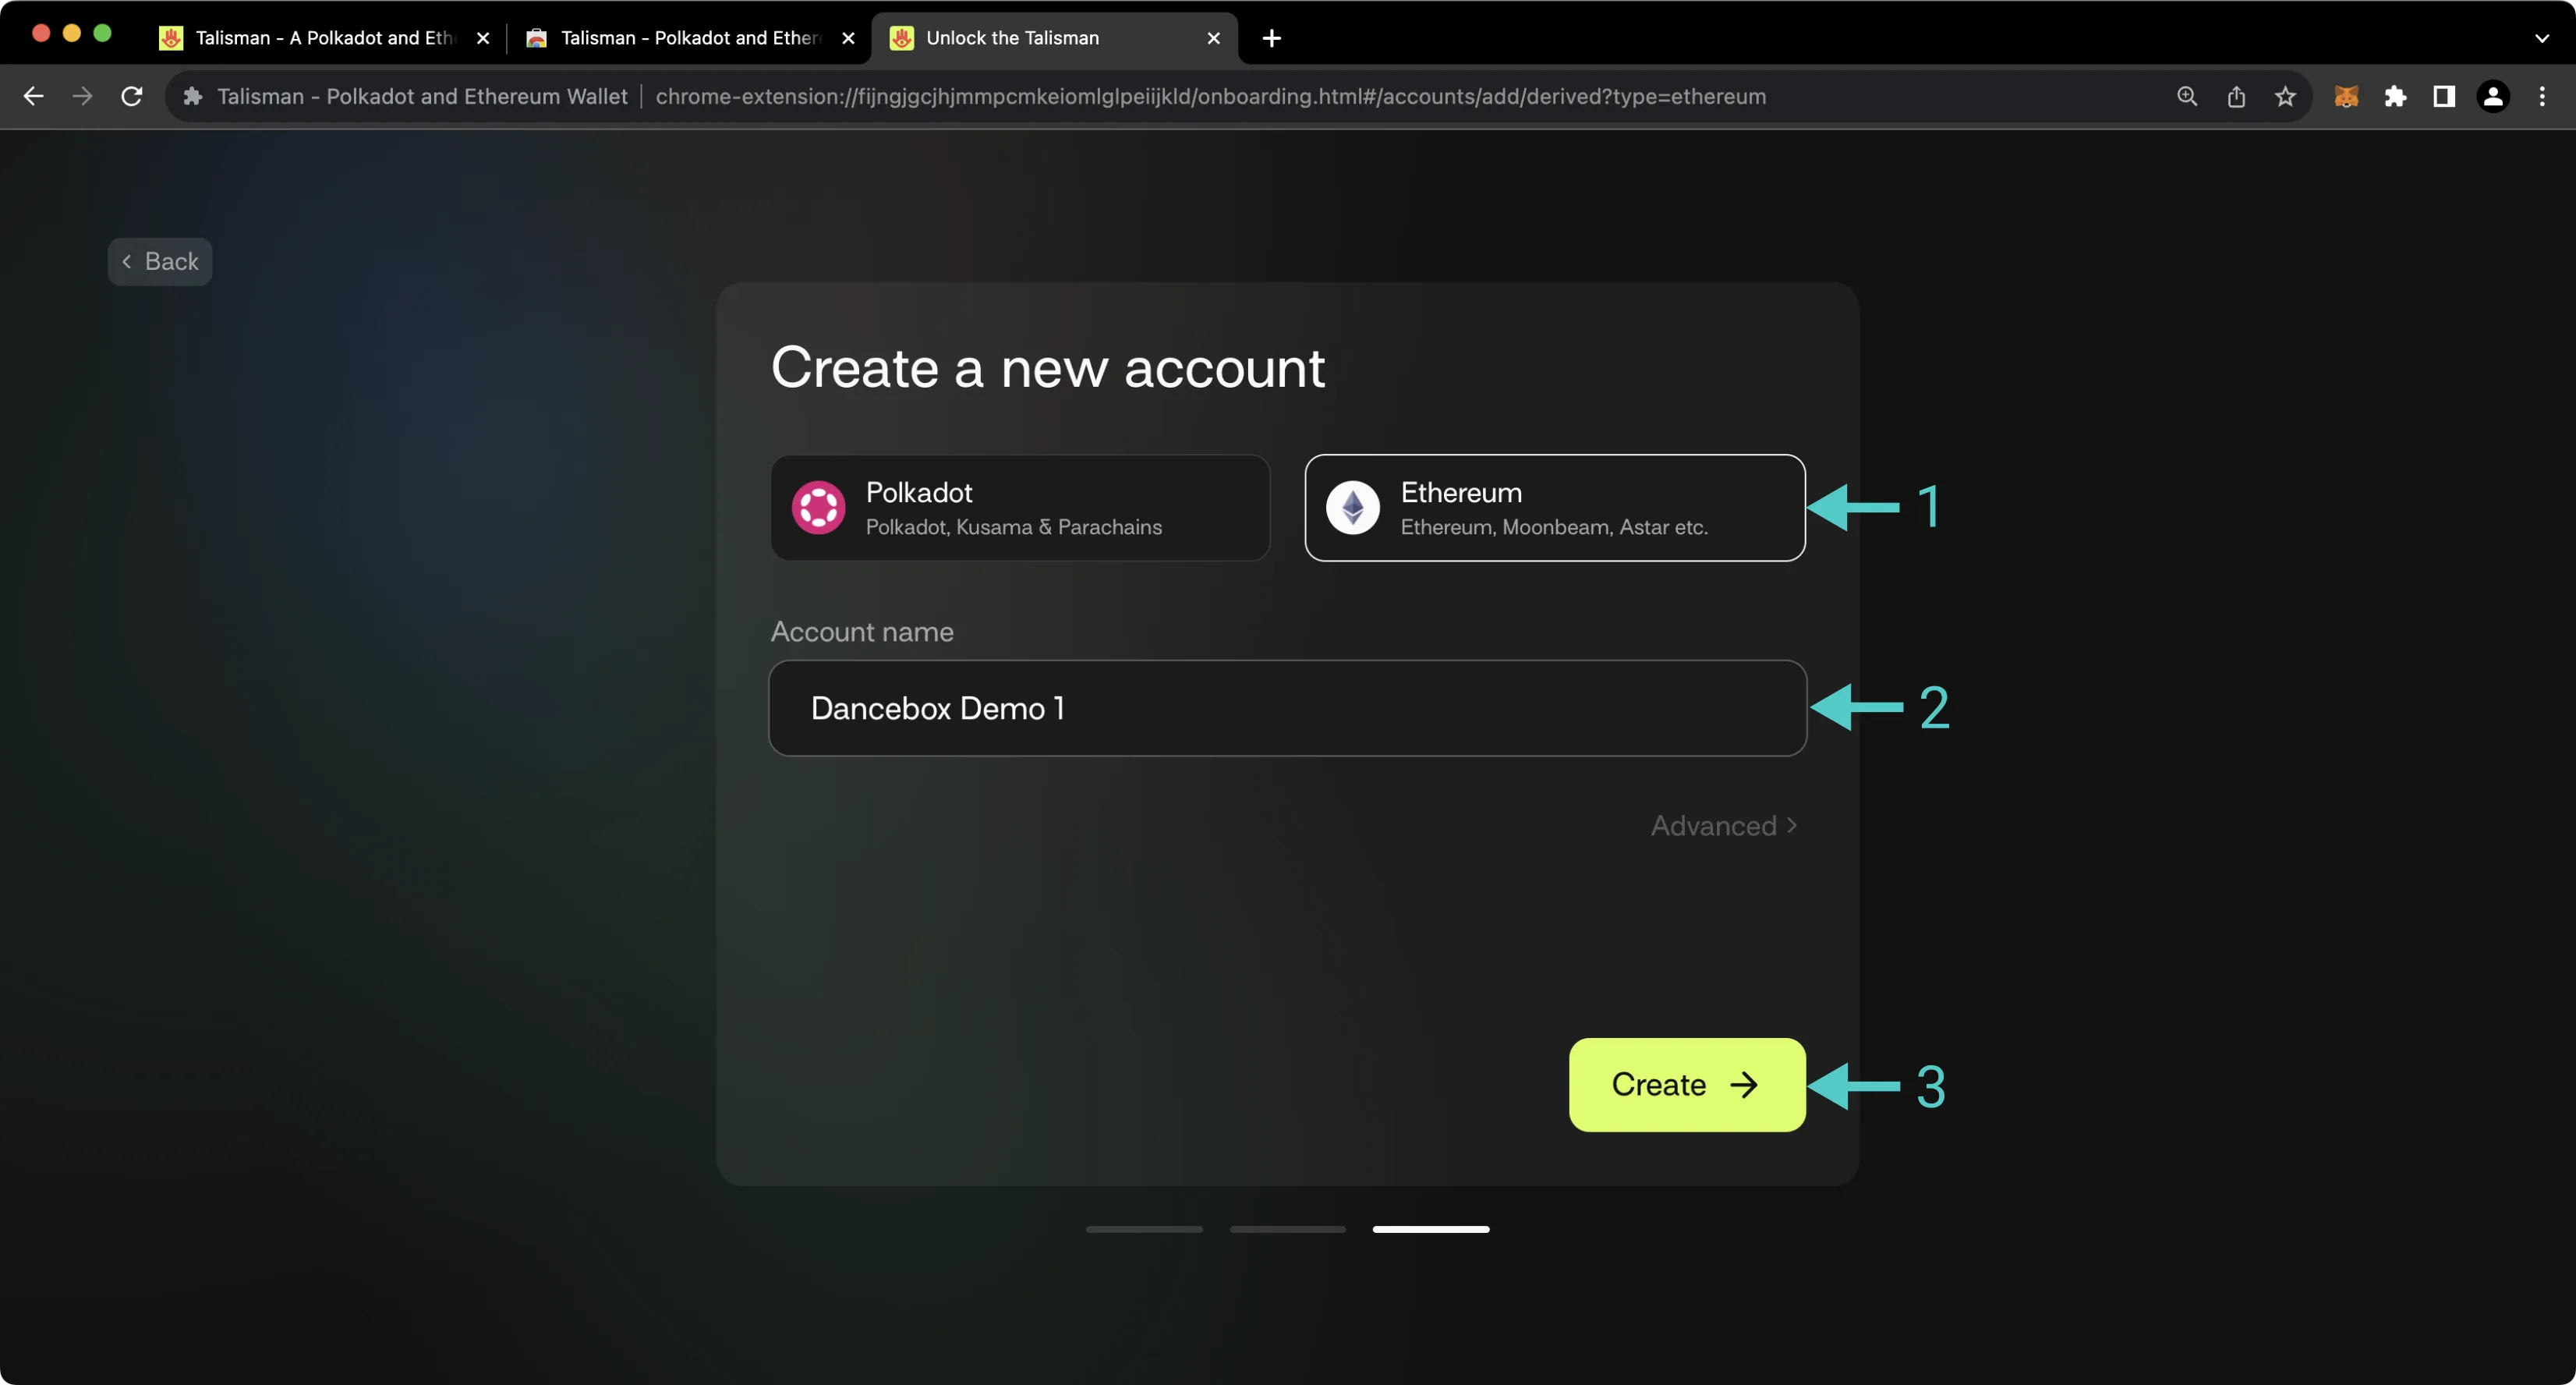
After creating your first account, you'll be prompted to back up your seed phrase. This is an important step, especially because you have the option to later derive additional accounts from this seed phrase.
!!! note
You should never share your seed phrase (mnemonic) or private key with anyone. This gives them direct access to your funds. This guide is for educational purposes only.
## Importing an Existing EVM Account {: #importing-an-existing-evm-account }
Of course, you can import an existing EVM account into Talisman. To do so, take the following steps:
1. Press **Add Account**
2. Press **Import**
3. Select **Import via Recovery Phrase** (note, this works for both seeds and private keys)
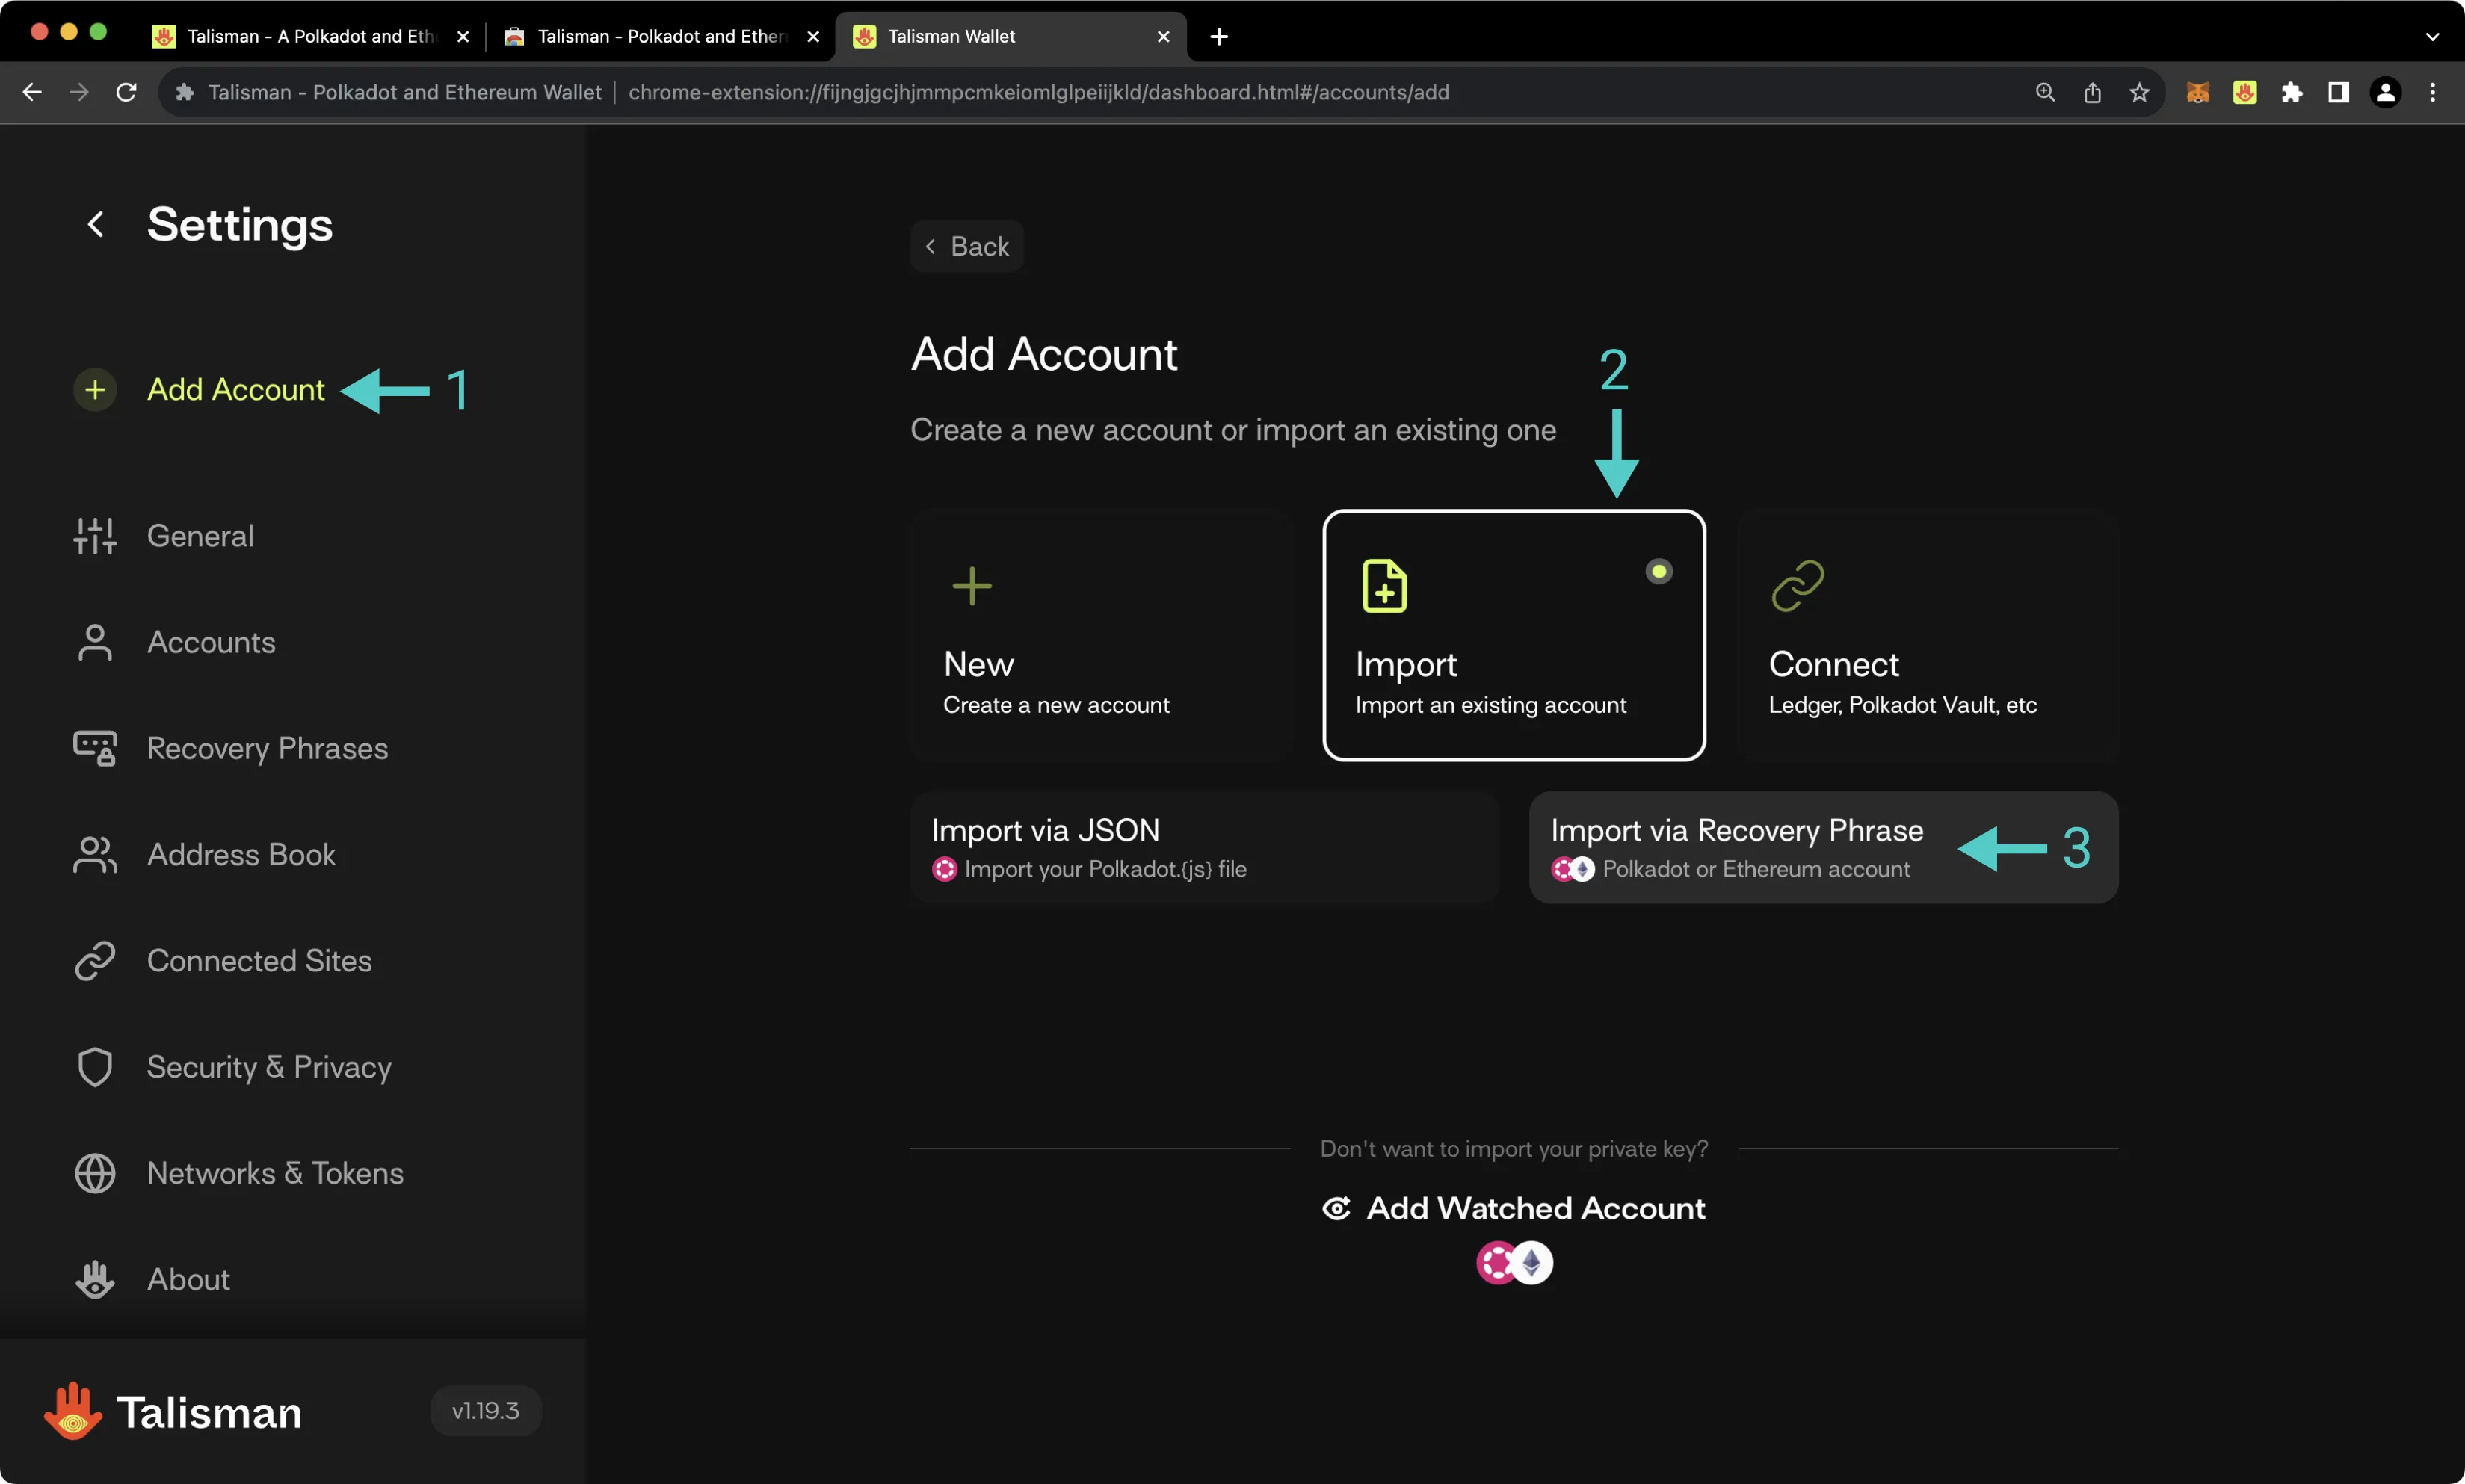
On the following screen, take the following steps:
1. Select the **Ethereum** account type
2. Provide a name for your account
3. Paste in your seed or private key
4. If you imported a mnenomic seed phrase in the prior step, select which accounts you'd like to import
5. Press **Import**
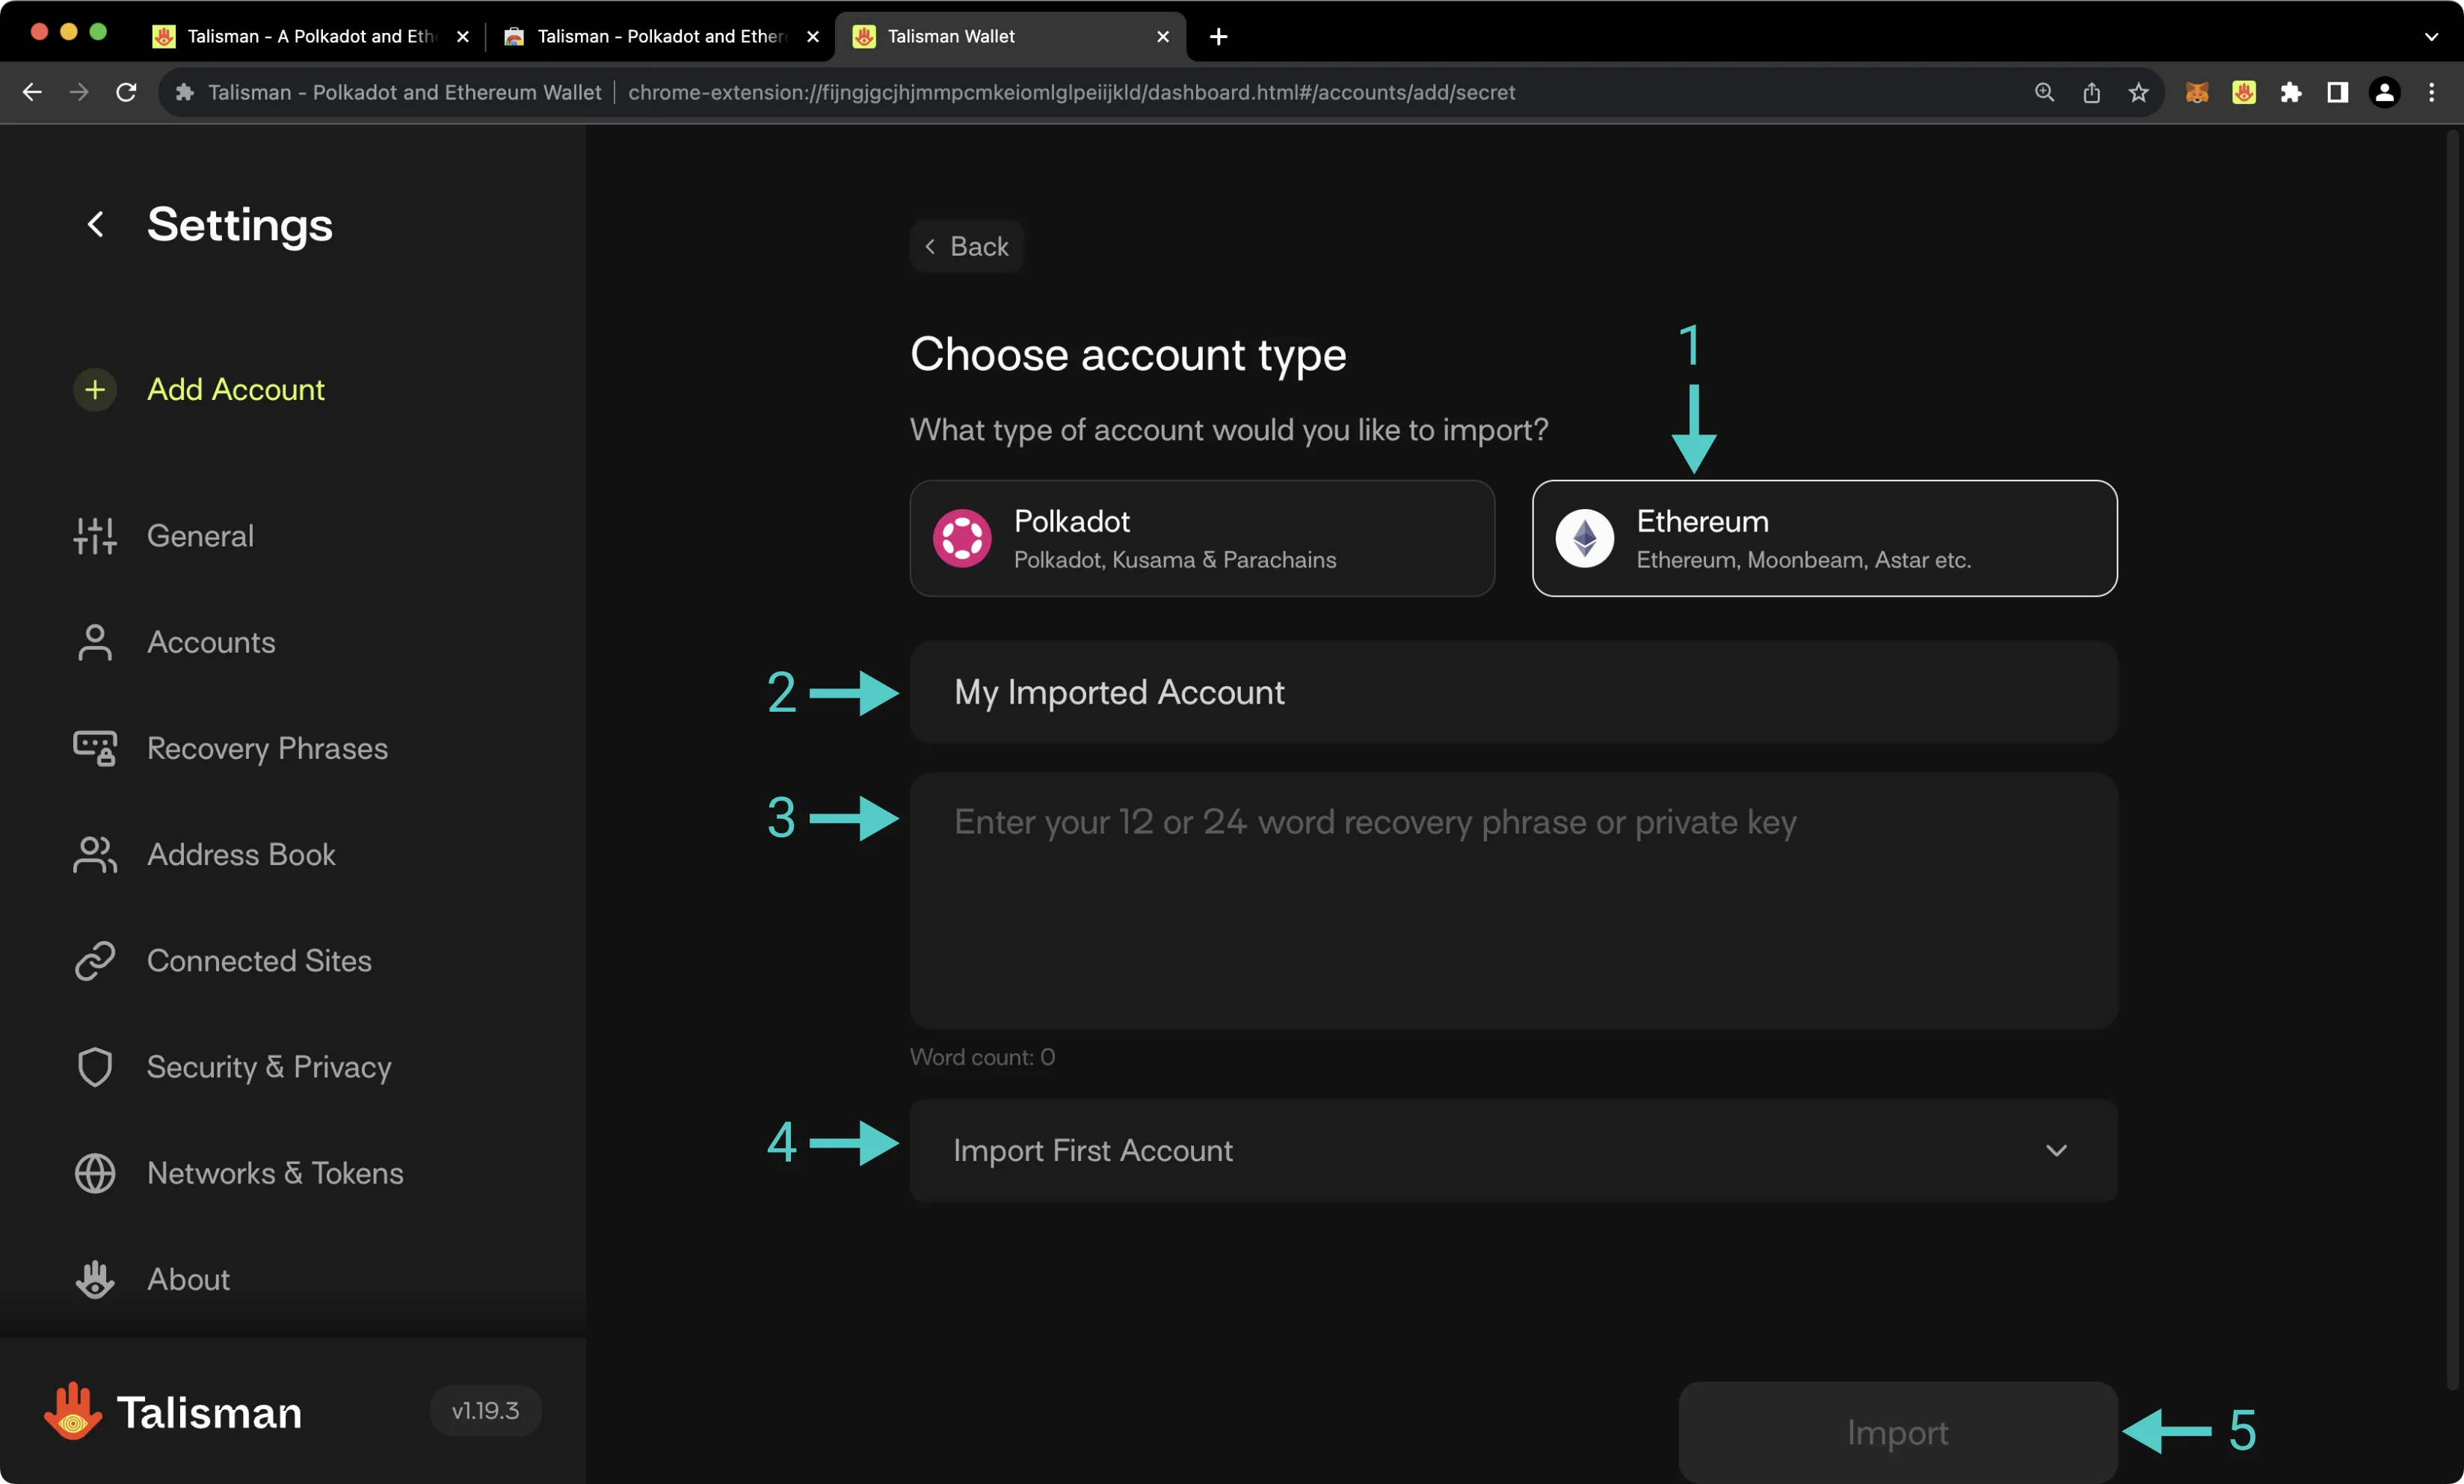
## Configuring Talisman for Your EVM Network {: #configuring-talisman-for-your-evm-network }
To configure Talisman for your Tanssi EVM network, open the Talisman extension and click on the **More Options** tab. Then, take the following steps:
1. Select **Settings**
2. Check the **Enable testnets** box
3. Press **Add Network**
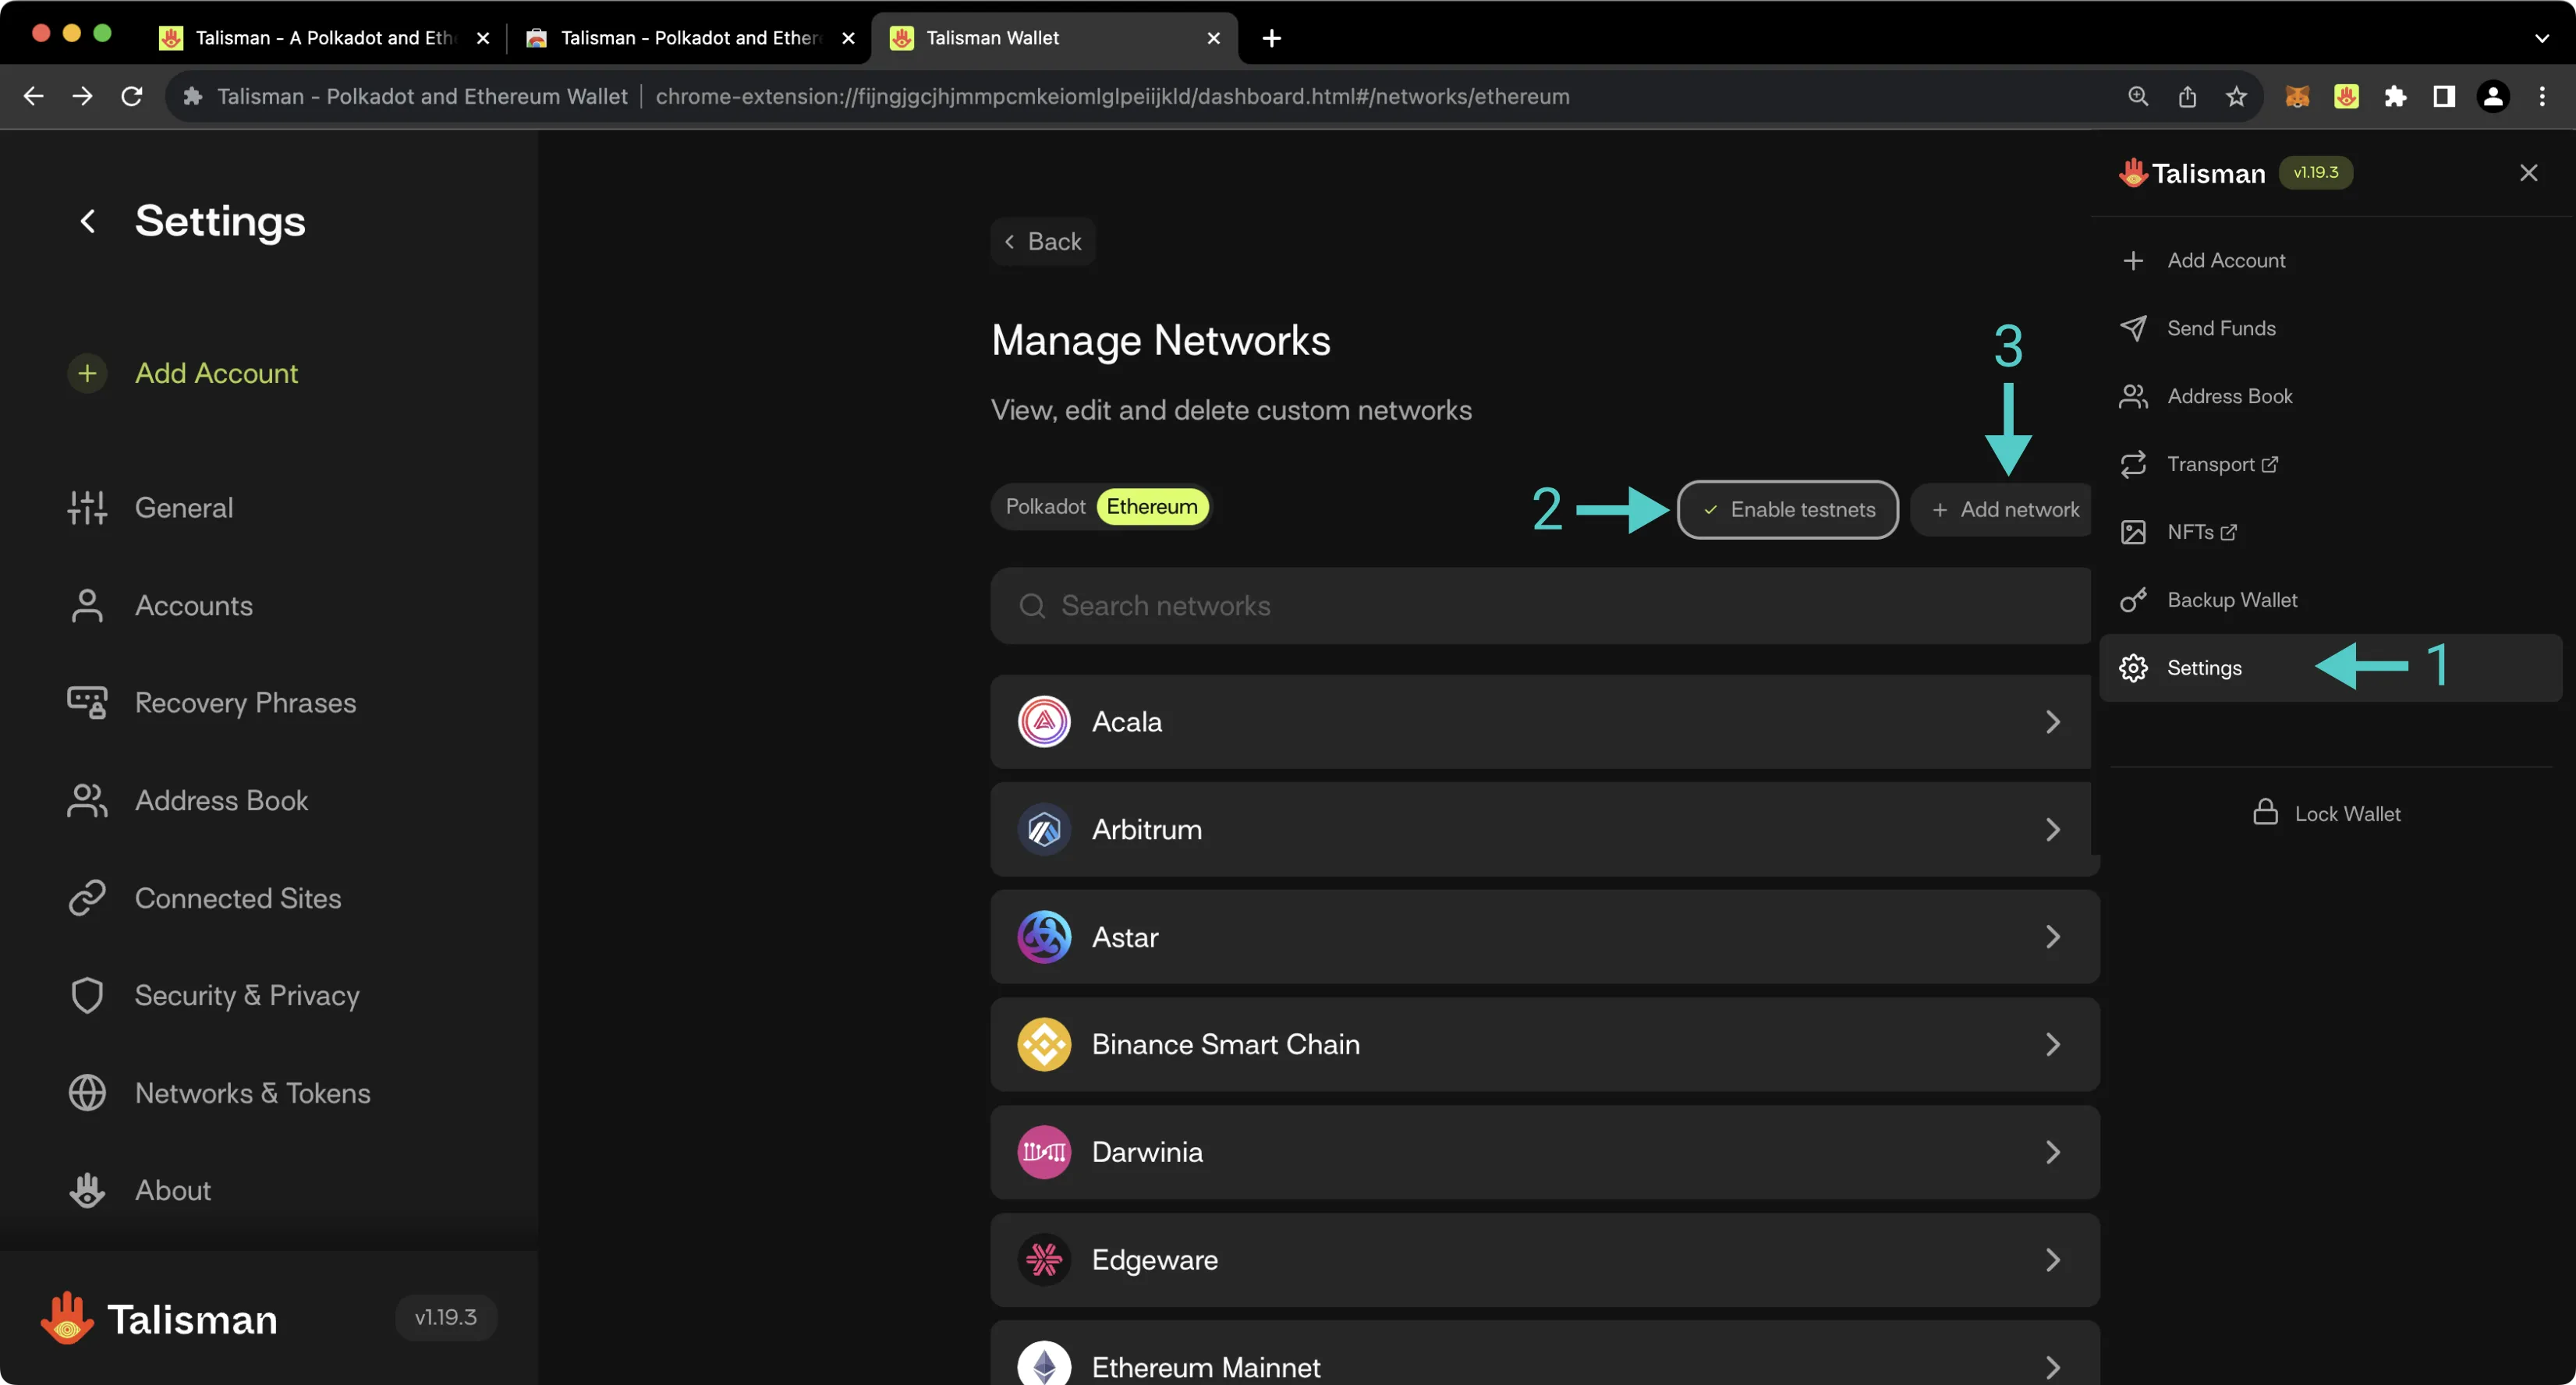
On the following page, you'll then be prompted to enter the network details for your Tanssi-powered network. For demonstration purposes, the demo EVM network is used here, but you can substitute these details for your own network. To add your network to Talisman, take the following steps:
1. Paste in the RPC URL of your Tanssi-powered network. The demo EVM network's RPC URL is `{{ networks.dancelight.demo_evm_rpc_url }}`. Other parameters will be autopopulated
2. Paste in the block explorer URL of your Tanssi-powered network. The demo EVM network's block explorer URL is `{{ networks.dancelight.demo_evm_blockscout_url }}`
3. Check the **This is a testnet** box if applicable
4. Press **Add Network**
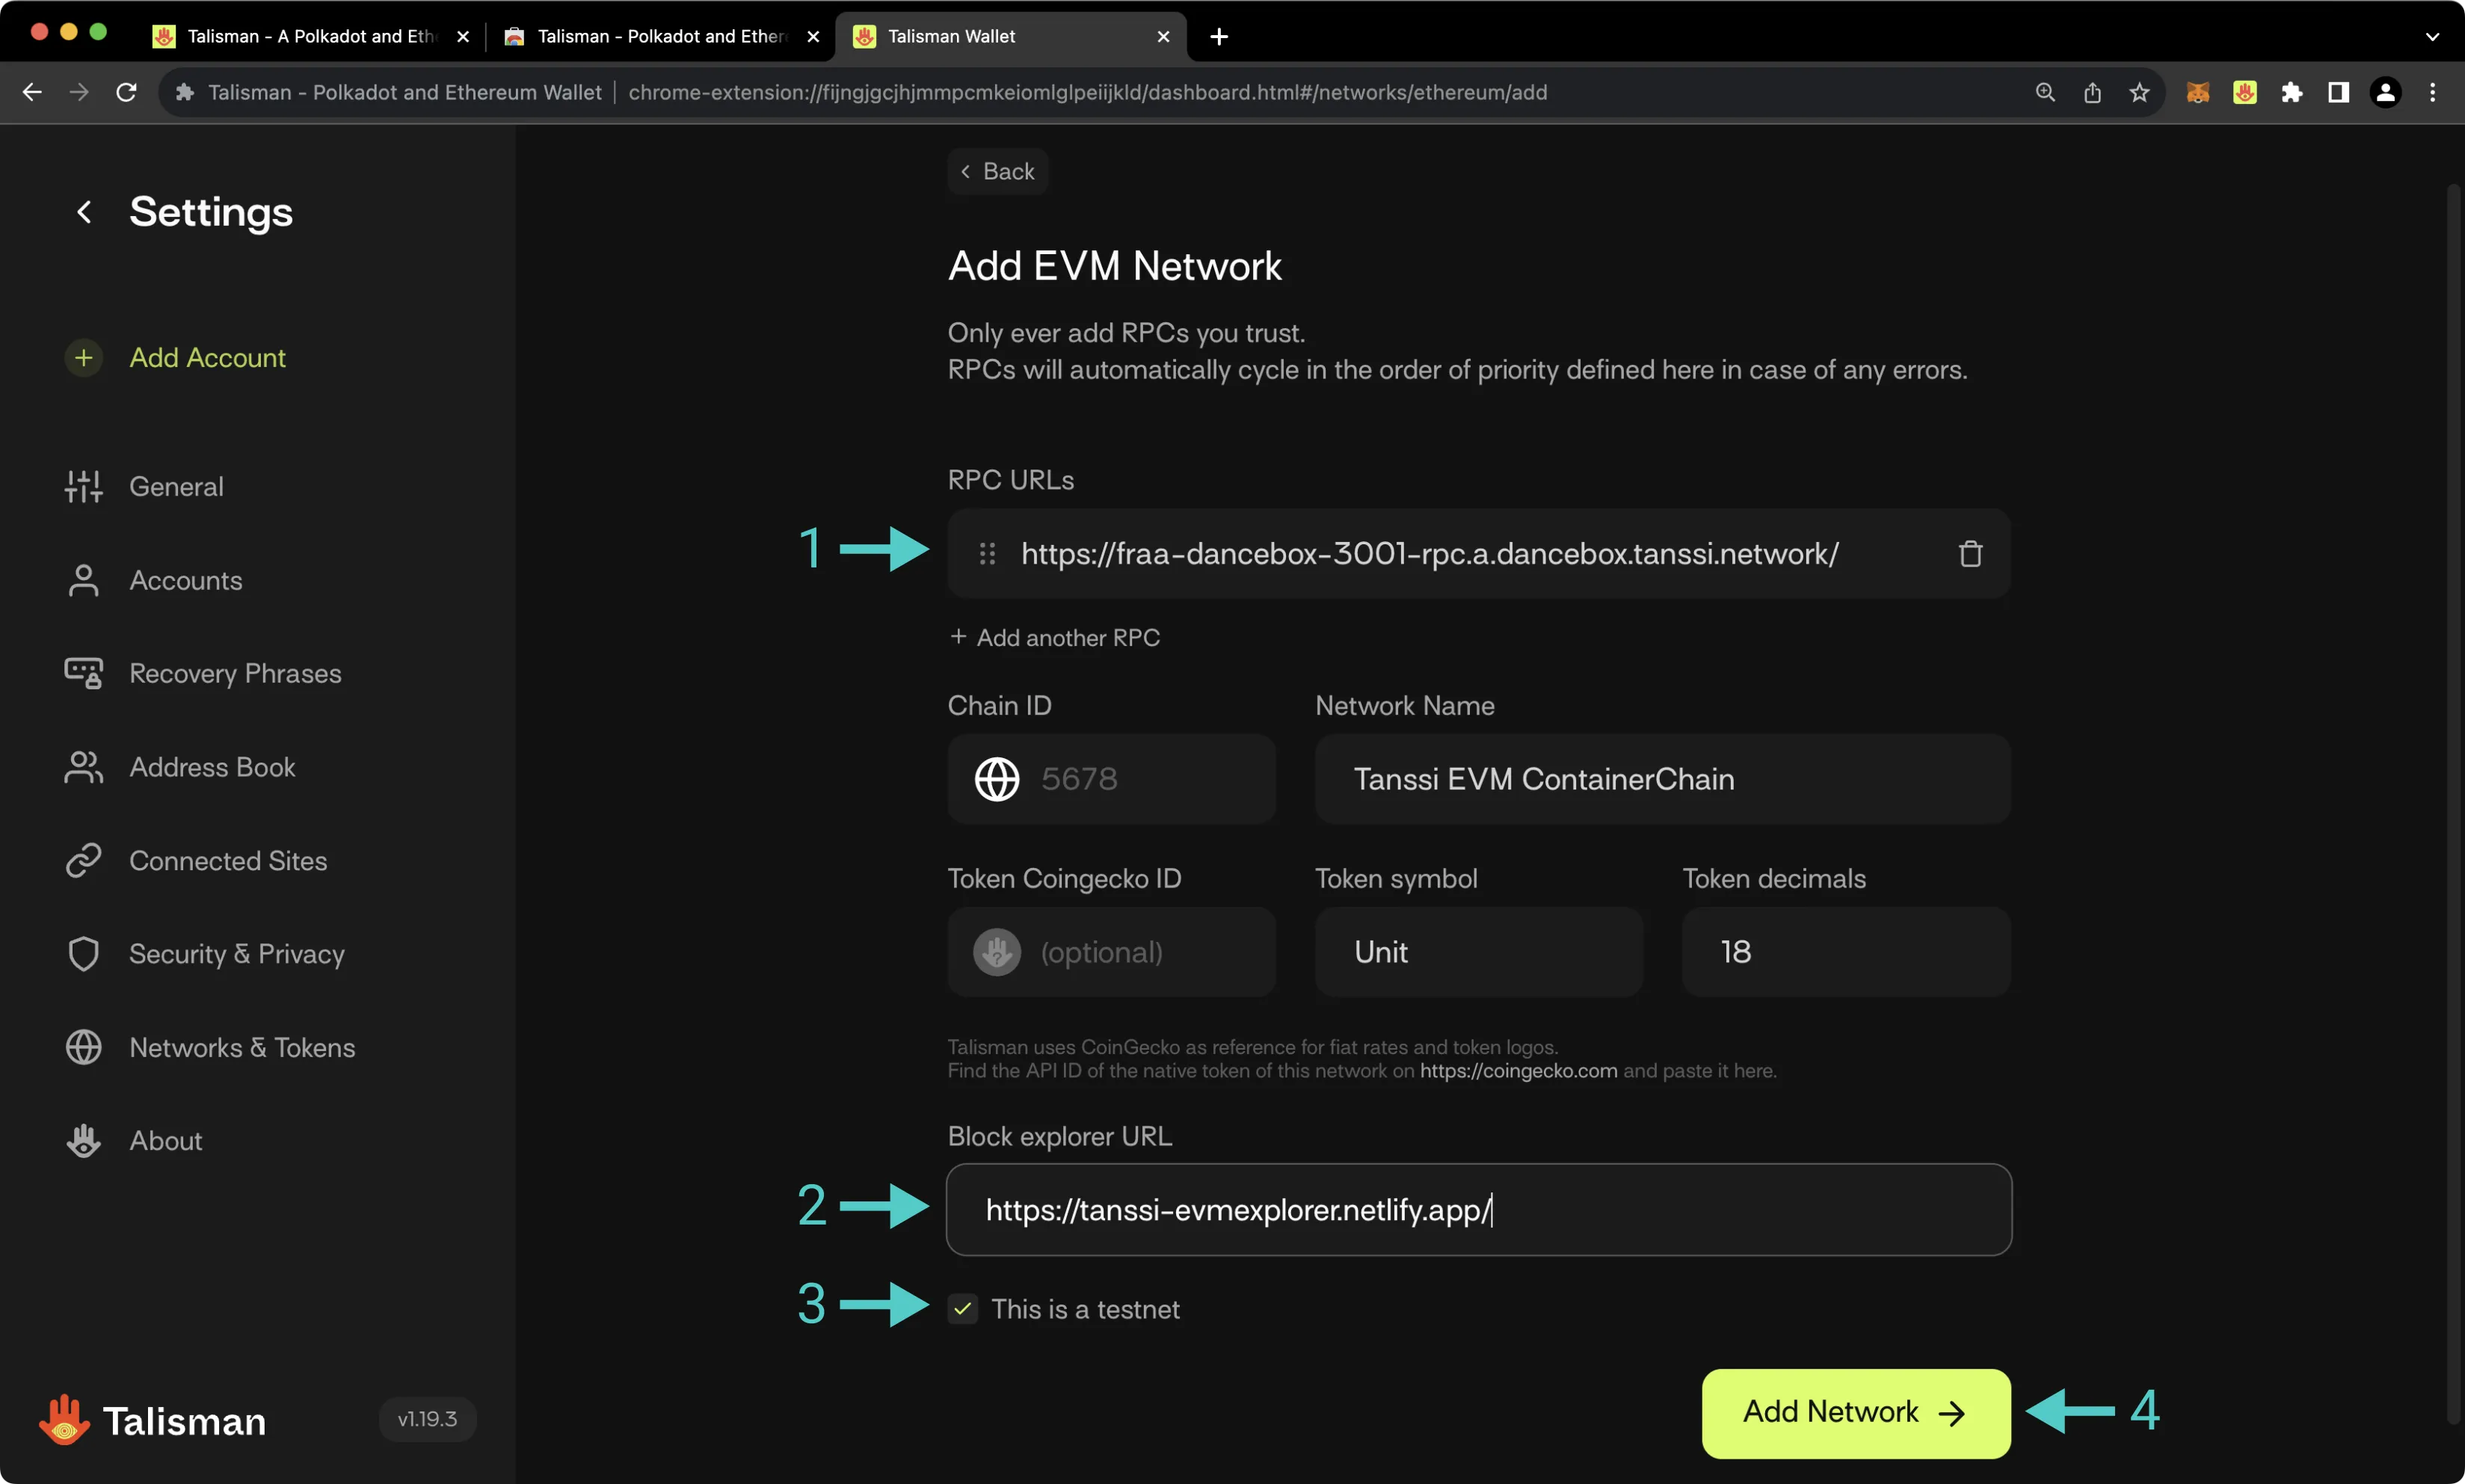
If you hold a balance of tokens in your newly created account for your network, you'll see the balance in the Talisman dashboard.
## Sending Assets on Your EVM Network {: #sending-assets-on-your-evm-network }
To transfer the native token of your Tanssi network, take the following steps:
1. Click on the **Send** icon
2. Click the desired **Send from** account
3. Enter the destination address
4. Enter the amount of tokens to send
5. Look over the transaction details, then press **Review** and subsequently **Confirm**
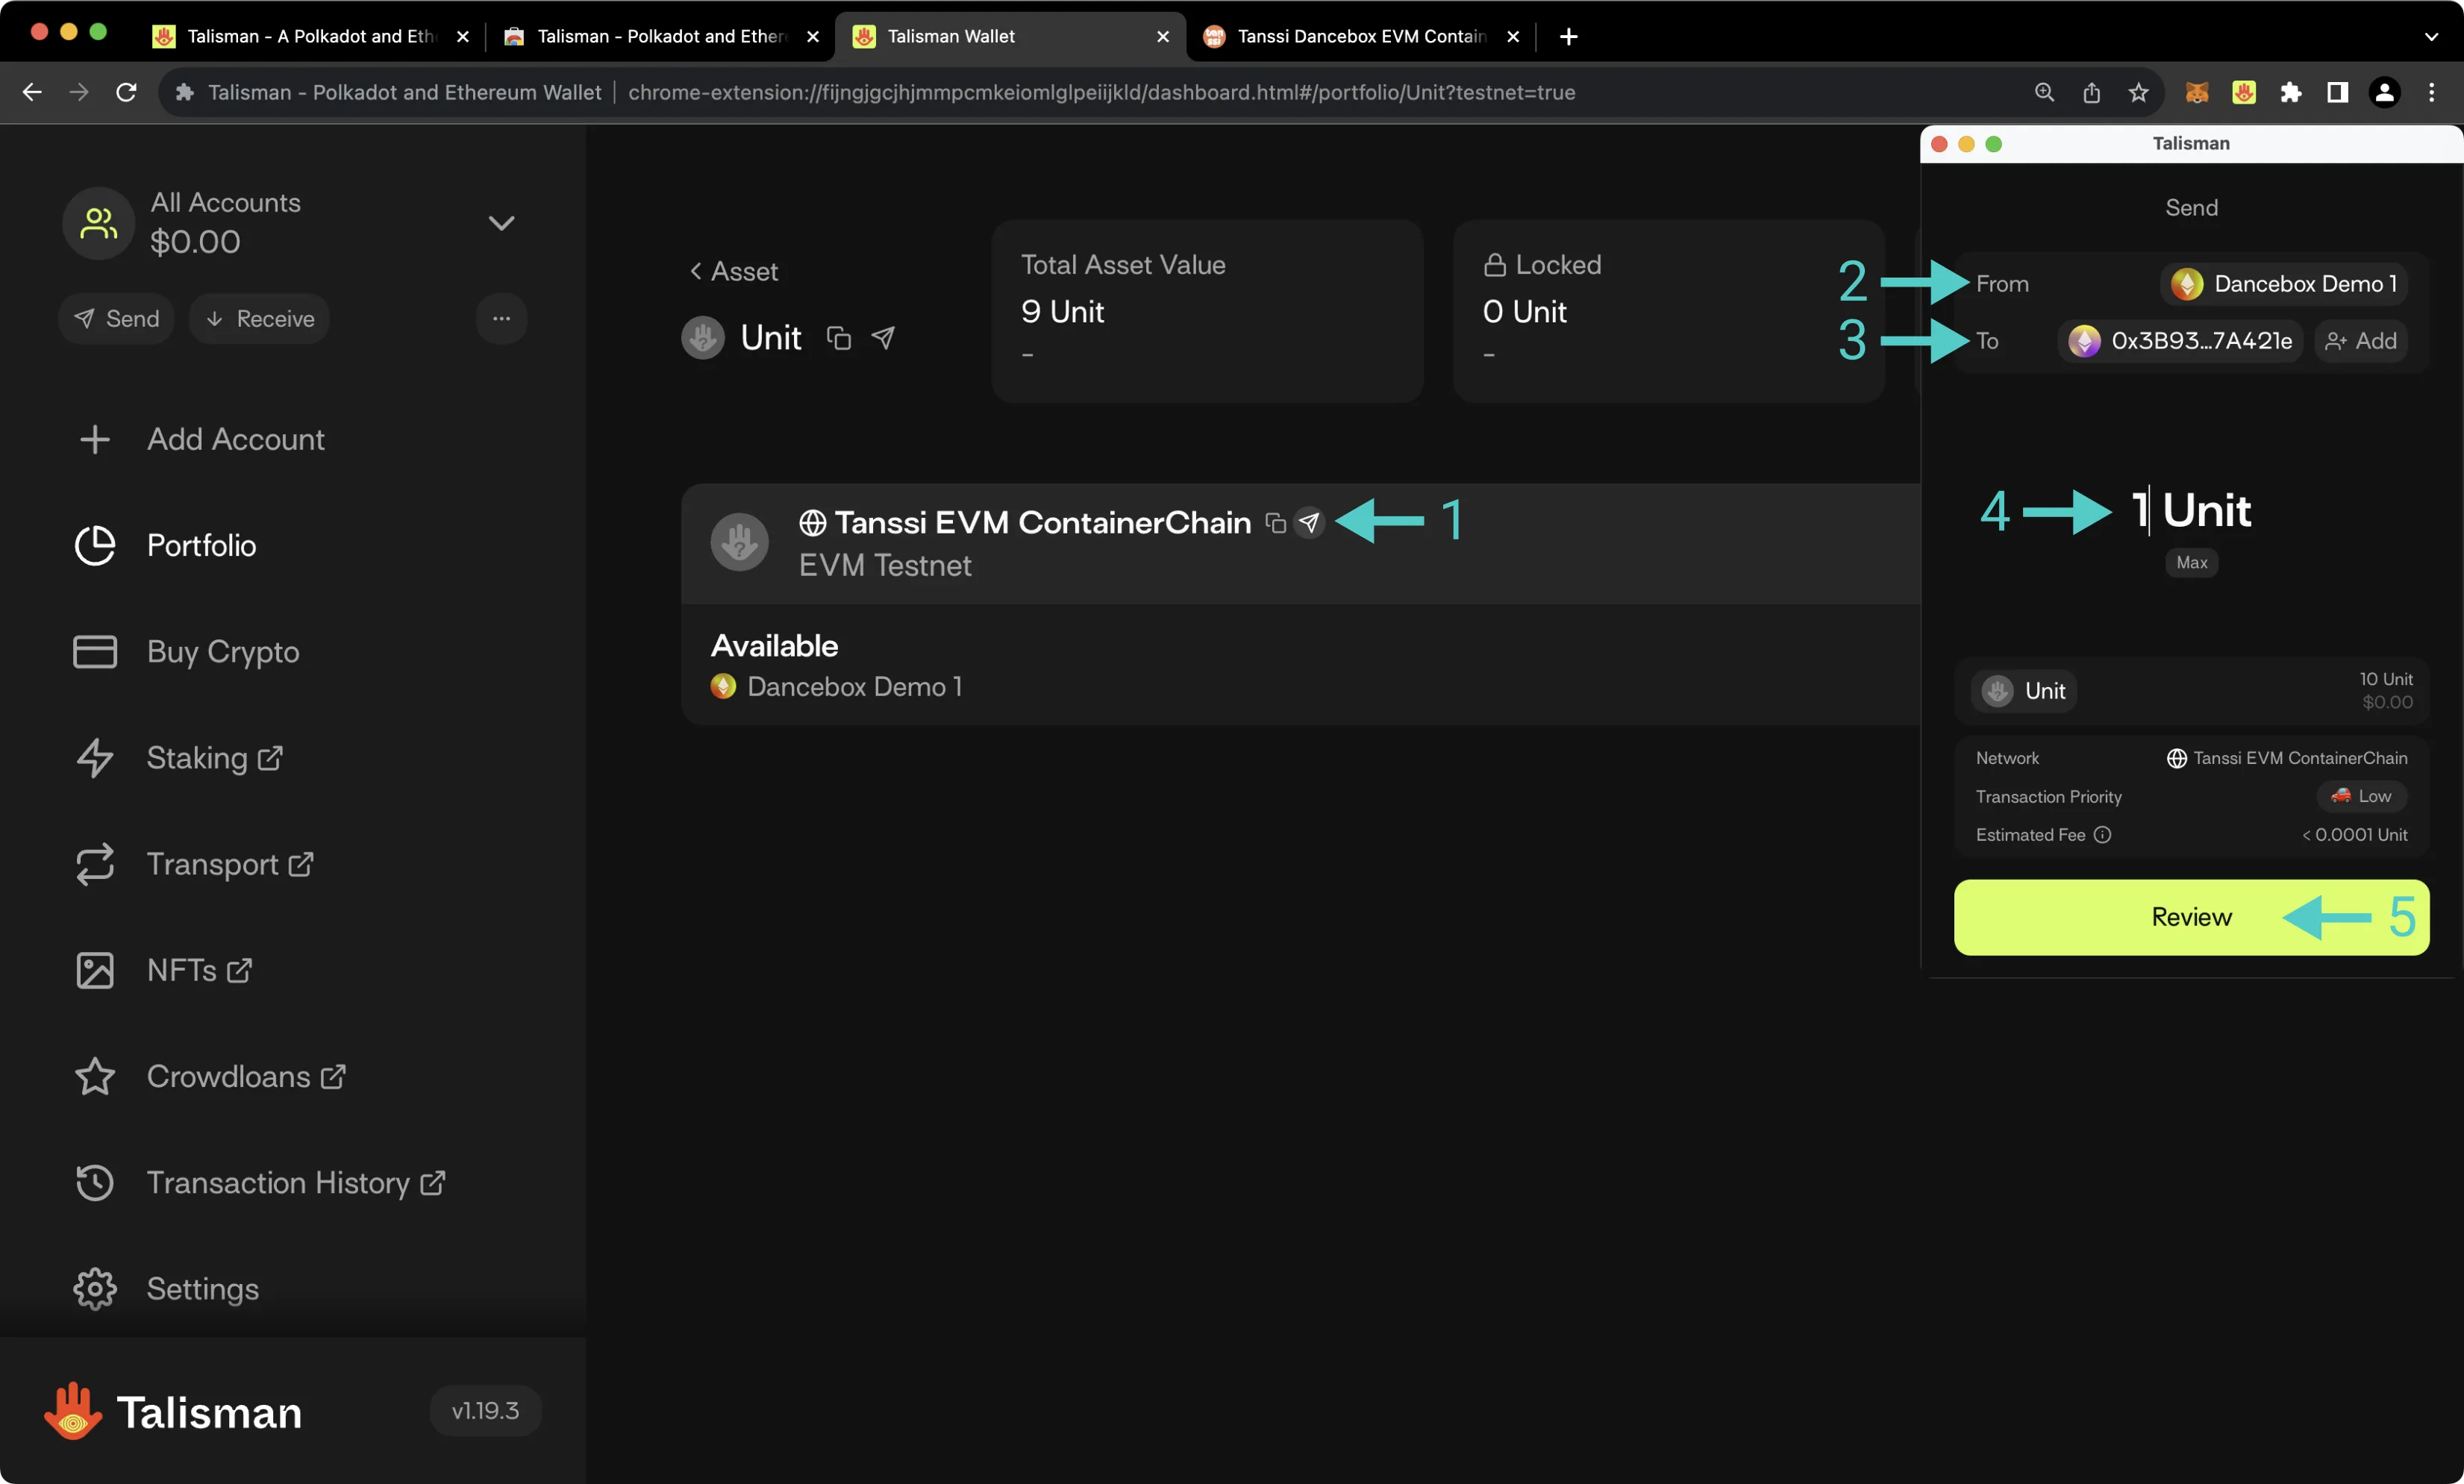
This guide focused specifically on configuring Talisman to work with your Tanssi-powered EVM network, but Talisman is also a full-featured wallet for Substrate (Polkadot) accounts. Under the Substrate API section, you'll find a similar tutorial for configuring Talisman to work with Substrate-based chains.
The information presented herein has been provided by third parties and is made available solely for general information purposes. Tanssi does not endorse any project listed and described on the Tanssi Doc Website (https://docs.tanssi.network/). Tanssi Foundation does not warrant the accuracy, completeness or usefulness of this information. Any reliance you place on such information is strictly at your own risk. Tanssi Foundation disclaims all liability and responsibility arising from any reliance placed on this information by you or by anyone who may be informed of any of its contents. All statements and/or opinions expressed in these materials are solely the responsibility of the person or entity providing those materials and do not necessarily represent the opinion of Tanssi Foundation. The information should not be construed as professional or financial advice of any kind. Advice from a suitably qualified professional should always be sought in relation to any particular matter or circumstance. The information herein may link to or integrate with other websites operated or content provided by third parties, and such other websites may link to this website. Tanssi Foundation has no control over any such other websites or their content and will have no liability arising out of or related to such websites or their content. The existence of any such link does not constitute an endorsement of such websites, the content of the websites, or the operators of the websites. These links are being provided to you only as a convenience and you release and hold Tanssi Foundation harmless from any and all liability arising from your use of this information or the information provided by any third-party website or service.
--- END CONTENT ---
Doc-Content: https://docs.tanssi.network/builders/toolkit/integrations/indexers/sqd/erc20-transfers/
--- BEGIN CONTENT ---
---
title: Index ERC-20 Transfers on an EVM Network
description: Learn how to use the Squid SDK, a query node framework that can index both Substrate and EVM data, to process blockchain data for your Tanssi-powered network.
icon: octicons-arrow-switch-24
categories: EVM-Template
---
# Indexing ERC-20 Transfers on a Tanssi EVM Network
## Introduction {: #introduction }
[SQD](https://www.sqd.ai/){target=\_blank} is a data network that allows rapid and cost-efficient retrieval of blockchain data from 100+ chains using SQD’s decentralized data lake and open-source SDK. In very simple terms, SQD can be thought of as an ETL (extract, transform, and load) tool with a [GraphQL](https://graphql.org){target=\_blank} server included. It enables comprehensive filtering, pagination, and even full-text search capabilities.
SQD has native and full support for both EVM and Substrate data. SQD offers a Substrate Archive and Processor and an EVM Archive and Processor. The Substrate Archive and Processor can be used to index both Substrate and EVM data. This allows developers to extract on-chain data from any Tanssi-powered network and process EVM logs as well as Substrate entities (events, extrinsics, and storage items) in one single project and serve the resulting data with one single GraphQL endpoint. If you exclusively want to index EVM data, it is recommended to use the EVM Archive and Processor.
This tutorial is a step-by-step guide to building a Squid to index EVM data from start to finish. It's recommended that you follow along, taking each step described on your own, but you can also find a [complete version of the Squid built in this tutorial in the tanssiSquid GitHub repository](https://github.com/themacexpert/tanssiSquid){target=\_blank}.
## Check Prerequisites {: #check-prerequisites }
To follow along with this tutorial, you'll need to have:
- [Docker installed](https://docs.docker.com/get-started/get-docker/){target=\_blank}
- [Docker Compose installed](https://docs.docker.com/compose/install){target=\_blank}
- An empty Hardhat project. For step-by-step instructions, please refer to the [Creating a Hardhat Project](/builders/toolkit/ethereum-api/dev-env/hardhat/#creating-a-hardhat-project){target=\_blank} section of our Hardhat documentation page
!!! note
The examples in this guide are based on a MacOS or Ubuntu 20.04 environment. If you're using Windows, you'll need to adapt them accordingly.
Furthermore, please ensure that you have Node.js and a package manager (such as npm or yarn) installed. To learn how to install Node.js, please check their [official documentation](https://nodejs.org/en/download){target=\blank}.
Also, make sure you've initialized a `package.json` file for ES6 modules. You can initialize a default `package.json` file using npm by running the following command `npm init --yes`.
## Deploy an ERC-20 with Hardhat {: #deploy-an-erc20-with-hardhat }
Before we can index anything with SQD we need to make sure we have something to index! This section will walk through deploying an ERC-20 token to your Tanssi-powered network so you can get started indexing it. However, you can feel free to skip to [Create a Squid Project](#create-a-squid-project) if either of the two scenarios apply:
- You have already deployed an ERC-20 token to your network (and made several transfers)
- You would prefer to use an existing ERC-20 token deployed to the demo EVM network (of which there are already several transfer events)
If you'd like to use an existing ERC-20 token on the demo EVM network, you can use the below `MyTok.sol` contract. The hashes of the token transfers are provided as well to assist with any debugging.
In this section, we'll show you how to deploy an ERC-20 to your EVM network and we'll write a quick script to fire off a series of transfers that will be picked up by our SQD indexer. Ensure that you have initialized an empty Hardhat project via the instructions in the [Creating a Hardhat Project](/builders/toolkit/ethereum-api/dev-env/hardhat/#creating-a-hardhat-project){target=\_blank} section of our Hardhat documentation page.
Before we dive into creating our project, let's install a couple of dependencies that we'll need: the [Hardhat Ethers plugin](https://hardhat.org/hardhat-runner/plugins/nomicfoundation-hardhat-ethers){target=\_blank} and [OpenZeppelin contracts](https://docs.openzeppelin.com/contracts/4.x){target=\_blank}. The Hardhat Ethers plugin provides a convenient way to use the [Ethers](/builders/toolkit/ethereum-api/libraries/ethersjs/){target=\_blank} library to interact with the network. We'll use OpenZeppelin's base ERC-20 implementation to create an ERC-20. To install both of these dependencies, you can run:
=== "npm"
```bash
npm install @nomicfoundation/hardhat-ethers ethers @openzeppelin/contracts
```
=== "yarn"
```bash
yarn add @nomicfoundation/hardhat-ethers ethers @openzeppelin/contracts
```
Now we can edit `hardhat.config.js` to include the following network and account configurations for our network. You can replace the demo EVM network values with the respective parameters for your own Tanssi-powered EVM network which can be found at [apps.tanssi.network](https://apps.tanssi.network){target=\_blank}.
???+ code "hardhat.config.js"
```js
// 1. Import the Ethers plugin required to interact with the contract
require('@nomicfoundation/hardhat-ethers');
// 2. Add your private key that is funded with tokens of your Tanssi-powered network
// This is for example purposes only - **never store your private keys in a JavaScript file**
const privateKey = 'INSERT_PRIVATE_KEY';
/** @type import('hardhat/config').HardhatUserConfig */
module.exports = {
// 3. Specify the Solidity version
solidity: '0.8.20',
networks: {
// 4. Add the network specification for your Tanssi EVM network
demo: {
url: 'https://services.tanssi-testnet.network/dancelight-2001/',
chainId: 5678, // Fill in the EVM ChainID for your Tanssi-powered network
accounts: [privateKey],
},
},
};
```
!!! remember
You should never store your private keys in a JavaScript or Python file. It is done in this tutorial for ease of demonstration only. You should always manage your private keys with a designated secret manager or similar service.
### Create an ERC-20 Contract {: #create-an-erc-20-contract }
For the purposes of this tutorial, we'll be creating a simple ERC-20 contract. We'll rely on OpenZeppelin's ERC-20 base implementation. We'll start by creating a file for the contract and naming it `MyTok.sol`:
```bash
mkdir -p contracts && touch contracts/MyTok.sol
```
Now we can edit the `MyTok.sol` file to include the following contract, which will mint an initial supply of MYTOKs and allow only the owner of the contract to mint additional tokens:
???+ code "MyTok.sol"
```solidity
// SPDX-License-Identifier: MIT
pragma solidity ^0.8.20;
import "@openzeppelin/contracts/token/ERC20/ERC20.sol";
import "@openzeppelin/contracts/access/Ownable.sol";
contract MyTok is ERC20, Ownable {
constructor() ERC20("MyToken", "MTK") Ownable(msg.sender) {
_mint(msg.sender, 50000 * 10 ** decimals());
}
function mint(address to, uint256 amount) public onlyOwner {
_mint(to, amount);
}
}
```
### Deploy an ERC-20 Contract {: #deploy-erc-20-contract }
Now that we have our contract set up, we can compile and deploy our contract.
To compile the contract, you can run:
```bash
npx hardhat compile
```

This command will compile our contract and generate an `artifacts` directory containing the ABI of the contract.
To deploy our contract, we'll need to create a deployment script that deploys our ERC-20 contract and mints an initial supply of MYTOKs. We'll use Alith's account to deploy the contract, and we'll specify the initial supply to be 1000 MYTOK. The initial supply will be minted and sent to the contract owner, which is Alith.
Let's take the following steps to deploy our contract:
1. Create a directory and file for our script:
```bash
mkdir -p scripts && touch scripts/deploy.js
```
2. In the `deploy.js` file, go ahead and add the following script:
???+ code "deploy.js"
```ts
// scripts/deploy.js
const hre = require('hardhat');
require('@nomicfoundation/hardhat-ethers');
async function main() {
// Get ERC-20 contract
const MyTok = await hre.ethers.getContractFactory('MyTok');
// Define custom gas price and gas limit
// This is a temporary stopgap solution to a bug
const customGasPrice = 50000000000; // example for 50 gwei
const customGasLimit = 5000000; // example gas limit
// Deploy the contract providing a gas price and gas limit
const myTok = await MyTok.deploy({
gasPrice: customGasPrice,
gasLimit: customGasLimit,
});
// Wait for the deployment
await myTok.waitForDeployment();
console.log(`Contract deployed to ${myTok.target}`);
}
main().catch((error) => {
console.error(error);
process.exitCode = 1;
});
```
3. Run the script using the `dev` network configurations we set up in the `hardhat.config.js` file:
```bash
npx hardhat run scripts/deploy.js --network demo
```
The address of the deployed contract should be printed to the terminal. Save the address, as we'll need it to interact with the contract in the following section.
### Transfer ERC-20s {: #transfer-erc-20s }
Since we'll be indexing `Transfer` events for our ERC-20, we'll need to send a few transactions that transfer some tokens from Alith's account to our other test accounts. We'll do this by creating a simple script that transfers 10 MYTOKs to Baltathar, Charleth, Dorothy, and Ethan. We'll take the following steps:
Create a new file script to send transactions:
```bash
touch scripts/transactions.js
```
In the `transactions.js` file, add the following script and insert the contract address of your deployed MyTok contract (output in the console in the prior step):
???+ code "transactions.js"
```ts
// We require the Hardhat Runtime Environment explicitly here. This is optional
// but useful for running the script in a standalone fashion through `node