`. To do so, you'll need to use the `paymentInfo` function after having built the entire transaction with the specific `module` and `method`.
The `paymentInfo` function returns weight information in terms of `refTime` and `proofSize`, which can be used to determine the transaction fee. This is extremely helpful when crafting remote execution calls via XCM.
For example, assuming you've [initialized the API](#creating-an-API-provider-instance), the following snippet shows how you can get the weight info for a simple balance transfer between two accounts:
```typescript
// Transaction to get weight information
const tx = api.tx.balances.transferAllowDeath('INSERT_BOBS_ADDRESS', BigInt(INSERT_VALUE));
// Get weight info
const { partialFee, weight } = await tx.paymentInfo('INSERT_SENDERS_ADDRESS');
console.log(`Transaction weight: ${weight}`);
console.log(`Transaction fee: ${partialFee.toHuman()}`);
```
??? code "View the complete script"
```typescript
import { ApiPromise, WsProvider } from '@polkadot/api';
const main = async () => {
// Construct API provider
const wsProvider = new WsProvider('INSERT_WSS_ENDPOINT');
const api = await ApiPromise.create({ provider: wsProvider });
// Transaction to get weight information
const tx = api.tx.balances.transferAllowDeath('INSERT_BOBS_ADDRESS', BigInt(INSERT_VALUE));
// Get weight info
const { partialFee, weight } = await tx.paymentInfo('INSERT_SENDERS_ADDRESS');
console.log(`Transaction weight: ${weight}`);
console.log(`Transaction fee: ${partialFee.toHuman()}`);
// Disconnect the API
await api.disconnect();
};
main();
```
### Transaction Events {: #transaction-events }
Any transaction will emit events; at a bare minimum, this will always be a `system.ExtrinsicSuccess` or `system.ExtrinsicFailed` event for the specific transaction. These provide the overall execution result for the transaction, that is, whether the execution has succeeded or failed.
Depending on the transaction sent, some other events may be emitted; for instance, for a balance transfer event, this could include one or more `balance.Transfer` events.
### Batch Transactions {: #batching-transactions }
The Polkadot.js API allows transactions to be batch processed via the `api.tx.utility.batch` method. The batched transactions are processed sequentially from a single sender. The transaction fee can be estimated using the `paymentInfo` helper method.
For example, assuming you've [initialized the API](#creating-an-API-provider-instance), a [keyring instance](#creating-a-keyring-instance) and [added an account](#adding-accounts), the following example makes a couple of transfers in one transaction:
```typescript
// Construct a list of transactions to batch
const txs = [
api.tx.balances.transferAllowDeath('INSERT_BOBS_ADDRESS', BigInt(INSERT_VALUE)),
api.tx.balances.transferAllowDeath('INSERT_CHARLEYS_ADDRESS', BigInt(INSERT_VALUE)),
];
// Estimate the fees as RuntimeDispatchInfo, using the signer (either
// address or locked/unlocked keypair)
const info = await api.tx.utility
.batch(txs)
.paymentInfo(alice);
console.log(`Estimated fees: ${info}`);
// Construct the batch and send the transactions
await api.tx.utility
.batch(txs)
.signAndSend(alice, ({ status }) => {
if (status.isInBlock) {
console.log(`included in ${status.asInBlock}`);
// Disconnect API here!
}
});
```
??? code "View the complete script"
```typescript
import { ApiPromise, WsProvider } from '@polkadot/api';
import Keyring from '@polkadot/keyring';
const main = async () => {
// Construct API provider
const wsProvider = new WsProvider('INSERT_NETWORK_WSS_ENDPOINT');
const api = await ApiPromise.create({ provider: wsProvider });
// Create a keyring instance (ECDSA)
const keyring = new Keyring({ type: 'ethereum' });
// Initialize wallet key pairs
const alice = keyring.addFromUri('INSERT_ALICES_PRIVATE_KEY');
// Construct a list of transactions to batch
const txs = [
api.tx.balances.transferAllowDeath('INSERT_BOBS_ADDRESS', BigInt(INSERT_VALUE)),
api.tx.balances.transferAllowDeath('INSERT_CHARLEYS_ADDRESS', BigInt(INSERT_VALUE)),
];
// Estimate the fees as RuntimeDispatchInfo, using the signer (either
// address or locked/unlocked keypair)
const info = await api.tx.utility.batch(txs).paymentInfo(alice);
console.log(`Estimated fees: ${info}`);
// Construct the batch and send the transactions
await api.tx.utility.batch(txs).signAndSend(alice, async ({ status }) => {
if (status.isInBlock) {
console.log(`Included in ${status.asInBlock}`);
// Disconnect the API
await api.disconnect();
}
});
};
main();
```
## Sample Code for Monitoring Native Token Transfers { #sample-code-for-monitoring-native-token-transfers }
The following code samples will demonstrate how to listen to both types of native token transfers, sent via Substrate or Ethereum API, using either the [Polkadot.js API library](https://polkadot.js.org/docs/api/start){target=\_blank} or [Substrate API Sidecar](https://github.com/paritytech/substrate-api-sidecar){target=\_blank}. The following code snippets are for demo purposes only and should not be used without modification and further testing in a production environment.
The following code snippet uses [`subscribeFinalizedHeads`](https://polkadot.js.org/docs/substrate/rpc/#subscribefinalizedheads-header){target=\_blank} to subscribe to new finalized block headers, and loops through extrinsics fetched from the block, and retrieves the events of each extrinsic.
Then, it checks if any event corresponds to a `balances.Transfer` event. If so, it will extract the `from`, `to`, `amount`, and the `tx hash` of the transfer and display it on the console. Note that the `amount` is shown in the smallest unit (Wei). You can find all the available information about Polkadot.js and the Substrate JSON RPC in their [official documentation site](https://polkadot.js.org/docs/substrate/rpc){target=\_blank}.
```typescript
import '@polkadot/api-augment';
import { ApiPromise, WsProvider } from '@polkadot/api';
// This script will listen to all Native token transfers (Substrate & Ethereum) and extract the tx hash
// It can be adapted for any Tanssi-powered network
const main = async () => {
// Define the provider
const wsProvider = new WsProvider('INSERT_WSS_ENDPOINT');
// Create the provider
const polkadotApi = await ApiPromise.create({
provider: wsProvider,
});
// Subscribe to finalized blocks
await polkadotApi.rpc.chain.subscribeFinalizedHeads(
async (lastFinalizedHeader) => {
const [{ block }, records] = await Promise.all([
polkadotApi.rpc.chain.getBlock(lastFinalizedHeader.hash),
(await polkadotApi.at(lastFinalizedHeader.hash)).query.system.events(),
]);
block.extrinsics.forEach((extrinsic, index) => {
const {
method: { args, method, section },
} = extrinsic;
const isEthereum = section == 'ethereum' && method == 'transact';
// Gets the transaction object
const tx = args[0] as any;
// Convert to the correct Ethereum Transaction format
const ethereumTx =
isEthereum &&
((tx.isLegacy && tx.asLegacy) ||
(tx.isEip1559 && tx.asEip1559) ||
(tx.isEip2930 && tx.asEip2930));
// Check if the transaction is a transfer
const isEthereumTransfer =
ethereumTx &&
ethereumTx.input.length === 0 &&
ethereumTx.action.isCall;
// Retrieve all events for this extrinsic
const events = records.filter(
({ phase }) =>
phase.isApplyExtrinsic && phase.asApplyExtrinsic.eq(index)
);
// This hash will only exist if the transaction was executed through Ethereum.
let ethereumHash = '';
if (isEthereum) {
// Search for Ethereum execution
events.forEach(({ event }) => {
if (event.section == 'ethereum' && event.method == 'Executed') {
ethereumHash = event.data[2].toString();
}
});
}
// Search if it is a transfer
events.forEach(({ event }) => {
if (event.section == 'balances' && event.method == 'Transfer') {
const from = event.data[0].toString();
const to = event.data[1].toString();
const balance = (event.data[2] as any).toBigInt();
const substrateHash = extrinsic.hash.toString();
console.log(
`Transfer from ${from} to ${to} of ${balance} (block #${lastFinalizedHeader.number})`
);
console.log(` - Triggered by extrinsic: ${substrateHash}`);
if (isEthereum) {
console.log(
` - Ethereum (isTransfer: ${isEthereumTransfer}) hash: ${ethereumHash}`
);
}
}
});
});
}
);
};
main();
```
In addition, you can find more sample code snippets related to more specific cases around balance transfers at this [GitHub page](https://gist.github.com/crystalin/b2ce44a208af60d62b5ecd1bad513bce){target=\_blank}.
## Utility Functions {: #utilities }
The Polkadot.js API also includes a number of utility libraries for computing commonly used cryptographic primitives and hash functions.
The following example computes the deterministic transaction hash of a raw Ethereum legacy transaction by first computing its RLP ([Recursive Length Prefix](https://ethereum.org/en/developers/docs/data-structures-and-encoding/rlp/){target=\_blank}) encoding and then hashing the result with keccak256.
```typescript
import { encode } from '@polkadot/util-rlp';
import { keccakAsHex } from '@polkadot/util-crypto';
import { numberToHex } from '@polkadot/util';
// Set the key type to string
type txType = {
[key: string]: any;
};
// Define the raw signed transaction
const txData: txType = {
nonce: numberToHex(1),
gasPrice: numberToHex(21000000000),
gasLimit: numberToHex(21000),
to: '0xc390cC49a32736a58733Cf46bE42f734dD4f53cb',
value: numberToHex(1000000000000000000),
data: '',
v: '0507',
r: '0x5ab2f48bdc6752191440ce62088b9e42f20215ee4305403579aa2e1eba615ce8',
s: '0x3b172e53874422756d48b449438407e5478c985680d4aaa39d762fe0d1a11683',
};
// Extract the values to an array
var txDataArray = Object.keys(txData).map(function (key) {
return txData[key];
});
// Calculate the RLP encoded transaction
var encoded_tx = encode(txDataArray);
// Hash the encoded transaction using keccak256
console.log(keccakAsHex(encoded_tx));
```
You can check the respective [NPM repository page](https://www.npmjs.com/package/@polkadot/util-crypto){target=\_blank} for a list of available methods in the `@polkadot/util-crypto` library and their descriptions.
The information presented herein has been provided by third parties and is made available solely for general information purposes. Tanssi does not endorse any project listed and described on the Tanssi Doc Website (https://docs.tanssi.network/). Tanssi Foundation does not warrant the accuracy, completeness or usefulness of this information. Any reliance you place on such information is strictly at your own risk. Tanssi Foundation disclaims all liability and responsibility arising from any reliance placed on this information by you or by anyone who may be informed of any of its contents. All statements and/or opinions expressed in these materials are solely the responsibility of the person or entity providing those materials and do not necessarily represent the opinion of Tanssi Foundation. The information should not be construed as professional or financial advice of any kind. Advice from a suitably qualified professional should always be sought in relation to any particular matter or circumstance. The information herein may link to or integrate with other websites operated or content provided by third parties, and such other websites may link to this website. Tanssi Foundation has no control over any such other websites or their content and will have no liability arising out of or related to such websites or their content. The existence of any such link does not constitute an endorsement of such websites, the content of the websites, or the operators of the websites. These links are being provided to you only as a convenience and you release and hold Tanssi Foundation harmless from any and all liability arising from your use of this information or the information provided by any third-party website or service.
--- END CONTENT ---
Doc-Content: https://docs.tanssi.network/builders/toolkit/substrate-api/libraries/sidecar-api/
--- BEGIN CONTENT ---
---
title: Using Substrate API Sidecar
description: Learn how to use Substrate-based REST service with Tanssi-powered networks to access blocks, account balance, compute gas used, and more.
icon: octicons-code-24
categories: Substrate-Template
---
# Using Substrate API Sidecar
## Introduction {: #introduction }
Substrate API Sidecar allows applications to access blocks, account balance, and other information of Substrate-based blockchains through a REST API. This can be useful for exchanges, wallets or other types of applications that need to keep track of account balance and other state changes on a Tanssi-powered network. This page will describe how to install and run a Substrate API Sidecar for a Tanssi network, and the commonly used API endpoints.
## Installing and Running Substrate API Sidecar {: #installing-and-running-substrate-api-sidecar }
There are multiple ways of installing and running the Substrate API Sidecar. This guide will describe the steps for installing and running it locally through NPM. For running Substrate API Sidecar through Docker, or building and running it from source, please refer to the [Substrate API Sidecar Github Repository](https://github.com/paritytech/substrate-api-sidecar#readme).
!!! note
The examples in this guide are based on a MacOS or Ubuntu 20.04 environment. If you're using Windows, you'll need to adapt them accordingly.
Furthermore, please ensure that you have Node.js and a package manager (such as npm or yarn) installed. To learn how to install Node.js, please check their [official documentation](https://nodejs.org/en/download){target=\blank}.
Also, make sure you've initialized a `package.json` file for ES6 modules. You can initialize a default `package.json` file using npm by running the following command `npm init --yes`.
### Installing the Substrate API Sidecar {: #installing-the-substrate-api-sidecar }
To install the Substrate API Sidecar service locally in the current directory, run this from the command line:
```bash
npm install @substrate/api-sidecar@{{ networks.mainnet.substrate_api_sidecar.stable_version }}
```
!!! note
If the current folder does not already have a Node.js project structure, you need to manually created the `node_modules` directory by typing `mkdir node_modules`.
Substrate API Sidecar v{{ networks.mainnet.substrate_api_sidecar.stable_version }} is the current stable version that has been tested to work with Tanssi networks. You can verify the installation was successful by typing from the installation directory root:
```bash
node_modules/.bin/substrate-api-sidecar --version
```
## Setting up the Substrate API Sidecar {: #setting-up-the-substrate-api-sidecar }
In the terminal that Sidecar will run, export the environmental variable for the WS endpoint of the network you want to connect to. For example, the WSS endpoint of your Tanssi network. Some examples:
=== "Tanssi MainNet"
```bash
export SAS_SUBSTRATE_URL=wss://{{ networks.mainnet.dns_name }}
```
=== "Dancelight TestNet"
```bash
export SAS_SUBSTRATE_URL=wss://{{ networks.dancelight.dns_name }}
```
=== "Demo EVM Network"
```bash
export SAS_SUBSTRATE_URL={{ networks.dancelight.demo_evm_rpc_wss_url }}
```
=== "Your Network"
```bash
export SAS_SUBSTRATE_URL=INSERT_NETWORK_WSS_ENDPOINT
```
After setting the environmental variable, you can use the `echo` command to check that the environmental variable has been set correctly, by typing:
```bash
echo $SAS_SUBSTRATE_URL
```
And it should display the network endpoint you have just set.
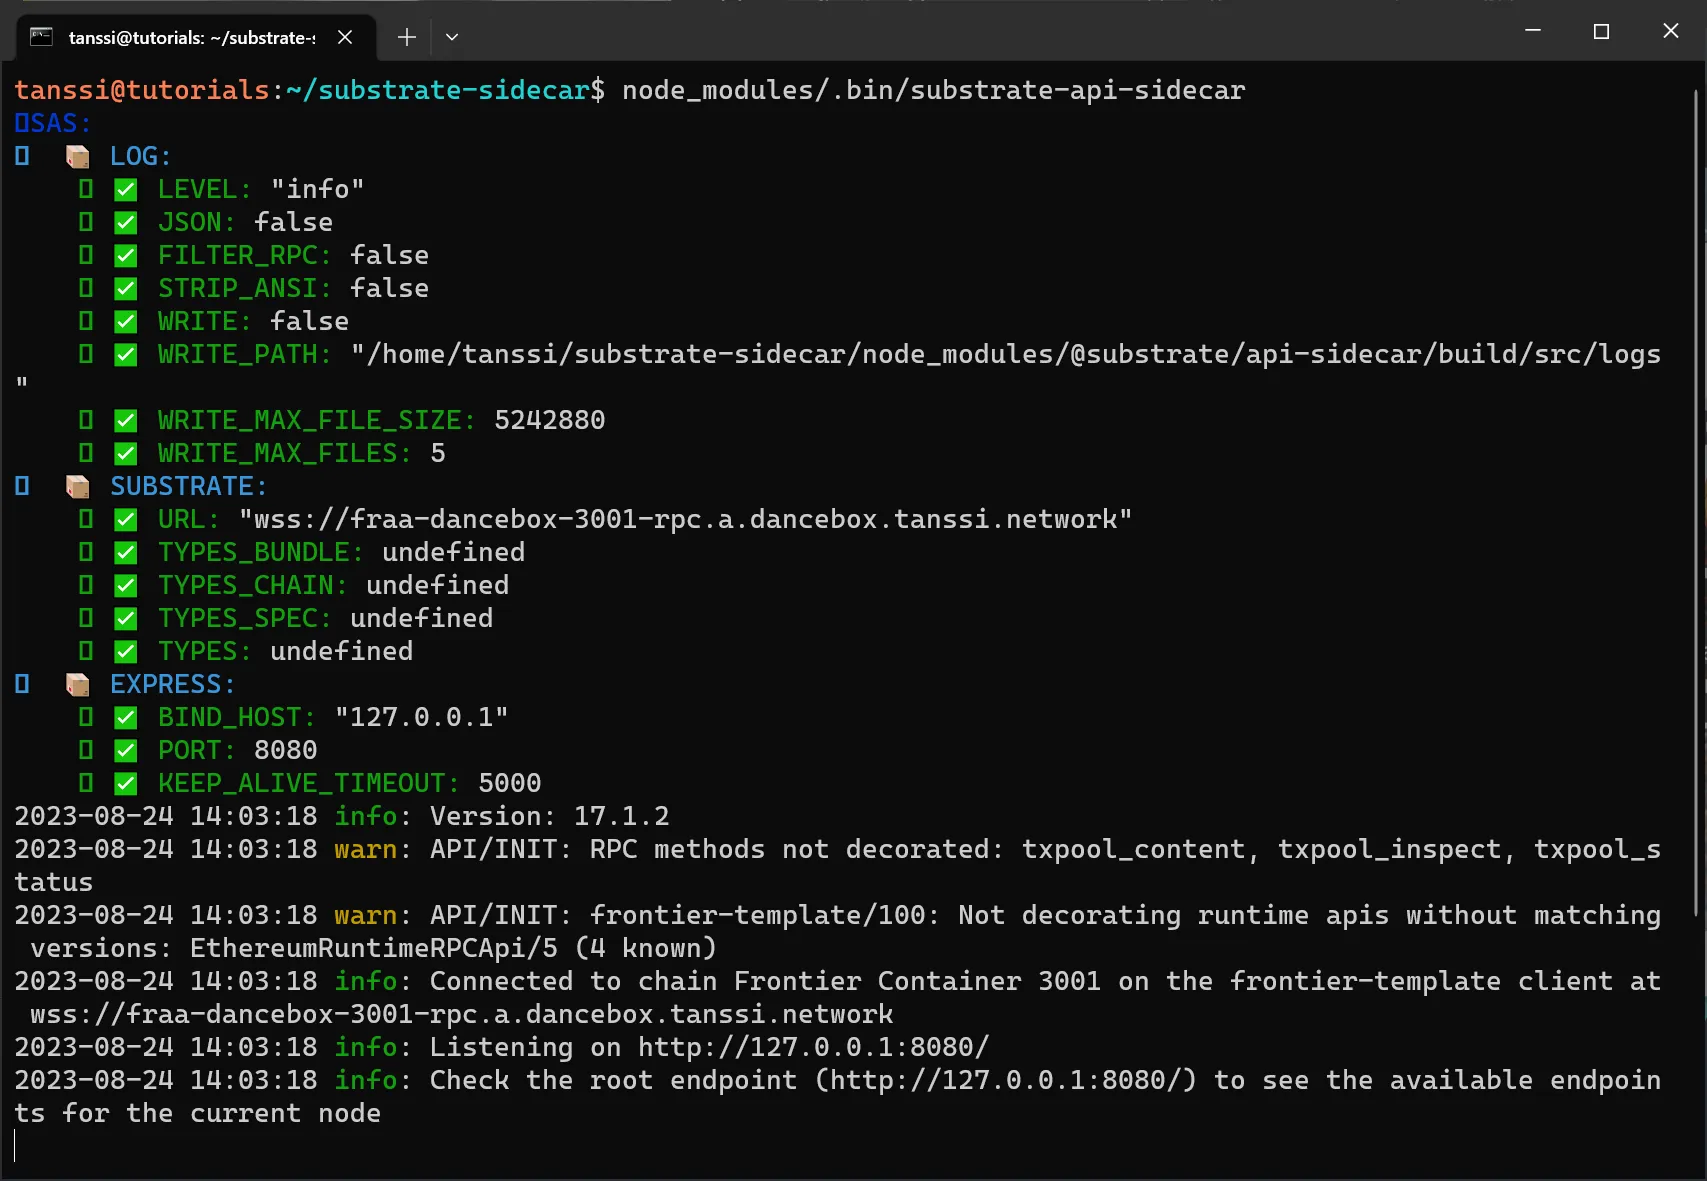
## Running Substrate API Sidecar {: #running-substrate-api-sidecar }
With the network endpoint environmental variable set, and from the installation directory root, run:
```bash
node_modules/.bin/substrate-api-sidecar
```
If the installation and configuration are successful, you should see this output in the console:
## Substrate API Sidecar Endpoints {: #substrate-api-sidecar-endpoints }
Some of the commonly used Substrate API Sidecar endpoints include:
- **GET /blocks/head** — Get the most recently finalized block. The optional parameter `finalized` can be set to `false` to the get the newest known block, which may not be finalized
- **GET /blocks/head/header** — Get the most recently finalized block header. The optional parameter `finalized` can be set to `false` to the get the newest known block header, which may not be finalized
- **GET /blocks/{blockId}** — Get a block by its height or hash
- **GET /accounts/{accountId}/balance-info** — Get balance information for an account
- **GET /node/version** — Get information about the Substrates node's implementation and versioning
- **GET /runtime/metadata** — Get the runtime metadata in decoded, JSON form
For a full list of API endpoints available on Substrate API Sidecar, please refer to the [official documentation](https://paritytech.github.io/substrate-api-sidecar/dist).
## Field Mapping in Block JSON Object {: #fields-mapping-in-block-json-object }
Substrate API Sidecar returns blocks as a JSON object. Part of this JSON object is a nesting structure for individual extrinsics processed in a specific block. Each extrinsic calls a specific method of a given module. Generally speaking, for individual extrinsics, the nesting structure is as following:
```text
RESPONSE JSON Block Object:
|--extrinsics
|--{extrinsic_number}
|--method
|--pallet: "MODULE_NAME"
|--method: "METHOD_NAME"
|--signature
|--nonce
|--args
|--transaction
|--{transaction_type}
|--hash
|--events
|--{event_number}
|--method
|--pallet: "MODULE_NAME"
|--method: "METHOD_EVENT_NAME"
|--data
|--0
|--1
|--2
|--3
...
```
Consequently, information from specific extrinsics (like balance transfers) can be extracted by knowing the module and method called by the extrinsic.
## EVM Field Mapping in Block JSON Object {: #evm-fields-mapping-in-block-json-object }
For Tanssi EVM networks, the information related to EVM execution of each Tanssi EVM network transaction can be identified by the `method` field under the current extrinsic object, where it is set to:
```text
{extrinsic_number}.method.pallet = "ethereum"
{extrinsic_number}.method.method = "transact"
```
The nesting structure for EVM transactions is as following:
```text
RESPONSE JSON Block Object:
|--extrinsics
|--{extrinsic_number}
|--method
|--pallet: "ethereum"
|--method: "transact"
|--signature
|--nonce
|--args
|--transaction
|--{transaction_type}
|--hash
|--events
|--{event_number}
|--method
|--pallet: "ethereum"
|--method: "Executed"
|--data
|--0
|--1
|--2
|--3
...
```
For example, for Substrate transactions, the "Nonce" and "Signature" fields are under:
```text
extrinsics[extrinsic_number]
```
### EVM Transaction Types and Payload {: #transaction-types-and-payload }
Tanssi EVM networks currently support three transaction standards: `legacy`, `eip1559`, and `eip2930`. These correspond to the `transaction type` field in the above JSON object diagram. For each transaction type, the transaction payload contains the following fields:
=== "EIP1559"
```text
...
|--eip1559
|--chainId
|--nonce
|--maxPriorityFeePerGas
|--maxFeePerGas
|--gasLimit
|--action
|--value
|--input
|--accessList
|--oddYParity
|--r
|--s
...
```
=== "Legacy"
```text
...
|--legacy
|--nonce
|--gasPrice
|--gasLimit
|--action
|--value
|--input
|--signature
...
```
=== "EIP2930"
```text
...
|--eip2930
|--chainId
|--nonce
|--gasPrice
|--gasLimit
|--action
|--value
|--input
|--accessList
|--oddYParity
|--r
|--s
...
```
For more information on the new [EIP1559](https://eips.ethereum.org/EIPS/eip-1559){target=\_blank} and [EIP2930](https://eips.ethereum.org/EIPS/eip-2930){target=\_blank} transaction types and what each field means, please refer to the respective official Ethereum proposal specs.
### Transaction Field Mappings {: #transaction-field-mappings }
To obtain the EVM sender address, recipient address, and EVM hash of any EVM transaction type, check the `events` field under the current extrinsic object, and identify the event where the `method` field is set to:
```text
{event_number}.method.pallet: "ethereum"
{event_number}.method.method: "Executed"
```
The EVM field mappings are then summarized as the following:
=== "EIP1559"
| EVM Field | Block JSON Field |
|:------------------------:|:----------------------------------------------------------------------------:|
| Chain ID | `extrinsics[extrinsic_number].args.transaction.eip1559.chainId` |
| Nonce | `extrinsics[extrinsic_number].args.transaction.eip1559.nonce` |
| Max priority fee per gas | `extrinsics[extrinsic_number].args.transaction.eip1559.maxPriorityFeePerGas` |
| Max fee per gas | `extrinsics[extrinsic_number].args.transaction.eip1559.maxFeePerGas` |
| Gas limit | `extrinsics[extrinsic_number].args.transaction.eip1559.gasLimit` |
| Access list | `extrinsics[extrinsic_number].args.transaction.eip1559.accessList` |
| Signature | `extrinsics[extrinsic_number].args.transaction.eip1559.oddYParity/r/s` |
| Sender address | `extrinsics[extrinsic_number].events[event_number].data[0]` |
| Recipient address | `extrinsics[extrinsic_number].events[event_number].data[1]` |
| EVM hash | `extrinsics[extrinsic_number].events[event_number].data[2]` |
| EVM execution status | `extrinsics[extrinsic_number].events[event_number].data[3]` |
=== "Legacy"
| EVM Field | Block JSON Field |
|:--------------------:|:----------------------------------------------------------------:|
| Nonce | `extrinsics[extrinsic_number].args.transaction.legacy.nonce` |
| Gas price | `extrinsics[extrinsic_number].args.transaction.legacy.gasPrice` |
| Gas limit | `extrinsics[extrinsic_number].args.transaction.legacy.gasLimit` |
| Value | `extrinsics[extrinsic_number].args.transaction.legacy.value` |
| Signature | `extrinsics[extrinsic_number].args.transaction.legacy.signature` |
| Sender address | `extrinsics[extrinsic_number].events[event_number].data[0]` |
| Recipient address | `extrinsics[extrinsic_number].events[event_number].data[1]` |
| EVM hash | `extrinsics[extrinsic_number].events[event_number].data[2]` |
| EVM execution status | `extrinsics[extrinsic_number].events[event_number].data[3]` |
=== "EIP2930"
| EVM Field | Block JSON Field |
|:--------------------:|:----------------------------------------------------------------------:|
| Chain ID | `extrinsics[extrinsic_number].args.transaction.eip2930.chainId` |
| Nonce | `extrinsics[extrinsic_number].args.transaction.eip2930.nonce` |
| Gas price | `extrinsics[extrinsic_number].args.transaction.eip2930.gasPrice` |
| Gas limit | `extrinsics[extrinsic_number].args.transaction.eip2930.gasLimit` |
| Value | `extrinsics[extrinsic_number].args.transaction.eip2930.value` |
| Access list | `extrinsics[extrinsic_number].args.transaction.eip2930.accessList` |
| Signature | `extrinsics[extrinsic_number].args.transaction.eip2930.oddYParity/r/s` |
| Sender address | `extrinsics[extrinsic_number].events[event_number].data[0]` |
| Recipient address | `extrinsics[extrinsic_number].events[event_number].data[1]` |
| EVM hash | `extrinsics[extrinsic_number].events[event_number].data[2]` |
| EVM execution status | `extrinsics[extrinsic_number].events[event_number].data[3]` |
For example, for EVM transactions, the "Nonce" and "Signature" fields are under:
```text
extrinsics[extrinsic_number].args.transaction[transaction_type]
```
Consequently, this leaves the "Nonce" and "Signature" for the Substrate-level field `extrinsics[extrinsic_number]` to be `null`.
A successfully executed EVM transaction will return either `succeed: "Stopped"` or `succeed: "Returned"` under the "EVM Execution Status" field.
## Monitor Token Balance Transfers {: #monitor-transfers }
The following code samples will demonstrate how to listen to both native token transfers, sent via Substrate or Ethereum API, and ERC-20 token transfers sent via the Ethereum API, using Substrate API Sidecar. Transfers via the Ethereum API are only applicable to Tanssi EVM networks.
### Native Token Transfers { #native-token-transfers }
Both Tanssi non-EVM networks and EVM networks can perform Substrate-based native token balance transfers.
The following code snippet uses the Axios HTTP client to query the Sidecar endpoint [`/blocks/head`](https://paritytech.github.io/substrate-api-sidecar/dist){target=\_blank} for the latest finalized block, and then decodes the block for the `from`, `to`, `value`, `tx hash` and `transaction status` of native token transfers at both the EVM and Substrate API level.
```typescript
import axios from 'axios';
// This script will decode all native token transfers (Substrate & Ethereum)
// in a given Sidecar block, and extract the tx hash. It can be adapted for
// any Tanssi-powered network.
// Endpoint to retrieve the latest block
const endpoint = 'http://127.0.0.1:8080/blocks/head';
async function main() {
try {
// Retrieve the block from the Sidecar endpoint
const response = await axios.get(endpoint);
// Retrieve the block height of the current block
console.log('Block Height: ' + response.data.number);
// Iterate through all extrinsics in the block
response.data.extrinsics.forEach((extrinsic) => {
// Retrieve Ethereum Transfers
if (
extrinsic.method.pallet === 'ethereum' &&
extrinsic.method.method === 'transact'
) {
// Get the value for any of the three EIP transaction standards supported
const value =
(extrinsic.args.transaction.legacy &&
extrinsic.args.transaction.legacy.value) ||
(extrinsic.args.transaction.eip1559 &&
extrinsic.args.transaction.eip1559.value) ||
(extrinsic.args.transaction.eip2930 &&
extrinsic.args.transaction.eip2930.value);
// Iterate through the events to get transaction details
extrinsic.events.forEach((event) => {
if (
event.method.pallet === 'ethereum' &&
event.method.method === 'Executed'
) {
console.log('From: ' + event.data[0]);
console.log('To: ' + event.data[1]);
console.log('Tx Hash: ' + event.data[2]);
console.log('Value: ' + value);
// Check the execution status
if (event.data[3].succeed) {
console.log('Status: Success');
} else {
console.log('Status: Failed');
}
}
});
}
// Retrieve Substrate Transfers
if (
extrinsic.method.pallet === 'balances' &&
(extrinsic.method.method === 'transferKeepAlive' ||
extrinsic.method.method === 'transfer')
) {
// Iterate through the events to get transaction details
extrinsic.events.forEach((event) => {
if (
event.method.pallet === 'balances' &&
event.method.method === 'Transfer'
) {
console.log('From: ' + event.data[0]);
console.log('To: ' + event.data[1]);
console.log('Tx Hash: ' + extrinsic.hash);
console.log('Value: ' + event.data[2]);
// Check the execution status
if (extrinsic.success) {
console.log('Status: Success');
} else {
console.log('Status: Failed');
}
}
});
}
});
} catch (err) {
console.log(err);
}
}
main();
```
### ERC-20 Token Transfers {: #erc-20-token-transfers }
Events emitted by smart contracts such as an ERC-20 token contract deployed on Tanssi EVM networks can be decoded from Sidecar block JSON objects. The nesting structure is as following:
```text
RESPONSE JSON Block Object:
|--extrinsics
|--{extrinsic_number}
|--method
|--pallet: "ethereum"
|--method: "transact"
|--signature:
|--nonce:
|--args
|--transaction
|--{transaction_type}
|--hash
|--events
|--{event_number}
|--method
|--pallet: "evm"
|--method: "Log"
|--data
|--0
|-- address
|-- topics
|--0
|--1
|--2
|-- data
...
...
```
ERC-20 token transfers will emit the [`Transfer`](https://eips.ethereum.org/EIPS/eip-20){target=\_blank} event which can be decoded as the following:
| Tx Information | Block JSON Field |
|:-----------------------:|:---------------------------------------------------------------------:|
| ERC-20 contract address | `extrinsics[extrinsic_number].events[event_number].data[0].address` |
| Event signature hash | `extrinsics[extrinsic_number].events[event_number].data[0].topics[0]` |
| Sender address | `extrinsics[extrinsic_number].events[event_number].data[0].topics[1]` |
| Recipient address | `extrinsics[extrinsic_number].events[event_number].data[0].topics[2]` |
| Amount | `extrinsics[extrinsic_number].events[event_number].data[0].data` |
Other events emitted by EVM smart contracts can be decoded in a similar fashion, but the content of the topics and data fields will change depending on the definition of the specific event.
!!! note
The amount transferred is given in accounting for decimals and in hexadecimal format.
## Substrate API Transaction Fees {: #substrate-api-transaction-fees }
For Tanssi non-EVM networks and EVM networks, all the information around fee data for transactions sent via the Substrate API can be extracted from the following block endpoint:
```text
GET /blocks/{blockId}
```
The block endpoints will return data relevant to one or more blocks. You can read more about the block endpoints on the [official Sidecar documentation](https://paritytech.github.io/substrate-api-sidecar/dist/#operations-tag-blocks){target=\_blank}.
Read as a JSON object, for a given `pallet` (module) and `method`, the transaction fee is provided by an associated event with the following extructure:
```text
{event_number}.method.pallet: "transactionPayment"
{event_number}.method.method: "TransactionFeePaid"
```
The relevant nesting structure is as follows:
```text
RESPONSE JSON Block Object:
...
|--number
|--extrinsics
|--{extrinsic_number}
|--method
|--signature
|--nonce
|--args
|--tip
|--hash
|--info
|--era
|--events
|--{event_number}
|--method
|--pallet: "transactionPayment"
|--method: "TransactionFeePaid"
|--data
|--0
|--1
|--2
...
```
The object mappings are summarized as follows:
| Tx Information | Block JSON Field |
|:------------------:|:-----------------------------------------------------------:|
| Fee paying account | `extrinsics[extrinsic_number].events[event_number].data[0]` |
| Total fees paid | `extrinsics[extrinsic_number].events[event_number].data[1]` |
| Tip | `extrinsics[extrinsic_number].events[event_number].data[2]` |
Then, the total transaction fee paid for this extrinsic is mapped to the following field of the block JSON object:
```text
extrinsics[extrinsic_number].events[event_number].data[1]
```
## Ethereum API Transaction Fees {: #ethereum-api-transaction-fees }
For Tanssi EVM networks, users could also send funds via the Ethereum API. To calculate the fee incurred on transactions sent via the Ethereum API, the following formula can be used:
=== "EIP-1559"
```text
GasPrice = BaseFee + MaxPriorityFeePerGas < MaxFeePerGas ?
BaseFee + MaxPriorityFeePerGas :
MaxFeePerGas;
Transaction Fee = (GasPrice * TransactionWeight) / 25000
```
=== "Legacy"
```text
Transaction Fee = (GasPrice * TransactionWeight) / 25000
```
=== "EIP-2930"
```text
Transaction Fee = (GasPrice * TransactionWeight) / 25000
```
The following sections describe in more detail each of the components needed to calculate the transaction fee.
### Base Fee {: #base-fee}
The `BaseFee` is the minimum amount charged to send a transaction and is a value set by the network itself. It was introduced in [EIP-1559](https://eips.ethereum.org/EIPS/eip-1559){target=\_blank}. Tanssi EVM networks have a dynamic fee mechanism that aims to replicate the [EIP-1559 fee market mechanism](https://eips.ethereum.org/EIPS/eip-1559#specification){target=\_blank}, where the base fee is adjusted based on block congestion.
For example, for the Tanssi EVM network template the minimum gas price is `1 GWei`.
The `BaseFee` can be directly retrieved from the `baseFeePerGas` storage found in the `baseFee` module (pallet), using the following endpoint:
```text
GET /pallets/baseFee/storage/baseFeePerGas?at={blockId}
```
Read as a JSON object, the relevant nesting structure is as follows:
```text
RESPONSE JSON Storage Object:
|--at
|--hash
|--height
|--pallet
|--palletIndex
|--storageItem
|--keys
|--value
```
The relevant data will be stored in the `value` key of the JSON object. This value is a fixed point data type, hence the real value is found by dividing the `value` by the decimals.
### GasPrice, MaxFeePerGas, and MaxPriorityFeePerGas {: #gasprice-maxfeepergas-maxpriorityfeepergas }
The `GasPrice` is used to specify the gas price of legacy transactions prior to [EIP-1559](https://eips.ethereum.org/EIPS/eip-1559){target=\_blank}. The `MaxFeePerGas` and `MaxPriorityFeePerGas` were both introduced in EIP-1559 alongside the `BaseFee`. The `MaxFeePerGas` defines the maximum fee permitted to be paid per unit of gas and is the sum of the `BaseFee` and the `MaxPriorityFeePerGas`. The `MaxPriorityFeePerGas` is the maximum priority fee configured by the sender of a transaction that is used to incentive the prioritization of a transaction in a block.
Although Tanssi EVM networks are Ethereum-compatible, they are also Substrate-based chains at their core, and priorities work differently in Substrate than in Ethereum. In Substrate, transactions are not prioritized by gas price. To address this, Tanssi EVM networks uses a modified prioritization system that reprioritizes Substrate transactions using an Ethereum-first solution. A Substrate transaction still goes through the validity process, where it is assigned transaction tags, longevity, and a priority. The original priority is then overwritten with a new priority based on the transaction's fee per gas, which is derived from the transaction's tip and weight. If the transaction is an Ethereum transaction, the priority is set according to the priority fee.
It's important to note that priority is not the sole component responsible for determining the order of transactions in a block. Other components, such as the longevity of a transaction, also play a role in the sorting process.
The values of `GasPrice`, `MaxFeePerGas` and `MaxPriorityFeePerGas` for the applicable transaction types can be read from the block JSON object according to the structure described in [the Sidecar API page](#evm-fields-mapping-in-block-json-object).
The data for an Ethereum transaction in a particular block can be extracted from the following block endpoint:
```text
GET /blocks/{blockId}
```
The paths to the relevant values have also truncated and reproduced below:
=== "EIP1559"
| EVM Field | Block JSON Field |
|:--------------------:|:----------------------------------------------------------------------------:|
| MaxFeePerGas | `extrinsics[extrinsic_number].args.transaction.eip1559.maxFeePerGas` |
| MaxPriorityFeePerGas | `extrinsics[extrinsic_number].args.transaction.eip1559.maxPriorityFeePerGas` |
=== "Legacy"
| EVM Field | Block JSON Field |
|:---------:|:---------------------------------------------------------------:|
| GasPrice | `extrinsics[extrinsic_number].args.transaction.legacy.gasPrice` |
=== "EIP2930"
| EVM Field | Block JSON Field |
|:---------:|:----------------------------------------------------------------:|
| GasPrice | `extrinsics[extrinsic_number].args.transaction.eip2930.gasPrice` |
### Transaction Weight {: #transaction-weight}
`TransactionWeight` is a Substrate mechanism used to measure the execution time a given transaction takes to be executed within a block. For all transactions types, `TransactionWeight` can be retrieved under the event of the relevant extrinsic where the `method` field is set to:
```text
pallet: "system", method: "ExtrinsicSuccess"
```
And then `TransactionWeight` is mapped to the following field of the block JSON object:
```text
extrinsics[extrinsic_number].events[event_number].data[0].weight
```
The information presented herein has been provided by third parties and is made available solely for general information purposes. Tanssi does not endorse any project listed and described on the Tanssi Doc Website (https://docs.tanssi.network/). Tanssi Foundation does not warrant the accuracy, completeness or usefulness of this information. Any reliance you place on such information is strictly at your own risk. Tanssi Foundation disclaims all liability and responsibility arising from any reliance placed on this information by you or by anyone who may be informed of any of its contents. All statements and/or opinions expressed in these materials are solely the responsibility of the person or entity providing those materials and do not necessarily represent the opinion of Tanssi Foundation. The information should not be construed as professional or financial advice of any kind. Advice from a suitably qualified professional should always be sought in relation to any particular matter or circumstance. The information herein may link to or integrate with other websites operated or content provided by third parties, and such other websites may link to this website. Tanssi Foundation has no control over any such other websites or their content and will have no liability arising out of or related to such websites or their content. The existence of any such link does not constitute an endorsement of such websites, the content of the websites, or the operators of the websites. These links are being provided to you only as a convenience and you release and hold Tanssi Foundation harmless from any and all liability arising from your use of this information or the information provided by any third-party website or service.
--- END CONTENT ---
Doc-Content: https://docs.tanssi.network/builders/toolkit/substrate-api/wallets/ledger/
--- BEGIN CONTENT ---
---
title: Using Ledger With Your Substrate Appchain
description: This guide walks you through setting up and using a Ledger device to interact with the Tanssi network or any of the Tanssi-powered Substrate appchains.
icon: material-wallet-outline
categories: Substrate-Template
---
# Interacting with Substrate Tanssi Chains Using Ledger
## Introduction {: #introduction }
Developers and users of Substrate networks, such as the Tanssi network or non-EVM Tanssi-powered appchains, have a variety of options when it comes to wallets. Regarding cold wallets, which store your private keys in a secure, offline environment, [Ledger](https://www.ledger.com/){target=\_blank} is one of the most popular options. Ledger provides full support for Substrate blockchains, such as the Tanssi network.
Ledger devices are hardware wallets designed to store the private keys offline. They are used to verify and sign the transactions, but they still need a software layer to provide the UI that interacts with the networks, builds the transactions, and sends the signed transactions back to the network once the user has verified them.
This guide takes you through all the necessary steps to use your Ledger device with Substrate Tanssi chains.
## Setting Up Your Ledger Device {: #setting-up-ledger-device }
If you have a brand new Ledger device, refer to the [official website](https://support.ledger.com/article/4404389503889-zd){target=\_blank} for a guide on getting it started with the initial setup.
Now, with your Ledger already initiated, install the _Polkadot_ app taking the following steps:
1. Open the Ledger Live App on your computer.
2. Go to My Ledger.
3. Connect and unlock the device.
Finally, search for **Polkadot (DOT)** app in Ledger Live and install it on your device.
!!! note
Why Polkadot? Tanssi is built using Substrate, the same framework that powers Polkadot. As a result, even though Tanssi and Polkadot are separate networks, they share the same cryptographic signature schema. This means that the Ledger app named **Polkadot (DOT)** is fully compatible with Tanssi.

And that's it. Your device now has a Substrate account and is able to sign transactions on Tanssi and any non-EVM Tanssi-powered appchain.
## Adding the Ledger to a Hot Wallet {: #adding-Ledger-hot-wallet }
As presented in the [introduction](#introduction), a Ledger hardware wallet provides secure, offline storage for private keys, allowing users to verify and sign transactions. However, by design, it can't interact with blockchains or dApps by itself, nor does it offer a UI for managing assets. To complement the device, a hot wallet is required. The user can choose any Substrate wallet, such as [Talisman](/builders/toolkit/substrate-api/wallets/talisman/){target=\_blank} or [SubWallet](/builders/toolkit/substrate-api/wallets/subwallet/){target=\_blank}.
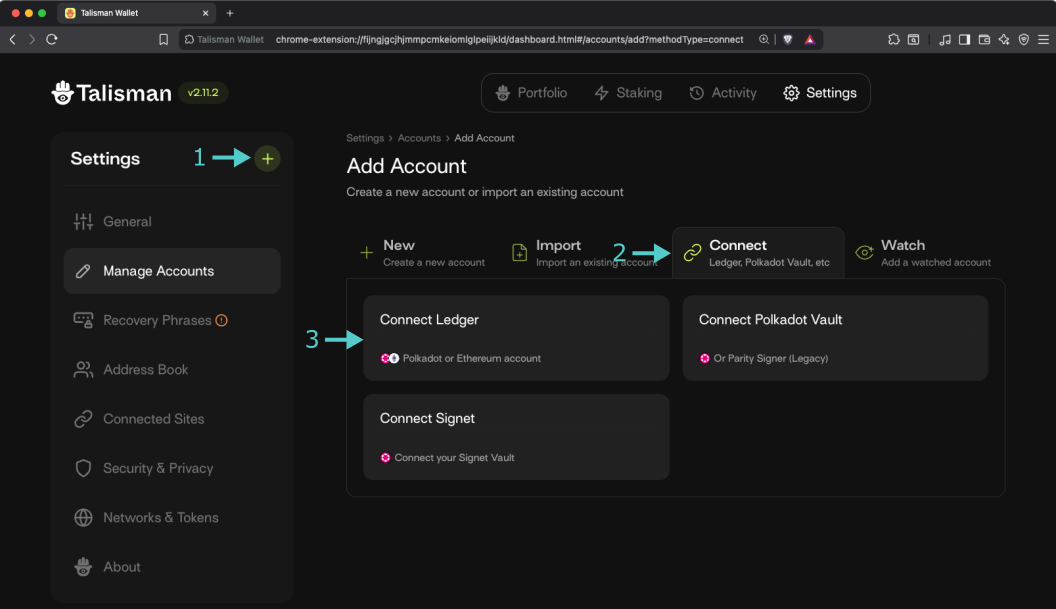
For demonstration purposes, we'll show how to configure Talisman to work with your hardware wallet, but these steps are generally applicable to any other Substrate-enabled wallet that supports Ledger. To follow along with the steps, make sure you have [Talisman installed](/builders/toolkit/substrate-api/wallets/talisman/#setting-up-talisman){target=\_blank} in your browser, then open the extension and:
1. Press the **+** icon (Add Account).
2. Click on the **Connect** tab.
3. Select **Connect Ledger**.
On the following screen, take the following steps:
1. Select **Polkadot**. Other options will be presented below.
2. Select **Polkadot** from the dropdown.
3. Select **Polkadot App** from the box. You'll be prompted to connect your ledger and open the Polkadot app.
4. Make sure that your ledger is successfully connected.
5. Click on **Continue**.
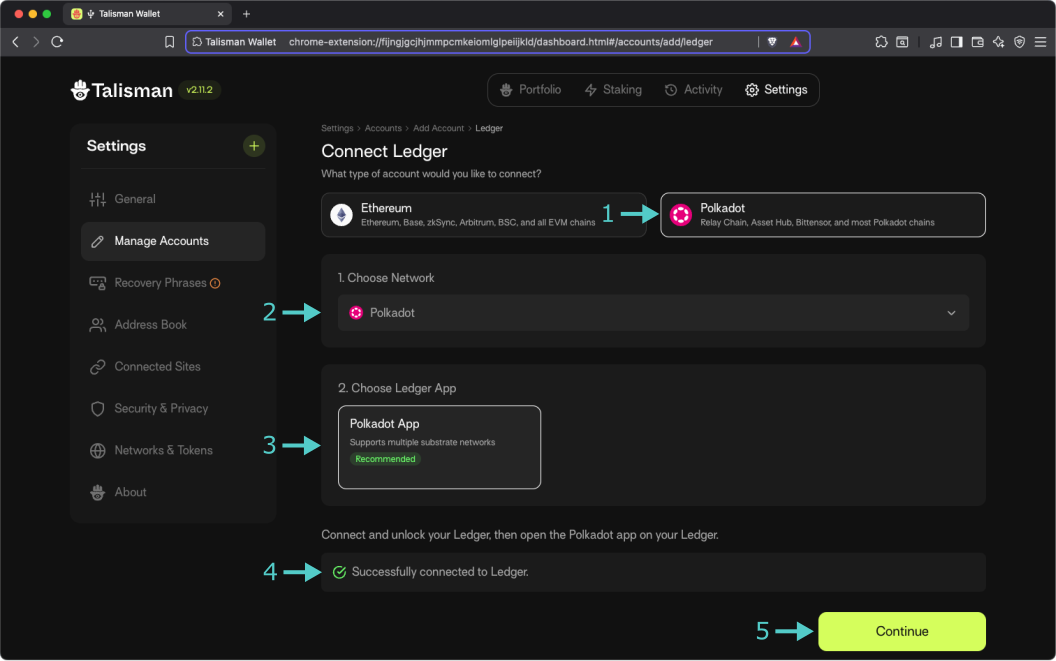
In the next step, you will be presented with a list of derived accounts. Select the one you want to import, click **Continue**, and that's all! Your Talisman wallet can now sign transactions using your Ledger device.
The information presented herein has been provided by third parties and is made available solely for general information purposes. Tanssi does not endorse any project listed and described on the Tanssi Doc Website (https://docs.tanssi.network/). Tanssi Foundation does not warrant the accuracy, completeness or usefulness of this information. Any reliance you place on such information is strictly at your own risk. Tanssi Foundation disclaims all liability and responsibility arising from any reliance placed on this information by you or by anyone who may be informed of any of its contents. All statements and/or opinions expressed in these materials are solely the responsibility of the person or entity providing those materials and do not necessarily represent the opinion of Tanssi Foundation. The information should not be construed as professional or financial advice of any kind. Advice from a suitably qualified professional should always be sought in relation to any particular matter or circumstance. The information herein may link to or integrate with other websites operated or content provided by third parties, and such other websites may link to this website. Tanssi Foundation has no control over any such other websites or their content and will have no liability arising out of or related to such websites or their content. The existence of any such link does not constitute an endorsement of such websites, the content of the websites, or the operators of the websites. These links are being provided to you only as a convenience and you release and hold Tanssi Foundation harmless from any and all liability arising from your use of this information or the information provided by any third-party website or service.
--- END CONTENT ---
Doc-Content: https://docs.tanssi.network/builders/toolkit/substrate-api/wallets/subwallet/
--- BEGIN CONTENT ---
---
title: How to Connect SubWallet to Tanssi Substrate
description: This guide walks you through how to connect SubWallet, a comprehensive Polkadot, Substrate, and Ethereum wallet, to your Tanssi-powered Substrate network.
icon: material-wallet-outline
categories: Substrate-Template
---
# Interacting with Your Tanssi Substrate Network Using SubWallet
## Introduction {: #introduction }
Developers and users of Tanssi-powered Substrate networks have a variety of options when it comes to wallets. SubWallet is a comprehensive Web3 wallet that natively supports Substrate (Polkadot) and Ethereum accounts. This tutorial centers on the Substrate API, but you can check out a similar [tutorial for interacting with SubWallet using the Ethereum API](/builders/toolkit/ethereum-api/wallets/subwallet/){target=\_blank}.
The SubWallet wallet browser extension [can be downloaded](https://www.subwallet.app/download.html){target=\_blank} for all supported browsers, including Chrome, Brave, Firefox, and MS Edge. SubWallet also has a mobile app for both iOS and Android, but that is beyond the scope of this guide. A complete online asset dashboard is accessible at [web.subwallet.app](https://web.subwallet.app){target=\_blank}.
This guide takes you through all the necessary steps, from installing SubWallet to setting up a wallet, connecting it to your Tanssi Substrate network, and sending funds.
## Creating Your First Substrate Account {: #creating-your-first-substrate-account }
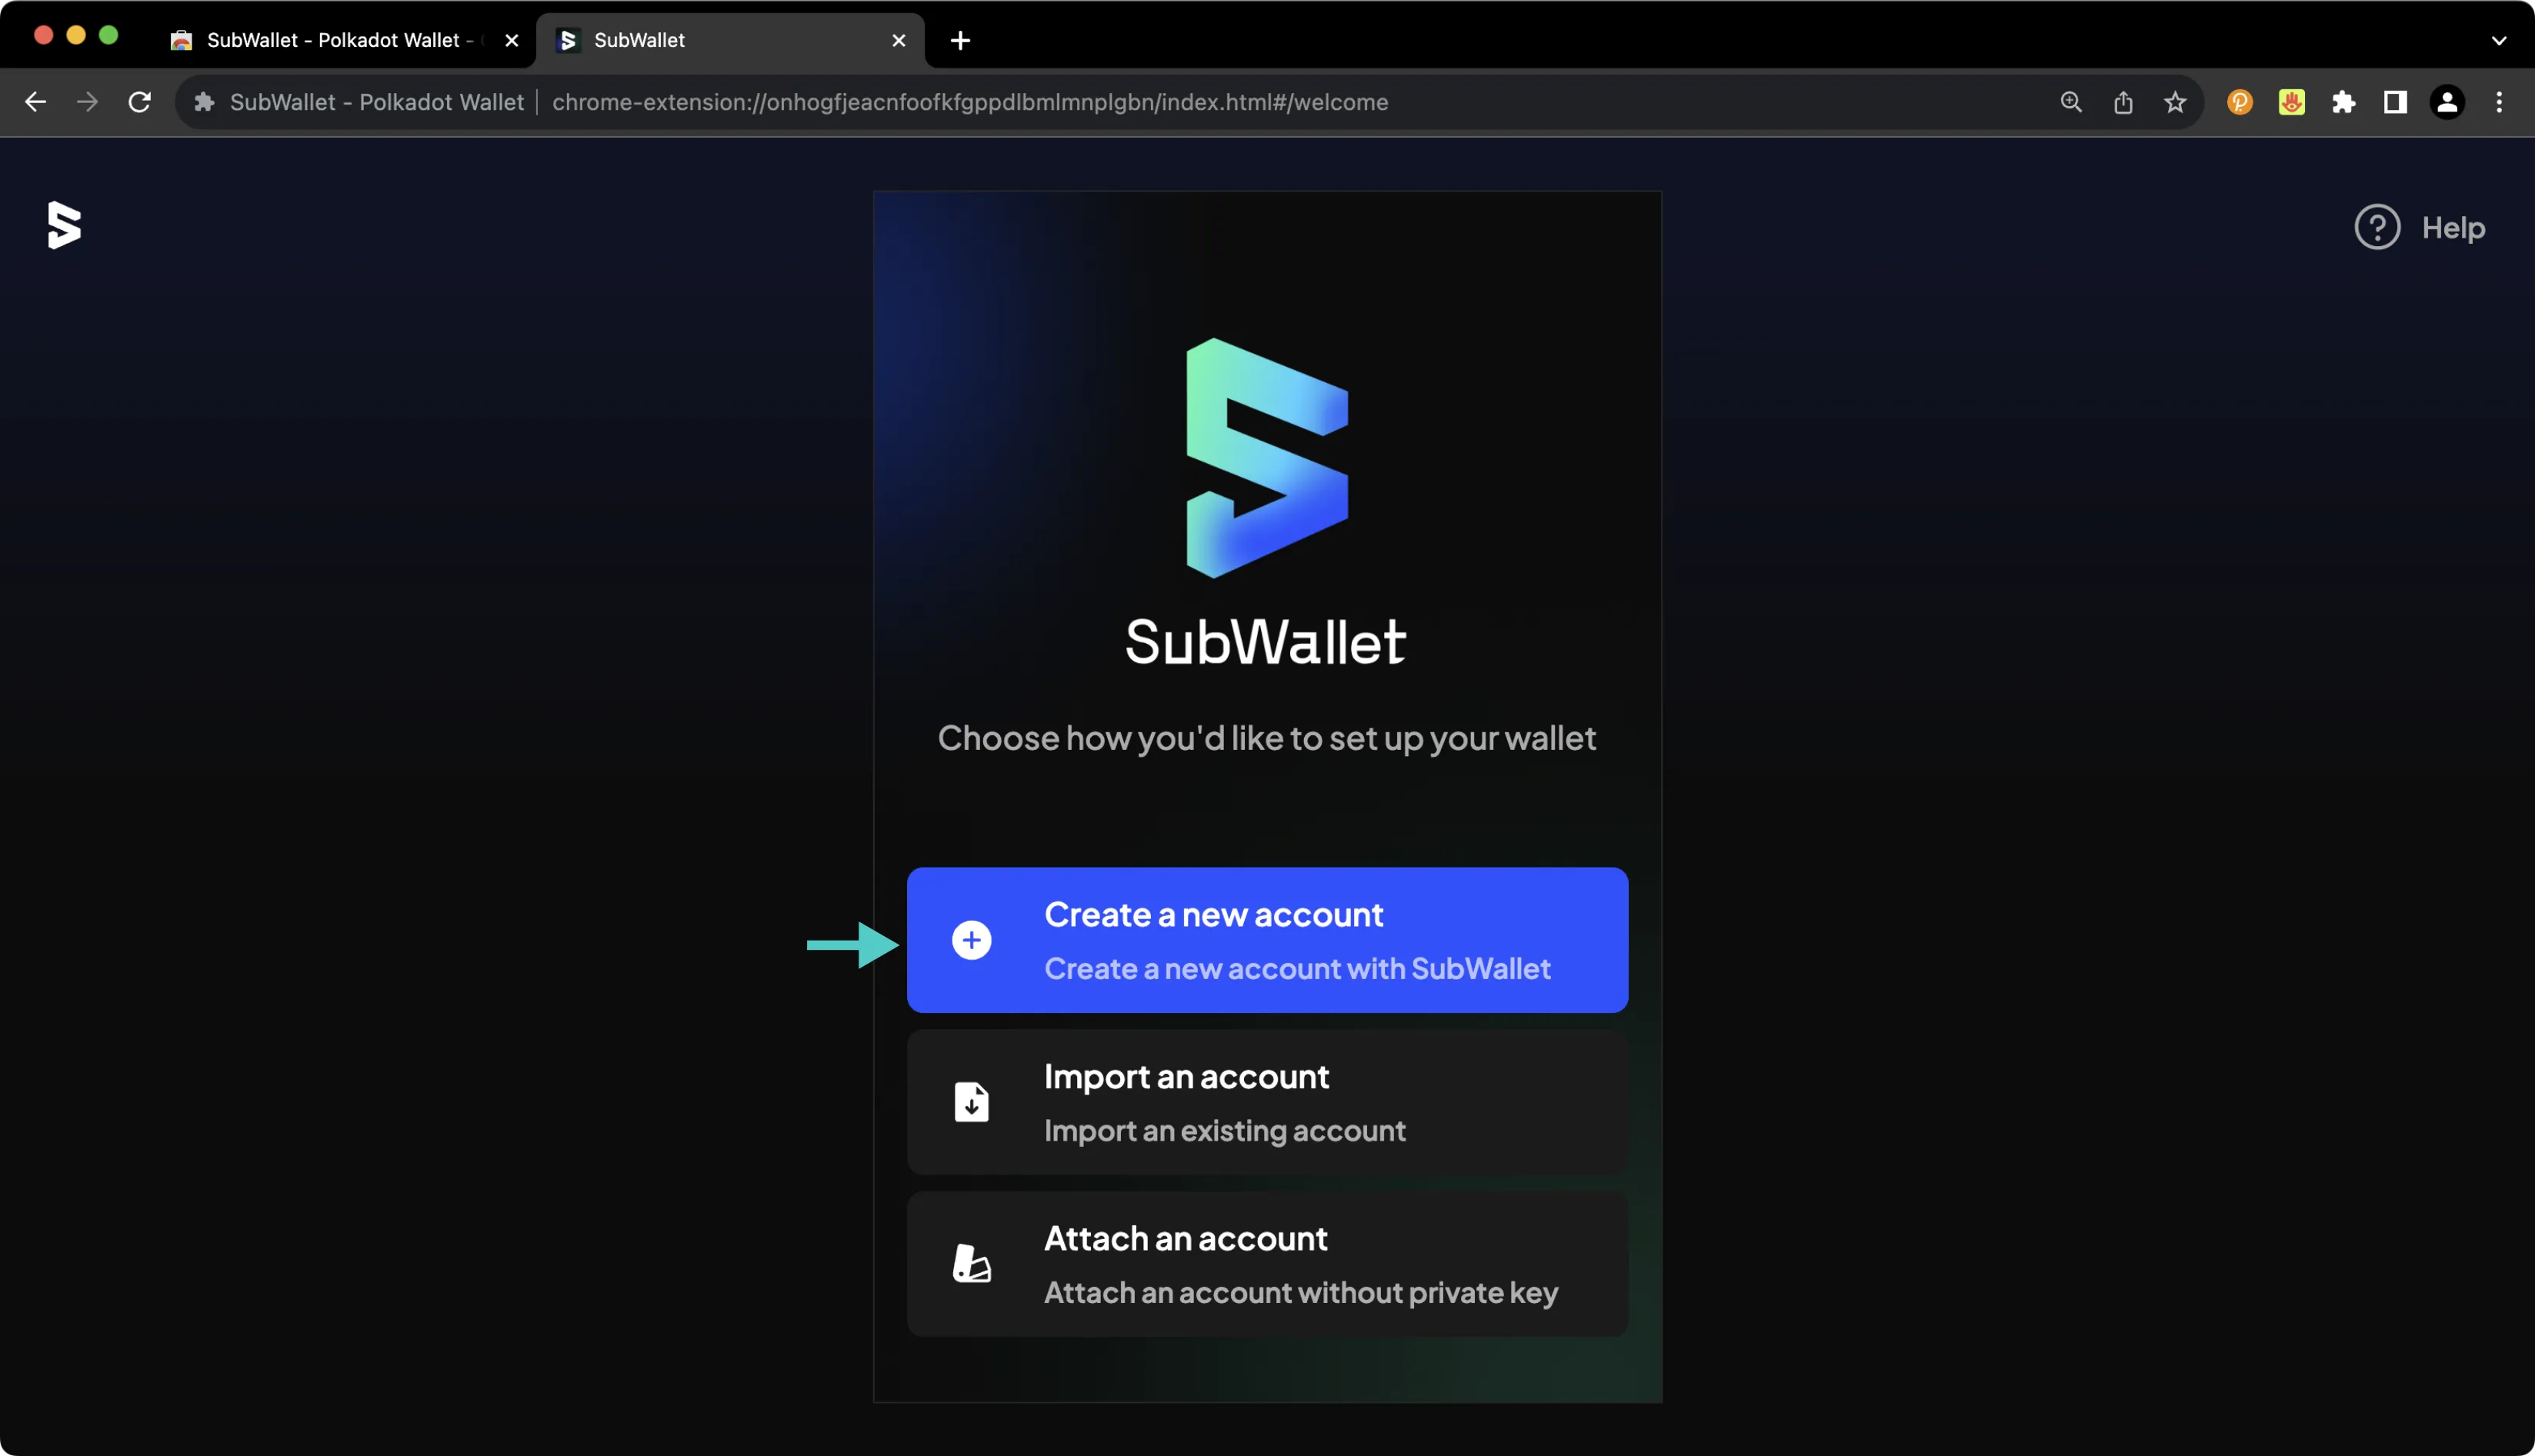
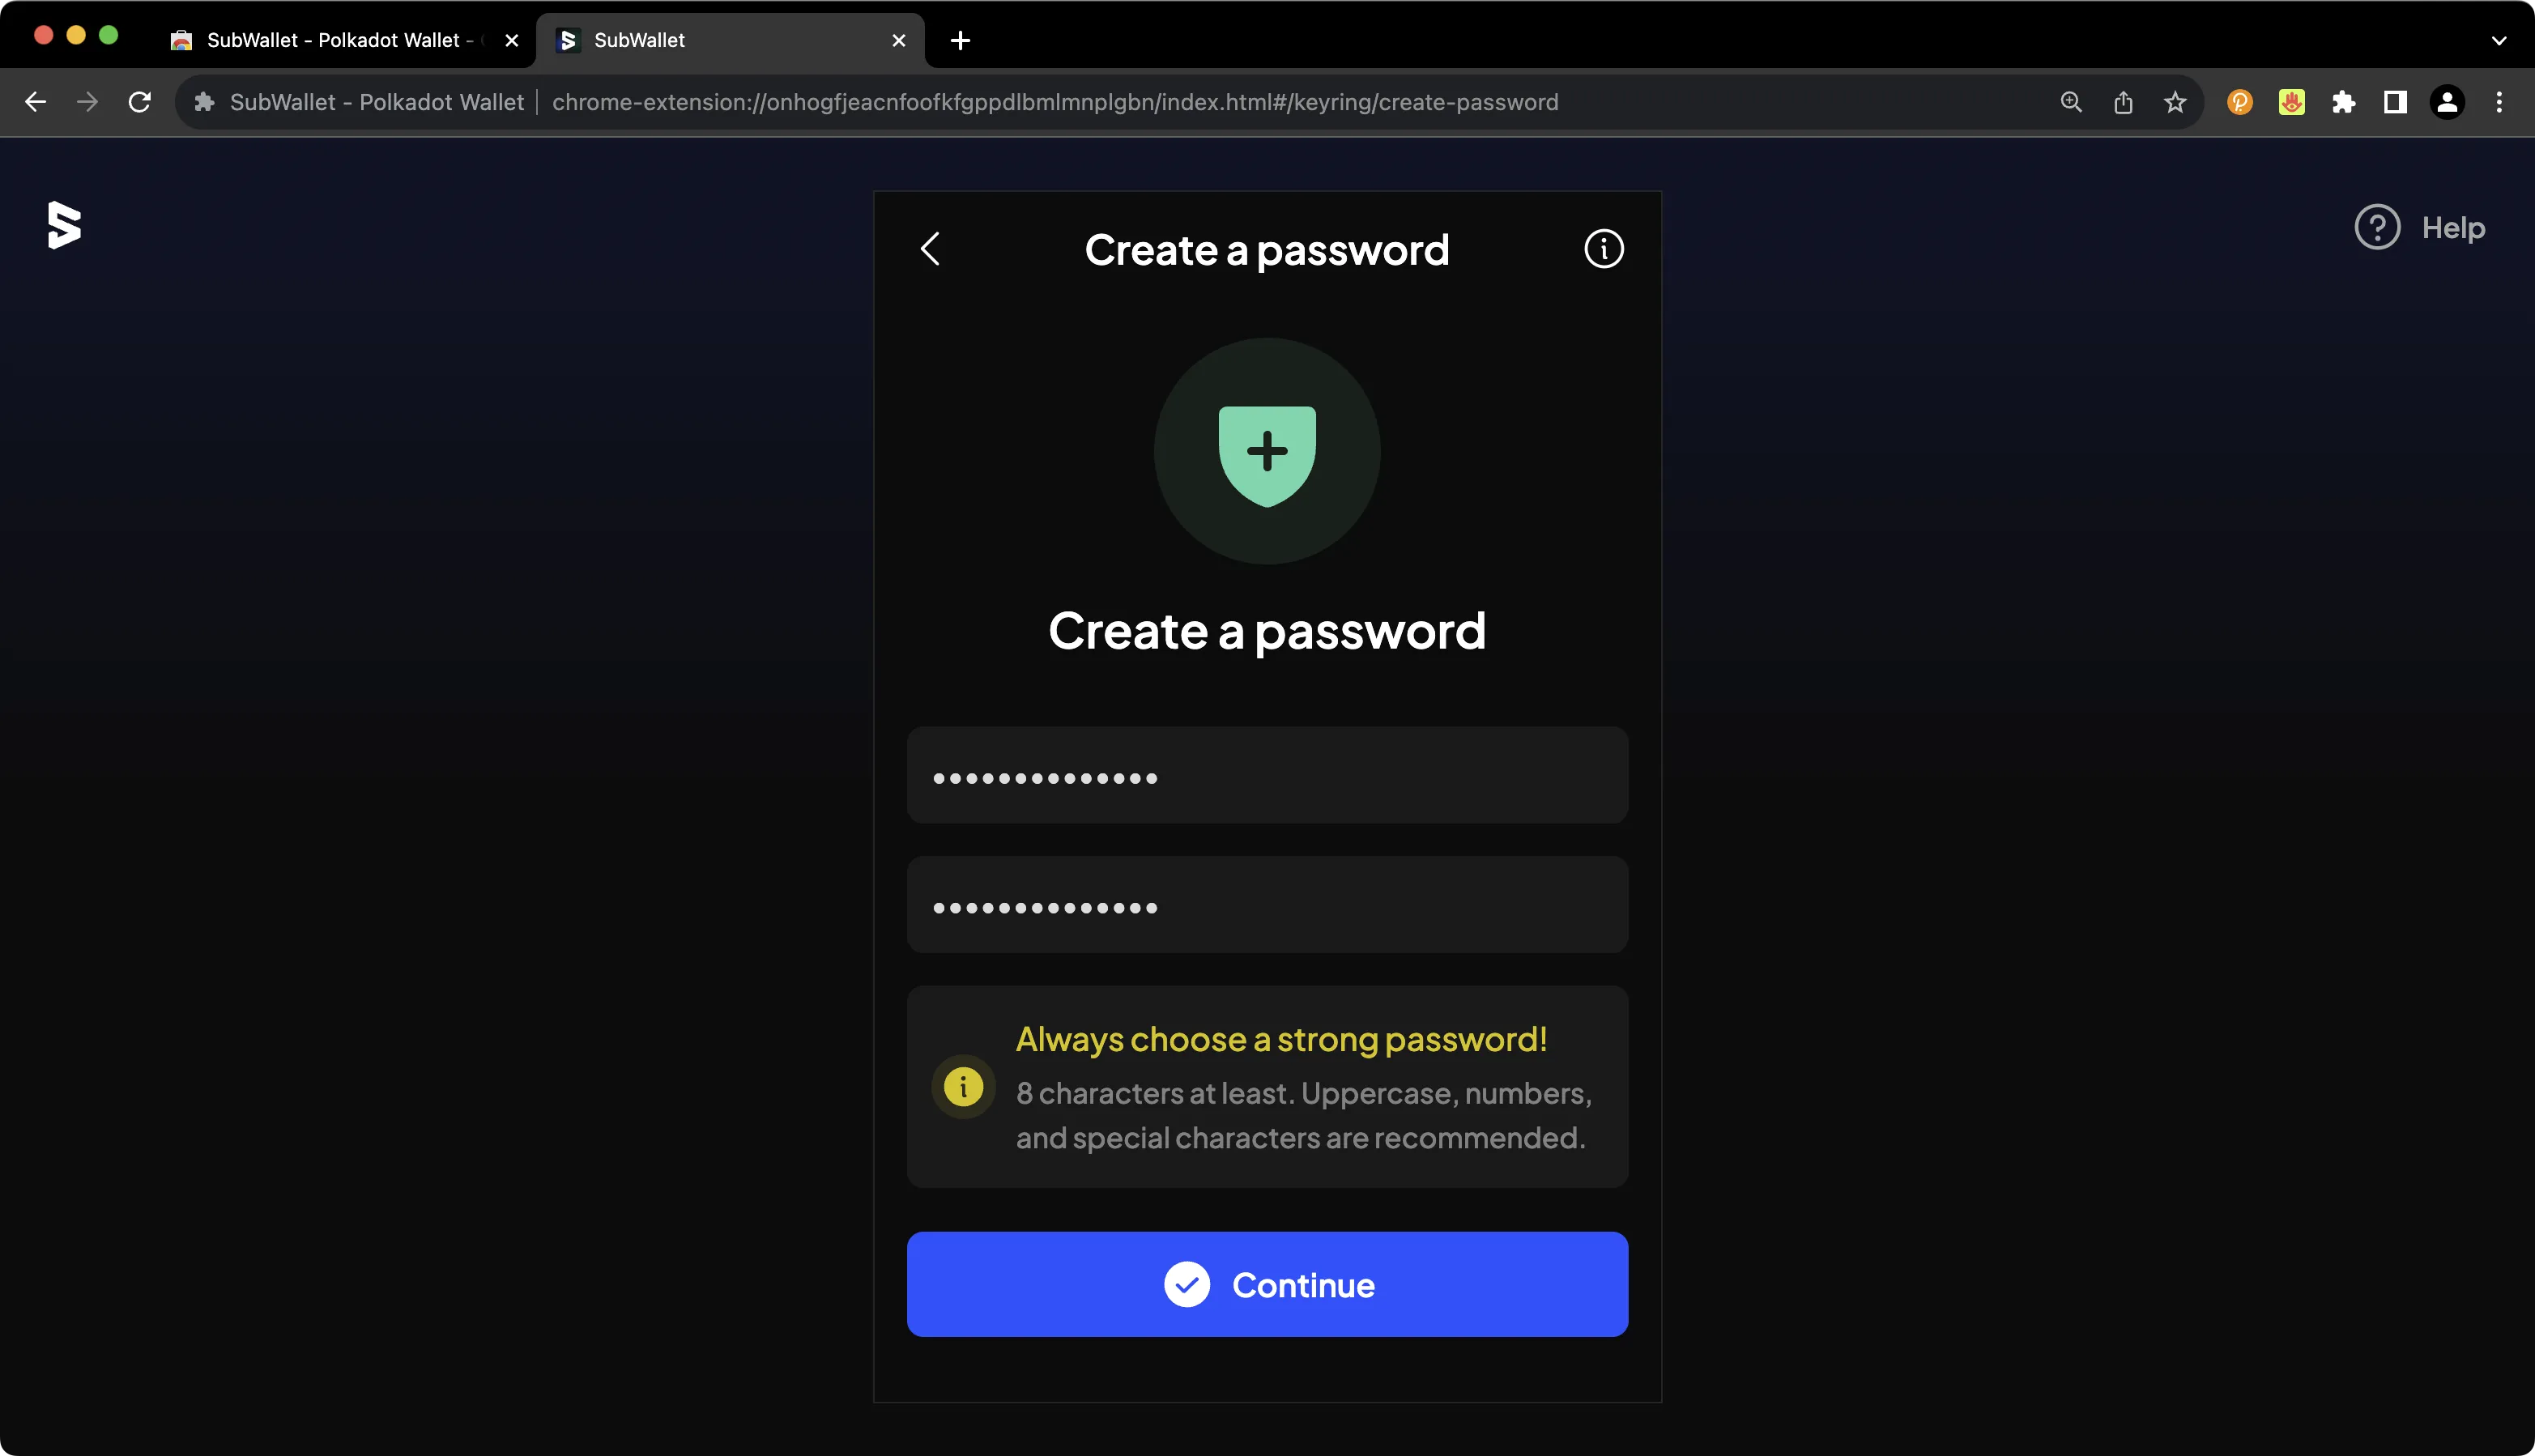
First, download and install the [SubWallet extension](https://www.subwallet.app/download.html){target=\_blank}. Creating a new account will generate a seed phrase that can derive multiple Ethereum and Substrate accounts. By default, SubWallet will generate a single Ethereum and a single Substrate account, but you can easily derive more from the same seed phrase. Click **Create a new account** to get started.
On the following screen, you'll be prompted to create a password to secure your new wallet.
You'll then be prompted to back up your seed phrase. This is an important step, especially because you have the option to later derive additional accounts from this seed phrase.
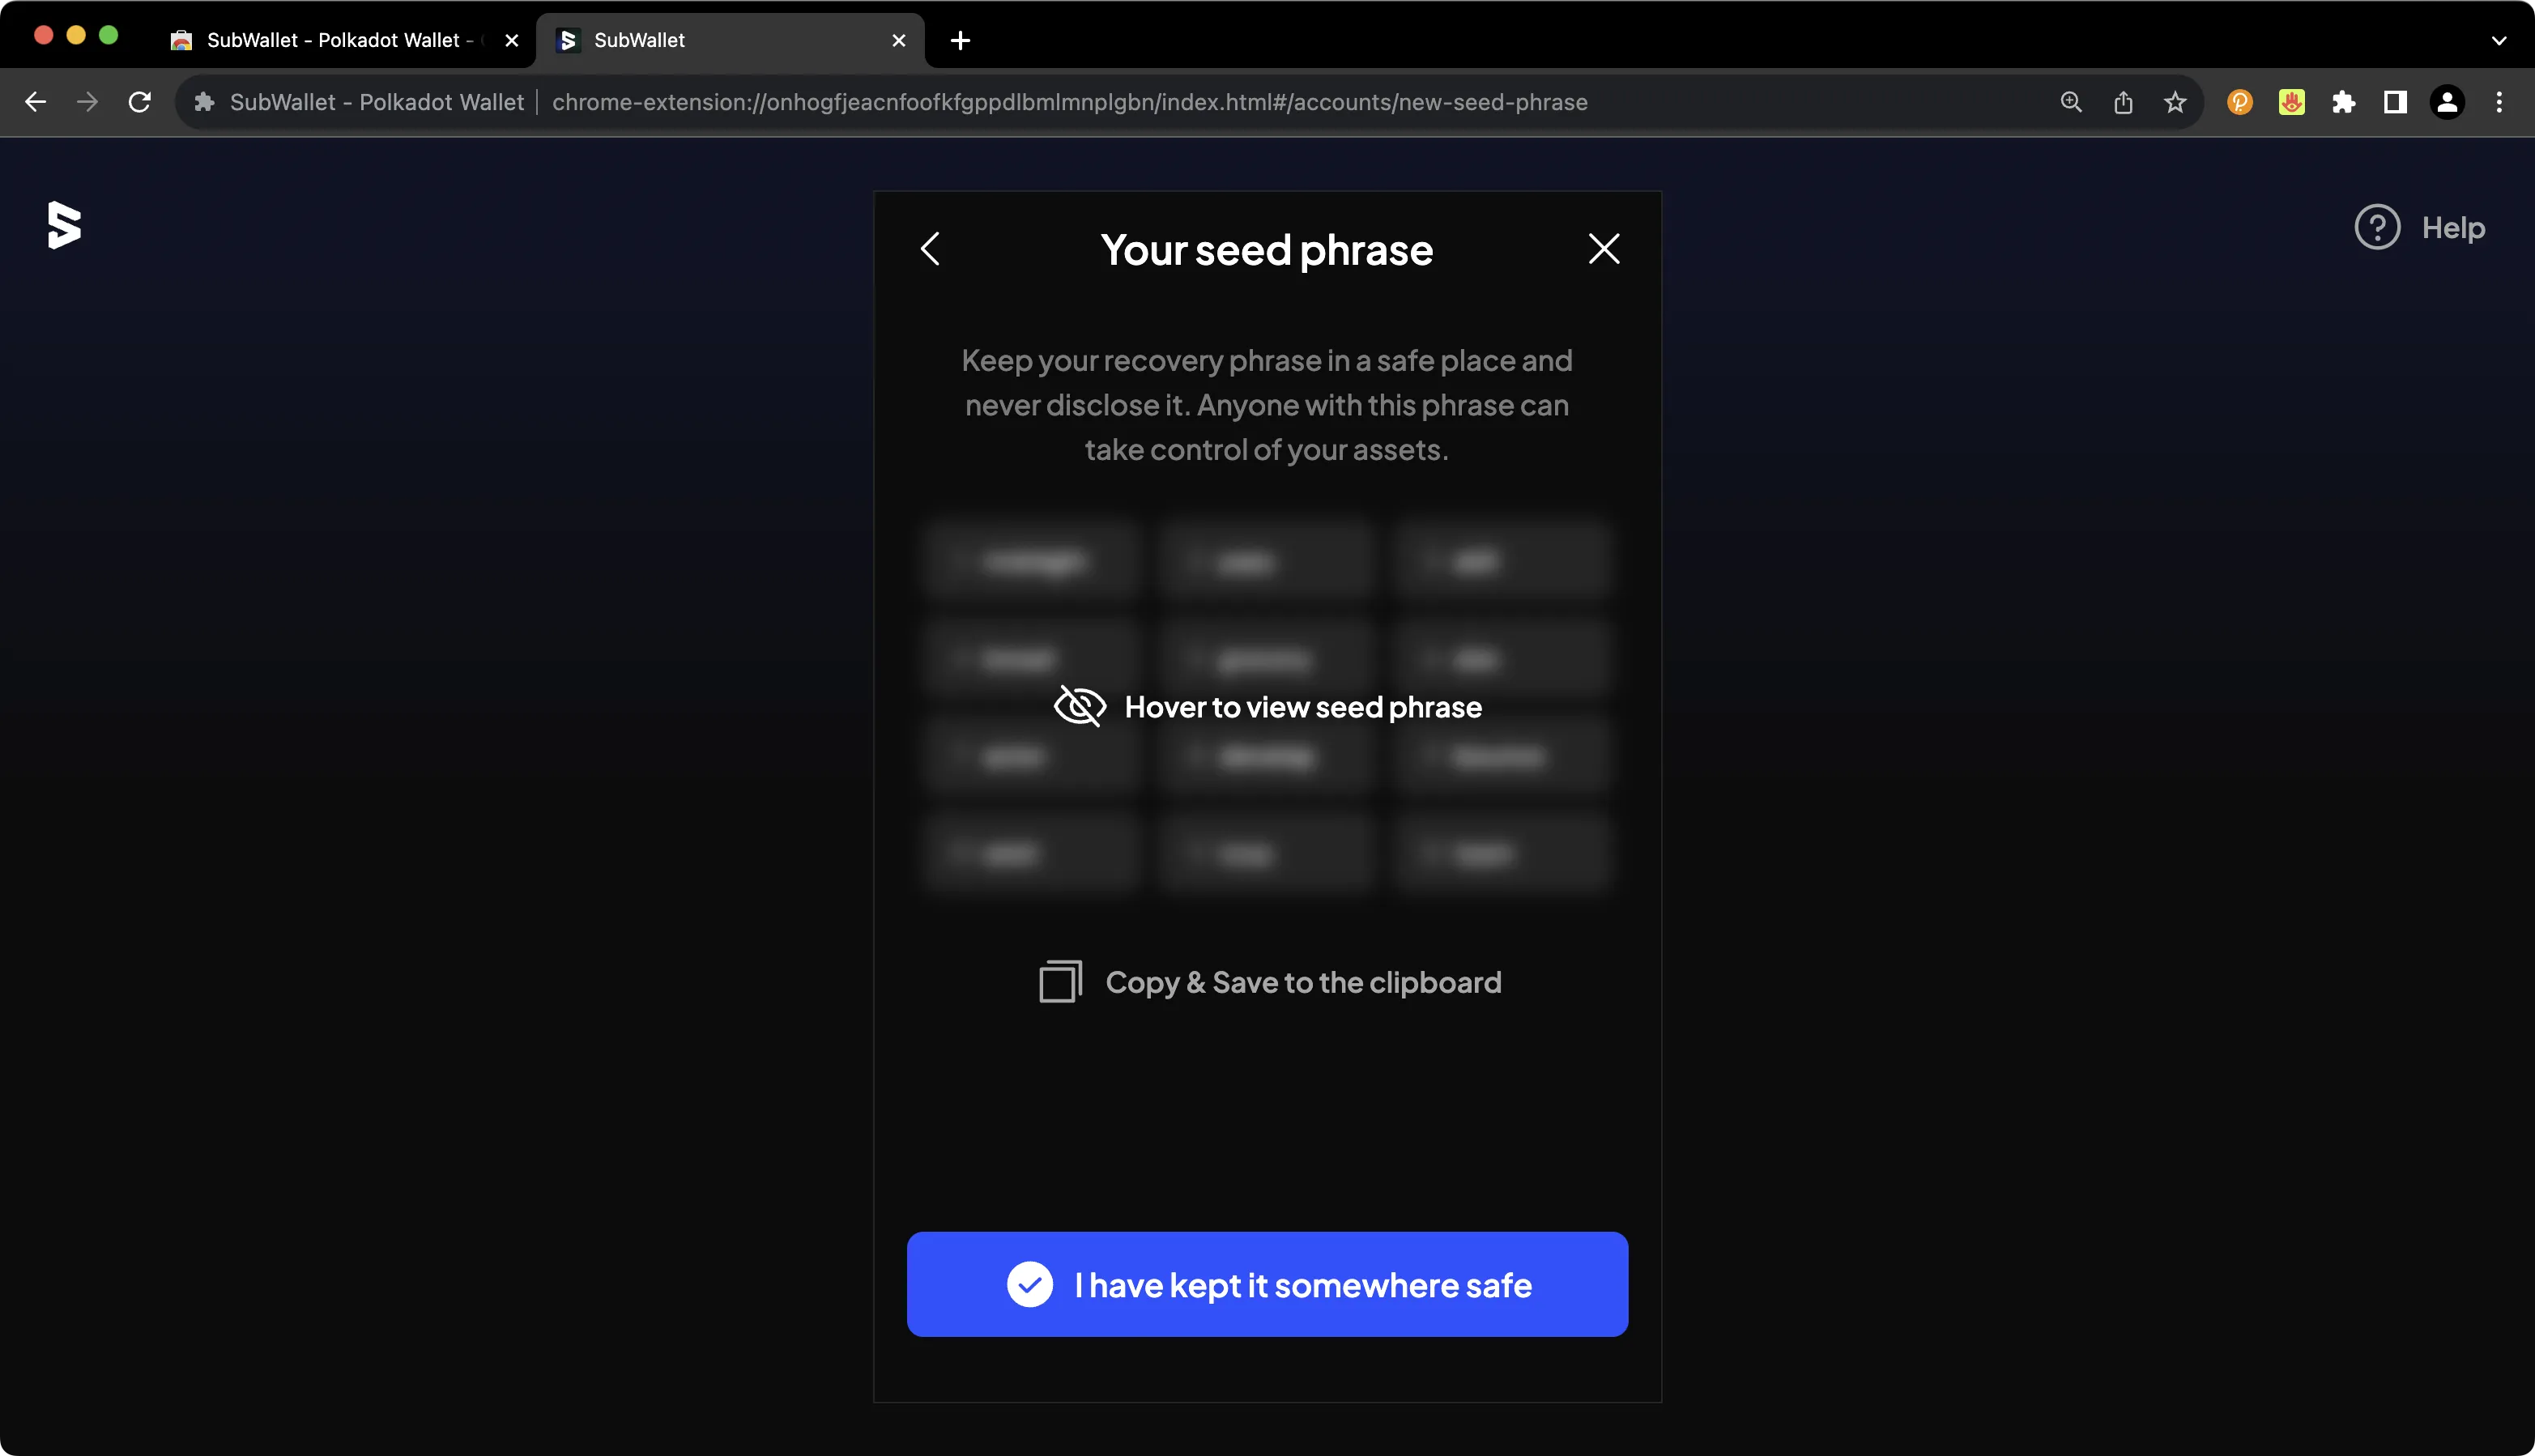
!!! note
You should never share your seed phrase (mnemonic) or private key with anyone. This gives them direct access to your funds. This guide is for educational purposes only.
## Importing an Existing Substrate Account {: #importing-an-existing-substrate-account }
Of course, you can import an existing Substrate account into SubWallet. To get started, take the following steps:
1. Press the **All accounts** button at the top
2. Press the **Import account** icon
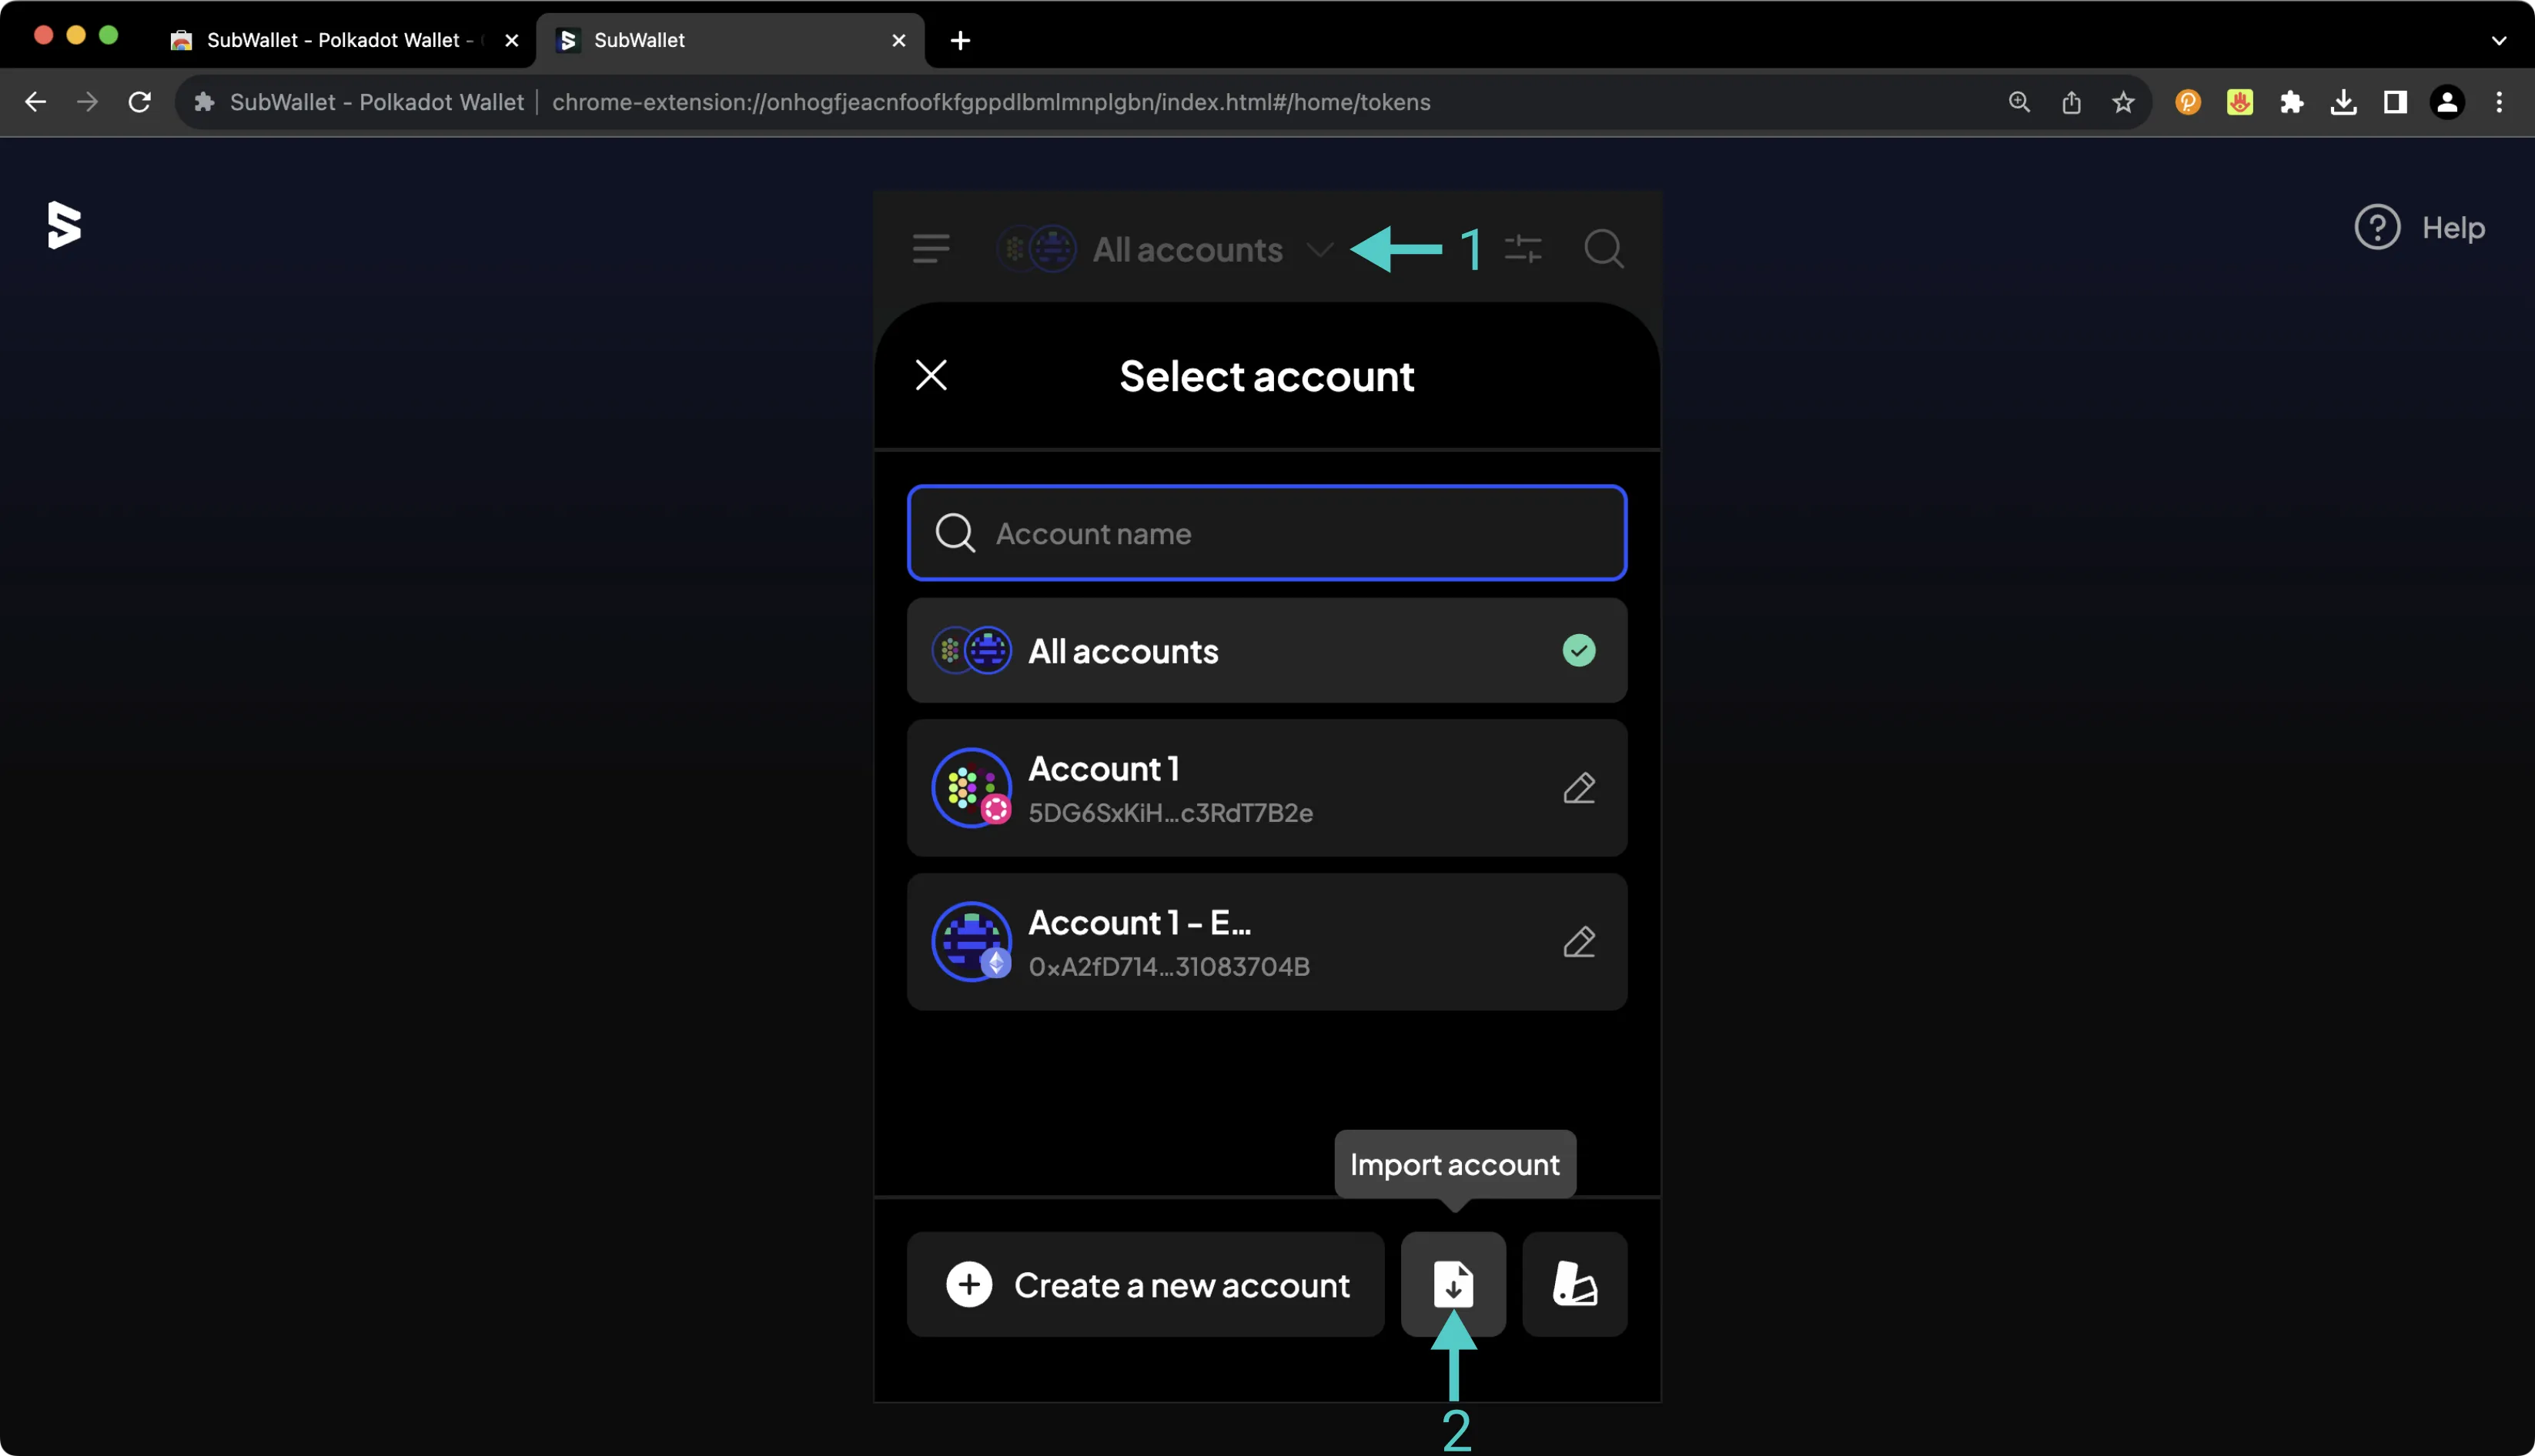
On the following screen, select the method by which you would like to import the existing account. If you're importing a Substrate account, you can choose from the seed phrase, Polkadot.js (JSON), or QR code options.
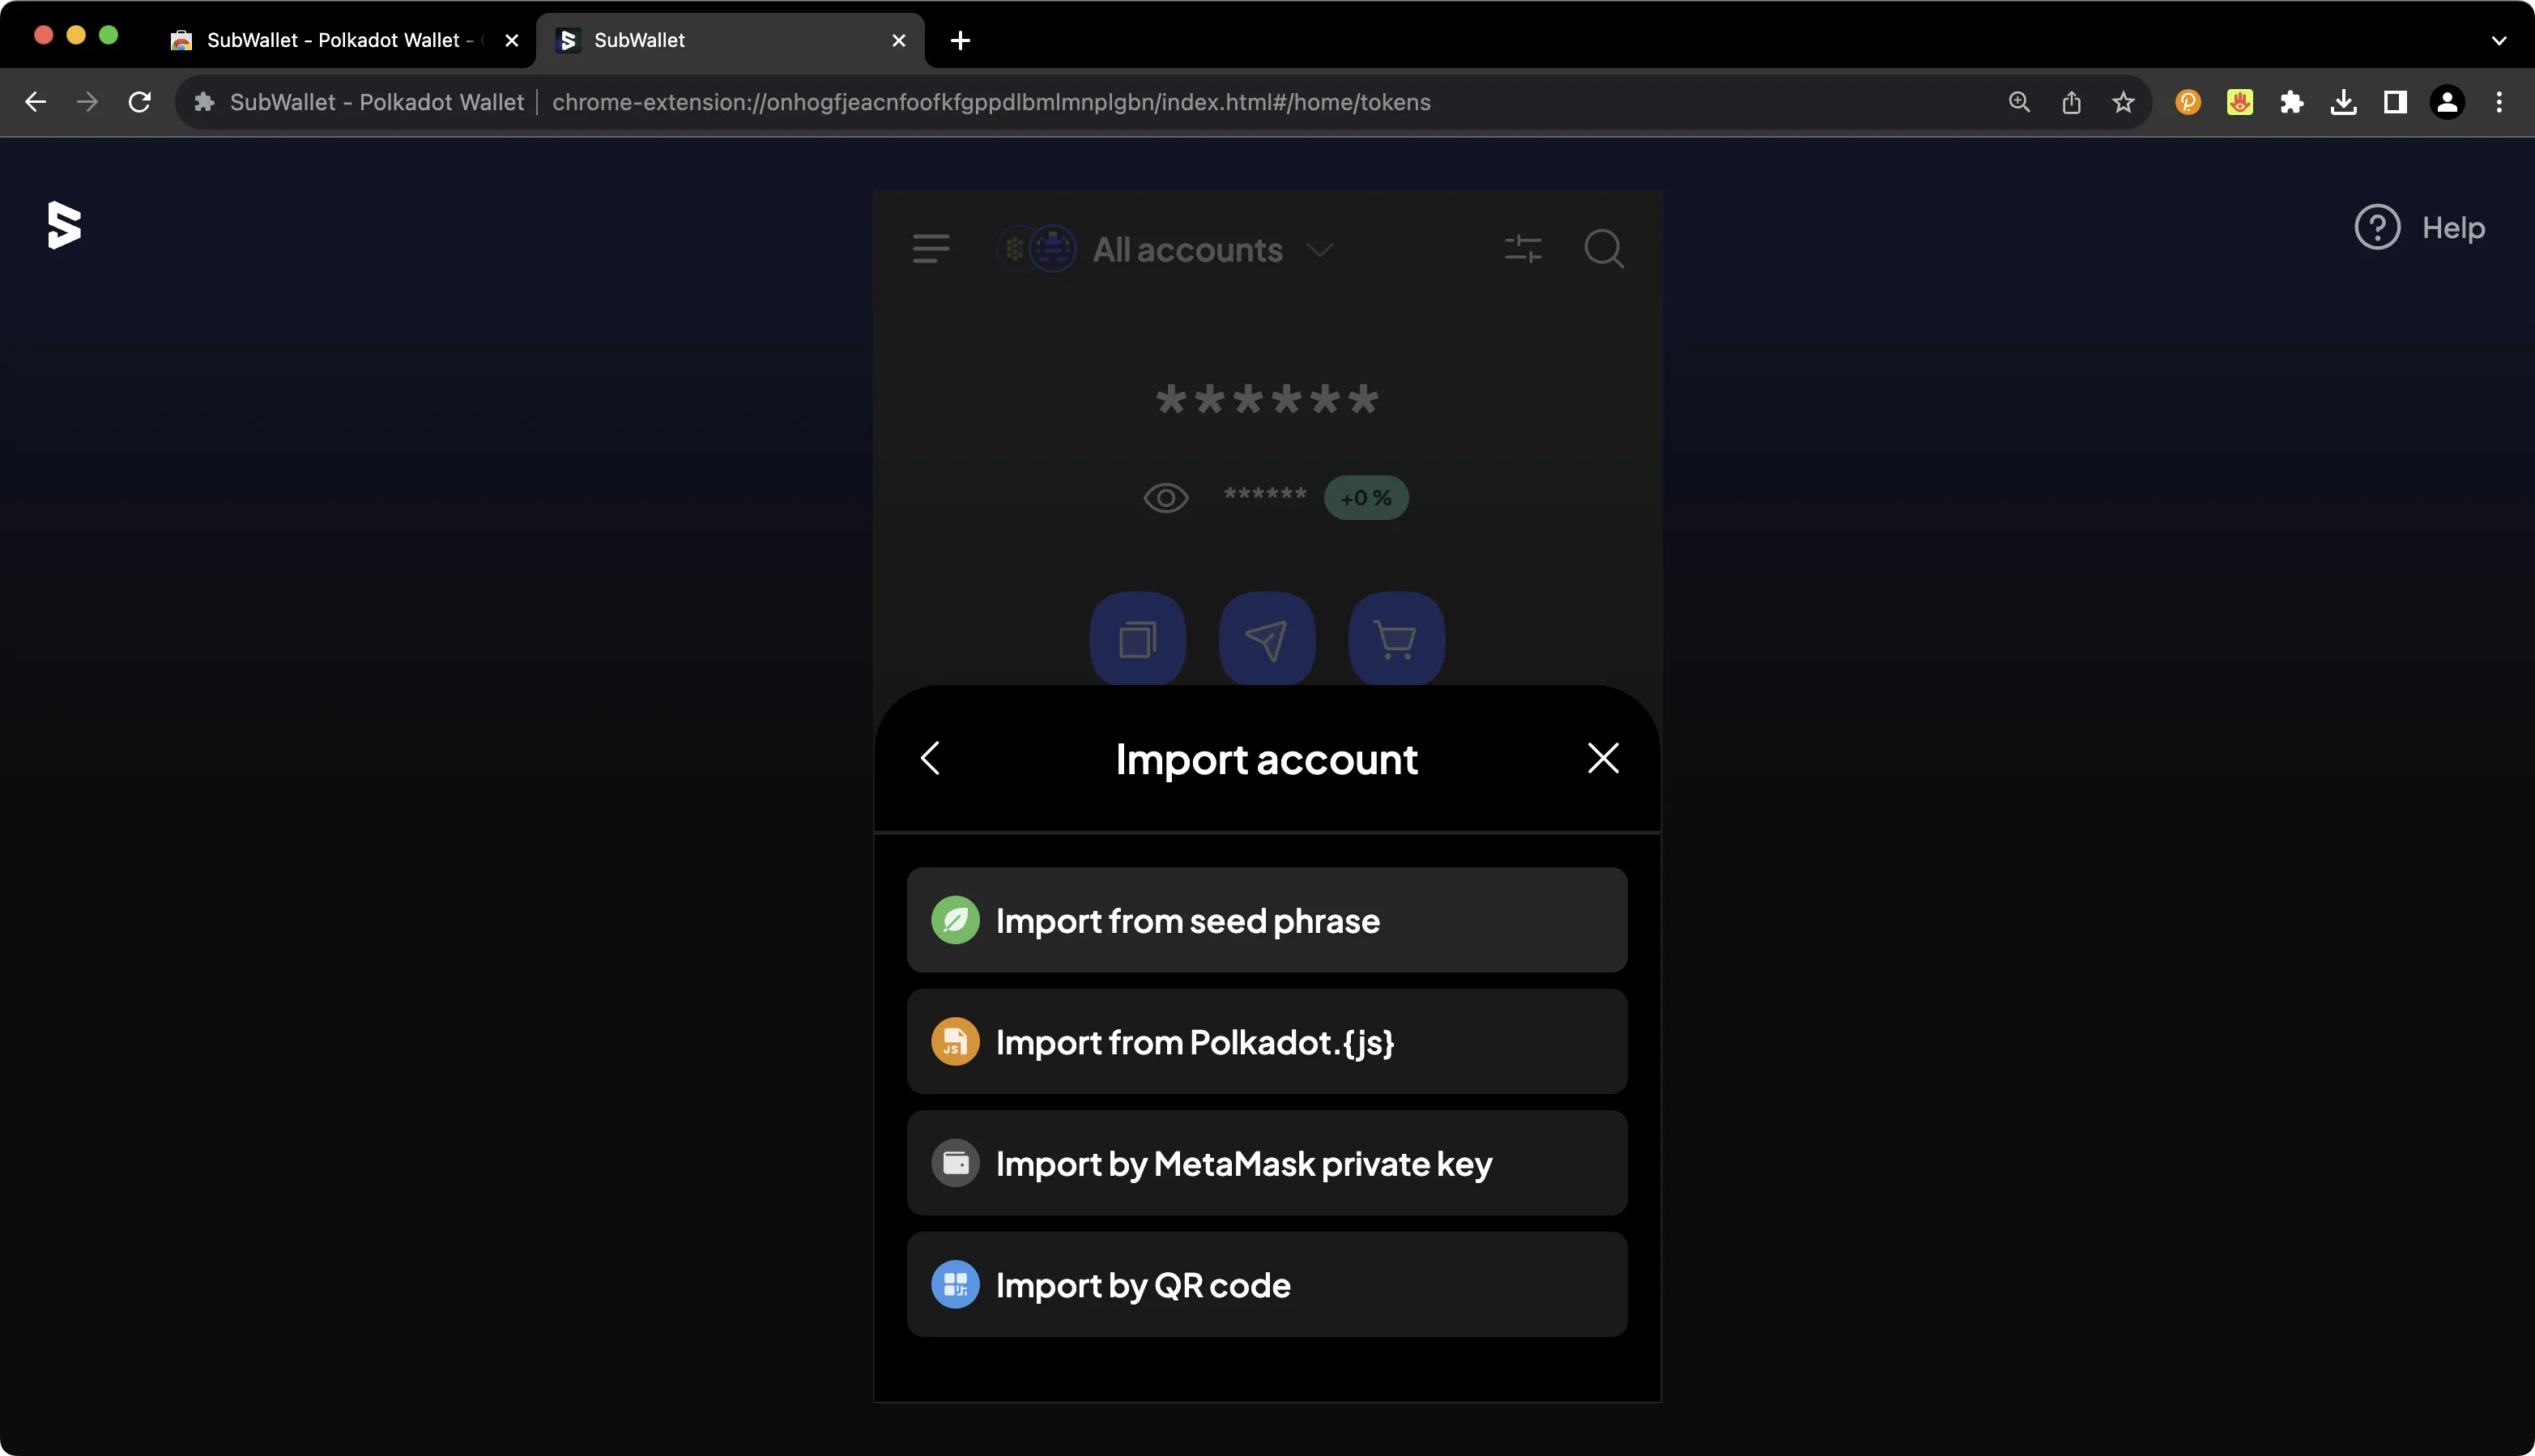
On the following screen, you'll be able to provide the relevant seed phrase, JSON file, or QR code, and you can begin using your new account right away.
## Connecting SubWallet to Dancelight {: #connecting-Subwallet-to-dancelight }
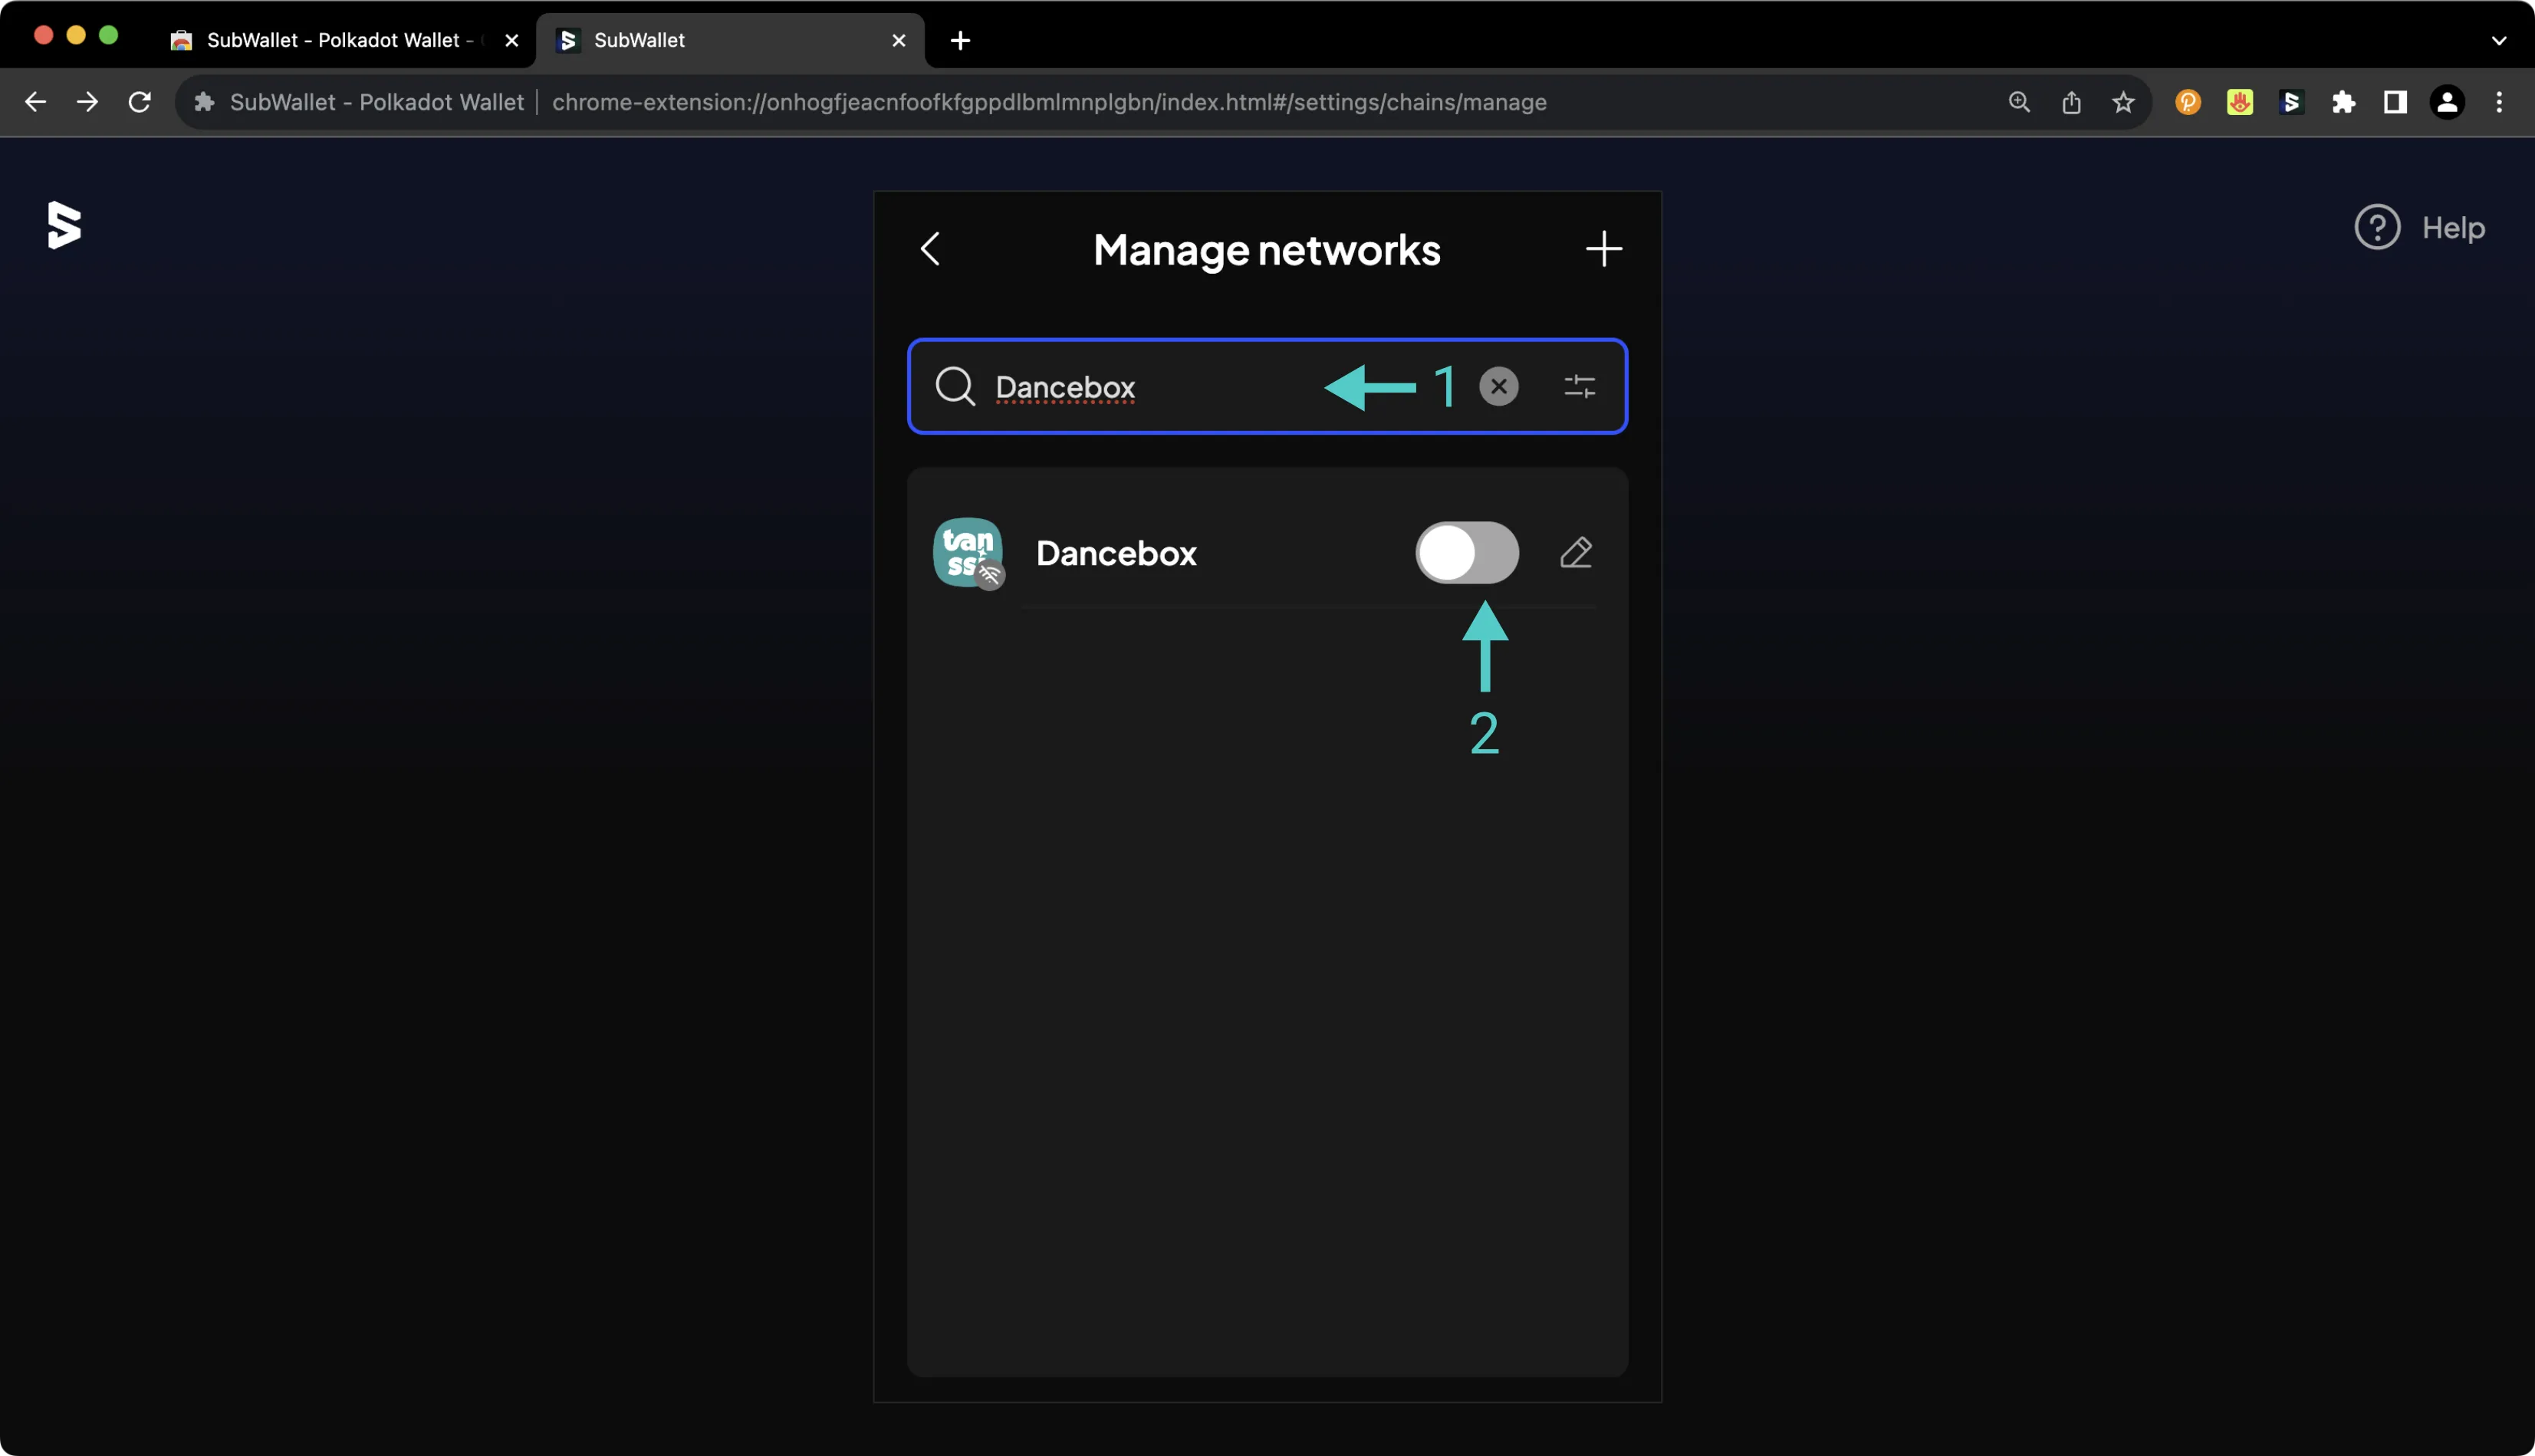
SubWallet comes pre-configured with support for Dancelight, the Tanssi TestNet, but it may not be enabled by default. You just need to head to the **Manage networks** page to toggle it on. Remember that [Dancelight](/builders/tanssi-network/testnet/dancelight/){target=\_blank} itself is the Substrate-based network that orchestrates and manages the launch of Tanssi-powered networks. To configure your SubWallet to work with Dancelight, press the **More Options** icon in the upper left corner. Then click **Manage networks** and take the following steps:
1. Search for **Dancelight**
2. Toggle the slider on to enable support for Dancelight
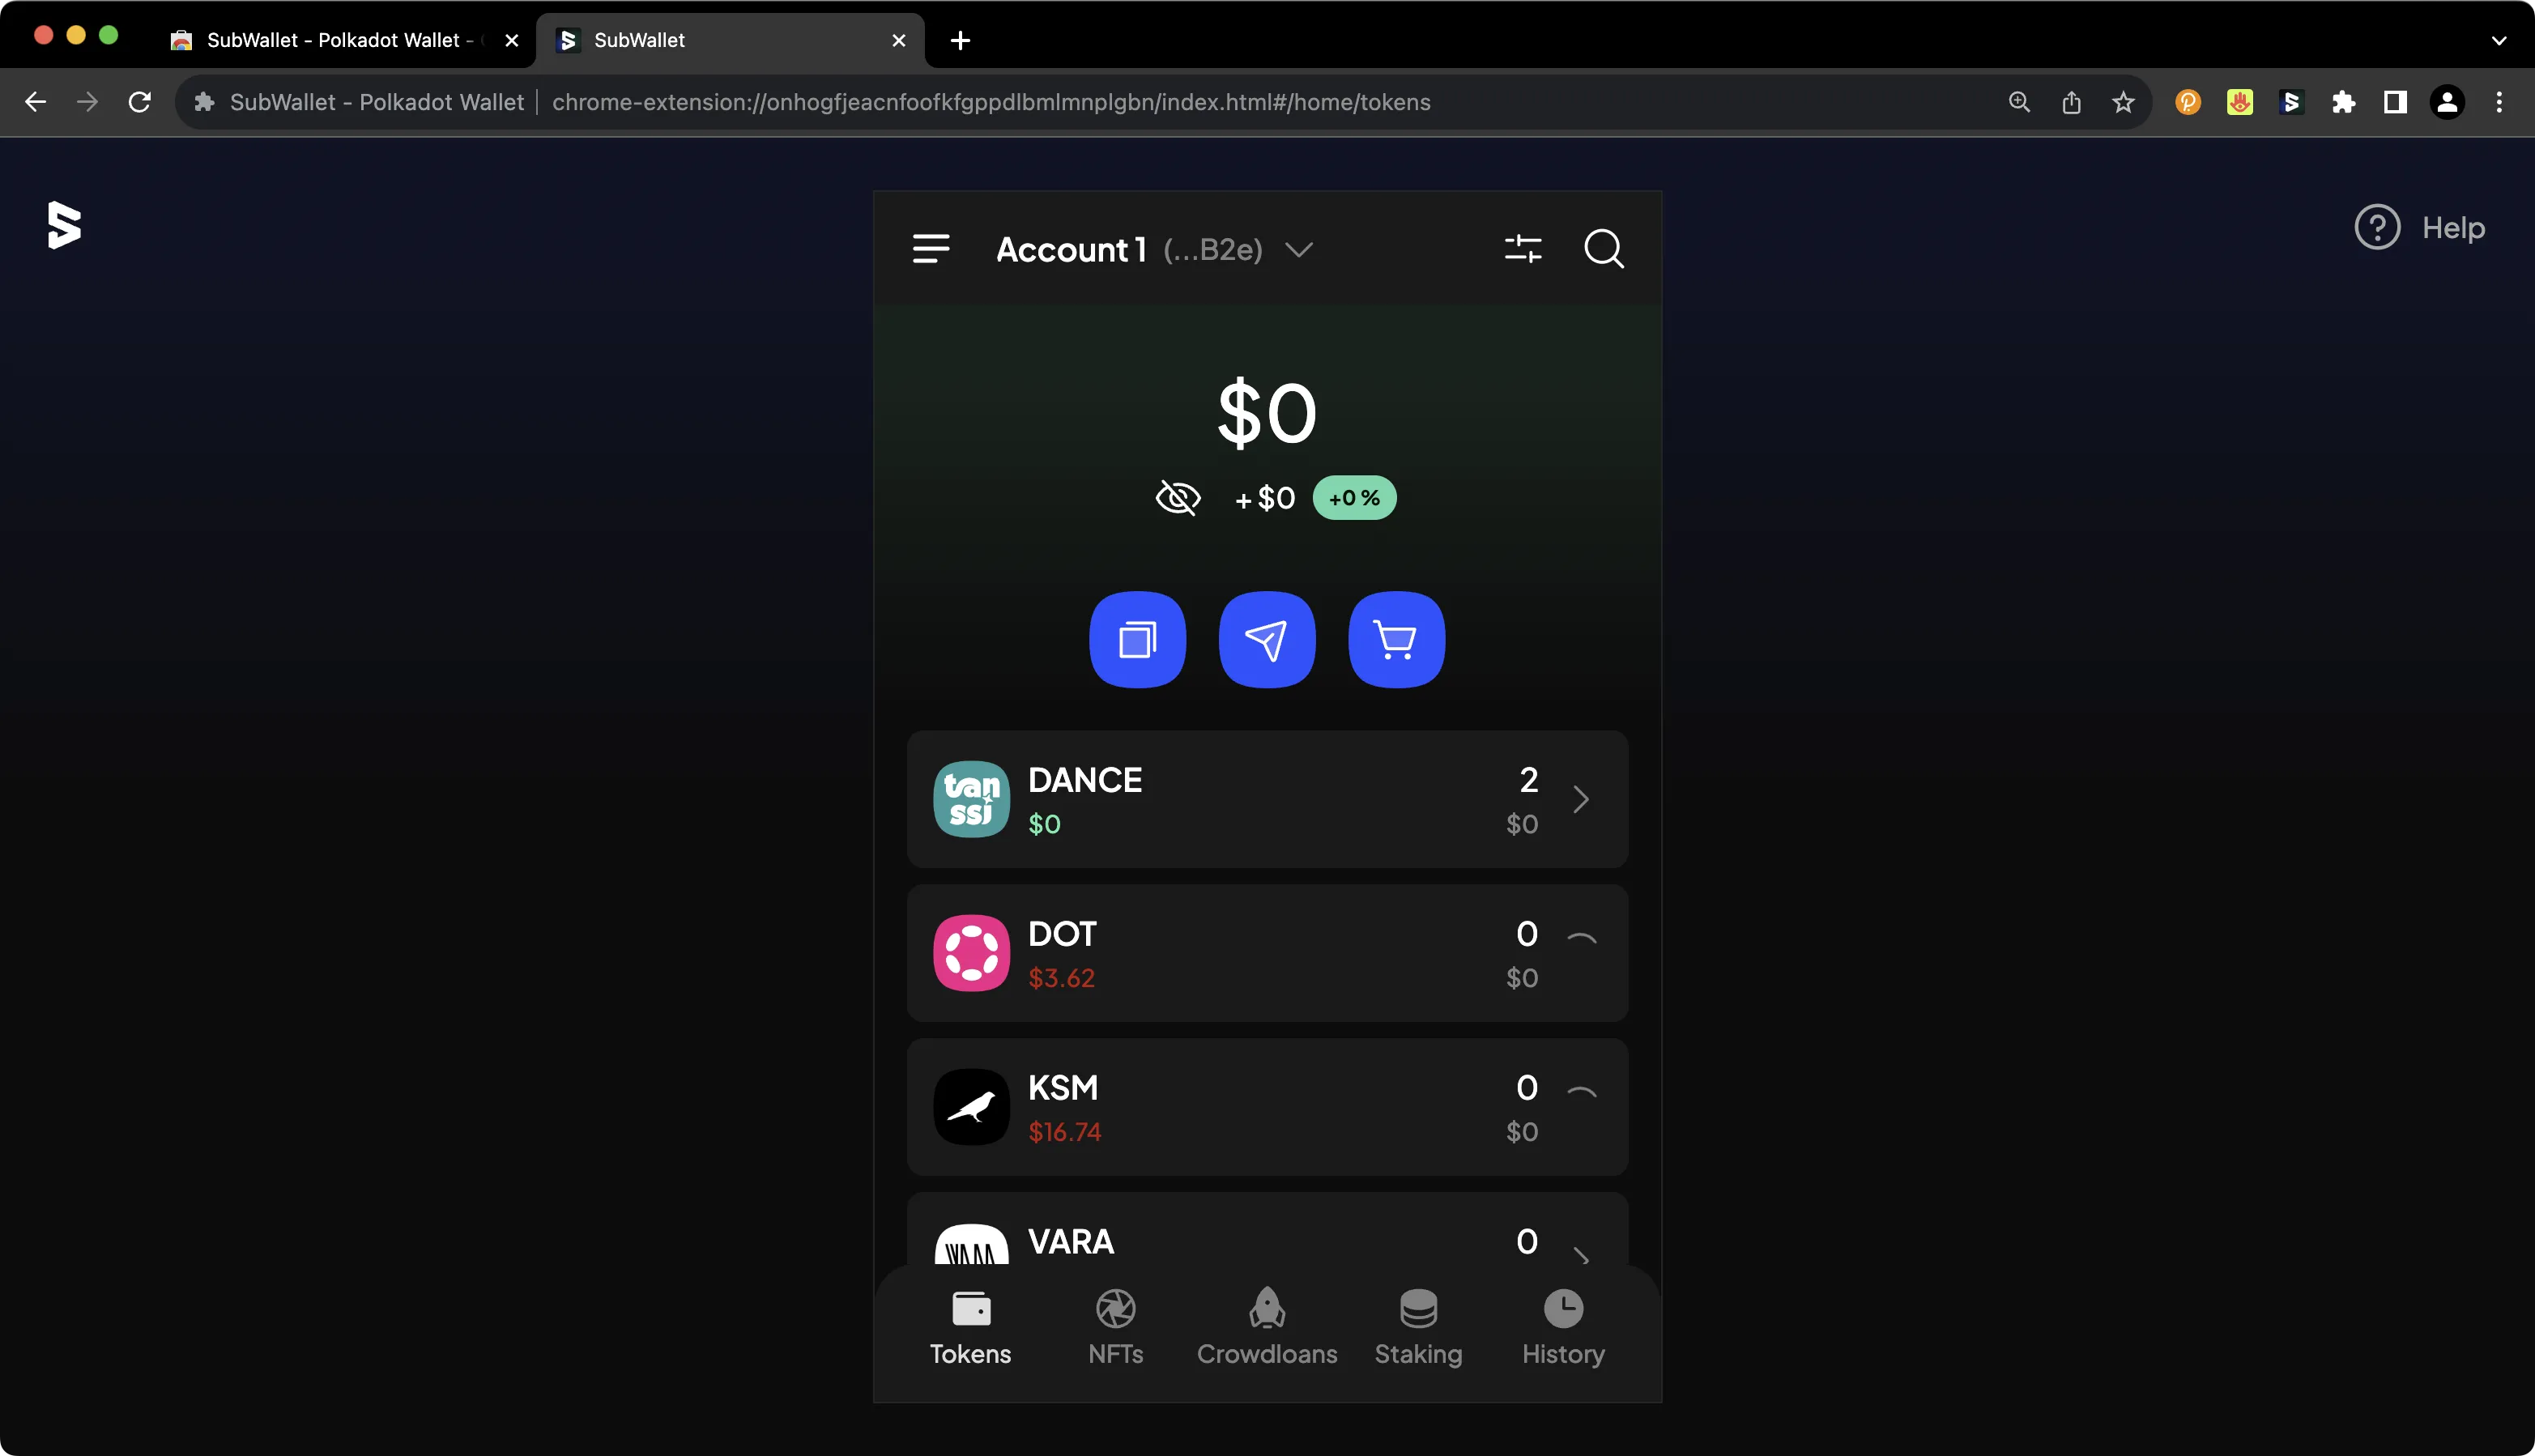
If you have a balance of Dancelight tokens, you'll see your account balance on the homepage of the SubWallet wallet. By default, all balances are hidden in SubWallet, but if you press the eye icon, you can toggle balance visibility.
## Connecting SubWallet to Your Substrate Network {: #connecting-Subwallet-to-your-substrate-network }
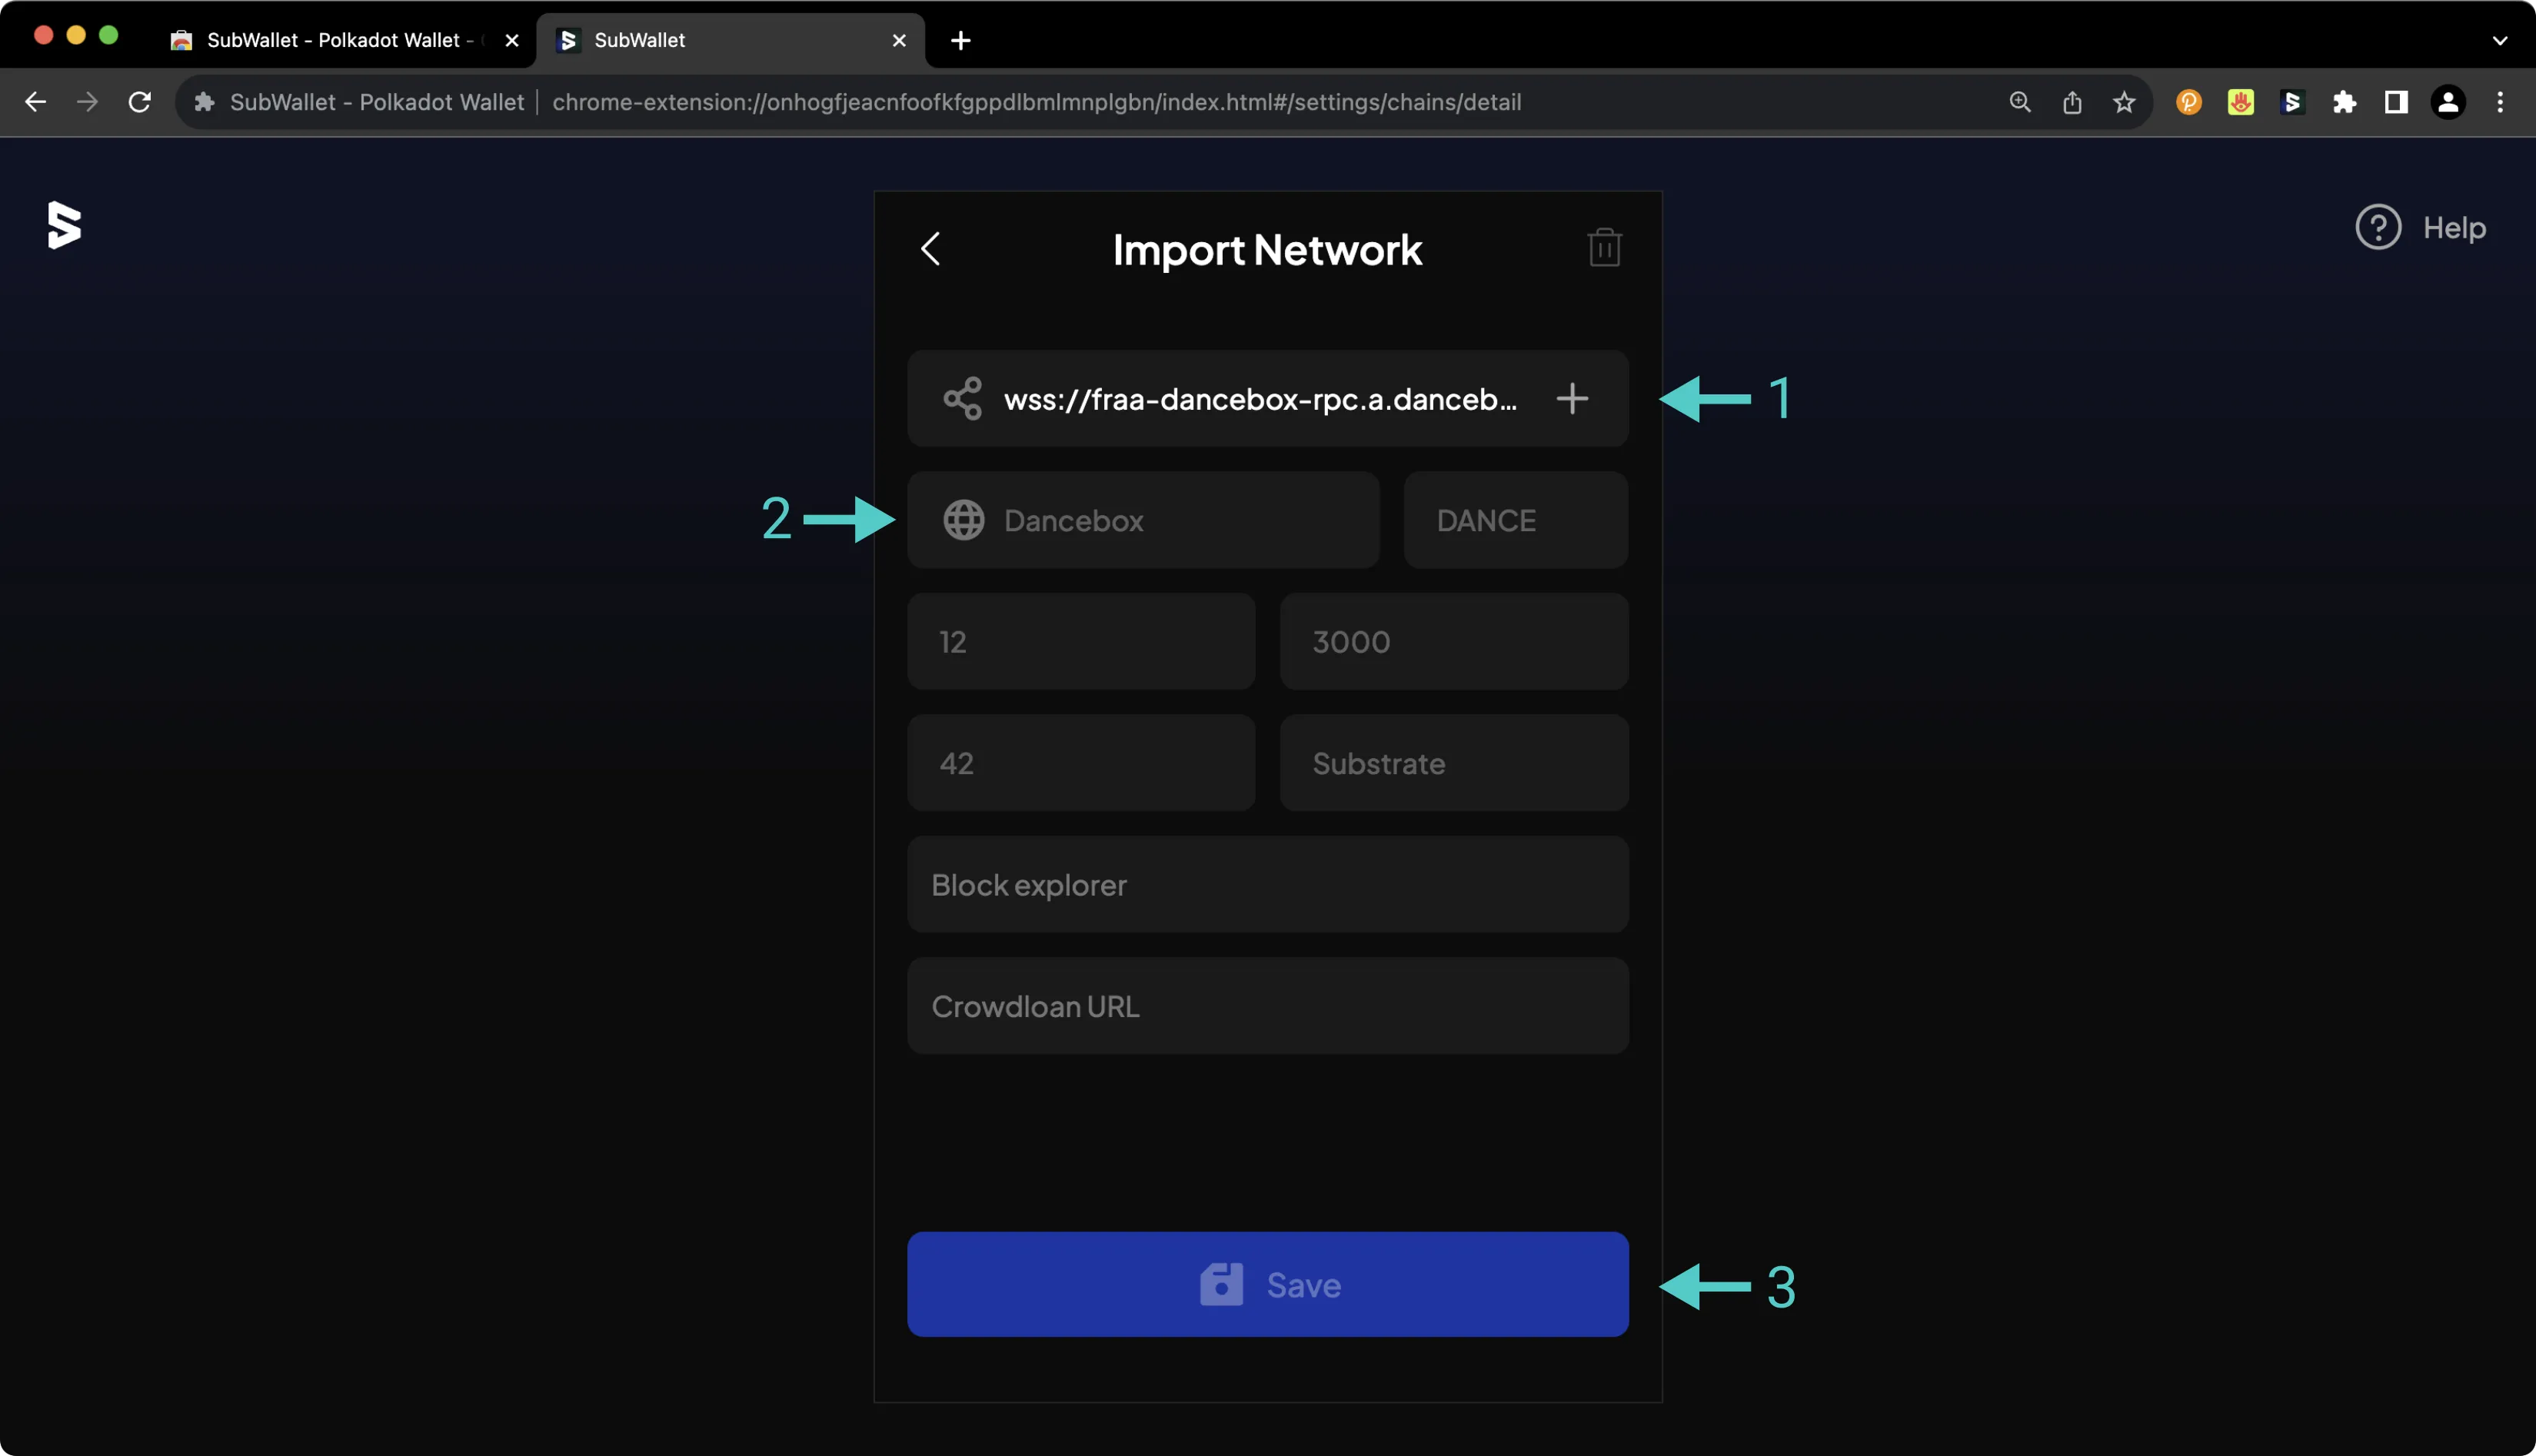
To configure SubWallet for your Substrate network, press the **More Options** icon in the upper left corner. Then click **Manage networks**. Press the **+** icon. On the following page, you'll then be prompted to enter the network details for your Tanssi network. For demonstration purposes, Dancelight is used here; however, you can substitute these details with your own Tanssi network. To add your Tanssi network to SubWallet, take the following steps:
1. Paste in the WSS URL of your Tanssi network. Other parameters like the parachain ID and token decimals may be auto-populated
2. Provide a name for your Tanssi network
3. Press **Save**
## Connecting to Polkadot.js {: #connecting-to-polkadotjs}
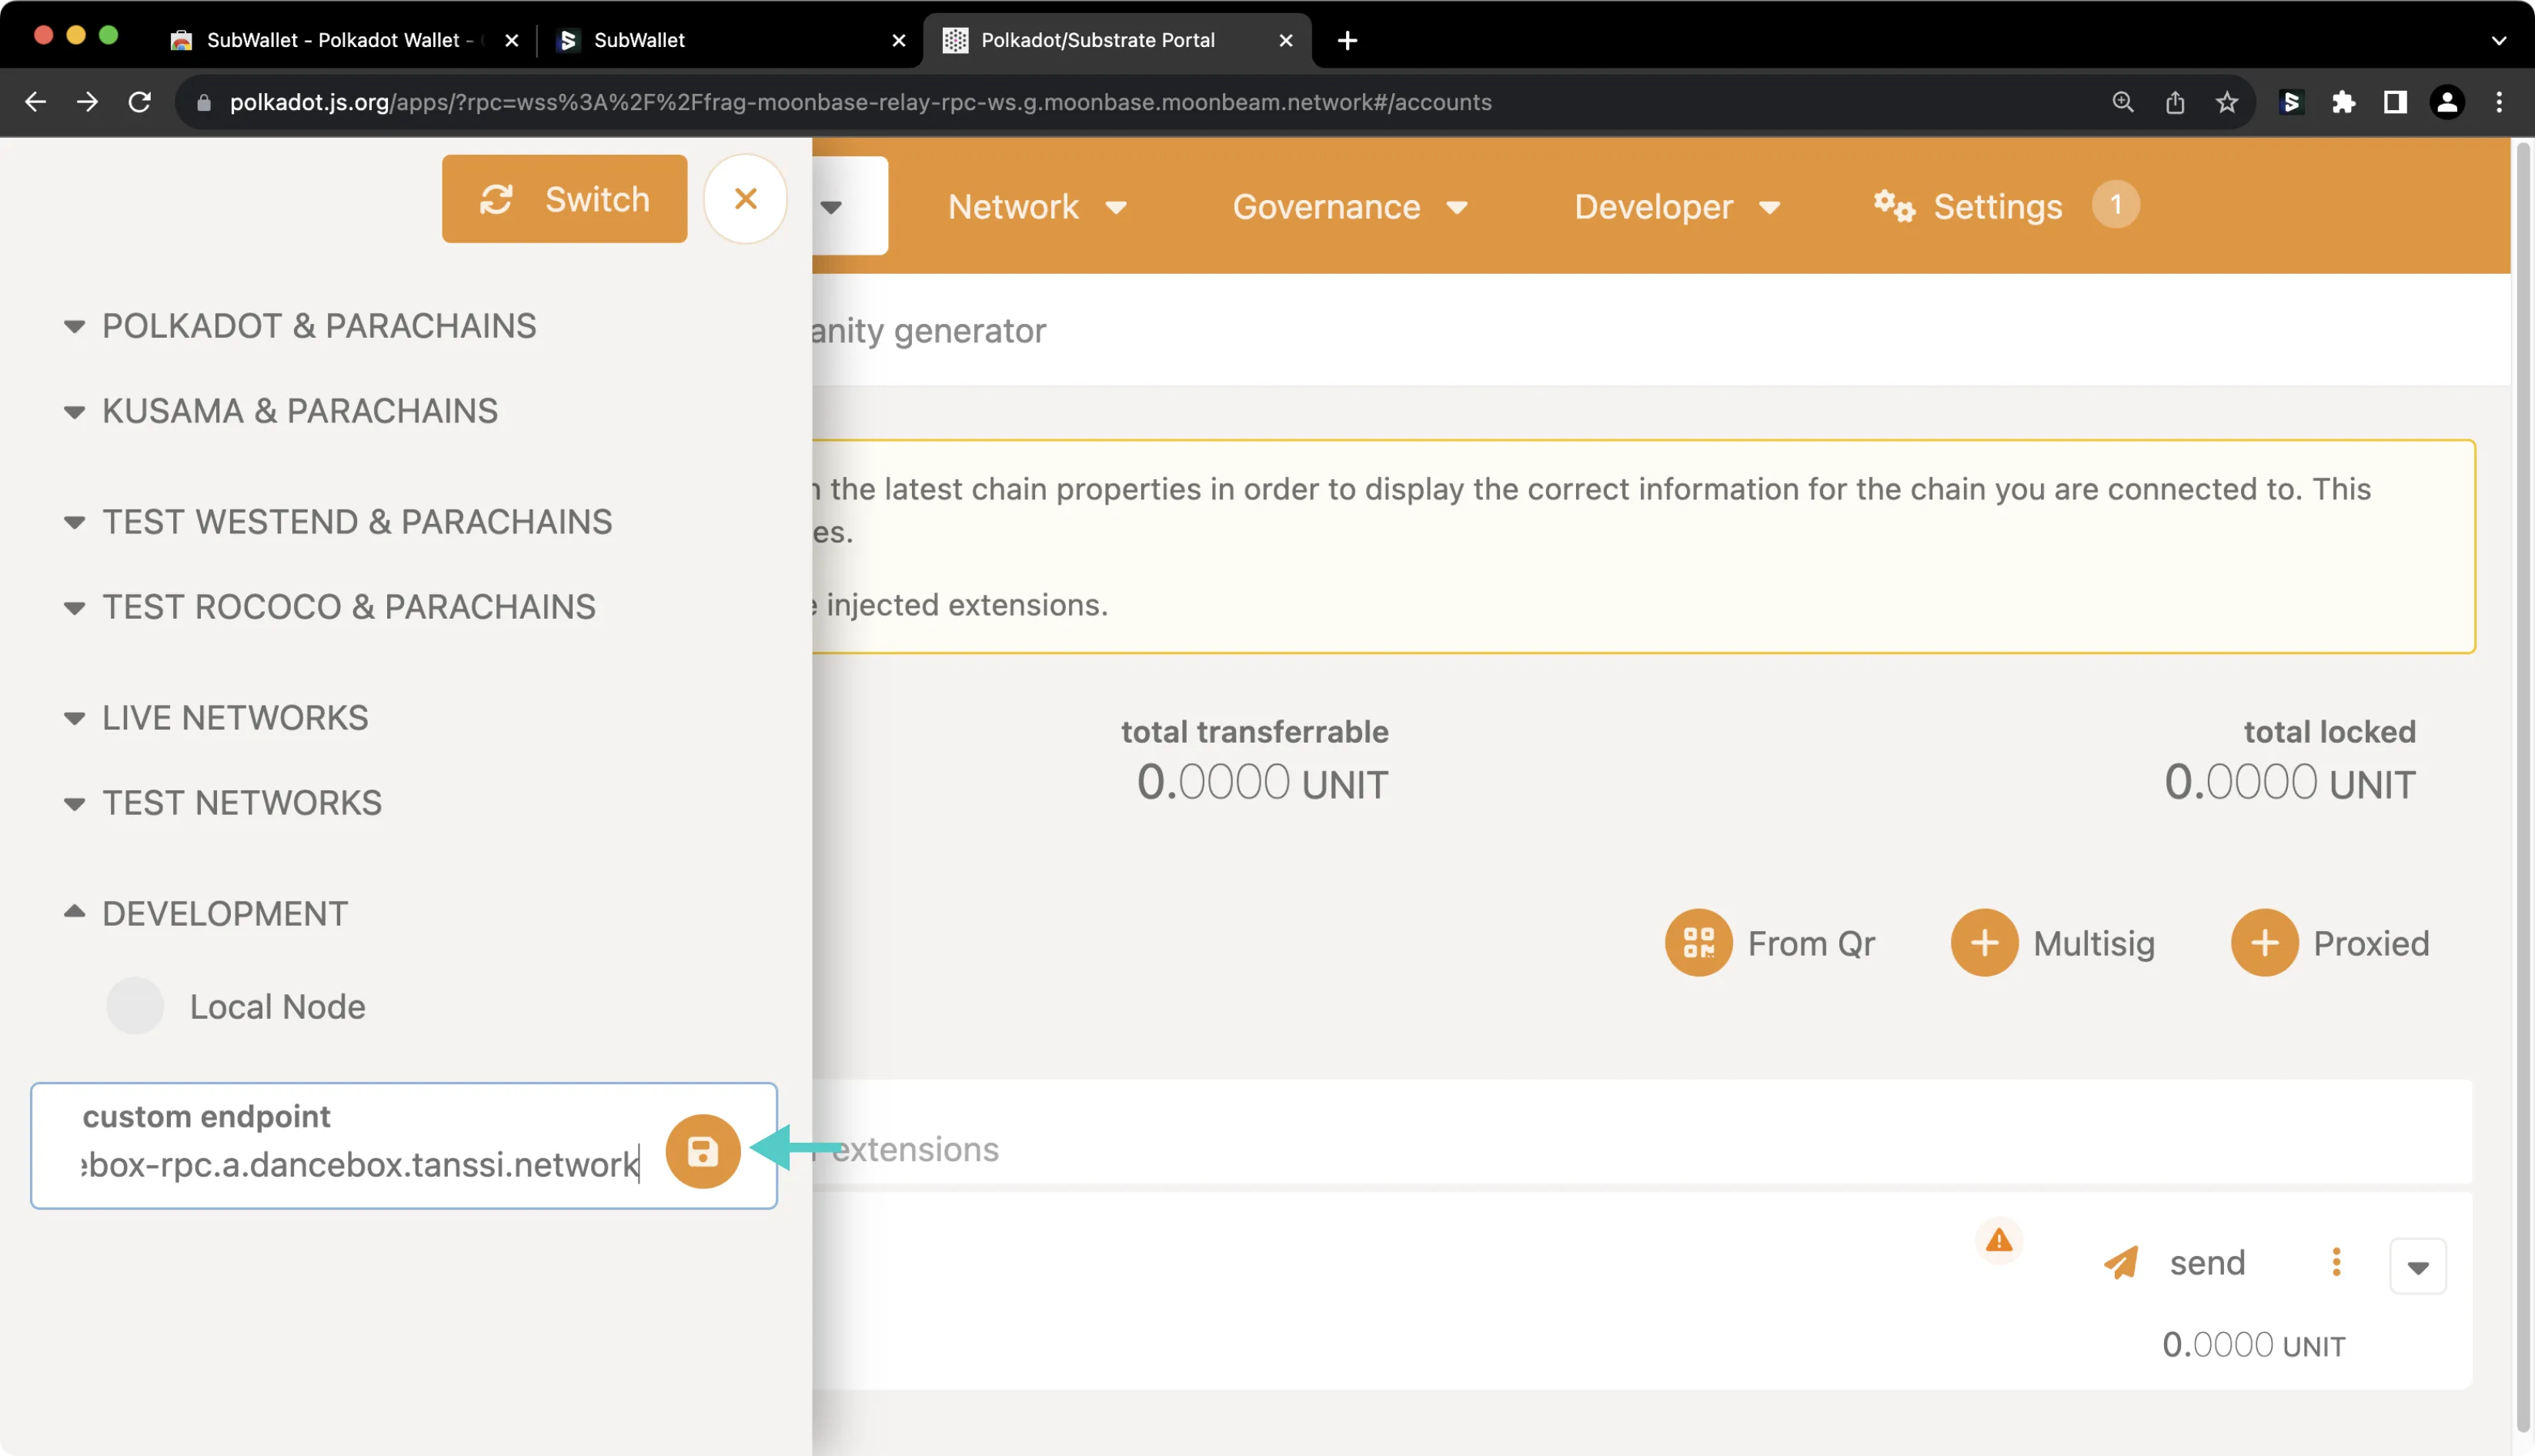
To connect your Tanssi Substrate network to Polkadot.js Apps, first head to [Polkadot.js Apps](https://polkadot.js.org/apps/?rpc=wss%3A%2F%2F{{ networks.dancelight.dns_name }}#/accounts){target=\_blank}. In this example, Polkadot.js Apps is connected to Dancelight, but you can point Polkadot.js to your Tanssi network by clicking on the network dropdown and filling in the WSS endpoint of your Tanssi network in the **custom endpoint** field.
The SubWallet extension will prompt you to select the accounts you'd like to use with Polkadot.js Apps. If it doesn't automatically pop up, you can open the SubWallet extension and click on the **Connected** icon next to your account at the top. To configure SubWallet to correctly interface with your Tanssi network on Polkadot.js Apps, you should take the following steps:
1. Select the Substrate account(s) that you'd like to use with Polkadot.js Apps
2. Press **Connect**
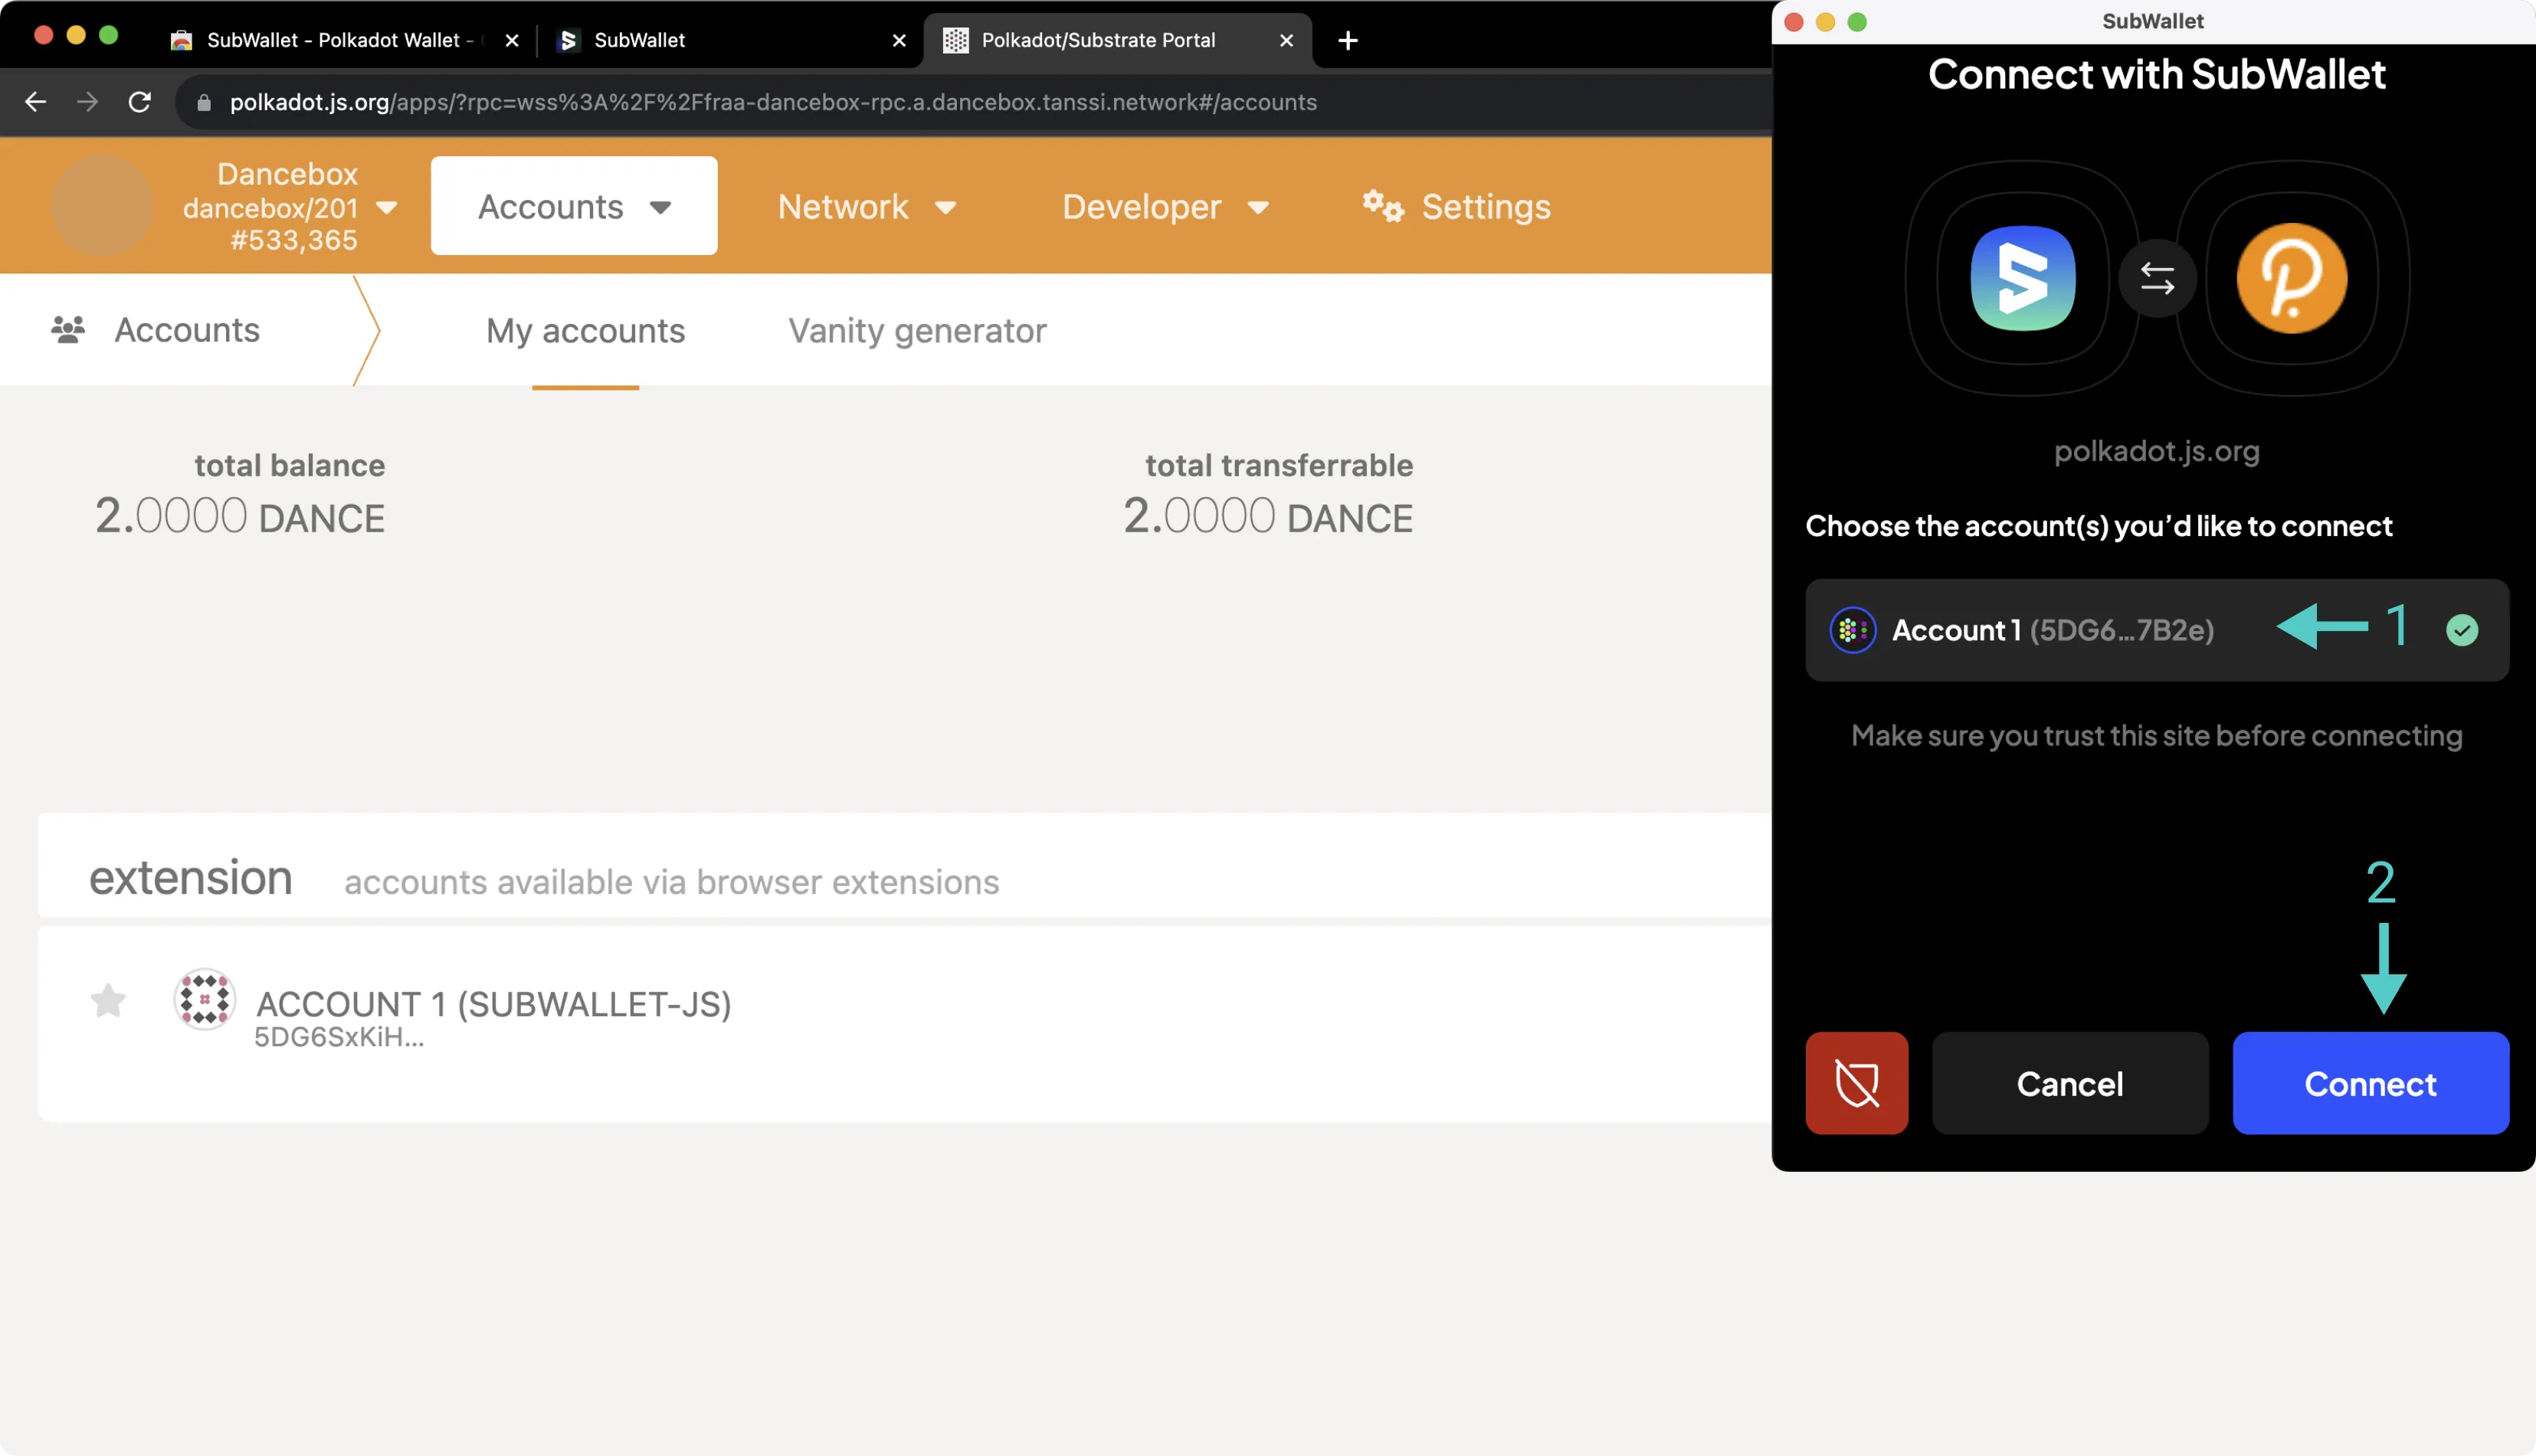
Your SubWallet wallet is now connected to Polkadot.js Apps. After refreshing Polkadot.js Apps, you should see your SubWallet account in the [Accounts page of Polkadot.js Apps](https://polkadot.js.org/apps/?rpc=wss%3A%2F%2F{{ networks.dancelight.dns_name }}#/accounts){target=\_blank} underneath the **extension** heading.
## Sending a Transaction {: #sending-a-transaction}
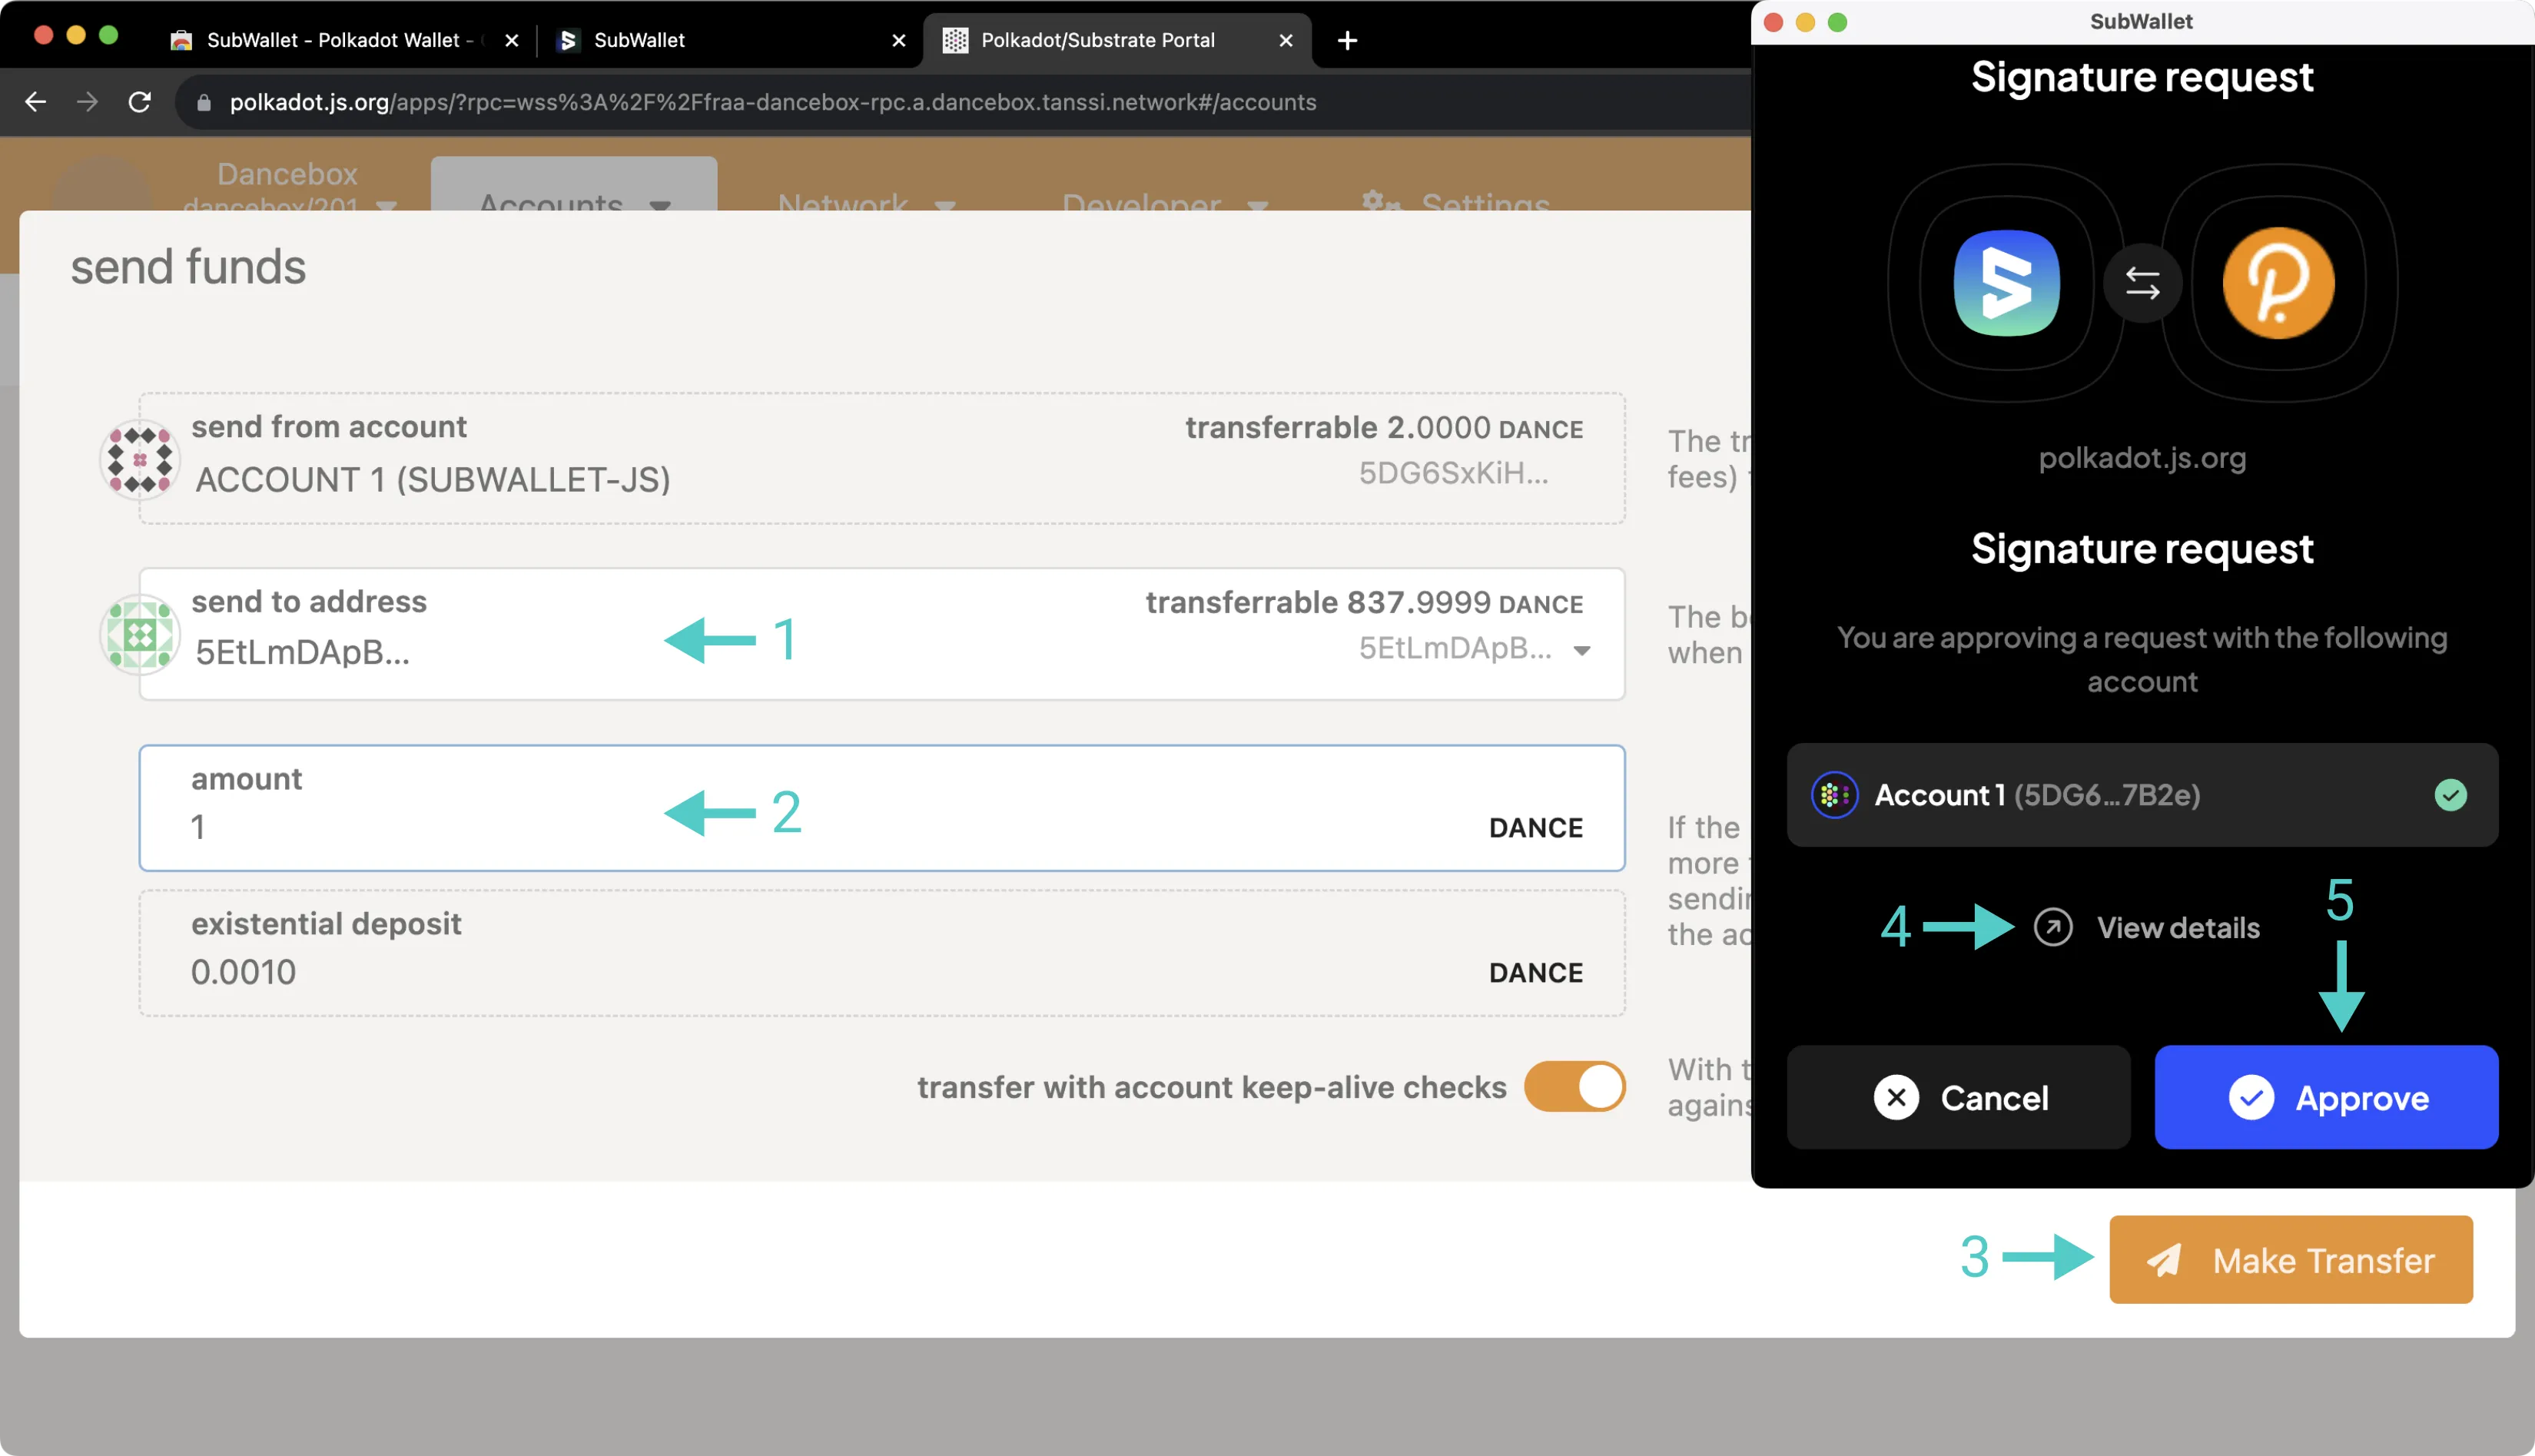
To send a transaction through the Substrate API, click **Send** next to your account on Polkadot.js Apps. Then, take the following steps:
1. Input the **send to address**
2. Enter the **amount**
3. Press **Make Transfer** and confirm the transaction in the resulting Polkadot.js pop-up
4. Press **View Details** if you'd like to inspect the contents of the transaction
5. Press **Approve** to submit the transaction
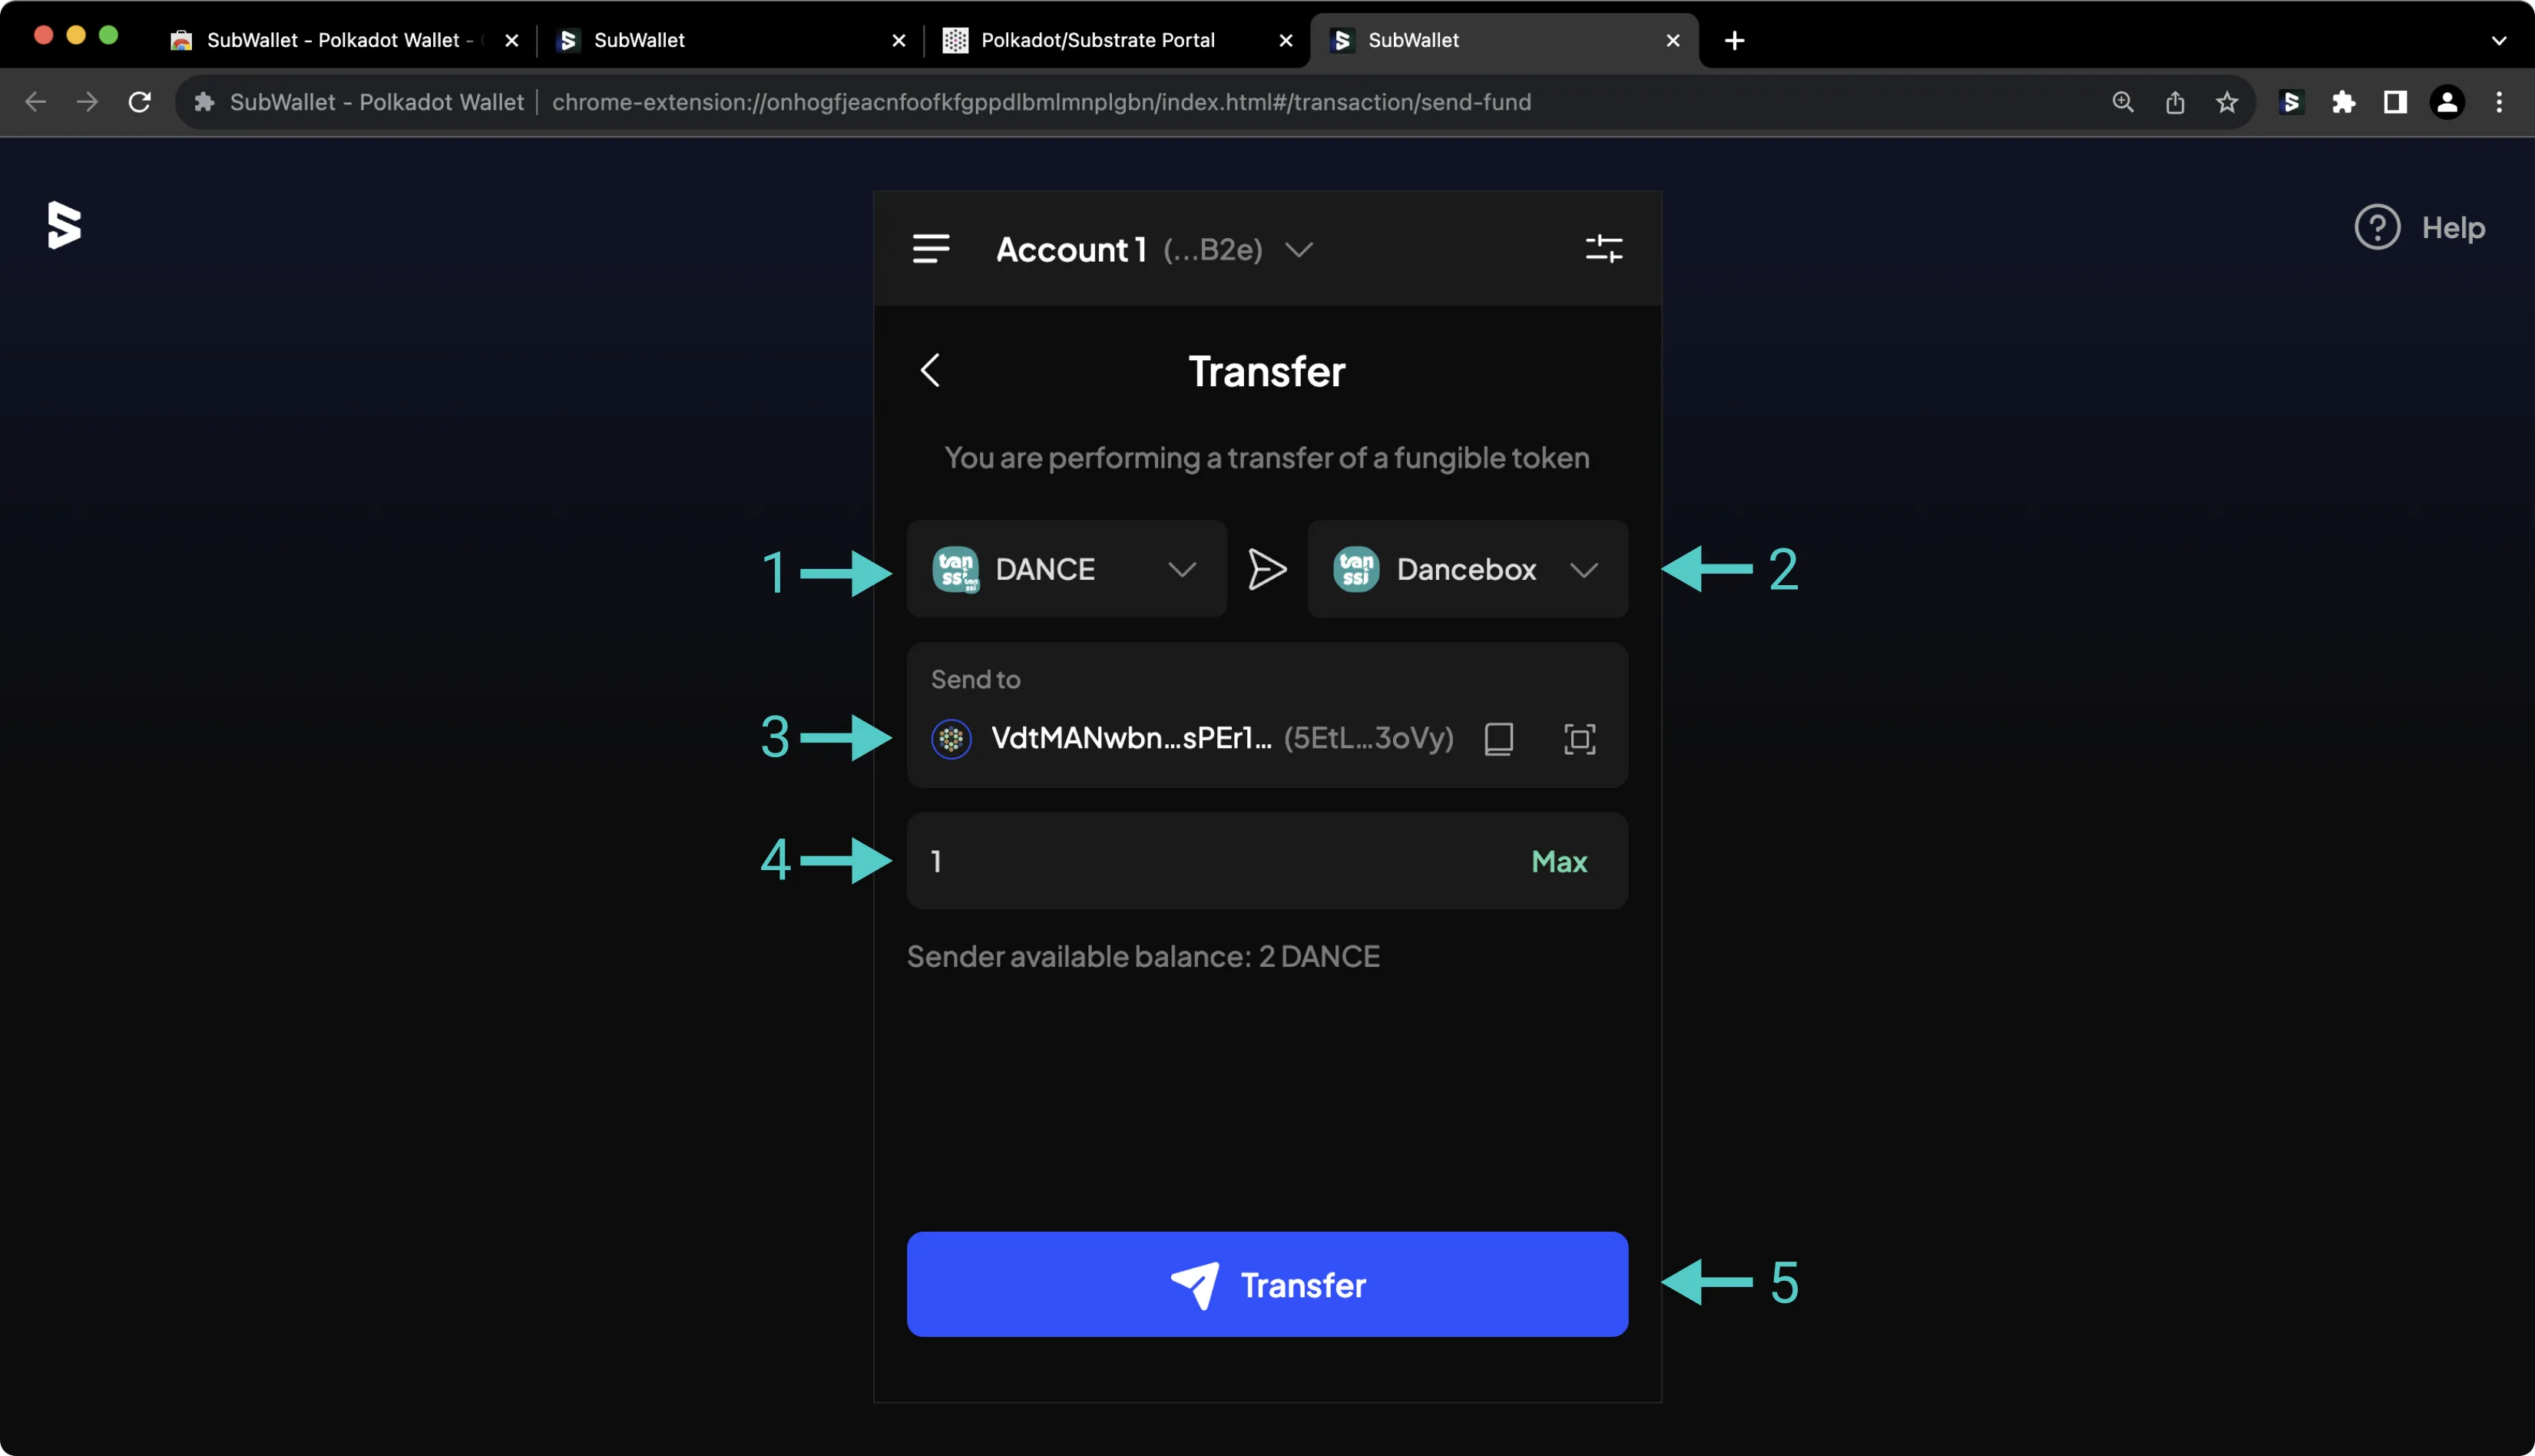
You can also send a transaction through the Substrate API directly from the SubWallet extension without using Polkadot.js Apps. To do so, press the **Send** icon and take the following steps:
1. Specify the asset to send
2. Specify the destination chain (in this case, the same chain that you're sending from)
3. Enter the destination address
4. Enter the number of tokens to send
5. Look over the transaction details, then press **Transfer** and subsequently **Approve**
This guide focused specifically on configuring SubWallet to work with your Tanssi Substrate network, but SubWallet is also a full-featured wallet for EVM accounts. Under the Ethereum API section, you'll find a [similar guide for configuring SubWallet for use with your Tanssi EVM network](/builders/toolkit/ethereum-api/wallets/subwallet/){target=\_blank}.
The information presented herein has been provided by third parties and is made available solely for general information purposes. Tanssi does not endorse any project listed and described on the Tanssi Doc Website (https://docs.tanssi.network/). Tanssi Foundation does not warrant the accuracy, completeness or usefulness of this information. Any reliance you place on such information is strictly at your own risk. Tanssi Foundation disclaims all liability and responsibility arising from any reliance placed on this information by you or by anyone who may be informed of any of its contents. All statements and/or opinions expressed in these materials are solely the responsibility of the person or entity providing those materials and do not necessarily represent the opinion of Tanssi Foundation. The information should not be construed as professional or financial advice of any kind. Advice from a suitably qualified professional should always be sought in relation to any particular matter or circumstance. The information herein may link to or integrate with other websites operated or content provided by third parties, and such other websites may link to this website. Tanssi Foundation has no control over any such other websites or their content and will have no liability arising out of or related to such websites or their content. The existence of any such link does not constitute an endorsement of such websites, the content of the websites, or the operators of the websites. These links are being provided to you only as a convenience and you release and hold Tanssi Foundation harmless from any and all liability arising from your use of this information or the information provided by any third-party website or service.
--- END CONTENT ---
Doc-Content: https://docs.tanssi.network/builders/toolkit/substrate-api/wallets/talisman/
--- BEGIN CONTENT ---
---
title: How to Connect Talisman to Tanssi
description: This guide walks you through how to connect Talisman, a Substrate and Ethereum wallet, to the Tanssi network or your Tanssi-powered Substrate appchain.
icon: material-wallet-outline
categories: Substrate-Template
---
# Interacting with Tanssi or Your Substrate Appchain Using Talisman
## Introduction {: #introduction }
Developers and users of Substrate networks, such as the Tanssi network or Tanssi-powered Substrate appchains, have a variety of options when it comes to wallets. Talisman is a great option, as it provides full native support for both Substrate and Ethereum accounts. This guide focuses on the Substrate API. You can also check out a [similar guide for configuring Talisman for use with your Tanssi EVM network](/builders/toolkit/ethereum-api/wallets/talisman/){target=\_blank}.
Talisman is a Web3 wallet that natively supports Substrate and Ethereum accounts. The Talisman wallet browser extension is available on [Google Chrome, Brave, and other Chromium-based browsers](https://chromewebstore.google.com/detail/talisman-wallet/fijngjgcjhjmmpcmkeiomlglpeiijkld){target=\_blank}, as well as [Firefox](https://addons.mozilla.org/en-US/firefox/addon/talisman-wallet-extension/){target=\_blank}. An asset dashboard is accessible at [app.talisman.xyz](https://app.talisman.xyz){target=\_blank}
This guide takes you through all the necessary steps, from installing Talisman to setting up a wallet, connecting it to your Tanssi Substrate network, and sending funds.
## Setting Up Talisman {: #setting-up-talisman }
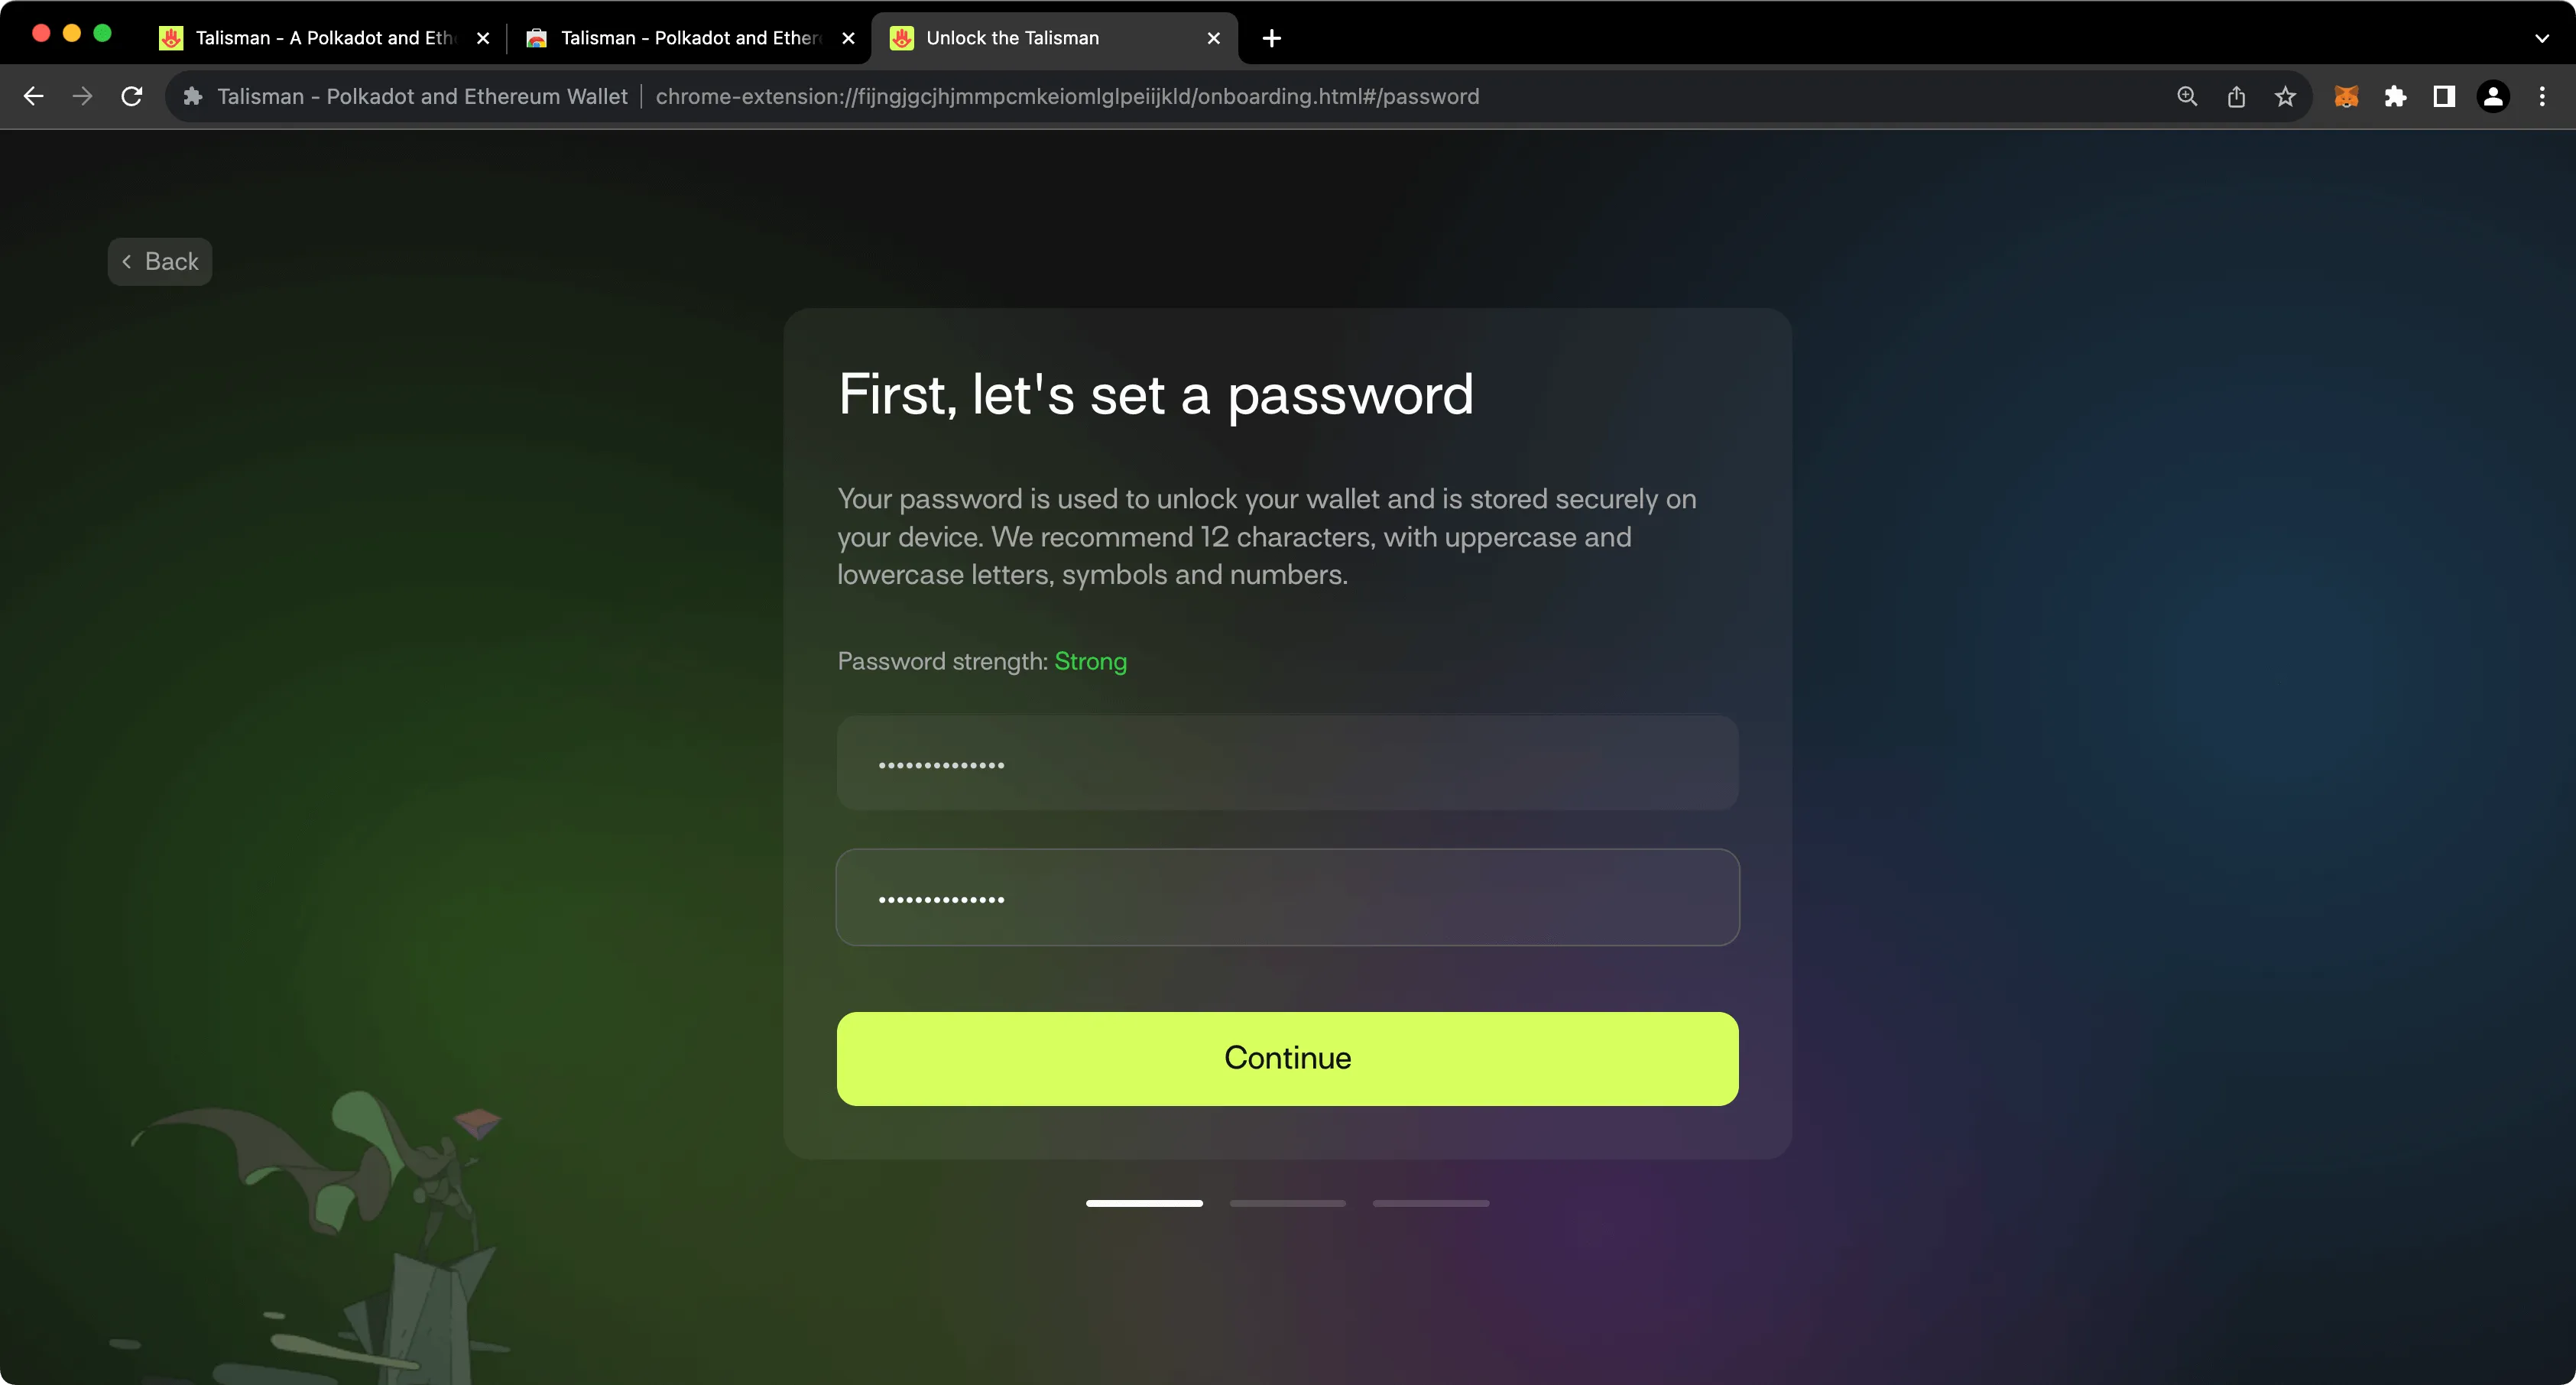
First, download and install the [Talisman extension](https://talisman.xyz/){target=\_blank}. This guide will first cover creating a new wallet and later address importing an existing one. Review the terms and conditions, then press **Get Started**.
On the following screen, you'll be prompted to create a password to secure your new wallet.
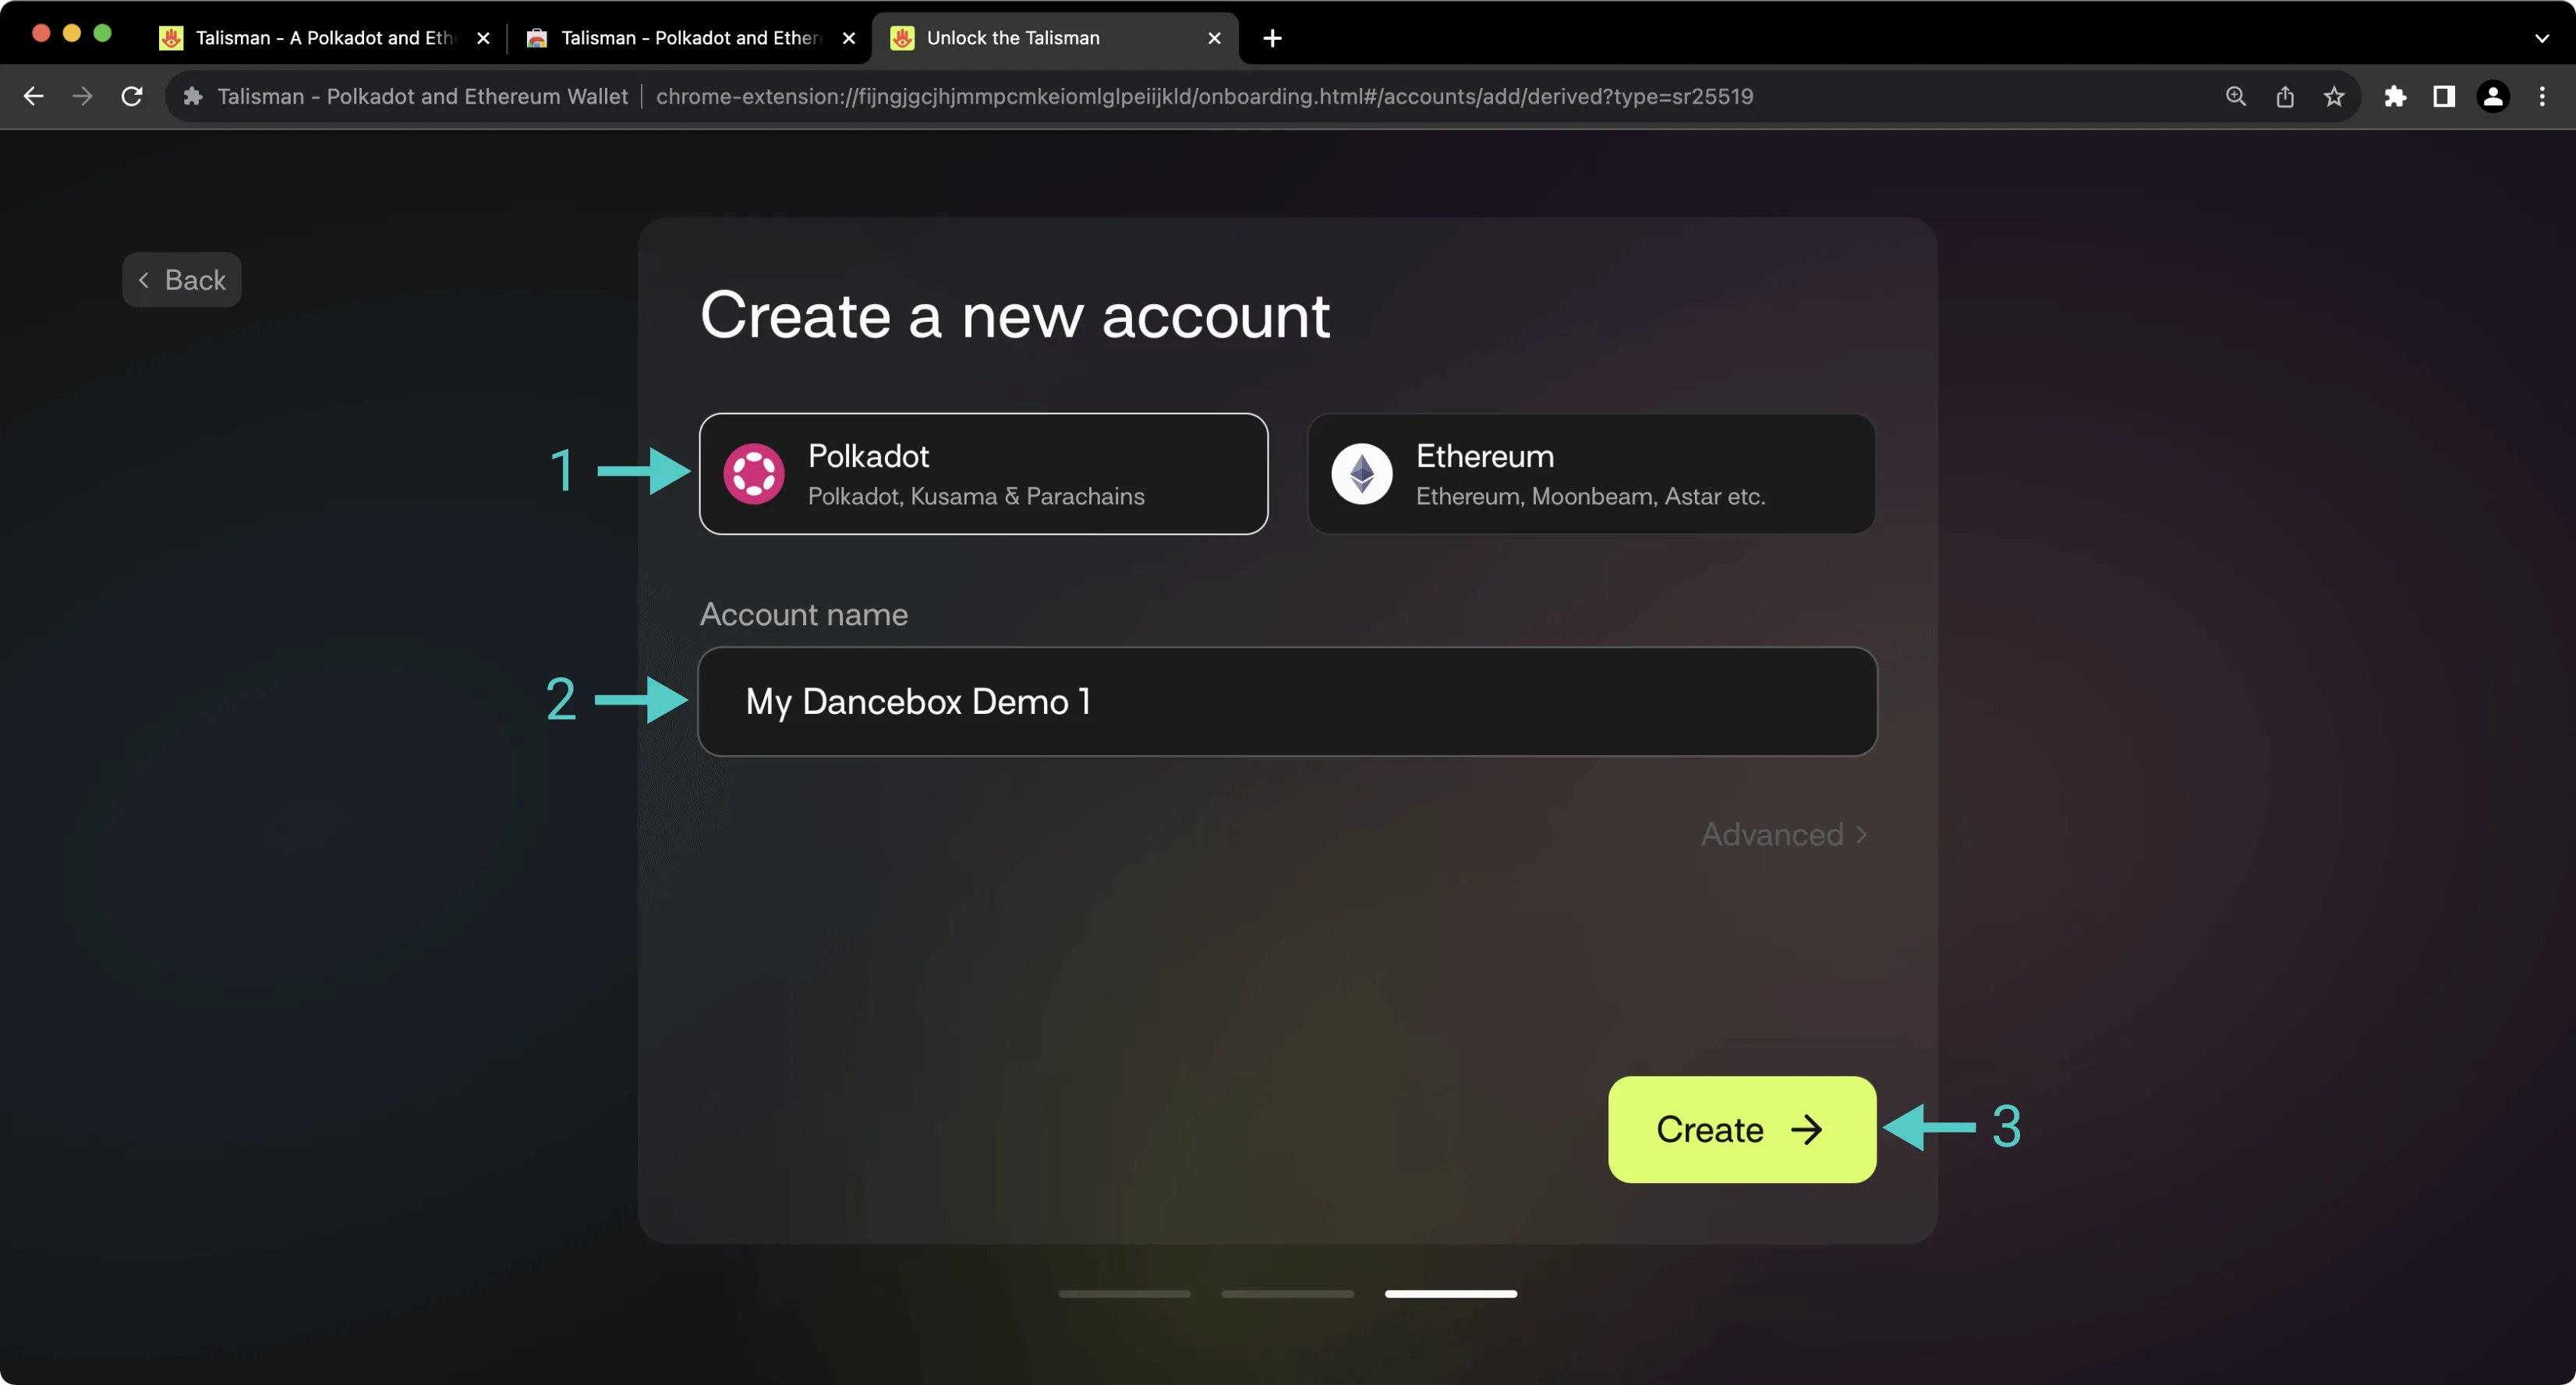
## Create a Substrate Account {: #create-a-substrate-account }
To create your first Substrate account in Talisman, take the following steps:
1. Select the **Polkadot** option.
2. Give your account a name.
3. Press **Create**.
!!! note
Why Polkadot? Tanssi and Tanssi-powered appchains are built using Substrate, the same framework that powers Polkadot. As a result, even though Tanssi and Polkadot are separate networks, they share the same cryptographic signature schema.
After creating your first account, you'll be prompted to back up your seed phrase. This is an important step, especially because you have the option to later derive additional accounts from this seed phrase.
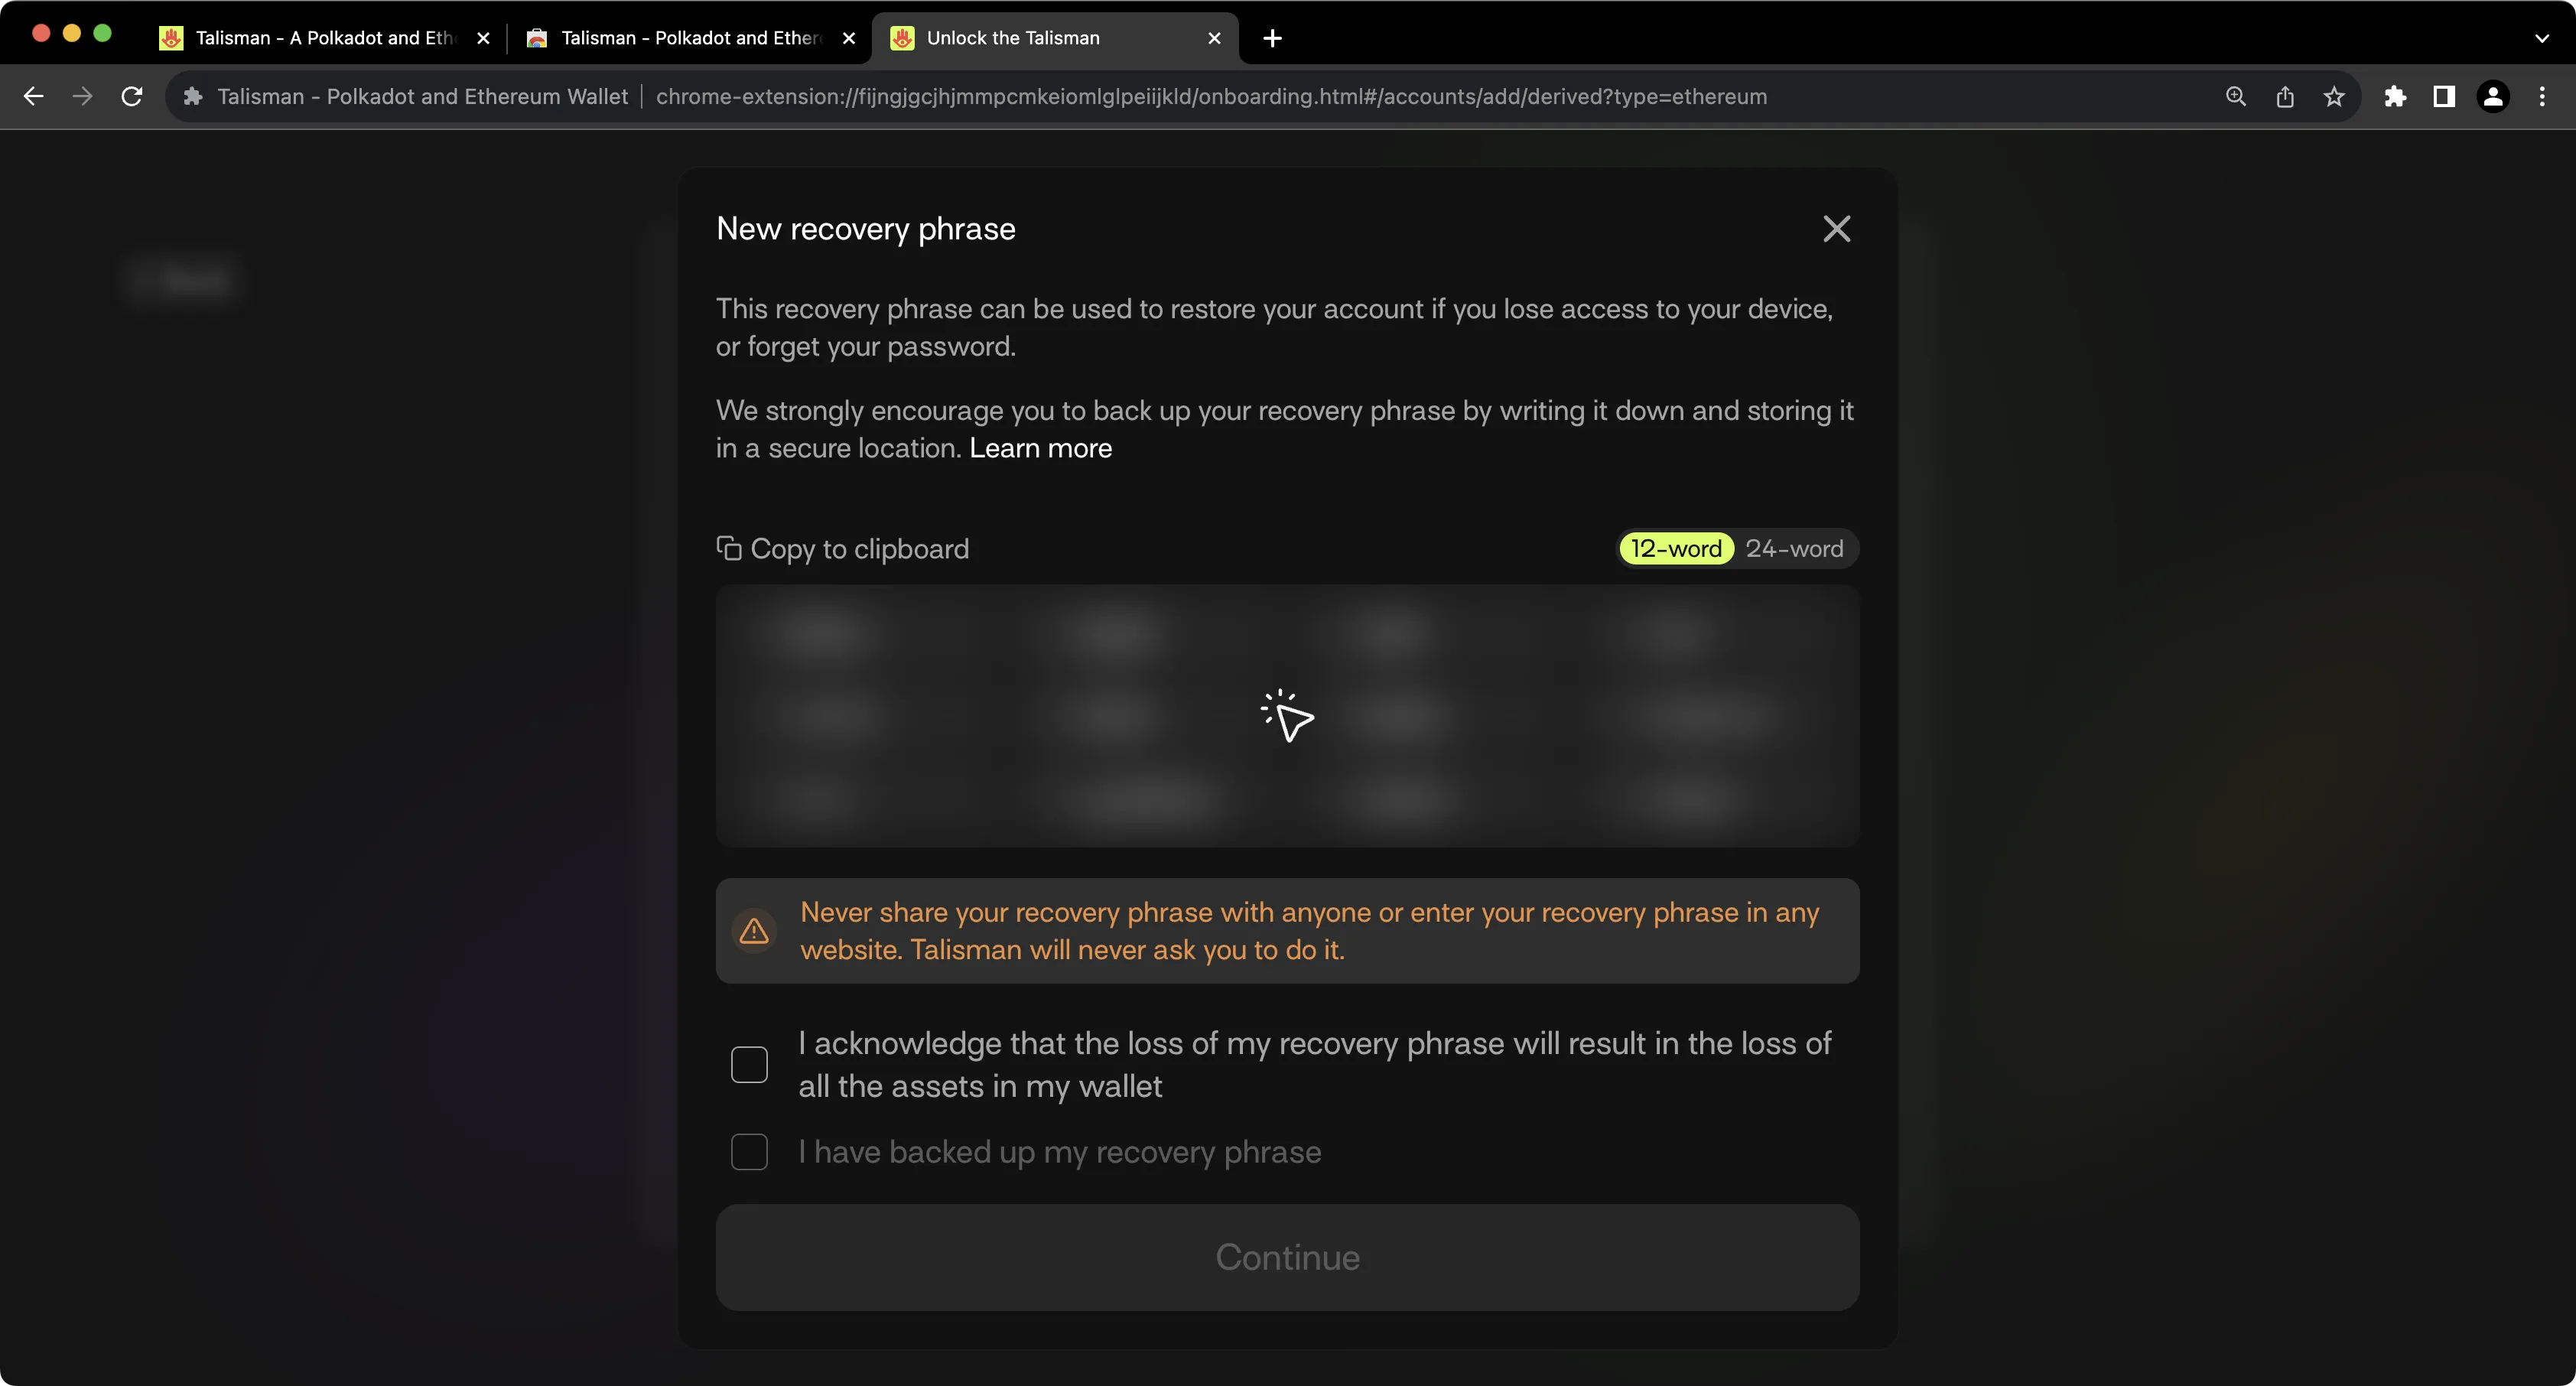
!!! note
You should never share your seed phrase (mnemonic) or private key with anyone. This gives them direct access to your funds. This guide is for educational purposes only.
## Importing an Existing Substrate Account {: #importing-an-existing-substrate-account }
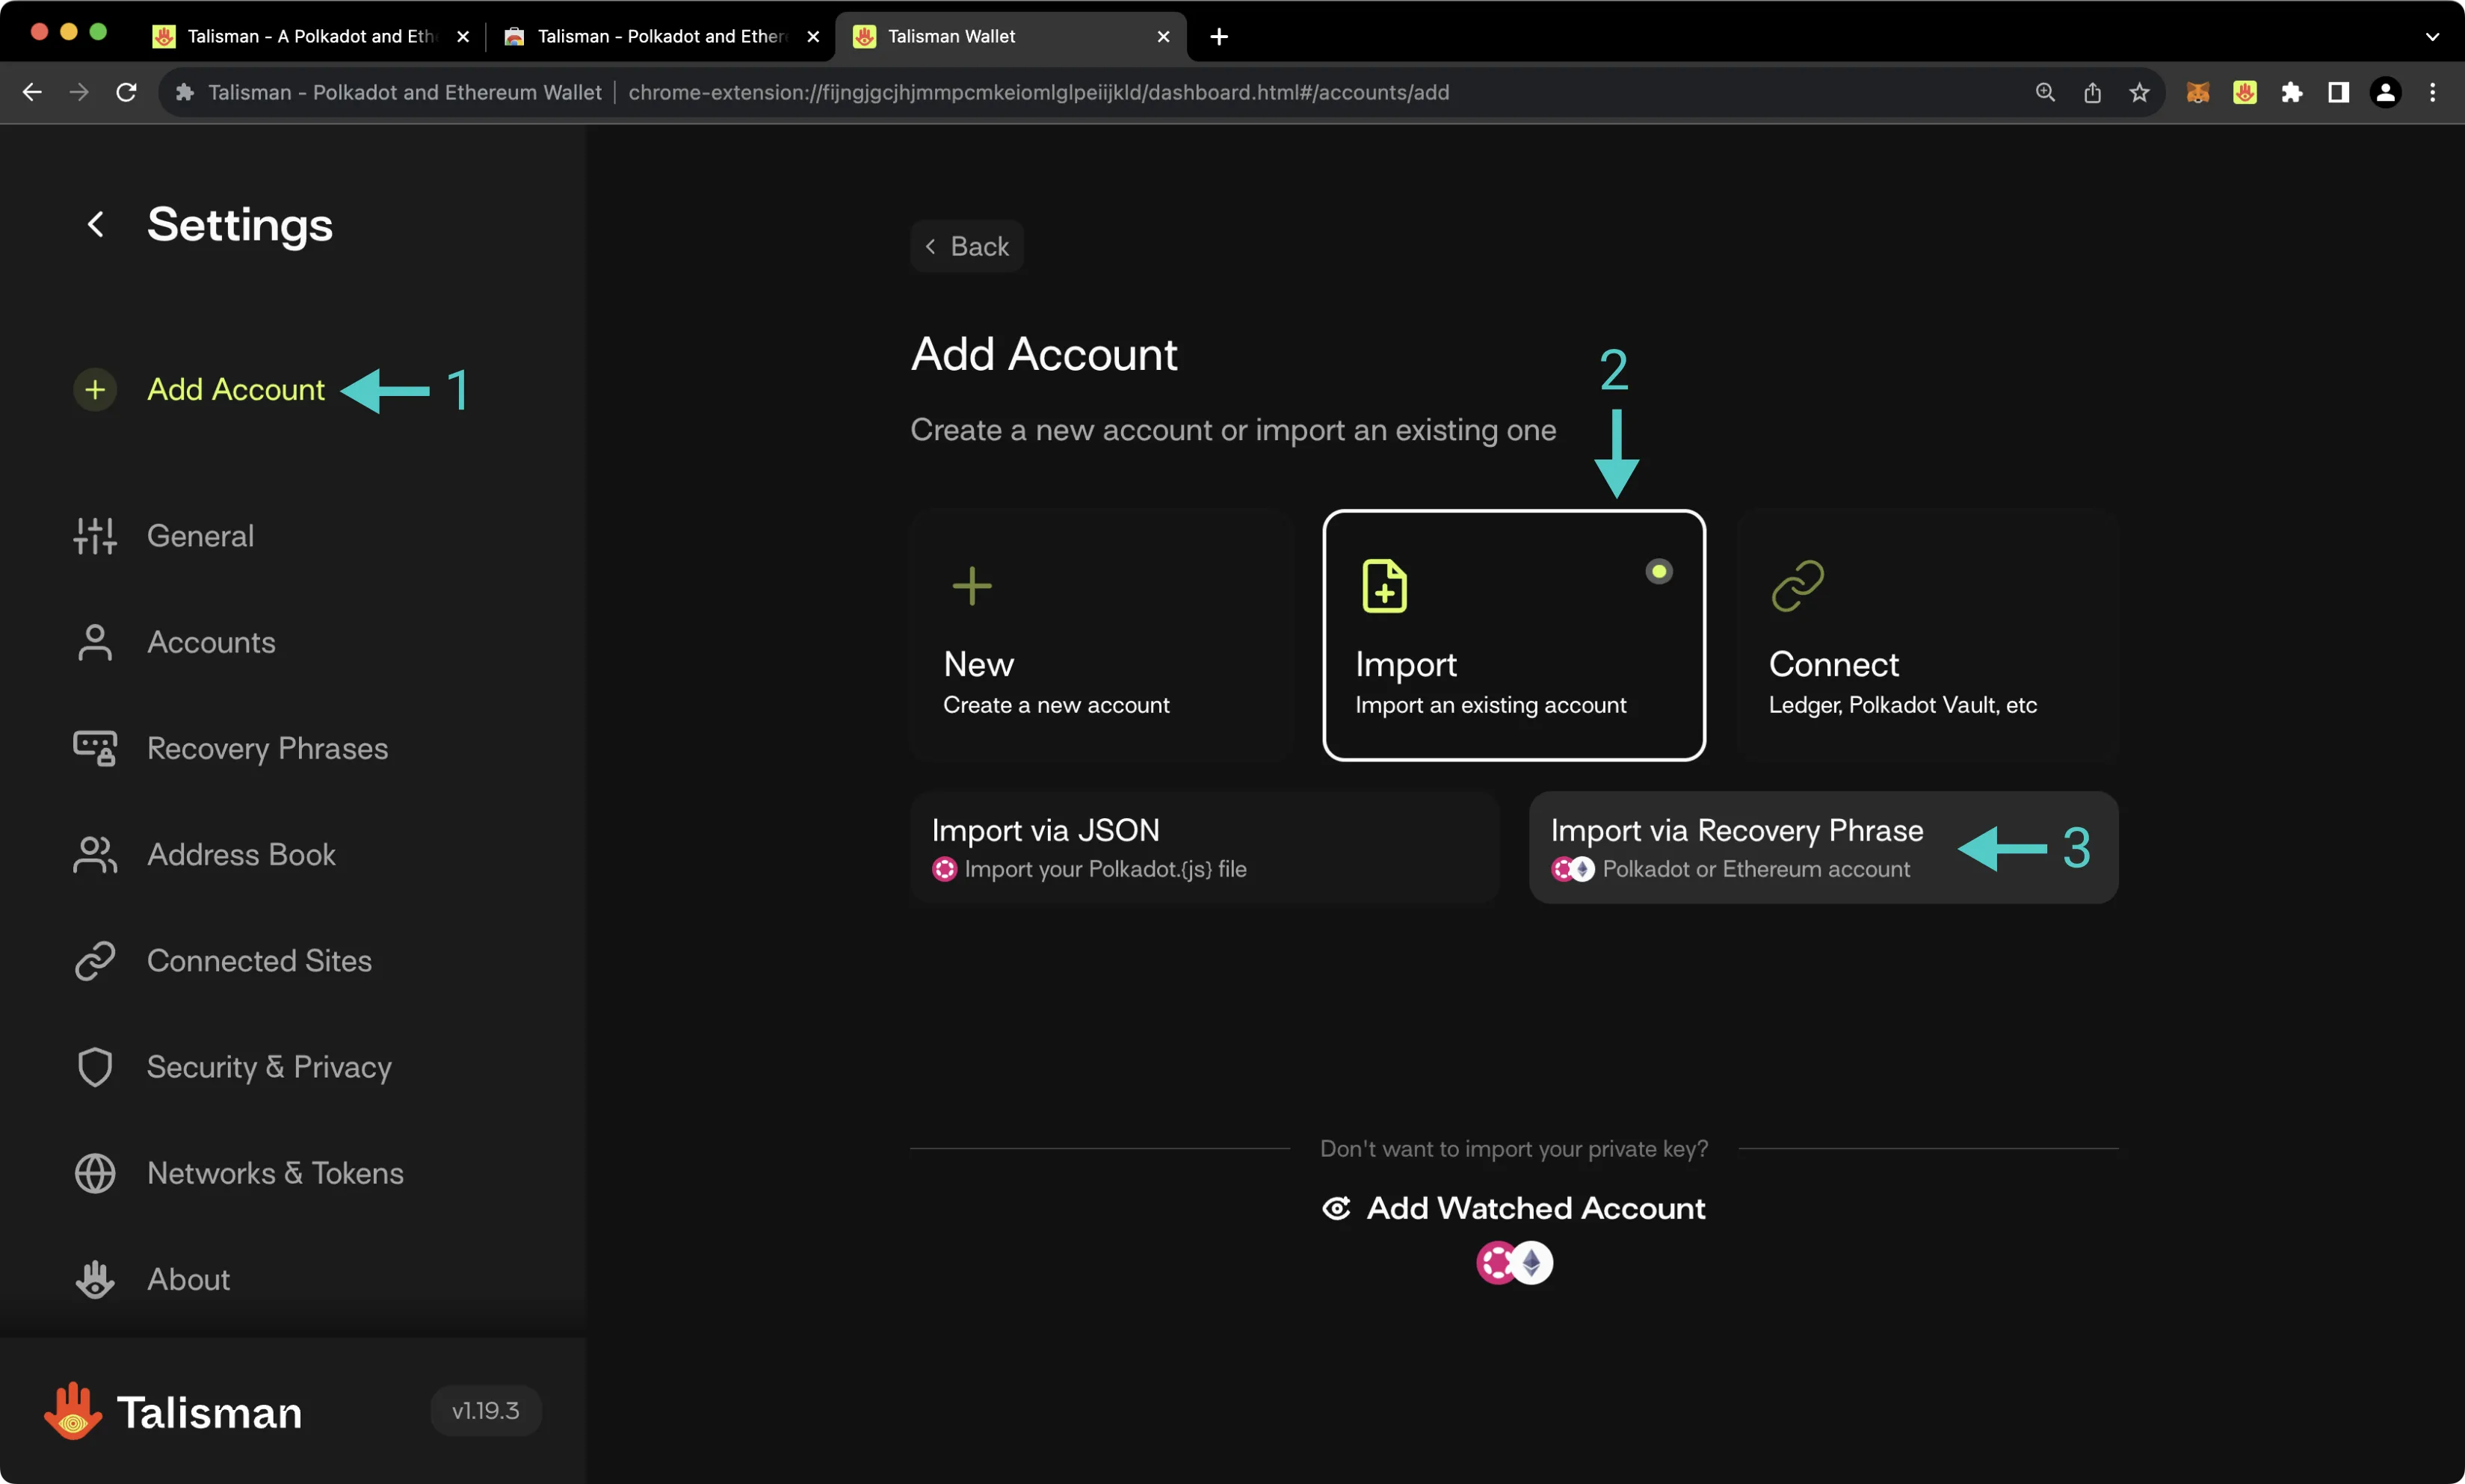
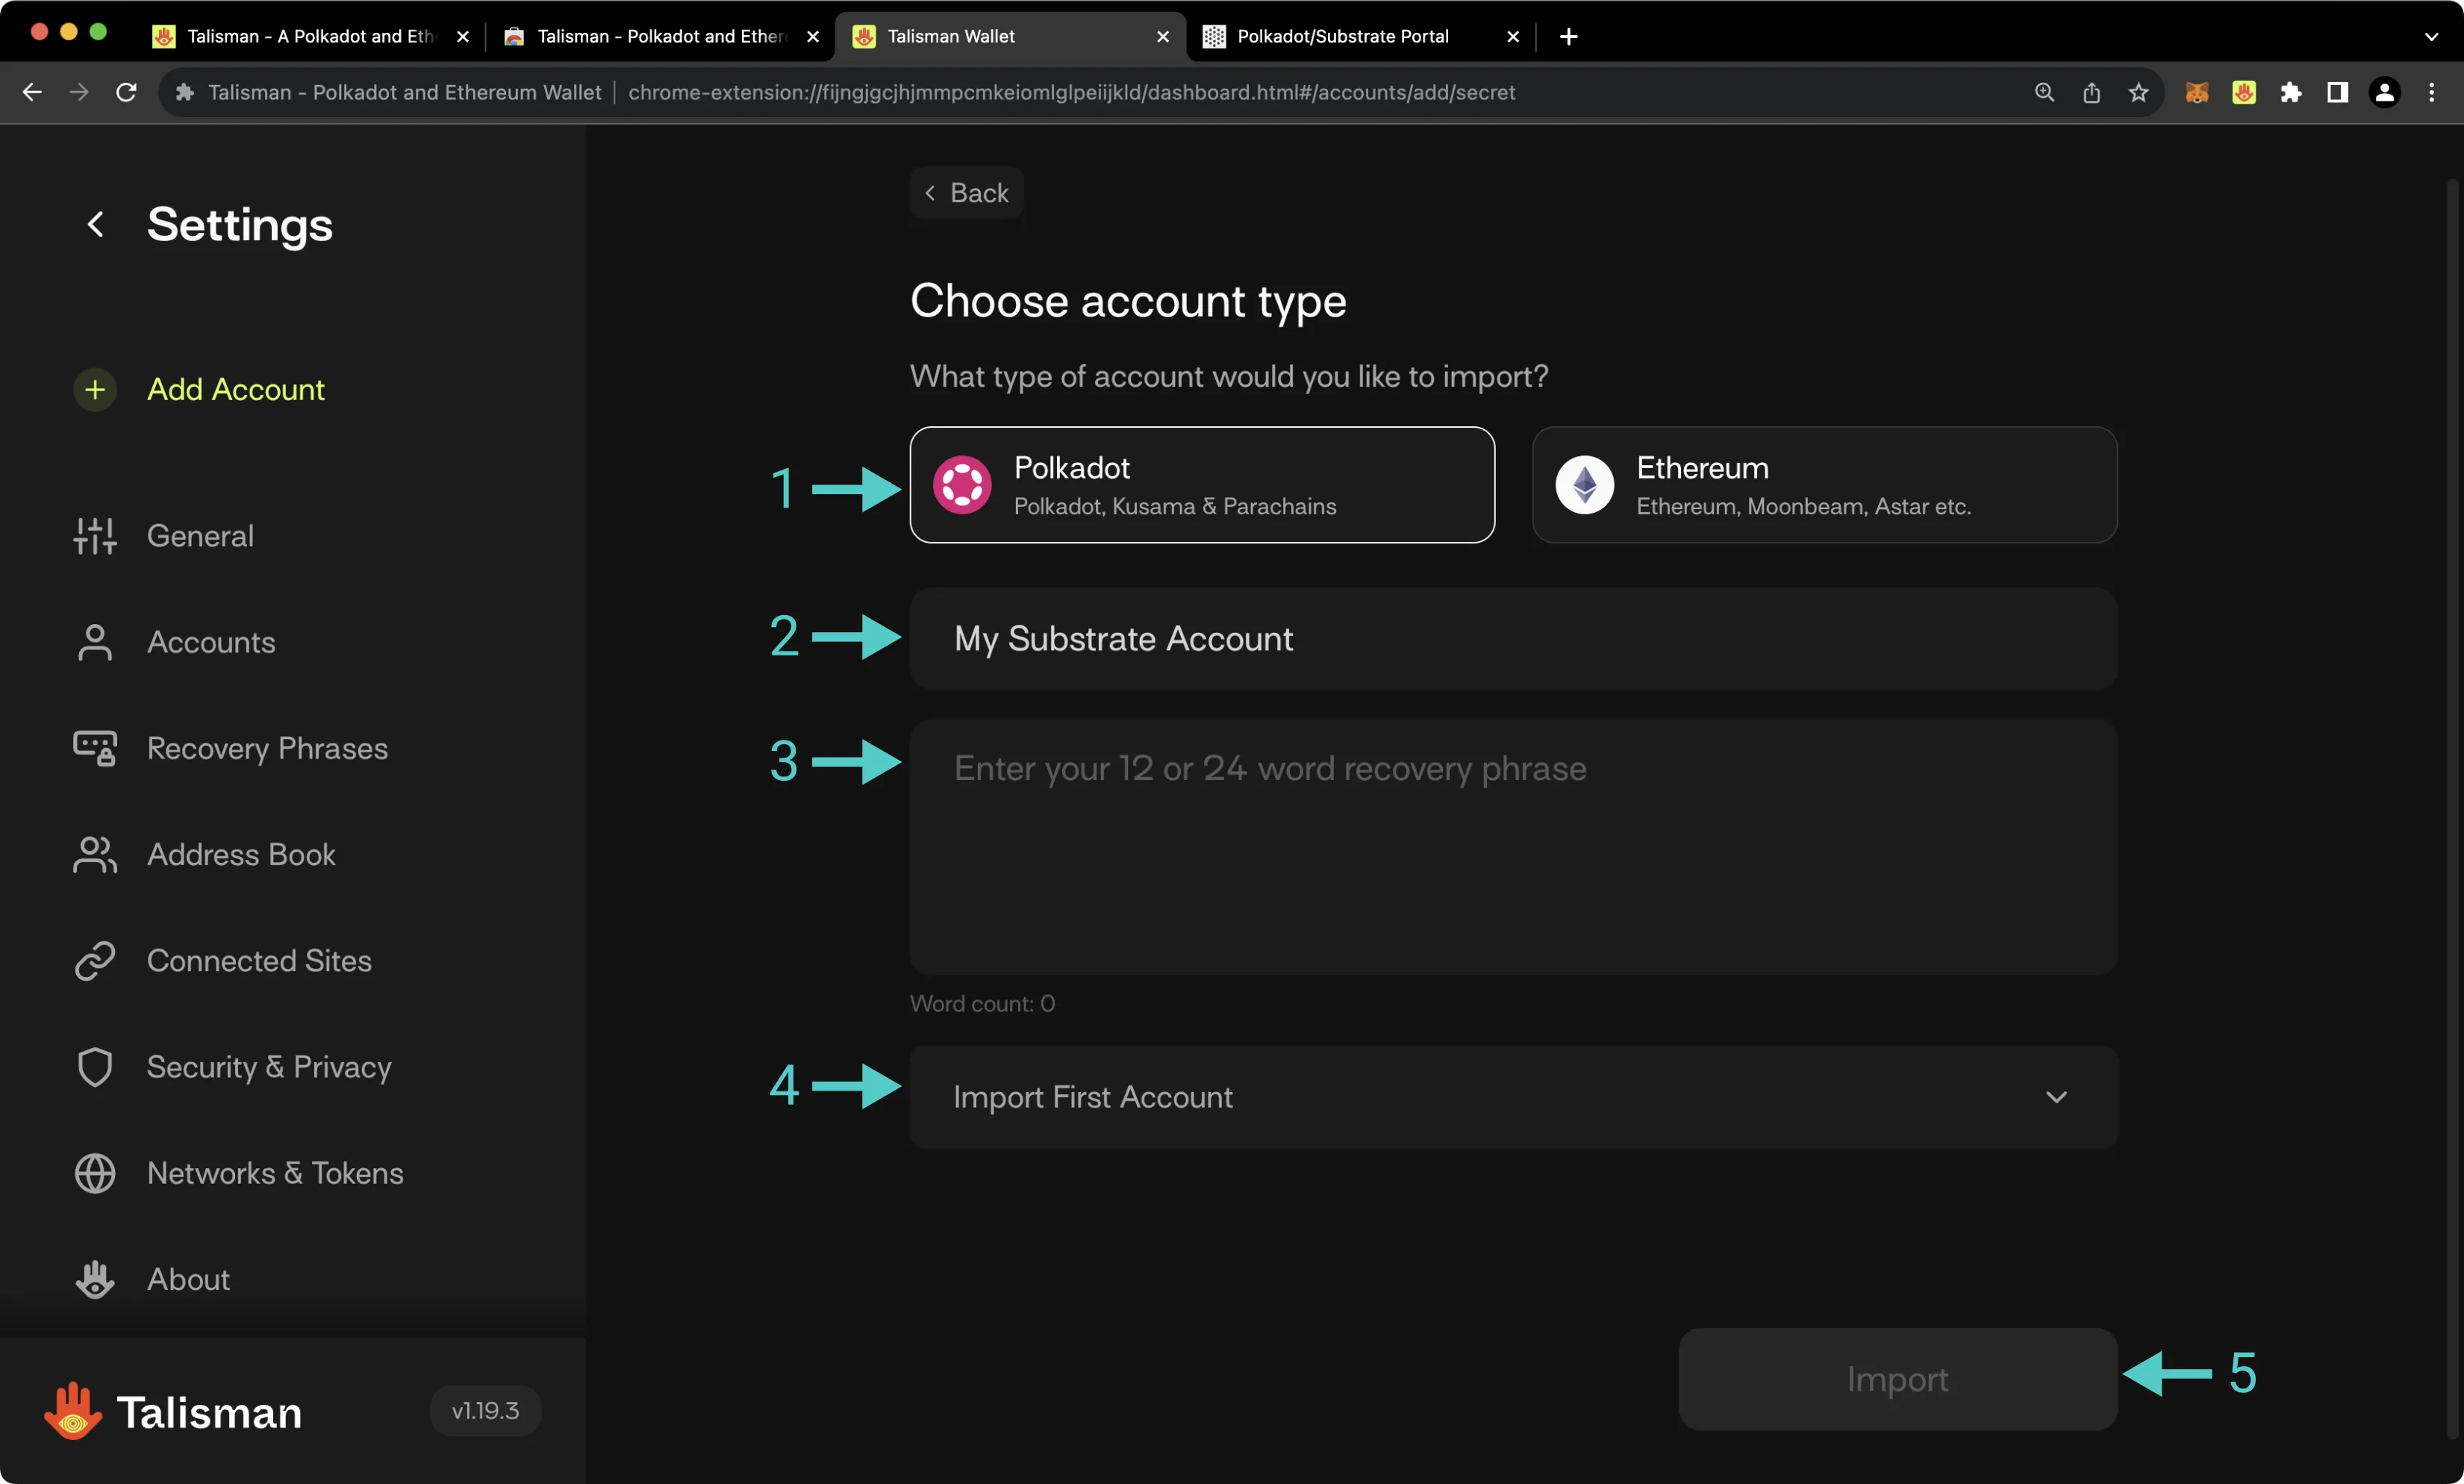
Of course, you can import an existing Substrate account into Talisman. To do so, take the following steps:
1. Press **Add Account**.
2. Press **Import**.
3. Select **Import via Recovery Phrase**.
On the following screen, take the following steps:
1. Select the **Polkadot** account type.
2. Provide a name for your account.
3. Paste in your seed.
4. Select which accounts you'd like to import.
5. Press **Import**.
## Connecting Talisman to the Tanssi Network {: #connecting-talisman-to-the-tanssi-network }
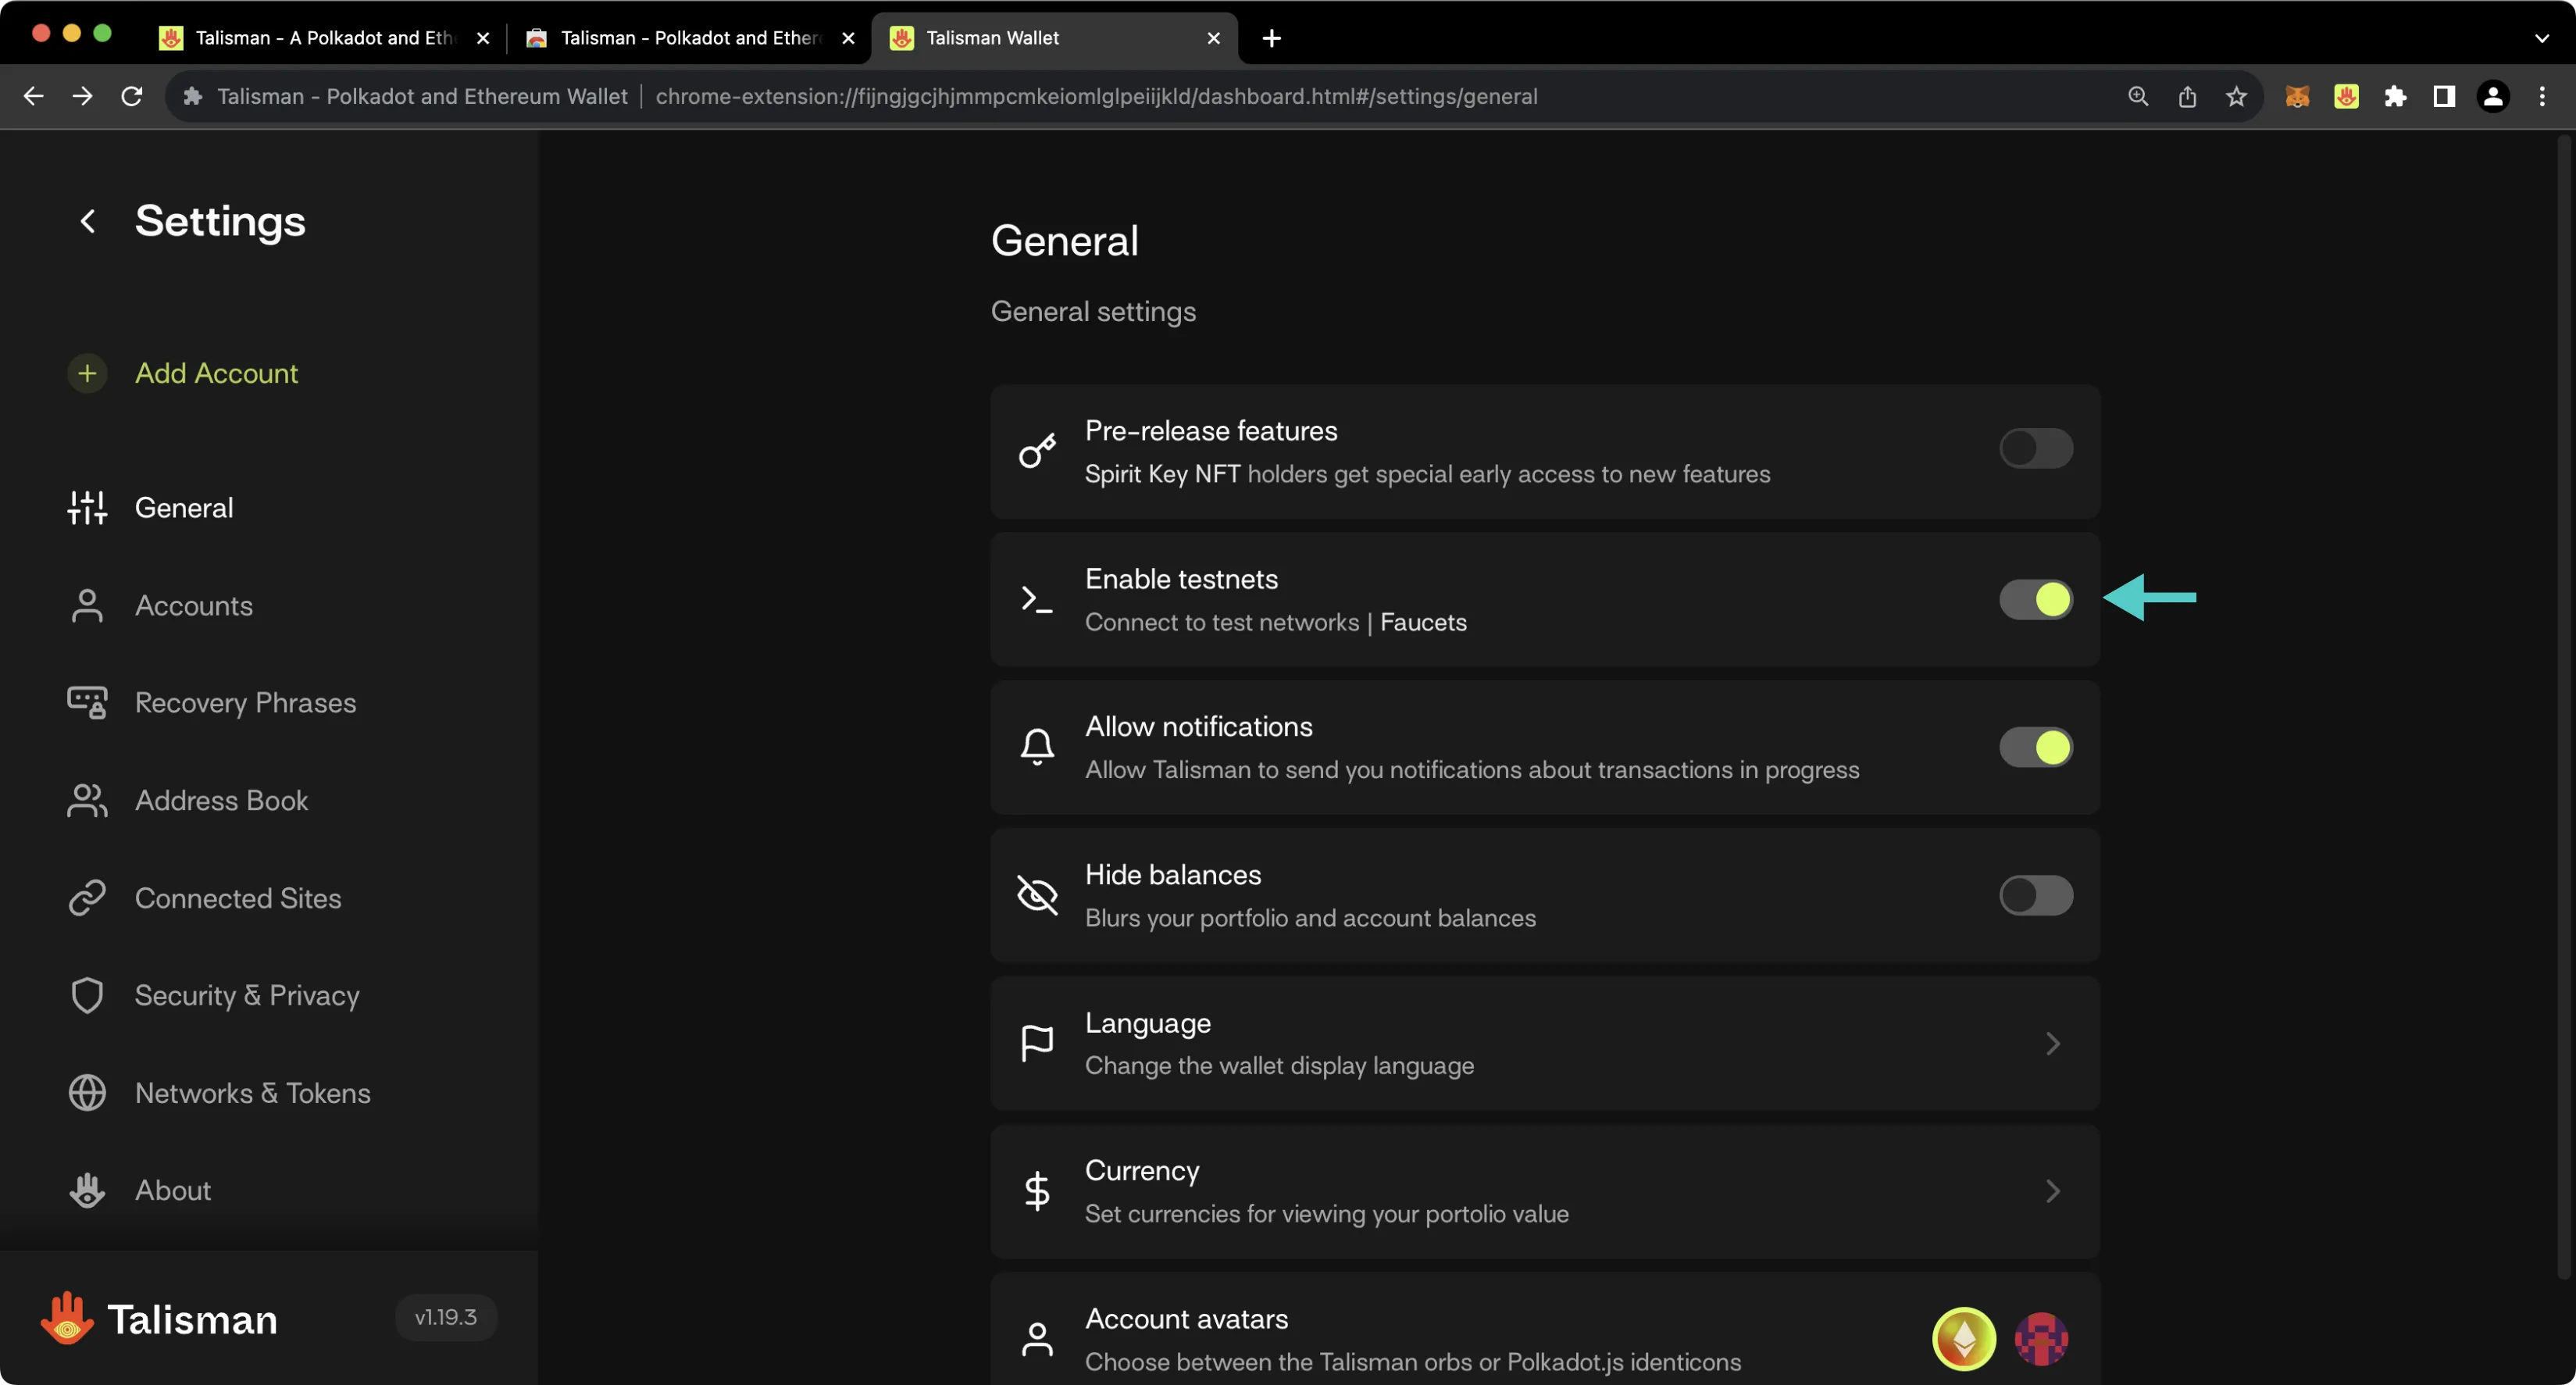
Talisman already comes pre-configured with support for Tanssi MainNet and [Dancelight](/builders/tanssi-network/testnet/dancelight/){target=\_blank}. To connect to Dancelight, you first need to make sure you have enabled support for TestNets on Talisman. To do so, take the following steps:
1. Open the Talisman extension and click on the Talisman logo.
2. Select **Settings**.
3. Ensure that **Enable testnets** is checked.
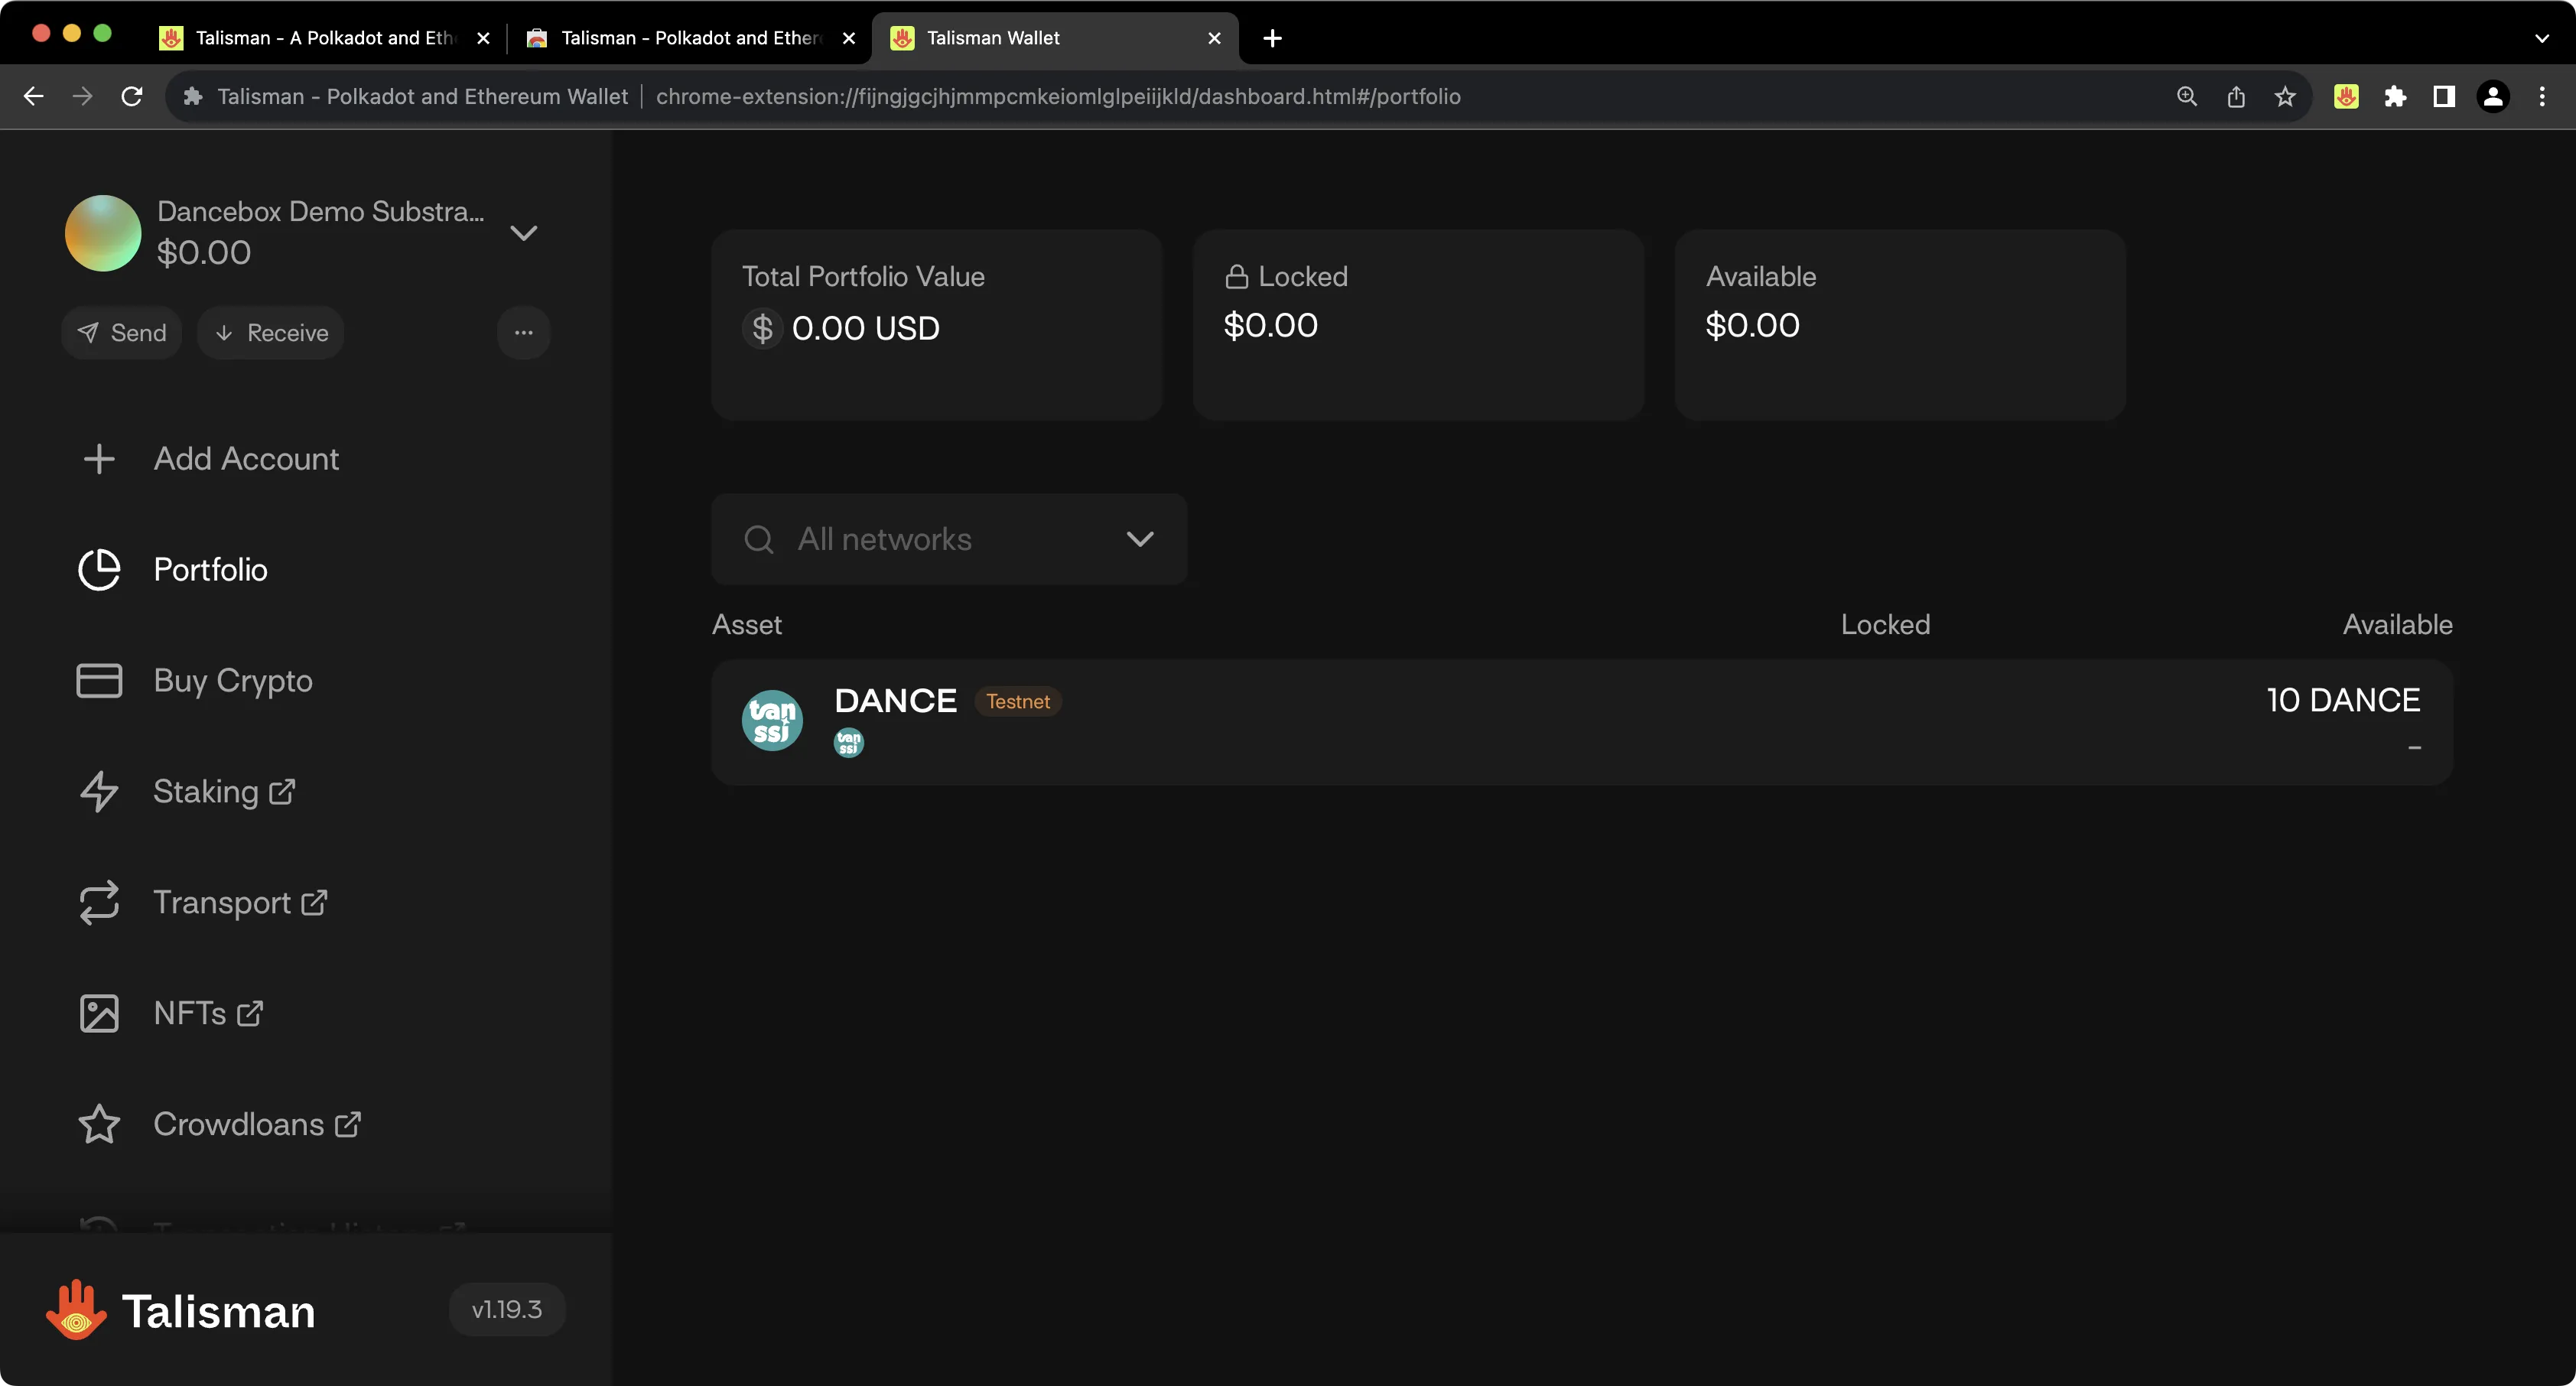
If you have a balance of Tanssi MainNet or Dancelight tokens, you'll see your account balance on the homepage of the Talisman wallet. When you don't have a balance, the network is omitted from your list of assets.
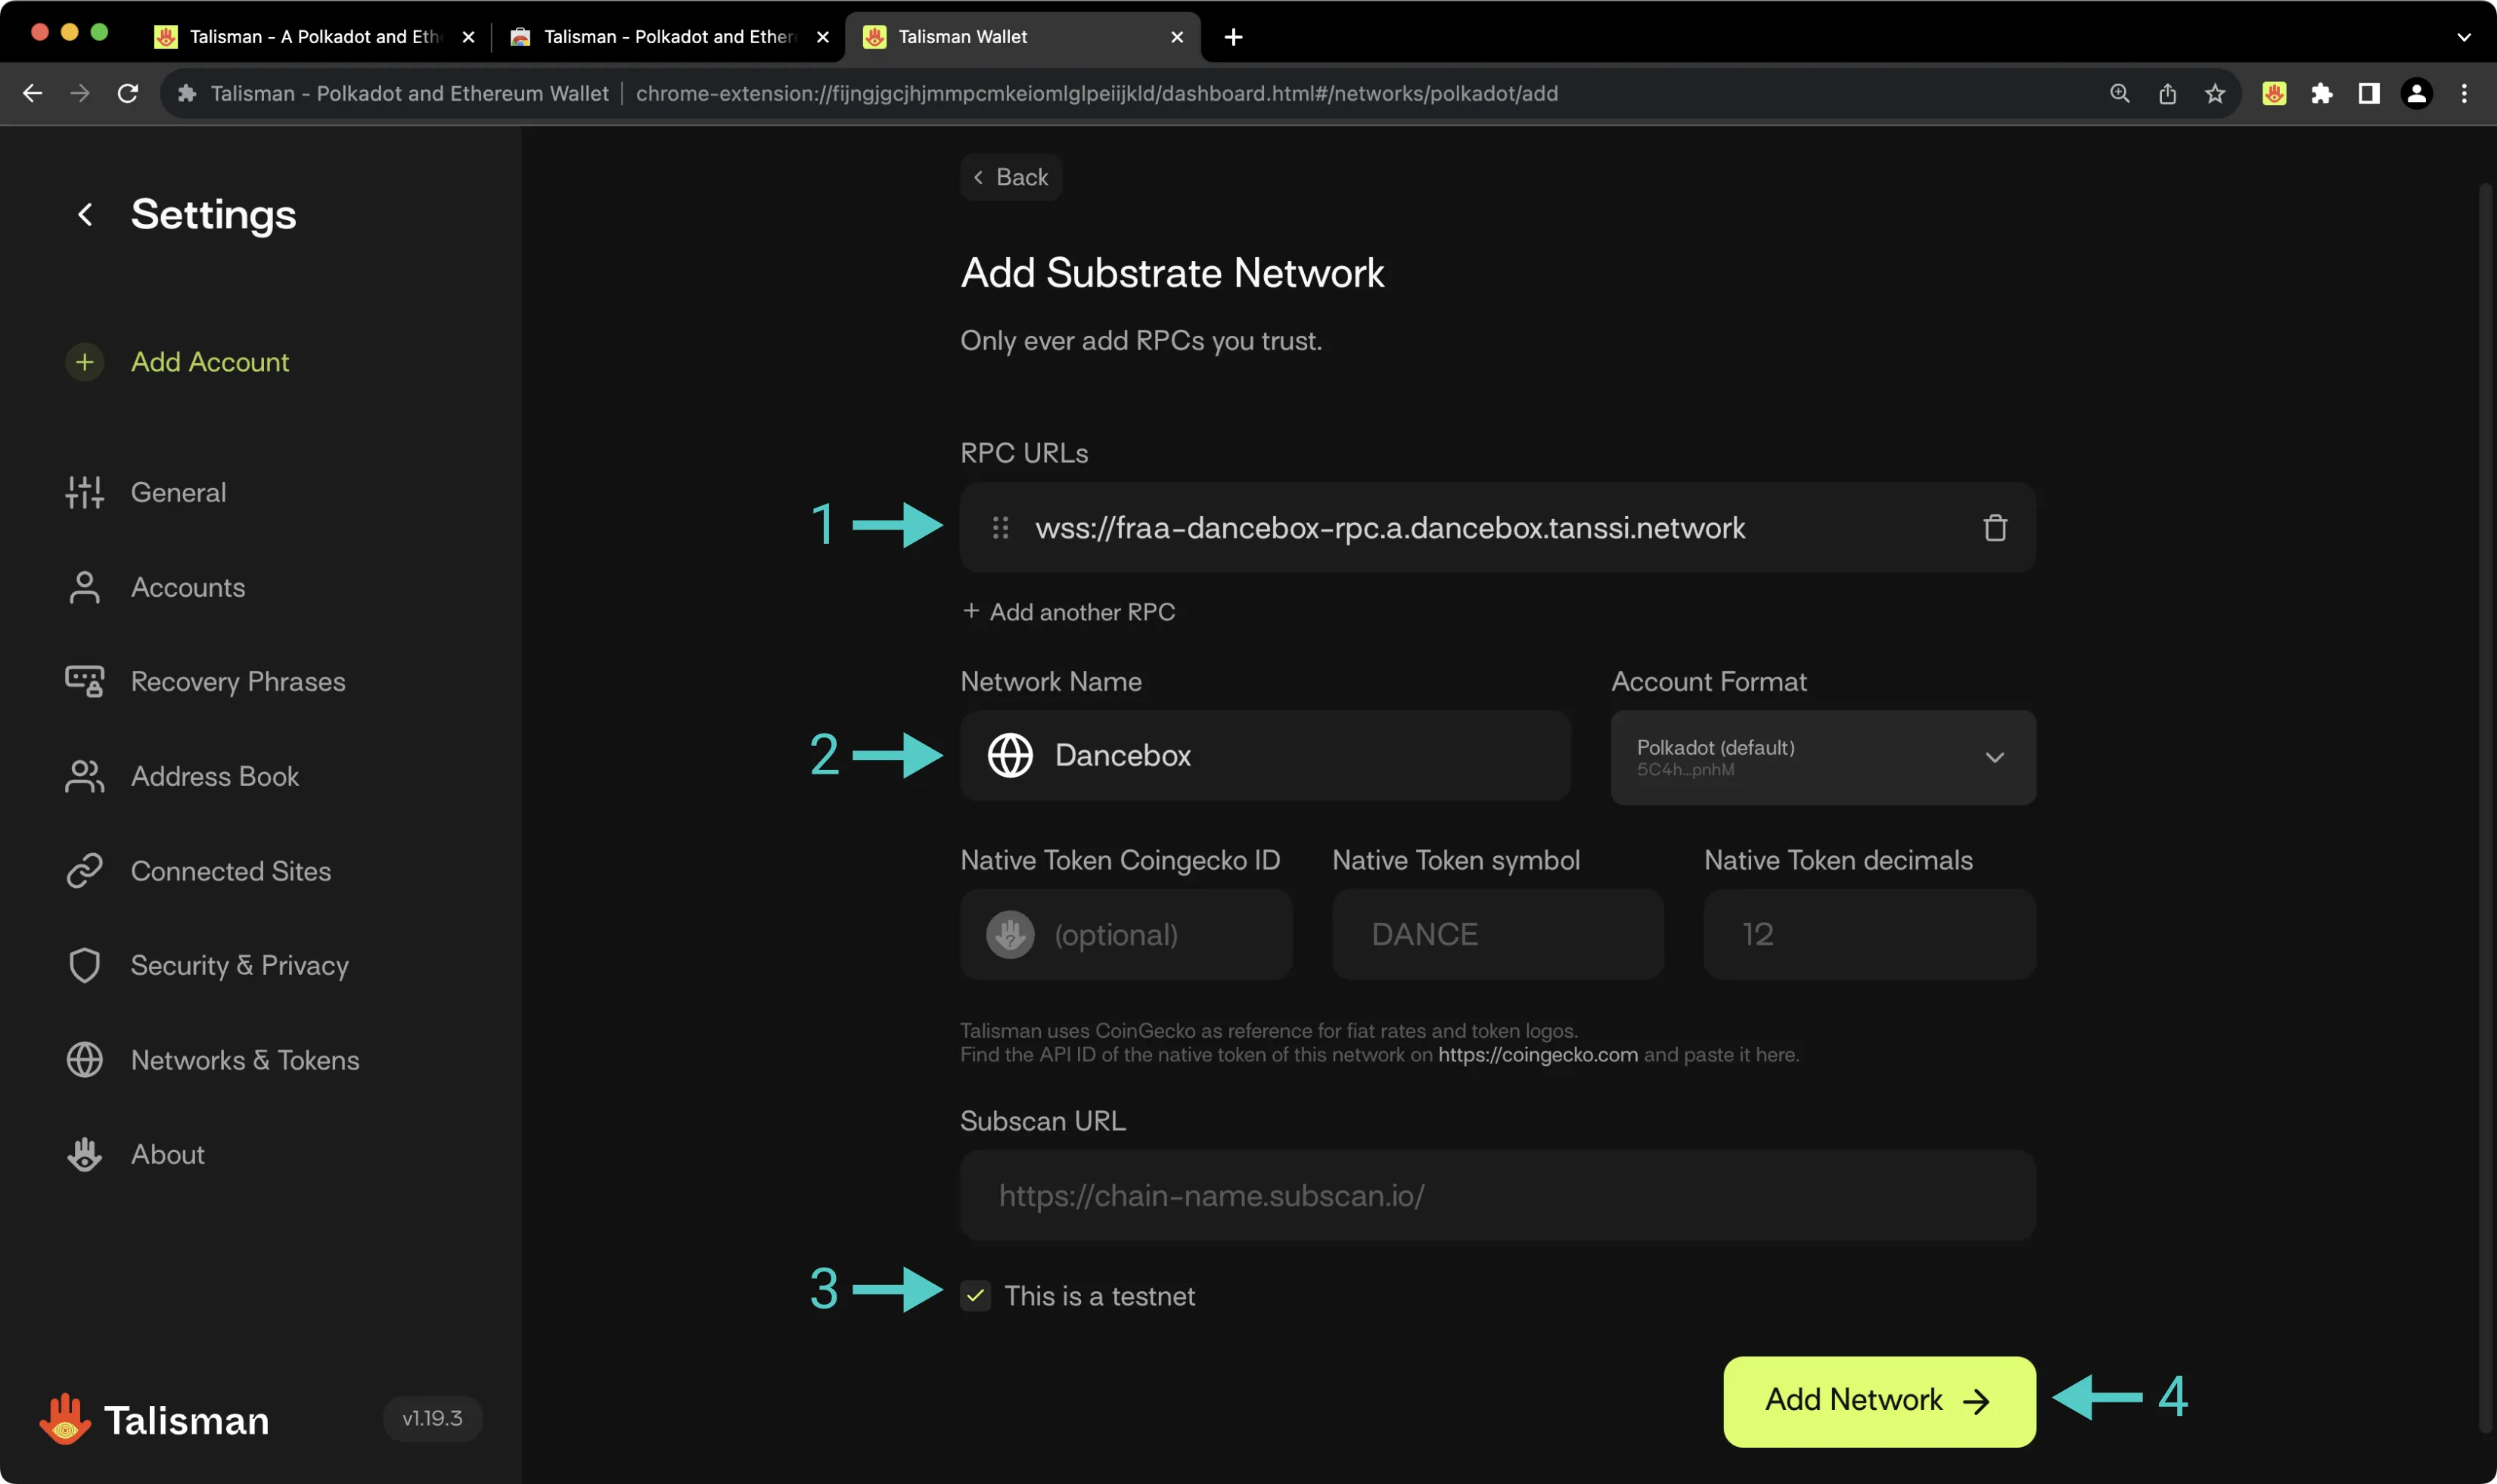
## Connecting Talisman to Your Substrate Network {: #connecting-talisman-to-your-substrate-network }
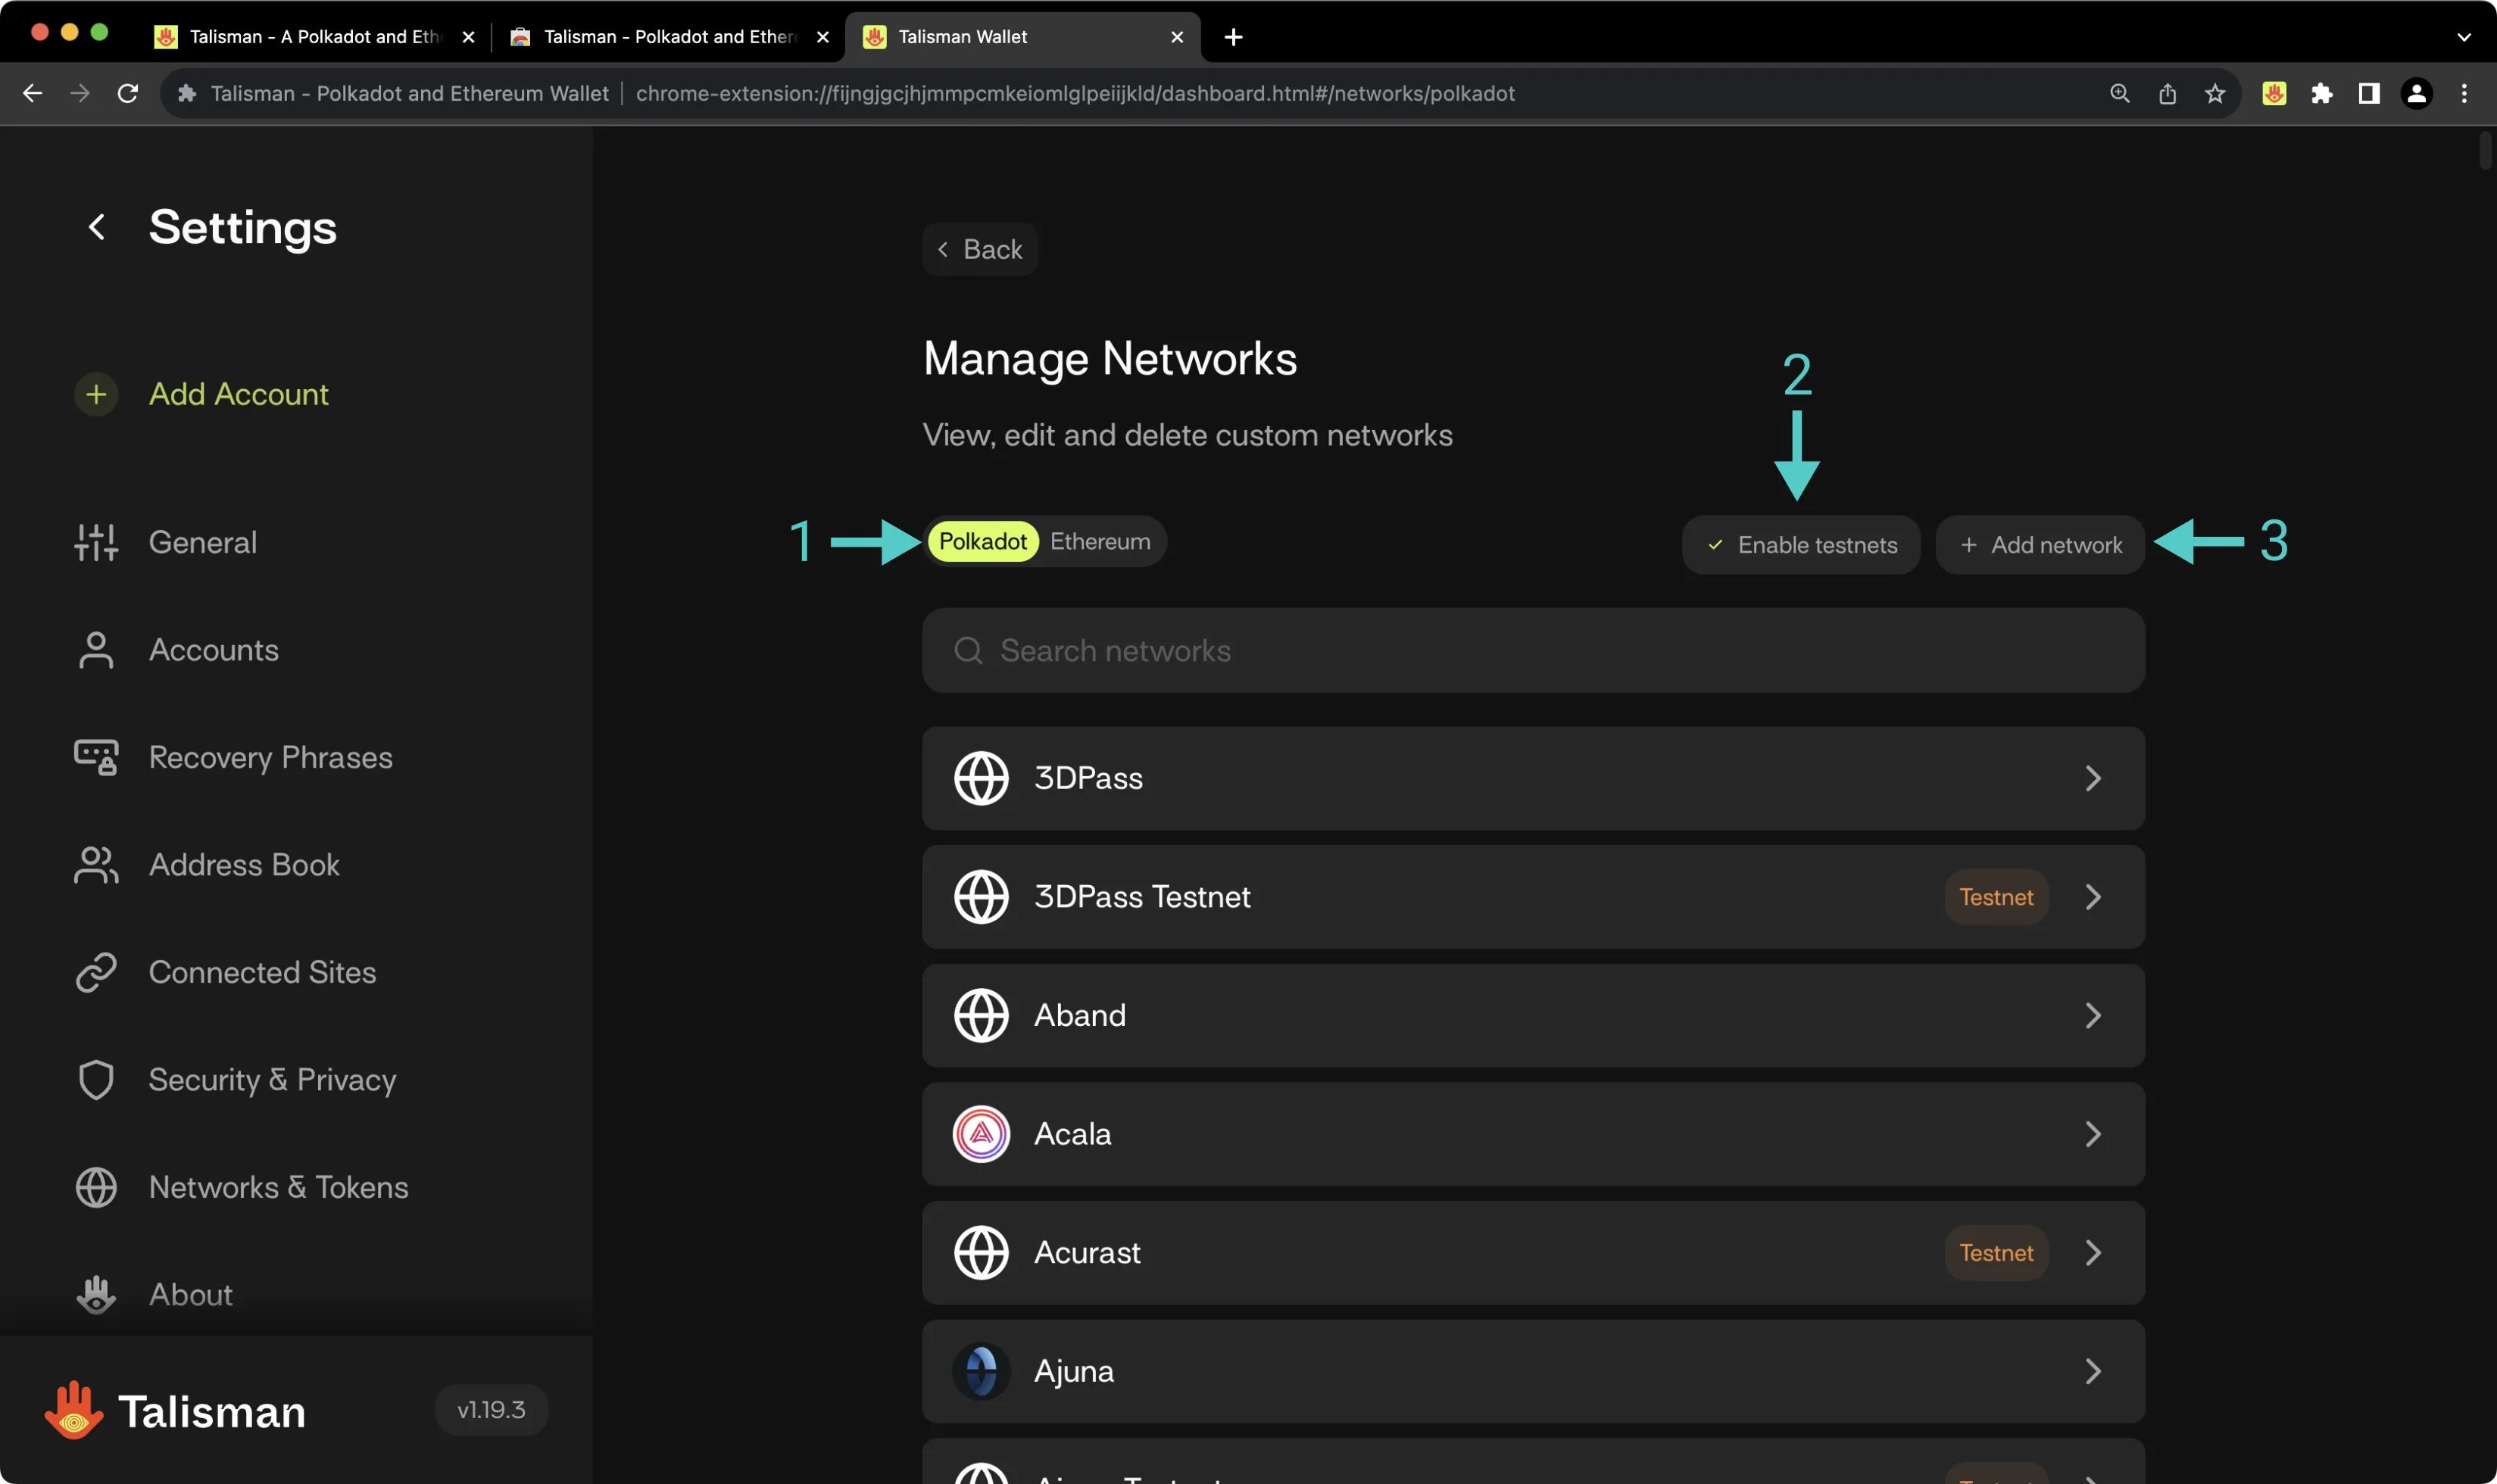
To configure Talisman for your Tanssi-powered Substrate network, open the Talisman extension and click on the **More Options** tab. Click on **Settings** > **Networks & Tokens** > **Manage Networks**.
1. Slide the network slider to **Polkadot**.
2. Check the **Enable testnets** box.
3. Press **Add Network**.
On the following page, you'll then be prompted to enter the network details for your Tanssi network. For demonstration purposes, Dancelight is used here, but you can substitute these details for your own Tanssi network. To add your Tanssi network to Talisman, take the following steps:
1. Paste in the RPC URL of your Tanssi network. Other parameters will be auto-populated.
2. Optionally, enter the block explorer URL of your Tanssi network, if applicable.
3. Check the **This is a testnet** box if applicable.
4. Press **Add Network**.
## Connecting to Polkadot.js {: #connecting-to-polkadotjs}
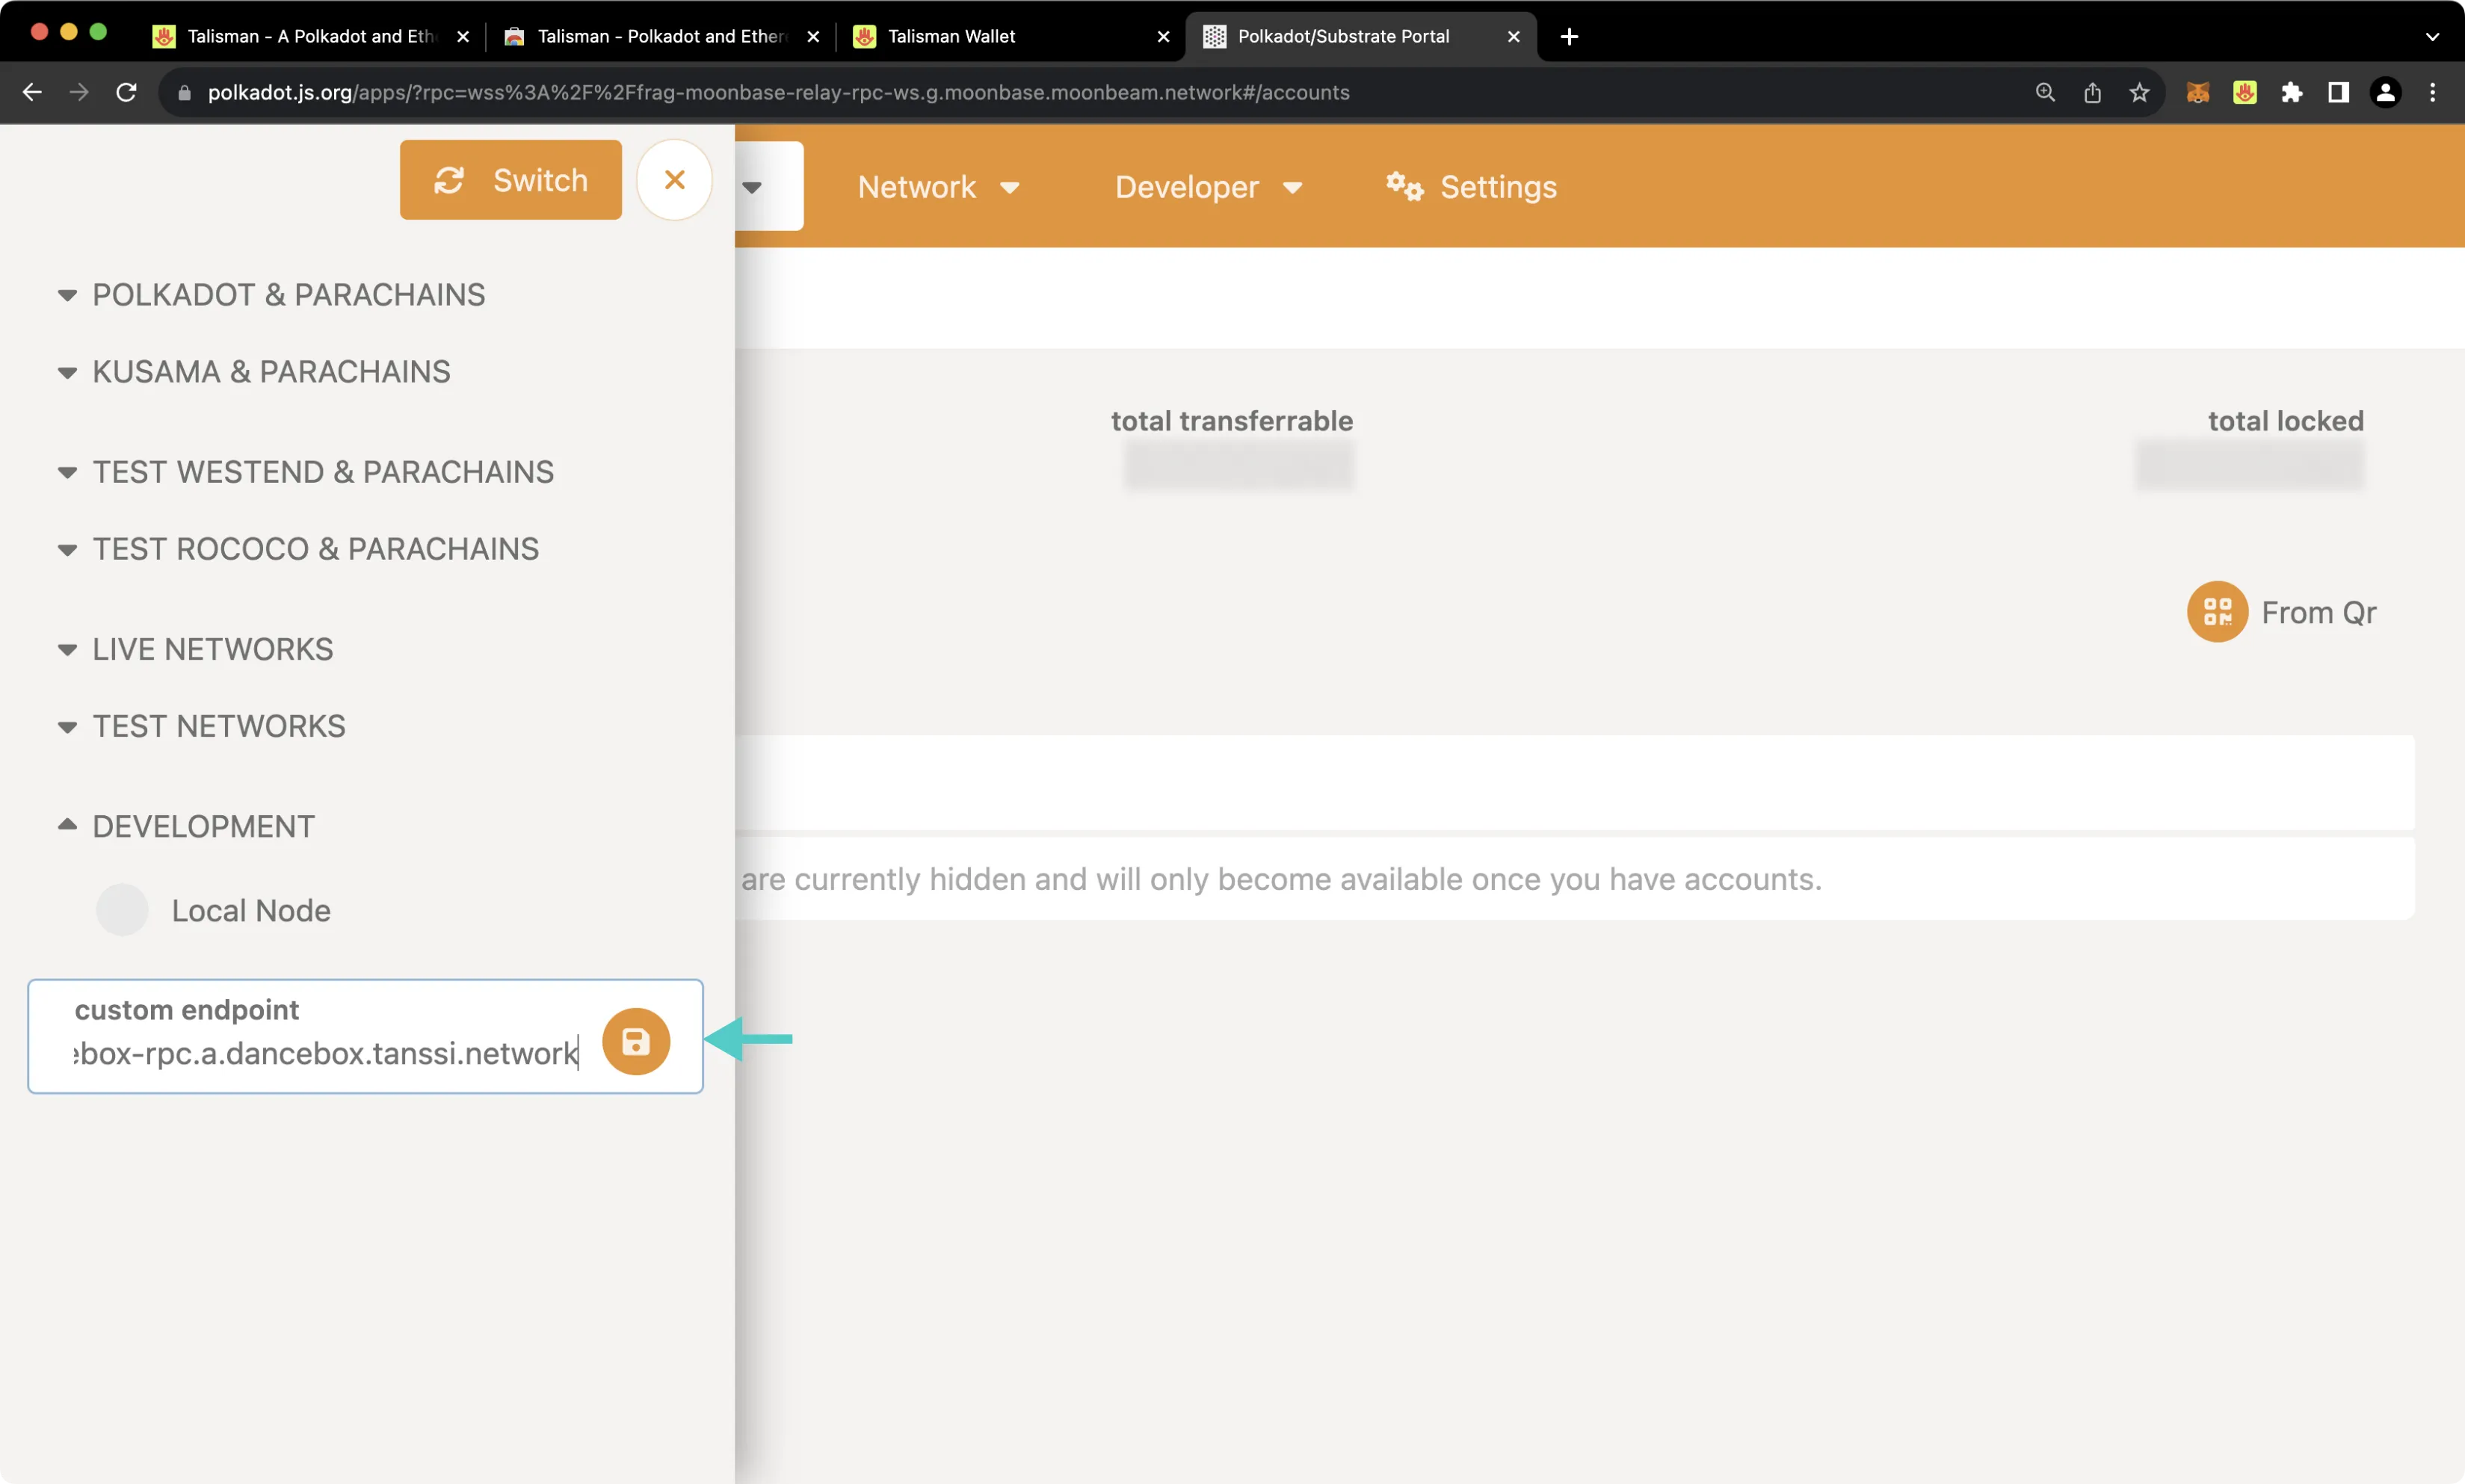
To connect your Tanssi Substrate network to Polkadot.js Apps, first head to [Polkadot.js Apps](https://polkadot.js.org/apps/?rpc=wss%3A%2F%2F{{ networks.dancelight.dns_name }}#/accounts){target=\_blank}. In this example, Polkadot.js Apps is connected to Dancelight, but you can point Polkadot.js to your Tanssi network by clicking on the network dropdown and filling in the WSS endpoint of your Tanssi network in the **custom endpoint** field.
The Talisman extension will prompt you to select the accounts you'd like to use with Polkadot.js Apps. If it doesn't automatically pop up, you can open the Talisman extension and click on the **polkadot.js.org** heading at the top. To configure Talisman to correctly interface with your Tanssi network on Polkadot.js Apps, you should take the following steps:
1. Select the Substrate account(s) that you'd like to use with Polkadot.js Apps
2. Press **Connect 1**. The value will change depending on the number of accounts you are connecting
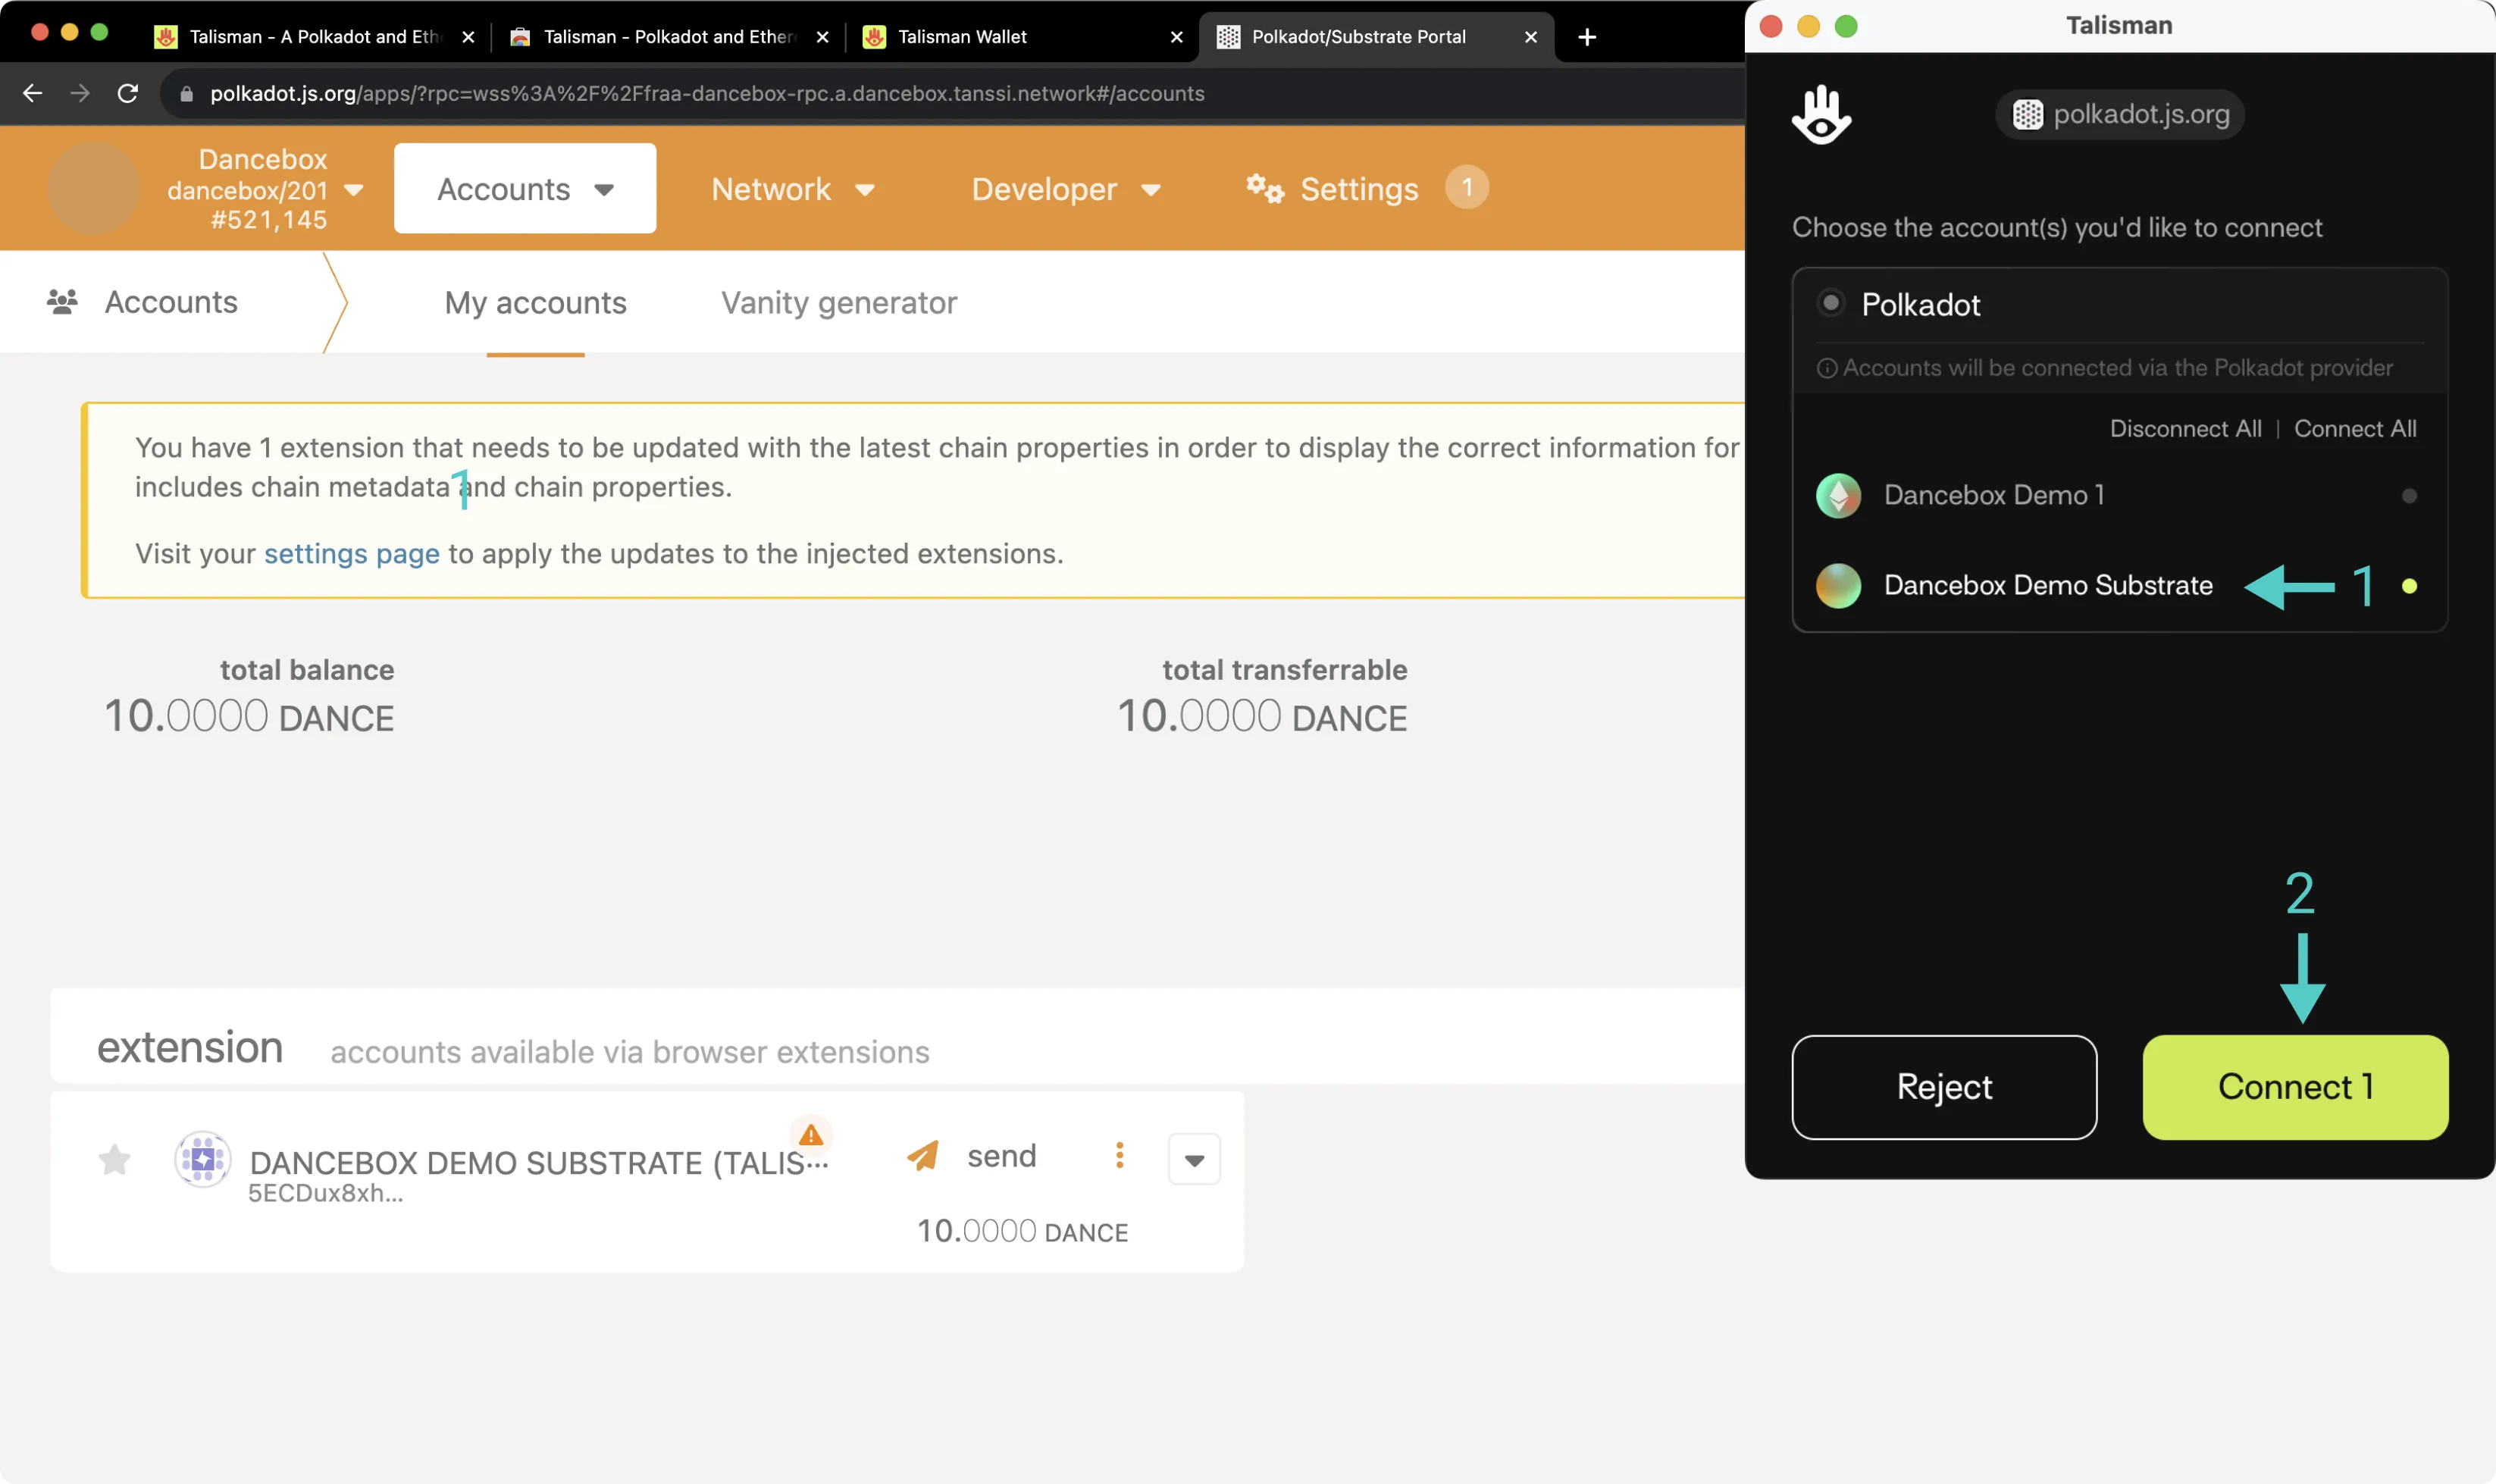
Your Talisman wallet is now connected to Polkadot.js Apps. After refreshing Polkadot.js Apps, you should see your Talisman account in the [Accounts page of Polkadot.js Apps](https://polkadot.js.org/apps/?rpc=wss%3A%2F%2F{{ networks.dancelight.dns_name }}#/accounts){target=\_blank} underneath the **extension** heading.
## Sending a Transaction {: #sending-a-transaction}
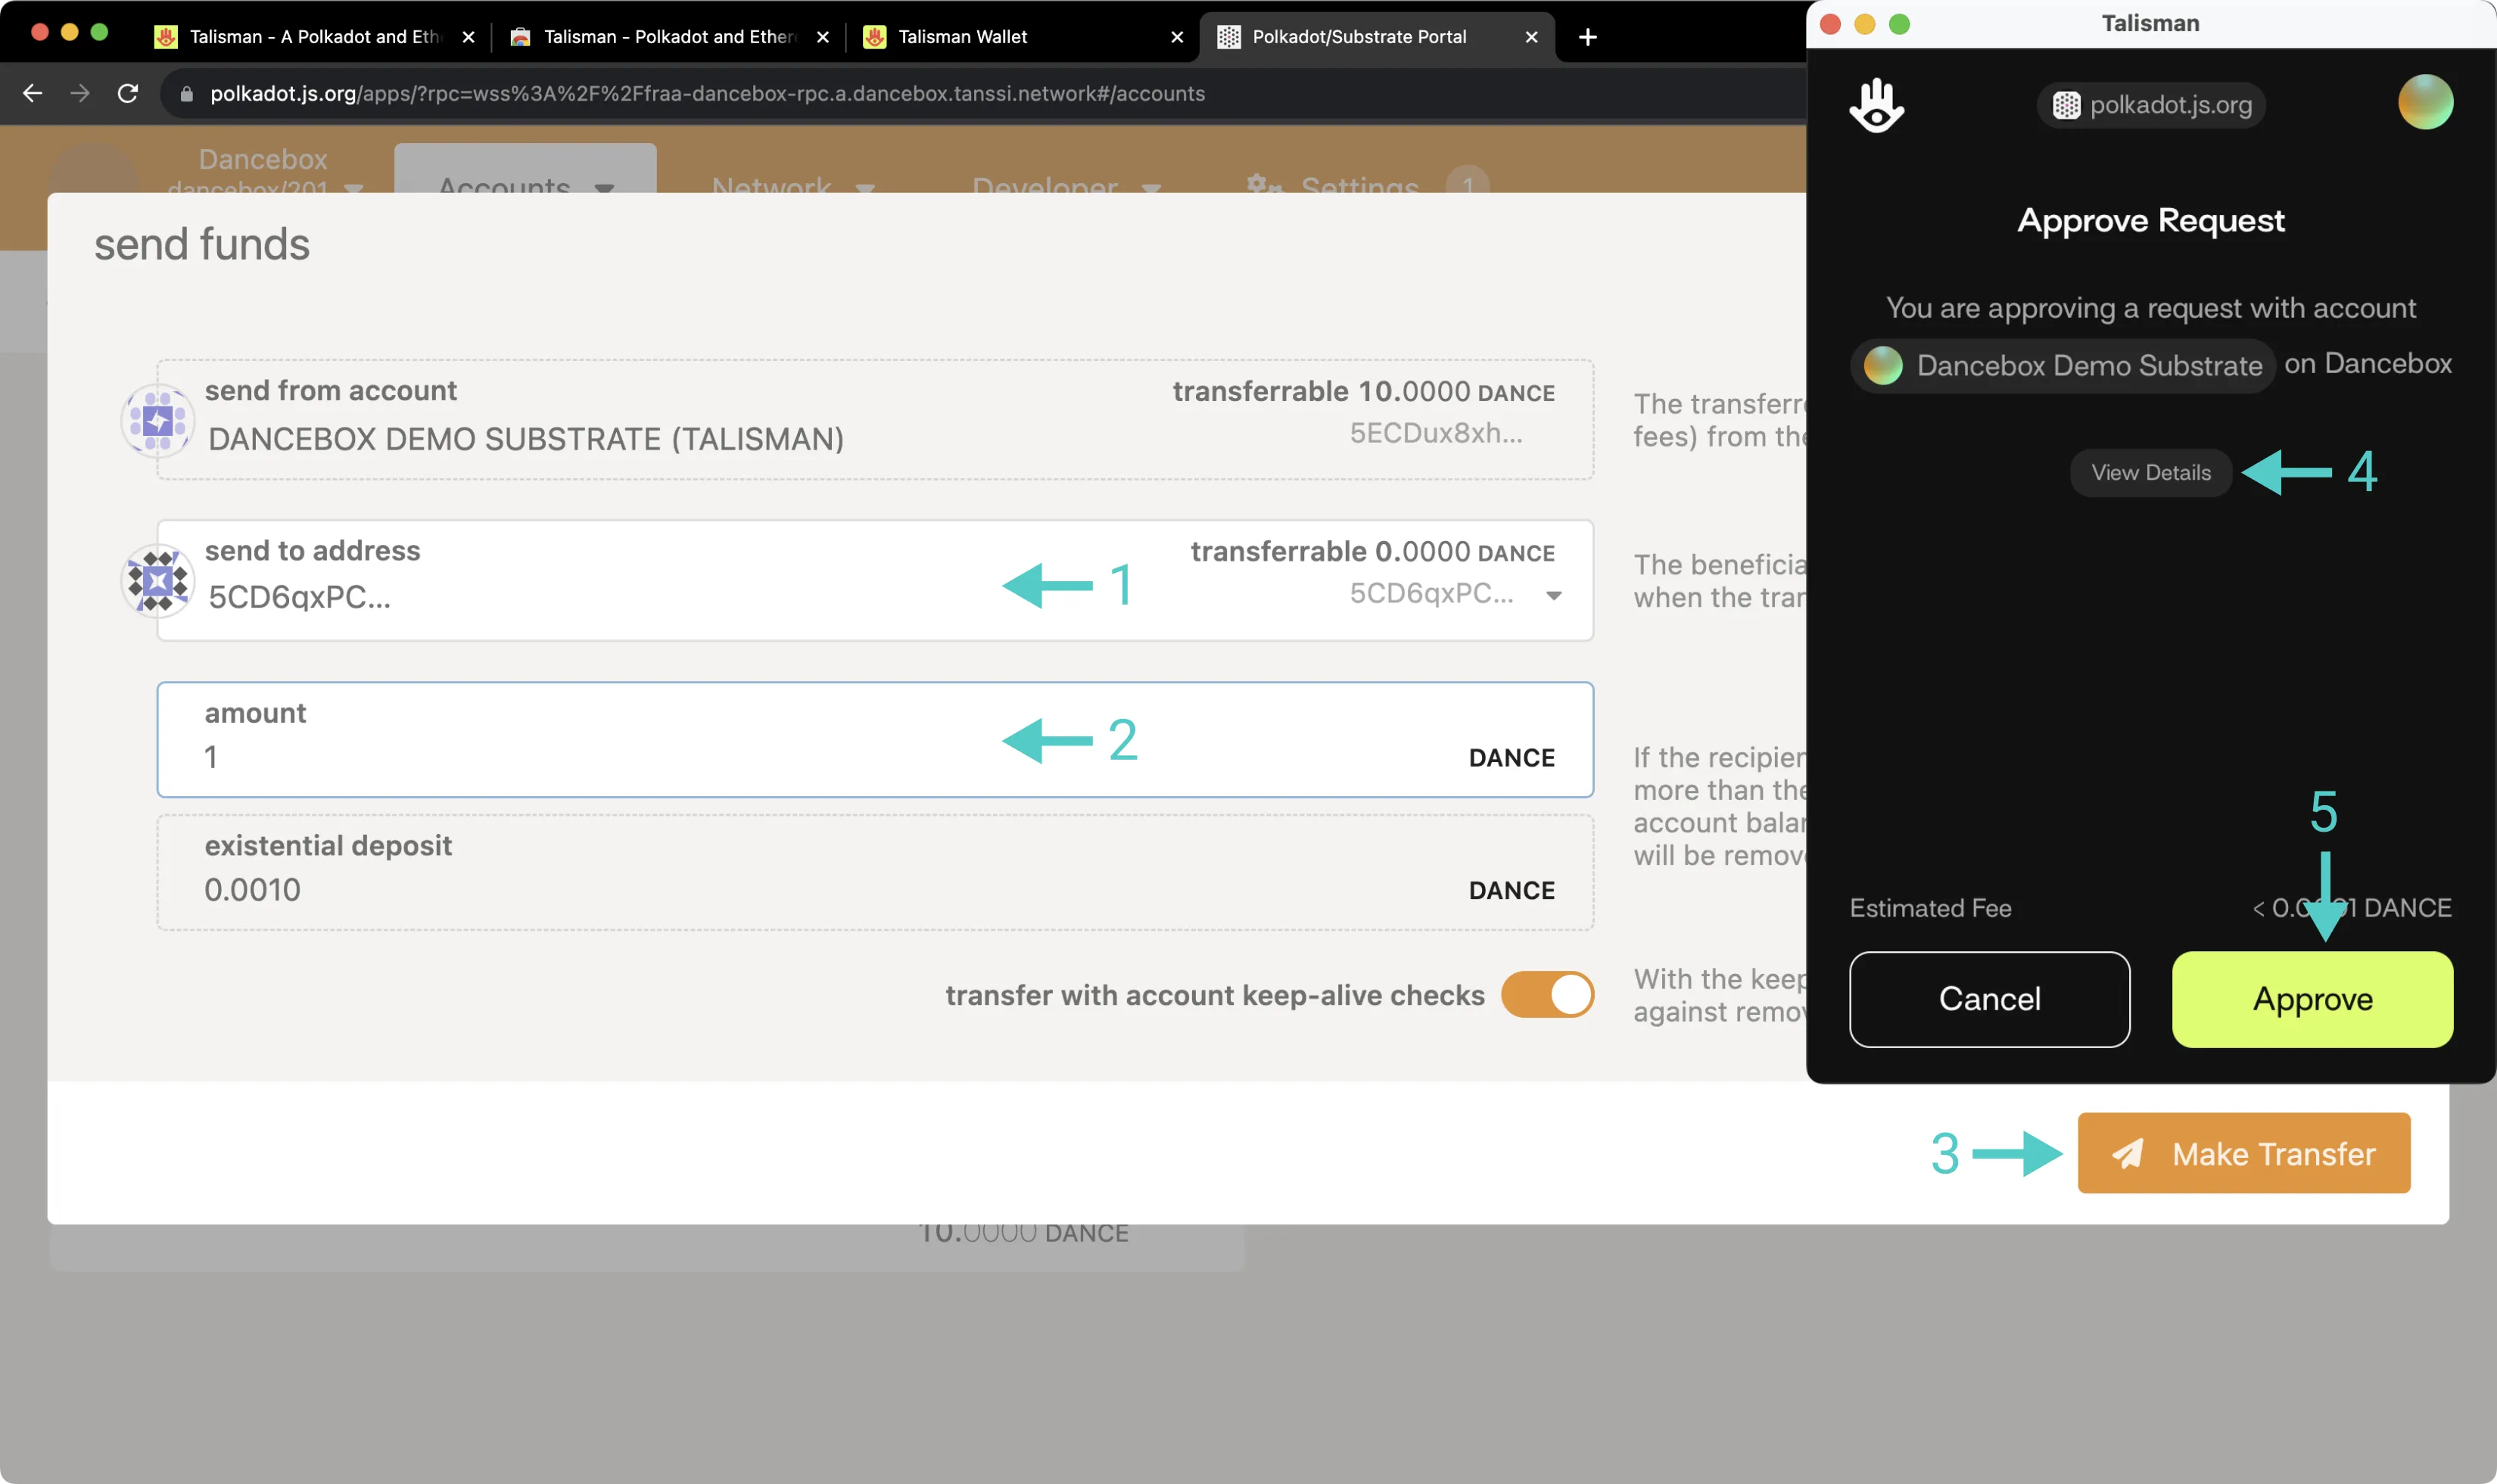
To send a transaction through the Substrate API, click **Send** next to your account on Polkadot.js Apps. Then, take the following steps:
1. Input the **send to address**.
2. Enter the **amount**.
3. Press **Make Transfer** and confirm the transaction in the resulting Polkadot.js pop-up.
4. Press **View Details** if you'd like to inspect the contents of the transaction.
5. Press **Approve** to submit the transaction.
This guide focused specifically on configuring Talisman to work with your Tanssi Substrate network, but Talisman is also a full-featured wallet for EVM accounts. Under the Ethereum API section, you'll find a [similar guide for configuring Talisman for use with your Tanssi EVM network](/builders/toolkit/ethereum-api/wallets/talisman/){target=\_blank}.
The information presented herein has been provided by third parties and is made available solely for general information purposes. Tanssi does not endorse any project listed and described on the Tanssi Doc Website (https://docs.tanssi.network/). Tanssi Foundation does not warrant the accuracy, completeness or usefulness of this information. Any reliance you place on such information is strictly at your own risk. Tanssi Foundation disclaims all liability and responsibility arising from any reliance placed on this information by you or by anyone who may be informed of any of its contents. All statements and/or opinions expressed in these materials are solely the responsibility of the person or entity providing those materials and do not necessarily represent the opinion of Tanssi Foundation. The information should not be construed as professional or financial advice of any kind. Advice from a suitably qualified professional should always be sought in relation to any particular matter or circumstance. The information herein may link to or integrate with other websites operated or content provided by third parties, and such other websites may link to this website. Tanssi Foundation has no control over any such other websites or their content and will have no liability arising out of or related to such websites or their content. The existence of any such link does not constitute an endorsement of such websites, the content of the websites, or the operators of the websites. These links are being provided to you only as a convenience and you release and hold Tanssi Foundation harmless from any and all liability arising from your use of this information or the information provided by any third-party website or service.
--- END CONTENT ---
## Basics Concepts [shared: true]
The following section contains foundational documentation shared across all Tanssi products.
It describes the architecture and infrastructure that serve as the backbone for all integrations built with Tanssi.
This includes the network development framework, Substrate and EVM development tools, templates, and guidance for node operators.
This context is provided to help understand how the system works under the hood, but responses should stay focused on the specific product unless the user explicitly asks about the general architecture.
---
## List of shared concept pages:
## Full content for shared concepts:
Doc-Content: https://docs.tanssi.network/learn/decentralized-networks/included-templates/
--- BEGIN CONTENT ---
---
title: Network Templates Included in Tanssi
description: Tanssi protocol provides useful templates to start building your decentralized network, including a ready-to-use EVM template for Ethereum compatibility.
icon: octicons-copy-24
categories: Basics
---
# Network Templates Included in Tanssi {: #network-templates-included-in-tanssi }
## Introduction {: #introduction }
Building a new network from scratch can be a daunting prospect. Fortunately, thanks to the [network development framework](/learn/framework/overview/){target=\_blank} used by Tanssi and its modular-oriented architecture, developers can leverage some pre-bundled network templates that help them jumpstart the process and benefit in some aspects, such as:
- **Head Start** - Tanssi network templates provide a starting point for your project, saving significant time and effort by providing a basic structure and a set of tested and ready-to-use functionalities. It allows developers to accelerate the construction of prototypes or minimum viable products (MVPs) and reduce the time to market
- **Consistency** - included Tanssi network templates follow established design patterns, coding standards, and best practices widely accepted among the developer community. They also provide a default set of architecture definitions to streamline blockchain development
- **UX** - Tanssi network templates cover the most demanded use cases, such as the EVM support for an Ethereum-compatible network
- **Customizability** - Tanssi network templates are a great starting point and are completely customizable. The functionalities and default configurations they include can be modified, replaced, or extended to meet the specific requirements of the use case
- **Upgrades and Compatibility** - Tanssi is built on top of an evolving framework, with new features, enhancements, and bug fixes being regularly introduced. The provided Tanssi network templates are kept up-to-date with these upgrades
## Start Building a Network {: #start-building }
To start building a decentralized network to deploy in Tanssi, some useful Tanssi network templates to kick-start the development process are provided in the [official repository](https://github.com/moondance-labs/tanssi){target=\_blank}.
The process is as simple as:
1. Select one of the templates
2. Add the specific logic to adapt the runtime to the requirements of the use case
3. Deploy in Tanssi
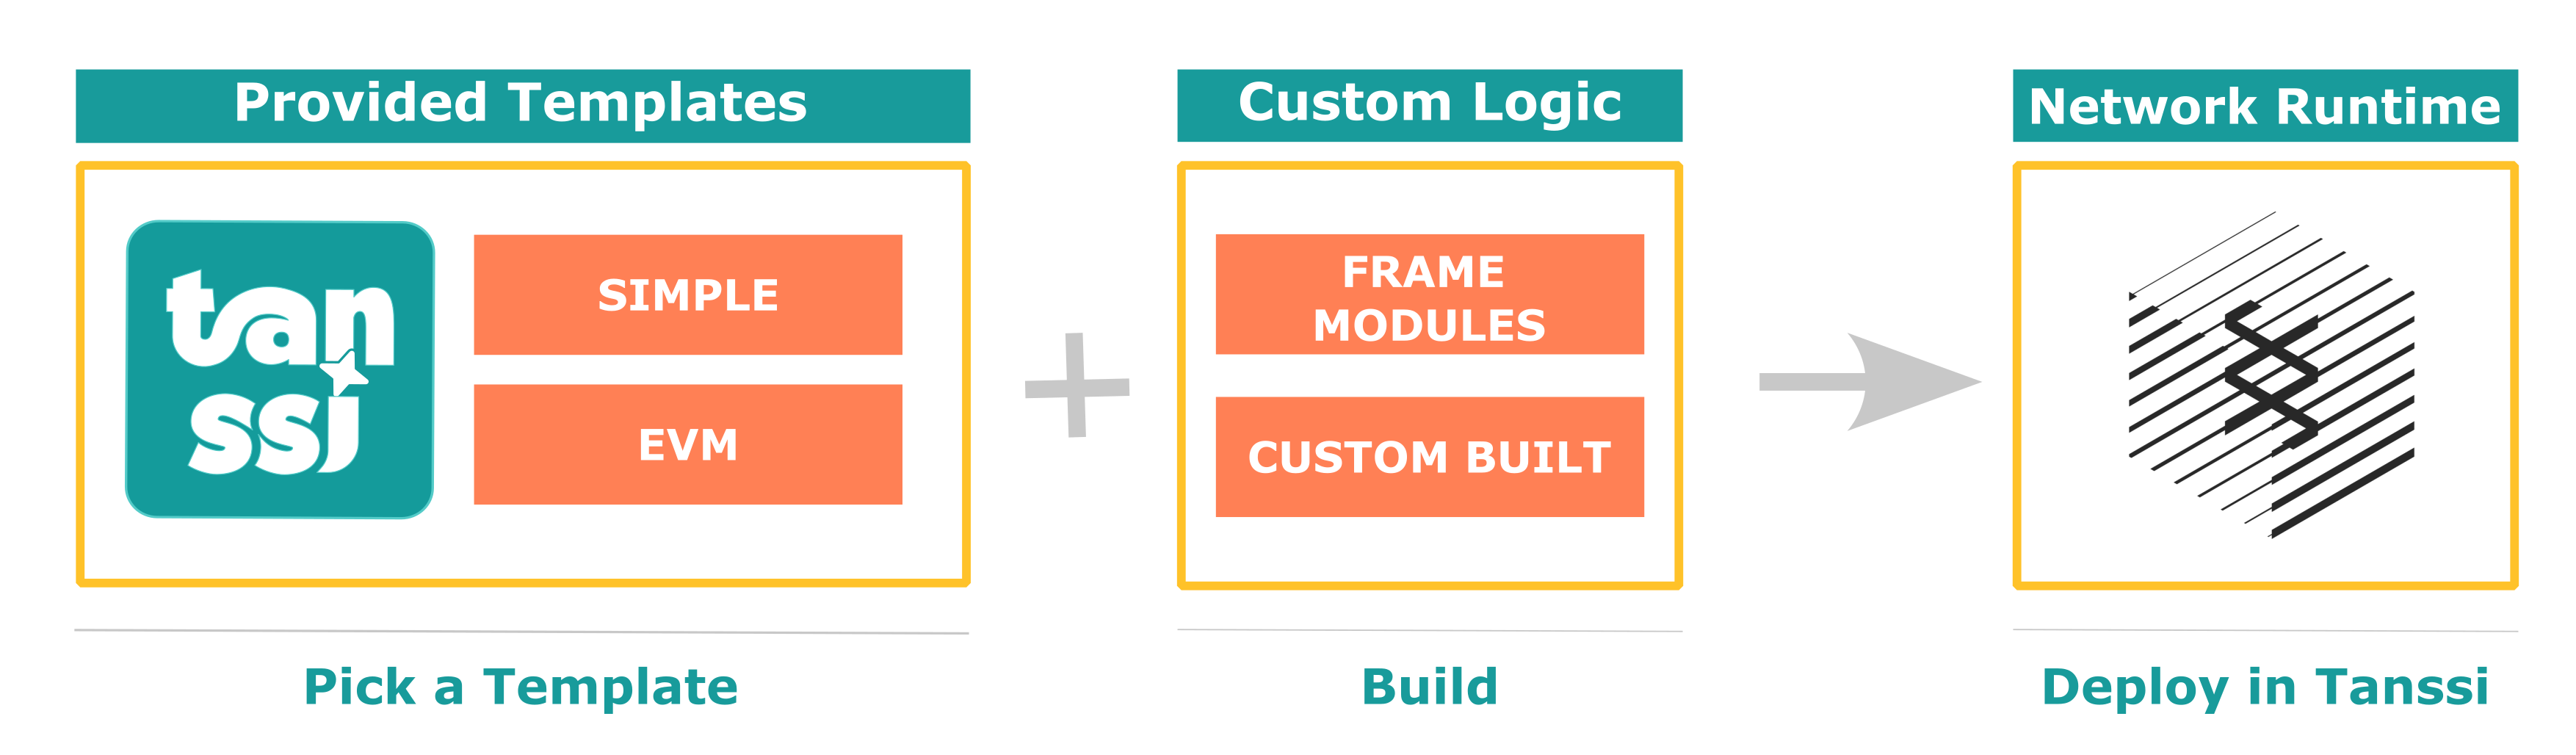
The two included templates are the *baseline network template* and the *baseline EVM template*, which are presented in the following sections.
### Baseline Network Template {: #baseline-network-template }
As presented in the [Overview](/learn/tanssi/overview/){target=\_blank} article, networks deployed through Tanssi are fully sovereign and customizable blockchains.
As part of the Tanssi ecosystem, networks must include the essential components to implement the consensus mechanism and be able to interact and synchronize with the security provider of their choice (for example, [Symbiotic](https://symbiotic.fi/){target=\_blank} on Ethereum). The baseline Tanssi network template includes all the necessary functionality for the sequencers logic, p2p, database, and synchronization layers between the network and the security provider, allowing developers to focus solely on customizing their product.
This template also includes Tanssi's [Author Noting](https://github.com/moondance-labs/tanssi/blob/master/pallets/author-noting/src/lib.rs){target=\_blank} module, which implements the logic for retrieving and validating the set of sequencers assigned to provide block production services to the network. It also includes logic that allows a sequencer to sign the block when the consensus mechanism determines that it is the sequencer's turn to produce the block (and thus be rewarded accordingly).
The source code for this template is public and accessible on the [Tanssi GitHub repository](https://github.com/moondance-labs/tanssi/blob/master/chains/container-chains/runtime-templates/simple/src/lib.rs){target=\_blank}.
### Baseline EVM (Ethereum Virtual Machine) Template {: #baseline-evm-template }
Extending the [baseline Tanssi network template](#baseline-network-template), this template provides not only Tanssi protocol support but also an EVM and full Ethereum compatibility.
Leveraging a set [EVM-specific modules](https://github.com/polkadot-evm/frontier){target=\_blank}, this template includes an Ethereum compatibility layer for networks to allow running unmodified Ethereum dApps.
Using this template, networks support the deployment and running of any existing smart contract written in Solidity or Vyper with no changes. By emulating Ethereum block production and exposing the expected RPC interface, developers can also continue using the same tools like [Metamask](https://metamask.io){target=\_blank}, [Hardhat](https://hardhat.org){target=\_blank}, [Remix](https://remix.ethereum.org){target=\_blank}, [Foundry](https://github.com/foundry-rs/foundry){target=\_blank}, and many more out of the box, with no extra adapters.
With this EVM template, developers can deploy a [Moonbeam](https://moonbeam.network){target=\_blank}-like network in no time and add their custom logic and features specific to their use case.
The source code for this template is public and accessible on the [Tanssi GitHub repository](https://github.com/moondance-labs/tanssi/blob/master/chains/container-chains/runtime-templates/frontier/src/lib.rs){target=\_blank}.
--- END CONTENT ---
Doc-Content: https://docs.tanssi.network/learn/decentralized-networks/overview/
--- BEGIN CONTENT ---
---
title: Network Overview
description: Learn the high-level definitions of how a Tanssi network works, its architecture, and its block production as a service mechanism with deterministic finality.
icon: octicons-home-24
categories: Basics
---
# Tanssi Networks Overview {: #networks-tanssi-overview }
## Introduction {: #introduction }
Networks deployed through Tanssi receive many [benefits](/learn/tanssi/overview/#what-tanssi-provides){target=\_blank}, like block production as a service, data retrievability as a service, and security through an [external security providers](/learn/tanssi/external-security-providers/){target=\_blank} such as [Symbiotic](https://symbiotic.fi/){target=\_blank} on Ethereum.
Also, because Tanssi-powered networks are based on a [modular tech stack](/learn/framework/){target=\_blank}, they profit from unique advantages when customizations are required at a runtime level. This [modularity](/learn/framework/modules/){target=\_blank} allows developers to add functionality directly into the runtime or extend the capabilities of the EVM itself via precompiled contracts.
For example, Tanssi provides a ready-to-use [template](/learn/decentralized-networks/included-templates#baseline-evm-template){target=\_blank} that includes [Frontier](https://github.com/polkadot-evm/frontier){target=\_blank} modules, enabling the effortless deployment of an EVM-compatible networks, similar to [Moonbeam](https://moonbeam.network){target=\_blank}.
This section covers the fundamentals of a Tanssi network, its architecture, its core modules and functionalities, and the transaction fee mechanism.
## General Architecture {: #general-architecture}
As previously discussed, networks deployed through Tanssi are customizable blockchains that, among other features, receive block production as a service and inherit security with deterministic block finality within seconds from an external security provider.
Tanssi-powered networks are fully decentralized networks. The decentralized nature of the networks considerably increases their resilience and fault tolerance since they don't rely on a single authority or entity to ensure their liveness, security, and performance but on trustless, decentralized protocols. For example, they receive block production services from a decentralized and incentivized set of sequencers managed by Tanssi.
The Tanssi protocol runs with an [external security provider](/learn/tanssi/external-security-providers/){target=\_blank}, which has a set of operators (also called validators) with assets at stake, validating the transactions from the Tanssi network itself and all of the networks deployed through Tanssi. This way, all Tanssi-powered networks inherit the economic security derived from the Tanssi protocol and, indirectly, from the operators, which verify every transaction from every network. Tanssi networks don't need to run their own operator set nor bootstrap liquidity to secure their protocol.
Tanssi networks also benefit from a set of Data-Preservers, with full archive nodes, ensuring the data availability layer availability. These data-preservers are incentivized through Tanssi's data retrieval services and also provide the RPC infrastructure for apps and users interacting with Tanssi networks.
```mermaid
flowchart TB
networks["Tanssi Networks
(Decentralized Networks)"]
subgraph tanssi["Tanssi Protocol"]
direction TB
sequencers["Decentralized Sequencers Set"]
node["Full Archive Nodes with
RPC Services"]
end
security["External Security Provider
Operators"]
networks<--Block Production-->tanssi
networks<--Shared Security Model-->tanssi
networks<--Data Availability
RPC endpoints-->tanssi
tanssi<--Transactions
Validation and Finality-->security
```
## Network Transaction Flow {: #network-transaction-flow }
A transaction submitted to a Tanssi-powered network follows a complex yet seamless path from submission to block inclusion and finalization. The network infrastructure, Tanssi, and the chosen [security provider](/learn/tanssi/external-security-providers/){target=\_blank} work together at different levels to ensure the process happens as quickly as possible, usually taking around 30 seconds. Remember that a transaction in a Tanssi network reaches deterministic finality. Consequently, once the transaction is final, it becomes irreversible and unchangeable, and the state transition resulting from executing that transaction is final.
For example, a user initiates a transaction when interacting via an application deployed to a Tanssi-powered network. The RPC provider will share the transaction, which sits in the chain's transaction pool, with all network participants. A sequencer assigned by Tanssi to that network will eventually pick up the transaction and include it in the next network block.
Then, the sequencer will share with the security provider's operators:
- The block itself with the state transitions
- The storage components in the Tanssi network database that the block is modifying
- The necessary hashes of the unaffected points in the Merkle tree of the storage
These components constitute the proof of validity (PoV).
Next, the PoV is verified by the security provider's operators. Note that the operators do not check that the Tanssi network storage is valid but that the state transitions that affect it are. A summary of that verification is then gossiped to other operators so they can verify it and include it in the next Tanssi block. Lastly, that Tanssi block with all the networks' verifications is finalized.
The transaction flow process is summarized in the following diagram:
--- END CONTENT ---
Doc-Content: https://docs.tanssi.network/learn/decentralized-networks/runtime-features/
--- BEGIN CONTENT ---
---
title: Core Runtime Features
description: Learn about the core features of a Tanssi network, the transactions types, how they are executed and included in a block, and the forkless runtime upgrades.
icon: octicons-package-24
categories: Basics
---
# Core Runtime Features {: #core-runtime-features }
## Introduction {: #introduction}
Networks deployed through Tanssi have [many benefits](/learn/tanssi/overview/#what-tanssi-provides){target=\_blank} due to its unique [architecture](/learn/tanssi/overview/#tanssi-architecture){target=\_blank}.
Nevertheless, Tanssi-powered networks are also unique due to the [framework](/learn/framework/){target=\_blank} (Substrate) they are built on top of, which provides some unique characteristics that developers can leverage to fine-tune specific behaviors in their runtime.
This section covers some of these Tanssi network core runtime-specific features, including the different origins a transaction might have, the different types of transactions and how they are executed and included in a block, the special account known as _SUDO_, and the quite unique feature of Tanssi networks: the forkless runtime upgrades.
## Origins {: #origins}
Generally speaking, all calls in a Tanssi network have an origin. But what is an origin? Developers from the EVM realm might be familiar with the concept of _msg.sender_ in EVM transactions. Origins are to Tanssi networks what _msg.sender_ is to an EVM transaction, but supercharged with many extra functionalities.
An origin defines where the call is coming from. In contrast to Ethereum-compatible chains, there can be many origins in Tanssi networks. For example, the _msg.sender_ of an EVM transaction is known as a _signed origin_, which means that the call is a transaction that was signed by some on-chain account's private key. This allows the runtime to authenticate the source of the call and, for example, charge transaction fees to the associated account.
However, origins can do much more than represent a private key/public key pair. Origins also have different privilege levels. For example, a _signed origin_ can send a transaction that is dispatched by the private key/public key pair but should not be able to authorize a runtime upgrade.
Some of the most common types of origins are:
- **Root** - a system-level origin with the highest privilege level. It can be thought of as a superuser of the chain, which can execute any call
- **Signed** - as mentioned before, the origin of a transaction signed by an on-chain account's private key, which includes the account identifier (address) as the signer
- **None** - a lack of origin. Used in specific actions that must be agreed upon at a runtime level. For example, you can program your runtime so that a transaction with _none_ origin can enact a pre-authorized runtime upgrade, which means that the transaction has no fee associated with it
- **Custom** - developers can also create custom origins for specific use cases. For example, [Moonbeam's on-chain governance](https://docs.moonbeam.network/learn/features/governance){target=\_blank} has specific origins for each type of governance vote, called _tracks_. Consequently, each track can be configured to only execute calls with specific privilege levels. One track is _Root_, whose origin is the _Root_ origin mentioned before, and has a very restrictive configuration for votes to go through. But other tracks have much lower privilege levels to do some less critical network operations
## Transaction Types {: #transaction-types}
Tanssi networks have three main types of transactions:
- **Signed Transactions** - include a signed payload requesting to execute some runtime call. Generally, the signature is associated with a private key/public key pair. Depending on the runtime logic, the account associated with the signature pays a transaction fee
- **Unsigned Transactions** - include an unsigned payload requesting to execute some runtime call. Because these transactions are unsigned, there is no account associated with them. Consequently, runtimes need to define specific conditions that prevent network spam or replay attacks because there is no fee mechanism to prevent such malicious behaviors. One example of an unsigned transaction is executing pre-approved actions, like a runtime upgrade
- **Inherent Transactions** - an unsigned transaction that a sequencer inserts into a block when initializing its construction. These transactions are part of the block and are not stored in the transaction pool or shared among network participants. In addition, the data inserted through inherent transactions can skip runtime validation, and it might be up to operators to accept it. One example is the block timestamp. This is injected into the block by an inherent transaction, and operators can accept or reject the block based on whether the timestamp is within some acceptable range
## Transaction Execution {: #transaction-execution}
When a user or application submits a signed transaction to a Tanssi network, the transaction is validated at a full-node level using rules defined in the runtime, and then it is queued in a transaction pool. This ensures that only transactions that comply with certain chain-specific conditions are considered to be included in a block.
!!! note
The most common type of transaction is a signed transaction. Nevertheless, unsigned transactions are also validated before they are queued in the transaction pool.
The valid transaction queue comprises two pools: ready and future. The ready queue contains all transactions that can be included in a new pending block. The future queue is for transactions that don't meet all the criteria to be included now but might become valid. For example, transactions with a future nonce. Invalid transactions are directly rejected.
During the block-building process, a sequencer uses a [priority system](https://github.com/paritytech/substrate/blob/fb24fda76d613305ebb2e5728c75362c94b64aa1/frame/transaction-payment/src/lib.rs#L614-L681){target=\_blank} through a transaction orchestration module to order transactions for the next block, until the block reaches its maximum capacity. The block building and execution order has the following operations:
- **Initializing a Block** - known as `on_initialize`, enables you to define runtime logic executed before any other transaction is accounted for. For example, inherent transactions, like the timestamp in the previous example, are commonly executed when initializing a block. Once the initialization logic is completed, the transaction orchestration module verifies the parent hash in the block header and the trie root to ensure the information is correct
- **Transaction Execution** - with the block already initialized, the transaction orchestration module executes each valid transaction according to its priority. The initial state is not cached before the execution, meaning that if one of the transactions fails mid-execution, any state changes committed up to that moment cannot be reverted, and the subsequent block will be invalid. Consequently, runtime logic should perform all necessary checks to ensure all valid transactions will succeed
- **Finalizing a Block** - after all queued valid transactions are executed or the block limit is reached, the orchestration module calls into each runtime module the `on_idle` and `on_finalize` functions. These two functions allow the definition of extra business logic that is automatically executed in the block finalization process. After the last `on_finalize` function is called, the orchestration module ensures that the block digest and storage root match what was calculated when the block was initialized
## Forkless Upgrades {: #forkless-upgrades}
Networks deployed through Tanssi have a thrilling feature: [forkless upgrades](https://docs.polkadot.com/develop/parachains/maintenance/runtime-upgrades/){target=\_blank}. Forkless upgrades allow developers to change the state transition function that governs the chain without creating a network fork, as seen on Ethereum multiple times. Furthermore, if the Tanssi network is set up with an on-chain governance system, upgrades to the network can happen in a truly decentralized and trustless way.
Forkless upgrades are made possible by storing the state transition function as a WebAssembly (Wasm) blob in both the Tanssi network itself and the Tanssi-powered network. When a new runtime is scheduled through a function call in the Tanssi-powered network, the Tanssi network validates this block, so it is notified and readies itself to validate incoming blocks using the most recent state transition function. Following a specified runtime upgrade delay period, a Tanssi sequencer on the Tanssi-powered network constructs a block that references a Tanssi network block, signaling to the Tanssi network that it can now apply the new runtime. Consequently, this new state transition function is utilized for that specific block. As all infrastructure participants at the network level employ the on-chain Wasm blob, every Tanssi network node operator can validate new blocks using the latest state transition function.
A high-level summary of the runtime upgrade process is shown in the following diagram:
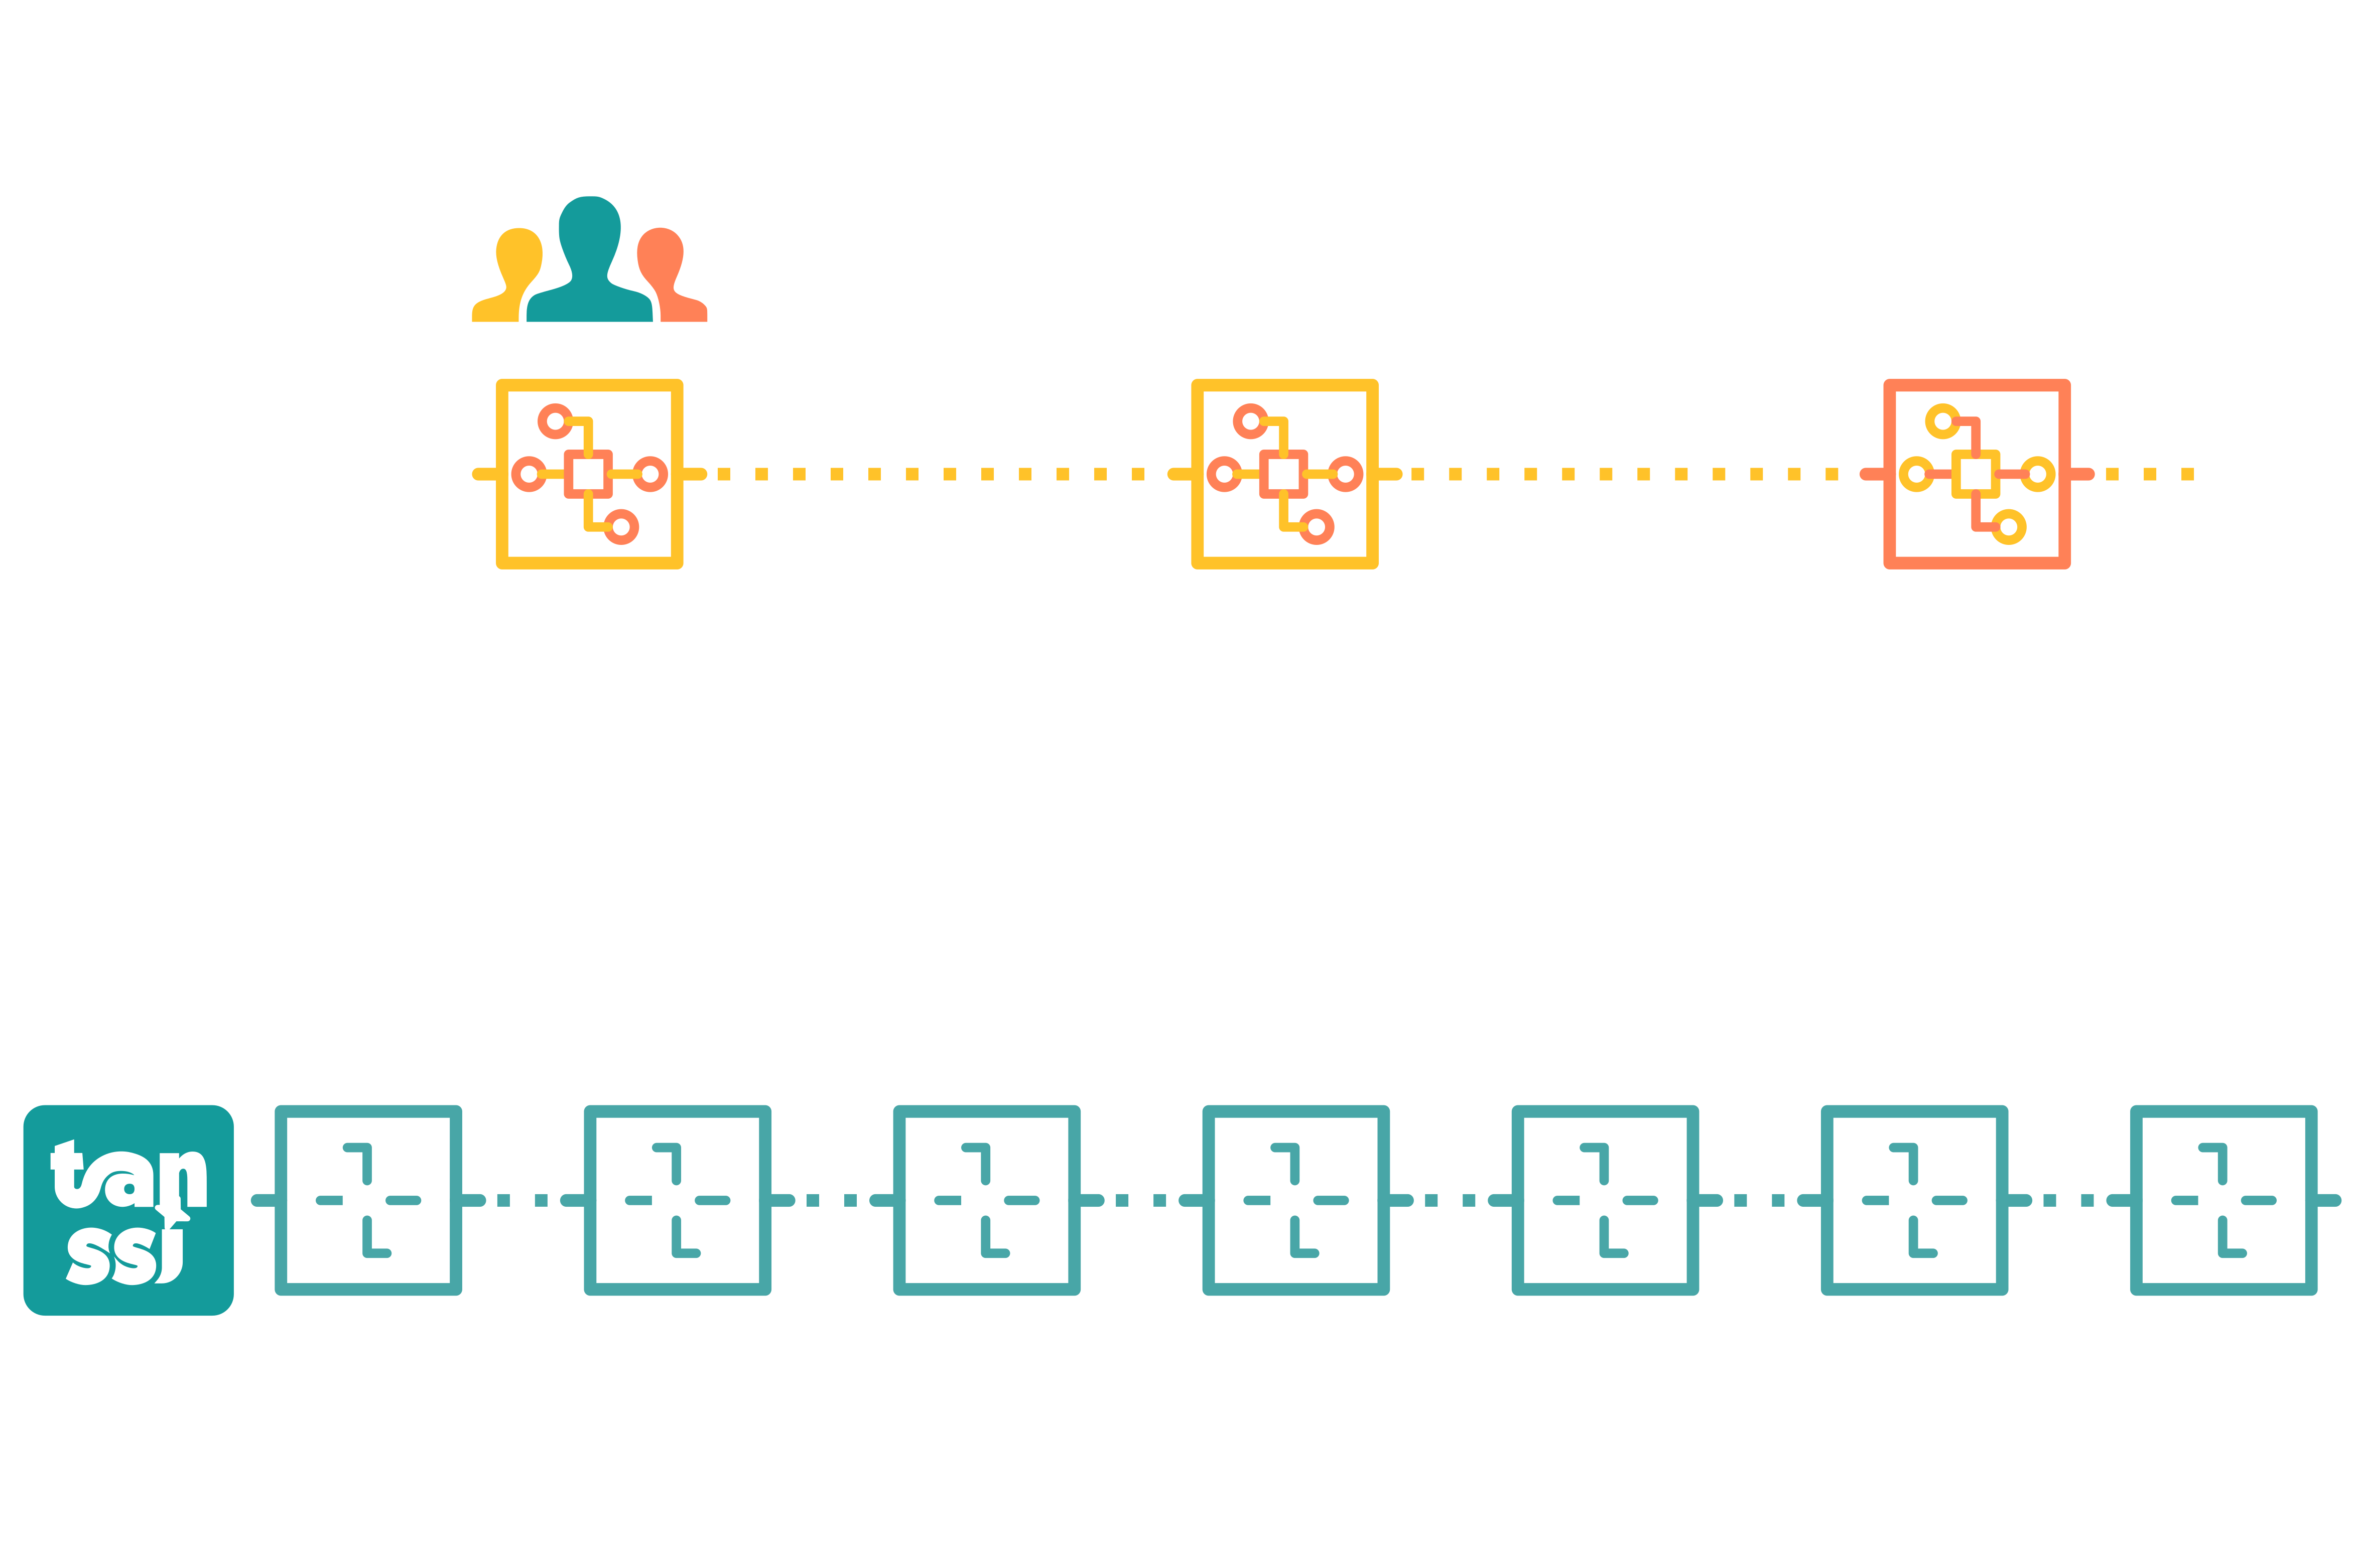
## SUDO Account {: #sudo-account}
Tanssi networks may use a specific module called [SUDO](https://paritytech.github.io/polkadot-sdk/master/pallet_sudo/pallet/struct.Pallet.html){target=\_blank}. This module introduces a new type of account, also named _SUDO_, that can execute transactions with the [_Root_ origin](#origins).
Consequently, the SUDO account can perform **any** action that the runtime allows the _Root_ origin to execute. This can include:
- Mint new native Tanssi network tokens
- Perform [forkless runtime upgrades](#forkless-upgrades)
- Send transactions impersonating other [origin types](#origins). Therefore, SUDO can send transactions on behalf of other users without accessing their private key
_SUDO_ is recommended for TestNets as it allows them to swiftly make changes without the need to go through a lengthy on-chain governance process. It is good practice to have _SUDO_ keys stored safely and grant access to _SUDO_ calls via proxy accounts. Nevertheless, having _SUDO_ enabled in a production environment can lead to undesired consequences.
**Understanding the centralization risks of having _SUDO_ in a production environment is key.**
--- END CONTENT ---
Doc-Content: https://docs.tanssi.network/learn/decentralized-networks/tx-fees/
--- BEGIN CONTENT ---
---
title: Transaction Fees
description: Learn about the transaction fee mechanism in Tanssi networks, how it works from a Substrate perspective, and in the Ethereum EVM emulation layer with EIP-1559.
icon: material-piggy-bank-outline
categories: Basics
---
# Transaction Fees {: #transaction-fees }
## Introduction {: #introduction}
Tanssi-powered networks are built with a [modular framework](/learn/framework/){target=\_blank} called [Substrate](https://docs.polkadot.com/develop/parachains/intro-polkadot-sdk/){target=\_blank}. With this framework, you can build unique ways to handle transaction fees. For example, most transactions use a specific module called [Transaction Payment](https://docs.rs/pallet-transaction-payment/latest/pallet_transaction_payment){target=\_blank}. However, transaction fees on Tanssi-powered EVM-compatible networks can be charged at an EVM execution level, bypassing other fee-related modules.
Under the hood, for execution time, instead of working with a gas-based mechanism, all Tanssi networks work with a [weight-based mechanism](https://docs.polkadot.com/polkadot-protocol/basics/blocks-transactions-fees/fees/){target=\_blank}. Weight refers to the time (in picoseconds) it takes to validate a block. Generally speaking, for both EVM and non-EVM Tanssi networks, all function calls have a weight associated with them, which sets limits on storage input/output and computation. For Tanssi EVM networks, there is a gas-to-weight mapping that fully complies with the expected gas requirements for Ethereum API-based tools.
A transaction fee scheme is applied on top of the weight-based mechanism to ensure economic incentives are in line to limit the execution time, computation, and number of calls (database read/writes) to perform operations. Transaction fees are fundamental to preventing network spam, as they represent the cost of using the Tanssi network service. Consequently, a user interacting with the network through a specific function call will pay a transaction fee determined by a baseline fee algorithm.
This page covers the fundamentals of transaction fees for Tanssi networks. It first covers the underlying transaction fee architecture and how it is adapted to a fully EIP-1559-compliant model for Tanssi EVM networks.
## Baseline Fees Calculation {: #baseline-fees }
Every action that alters the state of a Tanssi network incurs a transaction fee. This fee is essential for the network's operation, covering the computational resources required to process transactions, similar to the gas and gas price parameters in EVM-compatible chains like Ethereum.
Tanssi networks [modular framework](/learn/framework/){target=\_blank} use a weight-based fee calculation mechanism to determine transaction fees. This approach considers various factors, including computational resources and storage operations (inputs/outputs), to reflect the true cost of transactions accurately. By accounting for these elements, the network ensures fair and efficient resource allocation.
Furthermore, Tanssi networks modularity ensures that EVM-compatible networks support legacy and [EIP-1559 compatible](https://eips.ethereum.org/EIPS/eip-1559){target=\_blank} transaction pricing mechanisms, ensuring full compatibility with development environments commonly used in Ethereum.
This section outlines all the different concepts associated with transaction fees for Tanssi networks.
### Weight {: #baseline-weight}
Broadly speaking, weight refers to the execution time it takes to validate a block, measured in picoseconds. Weight is divided into two separate variables:
- **`refTime`** - corresponds to the weight associated with computation time and database reads/writes
- **`proofSize`** - corresponds to the weight associated with the size of the Proof-Of-Validity (or PoV for short). The PoV is associated with the relevant state of a transaction, and it is what the Tanssi network sequencer shares with the security provider operators to get a block validated and finalized as part of the [network transaction flow](/learn/decentralized-networks/overview/#network-transaction-flow){target=\_blank}
To find the weights for all function calls, they are benchmarked in a system with reference hardware, and the approximate values of `refTime` and `proofSize` are set. This process is repeated for all function calls that consume blockspace and affect the PoV.
For transactions in which the fees are handled by the [transaction payment](https://docs.rs/pallet-transaction-payment/latest/pallet_transaction_payment){target=\_blank} module, all weight-based parameters are then passed through a _weight to fee_ algorithm that converts all to a final value, deducted from the sender's account when executing the function call. The algorithm can be customized, but Tanssi networks have a constant value set.
For EVM transactions, gas is converted to weight through a gas-to-weight algorithm so that all EVM calls can be mapped to block execution time. Nevertheless, fees are handled at an EVM execution level.
### Baseline Transaction Fees {: #baseline-transaction-fees}
With all function calls benchmarked, the transaction fee for each specific call can be obtained. Transaction fees are typically comprised of the following elements:
- **`BaseFee`** - baseline cost for a transaction to be included. It accounts for the transaction inclusion overhead, like signature verification. The fee is defined by two separate parameters:
- **`ExtrinsicBaseWeight`** - a constant value that represents the weight of the transaction inclusion overhead
- **`WeightToFee`** - a polynomial function that converts weight to fee
- **`WeightFee`** - fee defined by two separate parameters:
- **`BenchmarkedWeight`** - weight that accounts for the complexity (execution time) of a specific call
- **`CongestionMultiplier`** - a function that converts weight to fee and can be adjusted to account for the congestion of the network (weight consumed in the previous block). The default strategy for Tanssi networks is [`SlowAdjustingFeeUpdate`](https://research.web3.foundation/Polkadot/overview/token-economics#2-slow-adjusting-mechanism){target=\_blank}, which adjusts this multiplier slowly over time following the network load
- **`LengthFee`** - a fee correlated to the length in bytes of the function call. The fee is defined by two separate parameters:
- **`ByteLengthFunctionCall`** - length in bytes of the call being executed
- **`LengthToFee`** - a function that defines the per-byte fee algorithm. For Tanssi networks, this is a constant value
- **`Tip`** - an optional value that increases the overall fee, increasing the priority of the transaction by incentivizing sequencers to include it in the next block
Therefore, in general terms, the transaction fee can be calculated with the following equation:
```text
BaseFee = ExtrinsicBaseWeight * WeightToFee
WeightFee = BenchmarkedWeight * CongestionMultiplier
LengthFee = ByteLengthFunctionCall * LengthToFee
InclusionFee = BaseFee + WeightFee + LengthFee
FinalFee = InclusionFee + Tip
```
All non-EVM function calls available to developers use these baseline calculations for transaction fees. Tanssi EVM networks have an extra layer to translate this fee scheme into an Ethereum-like scheme from an Ethereum JSON-RPC and EVM perspective.
### EVM Transaction Fees {: #evm-transaction-fees }
Tanssi offers [templates for full Tanssi EVM-compatible networks](/builders/build/templates/evm/){target=\_blank}. Such networks provide an Ethereum-like environment for developers, where they can use Eth-specific libraries like [Ethers.js](/builders/toolkit/ethereum-api/libraries/ethersjs/){target=\_blank}, [Hardhat](/builders/toolkit/ethereum-api/dev-env/hardhat/){target=_blank}, and [Foundry](/builders/toolkit/ethereum-api/dev-env/foundry/){target=\_blank}.
In addition, all Tanssi EVM-compatible networks have an [EIP-1559 compatible](https://eips.ethereum.org/EIPS/eip-1559){target=\_blank} transaction pricing mechanism for EVM transactions. But they support both commonly used EVM transaction types:
- **Type 0 (Legacy)** - the transaction fee is calculated through a single gas price value that is included in the signed transaction blob. Because Tanssi EVM-compatible networks have a dynamic pricing mechanism, gas price must be greater than the current block's `baseFee` for a transaction to be considered valid
- **Type 2 (EIP-1559)** - the transaction fee is calculated with a combination of the `maxFeePerGas` and `maxPriorityFeePerGas` from the signed transaction blob, and the network's `baseFee` dynamically changes based on block congestion
Independently of the transaction type, the outcome of all EVM transactions is that there is an associated cost in native tokens that the network must charge.
By default, Tanssi EVM-compatible networks are configured with the following parameters:
- **Minimum BaseFee** - the minimum gas price of the network in case there are no transactions for long periods. The default value is set to 1 GWei
- **Block Fulness Target (Elasticity)** - the target gas used in a block so that the `baseFee` remains the same. [EIP-1559](https://eips.ethereum.org/EIPS/eip-1559){target=\_blank} defines this value as a constant set to 2, meaning that the target usage is 50% of the block gas limit. All Tanssi EVM-compatible networks are set with the same target
- **Maximum BaseFee Increase** - the maximum amount the `baseFee` can increase or decrease, in percent points, based on the previous block target usage. [EIP-1559](https://eips.ethereum.org/EIPS/eip-1559){target=\_blank} defines this value as a constant set to 12.5%. Consequently, if the block is full/empty, the `baseFee` will increase/decrease by 12.5%, and any intermediate values are linearly adjusted. Developers can configure this value for Tanssi EVM-compatible networks, but the default value is 12.5%
!!! note
One key difference in Tanssi EVM-compatible networks EIP-1559 implementation is that the transaction fees are calculated using the previous block `baseFee`.
The EVM transaction fee cost associated with all Tanssi EVM-compatible networks is captured at an EVM execution level. Nevertheless, EVM transactions do take block execution time. Therefore a gas-to-weight algorithm is required to account for the weight consumed by a specific call relative to the gas it is consuming.
Ultimately, the transaction fee and weight associated to an EVM call in a Tanssi EVM-compatible network can be calculated with the following formula:
=== "EIP-1559"
```text
Gas Price = baseFee + maxPriorityFeePerGas < maxFeePerGas ?
baseFee + maxPriorityFeePerGas :
maxFeePerGas;
Transaction Fee = Gas Price * Gas Used
Transaction Weight = Gas Used * GasToWeight
```
=== "Legacy"
```text
Transaction Fee = GasPrice * GasUsed
Transaction Weight = GasUsed * GasToWeight
```
`GasToWeight` is a constant value set to `{{ templates.evm.gas_to_weight }}`.
--- END CONTENT ---
Doc-Content: https://docs.tanssi.network/learn/framework/architecture/
--- BEGIN CONTENT ---
---
title: Framework Architecture
description: In a Substrate node, two main components are the runtime, which controls the blockchain's state transition, and the client, which manages everything else.
icon: octicons-stack-24
categories: Basics
---
# Framework Architecture {: #framework-architecture }
## Introduction {: #introduction }
Substrate is a software development kit (SDK) for building blockchains. This framework is the foundation and engine powering many projects across the Web3 ecosystem, including the Tanssi network itself and the networks deployed through Tanssi.
Written in the Rust language and designed with a modular architecture, Substrate is extremely performant, flexible, and highly customizable, making it the best choice for developing blockchains.
In this article, the architecture of a Substrate node is covered.
## Architecture {: #architecture }
The Substrate framework is designed for maximum customizability, providing a fully functional implementation for every important internal aspect of a blockchain. It allows developers to focus on the specifics of the use case and the runtime characteristics, and it provides the ability to change any of the default features (should the need arise).
The architecture of a Substrate node contains two main components:
- **Core Client** - handles the communication with the outer world (other nodes, dApps, end users, among others), and many other internal responsibilities, such as storage and communication
- **Runtime** - implements the custom logic of the Tanssi network, executes transactions, and manages the state transitions
From the end-user perspective, all the interaction with the Tanssi network is usually made through dApps or directly via the node RPC endpoints, for example, using a wallet. When a user triggers a request to fetch data or sends transactions to a node, the core client is responsible for responding or queuing the transactions until execution in the runtime. Still, all these internal aspects of the node design are kept transparent to the user.
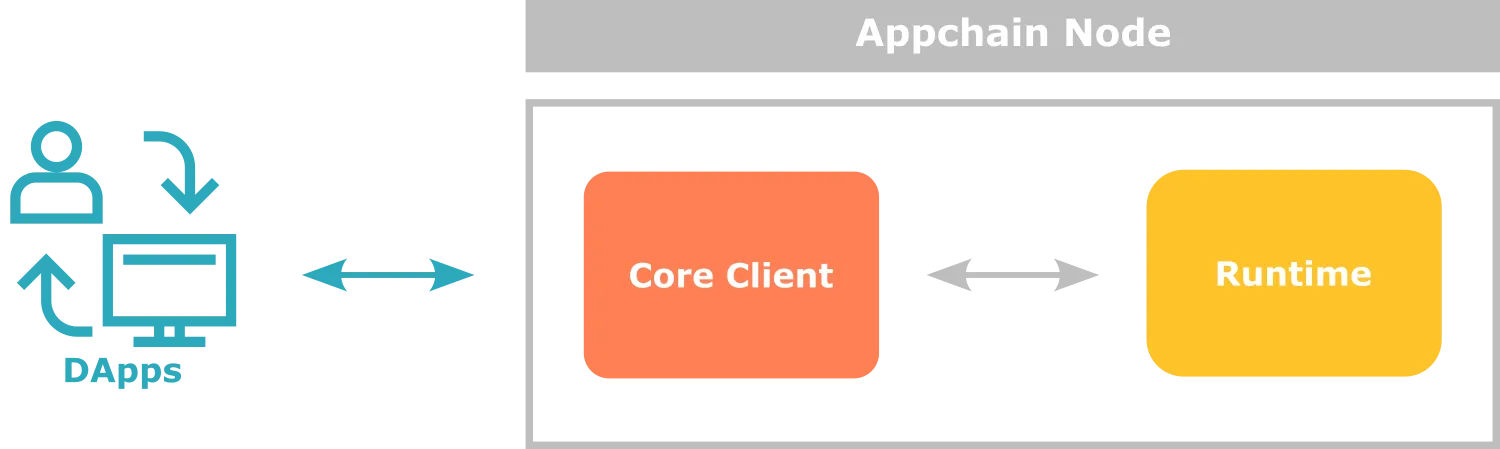
## The Core Client {: #core-client }
The core client comprises components responsible for everything in the operation of a node in the network except for what happens in the runtime.
Some of the main components are:
- **Networking** - this component handles the communication with the peers in the network (synchronizing blocks, propagating transactions, and so on) and exposes the endpoints that allow dApps to integrate and interact with the Tanssi network
- **Storage** - this component manages the state storage of the Tanssi network in a highly efficient key-value database
- **Consensus** - this component ensures that all the participants in the network agree on the state of the blockchain, validating transactions, state transitions, and the resulting blocks
The default configuration of a Substrate node and the built-in implementations of the components are usually the best choice for most use cases. Still, teams are welcome to innovate and change or replace any piece of the node or even write a completely different implementation of the core client, such as [Kagome](https://github.com/soramitsu/kagome#intro){target=\_blank} (C++ implementation) and [Gossamer](https://github.com/ChainSafe/gossamer#a-go-implementation-of-the-polkadot-host){target=\_blank} (Golang implementation).
## The Runtime {: #runtime }
The runtime plays a crucial role in the operation of the Tanssi network. It contains the core logic and rules to meet the requirements of the use case the developers are building, and, therefore, it is responsible for validating the transactions and executing the state transitions.
Being the core element in a Tanssi network, designing the Substrate architecture an important decision has been made regarding the format for the runtime: it is compiled to [WebAssembly (Wasm)](https://webassembly.org){target=\_blank} byte code.
The Wasm format offers many advantages to a deployed Tanssi network, including:
- **Portability** - the Wasm format is platform-independent, meaning that the same binary can be distributed and run on different nodes using different hardware architectures and operating systems
- **Deterministic Execution** - the Wasm format ensures deterministic execution of code, which means that the same input will always produce the same output. Determinacy is a critical aspect in blockchains to obtain the same state transitions across every node in the network and reach a consensus
- **Forkless Upgradeability** - Substrate stores the runtime Wasm blob on-chain, meaning that the runtime itself becomes part of the state. This design allows upgrading the runtime logic in a forkless way using a transaction
Besides the format, internally, a Substrate runtime is built by composing different modules, either provided and ready-to-use by Substrate or custom-made. Each one of these modules define, among other things, the transactions they expose, the logic behind them, what needs to be stored in the chain state, the best format to do it, and how they cooperate with other modules composing functionality. More details about building a runtime will be covered in the [modules](/learn/framework/modules/){target=\_blank} section.
## Client-Runtime Communication {: #client-runtime-communication }
As previously described, the two main components of a Substrate node (the core client and the runtime) have a clear separation of concerns. Beyond the functional responsibilities, at a lower level, their binary representation and execution environments are different. While the node is compiled to be installed and run on a specific platform (be it Linux x64 or any other), the Tanssi network runtime is compiled to a Wasm format that is platform-agnostic and runs in an isolated execution environment.
Bearing in mind the separated execution environments, all the communication between the node client and the runtime occurs through a limited and well-defined interface, allowing the necessary operations such as:
- **Executing Transactions** - when a user submits a transaction to the client node, the node passes this transaction to the runtime through the defined API for its execution
- **State Queries** - the client node can query the current state of the blockchain to retrieve information such as account balances and any other domain-specific data
- **Consensus and Finality** - the client node coordinates consensus and finalization of the blocks, but it is the runtime's responsibility to determine the validity of new blocks, validate transactions, and ensure that the consensus rules are followed
- **Event Notifications** - the runtime emits events while executing transactions that the client node can use to keep external users updated about specific actions or changes in the state
--- END CONTENT ---
Doc-Content: https://docs.tanssi.network/learn/framework/modules/
--- BEGIN CONTENT ---
---
title: Network Modules for your Runtime
description: Substrate is a modular blockchain development framework with an extensive set of ready-to-use components to bundle with custom logic into the network Runtime.
icon: material-puzzle-outline
categories: Custom-Runtime, Basics
---
# Network Framework Modules {: #network-framework-modules }
## Introduction {: #introduction }
The Substrate framework provides complete and ready-to-use implementations of the main functions a Tanssi network needs to work properly, including cryptography, consensus, governance, and so on. These implementations are fully customizable and could be replaced with custom logic if needed.
When building the Runtime, which defines the state transition rules between two blocks applied to a set of transactions, the intended behavior and features of the blockchain need to be set by determining the rules of the state transition.
To build the Runtime, Substrate provides many built-in modules (also known as pallets) that can be freely used as building blocks to compose and interact with any other custom-made modules, allowing teams to create unique behaviors according to the specific requirements of their Tanssi network.
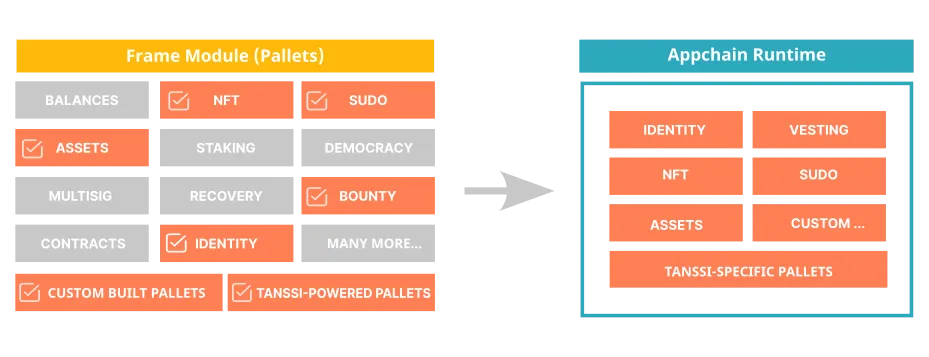
## Built-in Modules {: #built-in-modules }
When designing and writing the rules of a Tanssi network, the available set of functional modules brings a solution to many of the coding requirements that would otherwise need to be built from scratch.
Here is a list of some of the most popular modules:
- **[Balances](https://paritytech.github.io/substrate/master/pallet_balances/index.html){target=\_blank}** - it provides functions for handling accounts and balances for the Tanssi network native currency
- **[Assets](https://paritytech.github.io/substrate/master/pallet_assets/index.html){target=\_blank}** - it provides functions for handling any type of fungible tokens
- **[NFTs](https://paritytech.github.io/substrate/master/pallet_nfts/index.html){target=\_blank}** - it provides functions for dealing with non-fungible tokens
- **[Democracy](https://paritytech.github.io/substrate/master/pallet_democracy/index.html){target=\_blank}** - it provides functions to manage and administer general stakeholder voting
- **[Multisig](https://paritytech.github.io/substrate/master/pallet_multisig/index.html){target=\_blank}** - it provides functions for multi-signature dispatch
- **[Recovery](https://paritytech.github.io/substrate/master/pallet_recovery/index.html){target=\_blank}** - it provides functions to allow users to regain access to their accounts when the private key is lost. This works by granting other accounts the right to sign transactions on behalf of the lost account (note that it is necessary to have previously chosen the authorized accounts)
- **[Staking](https://paritytech.github.io/substrate/master/pallet_staking/index.html){target=\_blank}** - it provides functions to administer staked tokens, support rewarding, slashing, depositing, withdrawing, and so on
In addition to those previously listed, other modules like [identity](https://paritytech.github.io/substrate/master/pallet_identity/index.html){target=\_blank}, [smart contracts](https://paritytech.github.io/substrate/master/pallet_contracts/index.html){target=\_blank}, [vesting](https://paritytech.github.io/substrate/master/pallet_vesting/index.html){target=\_blank}, and many others that are freely available can speed up the development of the Tanssi network and, consequently, the time to market.
!!! note
The framework also includes other modules that provide core protocol functionality, such as consensus and low-level data encoding.
## Custom-Made Modules {: #custom-modules }
Developers creating new modules enjoy complete freedom to express any desired behavior in the core logic of the blockchain, like exposing new transactions, storing sensible information, and validating and enforcing business logic.
As explained in the [Architecture](/learn/framework/architecture/#client-runtime-communication){target=\_blank} article, a module needs to be able to communicate with the core client by exposing and integrating with a very specific API that allows the runtime to expose transactions, access storage, and code and decode information stored on-chain. It also needs to include many other required wiring codes that make the module work in the node.
To improve developer experience when writing modules, Substrate relies heavily on [Rust macros](https://doc.rust-lang.org/book/ch19-06-macros.html){target=\_blank}. Macros are special instructions that automatically expand to Rust code just before compile-time, allowing modules to keep up to seven times the amount of code out of sight of the developers. This allows developers to focus on the specific functional requirements when writing modules instead of dealing with technicalities and the necessary scaffolding code.
All modules in Substrate, including custom-made ones, implement these attribute macros, of which the first three are mandatory:
- **`#[frame_support::pallet]`** - this attribute is the entry point that marks the module as usable in the runtime
- **`#[pallet::pallet]`** - applied to a structure that is used to retrieve module information easily
- **`#[pallet::config]`** - is a required attribute to define the configuration for the data types of the module
- **`#[pallet::call]`** - this macro is used to define functions that will be exposed as transactions, allowing them to be dispatched to the runtime. It is here that the developers add their custom transactions and logic
- **`#[pallet::error]`** - as transactions may not be successful (insufficient funds, as an error example), and for security reasons, a custom module can never end up throwing an exception, all the possible errors are to be identified and listed in an enum to be returned upon an unsuccessful execution
- **`#[pallet::event]`** - events can be defined and used as a means to provide more information to the user
- **`#[pallet::storage]`** - this macro is used to define elements that will be persisted in storage. As resources are scarce in a blockchain, it should be used wisely to store only sensible information
All these macros act as attributes that must be applied to the code just above Rust modules, functions, structures, enums, types, etc., allowing the module to be built and added to the runtime, which, in time, will expose the custom logic to the outer world, as exposed in the following section.
### Custom Module Example { #custom-module-example }
As an example of a custom module, the following code (not intended for production use) showcases the use of the previously mentioned macros by presenting a simple lottery with minimal functionality, exposing two transactions:
- **buy_ticket** - this transaction verifies that the user signing the request has not already bought a ticket and has enough funds to pay for it. If everything is fine, the module transfers the ticket price to a special account and registers the user as a participant for the prize
- **award_prize** - this transaction generates a random number to pick the winner from the list of participants. The winner gets the total amount of the funds transferred to the module's special account
```rust
#![cfg_attr(not(feature = "std"), no_std)]
/// Learn more about FRAME and the core library of Substrate FRAME pallets:
///
pub use pallet::*;
#[frame_support::pallet(dev_mode)]
pub mod pallet {
use super::*;
use frame_support::pallet_prelude::{*, ValueQuery, OptionQuery};
use frame_system::pallet_prelude::*;
use scale_info::prelude::vec::Vec;
use frame_support::
{
sp_runtime::traits::AccountIdConversion,
traits:: {
Currency, ExistenceRequirement, Randomness
},
PalletId,
};
type BalanceOf =
<::Currency as Currency<::AccountId>>::Balance;
#[pallet::pallet]
pub struct Pallet(_);
/// Configure the module by specifying the parameters and types on which it depends.
#[pallet::config]
pub trait Config: frame_system::Config {
// Event definition
type RuntimeEvent: From>
+ IsType<::RuntimeEvent>;
// Currency
type Currency: Currency;
// Randomness
type MyRandomness: Randomness>;
// Ticket cost
#[pallet::constant]
type TicketCost: Get>;
// Maximum number of participants
#[pallet::constant]
type MaxParticipants: Get;
// Module Id
#[pallet::constant]
type PalletId: Get;
}
// The pallet's runtime storage items.
#[pallet::storage]
#[pallet::getter(fn get_participants)]
pub(super) type Participants = StorageValue<
_,
BoundedVec,
OptionQuery
>;
#[pallet::storage]
#[pallet::getter(fn get_nonce)]
pub(super) type Nonce = StorageValue<
_,
u64,
ValueQuery
>;
// Pallets use events to inform users when important changes are made.
// https://docs.substrate.io/main-docs/build/events-errors/
#[pallet::event]
#[pallet::generate_deposit(pub(super) fn deposit_event)]
pub enum Event {
/// Event emitted when a ticket is bought
TicketBought { who: T::AccountId },
/// Event emitted when the prize is awarded
PrizeAwarded { winner: T::AccountId },
/// Event emitted when the prize is to be awarded, but there are no participants
ThereAreNoParticipants,
}
// Errors inform users that something went wrong
#[pallet::error]
pub enum Error {
NotEnoughCurrency,
AccountAlreadyParticipating,
CanNotAddParticipant,
}
#[pallet::call]
impl Pallet {
#[pallet::call_index(0)]
#[pallet::weight(0)]
pub fn buy_ticket(origin: OriginFor) -> DispatchResult {
// 1. Validates the origin signature
let buyer = ensure_signed(origin)?;
// 2. Checks that the user has enough balance to afford the ticket price
ensure!(
T::Currency::free_balance(&buyer) >= T::TicketCost::get(),
Error::::NotEnoughCurrency
);
// 3. Checks that the user is not already participating
if let Some(participants) = Self::get_participants() {
ensure!(
!participants.contains(&buyer),
Error::::AccountAlreadyParticipating
);
}
// 4. Adds the user as a new participant for the prize
match Self::get_participants() {
Some(mut participants) => {
ensure!(
participants.try_push(buyer.clone()).is_ok(),
Error::::CanNotAddParticipant
);
Participants::::set(Some(participants));
},
None => {
let mut participants = BoundedVec::new();
ensure!(
participants.try_push(buyer.clone()).is_ok(),
Error::::CanNotAddParticipant
);
Participants::::set(Some(participants));
}
};
// 5. Transfers the ticket cost to the module's account
// to be hold until transferred to the winner
T::Currency::transfer(
&buyer,
&Self::get_pallet_account(),
T::TicketCost::get(),
ExistenceRequirement::KeepAlive)?;
// 6. Notify the event
Self::deposit_event(Event::TicketBought { who: buyer });
Ok(())
}
#[pallet::call_index(1)]
#[pallet::weight(0)]
pub fn award_prize(origin: OriginFor) -> DispatchResult {
// 1. Validates the origin signature
let _who = ensure_root(origin)?;
match Self::get_participants() {
Some(participants) => {
// 2. Gets a random number from the randomness module
let nonce = Self::get_and_increment_nonce();
let (random_seed, _) = T::MyRandomness::random(&nonce);
let random_number = ::decode(&mut random_seed.as_ref())
.expect("secure hashes should always be bigger than u32; qed");
// 3. Selects the winner from the participants lit
let winner_index = random_number as usize % participants.len();
let winner = participants.as_slice().get(winner_index).unwrap();
// 4. Transfers the total prize to the winner's account
let prize = T::Currency::free_balance(&Self::get_pallet_account());
T::Currency::transfer(
&Self::get_pallet_account(),
&winner,
prize,
ExistenceRequirement::AllowDeath)?;
// 5. Resets the participants list, and gets ready for another lottery round
Participants::::kill();
// 6. Notify the event
Self::deposit_event(Event::PrizeAwarded { winner: winner.clone() } );
},
None => {
// Notify the event (No participants)
Self::deposit_event(Event::ThereAreNoParticipants);
}
};
Ok(())
}
}
impl Pallet {
fn get_pallet_account() -> T::AccountId {
T::PalletId::get().into_account_truncating()
}
fn get_and_increment_nonce() -> Vec {
let nonce = Nonce::::get();
Nonce::::put(nonce.wrapping_add(1));
nonce.encode()
}
}
}
```
For more information about the step-by-step process of creating a custom-made module to the runtime, please refer to the [Adding a Custom-Made Module](/builders/build/customize/adding-custom-made-module/){target=\_blank} in the Builder's section.
--- END CONTENT ---
Doc-Content: https://docs.tanssi.network/learn/framework/overview/
--- BEGIN CONTENT ---
---
title: Network Development Framework Overview
description: Substrate is a blockchain development framework built in Rust Programming Language that streamlines and speeds up the process of developing new networks.
icon: octicons-home-24
categories: Basics
---
# Network Development Framework Overview {: #network-dev-framework-overview }
## Introduction {: #introduction }
Building a network from scratch is a very complex task that requires deep knowledge in a wide range of areas, including (but not limited to):
- **Consensus Algorithms** - consensus ensures that all participants in the blockchain network agree on the validity of transactions. Some popular consensus mechanisms include Proof of Work (PoW) and Proof of Stake (PoS)
- **Cryptography** - cryptography plays a crucial role in securing the blockchain. You'll need cryptographic algorithms for tasks like creating digital signatures, verifying transactions, and encrypting data
- **Distributed Network** - a network architecture to enable nodes to communicate, validate transactions, and synchronize the blockchain data is key to maintaining a shared ledger in a decentralized network
- **Data Structures** - besides the list of blocks, where each block contains a set of transactions along with a reference to the previous block, an optimized and performant strategy to store the state of the network is needed
- **Governance** - if the network is designed to be permissionless, a voting mechanism is important in order to keep it evolving and reflecting the community will
- **Upgradeability** - it is necessary to clearly define how to upgrade, how modifications are implemented, and how conflicts are resolved within the network
Fortunately, there’s no need to build these blockchain components from scratch, thanks to an excellent open-source framework called [Substrate](https://docs.polkadot.com/develop/parachains/intro-polkadot-sdk/){target=\_blank}. Tanssi itself is built with this framework, leveraging its comprehensive base implementations, modularity, and flexibility to achieve a high level of customization.
## Substrate Framework {: #substrate-framework}
Substrate is an extremely performant, flexible, modular, and highly customizable framework for building blockchains. This framework is the foundation and engine powering many projects across the Web3 ecosystem, including the Tanssi network itself and the networks deployed through Tanssi.
Many of its great features, such as performance, ease of use, and modularity, result from the programming language chosen for its development. This is where the [Rust Programming Language](#rust-programming-language) shines: It is fast, portable, and provides a wonderful model to handle memory, among other reasons detailed in the [next section](#rust-programming-language).
When developing a network, Substrate represents a great head start by providing a ready-to-use set of implementations of the main building blocks a project needs:
- **Consensus Algorithms** - there are multiple built-in consensus engines, such as Aura (Proof of Authority), Babe (Proof of Stake), and Grandpa (block finality), but due to the high degree of customization Substrate offers, teams can always choose to develop their specific consensus to adapt to the use case needs, as the Moonbeam team did with the [Nimbus Parachain Consensus Framework](https://docs.moonbeam.network/learn/features/consensus){target=\_blank}
- **Runtime Modules** - many built-in modules (explained in detail in the [modules](/learn/framework/modules/){target=\_blank} section) can be selected and configured into your network, such as accounts, balances, staking, governance, identity, and more
- **Networking** - built-in protocols and libraries for establishing connections, propagating transactions and blocks, synchronizing the blockchain state, and managing network interactions
- **Storage** - built-in storage mechanisms for efficient data storage and retrieval
- **Transaction Queue** - built-in transaction queue system that manages transaction validation, prioritization, and inclusion in blocks, ensuring the consistency and integrity of the network's state
- **RPC APIs** - Substrate provides Remote Procedure Call (RPC) APIs that enable external applications to interact with the network by querying blockchain data, submitting transactions, and accessing various functionalities exposed by the runtime
Every feature Substrate offers can be used as-is, extended, customized, or replaced to meet the specific requirements of the use case of the network.
Substrate streamlines and speeds up the process of developing new networks. When used in conjunction with Tanssi, which helps in handling the infrastructure and overseeing the deployment, the task of launching a new network becomes significantly simpler!
## Rust Programming Language {: #rust-programming-language}
[Rust](https://www.rust-lang.org){target=\_blank} is a programming language that has unique features that have made it the most loved language for the seventh consecutive year, according to [Stack Overflow's annual developer survey](https://survey.stackoverflow.co/2022#section-most-loved-dreaded-and-wanted-programming-scripting-and-markup-languages){target=blank}.
In addition to providing a great experience for developers, Rust excels in many areas:
- **Memory safety** - Rust compiler enforces strict compile-time checks to prevent common programming errors such as null pointer dereferences, buffer overflows, and data races. Additionally, memory is managed through a novel system of ownership (checked by the compiler), which eliminates the necessity for a garbage collector
- **Performance** - Rust achieves performance comparable to that of C and C++ by providing low-level control over system resources and minimizing runtime overhead. It has a zero-cost abstraction principle, similar to "what you don't use, you don't pay for" from C++, meaning that abstractions have no extra overhead
- **Concurrency** - Rust has built-in features that make it easy to write concurrent and parallel code without introducing data races. It provides lightweight threads (tasks) and a powerful ownership model that ensures the safe sharing of data between threads
- **Expressive and safe abstractions** - Rust offers a rich set of modern language features, such as pattern matching, algebraic data types, closures, and type inference, allowing developers to write and read expressive and concise code. The Rust compiler enforces the strong type system, preventing many runtime errors at compile-time
- **Cross-platform compatibility** - Rust is designed to work well on a variety of platforms and architectures. It supports major operating systems like Windows, macOS, and Linux, as well as embedded systems and WebAssembly. This versatility allows developers to write code that can be deployed across different environments
- **Growing ecosystem** - Rust has a rapidly growing ecosystem with a vibrant community and a rich collection of libraries and tools. The official package manager, Cargo, simplifies dependency management, building, and testing
- **Interoperability** - Rust provides seamless interoperability with existing codebases written in C and C++. It has a Foreign Function Interface (FFI) that allows Rust code to interface with code written in other languages, enabling developers to gradually introduce Rust into existing projects, like the Linux kernel
--- END CONTENT ---
Doc-Content: https://docs.tanssi.network/learn/framework/xcm/
--- BEGIN CONTENT ---
---
title: Native Cross-Chain Communication
description: Tanssi networks benefit from XCM, a native cross-chain communication language, which allows fast and secure bridging guaranteed by Polkadot's relay chain.
categories: Basics
---
# Native Cross-Chain Communication
## Introduction {: #introduction }
All Tanssi-powered networks have an inherent capability to communicate and interoperate with any other network in the ecosystem. This native cross-chain communication feature is possible thanks to the unique infrastructure the networks are built on top of, leveraging the Cross-Consensus Message format (XCM for short), which facilitates communication between different consensus systems.
XCM is a messaging language designed to be generic. It doesn't make any assumptions about the destination chain and can communicate different intentions between sovereign consensus systems.
An XCM message is a program holding one or more instructions that will be relayed for execution to the destination chain. By itself, each XCM instruction is meaningless, but the combination of a specific set of instructions can result in a desired action when the XCM message is executed in the destination chain.
In this article, we cover the basic concepts of the native cross-chain communication mechanism that allows fast and secure bridging within the ecosystem.
## Design Principles {: #design-principles }
Conceived with an abstract mindset, XCM is not designed to comply with a specific use case or specific destination network setup, thus minimizing the coupling effect. Its core design principles are:
- **Asynchronous** - similar to sending a postcard -but way faster- the sender will keep performing its duties as usual, without blocking itself or awaiting a response from the destination
- **Absolute** - messages are guaranteed to be delivered to the intended destination, in order and in a timely fashion
- **Asymmetric** - messages sent have no response counterpart. Any return values, if required, must be sent back from the destination to the sender with another message
- **Agnostic** - there are no assumptions whatsoever about the configuration or properties of two communicating networks. Networks might differ in every aspect, except the ability to understand XCM. E.g., one chain could be EVM-compatible and not the other, one chain could be a DeFi network and the other a gaming network, and so on
## Fees {: #fees }
A user executing a transaction on a network must pay the fees derived from computational effort associated with the task, and cross-chain execution is no exception to this rule. In cross-chain communication, a message requires execution on at least two different chains, and the user needs to pay for the fees associated with the computational effort made by every chain involved. Besides the execution-related costs, Tanssi networks include a default [delivery fee](https://paritytech.github.io/polkadot-sdk/master/polkadot_runtime_common/xcm_sender/struct.ExponentialPrice.html){target=\_blank} to prevent XCM spamming.
For example, if a user on network A wants to call a smart contract on network B, the user must have enough funds to pay for the message delivery and include instructions in the XCM message to provide an asset that network B accepts as payment for its services to cover the associated fees. Once such an asset is provided, the execution can now be bought on the destination chain.
!!! note
Since networks are sovereign, they get to decide which tokens are valid for paying their XCM execution fees.
E.g., if network B accepts network A tokens for fee payments, any user on network A can pay for an XCM message destined for network B using only network A tokens.
## Common Use Cases {: #common-use-cases }
Many use cases can be addressed by benefiting from the common ground and versatility XCM provides. Two of the most recurrent ones are asset transfers and remote execution.
### Asset Transfers {: #asset-transfer }
Moving digital assets from one network to another is essential for creating a more dynamic, efficient, and interconnected blockchain ecosystem. The native cross-chain capability allows two main strategies to transfer assets from one chain to another:
- **Teleport** - teleporting an asset is a simple and efficient mechanism, but it has a major caveat: it requires trust between the parties. In essence, when network A wants to send X amount of assets to network B, it burns X amount of assets and sends a message to network B instructing them to mint exactly X amount of assets, preserving the overall asset balance and concluding the teleport action. In this process, network A trusts network B not to mint more tokens than what was transferred, and network B trusts network A to burn the tokens that were transferred
- **Reserve transfer** - A reserve transfer involves the **reserve chain** of an asset, which is the chain where the asset is native (e.g., [Moonbeam](https://moonbeam.network/){target=\_blank} is the reserve chain for the GLMR token). Also, non-reserve networks hold a *sovereign account* on the reserve chain, a keyless account managed by the respective network governor. Thus, when reserve network A wants to send X amount of an asset to non-reserve network B, it locally transfers the assets to network's B sovereign account and, in the same atomic action, it sends an XCM message to network B with instructions to mint X amount of a derivative form of the transferred asset. On the other way around, if non-reserve network B wants to send X amount of an asset to reserve network A, then the steps are: network B burns the derived form of the asset locally and sends an XCM message to network A, with instructions to transfer the assets from network B's sovereign account to network's A destination account. Even if the non-reserve network mints derived tokens in excess (or doesn't burn tokens when transferring), these tokens will have no real value because they are not backed one-to-one in the reserve chain
The associated fees for executing transfers are typically deducted from the transferred amount, so the recipient receives the intended amount minus the fees.
### Remote Execution {: #remote-execution }
The native interoperability XCM provides allows a network to send a message to another triggering some action. For example, If the destination chain is EVM-compatible, network A can call a smart contract deployed on network B.
As mentioned in the [fees section](#fees), to get any on-chain request executed it is necessary to cover its associated fees. On XCM, remote execution can be bought with two steps:
1. Reserve some assets using the `WithdrawAsset` XCM instruction, which takes funds from the call origin and puts them in a holding register
2. Pay for the on-chain execution, using the `BuyExecution` XCM instruction, which uses the previously withdrawn assets
!!! note
When a network sends an XCM message, its default source on the receiving end is the origin network's Sovereign account. The sender network can add an XCM instruction called `DescendOrigin` to the message, changing the origin account to match the signing user's account, ensuring execution occurs on behalf of the same entity initiating the XCM message on the source chain, and avoiding a potentially unsafe scenario.
Finally, the execution takes place on the destination chain, calling a smart contract or any other transaction using the XCM instruction called `Transact`.
The general flow for remote execution is represented in the following diagram:

## Establishing Cross-Chain Communication {: #channel-registration }
Before two chains can communicate, a messaging channel must be established. Channels are unidirectional, which means that separate channels are needed to send messages from chain A to chain B and B to A.
For chain A to communicate with chain B, chain A must send an open channel transaction to the relay chain requesting a channel be opened with chain B. Chain B must then accept the request by sending a corresponding XCM message to the relay chain. Only when both chains agree is the channel opened in the next epoch. The same process is required to establish a channel from chain B to chain A.
It is important to note that a channel between a network and the relay chain is automatically opened upon network registration and onboarding.
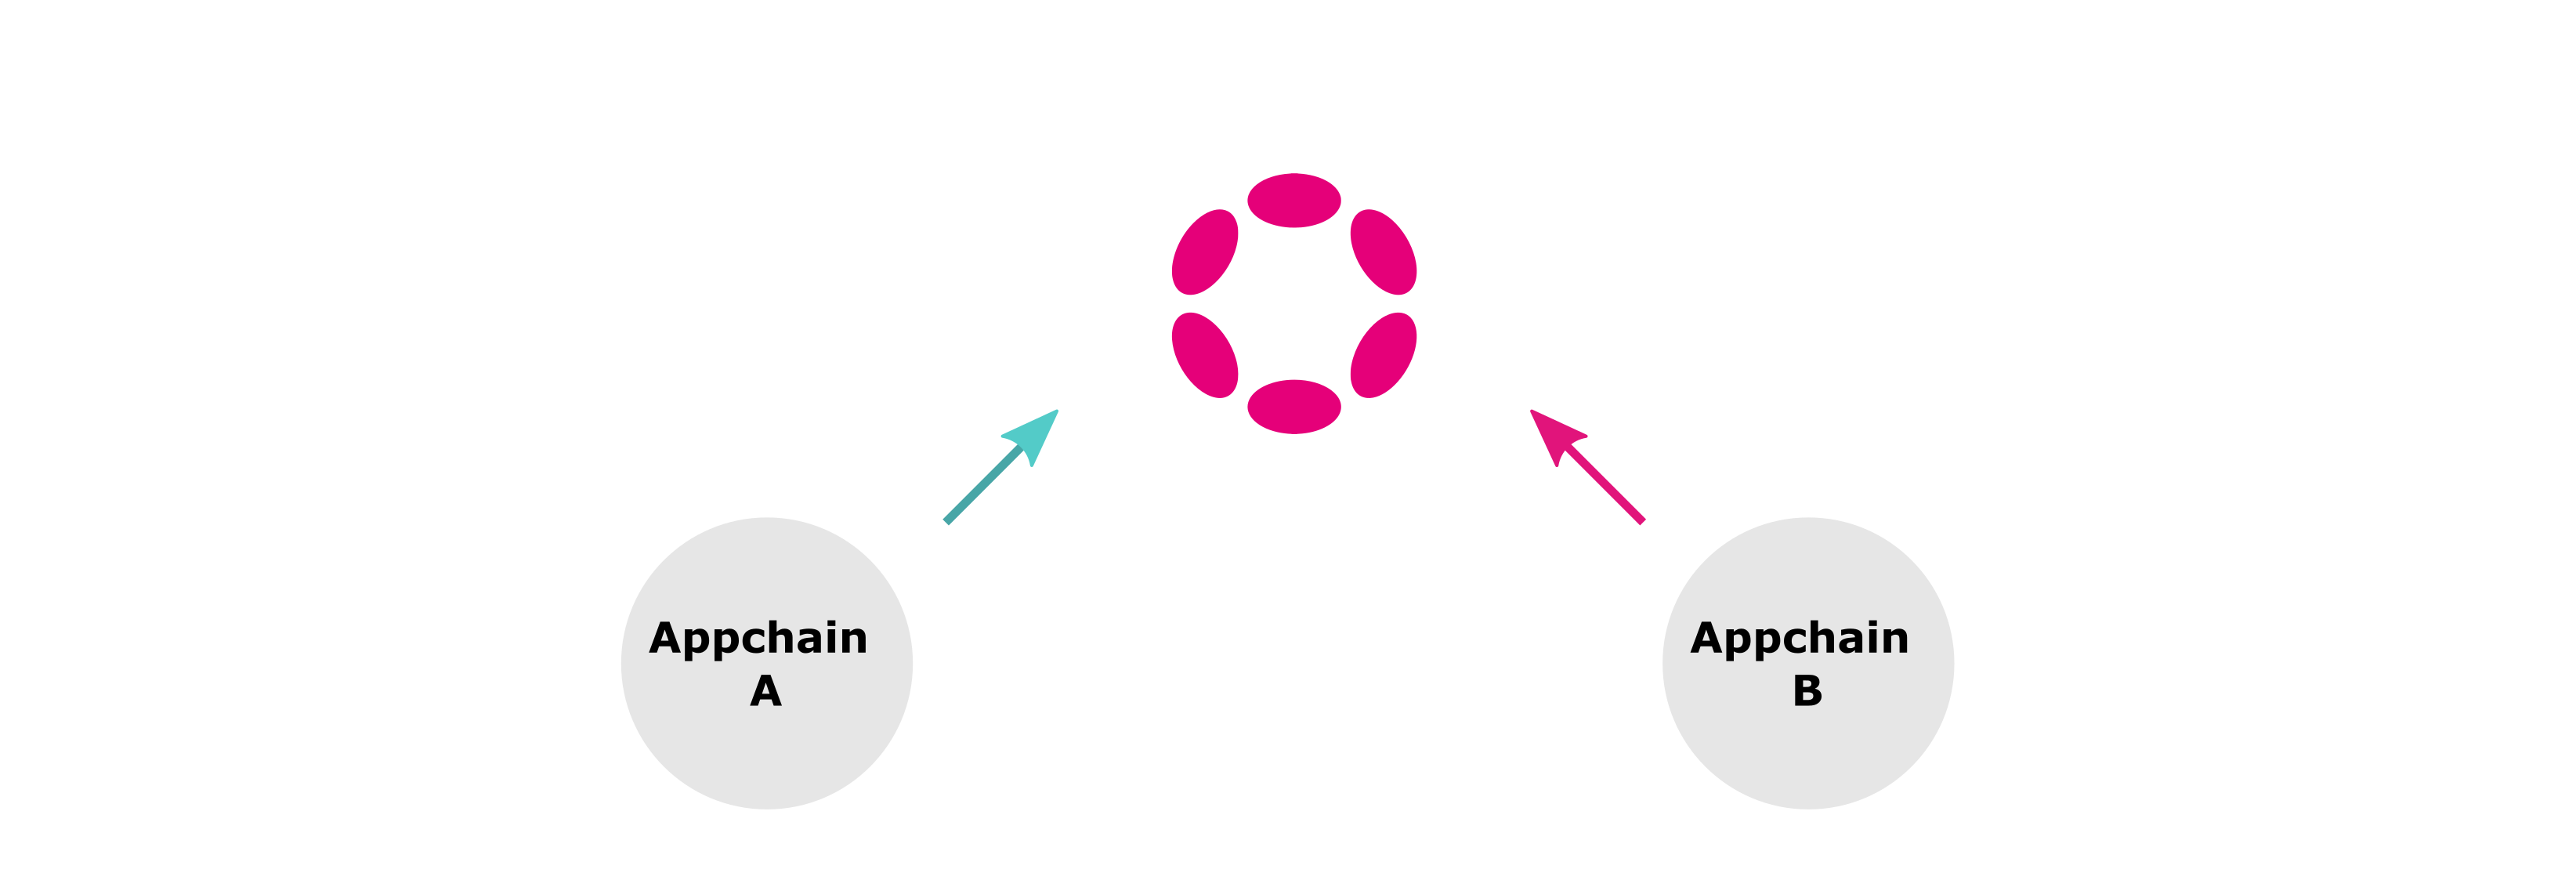
Once the channel is established, cross-chain messages can be sent between networks. For asset transfers, assets will also need to be registered before being transferred.
!!! note
XCM is a versioned, ever-evolving language. When two communicating networks use different XCM versions, they must use the latest version supported by the less upgraded side. To find out the latest XCM version a network can work with, other networks can query it and subscribe for updates whenever this changes.
## Message Destinations {: #message-destinations }
To compose meaningful messages in a multichain environment it is necessary to have a precise yet abstract way of referencing resources located in different consensus systems. A concept called *multilocation* is used to serve this purpose and target a specific chain or any of its inner elements, such as an account, an asset, or a smart contract.
XCM's destination elements are organized in a hierarchical architecture, where elements are contained within other components. For example, a smart contract is an element contained within a network, and the same can be said for an account or an ERC20 asset. Networks are contained by the relay chain, which plays a crucial role in the cross-chain messaging process, relaying messages from one network to another.
Multilocations are not a universal resource locator. They refer to elements from the sender's perspective and are composed of two components: `parents` and `interior`. Parents is a property that indicates if the route must "move up" in the hierarchy, i.e., from a network to the relay chain. Interior is a list of junctions that define how to locate the destination. Here are some examples of multilocations:
- **Network A references a smart contract in network B** - from the point of view of network A, to reach a smart contract in network B it is necessary to move up in the hierarchy (to the relay chain) and then descend to network B to, once there, reference the smart contract's address. The multilocation is therefore defined with a `parents` value set to `1`, which moves up, and two junctions, one defining which network should receive the message, and the other defining the H160 address of the smart contract that will be called
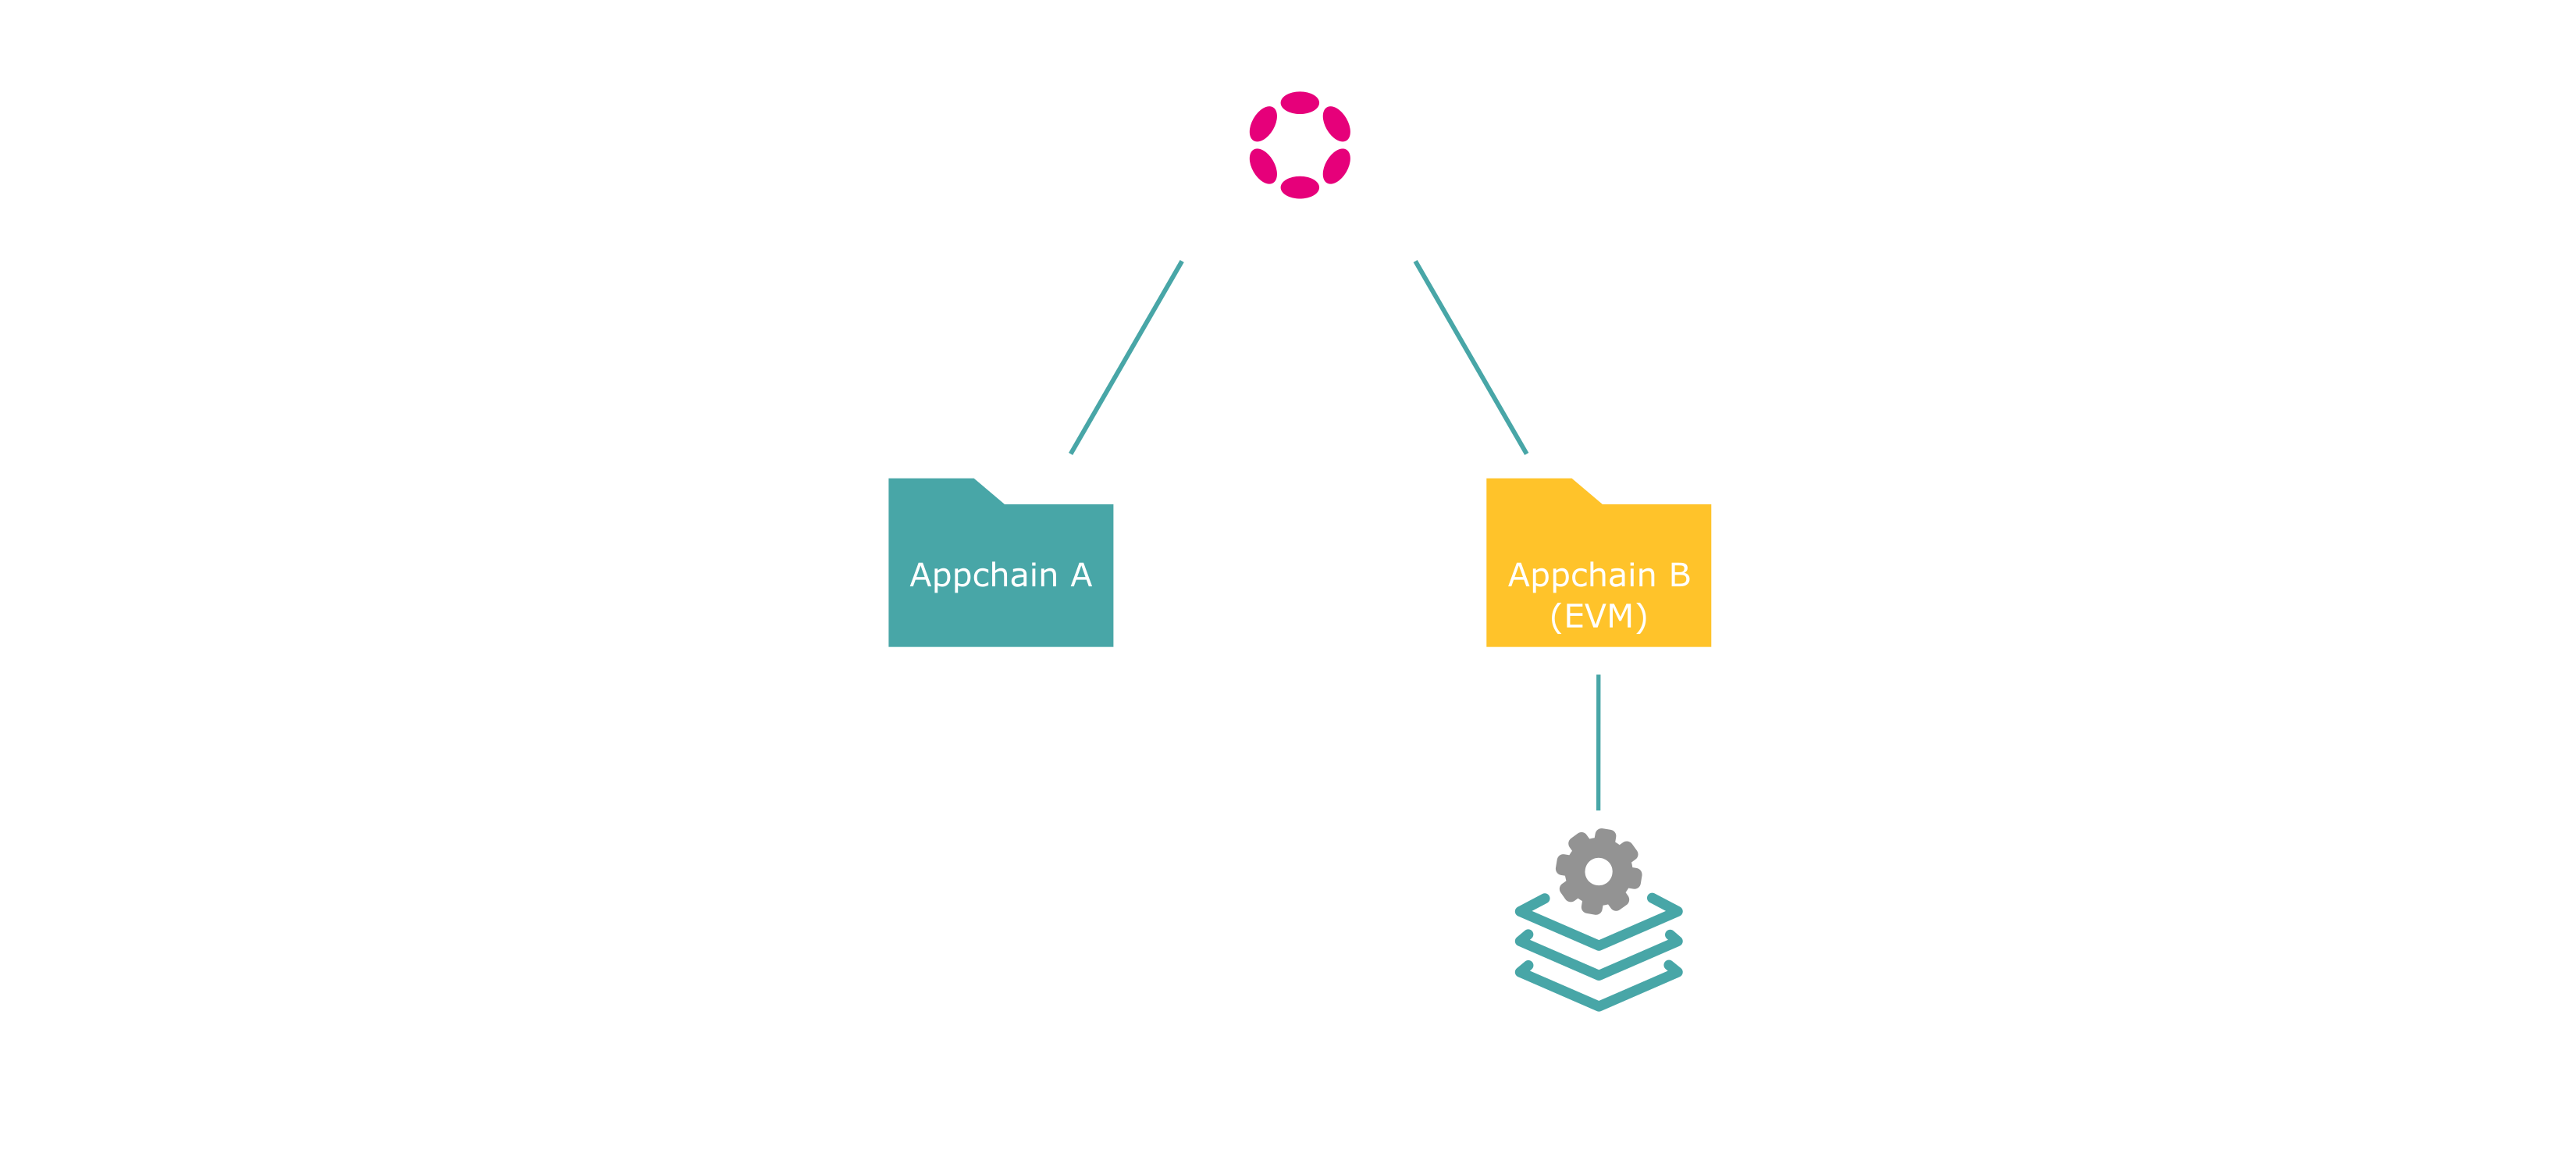
- **Network A references an account in the relay chain** - from the point of view of network A, to reference an account in the relay chain, it is necessary to move up and then reference the account. The multilocation is defined with a `parents` value set to `1`, which moves up to the relay chain, and one junction that references the substrate type destination address

--- END CONTENT ---
Doc-Content: https://docs.tanssi.network/learn/tanssi/account-types/
--- BEGIN CONTENT ---
---
title: Accounts in the Tanssi Protocol
description: Overview of the cryptographic keys essential for the Tanssi protocol, detailing the account types used and their general functions.
icon: octicons-key-24
categories: Basics
---
# Accounts in the Tanssi Protocol
## Introduction {: #introduction }
Blockchain technology relies on [public-private](https://en.wikipedia.org/wiki/Public-key_cryptography){target=\_blank} key cryptography for secure asset ownership and transaction verification. Private keys authorize transactions, while public keys serve as addresses for verification. Due to the Tanssi protocol's hybrid [Substrate](/learn/framework/overview/#substrate-framework){target=\_blank} and Ethereum nature, understanding the different account types is crucial for users and operators.
## Account Types in the Tanssi Protocol {: #key-types-in-tanssi-protocol }
| **Account Type** | **Underlying Algorithm** | **Primary Use in Tanssi** |
| --- | --- | --- |
| [Sr25519](https://wiki.polkadot.network/learn/learn-cryptography/){target=_blank} | Schnorr signatures on the Ristretto group | Default signature scheme for Substrate-based transactions and operator identity. |
| [Ed25519](https://wiki.polkadot.network/learn/learn-cryptography/){target=_blank} | EdDSA using Curve25519 | Used for specific consensus roles (e.g., block production, finality) within the Substrate framework. |
| [ECDSA](https://en.wikipedia.org/wiki/Elliptic_Curve_Digital_Signature_Algorithm){target=_blank} | Elliptic Curve Digital Signature Algorithm | Receiving rewards through the Ethereum-based Symbiotic protocol for operators. |
## Identity and Operations { : #identity-and-operations }
Tanssi, built with the Substrate framework, utilizes distinct cryptographic schemes for different functions, primarily _Sr25519_ and _Ed25519_. These account types are crucial for interacting with the protocol's Substrate components by signing transactions.
**Sr25519 (Schnorrkel/Ristretto x25519)** - is the primary account type used for most user-facing operations within Tanssi. Its strengths lie in security and efficiency. **Sr25519 accounts serve as your on-chain identity, used for holding tokens, participating in governance, paying transaction fees, and other general interactions with the network.** When you create a wallet to interact with Tanssi as a regular user, you will create and use an Sr25519 account.
**Ed25519 (Edwards-curve Digital Signature Algorithm)** - while Sr25519 handles general identity and transactions, Ed25519 is specifically leveraged for its high performance in cryptographic signing, making it ideal for consensus-related operations. **Within Tanssi, Ed25519 accounts are used by node operators for critical consensus mechanisms, such as block production and finality.** Regular users will typically not create or directly use an Ed25519 account. However, these accounts are fundamental for the security and operation of the network, managed by those running nodes.
Node operators on Tanssi require a Substrate account to record their activities, including operators who secure the network and sequencers who produce blocks. This account also tracks rewards, with session keys mapped to it for enhanced security.
## Security and Rewards on Ethereum { : #security-and-rewards-on-ethereum }
The Elliptic Curve Digital Signature Algorithm (ECDSA) is fundamental to Ethereum and is used by Tanssi to integrate with the Ethereum network via Symbiotic. This partnership leverages Ethereum's security for Tanssi-powered networks.
Tanssi operators need an ECDSA account to receive rewards distributed on Ethereum, likely through the Symbiotic protocol. The necessity of both Substrate and ECDSA accounts highlights Tanssi's hybrid design, where operations are Substrate-based, and security and rewards are linked to Ethereum.
## Account Mappings in Tanssi { : #account-mappings-in-tanssi}
### Internal Key Binding (_Sr25519_ and _Ed25519_)
Within Tanssi's Substrate-based protocol, an operator’s primary _Sr25519_ identity links to specific _Ed25519_ keys used for consensus tasks (like block production). Operators create this binding with an on-chain transaction. This transaction maps their internal public keys ("session keys") with the stash account. This on-chain registration ensures the network correctly attributes all actions from the session keys to the operator's primary identity.
### Cross-Ecosystem Reward Mapping (_Sr25519_ and _ECDSA_)
For rewards on Ethereum (e.g., via [Symbiotic](/learn/tanssi/external-security-providers/symbiotic/){target=\_blank}), an operator's Tanssi _Sr25519_ identity maps to an Ethereum _ECDSA_ address. Operators inform both accounts, which are then linked through the Tanssi middleware. This trusted link ensures that rewards from the operator's node work on the Tanssi network are routed to the operator's designated Ethereum account.
--- END CONTENT ---
Doc-Content: https://docs.tanssi.network/learn/tanssi/external-security-providers/symbiotic/
--- BEGIN CONTENT ---
---
title: Ethereum with Symbiotic
description: Tanssi's design allows developers to choose and connect to the Symbiotic restaking protocol, benefiting from Ethereum-grade security right from the start.
icon: octicons-shield-check-24
categories: Basics
---
# Ethereum with Symbiotic {: #ethereum-symbiotic }
## Introduction {: #introduction }
The Tanssi protocol takes care of critical infrastructural components, making it easy for developers to launch their networks in a few minutes. In addition to block production, data retrievability, and integrations with essential tools such as wallets, RPC endpoints, block explorers, and others, another major task to tackle is providing security to the network.
Tanssi is designed to offer developers a shared security model, alleviating them from having to source enough economic security or negotiating with operators to run nodes opting-in for their networks. By deploying networks through Tanssi, and by choosing [Symbiotic](https://symbiotic.fi/){target=\_blank} as a security provider, developers benefit from Ethereum-grade security, tapping into billions of dollars in shared security from staked ETH.
The following sections describe how the Symbiotic protocol works and how Tanssi networks can leverage it as their consensus mechanism.
## Ethereum-Grade Security with Symbiotic {: #symbiotic }
[Symbiotic](https://symbiotic.fi/){target=\_blank} is a shared security protocol designed to be permissionless, multi-asset, and network-agnostic. It fosters capital efficiency by allowing users to extend the functionality of their staked assets to secure other networks while providing additional utility.
The protocol provides a coordination layer for its main components and participants, aligning incentives among parties while minimizing execution layer risks by deploying non-upgradeable core contracts on Ethereum. The following diagram resumes all the components and actors participating in the protocol:
```mermaid
flowchart TD
%% Vaults subgraph
subgraph Ethereum["Ethereum/Symbiotic"]
slash[/Slashing Events/]
Restakers -- Deposit Assets --> Vaults
manager["Vault managers"] -- Manage --> Vaults
Resolvers -- Decide On --> slash
slash -- Executes On --> Vaults
end
%% Operators subgraph
subgraph Operators
direction BT
operators["Operators (Validators)"]
node_operators["Node Operators"]
node_operators -- Run --> operators
end
%% Networks subgraph
subgraph Networks
direction BT
developers["Developers"]
networks["Decentralized Networks"]
developers -- Launch --> networks
end
Vaults <--> Tanssi
Tanssi <--> Operators
Tanssi <--> Networks
```
Symbiotic's flexible design allows every party to decide on setups that best fit their use cases. For example, vaults can choose what forms of collateral they accept, operators can determine which networks they want to provide services to, and decentralized networks can customize their use case and define the level of security (which collaterals are accepted, for example) they need.
The following sections describe the protocol's main components.
### Vaults {: #vaults }
[Vaults](https://docs.symbiotic.fi/modules/vault/introduction){target=\_blank} are the Symbiotic protocol's economic backbone. They manage liquidity and deposits from restakers, connect operators and networks, and set up delegation strategies.
Each vault is bound to a specific token that satisfies the [IERC20](https://github.com/ethereum/ercs/blob/master/ERCS/erc-20.md){target=\_blank} interface and is accepted as collateral. Internally, the funds within the vault are represented as shares, which provide a mechanism for tracking ownership and distributing rewards. However, the reward token may differ from the collateral token.
A vault comprises three key modules, each serving a distinct function: the slasher, the delegator, and the accounting module. The implementation of these modules can vary depending on the vault manager's decisions.
- **Slasher module** - implements the [slashing](#slashing-process) logic, which penalizes bad actors
- **Delegator module** - defines how funds are delegated across operators and networks. Several [strategies](https://docs.symbiotic.fi/modules/vault/delegator){target=\_blank} are available, allowing the vault manager to select which operators and networks they want to work with
- **Accounting module** - handles the vault's financial operations, including processing user deposits, managing withdrawal requests, tracking active balances and total supply, and implementing epoch-based accounting for withdrawals and slashing events. The accounting module's standard implementation is [ERC-4626](https://ethereum.org/en/developers/docs/standards/tokens/erc-4626/){target=\_blank}, which provides a vault with a shares system included
Since the operators get delegated stake from the vault and could potentially get slashed, they must be approved by the vault managers beforehand. On a similar note, vault managers analyze and authorize each network the vault will secure, considering, for example, the rewards the network offers.
Vault managers also designate [resolvers](https://docs.symbiotic.fi/modules/counterparties/resolvers){target=\_blank}, responsible for approving or vetoing [slashing events](https://docs.symbiotic.fi/modules/vault/slasher){target=\_blank} caused by operators on networks with [veto-slashing](https://docs.symbiotic.fi/modules/vault/slasher#veto-slashing){target=\_blank} support, like the Tanssi Network.
### Operators {: #operators }
[Node operators](/node-operators/){target=\_blank} are entities or individuals responsible for running the [nodes (also known as operators or validators)](https://docs.symbiotic.fi/modules/counterparties/operators){target=\_blank}, which are the computational components validating the networks' transactions. They are responsible for the nodes' configuration, hardware setup, uptime, and performance.
Node operators opt-in to provide services to networks, which must accept their request. Also, they opt-in to provide services in vaults, which must accept their request.
Once an operator has been accepted by a vault and a network connected to that vault, the node can start providing validation services to that network, receiving rewards in exchange.
### Networks {: #networks }
[Networks](https://docs.symbiotic.fi/modules/counterparties/networks){target=\_blank} are the actively validated services or networks. These application-specific blockchains can be a use case from a wide range of industries, such as Gaming, Defi, RWAs, and others, and are the platforms that, through dApps, the end users interact with.
Since operators opt-in to provide services to networks and the vault managers must accept the networks, the developers are responsible for defining, controlling, and adapting their methodology for onboarding, rewarding, and slashing operators.
!!! note
Networks deployed through Tanssi don't need to work on the relation with vaults and operators since the Tanssi protocol deals with those complexities.
## Tanssi with Symbiotic {: #tanssi-symbiotic }
Developers launching networks through Tanssi benefit from [block production services](/learn/tanssi/network-services/block-production/){target=\_blank}, data retrievability as a service, and the shared security model derived from every vault opting-in to support the Tanssi protocol. This eliminates the hurdle of dealing with infrastructural and security components developers would need to take on otherwise.
Vault managers running vaults can apply to offer the restaked collaterals as economic security for the Tanssi Network. Since Tanssi networks run in a sandbox-like environment, and the Tanssi protocol manages all the networks-related responsibilities, vault managers only need to analyze and opt-in to the Tanssi protocol, regardless of the quality and the quantity of networks that are running through the Tanssi protocol at any given moment.
Operators opting-in to provide services to the Tanssi protocol (provided that they participate in a vault that supports the Tanssi protocol) have the benefit of running the same setup to provide block production and validation services to the Tanssi Network and, consequently, to every network deployed through Tanssi. This unique architecture facilitates all the tasks related to running and maintaining the operators since there are no changes in the setup when a new Tanssi network is launched or decommissioned.
!!! note
The Tanssi protocol effectively abstracts the details of the active set of networks away from vault managers and operators. Networks particularities don't require any additional setup from operators nor pose risks to vault assets.
All things combined shape a functional and elegant ecosystem where developers can focus on creating and innovating. Tanssi handles the infrastructural components, guaranteeing liveness and performance, and Symbiotic provides the economic safeguards to ensure the validity of the operations.
```mermaid
flowchart LR
subgraph Symbiotic
direction LR
Operators
Vaults
end
Symbiotic -- Validates/Secures --> tanssi["Tanssi Network"]
tanssi -- Block Production Services--> Networks
tanssi -- Security--> Networks
tanssi -- Data Retrievability--> Networks
class Symbiotic custom-container
```
### Tanssi-Ethereum Communication {: #tanssi-ethereum-communication }
It is important to learn how Tanssi and Ethereum exchange data to understand the mechanics of the protocol. They connect through a two-way bridge that lets them communicate with each other. Each protocol has a specific job in making cross-chain operations possible.
There are three key components between Symbiotic and Tanssi:
```mermaid
flowchart LR
Tanssi["Tanssi"] <--> Relayer
Relayer <--> Gateway
Gateway["Gateway"] <--> Middleware
Middleware <--> Symbiotic["Symbiotic"]
class Tanssi tanssiNode;
class Middleware middlewareNode;
class Gateway gatewayNode;
class Symbiotic symbioticNode;
class Relayer relayerNode;
```
- **`Relayer`** - is the software that continuously monitors both blockchains and transmits messages. Enabling reliable bidirectional communication between Tanssi and Ethereum, serving as the connection layer that ensures messages are correctly delivered across networks
- **`Gateway`** - operates on the Ethereum side of the bridge and serves three essential functions. It receives, verifies, and routes incoming messages from Tanssi to ensure they are correctly processed. The contract accepts outgoing messages destined for the Tanssi network, preparing them for relay. Finally, it handles higher-level application functionalities, most notably token transfers between the two networks, providing a secure interface for cross-chain asset movement
- **`Middleware`** - is Tanssi's implementation for handling network events and operations. It is the critical link between the `Gateway` and Tanssi's core protocol
The `Middleware` plays a central role in network coordination between Tanssi and Symbiotic. It distributes rewards to operators and vaults based on their network security and performance contributions. The contract sorts operators by stake to create a merit-based ranking system for their selection and transmits the list of sorted operator keys to Tanssi for assignment. Additionally, it facilitates operator registration processes and handles the reward and slashing protocols that maintain network incentive alignment.
#### From Ethereum to Tanssi {: #from-ethereum-tanssi }
The `Middleware` transmits operator set information to Tanssi for session assignment through the bridge. It sends details about active operators for each epoch, ordering them by their total stake aggregated across vaults. Tanssi then uses this information to assign operators for upcoming sessions, ensuring that the most economically aligned ones secure the network. This mechanism creates a stake-weighted operator selection process where economic security on Ethereum translates to operational security on Tanssi.
#### From Tanssi to Ethereum {: #from-tanssi-ethereum }
Tanssi sends operational data back to Ethereum through the same communication channel. This message includes reward information that enables proper distribution to stakeholders based on network performance. The network also transmits slashing event data when operators fail to perform correctly or violate protocol rules, allowing the protocol to apply penalties. Tanssi can also request new tokens to be created on Ethereum and register tokens, making managing assets between both networks easy.
### Rewards {: #rewards }
Well-behaved operators and restakers are rewarded for their participation with TANSSI tokens. The reward process consists of two main phases: [Reward Distribution Phase](#reward-distribution-phase) and [Reward Claiming Phase](#reward-claiming-phase).
#### Reward Distribution Phase {: #reward-distribution-phase }
The reward distribution phase calculates and allocates rewards through five key steps involving operators, restakers, and smart contracts. The steps are:
1. **Reward Calculation** - Tanssi calculates rewards based on the activity of operators and stakers and then creates a [Merkle root](https://en.wikipedia.org/wiki/Merkle_tree){target=\_blank}. This Merkle root is a cryptographic fingerprint that summarizes the reward allocations, indicating who receives what. Stakers are rewarded according to their stake in each vault
2. **Reward Data Sent via XCM** - reward allocation data is sent using [XCM](https://wiki.polkadot.network/learn/learn-xcm/){target=\_blank} (Cross-Consensus Messaging), a standardized protocol for blockchain communication. [Snowbridge](https://docs.snowbridge.network/){target=\_blank} acts as a trustless bridge between Tanssi and Ethereum
3. **Ethereum Message Reception** - once the message is relayed to the `Gateway` contract, this contract serves as Tanssi's authorized entry point on Ethereum for the Snowbridge bridge
4. **Message Processing and Validation** - the `Gateway` forwards the data to the [`Middleware`](https://github.com/moondance-labs/tanssi-symbiotic/blob/main/src/contracts/middleware/Middleware.sol){target=\_blank}, which is responsible for various tasks, including passing the information to the `OperatorReward` contract
5. **Reward Storage and Distribution** - this is the final destination for the data. The [`OperatorRewards`](https://github.com/moondance-labs/tanssi-symbiotic/blob/main/src/contracts/rewarder/ODefaultOperatorRewards.sol){target=\_blank} contract stores the Merkle tree of the reward allocations and handles the transfer of reward tokens when a claim is made
```mermaid
%%{init: {'sequence': {'mirrorActors': false}}}%%
sequenceDiagram
participant Tanssi Network
participant Snowbridge (XCM)
participant Gateway
participant Middleware
participant OperatorRewards
Tanssi Network->>Tanssi Network: 1. Calculate rewards and generate Merkle root
Tanssi Network->>Snowbridge (XCM): 2. Reward data sent via XCM (Merkle root + data)
Snowbridge (XCM)->>Gateway: 3. Relay message and sent to Ethereum
Gateway ->>Middleware: 4. Message processing and validation
Middleware->>OperatorRewards: 5. Reward storage and distribution
```
#### Reward Claiming Phase {: #reward-claiming-phase }
In the reward-claiming phase, operators and stakers can claim rewards based on their participation in the network. Tanssi determines the share distribution for operators and stakers, currently setting it at 20% for operators and 80% for stakers.
1. **Operator Reward Claim** - operators can claim their share by calling the `OperatorRewards` contract by using a cryptographic receipt that verifies their entitlement
2. **Token Release** - the operator call triggers the token release, and the `OperatorRewards` sends the established amount to the operator
3. **Token Distribution to Stakers** - the remaining rewards are forwarded to the `StakerRewards` contract for further claiming of the staker
4. **Staker Allocation** - the remaining 80% of the rewards are automatically directed to the [`StakerRewards`](https://github.com/moondance-labs/tanssi-symbiotic/blob/main/src/contracts/rewarder/ODefaultStakerRewards.sol){target=\_blank} contract, where stakers can claim rewards proportional to their stake in the vaults
```mermaid
%%{init: {'sequence': {'mirrorActors': false}}}%%
sequenceDiagram
participant Operator
participant OperatorRewards
participant StakerRewards
participant Stakers
Operator->>OperatorRewards: 1. Operator reward claim
OperatorRewards->>Operator: 2. Release rewards to the operator
OperatorRewards->>StakerRewards: 3. Forward the remainder to StakerRewards
Stakers->>StakerRewards: 4. Stakers claim individual rewards
```
### Slashing {: #slashing }
The Tanssi protocol implements slashing to penalize operators for misbehavior. When a slashing event is triggered, the authorities designated as resolvers by the vault managers can either accept or revert this action.
The following actions can trigger slashing events:
- Producing invalid blocks (e.g., blocks that include invalid transactions)
- Invalid validation (e.g., double-signing or breaking protocol rules)
- Downtime or unavailability
- Consensus violations
!!!note
Slashing events can only be triggered by operators' misbehavior within the Tanssi Network. Even if Tanssi networks are faulty or malicious, they operate in a sandboxed environment and cannot cause slashing.
#### Slashing Process {: #slashing-process }
The slashing process follows a path similar to that of rewards. When an operator misbehaves, the Tanssi Network sends a slashing request message to the trustless bridge (Snowbridge). The message passes through the `Gateway` and into the `Middleware` where the slashing method gets called.
The slashing method receives a unique identifier for the operator's identity, the severity of the slash as a percentage of the operator's assigned stake in each vault, and the time context within which the offense occurred.
The slashing process consists of the following steps:
1. **Slash Reported** - Tanssi sends the slash request to the `Middleware` with the parameters `operatorKey`, `percentage`, and `epoch`
2. **Operator Validation** - the `Middleware` validates the operator's identity and checks if the operator is subject to slashing
3. **Retrieve Active Vaults** - the `Middleware` iterates through all active vaults during the offense epoch, skipping any inactive vaults
4. **Retrieve Operator Stake** - for each active vault, the `Middleware` retrieves the stake of the misbehaving operator
5. **Calculate Slash Amount** - the `Middleware` calculates the slashing amount by applying the slashed percentage to the operator's stake in each vault
6. **Slashing** - depending on the vault's slashing implementation, there are two possible routes
- **Instant Slashing** - if the vault uses instant slashing, the stake is immediately reduced
- **Veto Slashing** - if the vault uses veto slashing, the `Middleware` requests the slashing from a resolver. A time-limited veto window is created (e.g., 7 days)
The slashing is canceled if the resolver vetoes the request within the time window. Otherwise, the slashing penalty is executed if no veto occurs within the time window
This process ensures that each vault's slashing is handled independently, preventing cross-contamination, and offers both instant and time-delayed slashing with dispute resolution mechanisms.
```mermaid
%%{init: {'sequence': {'mirrorActors': false}}}%%
sequenceDiagram
participant Network
participant Middleware
participant Vault
participant Slasher
Network->>Middleware: 1. Slash reported
Middleware->>Middleware: 2. Operator validation
loop Each Active Vault
Middleware->>Vault: 3. Retrieve operator stake
Vault-->>Middleware: 4. Retrieve vault stake
Middleware->>Middleware: 5. Calculate slash amount
alt Instant Slasher
Middleware->>Slasher: 6.1 Slash
else Veto Slasher
Middleware->>Slasher: 6.2 Request slash
opt If Not Vetoed
Slasher->>Slasher: 6.2 Execute slash
end
end
end
```
#### Burner {: #burner }
The `Burner` contract is an extension responsible for handling actions that follow a [slashing event](#slashing-process), notably the burning of slashed collateral. Once a slash is executed, the `Slasher` contract calls the `Burner` to carry out these post-slashing tasks.
Within the protocol, the `Burner` contract plays a crucial role in deciding what happens after slashing. While there are different ways to implement the burning process, the recommended approach is to burn the slashed assets.
When a slash is executed, the `Burner` contract's `onSlash` function is activated. This function kicks off the process of burning the slashed assets.
The vault manager chooses the specific implementation of the burning process during the vault's initialization phase, and once set, the vault manager cannot modify it. The exact design of the `Burner` contract may differ depending on the type of collateral asset involved. Below are some potential implementation options:
- **Burning Tokens** - if the slashed collateral is a regular ERC-20 token, the `Burner` destroys those tokens, permanently removing them from circulation
- **Unwrapping and Burning** - if the slashed tokens represent something like staked assets (e.g., liquid staking tokens) or liquidity provider (LP) tokens from a decentralized exchange (DEX), the `Burner` might convert them back into their original form before burning them
- **Cross-Chain Operations** - if the tokens are tied to assets on another blockchain, the `Burner` could unwrap them on Ethereum and trigger the burn process on the original network
- **Alternative Handling** - sometimes, burning isn't the best option. Instead, the `Burner` might redistribute the slashed assets to other operators, compensate affected users, or lock them in liquidity pools—whatever the system is designed to do
Burning slashed collateral is important because it penalizes misbehaving operators and reduces the total supply of tokens, which can have deflationary effects.
--- END CONTENT ---
Doc-Content: https://docs.tanssi.network/learn/tanssi/network-features/staking/
--- BEGIN CONTENT ---
---
title: Staking for Block Production
description: Learn how Tanssi implements a novel Staking mechanism to provide liveness via a decentralized and trustless set of sequencers to all Tanssi-powered networks.
icon: material-hand-coin-outline
categories: Basics
---
# Tanssi Staking for Block Production {: #tanssi-staking }
## Introduction {: #introduction }
One of Tanssi's core propositions is to simplify the infrastructure complexity for networks. A significant component is bootstrapping a decentralized set of sequencers, which Tanssi offers through its unique architecture and staking mechanics.
Tanssi staking mechanics guarantee that the sequencers for Tanssi-powered networks are selected through a trustless and decentralized mechanism. They also incentivize the community to delegate to top-performing or engaged sequencers.
This page covers the fundamental concepts of Tanssi's staking mechanics and how it secures a decentralized block production set that drives network liveness for Tanssi networks.
## Core Concepts {: #core-concepts }
Tanssi's staking module mechanics were inspired by the concept of liquidity pool tokens (LP tokens) in traditional Automated-Market-Makers (AMMs) like Uniswap V2.
Each sequencer has four liquidity pools through which delegators move as they perform different staking operations. In short, each liquidity pool represents a different state throughout the staking process: joining, staking through manual rewards, staking through auto-compound rewards, and leaving. Nevertheless, one core difference is that LP tokens in common AMMs are transferable while staking shares tokens are not.
A delegator has four simple transactions to go through the different states (liquidity pools): delegate (for manual or auto-compound rewards), undelegate, swap, and execute pending operations. For example, users who want to stake through either rewards pool can use the delegate call and join the Joining Pool immediately. After a delay, users (or anyone else) can execute the pending operation and enter the initially set rewards pool. Once there, users can swap between reward pools as often as they like. Lastly, users in a rewards pool can use the undelegate call to go into the Leaving Pool and unstake their tokens (or anyone else's) executing the pending operation after a given delay.
Liquidity pools have a set of shares that can be considered LP tokens in traditional AMMs. When users join a new liquidity pool, they are given several shares (LP tokens) that depend on the pool type, the number of tokens they staked, the total number of shares, and the total number of tokens staked in that pool.
Rewards are assigned to a sequencer's Manual or Auto-Compound Reward Pools when Tanssi attests that the specific block production slot that sequencer was assigned to has been fulfilled, and the block was produced successfully.
All rewards (for all pools) are stored in a protocol-owned account. Nevertheless, the protocol internally keeps track of the actual native tokens held by each pool. The core difference between staking through the Manual or Auto-Compound Rewards Pools is how rewards are distributed. In the Manual Rewards Pool, users have to claim any staking rewards they've accumulated manually. In contrast, in the Auto-Compound Rewards Pool, the rewards are automatically re-staked at each Tanssi block, where the protocol announces the sequencer for each block production assignment.
The delegate and undelegate operations need to be sent by the delegator itself. They signal the intent of the action to be taken and ask the protocol to perform the necessary checks to allow the delegator to delegate or undelegate. Consequently, these actions can be executed only after a certain number of sessions, but anyone in the network can perform this second operation through the execute pending operation transaction.
The following diagram summarizes the high-level flow of a delegator delegating and undelegating tokens to a sequencer. User actions are highlighted in cyan, while different pools are highlighted in coral.
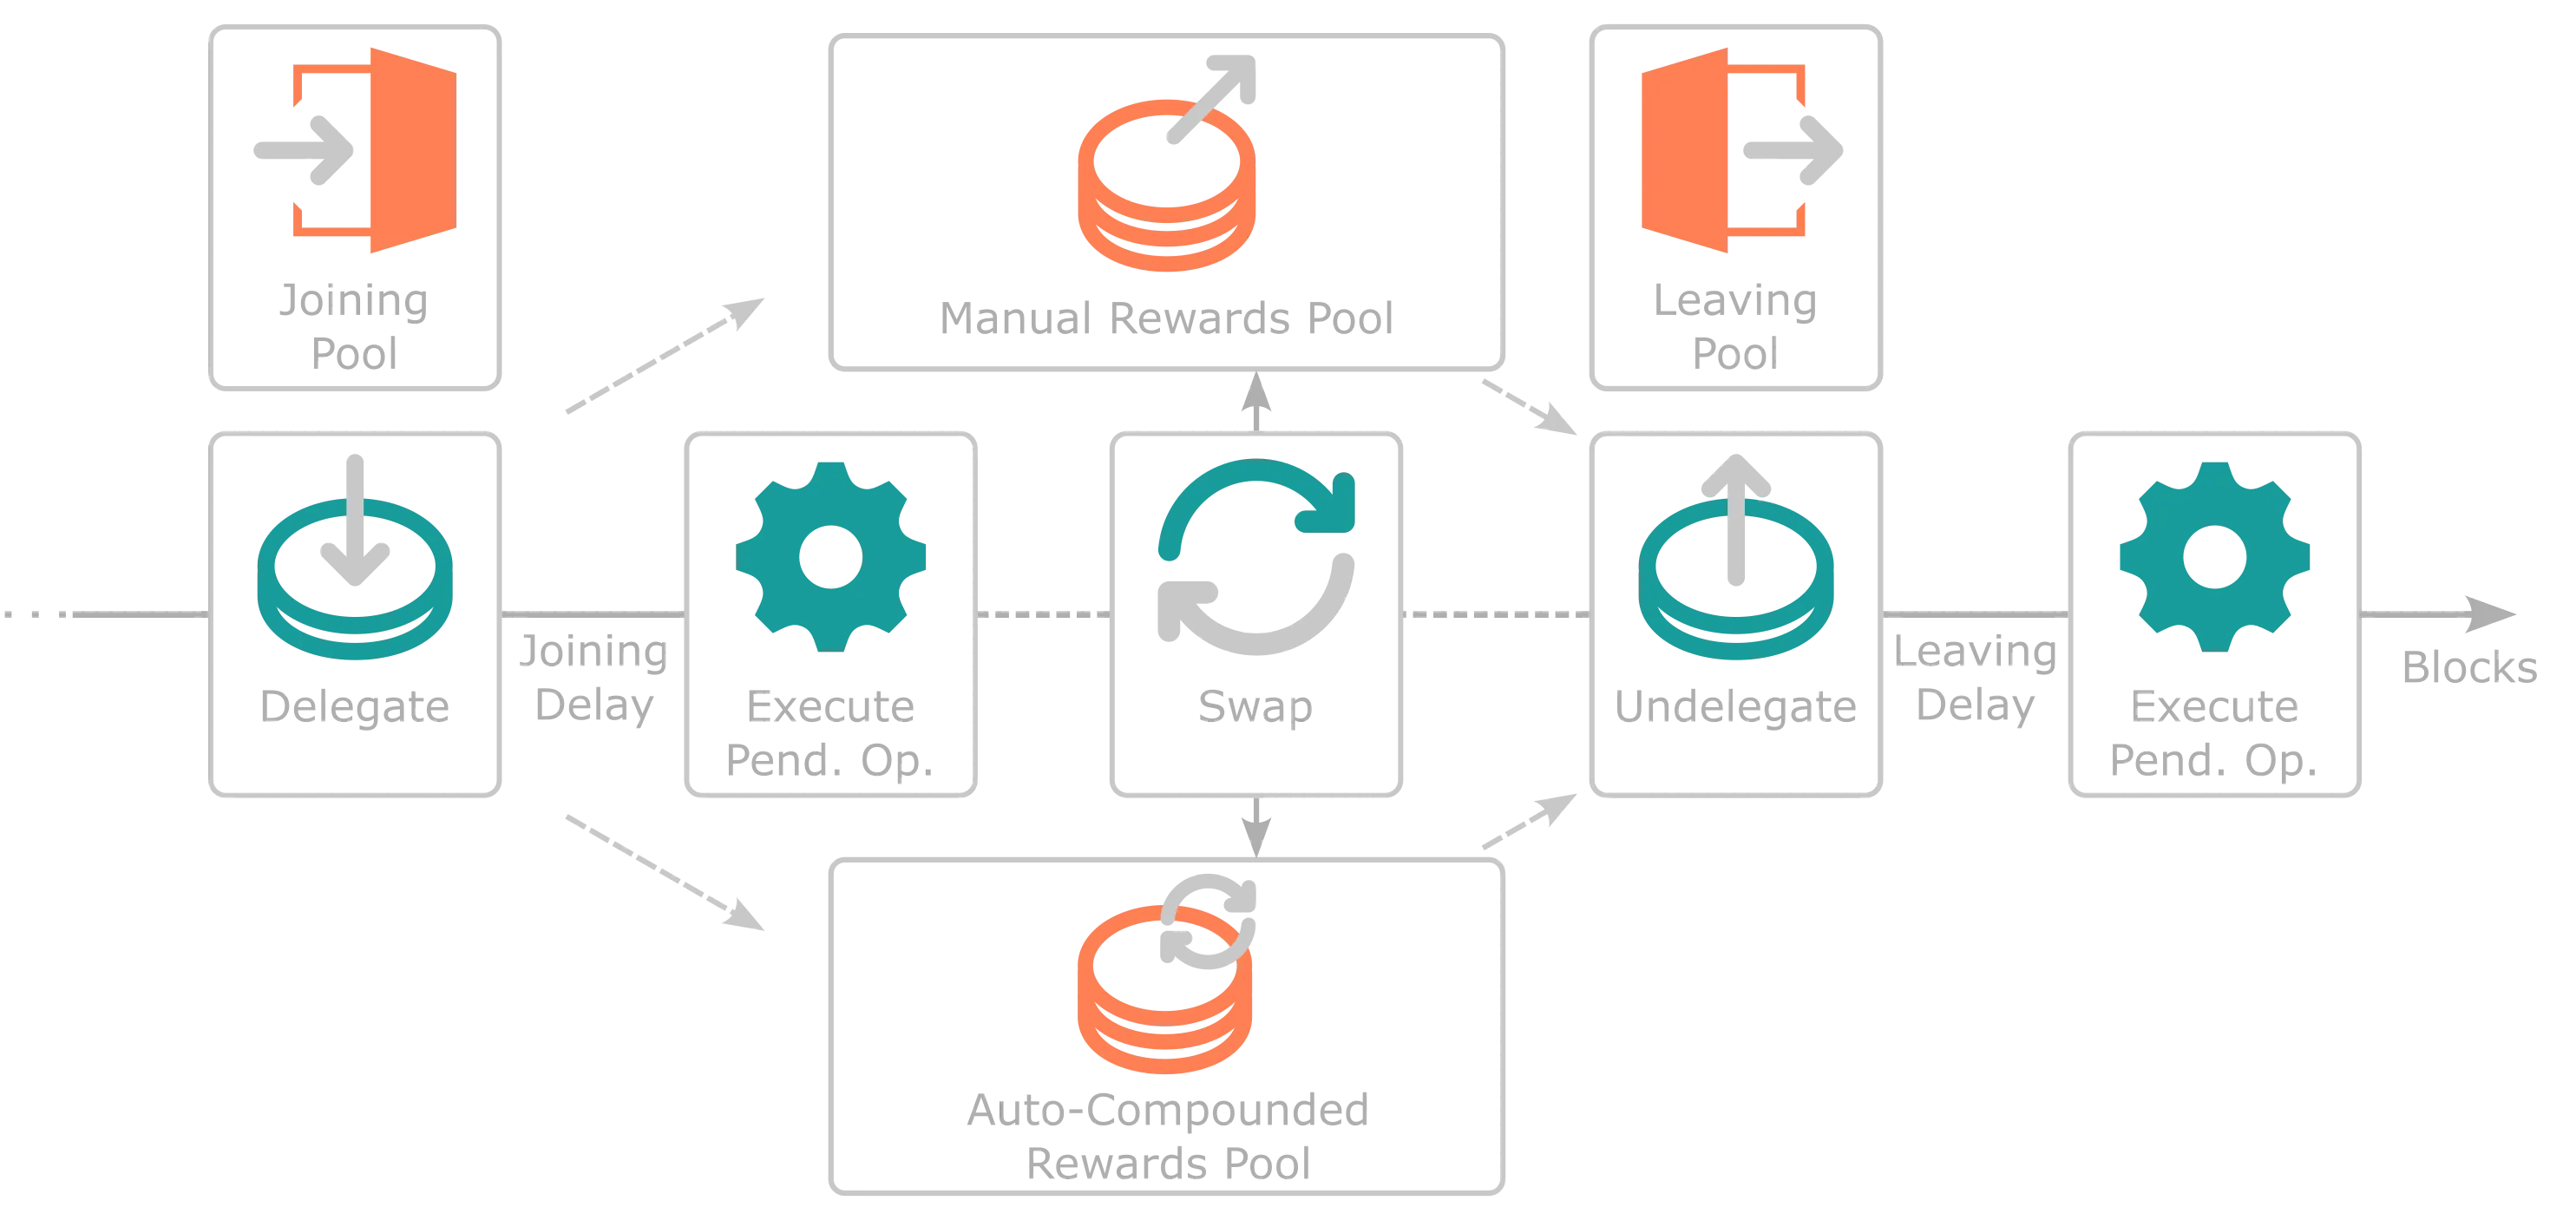
## Staking Parameters {: #staking-parameters }
=== "Tanssi MainNet"
| Variable | Value |
|:-------------:|:---------------------------------------------------------------------------------------------------------------------:|
| Joining Delay | {{ networks.mainnet.staking.joining_delay_blocks }} blocks ({{ networks.mainnet.staking.joining_delay_hours }} hours) |
| Leaving Delay | {{ networks.mainnet.staking.leaving_delay_blocks }} blocks ({{ networks.mainnet.staking.leaving_delay_hours }} hours) |
=== "Dancelight TestNet"
| Variable | Value |
|:-------------:|:---------------------------------------------------------------------------------------------------------------------------:|
| Joining Delay | {{ networks.dancelight.staking.joining_delay_blocks }} blocks ({{ networks.dancelight.staking.joining_delay_hours }} hours) |
| Leaving Delay | {{ networks.dancelight.staking.leaving_delay_blocks }} blocks ({{ networks.dancelight.staking.leaving_delay_hours }} hours) |
## Staking Pools {: #staking-pools}
The following section goes through each of the liquidity pools that represent a step throughout the staking process.
### Joining Pool {: $joining-pool}
When a user first delegates to start the staking process, it must state what staking rewards mechanism it wants: manual or auto-compound rewards (each being a separate pool). Once the joining transaction is executed, the user automatically enters the Joining Pool and is given shares of that pool directly correlated to the number of tokens being staked. This pool offers stability to the current set of sequencers by providing a delay between a delegator staking and receiving rewards. The delay is set to at least one entire session.
As a practical example, Alice starts the staking process targeting the Manual Rewards Pool and enters the Joining Pool halfway through a session; she must wait until the end of the next session to execute her pending operation to start receiving staking rewards.
Joining Pools for each sequencer have a one-to-one ratio of shares per token staked. Therefore, if Alice is staking 100 tokens, she will receive 100 shares (LP tokens) of the Joining Pool she entered. When her delegate pending operation is executed, the protocol consumes her shares of the Joining Pool in favor of native protocol tokens, which are immediately swapped to shares in either the Manual Rewards or Auto-Compound Rewards Pools.
The following diagrams assumes a user is staking into the Manual Rewards Pool.
### Manual Rewards Pool {: #manual-rewards-pool}
When a user joins the Manual Rewards Pool, the protocol destroys all Joining Pool shares they own in favor of the native protocol token. Next, in the same block, the protocol computes the amount of Manual Pool shares that can be minted with this amount based on the share's price. The price is calculated based on current pool conditions, that is, the number of native tokens and shares that exist:
```mathematica
SharePrice [Tokens/Shares] = NumberOfTokensInPool / NumberOfSharesInPool
```
Shares don't have decimals. Consequently, any remaining native tokens when acquiring the pool's shares are refunded to the user. The share price is not impacted by users joining the pool, as the ratio is maintained. Once the user has Manual Rewards Pool shares, they earn staking rewards (that is, in the same session) that need to be claimed manually by the user delegating.
In contrast to the Auto-Compound Rewards Pool, where reward distribution is done automatically to the specific pool, the distribution for the Manual Rewards Pools operates through a counter checkpoint rewards mechanism. This mechanism tracks the historical native token per share distribution rate assigned to you by the protocol for that particular Manual Reward Pool at a specific point in time. When Tanssi attests that a block was produced by a given sequencer, new rewards are assigned to that Manual Rewards Pool for users to claim, and the rewards counter increases. Therefore, rewards are reflected as the ratio of native tokens per share you receive as staking rewards, which is the difference between the current pool's rewards counter and your original rewards counter checkpoint.
Consequently, the native tokens per share rewards counter plays a vital role in the protocol's calculation of the tokens the user is due when they claim their rewards. Once the rewards are calculated, the protocol sends them from the protocol-owned account to the user. Simultaneously, the user's rewards counter checkpoint is reset to the current one set by the pool current counter value. This reset is necessary to ensure the user's new rewards counter aligns and that the due rewards are zero.
Similarly, when a user stakes or unstakes tokens, rewards are automatically claimed, and the user's checkpoint rewards counter is reset. Adding or removing a stake means that reward conditions for that specific amount differ from what the protocol has in storage. Consequently, the rewards counter checkpoint must be synced with the pool's rewards counter to ensure no imbalances.
### Auto-Compound Rewards Pool {: #autocompounded-rewards-pool}
When a user joins the Auto-Compound Rewards Pool, the protocol destroys all Joining Pool shares they own in favor of the native protocol token. Next, in the same block, the protocol computes the amount of Auto-Compound shares that can be minted with this amount based on the share's price. The price is calculated based on current pool conditions, that is, the amount of native tokens and shares that exist:
```mathematica
SharePrice [Tokens/Shares] = NumberOfTokensInPool / NumberOfSharesInPool
```
Shares don't have decimals. Consequently, any remaining native tokens when acquiring the pool's shares are refunded to the user. The share price is not impacted by users joining the pool, as the ratio is maintained. Once the user has Auto-Compound Rewards Pool shares, they earn staking rewards (that is, in the same session).
In contrast to the Manual Rewards Pool, native token rewards in the Auto-Compound Rewards Pool are automatically assigned to the pool at each Tanssi block where the protocol attests the sequencer for each block production assignment in any Tanssi-powered network. Consequently, as the number of native tokens held in the pool increases but the number of shares stays constant, the share price increases (according to the formula). Therefore, if the users redeem their shares for native tokens, they will receive more native tokens per share than when they joined the pool.
Native token rewards are automatically assigned as new stake into the Auto-Compound Rewards Pool, hence the auto-compounding nature of this specific staking pool mechanism.
Nevertheless, when auto-compound staking rewards are assigned, they are not held in the user's reserved balance, as the protocol-owned account still has them. The increase in the delegator's stake is indirectly represented by the share price increase. However, in specific scenarios, a user might want to let the protocol know that they want that balance to be represented in their state as reserved balance, for example, for governance purposes.
Consequently, the protocol offers a specific transaction any user can submit to update the reserve balance of any delegate. This call moves the auto-compound rewards for the specified user from the protocol-owned account to their reserve balance. This is also automatically executed by the protocol when a user removes liquidity from a Auto-Compound Rewards Pool.
### Leaving Pool {: #leaving-pool}
When a user decides to exit their staking positions from a Manual or Auto-Compound Reward Pool, they have the power to initiate an undelegation. This process, similar to when they initially entered the Joining Pool, is a two-step journey. The user signs an intent to remove a specific delegation and patiently waits for at least one entire session before the operation can be executed by anyone.
Upon executing the leaving transaction intent, the protocol exchanges shares of the specified pool for native tokens at the current pool price. For the Manual Rewards Pool, any unclaimed rewards are assigned to the user. Simultaneously, the protocol purchases Leaving Pool shares in a one-to-one ratio for the native tokens the user just received. This ensures that the user joins the Leaving Pool, acquiring shares that correspond to the number of native tokens they desire to unstake.
After an entire session passes, any user can execute the pending operation. Then, the protocol swaps Leaving Pool shares for native protocol tokens at a one-to-one ratio.
The primary purpose of the Leaving Pool is to provide a buffer for users leaving the staking mechanics. This buffer allows the implementation of slashing mechanisms to deter bad behavior. Slashing has not been implemented in Tanssi but could be implemented in the future.
The following diagrams assumes a user is unstaking from the Manual Rewards Pool.
### Swapping Between Rewards Pools {: #swap-rewards-pool}
Tanssi's staking module allows users to swap their stake from one type of reward pool to another. Users can use this functionality to move partial or full amounts of the staked tokens in a specific pool. The main benefit is that users don't have to go through the Leaving Pool and the Joining Pool again to move their stake.
First, all pending Manual Rewards Pool rewards are claimed at a protocol level, as liquidity is either added or removed. Therefore, the checkpoint rewards counter needs to be synced with the pool. Next, shares from the original pool are consumed and exchanged in favor of native protocol tokens at the current pool price. Then, shares of the new pool are attained at that pool's price. Lastly, any dust tokens remaining are automatically exchanged in favor of Leaving Pool shares. Note that all of the above is executed in the same block, and users don't have to wait for delays to earn rewards in the new pool. The dust in the Leaving Pool can be claimed after the required delays have passed.
--- END CONTENT ---
Doc-Content: https://docs.tanssi.network/learn/tanssi/network-services/block-production/
--- BEGIN CONTENT ---
---
title: Block Production Services
description: Tanssi abstracts away infrastructure complexities, such as block production, allowing developers to launch decentralized networks with Ethereum-grade security.
icon: octicons-container-24
categories: Basics
---
# Block Production Services {: #block-production-services }
## Introduction {: #introduction }
As presented in the [Overview](/learn/tanssi/overview/){target=\_blank} article, Tanssi is an infrastructure protocol that streamlines the deployment of decentralized networks with custom logic fitting a wide range of use cases, including DeFi, NFTs, Gaming, and any other use case development teams may want to address.
Infrastructure poses a huge challenge for developers, requiring them to bootstrap sequencers, data preservers, and RPC endpoints, while also managing integrations, interoperability, and security. This demands valuable time and resources, diverting focus from what truly matters: delivering value to their users.
Tanssi orchestrates resources, allowing developers to deploy decentralized networks (also known as actively validated services or AVSs) that are fully adaptable to any specific application or use case. In this analogy, the Tanssi network resembles [Kubernetes](https://kubernetes.io){target=\_blank} in its role as an orchestrator, managing resources to guarantee the liveness and performance of the networks.
The protocol also tackles the security front by allowing networks to select and connect to external security providers (like [Symbiotic](/learn/tanssi/external-security-providers/symbiotic/){target=\_blank}), ensuring Ethereum-grade security right from the start.
This article covers the necessary aspects to consider when building and deploying your own modular blockchain, along with the most relevant technical aspects of the Tanssi protocol.
## Block Production as a Service {: #block-production-as-a-service }
The Tanssi protocol provides block production as a service, orchestrating a decentralized and trustless set of sequencers, ensuring the networks' liveness. To do so, the protocol bridges both ends:
- **Node operators** - who run sequencers, offering their block production services to get rewards
- **Developers** - who launch networks, which require sequencers
The protocol assigns a subset of sequencers to provide services to each network, rotating them after a period of time. The sequencers can serve any Tanssi-powered network, regardless of the custom logic they implement. On the other hand, networks deployed through Tanssi can customize their runtime as much as they need to fit their use case and upgrade the logic at any moment in a forkless fashion without worrying about the sequencer's setup.
The following diagram illustrates how Tanssi assigns two sequencers to each active network, selecting them from a decentralized set of sequencers.
```mermaid
flowchart TB
subgraph network1 [Network 1]
s1bis[Sequencer 1]
s2bis[Sequencer 2]
end
subgraph network2 [Network 2]
s3bis[Sequencer 3]
s4bis[Sequencer 4]
end
Tanssi[Tanssi Network
Orchestrator]
subgraph sequencers [Sequencers Pool]
direction LR
s1[Sequencer 1]
s2[Sequencer 2]
s3[Sequencer 3]
s4[Sequencer 4]
sn[Sequencer N]
s1 --- s2 --- s3 --- s4 --- sn
end
sequencers -- Managed by --> Tanssi
Tanssi -- Assigns Sequencers --> network1
Tanssi -- Assigns Sequencers --> network2
```
### Sequencer Selection Process {: #sequencer-selection-process}
At any given time, all Tanssi networks require a certain number of sequencers, depending on the number of active networks and the current block production configuration set in Tanssi. The configuration sets the maximum number of total sequencers in the set and the number of sequencers each network has to have assigned.
=== "Tanssi MainNet"
| Variable | Value |
|:--------------------------:|:----------------------------------------------------------------------------------:|
| Max. # of Sequencers | {{ networks.mainnet.sequencers.configuration.max_block_producers }} |
| # of Sequencers (Networks) | {{ networks.mainnet.sequencers.configuration.block_producer_per_container }} |
=== "Dancelight TestNet"
| Variable | Value |
|:--------------------------:|:----------------------------------------------------------------------------------:|
| Max. # of Sequencers | {{ networks.dancelight.sequencers.configuration.max_block_producers }} |
| # of Sequencers (Networks) | {{ networks.dancelight.sequencers.configuration.block_producer_per_container }} |
Once the required number of sequencers for a given session is known, Tanssi uses two mechanisms to decide the set of sequencers distributed among all networks.
The first mechanism is through the *Invunerables* module, which sets a list of fixed sequencers prioritized by the protocol and ensures block production stability in certain scenarios, such as TestNets.
The second mechanism is through the [Tanssi staking module](/learn/tanssi/network-features/staking/){target=\_blank}. The module helps create a decentralized set of sequencers for all Tanssi networks by providing the protocol with a sorted list of sequencers by staked amount. Tanssi appends the sorted list by stake of sequencers to the invulnerable ones (if any), then takes from the list only the exact amount of sequencers needed, starting from the top, leaving out of the next session those sequencers that have less staked value, to finally begin the sequencer assignation process.
### Sequencers Assignment {: #block_producers-assignment }
Once the sequencer set that will participate in the next session is known, Tanssi shuffles the list and assigns them to provide block production services to the active Tanssi networks.
The assignment algorithm will start distributing the sequencers serving the networks by the registration date on a first-come, first-served basis. Once the assignment is made, it will be upheld for at least one session, representing a period measured in blocks with a constant set of sequencers. In Tanssi MainNet, the default session duration is set to {{ networks.mainnet.session.blocks }} blocks, which, with an average block time of six seconds, translates to (roughly) {{ networks.mainnet.session.display }} hours.
Every new assignment works intentionally with a one-session delay, so the sequencers know in advance which one of the networks they are assigned to. Sequencers will start syncing the new network they'll have to serve in the next session with a special syncing mechanism called [warp sync](https://spec.polkadot.network/chap-sync#sect-sync-warp){target=\_blank}. Warp sync allows the sequencers to swiftly sync the new network without acting as an archive node.
When a new session starts, the Tanssi protocol will put the queued assignment into effect. Sequencers will automatically change and start producing blocks in the new Tanssi network they've been assigned to while discarding the chain state from the previous assignment. Tanssi will also calculate the new assignment, considering changes in Tanssi networks that might have been activated or deactivated and sequencers that might have been added or removed from the pool or changed the total staked value. This new assignment will be queued for the next session.

### The Role of the Tanssi Network {: #tanssi-newtwork }
As previously discussed, the Tanssi protocol assigns sequencers to the Tanssi networks, and the result of this assignment is stored within the chain state. Besides running the network node, the sequencers also run the Tanssi one. Hence, by accessing the data stored in the finalized blocks of the Tanssi Network, they can learn their assignation for the session, and the Tanssi networks can confirm that a certain group of sequencers have been assigned to them.
As the Tanssi networks produce blocks, those blocks need to be validated and finalized by an external security provider. Once an operator verifies a block, a small proof of validity is produced and stored in Tanssi, keeping track of the proofs for each block of each chain. This small representation of the proof of validity is called [candidate receipt](https://polkadot.com/blog/the-path-of-a-parachain-block/#candidate-receipts){target=\_blank} and is composed of a set of values, including the state root, which can be used to verify state proofs.
Finally, Tanssi can verify that the author of a network block was the expected one and reward accordingly.
The following diagram shows a simplified model of the data Tanssi stores in its internal state. For every active network (in this example, two), Tanssi stores the assigned sequencers, which are the only ones authorized to produce blocks on the network's behalf, proof of validity (candidate receipts) extended by the security provider's operators, the latest state root, and the latest sequencer.

### The Role of the Tanssi-Powered Network {: #network }
As a sequencer assigned to a Tanssi-powered network includes built-in Tanssi node functionality, it is technically feasible to read the state from the Tanssi Network.
Leveraging this ability to access the states, the current sequencer with the authority to produce a block will read the state of the latest block produced in the Tanssi chain. It will proceed to include this state in the block of the network, the current set of sequencers assigned to the network, and its public signature, allowing Tanssi to know who produced the block and reward the node operator.
Once the block is filled with network transactions, it will be proposed as a candidate and handed over to the Tanssi chain, where the security provider's operators will ensure that the included state proofs match the state proofs from the latest state of Tanssi (preventing unauthorized block production) and that the transactions produced valid state transitions. Having verified the work of the sequencer, the operators will finalize the proposed block, including its candidate receipt in a Tanssi Network block.
## Block Production Fees {: #block-production-fees }
As presented in the [Introduction](#introduction), Tanssi is an infrastructure protocol that addresses the complexities and high costs associated with setting up and maintaining blockchain infrastructure, streamlining the deployment of networks. This protocol brings benefits for both participants:
- **Networks** - teams can focus on the core logic of their product, the UX, and the UI without dealing with the challenges of infrastructure bootstrapping and its management
- **Sequencers** - bearing with the responsibility of keeping their hardware and software configuration in optimal conditions, they are incentivized to execute transactions and produce blocks on behalf of the Tanssi networks
[Block production as a service](#block-production-as-a-service) carries associated costs that must be covered by the networks that want to leverage Tanssi for such a purpose. The following sections cover the general aspects of those costs and associated service payments.
### Service Payments {: #service-payments }
There are three main costs associated with block production as a service that any network must cover using Tanssi tokens to deploy successfully and get the block production services:
- **Registration deposit** - the initial deposit that is locked from the account that signs the network registration transaction. It is a variable amount depending on the appchain's runtime size
- **Sequencers assignment** - every time the Tanssi protocol assigns sequencers, which happens once per session, a fixed fee is charged. This fee gives networks the right to be assigned sequencers and discourages networks whose runtime logic fails to produce valid transactions or blocks
- **Block production** - networks must pay for each block produced on their behalf. Since the protocol selects and assigns the sequencers on a per-session basis, networks must have enough funds to cover all the blocks to be produced in an entire session to be served
The current configuration is set as follows:
=== "Tanssi MainNet"
| Variable | Value |
|:---------------------:|:---------------------------------------------------------------------------------------------------:|
| Registration deposit | {{ networks.mainnet.costs.registration_deposit }} x 10-5 {{ networks.mainnet.token_symbol }} per appchain runtime byte |
| Sequencers assignment | {{ networks.mainnet.costs.cost_per_assignment }} x 10-6 {{ networks.mainnet.token_symbol }} per session |
| Block production | {{ networks.mainnet.costs.cost_per_block }} x 10-6 {{ networks.mainnet.token_symbol }} per block |
=== "Dancelight TestNet"
| Variable | Value |
|:---------------------:|:---------------------------------------------------------------------------------------------------:|
| Registration deposit | {{ networks.dancelight.costs.registration_deposit }} x 10-5 {{ networks.dancelight.token_symbol }} per appchain runtime byte |
| Sequencers assignment | {{ networks.dancelight.costs.cost_per_assignment }} x 10-6 {{ networks.dancelight.token_symbol }} per session |
| Block production | {{ networks.dancelight.costs.cost_per_block }} x 10-6 {{ networks.dancelight.token_symbol }} per block |
To ensure block production in the next session, the total balance must be at least enough to cover the sequencers assignment cost plus the cost to produce the {{ networks.mainnet.session.blocks }} blocks that comprise an entire session.
!!! note
Although the sequencers assignment and block production costs are currently fixed, as protocol development progresses, they might become dynamic, varying in response to the network's workload.
### Tipping {: #tipping }
On some occasions, Tanssi might experience a high demand for its block production services that can not be met with the available resources. For example, if there are ten active networks for the next session and Tanssi can only serve eight, two networks will stall for the entire session duration.
To deal with these high-workload periods, the Tanssi protocol implements a tipping mechanism that allows networks to compete for a higher priority over the rest. Similar to Ethereum-compatible networks, where a priority fee can be set to outbid competing transactions and obtain preferential execution treatment, the Tanssi networks will be served according to the priority given by the tips they offer. Following the previous example, if there are ten active networks for the next session and Tanssi can only serve eight, then only the eight highest bidding networks will get sequencers assigned.
--- END CONTENT ---
Doc-Content: https://docs.tanssi.network/learn/tanssi/overview/
--- BEGIN CONTENT ---
---
title: Overview
description: Tanssi is an infrastructure protocol that simplifies the process of deploying decentralized appchains, allowing developers to focus on creating their product.
icon: octicons-home-24
categories: Basics
---
# What is Tanssi? {: #what-is-tanssi }
Tanssi is a decentralized appchain infrastructure protocol that allows developers to launch their appchain in minutes. In other words, Tanssi reduces the six-to-twelve-month setup process typically required for any team to go live with a new chain to minutes.
You can think of Tanssi as _AWS for appchains_. Instead of dealing with all the networking infrastructure yourself, Tanssi handles all the hurdles, allowing you to focus on building your application logic, growing your community, and other tasks essential to your product's success.
Security is another significant obstacle that developers must deal with, taking on the responsibility of attracting staked assets to ensure consensus security and bootstrapping a validator set, which can be particularly challenging for projects in their early stages. All Tanssi-powered appchains benefit from Ethereum-grade security right from the start, and by leveraging Tanssi's decentralized design, appchains aren't exposed to single points of failure.
Tanssi-powered appchains also benefit from a modular tech stack, providing ultimate control over the logic that powers the blockchain's runtime, offering an excellent way for projects to scale and build optimized solutions for their products. This complete control over the appchain's logic and governance mechanism suits perfectly a wide range of use cases, including DeFi Protocols, Real World Assets (RWA), Gaming Platforms, and others.
## The Problem with Appchains {: #the-problem-with-appchains }
Developers looking to build decentralized appchains typically have to deal with the following problems:
- **Complex Infrastructure Management**: Appchain deployments typically require handling numerous infrastructural components, including bootstrapping sequencers, operators (also known as validators), wallets, block explorers, oracles, indexers, RPC endpoints, and more. Properly managing these components are both time-consuming and resource-intensive.
- **Weak & Inefficient Security**: Appchains commonly suffer from having a small set of operators or weak economic security. Early-stage projects often lack sufficient economic backing to support a robust consensus mechanism. Moreover, developers often have to pay for full blockchain capacity validation even when they might not have achieved product-market fit, and blocks might be close to empty. This essentially means that operators are being overpaid, and there is a significant opportunity cost, as those resources could be used elsewhere to develop the protocol.
- **Cross-Chain and Interoperability**: Appchains inherently lack cross-chain capabilities, which prevents them from connecting to other blockchain ecosystems. Furthermore, developing interoperability solutions requires specialized expertise and meticulous implementation.
- **Slow Time to Market**: The complexities of appchain infrastructure divert developers' focus from application logic, which is the key driver for intuitive interfaces and a seamless user experience, critical for adoption.
## What Tanssi Provides {: #what-tanssi-provides}
Tanssi addresses the most common appchain pain points by:
- **Sequencing as a Service**: Appchains built with Tanssi have their blocks produced by Tanssi's incentivized workers. Tanssi guarantees the appchain's liveness by orchestrating a decentralized set of sequencers.
- **Economic Security Through External Providers**: Appchains deployed through Tanssi leverage security from a provider of choice (for example, [Symbiotic](https://symbiotic.fi/){target=\_blank} for Ethereum). The protocol is designed to finalize transactions deterministically in seconds through a decentralized set of operators.
- **Tanssi/Ethereum Bridge**: Move liquidity to and from Ethereum using the [built-in bridge](/learn/tanssi/tanssi-ethereum-bridge/){target=\_blank} based on Snowbridge.
- **Key Integrations**: Appchains built with Tanssi can access key infrastructural components alongside block production in a fully automated and standardized way. Tanssi-powered appchains come with built-in support for essential tools, including wallets, block explorers, indexers, RPC providers, and more, saving developers the effort of integrating these components.
- **Modular Blockchain Framework**: Appchains built with Tanssi can use a modular blockchain framework called [Substrate](https://docs.polkadot.com/develop/parachains/intro-polkadot-sdk/){target=\_blank}, which enables developers to quickly and easily build optimized and customizable blockchains for any use case. Tanssi handles most infrastructural complexities, allowing developers to focus on their appchain's custom logic.
In summary, appchains deployed through Tanssi are sovereign Layer 1 solutions designed to be highly modular and interconnected, with a focus on simplifying the deployment process and enabling customization of the appchain itself. This empowers developers to bring their blockchain applications to market faster, securely, and with greater potential for integration and interaction within the broader blockchain ecosystems.
### Key Aspects of Tanssi {: #tanssi-key-aspects }
The following table summarizes the main benefits Tanssi brings to your project:
| Aspect | The Tanssi Solution |
|--------------------------|-----------------------------------------------------------------------------------------------------------------------------------|
| Deployment Time | - Minutes to deploy
- Faster time to market |
| Block production | - Sequencing as a service
- Decentralized set of sequencers by design |
| Security | - Ethereum-grade security from the start |
| Finality/Settlement | - Deterministic
- Finality in seconds |
| Cost | - Registration bond + Pay-as-you-go model |
| Customizability | - Choose the governance mechanism that best suits your project
- Modular framework
- Full runtime customizability
|
| Integrations and tooling | - Essential tools available from the start |
## General Architecture of Tanssi & Tanssi-powered Appchains {: #tanssi-architecture }
As previously discussed, appchains deployed through Tanssi are sovereign and customizable blockchains that, among other features, leverage sequencing as a service and inherit block finality from an external security provider.
A high-level overview of the architecture is presented below, featuring [Symbiotic](https://symbiotic.fi/){target=\_blank} as the security provider.
The Tanssi protocol manages and orchestrates a decentralized set of sequencers assigned to provide block production services to Tanssi-powered appchains. The sequencers execute transactions and include them in blocks, which the security provider's operators then proceed to validate. Symbiotic's restaking protocol allows its operators to offer Ethereum-grade economic security. The mechanism of how this works is explained in two separate articles: [Block Production Services](/learn/tanssi/network-services/block-production/){target=\_blank} and [Ethereum with Symbiotic](/learn/tanssi/external-security-providers/symbiotic/){target=\_blank}.
While the sequencers providing block production services are rotated and reassigned to a different appchain upon every session change, each appchain will have its own set of Data Preservers running full archive nodes, ensuring data availability. These Data Preservers will provide the RPC infrastructure for apps and users interacting with Tanssi-powered appchains.
## What's Next? {: #whats-next }
- Head to the [Tanssi dApp](https://apps.tanssi.network){target=\_blank} and launch your appchain.
- Interact with a live Tanssi-powered appchain: the [Tanssi Demo EVM appchain](/builders/tanssi-network/testnet/demo-evm-network/){target=\_blank}.
--- END CONTENT ---
Doc-Content: https://docs.tanssi.network/learn/tanssi/tanssi-ethereum-bridge/
--- BEGIN CONTENT ---
---
title: Tanssi-Ethereum Bridge
description: Discover how Tanssi bridge enables secure, trustless cross-chain interoperability, facilitating asset and message transfers between Tanssi and Ethereum.
icon: octicons-link-24
categories: Basics
---
# Tanssi-Ethereum Bridge {: #tanssi-ethereum-bridge }
## Introduction {: #introduction }
Traditional blockchains often create silos, limiting asset and functional interoperability. The Tanssi-Ethereum bridge overcomes these limitations by enabling seamless cross-chain operations that benefit both ecosystems.
The bridge is more than an asset exchange. It’s a secure, standardized protocol for direct cross-chain interaction without centralized intermediaries. Its trustless design avoids the risks of central points of failure that many other bridges face.
This article introduces the Tanssi-Ethereum bridge as a key interoperability layer between the two networks. You’ll learn how it works, including its architecture, operator management, economic model, slashing mechanisms, and asset transfers.
You'll also learn about the consensus layers that secure communication ([BEEFY](https://docs.snowbridge.network/architecture/components#beefyclient){target=\_blank} on [Tanssi](https://docs.tanssi.network/learn/tanssi/){target=\_blank} and the [Ethereum Beacon Chain](https://ethereum.org/en/roadmap/beacon-chain/){target=\_blank}), and the roles of provers, verifiers, and relayers, giving you a clear view of how assets and messages move securely between Tanssi and Ethereum.
## Core Functions { : #core-functions }
The bridge facilitates several critical operations between Tanssi and Ethereum:
- **Operator Management** - maintains operator stake information on Ethereum via the [Symbiotic](/learn/tanssi/external-security-providers/symbiotic/#tanssi-symbiotic){target=\_blank} protocol, providing this data to Tanssi for selecting active, decentralized, and economically aligned operators each era
- **Economic Operations** - distributes [rewards](/learn/tanssi/external-security-providers/symbiotic/#rewards){target=\_blank} from Tanssi to Ethereum stakers and operators
- **Slashing** - processes [slashing requests](/learn/tanssi/external-security-providers/symbiotic/#slashing){target=\_blank} from Tanssi to Ethereum when operators violate protocol rules
- **Asset Transfer** - enables bilateral, trustless asset transfers between Tanssi and Ethereum, enhancing liquidity.
This interoperability expands the potential of decentralized applications and significantly enhances the liquidity and usability of blockchain assets.
## The Bridge Architecture { : #bridge-architecture }
Understanding the bridge's consensus functionality requires examining its core components: provers, verifiers, and relayers. Provers generate cryptographic proofs, verifiers validate them, and relayers move data between chains.
Provers include Tanssi's [BEEFY](https://docs.snowbridge.network/architecture/components#beefyclient){target=\_blank} module and Ethereum's Beacon Chain consensus. They produce consensus data transmitted by specialized relayers.
Each chain runs a [light client](https://ethereum.org/en/developers/docs/nodes-and-clients/light-clients/){target=\_blank} of the other, acting as an on-chain verifier for data legitimacy. For instance, when Tanssi sends a message to Ethereum, it generates compact proofs of events or state changes based on its consensus. Ethereum's light client verifies these proofs before acting. This efficient method avoids processing the entire sending chain's state, relying instead on concise cryptographic proof verification.
### Tanssi to Ethereum Consensus { : #tanssi-ethereum-consensus }
BEEFY (Bridge Efficiency Enabling Finality Yielder) is Tanssi's consensus protocol, which acts as a prover. It's designed for efficient, trustless bridging to chains like Ethereum that are not natively built for interoperability.
```mermaid
sequenceDiagram
%%{init: {'sequence': {'mirrorActors': false}}}%%
participant Tanssi_Pallet as Tanssi
BEEFY Pallet (prover)
participant Beefy_Relayer as Relayer
(Beefy)
participant Eth_BeefyClient as Ethereum
BEEFY Client (verifier)
Tanssi_Pallet->>Beefy_Relayer: Generate BEEFY Commitment
activate Beefy_Relayer
Beefy_Relayer->>Eth_BeefyClient: Submit commitment/proof
deactivate Beefy_Relayer
activate Eth_BeefyClient
Eth_BeefyClient->>Eth_BeefyClient: Verify commitment
deactivate Eth_BeefyClient
```
### Ethereum to Tanssi Consensus { : #ethereum-tanssi-consensus }
For Ethereum-to-Tanssi bridging, Ethereum's Beacon Chain consensus is the prover. It provides Tanssi's on-chain light client with proof of Ethereum's finalized state, including events or messages for Tanssi.
```mermaid
sequenceDiagram
%%{init: {'sequence': {'mirrorActors': false}}}%%
participant Eth_BeaconCons as Ethereum
Beacon Chain Consensus(Prover)
participant Beacon_Relayer as Relayer
(Beacon)
participant Tanssi_EthClient as Tanssi
Ethereum Light Client (verifier)
Eth_BeaconCons->>Beacon_Relayer: Beacon chain update (Header/Proof)
activate Beacon_Relayer
Beacon_Relayer->>Tanssi_EthClient: Submit update/proof
deactivate Beacon_Relayer
activate Tanssi_EthClient
Tanssi_EthClient->>Tanssi_EthClient: Verify update/proof
deactivate Tanssi_EthClient
```
From a messaging perspective, the bridge uses its consensus verification layer for secure cross-chain communication. Dedicated relayers transport messages: the Execution Relay for Ethereum to Tanssi, and the Tanssi Relay for Tanssi to Ethereum.
Relayers are stateless and only submit proofs. They cannot forge messages or steal funds, as the consensus mechanism revalidates each proof on-chain. Multiple concurrent relayers improve responsiveness without centralizing power.
Ethereum's `Gateway` contract is the central messaging point. It receives messages from Tanssi via relayers, validates them using consensus proofs, and executes operations like token minting/unlocking or smart contract calls.
### Ethereum to Tanssi Inbound Messages { : #ethereum-tanssi-messages }
This section describes messages from Ethereum to Tanssi, using Ethereum's Beacon Chain consensus for proofs and an Execution Relay (or Beacon Relay).
```mermaid
sequenceDiagram
%%{init: {'sequence': {'mirrorActors': false}}}%%
participant Eth_Gateway as Ethereum
Gateway Contract
participant Exec_Relay as Relayer
(Execution Relay)
participant Tanssi_InQueue as Tanssi
Inbound Queue
Note over Eth_Gateway: Message Ready / Event Occurs
Eth_Gateway->>Exec_Relay: Message + Proof
activate Exec_Relay
Exec_Relay->>Tanssi_InQueue: Submit Message/Proof
deactivate Exec_Relay
activate Tanssi_InQueue
Tanssi_InQueue->>Tanssi_InQueue: Process Inbound Message
deactivate Tanssi_InQueue
```
### Tanssi to Ethereum Outbound Messages { : #tanssi-ethereum-messages }
This section describes messages from Tanssi to Ethereum, using BEEFY consensus to prove Tanssi's state and a Tanssi Relay for transmission.
```mermaid
sequenceDiagram
%%{init: {'sequence': {'mirrorActors': false}}}%%
participant Tanssi_OutQueue as Tanssi
Outbound Queue
participant Para_Relay as Relayer
(Tanssi Relay)
participant Eth_Gateway as Ethereum
Gateway Contract
Note over Tanssi_OutQueue: Message Ready / Proof Committed
Tanssi_OutQueue->>Para_Relay: Message + Proof
activate Para_Relay
Para_Relay->>Eth_Gateway: Submit Message/Proof
deactivate Para_Relay
activate Eth_Gateway
Eth_Gateway->>Eth_Gateway: Process Outbound Message
deactivate Eth_Gateway
```
The `Gateway` manages Ethereum's outbound communications. For cross-chain transfers, it logs an event, locks tokens if necessary, and packages data for relay to Tanssi. Tanssi uses two queues for efficient message processing.
The `Outbound Queue` handles messages to Ethereum. It bundles them and adds a [Merkle root](https://en.wikipedia.org/wiki/Merkle_tree){target=\_blank} (cryptographic commitment) to each block header. This allows Ethereum's light client to verify message inclusion using consensus proofs efficiently.
The `Inbound Queue` processes messages from Ethereum. It receives and verifies proofs of Ethereum events via Tanssi's on-chain Ethereum light client. Verified events become internal instructions in Tanssi. This layered, consensus-secured architecture ensures trustless cross-chain interactions.
## Token Transfers Flow {: #token-transfers-flow }
This section explains how the bridge moves assets and messages. It involves locking/minting assets on one chain and a complementary action on the other, secured by verified proofs. The following describes the typical transfer sequences.
1. **Initiation (Source Chain)** - user initiates asset transfer
2. **Relay Proof** - off-chain relayers pick up the event and submit cryptographic proofs to the destination chain
3. **Verification (Destination Chain)** - on-chain light clients independently verify submitted proofs
4. **Execution** - upon successful verification, tokens are minted/unlocked on the destination chain
### Ethereum to Tanssi Transfer
This section outlines asset movement from Ethereum to Tanssi (as derivative assets).
1. **Lock on Ethereum** - a user deposits assets into Ethereum's Bridge contract. The contract locks the tokens and emits a deposit event
2. **Relay Proof to Tanssi** - an off-chain relayer detects the finalized event, creates a proof package (including Ethereum block header and Merkle proof of the deposit), and submits it to the Tanssi Bridge's `Inbound Queue`
3. **Verify on Tanssi** - Tanssi Bridge's `EthereumClient` module (an on-chain light client) receives the proof from the `Inbound Queue`. It verifies the Ethereum block header's finality/validity and the Merkle proof's authenticity
4. **Mint on Tanssi** - upon successful verification by the `EthereumClient`, the `Inbound Queue` is notified and mints the corresponding asset on Tanssi
```mermaid
sequenceDiagram
%%{init: {'sequence': {'mirrorActors': false}}}%%
participant User
participant EBridge as Ethereum Bridge Contract
participant Relayer
participant TBP as Tanssi Bridge
(Inbound Queue + ETH Client)
participant TAH as Tanssi
User->>EBridge: 1. Deposit Asset
activate EBridge
Note over EBridge: Lock Tokens & Emit Event
deactivate EBridge
Relayer->>Relayer: Observe Ethereum Event
Relayer->>TBP: 2. Submit Header + Merkle Proof
activate TBP
Note over TBP: Receive Proof (Inbound Queue)
TBP->>TBP: 3. Verify Proof (EthereumClient Pallet)
TBP->>TAH: Send Mint Request
deactivate TBP
activate TAH
TAH->>TAH: 4. Mint Asset
TAH-->>User: (Asset appears in Recipient Account)
deactivate TAH
```
### Tanssi to Ethereum Transfer
This flow describes the reverse process, moving assets from Tanssi to Ethereum.
1. **Initiate and Commit on Tanssi** - user initiates a transfer on Tanssi. A message with transfer details goes to the Bridge's `Outbound Queue`. The queue processes it, bundles the payload, and commits its Merkle root to the Tanssi block header, representing all outgoing messages in that block
2. **Relay Proof to Ethereum** - an off-chain relayer monitors Tanssi for finalized blocks with `Outbound Queue` Merkle roots. It retrieves proofs: a BEEFY commitment (signed statement of finalized Tanssi block headers) and a Merkle proof of the user's transfer payload under the committed root
3. **Submit Commitment in Ethereum** - the relayer submits the BEEFY commitment and Merkle proof to Ethereum's `Gateway` contract
4. **Verify on Ethereum** - Ethereum's Beefy Client contract (Tanssi's on-chain light client) receives the BEEFY commitment from the `Gateway` and verifies its validity (including signatures)
5. **Validate Payload** - after commitment verification, the `Gateway` validates the Merkle proof for the user's payload
6. **Execute on Ethereum** - with both proofs verified, the `Gateway` contract executes the action, usually releasing locked assets via the main Bridge contract to the recipient or executing a target contract call on Ethereum
The following diagram illustrates the initiation and commitment phase of the asset transfer process on the Tanssi side.
```mermaid
sequenceDiagram
%%{init: {'sequence': {'mirrorActors': false}}}%%
participant User
participant TAH as Tanssi
participant TBP as Tanssi Bridge
(Outbound Queue)
participant Relayer
User->>TAH: 1. Initiate Transfer & Deposit Asset
activate TAH
TAH->>TBP: Send message to Outbound Queue
deactivate TAH
activate TBP
Note over TBP: Process message, Bundle, and
Commit Merkle Root to Tanssi Header
deactivate TBP
Relayer->>Relayer: 2. Observe Tanssi Header /
BEEFY Commitment & Get Proof
Note over Relayer: Relayer is now ready to interact
with Ethereum based on observed data.
```
The subsequent diagram details the relay, verification, and execution steps on the Ethereum side of the asset transfer.
```mermaid
sequenceDiagram
%%{init: {'sequence': {'mirrorActors': false}}}%%
participant Relayer
participant EGateway as Ethereum Gateway Contract
participant EBeefy as Ethereum Beefy Client Contract
participant EBridge as Ethereum Bridge Contract
participant User
Relayer->>EGateway: 3. Submit BEEFY Commitment + Merkle Proof
activate EGateway
EGateway->>EBeefy: 4. Verify BEEFY Commitment
activate EBeefy
EBeefy-->>EGateway: Verification OK
deactivate EBeefy
EGateway->>EGateway: 5. Verify Merkle Proof for Payload
Note over EGateway: Proof Validated
EGateway->>EBridge: 6. Execute: Unlock Tokens / Call Target Contract
activate EBridge
Note over EBridge: Assets Transferred or
Target Call Executed
EBridge-->>User: (Tokens Received / Call Executed)
deactivate EBridge
deactivate EGateway
```
--- END CONTENT ---
Doc-Content: https://docs.tanssi.network/builders/account-management/identity/
--- BEGIN CONTENT ---
---
title: Set an Account Identity
description: Follow these instructions to establish an identity, including a display name so that you can be more easily recognizable on the Tanssi orchestrator chain.
icon: octicons-person-24
categories: Basics, Appchain
---
# Set Up an On-Chain Identity
## Introduction {: #introduction }
The [Substrate](/learn/framework/overview/#substrate-framework){target=\_blank} Identity [module](/learn/framework/modules/){target=\_blank} is an out-of-the-box solution for adding personal information to your on-chain account. Establishing an identity makes it easier for your account to be recognized by others, as your display name will automatically populate when someone pastes your address into a field on the [developer portal](https://polkadot.js.org/apps/?rpc=wss://{{ networks.mainnet.dns_name }}#/accounts){target=\_blank}.
The identity you configure goes beyond a simple display name. Personal information can include default fields such as your legal name, display name, website, Twitter handle, Discord, and Riot (now known as Element) name. You can also use custom fields to include any other relevant information.
This guide will demonstrate setting up an identity with a display name and additional parameters, enhancing your visibility and recognizability.
## General Definitions {: #general-definitions }
To store your information on-chain, you must bond some funds, which will eventually be returned once the identity has been cleared. There are two categories of fields: default and custom. A basic deposit amount is reserved upon identity creation, and a storage deposit is required for each additional byte of data stored on-chain.
- **Default fields include** - your legal name, display name, website, Twitter handle, Discord, Riot (now known as Element) name
- **Custom fields include** - any other relevant information
- **Subaccounts** - You can link subaccounts underneath a primary account. As an example, a sequencer service that's running multiple different sequencer nodes can establish subaccounts to demonstrate an official link between the nodes
=== "Tanssi MainNet"
| Variable | Definition | Value |
|:---------------------:|:--------------------------------------------------------------------------------:|:------------------------------------------------------------------------------------:|
| Basic deposit | The amount held on deposit for setting an identity | {{ networks.mainnet.identity.basic_deposit }} {{ networks.mainnet.token_symbol }} |
| Deposit per byte | The amount held on deposit per byte of on-chain storage used setting an identity | {{ networks.mainnet.identity.per_byte_deposit }} {{ networks.mainnet.token_symbol }} |
| Max additional fields | Maximum number of additional fields that may be stored in an ID | {{ networks.mainnet.identity.max_fields }} |
| Max subaccounts | Maximum number of subaccounts that can be defined under an account identity | {{ networks.mainnet.identity.max_subaccounts }} |
=== "Dancelight TestNet"
| Variable | Definition | Value |
|:---------------------:|:--------------------------------------------------------------------------------:|:------------------------------------------------------------------------------------------:|
| Basic deposit | The amount held on deposit for setting an identity | {{ networks.dancelight.identity.basic_deposit }} {{ networks.dancelight.token_symbol }} |
| Deposit per byte | The amount held on deposit per byte of on-chain storage used setting an identity | {{ networks.dancelight.identity.per_byte_deposit }} {{ networks.dancelight.token_symbol }} |
| Max additional fields | Maximum number of additional fields that may be stored in an ID | {{ networks.dancelight.identity.max_fields }} |
| Max subaccounts | Maximum number of subaccounts that can be defined under an account identity | {{ networks.dancelight.identity.max_subaccounts }} |
## Checking Prerequisites { : #checking-prerequisites }
To follow along with this guide, you will need the following:
=== "Tanssi MainNet"
- The [developer portal](https://polkadot.js.org/apps/?rpc=wss://{{ networks.mainnet.dns_name }}#/accounts){target=\_blank} open and connected to Tanssi MainNet.
- At least one account funded with `{{ networks.mainnet.token_symbol }}` tokens.
=== "Dancelight TestNet"
- The [developer portal](https://polkadot.js.org/apps/?rpc=wss://{{ networks.dancelight.dns_name }}#/accounts){target=\_blank} open and connected to [Dancelight](/builders/tanssi-network/testnet/dancelight/){target=\_blank}.
- At least one account funded with `{{ networks.dancelight.token_symbol }}` tokens.
If you need help importing your accounts into the developer portal, please check out the [Connecting to the developer portal](/builders/toolkit/substrate-api/wallets/talisman/#connecting-to-polkadotjs){target=\_blank} guide.
## Get Started {: #get-started }
Depending on the information to be included, there are a couple of different ways to set and clear an identity using the developer portal. If you intend to register your identity using only the default fields, you can follow the instructions for [Managing an Identity via the Accounts](#manage-via-accounts) page. **This is the recommended way to set and manage your identity**.
If you want to add custom fields beyond the default fields, follow the instructions for [Managing an Identity via the Extrinsics](#manage-via-extrinsics) page.
!!! note
Please note that using the **Accounts** page on the developer portal is recommended to manage your identity as it provides an easy-to-use interface that enforces character limits. If you use the **Extrinsics** page, please be aware that your input for each field (i.e., name, email, etc.) must be 32 characters or less; otherwise, your information will be cut off.
## Manage an Identity via Accounts {: #manage-via-accounts }
### Set an Identity {: #set-identity-accounts }
To get started with setting an identity using the Accounts page, head to the [**Accounts** tab](https://polkadot.js.org/apps/?rpc=wss://{{ networks.mainnet.dns_name }}#/accounts){target=\_blank} of the developer portal.
You should already have an account connected, so you can click on your account name to verify and note your balances. After you send the transaction to set an identity, the deposit(s) you submitted will be moved from your transferable balance to your reserved balance.
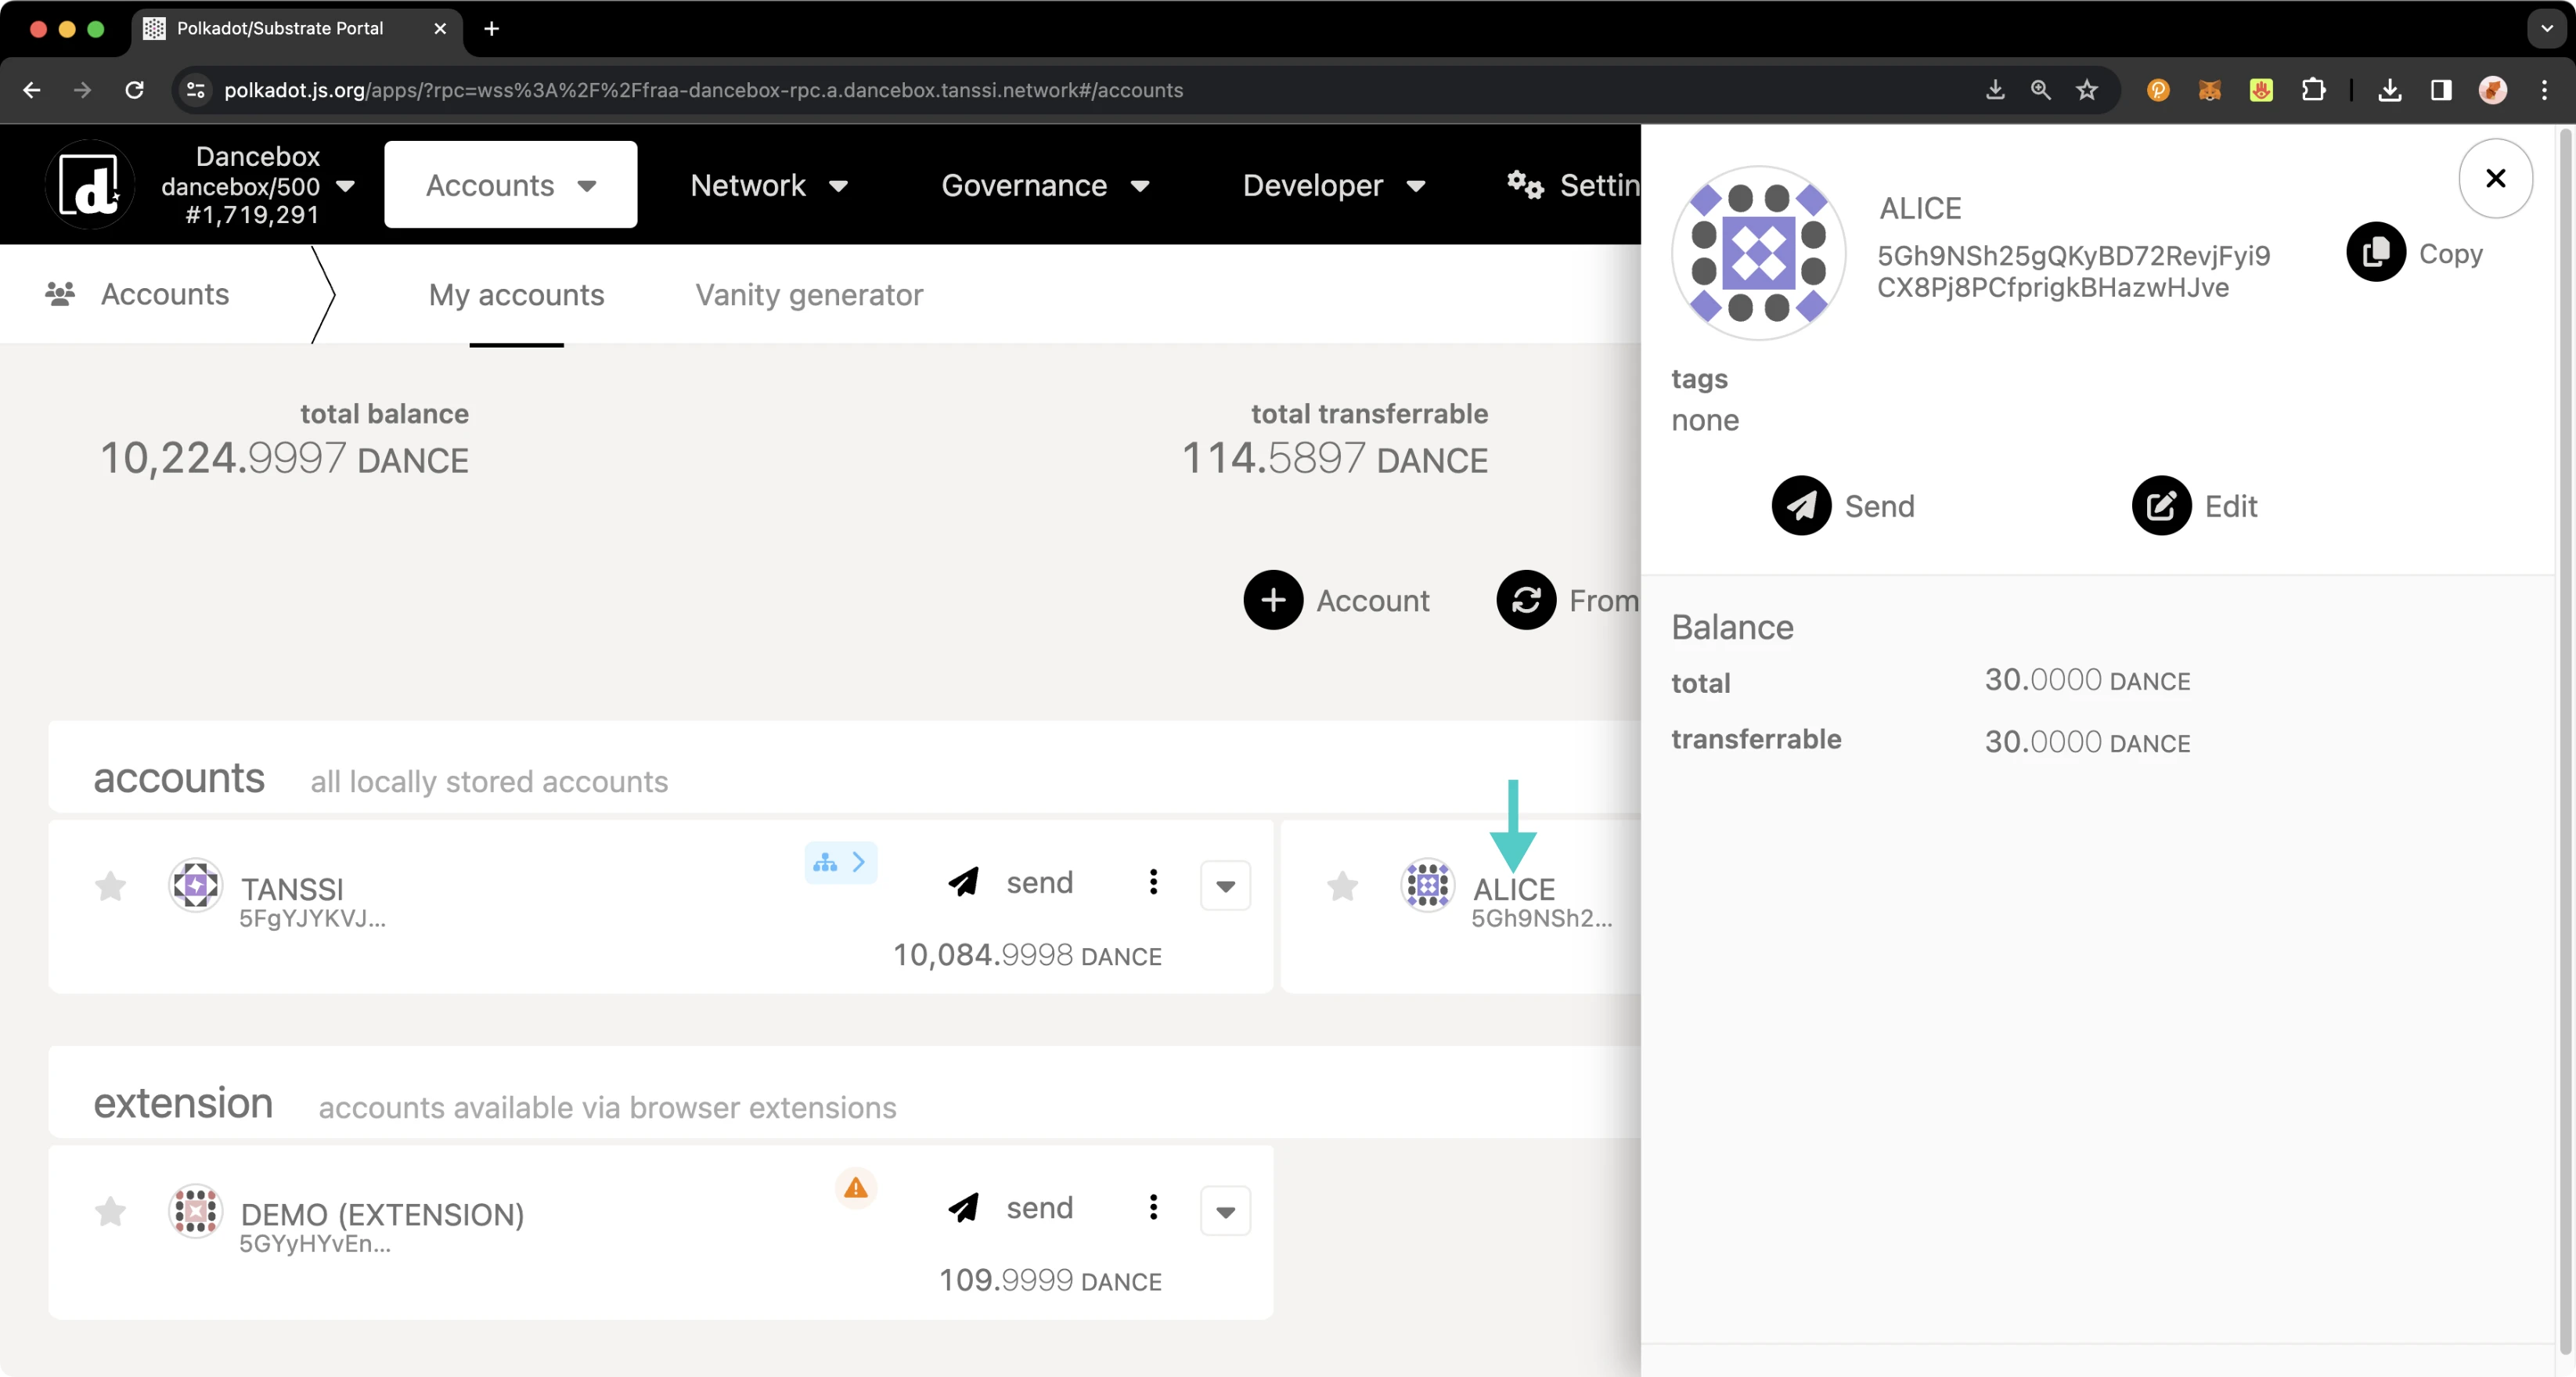
To set your identity, you'll need to:
1. Click on the three vertical dots next to the account you would like to set an identity for
2. A menu will pop up. Click **Set on-chain identity**
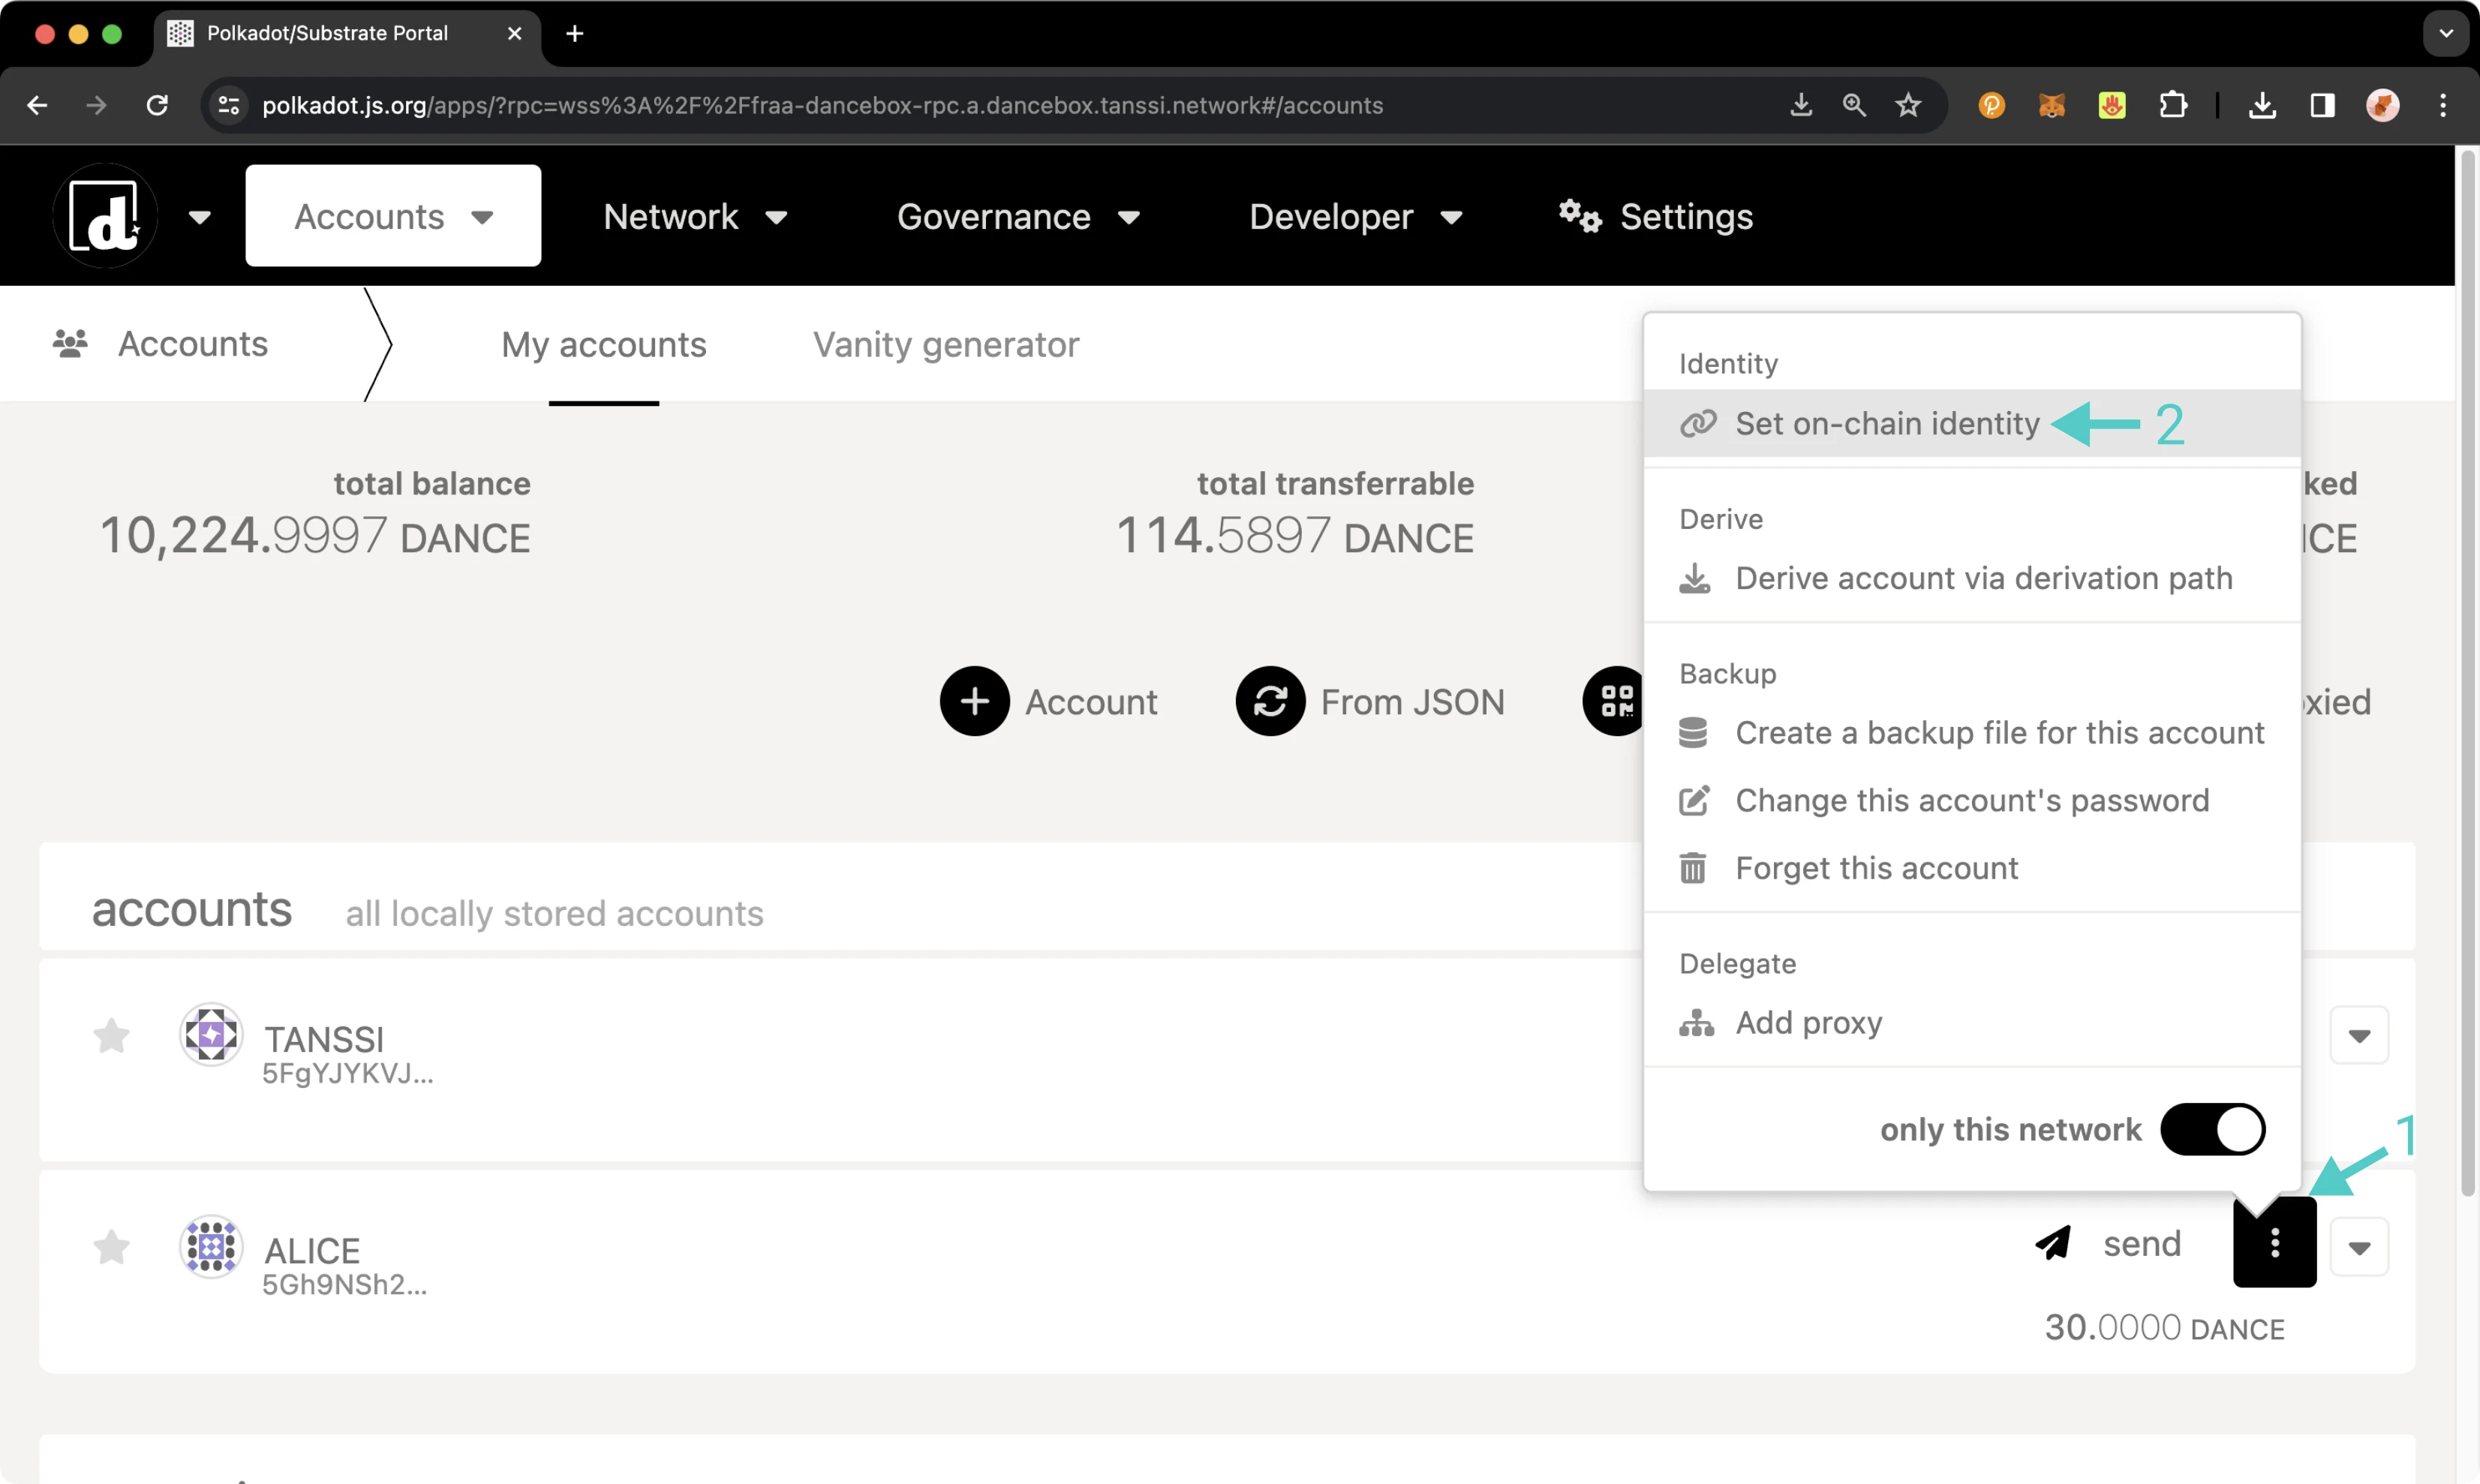
Next, the menu to register and set your identity will pop up, and you can start filling in your information. You are not required to enter information for every single field; you can choose to fill in just one field or all of them; it's up to you. For this example:
1. Set your display name
2. Click on the **include field** toggle for email and then enter in your email
3. Click on the **include field** toggle for web and then enter in your website URL
4. Click on the **include field** toggle for Twitter and then enter in your Twitter handle
5. Review the prior data fields and click **Set Identity**
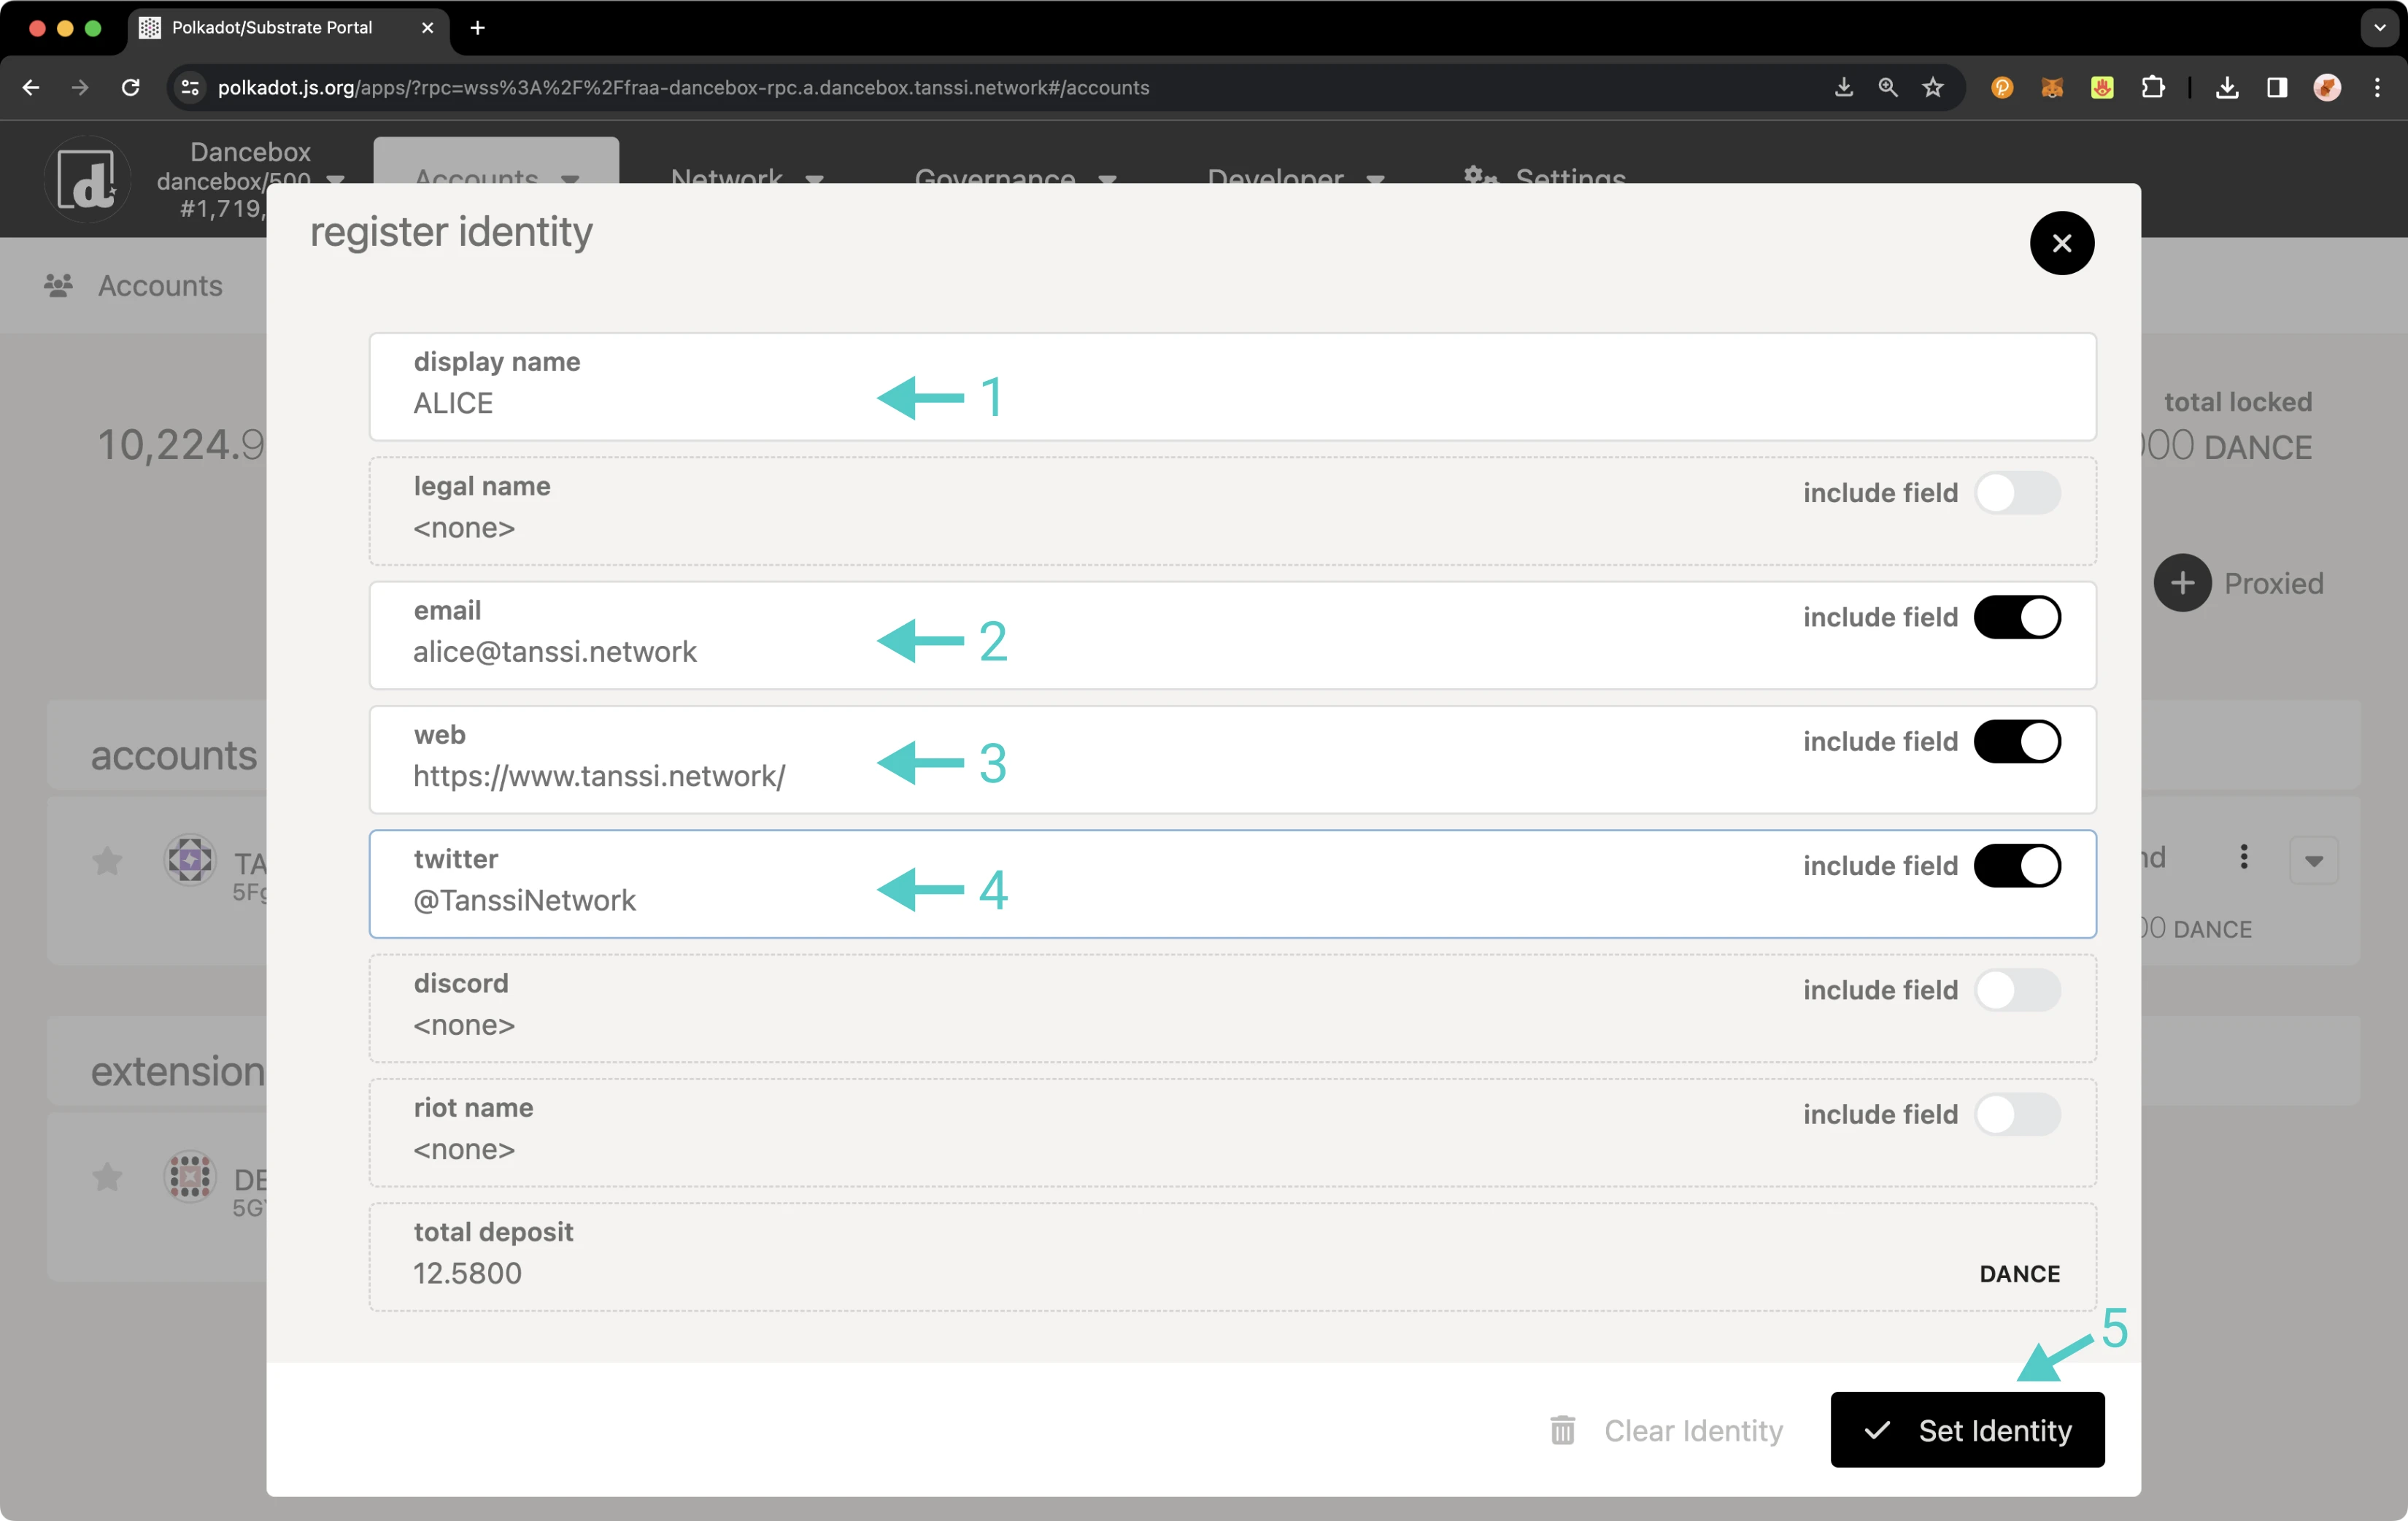
You will then be prompted to sign the transaction. If everything looks good, sign it.
You should see status notifications pop up in the top right-hand corner. Once the transaction has been confirmed, you can click on your account name again, and the panel will slide out on the right side of the page. Your balances will have changed, and you'll also see your new identity information.
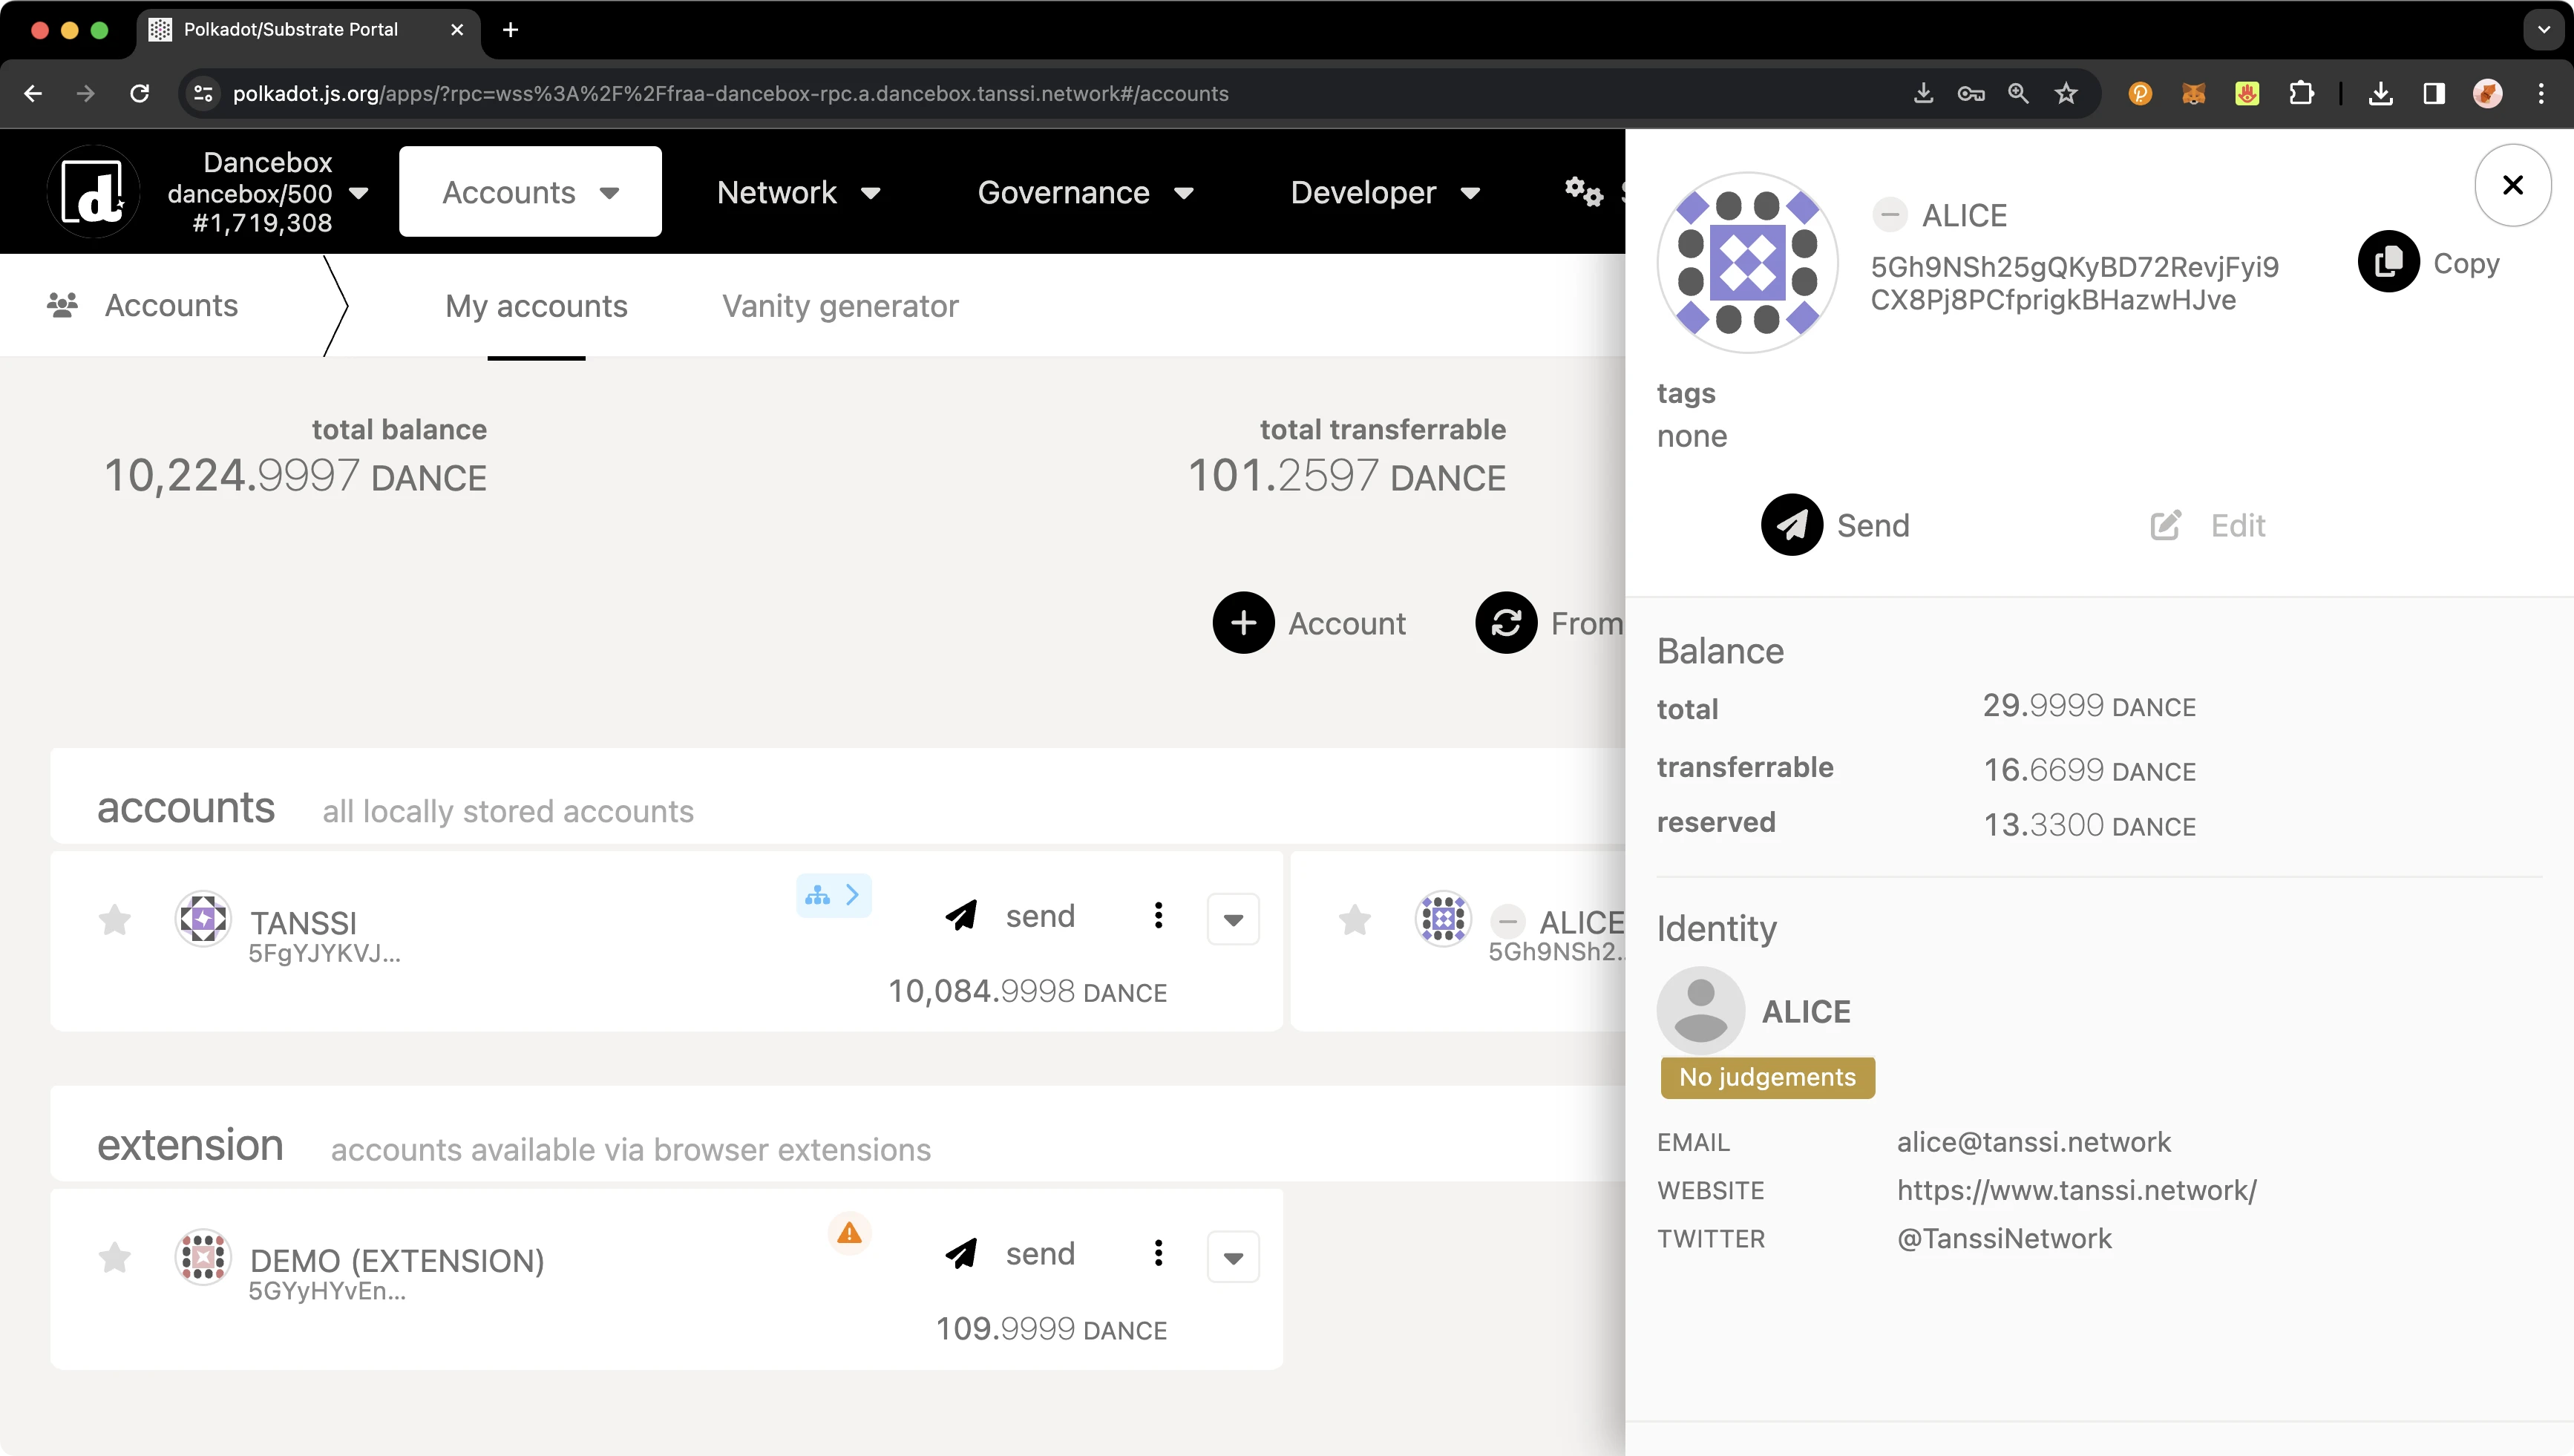
If the identity information matches what you entered, you've successfully set an identity!
Once you clear your identity, the deposit in your reserved balance will get transferred back to your transferable balance. If you need to change your identity, you can go through the process of setting your identity again. Please note that you must ensure all fields are re-entered, even if only one field needs to be changed, or they will be overwritten. You will not need to pay another deposit unless custom fields are used, but you will need to pay gas fees.
## Manage an Identity via Extrinsics {: #manage-via-extrinsics }
### Set an Identity {: #set-identity-extrinsics }
To register an identity using the extrinsics page, navigate to the [**Extrinsics** page](https://polkadot.js.org/apps/?rpc=wss://{{ networks.mainnet.dns_name }}#/extrinsics){target=\_blank} of the developer portal. Please ensure your input does not exceed 32 characters for each identity field. To complete your identity, take the following steps:
1. Select your account
2. Select identity from the **submit the following extrinsic** dropdown
3. Then select the **setIdentity(info)** function
4. Select **Raw** as the data format to enter your **Display Name**
5. Enter the data for **Display** in the selected format
6. Select **Raw** as the data format to enter your web address
7. Enter your website URL in the selected format
8. Select **Raw** as the data format to enter your email
9. Enter your email address in the selected format
10. Select **Raw** as the data format to enter your Twitter handle
11. Enter your Twitter in the selected format. Enter the username only, starting with the `@` symbol
12. Review the prepared fields and press **Submit Transaction**
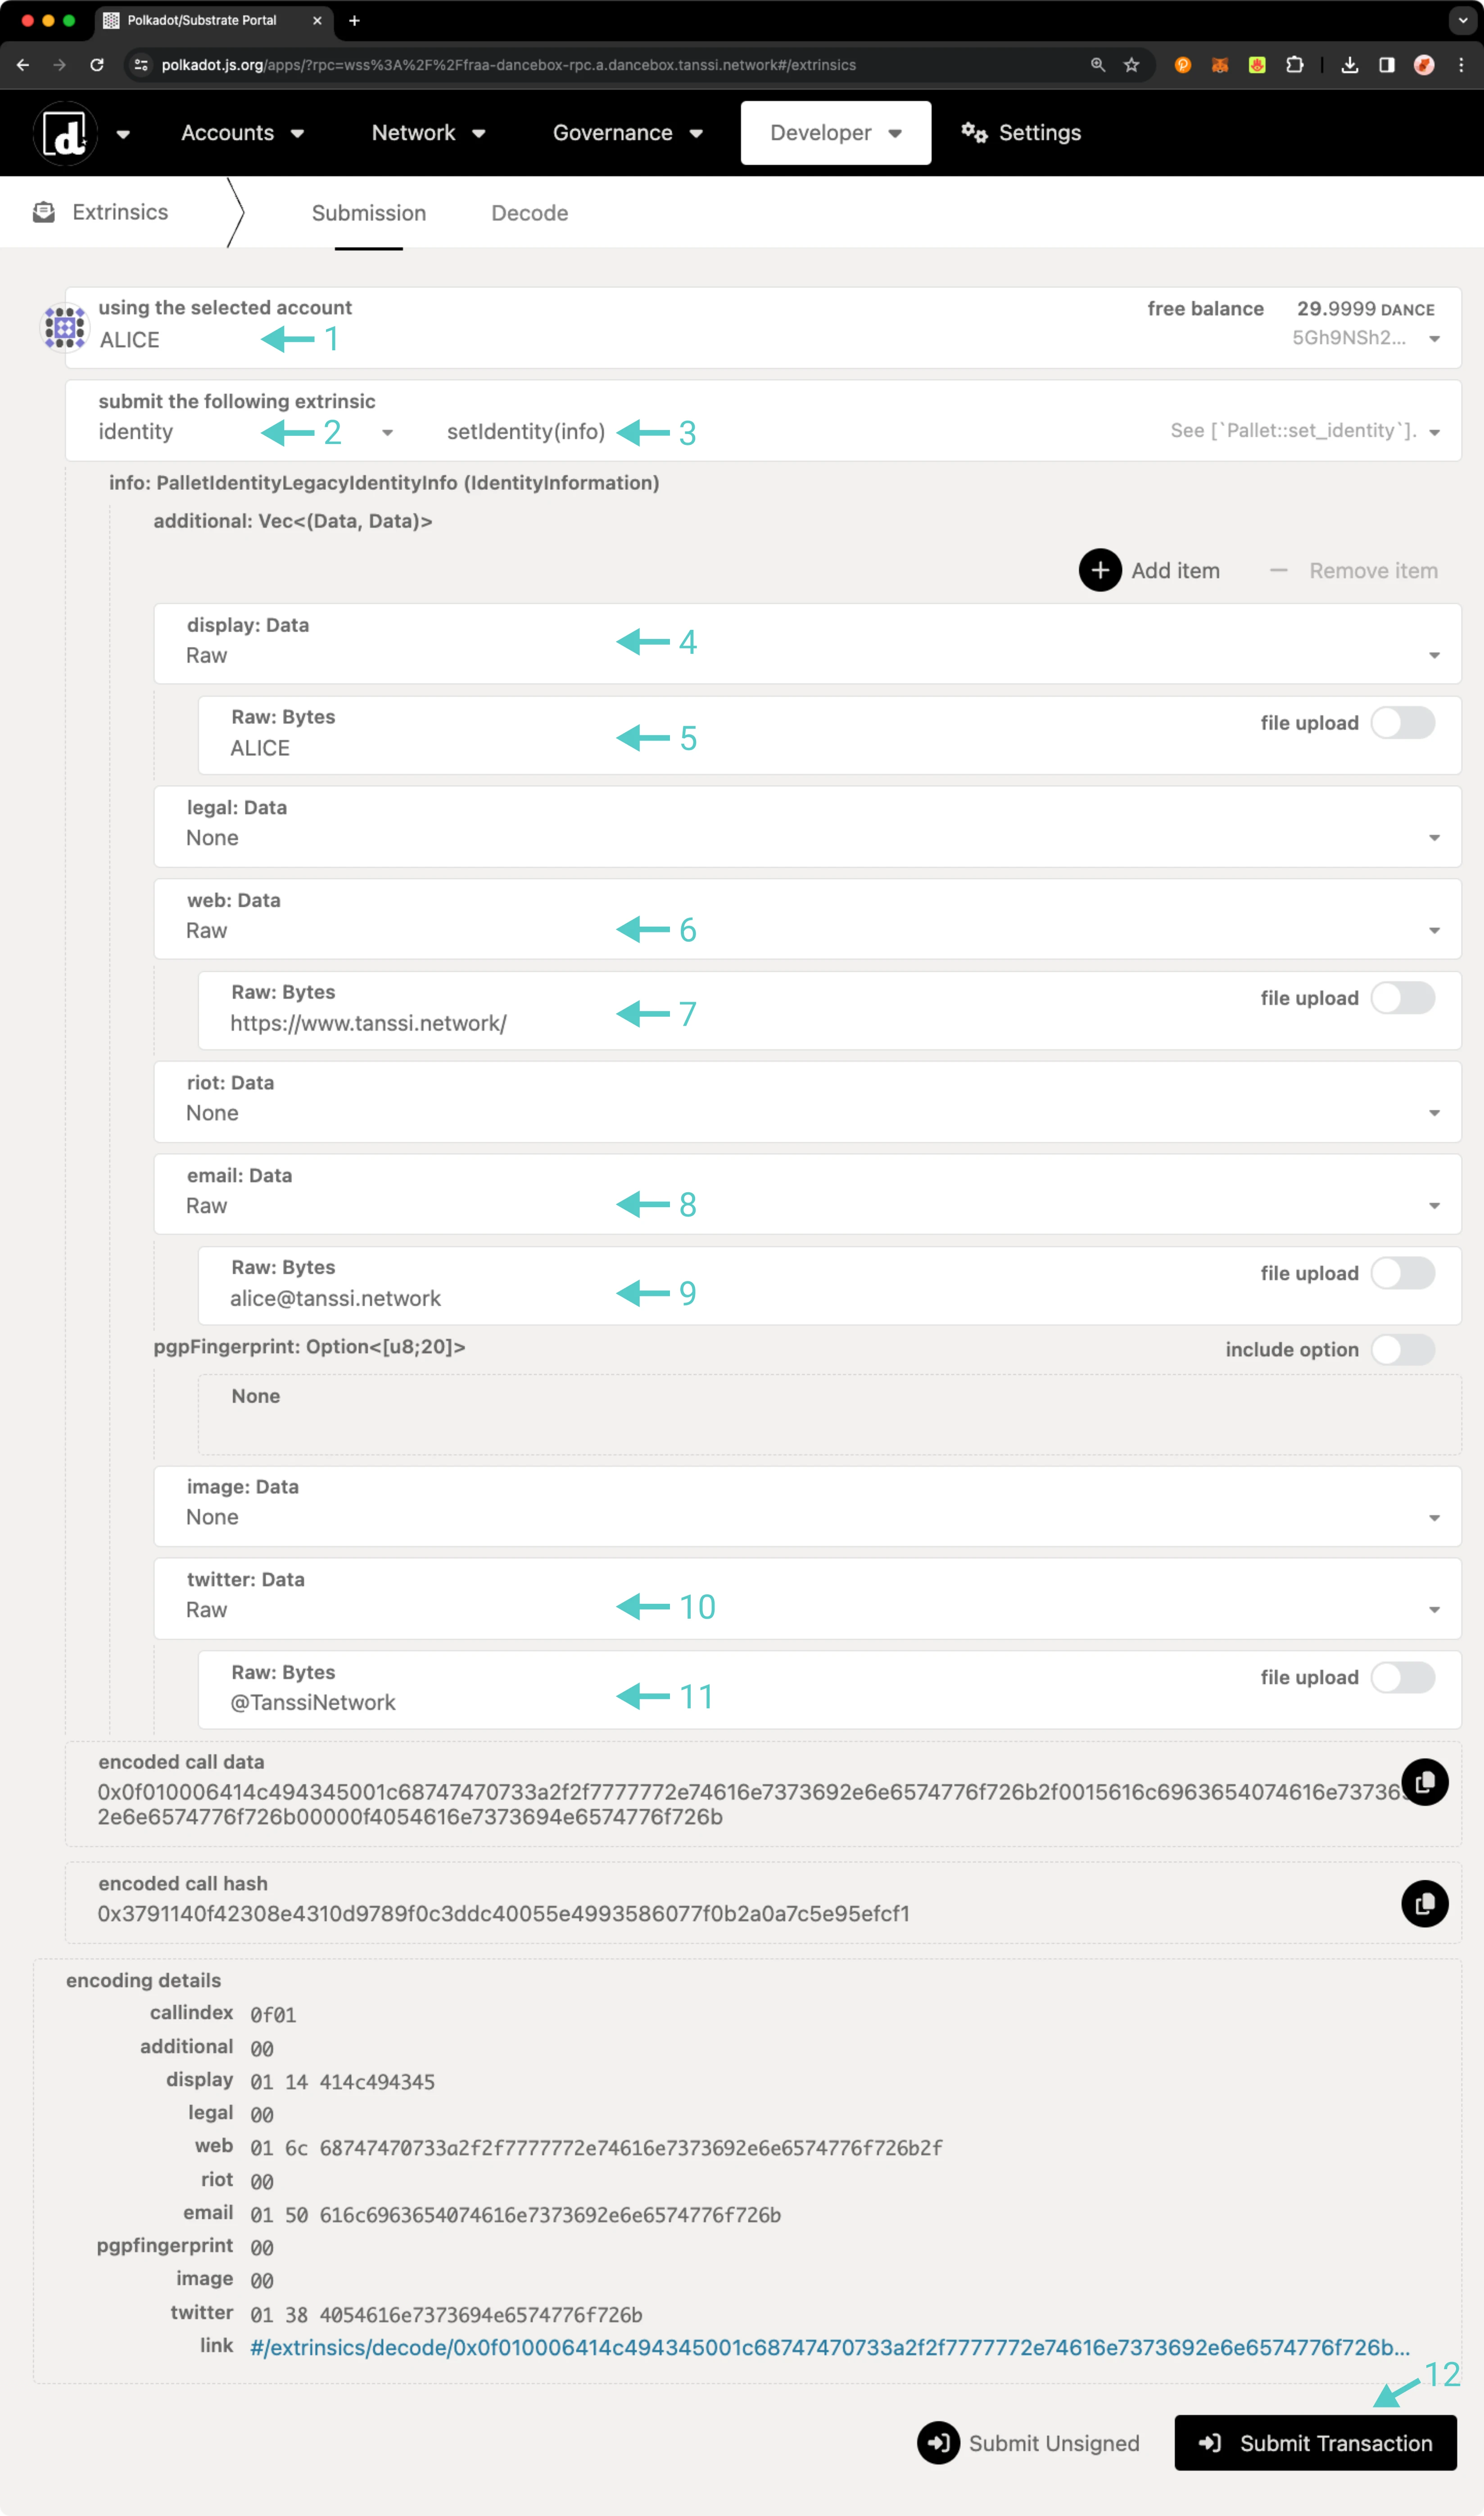
Optionally, if you would like to enter custom fields, take the following steps:
1. Scroll to the top and click on **Add item**
2. Two fields will appear: the first for the field name and the second for the value. Select **Raw** as the data format to enter the field name
3. Enter the field name in the specified format
4. Select **Raw** as the data format to enter the custom value
5. Enter the custom value in the specified format
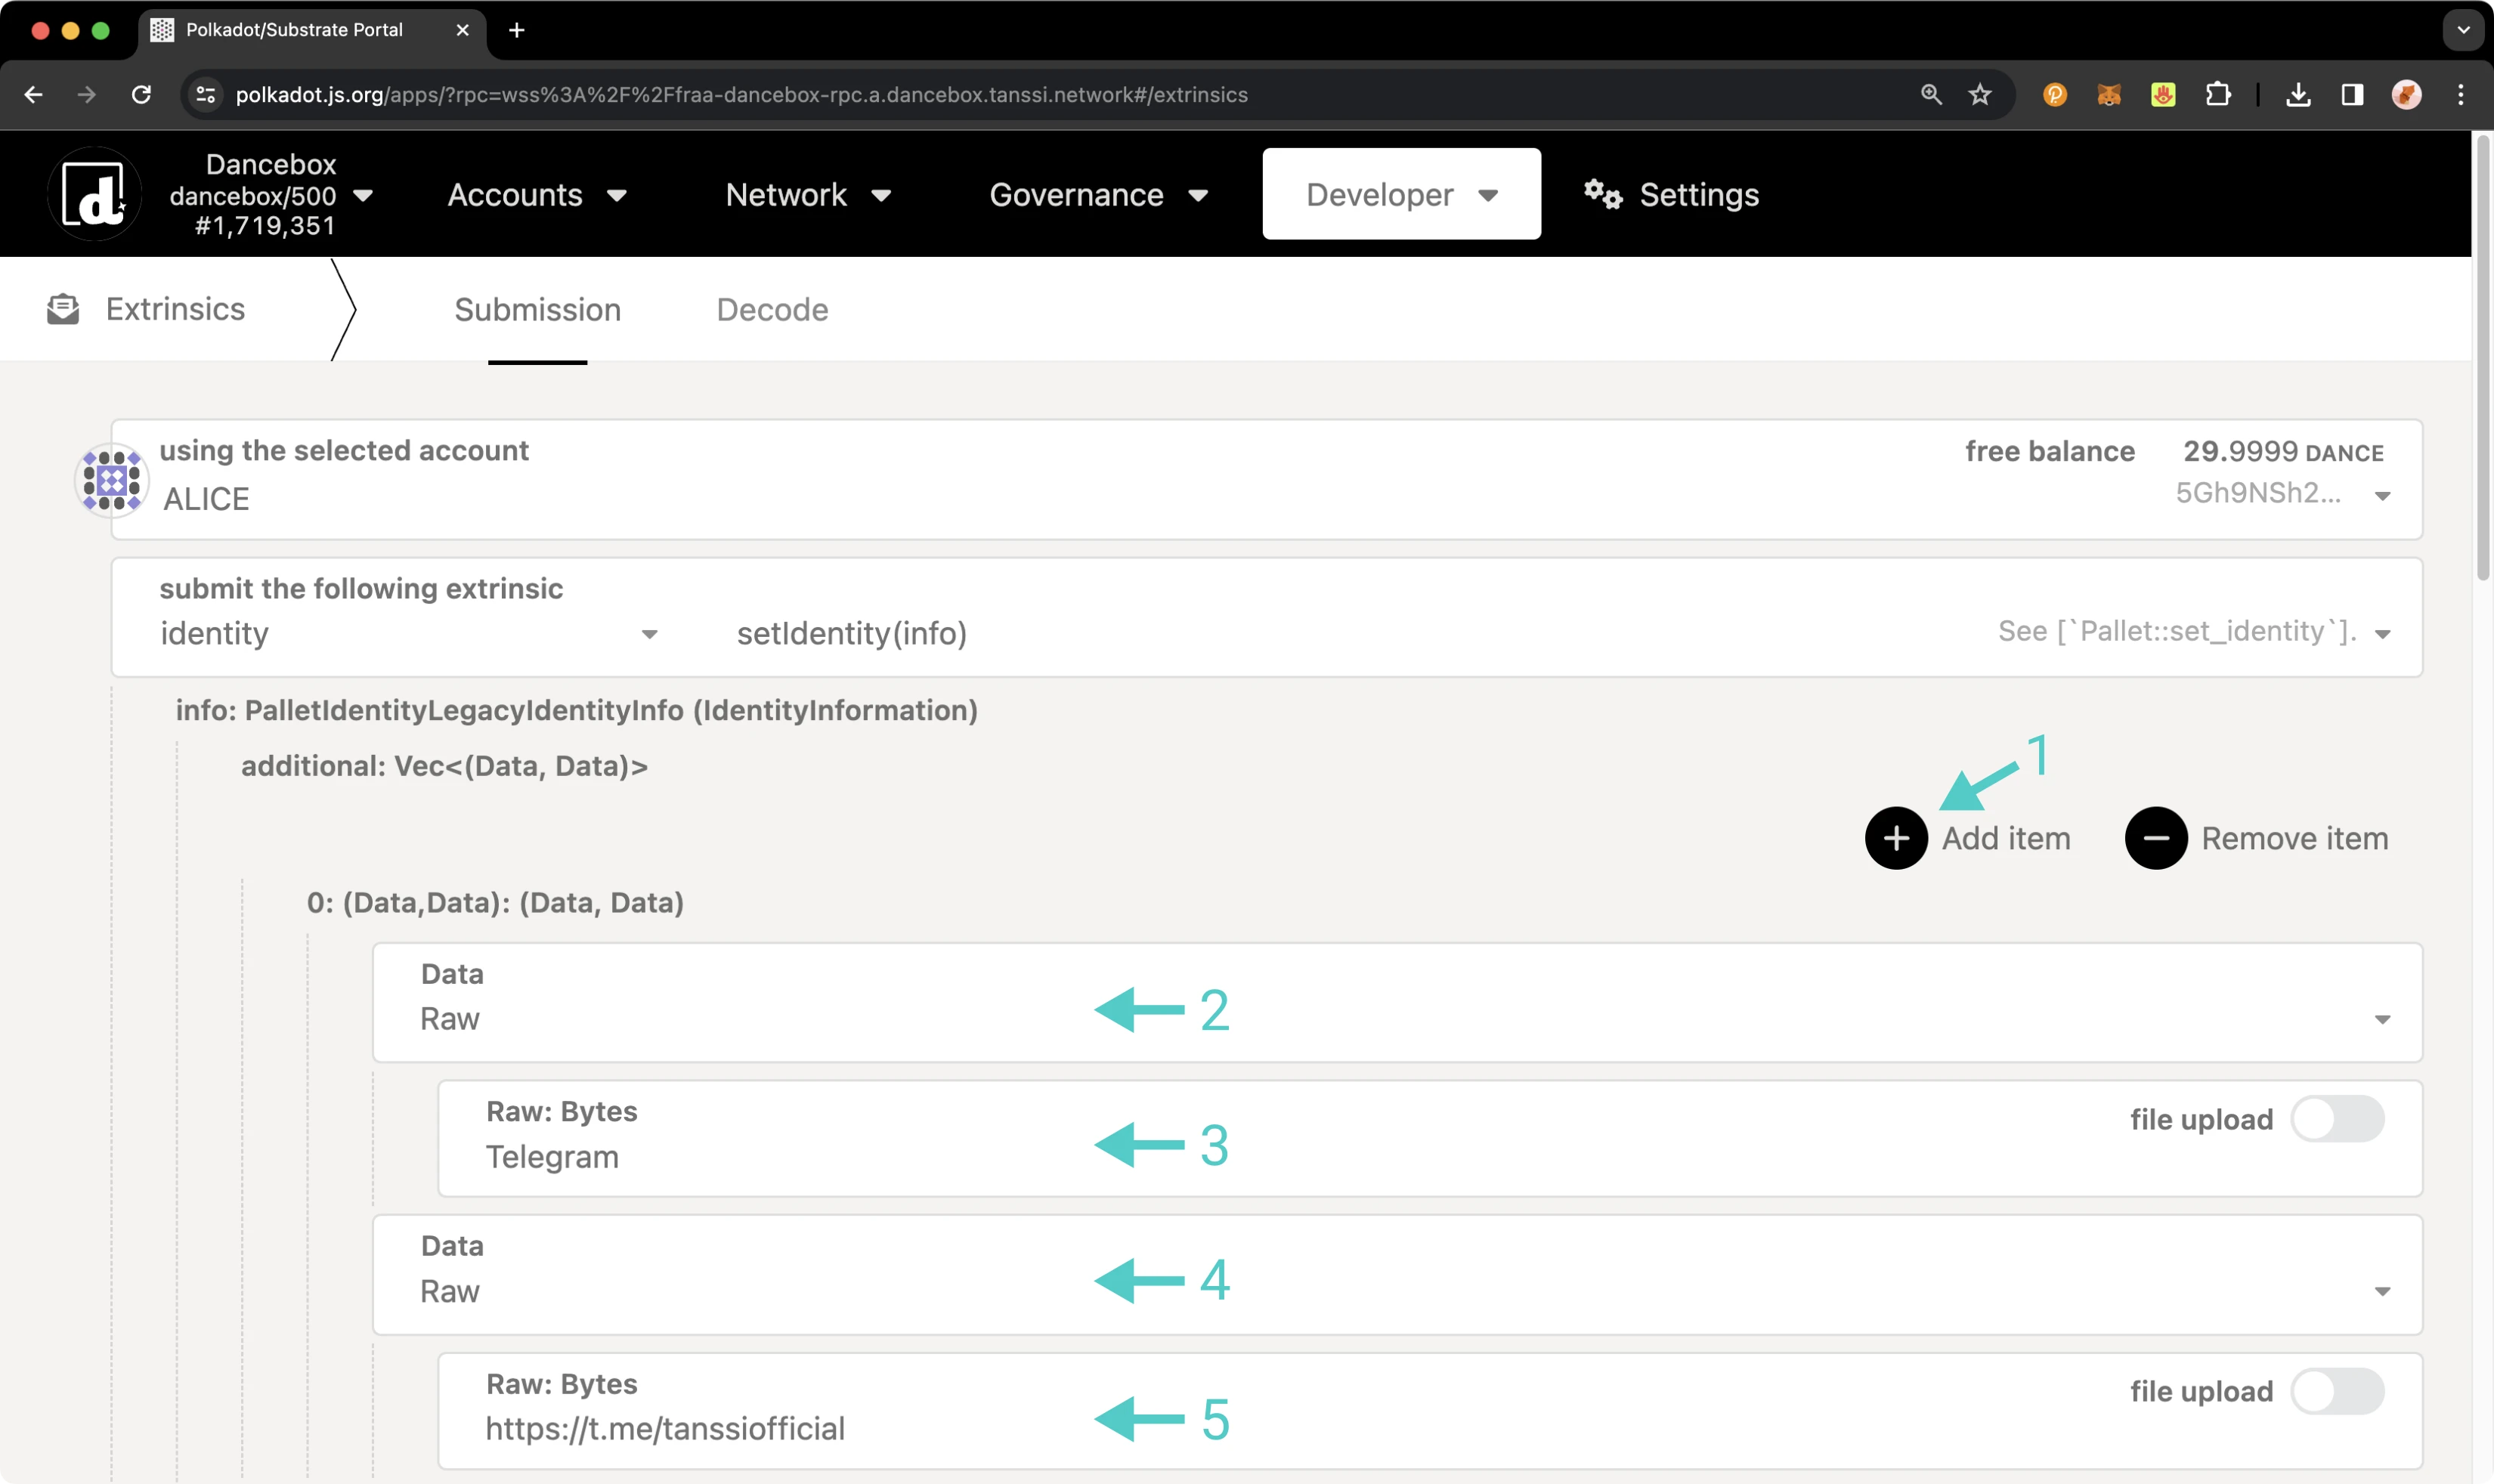
Finally, once all of your identity information has been added, you can scroll to the bottom of the page and click **Submit Transaction**.
You will then be prompted to sign the transaction. Remember, an additional deposit is required for each additional custom field. If everything looks good, sign the transaction.
You should see status notifications pop up in the top right-hand corner confirming the transaction. If successful, you've set an identity! Congratulations! To ensure everything went through and your identity information looks good, you can verify your identity.
### Confirm an Identity {: #confirm-identity-extrinsics }
To verify the addition of your identity information, you can click on the **Developer** tab and then navigate to [**Chain state**](https://polkadot.js.org/apps/?rpc=wss://{{ networks.mainnet.dns_name }}#/chainstate){target=\_blank}.
On the **Chain State** page, make sure **Storage** is selected. Then you can start to request your identity information:
1. Set **selected state query** to **identity**
2. Select the **identityOf(AccountId)** function
3. Select your account
4. Click the **+** button to get your identity information
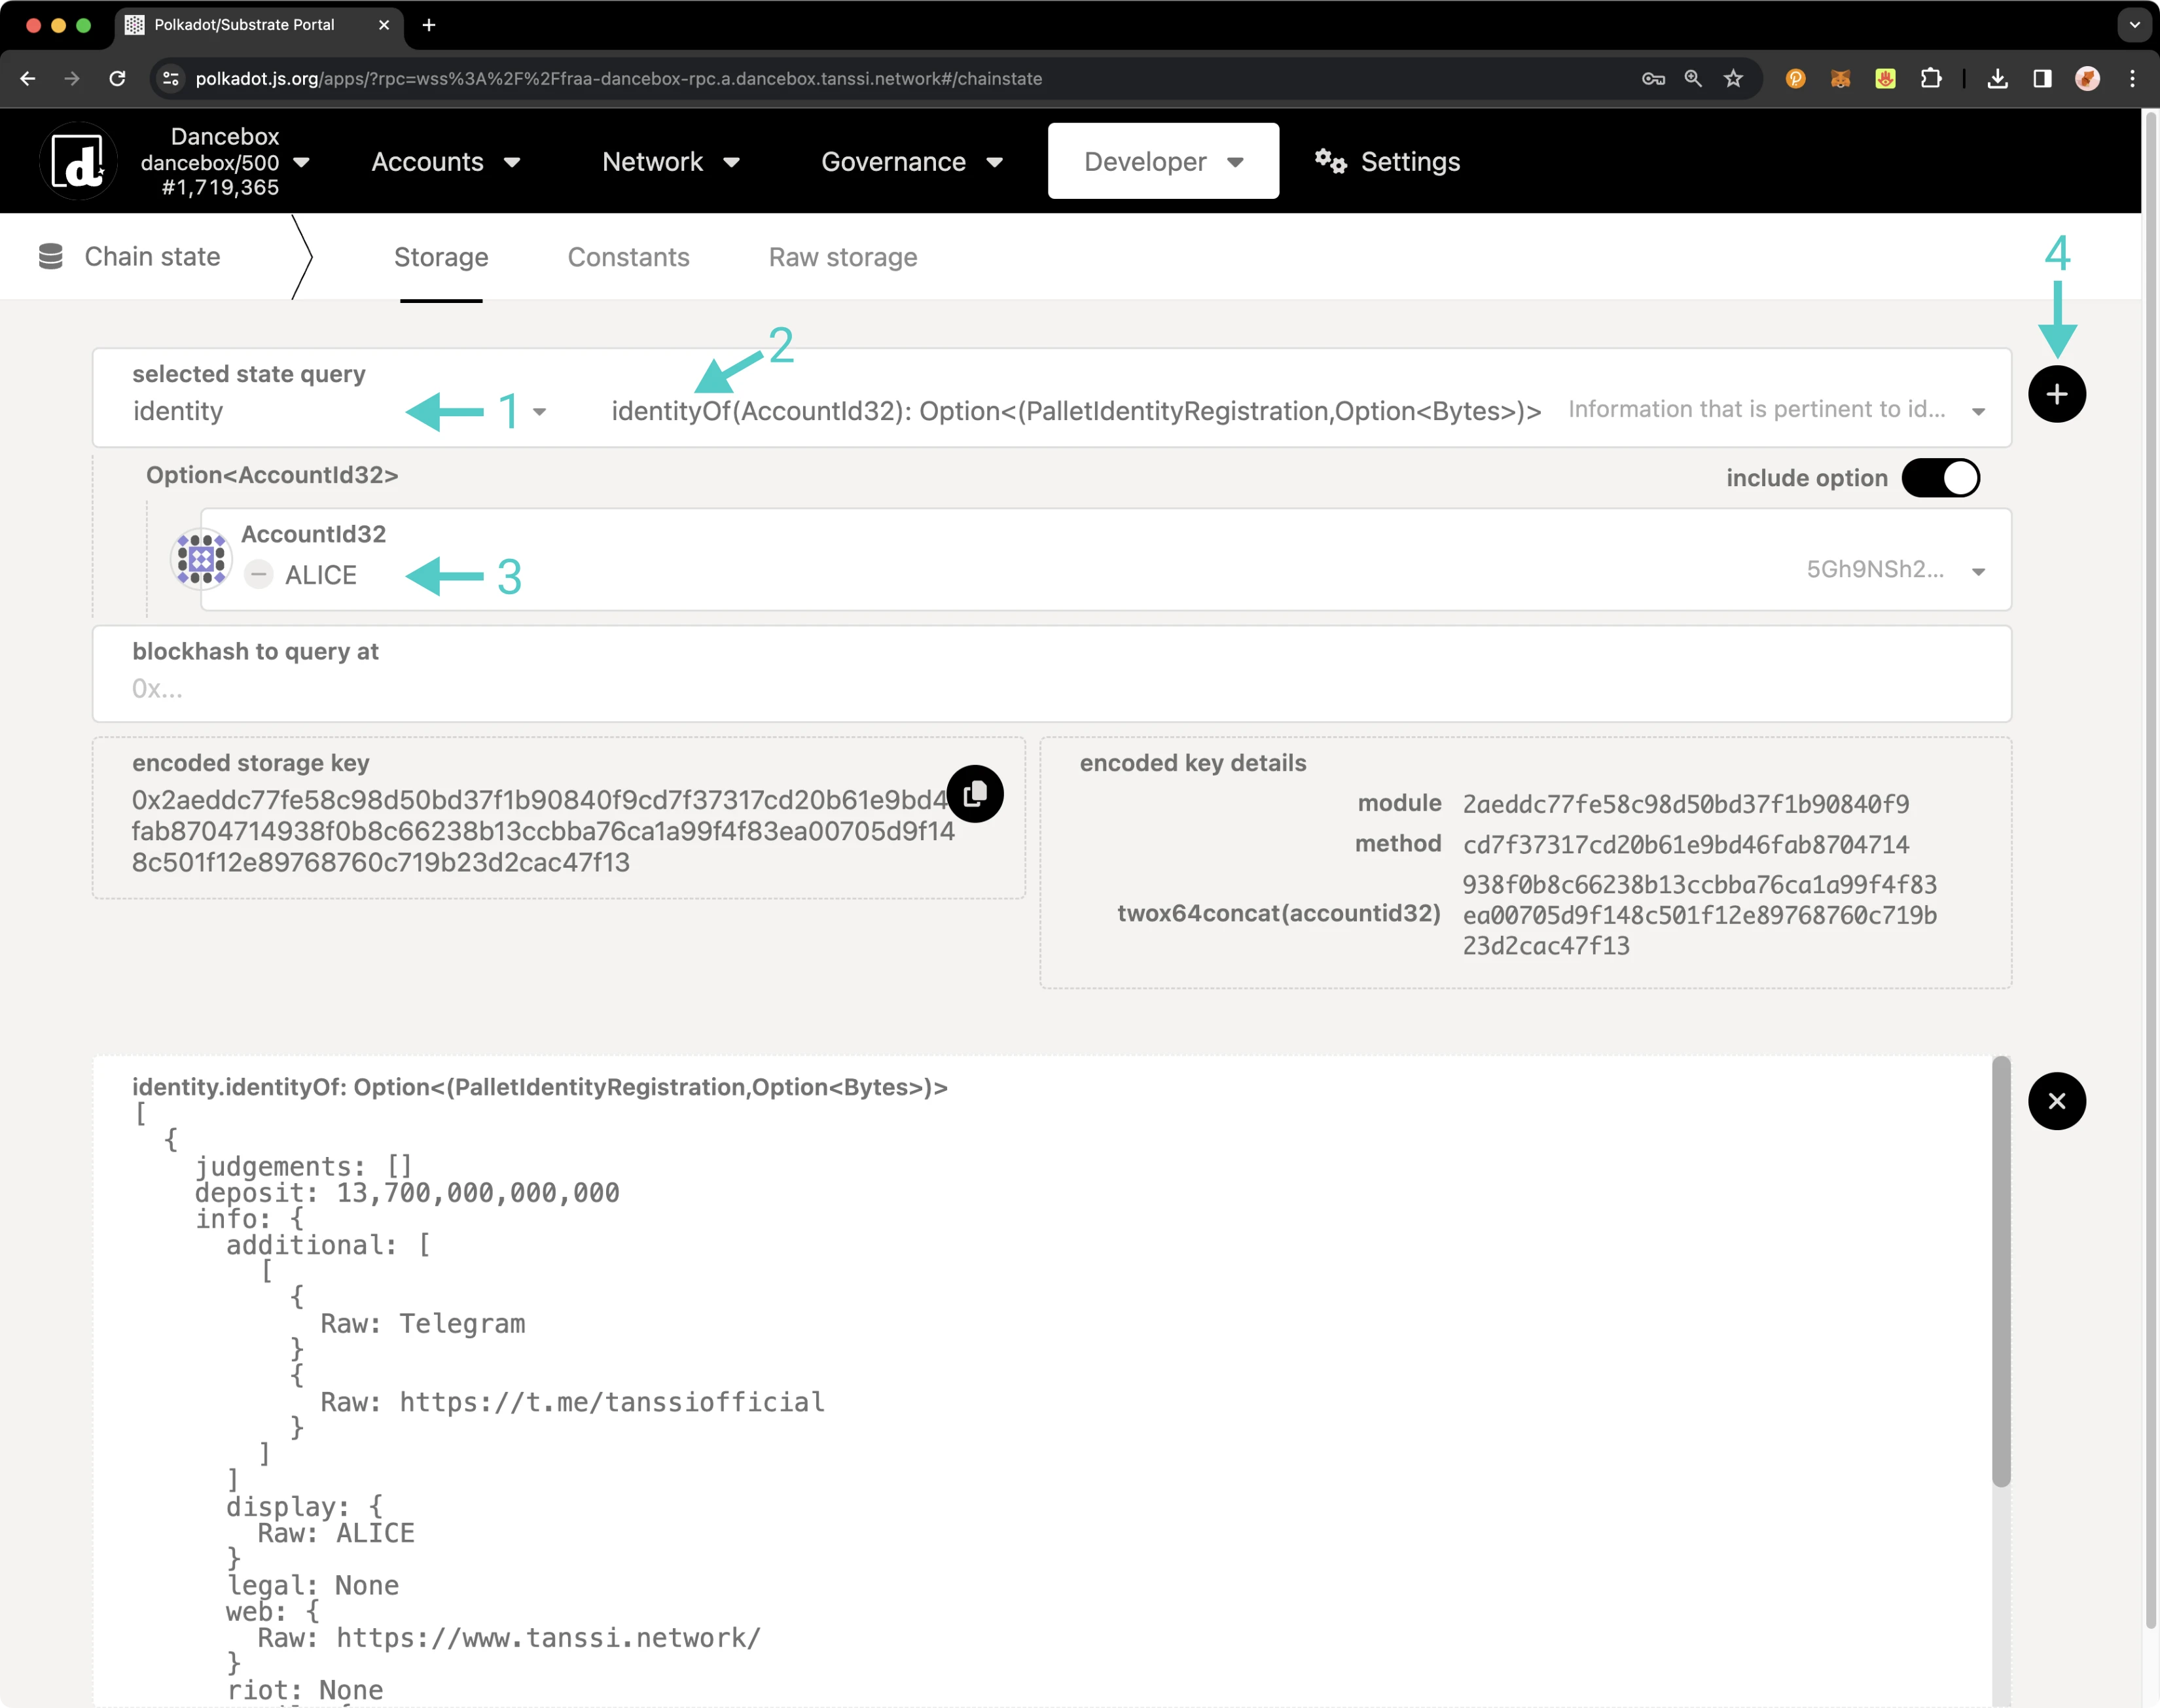
You can see now that you've successfully set an identity! Once you clear your identity, the deposit in your reserved balance will get transferred back to your transferable balance. If you need to change your identity, you can go through the process of setting your identity again. Please note that you must ensure all fields are re-entered, even if only one field needs to be changed, or they will be overwritten. You will not need to pay another deposit unless custom fields are used, but you will need to pay gas fees.
## Clear an Identity {: #confirm-identity-extrinsics }
To clear your identity, take the following steps from **Extrinsics** tab of the developer portal:
1. Select your account from the **using the selected account** dropdown
2. Select **identity** from the **submit the following extrinsic** dropdown
3. Then select the **clearIdentity()** function
4. Click **Submit Transaction**
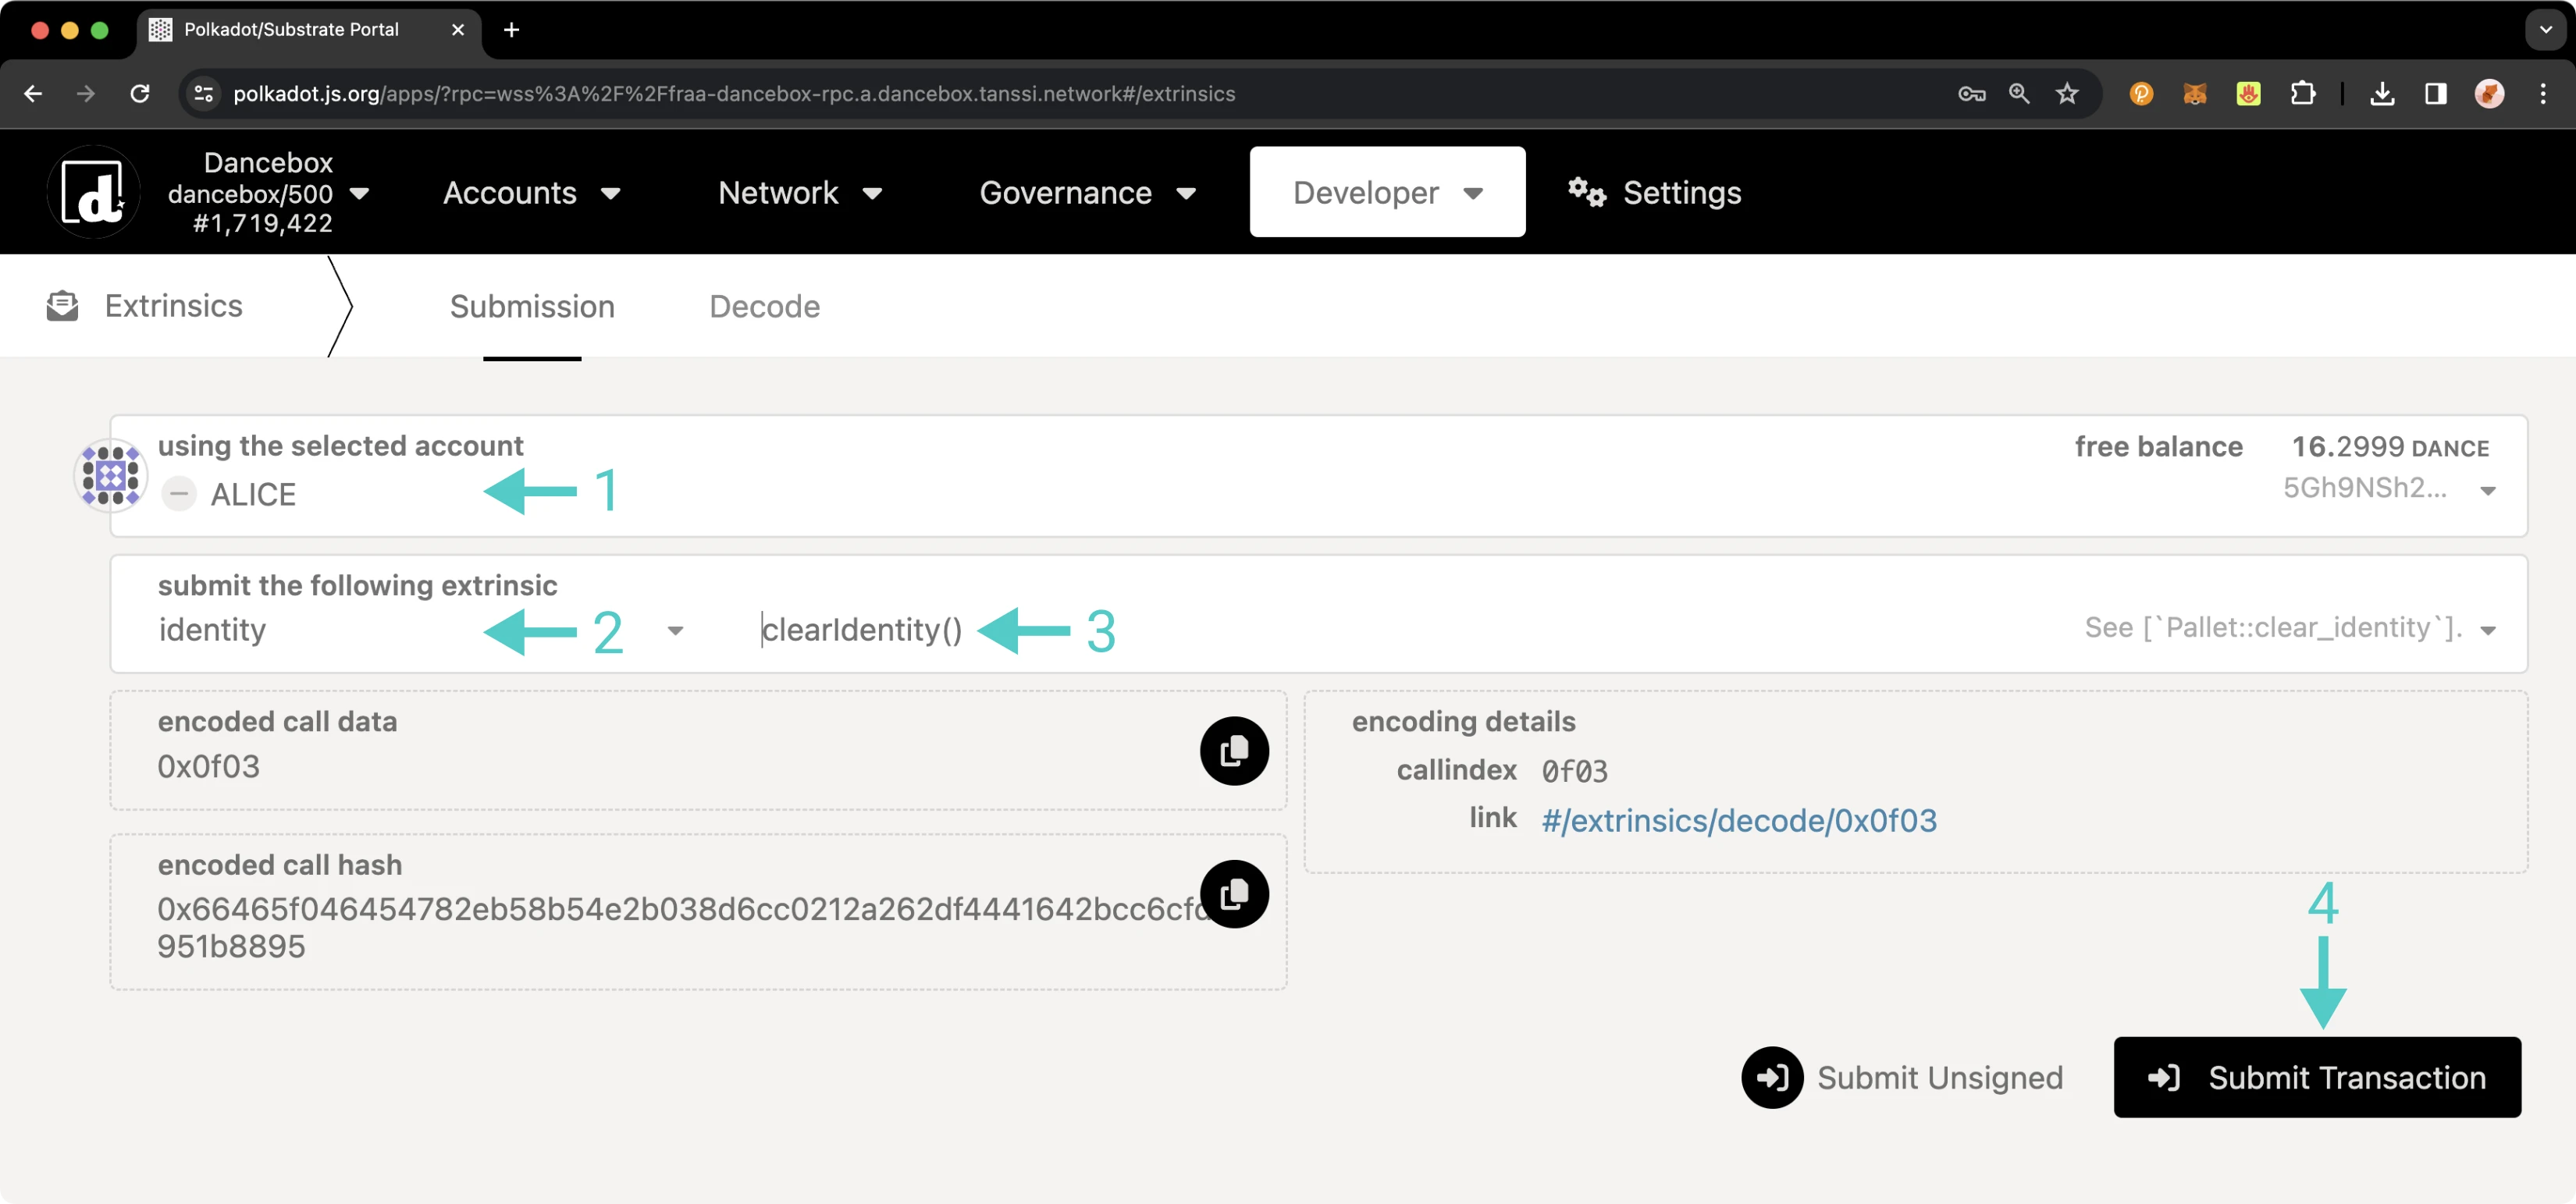
You will then be prompted to sign the transaction. If everything looks good, sign it. You should see status notifications in the top right-hand corner confirming the transaction.
To confirm that your identity information has been successfully removed, revisit the steps outlined in the [Confirm an Identity section](#confirm-identity-extrinsics). This time, instead of displaying your identity details, the response should indicate **none**, confirming that no identity information is currently linked to your account. Additionally, when you check your balances, you will find that the deposit initially made for setting your identity has been credited back to your transferable balance. This completes the process of clearing your identity.
--- END CONTENT ---
Doc-Content: https://docs.tanssi.network/builders/account-management/proxy-accounts/
--- BEGIN CONTENT ---
---
title: Set Up and Manage Proxy Accounts
description: Follow these step-by-step instructions to learn how proxies work and how to create, view, update, and remove proxy accounts from primary (proxied) accounts.
icon: octicons-shield-lock-24
categories: Basics, Appchain
---
# Proxy Accounts
## Introduction {: #introduction }
Proxy accounts can be set up to perform a limited number of actions on behalf of primary accounts and are helpful for keeping the underlying accounts safe. Your proxy account can act as a "hot wallet" to interact with the network on behalf of your "cold wallet" account. For added safety, you can regularly rotate the proxy account.
Proxy accounts can also help you implement the principle of least privilege for access control. For example, if you have multiple team members, you can give them the minimum level of access required to carry out their duties via a specific type of proxy account.
This tutorial will walk you through configuring a proxy account on Dancelight, the Tanssi TestNet, specifically for balance transfers. Then, it will demonstrate performing a balance transfer using the newly created proxy.
## Checking Prerequisites {: #checking-prerequisites }
To follow along with this tutorial, you will need to have:
- [Polkadot.js Apps](https://polkadot.js.org/apps/?rpc=wss://{{ networks.dancelight.dns_name }}#/accounts){target=\_blank} open and connected to [Dancelight](/builders/tanssi-network/testnet/dancelight/){target=\_blank}.
- Create or have two accounts accessible on the developer portal.
- At least one of the accounts will need to be funded with `{{ networks.dancelight.token_symbol }}` tokens.
If you need help importing your accounts into Polkadot.js Apps, please check out the [Connecting to Polkadot.js](/builders/toolkit/substrate-api/wallets/talisman/#connecting-to-polkadotjs){target=\_blank} guide.
## General Definitions {: #general-definitions }
When setting up a proxy account, a bond for the proxy is taken out of your free balance and moved to your reserved balance. The bond is required as adding a proxy requires on-chain storage space, and it is recalculated for each proxy you add or remove. The bond is returned to your free balance after all proxies are removed from your account.
The deposit is calculated based on a deposit base and a deposit factor:
- **Deposit base** - the amount to be reserved for an account to have a proxy list.
- **Deposit factor** - the additional amount to be reserved for every proxy the primary account has.
The equation for calculating the deposit is:
```text
deposit base + deposit factor * number of proxies
```
You can find each of the relevant variables below.
=== "Tanssi MainNet"
| Variable | Value |
|:--------------:|:--------------------------------------------------------------------------------:|
| Deposit base | {{ networks.mainnet.proxy.deposit_base }} {{ networks.mainnet.token_symbol }} |
| Deposit factor | {{ networks.mainnet.proxy.deposit_factor }} {{ networks.mainnet.token_symbol }} |
| Max proxies | {{ networks.mainnet.proxy.max_proxies }} proxies |
=== "Dancelight TestNet"
| Variable | Value |
|:--------------:|:--------------------------------------------------------------------------------------:|
| Deposit base | {{ networks.dancelight.proxy.deposit_base }} {{ networks.dancelight.token_symbol }} |
| Deposit factor | {{ networks.dancelight.proxy.deposit_factor }} {{ networks.dancelight.token_symbol }} |
| Max proxies | {{ networks.dancelight.proxy.max_proxies }} proxies |
## Proxy Types {: #proxy-types }
When creating a proxy account, you must choose a type of proxy that will define how the proxy can be used. The available options are:
- **`Any`** - allows the proxy account to use any function supported by the proxy pallet. There is no filtering of calls.
- **`NonTransfer`** - this type of proxy account is allowed to submit any type of transaction with the exception of balance transfers.
- **`Balances`** - allows the proxy account to only make transactions related to sending funds.
- **`Governance`** - allows the proxy account to only make transactions related to the governance pallet, such as voting or creating democracy proposals. Note, governance is not yet enabled on Tanssi. You can create governance proxy accounts but they will not be able to take any actions until governance is enabled.
- **`Registrar`** - allows the proxy account to only make transactions related to the registrar pallet.
- **`SudoRegistrar`** - allows the proxy account to only make transactions related to the registrar pallet that need to be called by Sudo.
- **`CancelProxy`** - allows the proxy account to reject and remove any announced proxy calls.
- **`Staking`** - allows the proxy account to perform staking-related transactions, such as sequencer and `session()` functions.
- **`SessionKeyManagement`** - allows the proxy account to make key management related transactions included in the session pallet.
For this guide, you will be setting up a proxy account using the balances proxy type. Since this type enables the proxy to spend funds on behalf of the primary account, you should exercise caution and only provide access to accounts you trust. The proxy will have access to transfer all of the funds within the primary account, and if not trusted, the proxy could drain the primary account. Ensure that you maintain oversight of your proxy accounts and remove any proxies that are no longer needed.
## Creating a Proxy Account {: #creating-a-proxy-account }
There are a couple of ways you can create proxy accounts in [Polkadot.js Apps](https://polkadot.js.org/apps/?rpc=wss://{{ networks.dancelight.dns_name }}#/accounts){target=\_blank}, either from the **Extrinsics** page or the **Accounts** page. However, to create a time-delayed proxy, you will need to use the **Extrinsics** page. A time delay provides an additional layer of security to proxies by specifying a delay period based on the number of blocks. This will prevent the proxy account from executing a transaction until the delay period ends. The delay allows time for the primary account that controls the proxy to review pending transactions, potentially for malicious actions, and cancel if necessary before execution.
The following demo will showcase configuring a Balances proxy, which allows for transferring funds, making it perfect for demonstration purposes. After configuring your Balances proxy you can try transferring funds from the primary account via proxy.
To get started creating your proxy account, head to the **Developer** tab and select [**Extrinsics**](https://polkadot.js.org/apps/?rpc=wss://{{ networks.dancelight.dns_name }}#/extrinsics){target=\_blank} from the dropdown. Next, you will need to take the following steps:
1. Select the primary account.
2. From the **submit the following extrinsic** dropdown, select **proxy**.
3. Choose the **addProxy** extrinsic.
4. Choose **Id** from the **AccountIdLookupOf** dropdown.
5. Select the **delegate** account for the proxy.
6. From the **proxyType** dropdown, choose **Balances**.
7. Optionally, you can add a time delay using a specified number of blocks to add an additional layer of security for the primary account to review the pending transaction.
8. Click **Submit Transaction**.
You will then be prompted to authorize and sign the transaction. Click **Sign and Submit** to create the proxy relationship. Once the transaction has been successfully submitted, you will receive some notifications confirming the transaction.
As previously mentioned, you can also create a proxy from the **Accounts** page. To do so, navigate to the **Accounts** page and take the following steps:
1. Select the three vertical dots next to the primary account.
2. Select **Add proxy**.
!!! note
If the account already has a proxy, **Manage proxies** will be displayed as an option instead of **Add proxy**.
A pop-up will appear and you can enter in the required information, such as the proxied/primary account, the proxy account, and type of proxy to create a proxy account. First click **Add Proxy**.
Then, take the following steps:
1. Select the account you would like to set as a proxy.
2. Select the proxy type.
3. Click **Submit** and sign the transaction.
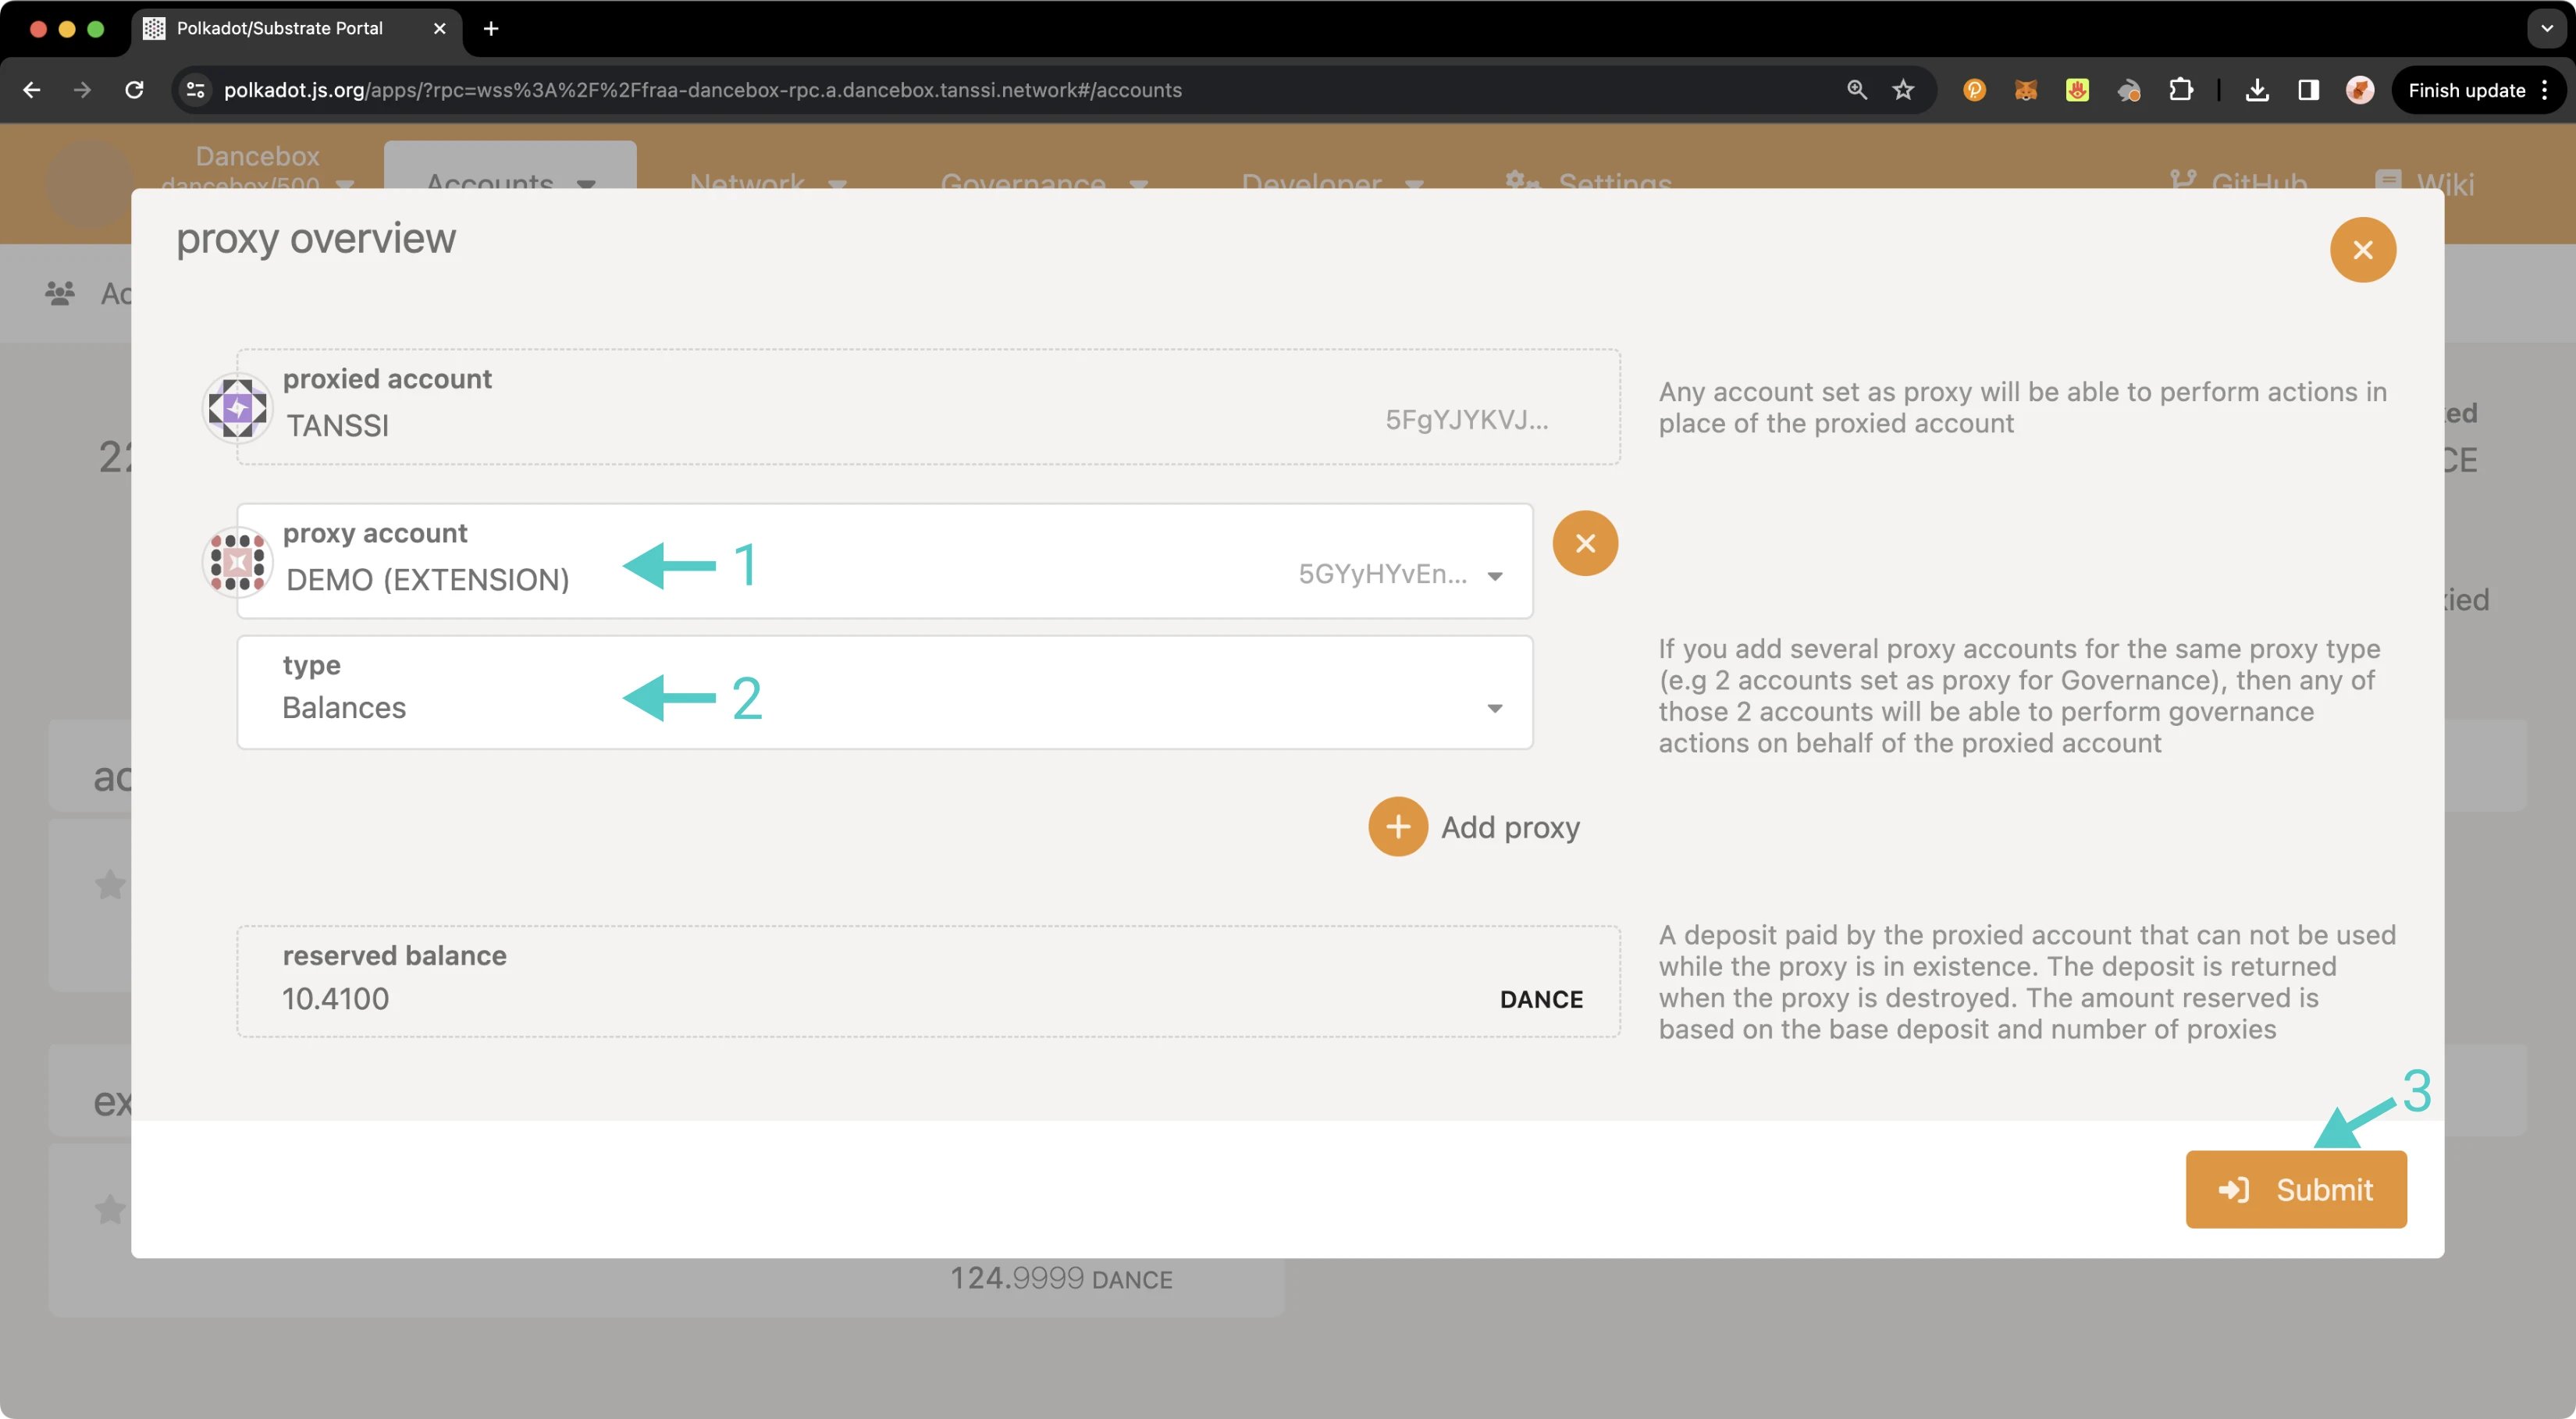
In the next section, you will learn how to verify that your proxy account was set up successfully.
## Verifying Your Proxy Account {: #verifying-your-proxy-account }
You can verify that your proxy account has been successfully set up in a couple of ways: either through the **Accounts** page or via the **Chain state** page.
To check your proxy accounts from the [**Chain state** page](https://polkadot.js.org/apps/?rpc=wss://{{ networks.dancelight.dns_name }}#/chainstate){target=\_blank}, you can take the following steps:
1. From the **selected state query** dropdown, select **proxy**.
2. Choose the **proxies** extrinsic.
3. Select your primary/proxied account.
4. Click on the **+** button to send the query.
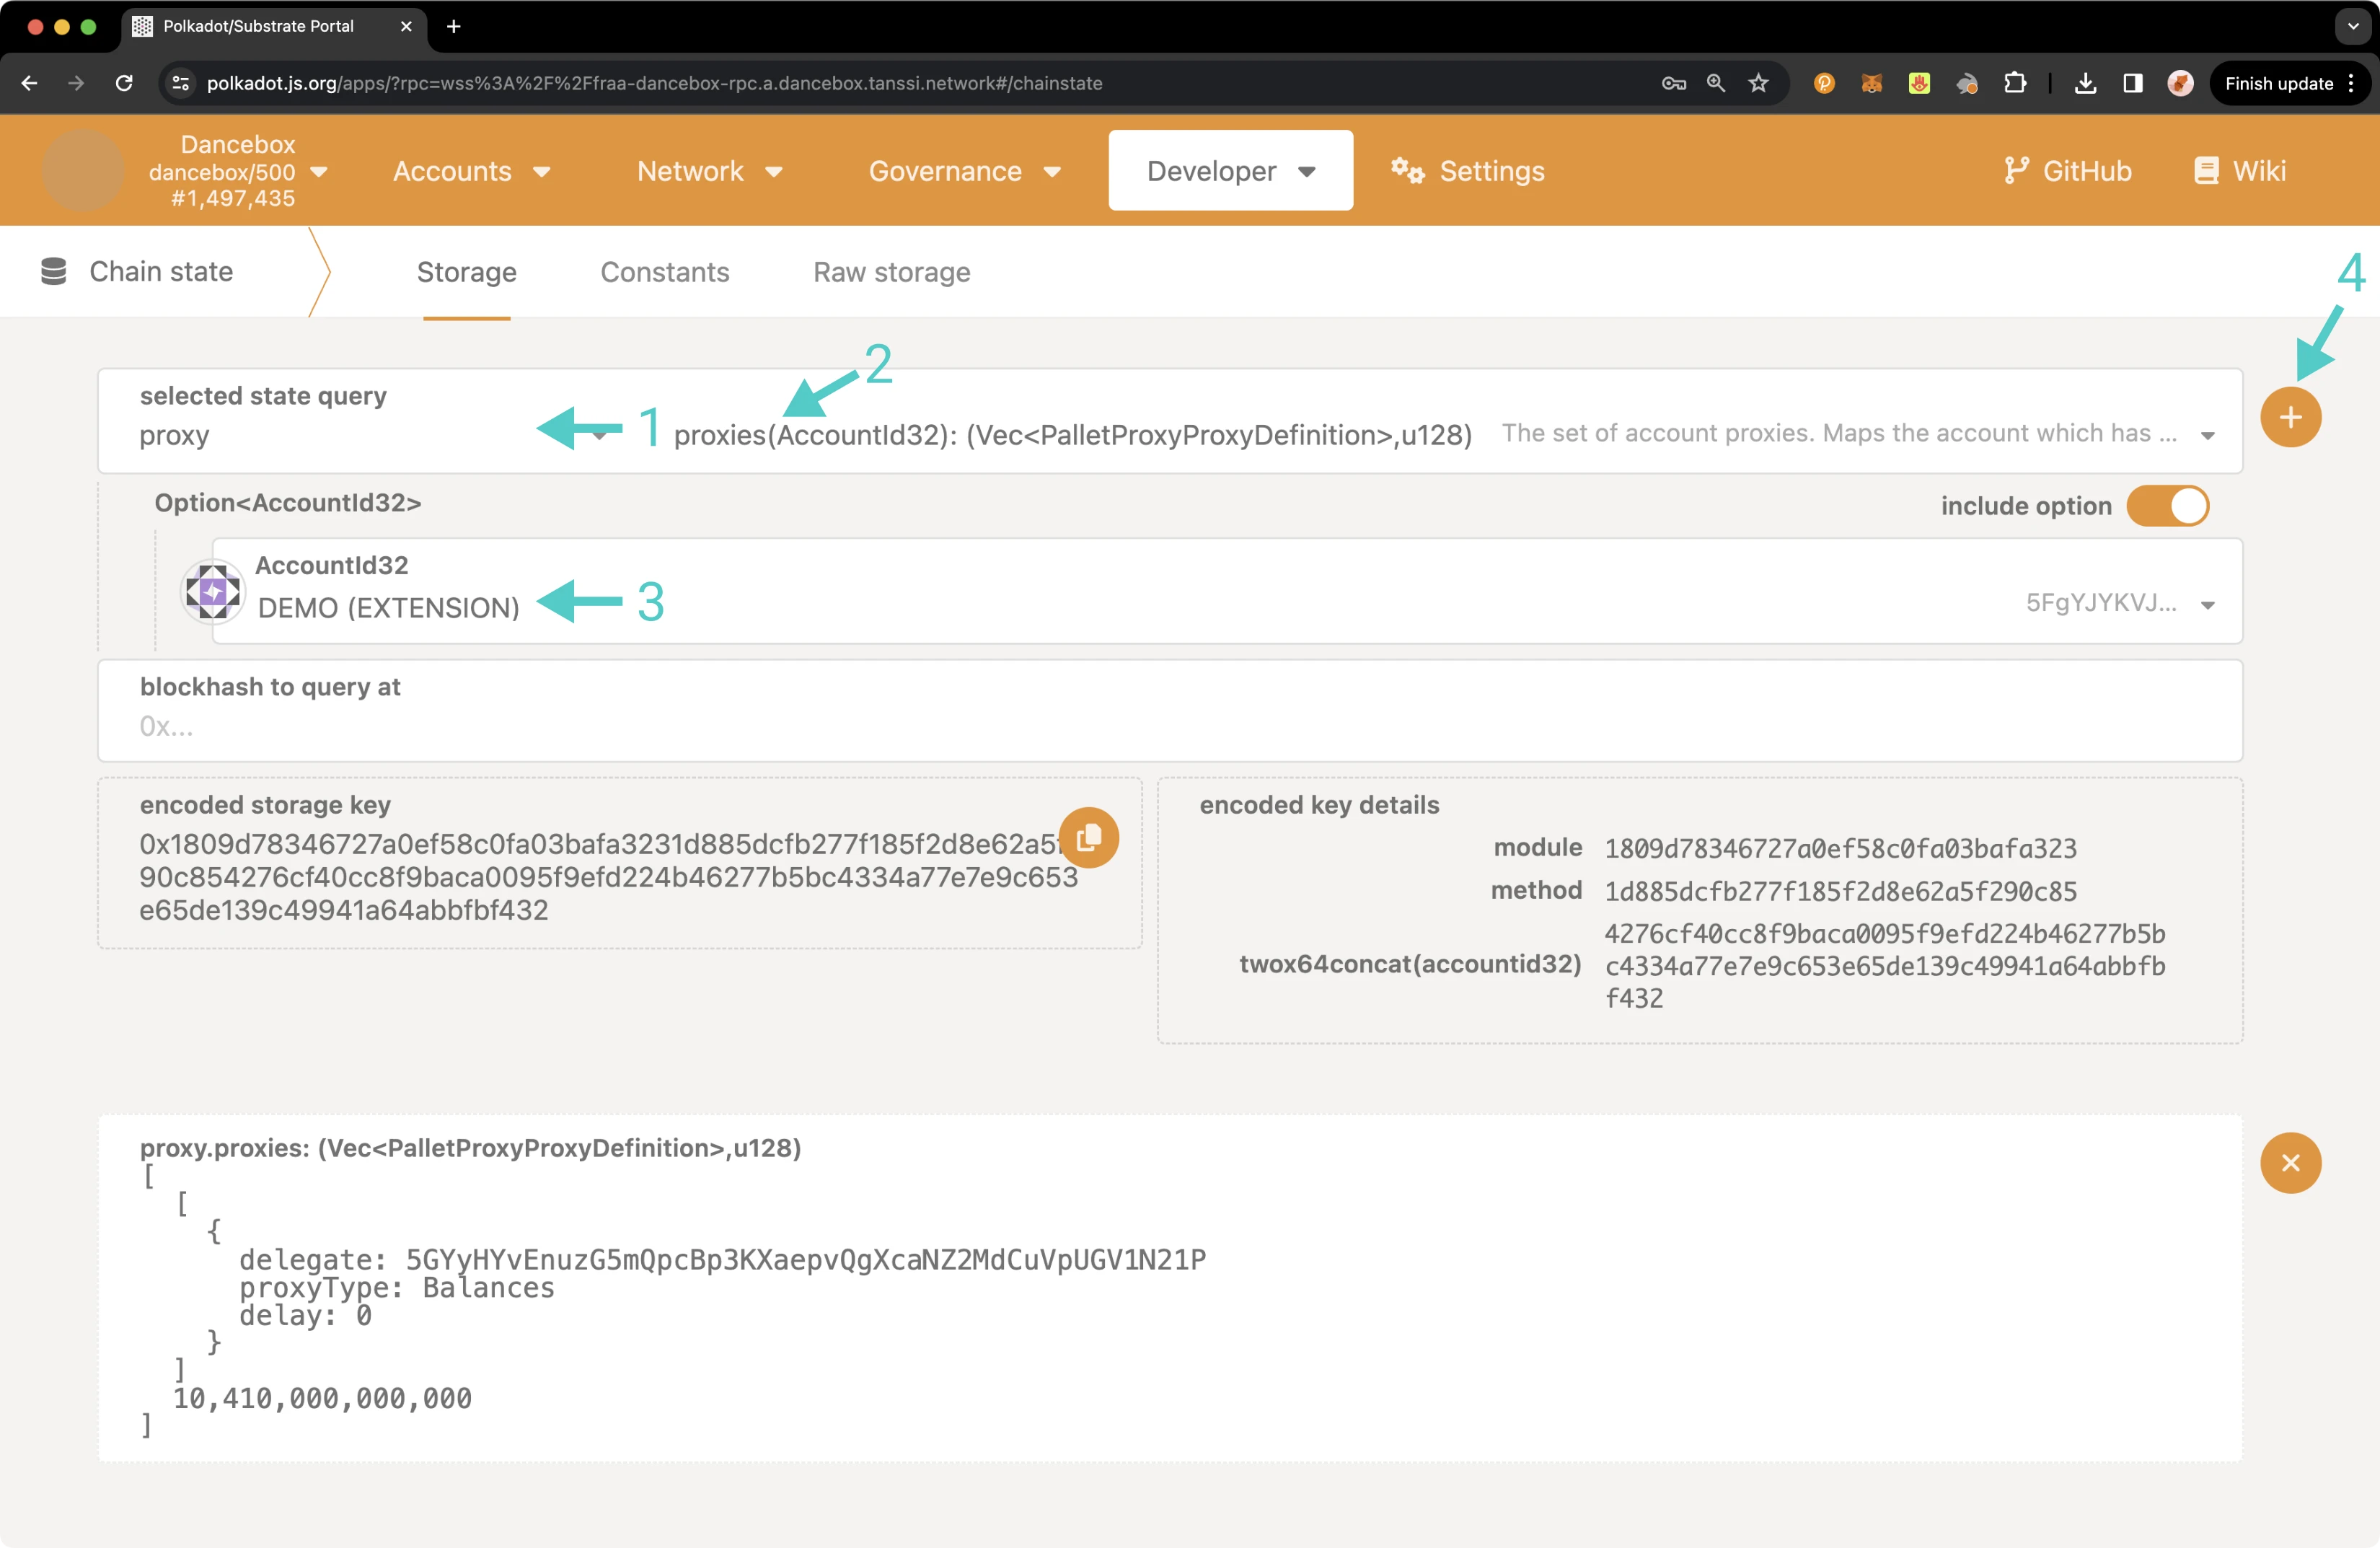
The result will appear on the page showing you information about all of your proxies, including the delegate/proxy account address, the proxy type, the delay period if one was specified, and the total bond amount for all of your proxies in Planck.
You can also check your proxy accounts from the **Accounts** page. To do so, navigate to the **Accounts** page, and there should be a Proxy symbol next to the primary account. Hover over the icon and click on **Manage proxies** to review your proxies.

A pop-up will appear where you can see an overview of all of your proxy accounts.
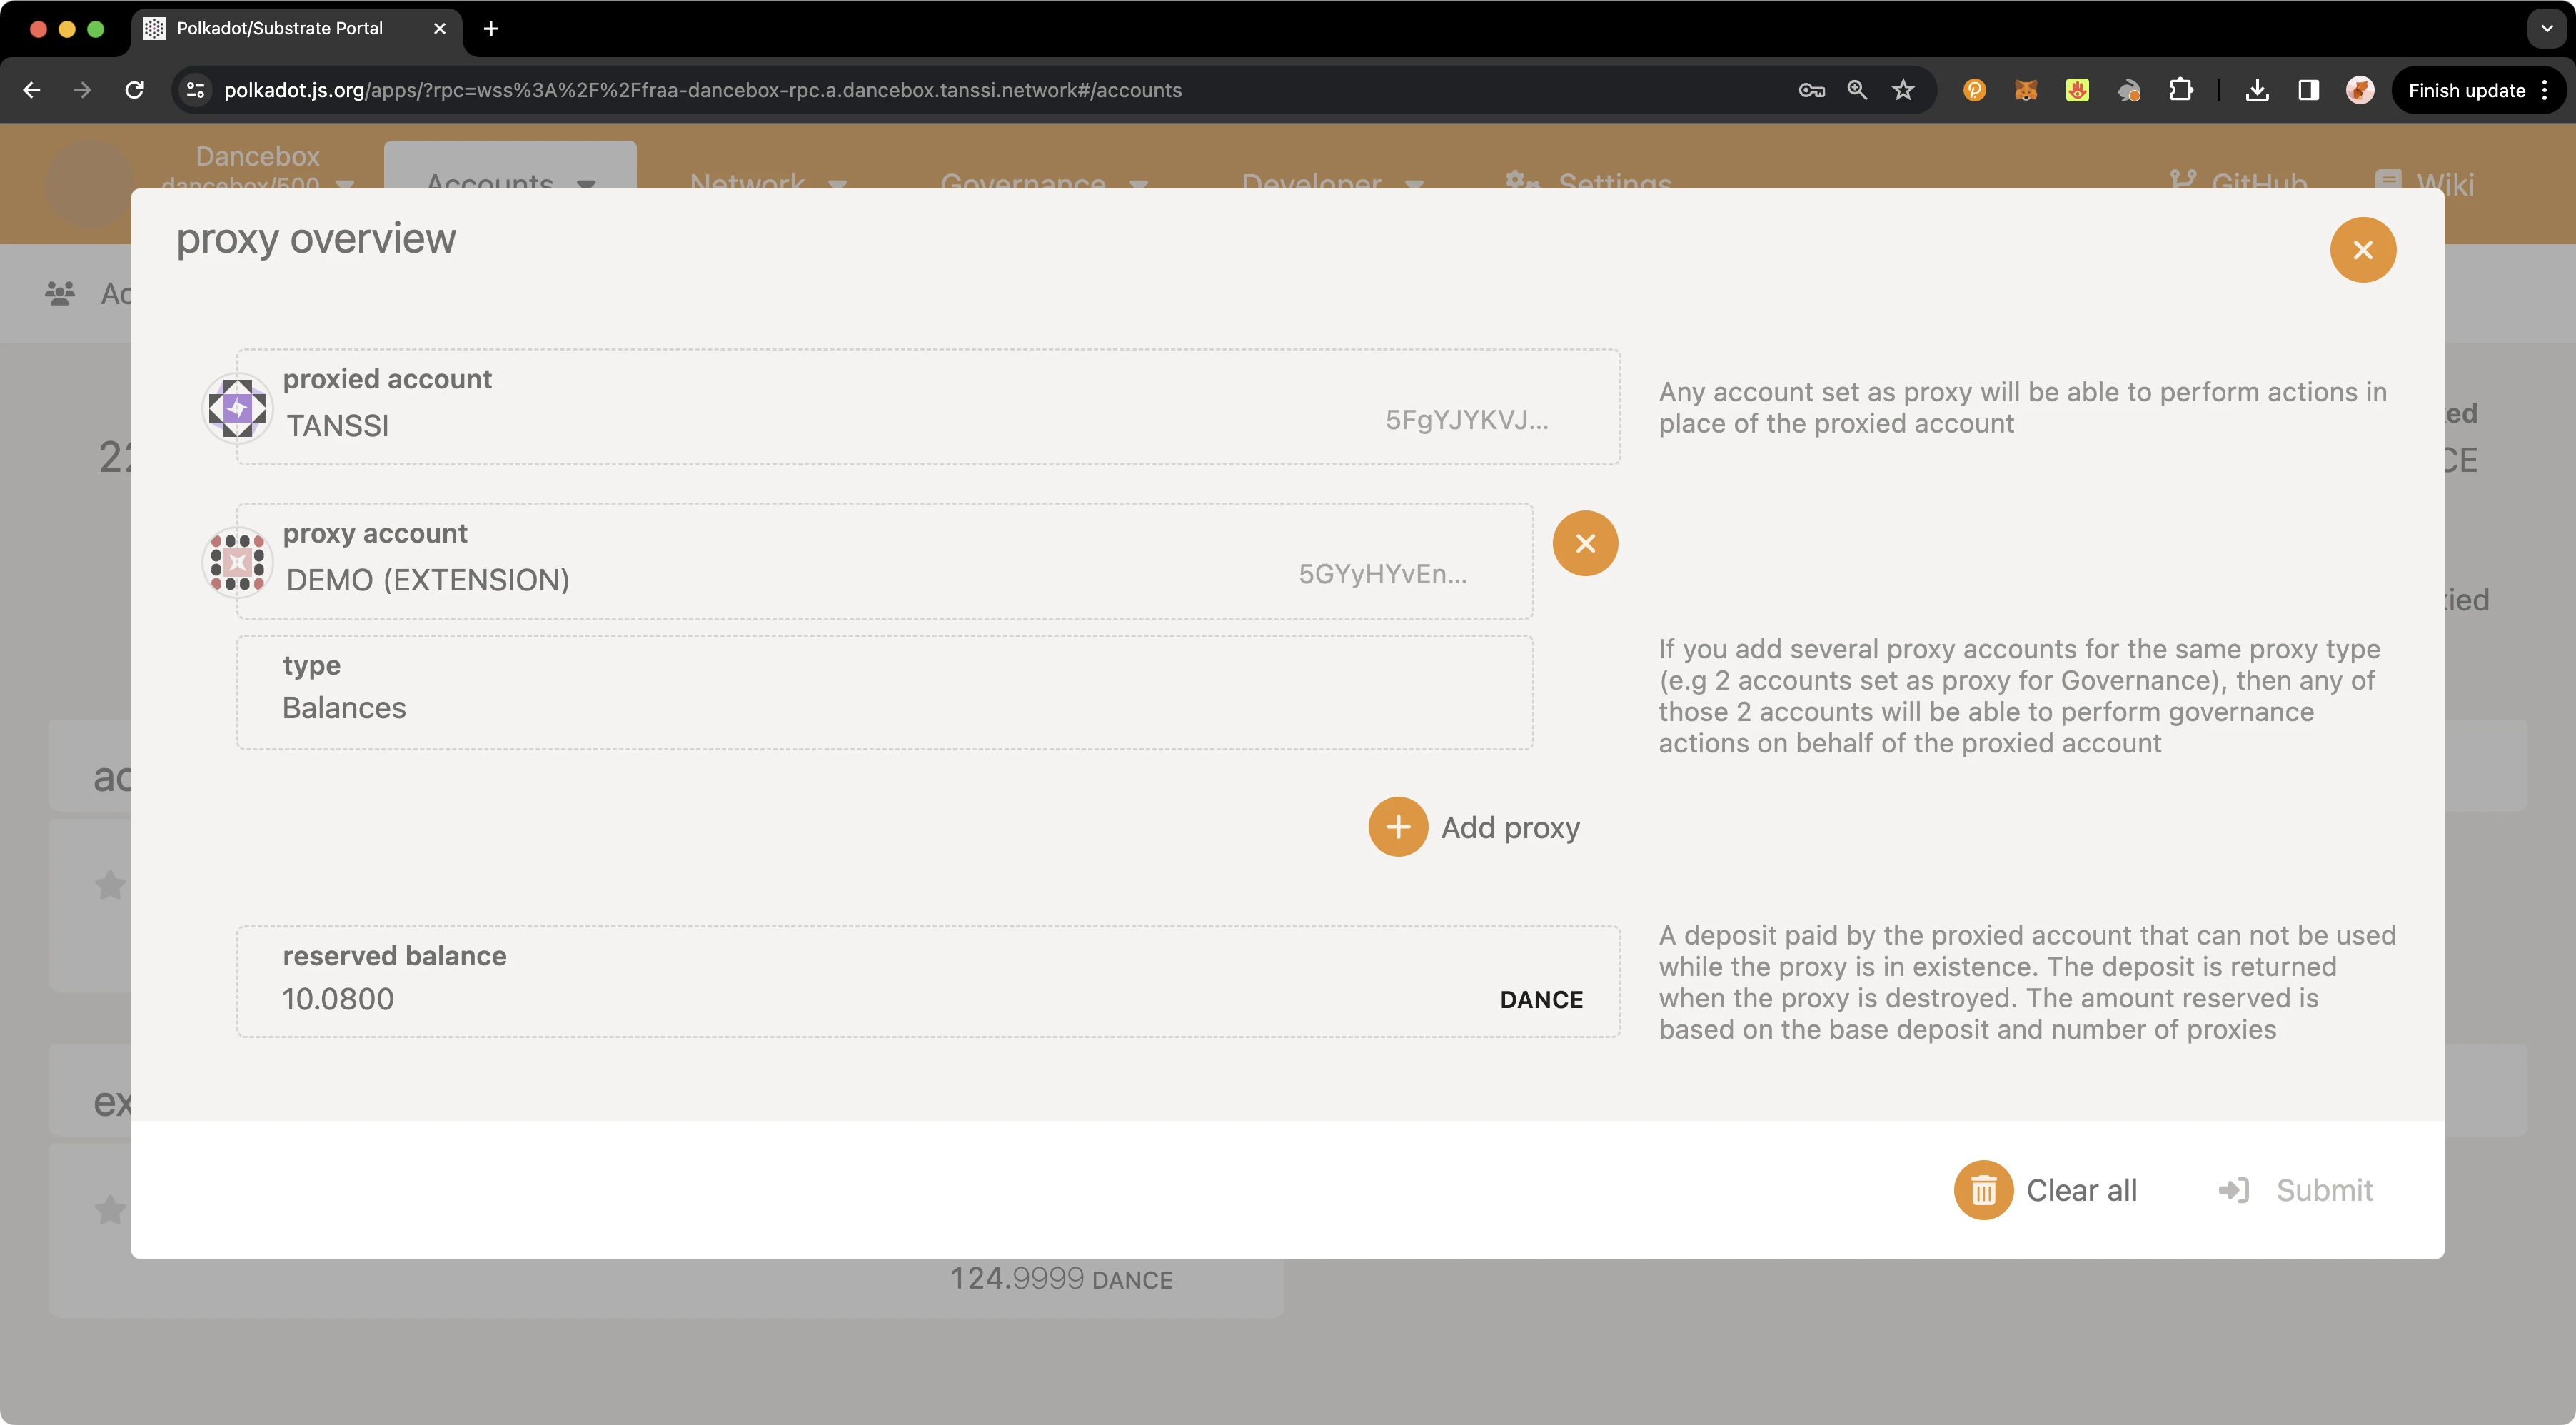
## Executing a Proxy Transaction {: #executing-a-proxy-transaction }
Now that you have created a proxy account and verified that it was successfully set up, you can execute a transaction using the proxy account on behalf of the primary account.
To execute a transaction, you can navigate back to the [**Extrinsics** page](https://polkadot.js.org/apps/?rpc=wss://{{ networks.dancelight.dns_name }}#/extrinsics){target=\_blank} and take the following steps:
1. Select the proxy account to submit the transaction from the **using the select account** dropdown.
2. From the **submit the following extrinsic** menu, select **proxy**.
3. Choose the **proxy** extrinsic.
4. Choose **Id** from the **AccountIdLookupOf** dropdown.
5. Select the primary account from the **real** dropdown.
6. Select the **balances** call.
7. Choose the **transferKeepAlive** extrinsic.
8. Choose **Id** from the **AccountIdLookupOf** dropdown.
9. In the **dest** field, enter the address you would like to send funds to.
10. In the **value** field, enter the amount of {{ networks.dancelight.token_symbol }} tokens to send. For this example, you can send `2` {{ networks.dancelight.token_symbol }} tokens.
11. Click **Submit Transaction**.
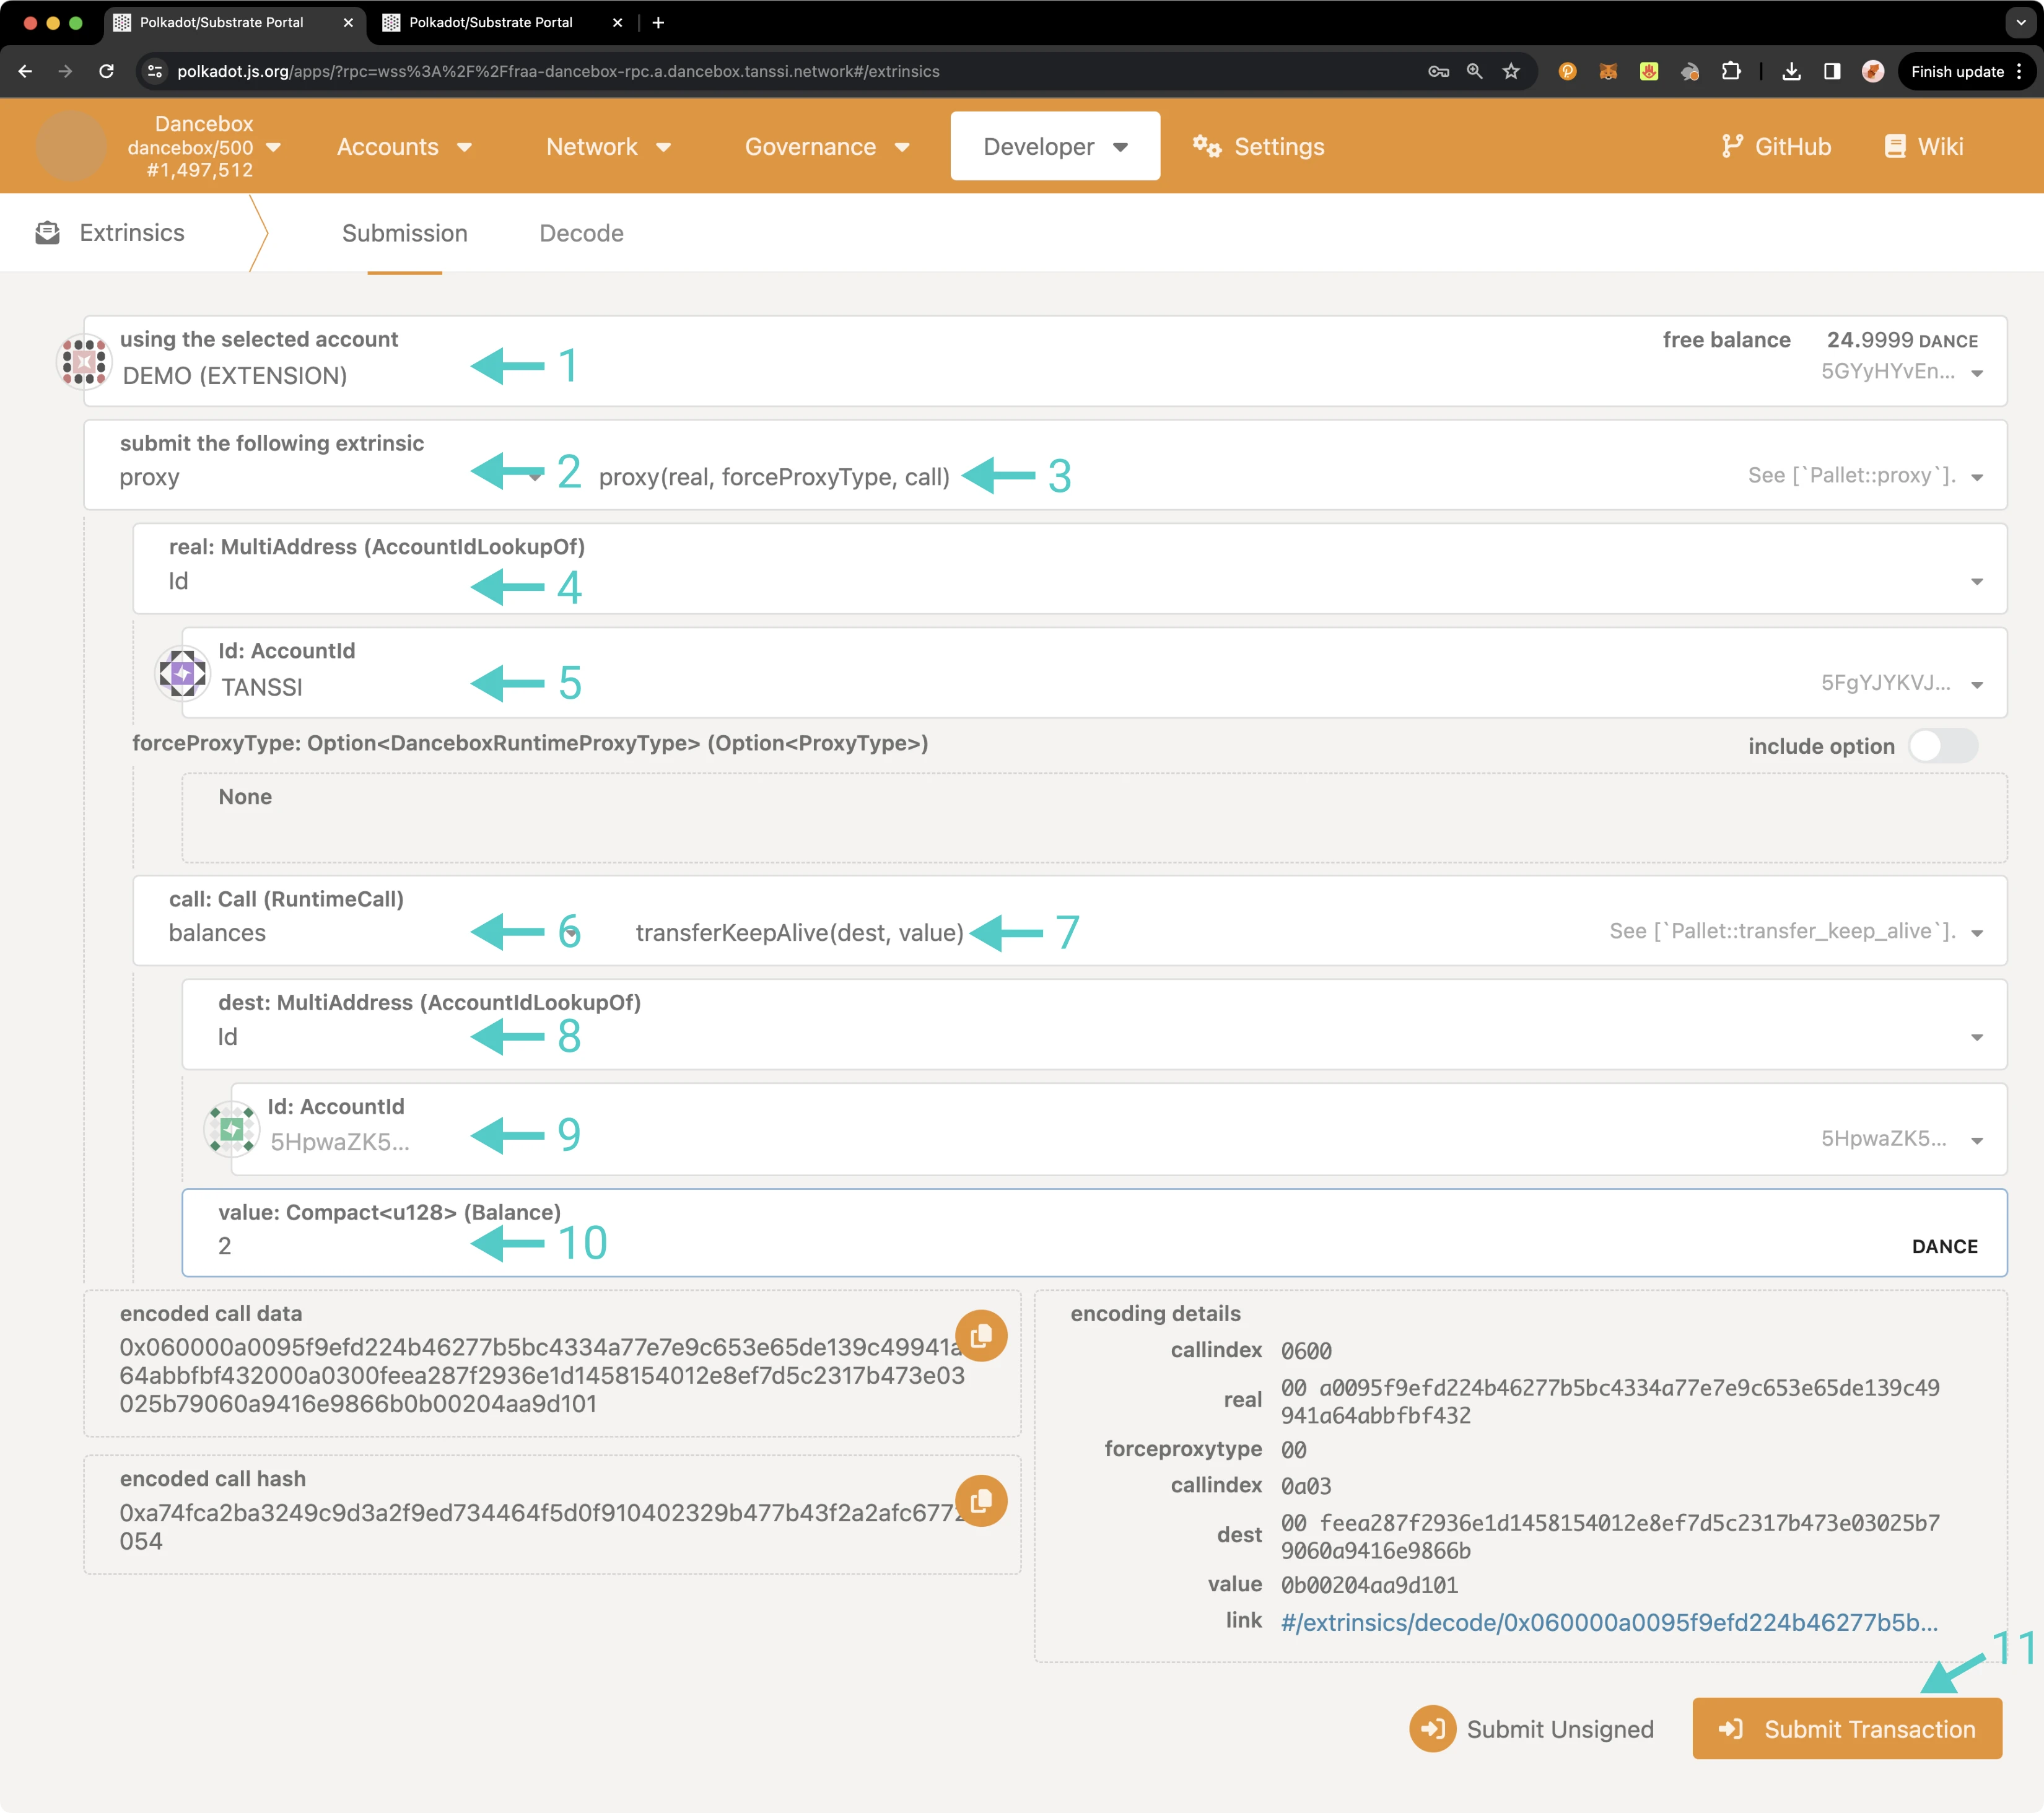
A pop-up will appear for you to authorize and sign the transaction. Enter your password for the proxy account and click **Sign and Submit**.
If the transaction successfully went through, you should see a couple of notification pop-ups. If you head over to the **Accounts** page, you'll see that your primary account balance has decreased. If you check the account balance where you sent the funds, you'll notice the balance there has increased.
That's it! You've successfully executed a transaction using a proxy account on behalf of your primary account.
## Removing a Proxy Account {: #removing-a-proxy-account }
Similarly to adding a proxy account, there are a couple of ways that you can remove a proxy account, either from the **Extrinsics** page or the **Accounts** page. Regardless of which page you use, you can elect to remove a single proxy account or all proxies associated with your primary account.
To remove a proxy from the [**Extrinsics** page](https://polkadot.js.org/apps/?rpc=wss://{{ networks.dancelight.dns_name }}#/extrinsics){target=\_blank}, you can take the following steps:
1. From the **using the selected account** dropdown, select your primary account.
2. Then select **proxy**.
3. Choose **removeProxy** to remove a single proxy or **removeProxies** to remove all associated proxies.
4. Choose **Id** from the **AccountIdLookupOf** dropdown.
5. If removing a single proxy, enter the proxy account to remove in the **delegate** field.
6. Select the **proxyType** to remove, in this case choose **Balances**.
7. Optionally, select a delay period in block numbers.
8. Click **Submit Transaction**.
A pop-up will appear asking you to authorize and sign the transaction. You can sign and send the transaction from the primary or proxy account, but the call to remove the proxy must be sent from the primary account. Enter your password and click **Sign and Submit**.
To check that the proxy or proxy accounts have been removed, follow the steps in the [Verifying your Proxy Account](#verifying-your-proxy-account) section.
As previously mentioned, you can also remove a proxy from the **Accounts** page. To do so, on the **Accounts** page, select the three vertical dots next to the primary account and select **Manage Proxies**.
A pop-up will appear showing an overview of your proxy accounts. To remove all proxies, you can click on **Clear all**, then you will automatically be prompted to enter your password and submit the transaction. To remove a single proxy, take the following steps:
1. Click the **X** button next to the proxy to remove
2. Press **Submit**
On the transaction confirmation screen, take the following steps:
1. Ensure that you do not use a proxy for this call (as this example is a balances proxy, the call to remove the proxy needs to come from the primary account rather than the proxy account).
2. Enter your password for the respective account.
3. Press **Sign and Submit**.
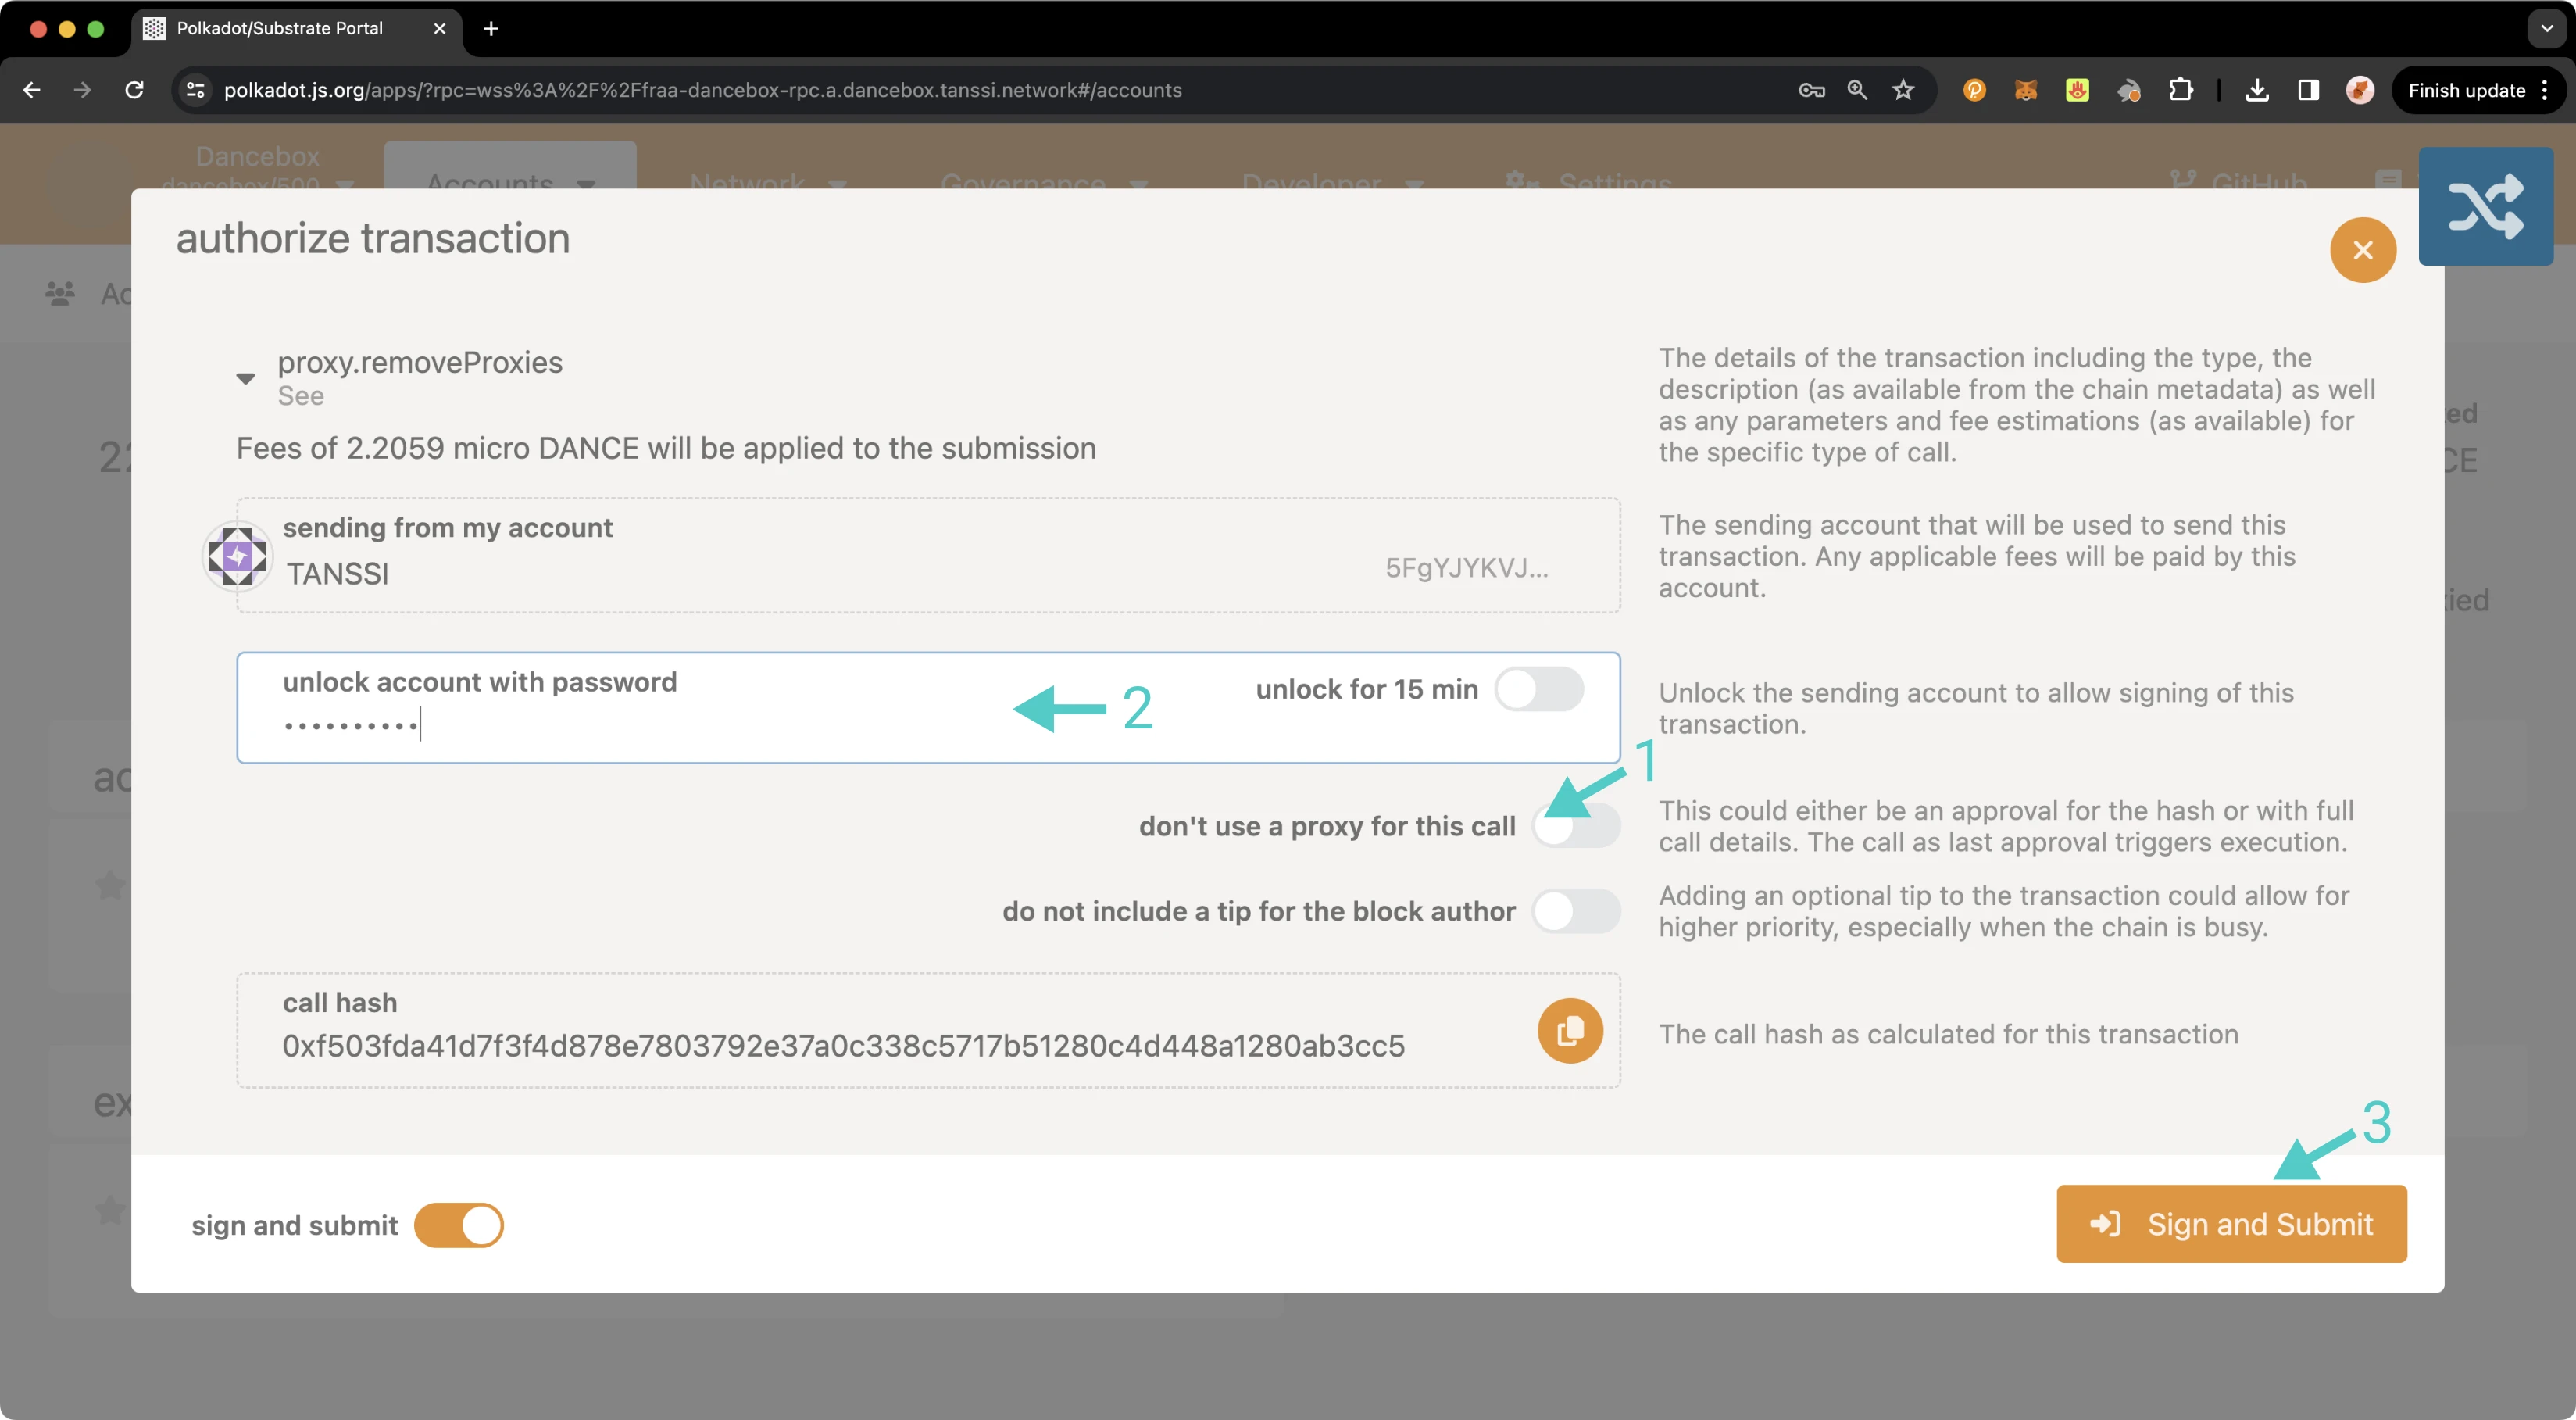
Once the transaction has successfully been submitted, you can review your current proxies, or if you removed all proxies, you will notice the proxy icon is no longer being displayed next to the primary account. And that's it! You've successfully created a proxy, reviewed all proxy accounts associated with your primary account, executed a proxy transaction, and removed a proxy account!
The information presented herein has been provided by third parties and is made available solely for general information purposes. Tanssi does not endorse any project listed and described on the Tanssi Doc Website (https://docs.tanssi.network/). Tanssi Foundation does not warrant the accuracy, completeness or usefulness of this information. Any reliance you place on such information is strictly at your own risk. Tanssi Foundation disclaims all liability and responsibility arising from any reliance placed on this information by you or by anyone who may be informed of any of its contents. All statements and/or opinions expressed in these materials are solely the responsibility of the person or entity providing those materials and do not necessarily represent the opinion of Tanssi Foundation. The information should not be construed as professional or financial advice of any kind. Advice from a suitably qualified professional should always be sought in relation to any particular matter or circumstance. The information herein may link to or integrate with other websites operated or content provided by third parties, and such other websites may link to this website. Tanssi Foundation has no control over any such other websites or their content and will have no liability arising out of or related to such websites or their content. The existence of any such link does not constitute an endorsement of such websites, the content of the websites, or the operators of the websites. These links are being provided to you only as a convenience and you release and hold Tanssi Foundation harmless from any and all liability arising from your use of this information or the information provided by any third-party website or service.
--- END CONTENT ---
Doc-Content: https://docs.tanssi.network/builders/build/templates/overview/
--- BEGIN CONTENT ---
---
title: Requirements and Features of Templates
description: Explore the foundational setup and key features included in each Tanssi template, designed to streamline the building and deployment of Tanssi networks.
icon: octicons-home-24
categories: Basics, Appchain
---
# Templates Overview {: #templates-overview }
## Introduction {: #introduction }
Networks deployed through Tanssi are fully customizable blockchains benefiting from a shared set of sequencers and the security of a provider of their choice. The templates presented in this article implement the necessary functionalities and configurations to support the Tanssi protocol, making development easier.
## Base Setup to Support the Tanssi Protocol {: #base-setup-supporting-tanssi }
Tanssi networks must implement the following modules to support the protocol and benefit safely from Tanssi's block production as a service:
- **Author Noting** - registers the set of sequencers assigned to the network by Tanssi
- **Author Inherent** - allows the sequencer authoring the block to include its identity to get validated and rewarded
If you don't include these modules in the Tanssi network's runtime, there won't be a method to confirm that the blocks are being generated by trustworthy sequencers designated by the Tanssi orchestrator. This could create a vulnerability for malicious actors to exploit and compromise the network. For more information about Tanssi's block production as a service please refer to the [Block Production Services](/learn/tanssi/network-services/block-production/){target=\_blank} article.
Besides block production, there are other essential aspects for any network covered in the templates, such as:
- **Consensus** - networks have the necessary functionality to allow the sequencers to produce blocks, gossip and validate them, and coordinate with the security provider to get notified about the block's finality
- **Networks Interoperability** - handles the ingestion and dispatch of incoming downward and lateral messages, allowing a Tanssi network to communicate and interoperate with the other chains within the ecosystem
- **Runtime Upgrades** - a runtime upgrade in a Tanssi network must be informed to the security provider's operators to allow them to check on the blocks produced by the sequencers of the Tanssi networks
## Included Modules {: #included-modules }
Besides the necessary modules to support the operation of a Tanssi network, many other modules provide functional behavior that the users can interact with.
These are some of the functional modules exposing a behavior to the users that are included in the templates and ready to use:
- **[Balances](https://paritytech.github.io/substrate/master/pallet_balances/index.html){target=\_blank}** - the Balances module provides functions for handling accounts and balances for the Tanssi network native currency
- **[Utility](https://paritytech.github.io/polkadot-sdk/master/pallet_utility/index.html){target=\_blank}** - the Utility module provides functions to execute multiple calls in a single dispatch. Besides batching transactions, this module also allows the execution of a call from an alternative signed origin
- **[Proxy](https://paritytech.github.io/polkadot-sdk/master/pallet_proxy/index.html){target=\_blank}** - the Proxy module provides functions to delegate to other accounts (proxies) the permission to dispatch calls from a proxied origin
- **[Maintenance Mode](https://github.com/moondance-labs/moonkit/blob/tanssi-polkadot-v1.3.0/pallets/maintenance-mode/src/lib.rs){target=\_blank}** - the Maintenance Mode module allows the Tanssi network to be set to a mode where it doesn't execute balance/asset transfers or other transactions. This could be useful when upgrading the runtime in an emergency, when executing large storage migrations, or when a security vulnerability is discovered
- **[Tx Pause](https://github.com/paritytech/polkadot-sdk/blob/master/substrate/frame/tx-pause/src/lib.rs){target=\_blank}** - the Tx Pause module allows a valid origin (typically Root) to pause (and unpause) an entire module or a single transaction. A paused transaction (or all the transactions included in a paused module) will fail when called until it is unpaused. This module provides a higher degree of granularity compared to maintenance mode, making it particularly useful when a faulty or vulnerable transaction is identified in the runtime
- **[Multisig](https://github.com/paritytech/polkadot-sdk/blob/master/substrate/frame/multisig/src/lib.rs){target=\_blank}** - the Multisig module enables transaction dispatches that require -typically- more than one signature. A multisig transaction defines a set of authorized accounts and a threshold for its approval, requiring consensus among multiple parties
## Start Building {: #getting-started }
To start building on top of the provided templates, be it the [baseline Tanssi network template](/builders/build/templates/substrate/){target=\_blank} or the [baseline EVM (Ethereum Virtual Machine) template](/builders/build/templates/evm/){target=\_blank}, the recommended approach is to fork the [Tanssi repository](https://github.com/moondance-labs/tanssi){target=\_blank} and start adding [built-in modules](/builders/build/customize/adding-built-in-module/){target=\_blank} or [custom-made modules](/builders/build/customize/adding-custom-made-module/){target=\_blank} on top of the [latest release](https://github.com/moondance-labs/tanssi/releases/latest){target=\_blank} tag.
This approach comes with some advantages, such as:
- Building on top of the latest and stable release
- Get the Tanssi protocol already configured and included in the template runtime
- Keep your fork up-to-date by syncing with the Tanssi upstream repository
- Run the included tests, ensuring that block production on your Tanssi network works as intended
- Run a complete local environment with the included [Zombienet](https://paritytech.github.io/zombienet){target=\_blank} configuration
If the templates already cover your use case needs, or after building and testing your chain, you can continue with the [Deploy Your Network via the Tanssi DApp](/builders/deploy/dapp/){target=\_blank} article to know how to use the Tanssi dApp to register and get your chain up and running.
--- END CONTENT ---
Doc-Content: https://docs.tanssi.network/builders/interoperability/built-in-bridge/
--- BEGIN CONTENT ---
---
title: Using the Built-In Tanssi Bridge
description: Learn how to use the built-in Tanssi bridge that connects Tanssi and Ethereum to convert TANSSI tokens between their native form and ERC-20 and vice versa.
icon: octicons-arrow-switch-24
categories: Basics
---
# Using the Built-In Tanssi Bridge
## Introduction {: #introduction }
The Tanssi protocol orchestrates infrastructure components, allowing developers to launch their customized appchains in minutes and providing them with out-of-the-box Ethereum-grade economic security. To make the whole process easy for developers, a [top-of-class architecture](/learn/tanssi/overview/#tanssi-architecture){target=\_blank} was designed and implemented.
The [TANSSI token](/builders/tanssi-network/tanssi-token/){target=\_blank} is the engine that enables the integration of different infrastructural components with [external security providers](/learn/tanssi/external-security-providers/symbiotic/){target=\_blank} and aligns incentives across various actors, including token holders, node operators, and appchain builders. To serve different use cases, the token has two versions: the Tanssi network's native currency, TANSSI (Substrate), and its ERC-20 version, on Ethereum.
Users can convert from one version to the other of the token using a [Tanssi built-in trustless bridge](/learn/tanssi/tanssi-ethereum-bridge/){target=\_blank}.
In this guide, you'll learn how to move your assets from Tanssi to Ethereum and vice versa through a secure and user-friendly web interface available at the [Tanssi dApp](https://apps.tanssi.network/bridge){target=\_blank}, making cross-chain transfers accessible for everyone.
## Prerequisites {: #prerequisites }
Before using the Tanssi bridge, ensure you have:
For bridging from Tanssi to Ethereum:
- A [Substrate-compatible wallet](/builders/toolkit/substrate-api/wallets/){target=\_blank}, such as [Talisman](/builders/toolkit/substrate-api/wallets/talisman/){target=\_blank}.
- TANSSI (Substrate) balance to transfer and pay the bridging fees.
- The Ethereum-type destination account.
For bridging from Ethereum to Tanssi:
- An [Ethereum-compatible wallet](/builders/toolkit/ethereum-api/wallets/){target=\_blank}, such as [MetaMask](/builders/toolkit/ethereum-api/wallets/metamask/){target=\_blank}.
- TANSSI (ERC-20) balance to transfer.
- ETH balance to pay the bridging fees.
- The Substrate-type destination account.
## Bridging TANSSI Tokens to Ethereum {: #bridge-to-ethereum }
If you want to convert your TANSSI (Substrate) tokens to TANSSI (ERC-20) on Ethereum, head to the Tanssi dApp, open the [bridge section](https://apps.tanssi.network/bridge){target=\_blank}, and then follow these steps:
1. Select **Mainnet** from the **From** dropdown.
2. Click on **Connect Wallet**. A pop-up will appear, allowing you to select your preferred Substrate wallet and choose the corresponding account.
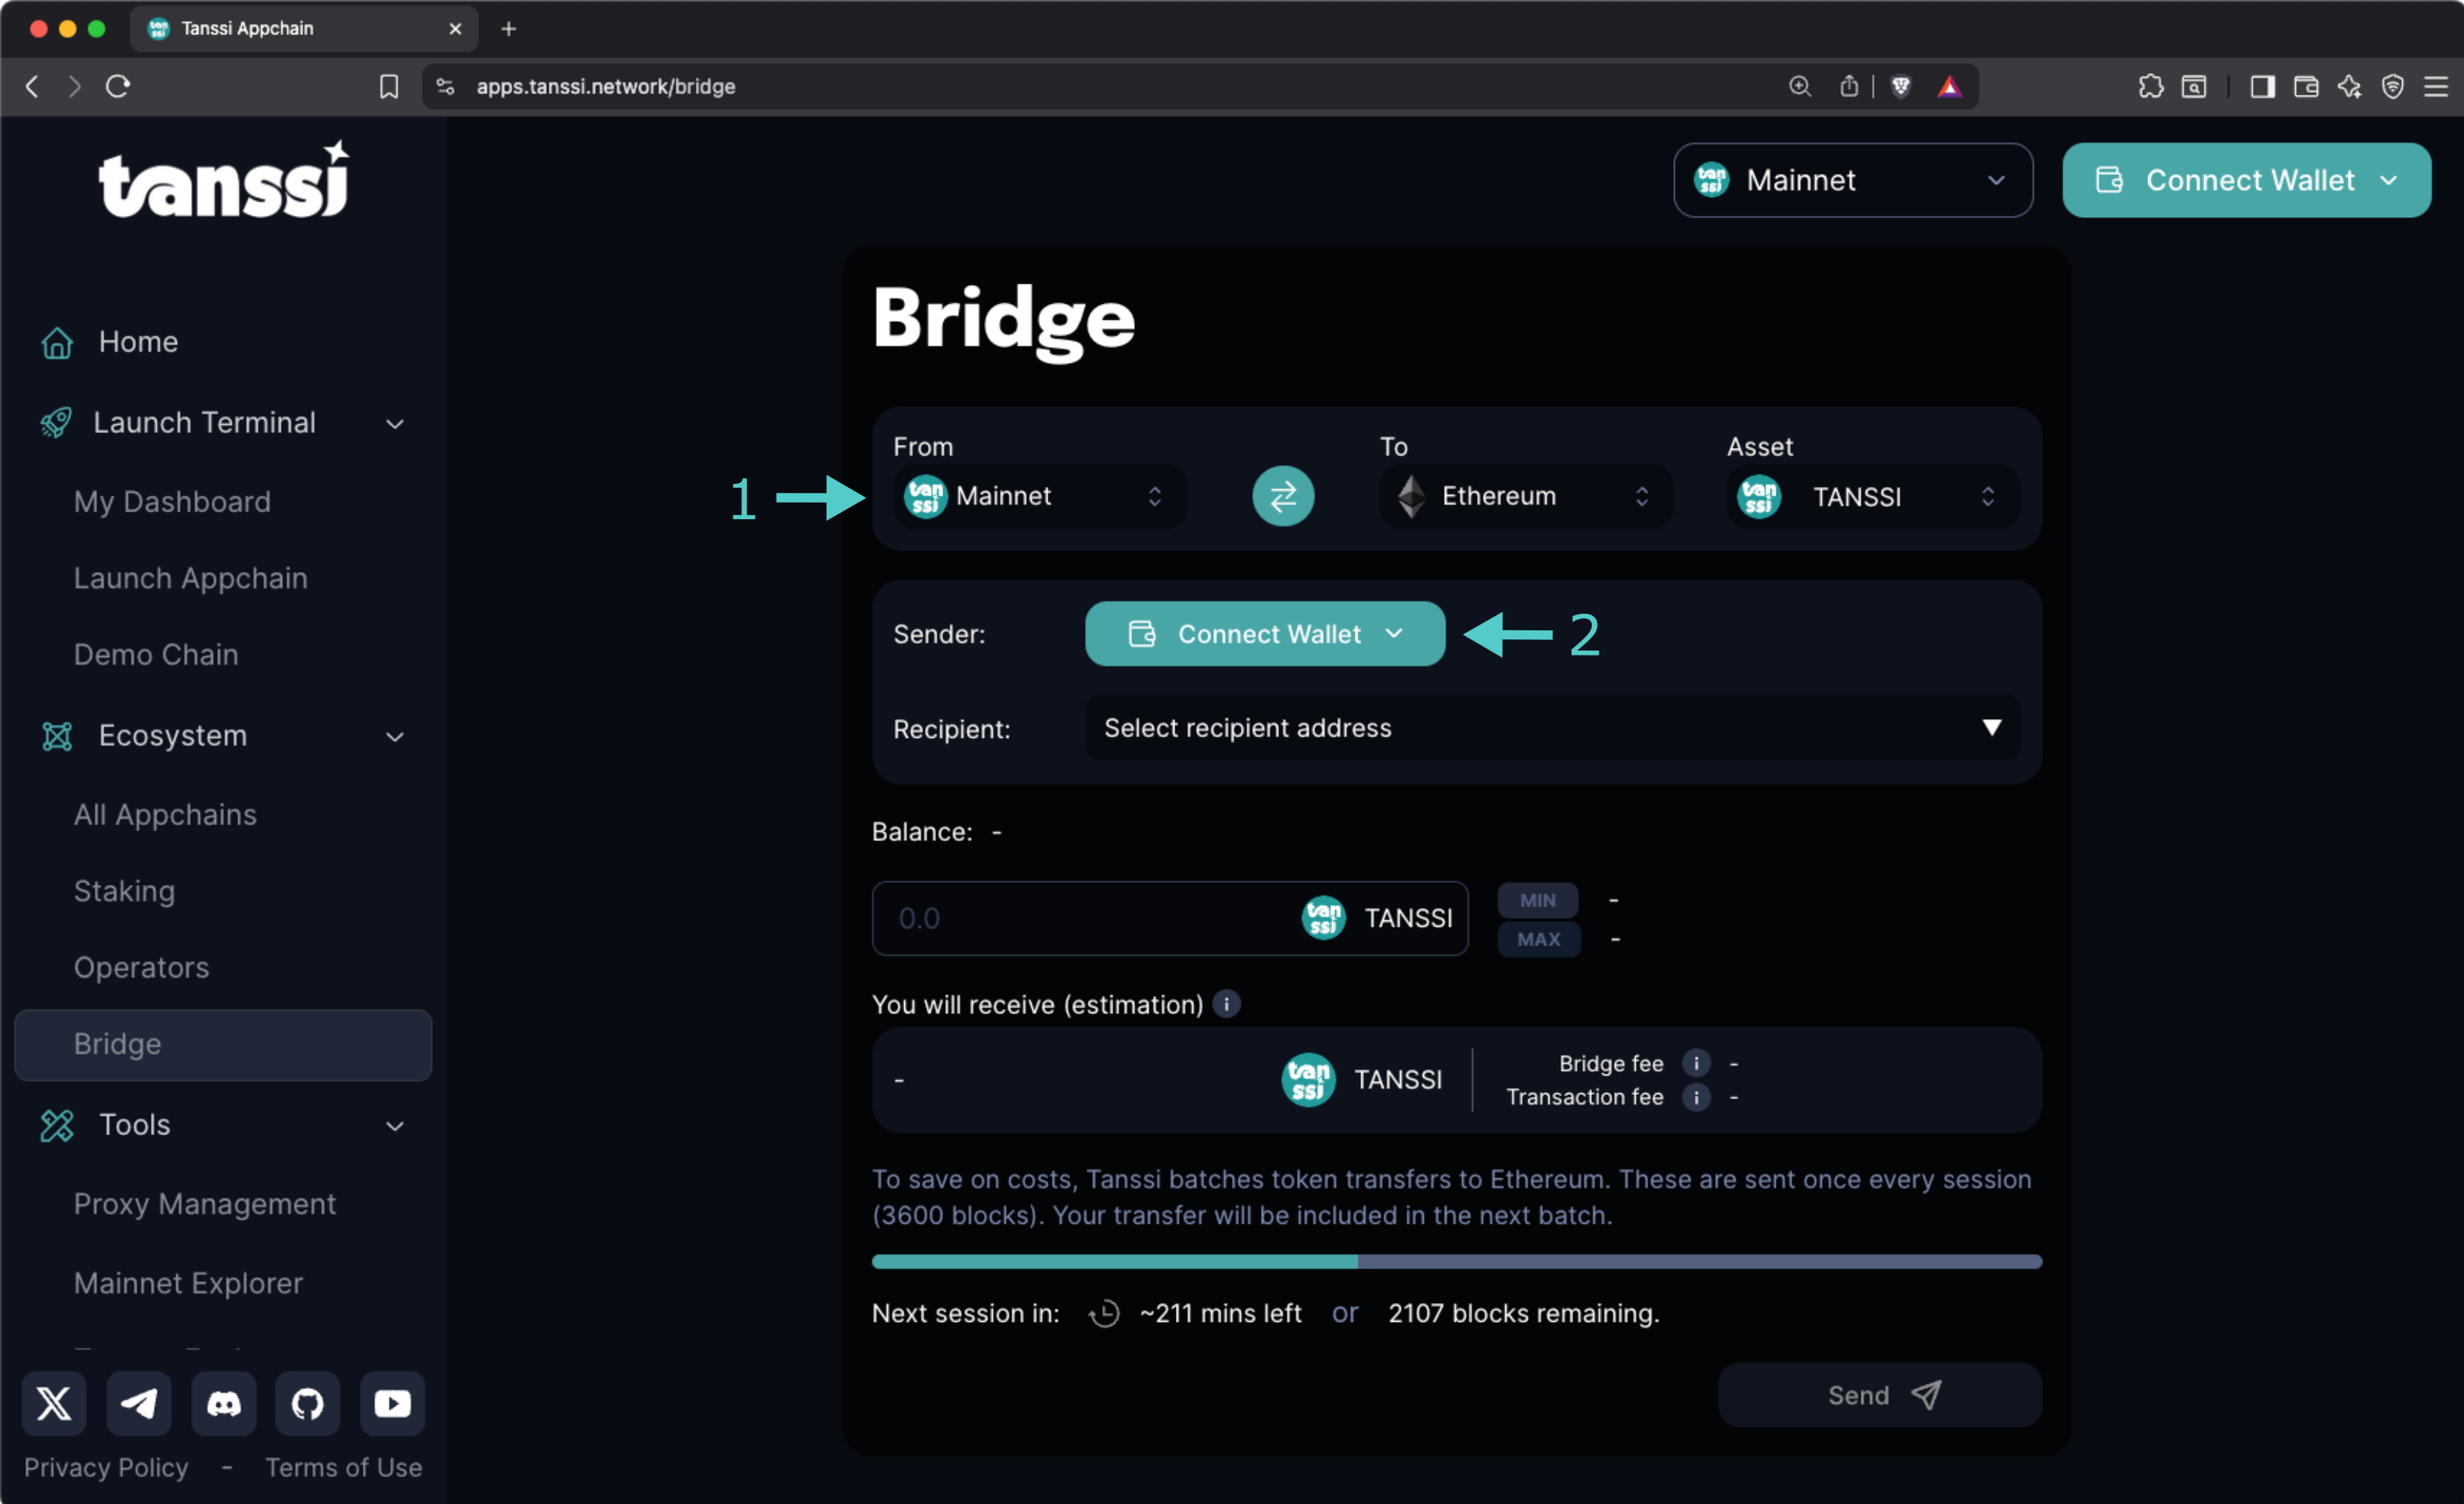
Now, with your wallet connected:
1. Select the destination account from the **Select recipient address** dropdown, or choose the **Enter a custom address** item and enter the account where you want to receive the ERC-20 tokens manually.
2. Enter the amount to bridge in the **Balance** field. The estimated bridge and transaction fees will be displayed along with the amount the destination account will receive.
3. Click on **Send** and sign the transaction.
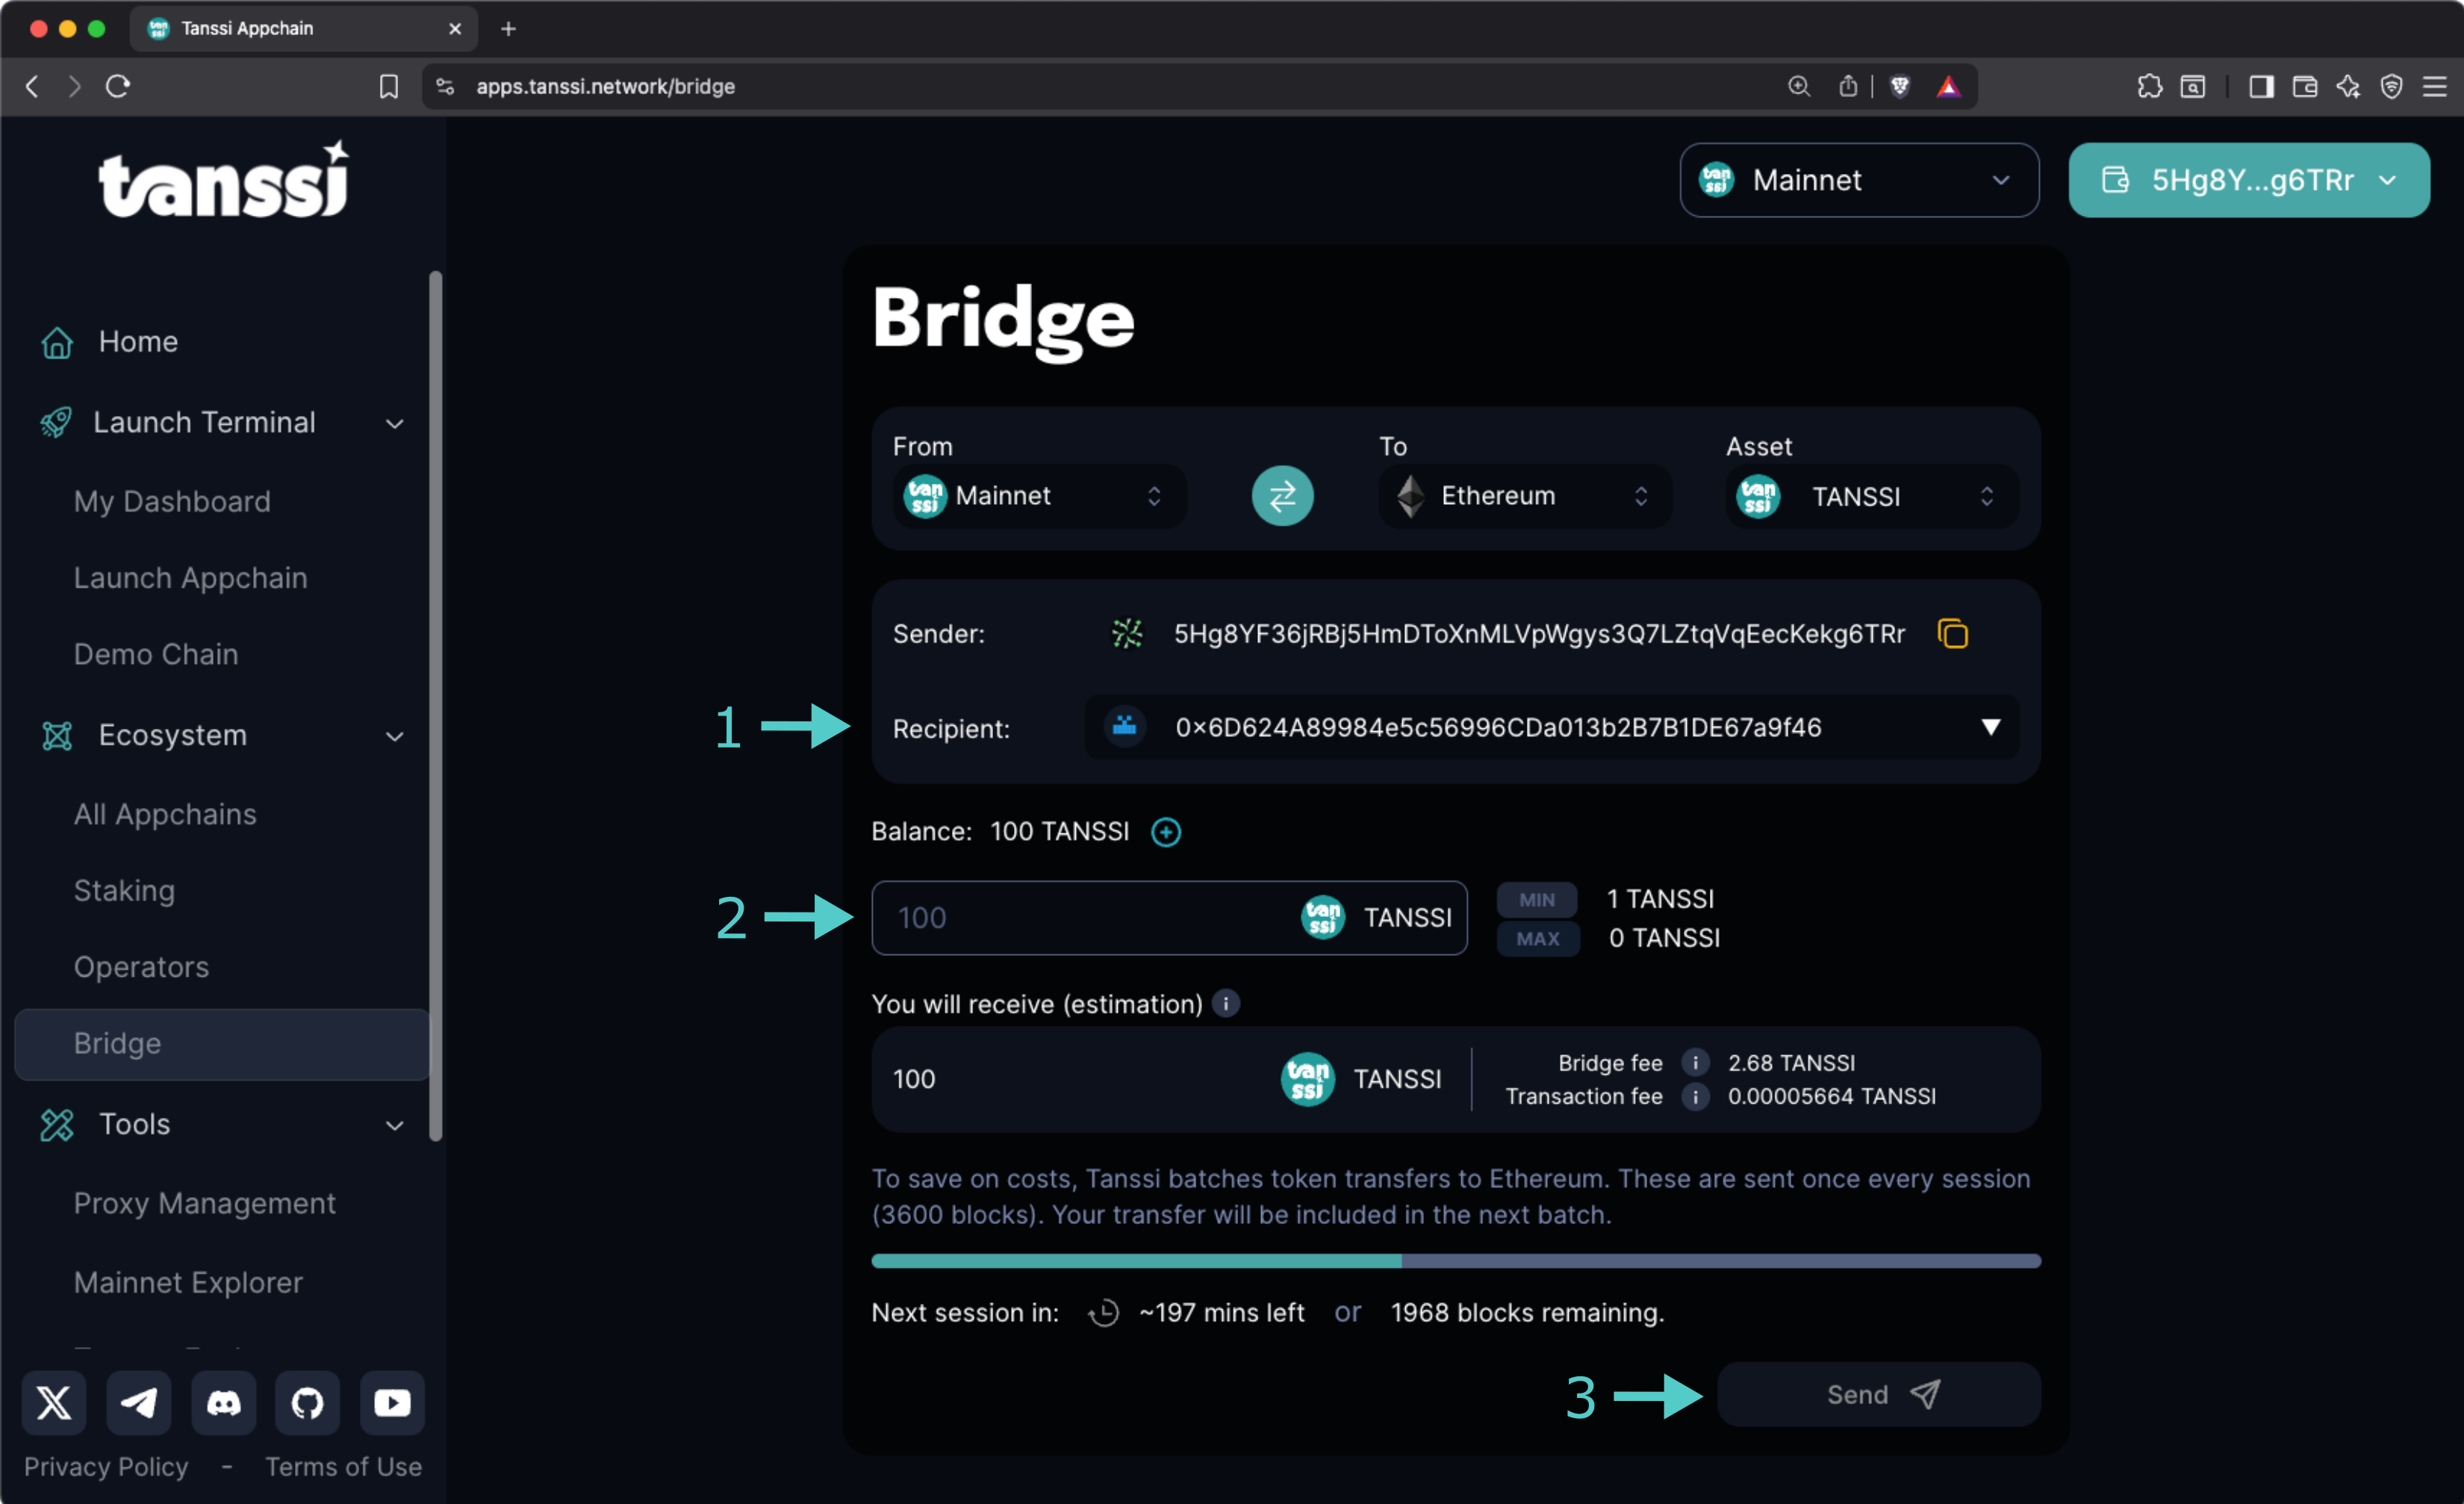
And that's it! Your tokens will be bridged when the next session starts. You can see how much time remains in the current session in the progress bar.
!!! note
- You can easily add the TANSSI ERC-20 contract address to your wallet by clicking the **+** icon shown next to your balance.
- Fees to convert your TANSSI (Substrate) tokens to TANSSI (ERC-20) might fluctuate over time and must be paid using TANSSI.
## Bridging ERC-20 TANSSI to Tanssi Network {: #bridge-to-tanssi }
If you want to convert your TANSSI (ERC-20) tokens to TANSSI (Substrate) native on the Tanssi network, head to the Tanssi dApp, open the [bridge section](https://apps.tanssi.network/bridge){target=\_blank}, and then follow these steps:
1. Select **Ethereum** from the **From** dropdown.
2. Click on **Connect Wallet**, select your preferred Ethereum wallet, and choose the account.
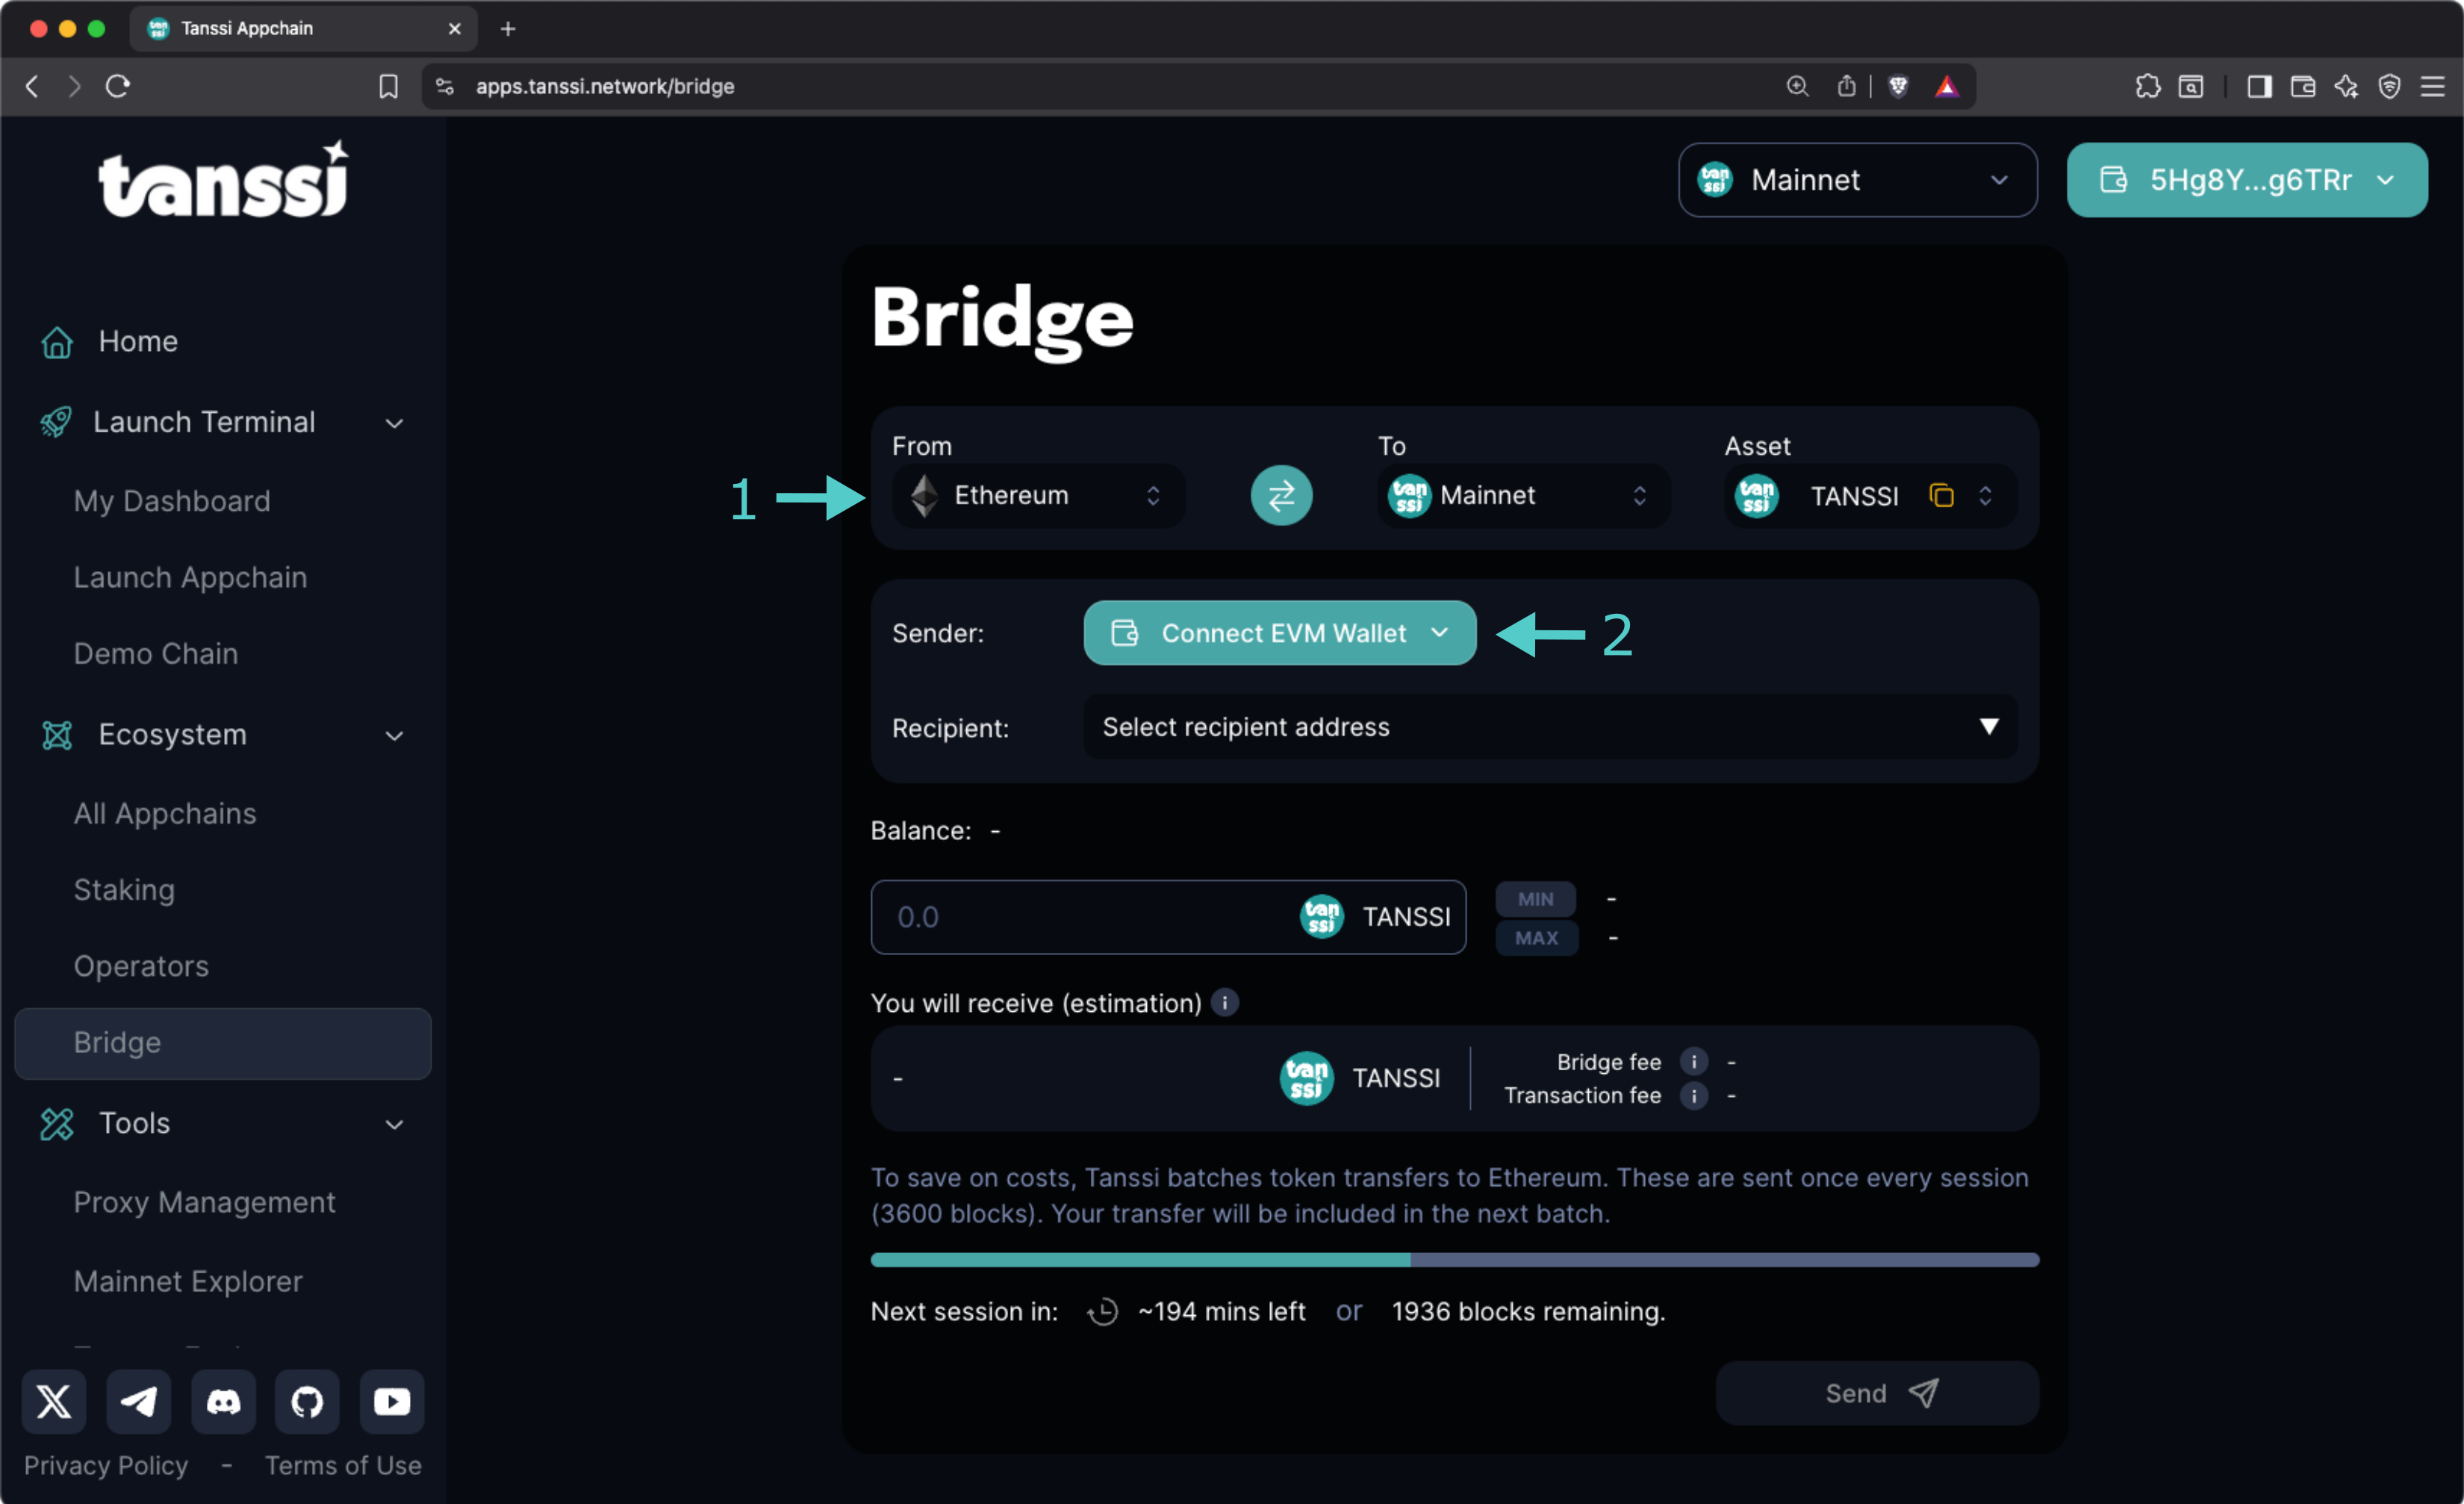
Now, with your wallet connected:
1. Enter the Substrate destination account in the **Recipient** field.
2. Enter the amount to bridge in the **Balance** field. The estimated bridge and transaction fees will be displayed along with the amount the destination account will receive.
3. Click on **Send** and sign the transaction.
And that's it! Your tokens will be bridged when the next session starts. You can see how much time remains in the current session in the progress bar.
!!! note
Fees to convert your TANSSI (ERC-20) tokens to TANSSI (Substrate) native on the Tanssi network might fluctuate over time and must be paid using ETH.
--- END CONTENT ---
Doc-Content: https://docs.tanssi.network/builders/tanssi-network/tanssi-token/
--- BEGIN CONTENT ---
---
title: TANSSI Token
description: Learn about the two versions of the Tanssi token - the native Substrate token and the ERC-20 representation on Ethereum, and their utilities and use cases.
icon: octicons-ruby-24
categories: Basics
---
# TANSSI Token {: #tanssi-token }
## Introduction {: #introduction }
The Tanssi network token is the utility token that powers the Tanssi protocol. Considering [Tanssi's architecture](/learn/tanssi/overview/#tanssi-architecture){target=\_blank}, the token exists in two distinct yet interconnected representations: native substrate and Ethereum ERC-20. The two versions can be bridged between each other through the [Tanssi-Ethereum bridge](/learn/tanssi/tanssi-ethereum-bridge/){target=\_blank}.
In this guide, the token's utility and the differences between its two representations are covered, which is crucial for network operators, stakers, appchain managers, and general users who want to participate in the Tanssi ecosystem.
## Token Utility {: #token-utility }
Tanssi is a decentralized infrastructure protocol that makes deploying appchains with custom logic easy. It allows developers to focus on the use case instead of diverting time and energy to manage the [numerous components required](/learn/tanssi/overview/#what-tanssi-provides){target=\_blank} for a network to run smoothly.
Running a healthy decentralized protocol not only requires a robust governance mechanism to ensure that decisions are made transparently but also aligning incentives and coordinating among several ecosystem actors, including appchain developers, node operators, sequencer operators, data availability and RPC providers, as well as general users. The Tanssi token serves as the backbone, providing the economic mechanisms necessary to coordinate, incentivize proper behavior, and secure the entire ecosystem. It enables a verifiable and code-enforced protocol evolution through a fully on-chain decision-making process.
The token has several utilities:
- **On-chain governance**: token holders can use the token to propose and vote in governance decisions, such as software upgrades, how to spend treasury funds, change protocol rules, and more.
- **Appchain deployment**: use the token to register and launch your appchain in minutes.
- **Sequencing as a service payment**: use the token to keep your appchain live.
- **Sequencing and operator services rewarding**: get tokens as rewards for your nodes' services.
- **Staking on sequencers**: token holders can stake on sequencers, getting rewards with no risk of slashing.
- **Staking on operators**: token holders can stake on operators, getting rewards for their validation services.
- **Fees payment**: use the token to pay the fees for interacting with the Tanssi network.
!!! note
All transaction fees on Tanssi are paid using the token, with the full amount going directly to fund the protocol's treasury account. These funds can only be spent via governance.
## Token Representations {: #token-representations }
The Tanssi network is built using the Substrate framework, leveraging its modular architecture and high performance. Therefore, the native token is of a Substrate type. The protocol's minting and burning mechanisms happen on the Tanssi network side, or, in other words, happen on the Substrate token representation.
Additionally, the Tanssi protocol relies on [external security providers](/learn/tanssi/external-security-providers/){target=\_blank}, such as [Symbiotic](/learn/tanssi/external-security-providers/symbiotic/){target=\_blank}, to secure the ecosystem through restaked assets. This restaking mechanism is implemented on Ethereum; therefore, an ERC-20 version of the token also exists to cover user cases on the Ethereum side.
Leveraging Tanssi's [built-in bridging capabilities](/learn/tanssi/tanssi-ethereum-bridge/){target=\_blank}, the token can be converted to (and from) the ERC-20 representation on Ethereum. When the token is bridged to Ethereum, the tokens are locked in the bridge's sovereign account, and a message is sent to the Ethereum contract to mint the equivalent amount in ERC-20. This lock-and-mint mechanism ensures the ERC-20 version is created through a trustless bridging mechanism, maintaining a 1:1 relationship with the native token.
```mermaid
flowchart LR
subgraph Tanssi_Network ["Tanssi Network"]
Tanssi_Substrate["$TANSSI (Substrate)"]
Tanssi_Substrate_Utility["✓ On-chain governance
✓ Appchain deployment
✓ Sequencers rewarding
✓ Staking on sequencers
✓ Fees payment
"]
Tanssi_Substrate --> Tanssi_Substrate_Utility
end
subgraph Ethereum_Network ["Ethereum"]
Tanssi_ERC20["$TANSSI (ERC-20)"]
Tanssi_ERC20_Utility["✓ Operator services rewarding
✓ Staking on operators
"]
Tanssi_ERC20 --> Tanssi_ERC20_Utility
end
Bridge["Trustless Bridge"]
Tanssi_Network <--> Bridge <--> Ethereum_Network
%% Apply custom style to utility nodes
classDef utility_style fill: transparent, stroke: transparent, text-align: start;
class Tanssi_Substrate_Utility,Tanssi_ERC20_Utility utility_style;
%% Make utility arrows transparent
linkStyle 0 stroke:transparent,fill:transparent;
linkStyle 1 stroke:transparent,fill:transparent;
```
### Tanssi (Substrate) - Native Token {: #tanssi-substrate }
The native Tanssi token exists on the Tanssi network as a Substrate-based asset and is the original form of the token that powers the core protocol operations.
This token uses as [Sr25519 subtrate-type account](/learn/tanssi/account-types/#key-types-in-tanssi-protocol){target=\_blank}, so it requires a wallet such as [Talisman](/builders/toolkit/substrate-api/wallets/talisman/){target=\_blank} or any other [substrate-compatible wallet](/builders/toolkit/substrate-api/wallets/){target=\_blank}.
!!! note
The Tanssi (Substrate) native token has twelve (12) decimal places.
### Tanssi (ERC-20) - Ethereum Representation {: #tanssi-erc-20 }
Tanssi's ERC-20 version is a standard Ethereum token that represents the native token on the Ethereum network. This version is created through the trustless bridging mechanism, utilizing a lock-and-mint strategy, thereby maintaining a 1:1 relationship with the native token.
This token, like any other Ethereum asset, uses an [ECDSA account](/learn/tanssi/account-types/#key-types-in-tanssi-protocol){target=\_blank}, so it requires a wallet such as [Metamask](/builders/toolkit/ethereum-api/wallets/metamask/){target=\_blank} or any other [Ethereum-compatible wallet](/builders/toolkit/ethereum-api/wallets/){target=\_blank}.
!!! note
The Tanssi (ERC-20) has twelve (12) decimal places.
### Tanssi (Substrate) and Tanssi (ERC-20) Comparison {: #substrate-erc-20-comparison }
To better understand the differences between the two token representations, the following table provides a summary of their main features:
| **Feature** | **Tanssi (Substrate)** | **Tanssi (ERC-20)** |
|------------------------|-------------------------------------------------------------------------------------------------------------------------------------------------------------------------------------------------------------------------|---------------------------------------------------------------------------------------------------------------------------------------------------------------------------------------------------|
| **Network** | Tanssi Network | Ethereum MainNet |
| **Token Standard** | Native Substrate asset | ERC-20 standard token |
| **Decimal Places** | Twelve (12) decimals | Twelve (12) decimals |
| **Account Type** | [Sr25519](https://wiki.polkadot.network/learn/learn-cryptography/#keypairs-and-signing){target=_blank} | [ECDSA](https://en.wikipedia.org/wiki/Elliptic_Curve_Digital_Signature_Algorithm){target=_blank} |
| **Compatible Wallets** | [Talisman](/builders/toolkit/substrate-api/wallets/talisman/){target=\_blank}, [SubWallet](/builders/toolkit/substrate-api/wallets/subwallet/){target=\_blank}, and others | [MetaMask](/builders/toolkit/ethereum-api/wallets/metamask/){target=\_blank}, [Talisman](/builders/toolkit/ethereum-api/wallets/talisman/){target=\_blank}, and other Ethereum-compatible wallets |
| **Primary Utilities** | - On-chain governance participation
- Appchain registration and deployment
- Sequencing services payment
- Transaction fees on Tanssi network
- Staking on sequencers
- Sequencer operation rewards | - Operator validation rewards
- Staking on operators |
| **Staking Options** | Sequencer staking (for keeping appchain liveness) | Operator staking (for validating/securing the entire Tanssi ecosystem) |
| **Bridge Conversion** | Can be bridged to ERC-20, paying fees in $TANSSI (Substrate) | Can be bridged to Substrate, paying fees in $ETH |
--- END CONTENT ---
## Reference Concepts [shared: true]
The following section contains reference material for Tanssi.
It includes network endpoints, JSON RPC methods, and contract or token addresses.
While it may not be required for all use cases, it offers a deeper technical layer for advanced development work.
---
## List of shared concept pages:
## Full content for shared concepts:
Doc-Content: https://docs.tanssi.network/builders/tanssi-network/endpoints/
--- BEGIN CONTENT ---
---
title: Network Endpoints
description: Tanssi networks have two endpoints available for users to connect to, one for HTTPS and one for WSS. This page has the RPC endpoints you need to get started.
icon: octicons-share-android-24
categories: Reference
---
## Network Endpoints
Tanssi networks have two endpoints available for users to connect to: one for HTTPS and one for WSS.
## Tanssi MainNet
The Tanssi Network MainNet HTTPS and WSS endpoints are as follows:
=== "HTTPS"
```text
https://{{ networks.mainnet.dns_name }}
```
=== "WSS"
```text
wss://{{ networks.mainnet.dns_name }}
```
## Dancelight
The Tanssi TestNet HTTPS and WSS endpoints are as follows:
=== "HTTPS"
```text
https://{{ networks.dancelight.dns_name }}
```
=== "WSS"
```text
wss://{{ networks.dancelight.dns_name }}
```
### Demo EVM Network
The demo EVM network HTTPS and WSS endpoints are as follows:
=== "HTTPS"
```text
{{ networks.dancelight.demo_evm_rpc_url }}
```
=== "WSS"
```text
{{ networks.dancelight.demo_evm_rpc_wss_url }}
```
--- END CONTENT ---
Doc-Content: https://docs.tanssi.network/builders/toolkit/ethereum-api/rpc/
--- BEGIN CONTENT ---
---
title: JSON-RPC API Methods
description: Learn about the supported JSON-RPC API methods for querying your Tanssi EVM network, including standard Ethereum methods and custom methods unique to Tanssi.
icon: material-code-json
categories: Reference
---
# JSON-RPC API Methods
## Standard Ethereum JSON-RPC Methods {: #standard-rpc-methods }
As Tanssi's EVM Compatibility is derived from [Frontier](https://github.com/polkadot-evm/frontier){target=\_blank} and closely modeled after Moonbeam's Ethereum compatibility, Tanssi nodes support a wide variety of standard supported Ethereum JSON-RPC methods.
Nevertheless, not all Ethereum JSON-RPC methods are supported; some of those supported return default values (those related to Ethereum's PoW consensus mechanism in particular). This guide provides a comprehensive list of supported Ethereum JSON-RPC methods on Tanssi. Developers can quickly reference this list to understand the available functionality for interfacing with Tanssi EVM networks.
The basic JSON-RPC methods from the Ethereum API supported by Tanssi are:
- **[eth_protocolVersion](https://ethereum.org/en/developers/docs/apis/json-rpc/#eth_protocolversion){target=\_blank}** — returns `1` by default
- **[eth_syncing](https://ethereum.org/en/developers/docs/apis/json-rpc/#eth_syncing){target=\_blank}** — returns an object with data about the sync status or `false`
- **[eth_hashrate](https://ethereum.org/en/developers/docs/apis/json-rpc/#eth_hashrate){target=\_blank}** — returns `"0x0"` by default
- **[eth_coinbase](https://ethereum.org/en/developers/docs/apis/json-rpc/#eth_coinbase){target=\_blank}** — returns the latest block author. Not necessarily a finalized block
- **[eth_mining](https://ethereum.org/en/developers/docs/apis/json-rpc/#eth_mining){target=\_blank}** — returns `false` by default
- **[eth_chainId](https://ethereum.org/en/developers/docs/apis/json-rpc/#eth_chainid){target=\_blank}** — returns the chain ID used for signing at the current block
- **[eth_gasPrice](https://ethereum.org/en/developers/docs/apis/json-rpc/#eth_gasprice){target=\_blank}** — returns the base fee per unit of gas used. This is currently the minimum gas price for each network
- **[eth_accounts](https://ethereum.org/en/developers/docs/apis/json-rpc/#eth_accounts){target=\_blank}** — returns a list of addresses owned by the client
- **[eth_blockNumber](https://ethereum.org/en/developers/docs/apis/json-rpc/#eth_blocknumber){target=\_blank}** — returns the highest available block number
- **[eth_getBalance](https://ethereum.org/en/developers/docs/apis/json-rpc/#eth_getbalance){target=\_blank}** — returns the balance of the given address
- **[eth_getStorageAt](https://ethereum.org/en/developers/docs/apis/json-rpc/#eth_getstorageat){target=\_blank}** — returns the content of the storage at a given address
- **[eth_getBlockByHash](https://ethereum.org/en/developers/docs/apis/json-rpc/#eth_getblockbyhash){target=\_blank}** — returns information about the block of the given hash, including `baseFeePerGas` on post-London blocks
- **[eth_getBlockByNumber](https://ethereum.org/en/developers/docs/apis/json-rpc/#eth_getblockbynumber){target=\_blank}** — returns information about the block specified by block number, including `baseFeePerGas` on post-London blocks
- **[eth_getBlockReceipts](https://www.alchemy.com/docs/node/ethereum/ethereum-api-endpoints/eth-get-block-receipts){target=\_blank}** — returns all transaction receipts for a given block
- **[eth_getTransactionCount](https://ethereum.org/en/developers/docs/apis/json-rpc/#eth_gettransactioncount){target=\_blank}** — returns the number of transactions sent from the given address (nonce)
- **[eth_getBlockTransactionCountByHash](https://ethereum.org/en/developers/docs/apis/json-rpc/#eth_getblocktransactioncountbyhash){target=\_blank}** — returns the number of transactions in a block with a given block hash
- **[eth_getBlockTransactionCountByNumber](https://ethereum.org/en/developers/docs/apis/json-rpc/#eth_getblocktransactioncountbynumber){target=\_blank}** — returns the number of transactions in a block with a given block number
- **[eth_getUncleCountByBlockHash](https://ethereum.org/en/developers/docs/apis/json-rpc/#eth_getunclecountbyblockhash){target=\_blank}** — returns `"0x0"` by default
- **[eth_getUncleCountByBlockNumber](https://ethereum.org/en/developers/docs/apis/json-rpc/#eth_getunclecountbyblocknumber){target=\_blank}** — returns `"0x0"` by default
- **[eth_getCode](https://ethereum.org/en/developers/docs/apis/json-rpc/#eth_getcode){target=\_blank}** — returns the code at the given address at the given block number
- **[eth_sendTransaction](https://ethereum.org/en/developers/docs/apis/json-rpc/#eth_sendtransaction){target=\_blank}** — creates a new message call transaction or a contract creation, if the data field contains code. Returns the transaction hash or the zero hash if the transaction is not yet available
- **[eth_sendRawTransaction](https://ethereum.org/en/developers/docs/apis/json-rpc/#eth_sendrawtransaction){target=\_blank}** — creates a new message call transaction or a contract creation for signed transactions. Returns the transaction hash or the zero hash if the transaction is not yet available
- **[eth_call](https://ethereum.org/en/developers/docs/apis/json-rpc/#eth_call){target=\_blank}** — executes a new message call immediately without creating a transaction on the blockchain, returning the value of the executed call
- **[eth_estimateGas](https://ethereum.org/en/developers/docs/apis/json-rpc/#eth_estimategas){target=\_blank}** — returns an estimated amount of gas necessary for a given transaction to succeed. You can optionally specify a `gasPrice` or `maxFeePerGas` and `maxPriorityFeePerGas`
- **[eth_feeHistory](https://www.alchemy.com/docs/node/ethereum/ethereum-api-endpoints/eth-fee-history){target=\_blank}** — returns `baseFeePerGas`, `gasUsedRatio`, `oldestBlock`, and `reward` for a specified range of up to 1024 blocks
- **[eth_getTransactionByHash](https://ethereum.org/en/developers/docs/apis/json-rpc/#eth_gettransactionbyhash){target=\_blank}** — returns the information about a transaction with a given hash. EIP-1559 transactions have `maxPriorityFeePerGas` and `maxFeePerGas` fields
- **[eth_getTransactionByBlockHashAndIndex](https://ethereum.org/en/developers/docs/apis/json-rpc/#eth_gettransactionbyblockhashandindex){target=\_blank}** — returns information about a transaction at a given block hash and a given index position. EIP-1559 transactions have `maxPriorityFeePerGas` and `maxFeePerGas` fields
- **[eth_getTransactionByBlockNumberAndIndex](https://ethereum.org/en/developers/docs/apis/json-rpc/#eth_gettransactionbyblocknumberandindex){target=\_blank}** — returns information about a transaction at a given block number and a given index position. EIP-1559 transactions have `maxPriorityFeePerGas` and `maxFeePerGas` fields
- **[eth_getTransactionReceipt](https://ethereum.org/en/developers/docs/apis/json-rpc/#eth_gettransactionreceipt){target=\_blank}** — returns the transaction receipt of a given transaction hash
- **[eth_getUncleByBlockHashAndIndex](https://ethereum.org/en/developers/docs/apis/json-rpc/#eth_getunclebyblockhashandindex){target=\_blank}** — returns `null` by default
- **[eth_getUncleByBlockNumberAndIndex](https://ethereum.org/en/developers/docs/apis/json-rpc/#eth_getunclebyblocknumberandindex){target=\_blank}** — returns `null` by default
- **[eth_getLogs](https://ethereum.org/en/developers/docs/apis/json-rpc/#eth_getlogs){target=\_blank}** — returns an array of all logs matching a given filter object
- **[eth_newFilter](https://ethereum.org/en/developers/docs/apis/json-rpc/#eth_newfilter){target=\_blank}** — creates a filter object based on the input provided. Returns a filter ID
- **[eth_newBlockFilter](https://ethereum.org/en/developers/docs/apis/json-rpc/#eth_newblockfilter){target=\_blank}** — creates a filter in the node to notify when a new block arrives. Returns a filter ID
- **[eth_getFilterChanges](https://ethereum.org/en/developers/docs/apis/json-rpc/#eth_getfilterchanges){target=\_blank}** — polling method for filters (see methods above). Returns an array of logs that occurred since the last poll
- **[eth_getFilterLogs](https://ethereum.org/en/developers/docs/apis/json-rpc/#eth_getfilterlogs){target=\_blank}** — returns an array of all the logs matching the filter with a given ID
- **[eth_uninstallFilter](https://ethereum.org/en/developers/docs/apis/json-rpc/#eth_uninstallfilter){target=\_blank}** — uninstall a filter with a given ID. It should be used when polling is no longer needed. Filters timeout when they are not requested using `eth_getFilterChanges` after some time
## Custom JSON-RPC Methods {: #custom-json-rpc-methods }
Tanssi nodes support two custom JSON-RPC endpoints: `frnt_isBlockFinalized` and `frnt_isTxFinalized`. Tanssi features deterministic finality (as opposed to probabilistic like Bitcoin's finality), which means that at any point of time, the answer to whether a block or transaction is finalized or not can be answered with a definitive yes or no. Tanssi has built these two custom endpoints to provide valuable functionality for checking the finality of on-chain events.
???+ function "frnt_isBlockFinalized - checks for the finality of the block given by its block hash"
=== "Parameters"
- `block_hash` ++"string"++ - the hash of the block, accepts either Substrate-style or Ethereum-style block hash as its input
=== "Returns"
++"boolean"++ - `true` if the block is finalized, `false` if the block is not finalized or not found
=== "Example"
```bash
curl -H "Content-Type: application/json" -X POST --data '{
"jsonrpc": "2.0",
"id": "1",
"method": "frnt_isBlockFinalized",
"params": ["INSERT_BLOCK_HASH"]
}' {{ networks.dancelight.demo_evm_rpc_url }}
```
???+ function "frnt_isTxFinalized - checks for the finality of a transaction given its EVM transaction hash"
=== "Parameters"
- `tx_hash` ++"string"++ - the EVM transaction hash of the transaction
=== "Returns"
++"boolean"++ - `true` if the transaction is finalized, `false` if the transaction is not finalized or not found
=== "Example"
```bash
curl -H "Content-Type: application/json" -X POST --data '{
"jsonrpc": "2.0",
"id": "1",
"method": "frnt_isTxFinalized",
"params": ["INSERT_TRANSACTION_HASH"]
}' {{ networks.dancelight.demo_evm_rpc_url }}
```
--- END CONTENT ---