Offboard as a Tanssi Block Producer
Introduction
As a block producer, there may come a time when you need to gracefully exit the network. Decommissioning your account involves a two-step process to ensure that your node is properly disassociated from your account and that you receive your bond back.
This guide will show you how to wind down your operations as a Tanssi block producer properly. This includes undelegating your self-delegation to reclaim your bond and unmapping your session keys to sever the connection between your node and your account. Naturally, this guide assumes that you're an existing Tanssi block producer with a block-producing node and mapped session keys.
Request Undelegation
When you set up your Tanssi block producer node, you had to submit a delegation bond of at least 10,000 DANCE. To get that back and remove your block producer from the list of eligible candidates, you'll need to take steps similar to those in the onboarding process.
View Existing Stake
Before undelegating, it is helpful first to see how much you have staked, as you'll need to provide this figure later. To do so, head to Polkadot.js Apps, click on the Developer tab, select Chain State from the dropdown, and take the following steps:
- Select the pooledStaking module
- Select the pools query
- Enter your block producer account
- Ensure that the include option slider is toggled on
- In the option field, you select JoiningShares
- Click the + button next to the extrinsic field
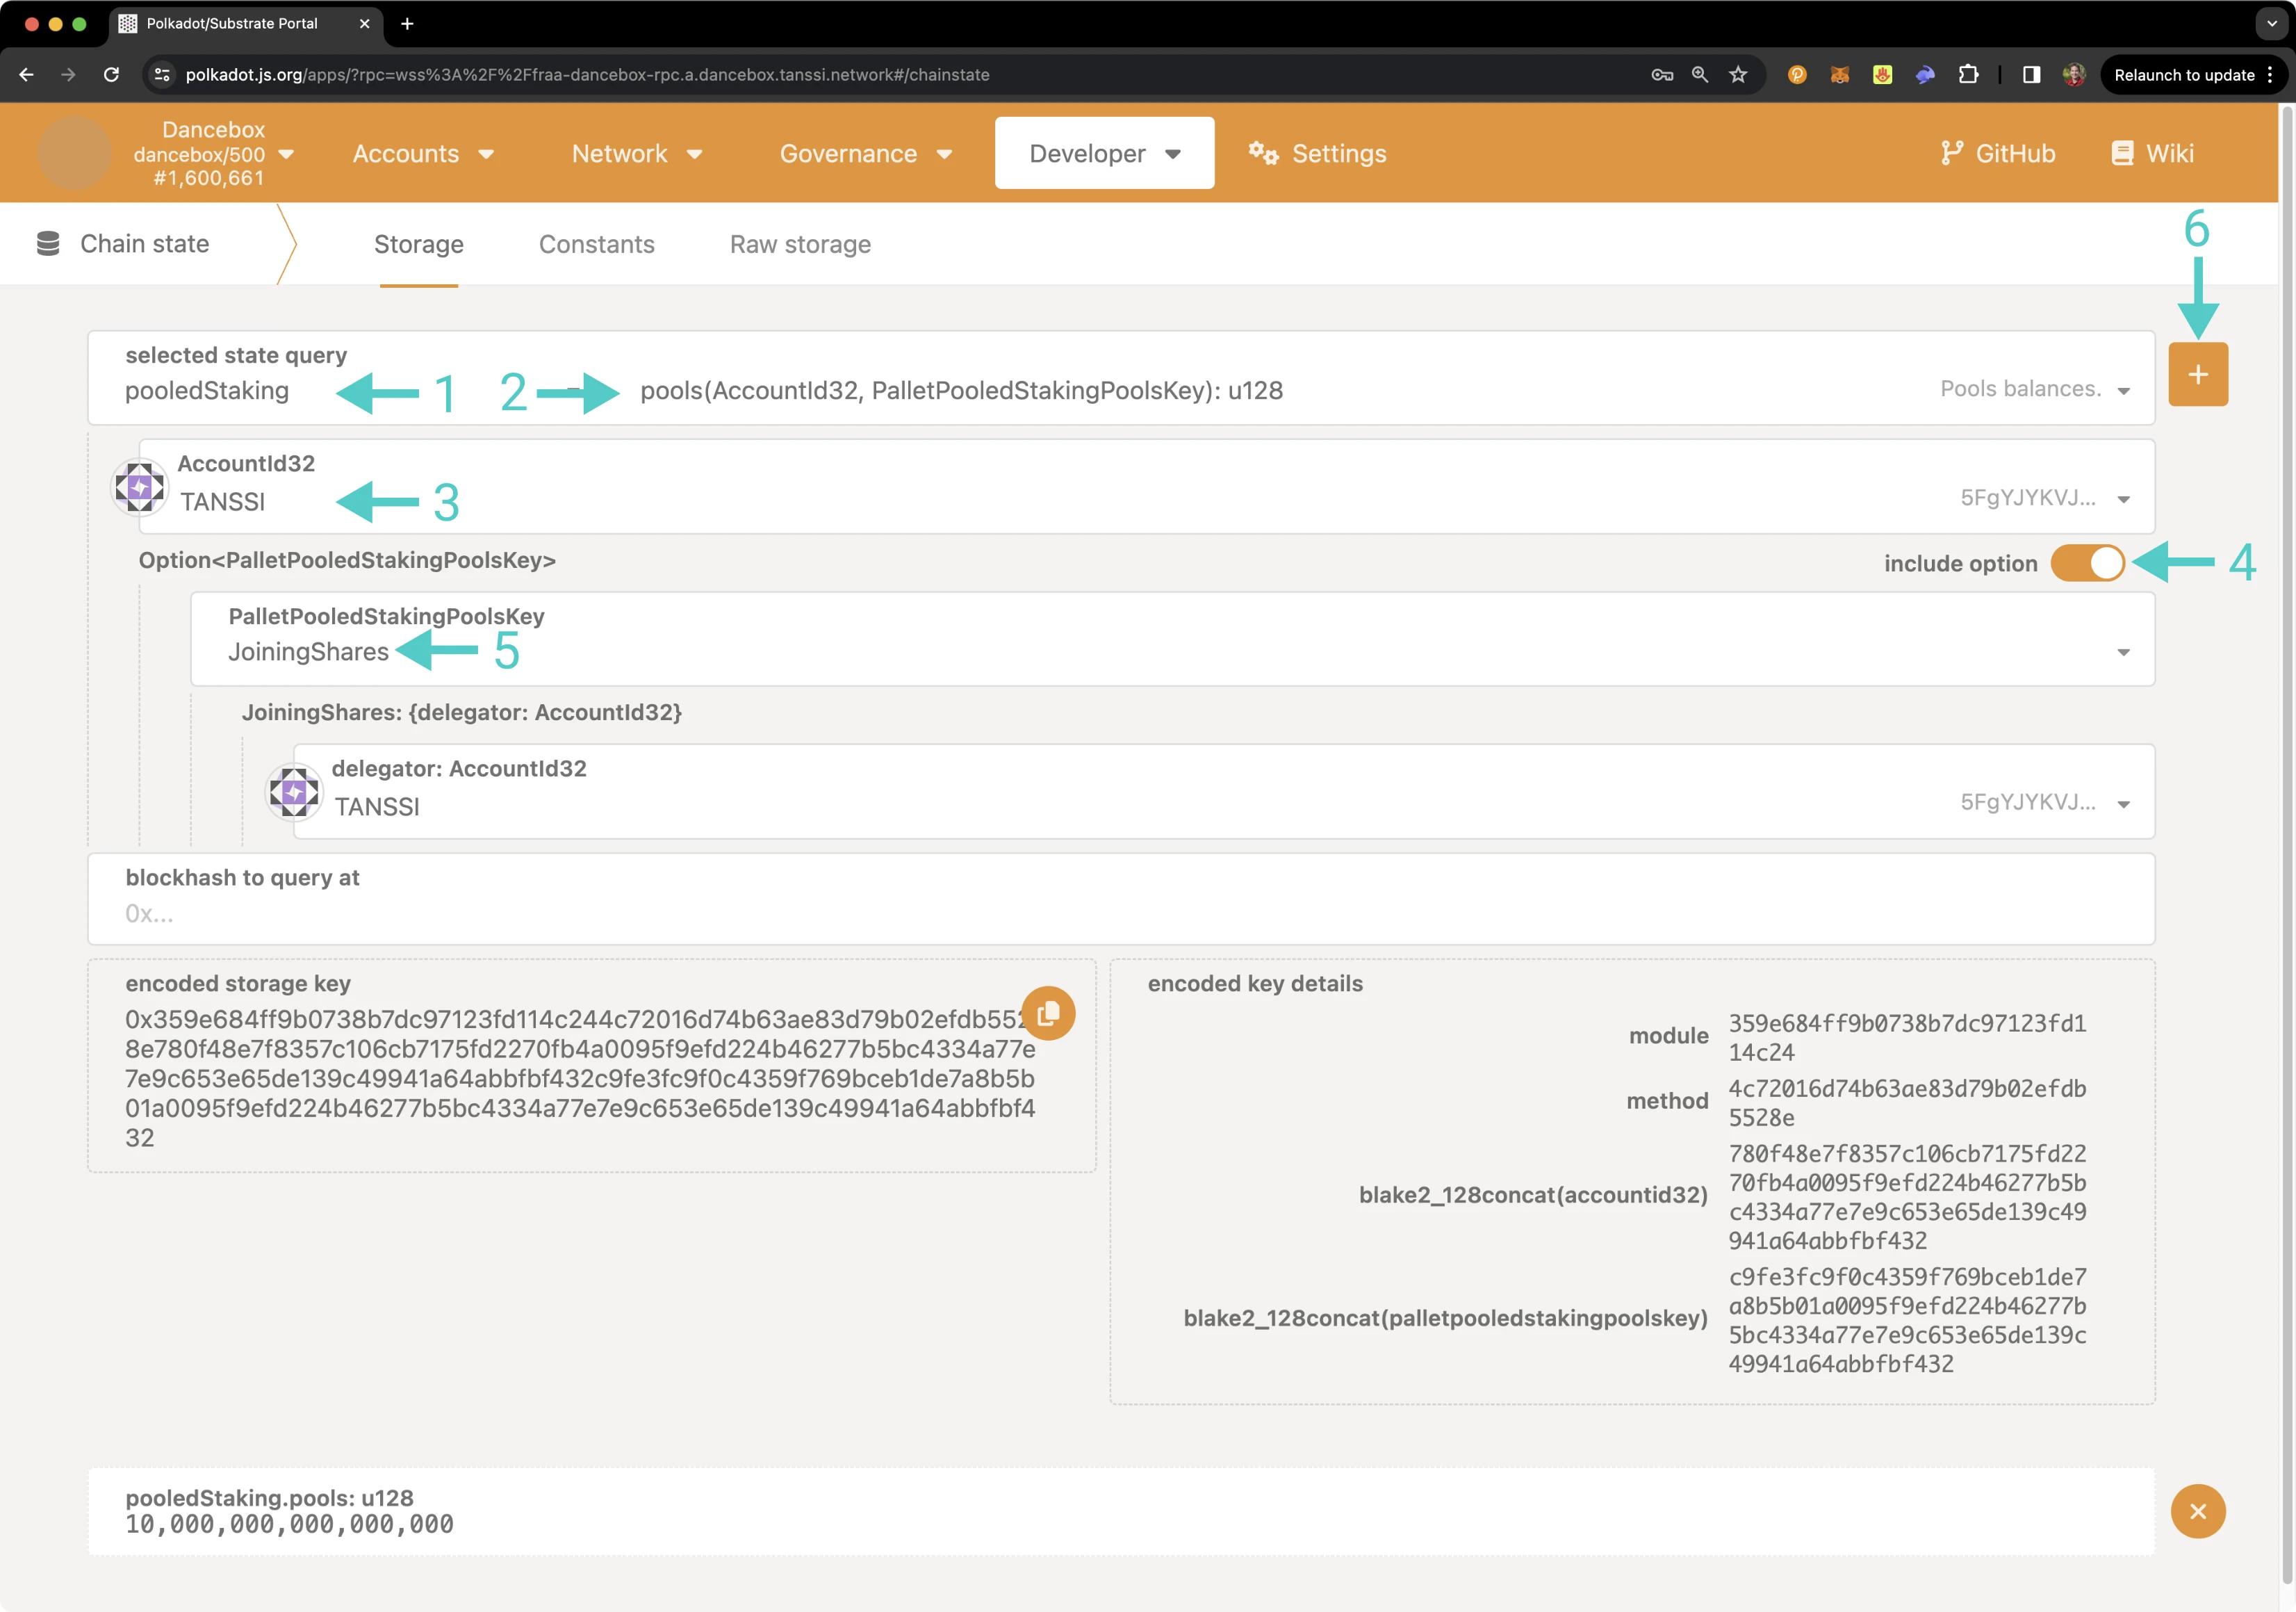
Note, JoiningShares returns only the initial amount you delegated when configuring your block producer. To get your total amount staked, you'll need to repeat the above steps for either ManualRewardShares or ManualRewardSharesHeldStake if you didn't select Autocompounding, and either AutoCompoundingShares or AutoCompoundingSharesHeldStake if you configured Autocompounding. Then add your autocompounding or manual shares value to JoiningShares to get your total delegation outstanding.
As an example, the total stake of an autocompounding block producer can be calculated by adding JoiningShares to AutoCompoundingShares. Note this amount, as you'll need it in the next section.
Submit Undelegation Request
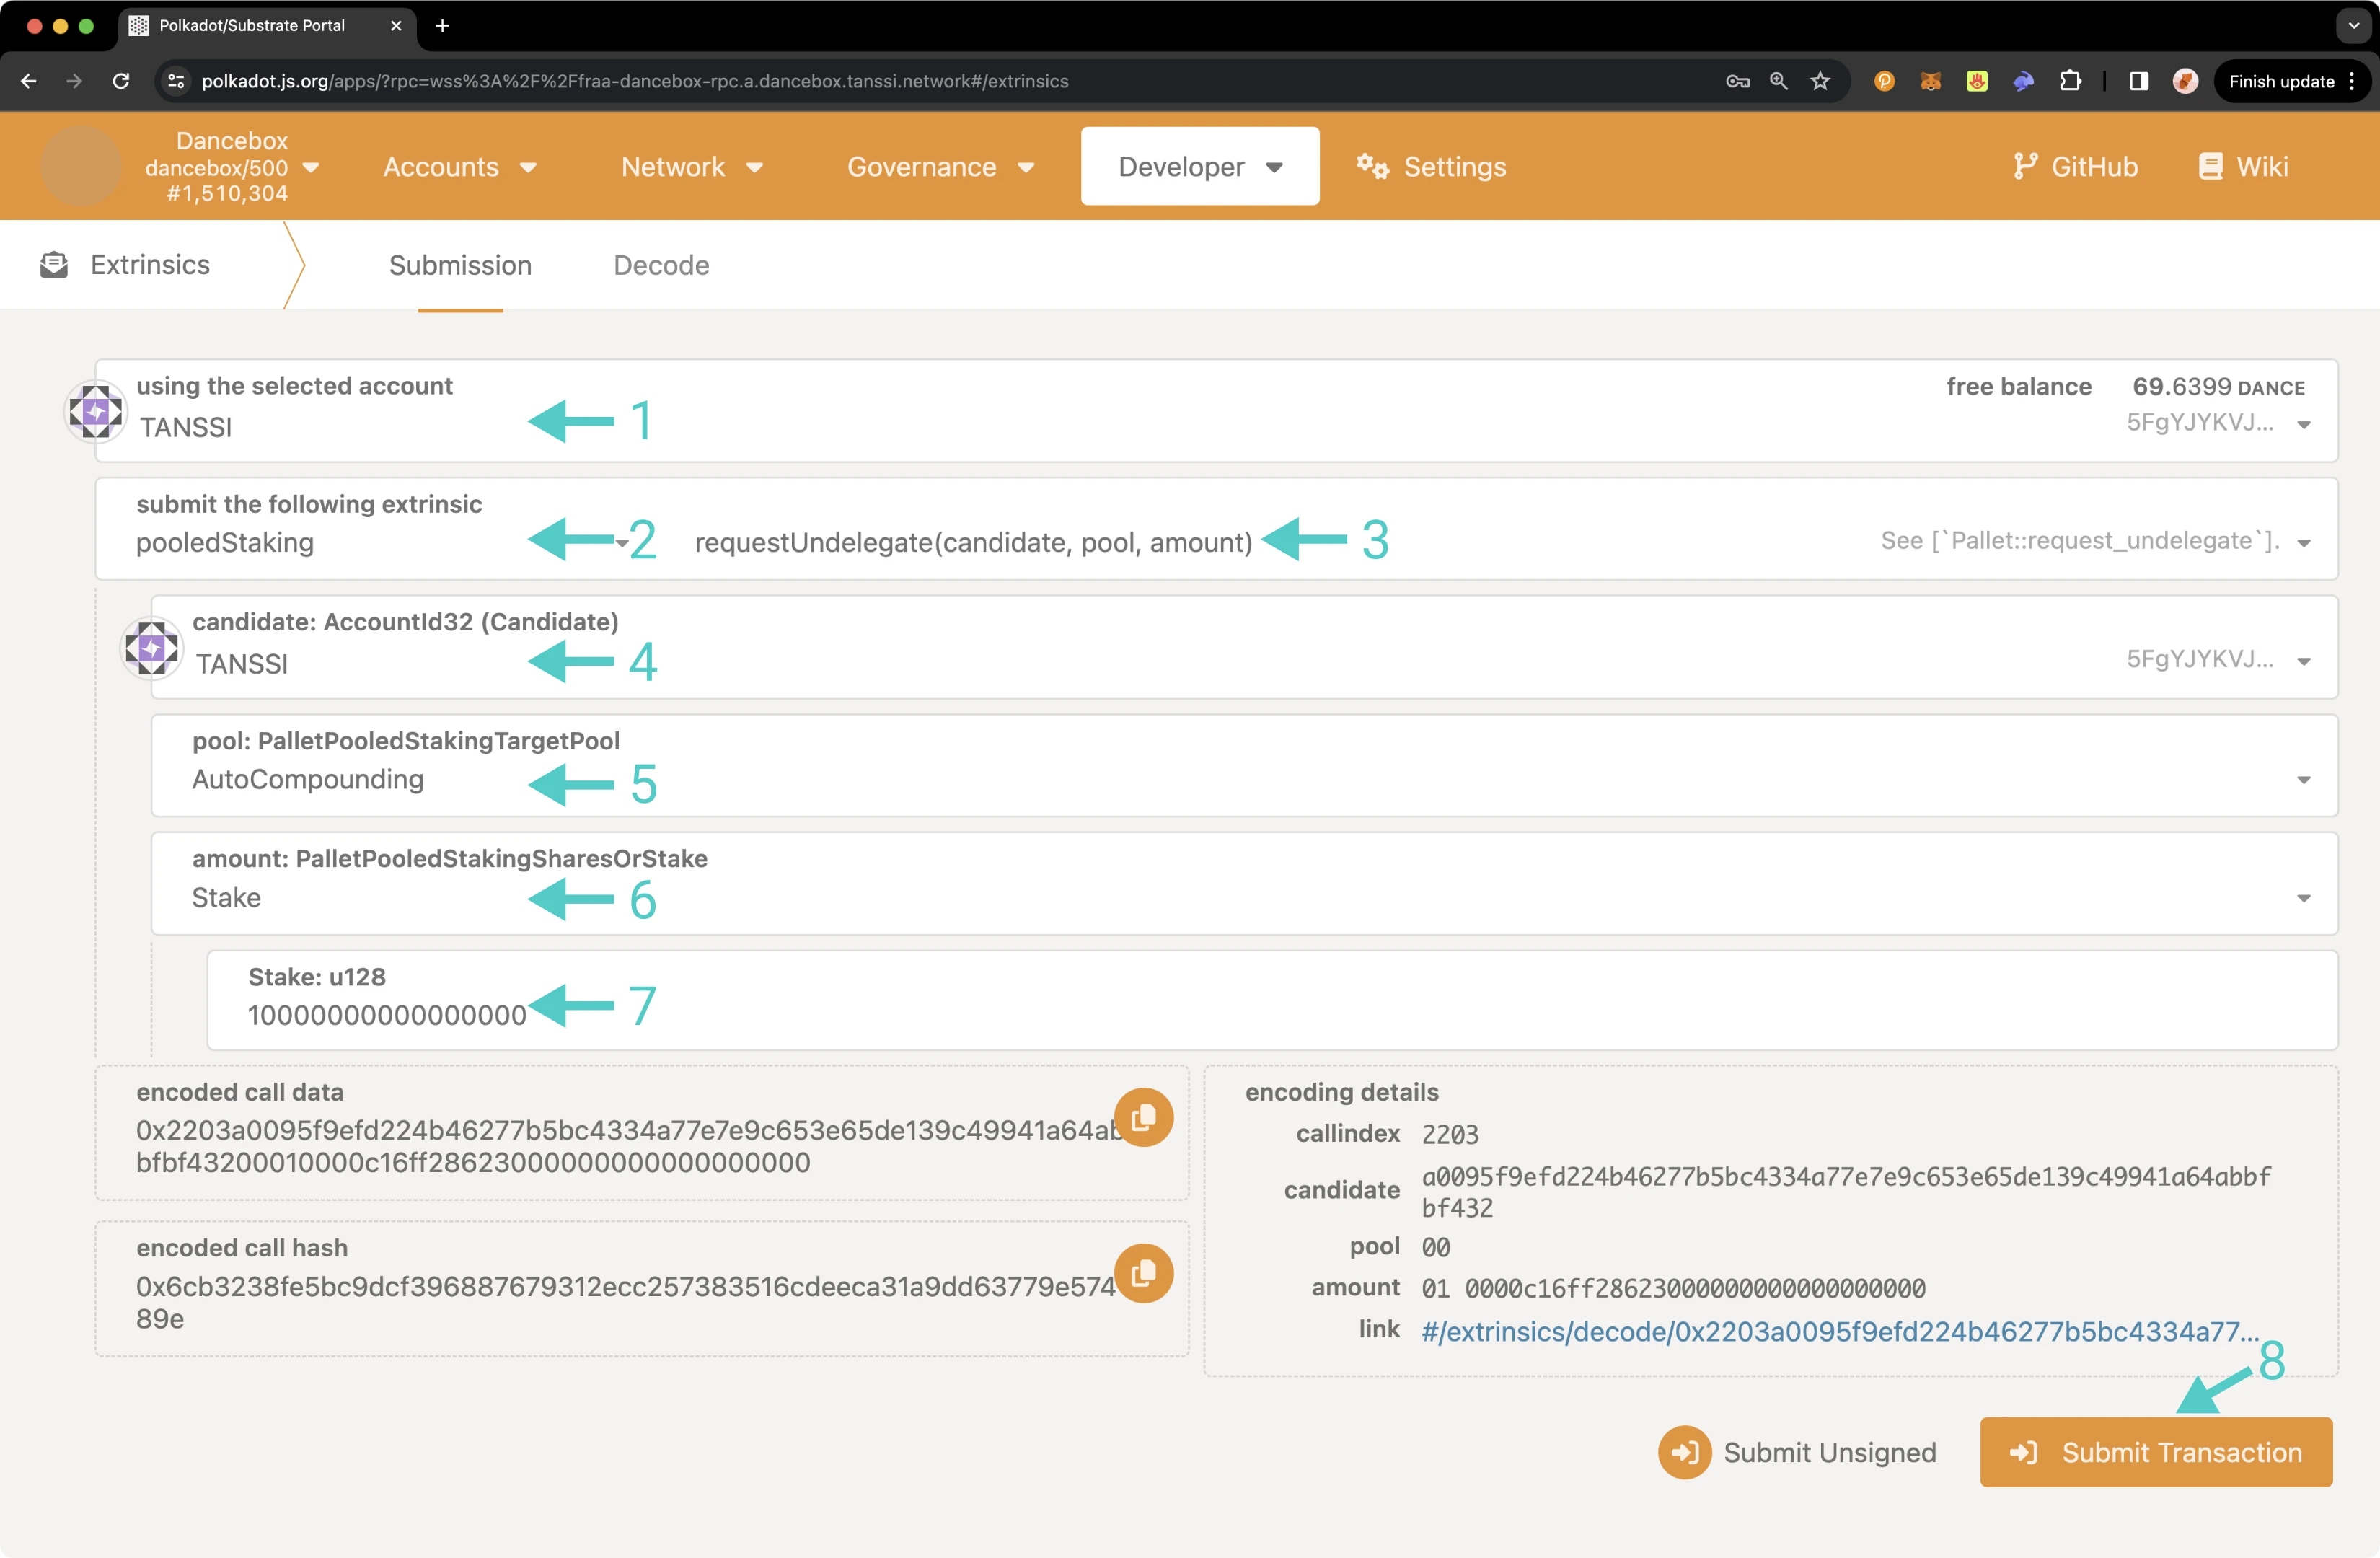
Head to Polkadot.js Apps, click on the Developer tab, select Extrinsics from the dropdown, and take the following steps:
- Select the account from which you want to send the extrinsic. This account must be your existing block producer account that you initially delegated from
- Select the pooledStaking module
- Select the requestUndelegate extrinsic
- Enter your account, which is, again, the same account you are sending the extrinsic from and the account you want to decommission as a block producer
- Choose the target pool that you originally used when configuring your delegation (either Autocompounding or Manual)
- Select Stake or Shares from the dropdown
- Enter the amount to unstake. If you selected Shares, simply enter the number of Shares. If you selected Stake, you'll need to submit the value in Planck. As a reminder, the minimum stake amount is
10,000DANCE. If you delegated the minimum amount and didn't accumulate additional rewards, you'll need to enter10000000000000000Planck - Click Submit Transaction and sign and send the transaction from your wallet
Execute the Pending Request
You'll need to wait at least two sessions before executing the pending request. Each session is comprised of 600 blocks and translates to about 1 hour per session. So, two sessions correspond to approximately two hours.
Before executing the pending request, you'll need to retrieve the session at which you submitted the request to delegate. To do so, head to Polkadot.js Apps, click on the Developer tab, select Chain state from the dropdown, and take the following steps:
- Select the pooledStaking module
- Select the pendingOperations query
- Enter your block producer account
- Toggle the include option slider off
- Click the + button next to the extrinsic field
- The pending request will be displayed at the bottom of the page
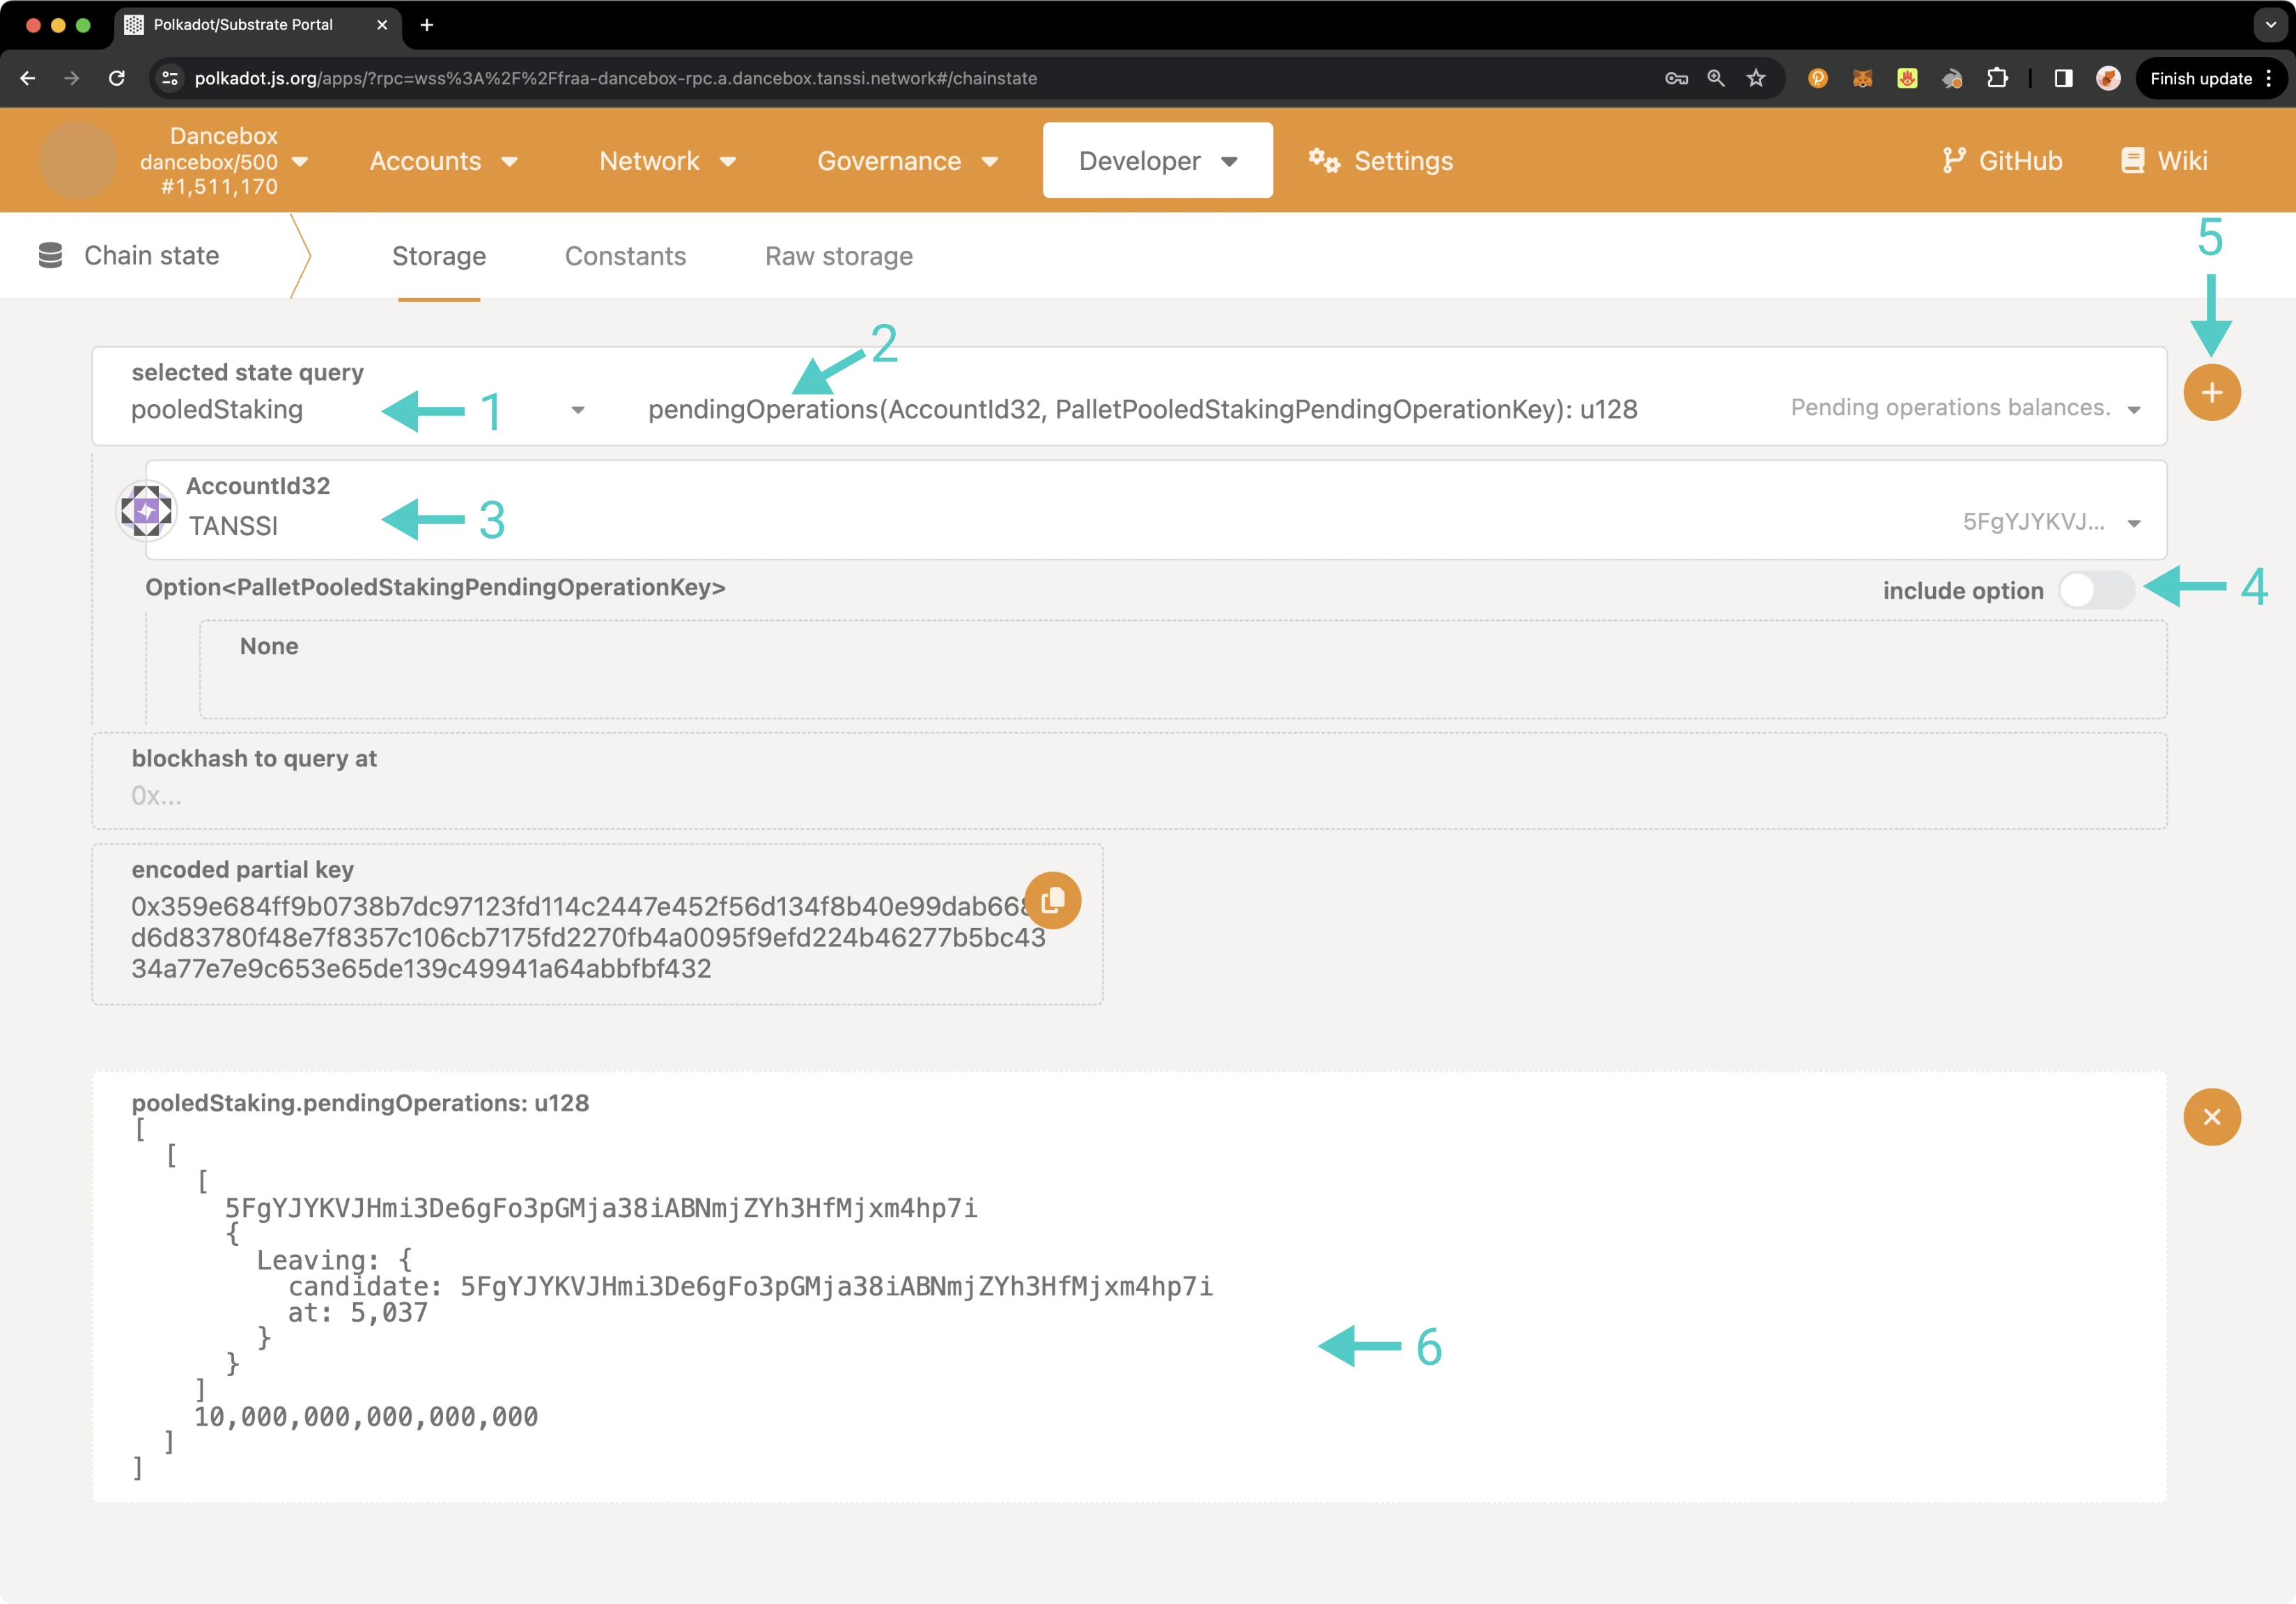
In the example in the above image, the undelegate request to leave the auto-compounding pool was submitted during session 5,037. So, the request can be executed starting at session 5,039. Take note of the operation and the session index at which you submitted the request, as you'll need both values to execute the pending request.
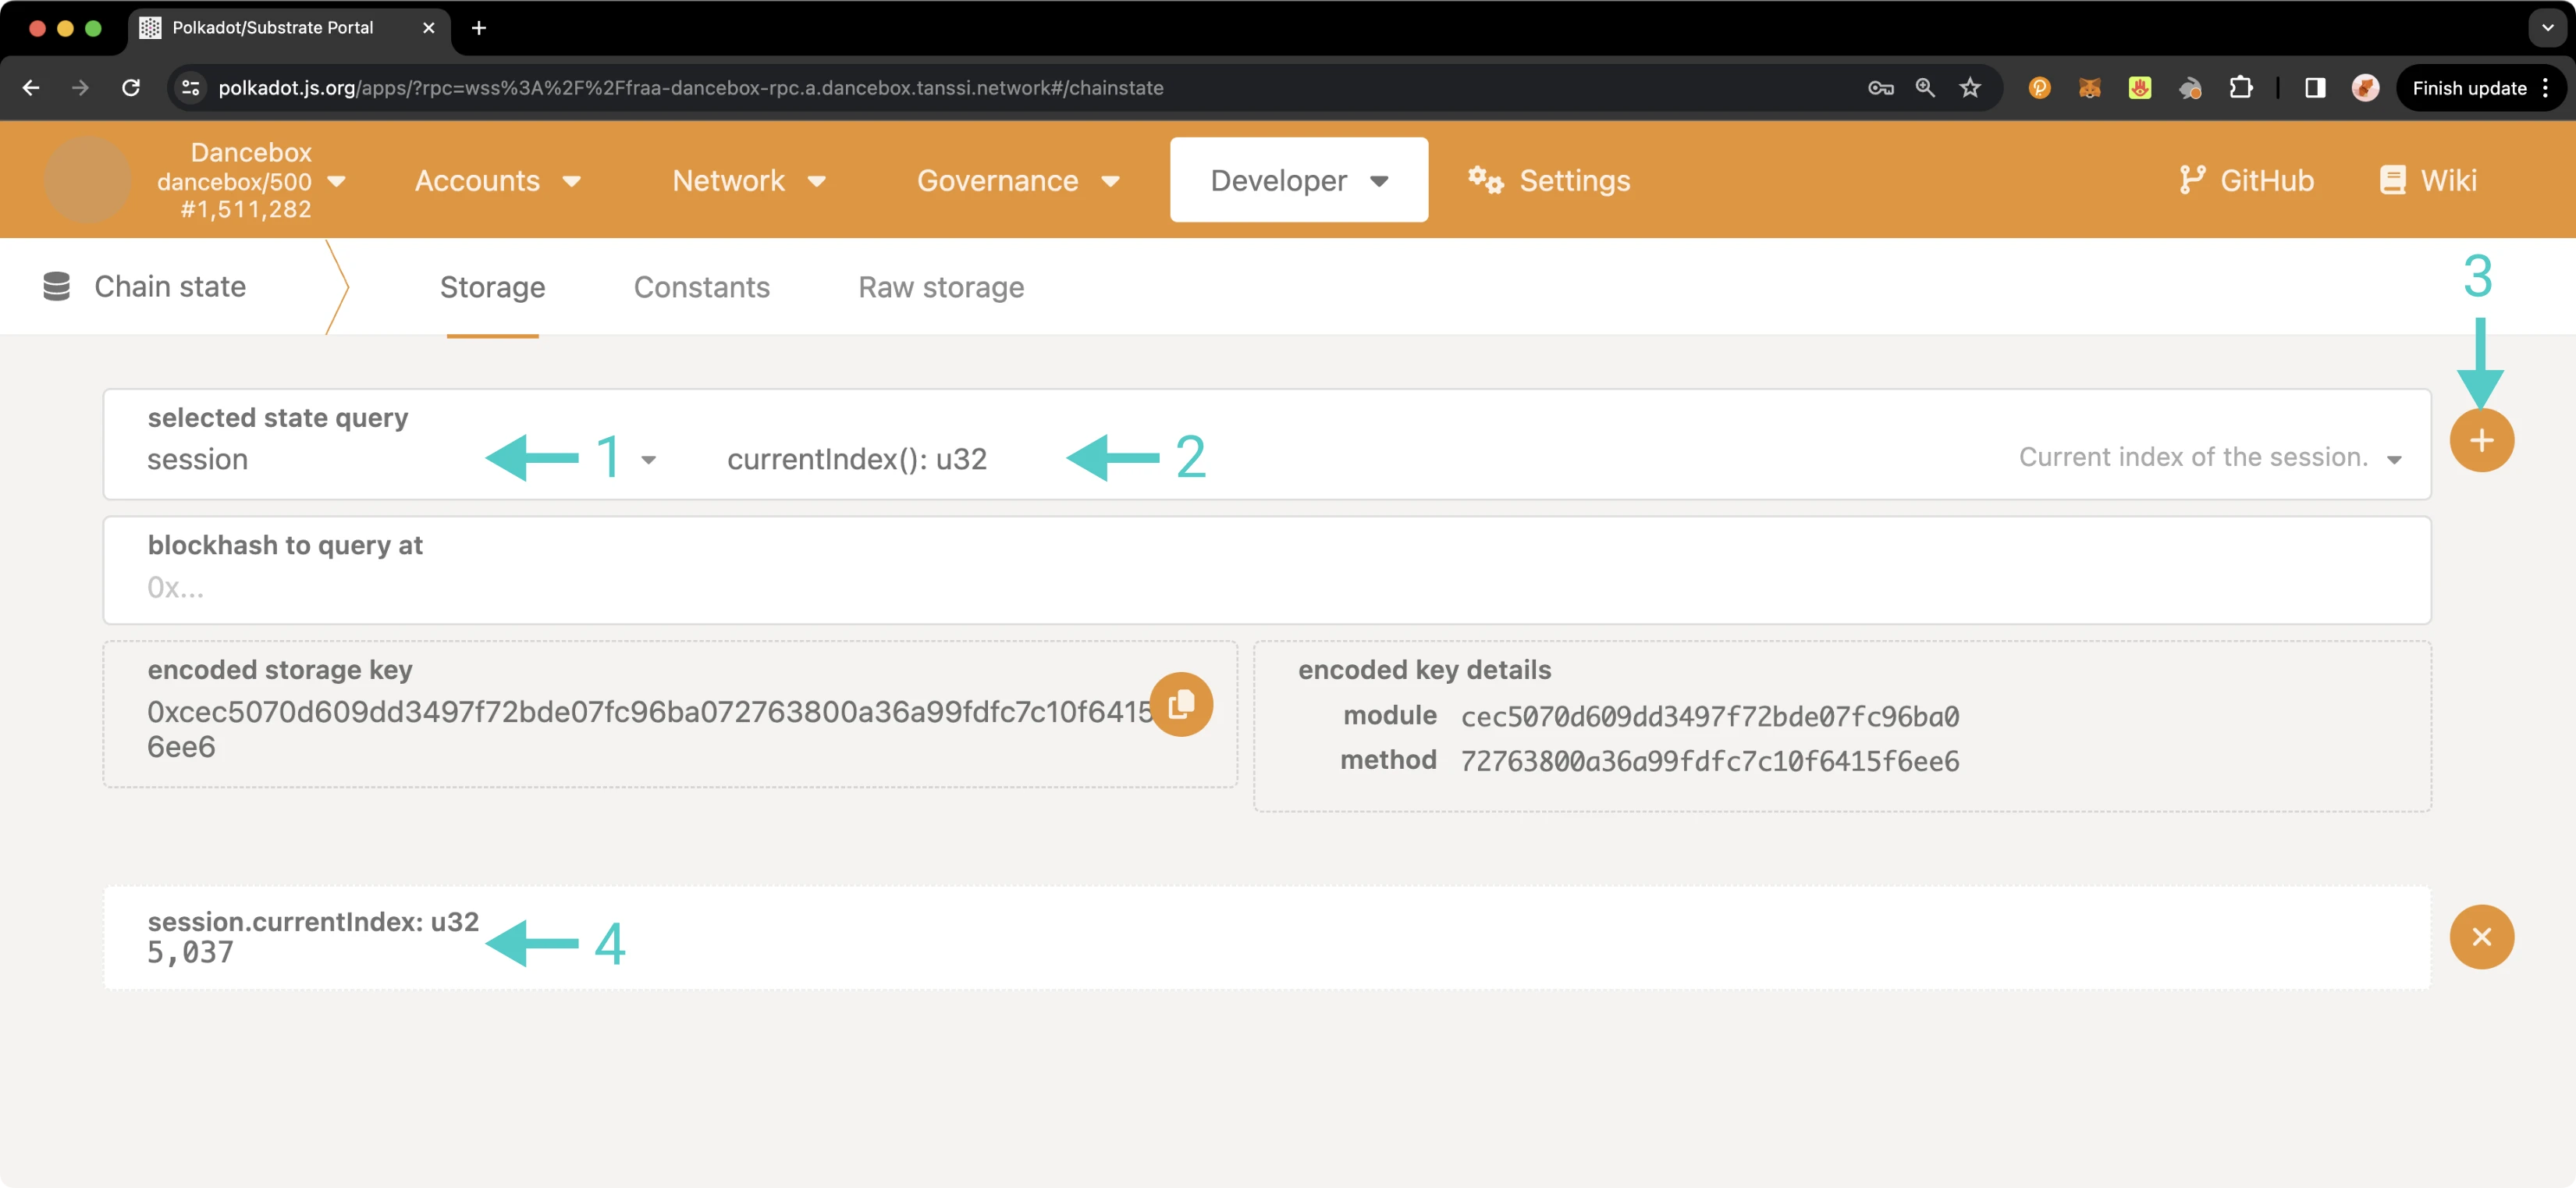
You can run another query from the Chain state page to check the current session. To do so, you can:
- Select the session module
- Select the currentIndex query
- Click the + button next to the extrinsic field
- The current session will be displayed at the bottom of the page
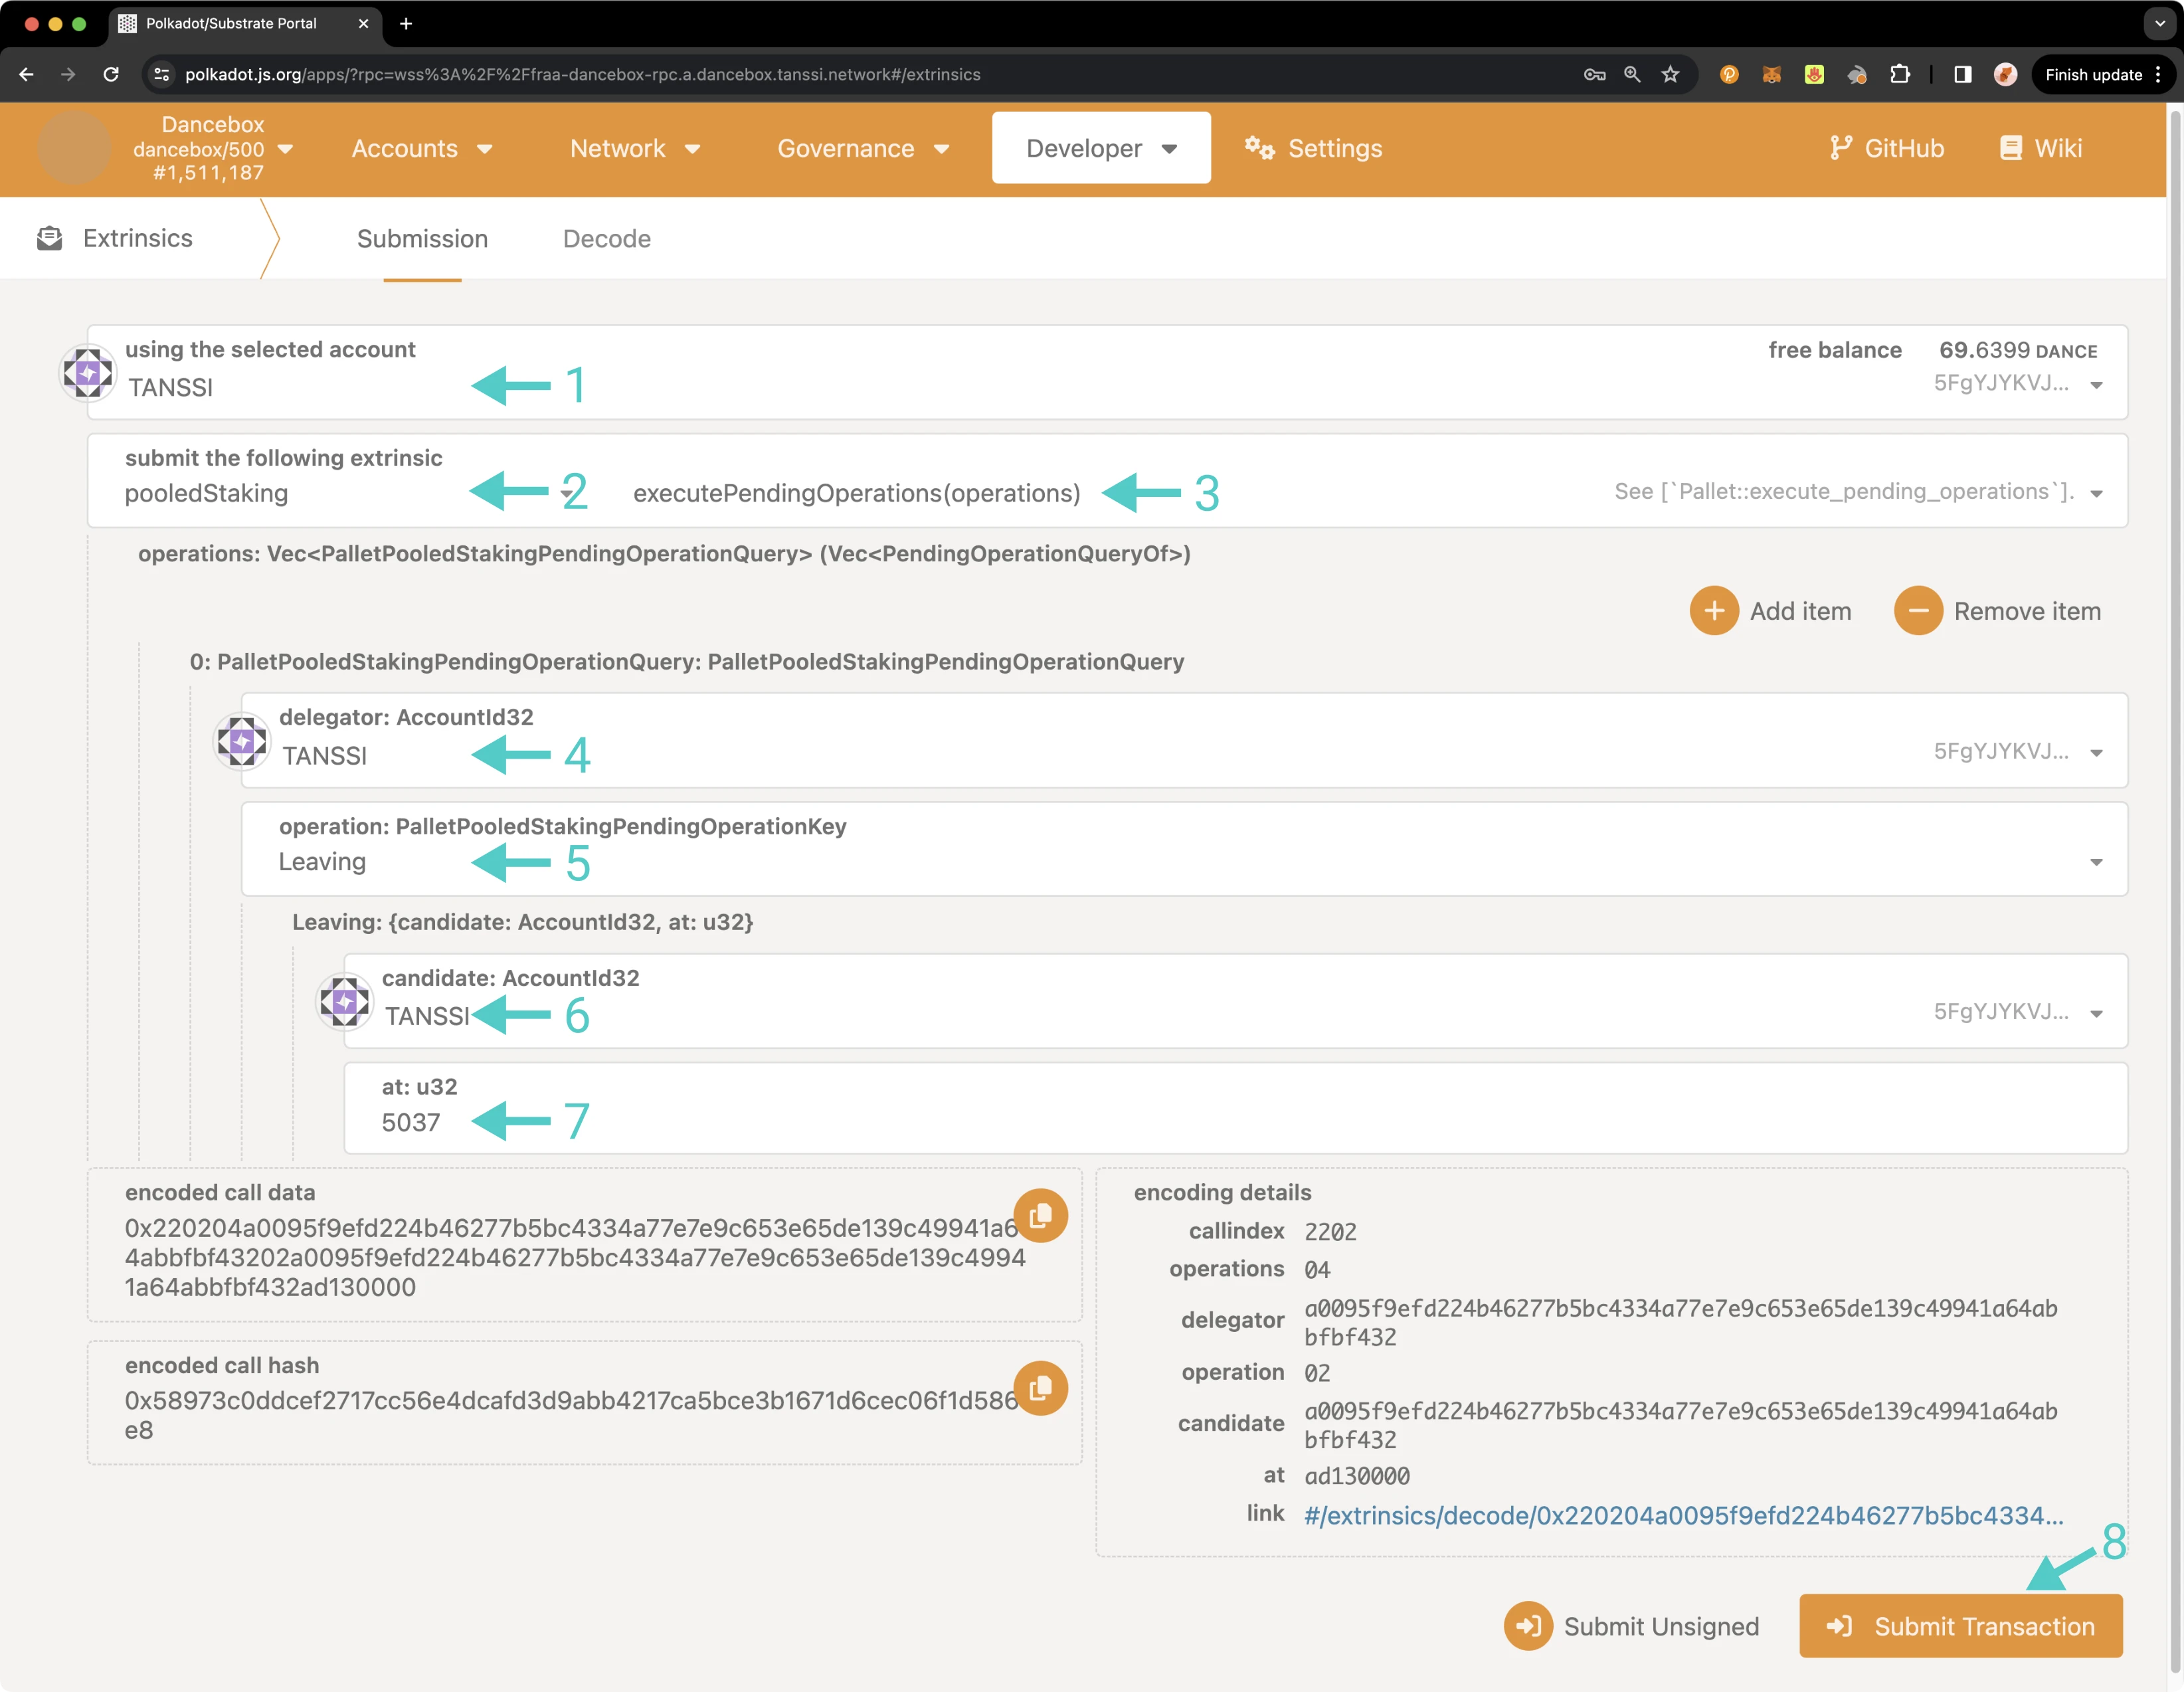
If at least two sessions have passed from the session you submitted the extrinsic, the request is ready to be executed. To do so, select Extrinsics from the Developer dropdown and take the following steps:
- Select the account from which you want to send the extrinsic
- Select the pooledStaking module
- Select the executePendingOperations extrinsic
- For delegator, enter your account, which is the same account you sent the self-delegate request from
- For operation, select Leaving
- For candidate, enter the same account as you did in the delegator field
- For at, enter the session index at which you submitted the delegate request
- Click Submit Transaction and sign and send the transaction from your wallet
Verify That Your Account Is Not in the List of Eligible Candidates
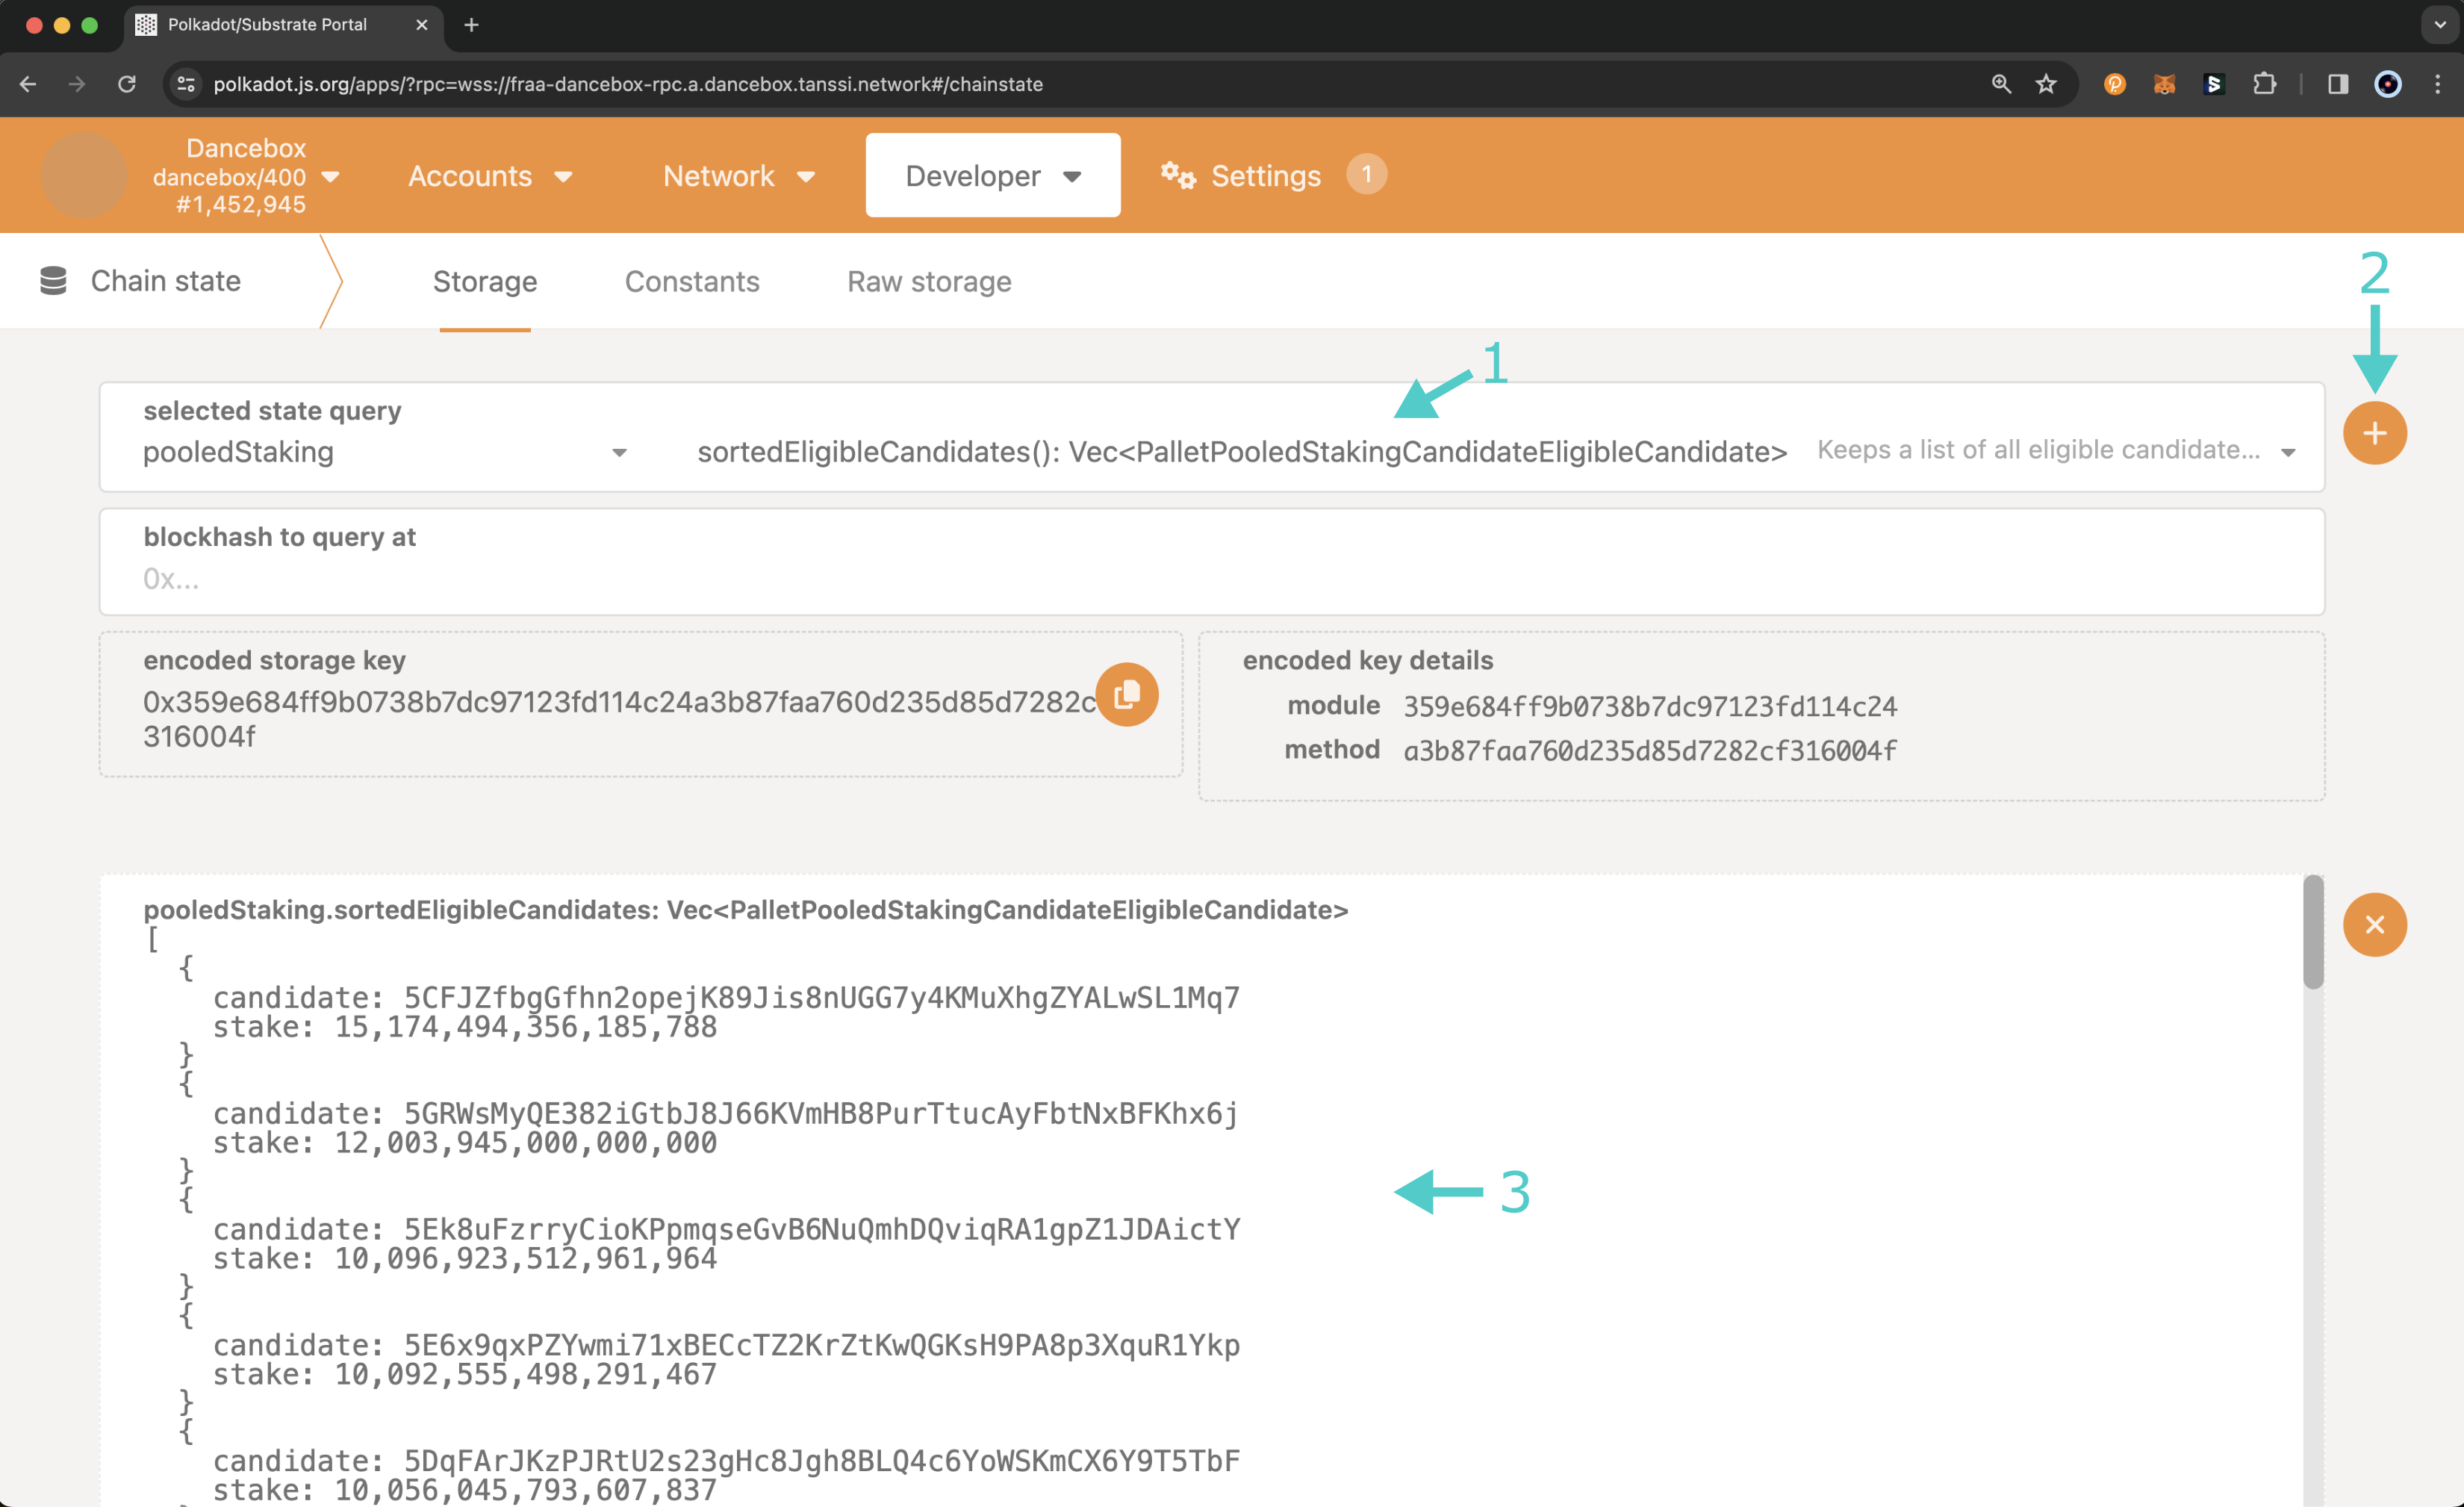
If you'd like, you can verify that your block-producing node is no longer in the list of eligible candidates. To do so, go to Polkadot.js Apps, click on the Developer tab, select Chain state from the dropdown, and take the following steps:
- Select the pooledStaking module and the sortedEligibleCandidates query
- Click the + button next to the extrinsic field
- A list of the eligible candidates and their stakes will be displayed at the bottom of the page. You can search for your address to ensure that it does not exist in the list
Unmap Session Keys
Session keys are used to perform network operations, such as signing blocks, whereas your block producer account holds the staked funds and has an on-chain identity. By unmapping the session key to your account, you sever the association between your block producer account and your block-producing node.
The unmapping step is taken only as part of the offboarding process. If you need to rotate/change your session keys, you'll need to follow the generating and mapping new session keys. You should not purge your keys during the session key rotation process.
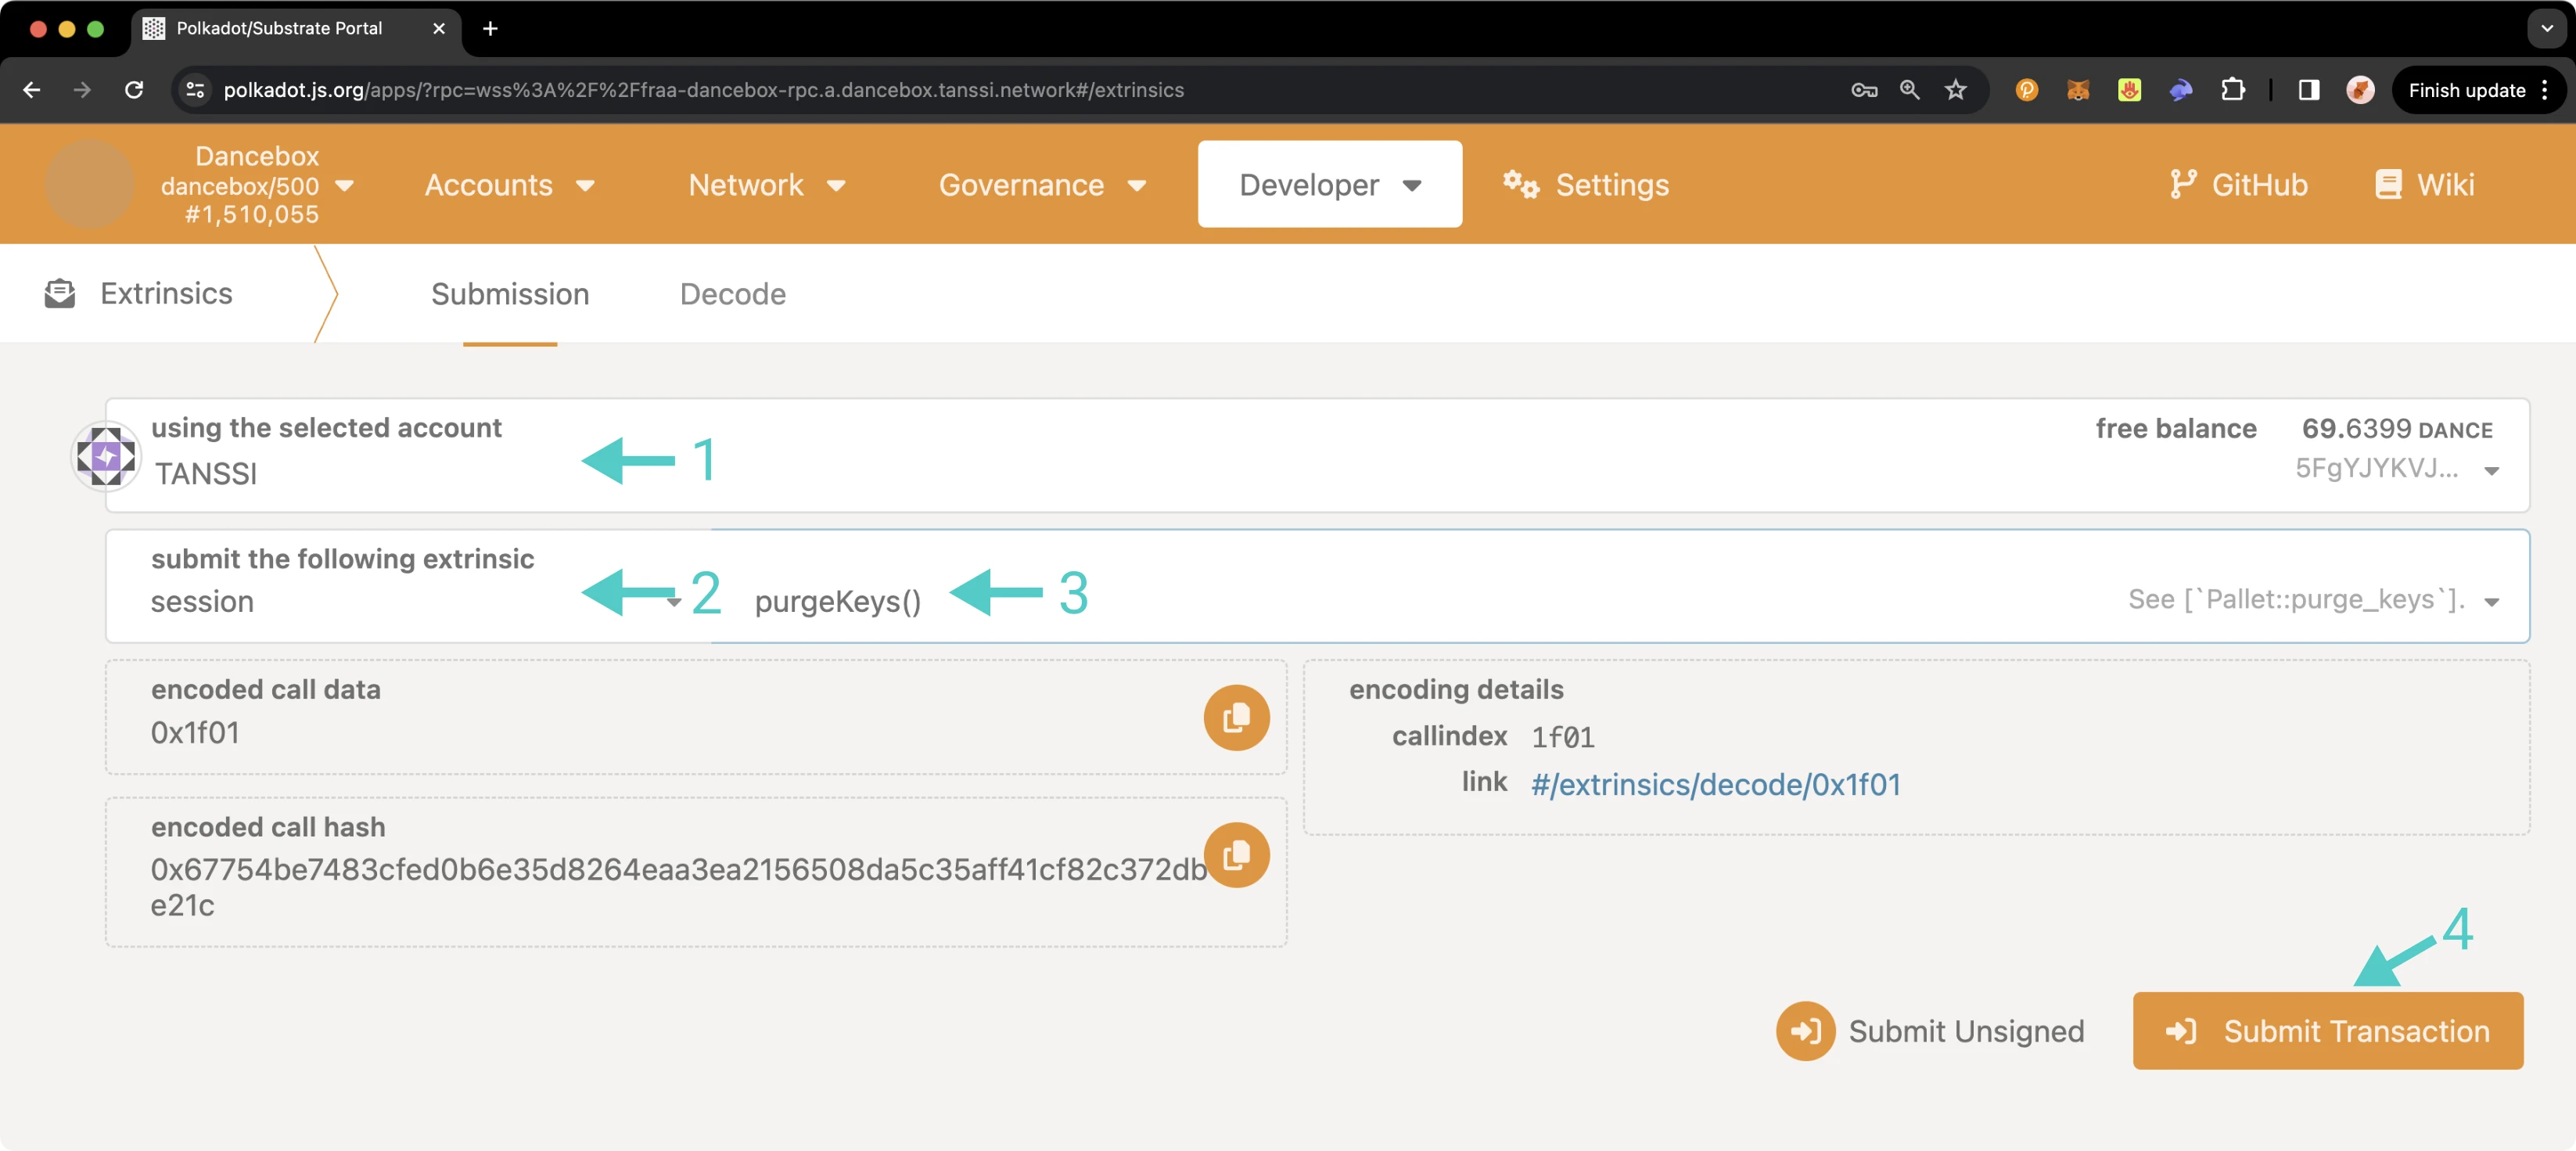
To unmap your session keys, head to Polkadot.js Apps, click on the Developer tab, select Extrinsics from the dropdown, and take the following steps:
- Select your Tanssi block producer account
- Select the session module
- Select purgeKeys extrinsic
- Click Submit Transaction and sign and send the transaction from your wallet
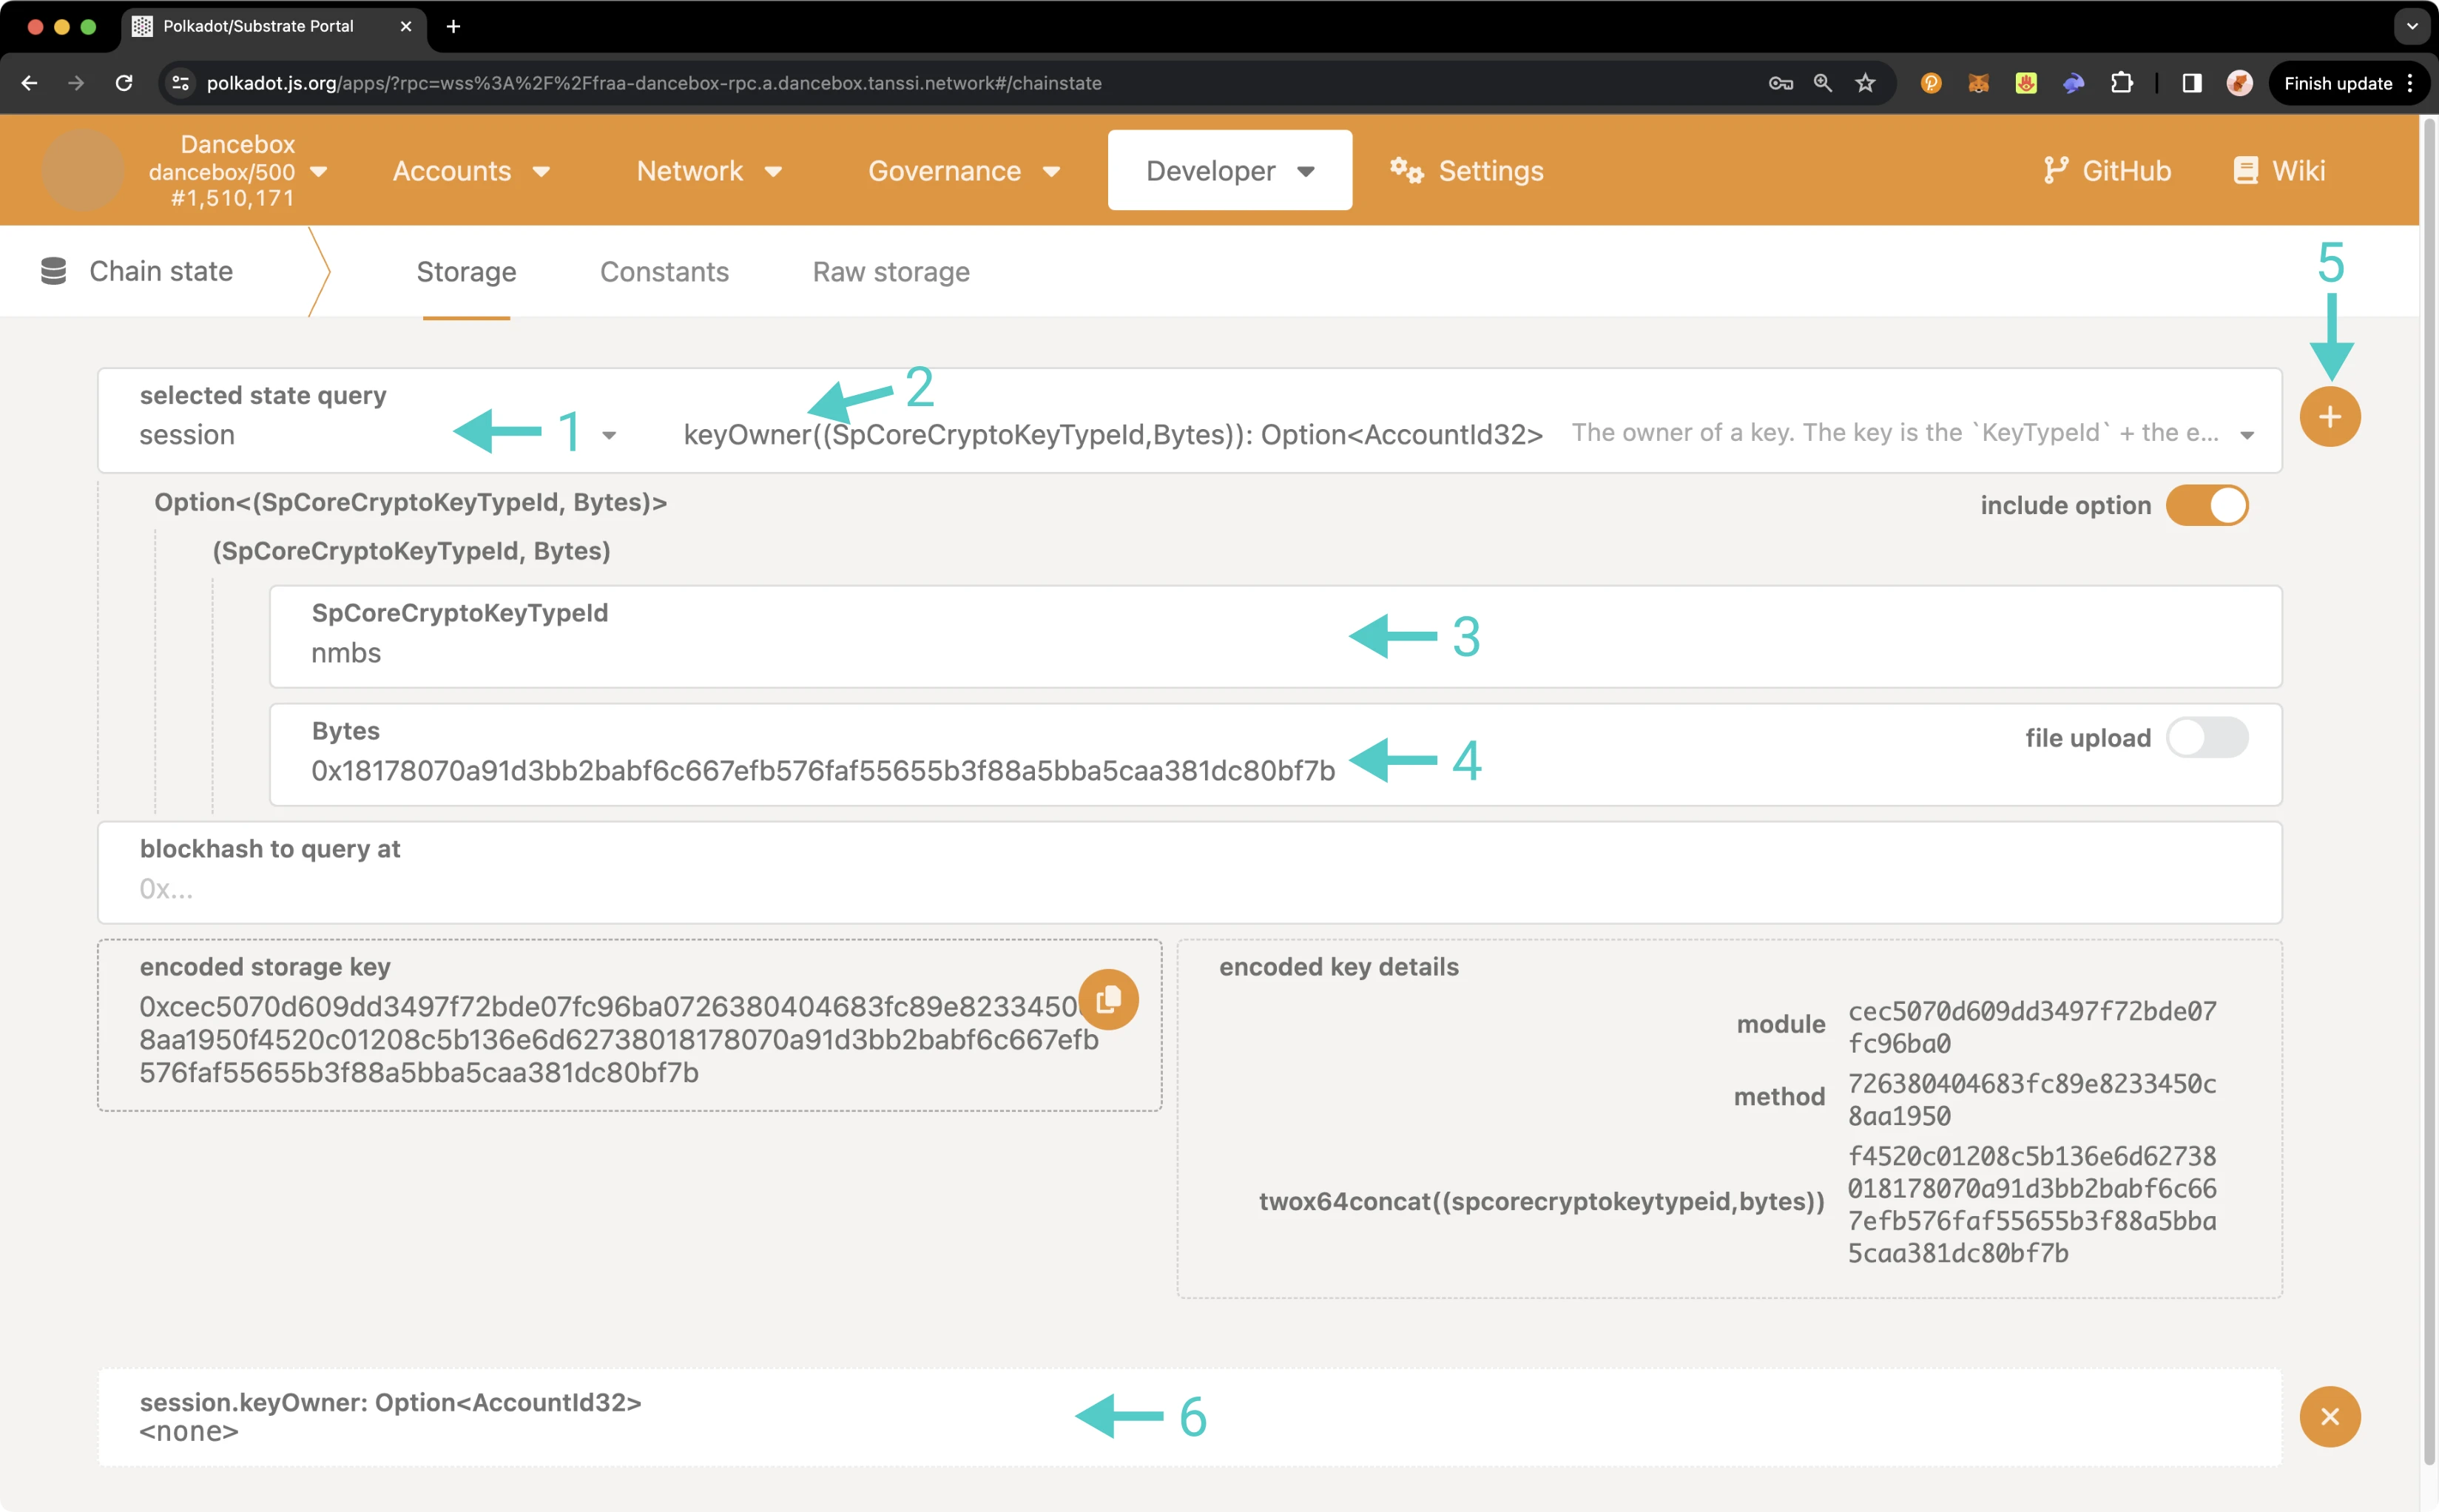
Using the session.keyOwner method, you can verify that your session keys have been unmapped from your account as expected. To do this on Polkadot.js Apps, click on the Developer tab, select Chain state from the dropdown, and take the following steps:
- Select the session module
- Select the keyOwner query
- Enter
nmbsin the SpCoreCryptoKeyTypeId field - For Bytes, enter your hex-encoded session keys
- Click the + button next to the extrinsic field
- The query should return none
And that's it! You have successfully offboarded a Tanssi block producer. If you change your mind at any point and want to onboard back as a Tanssi block producer, you can follow the steps in the onboarding guide.
| Created: March 9, 2024