Set Up Your Account to Produce Blocks on Tanssi
Introduction
Before you can start producing blocks on Tanssi-powered networks, you'll need to set up your account and establish your eligibility.
You must have spun up a Sequencer node to tackle the account setup steps in this guide.
You'll need to set up your account by generating session keys and mapping those session keys to your account. This account is the one to which delegators will choose to delegate and where your rewards will be distributed. You can optionally establish a proxy account for additional security.
To establish eligibility, you must delegate yourself as a sequencer and meet the minimum bond requirements.
By following the steps outlined in this guide, you'll learn everything you need to know to get started producing blocks within the Tanssi ecosystem.
Important Variables
When establishing eligibility to produce blocks, there are a couple of variables to be aware of:
- Minimum self-delegation - there is a minimum amount you must self-delegate to be considered eligible
- Session - a period that has a constant set of sequencers
- Network sequencers per session - the number of sequencers assigned to a Tanssi-powered network per session
| Variable | Value |
|---|---|
| Minimum self-delegation | 10000 TANSSI |
| Session | 3600 blocks |
| Network sequencers per session | 5 sequencers |
| Variable | Value |
|---|---|
| Minimum self-delegation | 10000 STAR |
| Session | 3600 blocks |
| Network sequencers per session | 2 sequencers |
Map an Account to Your Sequencer Node
The first step is a two-step process that generates session keys and maps the session keys to your account. Session keys are used to perform network operations, such as signing blocks, whereas your account holds the staked funds and has an on-chain identity. By mapping the session key to your account, you create an association between your account and your sequencer.
You will need to create session keys for your primary and backup servers. Each of your servers, your primary and backup, should have its own unique keys. Since the keys never leave your servers, you can consider them a unique ID for that server.
Generate Session Keys
Before generating session keys, you must be running a sequencer node.
To generate session keys, you'll send an RPC call, using the author_rotateKeys method, to your node's HTTP endpoint. For reference, if your sequencer's HTTP endpoint is at port 9945, the JSON-RPC call might look like this:
curl http://127.0.0.1:9945 -H \
"Content-Type:application/json;charset=utf-8" -d \
  '{
    "jsonrpc":"2.0",
    "id":1,
    "method":"author_rotateKeys",
    "params": []
  }'
Your hex-encoded session keys will be printed to the terminal in the "result" field.
"Content-Type:application/json;charset=utf-8" -d \
'{
"jsonrpc":"2.0",
"id":1,
"method":"author_rotateKeys",
"params": []
}' {"jsonrpc":"2.0","result": "0x76afaf334bd33b82d0b8fbd6a2845cb3b9b785edf1dce4ccefd4973fa79fed2b","id":1}
Make sure you write down your session keys; you'll need to map your session keys to your account in the next section.
Map Session Keys
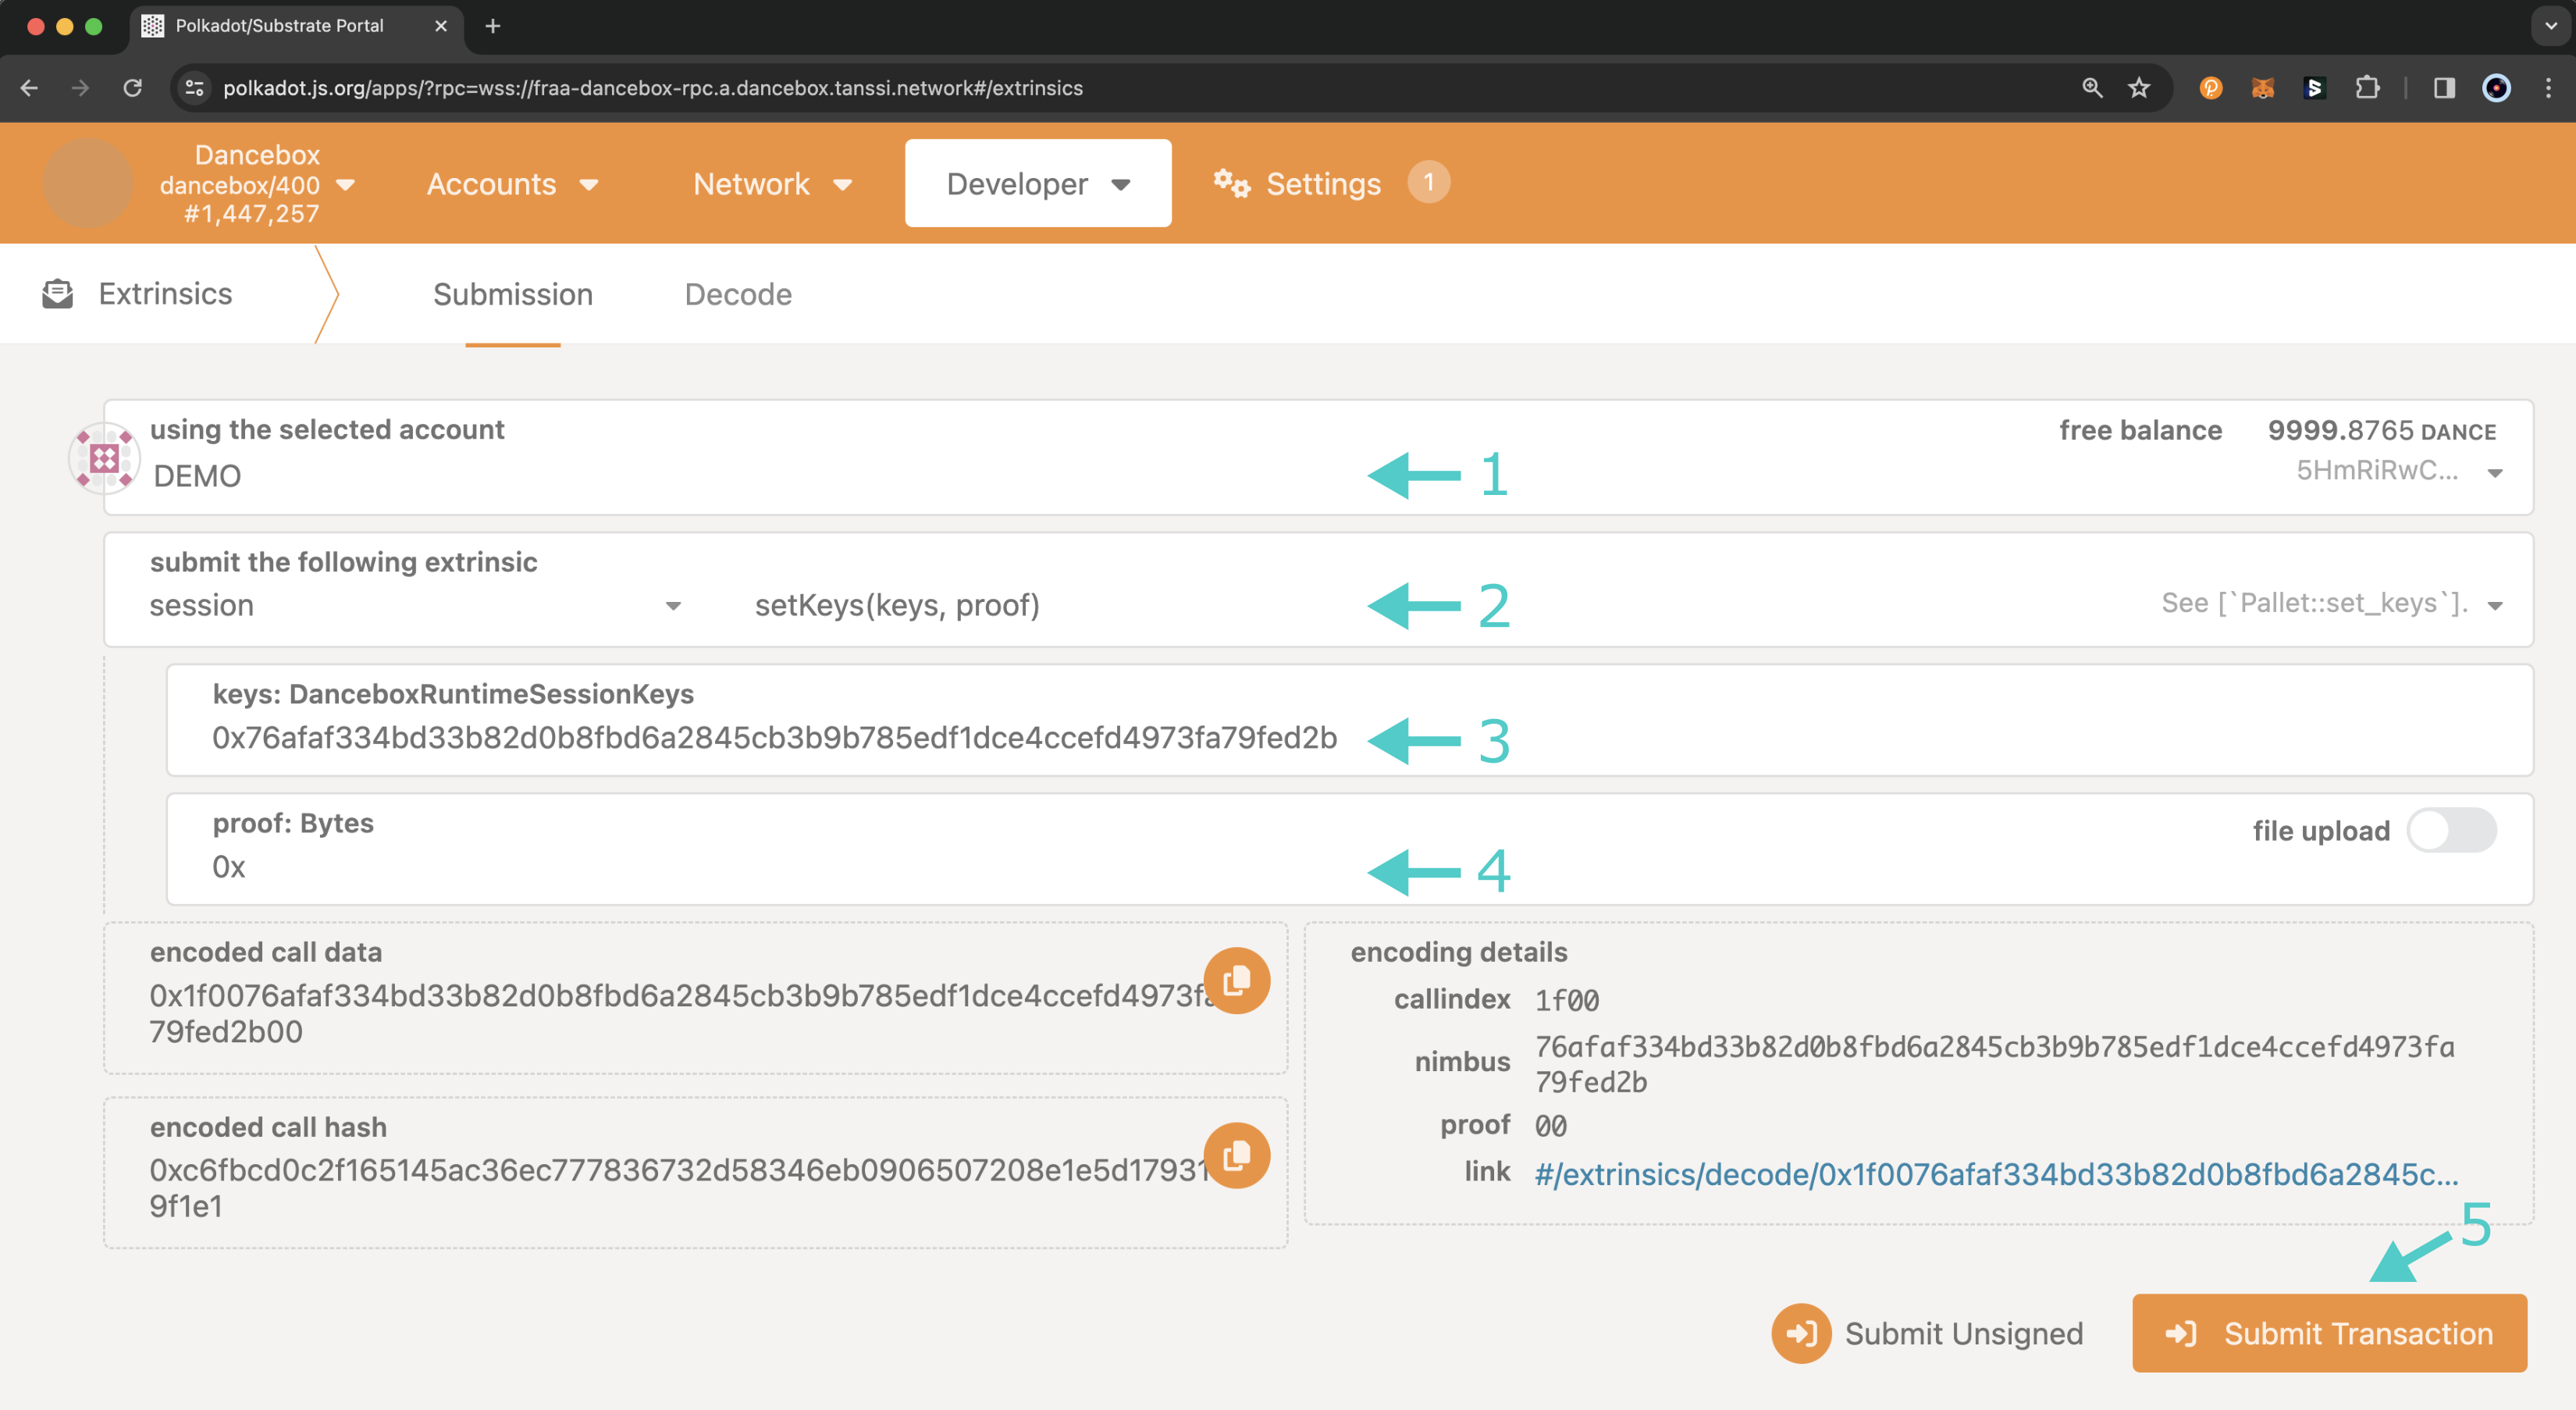
To perform the next step and map your session keys to your account, head to the developer portal, click on the Developer tab, select Extrinsics from the dropdown, and take the following steps:
- Select your account, which should be the same account that you previously self-delegated
- Select the session module and the setKeys extrinsic
- For keys, enter your session keys
- For proof, enter
0x - Click Submit Transaction and sign and send the transaction from your wallet
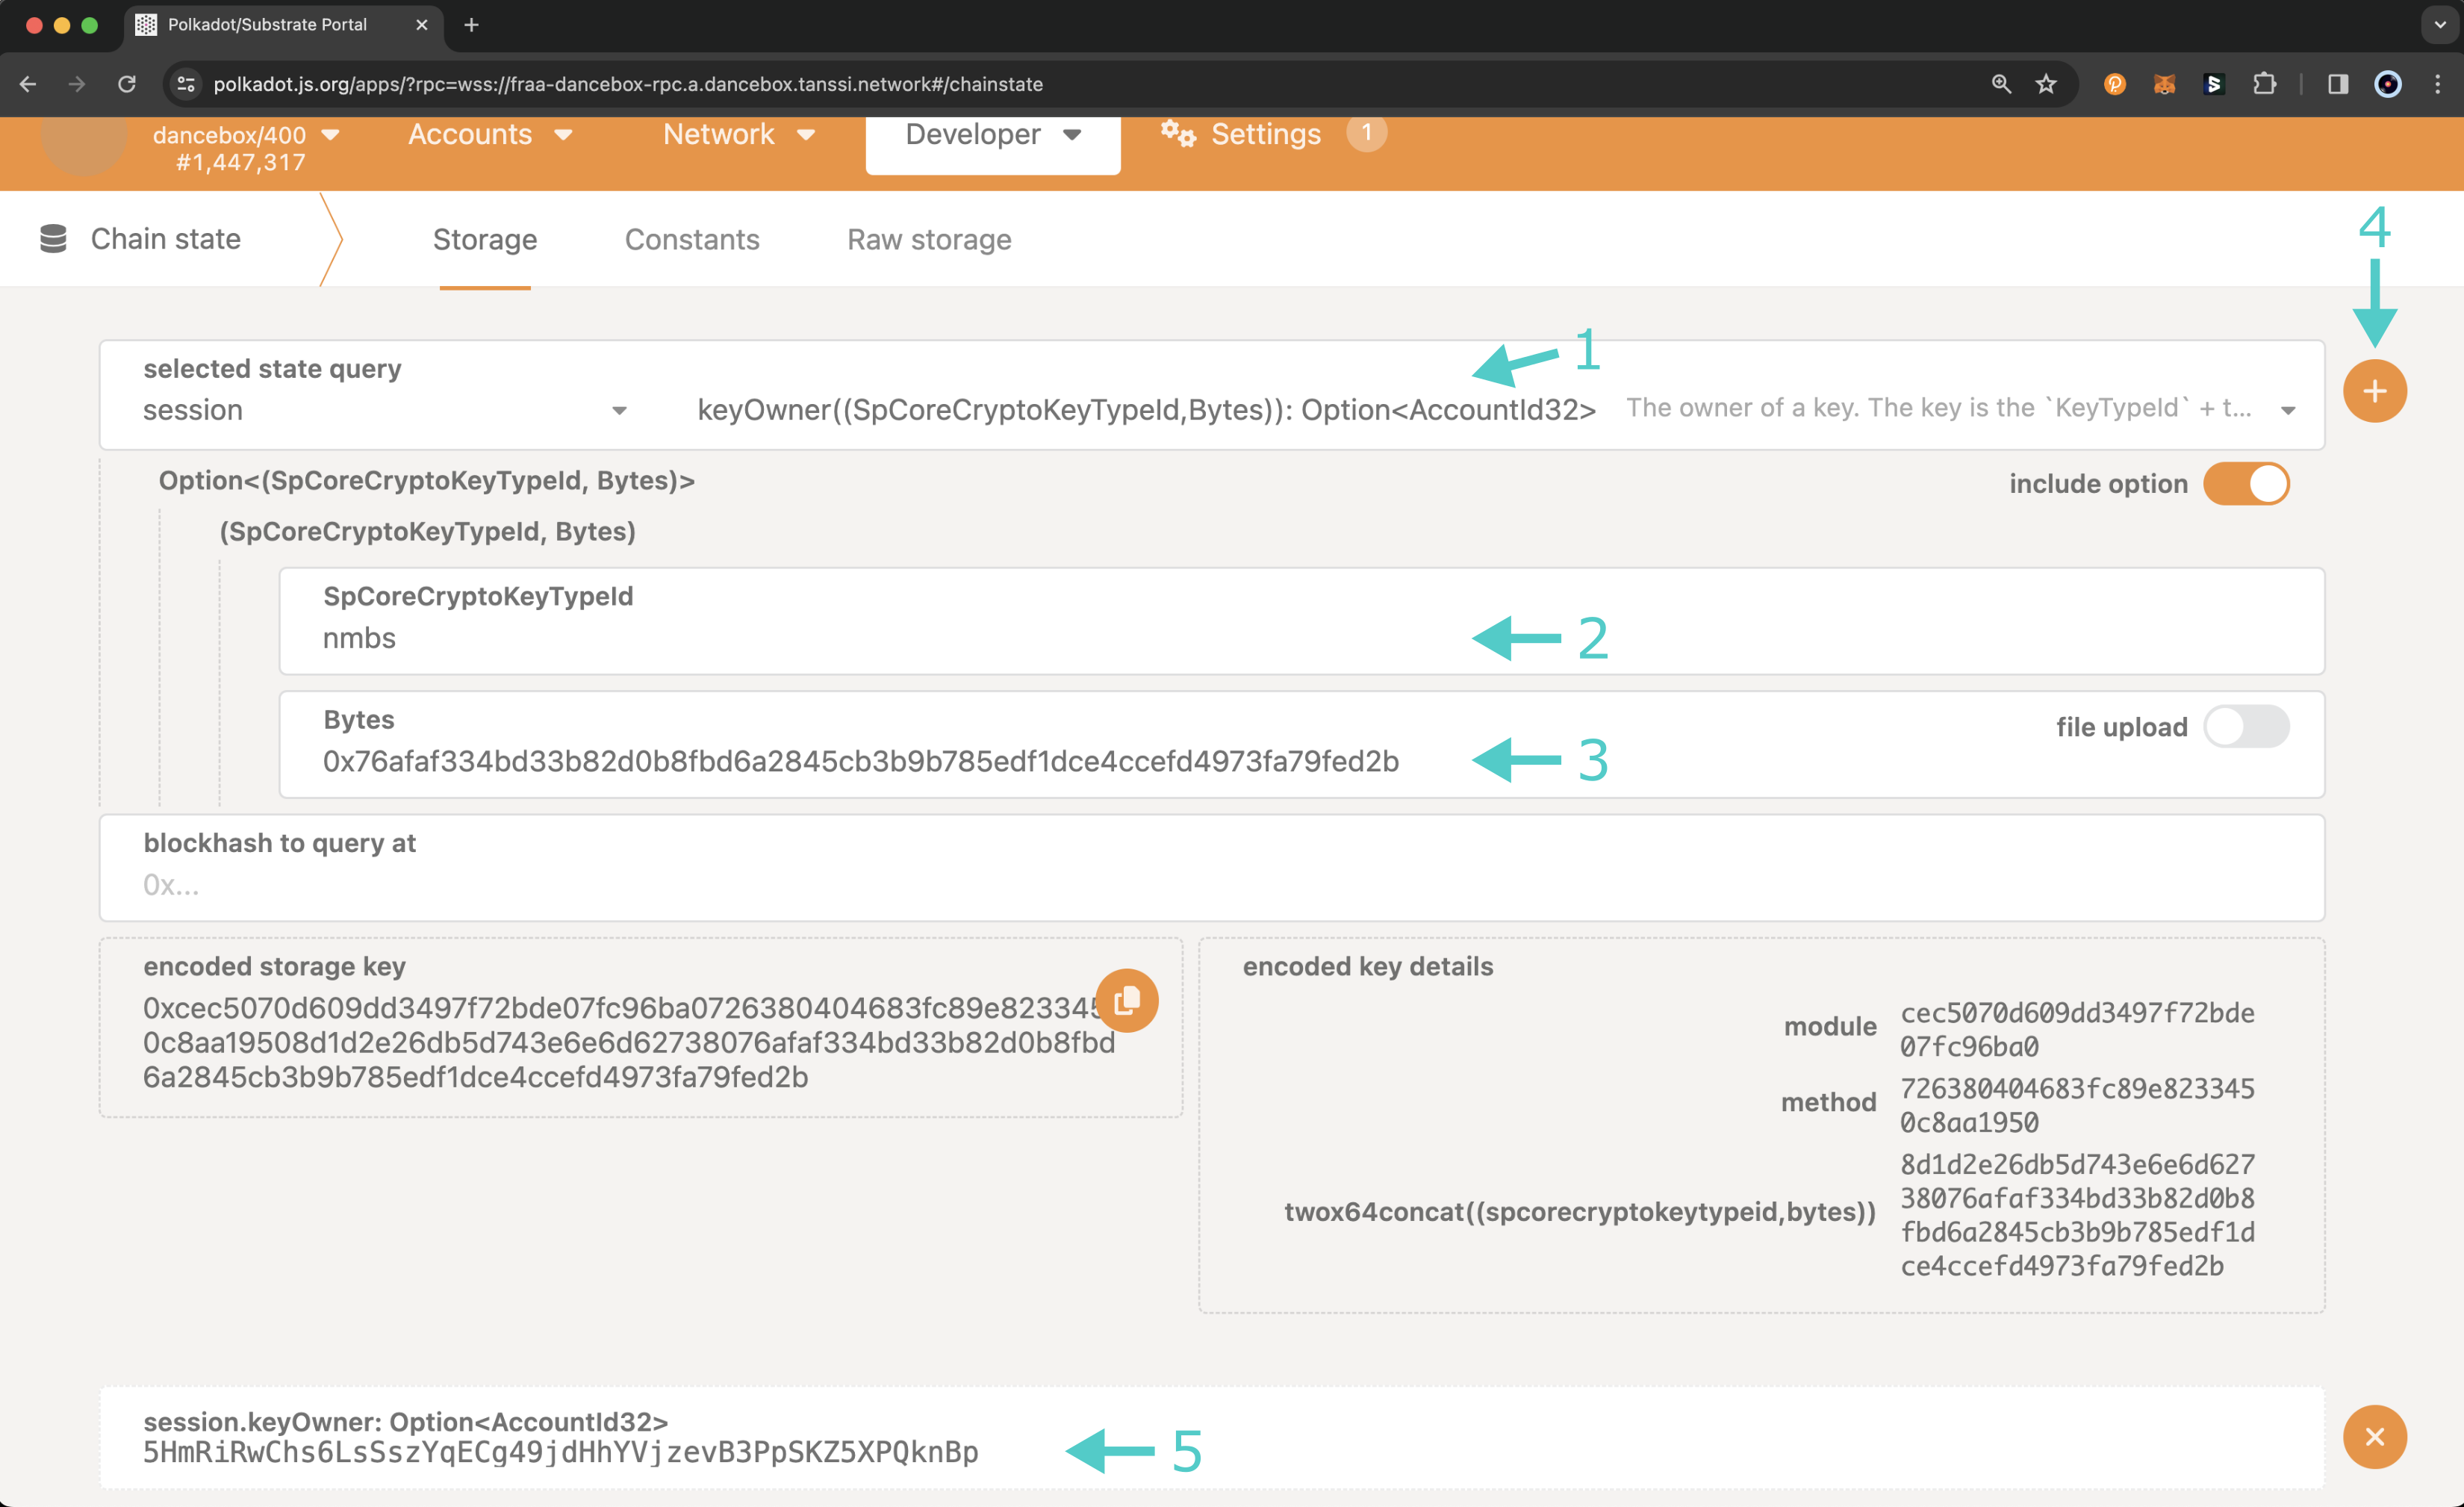
Using the session.keyOwner method, you can verify that your session keys have been mapped to your account as expected. To do this on the developer portal, click on the Developer tab, select Chain state from the dropdown, and take the following steps:
- Select the session module and the keyOwner query
- Enter
nmbsin the SpCoreCryptoKeyTypeId field - For Bytes, enter your hex-encoded session keys
- Click the + button next to the extrinsic field
- The account associated with the session keys, which should be your account, will be displayed at the bottom of the page
Submit Self-Delegation
The next step towards becoming eligible to produce blocks on Tanssi-powered networks is to delegate to your own account. To do this, you'll be required to submit a minimum of tokens, as listed in the important variables section.
After you've submitted the request to delegate, you'll need to wait for a minimum of sessions before you can execute the pending request. In the case of Tanssi MainNet, the number of sessions is configured to two. There are 3600 blocks in a session. So, two sessions are 7200 blocks, which can take around twelve hours.
Sequencers are assigned upon each session. The sequencers participating in the session are picked from the list of candidates ordered by total stake until the total number of sequencers required is covered. So, you'll need to ensure that your total stake is enough to fill one of the slots, which may require more than the minimum self delegation.
Request Delegate
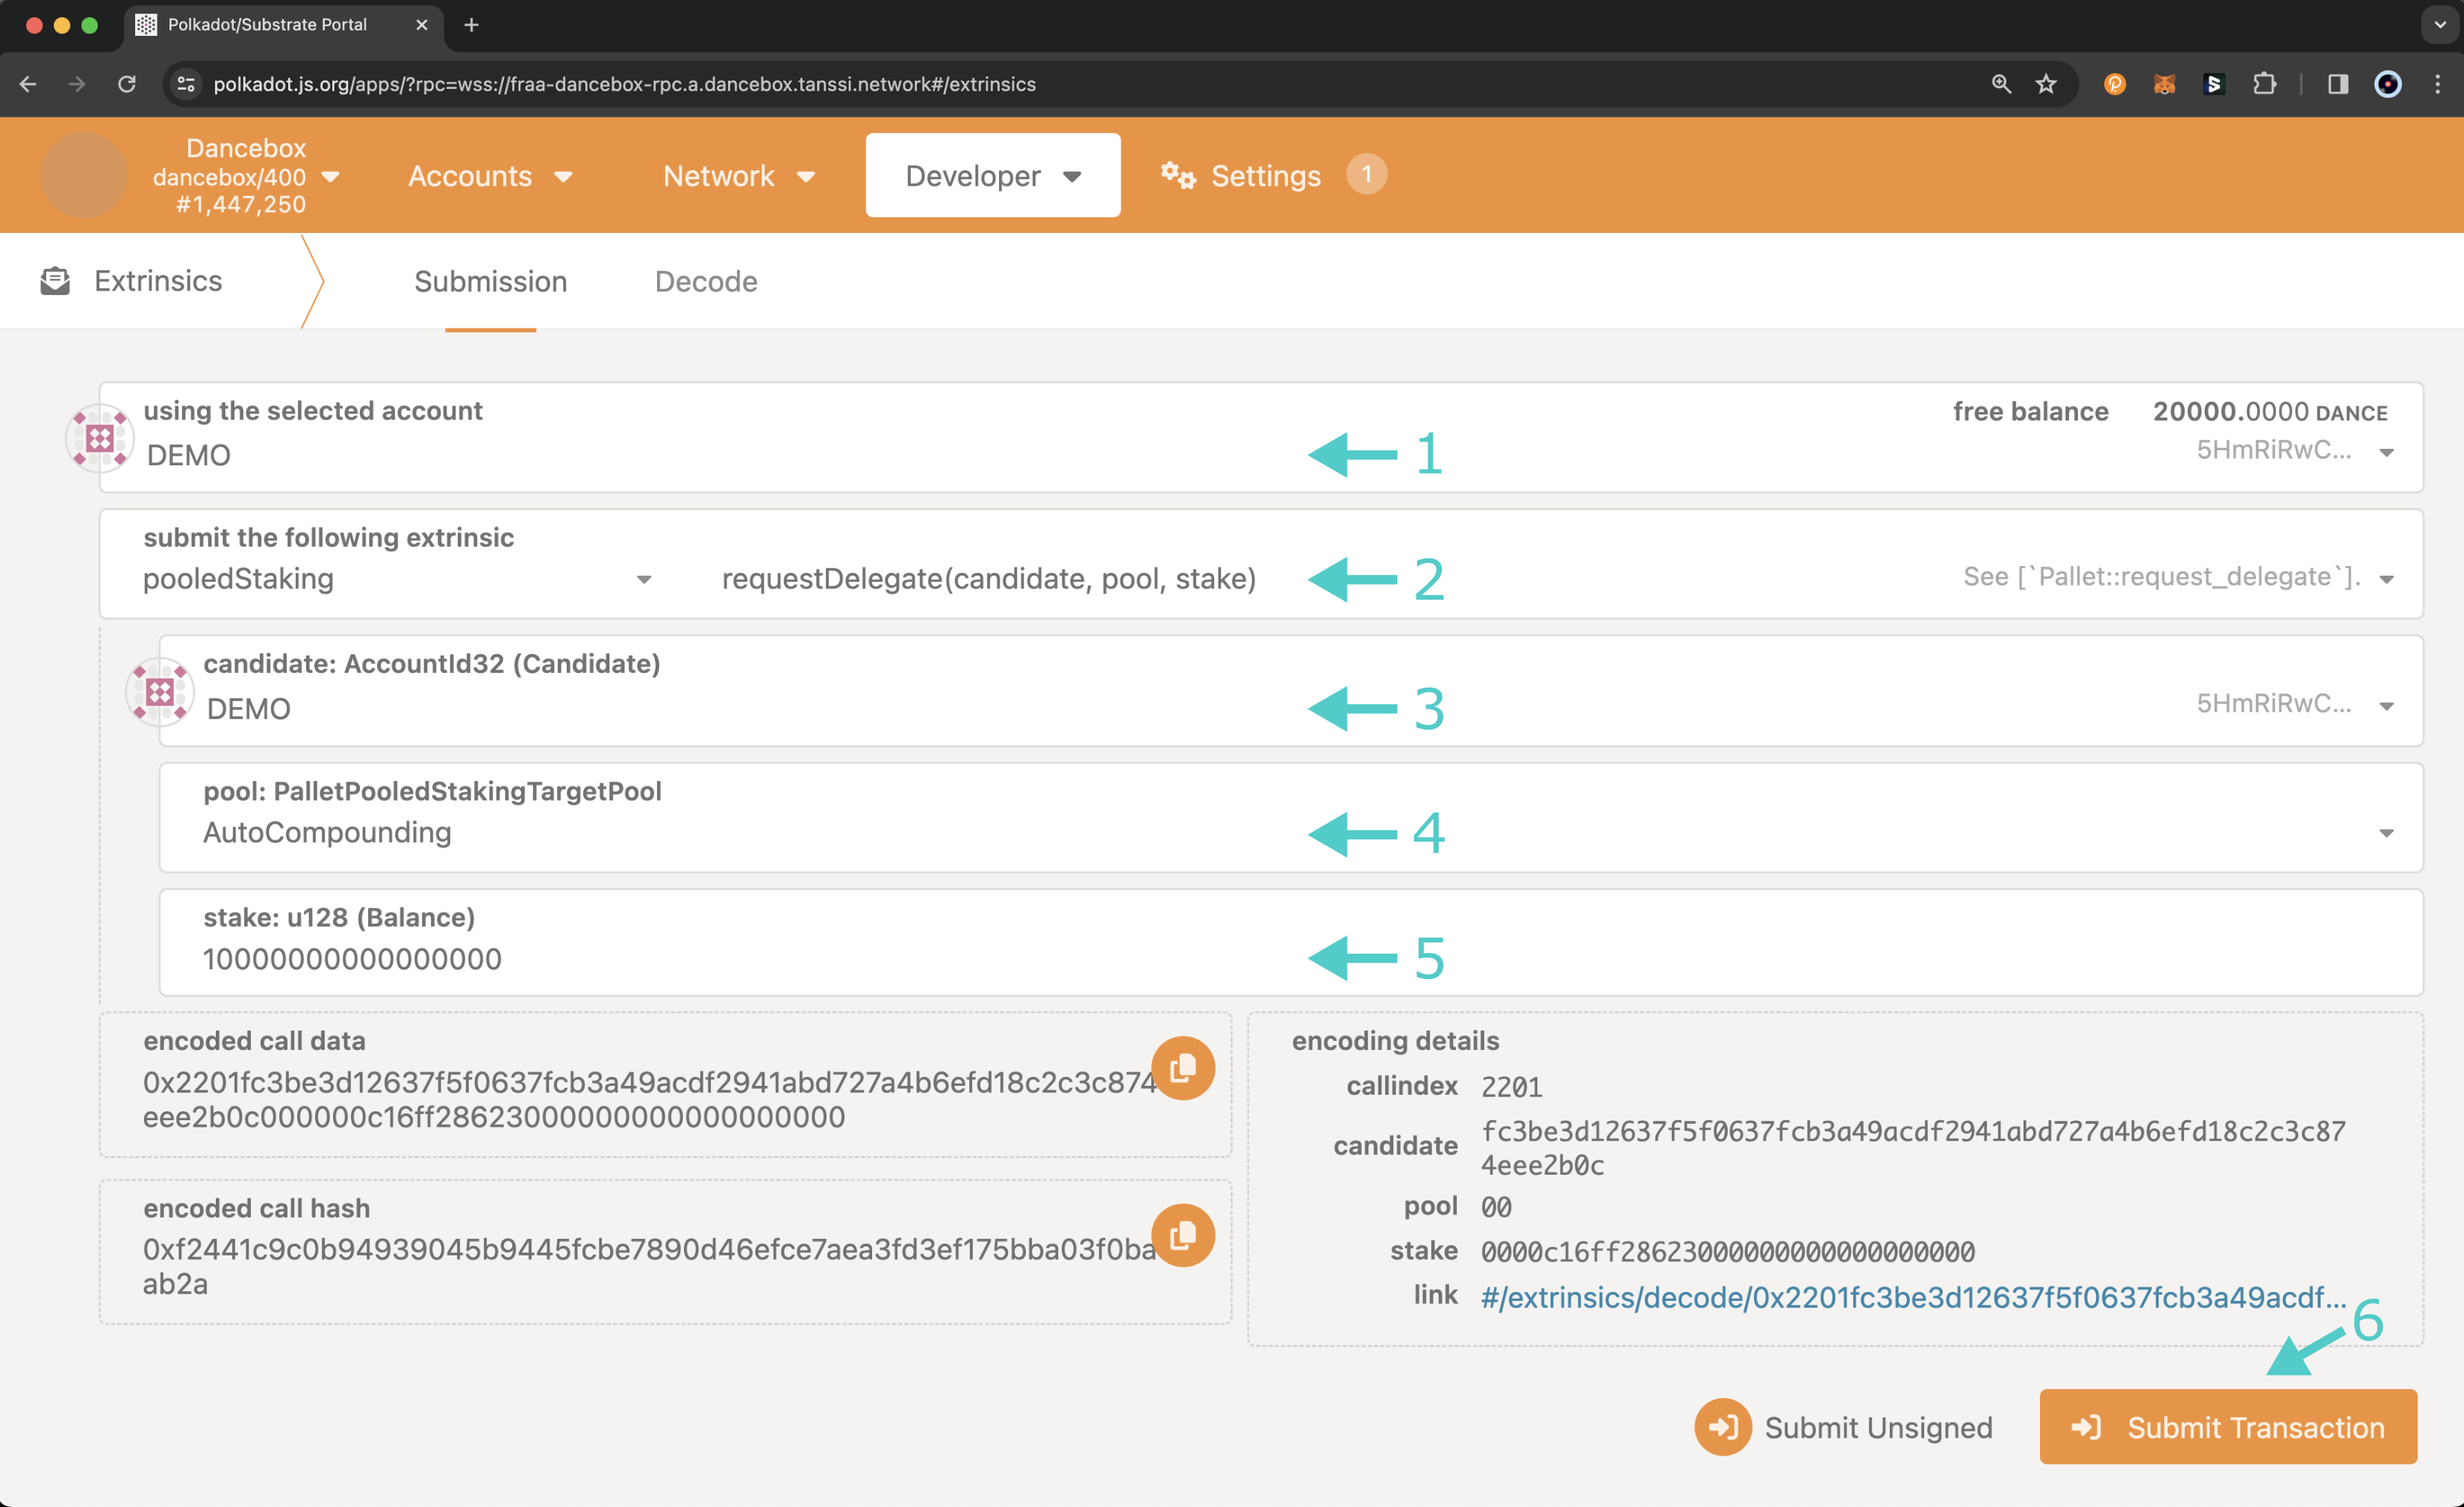
Head to the developer portal, click on the Developer tab, select Extrinsics from the dropdown, and take the following steps:
- Select the account from which you want to send the transaction. This account must be the same account that you are delegating to and is the account that you want to become a sequencer
- Select the pooledStaking module and the requestDelegate extrinsic
- Enter your account, which is, again, the same account you are sending the transaction from and the account you want to become a sequencer
- Choose the target pool. The pool can either be the auto-compounding pool, which auto-compounds delegation rewards, or the manual rewards pool, in which all actions related to rewards are manual
- Enter the amount to stake. This amount must meet the minimum, which is 10000 TANSSI tokens for Tanssi MainNet. Tanssi Network uses twelve decimal places, so when submitting the value make sure you add the decimal places to the self delegation. For MainNet, the value would be
10000000000000000 - Click Submit Transaction and sign and send the transaction from your wallet
Execute the Pending Request
Before executing the pending request, you'll need to retrieve the session at which you submitted the request to delegate. To do so, head to the developer portal, click on the Developer tab, select Chain state from the dropdown, and take the following steps:
- Select the pooledStaking module and the pendingOperations query
- Enter your account
- Toggle the include option slider off
- Click the + button next to the extrinsic field
- The pending request will be displayed at the bottom of the page
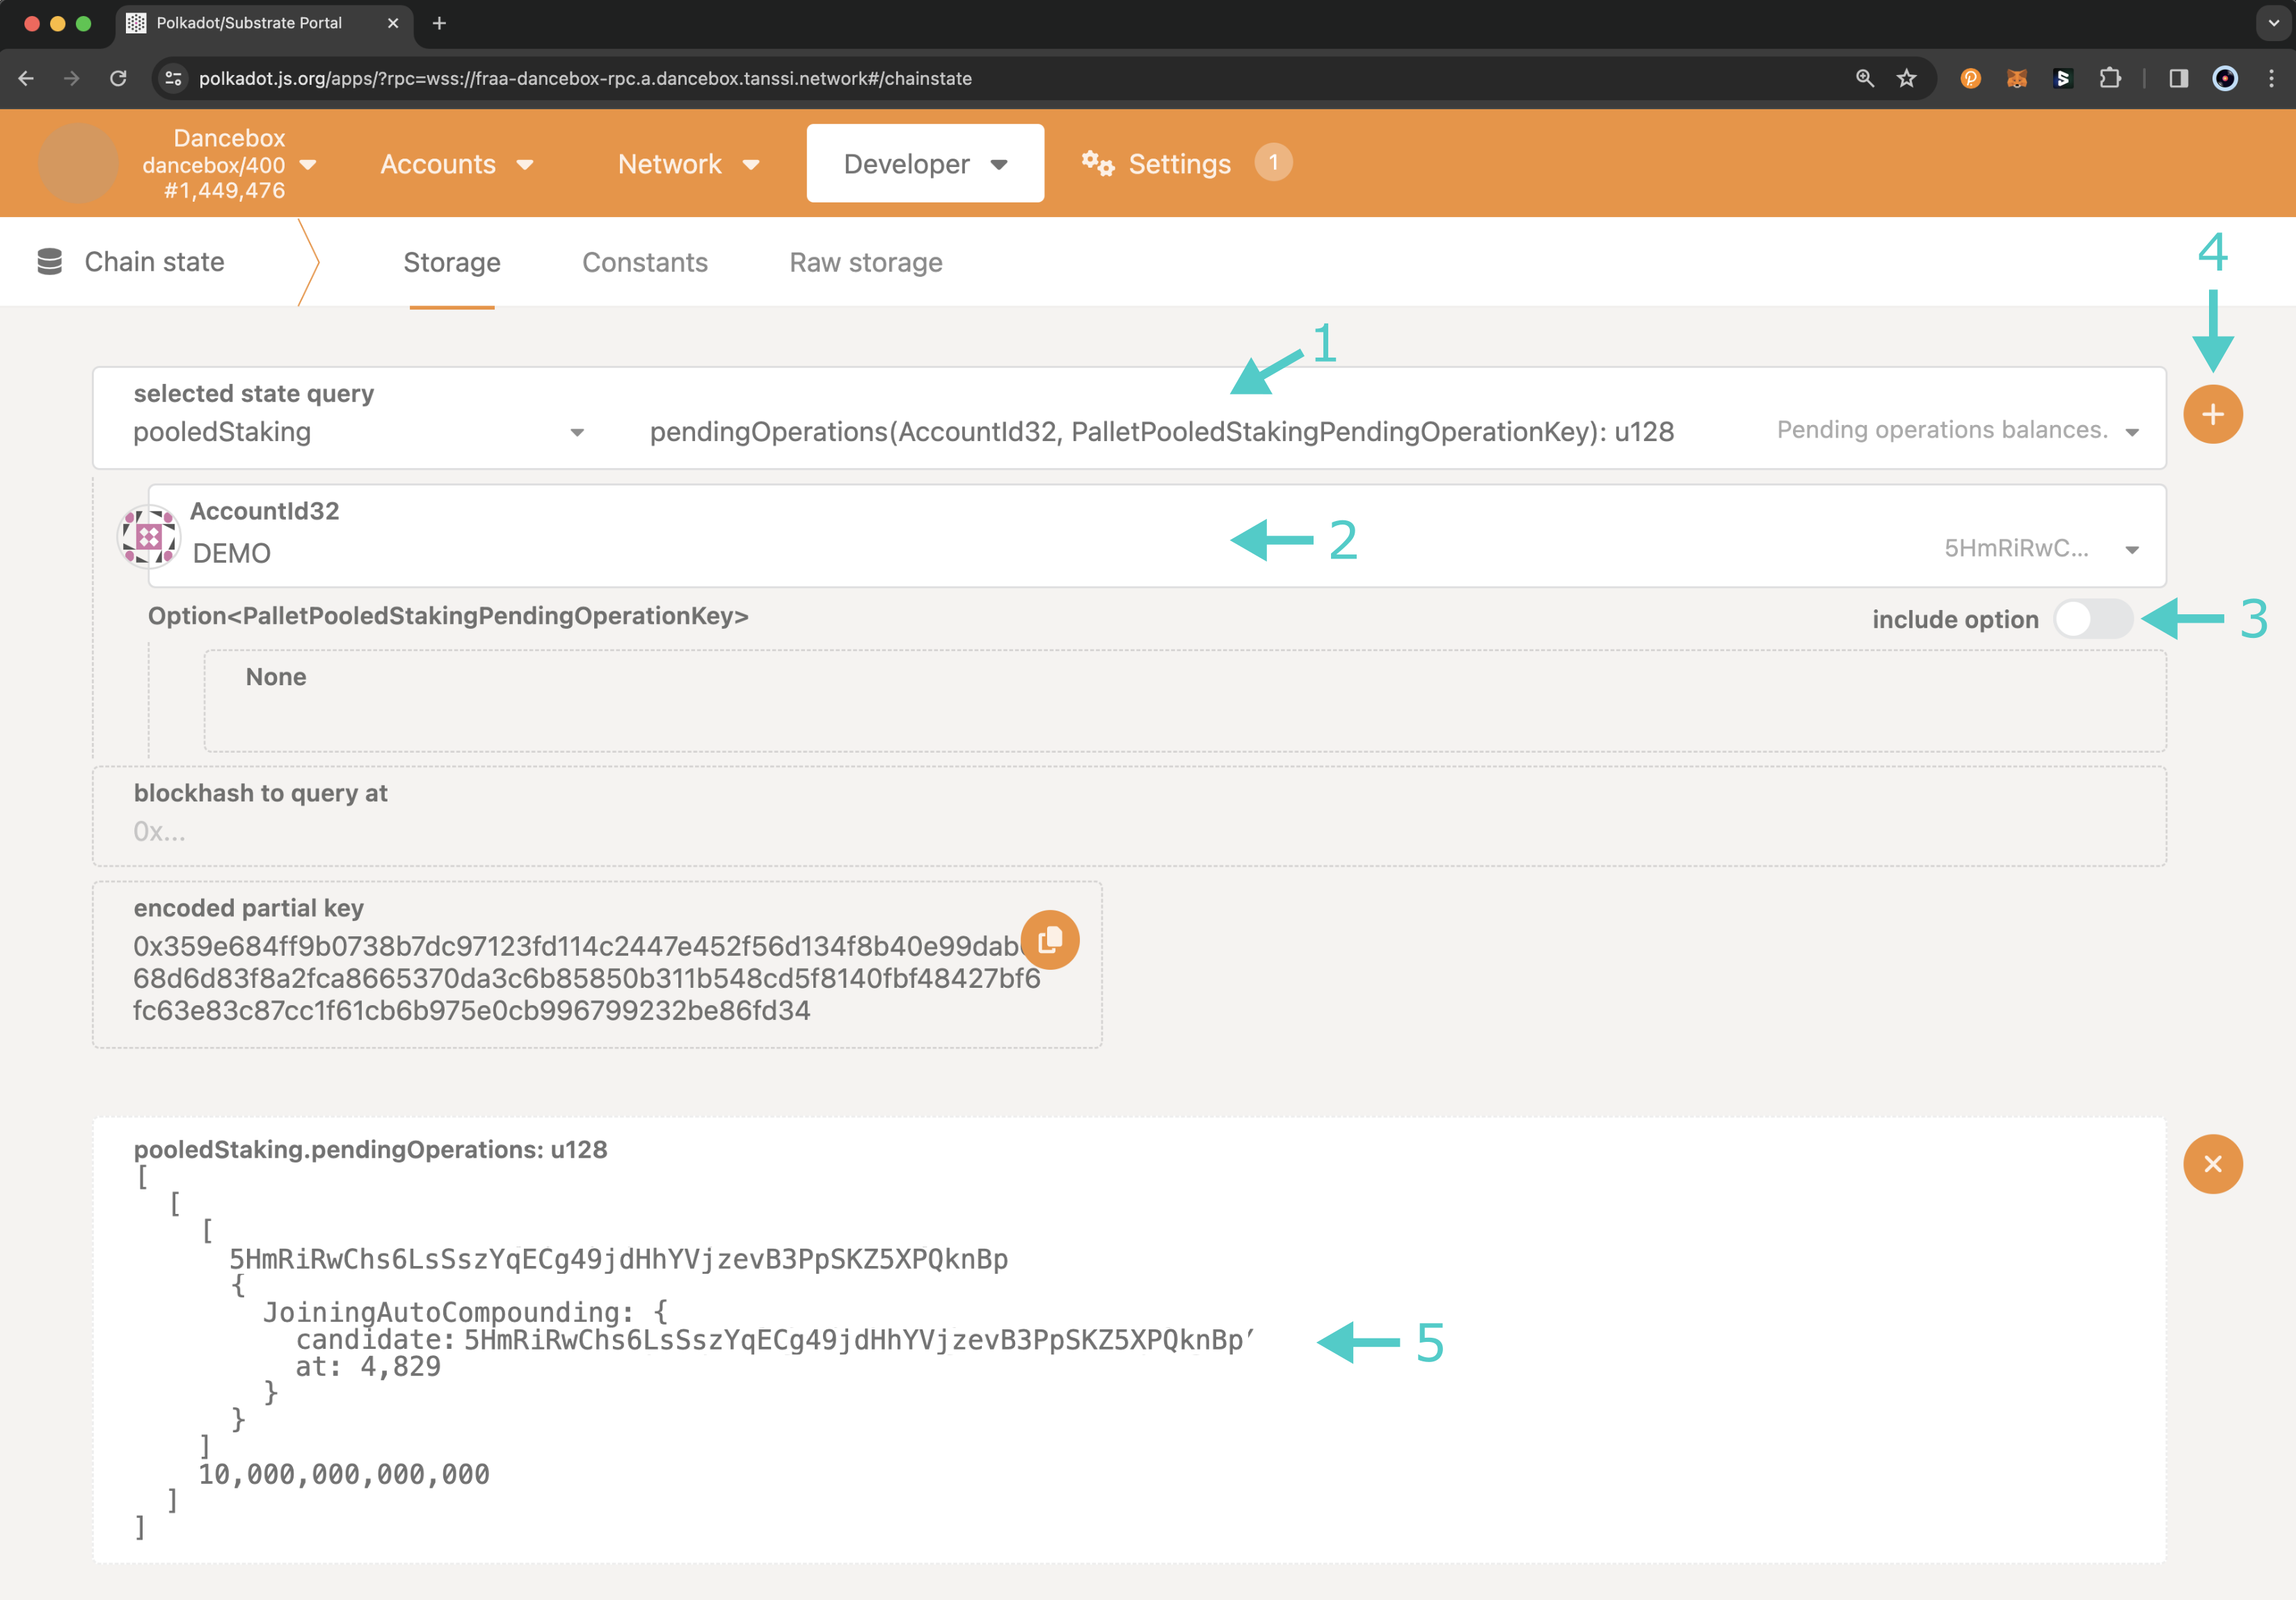
In the example in the above image, the delegate request to join the auto-compounding pool was submitted during session 4,829. So, the request can be executed starting at session 4,831.
Take note of the operation and the session number at which you submitted the request, as you'll need both values to execute the pending request.
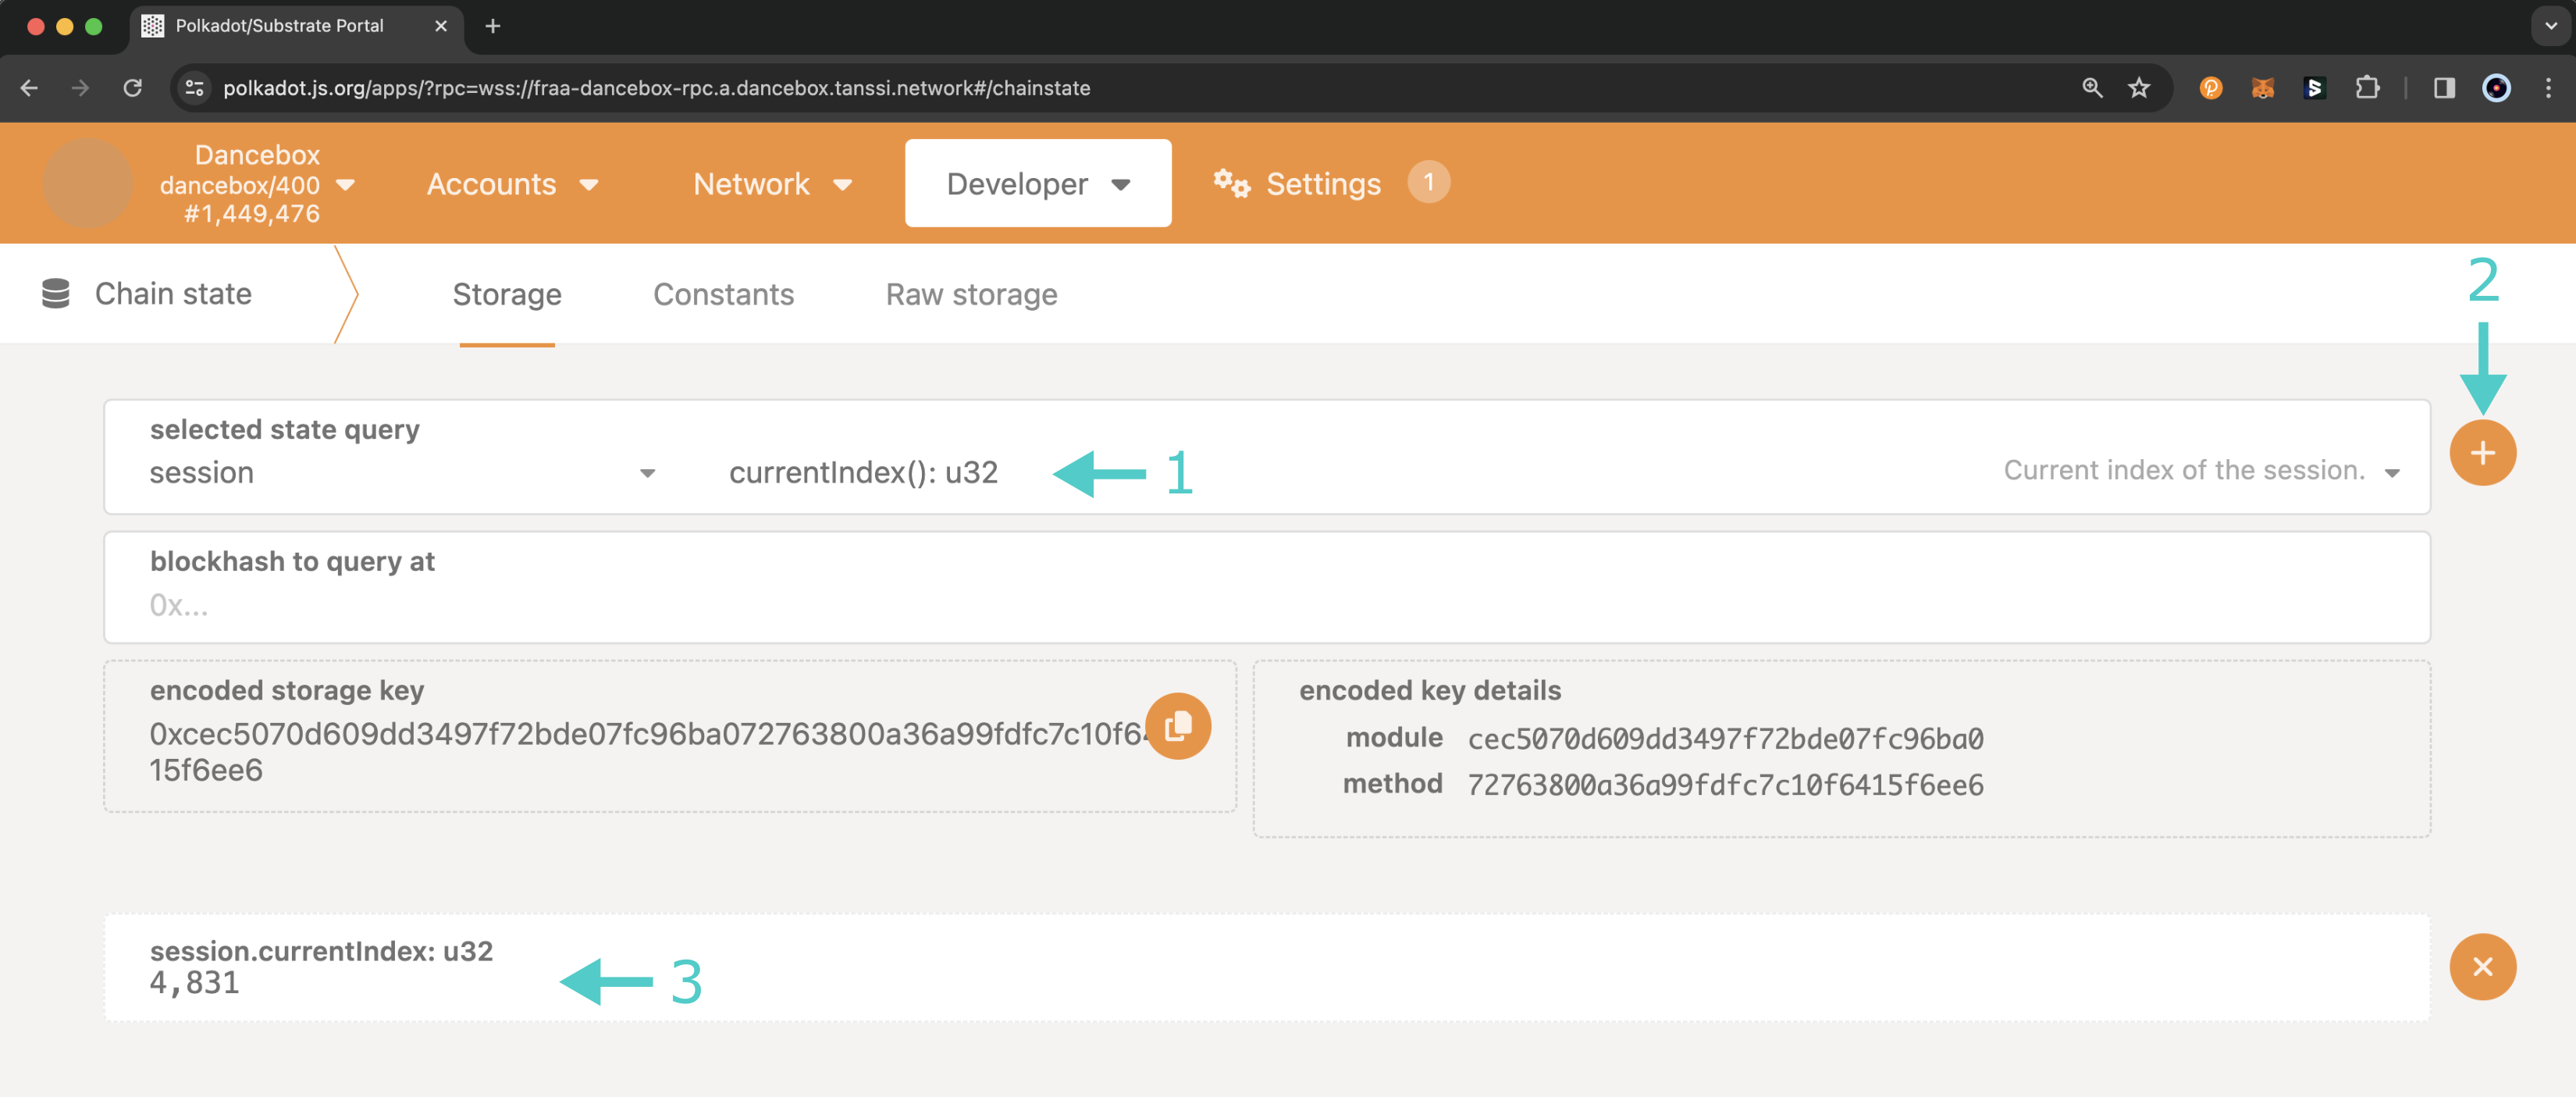
You can run another query from the Chain state page to check the current session. To do so, you can:
- Select the session module and the currentIndex query
- Click the + button next to the extrinsic field
- The current session will be displayed at the bottom of the page
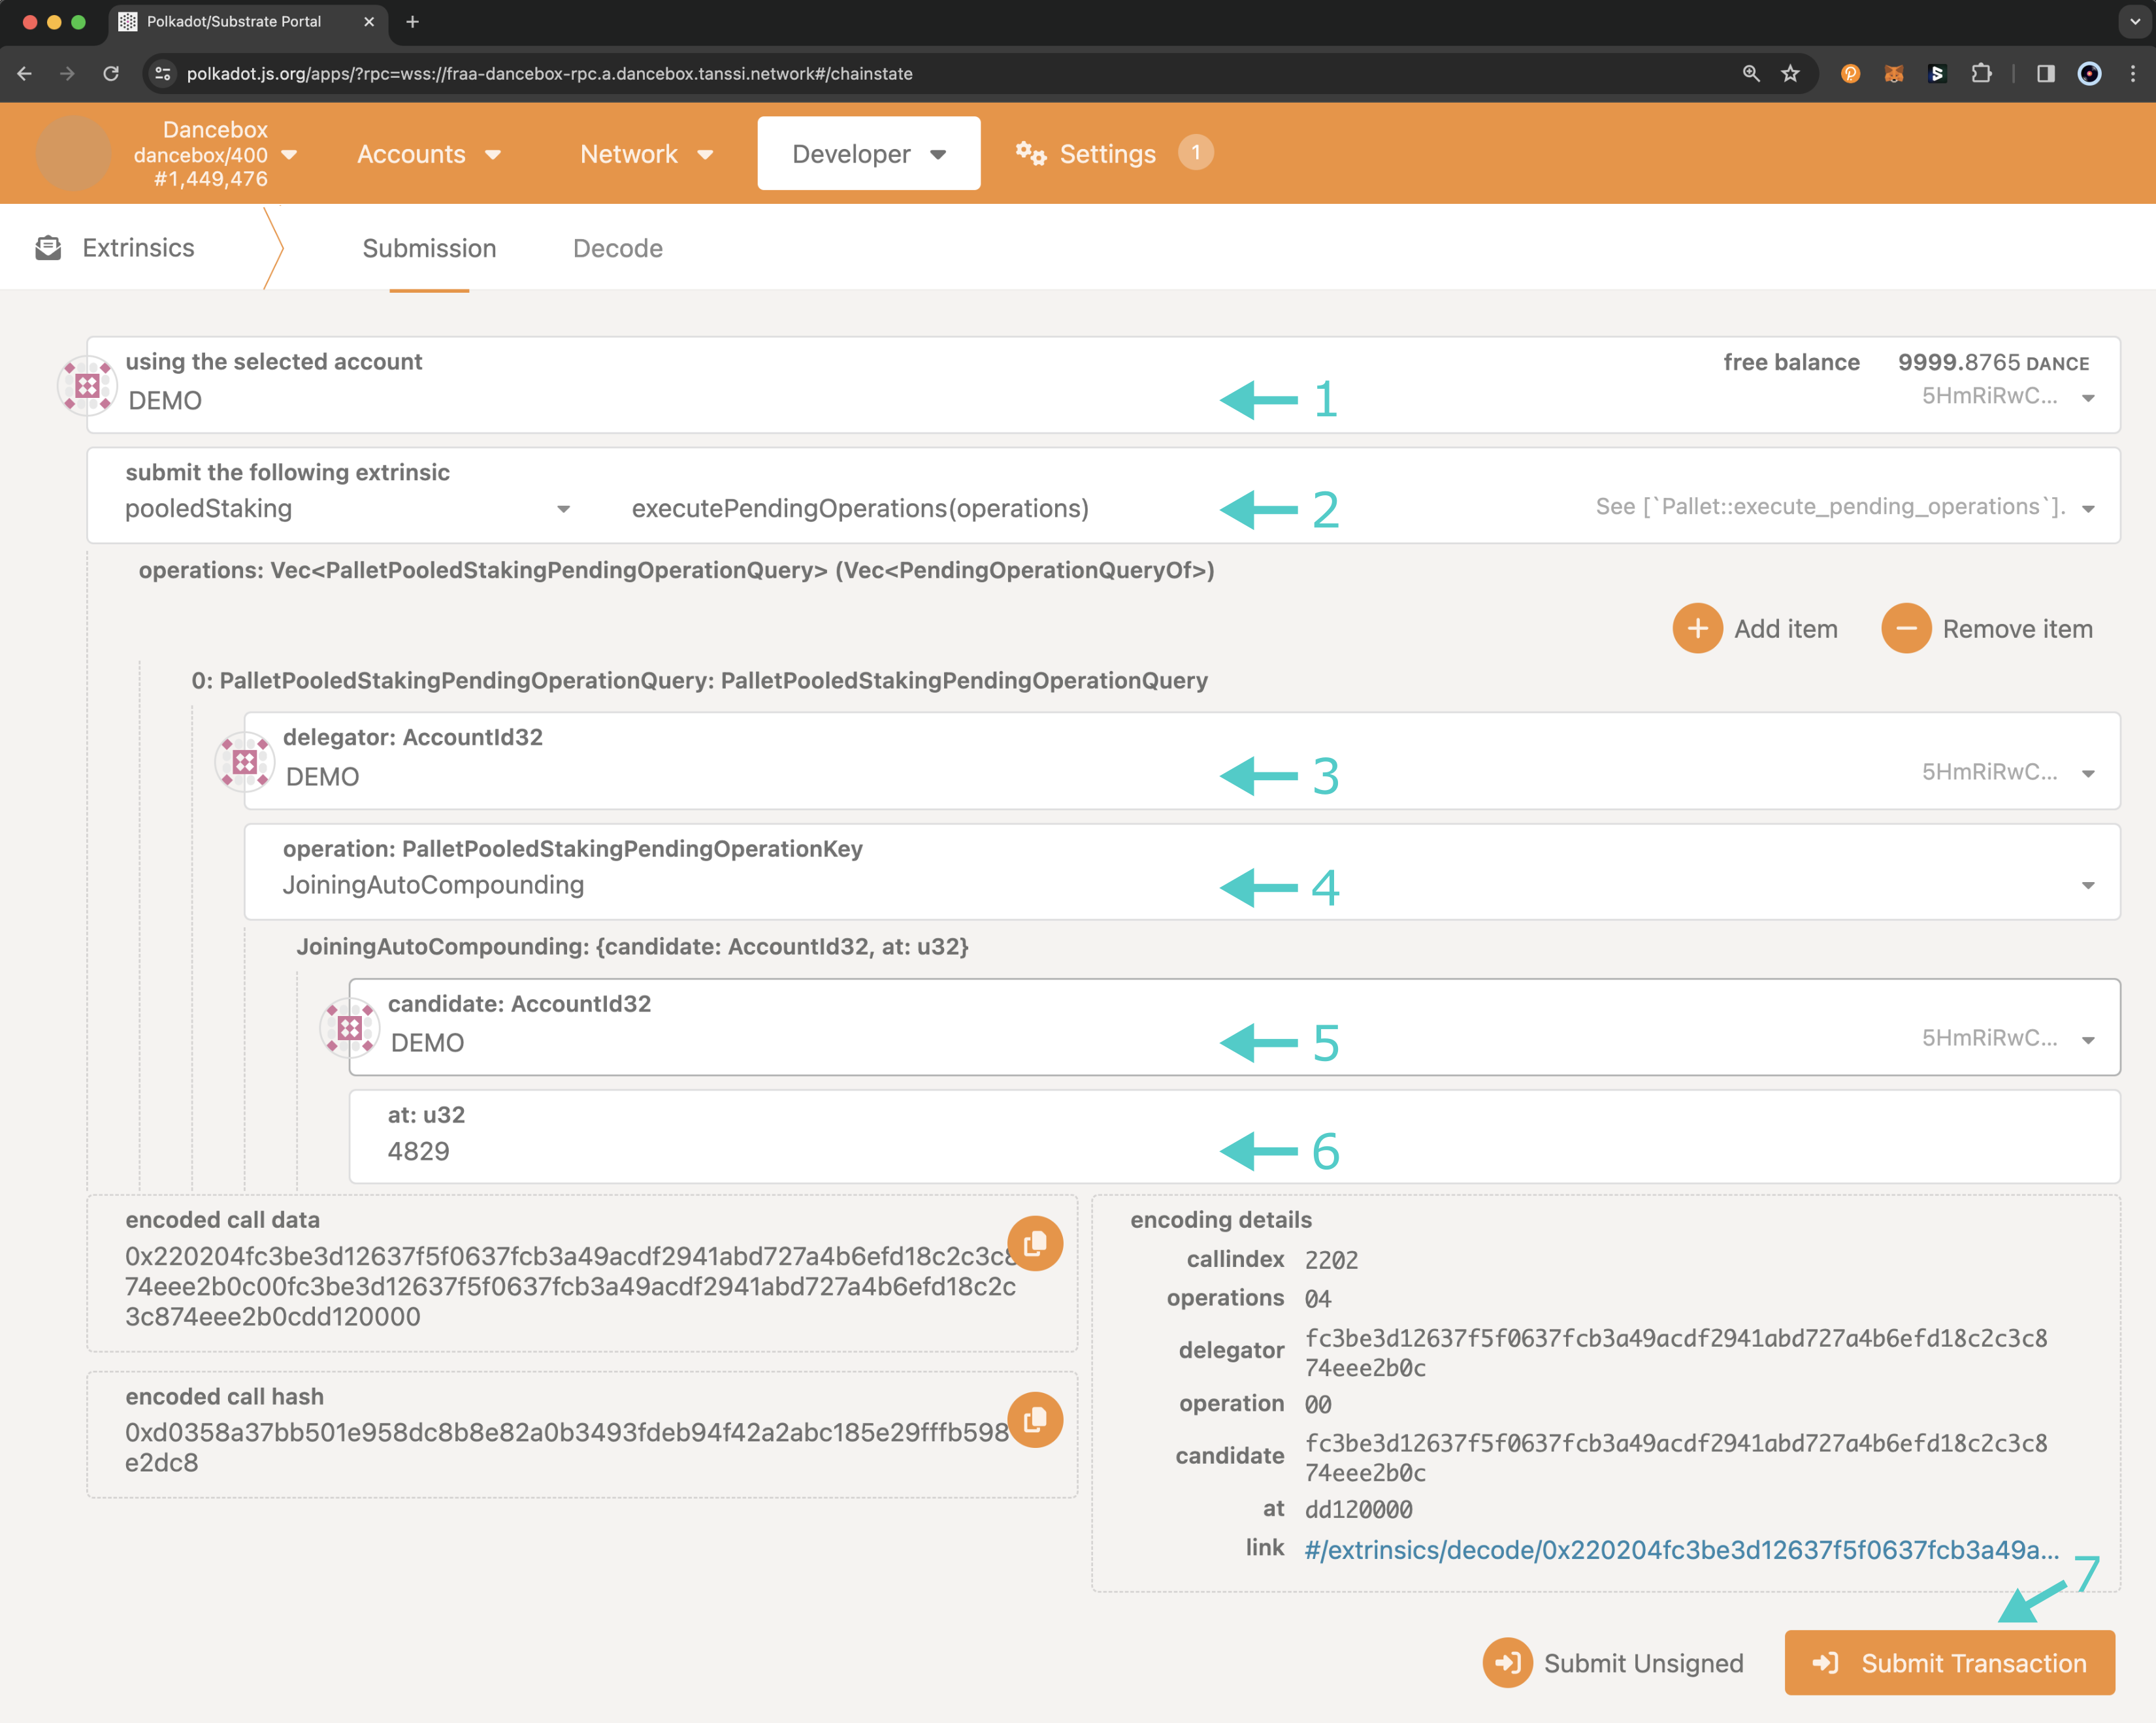
If the request can be executed, select Extrinsics from the Developer dropdown and take the following steps:
- Select the account from which you want to send the transaction
- Select the pooledStaking module and the executePendingOperations transaction
- For delegator, enter your account, which is the same account you sent the self-delegate request from
- For operation, select the type of operation to execute. This should be either JoiningAutoCompounding or JoiningManualRewards, depending on the target pool you selected at the time of submitting the self-delegation request
- For candidate, enter the same account as you did in the delegator field
- For at, enter the session id at which you submitted the delegate request
- Click Submit Transaction and sign and send the transaction from your wallet
Now, you have completed all of the necessary account setup to be eligible to produce blocks!
Verify That Your Account Is in the List of Eligible Candidates
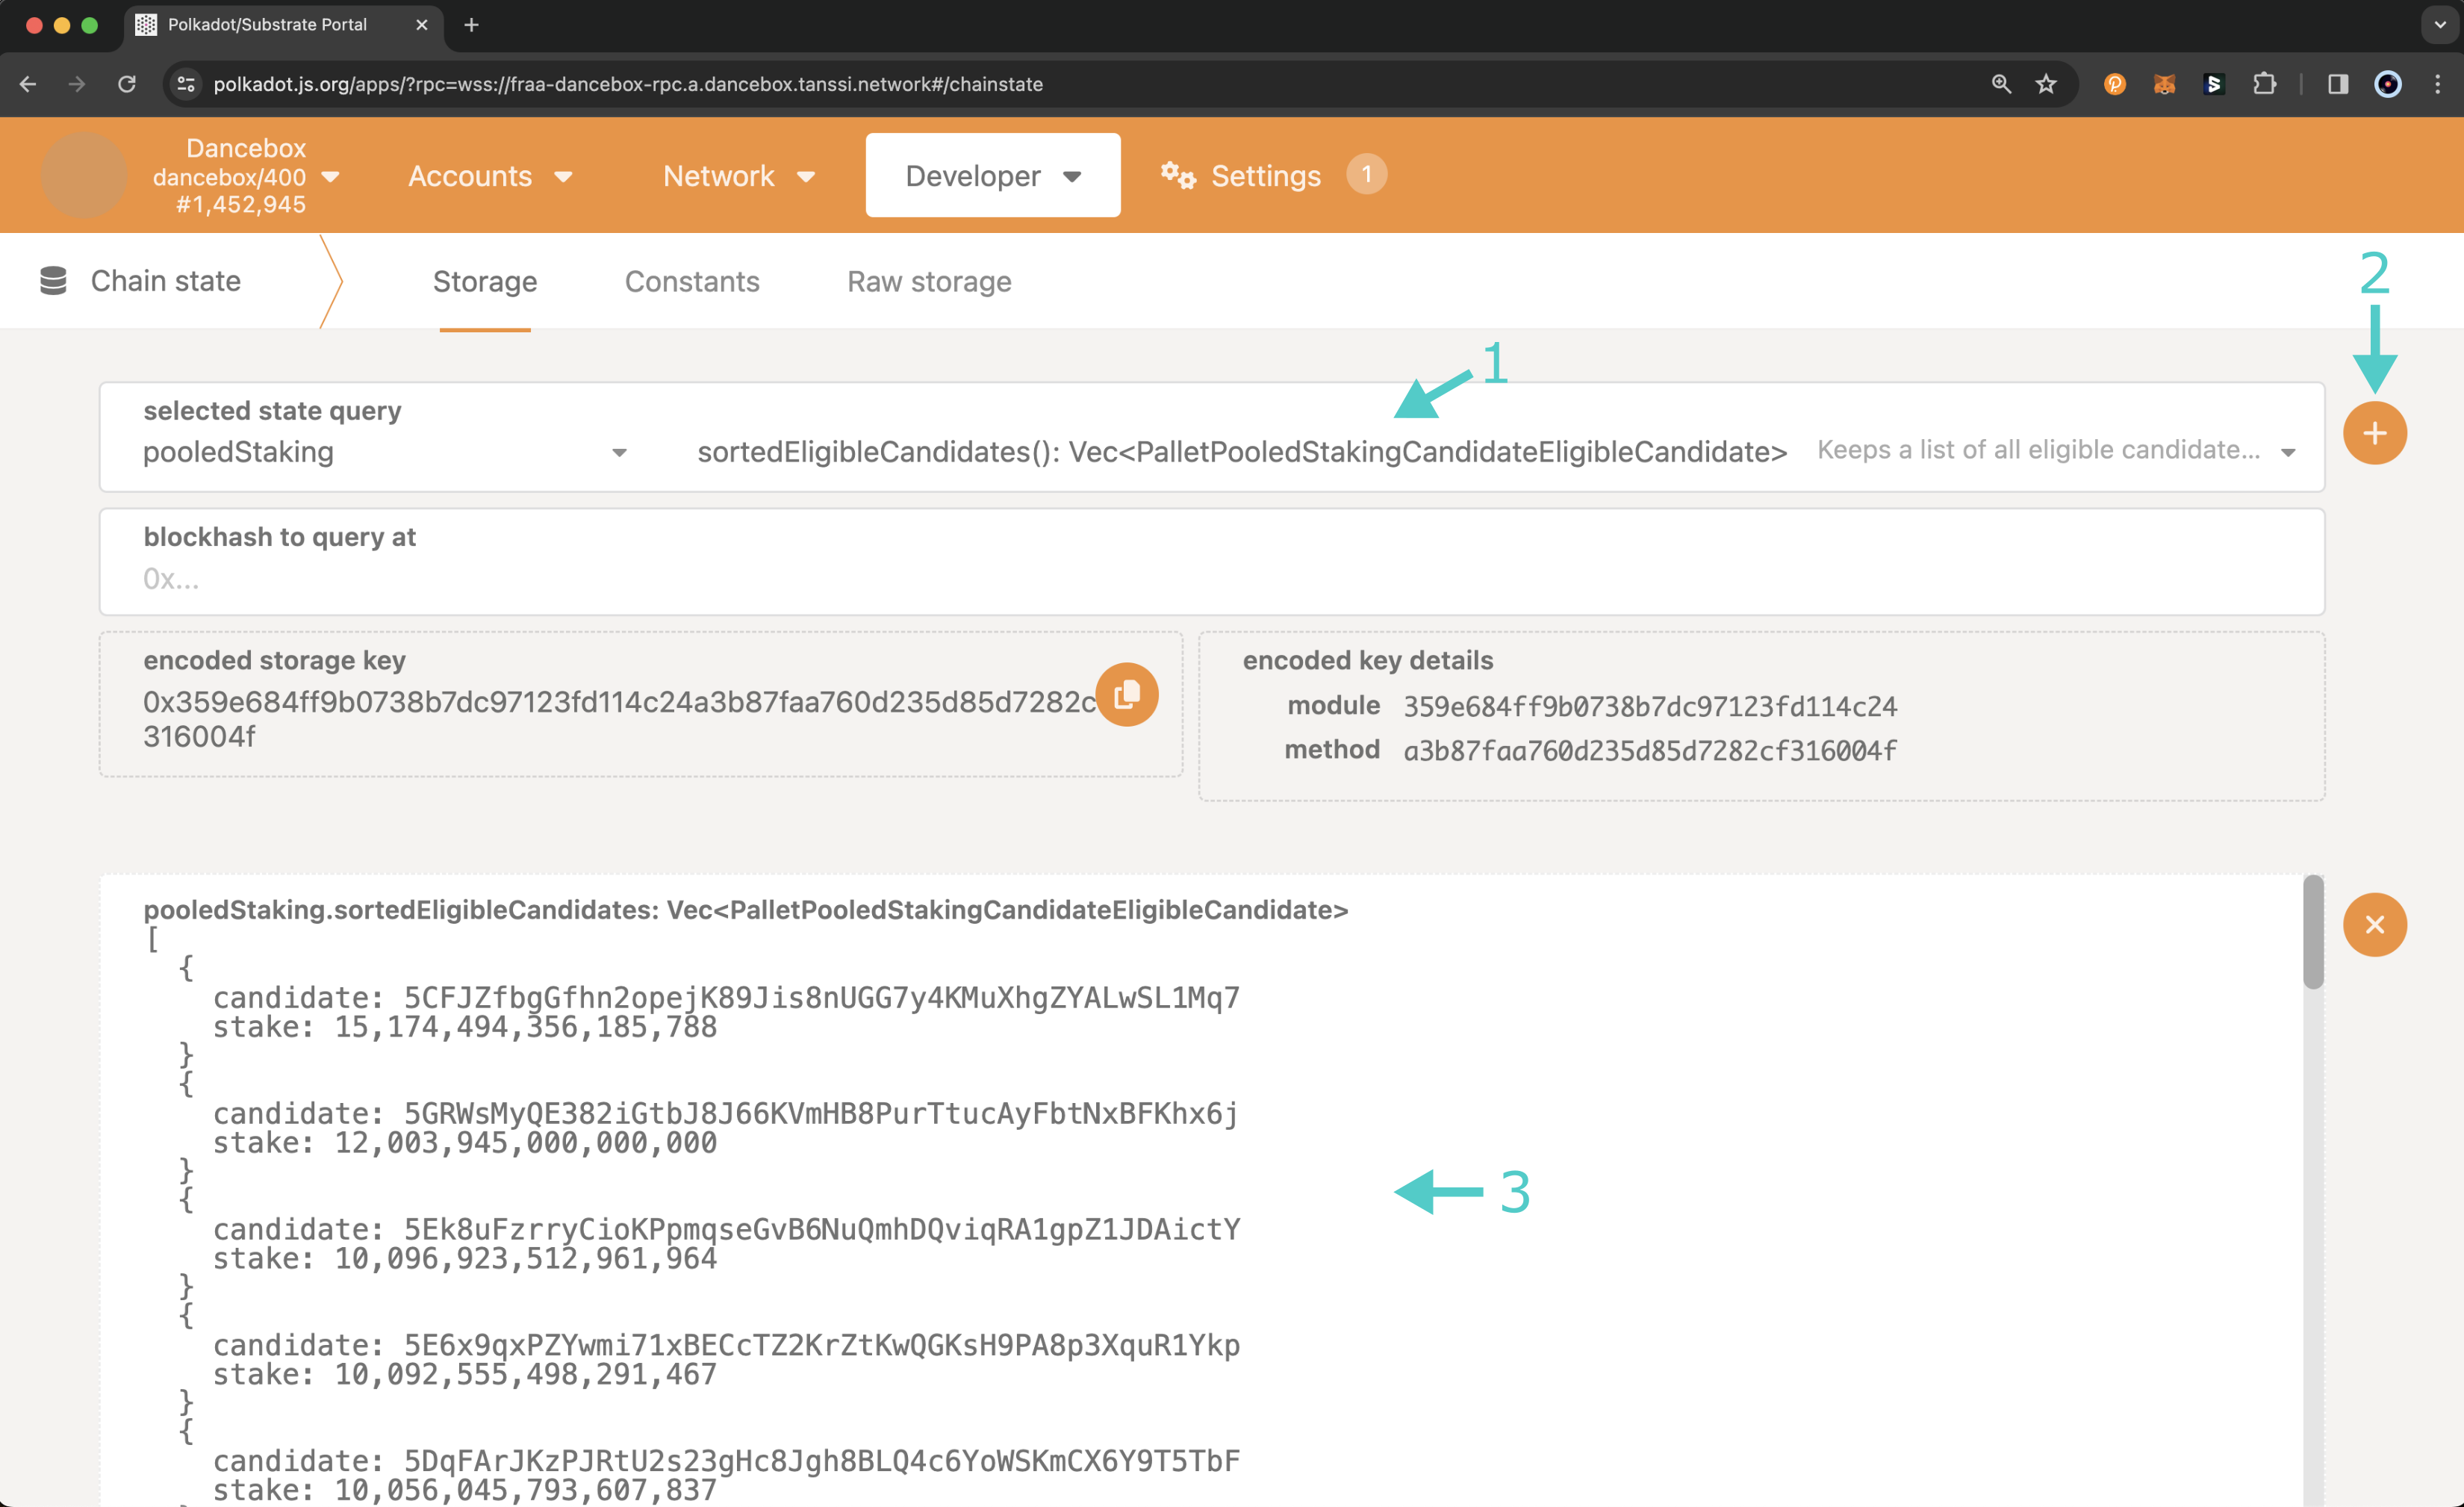
If you've followed all of the steps in this guide and have fully synced your sequencer, you are now eligible to produce blocks. To verify that you are in the list of eligible candidates, you can go to the developer portal, click on the Developer tab, select Chain state from the dropdown, and take the following steps:
- Select the pooledStaking module and the sortedEligibleCandidates query
- Click the + button next to the extrinsic field
- A list of the eligible candidates and their stake will be displayed at the bottom of the page. You can search for your address to ensure you are eligible to produce blocks
Remember that you'll need to be in the top candidates by total stake to produce blocks, and this is based on the number of sequencers required for each network and Tanssi.
| Created: February 28, 2024