Run an Appchain Node Using Systemd
Introduction
Running a Tanssi-powered appchain node allows you to connect to and interact with the appchain using your infrastructure via either HTTP or WebSocket protocols.
Nodes store block data and network state. However, developers can run different kinds of nodes:
-
Full Archive Node - a node storing the entire block data and network state at all block heights. Such nodes are helpful when querying historical data from old blocks. However, a full archive node takes up a lot of space
-
Full Pruned Node - a node storing block data and network state up to some specific number of blocks before the current block height. Such nodes are helpful when querying recent data or submitting transactions through your infrastructure. They require much less space than an archival node but don't store the full network state
In this guide, you'll learn how to spin up a Tanssi appchain node using a binary executable file and manage the service with Systemd on Linux systems.
The article follows the good practice of running the service with its own non-root account and granting that account write access to a specific directory. However, you can adapt this article's steps and instructions to your infrastructure configuration, preferences, and security policies.
Note
It is not possible to run an RPC node for quick Trial appchains as they run on a private network, and their nodes are, therefore, unreachable for syncing.
Checking Prerequisites
To get started, you'll need access to a computer running an Ubuntu Linux OS and root privileges. You will also need:
-
Node binary file - the instructions in this guide execute the latest official stable node release. If you want to build and run your own file, make sure to follow the instructions for building your appchain node.
-
Chain specifications files - the node needs information about two different blockchains to sync and run correctly. The following section will show you how to get those files.
Getting Specifications Files
An appchain node needs information about two different blockchains to run properly: the appchain and the Tanssi orchestration chain.
That information is a file called chain specifications, and it holds, among other things, the genesis state of the blockchain, allowing the node to verify and sync properly the blocks and state it receives from other nodes.
To get the Tanssi specifications file, execute the following command:
wget https://raw.githubusercontent.com/moondance-labs/tanssi/75e576add204abd321c48cded556c8de14d65618/chains/orchestrator-relays/node/tanssi-relay-service/chain-specs/starlight-raw-specs.json
wget https://raw.githubusercontent.com/moondance-labs/tanssi/75e576add204abd321c48cded556c8de14d65618/chains/orchestrator-relays/node/tanssi-relay-service/chain-specs/dancelight-raw-specs.json
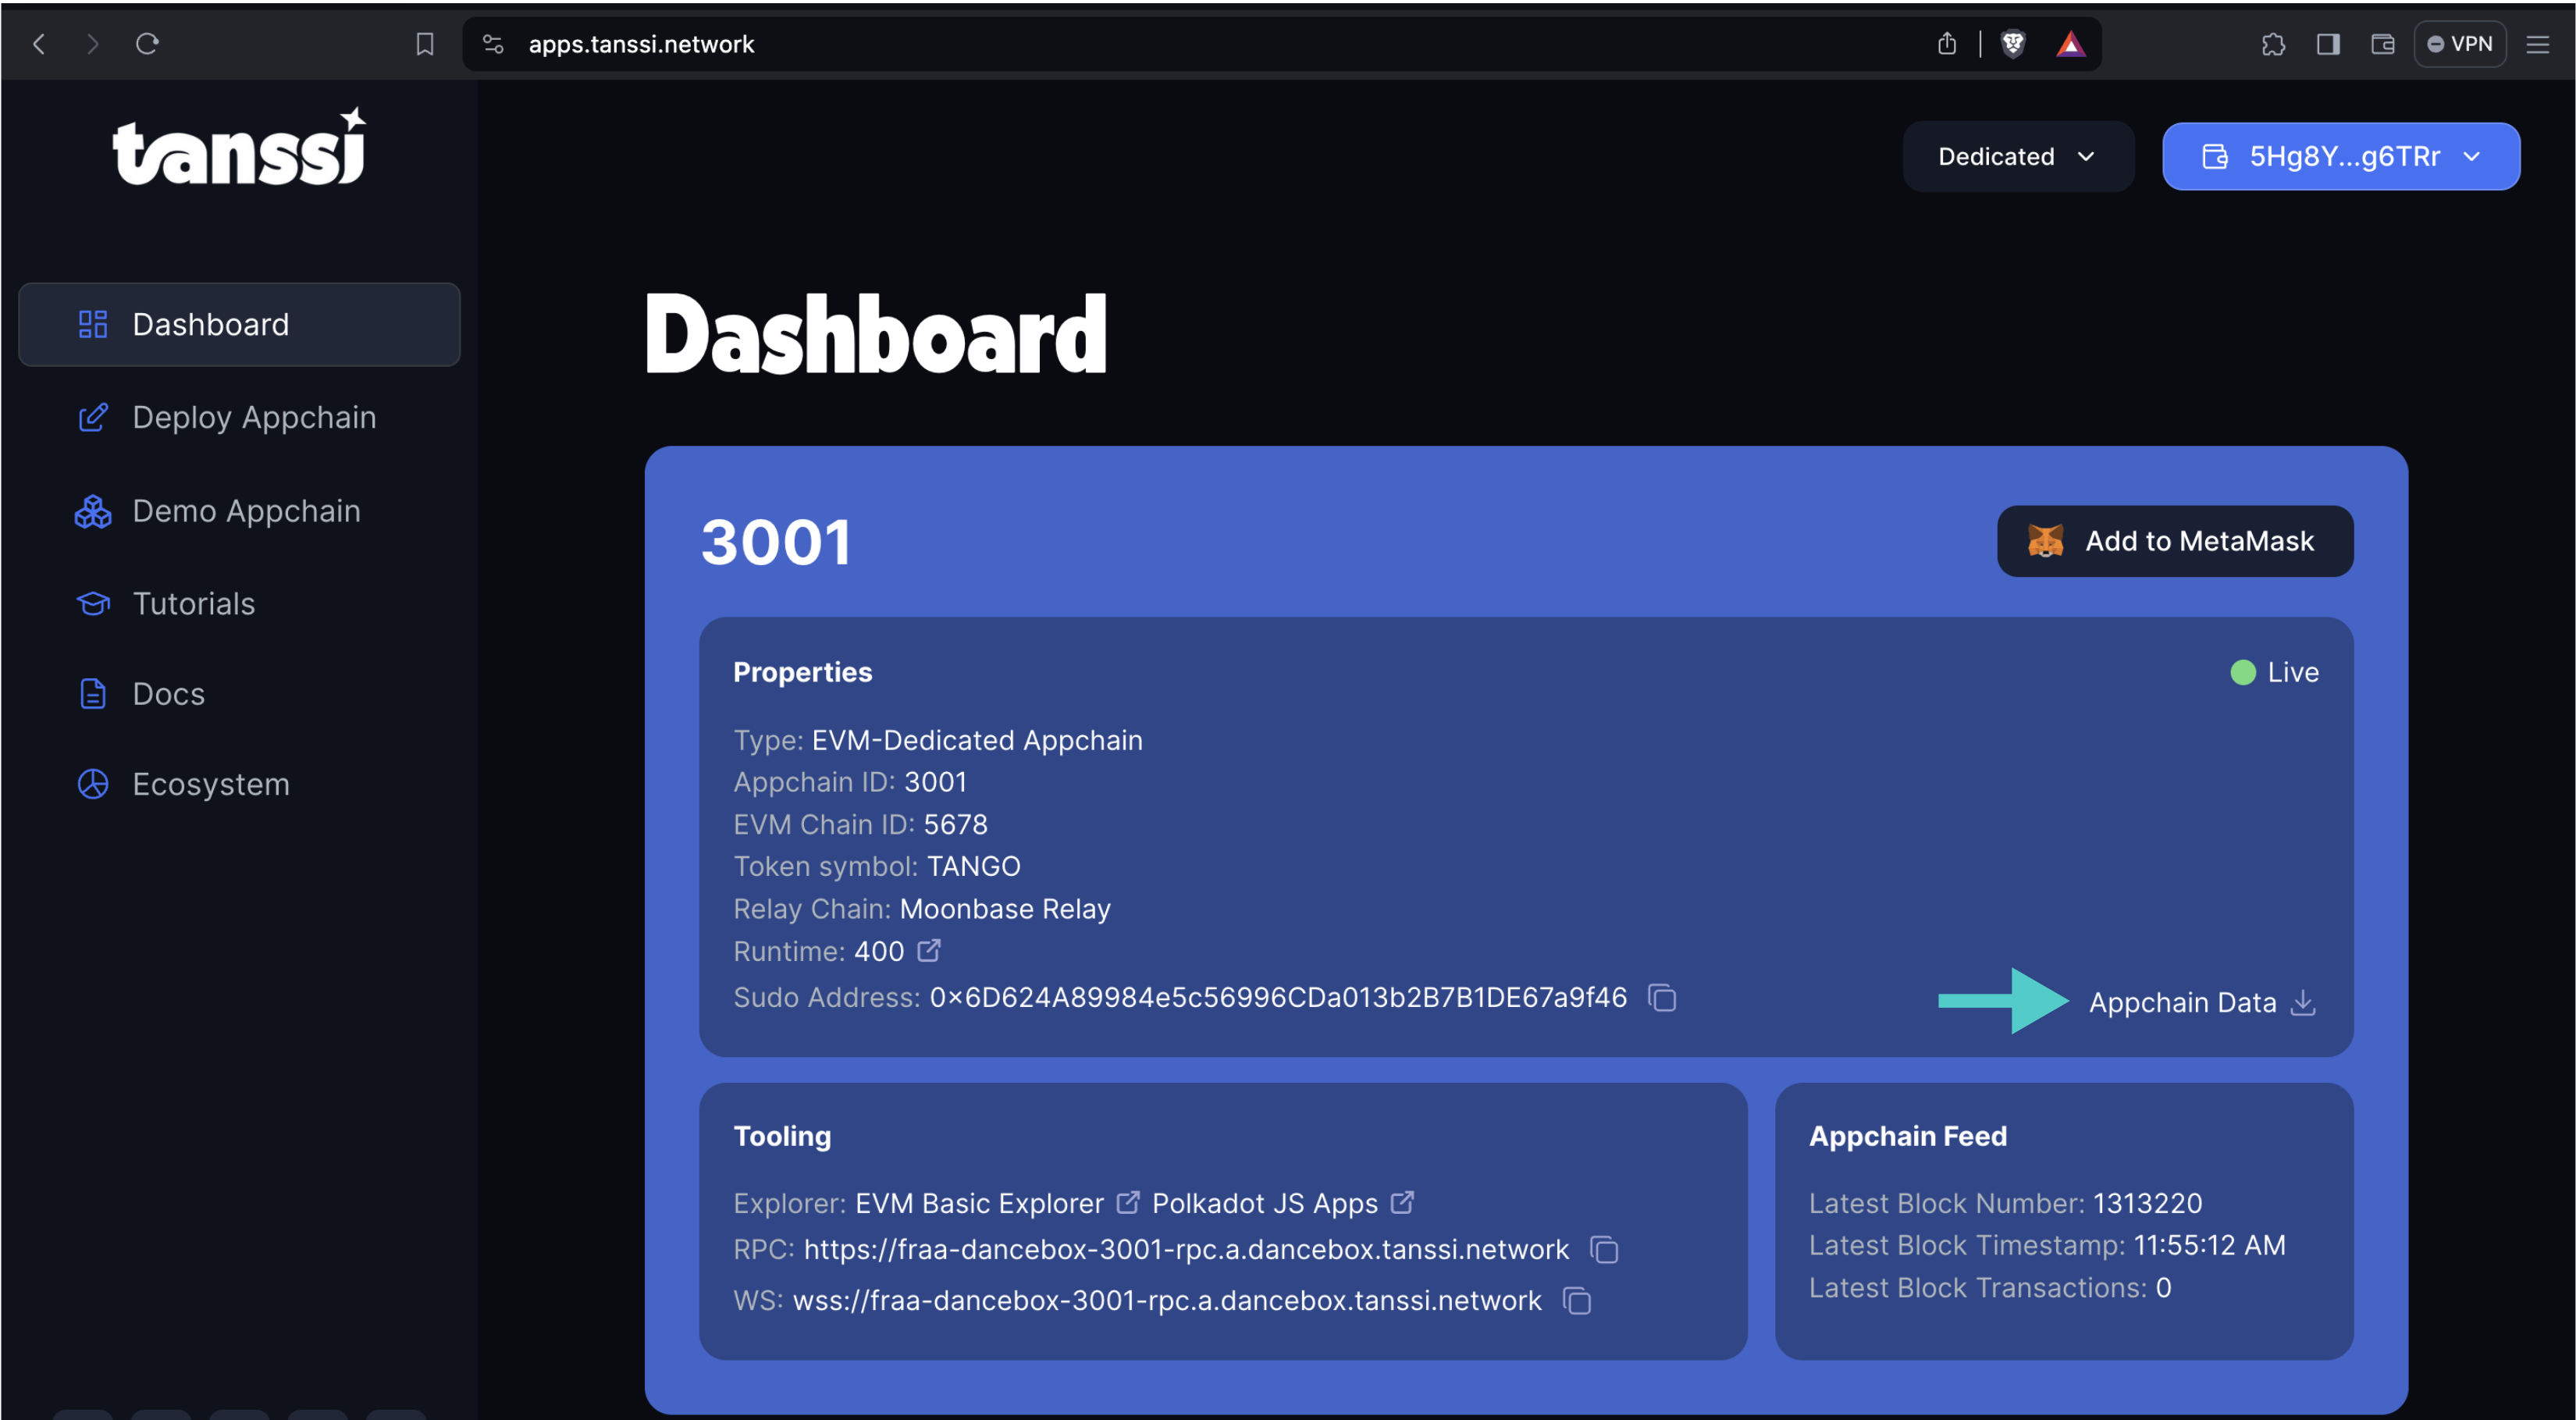
To get the appchain specification file, download it from the dashboard in the dApp by clicking the Network Data link
Download the Latest Release
Every new release includes two node binaries, one for EVM-compatible networks and another for Substrate networks. To get started, run the following command to get the latest release binary that matches your network type and make it executable:
wget https://github.com/moondance-labs/tanssi/releases/download/v0.15.0-para/container-chain-frontier-node && \
chmod +x ./container-chain-frontier-node
wget https://github.com/moondance-labs/tanssi/releases/download/v0.15.0-para/container-chain-simple-node && \
chmod +x ./container-chain-simple-node
Note
It is recommended that you run the optimized binary versions for either Intel's Skylake or AMD's Zen3 architectures for better performance.
Setup the Systemd Service
Systemd is a management system for Linux systems that manages services (daemons in Unix-like systems jargon), starting them automatically when the computer starts or reboots, or restarting them upon unexpected failures.
The following commands configure a new account, the directory, and move the previously downloaded files to the right location.
Create a new account to run the service:
adduser tanssi_service --system --no-create-home
adduser dancelight_service --system --no-create-home
Create a directory to store the required files and data:
mkdir /var/lib/tanssi-data
mkdir /var/lib/dancelight-data
Set the folder's ownership to the account that will run the service to ensure writing permission:
sudo chown -R tanssi_service /var/lib/tanssi-data
sudo chown -R dancelight_service /var/lib/dancelight-data
Move the chain specification file to the folder:
mv ./starlight-raw-specs.json /var/lib/tanssi-data
mv ./dancelight-raw-specs.json /var/lib/dancelight-data
Move the node binary as well:
mv ./container-chain-frontier-node /var/lib/tanssi-data
mv ./container-chain-simple-node /var/lib/tanssi-data
mv ./container-chain-frontier-node /var/lib/dancelight-data
mv ./container-chain-simple-node /var/lib/dancelight-data
Finally, move also your appchain's spec file to the same folder.
Create the Systemd Service Configuration File
The next step is to create the Systemd configuration file.
You can create the file by running the following command:
sudo touch /etc/systemd/system/appchain.service
Now, you can open the file using your favorite text editor (vim, emacs, nano, etc.) and add the configuration for the service.
Note that the ExecStart command has some parameters that need to be changed to match your specific network:
Specification file- replaceINSERT_YOUR_APPCHAIN_SPECS_FILE_NAMEwith your appchain's file name. Your path will look like/var/lib/tanssi-data/YOUR_FILENAME.json, for a MainNet appchain.Bootnode- a bootnode is a full archive node that is used to sync the network from scratch. You'll need to retrieve your Tanssi network bootnode and replaceINSERT_YOUR_NETWORK_BOOTNODESwith the actual bootnode information.
[Unit]
Description="Appchain systemd service"
After=network.target
StartLimitIntervalSec=0

[Service]
Type=simple
Restart=on-failure
RestartSec=10
User=tanssi_service
SyslogIdentifier=network
SyslogFacility=local7
KillSignal=SIGHUP
ExecStart=/var/lib/tanssi-data/container-chain-frontier-node \
--chain=/var/lib/tanssi-data/INSERT_YOUR_APPCHAIN_SPECS_FILE_NAME \
--rpc-port=9944 \
--name=para \
--base-path=/var/lib/tanssi-data \
--state-pruning=archive \
--blocks-pruning=archive \
--database=paritydb \
--unsafe-rpc-external \
--bootnodes=INSERT_YOUR_NETWORK_BOOTNODES \
-- \
--chain=/var/lib/tanssi-data/starlight-raw-specs.json \
--rpc-port=9945 \
--name=relay \
--sync=fast \
--database=paritydb \
--bootnodes=/dns4/deo-tanssi-boot-1.rv.tanssi.network/tcp/30334/p2p/12D3KooWNQ1cddxwvnZZUBG2gtByn9hirVGEn2yR37ztnGSi1VHu \
--bootnodes=/dns4/fro-tanssi-boot-1.rv.tanssi.network/tcp/30334/p2p/12D3KooWS3kv4PyNTxKS8CBxZsVrhMcNcXgxqVUHLrXixuz4DaSR \
--bootnodes=/dns4/qcl-tanssi-boot-1.rv.tanssi.network/tcp/30334/p2p/12D3KooWFDUJ1QZn18tmeJJZU4e6JbyQrLiAp4Xz7ongKzoSjadg \
--bootnodes=/dns4/qco-tanssi-boot-1.rv.tanssi.network/tcp/30334/p2p/12D3KooWBzJzAdAKNVXcsvfL3nHH8BSocNvxz7A8PkRAAJhTuQNm \
--bootnodes=/dns4/uko-tanssi-boot-1.rv.tanssi.network/tcp/30334/p2p/12D3KooWAexWR4uyhVPyxqPBNhhepJ5jRqUa885mu5dKPPVHSfpC


[Install]
WantedBy=multi-user.target
[Unit]
Description="Appchain systemd service"
After=network.target
StartLimitIntervalSec=0

[Service]
Type=simple
Restart=on-failure
RestartSec=10
User=tanssi_service
SyslogIdentifier=network
SyslogFacility=local7
KillSignal=SIGHUP
ExecStart=/var/lib/tanssi-data/container-chain-simple-node \
--chain=/var/lib/tanssi-data/INSERT_YOUR_APPCHAIN_SPECS_FILE_NAME \
--rpc-port=9944 \
--name=para \
--base-path=/var/lib/tanssi-data \
--state-pruning=archive \
--blocks-pruning=archive \
--database=paritydb \
--unsafe-rpc-external \
--bootnodes=INSERT_YOUR_NETWORK_BOOTNODES \
-- \
--chain=/var/lib/tanssi-data/starlight-raw-specs.json \
--rpc-port=9945 \
--name=relay \
--sync=fast \
--database=paritydb \
--bootnodes=/dns4/deo-tanssi-boot-1.rv.tanssi.network/tcp/30334/p2p/12D3KooWNQ1cddxwvnZZUBG2gtByn9hirVGEn2yR37ztnGSi1VHu \
--bootnodes=/dns4/fro-tanssi-boot-1.rv.tanssi.network/tcp/30334/p2p/12D3KooWS3kv4PyNTxKS8CBxZsVrhMcNcXgxqVUHLrXixuz4DaSR \
--bootnodes=/dns4/qcl-tanssi-boot-1.rv.tanssi.network/tcp/30334/p2p/12D3KooWFDUJ1QZn18tmeJJZU4e6JbyQrLiAp4Xz7ongKzoSjadg \
--bootnodes=/dns4/qco-tanssi-boot-1.rv.tanssi.network/tcp/30334/p2p/12D3KooWBzJzAdAKNVXcsvfL3nHH8BSocNvxz7A8PkRAAJhTuQNm \
--bootnodes=/dns4/uko-tanssi-boot-1.rv.tanssi.network/tcp/30334/p2p/12D3KooWAexWR4uyhVPyxqPBNhhepJ5jRqUa885mu5dKPPVHSfpC


[Install]
WantedBy=multi-user.target
[Unit]
Description="Appchain systemd service"
After=network.target
StartLimitIntervalSec=0

[Service]
Type=simple
Restart=on-failure
RestartSec=10
User=dancelight_service
SyslogIdentifier=network
SyslogFacility=local7
KillSignal=SIGHUP
ExecStart=/var/lib/dancelight-data/container-chain-frontier-node \
--chain=/var/lib/dancelight-data/INSERT_YOUR_APPCHAIN_SPECS_FILE_NAME \
--rpc-port=9944 \
--name=para \
--base-path=/var/lib/dancelight-data \
--state-pruning=archive \
--blocks-pruning=archive \
--database=paritydb \
--unsafe-rpc-external \
--bootnodes=INSERT_YOUR_NETWORK_BOOTNODES \
-- \
--chain=/var/lib/dancelight-data/dancelight-raw-specs.json \
--rpc-port=9945 \
--name=relay \
--sync=fast \
--database=paritydb \
--bootnodes=/dns4/qco-dancelight-boot-1.rv.dancelight.tanssi.network/tcp/30334/p2p/12D3KooWCekAqk5hv2fZprhqVz8povpUKdJEiHSd3MALVDWNPFzY \
--bootnodes=/dns4/qco-dancelight-rpc-1.rv.dancelight.tanssi.network/tcp/30334/p2p/12D3KooWEwhUb3tVR5VhRBEqyH7S5hMpFoGJ9Anf31hGw7gpqoQY \
--bootnodes=/dns4/ukl-dancelight-rpc-1.rv.dancelight.tanssi.network/tcp/30334/p2p/12D3KooWPbVtdaGhcuDTTQ8giTUtGTEcUVWRg8SDWGdJEeYeyZcT

[Install]
WantedBy=multi-user.target
[Unit]
Description="Appchain systemd service"
After=network.target
StartLimitIntervalSec=0

[Service]
Type=simple
Restart=on-failure
RestartSec=10
User=dancelight_service
SyslogIdentifier=network
SyslogFacility=local7
KillSignal=SIGHUP
ExecStart=/var/lib/dancelight-data/container-chain-simple-node \
--chain=/var/lib/dancelight-data/INSERT_YOUR_APPCHAIN_SPECS_FILE_NAME \
--rpc-port=9944 \
--name=para \
--base-path=/var/lib/dancelight-data \
--state-pruning=archive \
--blocks-pruning=archive \
--database=paritydb \
--unsafe-rpc-external \
--bootnodes=INSERT_YOUR_NETWORK_BOOTNODES \
-- \
--chain=/var/lib/dancelight-data/dancelight-raw-specs.json \
--rpc-port=9945 \
--name=relay \
--sync=fast \
--database=paritydb \
--bootnodes=/dns4/qco-dancelight-boot-1.rv.dancelight.tanssi.network/tcp/30334/p2p/12D3KooWCekAqk5hv2fZprhqVz8povpUKdJEiHSd3MALVDWNPFzY \
--bootnodes=/dns4/qco-dancelight-rpc-1.rv.dancelight.tanssi.network/tcp/30334/p2p/12D3KooWEwhUb3tVR5VhRBEqyH7S5hMpFoGJ9Anf31hGw7gpqoQY \
--bootnodes=/dns4/ukl-dancelight-rpc-1.rv.dancelight.tanssi.network/tcp/30334/p2p/12D3KooWPbVtdaGhcuDTTQ8giTUtGTEcUVWRg8SDWGdJEeYeyZcT

[Install]
WantedBy=multi-user.target
Fetching Bootnode Information
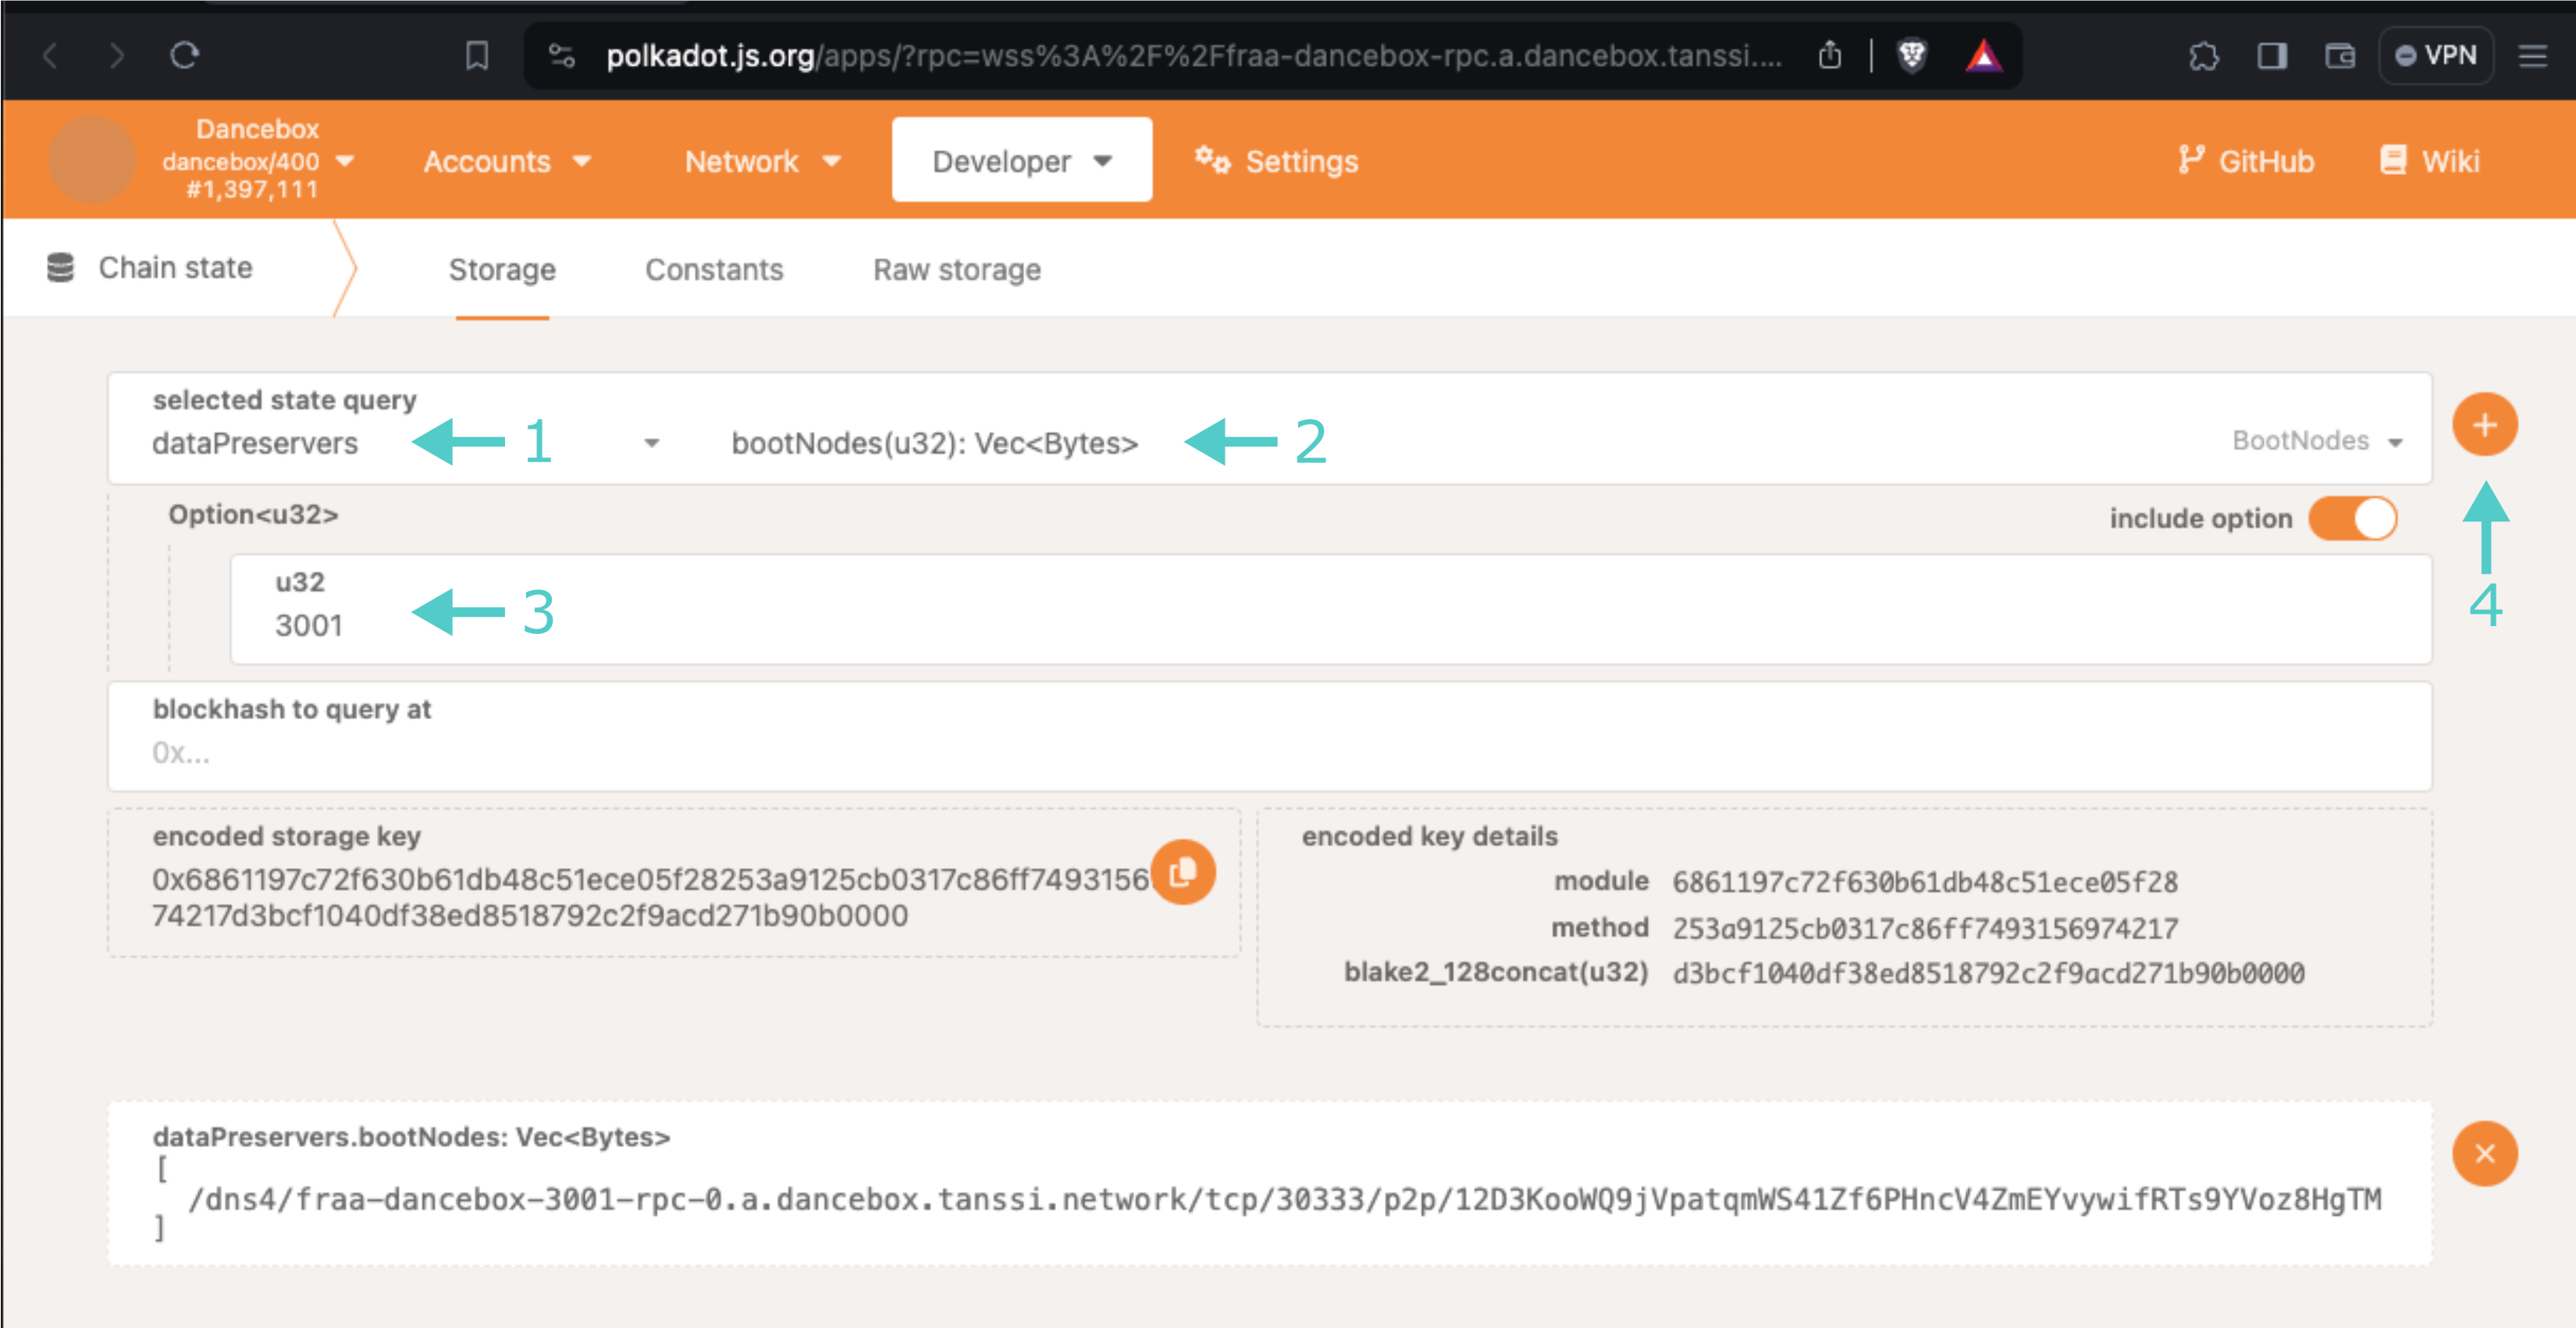
Bootnode information can be read directly from Tanssi itself. For example, you can use the developer portal to get the bootnodes for a specific network in Dancelight.
To do so, take the following steps:
- Select dataPreservers as the module to query
- Set the storage query to bootNodes
- Provide your Tanssi network ID
- Click on the + sign
Full Node Configuration Example for the Demo EVM Network
The following example deploys a fully functional full archive node for the demo EVM network deployed on Dancelight with an ID of 2001.
The raw chain specification file for the demo network is required to run the node, and can be downloaded from this public GitHub repository. Download the file and place it in the /var/lib/dancelight-data/ directory.
[Unit]
Description="Appchain systemd service"
After=network.target
StartLimitIntervalSec=0

[Service]
Type=simple
Restart=on-failure
RestartSec=10
User=dancelight_service
SyslogIdentifier=network
SyslogFacility=local7
KillSignal=SIGHUP
ExecStart=/var/lib/dancelight-data/container-chain-frontier-node \
--chain=/var/lib/dancelight-data/container-2001-raw-specs.json \
--rpc-port=9944 \
--name=para \
--state-pruning=archive \
--blocks-pruning=archive \
--base-path=/var/lib/dancelight-data \
--database=paritydb \
--unsafe-rpc-external \
--bootnodes=/dns4/ukl-dancelight-2001-rpc-1.rv.dancelight.tanssi.network/tcp/30333/p2p/12D3KooWKDotMgTRpURvoZHsLWP4K9ymhkBByi1EJjMQAnCmqg8E \
--bootnodes=/dns4/qco-dancelight-2001-rpc-1.rv.dancelight.tanssi.network/tcp/30333/p2p/12D3KooWB3kqqNhYgGtGbsdtgD18wUoFVeuXVXgWLXTFs91RNgAx \
-- \
--chain=/var/lib/dancelight-data/dancelight-raw-specs.json \
--rpc-port=9945 \
--name=relay \
--sync=fast \
--database=paritydb \
--bootnodes=/dns4/qco-dancelight-boot-1.rv.dancelight.tanssi.network/tcp/30334/p2p/12D3KooWCekAqk5hv2fZprhqVz8povpUKdJEiHSd3MALVDWNPFzY \
--bootnodes=/dns4/qco-dancelight-rpc-1.rv.dancelight.tanssi.network/tcp/30334/p2p/12D3KooWEwhUb3tVR5VhRBEqyH7S5hMpFoGJ9Anf31hGw7gpqoQY \
--bootnodes=/dns4/ukl-dancelight-rpc-1.rv.dancelight.tanssi.network/tcp/30334/p2p/12D3KooWPbVtdaGhcuDTTQ8giTUtGTEcUVWRg8SDWGdJEeYeyZcT

[Install]
WantedBy=multi-user.target
Run Flags
The flags used in the ExecStart command can be adjusted according to your preferences and hardware configuration. The following ones are some of the most note-worthy:
--name INSERT_NAME- a human-readable name for this node--rpc-port INSERT_PORT- specifies the JSON-RPC TCP port the node listens on--unsafe-rpc-external- exposes the RPC service on all the interfaces--state-pruning INSERT_STATE_PRUNING_TYPE- specifies when the Tanssi-powered network state should be removed from the database. The pruning type can be eitherarchive(which makes the node behave as a full node keeping all the state),archive-canonical(which keeps only the state of finalized blocks), or anynumber(representing the number of blocks whose states are kept)--blocks-pruning INSERT_BLOCKS_PRUNING_TYPE- specifies how many blocks should be kept in the database. The pruning type can be eitherarchive(which makes the node behave as a full node keeping all the blocks),archive-canonical(which keeps only finalized blocks), or anynumber(representing the amount of finalized blocks to keep)--detailed-log-output- enables detailed log output
Warning
The --unsafe-rpc-external enables external access to your node’s RPC interface, making it accessible from any IP address. Make sure that proper security controls are in place.
For a complete list of available flags, their description, and possible values, run the following command:
/var/lib/dancelight-data/container-chain-frontier-node --help
/var/lib/dancelight-data/container-chain-simple-node --help
Run the Service
Finally, enable the service and start it for the first time:
systemctl enable appchain.service && \
systemctl start appchain.service
You can verify that the service is up and running correctly running:
systemctl status appchain.service
● network.service - "Network systemd service"
Loaded: loaded (/etc/systemd/system/network.service; enabled; vendor preset: enabled)
Active: active (running) since Sun 2024-02-18 18:16:40 EST; 14min ago
Main PID: 4045278 (container-chain)
Tasks: 44 (limit: 9462)
Memory: 6.5G
CGroup: /system.slice/network.service
└─4045278 4045278 /var/lib/network-data/container-chain- ...
And check the logs, if needed, with the following command:
journalctl -f -u appchain.service
Feb 19 20:05:53 tutorials network[4066765]: 2024-02-19 20:05:53 Parachain Collator Template
Feb 19 20:05:53 tutorials network[4066765]: 2024-02-19 20:05:53 ✌️ version 0.1.0-3b1fbbfdfe7
Feb 19 20:05:53 tutorials network[4066765]: 2024-02-19 20:05:53 ❤️ by Moondance Labs,
2020-2024
Feb 19 20:05:53 tutorials network[4066765]: 2024-02-19 20:05:53 📋 Chain specification: Frontier Container 2001
Feb 19 20:05:53 tutorials network[4066765]: 2024-02-19 20:05:53 🏷 Node name: para
Feb 19 20:05:53 tutorials network[4066765]: 2024-02-19 20:05:53 👤 Role: FULL
Feb 19 20:05:53 tutorials network[4066765]: 2024-02-19 20:05:53 💾 Database: RocksDb at /var/lib/network-data/chains/frontier_container_2001/db/full
Feb 19 20:05:57 tutorials network[4066765]: 2024-02-19 20:05:57 Parachain id: Id(2001)
Feb 19 20:05:57 tutorials network[4066765]: 2024-02-19 20:05:57 Parachain Account: 5Ec4AhPQLGvfWywVhJZwufTDvknLT3BVPQcbV977JmBDUsHP
Feb 19 20:05:57 tutorials network[4066765]: 2024-02-19 20:05:57 Parachain genesis state V0: 0x000000000000000000000000000000000000000000000000000000000000000000e1324cc53e66
Feb 19 20:05:57 tutorials network[4066765]: 2024-02-19 20:05:57 Parachain genesis state V1: 0x000000000000000000000000000000000000000000000000000000000000000000327cfde8482b
| Created: February 16, 2024

